


DDI-1

This document is a PDF version of the AMSTRAD DDI-1 USER
INSTRUCTIONS manual.
This version has been scanned and OCRed from the original and as a result may
contain spelling mistakes and errors which were not part of the original
document.
This manual is © Copyright Amstrad plc. All rights reserved.
Amstrad plc have given their permission for this document to be distributed on
the Unofficial Amstrad WWW Resource.
Amstrad plc website:
http://www.amstrad.com/

AMSTRAD
DISC DRIVE & INTERFACE
DDI-1
Congratulations on becoming the proud owner of the Amstrad
DDI-1. You will soon discover the wisdom of your choice, and what
a worthwhile investment your unit is.
Its speed will allow you to load and save files in seconds which would take several
minutes using cassette. Furthermore, each disc allows you to store up to 180k Bytes of
program on a single disc surface (360k on both sides). In other words, all your utilities
on a disc, 10 or so games on a disc, all your standard letter files on a disc, the database
from your indexing system on a disc - and so on.
Moreover, you can access files at random - which means that you don't have to pass
laboriously through unwanted program files to get to the one that you want to use.
Disc operation comes into its own when you want to write any sort of program. When
developing any software, it's very reassuring to take a copy every now and again in
case you happen to attempt to run it, and then discover that you've left an 'ON BREAK
GOSUB' lurking to prevent you from ever escaping back to direct mode; and if you
can do this in 5 seconds rather than 5 minutes, you will obviously get a lot more done!
When developing assembler programs, the convenience of being able to assemble
from disc and then test within seconds rather than minutes will be a boon to both the
seasoned programmer, and the novice feeling his way through machine code for the
first time.
The inclusion of CP/M opens a vast wealth of programming experience to the user.
The 80 column mode ensures that programs will require minimal modification to run
on the CPC464 - and the number of books written on the subject of CP/M and its use
runs well into three figures.
In short, you have made exactly the right decision to upgrade to disc based operation.
It will help and speed up your understanding and appreciation of computing in a way
that is simply not comparable with cassette-only systems.
Furthermore, the 3 inch compact floppy disc format, in its tough plastic casing (with a
protective shutter covering the head area) prevents accidental damage and provides a
positive and rigid location in the drive mechanism.

Two operating systems are supplied:
AMSDOS is an extension of the cassette filing system in CPC464 BASIC, and allows
access to the BASIC interpreter.
CP/M 2.2 is the standard 'random access' Z80 disc operating system for over 5000
commercial programs - ranging from business and accounts software to second
languages and scientific and engineering analysis. Thanks to the thoughtful
implementation of CP/M on the CPC464, CP/M files may be freely mixed on the disc
with AMSDOS files, which are automatically labelled with the appropriate filetype.
Digital Research's famous Dr LOGO has emerged as the most universal educational
and teaching medium - combining the unique user-friendliness of 'turtle graphics' with
sophisticated processing power. Dr LOGO is acclaimed as the most comprehensive
implementation of LOGO available and is supplied free as part of your Amstrad DDI-1
package.
AMSOFT
A division of
AMSTRAD
CONSUMER ELECTRONICS PLC
© Copyright 1984 AMSOFT, AMSTRAD Consumer Electronics plc
Neither the whole or any part of the information contained herein, or the product described in this manual may be
adapted or reproduced in any material form except with the prior written approval of AMSTRAD Consumer Electro-
nics plc ('AMSTRAD’).
The product described in this manual and products for use with it are subject to continuous development and improve-
ment. All information of a technical nature and particulars of the product and its use (including the information and
particulars in this manual are given by AMSTRAD in good faith. However, it is acknowledged that there may be errors
or omissions in this manual. A list of details of any amendments or revisions to this manual can be obtained by sending
a stamped, self addressed envelope to AMSOFT Technical Enquiries. We ask that all users take care to submit their
reply paid user registration and guarantee cards.
AMSOFT welcome comments and suggestions relating to the product or this manual.
All correspondance should be addressed to:
AMSOFT
169 Kings Road
Brentwood
Essex CM14 4EF
All maintenance and service on the product must be carried out by AMSOFT authorised dealers. Neither AMSOFT nor
AMSTRAD can accept any liability whatsoever for any loss or damage caused by service or maintenance by unautho-
rised personnel. This guide is intended only to assist the reader in the use of the product, and therefore AMSOFT and
AMSTRAD shall not be liable for any loss or damage whatsoever arising from the use of any information or particulars
in, or any error or omission in, this guide or any incorrect use of the product.
Dr LOGO and CP/M are trade marks of Digital Research Inc.
Z80 is the trademark of Zilog Inc.
AMSDOS and CPC464 are trademarks of AMSTRAD.
First Published 1984
Compiled by Roland Perry and Ivor Spital with acknowledgements to Locomotive Software Ltd.
Published by AMSTRAD
Typeset by AMSOFT Computer Graphics
AMSTRAD is a registered trademark of AMSTRAD Consumer Electronics plc. Unauthorised use of the trademark or
word AMSTRAD is strictly forbidden.

Contents
Foundation Course
F1 Setting Up
F2 About Discs
F3 Loading Software/Games
F4 Introducing AMSDOS and CP/M
Chapter 1 Making Working Discs
Backup master disc
A working SYSTEM/UTILITY disc
A BASIC only disc
Turnkey AMSTRAD BASIC discs
Turnkey CP1M discs and packages
Configuring discs
Starting and autostarting a Turnkey CP/M package
Chapter 2 AMSDOS Primer
Disc directory
AMSDOS filenames and filetypes
Filename construction, headers and wild cards.
Examples of using AMSDOS commands in a program
Saving variables and performing a screen dump
Reference guide to AMSDOS commands
Copying files
Reference guide to AMSDOS error messages
Chapter 3 CP/M Primer
Operating with CP/M
CP/M system tracks
Configuration sector
Console control codes
Logging in a disc
Direct console commands
Transient commands
File and disc copying
System management
Disc generation
AMSTRAD Disc Drive & Interface DDI-1 Manual Contents

Chapter 4 Introduction to LOGO
What is LOGO
Dr LOGO procedures
Editing programs and procedures
Operating hints
Summary of Dr. LOGO primitives
Word and list processing
Arithmetic operations
Logical operations
Variables
Procedures
Editing
Text screen
Graphic screen
Turtle graphics
Keyboard, joystick
Sound
System primitives
System variables
System properties
Chapter 4 Technical information for the user – Firmware
Headers
Store requirements
Error messages
AMSDOS messages
BIOS messages
Disc organisation
Jump block interception – by AMSDOS
Jump block re-interception – by the user
Return parameters
Intercepted firmware calls
Appendices
Appendix 1 Glossary of terms
Appendix 2 End User Program Licence Agreement
Appendix 3 Index
Contents AMSTRAD Disc Drive & Interface DDI-1 Manual


AMSTRAD DDI-1
FOUNDATION COURSE
Foundations 1: Setting Up
Connecting the Mains Lead
The Amstrad disc drive operates from a 220-240V ~50Hz Mains Supply.
The Mains Lead is fitted at the rear of the unit. Fit a proper Mains Plug to the Mains
Lead. If a 13 Amp (BS1363) Plug is used, a 3 Amp fuse must be fitted. The 13 Amp
Fuse supplied in a new Plug must NOT be used. If any other type of Plug is used, a 5
Amp Fuse must be fitted either in the Plug or Adaptor or at the Distribution Board.
IMPORTANT
The wires in this Mains Lead are coloured in accordance with the following code:
Blue : Neutral
Brown: Live
As the colours of the wires in the Mains Lead of this apparatus may not correspond
with the coloured markings identifying the terminals in your Plug, proceed as follows:
The wire which is coloured Blue must be connected to the terminal which is marked
with the letter 'N' or coloured Black.
The wire which is coloured Brown must be connected to the terminal which is marked
with the letter 'L' or coloured Red.
Disconnect the Mains Plug from the Supply Socket when not in use.
Never attempt to remove any screws, or open the case of the disc drive. Always obey
the warning on the Rating Label which is located underneath the case of the disc drive:
WARNING LIVE PARTS INSIDE. DO NOT REMOVE ANY SCREWS
The POWER ON/OFF switch for the disc drive(s) is located on the rear panel of the
unit.
Always ensure that any discs are removed from the drive(s) before switching the
POWER switch ON or OFF.
Always switch the disc drives' POWER switch ON before switching the computer's
POWER switch ON.
Foundation 1.1 AMSTRAD Disc Drive & Interface DDI-1 Manual

Connecting the DDI-1 to the Computer
1. Check that the computer and disc drive(s) are switched off.
2. Plug the Interface Unit firmly into the edge-connector marked FLOPPY DISC at
the rear of the computer (See Figure 1)
Figure 1
3. At the end of the ribbon cable from the Interface Unit, you will find a plug which is
to be used for connecting to the main disc drive (Drive A), see Figure 2.
The plug which you will find slightly further back in the cable (see Figure 2) is to
be used only for connecting to a second disc drive (Drive B); i.e. if you have
purchased an additional Amstrad FD-1.
Figure 2
AMSTRAD Disc Drive & Interface DDI-1 Manual Foundation 1.2
Rear of Computer
Interface Unit
Interface
Unit
Ribbon
Cable
Connector Plug to
Main Disc Drive
(Drive A)
Connector Plug to
Second Disc Drive
(Drive B)
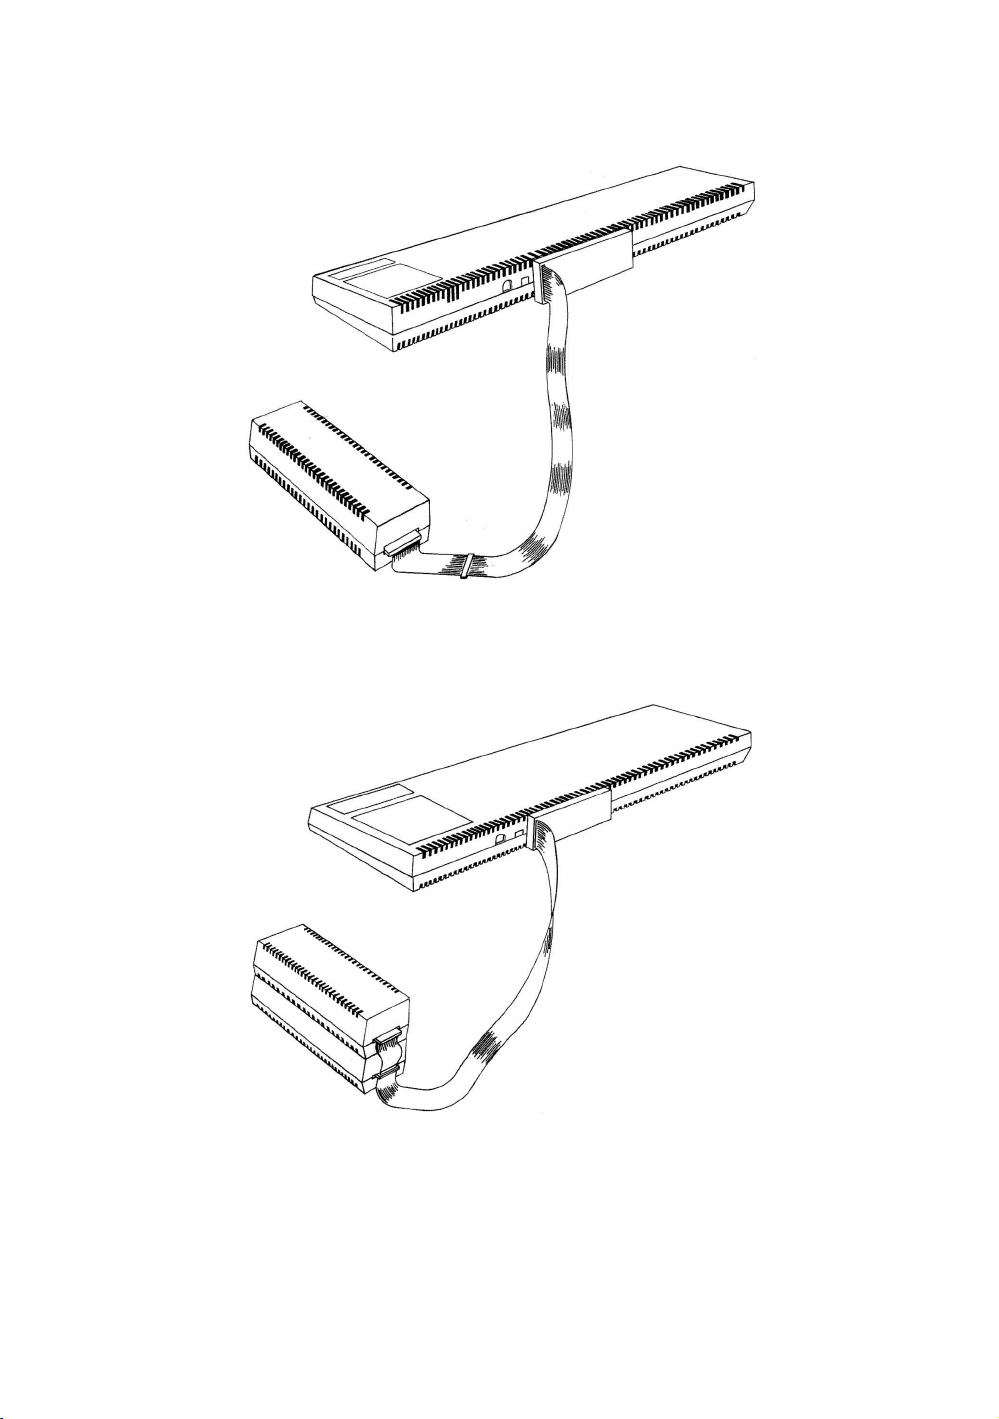
4. If you are operating with one disc drive only, connect the computer and disc drive
as shown in Figure 3.
Figure 3
5. If you are operating with 2 disc drives, connect the computer and disc drives as
shown in Figure 4.
Figure 4
Switch on the disc drive(s) then the computer. Your system is now ready for disc
operation.
Foundation 1.3 AMSTRAD Disc Drive & Interface DDI-1 Manual
Main Disc Drive
(Drive A)
Computer
Interface
Unit
Computer
Interface
Unit
Main Disc Drive
(Drive A)
Second Disc Drive
(Drive B)
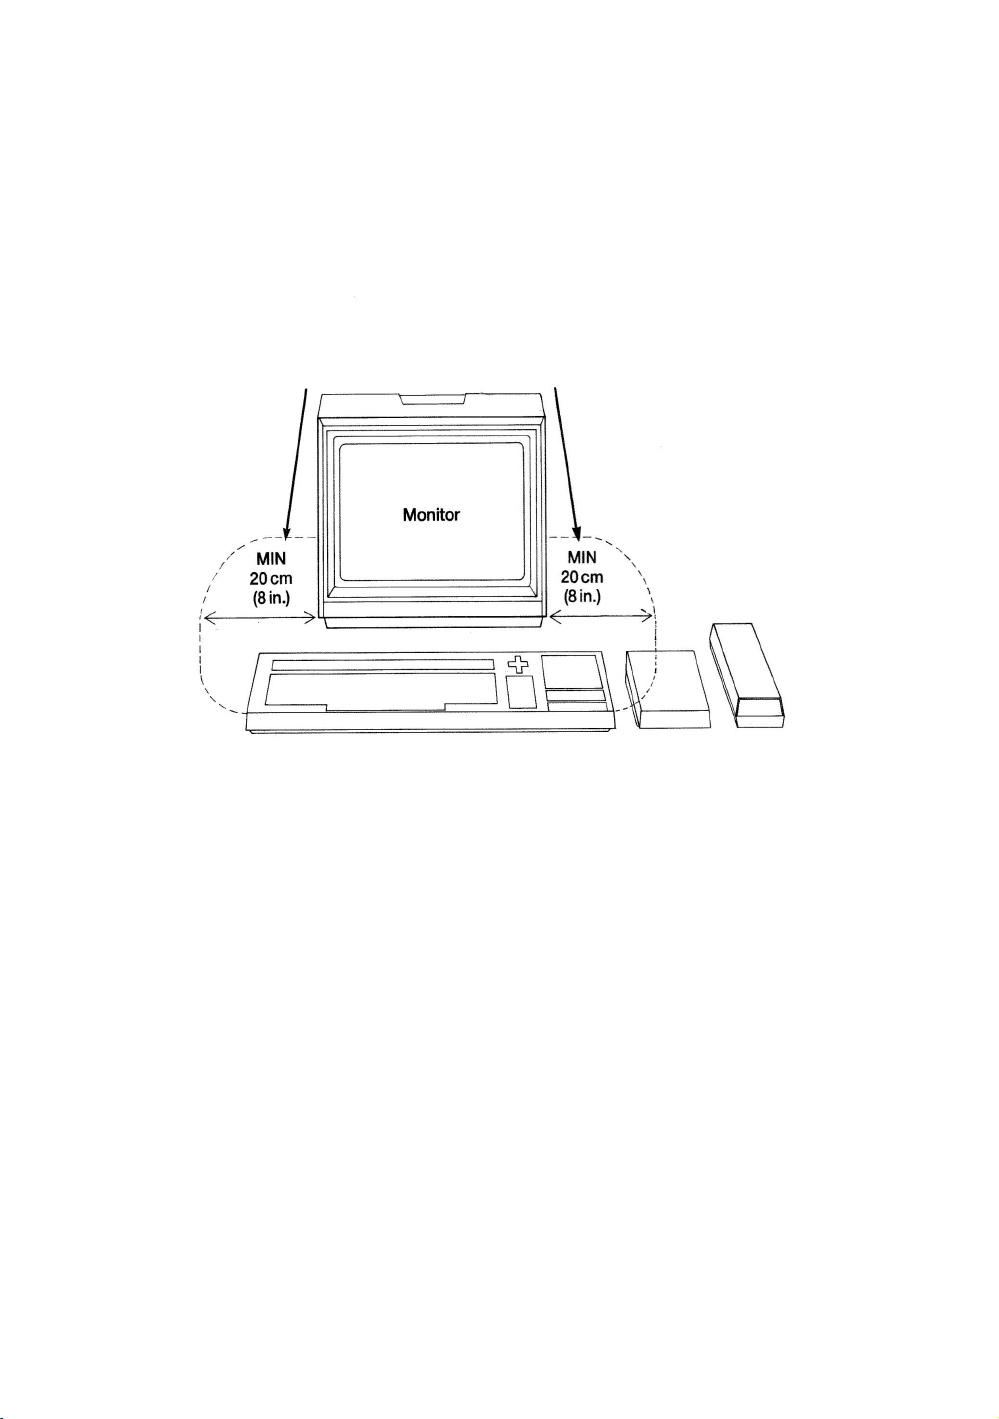
IMPORTANT
1) For maximum data reliability, do not position your disc drive(s) closer than 20cm
(8 inches) to the monitor, see Figure 5. It is recommended that you locate your disc
drive(s) to the right of the computer (or MP-1 modulator/power supply if used).
Figure 5
Always ensure that your disc drive(s) is not located close to any sources of
electrical interference/noise which could give rise to data corruption.
2) Always ensure that your disc drive(s) and discs are not placed near strong magnetic
fields such as those produced by televisions, hi-fi loudspeakers etc.
3) The ribbon cable from the interface unit to your disc drive(s) should not be placed
parallel to the Mains Leads of the disc drive or monitor, nor close to the monitor.
4) Never block or cover the ventilation slots on the top, bottom, or sides of the disc
drive(s).
5) Do not use or store the disc drive(s) in direct sunlight, or in excessively hot, cold,
damp or dusty areas, or places subject to any heavy vibration.
AMSTRAD Disc Drive & Interface DDI-1 Manual Foundation 1.4
DO NOT POSITION YOUR DISC
DRIVE(S) WITHIN THIS AREA
(RECOMMENDED
POSITION)
Computer
MP-1
(if used)
Disc
Drive(s)
Foundations 2: About Discs
The Amstrad disc drive uses 3 inch compact floppy discs. We strongly recommend
that for reliable data-to-disc transfer, you use only Amsoft CF-2 compact floppy discs.
Discs made by leading manufacturers however, may also be used.
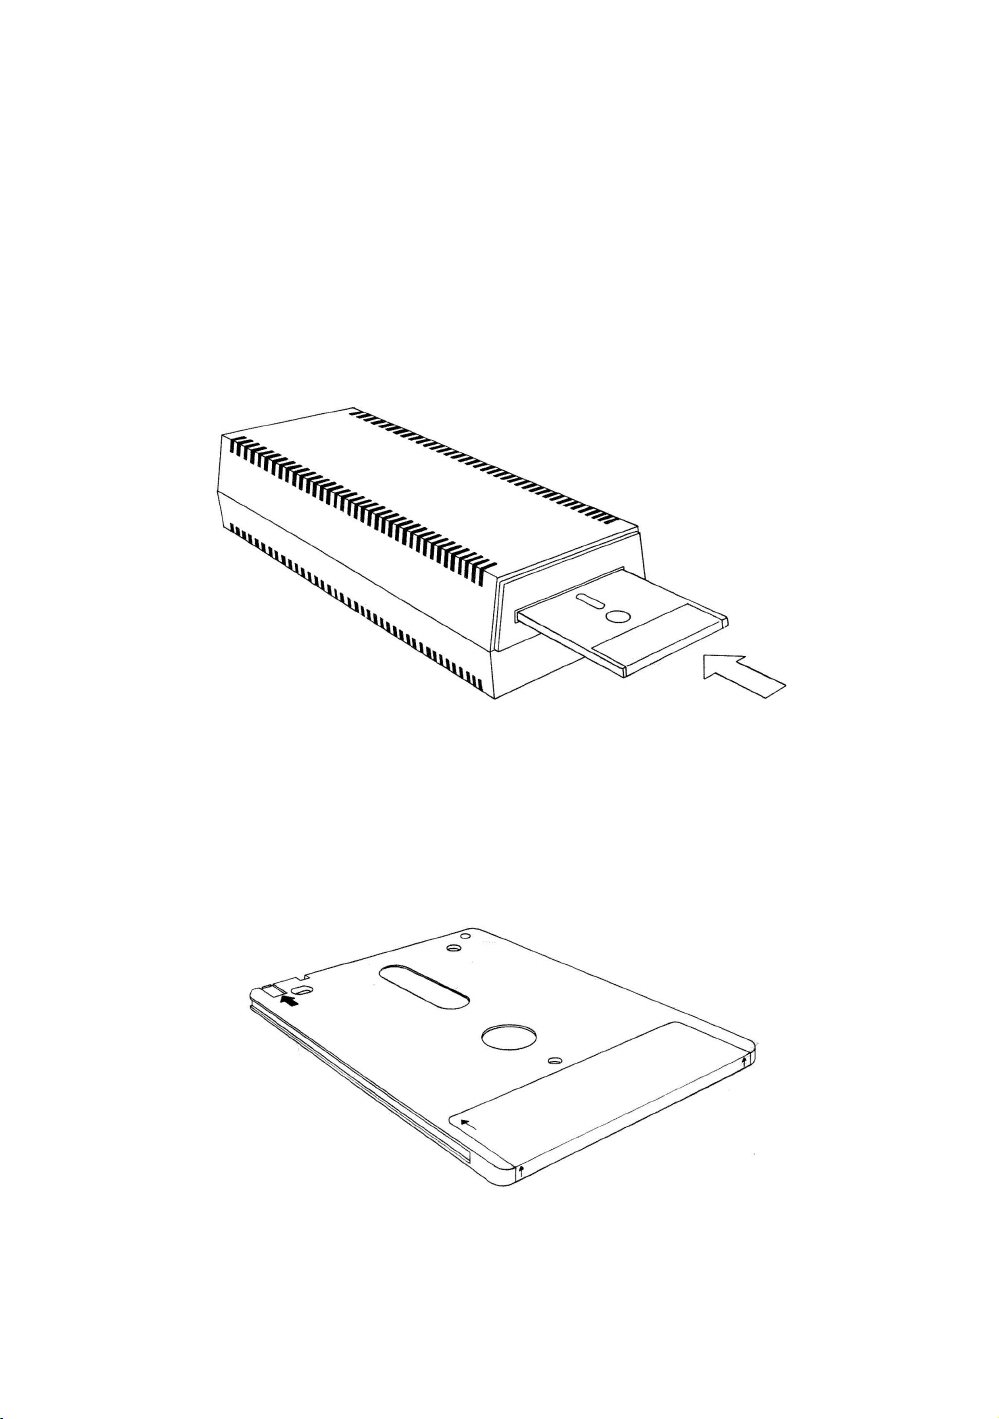
Each side of a disc may be used separately. A disc should be inserted with its label
facing outward from the drive, and with the side that you wish to use face up (See
Figure 6).
Figure 6
Write Protection
In the left hand corner of each side of a blank disc, you will see an arrow pointing to a
small shuttered hole. This is called the Write Protect hole, and facilitates protection
against erasure or 'overwriting'. See Figure 7.
Figure 7
Foundation 2.1 AMSTRAD Disc Drive & Interface DDI-1 Manual
Write Protect Hole
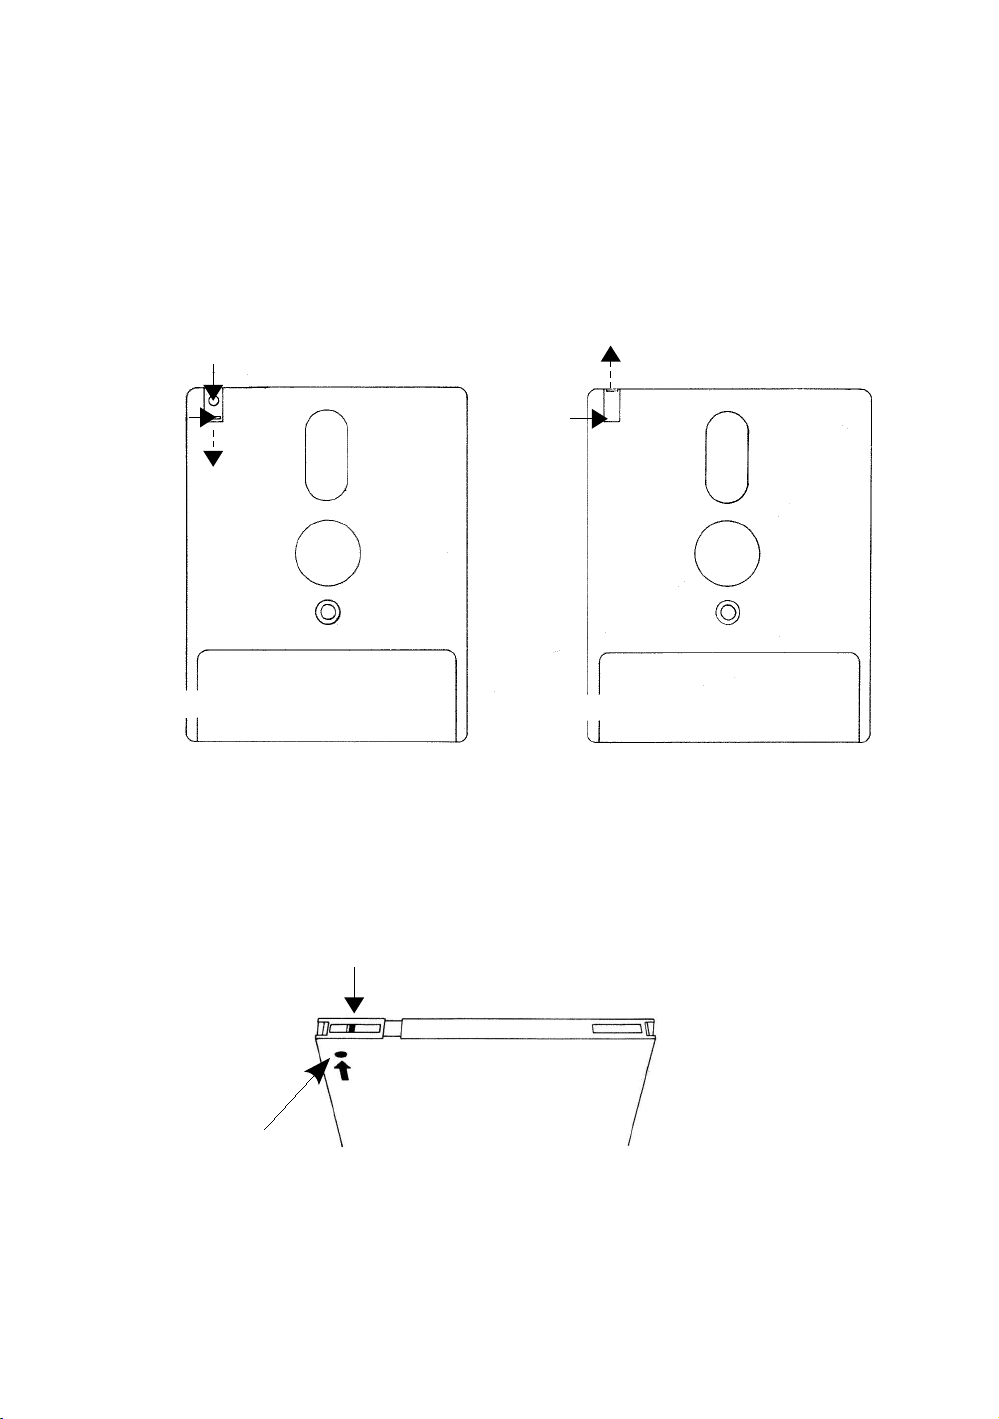
When the hole is closed, data can be 'written' onto the disc by the computer. When the
hole is open however, the disc will not allow data to be written onto it, thus enabling
you to avoid accidental erasure of valuable programs.
Various compact floppy disc manufacturers employ different mechanisms for opening
and closing the Write Protect hole. The operation may be carried out on the Amsoft
CF-2 compact floppy disc as follows:
To open the Write Protect hole, slide the small shutter located at the left hand corner
of the disc, and the hole will be opened, See Figure 8(a).
To close the Write protect hole, simply slide the shutter to it’s closed position, see
Figure 8(b).
Some other compact floppy discs employ a small plastic lever located in a slot at the
left hand corner, see Figure 9.
AMSTRAD Disc Drive & Interface DDI-1 Manual Foundation 2.2
Write Protect
hole
(CLOSED)
Lever
Figure 9
Figure 8(a)
Figure 8(b)
Write Protection ON Write Protection OFF
Shutter
OPEN
Shutter
CLOSED
Write Protect hole (OPEN)
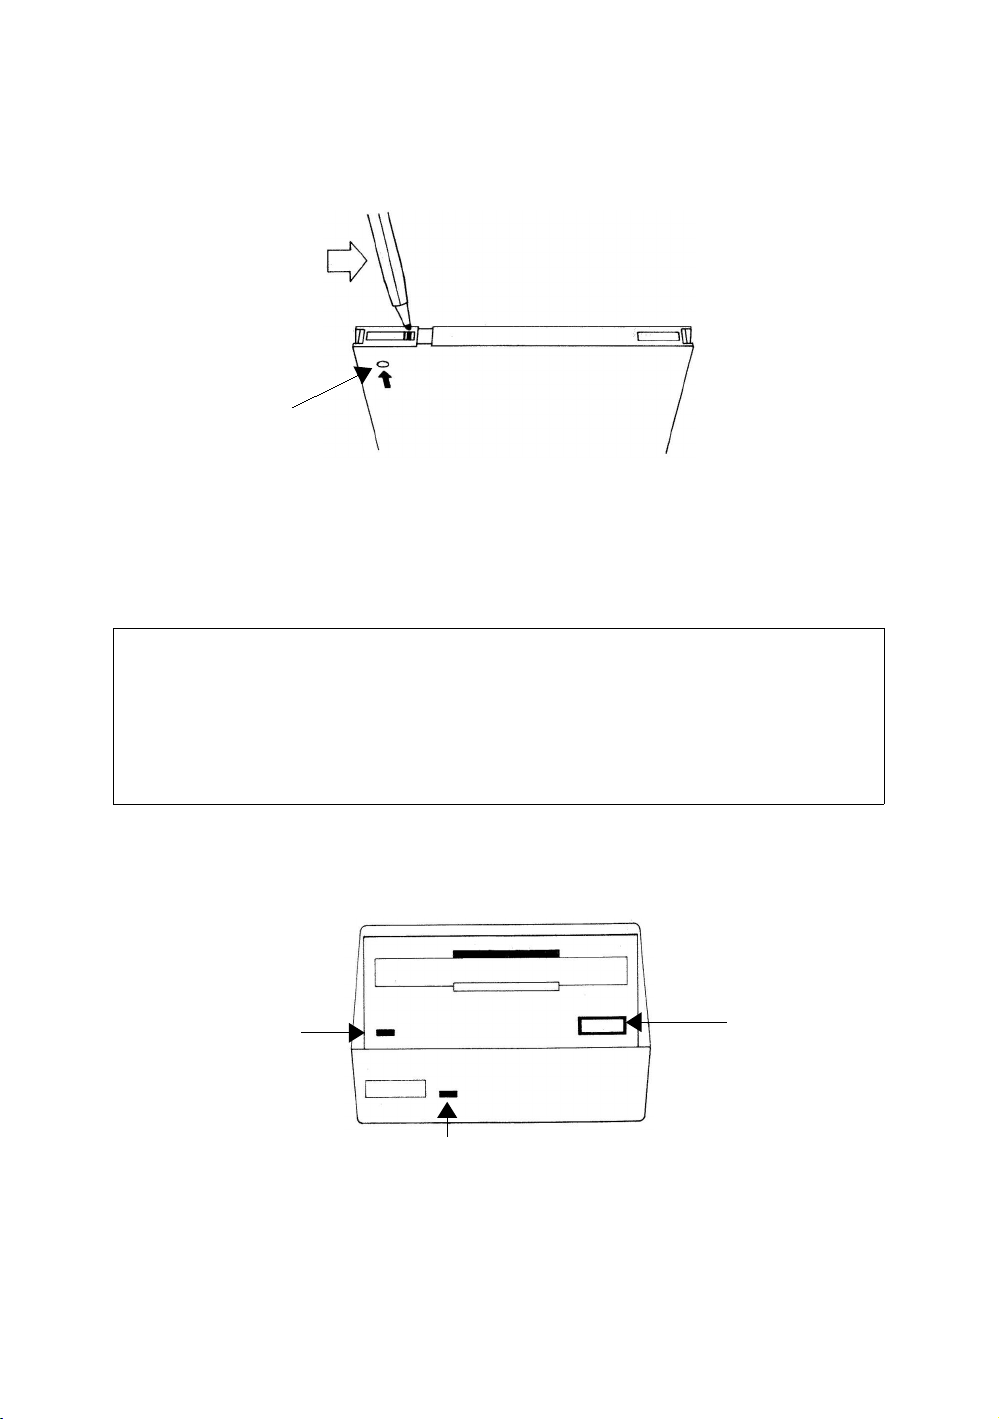
To open the Write Protect hole on this type of disc, slide the lever towards the middle
of the disc, using the tip of a ball-point pen or similar object, see Figure 10.
Figure 10
Note that regardless of the method employed to open and close the Write Protect hole,
opening the hole in all cases facilitates protection against overwriting.
IMPORTANT
Always ensure that the Write Protect holes on your master CP/M disc are open
When Your Disc Is In
On the front of the unit, you will see a red indicator lamp, and a push button for Eject,
see Figure 11.
Figure 11
Foundation 2.3 AMSTRAD Disc Drive & Interface DDI-1 Manual
Slide Lever
towards middle of
disc
Write protect
hole
(OPEN)
Indicator
Lamp
Eject
Button
POWER ON indicator

Indicator Lamp
The red indicator lamp has two functions:
If only one disc drive is connected (Drive A), the lamp indicates that data is being read
from, or written to the disc.
If two disc drives are connected, the red indicator on Drive B will illuminate
constantly, giving you a quick indication of which unit is Drive B.
When reading or writing to disc takes place however, the indicator reverts to its
primary function of indicating that reading/writing is being performed.
Eject Button
Pressing in the Eject button allows you to remove your disc from the drive.
IMPORTANT
1. ALWAYS REMOVE YOUR DISC FROM THE DRIVE
BEFORE SWITCHING THE SYSTEM ON OR OFF.
2. DO NOT PRESS THE EJECT BUTTON WHILE THE DISC IS
BEING READ FROM OR WRITTEN TO. EJECTING THE
DISC AT THIS TIME WILL RESULT IN READ/WRITE
ERRORS.
3. THE MAGNETIC FLOPPY DISC IS PROTECTED BY ITS
PLASTIC OUTER CASING. NEVER ATTEMPT TO GAIN
ACCESS TO OR TOUCH, THE DISC ITSELF.
It is assumed from here onwards in this manual, that you are familiar with the CPC-
464 computer, and with its BASIC, and that you have carefully read and understood
the CPC-464's User Instruction book.
AMSTRAD Disc Drive & Interface DDI-1 Manual Foundation 2.4

Foundations 3:
Loading Software/Games
Software/Games available on disc for the Amstrad system are loaded many times more
quickly than their cassette counterparts.
It is necessary however, to remember a few important rules concerning the names of
programs to be loaded or run.
A command such as RUN" normally used when loading cassette software, is invalid
during disc operation as the naming of the program to be run is obligatory on disc.
Program names (or filenames) on disc are comprised of 2 parts (or fields) separated by
a dot .
The first field may contain up to 8 characters, and is usually the title of the game or
program. The second field is optionally specifiable and usually relates to the type of
program, e.g. BAS or BIN (BASIC or binary).
Note that filenames should not contain spaces or punctuation marks in the first or
second field.
Note that the use of either UPPER or lower case letters is permitted when typing in
AMSDOS or CP/M commands and filenames.
Further information on the naming of disc files will be found later in this manual
under the sections concerning AMSDOS and CP/M.
For now, to run a program on disc such as 'Roland in the Caves' type in:
run "rolcave"
If you have inserted the software disc correctly the program will load in a few seconds,
and will be ready for you to use.
If not, study any error message on the screen to see where you went wrong:
Drive A: disc missing
Retry, Ignore or Cancel?
means that you have either not inserted your disc correctly, or that you have inserted it
into Drive B.
ROLCAVE. not found
means that you have either inserted the wrong disc, or have not carefully typed in the
exact name of the program.
(Always follow the loading instructions accompanying each software package).
Foundation 3.1 AMSTRAD Disc Drive & Interface DDI-1 Manual

Bad command
means that you have incorrectly named the program, either by exceeding the number
of permitted characters in a field, or by introducing an unwanted space or punctuation
mark.
Type mismatch
means that you have omitted the quotation marks
Syntax error
means that you mistyped the word run
Drive A: read fail
Retry, Ignore or Cancel?
means that the computer has failed to read data from your disc. Check that you have
inserted the correct disc and press R to Retry. If the above message continues to
appear when you attempt to run that particular disc, it is likely that the disc has been
corrupted, or has not been correctly formatted using Amstrad CP/M.
Finally, if the message:
Press PLAY then any key:
appears on the screen, the disc drive(s) or the interface unit has not been correctly
connected to the computer, or the disc drive is not plugged into the Mains Supply and
switched on.
Note that if you wish to run a disc program after previously operating the Cassette
Datacorder, it will be necessary to issue the |disc command, described in the next
section.
MEMORY USAGE WARNING
The DDI-1 disc interface reduces the amount of memory available in the CPC464 by
1280 bytes. This may result in some cassette-based software failing to operate
correctly if run whilst the disc system is connected to the computer.
The 'Home Runner' demonstration on the CPC464 Welcome cassette is an example
of this aspect of operation.
If you encounter any such problems with cassette-based software, first eject any disc
present in the drive(s), then switch off the computer and disc drive(s).
Unplug the interface unit from the rear of the computer, and then switch on the
computer again. You will now be able to run the cassette in the normal manner.
AMSTRAD Disc Drive & Interface DDI-1 Manual Foundation 3.2

Foundations 4:
Introducing AMSDOS and CP/M
When you switch your system on, the computer automatically runs internal checks to
see which peripherals are connected to the rear sockets. If the computer senses that a
disc drive(s) is connected, it will take any commands that would have been sent to the
cassette datacorder, and direct them to the disc drive. Hence, typing in any of the
commands:
load filename"
run "filename"
save "fitename"
chain "filename"
merge "filename"
chain merge "filename"
openin "filename"
openout "filename"
closein
closeout
cat
eof
input #9
line input #9
write #9
list #9
will act upon the disc instead of the cassette.
The speed write command however, always pertains to cassette operation, as
there is no such facility as 'disc speed write'.
Having sensed therefore, that a disc drive is connected, the computer reverts to
operation under the AMSDOS system. AMSDOS is an abbreviation of AMStrad Disc
Operating System, and enables you to program in normal Amstrad BASIC, with the
addition of extra commands for disc management.
These commands are called external commands, and are not available in the standard
computer without the disc drive connected. The software governing these commands is
contained in ROM (Read Only Memory) within the Disc Drive and Interface Unit.
External commands are preceeded with a bar symbol |. (You will find the | symbol by
holding down [SHIFT] and pressing the @ key.)
Some of the more common external commands that you will use are:
|a
|b
|tape (which can be sub-divided into |tape.in and |tape.out)
|disc (which can be sub-divided into |disc.in and |disc.out)
Foundation 4.1 AMSTRAD Disc Drive & Interface DDI-1 Manual

The commands |a and |b tell the computer which drive to direct any subsequent
disc command.
Typing in for example:
|a
load "filename"
will tell the computer to load the specified program from a disc placed in drive A.
If neither |a nor |b is initially entered or the computer is reset, the system will
default to drive A.
If you are using only one disc drive, this can be regarded as drive A, and |a or |b
commands need not be issued. Entering |b when only one disc drive is connected, will
result in the message on the screen:
Drive B: disc missing
Retry, Ignore or Cancel
to which you should respond C (to cancel).
The command |tape tells the computer to perform all loading and saving etc.
commands onto tape instead of disc. Unless |tape is entered, the computer will
always default to disc operation when switched on or reset.
To return to disc operation after |tape has been specified, type in:
|disc
Alternatively, you may for example wish to load in from cassette and save out to disc.
You may then use the command:
|tape.in
this command tells the computer to read data in from cassette, but continue to write
data out onto disc (default).
Similarly, to read data in from disc and save out onto cassette, you will first need to
type in: |disc.in to countermand the previously issued |tape.in (above), then: |
tape.out to tell the computer to write data out onto cassette.
It can be seen therefore that |tape.in and |tape.out countermand |disc.in
and |disc.out respectively, and vice versa.
Further information on directing data to and from discs and cassette will be found later
in this manual under the sections concerning AMSDOS and CP/M.
AMSTRAD Disc Drive & Interface DDI-1 Manual Foundation 4.2
Storing Data Onto Disc
Before writing any data onto a new blank disc, the disc itself must first be formatted.
Formatting can be likened to building a series of shelves and dividers onto a disc prior
to the storage of information on those shelves; in other words, laying down an
organised framework around which data can be put in or taken out.
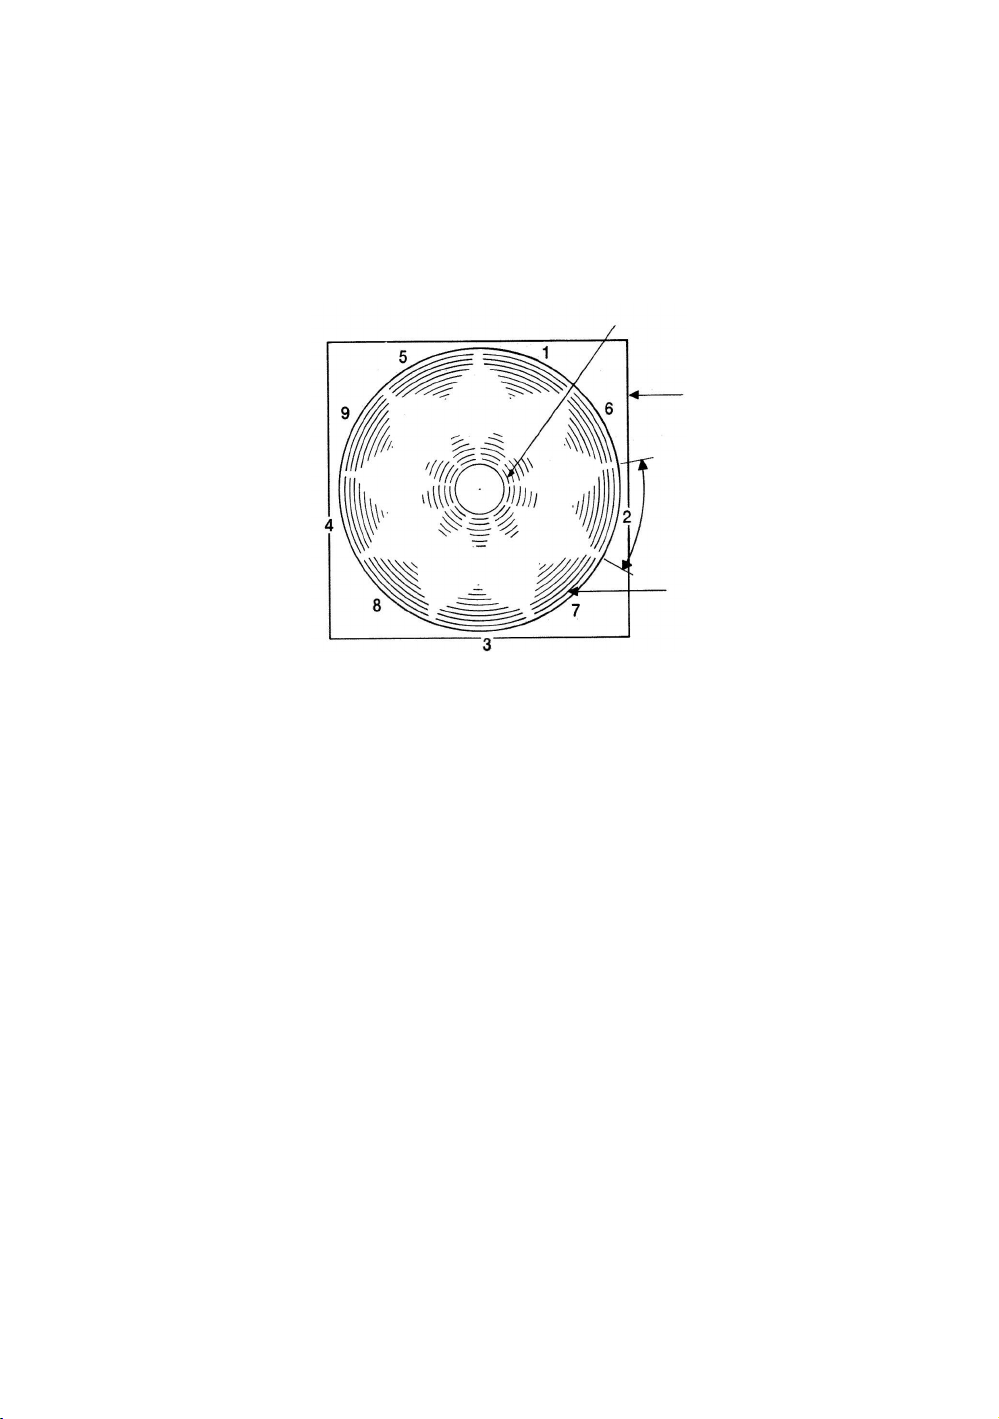
Formatting divides one side of the disc into 360 distinctly separate areas, see figure 12.
Figure 12
There are 40 tracks from the outside of the disc (Track 0), to the inside (Track 39), and
the circumference of the disc is divided into 9 sectors.
Each track in a sector can store up to 512 bytes of data; hence the total available space
on each side of a disc is 180kbytes.
First Steps Using The CP/M Disc
To prepare a new blank disc for reading and writing your own programs onto, you will
need to format using the CP/M disc.
Switch the system on, and insert the CP/M disc supplied, into the drive.
(If you are operating 2 disc drives always insert the CP/M disc into Drive A.)
Type in:
|cpm
This command hands over control of the operating system from AMSDOS to CP/M,
(CP/M stands for Control Program for Microcomputers).
Foundation 4.3 AMSTRAD Disc Drive & Interface DDI-1 Manual
Outer Case
Sector
Track 0
Track 39

After a few seconds you will see the following message on the screen:
CP/M 2.2 - Amstrad Consumer Electronics plc.
A>
This is a 'Sign on' message indicating that the operating system is under the control of
CP/M.
The displayed A> on the screen is a prompt, (similar to Ready during normal BASIC
operation) indicating that the computer is awaiting your instructions.
CP/M uses several prompts, all of which will be explained later in this manual under
the section concerning CP/M.
Once you are operating CP/M, you cannot enter BASIC commands into the computer,
as these will not be understood.
If for example, you type in the BASIC command:
cls
The Computer will return your entry, together with a question mark:
CLS?
indicating that it does not understand your command.
To briefly look at some of the CP/M commands, type in:
dir
On the screen you will see a directory of CP/M and utility COMmands one of which is
format. Type in:
format
On the screen you will see:
Please insert disc to be formatted into drive A
then press any key
Remove the CP/M disc and insert your new blank disc, then press any black or blue
key. Formatting will start, commencing at Track 0 and ending at track 39, after which
you will be asked on the screen:
Do you want to format another disc (Y/N):
If you wish to format the other side of your blank disc, or format another disc, type Y
(for Yes) and you will receive the initial message once again.
The formatting process can be repeated any number of times until you answer the
repeat question N (for No), whereupon the system will ask you to:
AMSTRAD Disc Drive & Interface DDI-1 Manual Foundation 4.4

Please insert a CP/M system disc into drive A
then press any key:
After doing so, the computer will return you to direct mode CP/M (console mode), and
will await your next command. Other CP/M commands will be dealt with later in this
manual but for now, having learnt to format with CP/M, we will return to AMSDOS
by typing in:
amsdos
Always keep a master copy of your CP/M disc in a safe place, as it is literally the key
to your system. Later on in this manual, you will be shown how to make a 'working
copy' of your CP/M disc, so that you can keep your master copy safely locked away!
BEWARE
FORMATTING A PREVIOUSLY RECORDED DISC WILL ERASE ITS
CONTENTS.
You will not be able to format a disc which has its Write Protect hole open.
Attempting to do so will result in the message on the screen:
Drive A: disc is write protected
Retry, Ignore or Cancel?
Press C to cancel, then follow the instructions on the screen.
The format mode will then be abandoned.
... Back to AMSDOS
Now that we have a formatted blank disc (or two), we can start to manipulate BASIC
programs to and from disc (and cassette) using AMSDOS.
Saving a Program in Memory onto Disc
Having typed a program into the computer's memory, save it onto disc by typing in:
save "filename"
Once again note that the naming of the program is obligatory, and that it should
contain no more than 8 characters in the first field, and up to 3 characters in the second
field. If you do not specify a second field, AMSDOS will place a token such as BAS
(short for BASIC) there.
Note also that filenames should not contain spaces or punctuation marks in the first or
second field. A dot . is used to separate fields.
Further information on the naming of disc files will be found later in this manual
Foundation 4.5 AMSTRAD Disc Drive & Interface DDI-1 Manual

under the sections concerning AMSDOS and CP/M.
As an example of saving to disc, write a short program into the memory, insert a
formatted disc, then type in:
save "example"
After a few seconds, the prompt Ready will appear on the screen, and the program
will have been saved onto disc. (If not, check any error message on the screen to
establish whether you either forgot to insert your disc into the correct drive, forgot to
close the write protect hole, mistyped the command or even forgot to plug in the disc
drive(s) and switch on!).
Binary, protected and ASCII text files may be saved onto disc using the normal ,b ,p
and ,a suffixes as with cassette saving.
Disc filenames do not require the use of a preceeding exclamation mark ! to suppress
reading/writing prompts and software messages on the screen. Any preceeding ! will
be removed from the filename and ignored by AMSDOS.
Catalog
Like cassettes, discs can be catalogued, but at much greater speed. After saving the
above program, type in:
cat
On the screen you will see:
Drive A: user 0
EXAMPLE.BAS
1K
The filename will be displayed, including any specified or token second field. together
with the file length (to the nearest higher kbyte).
Loading From Disc
Programs may be loaded from disc then run, using the commands:
load "filename"
run
or they may be run directly using the command:
run "filename"
Note that protected programs may be run directly only.
If you are operating 2 disc drives, you may specify which Drive (A or B), that you
require a function to be performed on, by issuing the command |a or |b before the
save, cat, load or run instructions.
AMSTRAD Disc Drive & Interface DDI-1 Manual Foundation 4.6

Copying Programs From Disc to Disc
Using the commands already learnt in this section, it can be seen that disc to disc
program copying is performed simply by loading the program into the memory from
the source disc, removing the source disc, and saving the program onto the destination
disc.
To save a program from disc to disc using 2 disc drives, you may prefer to insert your
source disc into, for example, Drive B, and your destination disc into Drive A. To
copy a program in this way, type in:
|b
load "filename"
|a
save "filename"
To copy the entire contents of one disc to another, it will be found much easier and
faster to use the DISCCOPY and COPYDISC facilities on the CP/M disc, than to
repeatedly load and save each program individually.
A brief description of how to use DISCCOPY and COPYDISC will be found later in
this section, and a more detailed account will be given under the section concerning
CP/M.
The DISCCOPY and COPYDISC facilities can be used to produce a 'working copy' of
the CP/M system disc itself.
Copying Programs From Cassette to Disc
Insert the program cassette into the datacorder, then type in:
|tape.in
load "program name" or load""
The computer will respond with:
Press PLAY then any key:
After the program has loaded and the cassette has stopped, type in:
save "filename"
Note that protected programs and software/games will not be able to be copied onto
disc or cassette.
Copying Programs From Disc to Cassette
Insert the program disc into the drive. If you have been previously loading in programs
from cassette, type in:
|disc.in
Foundation 4.7 AMSTRAD Disc Drive & Interface DDI-1 Manual

then type in:
load "filename"
After the program has loaded and the Ready prompt appears, save the program onto
cassette by typing in:
|tape.out
save "program name" or save""
The computer will respond with:
Press REC and PLAY then any key:
After the cassette has stopped, the program from disc will have been saved onto
cassette.
Note that the command |tape directs both input and output data to tape (equivalent to
issuing |tape.in and |tape.out commands). Similarly |disc directs both input
and output data to disc.
Copying Using the CP/M System Disc
The entire contents of a disc can be copied from one to another using the CP/M system
disc. If you have connected only one disc drive to the computer, use the DISCCOPY
facility.
If you are operating 2 disc drives you will find it easier and faster to use the
COPYDISC facility.
Copying Using DISCCOPY
Insert the CP/M system disc and type in:
|cpm
After the prompt A> appears on the screen, type in:
disccopy
The computer will ask you to:
Please insert source disc into drive A
then press any key
Remove the CP/M system disc from the drive, and insert the disc that you wish to
copy. If you wish to copy the CP/M disc itself, simply leave the CP/M disc inserted in
the drive.
AMSTRAD Disc Drive & Interface DDI-1 Manual Foundation 4.8

When the source disc is inserted and you have pressed a key, the computer will display
the message:
Copying started
Reading track 0 to 7
After which, you will be asked to:
Please insert destination disc into drive A
then press any key
Whereupon you should remove your source disc and insert a disc for copying onto.
Bear in mind that any previous data on your destination disc will be overwritten during
copying.
If you insert a wrongly formatted or new unformatted disc into the drive, it will be
correctly formatted automatically during copying.
After you have inserted your destination disc and pressed a key, the computer will
display the message:
Writing track 0 to 7
and will then invite you to insert the source disc once again for reading tracks 8 to 15.
The reading/writing process will continue, 8 tracks at a time, until the last track (39) is
completed.
You will then be asked:
Do you want to copy another disc (Y/N):
If you have finished copying, answer N, then follow the instructions on the screen to
exit from the DISCCOPY mode.
Copying Using COPYDISC
COPYDISC can only be used if you are operating 2 disc drives. The facility enables
you to copy the entire contents of one disc to another, in a similar manner to
DISCCOPY previously described. The advantage of COPYDISC however, is that you
do not have to repeatedly insert and remove the source and destination discs.
Having read and understood the principles of DISCCOPY, COPYDISC may then be
performed as follows:
Insert the CP/M system disc and type in:
|cpm
After the prompt A> type in:
copydisc
Foundation 4.9 AMSTRAD Disc Drive & Interface DDI-1 Manual

Follow the instructions on the screen, and the contents of your source disc will be
copied onto your destination disc 8 tracks at a time, until the last track (39) is
completed. Like DISCCOPY, COPYDISC incorporates automatic formatting if
required. COPYDISC can be used to produce a 'working copy' of the CP/M system
disc itself.
Checking Discs
The CP/M system disc provides facilities for comparing one disc against another to
check for error free data copying.
If you have connected only one disc drive to the computer, select CP/M then type in:
discchk
Follow the instructions on the screen, and the destination disc will be checked against
the source disc. If the computer detects a difference between the discs, it will display
the message:
Failed to verify destination disc correctly:
track x sector y
Otherwise, the computer will continue to check through the discs, 8 tracks at a time,
until checking is completed. If an error was detected, a final WARNING: will be
displayed on the screen, before asking whether you wish to check another disc.
If you are operating 2 disc drives, disc checking may be carried out with more speed
and ease, using the CHKDISC facility. This operates in a similar manner to DISCCHK
previously described. The advantage of CHKDISC however, is that you do not have to
repeatedly insert and remove the source and destination discs. To use CHKDISC,
select CP/M then type in:
chkdisc
and follow the instructions on the screen.
Aborting
Note that functions performed using the CP/M system disc can be aborted by holding
down [CTRL] and pressing the C key. Doing so will return you to CP/M console
mode.
As an example, select CP/M and type in:
disccopy
When the computer invites you to insert a disc, press [CTRL]C. The function will
then be aborted.
Further information on DISCCOPY, COPYDISC, DISCCHK and CHKDISC together
with FORMAT and other CP/M commands will be found later in this manual under the
section concerning CP/M.
AMSTRAD Disc Drive & Interface DDI-1 Manual Foundation 4.10

To conclude this 4-part Foundation course, here is a brief summary
of the Important points covered so far:
INSTALLATION
1. Always connect the Mains Lead to a 3 pin plug following the instructions
contained in the first section entitled, 'Setting Up'.
2. Never connect the disc drive(s) to any Mains Supply other than 220-240V ~ 50Hz.
3. There are no user serviceable parts inside the unit(s). Do not attempt to gain access
into the equipment. Refer all servicing to qualified service personnel.
4. Do not position your disc drives closer than 20cm (8 inches) to your monitor, nor
close to any source of electrical interference.
5. Keep disc drives and discs away from magnetic fields.
6. Keep the ribbon cable away from Mains Leads.
7. Do not block or cover any ventilation holes.
8. Do not use or store the equipment in excessively hot, cold, damp, or dusty areas.
OPERATION
1. Always remove any disc from the drive(s) before switching the system on or off.
2. Always switch the disc drives' POWER switch ON before switching the computer's
POWER switch ON.
3. Do not press the Eject button while reading or writing is being performed on a disc.
4. Ensure that you do not lose or accidentally overwrite your CP/M system disc. You
are advised to make a 'working copy' of the disc, and to ensure that its Write Protect
holes are open.
5. Never touch the floppy disc itself, inside its protective casing.
6. If you are using cassette based software while the DDI-1 system is connected to the
computer, observe the Memory Usage Warning on page F3.2 of this Foundation
Course.
Foundation 4.11 AMSTRAD Disc Drive & Interface DDI-1 Manual

AMSTRAD Disc Drive & Interface DDI-1 Manual Foundation 4.12

CHAPTER 1
Making Working Discs.
This chapter discusses how to make discs to use from day to day,
and introduces some facilities of CP/M and its Utility programs.
Subjects covered are:
• Making a backup Master System/Utilites disc
• Constructing a Working Systems/Utility disc.
• Operating with a BASIC only disc.
• Installing a Turnkey AMSTRAD BASIC application.
• Installing a Turnkey CP/M application.
The foundation course has described how to format a blank system disc, which you
can use for BASIC and games as well as CP/M, and how to make exact copies of discs
with the DISCCOPY (one drive) or COPYDISC (two drive) programs. This chapter
considers how to make discs with the programs that you want on them.
1.1 Backup Master Disc
It is most important to make a copy of the Master System/Utility disc provided with
your DDI-1 and keep the original safe - it will be very costly to replace if damaged!
Remember that the disc supplied has two sides, the System/Utilities side and the Dr
LOGO side. Every disc, in fact, has two sides and you are free to use either side for
any purposes.
Remember that if you are using a fresh disc to copy onto, the DISCCOPY and
COPYDISC programs will format for you as well as doing the copying.
Chapter 1.1 AMSTRAD Disc Drive & Interface DDI-1 Manual

1.2 A working SYSTEM/UTILITY disc.
You will find that, as well as making a day-to-day copy of your Master System/Utility
disc and Dr LOGO disc, it is most convenient if you make a 'working utility disc'
containing a few of the programs from the Master System/Utility disc that you use the
most. This will still leave plenty of room for your programs. Should you require to run
any other utility programs then you can always obtain them from your copy of the
Master System/Utility disc. All the more commonly used programs will, however, be
at your fingertips.
First use CP/M and the FORMAT program to create a new blank disc. Then use the
CP/M program FILECOPY to copy each program that you want, onto the new disc.
Experience will tell you which programs you'll want to have handy. In this example we
have chosen AMSDOS.COM, FILECOPY.COM and DISCCOPY.COM.
Using your copy of the Master System/Utilities disc as the CP/M system disc, select
CP/M, and at the A> prompt type FILECOPY FILECOPY.COM and follow the
displayed instructions. (The SOURCE disc is the one initially in the drive and the
DESTINATION disc is the new disc you are creating). When it has finished, copy the
other two programs by the commands FILECOPY AMSDOS.COM and FILECOPY
DISCCOPY.COM
Once you have made one working system/utilities disc with your selection upon it, you
can prepare the second side of that disc or both sides of other discs simply by using the
DISCCOPY or COPYDISC programs. Take note however of the copying restrictions
laid down in the End User Licence Agreement, in Appendix 2 of this manual.
1.3 A BASIC only disc.
Tracks 0 and 1 of a system disc are reserved by CP/M and cannot be used by you. If
you want to use all the space on a disc for games, programs or data in BASIC, and
NEVER intend to use CP/M or ANY of the CP/M utilities on that disc, it can be
formatted without the CP/M system tracks. It is then called a data disc.
The disc must be formatted using an option of the format program: type FORMAT D
instead of FORMAT. To copy programs onto this disc you must use FILECOPY
(loaded from a system disc) or LOAD and SAVE them from BASIC. In a two drive
system it is possible to use the CP/M utility PIP. The programs COPYDISC and
DISCCOPY will format the destination disc to the same as the source.
1.4 Turnkey AMSTRAD BASIC discs
If you buy an application program written in AMSTRAD BASIC for the CPC464 it
should be ready to operate when you switch on. (The expression "Turnkey" comes
from the days when all small computers had a key-operated power switch). All you
have to do is install it on a suitable working disc
AMSTRAD Disc Drive & Interface DDI-1 Manual Chapter 1.2
 Loading...