


|
|
|
|
|
|
|
|
|
|
|
|
|
|
|
|
|
|
|
|
|
|
|
|
|
|
|
|
|
|
|
|
|
|
|
|
|
|
|
|
|
|
|
|
|
|
|
|
|
|
|
|
|
|
|
|
|
|
|
|
|
|
|
|
|
|
|
|
|
|
|
|
|
|
|
|
|
|
|
|
|
|
|
|
|
|
|
|
|
|
|
|
|
|
|
|
|
|
|
|
|
|
|
|
|
|
|
|
|
|
|
|
|
|
|
|
|
|
|
|
|
|
|
|
|
|
|
|
|
|
|
|
|
|
|
|
|
|
|
|
|
|
|
|
|
|
|
|
|
|
|
|
|
|
|
|
|
|
|
|
|
|
|
|
|
|
|
|
|
|
|
|
|
|
|
|
|
|
|
|
|
|
|
|
|
|
|
|
|
|
|
|
|
|
|
|
|
|
|
|
|
|
|
|
|
|
|
|
|
|
|
|
|
|
|
|
|
|
|
|
|
|
|
|
|
|
|
|
|
|
|
|
|
|
|
|
|
|
|
|
|
|
|
|
|
|
|
|
|
|
|
|
|
|
|
|
|
|
|
|
|
|
|
|
|
|
|
|
|
|
|
|
|
|
|
|
|
|
|
|
|
|
|
|
|
|
|
|
|
|
|
|
|
|
|
|
|
|
|
|
|
|
|
|
|
|
|
|
|
|
|
|
|
|
|
|
|
|
|
|
|
|
|
|
|
|
|
|
|
|
|
|
|
|
|
|
|
EN-1 |
|
|
|
|
|
|
|
|
|
|
|
|
|
|
|
|
|
|
|
|
|
|
FR-2 |
|
|
|
|
|
|
|
|
|
|
|
|
|
|
|
|
|
|
|
|
|
|
|
|
|
|
|
|
||
|
|
|
|
|
|
|
|
|
|
|
|
|
|
|
DE-3 |
|
|
|
|
|
|
|
|
|
|
|
|
|
|
|
|
|
|
|
|
|
|
|
|
|
|
|
|
||
|
|
|
|
|
|
|
|
|
|
|
|
|
|
|
|
|
|
|
|
|
||
|
|
|
|
|
|
|
|
|
|
|
|
|
|
|
NL-4 |
|
|
|
|
|
|
|
|
|
|
|
|
|
|
|
|
|
|
|
|
|
|
IT- 5 |
|
|
|
|
|
|
|
|
|
|
|
|
|
|
|
|
|
|
|
|
|
|
ES-6 |
|
|
|
|
|
|
|
|
|
|
|
|
|
|
|
|
|
|
|
|
|
OWNER'S MANUAL |
DA-7 |
|
|
|
|
|
|
|
|
|
|
|
|
|
|
|
|
|
|
|
|
|
PL- 8 |
|
|
|
|
|
|
||
|
|
|
|
|
|
|
|
|
|
|
|
|
|
|
|
|
|
|
|
|
||
|
|
|
|
|
|
|
|
|
|
|
|
|
|
|
|
|
|
|
|
|
|
|
|
|
|
|
|
|
|
|
|
|
|
|
|
|
CB710 DAB BT |
|
|
|
|
|
|
|
|
|
|
|
|
|
|
|
|
|
|
|
|
|
|
|
|
|
|
|
||||
|
|
|
|
|
|
|
|
|
|
|
|
|
|
|
|
|
|
|
|
|
|
|
9482CMB747NA338A -1-EN.indd |
1 |
|
|
2014-10-28 |
13:44:28 |
|
|
||||
|
|
|
|
|
|
|
|
|
|
|
|

Safety Information
Thank you for purchasing the player. Please read this manual carefully before operating and reserve it for future reference.
————————————————————
WARNING:
To reduce the risk of fire or electric shock,
DO NOT expose this product to rain or moisture.
DO NOT open covers and do not repair yourself. Consult the dealer or an experienced technician for help.
————————————————————
PRECAUTIONS
Use only in a 12-volt DC negative-ground electrical system.
Disconnect the vehicle's negative battery terminal while mounting and connecting the unit.
When replacing the fuse, be sure to use one with an identical amperage rating. Using a fuse with a higher amperage rating may cause serious damage to the unit.
DO NOT attempt to disassemble the unit. Laser beams from the optical pick up are dangerous to the eyes.
Make sure that pins or other foreign objects do not get inside the unit; they may cause malfunctions, or create safety hazards such as electrical shock or laser beam exposure.
If you have parked the car for a long time in hot or cold weather, wait until the
temperature in the car becomes normal before operating the unit.
Keep the volume at a level at which you can hear outside warning sounds (horns sirens, etc.).
————————————————————
DISC NOTES
Playing a defective or dusty CD can cause dropouts in sound. Hold CDs as illustrated.
Do not touch the unlabelled side.
Do not attach any seal, label or data protection sheet to either side of a disc.
Do not expose a CD to direct sunlight or excessive heat.
Wipe a dirty CD from the center outward with a cleaning cloth.
Never use solvents such as benzine or alcohol.
This unit cannot play 3-inch ( 8cm ) CDs.
Never insert a 3-inch CD contained in the adapter or an irregularly shaped CD. The unit may not be able to eject it, resulting in a malfunction.
————————————————————
BEFORE OPERATION
Do not raise the volume level too much, as this will block outside sounds, making driving dangerous.
Stop the car before performing any complicated operation.
Contents |
|
Safety Information......................................... |
1 |
Panel Controls............................................... |
2 |
Panel Controls (Keypad)............................... |
3 |
General Operation......................................... |
4 |
Radio Operation............................................ |
4 |
RDS (Radio Data System)............................ |
5 |
USB/SD/MMC Operation.............................. |
6 |
MP3/WMA Playback.................................. |
6-8 |
Menu Function........................................... |
8-9 |
Bluetooth Operation................................. |
9-10 |
Password entered:...................................... |
11 |
Electrical Connections................................. |
11 |
Installation Guide........................................ |
12 |
Anti-Theft System................................... |
12-13 |
Troubleshooting.......................................... |
13 |
Specifications.............................................. |
14 |
FCC Statement........................................... |
15 |
* In addition to ordinary CDs, this unit can play back a CD-R/CD-RW/MP3/CD-TEXT.
EN-1
9482CMB747NA338A -1-EN.indd |
1 |
|
|
2014-10-28 |
13:44:28 |
|
|
||||
|
|
|
|
|
|
|
|
|
|
|
|

Panel Controls
Press PWR button to turn on the unit.
14 |
13 |
12 |
1
2
|
|
|
|
|
|
11 |
|
|
|
F |
F |
|
|
|
|
|
|
|
|
10 |
3 |
4 |
5 |
6 |
7 |
8 |
9 |
1.- Mute
-Press more than 2 seconds to power off.
2.- Rotate to adjust volume.
3.- Press to select VOLUME/BASS/TREBLE/
BALANCE/FADER, rotate the knob to adjust.
-Long press to enter system menu.
4.- Radio
-Disc play (when disc is in)
-SD/MMC card (when SD/MMC inserted)
-USB-drive (when USB inserted)
-Aux-in
-BT MUSIC
-Long press to disconnect /reconnect bluetooth phone.
5.- Radio band switch:
FM1->FM2->FM3->MW1->MW2->LW - Dial/Receive call
-Long press to re-dial.
-While talking, press to transfer the call.
6:- Disc playback Button 1: - Play/Pause
-Topplay(pressmorethan2sec.) Button 2: - Intro play (10 sec.)
Button 3: - Track repeat play Button 4: - Track random play
Button 5: - MP3 folder down (If there are more than 1 folders)
-MP3track-10down(longpress)
Button 6: - MP3 folder up (If there are more than 1 folders)
-MP3track+10up(longpress)
Radio preset 1~6
-Press to tune in a preset station.
-Hold for more than 2 seconds to store station.
EN-2
7.- Radio preset scan
-Radio auto preset(long press)
-MP3/WMA search
-Call off / cancel
8.- Display switch
-Time adjust (long press)
9.Radio tune
-Track skip/seek
10.- Aux-in jack
11.- USB connector
12.- Panel open
13.- Press to enter RDS PTY mode and use number button 1~6 to select RDS PTY stations.
14.- Press to turn RDS AF on/off.
- Long press to turn RDS TA on/off.
9482CMB747NA338A -1-EN.indd |
2 |
|
|
2014-10-28 |
13:44:29 |
|
|
||||
|
|
|
|
|
|
|
|
|
|
|
|
Panel Controls (Keypad)
Radio preset
Press each number button 1 ~ 6 more than 2 seconds to store current station, press briefly to recall stored station.
————————————————————
Disc playback
Press number button 1 to pause, press again to resume play.
Press number button 2 to intro play track on the disc for 10 seconds each, press again to intro play track in current folder for 10 seconds each, press again to end scan and play the selected track.
Press number button 3 to repeatedly play the current track, press again to repeatedly play all tracks in current folder, press again to resume normal play.
Press number button 4 to randomly play the current track, press again to randomly play all tracks in current folder, press again to resume normal play.
Press number button 5 or 6 to previous or next folder. (if there are more than 1 folders)
Press and hold 5 or 6 more than 2 seconds to goto -10 down or +10 up track.
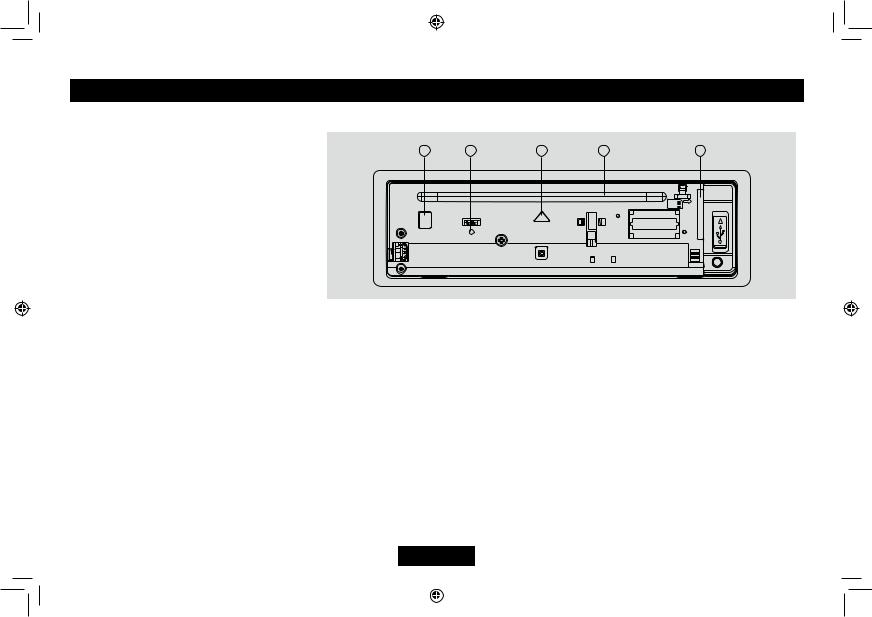
 Panel Controls (Other Instructions)
Press the  button to open the panel and press
  to eject the disc.
1 |
2 |
3 |
4 |
5 |
1.Disc eject (if there is a disc in the unit)
2.Reset hole (Note: Pressing the RESET hole will erase the clock setting and stored stations.)
3.Panel status indication: Lights up when you flip down the panel; twinkles when you remove the panel.
4.Slot, Insert the disc
5.SD/MMC card slot
EN-3
9482CMB747NA338A -1-EN.indd |
3 |
|
|
2014-10-28 |
13:44:30 |
|
|
||||
|
|
|
|
|
|
|
|
|
|
|
|
General Operation
Power On/Off Button
Press the PWR button to turn the unit on when the vehicle ignition switch is on. Long press to turn the unit off.
————————————————————
Adjust Volume level
Rotate the VOL knob to adjust volume level. Rotate it clockwise to increase and anticlockwise to decrease the volume.
————————————————————
Mode Button (SRC)
Press the SRC button to change between
Radio, DISC (when disc is in), USB(when USB connected), SD/MMC card(when card inserted), AUX play , BT audio.
————————————————————
Disc Load/Eject
Load: Press to flip down the panel. Insert the disc into the slot .
Eject: Press to flip down the panel. Press
 to eject the disc .
————————————————————
Auxiliary Input
To access an auxiliary device:
1.Connect the portable audio player to the AUX interface.
2.Press the SRC button to select Aux-In mode.
3.Press SRC again to cancel Aux-In mode and go to the next mode.
Display Selector (DISP)
This unit can display either the clock time or radio frequency/ CD player functions.
Ordinarily, the radio frequency or CD player track indication is displayed, but the unit will display the time when the DISP button is pressed. The time will display for approximately 5 seconds then return to the radio/CD player function display.
————————————————————
Setting the Clock
The correct time of day can be set by pressing and holding the DISP button.
To set the clock, perform the following steps:
1.Turn the vehicle ignition and radio on.
2.Press the DISP button to view the clock.
3.With the clock visible on the display, press and hold the DISP button until the time display flashes.
4.Within 5 seconds, rotate the VOL knob counter clockwise to adjust the minutes to the desired setting. To change the hour, rotate the VOL knob clockwise to adjust the hour to the desired time.
5.Press DISP button to confirm and exit clock setting.
EN-4
Radio Operation
Band Switch
During radio play, press the BAND button to choose between three FM, two MW and LW bands. The indication “MW”, “FM” or “LW“ appears on the display panel according to your selection.
————————————————————
TUNE
MANU SEEK: Press |
|
|
or |
|
to tune step by |
|
|
|
|||||
|
|
|||||
step. |
|
|
|
|
|
|
AUTO SEEK: Press |
|
or |
|
|
more than 2 |
|
|
|
|
||||
|
|
|
||||
seconds to seek automatically.
————————————————————
Store Station Manually
Press button 1 - 6 more than 2 seconds to store current station.
Press 1-6 briefly to recall preset station.
————————————————————
Store Station Automatically
Press AMS button more than 2 seconds to seek and save the 10 strongest stations in current band automatically.
Press AMS button briefly to intro play the preset stations.
9482CMB747NA338A -1-EN.indd |
4 |
|
|
2014-10-28 |
13:44:30 |
|
|
||||
|
|
|
|
|
|
|
|
|
|
|
|

RDS (Radio Data System)
RDS service availability varies with areas. Please understand if RDS service is not available in you area, the following service is not available.
————————————————————
RDS Basics
AF(Alternative Frequency): When the radio signal strength is poor, enabling the AF function will allow the unit to automatically search another station with the same PI
(program identification) as the current station but with stronger signal strength.
PS (Program Service name): The name of station will be display instead of frequency. AF Mode:
AF on: AF function is activated. AF off: AF function is disabled.
Remark: AF indicator on LCD will flash until RDS information is received. If RDS service is not available in your area, turn off the AF mode.
REG Mode: Press AF on the remote control for more than 2 seconds to switch REG mode on and off.
REG on: AF function will implement the regional code (of the PI) and only stations in the current region can be tuned automatically. REG off: AF function will ignore the regional code (of the PI) and stations in the other regions can also be tuned automatically.
Traffic Announcements
Some RDS FM stations periodically provide traffic information.
TP (Traffic Program Identification) Broadcasting of traffic information
TA (Traffic Announcements Identification) Radio announcements on traffic conditions
TA Mode: Hold TA/AF button on the panel or press TA button on the remote control to turn on/off TA mode. When TA mode is turned on, the TA indicator will blink.
When traffic announcement is received, the TA indicator will display. The unit will temporarily switch to the tuner mode (regardless of the current mode) and begin broadcasting the announcement at TA volume level. After the traffic announcement is over, it will return to the previous mode and volume level. When
TA is turned on, SEEK, SCAN, AMS function can only be received or saved when traffic program identification (TP) code is received.
————————————————————
EON (Enhanced Other Networks)
When EON data is received, the EON indicator lights and the TA and AF functions are enhanced.
TA: Traffic information can be received from the current station or stations in other network. AF: The frequency list of preset RDS stations
EN-5
is updated by EON data. EON enables the radio to make fuller use of RDS information. It constantly updates the AF list of preset stations, including the one that currently tuned into. If you preset a station around the area at your home, you will later be able to receive the same station at an alternative frequency, or any other station serving the same program,
EON also keeps track of locally available TP stations for quick reception.
————————————————————
PTY Reception (Program Type)
RDS FM stations provide a program type identification signal.
Example: news, rock, info, sport, etc.
PTY Mode: Press PTY button to enter the
MUSIC type, the previous type is shown.
Press PTY again to enter SPEECH type. At
MUSIC type or SPEECH type, use buttons 1
- 6 to select the desired program type. The selected PTY type is shown and searching starts if no other function is selected for 2 seconds. If there is no corresponding program type, NO PTY is shown and the unit will return to normal mode.
9482CMB747NA338A -1-EN.indd |
5 |
|
|
2014-10-28 |
13:44:30 |
|
|
||||
|
|
|
|
|
|
|
|
|
|
|
|
 Loading...