

Page 1

AMROAD P3
DOOR STATION
~
Technical Manual
Page 2

Page 3

AMROAD P3
Contents
Contents ............................................. i
Regulations and Safety Precautions ... 1
FCC Statement .............................................. 1
FCC Radiation Exposure Statement ............. 1
EC Directive Compliance Statement ............ 1
LOGIN ................................................ 2
FUNCTION BAR .................................. 3
LOGOUT............................................. 4
Idle ................................................................ 4
LOGOUT Before Saved ................................. 4
REBOOT ............................................. 5
REBOOT Before Saved .................................. 5
TOOLS................................................ 6
Import Settings ............................................ 6
Export Current Settings ............................... 6
Camera Setting ........................................... 18
Extension Setting ....................................... 20
GPIO Settings .............................................. 22
RFID Setting ................................................. 23
Information of adding cards ...................... 24
IO Application ................................. 25
Electric Bolt .................................................25
Electric Strike ............................................. 26
PIR Motion Sensor and Light ....................... 27
Technical Detail ............................... 28
APS Settings ................................................. 6
Update Firmware .......................................... 6
Restore to Factory Defaults ......................... 6
GENERAL ........................................... 7
Device Overview ........................................... 7
GENERAL – Essential Step .................. 8
Network Settings ......................................... 8
Network Settings – Static IP ........................ 9
SIP Settings ................................................. 10
Streaming Settings ...................................... 12
Device Connection Settings ........................ 13
GENERAL – User Preferences ............ 15
Basic Preference .......................................... 15
Device Volume ............................................. 17
i
Page 4

Regulations and
Safety Precautions
AMROAD P3
Regulations and Safety Precautions
FCC Statement
This product has been tested for compliance
with FCC Regulations Part 15, Specifications of
Class B Digital Devices. These limitations
provide reasonable protection against harmful
EMI caused by residential installations. This
product may generate and radiate energy in the
radio frequency; harmful interference to radio
communication may occur if not installed or
used in accordance with safety regulations.
However, this does not assure that specific
installation will not cause interference; in case
of interferences to the radio or TV reception in
the residence while this product is switched on
or off, the user may try the following
adjustment methods to improve the EMI
situation:
Adjust direction and location of the
antenna
Increase distance between the receiving
antenna and this product.
Do not use the product on the same
power socket used by the receiving
antenna.
FCC Radiation Exposure Statement
This product is in compliance with FCC’s
Radiation Exposure Limitations for
uncontrolled environment. While installing and
operating this product, the radiation
transmitter must be kept away from human
body at distance of at least 20cm.
EC Directive Compliance Statement
Manufacturer claims that this product
complies with basic requirements specified in
statutory regulations in relation to health,
safety and environmental protection. The
following regulations are set forth based on
European R&TTE - European Radio equipment
and Telecommunications Terminal Equipment –
1999/5/EC.
EN 301 489-1, 301 489-17, addressing EMC
requirements of general radio frequency
devices
EN 609 50 Safety EN 609 50 Safety
Specifications
EN 300-328-1, EN 300-328-2, addressing
technical requirements of radio frequency
devices.
NOTE:
This device is applicable in member countries of
EU and EFTA. Outdoor operation is limited to
specific radio frequencies or requirements only.
Please consult local authorities for application
procedures.
It is deemed not in conformity with the above
specification, and the product is not allowed to
be used in the EU Community or European
country where R&TTE directive 1999/5/EC is in
force, if the intensity of the overall radiated
power and/or antenna exceeds 100 mW EIRP
(Equivalent Isotropic Radiated Power).
1
Page 5
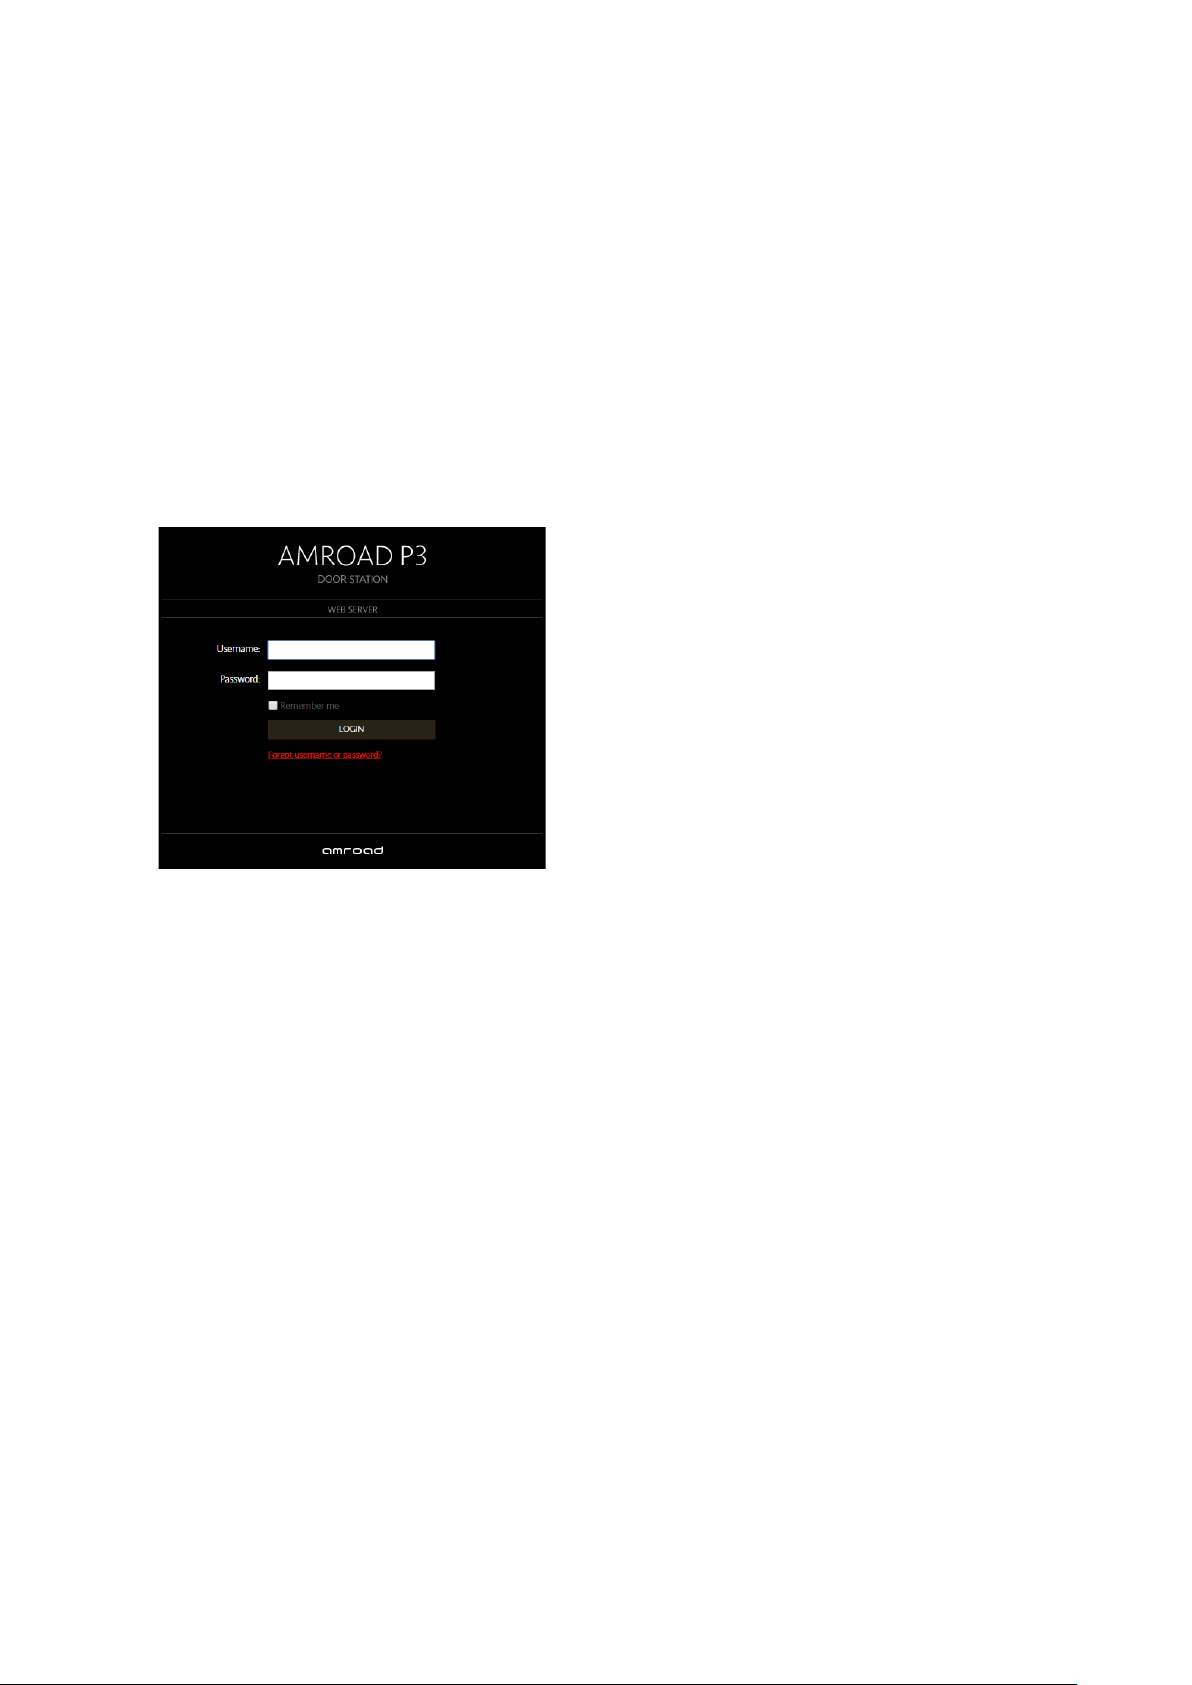
LOGIN
SI can set all kinds of function by using
AMROAD P3 WEB.
AMROAD P3
Input the IP address of this product on your
browser, then you will see home page of the
AMROAD P3 appearing. Web UI is protected by
Login ID and Password. Please key in the correct
ID and password, and then click “Login” button
to enter Web UI. The default ID and password
both are “admin”.
Recommend to use browser with Google
Chrome.
2
Page 6
AMROAD P3
FUNCTION BAR
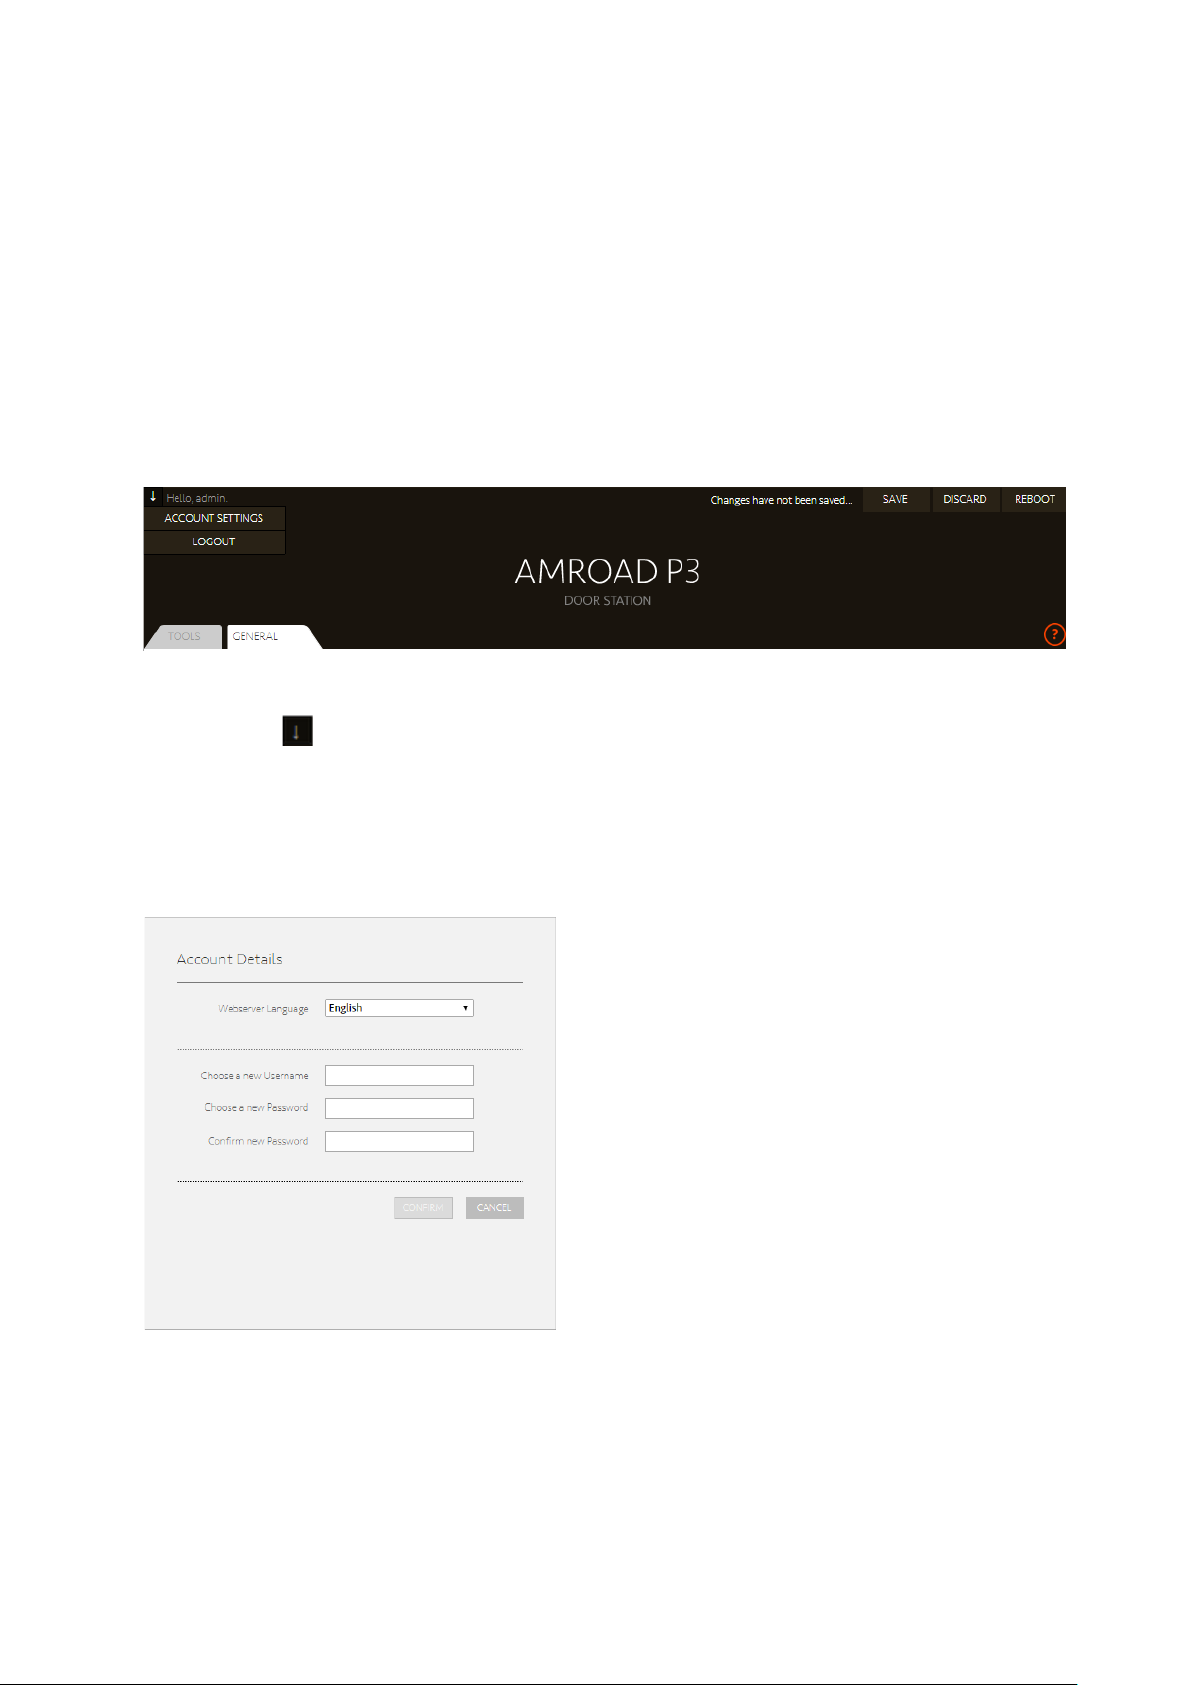
On the left side of the upper corner, the
content inside are “ACCOUNT SETTINGS”
and “LOGOUT”.
You can set language of the Webserver and the
account detail in “ACCOUNT SETTINGS”, as
shown below.
There are three bottoms on the right side of
the upper corner, and they are “SAV E”,
“DISCARD”, and “REBOOT”.
You click “SAVE” definitely after modify
anything on the WEB. It will be done indeed. If
Changes have not been saved, it will show on
the top to remind you.
“DISCARD」is discard the change you set after
you saved last time.
“REBOOT” is restart AMROAD P3 device.
3
Page 7
AMROAD P3
LOGOUT
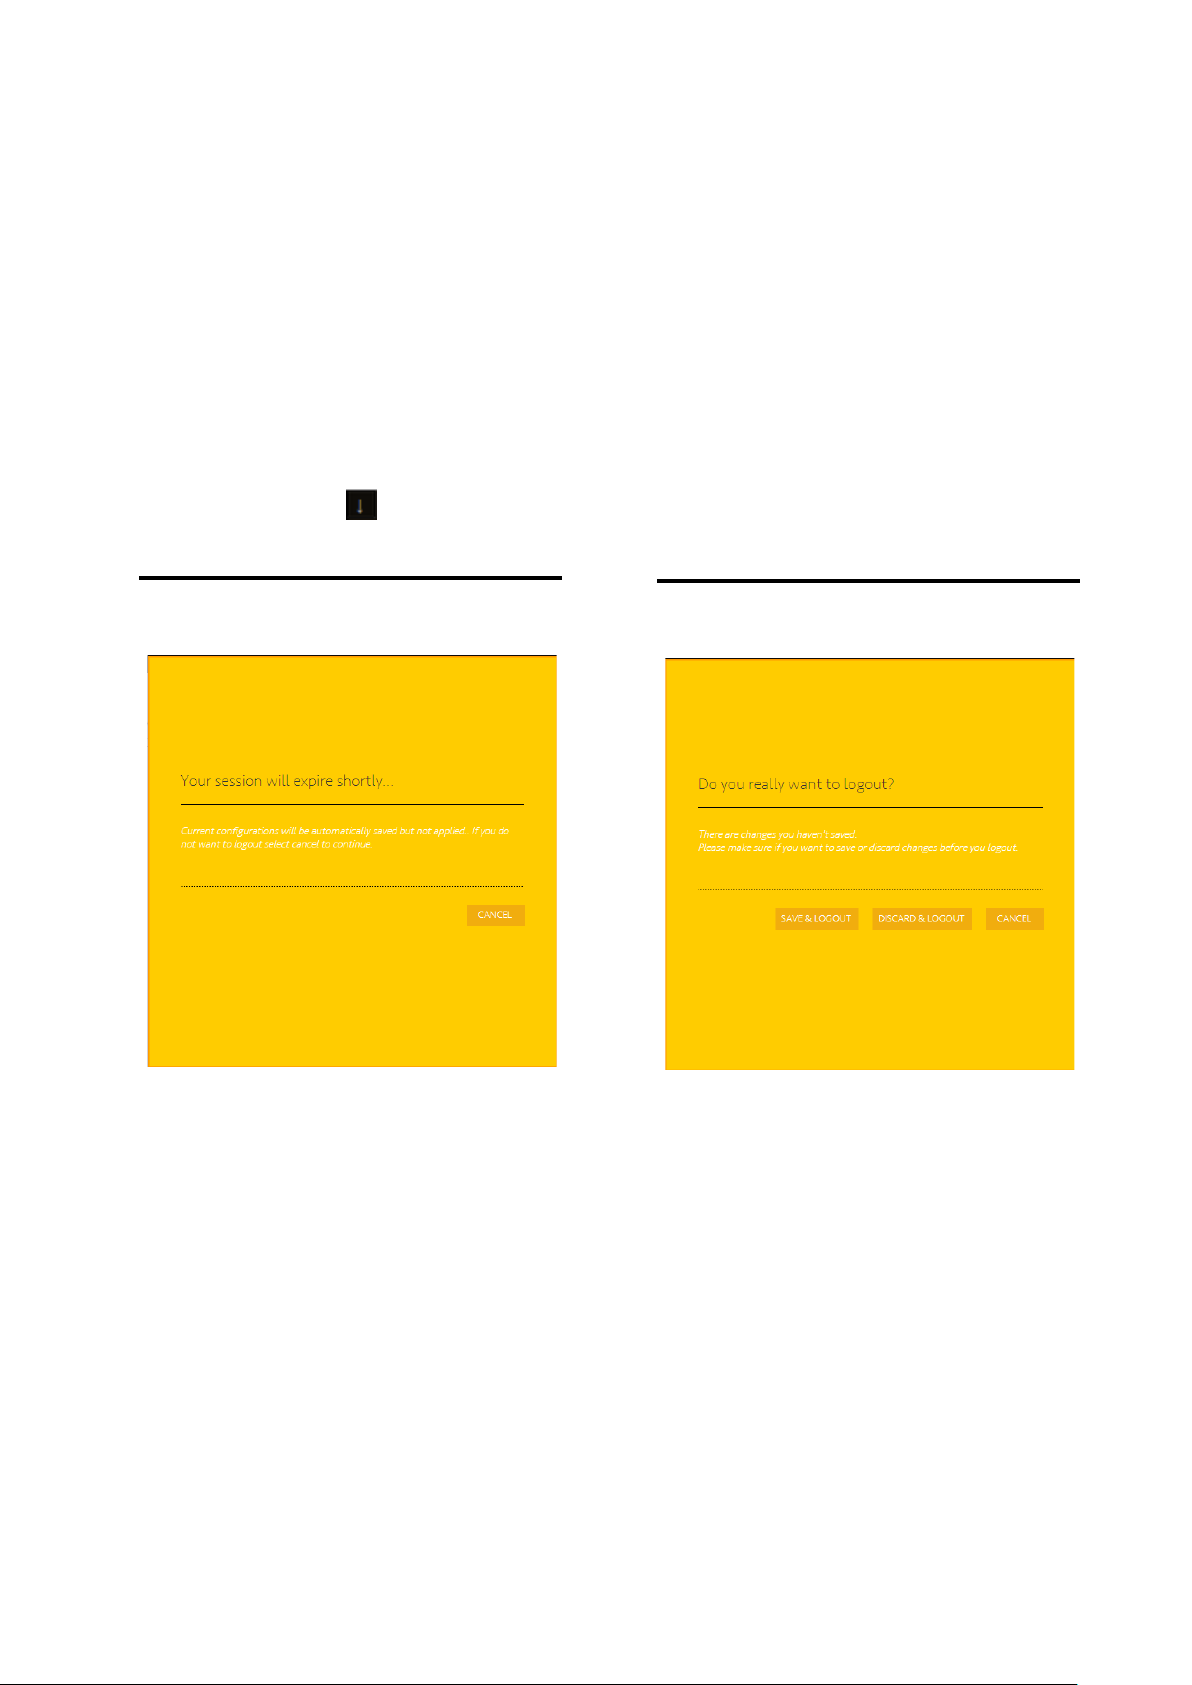
On the left side of the upper corner, you can
find “LOGOUT” inside .
Idle
If WEB lays idle for 3 minutes, it will show as
below.
LOGOUT Before Saved
If you don’t save the change before LOGOUT,
WEB will show as below.
After 6 minutes, WEB would LOGOUT and
saved automatically but not applied.
There are 3 options can choose, “SAVE &
LOGOUT”, “DISCARD & LOGOUT” and
“CANCEL”.
4
Page 8
REBOOT
REBOOT Before Saved
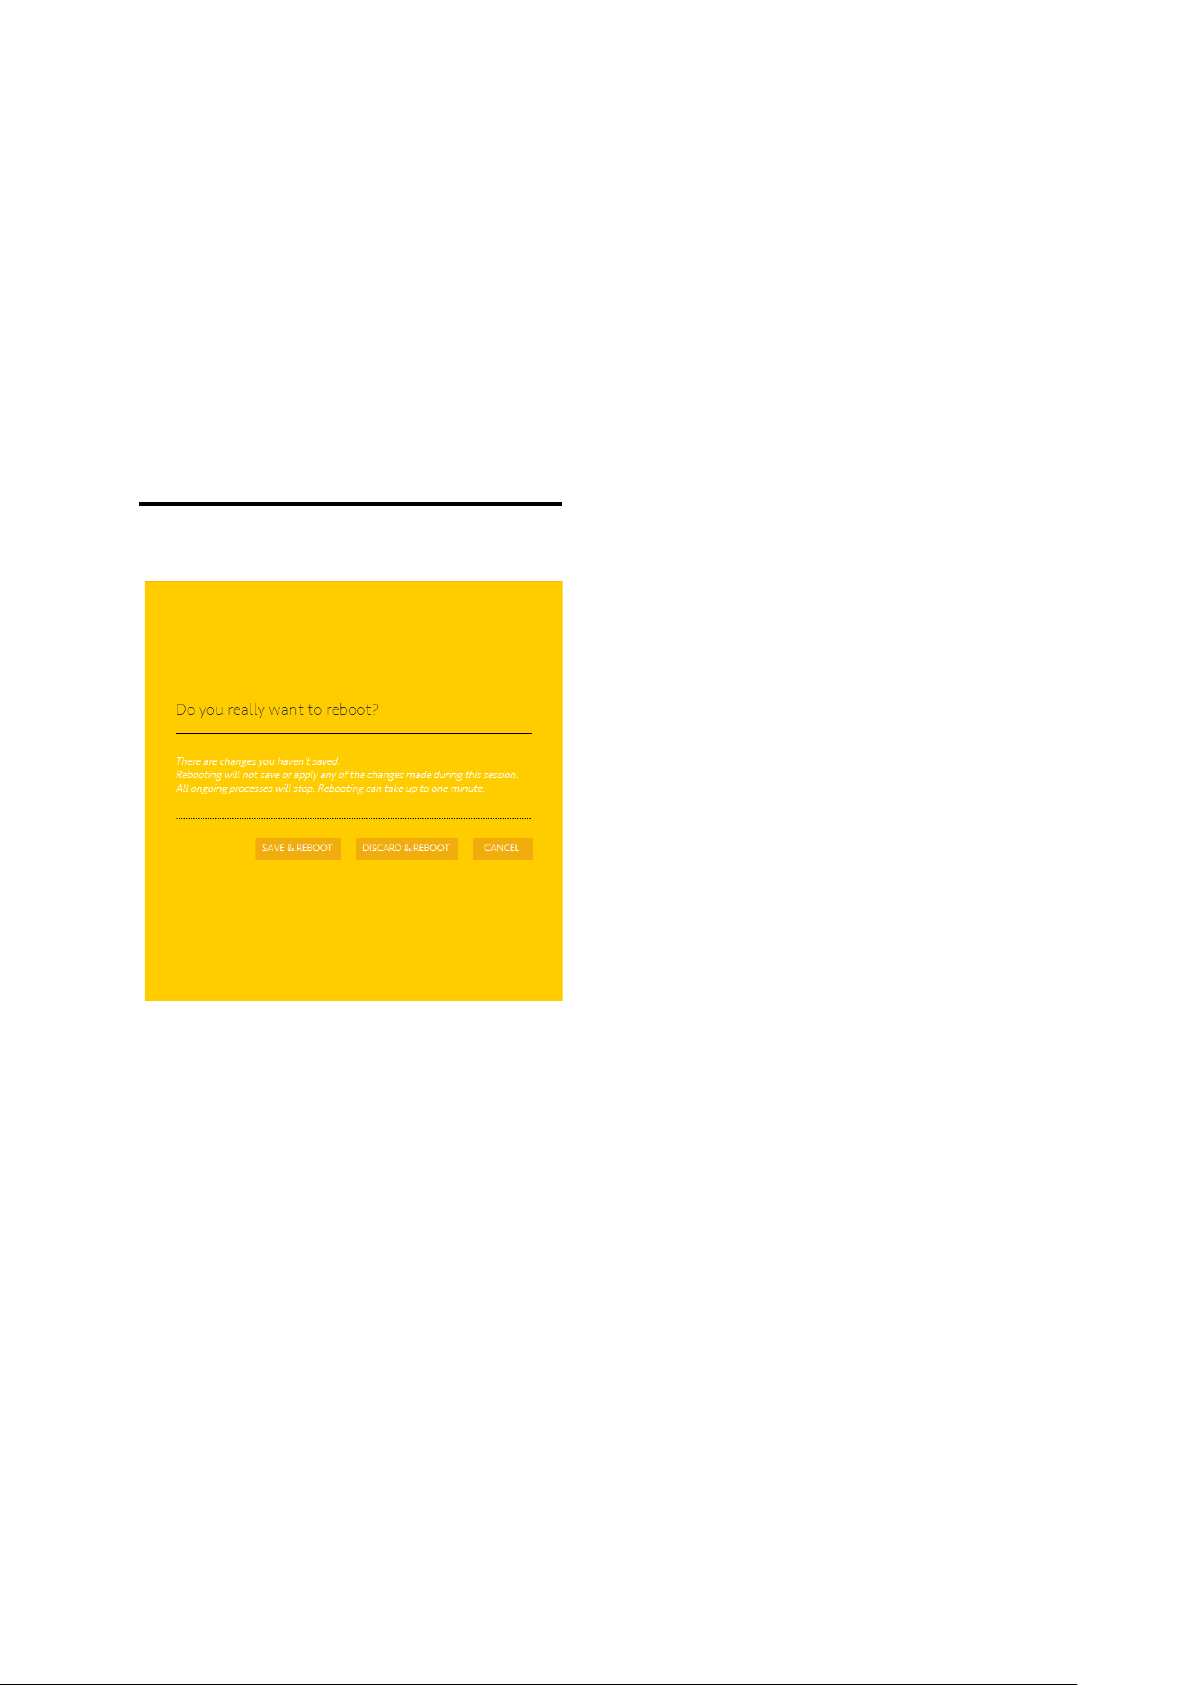
If you don’t save the change before REBOOT,
WEB will show as below.
AMROAD P3
There are 3 options can choose, “SAVE &
REBOOT”, “DISCARD & REBOOT” and
“CANCEL”.
5
Page 9
AMROAD P3
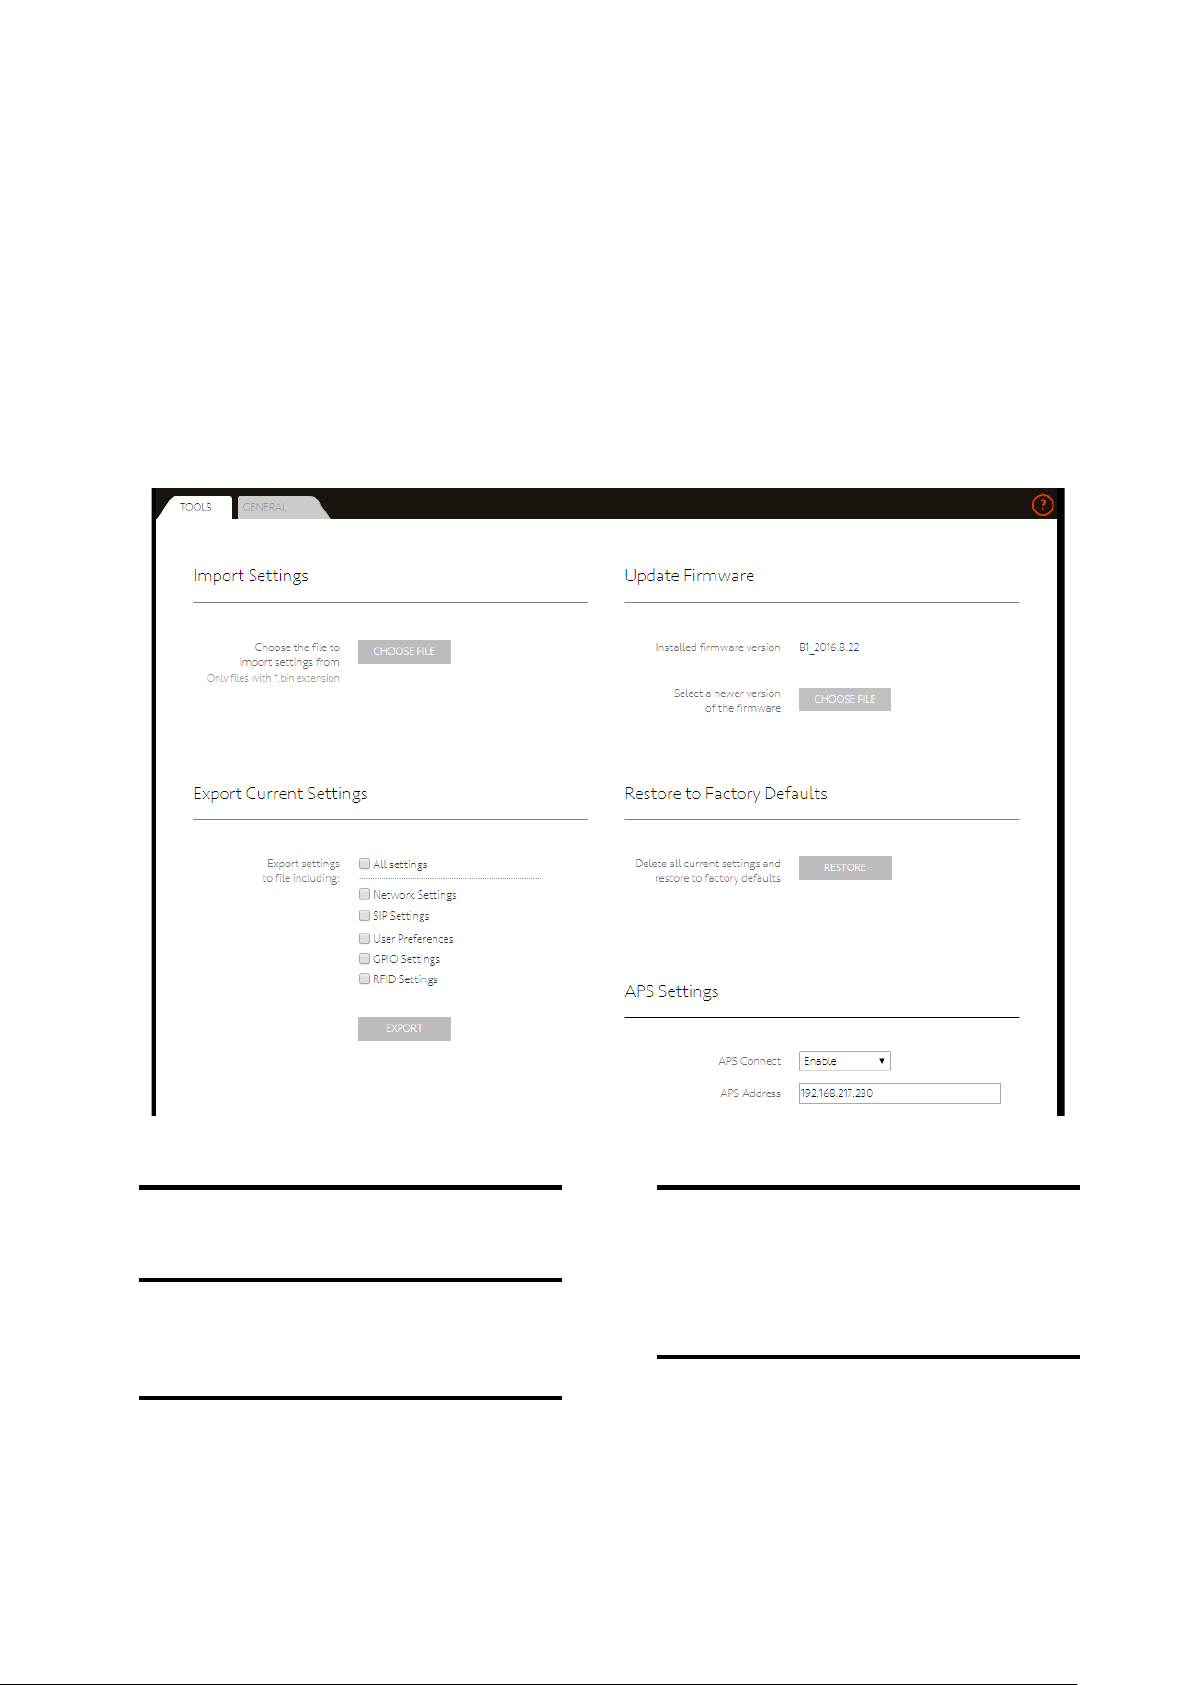
TOOLS
Import Settings
Import the setting file.
Export Current Settings
Choose the specific functions you need to
export the setting file.
APS Settings
Engineering mode.
Update Firmware
Import the new firmware and DO NOT turn off
or disconnect the Ethernet cable during
upgrade, for it may cause serious damage to
this device.
Restore to Factory Defaults
If you push the RESTORE bottom, it will delete
all current settings and restore to factory
defaults.
6
Page 10
AMROAD P3
Device Overview
GENERAL
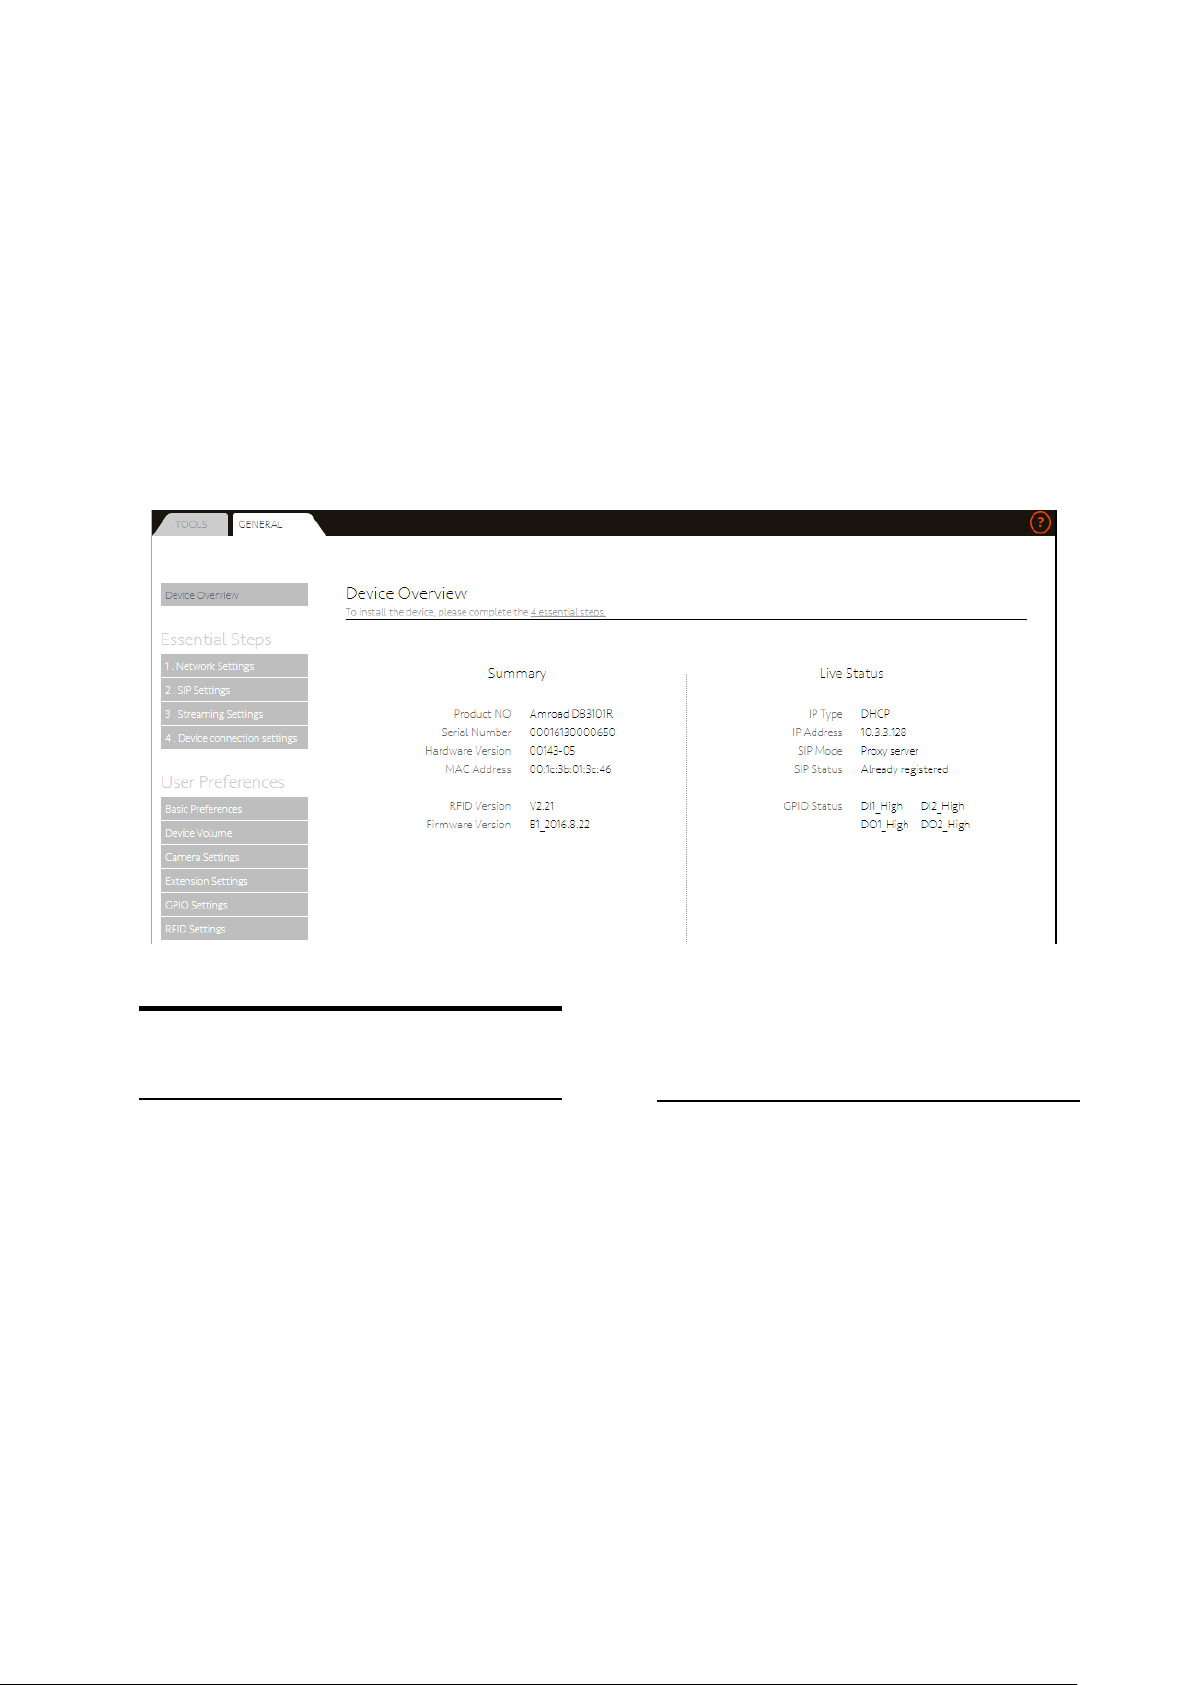
Device Overview
This page shows the device information setting.
Summary
Product NO
Serial Number
Hardware Version
MAC Address
Firmware Version
Current Device Language
Live Status
IP Type
IP Address
SIP Mode
SIP Status
Available/Total Memory
7
Page 11
Network Settings
GENERAL – Essential Step
AMROAD P3
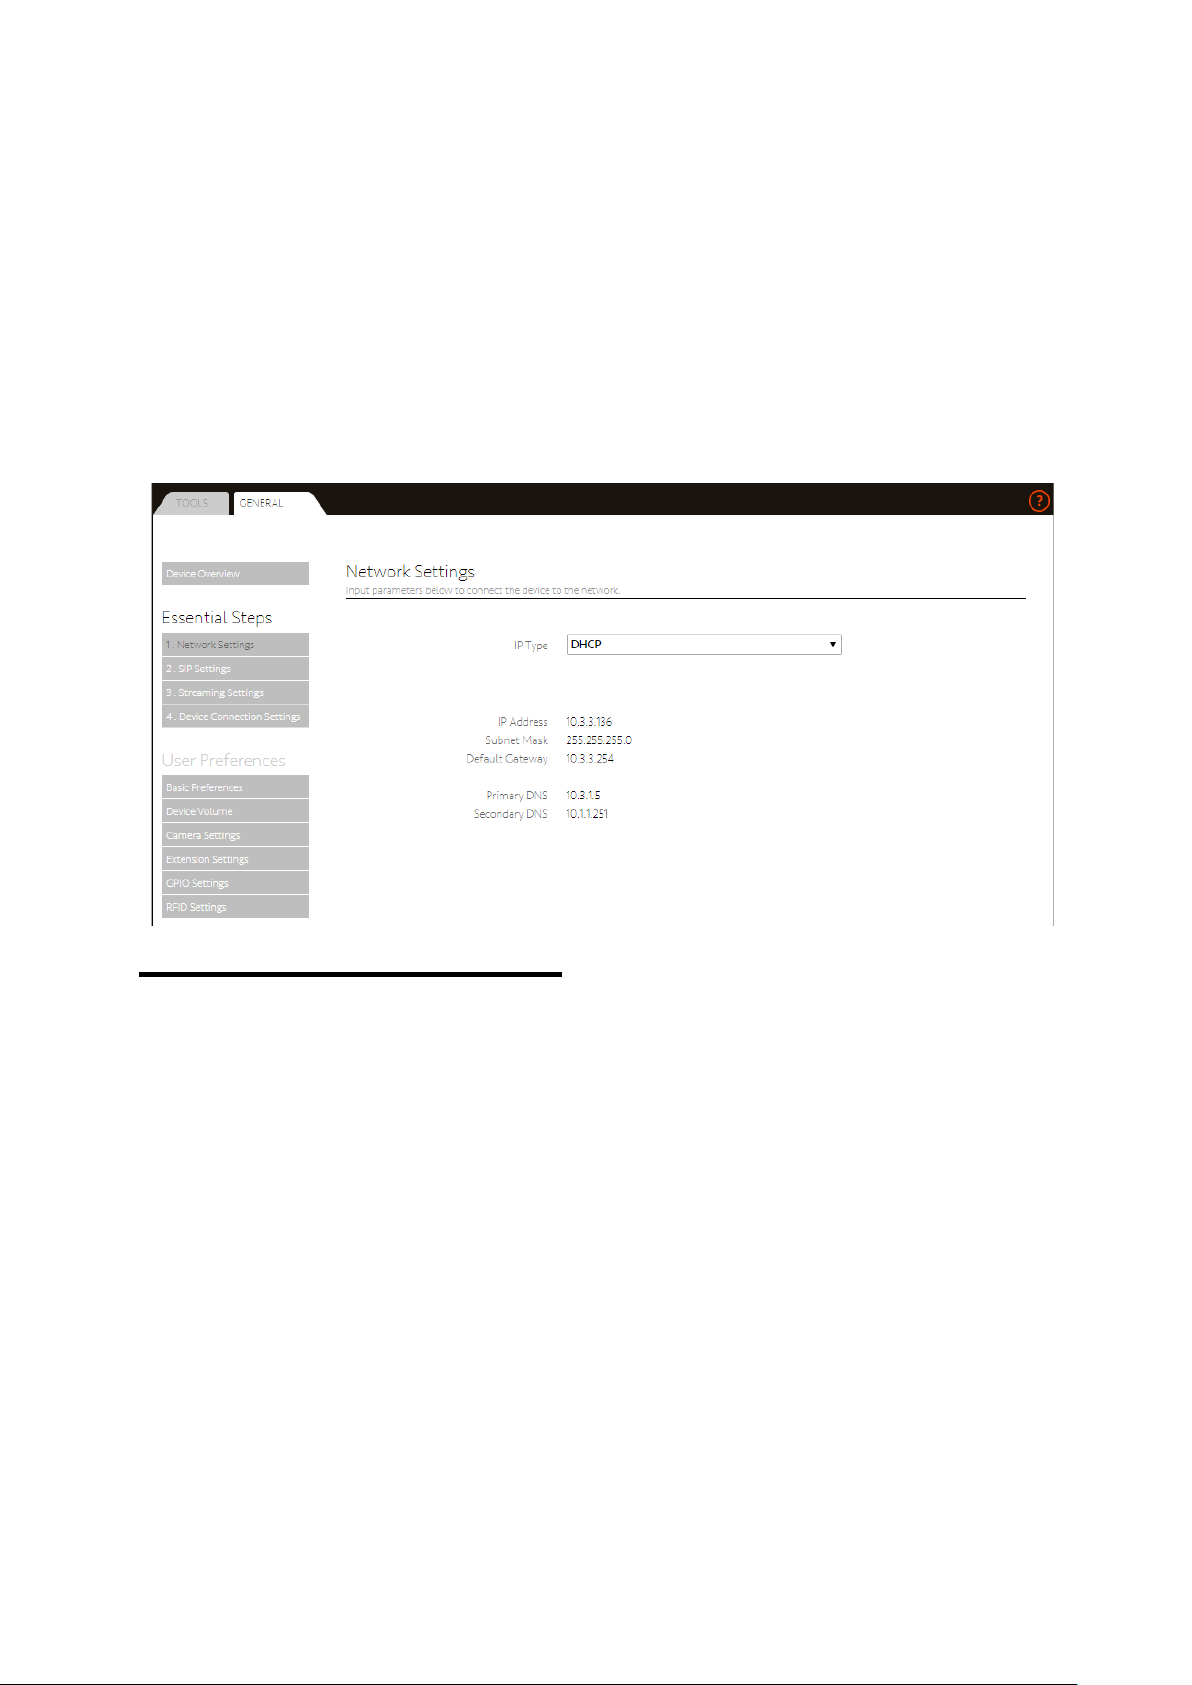
Network Settings
IP Type:If you choose DHCP, the system
will specify the following information
automatically.
IP Address
Subnet Mask
Default Gateway
Primary DNS
Secondary DNS
8
Page 12
AMROAD P3
Network
Settings
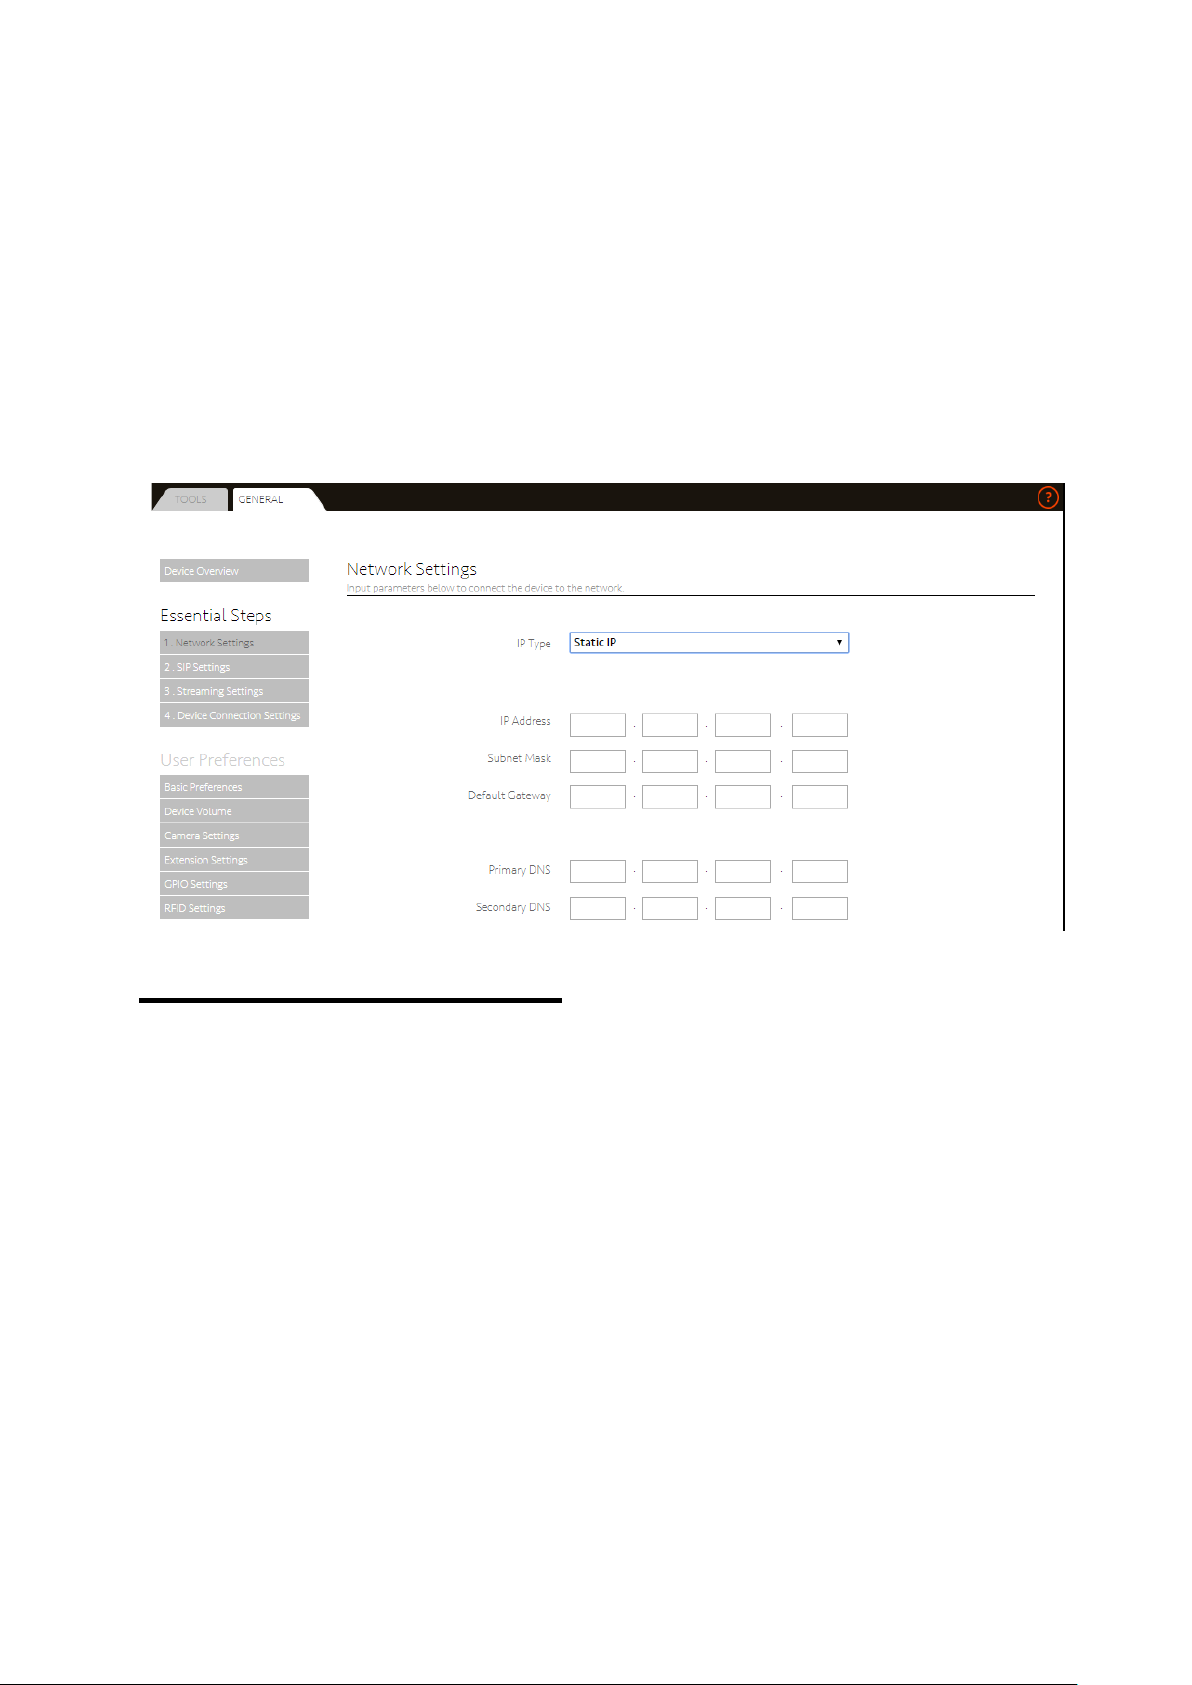
Network Settings – Static IP
IP Type:If you choose Static IP, you need to
input the information below.
IP Address
Subnet Mask:Default is 255.255.255.0
Default Gateway
Primary DNS
Secondary DNS
9
Page 13
AMROAD P3
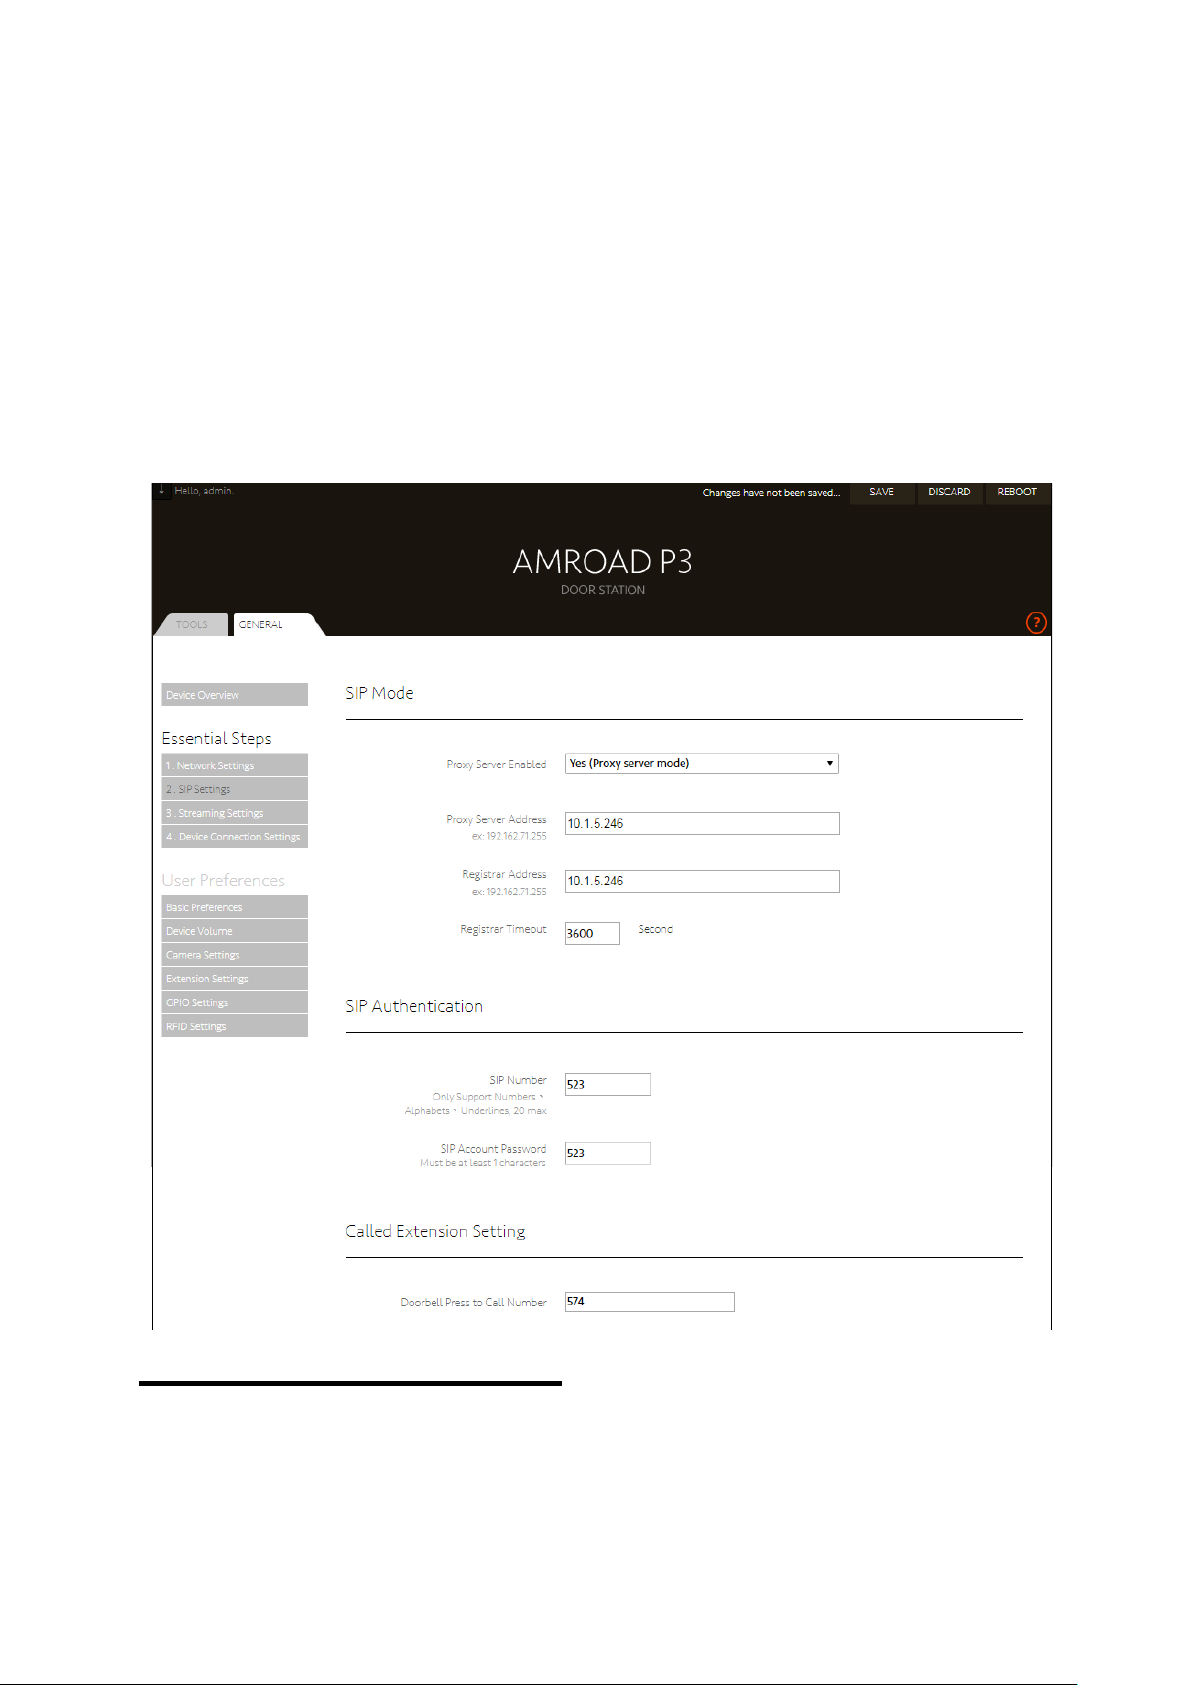
SIP Settings
SIP Settings
Enter SIP location and SIP number.
10
Page 14

SIP Settings
SIP Mode
Proxy Server Enabled:You may select “Yes”
to register with PBX.
Proxy Server Address:You may fill in the IP
address of SIP Registrar Server here.
Registrar Address:You may fill in the IP
address of SIP Registrar Server here.
(Required field)
Registrar Timeout:Set the time for SIP
registration authorization. The default is
3600 seconds.
AMROAD P3
SIP Authentication Setting
SIP Number:You may fill in your account
name of SIP service in this field. (Required
field)
SIP Account Password:You may fill in the
password of your SIP service account.
(Required field)
Called Extension Setting
Doorbell Press to Call Number (Required
field)
11
Page 15
AMROAD P3
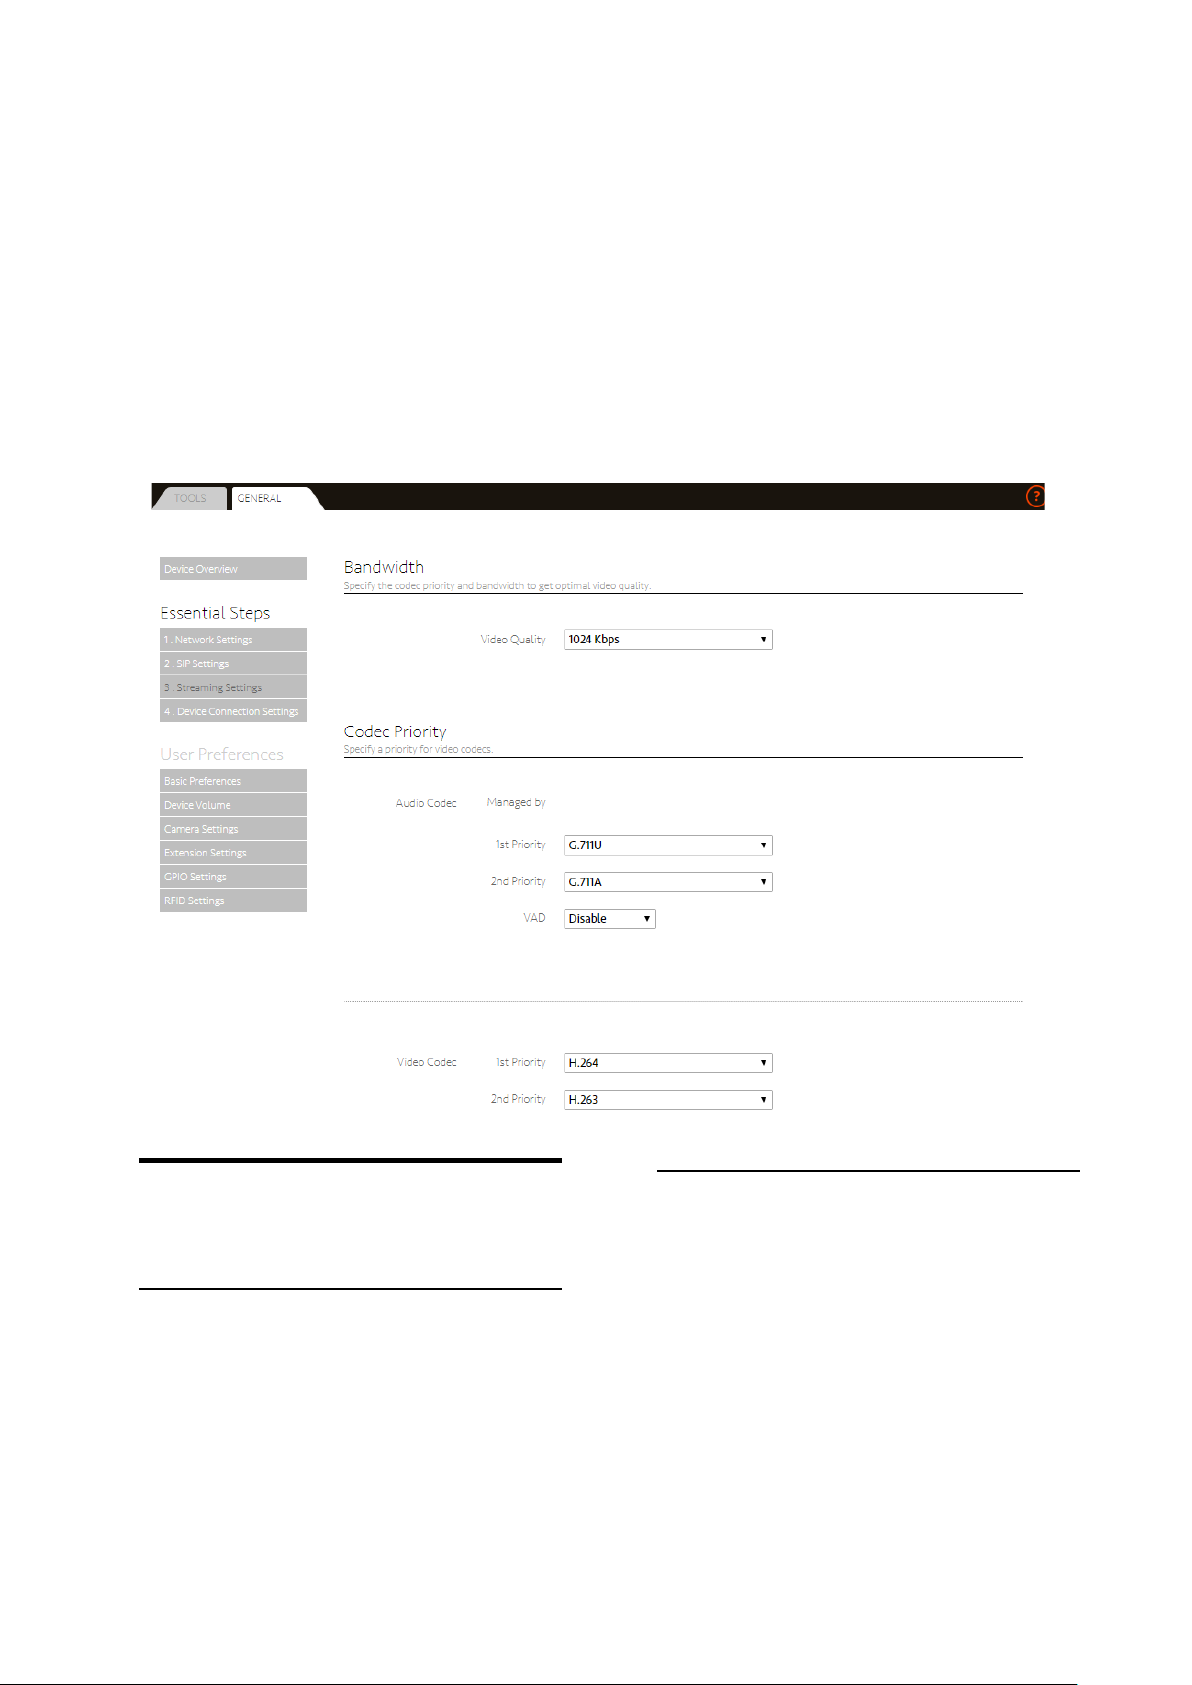
Streaming Settings
Streaming Settings
Adjust image-related settings.
Bandwidth
Video Quality:Choose Video Bandwidth.
Codec Priority
Audio Codec:Support G.711U and G.711A.
Enable or Disable VAN setting.
Video Codec:Choose video encoding
priorities, currently only supports H.263
and H.264.
12
Page 16
AMROAD P3
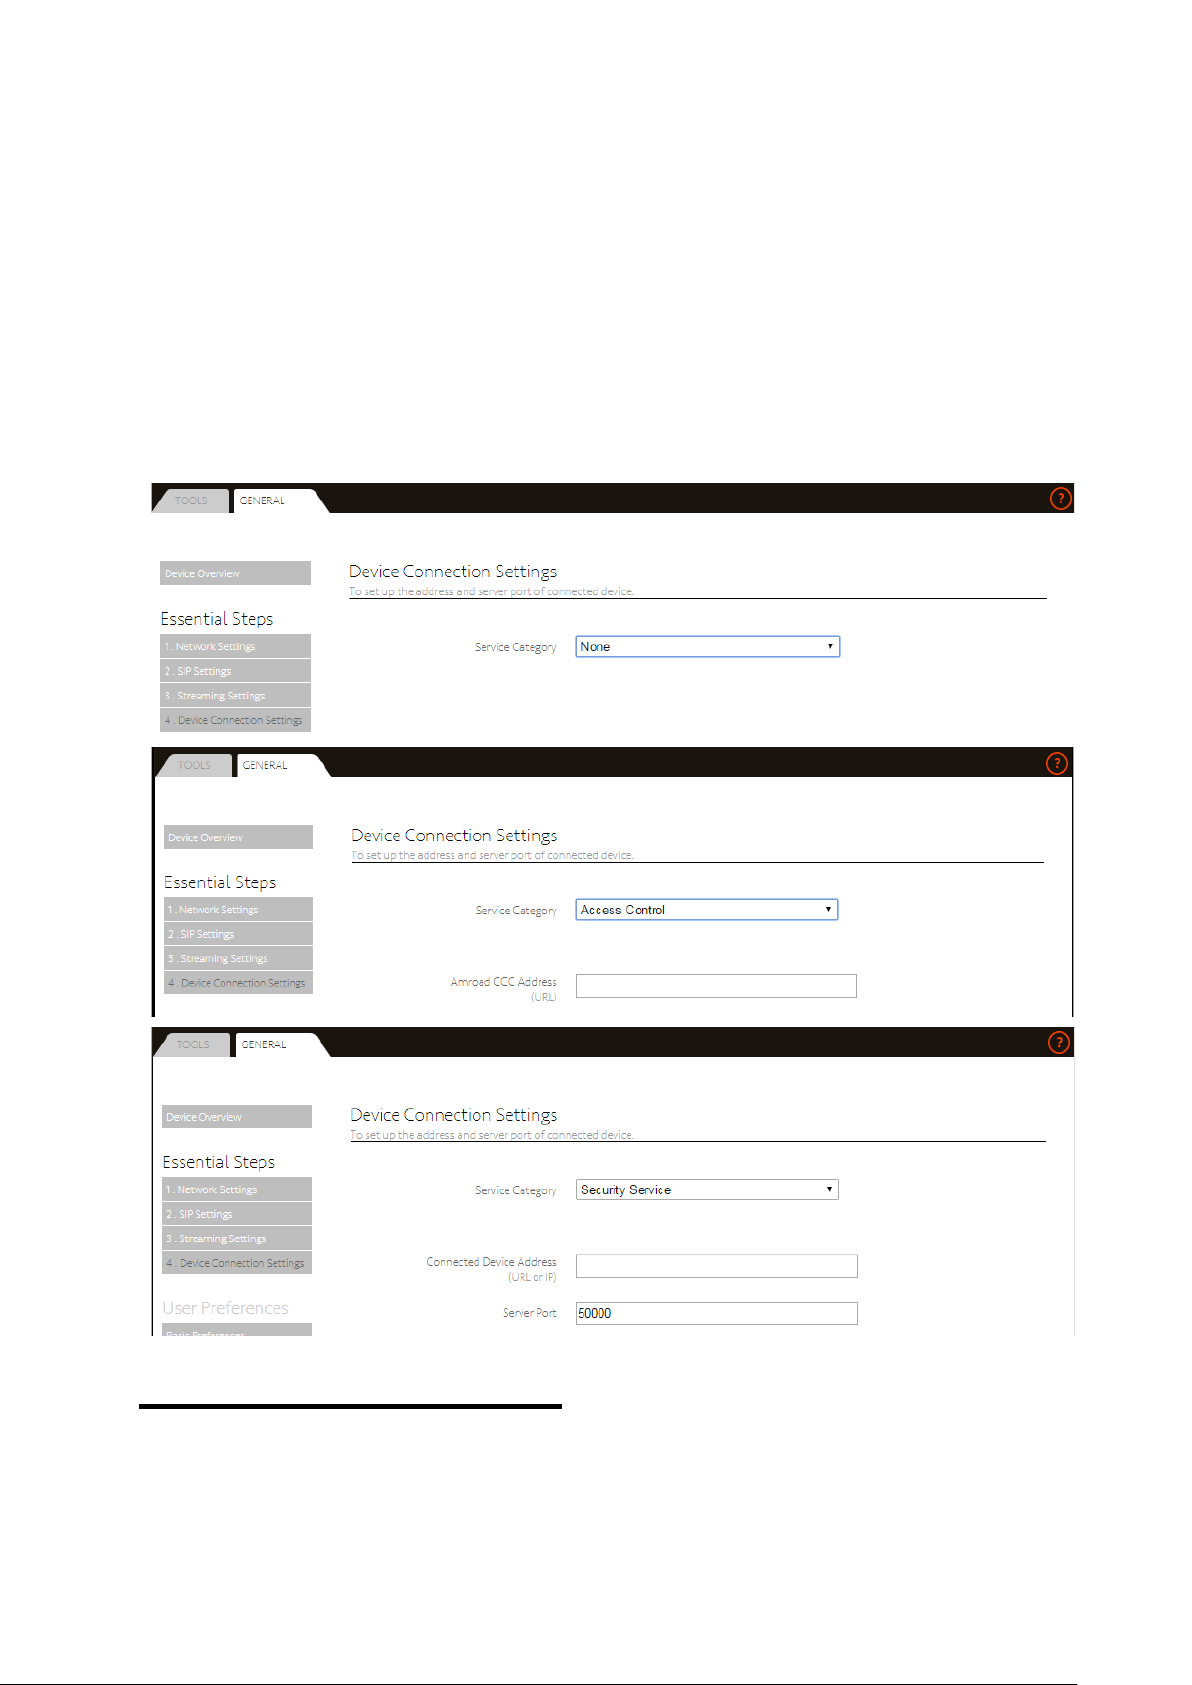
Device Connection Settings
Device Connection Settings
There are 3 Service Category for AMROAD P3.
They are None, Access Control, and Security
Service, and details will show as next page:
13
Page 17

Device Connection Settings
None
Choose “None” neither “Access Control” nor
“Security Service”.
Access Control
Often use “Access Control” in public area, and
need to connect with electric lock with
AMROAD P3. And control by AMROAD CCC.
AMROAD P3
FUNCTION : Scan cards for open the door, and
record data in AMROAD CCC.
Amroad CCC URL:Need to input Amroad CCC
URL for connecting with AMROAD CCC.
Security Service
Often use “Security Service” in front of each
unit, and need to connect with AMROAD
HOME STATION such as P9 or P5.
Connected Device Address : Input URL or IP of
AMROAD HOME STATION such as P9 or P5.
Server Port : Default is 50000 for connect with
AMROAD HOME STATION such as P9 or P5.
14
Page 18
AMROAD P3
Basic Preferences
GENERAL – User Preferences
Basic Preference
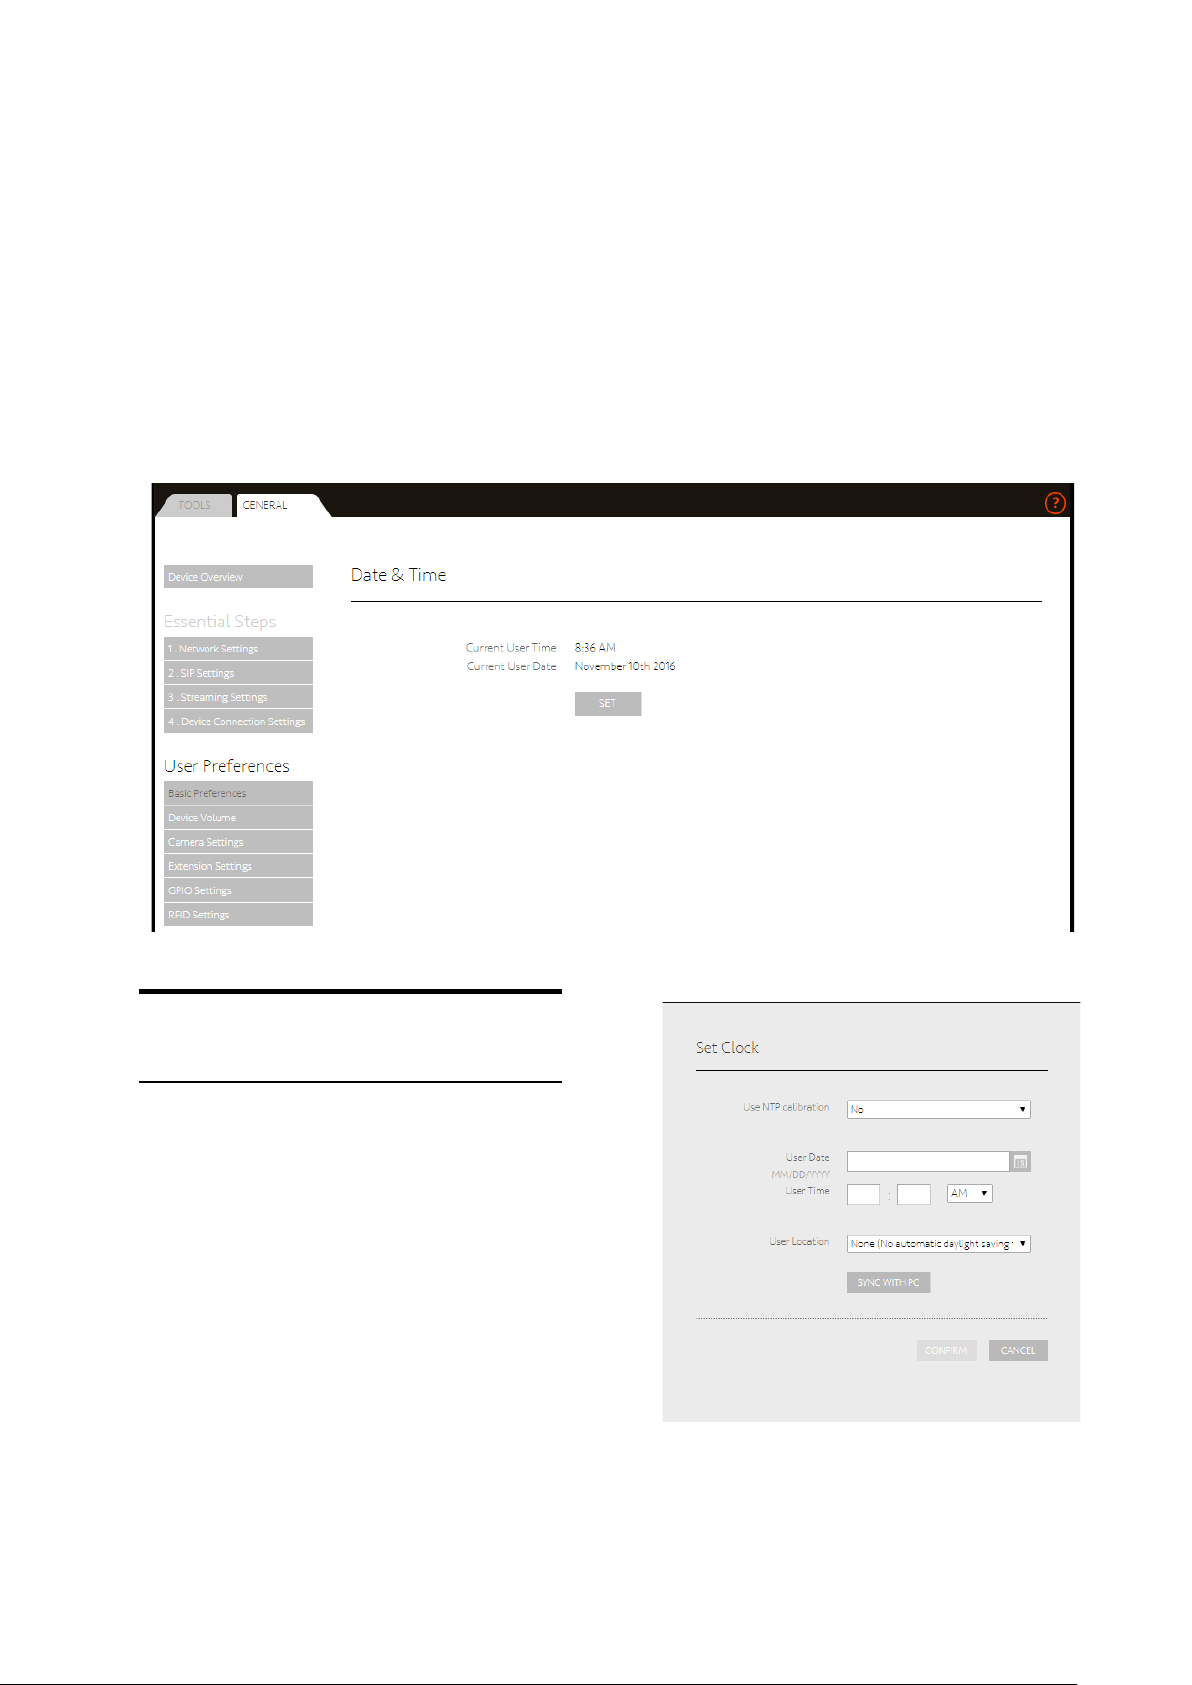
Date & Time
Current User Time
Current User Date
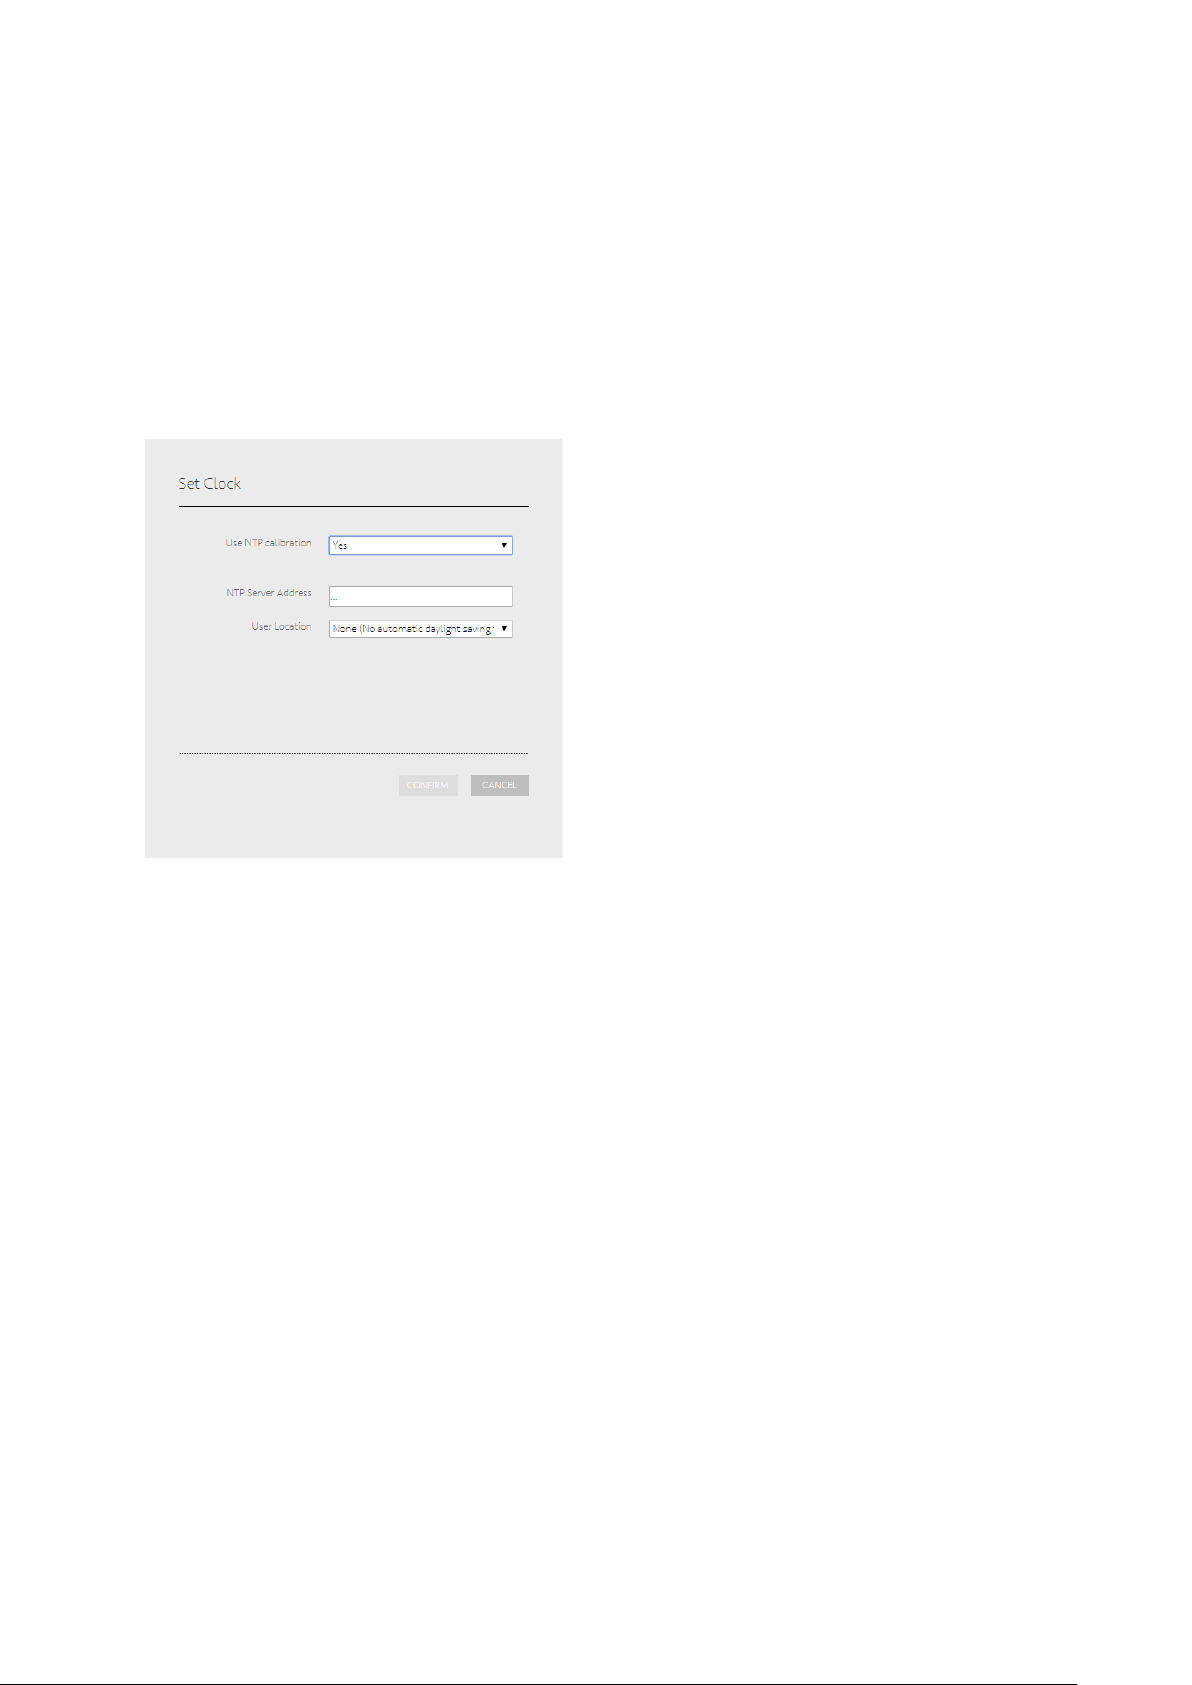
Use NTP calibration:If you choose “No”,
Click “SET”, the left picture of window will
show, and you can set time.
you should enter “User Date”, “User Time”
and “User Location”, or click “SYNC WITH
PC” to synchronize with PC.
15
Page 19
AMROAD P3
Basic Preferences
If you choose “Yes” on the Use NTP
calibration item, you also need to enter
“NTP Server Address” and “User Location”.
User Location is Time Zone.
16
Page 20
AMROAD P3
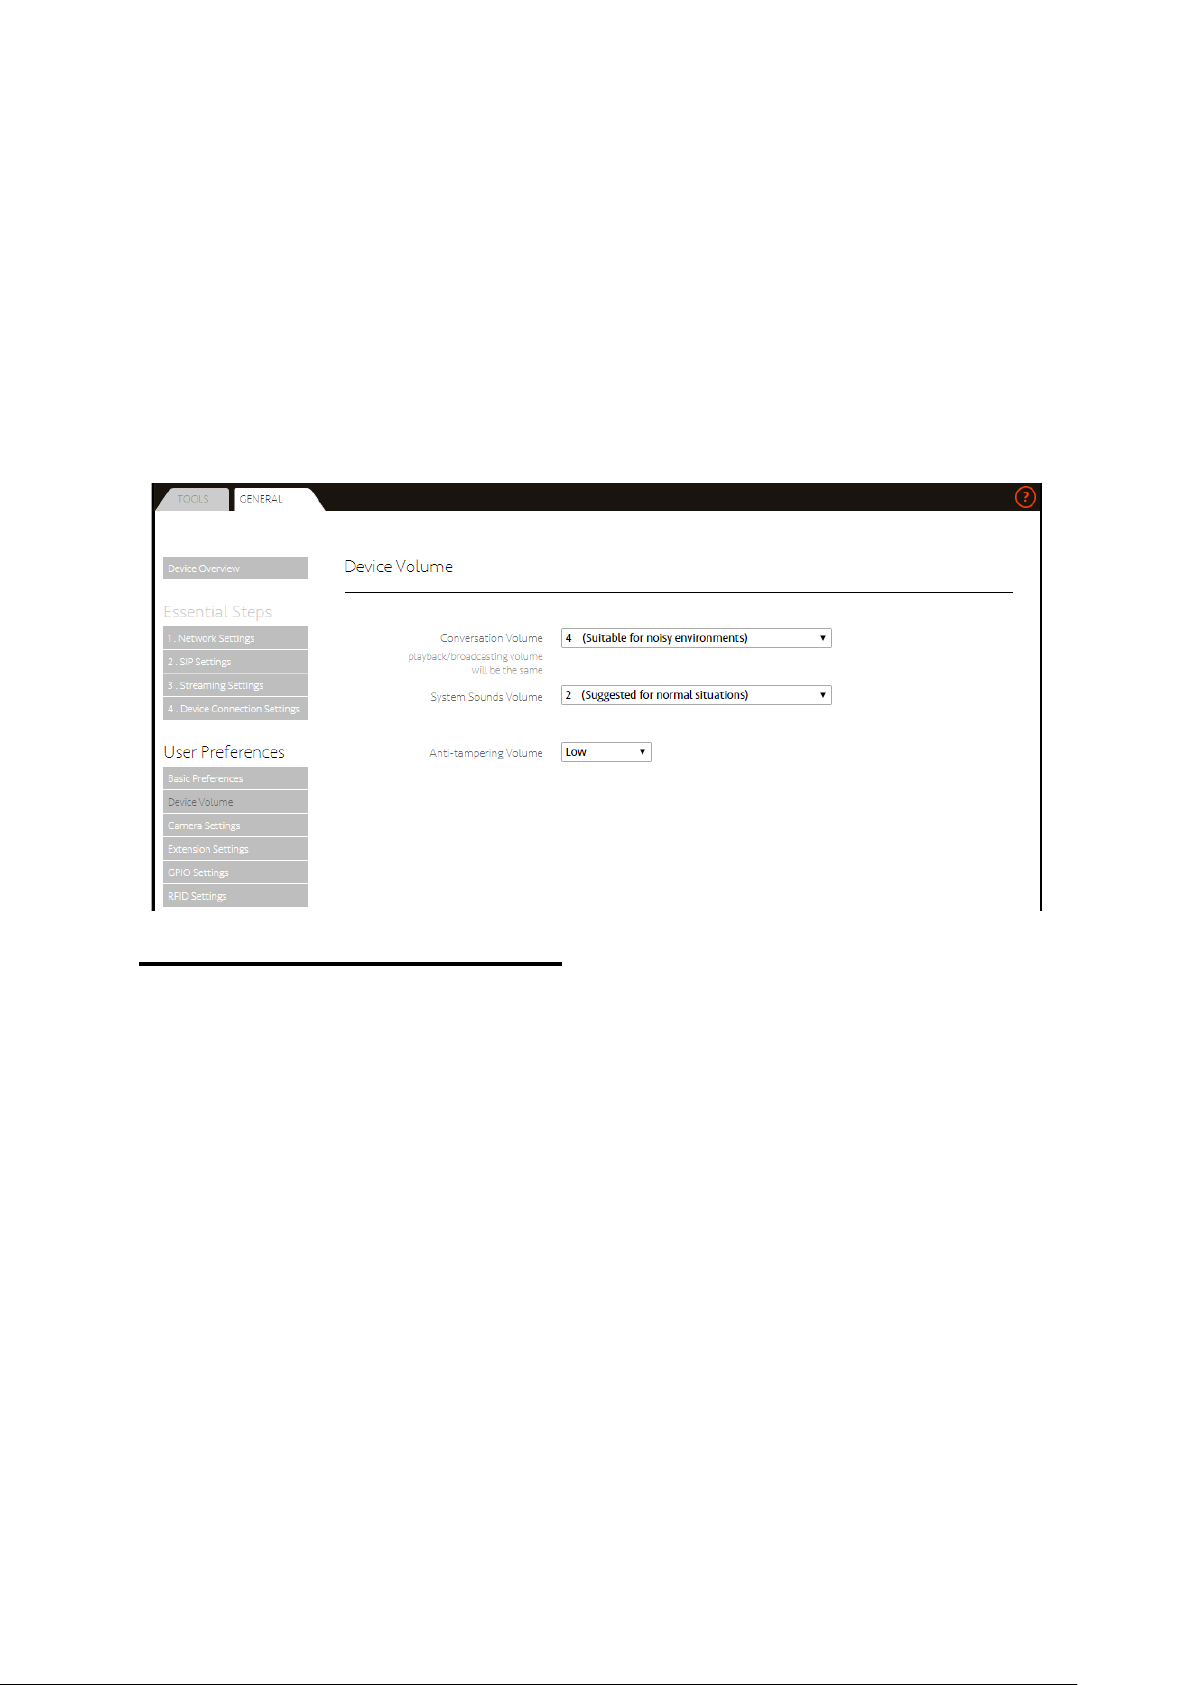
Device Volume
Device Volume
Conversation Volume:There are 4 levels. 4
is “Suitable for noisy environments”, 3 is
“High”, 2 is “Suitable for every
environments”, and 1 is “Where privacy is a
concern”.
System Sound Volume:There are 5 levels. 4
is “Very loud”, 3 is “Clear even in noisy
rooms”, 2 is “Suggested for normal
situations”, 1 is “Light sounds”, and 0 is
“No sound”.
Anti-tampering Volume:There are 2
choices, Low and High.
17
Page 21
AMROAD P3
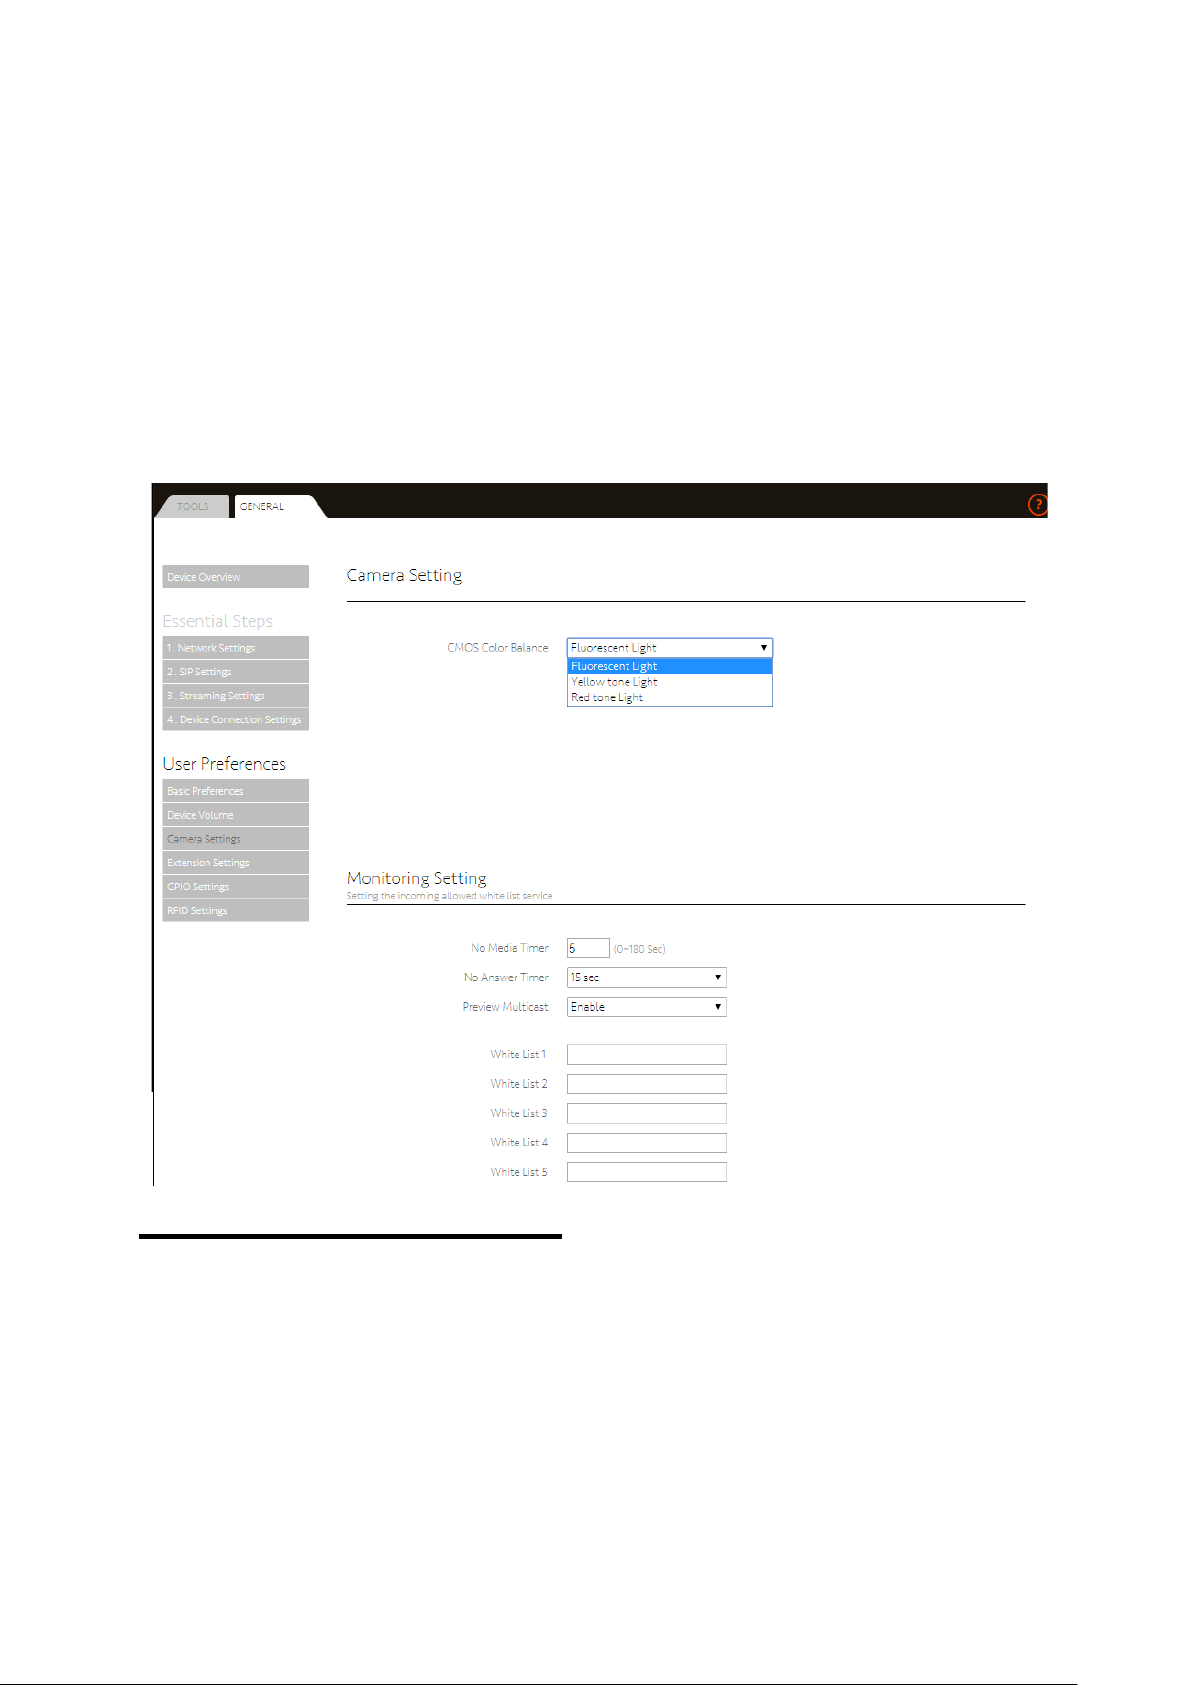
Camera Setting
Camera Setting
CMOS Color Balance:According to the
surroundings, there are 3 choices for you,
and they are Fluorescent Light, Yellow Tone
Light, and Red Tone Light.
18
Page 22

Camera Setting
Monitoring Setting
No Media Timer (0~180):While door
machine had not received any Media
Packets from a remote period of time, this
setting allows AMROAD P3 forcibly
stopped talking. Enter "0" seconds to
cancel this function.
No Answer Timer:When visitor presses the
door bell and no one answer the call, the
AMROAD P3 will ring for a time period. You
may select the time period- 15sec, 30sec,
45sec, or 60sec. Default is 15 seconds. The
setting should be based on your IP PBX.
AMROAD P3
Preview Multicast:When visitor presses
the door bell, you can preview who he is if
enable this function.
White List:White List1 to White List5 fill in
extension numbers(s) in these fields to
allow these resident’s SIP-based devices to
monitor through AMROAD P3 by dialing
AMROAD P3’s extension number. All other
SIP-based devices can call in and monitor if
all five fields leave blank.
19
Page 23
AMROAD P3
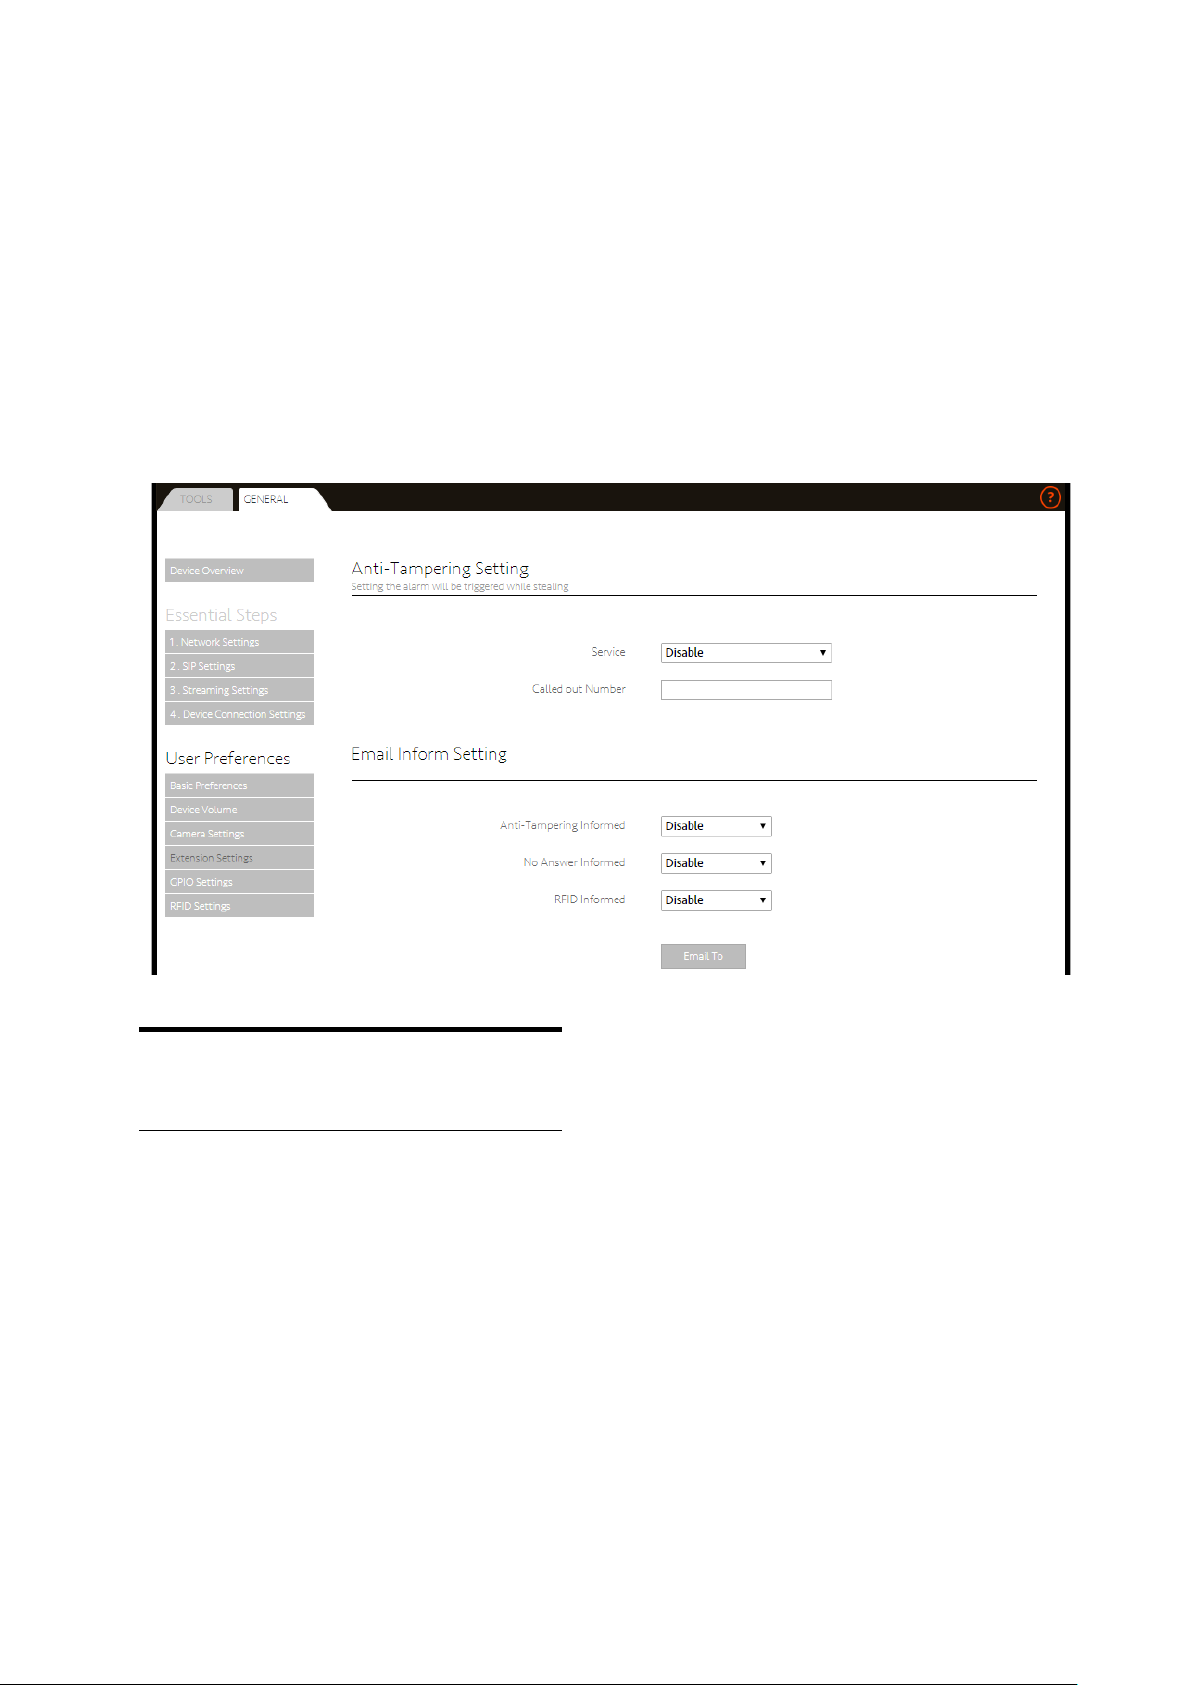
Extension Setting
Extension Setting
Alarm will be triggered while stealing.
Anti-Tampering Setting
Service : Alarm will be triggered while
stealing. This is a “Burglarproof” function.
Please disable this function when the
device is not ready or during the device is
repaired.
Called out Number:You may fill in the IP
Video phone number here. The device will
inform the IP Video Phone when the
internal alarm is triggered.
20
Page 24
AMROAD P3
Extension Setting
Email Inform Setting
AMROAD P3 will take a picture after sensor is
triggered, scanning RFID card, or nobody
answering the Door Station AMROAD P 3. You
can disable or enable the following three items
for system to send email with picture.
Anti-Tampering Informed:After internal
alarm is triggered, AMROAD P3 will take a
picture. You can enable/disable the
function for system to send email with
picture.
No Answer Informed:When this feature is
enabled, and No Answer Timer no answer
within the time, it will automatically take a
picture and send it to the specified e-mail.
RFID Informed:After someone scans RFID
card, AMROAD P3 will take a picture. You
can enable/disable the function for system
to send email with picture.
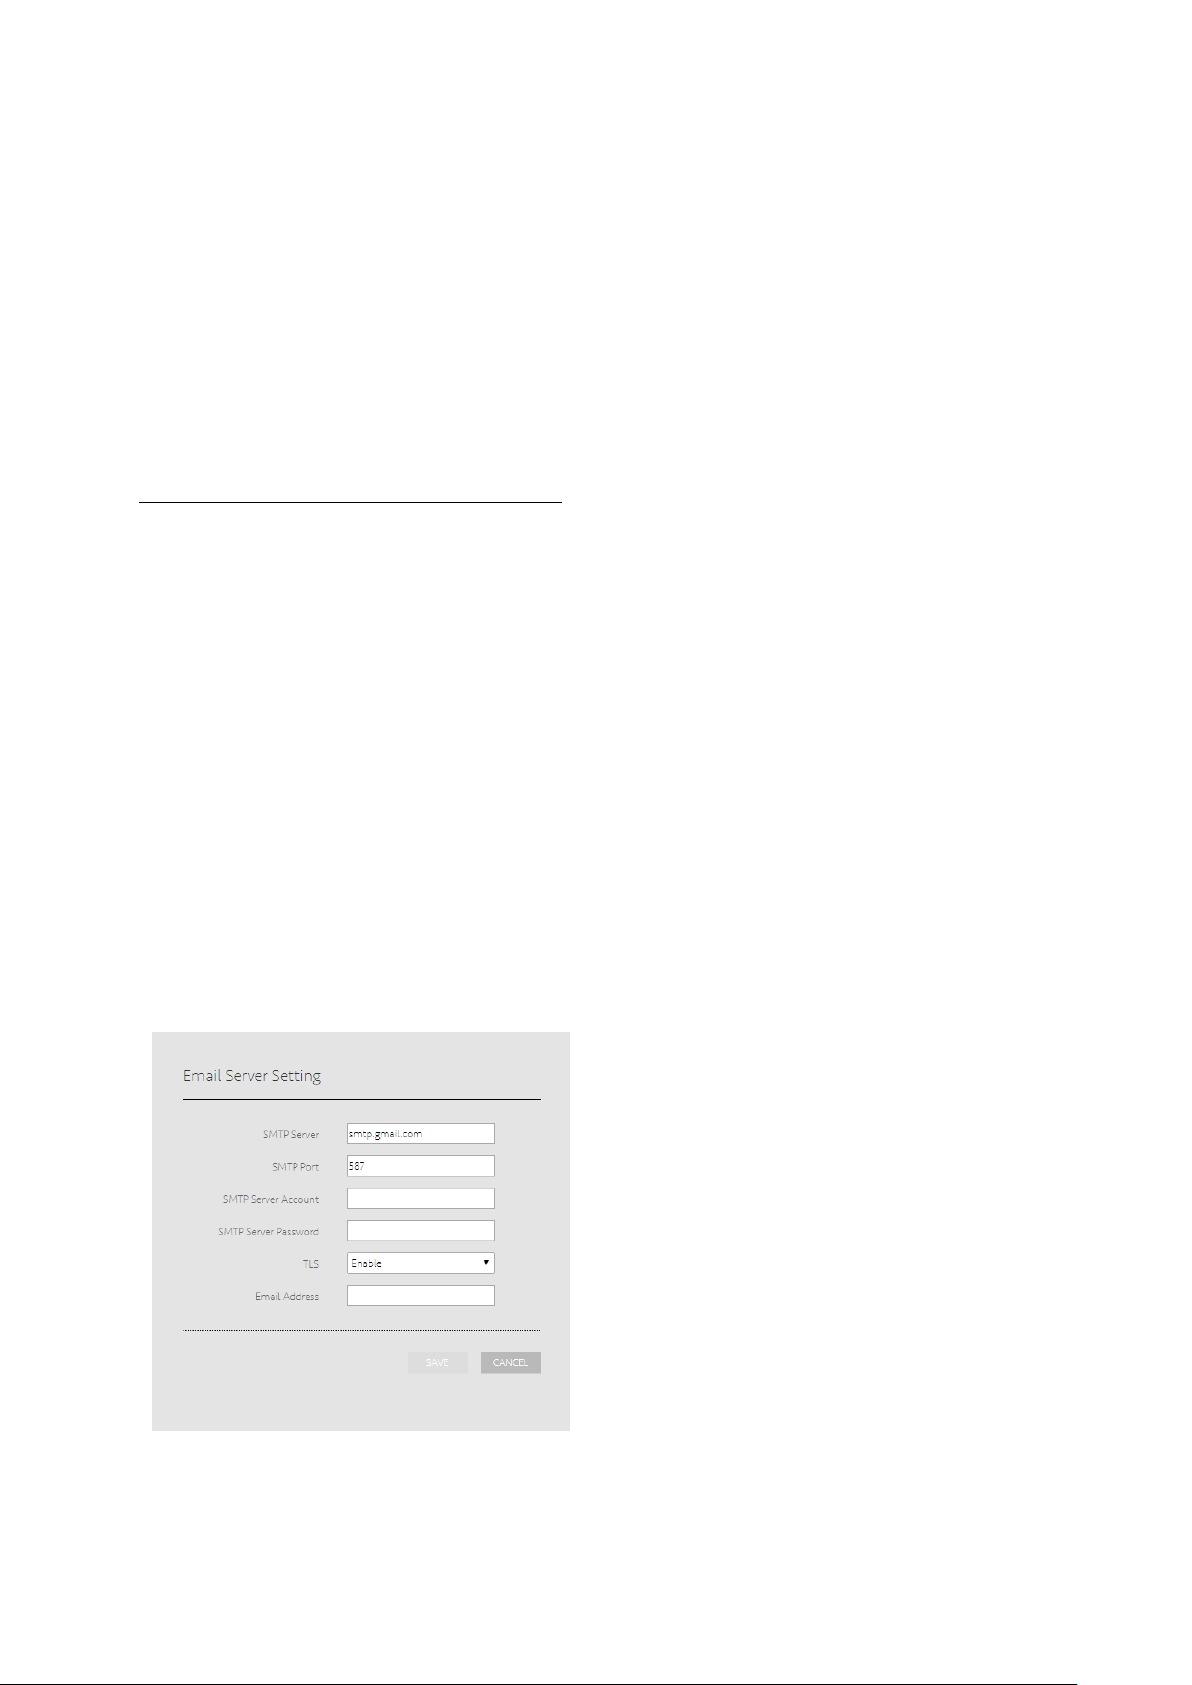
When you need to send an email, you need the
following settings:
SMTP server:Host name or IP address of
the SMTP server for notification. e.g.
smtp.gmail.com
SMTP port:To specify the port of the SMTP
server. If the field is empty, the default
value is 25. The “smtp.gmail.com” port is
587.
SMTP server Account:Input SMTP server
Account.
NOTE:Just enter the local-part of the
email address (ex, John123), and you don’t
need to enter the domain name (ex,
@gmail.com)
SMTP server Password:Input SMTP server
Password.
TLS:Set enable/disable for mail
transmission that “Confirms Client to the
Server identity” action is needed or not.
TLS (Transport Layer Security) is a network
protocol that ensures privacy between
email servers on communicating
applications.
Mail To:Input e-mail address which you
want to send to.
21
Page 25
AMROAD P3
GPIO
GPIO Settings
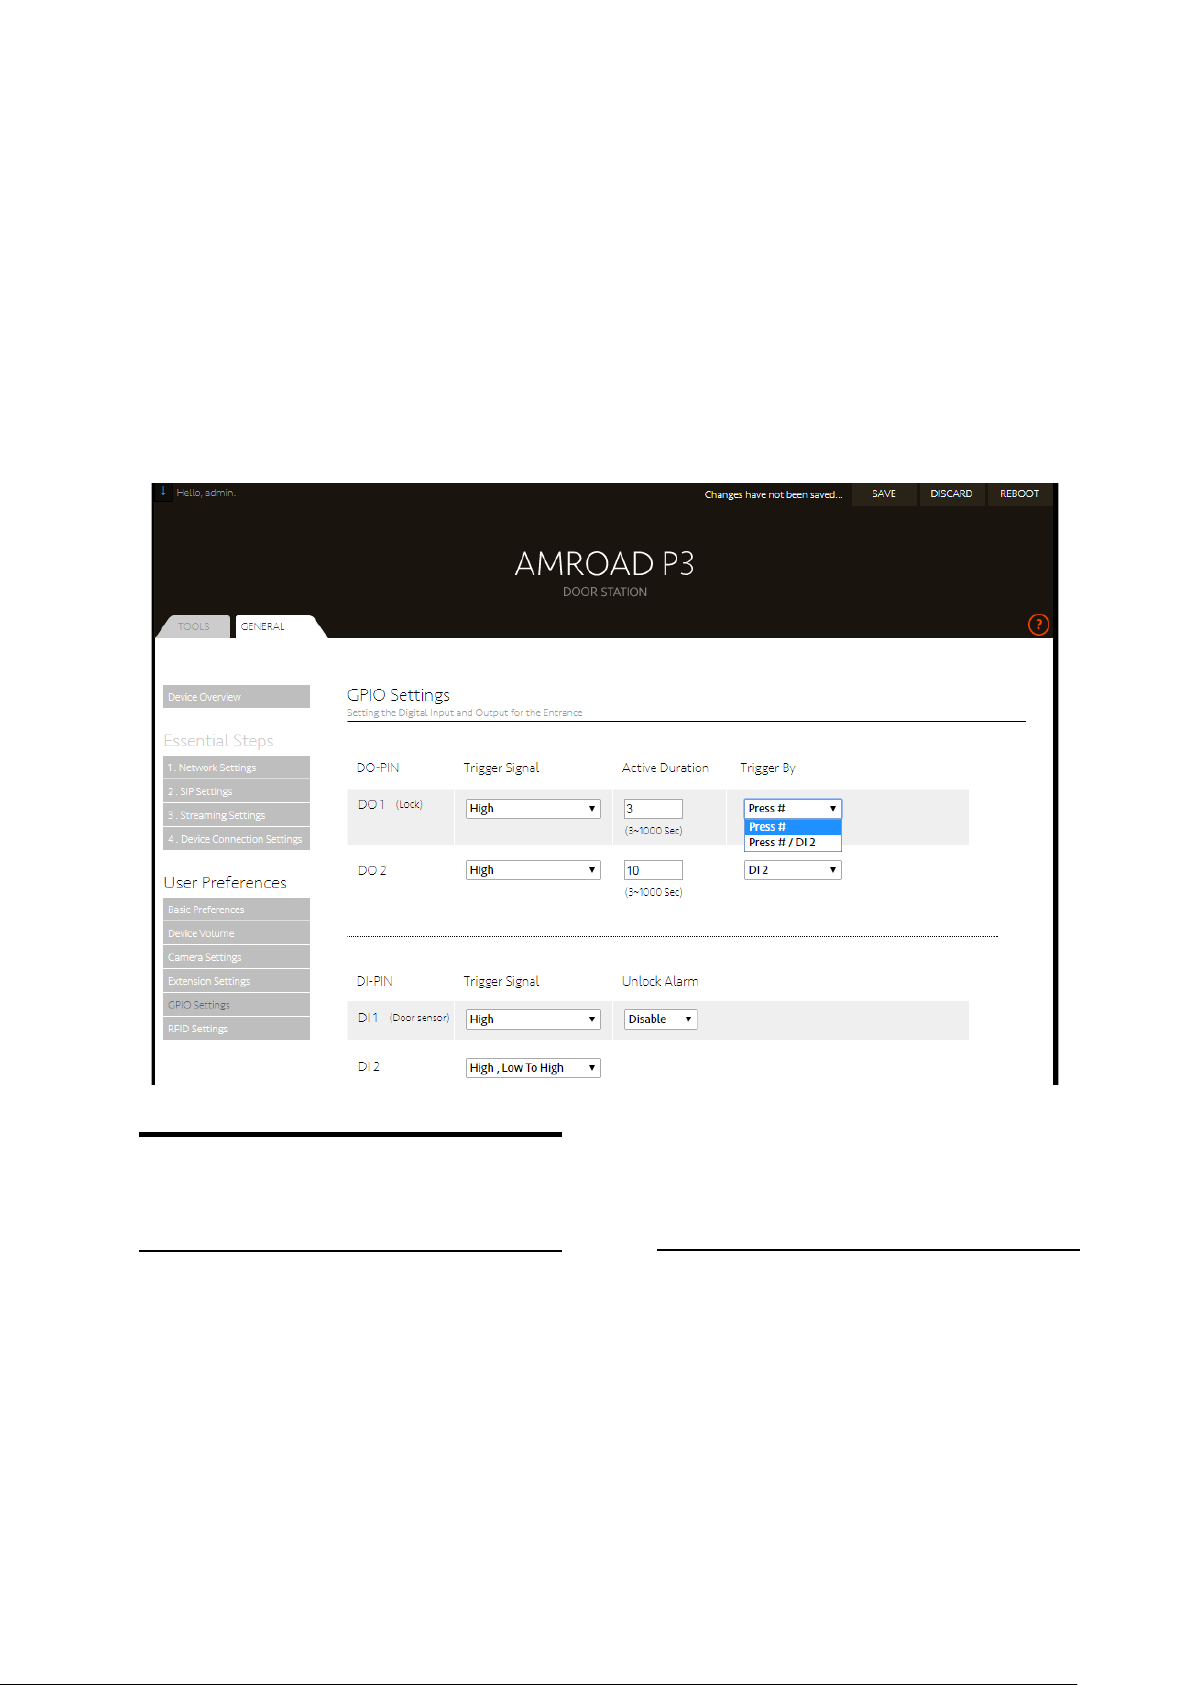
Set the Digital input and Output for the
Entrance.
DO
DO-PIN
Trigger Signal
Active Duration
Trigger By:Choose the way for triggering.
You can trigger by “Press #” or connect
with another DI device.
DI
DI-PIN
Trigger Signal
Unlock Alarm:Enable for alarm when door
is unlock.
22
Page 26
AMROAD P3
GPIO Setting
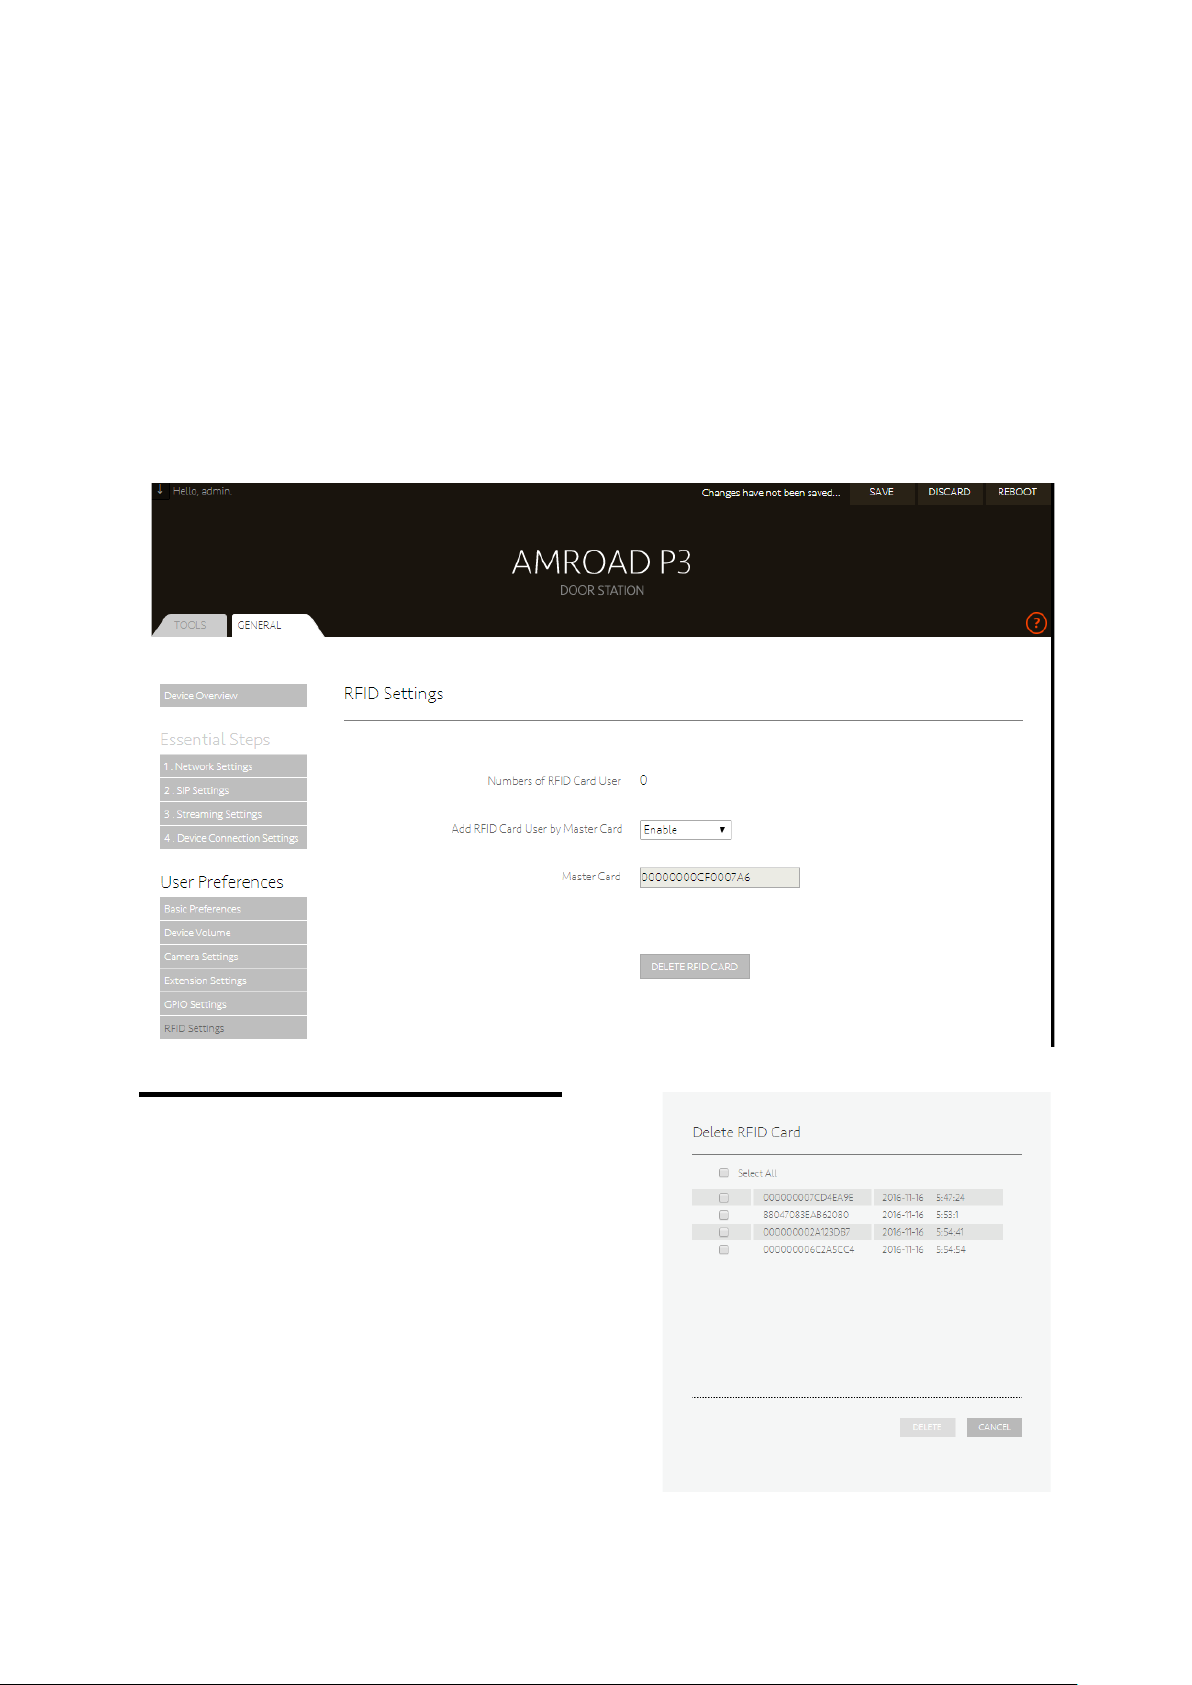
RFID Setting
Number of RFID Card User
Add RFID Card User by Master Card
Master Card
DELETE RFID CARD : Select cards you
would like to delete as shown right side.
23
Page 27

GPIO Setting
– Add new cards
AMROAD P3
Information of adding cards
The situation of adding cards would be
different in different service which is about the
“Device Connection Settings” section.
Access Control
1. Control and connect with AMROAD CCC,
AMROAD CCC authorizes cards directly.
2. Use Master Card to add new cards by
scanning AMROAD P3.
Steps:
(1) Master card will be the first one you
scanned.
(2) Scan Master card, and hear “Please
scan a new card”.
(3) Scan the card you would like to
authorize, and hear “new card has been
added”.
Security Service
Add a new card by using AMROAD P3 which is
connected with AMROAD HOME STATION such
as P9 or P5.
(1) Operate AMROAD HOME STATION
(AMROAD P9 or P5) to the page for adding
new cards. The screen will show “Please
swipe the card on the Door Station”.
(2) Please swipe the card on AMROAD P3.
(3) Select “Save” on AMROAD HO ME STATION
(AMROAD P9 or P5).
(4) You must scan Master Card before add
a new card.
24
Page 28
IO Application
Electric Bolt
AMROAD P3
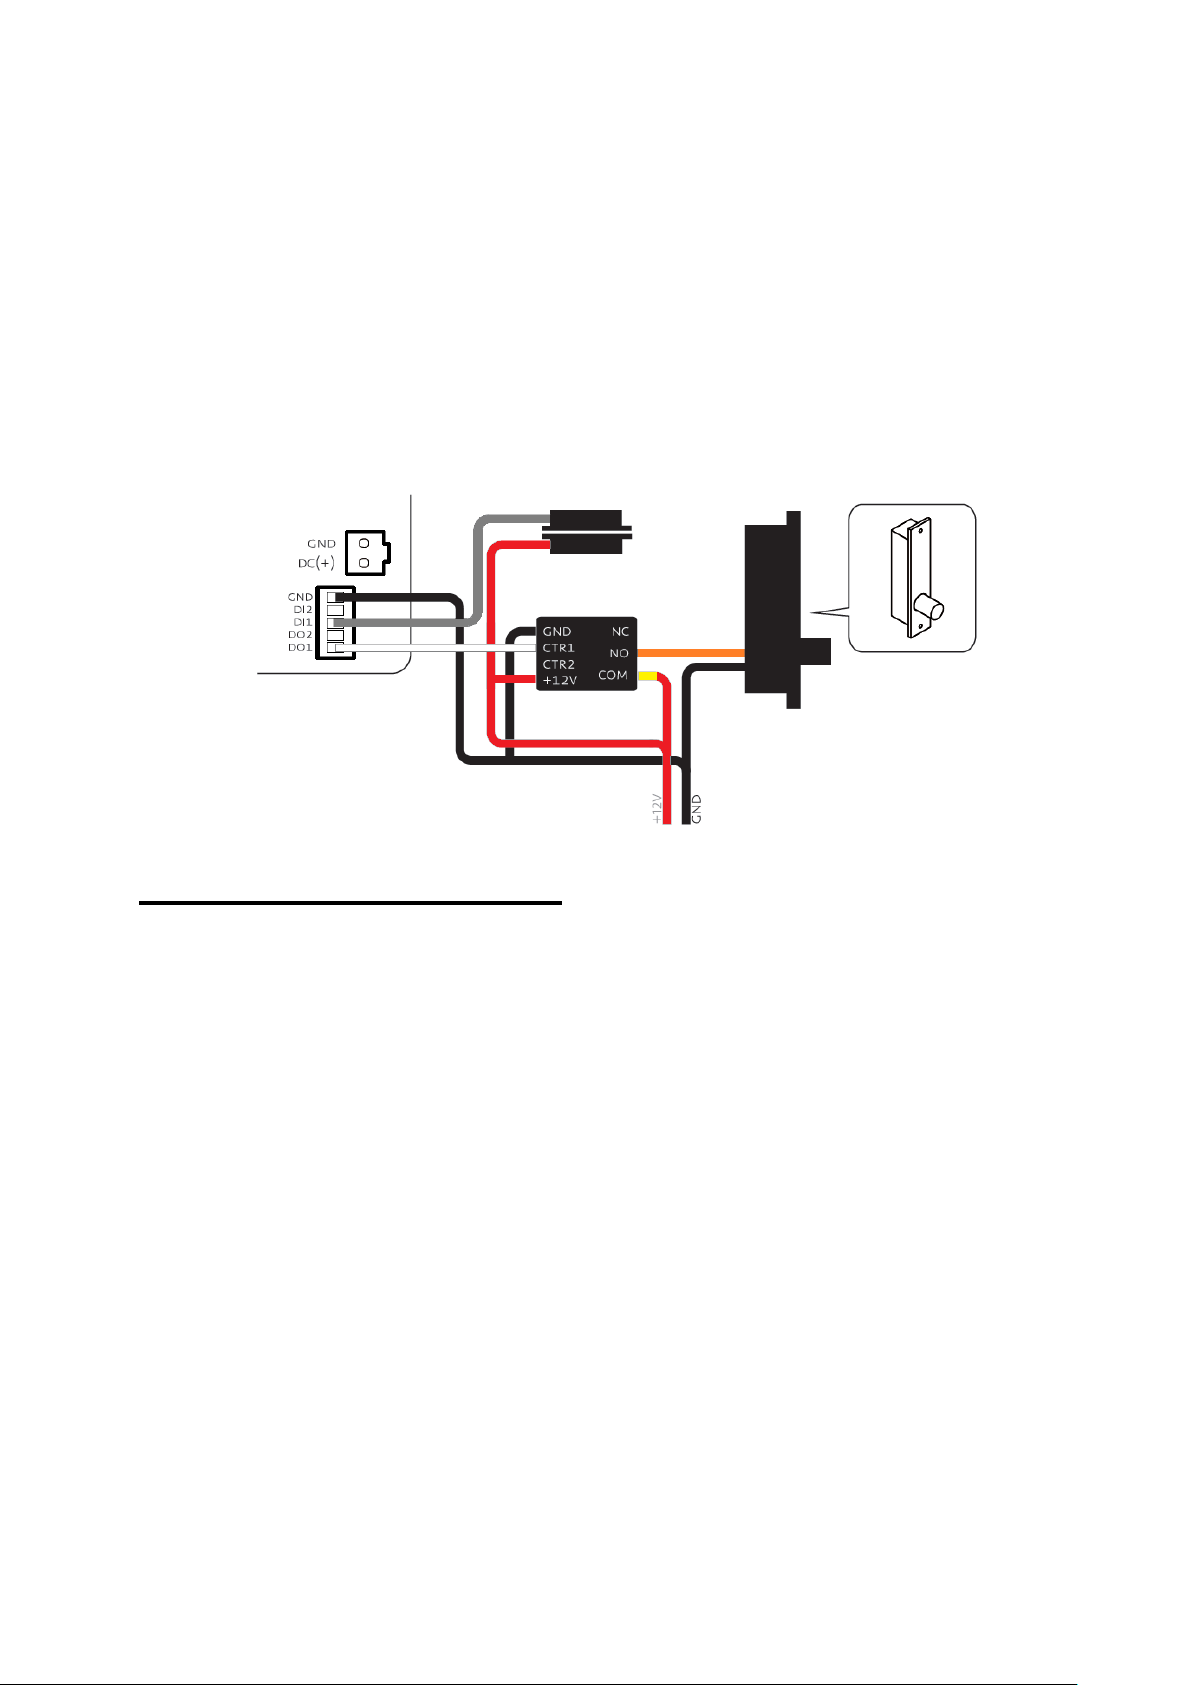
Electric Bolt
The Electric Bolt is closed when +12 V is
supplied.
The Electric Bolt is opened when +12V is
not supplied.
DI1:DI1 is used to detect whether the
door is closed well or not.
25
Page 29
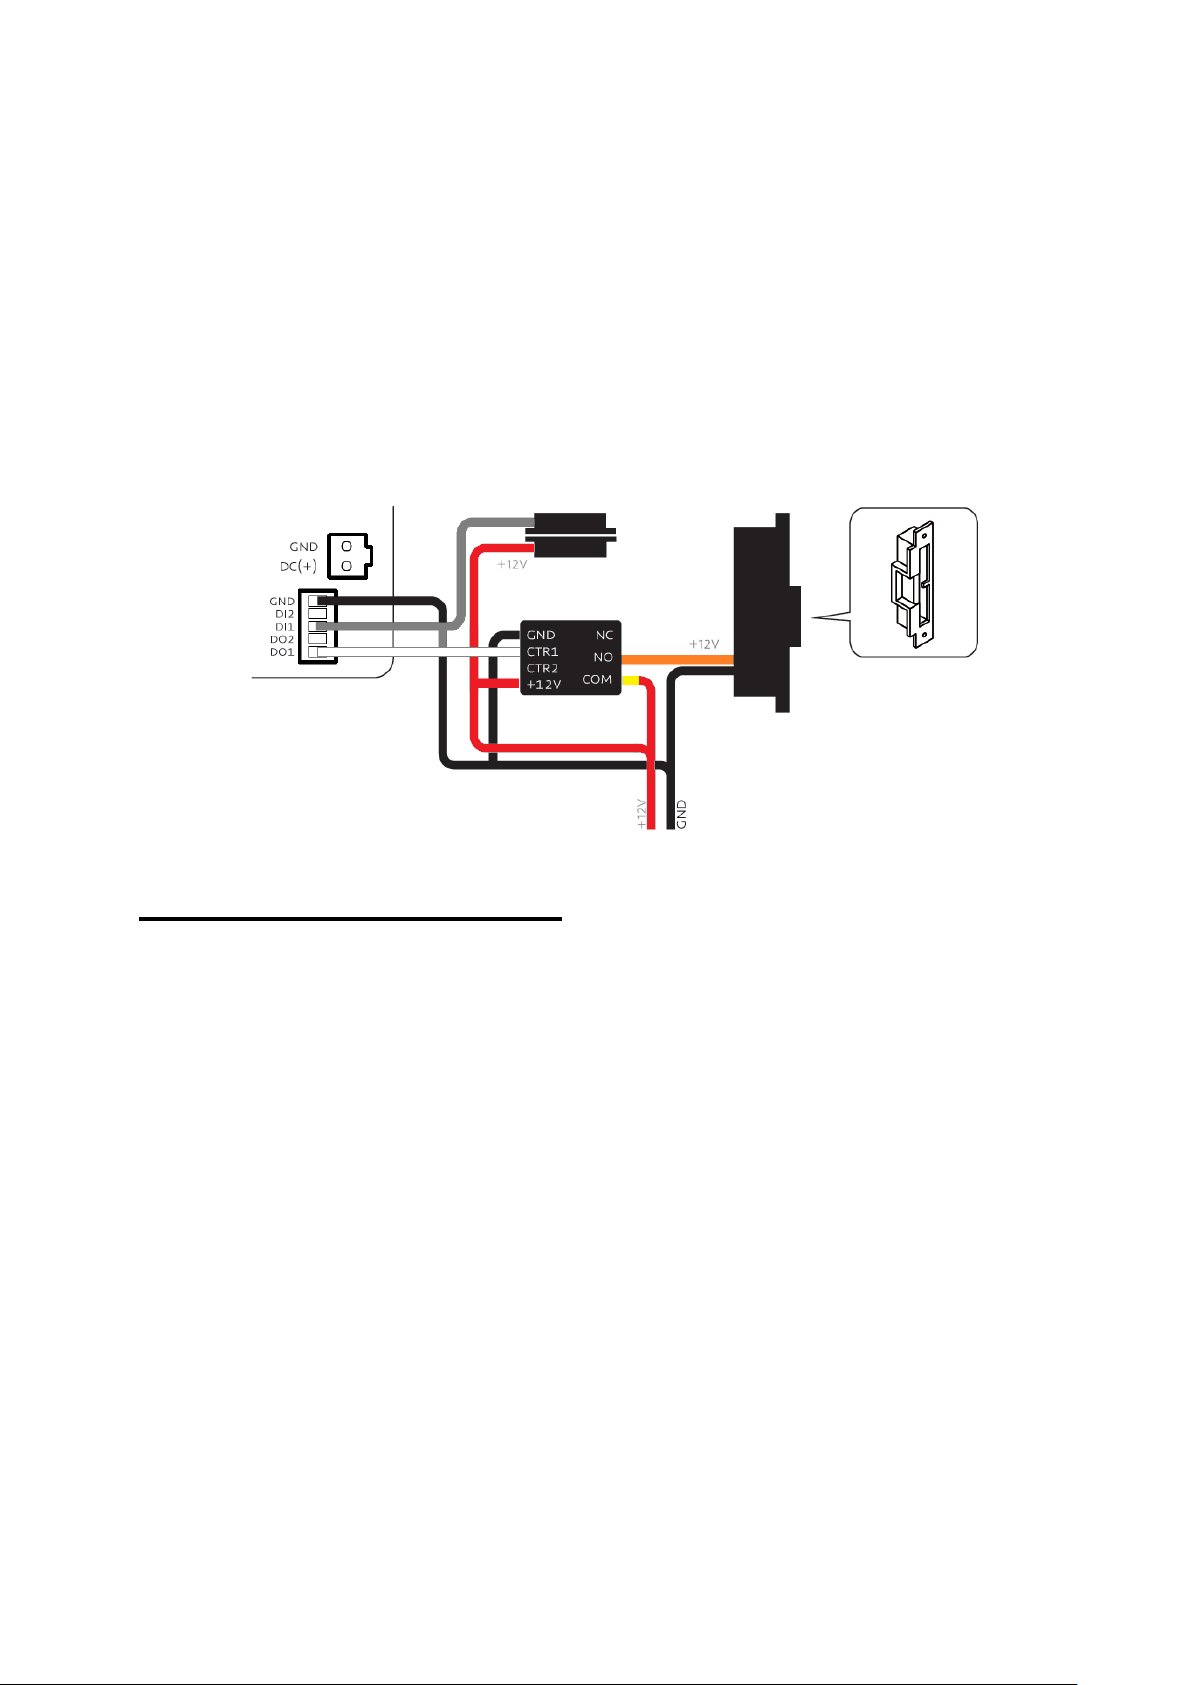
Electric
AMROAD P3
Strike
Electric Strike
The Electric Strike is opened when +12 V is
supplied.
The Electric Strike is closed when +12V is
not supplied.
DI1: DI1 is used to detect whether the
magnetic reed is revert or not.
26
Page 30
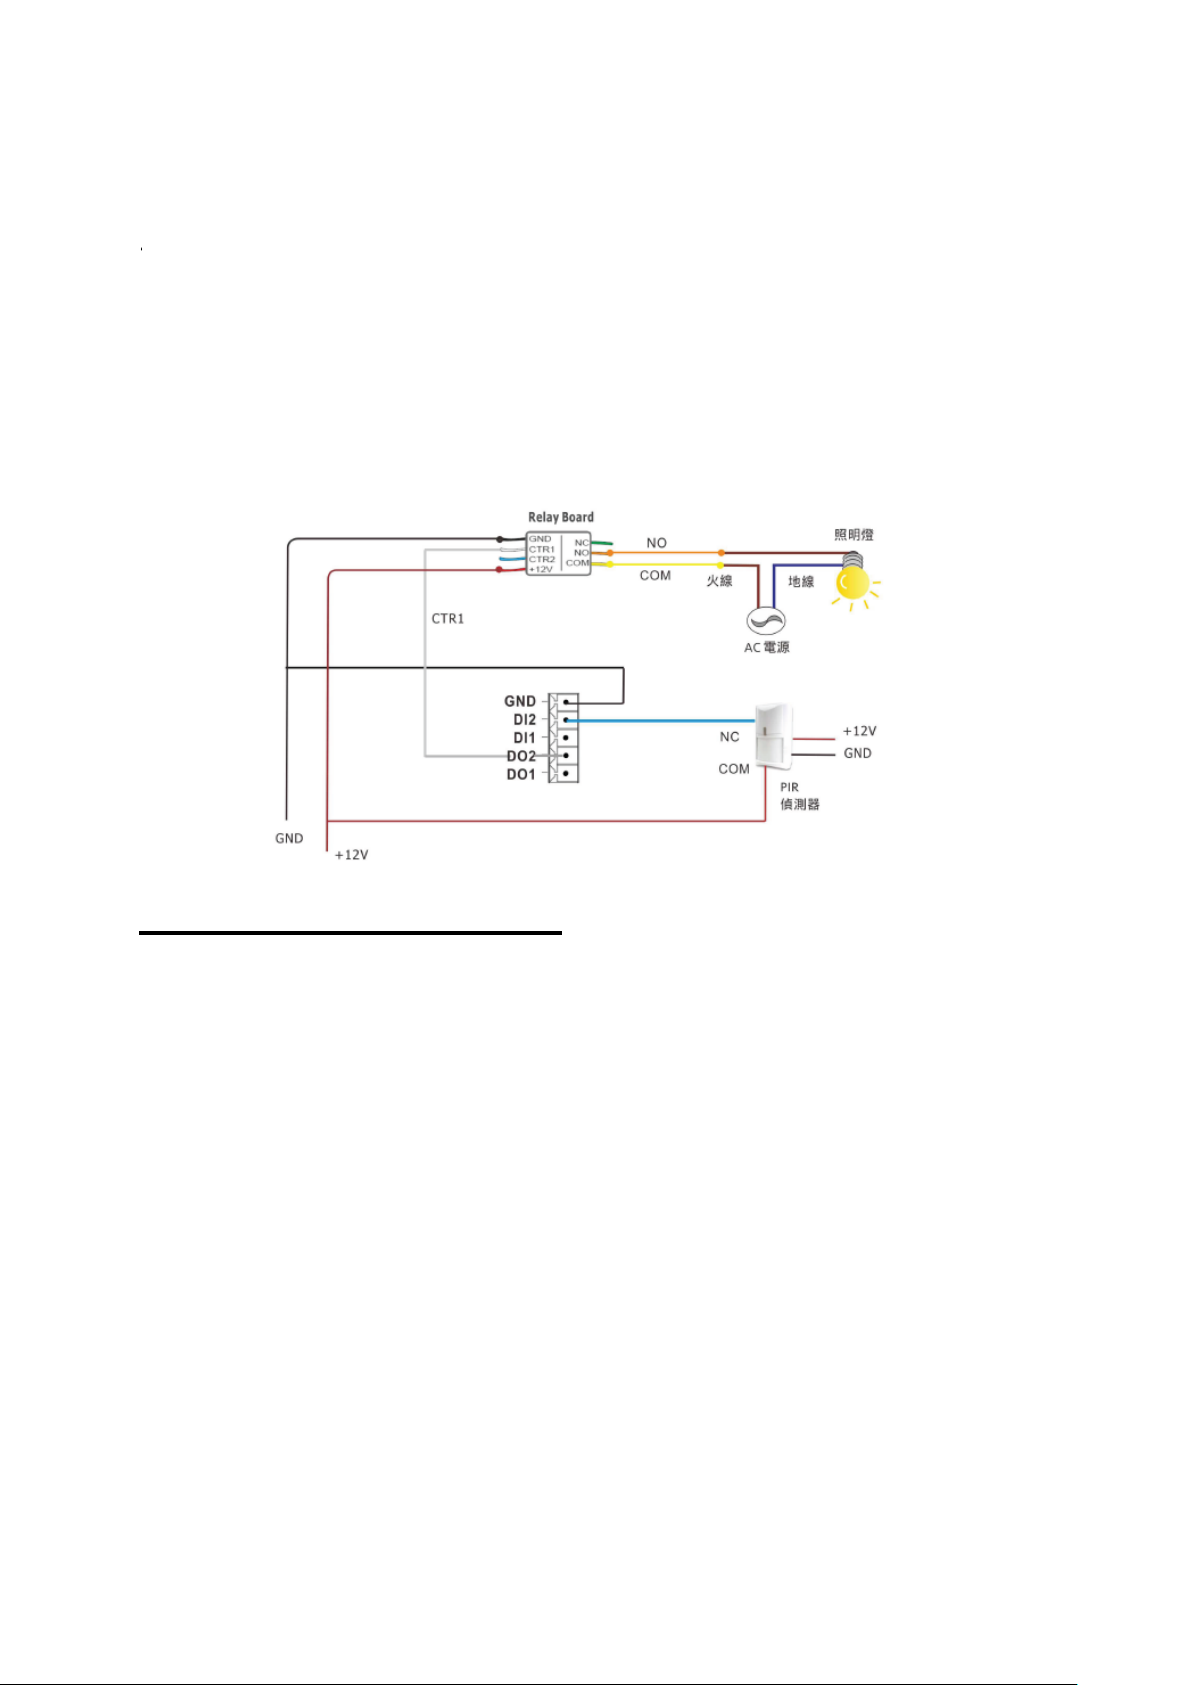
AMROAD P3
PIR Motion Sensor and Light
PIR Motion Sensor and Light
PIR Motion Sensor and Light
AMROAD P3 can also connect PIR (Passive
Infrared) motion sensor and Light. PIR motion
sensor detect whether person (or living things)
moves within the sensor range. Once PIR
motion sensor detects person (or living things)
moves, it will trigger the Light to be turn on for
30 seconds.
DO2 Service
If DI2 is triggered, DO2 will light up for 30
seconds automatically. DI2 is used to connect
to PIR (Movement Detector, Intruder Detector).
27
Page 31

Technical Detail
AMROAD P3
PRODUCT NO
DB3100R-FM-BA
(All Black Cover Panel)
DB3100R-FM-WH
(Pure White Cover
Panel)
DB3101R-FM-BA
(All Black Cover Panel)
DB3101R-FM-WH
(Pure White Cover
Panel)
LANGUAGES
Device’s vocal
messages language:
English, Traditional
Chinese
Web Server language:
English
SIP VERSION
SIP 2.0 – RFC3261
RFID READER
MIFARE ISO/IEC 14443
∙ Type A
(valid for all Amroad’s
devices)
PORTS
1 × RJ45 port
1 × 12V DC power input
2 × Digital Input (DI)
2 × Digital Output
(DO)
(enabled by Amroad
upon request)
POWER SUPPLY
12V DC – 1A Input
or PoE (Power Over
Ethernet)
CAMERA
Color camera
F2.0 glass lens / 105°
viewing angle
AUDIO CODEC
G.711 a/u Audio Codec
VIDEO CODEC
H.264 Video Codec
H.263 Video Codec
CERTIFICATION
CE / FCC / RoHS / NCC
/ IP55
WARRANTY
2-year warranty
Read complete policy
here
DEVICE
DIMENSIONS
W 110 × H 200 × D 52
mm
(protruding 7 mm
when mounted)
PACKAGE
CONTENTS
1 × Unit
1 × Cover panel
1 × Relay board
Screws, terminal
blocks, tools.
28
Page 32

TEL
886-2-8226-5686
FAX
886-2-8226-5687
AMROAD P3
AMROAD TECHNOLOGY INC.
17F.-1, No.16, Jian 8th Rd., Zhonghe Dist.,
New Taipei City 235, Taiwan (R.O.C.)
WWW.AMROAD.COM.TW
 Loading...