

Page 1

IR-500
Infrared Thermometer /
Voltage Detector /
Flashlight
Users Manual
• Mode d’emploi
• Bedienungshandbuch
• Manual d’Uso
• Manual de uso
Page 2

Page 3

IR-500
Infrared Thermometer /
Voltage Detector /
Flashlight
Users Manual
June 2011, Rev.1
©2011 Amprobe Test Tools.
All rights reserved. Printed in Taiwan
English
Page 4

Limited Warranty and Limitation of Liability
Your Amprobe product will be free from defects in material and
workmanship for 1 year from the date of purchase, unless local laws
require otherwise. This warranty does not cover fuses, disposable
batteries or damage from accident, neglect, misuse, alteration,
contamination, or abnormal conditions of operation or handling.
Resellers are not authorized to extend any other warranty on
Amprobe’s behalf. To obtain service during the warranty period,
return the product with proof of purchase to an authorized
Amprobe Test Tools Service Center or to an Amprobe dealer or
distributor. See Repair Section for details. THIS WARRANTY IS YOUR
ONLY REMEDY. ALL OTHER WARRANTIES - WHETHER EXPRESS,
IMPLIED OR STAUTORY - INCLUDING IMPLIED WARRANTIES OF
FITNESS FOR A PARTICULAR PURPOSE OR MERCHANTABILITY, ARE
HEREBY DISCLAIMED. MANUFACTURER SHALL NOT BE LIABLE
FOR ANY SPECIAL, INDIRECT, INCIDENTAL OR CONSEQUENTIAL
DAMAGES OR LOSSES, ARISING FROM ANY CAUSE OR THEORY.
Since some states or countries do not allow the exclusion or
limitation of an implied warranty or of incidental or consequential
damages, this limitation of liability may not apply to you.
Repair
All test tools returned for warranty or non-warranty repair or
for calibration should be accompanied by the following: your
name, company’s name, address, telephone number, and proof of
purchase. Additionally, please include a brief description of the
problem or the service requested and include the test leads with
the meter. Non-warranty repair or replacement charges should be
remitted in the form of a check, a money order, credit card with
expiration date, or a purchase order made payable to Amprobe®
Test Tools.
In-Warranty Repairs and Replacement – All Countries
Please read the warranty statement and check your battery before
requesting repair. During the warranty period any defective test
tool can be returned to your Amprobe® Test Tools distributor for
an exchange for the same or like product. Please check the “Where
to Buy” section on www.amprobe.com for a list of distributors near
you. Additionally, in the United States and Canada In-Warranty
repair and replacement units can also be sent to a Amprobe® Test
Tools Service Center (see address next page).
Page 5

Non-Warranty Repairs and Replacement – US and Canada
Non-warranty repairs in the United States and Canada should be
sent to a Amprobe® Test Tools Service Center. Call Amprobe® Test
Tools or inquire at your point of purchase for current repair and
replacement rates.
In USA In Canada
Amprobe Test Tools Amprobe Test Tools
Everett, WA 98203 Mississauga, ON L4Z 1X9
Tel: 877-AMPROBE (267-7623) Tel: 905-890-7600
Non-Warranty Repairs and Replacement – Europe
European non-warranty units can be replaced by your Amprobe®
Test Tools distributor for a nominalv charge. Please check the
“Where to Buy” section on www.amprobe.com for a list of
distributors near you.
European Correspondence Address*
Amprobe® Test Tools Europe
Beha-Amprobe GmbH
In den Engematten 14
79286 Glottertal, Germany
Tel.: +49 (0) 7684 8009 - 0
www.amprobe.eu
*(Correspondence only – no repair or replacement available from
this address. European customers please contact your distributor.)
Page 6
IR-500 Infrared Thermometer /
Voltage Detector / Flashlight
21
3
4
5
6
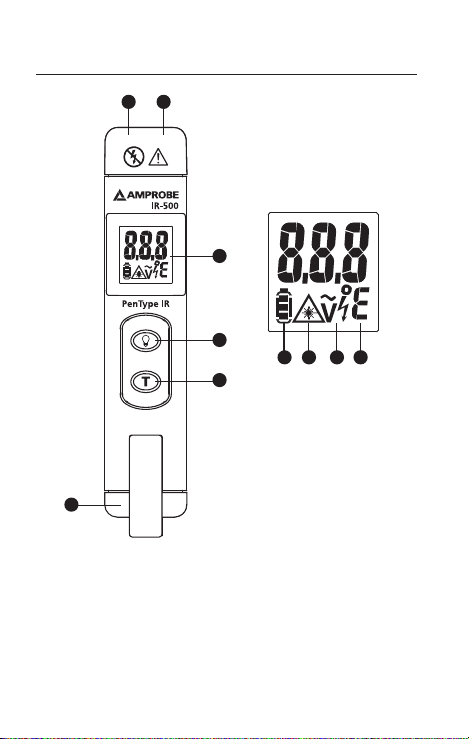
1) Laser
2) Flash light
3) Display
4) Flash light button
5) On button / Test button
7 8 9
10
6) Battery cover
7) Battery indicator
8) Laser indicator
9) NCV indicator
O
10)
C / OF
Page 7

CONTENTS
SYMBOLS ............................................................................1
UNPACKING AND INSPECTION ..........................................2
INTRODUCTION .................................................................. 2
OPERATING INSTRUCTIONS ............................................... 3
Power On / Off ...............................................................3
Auto Power Off .............................................................. 3
Auto Hold ....................................................................... 3
Operating the unit ......................................................... 3
Making Temperature Measurement .............................4
°C / °F Selection ..............................................................5
Distance & Spot Size ......................................................5
Reminders ....................................................................... 6
Emissivity ........................................................................7
Non-Contact Voltage ..................................................... 8
SPECIFICATION .................................................................... 9
TROUBLE SHOOTING .......................................................... 10
MAINTENANCE AND REPAIR ............................................. 10
BATTERY REPLACEMENT .................................................... 11
Page 8

SYMBOLS
Caution! Refer to the explanation in this Manual
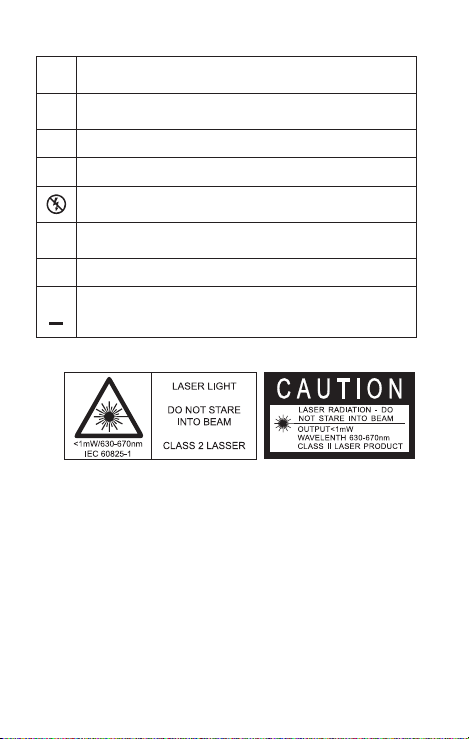
Laser light. Do not stare into laser beam
Caution ! Non-contact voltage
Battery
Do not apply directly or around bare hazardous
live conductor.
Conform to relevant Australian standards
Complies with European Directives
Do not dispose of this product as unsorted
municipal waste. Contact a qualified recycler
Safety Information
Warning
• Do not stare into laser beam.
• Do not point laser directly at eye or indirectly off
reective surfaces.
• For use by competent persons only.
• Do not leave the unit on or near objects of high
temperature.
• Non-Contact Voltage function can only test on
insulated wires. Testing on high voltage wires
should keep a distance of 20mm minimum.
• Do not use the unit to sense wire voltage higher
than 600V.
1
Page 9

Cautions
Use this unit only as specied in this manual or the
protection provided by the unit may be impaired.
The unit should be protected from the following,
• EMF (electro-magnetic elds) from arc welders,
induction heaters
• Static electricity
• Thermal shock (caused by large or abrupt ambient
temperature changes - allow 30 minutes for unit to
stabilize before use)
UNPACKING AND INSPECTION
Your shipping carton should include:
1 IR-500
1 1.5V AAA alkaline battery (installed)
1 Manual
If any of the items are damaged or missing, return
the complete package to the place of purchase for an
exchange.
INTRODUCTION
A must-have tool for everyday applications, verify
temperature, voltage presence and use it as flash light
in dark places. Compact and easy to use - just aim, press
the button, and read surface temperatures in less than a
second. You can safely measure surface temperatures of
hot, hazardous, or hard-to-reach objects without contact.
Features
• IR temperature measurement with laser pointer
• Integrated non-contact AC voltage warning
2
Page 10
• Holds temperature reading for 10 seconds
press
• Ultra white LED ashlight
• Selectable
o
F / oC
• Pocket clip
OPERATING INSTRUCTIONS
Power On / Off
Auto Power Off
3 minutes.
Auto Hold
The unit will hold the reading for 10 sec after On button
is released.
Operating the Unit
To measure a temperature, point unit at object and press
the Test Button. Be sure to consider distance-to-spot size
ratio and field of view. The unit is equipped with a laser,
use the laser only for aiming. See “Making Temperature
Measurement”.
3
Page 11
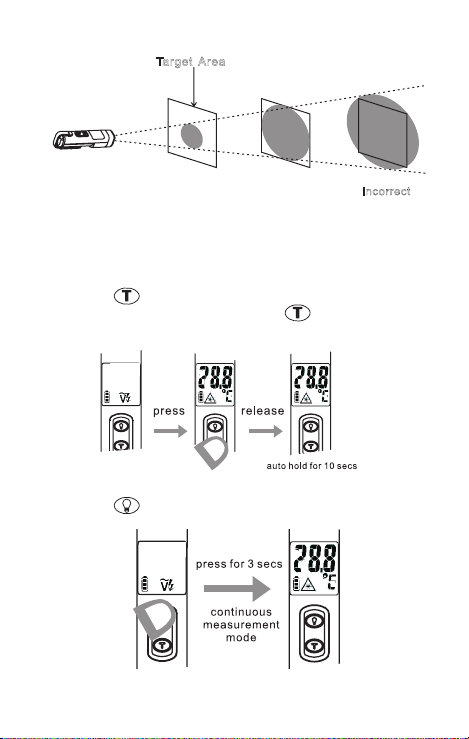
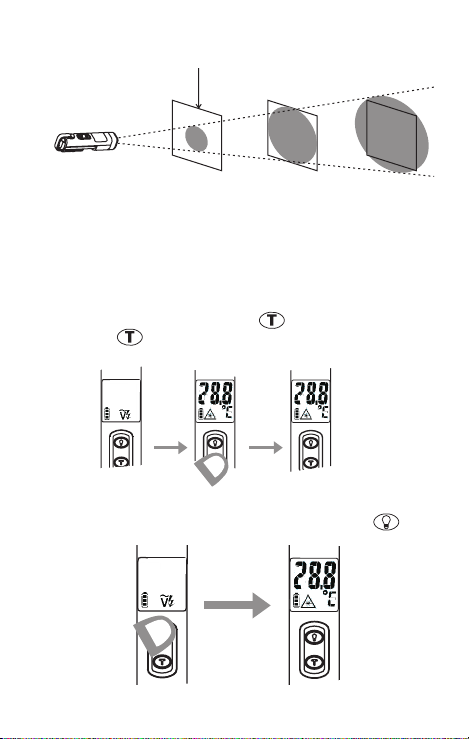
Making Temperature Measurement
Incorrect
Ta rget Area
Make sure that the target is larger than the unit‘s spot
size. The smaller the target, the closer you should be
to it. The minimum measurement area is 3.75cm (1.5in)
diameter.
Press the key, the unit will show the temperature
of target surface. Then release the key, the LCD will
hold the reading for 10 seconds.
Press the key for 3 seconds, the unit will turn into
the IR temperature continuous measurement mode.
4
Page 12
°C / °F Selection
Press Test button and Flash light button for 2 sec at the
same time for switching temperature unit °C/°F .
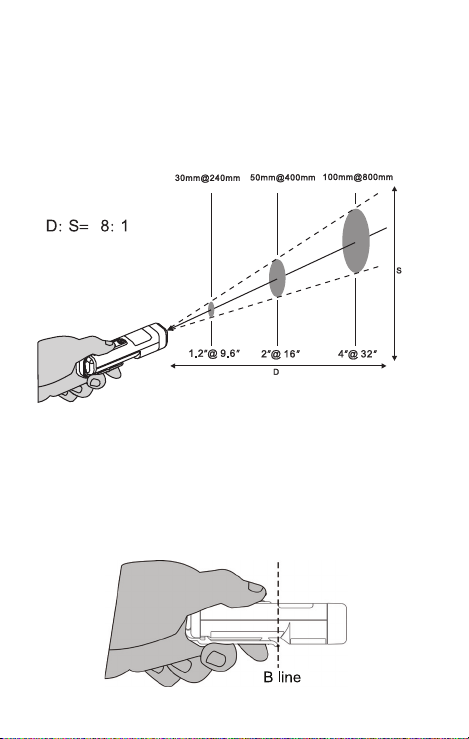
Distance & Spot Size
As the distance (D) from the object increases, the spot
size (S) of the area measured by the unit becomes larger.
Use the unit at around 30cm to get the best measurement
accuracy.
At longer distances, the target area shall be larger than
the distance divided by 8.
Please do not put the fingers on the housing for long
period of time and cross the “B line” to prevent from
thermo effect interference of measuring accuracy.
5
Page 13

Reminders
1. Changes of surrounding ambient temperature
can result in inaccurate reading, allow time for
the unit to adopt the change of ambient before
use. Specified accuracy applies after 30 minutes
when the unit changes to a different environment
ambient.
Allow time for the unit to adopt the change of
ambient from the user’s pocket to enviroment
ambient.
6
Page 14
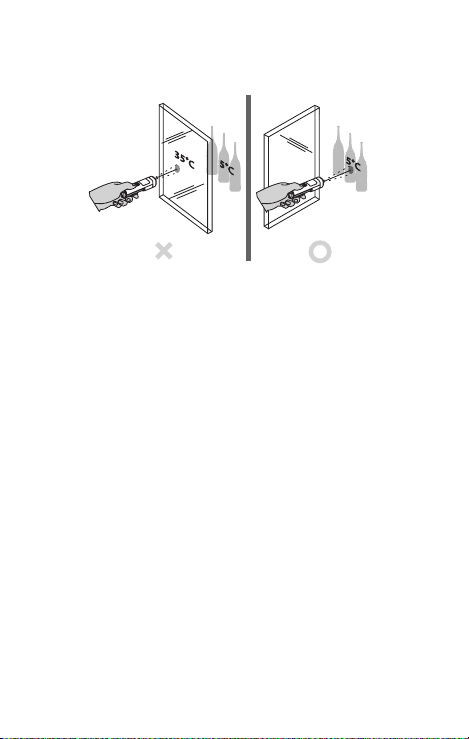
2. The unit cannot measure through transparent
surfaces such as glass. Remove the barrier between
the unit and the target surface.
3. Not recommended for use in measuring shiny or
polished metal surfaces (stainless steel, aluminum,
etc.). See Emissivity.
4. Steam, dust, smoke, etc., can prevent accurate
measurement by obstructing the unit‘s optics
Emissivity
Most organic materials and painted or oxidized surfaces
have an emissivity of 0.95 (pre-set in the unit). Inaccurate
readings will result from measuring shiny or polished
metal surfaces. To compensate, cover the surface to be
measured with masking tape or flat black paint. Allow
time for the tape to reach the same temperature as the
material underneath it. Measure the temperature of the
tape or painted surface.
7
Page 15
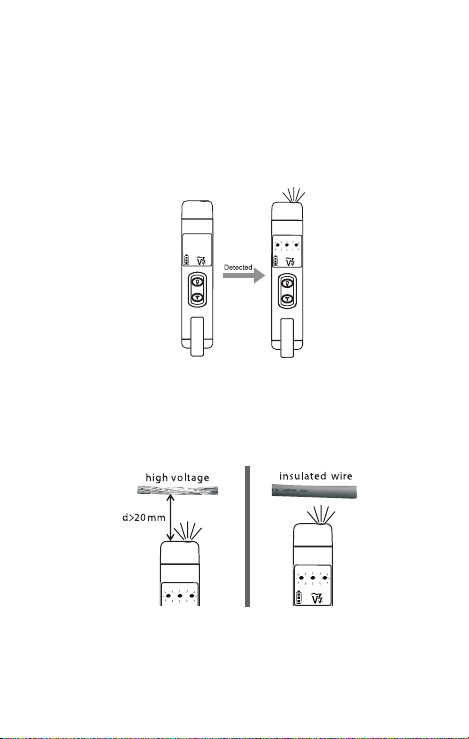
Non-Contact Voltage
The Non-Contact Voltage function is ON automatically
when the unit in standby mode.
When Non-Contact Voltage is sensed, the LCD flashes
three dashes and flash light flashes.
The number of dashes displaying on LCD indicates the
electric field intensity. The higher electric field is sensed,
the more “-” symbols display on LCD.
Non-Contact Voltage function can only test on insulated
wires. Testing on high voltage wires should keep a
distance of 20mm minimum.
8
Page 16

SPECIFICATION
Temperature
Range
Accuracy at
23°C ±2°C
<80﹪RH
Best display
Resolution
Response
Time
Wavelength 6.5um to 18um
Emissivity E=0.95
D:S 8:1(calculated at 80% energy)
Repeatability ±1°C or ±0.5% of reading, whichever is
Display Hold 10 s
Non-Contact
Voltage
Power 1.5V AAA alkaline battery
Weight Approx. 50g (0.11lb)
Dimensions
(HxWxD)
Storage
Temperature
-30°C to 500°C (-22°F to 932°F)
-30°C to 0°C (-22°F to 32°F): ±2°C (±4°F)
1°C to 10°C (34°F to 50°F): ±1.5°C (±3°F)
11°C to 40°C (52°F to 104°F): ±1°C (±2°F)
41°C to 500°C (106°F to 932°F): ±1.5°C
(±3°F) or ±1.5% of reading, whichever
is greater.
0.2°C (0.5°F)
0.5 s
greater.
60VAC ~ 600VAC
100 x 20 x 29mm (3.94 x 0.79 x 1.14in)
-20°C to 60°C (without battery)
CE Certication
This instrument conforms to the following standards:
• EN 61326-1 Electromagnetic Emissions and
Susceptibility
• EN 61010-1 General Safety
• EN 60825-1 Laser Safety
9
Page 17

TROUBLESHOOTING
Code Problem Action
Battery icon
appears
Blank display Possible dead
Laser doesn‘t
work
Possible low battery Check and/or
battery
Low or dead
battery
replace battery
Check and/or
replace battery
Replace battery
MAINTENANCE AND REPAIR
Lens Cleaning: Blow off loose particles using clean
compressed air. Gently brush remaining debris away with
a camel’s hair brush. Carefully wipe the surface with a
moist cotton swab. The swab may be moistened with
water or rubbing alcohol.
NOTE: DO NOT use solvents to clean the plastic lens.
Case Cleaning: Use soap and water on a damp sponge or
soft cloth.
NOTE: DO NOT submerge the unit in water.
10
Page 18
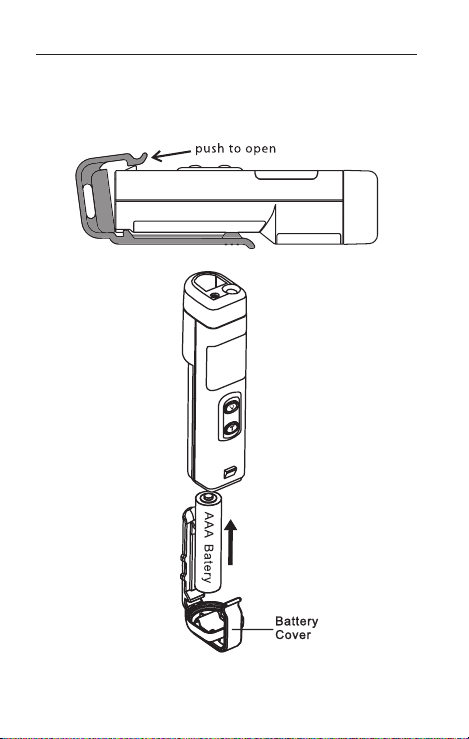
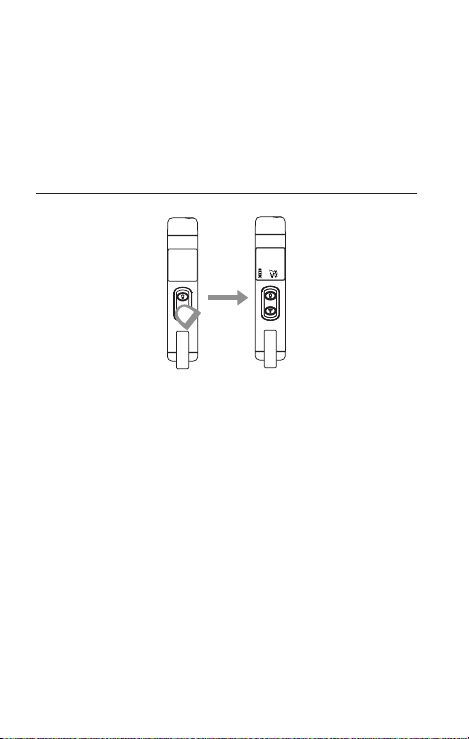
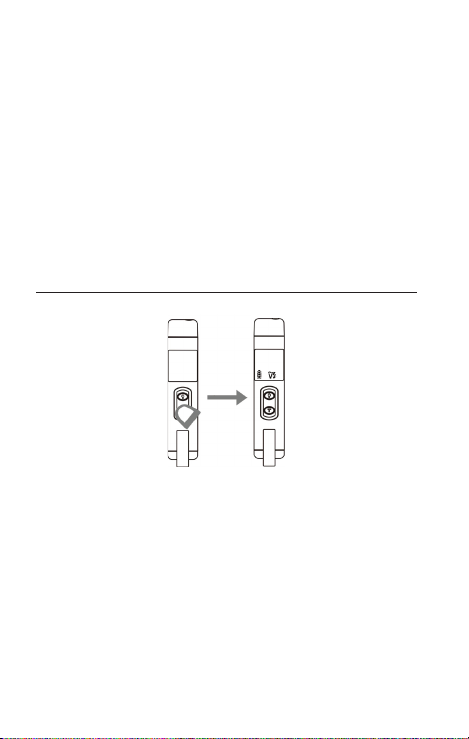
BATTERY REPLACEMENT
Please replace the battery when “Battery indicator” is
flashing on display.
When battery is replaced / installed, the unit will go into
standby mode automatically
11
Page 19

IR-500
Thermomètre à infrarouge /
Détecteur de tension /
Torche électrique
Mode d’emploi
Juin 2011, Rév.1
©2011 Amprobe Test Tools.
Tous droits réservés. Imprimé à Taïwan.
Français
Page 20

Limites de garantie et de responsabilité
Amprobe garantit l’absence de vices de matériaux et de fabrication
de ce produit pendant une période d’un an prenant effet à la
date d’achat, sauf disposition contraire prévue par la loi. Cette
garantie ne s’applique pas aux fusibles, aux piles jetables ni à tout
produit mal utilisé, modifié, contaminé, négligé ou endommagé
par accident ou soumis à des conditions anormales d’utilisation
et de manipulation. Les revendeurs n’ont pas l’autorisation de
prolonger toute autre garantie au nom d’Amprobe. Pour bénéficier
de la garantie, renvoyez le produit accompagné d’un justificatif
d’achat auprès d’un centre de services agréé par Amprobe Test
Tools ou d’un distributeur ou d’un revendeur Amprobe. Voir la
section Réparation pour tous les détails. LA PRÉSENTE GARANTIE
EST LE SEUL ET EXCLUSIF RECOURS DE L’UTILISATEUR TOUTES
AUTRES GARANTIES, EXPLICITES, IMPLICITES OU STATUTAIRES,
NOTAMMENT LE CAS ÉCHÉANT, LES GARANTIES DE QUALITÉ
MARCHANDE OU D’ADAPTATION À UN OBJECTIF PARTICULIER
SONT EXCLUES PAR LES PRÉSENTES. LE FABRICANT NE SERA EN
AUCUN CAS TENU RESPONSABLE DE DOMMAGES PARTICULIERS,
INDIRECTS, ACCIDENTELS OU CONSÉCUTIFS, NI D’AUCUN DÉGAT
OU PERTES DE DONNÉES, SUR UNE BASE CONTRACTUELLE, EXTRACONTRACTUELLE OU AUTRE. Étant donné que certaines juridictions
n’admettent pas les limitations d’une condition de garantie
implicite ou l’exclusion ou la limitation de dégâts accidentels ou
consécutifs, il se peut que les limitations et les exclusions de cette
garantie ne s’appliquent pas à votre cas.
Réparation
Tous les outils de test renvoyés pour être réparés au titre de la
garantie ou pour étalonnage doivent être accompagnés des
éléments suivants : nom, raison sociale, adresse, numéro de
téléphone et justificatif d’achat. Ajoutez également une brève
description du problème ou du service demandé et incluez les
cordons de test avec l’appareil. Les frais de remplacement ou
de réparation hors garantie doivent être acquittés par chèque,
mandat, carte de crédit avec date d’expiration, ou par bon de
commande payable à l’ordre de Amprobe® Test Tools.
Page 21

Remplacements et réparations sous garantie – Tous pays
Veuillez lire la déclaration de garantie et vérifiez la pile avant
de demander une réparation. Pendant la période de garantie,
tout outil de test défectueux peut être renvoyé auprès de votre
distributeur Amprobe® Test Tools pour être échangé contre un
produit identique ou similaire. Consultez la section « Where to
Buy » sur le site www.amprobe.com pour obtenir la liste des
distributeurs dans votre région. Au Canada et aux États-Unis, les
appareils devant être remplacés ou réparés sous garantie peuvent
également être envoyés dans un centre de services Amprobe® Test
Tools.
Remplacements et réparations hors garantie – Canada et États-Unis
Les appareils à réparer hors garantie au Canada et aux États-Unis
doivent être envoyés dans un centre de services Amprobe® Test
Tools. Appelez Amprobe® Test Tools ou renseignez-vous auprès
de votre lieu d’achat pour connaître les tarifs en vigueur de
remplacement ou de réparation.
Aux États-Unis Au Canada
Amprobe Test Tools Amprobe Test Tools
Everett, WA 98203 Mississauga, Ontario L4Z 1X9
Tél. : 877-AMPROBE (267-7623) Tél. : 905-890-7600
Remplacements et réparations hors garantie – Europe
Les appareils européens non couverts par la garantie peuvent être
remplacés par votre distributeur Amprobe® Test Tools pour une
somme nominale. Consultez la section « Where to Buy » sur le site
www.amprobe.com pour obtenir la liste des distributeurs dans
votre région.
Adresse postale européenne*
Amprobe® Test Tools Europe
Beha-Amprobe GmbH
In den Engematten 14
79286 Glottertal, Allemagne
Tél. : +49 (0) 7684 8009 - 0
www.amprobe.eu
*(Réservée à la correspondance – Aucune réparation ou
remplacement n’est possible à cette adresse. Nos clients européens
doivent contacter leur distributeur.)
Page 22

IR-500 Thermomètre à infrarouge /
Détecteur de tension / Torche électrique
21
3
4
5
6
1) Laser
2) Lampe-torche
3) Afchage
4) Lampe-torche, bouton
5) Bouton marche/arrêt et test
7 8 9
10
6) Couvercle de pile
7) Témoin de pile
8) Indicateur laser
9) Indicateur NCV
O
10)
C / OF
Page 23

TABLE DES MATIÈRES
SYMBOLES .......................................................................... 1
DEBALLAGE ET INSPECTION .............................................. 2
INTRODUCTION .................................................................. 2
CONSIGNES D’UTILISATION .........................................3
Marche/arrêt ................................................................... 3
Mise en veille automatique ........................................... 3
Maintien d’affichage automatique ..............................3
Fonctionnement de l’appareil ....................................... 3
Voir « Mesures de température » .................................4
°C / °F sélectionnable .....................................................5
Rapport de distance à taille de point ...........................5
Rappels ...........................................................................6
Émissivité ........................................................................7
Tension sans contact ...................................................... 8
CARACTÉRISTIQUES ........................................................... 9
DÉPANNAGE ....................................................................... 10
ENTRETIEN ET RÉPARATION ............................................... 11
CHANGEMENT DES PILES ................................................... 12
Page 24
SYMBOLES
Attention ! Se reporter aux explications de ce
manuel.
Lumière laser. Ne pas regarder dans le faisceau
laser.
Attention ! Tension sans contact.
Batterie
Ne pas appliquer directement sur ou à proximité
d’un conducteur nu sous tension dangereuse.
Conforme aux directives de l’association
australienne de normalisation.
Conforme aux directives européennes.
Ne pas mettre ce produit au rebut parmi les
déchets ménagers. Consulter un centre de
recyclage homologué.
Consignes de sécurité
Avertissement
• Ne pas regarder dans le faisceau laser.
• Ne pas pointer directement le laser en direction
des yeux, ou indirectement vers des surfaces
rééchissantes.
• Utilisation réservée aux personnes compétentes
• La fonction de tension sans contact (NCV) ne peut
vérier que les ls isolés. Maintenir une distance
de 20 mm minimum pour les tests sur les ls sous
tension élevée.
• Ne pas utiliser l’appareil pour détecter les tensions
sur les ls supérieures à 600 V.
1
Page 25

Attention
Utiliser uniquement cet appareil en respectant les
indications de ce mode d’emploi an de ne pas
entraver la protection intégrée de l’appareil.
L’appareil doit être protégé des éléments suivants :
• CEM (champs électromagnétiques) des soudeurs à
l’arc, chauffages à induction
• Électricité statique
• Choc thermique (provoqué par des changements
de température ambiante importants ou abrupts :
laisser l’appareil se stabiliser 30 minutes avant
l’emploi)
• Ne pas laisser l’appareil sur ou près d’objets à
température élevée
DÉBALLAGE ET INSPECTION
Le carton d’emballage doit inclure les éléments suivants :
1 IR-500
1 1 pile alcaline de 1,5 V (installée)
1 Manuel
Si l’un de ces éléments est endommagé ou manquant,
renvoyez le contenu complet de l’emballage au lieu
d’achat pour l’échanger.
INTRODUCTION
Un outil incontournable pour les applications
quotidiennes, la vérification de la température ou de
la présence d’une tension et l’utilisation en lampetorche dans les endroits obscurs. Compact et facile à
utiliser : il suffit de viser, d’appuyer sur le bouton pour
relever les températures de surface en moins d’une
seconde. L’appareil permet de mesurer sans danger les
températures de surface des objets brûlants, dangereux
ou difficiles d’accès, sans contact.
2
Page 26
Fonctionnalités
appuyer
• Mesure de température IR avec pointeur laser
• Avertissement de tension alternative sans contact
intégré
• Maintient les mesures de température pendant
10 secondes
• Lampe-torche à DEL ultra-lumineuse
o
•
F / oC sélectionnable
• Une pince accessoire permet de xer l’appareil à la
plupart des pinces et multimètres
• Agrafe de xation
CONSIGNES D’UTILISATION
Marche/arrêt
Mise en veille automatique
3 minutes.
Maintien d’afchage automatique
L’appareil maintient la mesure affichée pendant
10 secondes après la pression du bouton marche.
Fonctionnement de l’appareil
Pour mesurer une température, pointez l’appareil vers un
objet et appuyez sur le bouton Test. Veillez à respecter
la distance par rapport à la taille du point et du champ.
L’appareil est équipé d’un laser, celui-ci ne doit être utilisé
que pour viser. Voir « Mesures de température ».
3
Page 27
Voir « Mesures de température »
Incorrect
Zone ciblée
appuyer relâcher
Maintien automatique pendant 10 s
Appuyer pendant
3 s
Mode de
mesure
continue
Assurez-vous que la cible est plus grande que la taille
du point de l’appareil. Plus la cible est petite, plus il faut
s’en rapprocher. Le diamètre minimum de la zone de
mesure est de 3,75 cm (1,5 po).
L’appareil indique la température de la surface ciblée
quand on appuie sur la touche
la touche
, l’écran LCD maintient l’affichage de la
mesure pendant 10 secondes.
L’appareil passe en mode de mesure continue des
températures IR quand on appuie sur la touche
pendant 3 secondes.
. Quand on relâche
4
Page 28

°C / °F sélectionnable
1,2 po à 9,6 po 2 po à 16 po 4 po à 32 po
30 mm à 24 0 mm 50 m m à 4 00 mm 100 mm à 800 m m
Ligne B
Appuyez simultanément sur le bouton Test et le bouton
de lampe-torche pendant 2 secondes pour commuter
l’unité de température °C / °F.
Rapport de distance à taille de point
À mesure que la distance (D) de l’objet augmente, la
taille du point (S) de la zone mesurée par l’appareil
grandit.
L’appareil doit être utilisé à environ 30 cm de la cible pour
obtenir une précision de mesure optimale.
À des distances plus longues, la zone ciblée doit être plus
grande que la distance divisée par 8.
Ne placez pas les doigts sur le boîtier pendant une période
prolongée ou sur la « ligne B » afin de pas perturber la
précision de mesure avec des effets thermiques.
5
Page 29

Rappels
Attendre 30 minutes
Attendre 30 minutes pour obtenir une mesure plus précise.
1. Les changements de la température ambiante
environnante peuvent entraîner des mesures
inexactes, laissez l’appareil s’adapter au
changement de température ambiant avant de
l’utiliser. La précision spécifiée s’applique après
30 minutes lorsque l’appareil passe dans un milieu
ambiant différent.
Laissez à l’appareil le temps de se stabiliser à l’air
ambiant après l’avoir sorti de votre poche.
6
Page 30

2. L’appareil ne peut pas établir de mesures à travers
des surfaces transparentes telles que le verre.
Retirez l’écran entre l’appareil et la surface ciblée.
3. Son usage n’est pas recommandé pour mesurer
les surfaces métalliques brillantes ou polies (acier
inoxydable, aluminium, etc.). Voir Émissivité.
4. La vapeur, la poussière, la fumée, etc., peuvent
perturber la précision des mesures en obstruant
l’optique de l’appareil.
Émissivité
La plupart des matériaux organiques et des surfaces
peintes ou oxydées ont une émissivité de 0,95 (prédéfinie
dans l’appareil). Les surfaces métalliques brillantes ou
polies entraînent des mesures inexactes. Pour compenser,
couvrez la surface à mesurer de ruban opaque ou
de peinture matte noire. Laissez le temps au ruban
d’atteindre la même température que le matériau qu’il
recouvre. Mesurez la température du ruban ou de la
surface peinte.
7
Page 31

Tension sans contact
Detecté
fil isolé
haute tension
dmm20
La fonction de tension sans contact est active automatiquement quand l’appareil est en mode d’attente.
Lorsque la tension sans contact est détectée, l’écran LCD
fait clignoter trois tirets et la lampe-torche clignote.
Le nombre de tirets affichés sur l’écran LCD indique
l’intensité du champ électrique. Plus le champ électrique
détecté est intense, plus l’écran LCD affiche de
symboles « - ».
La fonction de tension sans contact (NCV) ne peut vérifier
que les fils isolés. Maintenez une distance de 20 mm
minimum pour les tests sur les fils sous tension élevée.
8
Page 32

CARACTÉRISTIQUES
Plage de
températures
Précision
déclarée à
23 °C ± 2 °C
<80 ﹪ HR
Meilleure
résolution
d’afchage
Temps de
réponse
Longueur
d’onde
Émissivité E = 0,95
D : S 8:1 (calculé à 80 % d’énergie)
Fidélité des
mesures
Maintien de
l’afchage
Tension sans
contact
Puissance 1 pile alcaline AAA de 1,5 V
Poids environ 50 g (0,11 lb)
Dimensions
(H x l x P)
Température
de stockage
-30 °C à 500 °C (-20 °F à 932 °F)
-30 °C à 0 °C (-20 °F à 32 °F) ±2 °C (±4 °F)
1 °C à 10 °C (34 °F à 50 °F) : ±1,5 °C
(±3 °F)
11 °C à 40 °C (52 °F à 104 °F) : ±1 °C
(±2 °F)
41 °C à 500 °C (106 °F à 932 °F) : ±1,5 °C
ou (± 3 F) ou ±1,5 % du résultat (selon la
valeur la plus élevée).
0,2 °C (0,5 °F)
0,5 s
6,5 um à 18 um
±1 °C ou ± 0,5 % du résultat (selon la
valeur la plus élevée)
10 s
60 V c.a. à 600 V c.a.
100 x 20 x 29 mm (3,94 x 0,79 x 1,14 po)
- 20 °C à 60 °C (sans pile)
9
Page 33

Certication CE
Cet appareil de mesure est conforme aux normes
suivantes :
• Émissions et sensibilité électromagnétique EN 61326-1
• Sécurité générale EN 61010-1
• Sécurité laser EN 60825-1
DÉPANNAGE
Code Problème Action
L’icône de la
pile apparaît
Affichage vide La pile peut être
Le laser ne
fonctionne pas
La pile peut être
faible
usée
La pile est faible
ou usée
Vérifier et/ou
remplacer la
pile
Vérifier et/ou
remplacer la
pile
Remplacer la
pile.
10
Page 34

ENTRETIEN ET RÉPARATION
Alc ool
dén atu ré
Nettoyage de l’objectif : Expulsez les impuretés en
suspension avec de l’air comprimé sec et propre. Essuyez
doucement les débris restants à l’aide d’un pinceau
d’aquarelle. Essuyez soigneusement la surface avec un
coton humide. Essuyez soigneusement la surface avec un
coton-tige humide ou imbibé d’alcool.
REMARQUE : NE PAS utiliser de solvants pour nettoyer la
lentille en plastique.
Nettoyage du boîtier : Utilisez de l’eau savonneuse sur
une éponge humide ou un chiffon doux.
REMARQUE : NE PAS plonger l’appareil dans l’eau.
11
Page 35

CHANGEMENT DES PILES
Enfoncer pour ouvrir
Pi le AA A
Couvercle
de pile
Veuillez remplacer la pile lorsque le témoin de pile
clignote sur l’affichage.
Lorsque la pile est remplacée / installée, l’appareil passe
en mode de veille automatiquement.
12
Page 36

Page 37

IR-500
Infrarotthermometer /
Spannungsprüfer /
Stablampe
Bedienungshandbuch
Juni 2011, Rev. 1
©2011 Amprobe Test Tools.
Alle Rechte vorbehalten. Gedruckt in Taiwan.
Deutsch
Page 38

Beschränkte Gewährleistung und Haftungsbeschränkung
Es wird gewährleistet, dass dieses Amprobe-Produkt für die
Dauer von einem Jahr ab dem Kaufdatum frei von Materialund Fertigungsdefekten ist, sofern örtliche Gesetze nichts
anderes vorsehen. Diese Gewährleistung erstreckt sich nicht
auf Sicherungen, Einwegbatterien oder Schäden durch Unfälle,
Nachlässigkeit, Missbrauch, Änderungen oder abnormale
Betriebsbedingungen bzw. unsachgemäße Handhabung. Die
Verkaufsstellen sind nicht dazu berechtigt, diese Gewährleistung
im Namen von Amprobe zu erweitern. Um während der
Gewährleistungsperiode Serviceleistungen in Anspruch zu nehmen,
das Produkt mit Kaufnachweis an ein autorisiertes Amprobe
Test Tools Service-Center oder an einen Amprobe-Fachhändler/Distributor einsenden. Nähere Einzelheiten siehe Abschnitt
„Reparatur“. DIESE GEWÄHRLEISTUNG STELLT DEN EINZIGEN
UND ALLEINIGEN RECHTSANSPRUCH AUF SCHADENERSATZ DAR.
ALLE ANDEREN (VERTRAGLICH GEREGELTEN ODER GESETZLICH
VORGESCHRIEBENEN) GEWÄHRLEISTUNGEN, EINSCHLIESSLICH
DER GESETZLICHEN GEWÄHRLEISTUNG DER MARKTFÄHIGKEIT
UND DER EIGNUNG FÜR EINEN BESTIMMTEN ZWECK, WERDEN
ABGELEHNT. DER HERSTELLER ÜBERNIMMT KEINE HAFTUNG FÜR
SPEZIELLE, INDIREKTE, NEBEN- ODER FOLGESCHÄDEN ODER FÜR
VERLUSTE, DIE AUF BELIEBIGER URSACHE ODER RECHTSTHEORIE
BERUHEN. Weil einige Staaten oder Länder den Ausschluss oder
die Einschränkung einer implizierten Gewährleistung sowie den
Ausschluss von Begleit- oder Folgeschäden nicht zulassen, ist diese
Gewährleistungsbeschränkung möglicherweise für Sie nicht gültig.
Reparatur
Zu allen Geräten, die zur Reparatur oder Kalibrierung im Rahmen
der Garantie oder außerhalb der Garantie eingesendet werden,
muss folgendes beigelegt werden: Name des Kunden, Firmenname,
Adresse, Telefonnummer und Kaufbeleg. Zusätzlich bitte eine
kurze Beschreibung des Problems oder der gewünschten Wartung
sowie die Messleitungen dem Messgerät beilegen. Die Gebühren
für außerhalb des Garantiezeitraums durchgeführte Reparaturen
oder für den Ersatz von Instrumenten müssen per Scheck,
Zahlungsanweisung oder Kreditkarte (Kreditkartennummer mit
Ablaufdatum) beglichen werden oder es muss ein Auftrag auf
Rechnung an Amprobe® Test Tools formuliert werden.
Page 39

Garantiereparaturen oder -austausch – alle Länder
Bitte die Garantieerklärung lesen und die Batterie prüfen, bevor
Reparaturen angefordert werden. Während der Garantieperiode
können alle defekten Geräte zum Umtausch gegen dasselbe oder
ein ähnliches Produkt an den Amprobe® Test Tools-Distributor
gesendet werden. Ein Verzeichnis der zuständigen Distributoren
ist im Abschnitt „Where to Buy“ (Verkaufsstellen) auf der Website
www.amprobe.com zu finden. Darüber hinaus können in den USA
und in Kanada Geräte an ein Amprobe® Test Tools Service-Center
zur Reparatur oder zum Umtausch eingesendet werden.
Reparaturen und Austausch außerhalb der Garantie –
USA und Kanada
Für Reparaturen außerhalb des Garantiezeitraums in den
Vereinigten Staaten und in Kanada werden die Geräte an ein
Amprobe Test Tools Service-Center gesendet. Auskunft über die
derzeit geltenden Reparatur- und Austauschgebühren erhalten Sie
von Amprobe® Test Tools oder der Verkaufsstelle.
In den USA: In Kanada:
Amprobe Test Tools Amprobe Test Tools
Everett, WA 98203 Mississauga, ON L4Z 1X9
Tel.: 877-AMPROBE (267-7623) Tel.: 905-890-7600
Reparaturen und Austausch außerhalb der Garantie – Europa
Geräte mit abgelaufener Garantie können durch den zuständigen
Amprobe® Test Tools-Distributor gegen eine Gebühr ersetzt
werden. Ein Verzeichnis der zuständigen Distributoren ist im
Abschnitt „Where to Buy“ (Verkaufsstellen) auf der Website
www.amprobe.com zu finden.
Korrespondenzanschrift für Europa*
Amprobe® Test Tools Europe
Beha-Amprobe GmbH
In den Engematten 14
79286 Glottertal, Deutschland
Tel.: +49 (0) 7684 8009 - 0
www.amprobe.eu
*(Nur Korrespondenz – keine Reparaturen und kein Umtausch
unter dieser Anschrift. Kunden in Europa wenden sich an den
zuständigen Distributor.)
Page 40

IR-500 Infrarotthermometer /
Spannungsprüfer / Stablampe
21
3
6
1) Laser
2) Lampe
3) Anzeige
4) Lampentaste
5) Ein-Taste / Test-Taste
4
7 8 9
5
6) Batterieabdeckung
7) Batterieanzeige
8) Laseranzeige
9) NCV-Anzeige
O
10)
C / OF
10
Page 41

INHALT
SYMBOLE ............................................................................ 1
AUSPACKEN UND ÜBERPRÜFEN ........................................ 2
EINFÜHRUNG ...................................................................... 2
BETRIEBSANWEISUNGEN ............................................. 3
Ein/Aus-Taste .................................................................. 3
Automatische Ausschaltung (APO) ............................... 3
Auto-Hold ....................................................................... 3
Bedienung des Geräts .................................................... 3
Durchführen von Temperaturmessungen .....................4
°C/°F-Auswahl ................................................................. 5
Abstand und Punktgröße .............................................. 5
Zur Beachtung ................................................................ 6
Emissivität ....................................................................... 7
Berührungslose Spannung ............................................8
TECHNISCHE DATEN ........................................................... 9
FEHLERBEHEBUNG .............................................................10
WARTUNG UND REPARATUR ............................................. 11
ERSETZEN DER BATTERIE ................................................... 12
Page 42

SYMBOLE
Vorsicht! Siehe Erklärung in diesem Handbuch.
Laserlicht. Nicht in Laserstrahl blicken.
Vorsicht! Berührungslose Spannung.
Batterie
Nicht direkt im Bereich von unisolierten
gefährlichen stromführenden Leitern anwenden.
Übereinstimmung mit den relevanten
australischen Standards.
Übereinstimmung mit EU-Vorschriften.
Dieses Produkt nicht im unsortierten
Kommunalabfall entsorgen. Ein qualifiziertes
Recycling-Unternehmen kontaktieren.
Sicherheitsinformationen
Warnung
• Nicht in den Laserstrahl blicken.
• Laser nicht direkt auf Auge oder indirekt
reektierende Flächen richten.
• Ausschließlich für Gebrauch durch fachkundiges
Personal.
• Das Gerät nicht auf Objekte oder in der Nähe von
Objekten ablegen, die eine hohe Temperatur aufweisen.
• NCV-Funktion (Non-Contact Voltage/berührungslose
Spannung) kann nur an isolierten Drähten prüfen. Beim
Testen an Hochspannungsdrähten sollte mindestens ein
Abstand von 20 mm eingehalten werden.
• Das Gerät nicht verwenden, um Drahtspannung über
600 V zu bestimmen.
1
Page 43

Vorsicht
Das Gerät ausschließlich wie in diesem Handbuch
beschrieben einsetzen, da sonst der durch das Gerät
gebotene Schutz beeinträchtigt werden kann.
Das Gerät sollte gegenüber folgenden Bedingungen
geschützt werden:
• EMF (elektromagnetische Felder) von Bogensch-
weißgeräten oder Hochfrequenzheizgeräten
• Statische Elektrizität
• Wärmestoß (verursacht durch große oder abrupte
Umgebungstemperaturschwankungen – das Gerät
vor Gebrauch 30 Minuten stabilisieren lassen)
• Das Gerät nicht auf oder in der Nähe von Objekten
ablegen, die eine hohe Temperatur aufweisen
AUSPACKEN UND ÜBERPRÜFEN
Der Verpackungskarton sollte Folgendes enthalten:
1 IR-500
1 1,5 V AAA/LR3 Alkalibatterie (eingesetzt)
1 Handbuch
Wenn einer dieser Artikel beschädigt ist oder fehlt, die
gesamte Lieferung zwecks Ersatz an die Verkaufsstelle
zurücksenden.
EINFÜHRUNG
Ein unentbehrliches Werkzeug für alltägliche
Anwendungen, Temperaturprüfung und
Spannungsanzeige und Verwendung als Lampe in
dunklen Umgebungen. Kompakt und bedienerfreundlich
– das Gerät einfach auf ein Ziel richten, die Taste
drücken und nach weniger als einer Sekunde die
Oberflächentemperatur ablesen. Oberflächentemperaturen
heißer, gefährlicher oder schwer zugänglicher Objekte
können ohne Berührung sicher gemessen werden.
2
Page 44

Merkmale
Drücken
• IR-Temperaturmessung mit Laserstrahl
• Integrierte berührungslose
Wechselspannungsprüfung
• Hält Temperaturmesswert 10 Sekunden lang fest
• Ultraweiße LED-Lampe
• Wahl zwischen
o
F und oC
• Zubehörklammer zum Anbringen an
Zangenmessgeräten und Multimetern
• Ansteckklammer
BEDIENUNGSANWEISUNGEN
Ein/Aus-Taste
Automatische Ausschaltung (APO)
3 Minuten.
Auto-Hold
Das Gerät hält den Messwert nach Loslassen der EinTaste 10 Sekunden lang fest.
Bedienung des Geräts
Um eine Temperatur zu messen, das Gerät auf ein
Objekt richten und die Test-Taste drücken. Das
Verhältnis zwischen Abstand und Punktgröße sowie
das Sichtfeld berücksichtigen. Das Gerät ist mit einem
Laser ausgestattet; den Laser ausschließlich zum Zielen
auf das Objekt verwenden. Siehe „Durchführen von
Temperaturmessungen“.
3
Page 45

Durchführen von Temperaturmessungen
inkorrekt
Zielbereich
drücken loslassen
Auto-Hold 10 Sek.
3 Sekunden
lang drücken
kontinuierlicher
Messmodus
Sicherstellen, dass das Ziel größer ist als die Punktgröße
des Geräts. Je kleiner das Ziel ist, desto näher soll das
Gerät gehalten werden. Der minimale Messbereich weist
einen Durchmesser von 3,75 cm auf.
Die Taste drücken; das Gerät zeigt die Temperatur
der Zieloberfläche an. Dann die Taste
Gerät hält den Messwert 10 Sekunden lang fest.
Die Taste 3 Sekunden lang gedrückt halten; das
Gerät schaltet in den kontinuierlichen IR-TemperaturMessmodus.
loslassen; das
4
Page 46

°C/°F-Auswahl
30 mm bei 240 mm 50 mm bei 400 mm 100 mm bei 800 mm
1,2 Zoll bei 9,6 Zoll 2 Zoll bei 16 Zoll 4 Zoll bei 32 Zoll
B-Grenzlinie
Die Test-Taste und die Lampen-Taste gleichzeitig
2 Sekunden lang gedrückt halten, um die
Temperatureinheit °C/°F umzuschalten.
Abstand und Punktgröße
Die Punktgröße (S) des vom Gerät gemessenen Bereichs
wird mit zunehmendem Abstand (D) zum Objekt größer.
Das Gerät bei ungefähr 30 cm verwenden, um optimale
Messgenauigkeit zu erzielen.
Bei größeren Abständen sollte der Zielbereich größer sein
als der Abstand dividiert durch 8.
Nicht für längere Zeit die Finger auf dem Gehäuse jenseits
der B-Grenzlinie halten, um Störung der Messgenauigkeit
durch Thermoeffekt zu verhindern.
5
Page 47

Zur Beachtung
30 Minuten warten
Für beste Genauigkeit 30 Minuten warten.
1. Schwankungen in der Umgebungstemperatur
können zu ungenauen Ergebnissen führen; vor
Gebrauch warten, damit sich das Gerät an die
Umgebungstemperatur anpassen kann. Die
spezifizierte Genauigkeit gilt nach 30 Minuten,
wenn das Gerät in eine andere Umgebung
eingebracht wird.
Dem Gerät Zeit gewähren, um die Änderung der
Temperatur von der Tasche des Benutzers zur
Umgebung auszugleichen.
6
Page 48

2. Das Gerät kann nicht durch transparente Flächen
(z. B. Glas) hindurch messen. Hindernisse zwischen
dem Gerät und der Zieloberfläche entfernen.
3. Nicht empfohlen für Gebrauch zum Messen von
glänzenden oder polierten Metallflächen (Edelstahl,
Aluminium usw.). Siehe Emissivität.
4. Dampf, Staub, Rauch usw. können genaue
Messungen verhindern, da sie u. U. die Optik des
Geräts beeinträchtigen.
Emissivität
Die meisten organischen Stoffe und angemalten oder
oxidierten Flächen weisen einen Emissionswert von 0,95
(im Gerät voreingestellt) auf. Ungenaue Messwerte treten
beim Messen von glänzenden oder polierten Metallflächen
auf. Um zu kompensieren, die zu messende Fläche mit
Abdeckband oder matter schwarzer Farbe bedecken.
Zeit einräumen, sodass das Band/die Farbe die gleiche
Temperatur wie der Stoff darunter annehmen kann. Die
Temperatur des Bandes/der angemalten Fläche messen.
7
Page 49

Berührungslose Spannung
Erkannt
isolierter Draht
Hochspannung
d 20 mm
Die Funktion „Berührungslose Spannung“ ist automatisch
eingeschaltet, wenn sich das Gerät im Bereitschaftsmodus
befindet.
Wenn Spannung erkannt wird, blinken drei Bindestriche
auf der LCD und die Lampe blinkt.
Die Anzahl der auf der LCD angezeigten Gedankenstriche
zeigt die Intensität des elektrischen Feldes an. Je
stärker das elektrische Feld gemessen wird, desto mehr
Gedankenstriche (-) werden auf der LCD angezeigt.
NCV-Funktion (Non-Contact Voltage/berührungslose
Spannung) kann nur an isolierten Drähten messen. Beim
Testen an Hochspannungsdrähten sollte mindestens ein
Abstand von 20 mm eingehalten werden.
8
Page 50

TECHNISCHE DATEN
Temperaturbereich
Genauigkeit
bei 23 °C ±2 °C
< 80 ﹪RH
Auösung der
Anzeige
Ansprechzeit 0,5 s
Wellenlänge 6,5 um bis 18 um
Emissivität E = 0,95
D:S 8:1 (berechnet bei 80 % Energie)
Wieder-
holbarkeit
Display-Hold 10 s
Berührungslose
Spannung
Strom-
versorgung
Gewicht Ca. 50 g
Abmessungen
(HxBxT)
Lagerungs-
temperatur
-30 °C bis 500 °C (-20 °F bis 932 °F)
-30 °C bis 0 °C (-20 °F bis 32 °F):
±2 °C (±4 °F)
1 °C bis 10 °C (34 °F bis 50 °F):
±1,5 °C (±3 °F)
11 °C bis 40 °C (52 °F bis 104 °F):
±1 °C (±2 °F)
41 °C bis 500 °C (106 °F bis 932 °F):
±1,5 °C (±3 °F) oder ±1,5 % von
Messwert, es gilt der größere Wert.
0,2 °C (0,5 °F)
±1 °C oder ±0,5 % von Messwert, es
gilt der größere Wert
60 V AC ~ 600 V AC
1,5 V AAA/LR3 Alkalibatterie
100 x 20 x 29 mm
-20 °C bis 60 °C (ohne Batterie)
9
Page 51

CE-Zertizierung
Dieses Messgerät erfüllt die folgenden Standards:
• EN 61326-1 Elektromagnetische Störaussendungen
und Empfindlichkeit
• EN 61010-1 Allgemeine Sicherheit
• EN 60825-1 Lasersicherheit
FEHLERBEHEBUNG
Code Problem Maßnahme
Batteriesymbol
erscheint
Leere Anzeige Möglicherweise
Laser
funktioniert
nicht
Möglicherweise
schwache Batterie
leere Batterie
Schwache oder
leere Batterie
Batterie prüfen
und/oder
ersetzen
Batterie prüfen
und/oder
ersetzen
Batterie
ersetzen
10
Page 52

WARTUNG UND REPARATUR
Rei nig ungs -
alk ohol
Linsenreinigung: Lose Partikel mit sauberer Druckluft
abblasen. Verbleibende Verunreinigungen mit einer
Kamelhaarbürste behutsam abbürsten. Die Oberfläche
mit einem angefeuchteten Baumwolllappen sorgfältig
abwischen. Der Lappen kann mit Wasser oder
Reinigungsalkohol angefeuchtet werden.
HINWEIS: KEINE Lösungsmittel zur Reinigung der
Kunststofflinse verwenden.
Gehäusereinigung: Seife und Wasser an einem feuchten
Schwamm oder weichen Tuch verwenden.
HINWEIS: Das Gerät NICHT in Wasser eintauchen.
11
Page 53

ERSETZEN DER BATTERIE
Drücken, um zu önen
Batteriefachabdeckung
AAA Bat terie
Die Batterie ersetzen, wenn das Symbol für schwache
Batterie auf der Anzeige blinkt.
Sobald die Batterie ersetzt/eingesetzt ist, schaltet das
Gerät automatisch in den Bereitschaftsmodus.
12
Page 54

Page 55

IR-500
Termometro a infrarossi /
Rivelatore di tensione /
Torcia
Manuale d’uso
Giugno 2011, Rev. 1
©2011 Amprobe Test Tools.
Tutti i diritti riservati. Stampato in Taiwan.
Italiano
Page 56

Garanzia limitata e limitazione di responsabilità
Questo prodotto Amprobe sarà esente da difetti di materiale e
fabbricazione per un anno a decorrere dalla data di acquisto se
non specificato diversamente dalle leggi locali. Sono esclusi da
questa garanzia i fusibili, le pile monouso e i danni causati da
incidenti, negligenza, uso improprio, alterazione, contaminazione
o condizioni anomale di funzionamento o manipolazione. I
rivenditori non sono autorizzati a offrire nessun’altra garanzia
a nome della Amprobe. Per richiedere un intervento durante il
periodo di garanzia, restituire il prodotto, allegando la ricevuta
di acquisto, a un centro di assistenza autorizzato Amprobe Test
Tools oppure a un rivenditore o distributore Amprobe locale.
Per ulteriori informazioni vedere la sezione Riparazioni. QUESTA
GARANZIA È IL SOLO RICORSO A DISPOSIZIONE DELL’ACQUIRENTE
E SOSTITUISCE QUALSIASI ALTRA GARANZIA, ESPRESSA, IMPLICITA
O PREVISTA DALLA LEGGE, COMPRESA, MA NON A TITOLO
ESCLUSIVO, QUALSIASI GARANZIA IMPLICITA DI COMMERCIABILITÀ
O DI IDONEITÀ PER SCOPI PARTICOLARI. IL PRODUTTORE NON
SARÀ RESPONSABILE DI DANNI O PERDITE SPECIALI, INDIRETTI O
ACCIDENTALI, DERIVANTI DA QUALSIASI CAUSA O TEORIA. Poiché
alcuni stati o Paesi non permettono l’esclusione o la limitazione
di una garanzia implicita o di danni accidentali o indiretti, questa
limitazione di responsabilità potrebbe non riguardare l’acquirente.
Riparazioni
A tutti gli strumenti di misura restituiti per interventi in garanzia
non coperti dalla garanzia oppure per la taratura, devono essere
allegate le seguenti informazioni: il proprio nome e quello
dell’azienda, indirizzo, numero telefonico e ricevuta di acquisto.
Allegare anche una breve descrizione del problema o dell’intervento
richiesto e i cavi di misura. Gli importi dovuti per sostituzioni
o riparazioni non coperte dalla garanzia vanno versati tramite
assegno, vaglia bancario, carta di credito con data di scadenza,
oppure ordine di acquisto all’ordine di Amprobe® Test Tools.
Page 57

Sostituzioni e riparazioni in garanzia – Tutti i Paesi
Leggere la garanzia e controllare la batteria prima di richiedere
una riparazione. Durante il periodo di garanzia, si può restituire
uno strumento difettoso al rivenditore Amprobe® Test Tools per
ricevere un prodotto identico o analogo. Nella sezione "Where
to Buy" del sito www.amprobe.com c’è un elenco dei distributori
più vicini. Negli Stati Uniti e nel Canada gli strumenti da sostituire
o riparare in garanzia possono essere inviati anche a un centro di
assistenza Amprobe® Test Tools.
Sostituzioni e riparazioni non coperte dalla garanzia – Stati Uniti
e Canada
Se la riparazione non è coperta dalla garanzia negli Stati Uniti
e nel Canada, lo strumento va inviato a un centro di assistenza
Amprobe® Test Tools. Rivolgersi alla Amprobe® Test Tools
o al rivenditore per informazioni sui costi delle riparazioni e
sostituzioni.
Stati Uniti Canada
Amprobe Test Tools Amprobe Test Tools
Everett, WA 98203 Mississauga, ON L4Z 1X9
Tel: 877-AMPROBE (267-7623) Tel: 905-890-7600
Sostituzioni e riparazioni non coperte dalla garanzia – Europa
Gli strumenti acquistati in Europa e non coperti dalla garanzia
possono essere sostituiti dal rivenditore Amprobe® Test Tools
per un importo nominale. Nella sezione "Where to Buy" del sito
www.amprobe.com c’è un elenco dei distributori più vicini.
Recapito postale europeo*
Amprobe® Test Tools Europe
Beha-Amprobe GmbH
In den Engematten 14
79286 Glottertal, Germania
Tel: +49 (0) 7684 8009 - 0
www.amprobe.eu
*(Solo per corrispondenza – non rivolgersi a questo indirizzo per
riparazioni o sostituzioni. Si pregano i clienti europei di rivolgersi al
proprio rivenditore.)
Page 58

Termometro a infrarossi /
Rivelatore di tensione / Torcia
21
3
6
1) Laser
2) Torcia
3) Display
4) Pulsante accensione torcia
5) Pulsante accensione
strumento / esecuzione
misure
4
7 8 9
5
6) Coperchio scomparto
pila
7) Spia batteria
8) Spia laser
9) Spia NCV
O
10)
C / OF
10
Page 59

INDICE
SIMBOLI ..............................................................................1
DISIMBALLAGGIO E ISPEZIONE ......................................... 2
INTRODUZIONE ..................................................................2
ISTRUZIONI PER L’USO .................................................. 3
Accensione / spegnimento ............................................. 3
Spegnimento automatico .............................................. 3
Tenuta dati automatica ................................................. 3
Azionamento dello strumento ...................................... 3
Esecuzione di misure di temperatura ...........................4
Selezione dell’unità di misura: °C o °F .......................... 5
Distanza e diametro dello spot ..................................... 5
Promemoria .................................................................... 6
Emissività ........................................................................7
Tensione senza contatto ................................................ 8
DATI TECNICI ....................................................................... 9
RICERCA GUASTI ................................................................10
MANUTENZIONE E RIPARAZIONI ....................................... 11
SOSTITUZIONE DELLA PILA ................................................ 12
Page 60

SIMBOLI
Attenzione. Vedere la spiegazione nel manuale.
Luce laser. Non tenere lo sguardo fisso sul fascio
laser.
Attenzione. Tensione senza contatto.
Batteria
Non applicare direttamente su, o presso, un
conduttore ad alta tensione nudo.
Conforme alle norme australiane di pertinenza.
Conforme alle direttive della Comunità Europea.
Non smaltire questo prodotto assieme ad altri
rifiuti solidi non differenziati. Rivolgersi a una
ditta di riciclaggio qualificata.
Informazioni sulla sicurezza
Avvertenza
• Non tenere lo sguardo sso sul fascio laser.
• Non dirigere il fascio laser verso gli occhi, né
direttamente né indirettamente tramite superci
riettenti.
• Solo per l’uso da parte di persone competenti.
• Non lasciare lo strumento su, o presso, oggetti ad
alta temperatura.
• La funzione misura di tensioni senza contatto (NCV)
è impiegabile solo su cavi isolati. Durante misure di
alta tensione mantenere una distanza di almeno 20
mm dai cavi.
• Non utilizzare lo strumento per rilevare tensioni su
cavi superiori a 600 V.
1
Page 61

Attenzione
Usare lo strumento solo come specicato nel presente
manuale, altrimenti si rischia di comprometterne la
protezione offerta.
Lo strumento deve essere protetto contro le seguenti
condizioni:
• campi elettromagnetici generati da saldatrici ad arco
o riscaldatori a induzione;
• elettricità statica;
• intense sollecitazioni termiche, causate da variazioni
di temperatura improvvise o estreme (lasciare che lo
strumento si stabilizzi per 30 minuti prima di usarlo);
• prossimità o contatto dello strumento con oggetti
ad alta temperatura.
DISIMBALLAGGIO E ISPEZIONE
La confezione deve contenere:
1 IR-500
1 Pila alcalina ministilo (AAA) da 1,5 V (già installata)
1 Manuale
Se uno di questi articoli è danneggiato o manca, restituire
l’intera confezione al punto di acquisto perché venga
sostituita.
INTRODUZIONE
Uno strumento essenziale per l’impiego quotidiano, per
verificare temperature o la presenza di tensioni, utilizzabile
anche come torcia. Compatto e di facile uso: basta puntarlo
e premere il pulsante; la temperatura superficiale viene
visualizzata in meno di un secondo. Consente di misurare
in sicurezza la temperatura delle superfici di oggetti caldi,
pericolosi o difficili da raggiungere, senza alcun contatto.
Caratteristiche
• Misure di temperatura a raggi infrarossi (IR) con il
puntatore laser
• Sistema integrato di segnalazione di tensioni AC
senza contatto
2
Page 62

• La lettura di temperatura rimane visualizzata per
premere
10 secondi
• Torcia a LED a luce ultrabianca
o
• Possibilità di selezionare
F o oC
• Clip che consente il ssaggio alla maggior parte dei
multimetri e delle pinze amperometriche
• Clip da tasca
ISTRUZIONI PER L’USO
Accensione / spegnimento
Spegnimento automatico
3 minuti.
Tenuta dati automatica
La lettura rimane visualizzata per 10 secondi dopo che si
rilascia il pulsante di accensione.
Azionamento dello strumento
Per misurare una temperatura, puntare lo strumento
verso l’oggetto e premere l’apposito pulsante. Accertarsi
di considerare il rapporto distanza-diametro spot e il
campo visivo. Lo strumento è dotato di un laser, da usare
solo per il puntamento. Vedi “Esecuzione di misure di
temperatura”.
3
Page 63

Esecuzione di misure di temperatura
Sbagliata
Area di misura
premere rilasciare
Tenuta automatica per 10 secondi
Premere per
3 secondi
Modalità di
misura
continua
Accertarsi che l’oggetto di cui misurare la temperatura
sia più grande del diametro dello spot dello strumento.
Più è piccolo l’oggetto, più ci si deve avvicinare con il
termometro. L’area di misura minima ha un diametro di
3,75 cm.
Premere il pulsante
temperatura della superficie. Rilasciare il pulsante
la lettura rimane visualizzata per 10 secondi.
Tenere premuto il pulsante per tre secondi; lo
strumento passa alla modalità di misura continua di
temperatura a raggi infrarossi.
; lo strumento visualizza la
4
;
Page 64

Selezione dell’unità di misura: °C o °F
Da 30 mm a 240 mm Da 50 m m a 400 mm Da 1 00 mm a 800 mm
1,2” à 9,6” 2” à 16” 4“ à 32”
Linea B
Premere simultaneamente il pulsante di misura e il pulsante
della torcia per due secondi per selezionare °C o °F.
Distanza e diametro dello spot
Aumentando la distanza (D) dall’oggetto, aumenta
anche il diametro dello spot (S), ossia dell’area misurata
dallo strumento.
Usare lo strumento a una distanza pari a circa 30 cm per
ottenere la massima precisione.
A distanze più lunghe, l’area di misura sarà maggiore del
rapporto distanza/8.
Non tenere le dita sull’alloggiamento per un lungo
periodo di tempo né tenerle oltre la linea immaginaria B,
per evitare effetti di interferenza termica sulla precisione
della misura.
5
Page 65

Promemoria
Attendere 30 minuti
Attendere 30 minuti per eseguire misure più precise.
1. Variazioni della temperatura ambiente nelle aree
circostanti possono causare misure imprecise; prima
di usare lo strumento, attendere che si adatti alla
variazione di temperatura. La precisione dichiarata
è valida 30 minuti dopo che lo strumento rileva una
variazione della temperatura ambiente.
Attendere che lo strumento si adatti al
cambiamento di condizioni dalla tasca all’ambiente
in cui sarà adoperato.
6
Page 66

2. Lo strumento non è in grado di misurare
attraverso superfici trasparenti, come ad esempio
il vetro. Rimuovere la barriera che si interpone
tra lo strumento e la superficie di cui misurare la
temperatura.
3. Si sconsiglia l’uso dello strumento per la misura
della temperatura di superfici lucide o di metallo
levigato (acciaio inossidabile, alluminio, ecc.).
Vedere la sezione Emissività.
4. La presenza di vapore, polvere, fumo, ecc. può
ostruire l’ottica dello strumento, compromettendo
la precisione delle misure.
Emissività
La maggior parte dei materiali organici e delle superfici
verniciate o ossidate ha un’emissività di 0,95 (preimpostata
nello strumento). Misurando la temperatura di superfici
lucide o di metallo levigato si ottengono risultati
imprecisi; per compensare, coprire la superficie su cui
eseguire la misura con nastro adesivo di carta o con
vernice nera opaca. Lasciare che il nastro raggiunga la
stessa temperatura del materiale ricoperto e misurare la
temperatura del nastro o della superficie verniciata.
7
Page 67

Tensione senza contatto
Rilevata
cavo isolato
alta tensione
dmm20
La funzione rilevazione di tensione senza contatto è
attivata automaticamente quando lo strumento è nella
modalità di attesa.
Quando viene rilevata una tensione senza contatto, sul
display lampeggiano tre trattini e la torcia lampeggia.
Il numero di trattini visualizzati indica l’intensità del
campo elettrico. Quanto maggiore è l’intensità rilevata,
tanto maggiore è il numero di simboli “-” che compaiono
sul display.
La funzione misura di tensioni senza contatto (NCV) è
impiegabile solo su cavi isolati. Durante misure di alta
tensione mantenere una distanza di almeno 20 mm dai cavi.
8
Page 68

DATI TECNICI
Portata di
temperatura
Precisione a 23 °C
±2 °C a < 80﹪di
umidità relativa
Risoluzione
ottimale del
display
Tempo di risposta 0,5 s
Lunghezza
d’onda
Emissività E=0,95
D:S 8:1 (calcolato all’80% di energia)
Ripetibilità ±1 °C o ±0,5% della lettura (il valore
Tenuta dati sul
display
Tensione senza
contatto
Alimentazione Pila alcalina ministilo (AAA) da 1,5 V
Peso Circa 50 g
Dimensioni
(AxLxP)
Temperatura di
immagazzinaggio
Da -30 a 500 °C (da -4 a 932 °F)
Da -30 a 0 °C (da -20 a 932 °F):
±2 °C (±4 °F)
Da 1 a 10 °C (da 34 a 50 °F):
±1,5 °C (±3 °F)
Da 11 a 40 °C (da 52 a 104 °F):
±1 °C (±2 °F)
Da 41 a 500 °C (da 106 a 932 °F):
±1,5 °C (±3 °F) o ±1,5% della lettura
(il valore maggiore tra i due).
0,2 °C (0,5 °F)
Da 6,5 a 18 um
maggiore tra i due)
10 s
60 ~ 600 V AC
100 x 20 x 29 mm
Da -20 a 60 °C (senza pila)
9
Page 69

Certicazione CE
Lo strumento è conforme alle seguenti norme:
• EN 61326-1 – Emissioni elettromagnetiche e
suscettibilità
• EN 61010-1 – Sicurezza generale
• EN 60825-1 – Sicurezza laser
RICERCA GUASTI
Segnalazione Problema Intervento
Si visualizza
l’icona della
pila.
Display vuoto. La pila
Il laser non
funziona.
La pila potrebbe
essere quasi scarica.
potrebbe essere
completamente
scarica.
La pila potrebbe
essere parzialmente
o completamente
scarica.
Controllare
la pila e/o
sostituirla.
Controllare
la pila e/o
sostituirla.
Sostituire la
pila.
10
Page 70

MANUTENZIONE E RIPARAZIONI
Alc ol
dis in fet ta nt e
Pulizia della lente – Ripulire la lente dalle particelle
non attaccate usando aria compressa pulita. Eliminare
le particelle rimaste passando delicatamente sulla lente
un pennello con setole di cammello. Passare con cautela
sulla superficie un tamponcino di cotone inumidito con
acqua o alcol disinfettante.
NOTA: per pulire la lente di plastica NON utilizzare
solventi.
Pulizia dell’involucro – Usare una spugna o un panno
morbido inumiditi con acqua e sapone.
NOTA: NON immergere lo strumento in acqua.
11
Page 71

SOSTITUZIONE DELLA PILA
Spingere per aprire
pila stilo (AA)
Coperchio
scomparto pila
Sostituire la pila quando sul display lampeggia il
corrispondente indicatore.
Quando si sostituisce la pila, lo strumento passa
automaticamente alla modalità di attesa.
12
Page 72

Page 73

IR-500
Termómetro por infrarrojos /
Detector de tensión /
Linterna
Manual de uso
Junio de 2011, Rev.1
©2011 Amprobe Test Tools.
Reservados todos los derechos. Impreso en Taiwán.
Español
Page 74

Garantía limitada y limitación de responsabilidades
Su producto de Amprobe está garantizado contra defectos de
material y mano de obra durante 1 año a partir de la fecha de
compra, salvo que la legislación de su país estipule lo contrario.
Esta garantía no cubre fusibles, baterías desechables, ni daños
derivados de accidentes, negligencia, uso indebido, alteración,
contaminación o condiciones anormales de uso o manipulación.
Los revendedores no están autorizados a extender ninguna otra
garantía en nombre de Amprobe. Para obtener servicio durante
el período de garantía, devuelva el producto acompañado del
comprobante de compra a un centro de servicio de Amprobe Test
Tools autorizado o a un concesionario o distribuidor de Amprobe.
Consulte el apartado Reparación para obtener información más
detallada. ESTA GARANTÍA CONSTITUYE SU ÚNICO RECURSO.
TODAS LAS DEMÁS GARANTÍAS, TANTO EXPRESAS COMO
IMPLÍCITAS O ESTATUTARIAS, INCLUIDAS LAS GARANTÍAS
IMPLÍCITAS DE IDONEIDAD PARA UN PROPÓSITO DETERMINADO O
DE COMERCIABILIDAD, QUEDAN POR LA PRESENTE DENEGADAS. EL
FABRICANTE NO SERÁ RESPONSABLE DE LOS DAÑOS O PÉRDIDAS
ESPECIALES, INDIRECTOS, CONTINGENTES O RESULTANTES, QUE
SE DERIVEN DE CUALQUIER CAUSA O TEORÍA. Debido a que
determinados estados o países no permiten la exclusión o limitación
de una garantía implícita o de los daños contingentes o resultantes,
esta limitación de responsabilidad puede no regir para usted.
Reparación
Todas las herramientas de prueba que se devuelvan para su
reparación, cubierta o no por garantía, o para su calibración,
deben ir acompañadas de lo siguiente: su nombre, el nombre de
su empresa, el domicilio, el número de teléfono y el comprobante
de compra. Además, incluya una breve descripción del problema
o del servicio solicitado y adjunte los conductores de prueba del
medidor. La reparación fuera de garantía o los cargos de sustitución
deben remitirse en la forma de cheque, giro postal, tarjeta de
crédito con fecha de vencimiento u orden de compra pagadera a
®
Amprobe
Test Tools.
Reparaciones y sustituciones cubiertas por la garantía –
Todos los países
Sírvase leer la declaración de garantía y compruebe su batería
antes de solicitar la reparación. Durante el período de garantía,
toda herramienta de prueba defectuosa puede devolverse al
distribuidor de Amprobe® Test Tools para cambiarla por otra igual
Page 75

o por un producto similar. Consulte el apartado “Where to buy”
en www.amprobe.com para ver una lista de distribuidores locales.
Además, en Estados Unidos y Canadá, las unidades para reparación
y reemplazo cubiertas por la garantía también se pueden enviar a
un Centro de Servicio de Amprobe® Test Tools.
Reparaciones y sustituciones no cubiertas por la garantía –
Estados Unidos y Canadá
Las reparaciones fuera de la garantía en los Estados Unidos y
Canadá deben enviarse a un Centro de servicio de Amprobe® Test
Tools. Llame a Amprobe® Test Tools o pregunte en su punto de
compra para conocer las tarifas actuales de reparación y sustitución
de productos.
En Estados Unidos En Canadá
Amprobe Test Tools Amprobe Test Tools
Everett, WA 98203 Mississauga, Ontario L4Z 1X9
Tel.: 877-AMPROBE (267-7623) Tel.: 905-890-7600
Reparaciones y sustituciones no cubiertas por la garantía – Europa
El distribuidor de Amprobe® Test Tools puede sustituir las unidades
vendidas en Europa que no estén cubiertas por la garantía por
un coste nominal. Consulte el apartado “Where to buy” en
www.amprobe.com para ver una lista de distribuidores locales.
Dirección para envío de correspondencia en Europa*
Amprobe® Test Tools Europe
Beha-Amprobe GmbH
In den Engematten 14
79286 Glottertal, Alemania
Tel.: +49 (0) 7684 8009 - 0
www.amprobe.eu
*(Correspondencia solamente. En esta dirección no se proporcionan
reparaciones ni sustituciones de productos. Los clientes europeos
deben ponerse en contacto con su distribuidor).
Page 76

IR-500 Termómetro por infrarrojos /
Detector de tensión / Linterna
21
3
6
1) Láser
2) Linterna
3) Pantalla
4) Botón de la linterna
5) Botón de encendido/
prueba
4
7 8 9
5
6) Tapa de la batería
7) Indicador de la
batería
8) Indicador láser
9) Indicador NCV
O
10)
C / OF
10
Page 77

ÍNDICE
SÍMBOLOS ........................................................................... 1
DESEMBALAJE E INSPECCIÓN ............................................ 2
INTRODUCCIÓN .................................................................. 2
INSTRUCCIONES DE FUNCIONAMIENTO .................3
Encendido y apagado ....................................................3
Apagado automático ..................................................... 3
Retención automática .................................................... 3
Funcionamiento de la unidad .......................................3
Mediciones de temperatura .......................................... 4
Selección de °C/°F ........................................................... 5
Distancia y tamaño de punto ........................................ 5
Recordatorios .................................................................6
Emisividad ....................................................................... 7
Tensión sin contacto.......................................................8
ESPECIFICACIONES ............................................................. 9
RESOLUCIÓN DE PROBLEMAS ........................................... 10
MANTENIMIENTO Y REPARACIÓN .................................... 11
CAMBIO DE LA BATERÍA .................................................... 12
Page 78

SÍMBOLOS
¡Precaución! Consulte la explicación incluida en
este manual.
Luz láser. No mire directamente al haz láser.
¡Precaución! Tensión sin contacto.
Batería
No aplique la unidad directamente ni
alrededor de conductores peligrosos que estén
electrificados.
Cumple las normas australianas pertinentes.
Cumple las directivas europeas.
No elimine este producto como residuo municipal
sin clasificar. Póngase en contacto con un
reciclador cualificado.
Información de seguridad
Advertencia
• No mire directamente al haz láser.
• No apunte con el láser directamente a los ojos
ni de forma indirecta por medio de supercies
reectantes.
• Para uso exclusivo por personal competente
• No deje la unidad encima ni cerca de objetos muy
calientes.
• La función de tensión sin contacto puede realizar
comprobaciones únicamente en cables aislados. Para
realizar comprobaciones en cables de alta tensión,
se deberá mantener una distancia de 20 mm como
mínimo.
1
Page 79

• No utilice la unidad para detectar en cables
tensiones superiores a 600 V.
Precauciones
Utilice esta unidad solamente de la manera que se
especica en este manual; de lo contrario, la protección
provista por la unidad podría verse afectada.
La unidad debe protegerse de lo siguiente:
• Campos electromagnéticos (EMF) de equipos de
soldadura por arco, calefactores por inducción
• Electricidad estática
• Contraste térmico (causado por cambios intensos
o bruscos en la temperatura ambiente; deje que
transcurran 30 minutos para que la unidad se
estabilice antes de volver a utilizarla)
• No deja la unidad encima ni cerca de objetos muy
calientes
DESEMBALAJE E INSPECCIÓN
La caja del producto debe contener lo siguiente:
1 IR-500
1 Batería alcalina AAA de 1,5 V (instalada)
1 Manual
Si alguno de los artículos está dañado o no está en la
caja, devuelva el producto completo a la tienda donde lo
compró para cambiarlo.
INTRODUCCIÓN
Una herramienta imprescindible para aplicaciones
cotidianas: verifique temperaturas, compruebe la
presencia de tensión eléctrica y utilícela como linterna para
ver en la oscuridad. Compacta y fácil de usar: simplemente
necesita apuntar, pulsar el botón, y leer la temperatura
de las superficies en menos de un segundo. Podrá medir
sin riesgos y sin contacto la temperatura de superficies de
objetos calientes, peligrosos o de difícil acceso.
2
Page 80

Características
pulsar
• Medición de temperatura IR con puntero láser
• Incluye advertencia de tensión de CA sin contacto
• Retiene la lectura de la temperatura durante
10 segundos
• Linterna LED ultrablanca
• Permite elegir entre
• Pinza accesoria para jación en la mayoría de las
pinzas amperimétricas y multímetros
o
C / oF
• Pinza de bolsillo
INSTRUCCIONES DE FUNCIONAMIENTO
Encendido y apagado
Apagado automático
3 minutos.
Retención automática
La unidad retiene la lectura durante 10 segundos tras
soltarse el botón de encendido.
Funcionamiento de la unidad
Para medir una temperatura, apunte la unidad al
objeto y pulse el botón de prueba. Tenga siempre en
cuenta la proporción distancia-tamaño del punto, así
como el campo de visión. La unidad está equipada con
láser; utilícelo exclusivamente para apuntar. Consulte el
apartado “Mediciones de temperatura”.
3
Page 81

Mediciones de temperatura
Incorrecto
Zona objetivo
pulsar liberar
Retención automática 10 segundos
Pulsar 3 segundos
Modo de
medición
continua
Asegúrese de que el objetivo tiene un tamaño mayor
que el punto de la unidad. Cuanto menor sea el objetivo,
más cerca del objeto deberá situarse. El área de medición
mínima es de 3,75 cm (1,5 pulgadas) de diámetro.
Pulse la tecla , la unidad indicará la temperatura
de la superficie. A continuación, libere la tecla , la
pantalla LCD retendrá la lectura durante 10 segundos.
Pulse la tecla durante 3 segundos; la unidad pasará
al modo de medición continua de la temperatura
mediante IR.
4
Page 82

Selección de °C / °F
30 mm a 240 mm 50 mm a 400 mm 100 mm a 800 mm
1,2 pulg. a 9,6 pulg. 2 pulg. a 16 pulg. 4 pulg. a 32 pulg.
D : P = 8 : 1
Línea B
Pulse el botón de prueba y el botón de la linterna
simultáneamente durante 2 segundos para cambiar la
unidad de temperatura entre °C/°F.
Distancia y tamaño de punto
A medida que aumenta la distancia (D) hasta el objeto,
crecerá el tamaño del punto (P) del área medida.
Utilice la unidad a unos 30 cm para que la precisión de la
medición sea la máxima.
A distancias superiores, el área del objetivo deberá ser
mayor que la distancia dividida por 8.
No deje los dedos puestos en la carcasa durante periodos
prolongados ni cruce la “línea B” para evitar que el efecto
térmico interfiera con la precisión de las mediciones.
5
Page 83

Recordatorios
Espere 30 minutos
Espere 30 minutos para una medición más precisa
1. Los cambios en la temperatura ambiente pueden
afectar a la exactitud de las lecturas; deje que la
unidad se adapte al cambio de la temperatura
ambiente antes de utilizarla. La exactitud
especificada se consigue transcurridos 30 minutos
del cambio de la temperatura ambiente.
Deje tiempo para que la unidad se adapte al cambio
desde el bolsillo del usuario a la temperatura
ambiente del entorno.
6
Page 84

2. La unidad no puede realizar mediciones a través de
superficies transparentes como el vidrio. Quite la
barrera existente entre la unidad y la superficie que
se desee medir.
3. No se recomienda su uso para medir superficies
metálicas brillantes o pulidas (acero inoxidable,
aluminio, etc.). Consulte el apartado Emisividad.
4. La presencia de vapor, polvo, humo, etcétera,
puede obstruir la óptica de la unidad e impedir la
realización de mediciones exactas.
Emisividad
La mayoría de los materiales orgánicos y las superficies
pintadas u oxidadas tienen una emisividad de 0,95
(preconfigurada en la unidad). La medición de superficies
metálicas brillantes o pulidas ofrecerá resultados
inexactos. Para compensar este efecto, cubra la superficie
con cinta de pintor o con pintura negra lisa. Deje que
transcurra el tiempo necesario para que la cinta alcance
la misma temperatura que el material sobre el que
está colocada. Mida la temperatura de la cinta o de la
superficie pintada.
7
Page 85

Tensión sin contacto
Detectada
cable aislado
alta tensión
dmm20
La función de tensión sin contacto está activada
automáticamente cuando la unidad se encuentra en
modo de espera.
Si se detecta tensión sin contacto, la pantalla LCD
parpadeará tres veces y la linterna destellará.
El número de guiones que aparecen en la pantalla LCD
indica la intensidad del campo eléctrico. Cuando más
alto sea el campo eléctrico detectado, más símbolos “-”
aparecerán en la pantalla LCD.
La función de tensión sin contacto puede realizar
comprobaciones únicamente en cables aislados. Para
realizar comprobaciones en cables de alta tensión, se
deberá mantener una distancia de 20 mm como mínimo.
8
Page 86

ESPECIFICACIONES
Rango de
temperatura
Exactitud a
23 °C ±2 °C
< 80 ﹪ HR
Resolución
óptima de la
pantalla
Tiempo de
respuesta
Longitud de
onda
Emisividad E=0,95
D:P 8:1 (calculada al 80 % de la energía)
Repetibilidad ±1 °C o ±0,5 % de la lectura, el valor que
Retención de
datos
Tensión sin
contacto
Alimentación Batería alcalina AAA de 1,5 V
Peso Aprox. 50 g (0,11 lb)
Dimensiones
(Al x An x Pr)
Temperatura
de almacenamiento
-30 °C a 500 °C (-20 °F a 932 °F)
-30 °C a 0 °C (-20 °F a 32 °F): ±2 °C (±4 °F)
1 °C a 10 °C (34 °F a 50 °F): ±1,5 °C (±3 °F)
11 °C a 40 °C (52 °F a 104 °F): ±1 °C (±2 °F)
41 °C a 500 °C (106 °F a 932 °F): ±1,5 °C
(±3 °F) o ±1,5 % de la lectura, el valor
que sea superior.
0,2 °C (0,5 °F)
0,5 seg.
6,5 um a 18 um
sea superior
10 seg.
60 V CA ~ 600 V CA
100 x 20 x 29 mm
(3,94 x 0,79 x 1,14 pulg)
-20 °C a 60 °C (sin batería)
9
Page 87

Certicación CE
Este instrumento cumple las siguientes normas
industriales:
• EN 61326-1, susceptibilidad y emisiones
electromagnéticas
• EN 61010-1, seguridad general
• EN 60825-1, seguridad de láser
RESOLUCIÓN DE PROBLEMAS
Código Problema Acción
Aparece el
icono de la
batería
La pantalla
aparece vacía
El láser no
funciona
Es posible que
quede poca carga
Es posible que
la batería esté
agotada
Poca carga o
batería agotada
Compruebe
la batería o
cámbiela
Compruebe
la batería o
cámbiela
Cambie la
batería
10
Page 88

MANTENIMIENTO Y REPARACIÓN
Alc oh ol
iso pro pí li co
Limpieza de la lente: Utilice aire comprimido limpio para
retirar partículas sueltas. Utilice un cepillo de pelo de
camello para quitar con cuidado la suciedad que quede.
Frote suavemente la superficie con un bastoncillo de
algodón humedecido. El bastoncillo puede humedecerse
con agua o con alcohol isopropílico.
NOTA: NO utilice disolventes para limpiar la lente de
plástico.
Limpieza de la carcasa: Utilice jabón y agua con una
esponja húmeda o un paño suave.
NOTA: NO sumerja la unidad en agua.
11
Page 89

CAMBIO DE LA BATERÍA
Presionar para abrir
Cubierta de
la batería
Bat erí a AA A
Cambie la batería cuando aparezca el indicador de
batería parpadeando en la pantalla.
Cuando se cambia o se instala la batería, la unidad pasa
automáticamente al modo de funcionamiento en espera.
12
Page 90

 Loading...