

Page 1

INSP-3
Wiring Inspection
Tester
Users Manual
• Mode d’emploi
• Bedienungshandbuch
• Manual d’Uso
• Manual de uso
Page 2

Page 3

INSP-3
Wiring Inspection Tester
Users Manual
December 2009, Rev.1
©2009 Amprobe Test Tools.
All rights reserved. Printed in China
English
Page 4

Limited Warranty and Limitation of Liability
Your Amprobe product will be free from defects in material
and workmanship for 1 year from the date of purchase. This
warranty does not cover fuses, disposable batteries or damage
from accident, neglect, misuse, alteration, contamination, or
abnormal conditions of operation or handling. Resellers are
not authorized to extend any other warranty on Amprobe’s
behalf. To obtain service during the warranty period, return the
product with proof of purchase to an authorized Amprobe Test
Tools Service Center or to an Amprobe dealer or distributor.
See Repair Section for details. THIS WARRANTY IS YOUR ONLY
REMEDY. ALL OTHER WARRANTIES - WHETHER EXPRESS,
IMPLIED OR STAUTORY - INCLUDING IMPLIED WARRANTIES OF
FITNESS FOR A PARTICULAR PURPOSE OR MERCHANTABILITY,
ARE HEREBY DISCLAIMED. MANUFACTURER SHALL NOT
BE LIABLE FOR ANY SPECIAL, INDIRECT, INCIDENTAL OR
CONSEQUENTIAL DAMAGES OR LOSSES, ARISING FROM ANY
CAUSE OR THEORY. Since some states or countries do not
allow the exclusion or limitation of an implied warranty or of
incidental or consequential damages, this limitation of liability
may not apply to you.
Repair
All test tools returned for warranty or non-warranty repair or
for calibration should be accompanied by the following: your
name, company’s name, address, telephone number, and proof
of purchase. Additionally, please include a brief description of
the problem or the service requested and include the test leads
with the meter. Non-warranty repair or replacement charges
should be remitted in the form of a check, a money order,
credit card with expiration date, or a purchase order made
payable to Amprobe® Test Tools.
In-Warranty Repairs and Replacement – All Countries
Please read the warranty statement and check your battery
before requesting repair. During the warranty period any
defective test tool can be returned to your Amprobe® Test
Tools distributor for an exchange for the same or like product.
Please check the “Where to Buy” section on www.amprobe.com
for a list of distributors near you. Additionally, in the United
Page 5

States and Canada In-Warranty repair and replacement units
can also be sent to a Amprobe® Test Tools Service Center (see
address below).
Non-Warranty Repairs and Replacement – US and Canada
Non-warranty repairs in the United States and Canada
should be sent to a Amprobe® Test Tools Service Center. Call
Amprobe® Test Tools or inquire at your point of purchase for
current repair and replacement rates.
In USA In Canada
Amprobe Test Tools Amprobe Test Tools
Everett, WA 98203 Mississauga, ON L4Z 1X9
Tel: 877-AMPROBE (267-7623) Tel: 905-890-7600
Non-Warranty Repairs and Replacement – Europe
European non-warranty units can be replaced by your
Amprobe® Test Tools distributor for a nominalv charge. Please
check the “Where to Buy” section on www.amprobe.com for a
list of distributors near you.
European Correspondence Address*
Amprobe® Test Tools Europe
In den Engematten 14
79286 Glottertal, Germany
Tel.: +49 (0) 7684 8009 - 0
*(Correspondence only – no repair or replacement available
from this address. European customers please contact your
distributor.)
Page 6
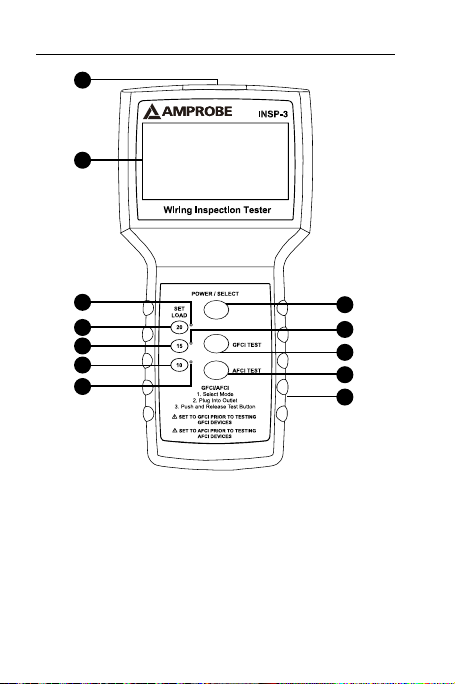
INSP-3 Wiring Inspection Tester
1
6
7
8
10
11
12
1) Power Cord Receptacle
2) Power/Select Push button
3) GFCI Test Push button
4) AFCI Test Push button
5) Battery Compartment
6) LCD Display
7) 20A load LED indicator
2
9
3
4
5
8) 20A load push button
selector
9) 15A load LED indicator
10) 15A load push button
selector
11) 10A load push button
selector
12) 10A load LED indicator
Page 7

CONTENTS
SYMBOLS ........................................................................ 2
UNPACKING AND INSPECTION ..................................... 4
INTRODUCTION .............................................................. 4
Features ...................................................................... 4
OPERATION ..................................................................... 6
Main Screen
Secondary Screen
What the Readings Mean ......................................... 8
SPECIFICATION ............................................................. 11
MAINTENANCE AND REPAIR ....................................... 11
Battery Replacement .............................................. 12
(Refer to Fig.2) ..................................... 6
(Refer to Fig.3) ............................ 7
1
Page 8

2
3
SYMBOLS
Battery
�
Refer to the
manual
Double Insulated
Alternating Current
Direct Current
Application around
and removal
from hazardous
�
live conductors is
permitted
Do not dispose
of this product as
=
unsorted municipal
waste
Underwriters
Laboratories.[Note:
Canadian and US.]
Dangerous Voltage
Earth Ground
Fuse
Complies with EU
directives
Conform to
relevant Australian
standards
Audible tone
Safety Information
• The INSP-3 wiring inspection Tester is conformed
to EN61010-1:2001; CAT II 120 V, class II and
pollution deg.2
• Do not exceed the maximum overload limits
(see specifications) nor the limits marked on the
instrument itself. Never apply more than 120
VAC rms between the adaptor prongs of the
wiring inspection tester.
Page 9

3
�WARNING and PRECAUTIONS
• Before and after hazardous voltage
measurements, test the voltage function on a
known source such as line voltage to determine
proper meter functioning.
• Inspect the INSP-3 wiring inspection tester before
every use. Do not use any damaged part.
• Never ground yourself when taking
measurements. Do not touch exposed circuit
elements or test probe tips.
• Do not operate the instrument in an explosive
atmosphere.
• To reduce the risk of fire or electric shock, do not
expose this product to rain or moisture.
• The meter is intended only for indoor use. To
avoid electrical shock hazard, observe the proper
safety precautions when working with voltages
above 60 VDC, 42.4 Vpk, or 30 VAC rms. These
voltage levels pose a potential shock hazard to
the user.
• Before and after hazardous voltage
measurements, test the voltage function on a
known source such as line voltage to determine
proper meter functioning.
• Keep your hands/fingers behind the hand/finger
barriers (of the meter and the power cord) that
indicate the limits of safe access of the hand-held
part during measurement.
Page 10

4
5
UNPACKING AND INSPECTION
Your shipping carton should include:
1 INSP-3 Wiring Inspection Tester
1 Power Cord
1 9V Alkaline Battery (Installed)
1 Users Manual
1 Carrying Case
If any of the items are damaged or missing, return
the complete package to the place of purchase for an
exchange.
INTRODUCTION
The INSP-3, wiring inspector is a rugged tester
designed to verify building wiring compliance to
electrical code, especially voltage drop under load.
Identify issues with splices, connections and conductor
quality, crucial to safety and performance of the
electrical system.
Features
• Testingefciency-relevanttestdata(voltage,
voltage drop, hot and neutral voltage drop,
voltage with load, ground impedance) is
presented on a single large display to save
operator time - no scrolling or switching screens
needed
• Veriesifwiringistestedforload
carrying ability that meets electrical code
recommendations for voltage drop under load
Page 11

5
• Meterdetectsfaultywiringinneedofrepair
without removing outlets cover plates, or panel
covers:
• Faultysplicesandconnections
• Incorrectwiring
• Undersizedwiring
• FaultyGFCIs,
• FaultyorincorrectlywiredAFCIs
• Incorrectlinevoltage
• Poorgroundquality
• Userselectable10,15and20ampsloadstoverify
performance of the electrical system
• Incorrectwiringorvoltagedroptestfailureis
clearly indicated by flashing screen
• Willnottripcircuitbreakersorblowfuses
during the test
• TestsGFCIandAFCIoperations
• Checkgroundqualityforsafetyandabilityto
support sensitive electronic equipment
• Measurefaultcurrents
• Savemoneyandtimebyeliminatingguesswork.
NOTE: The Inspector™ 3 does not check the
condition of wiring insulation.
Page 12

6
7
OPERATION
A High Quality Adaptor should be used when testing
2 wire outlets.
Ground impedance and polarity is not tested on 2 wire
outlets.
1. Push GFCI TEST push button or AFCI TEST push
button before plugging the INSP-3 to a GFCI or
AFCI circuit outlet to be tested.
2. Plug the INSP-3 wiring inspection tester into
an energized 120V wall outlet using the power
cord provided. Refer to Fig.1
3. The unit will turn itself ON and display the test
results.
4. Push the desired Set Load push button.
Although 10 AMP outlets don’t exist, the switch may be
set to 10 simulating a light load if a small, lower current
device will be connected to the line. Typical 2 wire, 15
AMP and 20 AMP outlets appear as follows:
2 WIRE 15 AMP 20 AMP
5. Read the test results. For GFCI and AFCI, refer to
fig.4 and fig.5
Main Screen (Refer to Fig.2)
Line 1: shows an unloaded voltage of 121.5V /
60Hz at the outlet being tested.
Page 13

7
Line 2: shows the polarity status
Line 3: The “SET LOAD” switch is set for a test
drawing 15 amps. At 15 amps of current draw, the
voltage at the outlet would drop by 4.2%. Since
4.2% is lower than the NEC recommendation of a
maximum of 5% drop, it would not be flashing.
Line 4: shows that 1.1% of the voltage drop is on
the hot conductor while 3.1% is on the neutral
conductor.
Line 5: shows that the voltage at the outlet would
drop to 116.4 volts with a 15 amp load applied.
Line 6: shows that the resistance of the ground
conductor from the outlet to the point where it is
bonded to the neutral conductor is .27 ohms.
NOTE: The Set Load switch may be changed to
show what the drops and voltage would be at 10,
15, or 20 Amps any time after the first reading is
indicated.
Secondary Screen (Refer to Fig.3)
Line 1: shows the outlet to have a true rms voltage
of 121.5/60 Hz volts with no load applied by The
Inspector-3.
Line2: shows the polarity status
Line 3: shows the common mode (the voltage
difference between the ground and neutral
conductor) to be 0.79 volts with no load applied
by the Inspector-3.
Line 4: shows that if the hot and neutral
conductors were to be shorted at the outlet,
Page 14

8
9
the wiring resistance would limit the current to
approximately 424 Amps.
Line 5: shows that if the hot and ground
conductors were to be shorted at the outlet,
the wiring resistance would limit the current to
approximately 850 Amps.
NOTE: Unit turns on automatically when plugged
in. Push and release Power/Select push button to
toggle between screens.
What the Readings Mean
A) Voltage under load: This is the actual voltage
available if a steady load of 10, 15 or 20 amps is
applied to the line. Most North American devices
will operate correctly between approximately
110 and 125 volts. Voltage of less than 108 may
cause computers and other sensitive equipment
to malfunction. High or low voltage can often be
corrected by the utility company servicing your
area.
B) Voltage Drop: Indicates amount voltage would
be reduced with the set load applied to the line.
The national electrical code recommends no
more than a 5% voltage drop. Excessive voltage
drop can be caused by poor splices, connections
or too small of wiring for the length of the run.
Excessive voltage drop can lead to fire, low
operating voltages, and marginal operations
of equipment. Individual conductor quality is
tested by comparing the percentage of voltage
drop on the hot and neutral conductors. This
will indicate if either the hot or the neutral has a
Page 15

9
loose connection or if the wiring run is too long
or has too small a gauge wire for the length of
the run. The electrical code states that “. . . where
the maximum voltage drop on both feeders
and branch circuits to the farthest outlet does
not exceed 5 percent, will provide reasonably
efficiency of operation” (Sec. 210-19)
Possible problems creating excessive voltage drop:
a) Bad splice
b) Loose screw termination
c) Stripped thread on wire nuts or terminal screws
d) Faulty outlet
e) Undersize wiring (too long of run for wire size)
f) Loose connection at circuit breaker or fuse
g) Corroded connections
h) Overheating due to loose contacts
i) Faulty or poor quality push in connections on
receptacles
j) Cold forming on aluminum wiring, causing
loose connections
k) Worn switch or circuit breaker contacts.
NOTE: 15 amp systems should not be expected to
perform to 20 amp specifications
C) Ground Impedance Test – This test is not related
to the “set load” switch and is not affected by
voltage drop on the line. This test simply tells you
the quality of the outlet ground. Most computers
Page 16

10
11
and high technology electronics are reliant on
a good quality equipment ground for proper
operation. A typical rule of thumb is ground
resistance in most cases should be less than 2
ohms. Loose connection, splices or too small of a
ground conductor can cause high impedance. If
less than .05 ohms is indicated on a medium or
long wire run, check the test outlet for a short
between neutral and ground.
D) Polarity Test – This test checks for typical wiring
errors involving three wire outlets. Any wiring
errors should be corrected immediately before
further test of the outlet.
NOTE: Open hot is indicated by “No AC present”
Important Notes for Testing GFCI / AFCI Circuits
A) Consult the manufacturer’s installation
instructions to determine that the device is
installed in accordance with the manufacturer’s
specifications.
B) Check for correct wiring of the receptacle and
all remotely connected receptacles on the branch
circuit.
C) Operate the test button on the installed device.
The device must trip. If it does not – do not use the
circuit – consult an electrician.
NOTE: A good quality 3 to 2 wire adapter may be
used to test ungrounded systems with little loss in
accuracy.
Lighting or motor circuits may be tested by using a
good quality plug to clip lead adapter having not
Page 17

11
smaller than 14 gauge wire and not longer than
4 feet.
Large power disturbances or spikes may cause
erratic readings.
SPECIFICATION
Load: Constant 0, 10,15 or 20 AMP simulation
regardless of line voltage
Operating Voltage: 95-140V AC
Power: 9V Alkaline Battery
Fuse: ½ Amp, 125V. Not user replaceable.
GFI Trip: 6.0 mA nominal to trip GFI, 30 mA to trip RCD
AFCI Trip: Up to 8, 120 Amp pulses within ½ second
period
Operating Temperature: 0°C to 50°C ( 32°F to 120°F)
Accuracy: +/- 2%, +/- 2 digits.
MAINTENANCE AND REPAIR
If there appears to be a malfunction during the
operation of the meter, the following steps should
be performed in order to isolate the cause of the
problem.
1. Check the battery. Replace the battery
immediately when the unit doesn’t turn ON.
2. Make sure you use the power cord provided
with the unit
Page 18

12
13
3. Review the operating instructions for possible
mistakes in operating procedure.
Except for the replacement of the battery, repair of
the meter should be performed only by a Factory
Authorized Service Center or by other qualified
instrument service personnel. The front panel and
case can be cleaned with a mild solution of detergent
and water. Apply sparingly with a soft cloth and allow
to dry completely before using. Do not use aromatic
hydrocarbons or chlorinated solvents for cleaning.
Battery Replacement
Power is supplied by 9V Alkaline Battery x1
To replace the battery, remove the screw from the
back of the meter and pull the battery door outward.
Remove the battery from case bottom and replace it
with a fresh 9V Alkaline battery.
To open,
remove screw
Page 19

13
Volt Drop @15A=4.2%
(1.1% Hot + 3.1% Neut)
Loaded Voltage =116.4
Gnd Impedance = .27e
121.5 Vrms
60 Hz
Polarity OK
Common Mode: 0.79V
HotNeu Fault: 424A
HotGnd Fault: 850A
121.5 Vrms
60 Hz
Polarity OK
Fig.2
Fig.3
Fig.1
Page 20

121.5V Drop@15A=3.9%
(1.5% Hot + 2.4% Neut)
Loaded Voltage=118.0
Push GFCI to trip
GFCI Breaker Test
Testing at 6mA
GFCI Breaker Test
GFCI Test passed at
6mA in 1.2 Seconds
GFCI Breaker Test
GFCI Test passed at
30mA in 1.5 Seconds
GFCI Breaker Test
Failed 6mA Test
Testing at 30mA
GFCI Breaker Test
Failed 6mA Test
Failed 30mATest
GFCI Test Failed
Draws up to eight 120A
pulses within half period
AFCI Test passed
AFCI Test Failed
Volt Drop@15A=3.9%
(1.5% Hot + 2.4% Neut)
Loaded Voltage=116.8
Push AFCI to trip
121.5 Vrms
60 Hz
Fig.4
Fig.5
14
Page 21

Page 22

 Loading...