

Page 1

CO2-100
CO2 Meter
User Manual
ENG FRE
ITA SPA
GER
Page 2

Page 3

CO2-100
CO2 Meter
User Manual
1/2018, Rev.B
©2018 Amprobe Test Tools.
All rights reserved. Printed in China
English
Page 4

Limited Warranty and Limitation of Liability
Your Amprobe product will be free from defects in material
and workmanship for 1 year from the date of purchase. This
warranty does not cover fuses, disposable batteries or damage
from accident, neglect, misuse, alteration, contamination, or
abnormal conditions of operation or handling. Resellers are not
authorized to extend any other warranty on Amprobe’s behalf.
To obtain service during the warranty period, return the product
with proof of purchase to an authorized Amprobe Test Tools
Service Center or to an Amprobe dealer or distributor. See Repair
Section for details. THIS WARRANTY IS YOUR ONLY REMEDY.
ALL OTHER WARRANTIES - WHETHER EXPRESS, IMPLIED OR
STAUTORY - INCLUDING IMPLIED WARRANTIES OF FITNESS FOR
A PARTICULAR PURPOSE OR MERCHANTABILITY, ARE HEREBY
DISCLAIMED. MANUFACTURER SHALL NOT BE LIABLE FOR ANY
SPECIAL, INDIRECT, INCIDENTAL OR CONSEQUENTIAL DAMAGES
OR LOSSES, ARISING FROM ANY CAUSE OR THEORY. Since some
states or countries do not allow the exclusion or limitation of an
implied warranty or of incidental or consequential damages, this
limitation of liability may not apply to you.
Repair
All test tools returned for warranty or non-warranty repair or
for calibration should be accompanied by the following: your
name, company’s name, address, telephone number, and proof of
purchase. Additionally, please include a brief description of the
problem or the service requested and include the test leads with
the meter. Non-warranty repair or replacement charges should be
remitted in the form of a check, a money order, credit card with
expiration date, or a purchase order made payable to Amprobe®
Test Tools.
In-Warranty Repairs and Replacement – All Countries
Please read the warranty statement and check your battery before
requesting repair. During the warranty period any defective test
tool can be returned to your Amprobe® Test Tools distributor
for an exchange for the same or like product. Please check the
“Where to Buy” section on www.amprobe.com for a list of
distributors near you. Additionally, in the United States and
Canada In-Warranty repair and replacement units can also be sent
to a Amprobe® Test Tools Service Center (see address below).
Page 5

Non-Warranty Repairs and Replacement – US and Canada
Non-warranty repairs in the United States and Canada should be
sent to a Amprobe® Test Tools Service Center. Call Amprobe® Test
Tools or inquire at your point of purchase for current repair and
replacement rates.
In USA In Canada
Amprobe Test Tools Amprobe Test Tools
Everett, WA 98203 Mississauga, ON L4Z 1X9
Tel: 877-AMPROBE (267-7623) Tel: 905-890-7600
Non-Warranty Repairs and Replacement – Europe
European non-warranty units can be replaced by your Amprobe®
Test Tools distributor for a nominalv charge. Please check the
“Where to Buy” section on www.amprobe.com for a list of
distributors near you.
European Correspondence Address*
Amprobe® Test Tools Europe
In den Engematten 14
79286 Glottertal, Germany
Tel.: +49 (0) 7684 8009 - 0
*(Correspondence only – no repair or replacement available from
this address. European customers please contact your distributor.)
Page 6
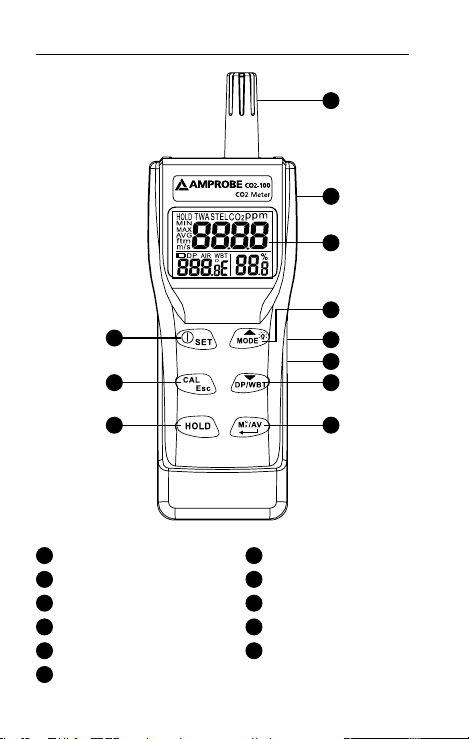
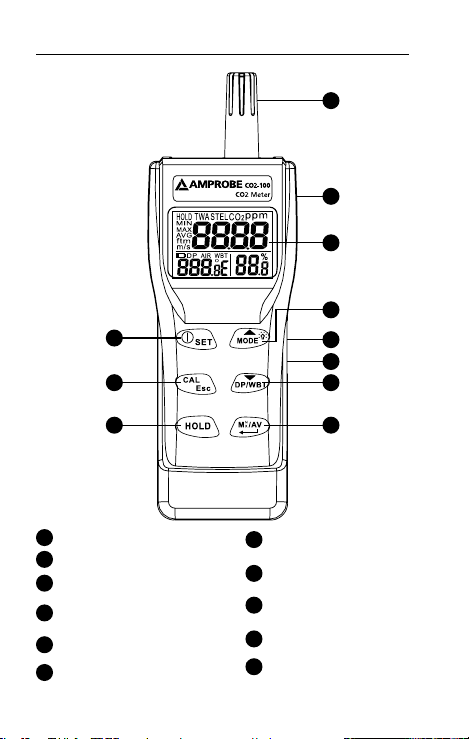
CO2-100 CO2 Meter
4
6
1
2
3
5
11
10
7
8
Humidity Sensor
1
LCD Display
3
Backlight/Roll Up Key
5
7
Temp. Mode/Roll Down Key
9
Min/Max/Avg./Enter Key
11
DC Adaptor Port
9
CO2 Sensor (Rear Side)
2
POWER/SET Key
4
Calibration/Escape Key
6
8
Data Hold Key
10
USB Port
Page 7

LCD Display
8
9
4 56 7
1
10
3
11 12
1
Primary Screen Displays CO2 Concentration
2
Relative Humidity In %
3
Air, Dew Point, Wet Bulb Temperature Display
4
Co2 Measurement Mode
5
Unit For Co2 Concentration
6
Time Weighted Average (8 Hours)
7
Short-Term Exposure Limit
(15 Minutes Weighted Average)
8
To Freeze Readings
9
Minimum/Maximun Readings
10
Low Battery Indicator
11
Dew Point Temperature
12
Wet Bulb Temperature
2
Page 8

CONTENTS
SYMBOLS .......................................................................... 2
UNPACKING AND INSPECTION .......................................2
INTRODUCTION ................................................................ 3
Features ........................................................................ 3
OPERATION .......................................................................4
Auto Power Off ........................................................... 5
Setup ............................................................................ 6
Calibration Mode ........................................................ 7
USB Interface capabilities ........................................... 8
SPECIFICATION .................................................................9
MAINTENANCE AND REPAIR ...........................................10
Battery Replacement ..................................................10
TROUBLE SHOOTING .......................................................11
APPENDIX ........................................................................ 12
1
Page 9

SYMBOLS
Caution! Refer to the explanation in this
Manual
Conforms to relevant Australian standards
Complies with European Directives
Do not dispose of this clamp meter as
unsorted municipal waste. Contact a qualified
recycler for disposal.
Warning and Precautions
• Avoid condensation on CO2 sensor
• Do not hold the meter close to faces in case
exhalation affects CO2 levels.
• Do not calibrate the meter in the air with
unknown CO2 concentration. Otherwise, it will
be calibrated as 400ppm by default and leads to
inaccurate measurements.
UNPACKING AND INSPECTION
Your shipping carton should include:
1 CO2-100 CO2 Meter
4 AA battery
1 User manual
1 Hard carrying case
If any of the items are damaged or missing, return
the complete package to the place of purchase for an
exchange.
2
Page 10

INTRODUCTION
Thank you for purchasing this portable CO2 meter. The
meter measures CO2 level, air temp., dew point, wet
bulb temp. and humidity and is an ideal instrument for
indoor air quality (IAQ) diagnosis.
Poor indoor air quality is considered unhealthy because
it causes tiredness, loss of ability to concentrate, and
even illness (ex. Sick Building Syndrome). IAQ monitoring
and survey, especially on CO2 level and air ventilation
become widely applied in public areas such as offices,
classrooms, factories, hospitals and hotels. It is also
suggested in regulations of industrial hygiene in some
countries. (Appendix)
The portable CO2 meter uses NDIR (non-dispersive
infrared) technology to ensure the reliability and long
term stability. It’s useful in verifying HVAC system
performance and air ventilation control
Features
• Triple displays of CO2 level, temp. and humidity.
• Stable NDIR sensor for CO2 detection.
• Statistics of weighted averages (TWA & STEL)
• Backlight for working in dark area
• Audile CO2 warning alarm
• Battery and adaptor power supply
• Easy manual calibration on CO2 and humidity
• USB PC connection
3
Page 11
OPERATION
1. Press “POWER/SET” to turn instrument on and off.
At power up, it emits a short beep and performs
30 seconds countdown for meter warm up, then
enters normal mode.
2. The meter starts measurement when power
on and update readings every second. In the
condition of operating environment change (ex.
from high to low temp.), it takes 30 sec to respond
for CO2 sensor and 30 minutes for RH.
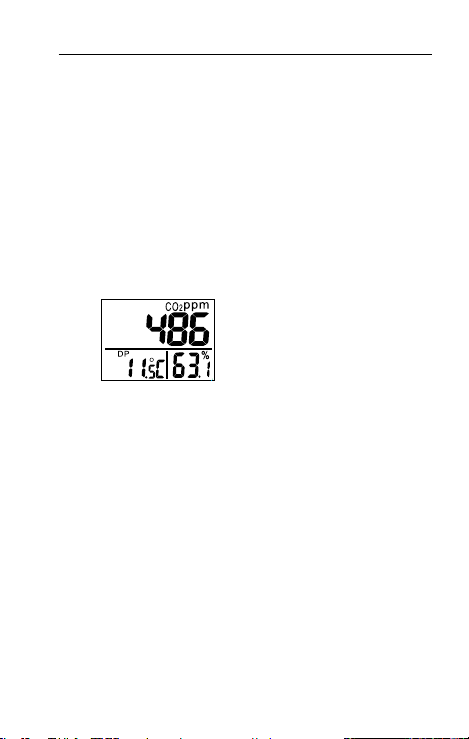
3. Press “DP/WBT” to switch temperatures
display. The lower left display will cycle from air
temperature, dew point temp., and wet bulb
temp. (Fig.1)
Fig.1
4. Press “HOLD” to freeze the readings, “HOLD”
icon is displayed on the left top of LCD. All current
readings are kept unchanged, except STEL and
TWA. Press “HOLD” again to cancel data hold
function.
5. Hold down “MODE/p”for more than 1 second to
activate and cancel backlight.
6. Press “MAX/MIN” to see the minimum, maximum,
and weighted average readings. Each press of it
displays MIN, MAX, STEL, TWA in sequence and
returns to normal mode. In MIN and MAX modes,
it shows the minimum and maximum readings
of CO2 on main display, and of AIR/DP/WBT
temperatures and humidity on the lower displays.
4
Page 12

In STEL and TWA modes, the main display shows
the weighted average of CO2 readings for the past
15 minutes (STEL) and 8 hours(TWA), but the lower
displays are the current AIR, DP/WB temperatures
and humidity readings.
NOTE:
• If the meter is turned on for shorter than 15
minutes, the STEL value will be the weighted
average of readings taken since power on. Same
for TWA values appear before 8 hours.
• It takes at least 5 minutes to calculate STEL and
TWA. The display shows “----” during the first 5
minutes from power on (Fig.2).
Fig.2
• While all readings are held unchanged, STEL
and TWA will keep updating every 5 minutes.
7. The instrument emits beeps (Abt.80dB) when CO2
level goes over the set limit and stops when any
key (but “POWER“ key) was pressed or readings
fall below the set value. It beeps again when value
goes over the limit. Restart the meter if beeper
can’t be stopped.
Auto Power Off
The meter turns off automatically after 20 minutes of
inactivity. To override the function, hold down “POWER
/ SET” and ”HOLD” for 2 seconds to turn on the meter
until “n” appears.
5
Page 13
Setup
The advanced setup mode lets you customize your meter.
2 types parameter are available.
P1.0: CO2 alarm threshold setting
P3.0: Temperature unit setting
P1.0 CO2 alarm threshold setting
Hold down “POWER/SET” under normal mode for more
than 1 sec to enter set up mode. To exit setup, press
“CAL/ESC” in P1.0 or P3.0.
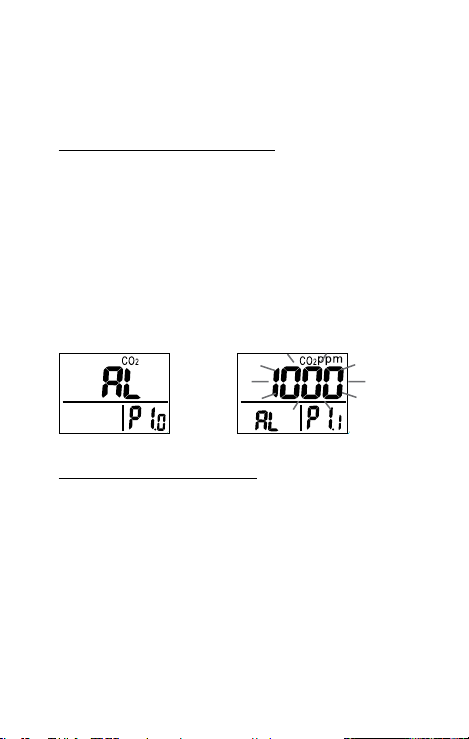
When entering setup mode, P1.0 and “AL” are displayed
on the LCD (Fig.3). Press “ENTER” to go into P1.1 for
setting CO2 alarm threshold. The current set value will
be blinking on LCD (Fig.4). Press “p”to increase the
value or “q”to decrease. Each press tunes 100 ppm and
the alarm range is from 100 to 9900ppm. When the
preferred alarm value is set, press “ENTER” to save the
setting or “ESC” without saving and return to P1.0.
Fig.3 Fig.4
P3.0: Temperature unit setting
Press “p“or “q”in P1.0 to access P3.0 for setting up
temperature scale. Press “ENTER” and it goes into P3.1
with blinking °C or °F current set on the lower left
display. To switch °C or °F, press “p“or “q. Then press
“ENTER” to save the setting or “ESC” without saving and
return to P3.0.
6
Page 14

Calibration Mode
CO2 calibration
1. Place the meter in an outdoor area with well
ventilated air. Turn on the meter and hold down
“CAL” and “p” simultaneously to enter CO2
calibration mode. 400ppm and “CAL” are blinking
on the LCD while performing calibration (Fig.5).
Fig.5
2. Wait about 5 minutes until it stops blinking and
the calibration completes automatically and back
to normal mode.
3. To abort the calibration, turn off the meter at any
time.
Humidity calibration
1. Plug the sensor probe into 33% salt bottle. Hold
down “CAL” and “q” under normal mode to
enter 33% calibration. “CAL” and calibrating
value (32.7% if at 25°C) are blinking on the LCD
with current temperature at the left. Meter is now
calibrating, and will finish in about 60 minutes
when “CAL” and humidity value stop blinking.
2. After 33% calibration, plug the sensor probe into
75% salt bottle, then press “ENTER” to enter 75%
calibration. “CAL” and calibrating value (75.2%
if at 25°C) are blinking on the LCD with current
temperature at the left. Meter is now calibrating.
Wait about 60 minutes until blinking stops, then
calibration is completed and it returns to normal
mode.
7
Page 15

3. Users can also calibrate either point. To calibrate
33% only, press “ESC” and exit when 33%
calibration is completed. To calibrate 75%
only, press “p” or “q”within 5 minutes while
initializing 33% calibration. To abort calibration,
just turn off the meter.
USB Interface Capabilities
The USB cable and software (optional kit) are required
to transfer data to a PC. Install the USB driver in the
software first before connection.
8
Page 16

SPECIFICATION
CO2
Range
Resolution 1 ppm
Accuracy
Pressure
Dependence Pressure, 100kPa
Temperature
Range -10.0~60.0°C (14~140°F)
Resolution 0.1°C /0.1°F
Accuracy ±0.6°C / ±0.9°F
Humidity
Range 0.0~95%
Resolution 0.1%
Accuracy ±3%(10~90% at 25°C) ; ±5%(others)
Operating
environment
Storage
environment
Power supply 4pcs AA batteries
- EMC: Conforms to EN61326-1. This product complies
with requirements of the following European Community Directives:
2014/30/EU (Electromagnetic Compatibility). However, electrical noise
or intense electromagnetic fields in the vicinity of the equipment
may disturb the measurement circuit. Measuring instruments will
also respond to unwanted signals that may be present within the
measurement circuit. Users should exercise care and take appropriate
precautions to avoid misleading results when making measurements
in the presence of electronic interference.
0~9999ppm
(5001~9999 out of accuracy scale range)
±30ppm±5%rdg (0~5000)
(Not specified for out of scale)
+1.6% reading per kPa deviation from
normal
0~50°C, 0~95%RH (avoid condensation)
-20~60°C, 0~99%RH
(avoid condensation)
9
Page 17

MAINTENANCE AND REPAIR
If there appears to be a malfunction during the
operation of the meter, the following steps should be
performed in order to isolate the cause of the problem.
1. Check the battery. Replace the battery
immediately when the “
the LCD.
2. Review the operating instructions for possible
mistakes in operating procedure.
Except for the replacement of the battery, repair of the
meter should be performed only by a Factory Authorized
Service Center or by other qualified instrument service
personnel. The front panel and case can be cleaned with
a mild solution of detergent and water. Apply sparingly
with a soft cloth and allow to dry completely before
using. Do not use aromatic hydrocarbons or chlorinated
solvents for cleaning.
” symbol appears on
BATTERY REPLACEMENT
1. The meter is powered by either 4 AA batteries or a
DC adaptor (9V/1A output).
2. When battery voltage gets low, “
will appear on the LCD (Fig.6). And beeper sounds.
The CO2 sensor can’t work under low voltage, so it
beeps to indicate failed CO2 measurement and the
readings won’t be displayed. Please replace with
fresh batteries or connect with an adaptor.
” and “Lob”
10
Page 18

TROUBLE SHOOTING
Can’t power on
• Make sure you press power key more than 0.3
second.
• Check the battery conditions and replace if
necessary.
• Check whether the adaptor is well plugged.
• Move batteries away for one minute and then
re-install.
Display disappear
• Check whether the low battery icon is appeared
before the display is off. If yes, replace with new
batteries.
Fixed readings
• Check whether data hold function was activated.
(HOLD icon at the left top)
Slow response
• Check whether the air flow channels on the rear
were blocked
Error code
E01: CO2 sensor damaged.
E02: The value is under range.
E03: The value is over range.
E04: The original data error results in this error
(DP, WB)
E07: Too low voltage to measure CO2. Replace
batteries or use an adaptor.
E11: Retry humidity calibration.
E17: Retry CO2 calibration.
E31: Temperature sensor damaged.
E34: Humidity sensor damaged.
11
Page 19

APPENDIX - CO2 LEVELS AND GUIDELINES
NIOSH recommendations
250-350 ppm: normal outdoor ambient concentrations
600 ppm: minimal air quality complaints
600-1000 ppm: less clearly interpreted
1000 ppm: indicates inadequate ventilation; complaints
such as headaches, fatigue, and eye/throat irritation will
be more widespread. 1000 ppm should be used as an
upper limit for indoor levels.
ASHRAE Standard 62-1989: 1000ppm
CO2 concentration in occupied building should not
exceed 1000ppm.
Building bulletin 101 (BB101): 1500ppm
UK standards for schools say that CO2 at averaged over
the whole day(i.e. 9am to 3.30pm) should not exceed
1500ppm.
OSHA: 5000ppm
Time weighted average over five 8-hour work days
should not exceed 5000ppm.
Germany, Japan, Australia, UK...: 5000ppm
8 hours weighted average in occupational exposure limit
is 5000ppm.
12
Page 20

Page 21

CO2-100
Compteur de CO2
Mode d’emploi
1/2018, rév.B
©2018 Amprobe Test Tools.
Tous droits réservés. Imprimé en Chine.
Français
Page 22

Limites de garantie et de responsabilité
Amprobe garantit l’absence de vices de matériaux et de
fabrication de ce produit pendant une période d’un an prenant
effet à la date d’achat. Cette garantie ne s’applique pas aux
fusibles, aux piles jetables ni à tout produit mal utilisé, modifié,
contaminé, négligé ou endommagé par accident ou soumis à
des conditions anormales d’utilisation et de manipulation. Les
revendeurs n’ont pas l’autorisation de prolonger toute autre
garantie au nom d’Amprobe. Pour bénéficier de la garantie,
renvoyez le produit accompagné d’un justificatif d’achat
auprès d’un centre de services agréé par Amprobe Test Tools ou
d’un distributeur ou d’un revendeur Amprobe. Voir la section
Réparation pour tous les détails. LA PRESENTE GARANTIE EST
LE SEUL ET EXCLUSIF RECOURS DE L’UTILISATEUR TOUTES
AUTRES GARANTIES, EXPLICITES, IMPLICITES OU STATUTAIRES,
NOTAMMENT LES GARANTIES DE QUALITE MARCHANDE OU
D’ADAPTATION A UN OBJECTIF PARTICULIER SONT EXCLUES
PAR LES PRESENTES. LE FABRICANT NE SERA EN AUCUN CAS
TENU RESPONSABLE DE DOMMAGES PARTICULIERS, INDIRECTS,
ACCIDENTELS OU CONSECUTIFS, NI D’AUCUNS DEGATS OU
PERTES DE DONNEES, SUR UNE BASE CONTRACTUELLE, EXTRACONTRACTUELLE OU AUTRE. Etant donné que certaines
juridictions n’admettent pas les limitations d’une condition
de garantie implicite ou l’exclusion ou la limitation de dégâts
accidentels ou consécutifs, il se peut que les limitations et les
exclusions de cette garantie ne s’appliquent pas à votre cas.
Réparation
Tous les outils de test renvoyés pour être réparés au titre de la
garantie ou pour étalonnage doivent être accompagnés des
éléments suivants : nom, raison sociale, adresse, numéro de
téléphone et justificatif d’achat. Ajoutez également une brève
description du problème ou du service demandé et incluez les
cordons de test avec l’appareil. Les frais de remplacement ou
de réparation hors garantie doivent être acquittés par chèque,
mandat, carte de crédit avec date d’expiration, ou par bon de
commande payable à l’ordre de Amprobe
Remplacements et réparations sous garantie – Tous pays
Veuillez lire la déclaration de garantie et vérifiez la pile avant
de demander une réparation. Pendant la période de garantie,
tout outil de test défectueux peut être renvoyé auprès de votre
distributeur Amprobe
produit identique ou similaire. Consultez la section « Where to
®
Test Tools pour être échangé contre un
®
Test Tools.
Page 23

Buy » sur le site www.amprobe.com pour obtenir la liste des
distributeurs dans votre région. Les appareils sous garantie devant
être remplacés ou réparés au Canada et aux Etats-Unis peuvent
également être envoyés dans un centre de services Amprobe
Tools (voir les adresses ci-dessous).
Remplacements et réparations hors garantie – Canada
et Etats-Unis
Les appareils à réparer hors garantie au Canada et aux Etats-Unis
doivent être envoyés dans un centre de services Amprobe
Tools. Appelez Amprobe
de votre lieu d’achat pour connaître les tarifs en vigueur de
remplacement ou de réparation.
Aux Etats-Unis Au Canada
Amprobe Test Tools Amprobe Test Tools
Everett, WA 98203 Mississauga, ON L4Z 1X9
Tél. : 877-AMPROBE (267-7623) Tél. : 905-890-7600
Remplacements et réparations hors garantie – Europe
Les appareils européens non couverts par la garantie peuvent être
remplacés par votre distributeur Amprobe
somme nominale. Consultez la section « Where to Buy » sur le site
www.amprobe.com pour obtenir la liste des distributeurs dans
votre région.
Adresse postale européenne*
®
Test Tools Europe
Amprobe
In den Engematten 14
79286 Glottertal, Allemagne
Tél. : +49 (0) 7684 8009-0
*(Réservée à la correspondance – Aucune réparation ou
remplacement n’est possible à cette adresse. Nos clients européens
doivent contacter leur distributeur.)
®
Test Tools ou renseignez-vous auprès
®
Test Tools pour une
®
Test
®
Test
Page 24
Compteur de CO2 CO2-100
4
6
1
2
3
5
11
10
7
8
Capteur d’humidité
1
Ecran LCD
3
Touche de rétroéclairage/
5
défilement vers le haut
Température Touche de mode/
7
défilement vers le bas
Touche Min/Max/Moyenne/
9
Entrée
11
Port d’adaptateur en c.c.
9
Capteur de CO2
2
(côté arrière)
Touche d’alimentation/
4
réglage
Touche de calibrage/
6
Echap
Touche de maintien
8
d’affichage
Port USB
10
Page 25

Ecran LCD
4 56 7
8
9
1
10
3
11 12
1
L’écran principal affiche la concentration de CO2
2
Humidité relative en %
Affichage de la température, air, point de rosée,
3
température humide
Mode de mesure de CO2
4
5
Unité de concentration de CO2
Moyenne temporelle pondérée (8 heures)
6
Limite d’exposition à court-terme
7
(moyenne pondérée à 15 minutes)
Pour geler les valeurs relevées
8
9
Valeurs minimum/maximum
Indicateur de piles faibles
10
Température de point de rosée
11
12
Température humide
2
Page 26

TABLE DES MATIERES
SYMBOLES ........................................................................ 2
DEBALLAGE ET INSPECTION ............................................ 2
INTRODUCTION ................................................................ 3
Fonctionnalités ............................................................. 3
FONCTIONNEMENT .......................................................... 4
Arrêt automatique ....................................................... 6
Configuration ............................................................... 6
Mode de calibrage ....................................................... 7
Capacités d’interface USB ............................................ 8
CARACTERISTIQUES ......................................................... 9
ENTRETIEN ET REPARATION ............................................. 10
Changement des piles ..................................................10
DEPANNAGE .....................................................................11
ANNEXE ............................................................................ 12
1
Page 27

SYMBOLES
Attention ! Se reporter aux explications de
ce manuel
Conforme aux directives de l’association
australienne de normalisation
Conforme aux directives européennes
Ne pas mettre cette pince au rebut parmi les
déchets ménagers. Consulter un centre de
recyclage homologué pour sa mise au rebut
Mises en garde et précautions
• Eviter la condensation sur le capteur de CO2
• Ne pas maintenir le compteur près du visage
pour ne pas affecter les niveaux de CO2 avec
l’exhalation.
• Ne pas calibrer le compteur dans un air présentant
une concentration de CO2 inconnue. Sinon le
compteur sera calibré à 400 ppm par défaut en
entraînant des mesures erronées.
DÉBALLAGE ET INSPECTION
Le carton d’emballage doit inclure les éléments suivants :
1 compteur de CO2 CO2-100
4 piles AA
1 Mode d’emploi
1 étui de transport
Si l’un de ces éléments est endommagé ou manquant,
renvoyez le contenu complet de l’emballage au lieu
d’achat pour l’échanger.
2
Page 28

INTRODUCTION
Nous vous remercions d’avoir acheté ce compteur de
CO2 portable. Le compteur mesure le niveau de CO2, la
température de l’air, le point de rosée, la température
humide et l’humidité ; c’est un instrument idéal pour
mesurer la qualité de l’air intérieur (QAI).
Une mauvaise qualité de l’air intérieur est jugée
insalubre car elle provoque la fatigue, une perte de
concentration, voire des maladies (p. ex. syndrome des
édifices hermétiques). La surveillance et l’inspection QAI,
particulièrement des niveaux de CO2 de la ventilation,
sont très fréquentes dans les espaces publics tels que
les bureaux, les classes, les usines, les hôpitaux et les
hôtels. Elles sont également recommandées dans les
réglementations de l’hygiène industrielle dans certains
pays. (Annexe).
Le compteur de CO2 portable utilise la technologie
NDIR (infrarouge non dispersif) pour assurer la fiabilité
et la stabilité à long terme. Il est utile pour vérifier les
performances des systèmes CVC et la régulation de
la ventilation.
Fonctionnalités
• Triple affichages du niveau de CO2, de la
température et de l’humidité
• Capteur NDIR stable pour la détection du CO2
• Statistiques des moyennes pondérées dans le temps
(TWA) et limite d’exposition à court terme (STEL)
• Rétroéclairage pour les interventions dans les
endroits sombres
• Alerte au CO2 sonore
• Alimentation sur batterie et avec adaptateur
• Un calibrage manuel facile du CO2 et de
l’humidité
• Connexion PC USB
3
Page 29

FONCTIONNEMENT
1. Appuyez sur « POWER/SET » pour allumer et
éteindre l’instrument. Au démarrage, l’appareil
émet un bip et procède à un décompte de
30 secondes pour le préchauffage du compteur
avant de passer en mode normal.
2. Le compteur lance la mesure une fois mis sous
tension et actualise les valeurs relevées toutes les
secondes. En cas de changement d’environnement
ambiant (p. ex. passage d’une température haute à
basse), il lui faut 30 secondes de réaction au capteur
de CO2 et 30 minutes pour l’humidité relative.
3. Appuyez sur « DP/WBT » pour permuter d’un
affichage de température à l’autre. L’affichage
inférieur gauche répète en boucle la température
de l’air, la température du point de rosée et la
température humide. (Fig. 1).
Fig. 1
4. Appuyez sur « HOLD » pour geler les valeurs
relevées, l’icône « HOLD » s’affiche dans le coin
supérieur gauche de l’écran LCD. Tous les valeurs
actives sont conservées sans changement, sauf les
valeurs STEL et TWA. Appuyez de nouveau sur
« HOLD » pour annuler la fonction de maintien
des données d’affichage.
5. Maintenez « MODE/p » pendant plus d’une
seconde pour activer et annuler le rétroéclairage.
6. Appuyez sur « MAX/MIN » pour afficher les valeurs
moyennes pondérées, minimum et maximum.
Chaque pression affiche consécutivement les
valeurs MIN, MAX, STEL et TWA et renvoie au
mode normal. En modes MIN et MAX, l’appareil
4
Page 30

affiche les valeurs minimum et maximum de CO2
sur la fenêtre principale et des températures AIR/
DP/WBT et d’humidité sur les fenêtres inférieures.
En modes STEL et TWA, l’affichage principal
montre la moyenne pondérée des valeurs de CO2
relevées dans les 15 dernières minutes (STEL) et
sur 8 heures (TWA), mais les fenêtres inférieures
indiquent les températures AIR, DP/WB (Air,
point de rosée/température humide) actives et
l’humidité.
REMARQUE :
• Si le compteur est activé pendant moins de
15 minutes, la valeur STEL est la moyenne
pondérée des valeurs relevées depuis la mise
sous tension. Le même principe s’applique aux
valeurs TWA avant 8 heures.
• Il faut moins de 5 minutes pour calculer STEL
et TWA. L’affichage montre « ---- » pendant les
5 premières minutes après le démarrage (Fig. 2).
Fig. 2
• Tandis que toutes les valeurs restent inchangées,
STEL et TWA sont actualisées toutes les
5 minutes.
7. L’instrument émet des bips sonores (Abt. 80 dB)
lorsque le niveau de CO2 dépasse la limite de
consigne et s’arrête à la pression d’une touche
(sauf la touche « POWER ») ou les valeurs tombent
en dessous de la valeur définie. Il émet de nouveau
un bip sonore lorsque la valeur dépasse la limite.
Redémarrez le compteur si l’avertisseur ne peut
pas être interrompu.
5
Page 31

Arrêt automatique
Le compteur s’éteint automatiquement après 20 minutes
d’inactivité. Pour contourner cette fonction, maintenez
les boutons « POWER/SET » et « HOLD » enfoncés
pendant 2 secondes pour activer le compteur jusqu’à
l’apparition de « n ».
Configuration
Le mode de configuration avancé permet de
personnaliser le fonctionnement du compteur.
2 types de paramètres sont disponibles.
P1.0 : Réglage du seuil d’alarme au CO2
P3.0 : Réglage de l’unité de température
Réglage du seuil d’alarme au CO2 P1.0
Maintenez enfoncé « POWER/SET » en mode normal
pendant plus d’une seconde pour passer en mode de
configuration. Pour quitter la configuration, appuyez sur
« CAL/ESC » en P1.0 ou P3.0.
En passant en mode de configuration, P1.0 et « AL »
s’affichent sur l’écran LCD (Fig. 3). Appuyez sur
« ENTER » pour passer en P1.1 pour le réglage du seuil
d’alarme au CO2. La valeur de consigne active clignote
alors sur l’écran LCD (Fig. 4). Appuyez sur « p » pour
augmenter la valeur, ou « q » pour la diminuer. Chaque
pression produit un ajustement de 100 ppm et la plage
d’alarme va de 100 à 9900 ppm. Après avoir réglé la
valeur d’alarme souhaitée, appuyez sur « ENTER » pour
enregistrer le paramètre ou sur « ESC » pour ne rien
enregistrer et revenir à P1.0.
Fig. 3 Fig. 4
6
Page 32

P3.0 : Réglage de l’unité de température
Appuyez sur « p » ou sur « q » en P1.0 pour accéder
à P3.0 et configurer l’échelle des température.
Appuyez sur « ENTER » et le compteur passe en P3.1
en faisant clignoter °C ou °F actuellement défini sur la
fenêtre inférieure gauche. Pour basculer entre °C ou
°F, appuyez sur « p » ou sur « q » puis sur « ENTER »
pour enregistrer le paramètre ou sur « ESC » sans rien
enregistrer et revenir à P3.0.
Mode de calibrage
Calibrage du CO2
1. Placez le compteur à l’intérieur de locaux bien
ventilés. Mettez le compteur sous tension
et maintenez les touches « CAL » et « p »
simultanément pour passer au mode de calibrage
en CO2. 400 ppm et « CAL » clignotent sur l’écran
LCD pendant le calibrage (Fig. 5).
Fig. 5
2. Attendez environ 5 minutes que l’appareil
arrête de clignoter et termine le calibrage
automatiquement avant de revenir au
mode normal.
3. Pour annuler le calibrage, éteignez le compteur à
tout moment.
7
Page 33

Calibrage de l’humidité
1. Reliez la sonde du capteur dans un flacon d’eau
salée à 33 %. Maintenez enfoncés « CAL » et
« q » en mode normal pour entrer un calibrage
de 33 % . « CAL » et la valeur de calibrage (32,7 %
à la température de 25 °C) clignotent sur l’écran
LCD avec la température active à gauche. Le
compteur effectue le calibrage pour le terminer
en 60 minutes environ lorsque la valeur « CAL » et
l’humidité arrêtent de clignoter.
2. Après 33 % de calibrage, mettez la sonde du
capteur dans un flacon d’eau salée à 75 %, et
appuyez sur « ENTER » pour entrer un calibrage
à 75 %. « CAL » et la valeur de calibrage (75,2 %
si à 25 °C) clignotent sur l’écran LCD avec la
température active à gauche. Le compteur
procède maintenant au calibrage. Attendez
60 minutes que le clignotement s’arrête, que le
calibrage se termine ; l’appareil revient ensuite en
mode normal.
3. Les utilisateurs peuvent également calibrer l’un ou
l’autre point. Pour ne calibrer qu’à 33 %, appuyez
sur « ESC » et quittez lorsque le calibrage à 33 %
est terminé. Pour ne calibrer qu’à 75 % , appuyez
sur « p » ou sur « q » en 5 minutes pendant
l'initialisation du calibrage à 33 %. Pour annuler le
calibrage, éteignez le compteur.
Capacités de l’interface USB
Le câble USB et le logiciel (kit en option) sont nécessaires
pour transférer les données vers un PC. Installez le pilote
USB dans le logiciel avant d’établir la connexion.
8
Page 34

CARACTERISTIQUES
CO2
Gamme
Résolution 1 ppm
Précision
Pression
Dépendance Pression, 100 kPa
Température
Gamme -10,0 à 60,0 °C (14 à 140 °F)
Résolution 0,1 °C/0,1 °F
Précision ±0,6 °C / ±0,9 °F
Humidité
Gamme 0,0 à 95 %
Résolution 0,1 %
Précision ±3 % (10 à 90 % à 25 °C) ; ±5 % (autres)
Environ-
nement de
fonctionnement
Environnement
d’entre posage
Alimentation 4 piles AA
- CEM : Conforme à EN61326-1. Ce produit est conforme
aux exigences des directives suivantes de la Communauté
européenne: 2014/30/EU (Compatibilité électromagnétique).
Toutefois, le bruit électrique ou les champs électromagnétiques
intenses à proximité de l’équipement sont susceptibles de
0 à 9999 ppm
(gamme d’échelle de 5001 à
9999 hors-précision)
±30 ppm ±5 % résultat (0 à 5000)
(non spécifiée si hors échelle)
+1,6 % du résultat en fonction de
l’écart kPa de la normale
0 à 50 °C, 0 à 95 % HR
(éviter la condensation)
-20 à 60 °C, 0 à 99 % HR
(éviter la condensation)
9
Page 35

perturber le circuit de mesure. Les appareils de mesure réagissent
également aux signaux indésirables parfois présents dans le circuit
de mesure. Les utilisateurs doivent faire preuve de prudence et
prendre les précautions nécessaires pour éviter les erreurs de
mesure en présence de parasites électromagnétiques.
ENTRETIEN ET REPARATION
Si une anomalie est suspectée pendant le fonctionnement
du multimètre, procédez comme suit pour isoler la cause
du problème.
1. Vérifiez les piles. Remplacez immédiatement
les piles à l’apparition du symbole «
» sur
l’écran LCD.
2. Consultez les consignes d’utilisation pour vérifier
les erreurs possibles lors de l’utilisation.
A l’exception du changement des piles, la réparation de
l’appareil doit être effectuée en usine dans un centre de
service agréé ou par un autre personnel de réparation
qualifié. La face avant et le boîtier peuvent être
nettoyés à l’aide d’une solution légère à base d’eau et
de détergent. Appliquez cette solution avec modération
en utilisant un tissu doux et laissez bien sécher avant
l’utilisation. N’utilisez pas de solvants à base de chlore ou
d’hydrocarbures aromatiques pour le nettoyage.
CHANGEMENT DES PILES
1. Le compteur est alimenté par 4 piles AA ou un
adaptateur c.c. (sortie 9 V/1 A).
2. Lorsque la tension des piles baisse, «
« Lob » apparaissent sur l’écran LCD (Fig. 6).
L’avertisseur retentit. Le capteur de CO2 ne peut
pas fonctionner avec une tension basse, de sorte
que l’avertisseur indique l’échec de la mesure de
CO2 et les résultats ne seront pas affichés. Installez
des piles neuves ou branchez un adaptateur.
» et
10
Page 36

DEPANNAGE
Démarrage impossible
• Veiller à appuyer sur la touche d’alimentation plus
longtemps que 0,3 seconde.
• Vérifier l’état des piles et les remplacer
si nécessaire.
• S’assurer que l’adaptateur est solidement branché.
• Enlever les piles pendant une minute et
les réinstaller.
L’affichage disparaît
• Confirmer si l’icône des piles faibles s’est affichée
avant l’extinction de l’écran. Dans l’affirmative,
installer des piles neuves.
Résultats fixes
• Vérifier que la fonction de maintien des données
était activée. (icône HOLD en haut à gauche)
Réponse lente
• Vérifier si les circuits d’écoulement de l’air à
l’arrière étaient bloqués
Code d’erreur
E01 : Capteur de CO2 endommagé.
E02 : La valeur est inférieure au seuil limite inférieur
de la gamme.
E03 : La valeur est supérieure au seuil limite
supérieur de la gamme.
E04 : Les résultats d’erreur des données initiales dans
cette erreur (DP, WB).
E07 : Tension trop faible pour mesurer le CO2.
Remplacer les piles ou utiliser un adaptateur.
11
Page 37

E11 : Recommencer le calibrage de l’humidité
E17 : Recommencer le calibrage de CO2.
E31 : Capteur de température endommagé.
E34 : Capteur d’humidité endommagé.
ANNEXE - NIVEAUX DE CO2 ET DIRECTIVES
Recommandations du NIOSH
250-350 ppm : concentrations normales en extérieur
ambiant
600 ppm : plaintes minimales sur la qualité de l’air
600-1000 ppm : moins clairement interprété
1000 ppm : indique une ventilation inadéquate ; les
plaintes liées aux migraines, à la fatigue et à l’irritation
des yeux et de la gorge sont plus répandues. Utiliser
1000 ppm comme seuil supérieur pour les niveaux
en intérieur.
Norme ASHRAE 62-1989 : 1000 ppm
La concentration en CO2 dans un bâtiment occupé ne
doit pas dépasser 1000 ppm.
Bulletin du bâtiment 101 (BB101) : 1500 ppm
Selon les normes britanniques pour les bâtiments
scolaires, la moyenne de CO2 d’une journée complète
(c.-à-d. de 9 h 00 à 15 h 30) ne doit pas dépasser
1500 ppm.
OSHA : 5000 ppm
La moyenne temporelle pondérée sur des postes de
8 heures ne doit pas dépasser 5000 ppm.
Allemagne, Japon, Australie, Royaume-Uni...: 5000 ppm
La moyenne pondérée sur 8 heures dans la limite
d’exposition professionnelle est de 5000 ppm.
12
Page 38

Page 39

CO2-100
CO2-Messgerät
Bedienungshandbuch
1/2018, Rev.B
©2018 Amprobe Test Tools.
Alle Rechte vorbehalten. Gedruckt in den China.
Deutsch
Page 40

Beschränkte Gewährleistung und Haftungsbeschränkung
Es wird gewährleistet, dass dieses Amprobe-Produkt für die
Dauer von einem Jahr ab dem Kaufdatum frei von Material- und
Fertigungsdefekten ist. Diese Gewährleistung erstreckt sich
nicht auf Sicherungen, Einwegbatterien oder Schäden durch
Unfälle, Nachlässigkeit, Missbrauch, Änderungen oder abnormale
Betriebsbedingungen bzw. unsachgemäße Handhabung. Die
Verkaufsstellen sind nicht dazu berechtigt, diese Gewährleistung
im Namen von Amprobe zu erweitern. Um während der
Gewährleistungsperiode Serviceleistungen in Anspruch zu
nehmen, das Produkt mit Kaufnachweis an ein autorisiertes
Amprobe Test Tools Service-Center oder an einen AmprobeFachhändler/-Distributor einsenden. Nähere Einzelheiten
siehe Abschnitt „Reparatur“. DIESE GEWÄHRLEISTUNG
STELLT DEN EINZIGEN UND ALLEINIGEN RECHTSANSPRUCH
AUF SCHADENERSATZ DAR. ALLE ANDEREN (VERTRAGLICH
GEREGELTEN ODER GESETZLICH VORGESCHRIEBENEN)
GEWÄHRLEISTUNGEN, EINSCHLIESSLICH DER GESETZLICHEN
GEWÄHRLEISTUNG DER MARKTFÄHIGKEIT UND DER EIGNUNG
FÜR EINEN BESTIMMTEN ZWECK, WERDEN ABGELEHNT. DER
HERSTELLER ÜBERNIMMT KEINE HAFTUNG FÜR SPEZIELLE,
INDIREKTE, NEBEN- ODER FOLGESCHÄDEN ODER FÜR VERLUSTE,
DIE AUF BELIEBIGER URSACHE ODER RECHTSTHEORIE BERUHEN.
Weil einige Staaten oder Länder den Ausschluss oder die
Einschränkung einer implizierten Gewährleistung sowie den
Ausschluss von Begleit- oder Folgeschäden nicht zulassen, ist diese
Gewährleistungsbeschränkung möglicherweise für Sie nicht gültig.
Reparatur
Zu allen Geräten, die zur Reparatur oder Kalibrierung im
Rahmen der Garantie oder außerhalb der Garantie eingesendet
werden, muss folgendes beigelegt werden: Name des Kunden,
Firmenname, Adresse, Telefonnummer und Kaufbeleg.
Zusätzlich bitte eine kurze Beschreibung des Problems oder der
gewünschten Wartung sowie die Messleitungen dem Messgerät
beilegen. Die Gebühren für außerhalb des Garantiezeitraums
durchgeführte Reparaturen oder für den Ersatz von Instrumenten
müssen per Scheck, Zahlungsanweisung oder Kreditkarte
(Kreditkartennummer mit Ablaufdatum) beglichen werden
oder es muss ein Auftrag auf Rechnung an Amprobe
formuliert werden.
®
Test Tools
Page 41

Garantiereparaturen oder -austausch – Alle Länder
Bitte die Garantieerklärung lesen und die Batterie prüfen, bevor
Reparaturen angefordert werden. Während der Garantieperiode
können alle defekten Geräte zum Umtausch gegen dasselbe oder
ein ähnliches Produkt an den Amprobe
gesendet werden. Ein Verzeichnis der zuständigen Distributoren
ist im Abschnitt „Where to Buy“ (Verkaufsstellen) auf der Website
www.amprobe.com zu finden. Darüber hinaus können in den
USA und in Kanada Geräte an ein Amprobe
Center (siehe Adresse unten) zur Reparatur oder zum Umtausch
eingesendet werden.
Reparaturen und Austausch außerhalb der Garantie – USA
und Kanada
Für Reparaturen außerhalb des Garantiezeitraums in den
Vereinigten Staaten und in Kanada werden die Geräte an ein
®
Test Tools Service-Center gesendet. Auskunft über die
Amprobe
derzeit geltenden Reparatur- und Austauschgebühren erhalten Sie
von Amprobe
In den USA In Kanada
Amprobe Test Tools Amprobe Test Tools
Everett, WA 98203 Mississauga, ON L4Z 1X9
Tel.: 877-AMPROBE (267-7623) Tel.: 905-890-7600
Reparaturen und Austausch außerhalb der Garantie – Europa
Geräte mit abgelaufener Garantie können durch den zuständigen
Amprobe
werden. Ein Verzeichnis der zuständigen Distributoren ist im
Abschnitt „Where to Buy“ (Verkaufsstellen) auf der Website
www.amprobe.com zu finden.
Korrespondenzanschrift für Europa*
Amprobe
In den Engematten 14
79286 Glottertal, Deutschland
Tel.: +49 (0) 7684 8009-0
*(Nur Korrespondenz – keine Reparaturen und kein Umtausch
unter dieser Anschrift. Kunden in Europa wenden sich an den
zuständigen Distributor.)
®
Test Tools oder der Verkaufsstelle.
®
Test Tools-Distributor gegen eine Gebühr ersetzt
®
Test Tools Europe
®
Test Tools-Distributor
®
Test Tools Service-
Page 42

CO2-100 CO2-Messgerät
4
6
1
2
3
5
11
10
7
8
Luftfeuchtigkeitssensor
1
LCD-Anzeige
3
Hintergrundbeleuchtung/
5
Aufwärts-Taste
7
Temp. Modus/Abwärts-Taste
Min/Max/Avg./Eingabe-Taste
9
Anschluss für
11
Gleichspannungsadapter
9
CO2-Sensor (Rückseite)
2
Ein/Aus-/SET-Taste
4
Kalibrier/Escape-Taste
6
Datenhaltemodus-Taste
8
USB-Anschluss
10
Page 43

LCD-Anzeige
8
9
4 56 7
1
10
3
11 12
1
Primäre Anzeige zeigt CO2-Konzentration an
2
Relative Luftfeuchtigkeit in %
3
Luft-/Taupunkt-/Feuchtkugel-Temperaturanzeige
CO2-Messmodus
4
Messeinheit für CO2-Konzentration
5
Zeitgewichteter Durchschnitt (8 Stunden)
6
Kurzzeit-Expositionsgrenzwert
7
(15 Minuten zeitgewichteter Durchschnitt)
Hält Messwerte fest
8
Min./Max.-Messwerte
9
Anzeige für schwache Batterie
10
Taupunkttemperatur
11
12
Feuchtkugeltemperatur
2
Page 44

INHALT
SYMBOLE .......................................................................... 2
AUSPACKEN UND ÜBERPRÜFEN ......................................2
EINFÜHRUNG .................................................................... 3
Merkmale .....................................................................3
BEDIENUNG ......................................................................4
Automatische Ausschaltung ........................................ 6
Setup ............................................................................. 6
Kalibriermodus ............................................................ 7
USB-PC-Schnittstellenfunktionalität ........................... 8
TECHNISCHE DATEN .........................................................9
WARTUNG UND REPARATUR ...........................................10
Auswechseln der Batterie ............................................ 10
FEHLERBEHEBUNG ...........................................................11
ANHANG ........................................................................... 12
1
Page 45

SYMBOLE
Vorsicht! Siehe Erklärung in diesem Handbuch
Übereinstimmung mit den relevanten
australischen Normen
Übereinstimmung mit EU-Vorschriften
Dieses Messgerät nicht im unsortierten
Kommunalabfall entsorgen. Zur Entsorgung
ein qualifiziertes Recycling-Unternehmen
kontaktieren
Warn- und Vorsichtshinweise
• Kondensation an CO2-Sensor vermeiden.
• Das Messgerät nicht nahe am Gesicht halten, da
Ausatmen CO2-Pegel beeinflussen kann.
• Das Messgerät nicht in einer Umgebung (Luft)
mit unbekannter CO2-Konzentration kalibrieren.
Ansonsten wird das Gerät standardmäßig mit
400 ppm kalibriert, was zu ungenauen Messungen
führen kann.
AUSPACKEN UND ÜBERPRÜFEN
Der Verpackungskarton sollte Folgendes enthalten:
1 CO2-100 CO2-Messgerät
4 AA/LR6-Batterien
1 Bedienungshandbuch
1 Transportbehälter
Wenn einer dieser Artikel beschädigt ist oder fehlt, die
gesamte Lieferung zwecks Ersatz an die Verkaufsstelle
zurücksenden.
2
Page 46

EINFÜHRUNG
Vielen Dank für den Kauf dieses tragbaren CO2Messgeräts. Das Messgerät misst CO2-Pegel,
Lufttemperatur, Taupunkt, Feuchtkugeltemperatur und
Luftfeuchtigkeit. Es ist ein ideales Gerät zur Diagnose
von Innenluftqualität (IAQ).
Schlechte Innenluftqualität wird als ungesund betrachtet,
da sie zu Müdigkeit, Verlust der Konzentrationsfähigkeit
und sogar Erkrankung führen kann (Sick Building
Syndrome). Überwachung und Untersuchung der
Innenluftqualität, insbesondere CO2-Pegel und
Entlüftung, werden in öffentlichen Bereichen (z. B. Büros,
Schulzimmer, Produktionsstätten, Krankenhäuser und
Hotels) immer häufiger eingesetzt. Diese Vorkehrungen
werden in einigen Ländern auch in Vorschriften zur
Betriebshygiene vorgeschlagen. (Anhang)
Das tragbare CO2-Messgerät verwendet NDIRTechnologie (Nichtdispersive-IR-Absorption)
zur Gewährleistung der Zuverlässigkeit und der
Langzeitstabilität. Das Gerät ist beim Prüfen der HVACSystemleistung und der Lüftungskontrolle nützlich.
Merkmale
• Dreifachanzeige mit CO2-Pegel, Temperatur und
Luftfeuchtigkeit
• Stabiler NDIR-Sensor für CO2-Erkennung
• Statistik gewichteter Durchschnitte (TWA und STEL)
• Hintergrundbeleuchtung für Betrieb in dunkler
Umgebung
• Akustischer CO2-Alarm
• Batterie- und Adapter-Stromversorgung
• Einfache manuelle Kalibrierung für CO2 und
Luftfeuchtigkeit
• USB-PC-Anschluss
3
Page 47

BEDIENUNG
1. Die „Ein/Aus-/SET-Taste“ drücken, um das
Messgerät ein- bzw. auszuschalten. Das Messgerät
gibt beim Einschalten ein kurzes akustisches Signal
aus, führt einen 30 Sekunden langen Countdown
zum Aufwärmen durch und aktiviert dann den
Normalmodus.
2. Das Messgerät beginnt nach dem Einschalten zu
messen und aktualisiert die Messwerte einmal pro
Sekunde. Bei einem Wechsel der Umgebung (z. B.
von einer hohen zu einer niedrigen Temperatur)
dauert es 30 Sekunden, bis der Sensor anspricht
und 30 Minuten für Luftfeuchtigkeit (RH).
3. Die Taste „DP/WBT“ drücken, um Temperaturanzeige umzuschalten. Die Anzeige unten links
wechselt von Lufttemperatur zu Taupunkttemperatur und Feuchtkugeltemperatur. (Abb. 1)
Abb. 1
4. Die Taste „HOLD“ drücken, um die Messwerte
festzuhalten. Das Symbol „HOLD“ wird oben
links auf der LCD eingeblendet. Alle aktuellen
Messwerte bleiben unverändert, ausgenommen
STEL und TWA. Die Taste „HOLD“ erneut drücken,
um die Datenhaltefunktion abzubrechen.
5. Die Taste „MODE/p“ mehr als eine Sekunde
gedrückt halten, um die Hintergrundbeleuchtung
zu aktivieren bzw. zu deaktivieren.
6. Die Taste „MAX/MIN“ drücken, um die Min.-,
Max.- und gewichteten Durchschnitts-Messwerte
anzuzeigen. Jedes Drücken der Taste zeigt MIN,
MAX, STEL, TWA in Folge an und kehrt in den
Normalmodus zurück. Im MIN- und MAX-Modus
zeigt das Gerät die Min.- und Max.-Messwerte
4
Page 48

von CO2 auf der Hauptanzeige und die Luft-/
Taupunkt-/Feuchtkugel-Temperaturen (AIR/DP/
WBT) auf den unteren Anzeigen an.
Im STEL- und TWA-Modus zeigt die Hauptanzeige
den gewichteten Durchschnitt von CO2Messwerten für die letzten 15 Minuten (STEL)
bzw. 8 Stunden (TWA) an. Die unteren Anzeigen
zeigen jedoch die aktuellen Luft-/Taupunkt-/
Feuchtkugel-Temperaturen (AIR, DP/WB) und die
Luftfeuchtigkeitsmesswerte an.
HINWEIS:
• Wenn seit dem Einschalten des Messgeräts
weniger als 15 Minuten vergangen sind,
handelt es sich beim STEL-Wert um den
gewichteten Durchschnitt der Messwerte seit
dem Einschalten. Ebenso für TWA-Werte, bevor
8 Stunden vergangen sind.
• Es dauert mindestens 5 Minuten, bevor STELund TWA-Werte verfügbar sind. Die Anzeige
zeigt „----“ während der ersten 5 Minuten nach
dem Einschalten an (Abb. 2).
Abb. 2
• Während alle Messwerte festgehalten werden,
werden die STEL- und TWA-Werte laufend alle
5 Minuten aktualisiert.
7. Das Messgerät gibt akustische Signale (Abt. 80 dB)
aus, wenn der CO2-Pegel einen festgelegten
Grenzwert übersteigt, und stoppt, wenn eine
beliebige Taste (außer der „Ein/Aus-Taste“)
gedrückt wird oder wenn die Messwerte unter den
Grenzwert fallen. Das Gerät gibt erneut akustische
Signale aus, wenn der Messwert den Grenzwert
5
Page 49

übersteigt. Das Messgerät neu starten, falls das
akustische Signal nicht gestoppt werden kann.
Automatische Ausschaltung
Das Messgerät schaltet sich nach 20 Minuten Inaktivität
automatisch aus. Um die Funktion zu übersteuern, die
„Ein/Aus-/ SET-Taste“ und die „HOLD-Taste“ drücken
und 2 Sekunden gedrückt halten, sodass sich das
Messgerät einschaltet und „n“ anzeigt.
Setup
Der erweiterte Setup-Modus ermöglicht Anpassungen
des Messgeräts.
Es gibt zwei Arten von Parametern:
P1.0: Einstellung CO2-Alarm-Schwellenwert
P3.0: Einstellung Temperatureinheit
P1.0 Einstellung CO2-Alarm-Schwellenwert
Die „Ein-/Aus-/SET-Taste“ im Normalmodus drücken
und mehr als 1 Sekunde gedrückt halten, um den SetupModus zu aktivieren. Um Setup zu beenden, die Taste
„CAL/ESC“ in P1.0 oder P3.0 drücken.
Wenn der Setup-Modus aktiviert wird, werden P1.0 und
„AL“ auf der LCD angezeigt (Abb. 3). Die „Eingabetaste“
drücken, um P1.1 zu aktivieren und den CO2-AlarmSchwellenwert einzustellen. Der aktuell eingestellte
Wert blinkt auf der LCD (Abb. 4). Die Taste „p“ drücken,
um den Wert zu erhöhen, bzw. „q“ drücken, um den
Wert zu verringern. Jedes Drücken entspricht 100 ppm
und der Alarmbereich reicht von 100 bis 9900 ppm.
Wenn der gewünschte Alarmwert eingestellt ist,
die „Eingabetaste“ drücken, um die Einstellung zu
speichern, bzw. die Taste „ESC“ drücken, um ohne zu
speichern zu P1.0. zurückzukehren.
Abb. 3 Abb. 4
6
Page 50

P1.0: Einstellung Temperatureinheit
Die Taste „p“ oder „q“ in P1.0 drücken, um P3.0 zu
aktivieren und die Temperaturskala einzurichten. Die
„Eingabetaste“ drücken, sodass P3.1 aktiviert wird. Unten
links auf der Anzeige blinkt die aktuelle Einstellung, °C
oder °F. Um °C oder °F umzuschalten, die Taste „p“ oder
„q“ drücken. Dann die „Eingabetaste“ drücken, um die
Einstellung zu speichern, bzw. die Taste „ESC“ drücken,
um ohne zu speichern zu P3.0. zurückzukehren.
Kalibriermodus
CO2-Kalibrierung
1. Das Messgerät in einen Außenbereich mit guter
Belüftung bringen. Das Messgerät einschalten und
die Tasten „CAL“ und „p“ gleichzeitig gedrückt
halten, um den CO2-Kalibriermodus zu aktivieren.
400 ppm und „CAL“ blinken während der
Kalibrierung auf der LCD (Abb. 5).
Abb. 5
2. Ungefähr 5 Minuten warten, bis das Blinken der
Anzeigen aufhört, die Kalibrierung automatisch
endet und das Gerät in den Normalmodus
zurückkehrt.
3. Um die Kalibrierung abzubrechen, das Messgerät
zu einem beliebigen Zeitpunkt ausschalten.
7
Page 51

Feuchtigkeitskalibrierung
1. Die Sensorsonde in 33 %-Salzlösung einstecken.
Die Tasten „CAL“ und „q“ im Normalmodus
gleichzeitig gedrückt halten, um 33 %- Kalibrierung
zu aktivieren. „CAL“ und der Kalibrierwert
(32,7 % bei 25 °C) blinken auf der LCD und links
wird die aktuelle Temperatur angezeigt. Das
Messgerät kalibriert jetzt und beendet den Prozess
in ungefähr 60 Minuten, wenn „CAL“ und der
Feuchtigkeitswert zu blinken aufhören.
2. Nach der 33 %-Kalibrierung die Sensorsonde
in 75 %-Salzlösung einstecken und dann die
„Eingabetaste“ drücken, um 75 %-Kalibrierung zu
aktivieren. „CAL“ und der Kalibrierwert (75,2 %
bei 25 °C) blinken auf der LCD und links wird die
aktuelle Temperatur angezeigt. Das Messgerät
kalibriert jetzt. Ungefähr 60 Minuten warten, bis
das Blinken der Anzeigen aufhört, die Kalibrierung
ist dann beendet und das Gerät kehrt in den
Normalmodus zurück.
3. Benutzer können auch einen der Punkte
kalibrieren. Um nur 33 % zu kalibrieren, die
Taste „ESC“ drücken und beenden, wenn die
33 %-Kalibrierung abgeschlossen ist. Um nur
75 % zu kalibrieren, bei der Initialisierung der
33 %-Kalibrierung innerhalb von 5 Minuten die
Taste „p“ oder „q“ drücken. Um die Kalibrierung
abzubrechen, einfach das Messgerät ausschalten.
USB-PC-Schnittstellenfunktionalität
Das USB-Kabel und die Software (optionales Kit) sind
erforderlich, um Daten auf einen PC zu übertragen.
Vor dem Anschließen den USB-Treiber der Software
installieren.
8
Page 52

TECHNISCHE DATEN
CO2
Bereich
Auflösung 1 ppm
Genauigkeit
Druck
Abhängigkeit Druck, 100 kPa
Temperatur
Bereich -10,0~60,0 °C (14~140 °F)
Auflösung 0,1 °C / 0,1 °F
Genauigkeit ±0,6 °C / ±0,9 °F
Feuchtigkeit
Bereich 0,0~95 %
Auflösung 0,1 %
Genauigkeit
Betriebsumgebung
Lagerungsumgebung
Stromversorgung
- EMV: Stimmt überein mit EN61326-1. Dieses
Produkt erfüllt die Anforderungen der folgenden EU-Richtlinien:
2014/30/EU (Elektromagnetische Verträglichkeit). Doch elektrisches
Rauschen oder intensive elektromagnetische Felder in der Nähe
des Geräts können den Messschaltkreis stören. Messinstrumente
reagieren auch auf unerwünschte Impulse/Signale, die unter
Umständen im Messschaltkreis vorkommen. Die Benutzer müssen
0~9999 ppm
(5001~9999 UngenauigkeitsSkalenbereich)
±30 ppm ±5 % Anzeige (0~5000)
(nicht spezifiziert für außerhalb Skala)
+1,6 % Anzeige pro kPa-Abweichung
von normal
±3 % (10~90 % bei 25 °C); ±5 %
(sonstige)
0~50 °C, 0~95 % RH
(Kondensation vermeiden)
-20~60 °C, 0~99 % RH
(Kondensation vermeiden)
4 LR6/AA-Batterien
9
Page 53

die nötige Sorgfalt walten lassen und geeignete Vorkehrungen
treffen, um irreführende Ergebnisse bei Messungen bei
Vorhandensein elektrischer Störeinflüsse zu vermeiden.
WARTUNG UND REPARATUR
Wenn ein Fehlverhalten während des Betriebs des
Messgeräts vermutet wird, sollten die folgenden Schritte
durchgeführt werden, um die Ursache des Problems
genau zu bestimmen.
1. Die Batterien prüfen. Die Batterie sofort ersetzen,
wenn das „
“-Symbol auf der LCD erscheint.
2. Die Bedienungsanleitungen studieren, um
mögliche Fehler bei der Bedienung zu erkennen.
Außer dem Ersetzen der Batterie sollten Reparaturen am
Messgerät ausschließlich durch werkseitig autorisiertes
Servicepersonal oder anderes Fachpersonal durchgeführt
werden. Die Vorderseite und das Gehäuse können mit
einer milden Lösung von Reinigungsmittel und Wasser
gereinigt werden. Die Lösung spärlich mit einem
weichen Tuch auftragen und das Gerät vor Gebrauch
vollständig trocknen lassen. Keine aromatischen
Kohlenwasserstoffe oder Chlorlösungsmittel zur
Reinigung verwenden.
Auswechseln der Batterie
1. Das Messgerät wird entweder durch 4 LR6/AA-
Batterien oder einen Gleichspannungsadapter
(9 V/1 A Ausgang) versorgt.
2. Wenn die Batteriespannung niedrig ist, erscheinen
“ und „Lob“ auf der LCD (Abb. 6). Und es
„
wird ein akustisches Signal ausgegeben. Der CO2Sensor kann unter schwacher Spannung nicht
funktionieren. Das Gerät gibt ein akustisches
Signal aus, um anzuzeigen, dass die CO2-Messung
fehlgeschlagen ist. Es werden keine Messwerte
angezeigt. Neue Batterien einsetzen oder einen
Gleichspannungsadapter anschließen.
10
Page 54

FEHLERBEHEBUNG
Gerät kann nicht eingeschaltet werden
• Die Ein/Aus-Taste muss gedrückt und mindestens
0,3 Sekunden gedrückt gehalten werden.
• Den Batteriezustand prüfen und die Batterien
ggf. ersetzen.
• Prüfen, ob der Adapter korrekt angeschlossen ist.
• Die Batterien für 1 Minute aus dem Gerät
entfernen und dann wieder einsetzen.
Anzeige erlischt
• Prüfen, ob das Symbol für schwache Batterie
angezeigt wird, bevor die Anzeige erlischt. Falls ja,
neue Batterien einsetzen.
Fixierte Messwerte
• Prüfen, ob die Datenhaltefunktion aktiviert ist.
(HOLD-Symbol oben links.)
Gerät spricht langsam an
• Prüfen, ob die Luftstromkanäle an der Rückseite
blockiert sind.
Fehlercode
E01: CO2-Sensor beschädigt.
E02: Der Wert ist eine Bereichsunterschreitung.
E03: Der Wert ist eine Bereichsüberschreitung.
E04: Der ursprüngliche Datenfehler führt zu diesem
Fehler (DP, WB).
E07: Spannung zu niedrig, um CO2 zu messen.
Batterien auswechseln oder Adapter
verwenden.
E11: Feuchtigkeitskalibrierung nochmals versuchen.
E17: CO2-Kalibrierung nochmals versuchen.
E31: Temperatursensor beschädigt.
E34: Luftfeuchtigkeitssensor beschädigt.
11
Page 55

ANHANG – CO2-PEGEL UND RICHTLINIEN
NIOSH-Empfehlungen
250-350 ppm: normale Umgebungskonzentrationen
in Außenluft
600 ppm: minimale Beschwerden über Luftqualität
600-1000 ppm: weniger deutlich interpretiert
1000 ppm: zeigt ungenügende Lüftung an. Beschwerden
wie Kopfschmerzen, Müdigkeit und Augen-/Halsreizung
treten häufiger auf. 1000 ppm sollte als Grenzwert für
Innenluftpegel verwendet werden.
ASHRAE Standard 62-1989: 1000 ppm
Die CO2-Konzentration in genutzten Gebäuden sollte
1000 ppm nicht überschreiten.
Building Bulletin 101 (BB101): 1500 ppm
Die Standards in Großbritannien für Schulen schreiben
vor, dass CO2 durchschnittlich über den ganzen Tag (d. h.
09:00 bis 15:30 Uhr) 1500 ppm nicht überschreiten sollte.
OSHA: 5000 ppm
Der zeitgewichtete Durchschnitt über fünf 8-StundenArbeitstage sollte 1500 ppm nicht überschreiten.
Deutschland, Japan, Australien, Großbritannien...
5000 ppm
Der gewichtete 8-Stunden-Durchschnitt für
berufsbedingte Exposition beträgt maximal 5000 ppm.
12
Page 56

Page 57

CO2-100
Misuratore di CO2
Manuale d’uso
1/2018, Rev.B
©2018 Amprobe Test Tools.
Tutti i diritti riservati. Stampato in Cina.
Italiano
Page 58

Garanzia limitata e limitazione di responsabilità
Questo prodotto Amprobe sarà esente da difetti di materiale e
fabbricazione per un anno a decorrere dalla data di acquisto.
Sono esclusi da questa garanzia i fusibili, le pile monouso e i
danni causati da incidenti, negligenza, uso improprio, alterazione,
contaminazione o condizioni anomale di funzionamento o
manipolazione. I rivenditori non sono autorizzati a offrire
nessun’altra garanzia a nome della Amprobe. Per richiedere un
intervento durante il periodo di garanzia, restituire il prodotto,
allegando la ricevuta di acquisto, a un centro di assistenza
autorizzato Amprobe Test Tools oppure a un rivenditore o
distributore Amprobe locale. Per ulteriori informazioni vedere
la sezione Riparazioni. QUESTA GARANZIA È IL SOLO RICORSO
A DISPOSIZIONE DELL’ACQUIRENTE, E SOSTITUISCE QUALSIASI
ALTRA GARANZIA, ESPRESSA, IMPLICITA O PREVISTA DALLA
LEGGE, COMPRESA, MA NON A TITOLO ESCLUSIVO, QUALSIASI
GARANZIA IMPLICITA DI COMMERCIABILITÀ O DI IDONEITÀ PER
SCOPI PARTICOLARI. IL PRODUTTORE NON SARÀ RESPONSABILE DI
DANNI O PERDITE SPECIALI, INDIRETTI O ACCIDENTALI, DERIVANTI
DA QUALSIASI CAUSA O TEORIA. Poiché alcuni stati o Paesi
non permettono l’esclusione o la limitazione di una garanzia
implicita o di danni accidentali o indiretti, questa limitazione di
responsabilità potrebbe non riguardare l’acquirente.
Riparazioni
A tutti gli strumenti di misura restituiti per interventi in garanzia
non coperti dalla garanzia oppure per la taratura, devono
essere allegate le seguenti informazioni: il proprio nome e
quello dell’azienda, indirizzo, numero telefonico e ricevuta di
acquisto. Allegare anche una breve descrizione del problema
o dell’intervento richiesto e i cavetti. Gli importi dovuti per
sostituzioni o riparazioni non coperte dalla garanzia vanno
versati tramite assegno, vaglia bancario, carta di credito con
data di scadenza, oppure ordine di acquisto all’ordine di
®
Test Tools.
Amprobe
Sostituzioni e riparazioni in garanzia – Tutti i Paesi
Leggere la garanzia e controllare la batteria prima di richiedere
una riparazione. Durante il periodo di garanzia, si può restituire
uno strumento difettoso al rivenditore Amprobe
ricevere un prodotto identico o analogo. Nella sezione “Where
to Buy” del sito www.amprobe.com c’è un elenco dei distributori
più vicini. Negli Stati Uniti e nel Canada gli strumenti da sostituire
o riparare in garanzia possono essere inviati anche a un centro di
assistenza Amprobe
®
Test Tools (l’indirizzo è più avanti).
®
Test Tools per
Page 59

Sostituzioni e riparazioni non coperte dalla garanzia – U.S.A.
e Canada
Se la riparazione non è coperta dalla garanzia negli Stati Uniti
e nel Canada, lo strumento va inviato a un centro di assistenza
®
Test Tools. Rivolgersi alla Amprobe® Test Tools
Amprobe
o al rivenditore per informazioni sui costi delle riparazioni
e sostituzioni.
Negli Stati Uniti Nel Canada
Amprobe Test Tools Amprobe Test Tools
Everett, WA 98203 Mississauga, ON L4Z 1X9
Tel.: 877-AMPROBE (267-7623) Tel.: 905-890-7600
Sostituzioni e riparazioni non coperte dalla garanzia – Europa
Gli strumenti acquistati in Europa e non coperti dalla garanzia
possono essere sostituiti dal rivenditore Amprobe
un importo nominale. Nella sezione “Where to Buy” del sito
www.amprobe.com c’è un elenco dei distributori più vicini.
Recapito postale europeo*
®
Test Tools Europe
Amprobe
In den Engematten 14
79286 Glottertal, Germania
Tel.: +49 (0) 7684 8009-0
*(Solo per corrispondenza; non rivolgersi a questo indirizzo per
riparazioni o sostituzioni. Si pregano i clienti europei di rivolgersi
al proprio rivenditore.)
®
Test Tools per
Page 60

CO2-100 - Misuratore di CO2
4
6
1
2
3
5
11
10
7
8
Sensore di umidità
1
3
Display a cristalli liquidi
Retroilluminazione/freccia su
5
Modalità temp./freccia giù
7
9
Pulsante Min/Max/Media/Invio
Connettore adattatore c.c.
11
9
Sensore di CO2
2
(lato posteriore)
Pulsante ALIMENTAZIONE/
4
IMPOSTAZIONE
Pulsante Taratura/Escape
6
Pulsante Tenuta dati
8
10
Porta USB
Page 61

Display a cristalli liquidi
8
9
4 56 7
1
10
3
11 12
Schermo principale - mostra la concentrazione
1
di CO2
2
Umidità relativa in %
Temperatura aria, punto di rugiada, a
3
bulbo umido
Modalità di misura CO2
4
5
Unità di misura per la concentrazione di CO2
6
Media pesata nel tempo (TWA) (8 ore)
7
Limite di esposizione a breve termine (STEL)
(media pesata nell’intervallo di 15 minuti)
8
Fermo letture
Letture minima/massima
9
Indicatore di bassa carica delle pile
10
Temperatura del punto di rugiada
11
Temperatura a bulbo umido
12
2
Page 62

INDICE
SIMBOLI ............................................................................ 2
DISIMBALLAGGIO E ISPEZIONE ....................................... 2
INTRODUZIONE ................................................................3
Caratteristiche .............................................................. 3
FUNZIONAMENTO ............................................................ 4
Spegnimento automatico ............................................ 6
Impostazione ................................................................ 6
Modalità di taratura .................................................... 7
Funzionalità di interfaccia USB ................................... 8
DATI TECNICI .....................................................................9
MANUTENZIONE E RIPARAZIONI .....................................10
Sostituzione delle pile .................................................10
RICERCA GUASTI ..............................................................11
APPENDICE ........................................................................12
1
Page 63

SIMBOLI
Attenzione. Vedere la spiegazione
nel manuale
Conforme alle norme australiane di pertinenza
Conforme alle direttive della
Comunità Europea
Non smaltire questo prodotto assieme ad altri
rifiuti solidi non differenziati. Rivolgersi a una
ditta di riciclaggio qualificata
Avvertenze e precauzioni
• Evitare condensazione sul sensore di CO2.
• Non tenere lo strumento vicino al volto, nel caso il
respiro emesso influisca sui livelli di CO2.
• Non tarare lo strumento se la concentrazione di
CO2 nell’aria non è nota. Il punto di riferimento
verrebbe impostato automaticamente a 400 ppm e
condurrebbe a misure imprecise.
DISIMBALLAGGIO E ISPEZIONE
La confezione deve contenere:
1 misuratore di CO2 CO2-100
4 pile stilo (AA)
1 copia del manuale d’uso
1 custodia da trasporto rigida
Se uno di questi articoli è danneggiato o manca,
restituire l’intera confezione al punto di acquisto perché
venga sostituita.
2
Page 64

INTRODUZIONE
Grazie per avere acquistato questo misuratore di
CO2 portatile. Lo strumento misura i livelli di CO2,
la temperatura dell’aria, il punto di rugiada, la
temperatura a bulbo umido e l’umidità, ed è ideale per
la diagnosi della qualità dell’aria in locali chiusi.
Una qualità scadente dell’aria in un ambiente chiuso è
considerata malsana in quanto causa stanchezza, perdita
della capacità di concentrazione e anche malattie
(p. es., la sindrome dell’edificio malato). Il monitoraggio
della qualità dell’aria in locali chiusi, specialmente per
quanto riguarda i livelli di CO2 e la ventilazione, è
sempre più diffuso in aree pubbliche come uffici, scuole,
fabbriche, ospedali e alberghi. Inoltre è suggerito in
vari regolamenti di igiene industriale in alcune nazioni
(vedi Appendice).
Questo misuratore di CO2 portatile impiega una
tecnologia a raggi infrarossi non dispersivi (NDIR) che
assicura affidabilità e stabilità a lungo termine. È utile per
la verifica delle prestazioni di impianti di riscaldamento,
ventilazione e condizionamento dell’aria (HVAC).
Caratteristiche
• Visualizzazione simultanea del livello di CO2, della
temperatura e dell’umidità
• Sensore NDIR di grande stabilità per la rilevazione
di CO2
• Statistiche delle medie pesate (TWA e STEL)
• Retroilluminazione per l’uso in aree poco illuminate
• Allarme acustico del livello di CO2
• Alimentazione a pile o con adattatore di c.a.
• Agevole taratura manuale del livello di CO2 e
dell’umidità
• Connessione a un PC tramite interfaccia USB
3
Page 65

FUNZIONAMENTO
1. Premere il pulsante “ALIMENTAZIONE/SET” per
accendere e spegnere lo strumento. All’accensione
lo strumento emette un breve segnale acustico;
dopo 30 secondi di riscaldamento, passa alla
modalità di normale funzionamento.
2. Lo strumento inizia le misure quando viene acceso
e aggiorna le letture ogni secondo. In condizioni di
variazioni ambientali (p. es. un passaggio da alte
a basse temperature), occorrono 30 secondi prima
che il sensore di CO2 diventi operativo e 30 minuti
prima che possa essere misurata l’umidità relativa.
3. Premere il pulsante “DP/WBT” per passare alla
visualizzazione delle temperature. Lo schermo in
basso a sinistra mostra ciclicamente la temperatura
dell’aria, il punto di rugiada e la temperatura a
bulbo umido. (Fig. 1).
Fig. 1
4. Premere “HOLD” per fermare le letture; sulla
parte superiore sinistra del display compare l’icona
“HOLD”. Tutte le letture rimangono invariate
eccetto due: STEL e TWA. Premere di nuovo
“HOLD” per annullare la funzione di tenuta dati.
5. Tenere premuto “MODE/p” per più di 1 secondo
per attivare o annullare la retroilluminazione.
6. Premere “MAX/MIN” per visualizzare le misure
minima, massima e media pesata nel tempo.
Ogni volta che si premere il pulsante compare in
sequenza la lettura MIN, MAX, STEL e TWA, quindi
lo strumento ritorna alla normale modalità. Nelle
modalità MIN e MAX lo strumento visualizza le
letture minima e massima di CO2 sullo schermo
4
Page 66

principale e le letture di temperatura AIR/DP/WBT
e di umidità sugli schermi inferiori. Nelle modalità
STEL e TWA, lo schermo principale mostra la media
pesata delle letture di CO2 negli ultimi 15 minuti
(STEL) e 8 ore (TWA), mentre gli schermi inferiori
mostrano le misure di umidità e di temperatura
AIR, DP/WB attuali.
NOTA:
• Se lo strumento rimane acceso per meno di
15 minuti, il valore STEL è la media pesata
delle misure eseguite da quando lo strumento
è stato acceso. Ciò vale anche per i valori TWA
che compaiono prima che siano trascorse 8 ore
dall’accensione.
• Occorrono almeno 5 minuti per calcolare i valori
STEL e TWA. Sul display compare “----” durante i
primi 5 minuti dall’accensione (Fig. 2).
Fig. 2
• Mentre tutte le letture rimangono invariate,
i valori STEL e TWA vengono aggiornati ogni
5 minuti.
7. Lo strumento emette un segnale acustico (di
livello pari a circa 80 dB) quando il livello di CO2
supera la soglia impostata; il segnale cessa se si
preme un pulsante qualsiasi (eccetto il pulsante
“ALIMENTAZIONE“) o se il valore rilevato scende
sotto il limite impostato. IL segnale viene riemesso
non appena il valore rilevato supera il limite. Se
non è possibile fare cessare il segnale acustico,
riavviare lo strumento.
5
Page 67

Spegnimento automatico
Lo strumento si spegne automaticamente dopo
20 minuti di inattività. Per escludere questa funzionalità,
tenere premuti i pulsanti “ALIMENTAZIONE / SET” e
”HOLD” per 2 secondi per accendere lo strumento,
finché non si visualizza “n”.
Impostazione
La modalità di impostazione avanzata consente di
personalizzare lo strumento.
Sono disponibili due parametri diversi:
P1.0: impostazione della soglia di allarme da livello di CO2
P3.0: impostazione delle unità di misura della
temperatura
P1.0: impostazione della soglia di allarme da livello
di CO2
Tenere premuto “ALIMENTAZIONE/IMPOSTAZIONE”
nella modalità di normale funzionamento per più di
1 secondo per andare alla modalità di impostazione.
Per uscire dalla modalità di impostazione premere
“CAL/ESC” in P1.0 o P3.0.
Quando si va alla modalità di impostazione, sul display
compaiono P1.0 e “AL” (Fig. 3). Premere “Invio” per
andare a P1.1 e impostare la soglia di allarme da livello
di CO2. Sul display lampeggia il valore attualmente
impostato (Fig. 4). Premere “p” per aumentare il valore
o “q” per diminuirlo. L’incremento a ogni pressione
del pulsante è di 100 ppm e l’intervallo di allarme va da
100 a 9900 ppm. Una volta impostato il limite di allarme
desiderato, premere “Invio” per salvare l’impostazione o
“ESC” per ritornare a P1.0 senza salvarla.
Fig. 3 Fig. 4
6
Page 68

P3.0: impostazione delle unità di misura
della temperatura
Premere “p“ o “q” in P1.0 per accedere a P3.0 e
impostare la scala delle temperature. Premere “Invio”;
lo strumento va a P3.1 e sullo schermo inferiore sinistro
lampeggia l’unità attualmente impostata: °C o °F. Per
selezionare °C o °F, premere “p“ o “q“; quindi premere
“Invio” per salvare l’impostazione o “ESC” per ritornare
a P3.0 senza salvarla.
Modalità di taratura
Taratura di CO2
1. Collocare lo strumento in un’area all’aperto in cui
vi sia una buona ventilazione dell’aria. Accendere
lo strumento e tenere premuti “CAL” e “p”
simultaneamente per andare alla modalità di
taratura di CO2. Sul display lampeggiano 400 ppm
e “CAL” mentre si esegue la taratura (Fig. 5).
Fig. 5
2. Attendere circa 5 minuti, finché le indicazioni non
lampeggiano più, la taratura viene completata
automaticamente e lo strumento ritorna alla
modalità di normale funzionamento.
3. Per interrompere la taratura, spegnere il
multimetro.
7
Page 69

Taratura dell’umidità
1. Introdurre il sensore in un flacone con il 33%
di sale. Tenere premuti “CAL” e “q” nella
modalità di normale funzionamento per andare
alla taratura del punto al 33%. Sul display
lampeggiano “CAL” e il valore di taratura (32,7%
se a 25 °C), con la temperatura attuale a sinistra.
A questo punto lo strumento sta eseguendo la
taratura, che sarà completata dopo circa 60 minuti
quando “CAL” e il valore di umidità cessano di
lampeggiare.
2. Dopo la taratura del punto al 33%, introdurre il
sensore in un flacone con il 75% di sale, quindi
premere “Invio” per andare alla taratura del
punto al 75%. Sul display lampeggiano “CAL”
e il valore di taratura (75,2% se a 25 °C), con la
temperatura attuale a sinistra. A questo punto lo
strumento sta eseguendo la taratura. Attendere
circa 60 minuti finché le indicazioni cessano di
lampeggiare; la taratura è così completata e
lo strumento ritorna alla modalità di normale
funzionamento.
3. È possibile tarare un solo punto. Per tarare solo il
punto al 33%, premere “ESC” e uscire quando la
taratura del punto al 33% è stata completata. Per
tarare solo il punto al 75%, premere “p” o “q”
entro 5 minuti mentre si inizializza la temperatura
al 33%. Per interrompere la taratura, spegnere
lo strumento.
Funzionalità di interfaccia USB
Per trasferire i dati a un PC sono necessari un cavo USB
e l’apposito software (kit opzionale). Installare il driver
USB prima di eseguire la connessione.
8
Page 70

DATI TECNICI
CO2
Portata
Risoluzione 1 ppm
Precisione
Pressione
Dipendenza Pressione, 100 kPa
Temperatura
Portata -10,0 ~ 60,0 °C (14~140 °F)
Risoluzione 0,1 °C / 0,1 °F
Precisione ±0,6 °C / ±0,9 °F
Umidità
Portata 0,0 ~ 95%
Risoluzione 0,1%
Precisione
Ambiente
di funzionamento
Ambiente di
immagazzinaggio
Alimentazione 4 pile stilo (AA)
0~9999 ppm
(5001~9999 fuori della scala
di precisione)
±30 ppm ±5% della lettura (0~5000)
(non specificata per misure fuori scala)
+1,6% della lettura per kPa di
deviazione dal valore normale
±3% (10~90% a 25 °C); ±5%
(ad altri valori)
0~50 °C, 0 ~ 95% di umidità relativa
(evitare la condensazione)
-20~60 °C, 0~99% di umidità relativa
(evitare la condensazione)
- Compatibilità elettromagnetica: a norma
EN61326-1.
direttive della Comunità Europea: 2014/30/EU (compatibilità
elettromagnetica). Tuttavia, rumore elettrico o campi
elettromagnetici intensi vicino all’apparecchio possono disturbare
il circuito di misura. Inoltre gli strumenti di misura risponderanno
Questo prodotto risponde ai requisiti delle seguenti
9
Page 71

a segnali indesiderati che possono essere presenti nel circuito
di misura. Gli utenti devono esercitare cautela e prendere le
opportune precauzioni per evitare risultati falsi quando si
eseguono misure in presenza di interferenze elettroniche.
MANUTENZIONE E RIPARAZIONI
Se sembra che il termometro non funzioni bene,
procedere come segue per individuare la causa
del problema:
1. Controllare le pile. Sostituirle immediatamente
quando sul display compare l’icona “
”.
2. Rileggere le istruzioni per l’uso, per accertarsi di
non avere compiuto operazioni sbagliate.
Fatta eccezione per la sostituzione delle pile, qualsiasi
operazione di manutenzione o riparazione dello
strumento deve essere eseguita esclusivamente presso
un centro di assistenza autorizzato dalla fabbrica o da
altro personale di manutenzione qualificato. Il pannello
anteriore e l’involucro possono essere puliti con una
soluzione di acqua e detergente neutro. Applicare la
soluzione in quantità moderata con un panno morbido
e lasciare asciugare completamente lo strumento prima
di usarlo. Non utilizzare idrocarburi aromatici né solventi
clorurati per la pulizia.
SOSTITUZIONE DELLE PILE
1. Lo strumento è alimentabile con 4 pile stilo (AA) o
con un adattatore di c.a. (uscita a 9 V / 1 A).
2. Quando le pile sono quasi scariche, sul display
compaiono “
emesso un segnale acustico. Il sensore di CO2
non può funzionare con una bassa tensione di
alimentazione; il segnale acustico indica che la
misura di CO2 non è stata eseguita, e la lettura
non viene visualizzata. Sostituire le pile con pile
nuove o collegare l’adattatore di corrente.
” e “Lob” (Fig. 6), e viene
10
Page 72

RICERCA GUASTI
Lo strumento non si accende
• Accertarsi che il pulsante di alimentazione rimanga
premuto per almeno 0,3 secondi.
• Controllare le condizioni delle pile e sostituirle
se necessario.
• Verificare che l’adattatore di corrente sia
collegato bene.
• Rimuovere le pile per un minuto, quindi
reinstallarle.
Il display si spegne
• Controllare se prima dello spegnimento del display
compare l’icona di bassa carica delle pile. In caso
affermativo, sostituire le pile.
Le letture non cambiano
• Controllare se è stata attivata la funzione di tenuta
dati (icona HOLD in alto a sinistra).
Risposta lenta
• Controllare se i canali per il flusso dell’aria, sulla
parte posteriore, sono ostruiti.
Codici di errore
E01: sensore di CO2 danneggiato.
E02: valore sotto il limite inferiore.
E03: valore sopra il limite superiore.
E04: errore dei dati originali (DP, WB).
E07: tensione troppo bassa per misure di CO2.
Sostituire le pile o usare un adattatore.
E11: rieseguire la taratura dell’umidità.
E17: rieseguire la taratura di CO2.
E31: sensore di temperatura danneggiato.
E34: sensore di umidità danneggiato.
11
Page 73

APPENDICE - LIVELLI DI CO2 E LINEE GUIDA
Raccomandazioni NIOSH (National Institute for
Occupational Safety and Health)
250-350 ppm: concentrazioni normali all’aperto
600 ppm: qualità minima dell’aria
600-1000 ppm: interpretazione meno chiara
1000 ppm: indica ventilazione inadeguata; sintomi quali
mal di testa, fatica e irritazione agli occhi o alla gola
sono più comuni. 1000 ppm va adoperato come limite
superiore per i livelli in locali chiusi.
Standard ASHRAE (American Society of Heating,
Refrigerating and Air-Conditioning Engineers) 62-1989:
1000 ppm
La concentrazione di CO2 in un edificio occupato non
deve superare 1000 ppm.
Building bulletin 101 (BB101): 1500 ppm
Le norme del Regno Unito per le scuole specificano che
i livelli medi di CO2 nel corso della giornata (ossia dalle
9:00 alle 15:30) non devono superare 1500 ppm.
OSHA (Occupational Safety and Health Administration):
5000 ppm
Il livello medio pesato nel corso di cinque giornate
lavorativve di 8 ore ciascuna non deve superare
5000 ppm.
Germania, Giappone, Australia, Regno Unito: 5000 ppm
Il livello medio di esposizione per i lavoratori pesato
nell’arco di 8 ore è pari a 5000 ppm.
12
Page 74

Page 75

CO2-100
Medidor de CO2
Manual de uso
1/2018, Rev.B
©2018 Amprobe Test Tools.
Reservados todos los derechos. Impreso en China.
Español
Page 76

Garantía limitada y limitación de responsabilidad
Su producto Amprobe estará libre de defectos de material y
mano de obra durante 1 año a partir de la fecha de compra. Esta
garantía no cubre fusibles, baterías desechables ni daños que sean
consecuencia de accidentes, negligencia, uso indebido, alteración,
contaminación o condiciones anormales de uso o manipulación.
Los revendedores no están autorizados a extender ninguna otra
garantía en nombre de Amprobe. Para obtener servicio durante
el período de garantía, devuelva el producto con un comprobante
de compra a un centro de servicio de equipos de comprobación
autorizado por Amprobe o a un concesionario o distribuidor
de Amprobe. Consulte la sección Reparación para obtener
información más detallada. ESTA GARANTÍA CONSTITUYE SU
ÚNICO RESARCIMIENTO. TODAS LAS DEMÁS GARANTÍAS, TANTO
EXPRESAS, IMPLÍCITAS COMO ESTATUTARIAS, INCLUYENDO LAS
GARANTÍAS IMPLÍCITAS DE IDONEIDAD PARA UN PROPÓSITO
DETERMINADO O COMERCIABILIDAD, QUEDAN POR LA PRESENTE
DESCONOCIDAS. EL FABRICANTE NO SERÁ RESPONSABLE DE
NINGÚN DAÑO O PÉRDIDA, YA SEA ESPECIAL, INDIRECTO,
CONTINGENTE O RESULTANTE QUE SURJA DE CUALQUIER
CAUSA O TEORÍA. Debido a que determinados estados o países
no permiten la exclusión o limitación de una garantía implícita
o de los daños contingentes o resultantes, esta limitación de
responsabilidad puede no regir para usted.
Reparación
Todas las herramientas de prueba devueltas para reparación bajo
la garantía o fuera de garantía, o devueltas para calibración,
deben ir acompañadas de lo siguiente: su nombre, el nombre de
su compañía, la dirección, el número de teléfono y la prueba de
compra. Además, incluya una breve descripción del problema o
del servicio solicitado y los conductores de prueba del medidor.
Los gastos en concepto de reparación o reemplazo fuera de
garantía deben remitirse en forma de cheque, giro postal, tarjeta
de crédito con fecha de vencimiento o una orden de compra
pagadera a Amprobe
Reparaciones y reemplazos cubiertos por la garantía
(todos los países)
Sírvase leer la declaración de garantía y compruebe su batería
antes de solicitar la reparación. Durante el período de garantía,
cualquier herramienta de comprobación defectuosa puede
ser devuelta a su distribuidor de Amprobe
intercambio por el mismo producto u otro similar. Consulte
®
Test Tools.
®
Test Tools para un
Page 77

la sección “Dónde comprar” en www.amprobe.com para ver
una lista de distribuidores locales. Asimismo, las unidades de
reparación en garantía y de reemplazo en Estados Unidos
y Canadá también pueden enviarse al centro de servicio
®
Test Tools (consulte la dirección más abajo).
Amprobe
Reparaciones y reemplazos no cubiertos por la garantía
(Estados Unidos y Canadá)
Las reparaciones fuera de la garantía en Estados Unidos y Canadá
deben enviarse a un centro de servicio de Amprobe
Llame a Amprobe
para conocer las tarifas actuales de reparación y reemplazo.
En EE.UU. En Canadá
Amprobe Test Tools Amprobe Test Tools
Everett, WA 98203 Mississauga, ON L4Z 1X9
Tel.: 877-AMPROBE (267-7623) Tel.: 905-890-7600
Reparaciones y reemplazos no cubiertos por la garantía (Europa)
El distribuidor de Amprobe
unidades vendidas en Europa no cubiertas por la garantía por
un costo nominal. Consulte la sección “Dónde comprar” en
www.amprobe.com para ver una lista de distribuidores locales.
Dirección para envío de correspondencia en Europa*
Amprobe
In den Engematten 14
79286 Glottertal, Alemania
Tel.: +49 (0) 7684 8009-0
*(Correspondencia solamente. En esta dirección no se
proporcionan reparaciones ni reemplazos. Los clientes europeos
deben ponerse en contacto con su distribuidor).
®
Test Tools o consulte en su punto de compra
®
Test Tools puede reemplazar las
®
Test Tools Europe
®
Test Tools.
Page 78

Medidor de CO2 CO2-100
4
6
1
2
3
5
11
10
7
8
ensor de humedad
S
1
Pantalla LCD
3
Tecla de retroiluminación/
5
flecha arriba
Tecla de modo temp./
7
flecha abajo
9
Tecla Mín/Máx/Promedio/Intro
Puerto de la fuente de
11
alimentación de CC
9
Sensor de CO2 (lado posterior)
2
Tecla de encendido/SET
4
6
Tecla de calibración/escape
8
Tecla de retención de datos
Puerto USB
10
Page 79

Pantalla LCD
8
9
4 56 7
1
10
3
11 12
La pantalla principal muestra la concentración
1
de CO2
2
Humedad relativa en %
Pantalla de temperatura de aire, punto de
3
condensación, temperatura de bulbo húmedo
4
Modo de medición de CO2
5
Unidad para concentración de CO2
Promedio ponderado en el tiempo (8 horas)
6
Límite de exposición a corto plazo
7
(promedio ponderado de 15 minutos)
8
Para congelar las lecturas
Lecturas mínima/máxima
9
Indicador de batería baja
10
11
Temperatura del punto de condensación
12
Temperatura de bulbo húmedo
2
Page 80

ÍNDICE
SÍMBOLOS .........................................................................2
DESEMBALAJE E INSPECCIÓN ..........................................2
INTRODUCCIÓN ................................................................ 3
Características ...............................................................3
FUNCIONAMIENTO ...........................................................4
Apagado automático ................................................... 6
Configuración ...............................................................6
Modo de calibración .................................................... 7
Capacidades de la interfaz USB ...................................8
ESPECIFICACIONES ........................................................... 9
MANTENIMIENTO Y REPARACIÓN ..................................10
Reemplazo de baterías ................................................ 10
RESOLUCIÓN DE PROBLEMAS ......................................... 11
APENDICE ..........................................................................12
1
Page 81

SÍMBOLOS
¡Precaución! Consulte la explicación incluida
en este manual
Cumple las normas australianas relevantes
Cumple las directivas europeas
No se deshaga de este producto utilizando
los servicios municipales de recolección de
desechos sin clasificar. Póngase en contacto
con un reciclador calificado para desecharlo
Advertencias y precauciones
• Evite la condensación en el sensor de CO2.
• No sujete el instrumento cerca de la cara por si la
exhalación afectara a los niveles de CO2.
• No calibre el instrumento en el aire con una
concentración desconocida de CO2, ya que se
calibrará de manera predeterminada como
400 ppm y se producirán mediciones inexactas.
DESEMBALAJE E INSPECCIÓN
La caja de envío debe incluir:
1 Medidor de CO2 CO2-100
4 Baterías AA
1 Manual de uso
1 Estuche duro para transporte
Si alguno de los elementos estuviera dañado o faltara,
devuelva el paquete completo al lugar de compra para
hacer un cambio.
2
Page 82

INTRODUCCIÓN
Gracias por haber comprado este medidor portátil de
CO2. El medidor mide el nivel de CO2, la temperatura del
aire, el punto de condensación, la temperatura de bulbo
húmedo y la humedad, y es un instrumento ideal para el
diagnóstico de la calidad del aire en interiores (IAQ).
Se considera que una calidad deficiente del aire en
interiores no es saludable porque causa cansancio,
pérdida de la capacidad de concentración e incluso
enfermedad (por ejemplo, síndrome de edificio
enfermo). La monitorización y el sondeo de la IAQ,
especialmente con respecto al nivel de CO2 y a la
ventilación del aire, se ha aplicado extensamente en
áreas públicas como oficinas, aulas, fábricas, hospitales y
hoteles. También se sugiere en las normativas de higiene
laboral de algunos países. (Apéndice).
El medidor portátil de CO2 utiliza la tecnología NDIR
(infrarrojo no dispersivo) para asegurar la fiabilidad y
la estabilidad a largo plazo. Resulta útil para verificar
el rendimiento del sistema de calefacción, ventilación y
aire acondicionado (HVAC) y el control de la ventilación
del aire.
Características
• Lecturas triples de nivel de Co2, temperatura
y humedad
• Sensor NDIR estable para la detección del CO2
• Estadísticas de promedios ponderados
(TWA y STEL)
• Retroiluminación para trabajar en áreas oscuras
• Alarma sonora de advertencia de CO2
• Batería y fuente de alimentación
• Sencilla calibración manual para CO2 y humedad
• Conexión USB para PC
3
Page 83

FUNCIONAMIENTO
1. Pulse “POWER/SET” para encender y apagar el
instrumento. En el momento del encendido, emite
una breve señal acústica y realiza una cuenta
atrás de 30 segundos para que el instrumento
se caliente antes de pasar al modo normal de
funcionamiento.
2. El instrumento comienza la medición cuando está
encendido y actualiza las lecturas cada segundo.
En condiciones de cambios del entorno operativo
(por ejemplo, de alta a baja temperatura), el
sensor de CO2 tarda 30 segundos en reacciones, y
el de HR tarda 30 minutos.
3. Pulse “DP/WBT” para conmutar la pantalla de
temperatura. La pantalla del extremo inferior
izquierdo pasará cíclicamente por la temperatura
del aire, la temperatura del punto de condensación
y la temperatura de bulbo húmedo. (Fig. 1)
Fig. 1
4. Pulse “HOLD” para congelar las lecturas; aparece
el icono “HOLD” en la esquina superior izquierda
de la pantalla LCD. Todas las lecturas actuales se
mantienen sin cambios, salvo STEL y TWA. Pulse
“HOLD” una vez más para cancelar la función de
retención de datos.
5. Mantenga pulsado “MODE/p” durante
más de 1 segundo para activar y cancelar la
retroiluminación.
6. Pulse “MAX/MIN” para ver las lecturas mínima,
máxima y de promedio ponderado. Con cada
pulsación de esta tecla se muestra MIN, MAX,
STEL, TWA en secuencia, y se regresa al modo
normal de funcionamiento. En los modos MIN y
4
Page 84

MAX, muestra las lecturas mínima y máxima de
CO2 en la pantalla principal, las temperaturas
de AIR/DP/WBT (temperaturas de aire, punto de
condensación y bulbo húmedo) y la humedad
en las pantallas inferiores. En los modos STEL y
TWA, la pantalla principal muestra el promedio
ponderado de lecturas de CO2 para los últimos
15 minutos (STEL) y 8 horas (TWA), pero las
pantallas inferiores indican las temperaturas
actuales de AIR, DP/WB y las de humedad.
NOTA:
• Si el instrumento lleva menos de 15 minutos
encendido, el valor de STEL será el promedio
ponderado de las lecturas tomadas desde el
momento del encendido. Lo mismo sucede con
los valores de TWA que aparecen antes de que
transcurran 8 horas.
• El cálculo de los valores de STEL y TWA tarda
como mínimo 5 minutos. La pantalla muestra
“----” durante los primeros 5 minutos desde el
momento del encendido (Fig. 2).
Fig. 2
• Aunque todas las lecturas se retienen sin
cambios, los valores de STEL y TWA se continuan
actualizando cada 5 minutos.
7. El instrumento emite señales acústicas (Abt.80dB)
cuando el nivel de CO2 supera el límite fijado
y se detiene al pulsar cualquier tecla (salvo la
tecla de“ENCENDIDO”) o cuando las lecturas
disminuyen por debajo del valor establecido.
Vuelve a emitirse una señal acústica cuando el
valor supera el límite. Reinicie el instrumento si no
puede detener la señal acústica.
5
Page 85

Apagado automático
El instrumento se apaga automáticamente después
de 20 minutos de inactividad. Para anular la función,
mantenga pulsada la tecla “ENCENDIDO / SET”
y ”HOLD” durante 2 segundos para encender el
instrumento hasta que aparezca “n”.
Configuración
El modo de configuración avanzada le permite
personalizar el instrumento.
Hay 2 tipos de parámetros disponibles.
P1.0: Ajuste del umbral de la alarma de CO2
P3.0: Ajuste de la unidad de temperatura
P1.0 Ajuste del umbral de la alarma de CO2
Mantenga pulsado el botón“ENCENDIDO/SET” en
el modo de funcionamiento normal durante más de
1 segundo para acceder al modo de configuración. Para
salir de la configuración, pulse “CAL/ESC” en P1.0 o P3.0.
Al acceder al modo de configuración, aparecen P1.0 y
“AL” en la pantalla LCD (Fig. 3). Pulse “INTRO” para
acceder a P1.1 y ajustar el umbral de la alarma de CO2. El
valor fijado actual quedará parpadeando en la pantalla
(Fig. 4). Pulse “p” para aumentar el valor o “q” para
reducirlo. Cada pulsación ajusta 100 ppm y el rango de la
alarma es de 100 a 9900 ppm. Cuando aparezca el valor
preferido para la alarma, pulse “INTRO” para guardar el
ajuste o “ESC” para salir sin guardar y regresar a P1.0.
Fig. 3 Fig. 4
P3.0: Ajuste de la unidad de temperatura
Pulse “p” o “q” en P1.0 para acceder a P3.0 y
configurar la escala de temperatura. Pulse “INTRO” para
6
Page 86

pasar a P3.1, donde parpadea °C o °F para indicar qué
unidad hay fijada en la esquina inferior izquierda de la
pantalla. Para alternar entre °C y °F, pulse “p” o “q”.
Seguidamente, pulse “INTRO” para guardar el ajuste o
“ESC” para salir sin guardar y regresar a P3.0.
Modo de calibración
Calibración de CO2
1. Coloque el instrumento en un área al aire libre
con aire bien ventilado. Encienda el instrumento y
mantenga pulsado “CAL” y “p” simultáneamente
para acceder al modo de calibración de CO2. En la
pantalla parpadean 400 ppm y “CAL” mientras se
realiza la calibración (Fig. 5).
Fig. 5
2. Espere aproximadamente 5 minutos hasta
que deje de parpadear la pantalla y concluya
la calibración antes de volver al modo de
funcionamiento normal.
3. Para anular la calibración, apague el instrumento
en cualquier momento.
7
Page 87

Calibración de la humedad
1. Enchufe la sonda del sensor en el frasco de sal
al 33%. Mantenga pulsado “CAL” y “q” en el
modo de funcionamiento normal para acceder a
la calibración al 33%. En la pantalla parpadean
“CAL” y el valor de calibración (32,7% si se está
a 25 °C), y a la izquierda se indica la temperatura
actual. El instrumento se está calibrando en
ese momento y terminará transcurridos unos
60 minutos cuando dejen de parpadear “CAL” y el
valor de humedad.
2. Después de la calibración al 33%, enchufe la
sonda del sensor en el frasco de sal al 75%, y
seguidamente pulse “INTRO” para acceder a la
calibración del 75%. En la pantalla parpadean
“CAL” y el valor de calibración (75,2% si se está
a 25 °C), y a la izquierda se indica la temperatura
actual. El instrumento se está calibrando. Espere
aproximadamente 60 minutos hasta que deje de
parpadear, tras lo cual concluye la calibración y el
instrumento vuelve al modo de funcionamiento
normal.
3. Los usuarios también pueden calibrar cualquiera
de los dos puntos. Para calibrar únicamente
al 33%, pulse “ESC” y salga cuando se haya
completado la calibración al 33%. Para calibrar
únicamente al 75%, pulse “p” o “q” dentro de
un plazo de 5 minutos mientras se inicializa la
calibración del 33%. Para anular la calibración,
simplemente apague el instrumento.
Capacidades de la interfaz USB
Es necesario utilizar el cable USB y el software (kit
opcional) para transferir datos a un PC. Antes de realizar
la conexión, instale el controlador USB en el software.
8
Page 88

ESPECIFICACIONES
CO2
Rango
Resolución 1 ppm
Precisión
Presión
Dependencia Presión, 100 kPa
Temperatura
Rango -10,0~60,0 °C (14~140 °F)
Resolución 0,1 °C /0,1 °F
Precisión ±0,6 °C / ±0,9 °F
Humedad
Rango 0,0~95%
Resolución 0,1%
Precisión ±3% (10~90% a 25 °C); ±5% (otros)
Condiciones
ambientales
de funcionamiento
Condiciones
ambientales
de almacenamiento
Alimentación 4 baterías AA
0~9999 ppm
(5001~9999 de rango de escala fuera
de exactitud)
±30 ppm ±5% redondeado (0~5000)
(no especificado para valores fuera
de escala)
+1,6% de la lectura por desviación de
kPa de la normal
0~50 °C, 0~95% HR
(evitar condensación)
-20~60 °C, 0~99% HR
(evitar condensación)
- Compatibilidad electromagnética: Cumple la
norma EN61326-1.
las siguientes directivas de la comunidad europea: 2014/30/EU
(compatibilidad electromagnética). No obstante, la presencia de
Este producto cumple con los requisitos de
9
Page 89

impulsos eléctricos o campos electromagnéticos intensos cerca del
equipo puede afectar al funcionamiento del circuito de medición.
Los instrumentos de medición también responden ante señales
no deseadas que estén presentes en el circuito de medición.
Los usuarios deben obrar con cuidado y tomar las precauciones
adecuadas para evitar resultados erróneos al medir en presencia
de interferencias electrónicas.
MANTENIMIENTO Y REPARACIÓN
Si parece que el medidor no funciona bien, realice los
pasos siguientes para identificar la causa del problema:
1. Compruebe la batería. Reemplace la batería
inmediatamente cuando aparezca el símbolo “
en la pantalla LCD.
2. Repase las instrucciones de funcionamiento
por si hubiera cometido algún error en algún
procedimiento.
Excepto el cambio de la batería, cualquier otra
reparación del medidor deberá llevarla a cabo
exclusivamente un centro de servicio autorizado por
la fábrica u otro personal cualificado para reparación
de instrumentos. El panel frontal y la carcasa pueden
limpiarse con una solución suave de detergente y agua.
Aplique sólo un poquito de dicha solución con un paño
suave y séquelo por completo antes de su utilización. No
utilice hidrocarburos aromáticos ni solventes clorados
para la limpieza.
REEMPLAZO DE BATERÍAS
1. El instrumento se alimenta mediante 4 baterías AA
o con una fuente de alimentación de CC (salida de
9 V / 1 A).
2. Cuando la tensión de la batería es baja,
aparecerán “
(Fig. 6). Y sonará la señal acústica. El sensor de
CO2 no puede funcionar con baja tensión, de
modo que emite la señal acústica para indicar el
” y “Lob” en la pantalla LCD
”
10
Page 90

fallo de una medición de CO2, y las lecturas no se
mostrarán en pantalla. Utilice baterías nuevas o
conecte la unidad a la fuente de alimentación.
RESOLUCIÓN DE PROBLEMAS
No es posible encender el instrumento
• Asegúrese de pulsar la tecla de encendido durante
más de 0,3 segundos.
• Compruebe el estado de las baterías y cámbielas si
fuera necesario.
• Verifique si la fuente de alimentación está
correctamente enchufada.
• Retire las baterías durante un minuto y luego
vuelva a instalarlas.
La pantalla se borra
• Verifique si apareció el icono de batería con poca
carga antes de apagarse la pantalla. Si es así,
utilice baterías nuevas.
Lecturas fijas
• Compruebe si se activó la función de retención
de datos (icono HOLD en la esquina superior
izquierda).
Respuesta lenta
• Verifique si estaban bloqueados los canales de
flujo de aire en la parte posterior.
Código de error
E01: El sensor de CO2 está dañado.
E02: El valor es inferior al rango.
E03: El valor es superior al rango.
E04: El error original de datos ocasiona este error
(DP, WB).
E07: Tensión demasiado baja para medir CO2.
Reemplace las baterías o utilice la fuente
de alimentación.
11
Page 91

E11: Reintente la calibración de humedad.
E17: Reintente la calibración de CO2.
E31: El sensor de temperatura está dañado.
E34: El sensor de humedad está dañado.
APENDICE - NIVELES Y DIRECTRICES DE CO2
Recomendaciones de NIOSH
250-350 ppm: concentraciones ambientales normales
en exteriores
600 ppm: quejas mínimas por la calidad del aire
600-1000 ppm: interpretación menos clara
1000 ppm: indica una ventilación inadecuada; quejas
como dolores de cabeza, fatiga e irritación de ojos/
garganta serán cada vez más comunes. Debe utilizarse
1000 ppm como límite superior para niveles en interiores.
Norma 62-1989 de ASHRAE: 1000 ppm
La concentración de CO2 en edificios ocupados no debe
ser superior a 1000 ppm.
Boletín de edificios 101 (BB101): 1500 ppm
Las normas de Reino Unido para las escuelas indican que
el CO2 promediado a lo largo de todo el día (es decir, de
las 9 a las 15:30 horas) no debe superar un valor de 1500
ppm.
OSHA: 5000 ppm
El promedio ponderado en función del tiempo a lo largo
de cinco días laborables de 8 horas no debe superar las
5000 ppm.
Alemania, Japón, Australia, RU...: 5000 ppm
El límite del promedio ponderado de 8 horas en
exposición durante el trabajo es de 5000 ppm.
12
Page 92

Visit amprobe.com for
• Catalog
• Application notes
• Product specifications
• User manuals
Amprobe
®
amprobe.com
Division of Fluke Corp.
6920 Seaway Blvd.
M/S 143F
Everett, WA 98203 USA
Tel: 877-AMPROBE (267-7623)
Beha-Amprobe
®
beha-amprobe.com
c/o Fluke Europe BV
Science Park
Eindhoven 5110
NL-5692 EC Son
Tel.: +49 (0) 7684 8009 - 0
Please
Recycle
 Loading...