

Page 1

Users Manual
• Mode d’emploi
• Bedienungshandbuch
• Manual d’Uso
• Manual de uso
• Användarhandbok
CM100
Carbon Monoxide
Meter
Page 2

CM100
Carbon Monoxide Meter
Users Manual
CM100_Rev001
© 2008 Amprobe Test Tools.
All rights reserved.
English
Page 3

Limited Warranty and Limitation of Liability
Your Amprobe produc t will be free from defects in material and workmanship for 1 year from the
date of purchase. This warranty does not cover fuses, disposable batteries or damage from accident,
neglec t, misuse, alteration, contamination, or abnormal conditions of operation or handling.
Resellers are not authorized to exte nd any other warrant y on Amprobe’s behalf. To obtain service
during the warrant y period, return the product with proof of purchase to an authorized Amprobe
Test Tools Ser vice Center or to an A mprobe dealer or distributor. See Repair Section for details.
THIS WARRANT Y IS YOUR ONLY REMEDY. ALL OTHER WARRANTIES - WHE THER EX PRESS, IMPLIED
OR STAUTORY - INCLUDING IMPLIED WARRA NTIES OF FITNESS FOR A PARTICULAR PURPOSE OR
MERCHANTABILITY, ARE HEREBY DISCL AIMED. MANUFACTURER SHALL NOT BE LIABLE FOR ANY
SPECIAL, INDIRECT, INC IDENTAL OR CONSEQUENTIAL DAMAGES OR LOSSES, ARISING FROM ANY
CAUSE OR THEORY. Since some states or countries do not allow the exclusion or limitation of an
implied warranty or of incidental or consequential damages, this limitation of liability may not apply
to you.
Repair
All test tools returned for warranty or non-warranty repair or for calibration should be accompanied
by the following: your name, company’s name, address, telephone number, and proof of purchase.
Additionally, please includ e a brief de scription of the problem or the service reque sted and include
the test leads with the meter. Non-warranty repair or replacement charges should be remitted in the
form of a check, a money order, cre dit card with expiration date, or a purchase order made payable
to Amprobe® Test Tools .
In-Warranty Repairs and Replacement – All Countries
Please read the warranty st atement and check your battery before requesting repair. During the
warrant y period any defec tive test tool can be returned to your Amprobe® Test Tools distributor
for an exchange for the same or like produc t. Please check the “Where to Buy” se ction on www.
amprobe.com for a list of distributors near you. Additionally, in the United States and Canada InWarranty repair and replacement units can also be sent to a A mprobe® Test Tools Service Center
(see address below).
Non-Warranty Repairs and Replacement – US and Canada
Non-warranty repairs in the Unite d States and Canada should be sent to a Amprobe® Test Tools
Service Center. Call Amprobe® Test Tools or inquire at your point of purchase for current repair and
replacement rates.
In USA In Canada
Amprobe Test Tools Amprobe Test Tools
Everett, WA 98203 Mississauga, ON L4Z 1X9
Tel: 877-AMPROBE (267-7623) Tel: 905-890-7600
Non-Warranty Repairs and Replacement – Europe
European non-warranty units can b e replaced by your Amprobe® Test Tools distributor for a nominal
charge. Please check the “W here to Buy” section on ww w.amprobe.com for a list of distributors near
you.
European Correspondence Address*
Amprobe
In den Engematten 14
79286 Glotter tal, Germany
Tel.: +49 (0) 7684 8009 - 0
*(Correspondence only – no repair or replacement available from this addres s. European customers
please contact your distributor.)
®
Test Tools Europe
2
Page 4

ppm
Max
1
2
3
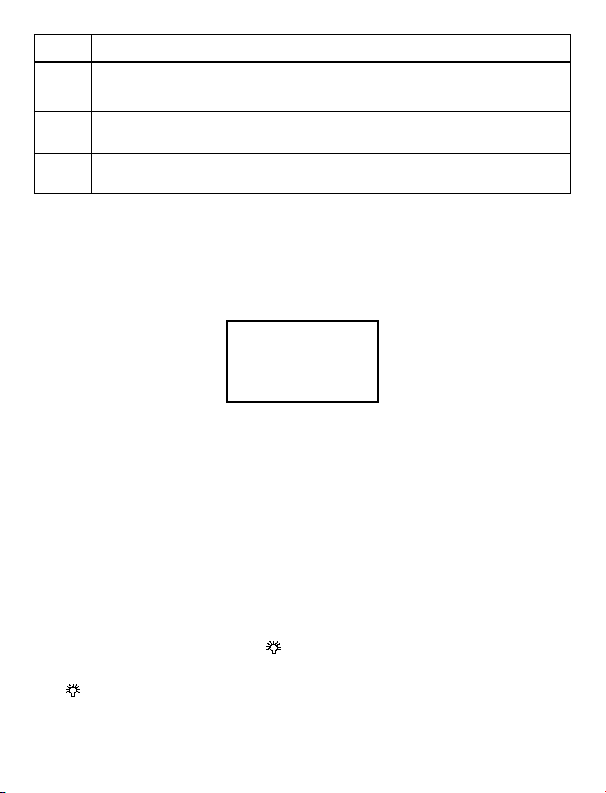
CO Meter
LCD display
1
2
3
➊ Display current CO value.
Display maximum CO value.
➋
Low battery indicator.
➌
Function Keys
Turn the meter on and off. Select the alarm value.
➊
Turn on and off the backlight. Reset the maximum
➋
CO value. Select the calibration value.
➌ Enter calibration mode by pressing both pushbuttons
3
Page 5

Carbon Monoxide Meter
CM100
CONTENTS
Unpacking and Inspection ..................................................................................................................5
Introduction .........................................................................................................................................5
Features ..........................................................................................................................................5
CO Levels and Standards .....................................................................................................................5
Operation ............................................................................................................................................6
1. Power on/off ..............................................................................................................................6
2. Alarm setting .............................................................................................................................6
3. Measurement .............................................................................................................................6
4. Backlight .....................................................................................................................................6
5. Low battery indicator ................................................................................................................7
6. Auto power off ..........................................................................................................................7
Calibration ...........................................................................................................................................7
0ppm calibration ............................................................................................................................7
100ppm/500ppm calibration ........................................................................................................7
Troubleshooting ..................................................................................................................................7
Precautions ..........................................................................................................................................8
Technical Specifications ......................................................................................................................8
4
Page 6

UNPACKING AND INSPECTION
Your shipping container should include:
1 CM100 Carbon Monixide Detector
3 AAA battery
1 Carrying Case
1 Users Manual
INTRODUCTION
Congratulations on your purchase of this digital pen type CO meter. Please read the manual
completely before using the meter.
Features
Adjustable CO warning level•
Dual and digital display•
Backlight for operation in dark area•
Low battery indicator•
Auto power off function•
CO LEVELS AND STANDARDS
ppm Symptoms and applicable standard
0-1 Normal background levels
Maximum indoor air quality level:
9
Maximum allowable concentration per ASHRAE Residential standards 62-1989 for
living area.
Maximum limit 8 hrs of continuous exposure per California OSHA Workplace
25
standards.
35 Maximum 8 hrs average exposure level per US OSHA workplace standards.
Maximum concentration for continuous exposure in any 8 hrs average level per
50
OSHA standards.
Remove employees from enclosed space if the CO concentration exceeds 100ppm
100
per OSHA exposure limit.
200 Mild headache, fatigue, nausea and dizziness w/i 2-3 hrs.
5
Page 7
ppm Symptoms and applicable standard
Frontal headache, life threatening after 3hrs. Maximum concentration in flue gas
400
per EPA and AGA.
800 Dizziness, nausea, convulsions, death w/i 2-3 hrs.
1600 Nausea w/I 20 min; death w/I 2-3 hrs
OPERATION
1. Power on/off
Press • � to turn on and off the meter. When meter is power on, the preset alarm value and
current air temperature will be blinking on the LCD.
Meter will perform Self-Test for 15 seconds. A beep after the self test indicates that the •
meter is ready to use.
A 25 ppm
26 C
IMPORTANT:
It is recommended to turn on the meter in an area free of CO since high CO level may cause
failure in passing Self-Test.
2. Alarm setting
The meter alarm is preset to 25ppm to warn about possible danger. •
User can adjust the alarm level by choosing one. The available CO gas levels: 25, 30, 35, 45, •
50, 70, 100 and 200ppm.
Release the pushbutton to select the preferred value. The meter will return to Self-Test •
mode in a few seconds.
3. Measurement
The meter detects the existence of CO in the environment and displays the reading in ppm. •
It also indicates the maximum value (at lower side of the LCD) of all readings.
Reset the maximum value by pressing•
4. Backlight
pushbutton to turn on and off the backlight.
Press
pushbutton for two seconds in measuring mode.
6
Page 8

5. Low battery indicator
Appears on the LCD when battery voltage is low.
6. Auto power off
The meter turns itself off automatically after 15 minutes of non-operation.
CALIBRATION
To enter the calibration mode, turn off meter and press � +
for 2 seconds. It will show a blinking ppm on the upper display and calibration value ”0” at
lower side. Now the meter is running 0ppm calibration as default.
0ppm calibration
The preset calibration value is 0ppm. Put the meter in an area free of CO and enter the
calibration mode. It calibrates automatically. The LCD is now displaying a blinking ppm value
at the upper side which slowly runs down to 0 or minus value, then stops blinking when the
calibration is completed. This takes about 10 minutes.
Note:
Don’t be alarmed if high ppm or minus value shows up when entering calibration mode. It will
go down and approach to 0 in seconds. The erratic readings are caused by electromagnetic
interference (EMI) in the environment, such as computers or cell phone. It is required to have
the meter away from these types of interference, otherwise the calibration may take much
longer time or never complete.
100ppm/500ppm calibration
For other standard calibration, press 1.
value. (0, 100, 500ppm).
Place the meter into the sealed box filled with standard gas (e.g. 100ppm/500ppm) for 15 2.
minutes. Then the Calibration will be done automatically.
Check if the reading meets calibration value. If it does, the calibration is well completed. If 3.
not, repeat the procedure.
TROUBLESHOOTING
Device cannot power ON
Check if the time since power on is over 300 mS.1.
Make sure the batteries are in good contact and correct polarity.2.
Replace the batteries and try again3.
Display disappears
Check whether the low battery indicator shows before display disappears. If so, replace the
batteries.
Calibration failure
Check if the low battery indicator shows before calibration. If so, replace a new battery and 1.
try again.
pushbutton and hold to select the calibration
pushbuttons simultaneously
7
Page 9

Make sure the standard gas is correct.2.
E 2.: The value is underflow.
E 3.: The value is overflow.
E 4.:The value is “error”because of some original data.
E 31.: A/D failure, return the meter to the dealer for repair.
E 33.: Some measurement circuits failure, return the meter to the dealer for replacement or
repair.
E 35.: Self-Test failure. Turn on the meter again in other area free of CO.
Sensor failure. Return the meter to the dealer for repair.
PRECAUTIONS
Keep the meter away from electromagnetic interference (EMI) which may cause erratic 1.
readings.
Recovering time is required when meter exposed to high level CO. The longer the exposure, 2.
the longer recovering time is needed.
Self-Test after power on is to test the sensor and circuit condition. 3.
TECHNICAL SPECIFICATIONS
CO range: 0~999ppm
Resolution: 1 ppm
Accuracy: ± 20% at 0~100ppm; ±15% at 100~500ppm (at 20°C±5% and 50%±20%RH)
Battery: 3 AAA alkaline. Battery life is 250 hours when backlight is off and 35 hours when
backlight is on.
8
Page 10

CM100
Compteur de monoxyde
de carbone
Mode d’emploi
CM100_Rev001
© 2008 Amprobe Test Tools.
Tous droits réservés.
9
Français
Page 11

Limites de garantie et de responsabilité
Amprob e garantit l’absence de vices de matériaux et de fabrication de ce produit pendant une
périod e d’un an prenant effet à la date d’achat. Cette garantie ne s’applique pas aux fusibles, aux
piles jetables ni à tout produit mal utilisé, modifié, cont aminé, négligé ou endommagé par accident
ou soumis à des conditions anormales d ’utilis ation et de manipulation. L’obligation de garantie
d’Amprobe est limitée, au choix d’Amprob e, au remboursement du prix d’achat ou à la réparation/
remplacement gratuit d’un produit défectueux. Le s distributeurs agréés par Amprobe ne sont pas
autoris és à appliquer une garantie plus étendue au nom d’Amprobe. Pour bénéficier de la garantie,
renvoyez le produit accompagné d’un jus tificatif d’achat auprès d’un centre de service s agréé par
Amprob e Test Tools ou d’un distributeur ou d ’un revendeur Amprobe. Voir la s ection Réparation
pour tous les détails. LA PRESENTE GARANTIE EST LE SEUL ET EXCLUSIF RECOURS. TOUTES AUTRES
GARA NTIES , EXPLICITES , IMPLICITES OU STATUTAIRES, NOTAMMENT LE CAS ECHEANT LES
GARA NTIES DE QUALITE MARCHANDE OU D’ADAP TATION A UN OBJECTIF PARTICULIER, SONT
EXCLUES PAR L ES PRESENTES. AM PROBE, L A SOCIÉTÉ MÈRE OU SES FILIALES NE PEUVENT EN AUCUN
CAS ÊTRE TENUES RESPO NSABLES DES DOMMAGES PARTICULIERS, INDIRECT S, ACCIDENTELS OU
CONSÉCU TIFS, NI D’AUCUNS DÉGÂTS OU PERTES DE DONNÉES, SUR UNE BASE CONTRAC TUELLE,
EXTRA-CONTR ACTUELLE OU AUTRE. Etant donné que certaines juridictions n’admettent pas le s
limitations d’une condition de garantie implicite, ou l’exclusion ou la limitation de dégâts accide ntels
ou consécutifs , il se peut que les limitation s et/ou les exclusions de ce tte garantie ne s’appliquent pas
à votre cas.
Réparation
Tous les outils de test renvoyés p our un étalonnage ou une réparation couverte ou non par la
garantie doivent être accompagnés des éléments suivants : nom, raison sociale, adresse, numéro
de téléphone et justificatif d’achat . Ajoutez également une brève description du problème ou du
service demandé et incluez les cordons de me sure avec l’appareil. Les frais d e remplacement ou
de réparation hors garantie doivent être acquittés par chèque, mandat, carte de crédit ave c date
d’expiration, ou par bon de commande payable à l’ordre de Amprobe
Remplacements et réparations sous garantie – Tous pays
Veuillez lire la déclaration de garantie et vérifier la pile avant de demander une réparation. Pendant
la période de garantie, tout outil de tes t défec tueux peut être renvoyé auprès de votre distributeur
®
Amprobe
Test Tools pour être échangé contre un produit identique ou similaire. Consultez la
section « Where to Buy » sur le site www.amprobe.com pour obtenir la liste des distributeur s dans
votre région. Au Canada et aux Etats- Unis, les appareils devant être remplacés ou réparés sous
garantie peuvent é galement être envoyés dans un centre de services Amprobe
suivante pour les adresse s).
Remplacements et réparations hors garantie – Canada et Etats-Unis
Les appareils à réparer hor s garantie au Canada e t aux Etats-Unis doivent être envoyés dans un
centre de services Amprobe
votre lieu d’achat pour connaître les tarifs en vigueur de remplacement ou de réparation.
Aux Etats-Unis Au Canada
Amprobe Test Tools Amprob e Test Tools
Everet t, WA 98203 Missis sauga, Ontario L4Z 1X9 Canada
Tél. : 877-993-5853 Tél. : 905-890 -7600
Fax : 425-44 6-6390 Fax : 905-890 -6866
Remplacements et réparations hors garantie – Europe
Les appareils européens non couverts par la garantie peuvent être remplacés par votre distributeur
®
Amprobe
Test Tools pour une somme nominale. Consultez la sec tion « Where to Buy » sur le site
www.amprobe.com pour obtenir la liste des distributeurs dans votre région.
Adresse postale européenne*
Amprobe
Beha-Amprobe GmbH
In den Engematten 14
79286 Glotter tal, Allemagne
Tél. : +49 (0) 7684 80 09 – 0
*(Réser vée à la correspondance – Au cune réparation ou remplacement n’es t possible à cette adresse.
Nos clients européens doivent contacter leur distributeur.)
®
®
Test Tools. Appelez Amprobe® Test Tools ou renseignez-vous auprès de
Test Tools Europe
10
®
Test Tools.
®
Test Tools (voir page
Page 12

ppm
Max
1
2
3
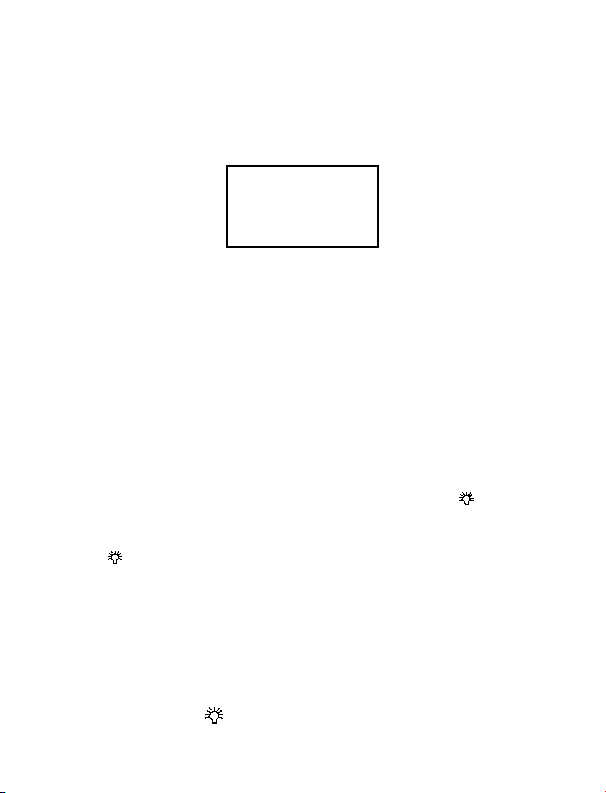
CO Meter
Ecran LCD
1
2
3
Affiche la valeur CO actuelle.
➊
Affiche la valeur CO maximum.
➋
Témoin de batterie faible.
➌
Touches de fonction
Active ou désactive l’appareil. Sélectionne la
➊
valeur d’alarme.
➋ Active ou désactive le rétroéclairage. Remet à zéro
la valeur CO maximum. Sélectionne la
valeur d’étalonnage.
Ouvre le mode d’étalonnage en activant les deux
➌
boutons-poussoirs.
11
Page 13

Compteur de monoxyde de carbone
CM100
SOMMAIRE
Déballage et inspection ......................................................................................................................5
Introduction .........................................................................................................................................5
Fonctionnalités ...............................................................................................................................5
Etalons et niveaux de CO ....................................................................................................................5
Fonctionnement ..................................................................................................................................6
1. Marche/arrêt ..............................................................................................................................6
2. Réglage de l’alarme ...................................................................................................................6
3. Mesure ........................................................................................................................................6
4. Rétroéclairage ............................................................................................................................6
5. Témoin de batterie faible .........................................................................................................7
6. Arrêt automatique .....................................................................................................................7
Etalonnage ..........................................................................................................................................7
Etalonnage à 0 ppm ......................................................................................................................7
Etalonnage à 100 ppm/500 ppm ..................................................................................................7
Dépannage ..........................................................................................................................................7
Précautions ..........................................................................................................................................8
Spécifications techniques ....................................................................................................................8
12
Page 14

DÉBALLAGE ET INSPECTION
Le carton d’emballage reçu doit inclure les éléments suivants :
1 détecteur de monoxyde de carbone CM100
3 piles AAA
1 étui de transport
1 mode d’emploi
INTRODUCTION
Félicitations. Nous vous remercions d’avoir acheté ce compteur de monoxyde de carbone
numérique de type stylet. Lisez entièrement le manuel avant d’utiliser le compteur.
Fonctionnalités
Niveau d’alerte au CO réglable•
Double affichage numérique•
Rétroéclairé pour l’utilisation dans les endroits sombres•
Témoin de batterie faible•
Fonction d’arrêt automatique•
ETALONS ET NIVEAUX DE CO
ppm Symptômes et étalon applicable
0-1 Niveaux normaux en arrière-plan.
Niveau maximum de la qualité de l’air intérieur :
9
Concentration maximale admissible selon les normes résidentielles ASHRAE 621989 pour espaces habitables.
Limite d’exposition maximale continue de 8 heures selon les normes OSHA
25
Californie sur les lieux de travail.
Niveau d’exposition maximal moyen de 8 heures selon les normes OSHA
35
américaines sur les lieux de travail.
Concentration maximale lors d’une exposition continue à un niveau moyen de
50
8 heures selon les normes OSHA.
Demander aux employés de quitter un espace clos si la concentration en CO est
100
supérieure à 100 ppm selon la limite d’exposition OSHA.
200 Légers maux de tête, fatigue, nausées et vertiges dans les 2 à 3 heures.
Céphalée en casque, mettant en danger la vie du sujet après 3 heures.
400
Concentration maximale de gaz de fumée selon EPA et AGA.
800 Vertiges, nausées, convulsions, décès dans les 2 à 3 heures.
1600 Nausées dans les 20 mn ; décès dans les 2 à 3 heures.
13
Page 15
FONCTIONNEMENT
1. Marche/arrêt
Appuyez sur • � pour mettre le compteur hors et sous tension. Lorsque le compteur est sous
tension, la consigne d’alarme prédéfinie et la température de l’air actuelle clignotent sur
l’écran LCD.
Le compteur effectue alors un auto-diagnostic pendant 15 secondes. Un bip sonore retentit •
après l’auto-diagnostic, indiquant que le compteur est prêt à l’emploi.
A 25 ppm
26 C
IMPORTANT :
Il est recommandé de mettre le compteur sous tension dans un endroit dépourvu de tout CO
car un niveau de CO élevé risque d’entraîner un échec de l’auto-diagnostic.
2. Réglage de l’alarme
L’alarme du compteur est préréglée à 25 ppm pour signaler un danger potentiel. •
L’utilisateur peut ajuster le niveau d’alarme en choisissant l’un des niveaux de gaz CO •
proposés : 25, 30, 35, 45, 50, 70, 100 et 200 ppm.
Relâchez le bouton-poussoir pour sélectionner la valeur souhaitée. Le compteur revient en •
mode d’auto-diagnostic après quelques secondes.
3. Mesure
Le compteur détecte la présence de monoxyde de carbone dans l’environnement et affiche •
le résultat relevé en ppm. Il indique également la valeur maximale (dans le coin inférieur de
l’écran LCD) de toutes les lectures.
Remettez la valeur maximale à zéro en appuyant sur le bouton-poussoir•
secondes en mode de mesure.
4. Rétroéclairage
Appuyez sur
5. Témoin de batterie faible
Il apparaît sur l’écran LCD lorsque la tension des piles est faible.
6. Arrêt automatique
Le compteur s’éteint automatiquement après 15 minutes d’inactivité.
ETALONNAGE
Pour passer en mode d’étalonnage, mettez le compteur hors tension et appuyez simultanément
sur les boutons-poussoirs � +
pour activer ou désactiver le rétroéclairage.
pendant 2 secondes. Les lettres ppm clignotent sur
pendant deux
14
Page 16

l’affichage supérieur et la valeur d’étalonnage « 0 » apparaît dans le volet inférieur. Le
compteur effectue par défaut un étalonnage à 0 ppm.
Etalonnage à 0 ppm
La valeur d’étalonnage est prédéfinie à 0 ppm. Placez le compteur dans une zone dépourvue
en CO et passez en mode d’étalonnage. L’étalonnage s’effectue automatiquement. L’écran
LCD affiche la valeur ppm qui clignote dans le volet supérieur ; elle progresse jusqu’à 0 ou
une valeur négative et s’arrête de clignoter une fois l’étalonnage terminé. L’étalonnage dure
environ 10 minutes.
Remarque :
Ne vous inquiétez pas si une valeur ppm ou négative apparaît lors du passage au mode
d’étalonnage. Elle se stabilise pour approcher 0 en quelques secondes. Les résultats irréguliers
sont dus à l’interférence électromagnétique (EMI) d’appareils, ordinateurs ou téléphones
portables par exemple, présents dans l’environnement. Eloignez le compteur de ces sources
d’interférence, sinon l’étalonnage risque de durer plus longtemps ou ne jamais se terminer.
Etalonnage de 100 ppm à 500 ppm
Pour un autre étalonnage standard, maintenez le bouton-poussoir1.
sélectionner la valeur d’étalonnage. (0, 100, 500 ppm).
Placez le compteur dans le coffret hermétique rempli de gaz étalon (p. ex. 2.
100 ppm/500 ppm) pendant 15 minutes. L’étalonnage se déroule automatiquement.
Vérifiez si la valeur relevée est conforme à la valeur d’étalonnage. Dans l’affirmative, 3.
l’étalonnage a réussi. Sinon, répétez la procédure.
DÉPANNAGE
L’appareil ne s’allume pas
Vérifiez si la durée écoulée depuis la mise sous tension est supérieure à 300 ms.1.
Vérifiez la bonne polarité et le contact des piles.2.
Replacez les piles et recommencez.3.
L’affichage disparaît
Vérifiez si le témoin de batterie faible s’affiche avant la disparition d’affichage. Dans
l’affirmative, remplacez les piles.
Echec de l’étalonnage
Vérifiez si le témoin de batterie faible est affiché avant l’étalonnage. Dans l’affirmative, 1.
remplacez les piles et recommencez.
Vérifiez que le gaz étalon est correct.2.
E 2. : La valeur est un dépassement de capacité par valeurs inférieures.
E 3. : La valeur est un dépassement de capacité par valeurs supérieures.
E 4. : La valeur « error » apparaît en raison de certaines données initiales.
E 31. : Echec A/D, renvoyez le compteur au distributeur pour réparations.
enfoncé pour
15
Page 17

E 33. : Echec des circuits de mesure, renvoyez le compteur au distributeur pour le faire
réparer ou remplacer.
E 35. : Echec de l’auto-diagnostic. Remettez le compteur sous tension dans un autre endroit
dépourvu en CO.
Echec de capteur. Renvoyez le compteur au distributeur en réparation.
PRÉCAUTIONS
Eloignez le compteur des interférences électromagnétiques (EMI) qui provoquent des 1.
résultats irréguliers.
Un délai de récupération est nécessaire lorsque le compteur est exposé à un haut niveau de 2.
monoxyde de carbone. Plus l’exposition est longue, plus le délai de récupération doit
être long.
L’auto-diagnostic après la mise sous tension teste l’état du capteur et des circuits. 3.
SPECIFICATIONS TECHNIQUES
Gamme CO : 0~999 ppm
Résolution : 1 ppm
Précision : ± 20 % à 0~100 ppm; ± 15 % à 100~500 ppm (à 20 °C ± 5 % et 50 % ± 20 %HR)
Batterie : 3 piles alcalines AAA. La durée de vie des piles est de 250 heures avec le rétroéclairage
inactif et de 35 heures avec le rétroéclairage actif.
16
Page 18

CM100
Kohlenmonoxid-Messgerät
Bedienungshandbuch
CM100_Rev001
© 2008 Amprobe Test Tools.
Alle Rechte vorbehalten.
17
Deutsch
Page 19

Beschrä nkte Gewährleistung und Haftungs beschränkung
Es wird gewährleistet, dass dieses A mprobe-Pro dukt für die Dauer von einem Jah r ab dem Kaufdatum
frei von Material- un d Fertigungsdefekte n ist. Diese Gewährleistung erstreckt si ch nicht auf Sicherungen,
Einwegba tterien oder Sc häden durch Unfälle, Nachlässigkeit, Missbrauch, Änd erungen oder abnormale
Betrieb sbedingunge n bzw. unsachgemä ße Handhabung. Die Garantieverpflich tung von Amprobe b eschränkt
sich darau f, dass A mprobe nach eige nem Ermessen de n Kaufpreis ersetzt oder aber das d efekte Produk t
unentgeltlich rep ariert oder austauscht. Die Verka ufsstellen sin d nicht dazu berechtigt, die se Gewährleistu ng
im Namen vo n Amprobe zu erwe itern. Um während d er Gewährleistu ngsperiode Se rviceleistu ngen zu
beansp ruchen, das Produkt mit Kaufnachweis an ein auto risiertes Amp robe Test Tools Service-C enter oder
an einen Amprobe -Fachhändler/-Distr ibutor einsenden. Näher e Einzelheiten siehe Abschni tt „Reparatur“.
DIESE GE WÄHRLEISTUNG STELLT DEN EIN ZIGEN UND ALLEINIGEN RECH TSANSPRUCH AUF SCHADEN ERSATZ
DAR. ALL E ANDEREN GEWÄHR LEISTUNGEN, VERTRAGLICH GER EGELTE ODER GESETZLICH VORG ESCHRIEBENE,
EINSCH LIESSLICH DER GE SETZLICHEN GEWÄHRLEI STUNG DER MARK TFÄHIGKEIT UN D DER EIGNUNG FÜR EI NEN
BESTIM MTEN ZWECK, W ERDEN ABGELEHNT. WEDER AMPRO BE NOCH DESSEN MUTTERGE SELLSCHAFT ODER
TOCHTERGESELLSCHAFTEN ÜBERNEHMEN HAF TUNG FÜR SPEZIELLE, INDI REKTE, NEBEN- ODER FOLGESCHÄDEN
ODER FÜR VERLUSTE, DIE AUF BELIEBIGER UR SACHE ODER RECHT STHEORIE BERUHEN. Weil einig e Staaten
oder Länder den Au sschluss oder die Einschränkung ein er implizierten G ewährleistung s owie den Ausschluss
von Begleit- oder Fol geschäden nich t zulassen, ist diese Gewährleistu ngsbeschränkung möglicherwe ise für Sie
nicht gültig.
Reparatur
Alle Geräten, die inn erhalb oder außerhalb des Ga rantiezeitraums zur Reparatur oder Kalib rierung
einges endet werden, müssen mit folgend en Informationen und Dokumenten ver sehen werden: Na me
des Kunde n, Firmenname, Adresse, Telefonnumm er und Kaufbeleg. Zusätzlich bitte dem Mess gerät eine
kurze Bes chreibung des Problems od er der gewünsch ten Wartung sowie die Messl eitungen beilegen. Die
Gebühren für Reparaturen auß erhalb der Garanti e oder für den Ersa tz von Instrume nten müssen per S check,
Geldanw eisung oder Kreditkarte (Kreditkartennummer mit A blaufdatum) begli chen werden oder es muss ein
Auftrag an Amprob e® Test Tools form uliert werden.
Garantiereparaturen und -austaus ch - alle Länder
Bitte die Garantiee rklärung lesen u nd die Batterie prüfen, bevor Reparaturen angeforder t werden. Während
der Garantieperio de können alle defekten Gerä te zum Umtausch ge gen dasselbe od er ein ähnliches Produkt
an den Amp robe® Test Tools- Distributor ge sendet werden . Ein Verzeichnis der zu ständigen Dis tributoren ist
im Absch nitt „Where to Buy“ ( Verkaufsstellen) auf der We bsite www.amprobe.co m zu finden. Darüber hinaus
können in de n USA und in Kanada Ge räte an ein Amprobe® Test Tools Ser vice-Center (Adres se siehe nächst e
Seite) zur Re paratur oder zum Um tausch einges endet werden.
Reparatu ren und Ersatz auß erhalb des Garant iezeitraums - USA un d Kanada
Für Repara turen außerhalb des Garantiezeitraums i n den Vereinigten Staaten und in Kanada werden die
Geräte an ein Amprob e® Test Tools Ser vice-Center gesen det. Auskunft über die derzeit geltenden Re paraturund Aust auschgebühren erhalte n Sie von Amprobe® Test Tools ode r der Verkaufsstelle.
In den U SA: In Kanada :
Amprobe Test Tools Amprob e Test Tools
Evere tt, WA 98203 Missis sauga, ON L4Z 1X9
Tel.: 877-993-5853 Tel.: 905 -890-7600
Fax: 425-4 46-6390 Fax: 905 -890- 6866
Reparatu ren und Austausc h außerhalb des Garantiezeitraums - Europa
Geräte mit abgelaufener Gara ntie können durch den zuständ igen Amprobe® Test Tools- Distributor gegen
eine Gebühr ersetzt werd en. Ein Verzeichnis d er zuständigen Distribu toren ist im Absc hnitt „Where to Buy“
(Verkaufsstellen) auf der We bsite www.am probe.com zu finden.
Korresponden zanschrift für Eu ropa*
Amprobe® Test Tools Europ e
Beha -Amprobe GmbH
In den Engemat ten 14
79286 Glotter tal, Deutschland
Tel.: +49 (0) 7684 8009 – 0
*(Nur Korre spondenz – keine Reparaturen u nd kein Umtausch un ter dieser Anschrift. Ku nden in Europa
wenden sich an den zuständigen Distributor.)
18
Page 20

ppm
Max
1
2
3
CO Meter
LCD-Anzeige
1
2
3
➊ Aktuellen CO-Wert anzeigen.
Maximalen CO-Wert anzeigen.
➋
Anzeiger für schwache Batterie.
➌
Funktionstasten
Messgerät ein und ausschalten.
➊
Alarmwert auswählen.
➋ Hintergrundbeleuchtung ein- und ausschalten.
Maximalen CO-Wert zurücksetzen.
Kalibrierwert auswählen.
Durch Drücken beider Tasten
➌
Kalibriermodus aktivieren.
19
Page 21

Kohlenmonoxid-Messgerät
CM100
INHALT
Auspacken und Überprüfen ...............................................................................................................5
Einführung ...........................................................................................................................................5
Merkmale .......................................................................................................................................5
CO-Pegel und Standards .....................................................................................................................5
Bedienung ...........................................................................................................................................6
1. Strom ein/aus .............................................................................................................................6
2. Alarmeinstellung .......................................................................................................................6
3. Messwert ....................................................................................................................................6
4. Hintergrundbeleuchtung ..........................................................................................................6
5. Anzeiger für schwache Batterie ................................................................................................7
6. Automatische Ausschaltung ......................................................................................................7
Kalibrierung .........................................................................................................................................7
0 ppm Kalibrierung ........................................................................................................................7
100 ppm/500 ppm Kalibrierung ...................................................................................................7
Fehlerbehebung ..................................................................................................................................7
Sicherheitshinweise .............................................................................................................................8
Technische Spezifikationen ................................................................................................................8
20
Page 22

AUSPACKEN UND ÜBERPRÜFEN
Die Verpackung sollte Folgendes enthalten:
1 CM100 Kohlenmonoxid-Detektor
3 LR3/AAA Batterien
1 Transportbehälter
1 Bedienungshandbuch
EINFÜHRUNG
Gratulation zum Kauf des digitalen CO-Stift-Messgeräts. Vor Gebrauch des Messgeräts das
ganze Handbuch lesen.
Merkmale
Einstellbarer CO-Warnpegel•
Doppelanzeige und Digitalanzeige•
Hintergrundbeleuchtung für Betrieb in dunkler Umgebung•
Anzeiger für schwache Batterie•
Automatische Ausschaltfunktion•
CO-PEGEL UND STANDARDS
ppm Symptome und anwendbare Standards
0-1 Normale Hintergrundpegel.
Maximaler Pegel für Innenraumluft:
9
Maximal zulässige Konzentration gemäß ASHRAE Residential Standards 62-1989
für Wohnumgebung.
Maximaler Grenzwert für 8 Stunden kontinuierliche Exposition gemäß California
25
OSHA Workplace Standards.
Maximaler 8-Stunden-Durchschnitts-Expositionspegel gemäß US OSHA
35
Workplace Standards.
Maximale Konzentration für kontinuierliche Exposition in beliebigem 8-Stunden-
50
Durchschnittspegel gemäß OSHA Standards.
Personen aus geschlossenen Räumen entfernen, falls die CO-Konzentration
100
gemäß OSHA-Expositionsgrenzwert 100 ppm übersteigt.
Schwache Kopfschmerzen, Müdigkeit, Übelkeit und Benommenheit innerhalb
200
von 3 Stunden.
Starker Kopfschmerz, Lebensgefahr nach 3 Stunden. Maximale Konzentration in
400
Rauchgas gemäß EPA und AGA.
800 Benommenheit, Übelkeit Krämpfe, Tod innerhalb von 2-3 Stunden.
1600 Übelkeit innerhalb von 20 Minuten. Tod innerhalb von 2-3 Stunden.
21
Page 23

BEDIENUNG
1. Strom ein/aus
• � drücken, um das Messgerät ein- bzw. auszuschalten. Wenn das Messgerät eingeschaltet
ist, blinken der voreingestellte Alarmwert und die aktuelle Lufttemperatur auf der
LCD-Anzeige.
Das Messgerät führt einen Selbsttest durch (15 Sekunden). Ein akustisches Signal nach dem •
Selbsttest zeigt an, dass das Messgerät betriebsbereit ist.
A 25 ppm
26 C
WICHTIG:
Es wird empfohlen, das Messgerät in einer CO-freien Umgebung einzuschalten, da ein hoher
CO-Pegel bewirken kann, dass der Selbsttest fehlschlägt.
2. Alarmeinstellung
Der Messgerätalarm zur Alarmierung über mögliche Gefahr ist auf 25 ppm voreingestellt. •
Bediener können den Alarmpegel selbst bestimmen. Die verfügbaren CO-Pegel sind: 25, 30, •
35, 45, 50, 70, 100 und 200 ppm.
Die Taste loslassen, um den bevorzugten Wert auszuwählen. Das Messgerät kehrt nach •
einigen Sekunden in den Selbsttestmodus zurück.
3. Messen
Das Messgerät erkennt das Vorhandensein von CO in der Umgebung und zeigt den •
Messwert in ppm an. Es zeigt zudem den maximalen Wert (unten auf der LCD) aller
Messwerte an.
Den maximalen Wert durch 2 Sekunden langes Drücken der Taste•
zurücksetzen.
4. Hintergrundbeleuchtung
drücken, um die Hintergrundbeleuchtung ein- bzw. auszuschalten.
5. Anzeiger für schwache Batterie
Erscheint auf der LCD, wenn die Batteriespannung niedrig ist.
6. Automatische Ausschaltung
Das Messgerät schaltet sich nach 15 Minuten Inaktivität automatisch aus.
KALIBRIERUNG
Um den Kalibriermodus zu aktivieren, das Messgerät ausschalten und die Tasten � +
gleichzeitig 2 Sekunden lang drücken. Oben auf der Anzeige blinkt „ppm“ und unten auf der
im Messmodus
22
Page 24

Anzeige wird der Wert „0“ angezeigt. Das Messgerät funktioniert jetzt mit 0 ppm Kalibrierung
als Standard.
0 ppm Kalibrierung
Der voreingestellte Kalibrierwert ist 0 ppm. Das Messgerät in eine CO-freie Umgebung bringen
und den Kalibriermodus aktivieren. Das Messgerät kalibriert sich automatisch. Oben auf der
LCD blinkt jetzt ein ppm-Wert, der langsam auf 0 oder einen negativen Wert sinkt und dann
stoppt, wenn die Kalibrierung abgeschlossen ist. Dies dauert ungefähr 10 Minuten.
Hinweis:
Es besteht kein Grund zur Besorgnis, wenn bei Aktivierung ein hoher oder negativer ppmWert angezeigt wird. Der Wert wird innerhalb von wenigen Sekunden gegen 0 streben. Die
unbeständigen Messwerte werden durch elektromagnetische Störung (EMI) in der Umgebung
verursacht, beispielsweise von Computern oder Mobiltelefonen. Es ist vorgeschrieben, das
Messgerät von derartigen Geräten/Störungen fernzuhalten, da die Kalibrierung ansonsten sehr
viel länger dauern oder sogar endlos sein kann.
100 ppm/500 ppm Kalibrierung
Für eine andere Standardkalibrierung die Taste 1.
Kalibrierwert auszuwählen: (0, 100, 500 ppm).
Das Messgerät 15 Minuten lang in einem mit Standardgas (z. B. 100 ppm/500 ppm) 2.
gefüllten, verschlossenen Kasten platzieren. Die Kalibrierung wird
automatisch durchgeführt.
Prüfen, ob die Kalibrierung dem Kalibrierwert entspricht. Falls dies der Fall ist, ist die 3.
Kalibrierung erfolgreich abgeschlossen. Falls nicht, Verfahren wiederholen.
FEHLERBEHEBUNG
Gerät schaltet sich nicht ein
Prüfen, ob die Zeitdauer seit der Einschaltung größer als 300 ms ist.1.
Sicherstellen, dass die Batterien guten Kontakt haben und die Polarität korrekt ist.2.
Die Batterien ersetzen einen neuen Versuch machen.3.
Anzeige erlischt
Prüfen, ob der Anzeiger für schwache Batterie angezeigt wird, bevor die Anzeige erlischt. Falls
ja, die Batterien ersetzen.
Kalibierfehler
Prüfen, ob der Anzeiger für schwache Batterie vor der Kalibrierung angezeigt wird. Falls ja, 1.
die Batterien ersetzen einen neuen Versuch machen.
Sicherstellen, dass das Standardgas korrekt ist.2.
E 2.: Der Wert ist Unterlauf.
E 3.: Der Wert ist Überlauf.
E 4.: Der Wert ist „error“ (Fehler) aufgrund bestimmter ursprünglicher Daten.
E 31.: A/D-Fehler, das Messgerät zur Reparatur an den Fachhändler einsenden.
drücken und gedrückt halten, um den
23
Page 25

E 33.: Messschaltkreisfehler, das Messgerät zum Austausch/zur Reparatur an den Fachhändler
einsenden.
E 35.: Selbsttest fehlerhaft. Das Messgerät in einer CO-freien Umgebung erneut einschalten.
Sensorfehler. Das Messgerät zur Reparatur an den Fachhändler einsenden.
SICHERHEITSHINWEISE
Das Messgerät von elektromagnetischer Störung (EMI) fernhalten, die unbeständige 1.
Messwerte verursachen kann.
Wiederherstellungszeit ist erforderlich, wenn das Messgerät einer hohen CO-2.
Konzentration ausgesetzt wurde. Je länger die Exposition, desto länger ist die erforderliche
Wiederherstellungszeit.
Der Selbsttest nach dem Einschalten testet den Zustand des Sensors und des Schaltkreises. 3.
TECHNISCHE SPEZIFIKATIONEN
CO-Bereich: 0~999 ppm
Auflösung: 1 ppm
Genauigkeit: ± 20 % bei 0~100 ppm; ± 15 % bei 100~500 ppm (bei 20 °C ± 5 % und
50 % ± 20 %RH)
Batterie: 3 LR3/AAA Alkalibatterien. Die Batterielebensdauer ist 250 Stunden bei
ausgeschalteter und 35 Stunden bei eingeschalteter Hintergrundbeleuchtung.
24
Page 26

CM100
Rivelatore di monossido di
carbonio
Manuale d’uso
CM100_Rev001
© 2008 Amprobe Test Tools.
Tutti i diritti riservati.
25
Italiano
Page 27

Garanzia limitata e limitazione di responsabilità
Questo prodot to Amprobe sarà es ente da difetti di materiale e fabbricazione per un an no a decorrere dalla
data di acq uisto. Sono escl usi da questa garanzia i fusib ili, le pile monouso e i danni caus ati da incidenti,
neglige nza, uso impropr io, alterazione, contaminazione o condizioni anomal e di funzionamento o
maneggiamento. L’obblig o di garanzia è limitato, a scelta della Ampro be, al rimborso del prezzo d’acquisto,
alla riparazione gratuita o alla sos tituzione di un prodotto difettoso. I rivenditori non sono autorizzati a offrir e
nessun ’altra gara nzia a nome della Amprobe. Per ri chiedere un inter vento durante il pe riodo di garanzia
restituire il prodotto, alle gando la ricevuta di acquisto, a un centro di assistenza autorizzato Amp robe Test
Tools oppur e a un rivenditore o dis tributore Amprobe local e. Per ulteriori informazioni vedere la sezione
Riparazio ni. QUESTA GARANZIA È IL SOLO RICORSO A DISPOSIZIONE DELL’ACQUIRENTE E SOSTITUIS CE
QUALSI ASI ALTRA GARANZIA, ESPRESSA, IMPLICITA O PREV ISTA DALLA LEGGE, CO MPRESA QUALSIASI
GARA NZIA IMPLICITA DI CO MMERCIABILI TÀ O DI IDON EITÀ PER SCOPI PARTICO LARI. NÉ LA AM PROBE NÉ LA
SUA SOCIE TÀ MADRE O S UE AFFILIATE SAR ANNO RESPONSABILI DI DANNI O PERDI TE SPECIALI, INDIRET TI
O ACCIDENTALI, DERIVANTI DA QUALS IASI CAUSA O TEORIA. Poi ché alcuni stati o Paesi non permettono
l’esclusione o la limitazione di una garanzia im plicita o di danni accidentali o i ndiretti, questa limitazione di
respon sabilità potrebbe non riguardare l’acquirente.
Riparazioni
A tutti gli s trumenti di misura restituiti per inte rventi in garanzia o non coper ti dalla garanzia, oppure per
la taratura, devono e ssere allegate le s eguenti informa zioni: il proprio nome e quello dell’azienda, i ndirizzo,
numero telefonico e ricevuta di acquisto . Allegare anche una breve des crizione del problema o dell’intervento
richies to e i cavi di misura. Gli importi d ovuti per sostit uzioni o riparazioni no n coperte dalla garanzia vanno
versat i tramite assegno , vaglia bancario, carta di credito con da ta di scadenza, o ppure ordine di acquisto
all’ordine di Amprob e® Test Tools.
Sostituzioni e riparazioni in garanzia – Tutti i Paesi
Si prega di l eggere la garanzia e di controllar e le pile prima di richie dere una riparazione. Durante il periodo di
garanzia, si può restituire uno s trumento difettoso al rivenditore Am probe® Test Tools per ri cevere un prodot to
identico o analogo. L a sezione “Where to Buy” del si to www.amprobe.com contiene un ele nco dei distributori
più vicini. Negli Stati Uniti e nel Ca nada gli strumenti da sostituire o ripara re in garanzia posso no essere inviati
anche a un ce ntro di assistenza Amprob e® Test Tools (gli in dirizzi sono alla pag ina successiva).
Sostituzioni e riparazioni non coperte dalla garanzia – U.S.A. e Canada
Per ripara zioni non coperte dalla garanzia, negli Stati Uniti e nel C anada, lo strum ento deve essere inviato a un
centro di assistenza Amprobe® Test Tools. Rivolgers i alla Amprobe® Test Tools o al rive nditore per infor mazioni
sui costi d elle riparazioni e so stituzioni.
Stati Uniti Canada
Amprobe Test Tools Amprob e Test Tools
Evere tt, WA 98203, U.S .A. Missis sauga, ON L4Z 1X9 C anada
Tel.: 877-993-5853 Tel.: 905 -890-7600
Fax: 425-4 46-6390 Fax: 905 -890- 6866
Sostituzioni e riparazioni non coperte dalla garanzia – Europa
Gli strum enti acquistati in Europa e non coperti d alla garanzia possono essere sostit uiti dal rivenditore
Amprobe® Test Tools per un importo nominale. La sezione “ Where to Buy” del sito www.amprobe.com
contiene un elenco dei distrib utori più vicini.
Reca pito postale eur opeo*
Amprobe® Test Tools Europ e
Beha -Amprobe GmbH
In den Engemat ten 14
79286 Glotter tal, Germania
Tel.: +49 (0) 7684 8009 – 0
*(Solo per corrispo ndenza; non rivolgersi a questo indirizzo per rip arazioni o sostituzioni. Si pre gano i clienti
europei di rivolgersi al riven ditore.)
26
Page 28

ppm
Max
1
2
3
CO Meter
Display a cristalli liquidi
1
2
3
➊ Valore CO attuale.
Valore CO massimo.
➋
Spia di bassa carica
➌
della batteria.
Funzioni dei pulsanti
Per accendere e spegnere il rivelatore. Serve anche a
➊
selezionare la soglia di allarme.
➋ Per attivare e disattivare la retroilluminazione.
Per azzerare il valore CO massimo. Serve anche a
selezionare il valore di taratura.
Per passare alla modalità di taratura premere
➌
entrambi i pulsanti.
27
Page 29

Rivelatore di monossido di carbonio
CM100
INDICE
Disimballaggio e ispezione .................................................................................................................5
Introduzione ........................................................................................................................................5
Caratteristiche ................................................................................................................................5
Standard e livelli di CO .......................................................................................................................5
Funzionamento ...................................................................................................................................6
1. Accensione/spegnimento ..........................................................................................................6
2. Impostazione dell’allarme .........................................................................................................6
3. Misure .........................................................................................................................................6
4. Retroilluminazione ....................................................................................................................6
5. Spia di bassa carica della batteria .............................................................................................7
6. Spegnimento automatico ..........................................................................................................7
Taratura ...............................................................................................................................................7
Taratura a 0 ppm ..........................................................................................................................7
Taratura a 100 ppm/500 ppm ......................................................................................................7
Soluzione dei problemi .......................................................................................................................7
Precauzioni ..........................................................................................................................................8
Dati tecnici ...........................................................................................................................................8
28
Page 30

DISIMBALLAGGIO E ISPEZIONE
La confezione deve contenere:
Un rivelatore di monossido di carbonio CM100
Tre pile ministilo (AAA)
Una custodia da trasporto
Una copia del manuale d’uso
INTRODUZIONE
Grazie per avere acquistato questo rivelatore digitale di CO a penna. Leggere per intero il
manuale prima di usare il rivelatore.
Caratteristiche
Soglia di allarme del livello di CO regolabile•
Display digitale doppio•
Retroilluminazione per il funzionamento in condizioni di bassa illuminazione•
Spia di bassa carica della batteria•
Funzione di spegnimento automatico•
STANDARD E LIVELLI DI CO
ppm Sintomi e standard pertinenti
0-1 Livelli base normali.
Livello massimo della qualità dell’aria in locali chiusi:
9
Concentrazione massima permessa in un ambiente residenziale frequentato da
persone a norma ASHRAE 62-1989.
Limite massimo di 8 ore di esposizione continua in ambiente di lavoro a norma
25
OSHA in California.
Limite massimo di 8 ore di esposizione media in ambiente di lavoro a norma
35
OSHA negli Stati Uniti.
Concentrazione massima per l’esposizione continua nell’arco delle 8 ore, livello
50
medio a norma OSHA.
Fare allontanare i dipendenti dal locale chiuso se la concentrazione di CO supera i
100
100 ppm secondo il limite di esposizione OSHA.
200 Leggero mal di testa, fatica, nausea e vertigini entro 2 - 3 ore.
Cefalea frontale, che può diventare mortale dopo 3 ore. Massima concentrazione
400
del gas a norma EPA e AGA.
800 Vertigini, nausea, convulsioni, morte entro 2 – 3 ore.
1600 Nausea entro 20 minuti; morte entro 2 – 3 ore.
29
Page 31

FUNZIONAMENTO
1. Accensione/spegnimento
Premere • � per accendere e spegnere il rivelatore. Quando si accende il rivelatore, la soglia
preimpostata di allarme e il valore attuale della temperatura dell’aria lampeggiano sul
display.
Il rivelatore segue un autotest della durata di 15 secondi; al termine, un segnale acustico •
indica che lo strumento è pronto all’uso.
A 25 ppm
26 C
NOTA BENE
Si suggerisce di accendere lo strumento in un’area in cui non è presente CO, dato che livelli
elevati di CO possono causare il non superamento dell’autotest.
2. Impostazione dell’allarme
La soglia di allarme è preimpostata a 25 ppm. •
È possibile regolare la soglia di CO che fa scattare l’allarme tra i seguenti livelli: 25, 30, 35, •
45, 50, 70, 100 e 200 ppm.
Rilasciare il pulsante per selezionare il valore desiderato. Entro alcuni secondi lo strumento •
ritorna alla modalità di autotest.
3. Misure
Lo strumento rileva la presenza di CO nell’ambiente e ne visualizza il livello in ppm. Inoltre •
indica (sul lato sinistro del display) il valore massimo di tutte le letture.
Per azzerare il valore massimo, premere il pulsante•
è nella modalità di misura.
4. Retroilluminazione
Premere il pulsante
5. Spia di bassa carica della batteria
Compare sul display quando la tensione della batteria è bassa.
6. Spegnimento automatico
Il rivelatore si spegne automaticamente dopo 15 minuti di inattività.
TARATURA
Per passare alla modalità di taratura, spegnere lo strumento e premere simultaneamente i
pulsanti � +
parte inferiore, il valore di taratura “0”. A questo punto lo strumento funziona con il valore
per attivare e disattivare la retroilluminazione.
per due secondi. Sulla parte superiore del display lampeggia “ppm” e sulla
per due secondi mentre lo strumento
30
Page 32

predefinito di taratura a 0 ppm.
Taratura a 0 ppm
Il valore preimpostato di taratura è 0 ppm. Portare il rivelatore in un’area in cui non c’è CO
e passare alla modalità di taratura. Lo strumento esegue automaticamente la taratura. Sulla
parte superiore del display lampeggia un valore di ppm, che diminuisce lentamente sino a 0 o a
un valore negativo; il display cessa di lampeggia quando la taratura è stata completata. Questa
processo dura circa 10 minuti.
NOTA BENE
È normale che, quando si passa alla modalità di taratura, il display mostri un valore elevato o
negativo di ppm. Il valore diminuisce e si avvicina a 0 nell’arco di secondi. Le letture irregolari
risultano dall’eventuale interferenza elettromagnetica nell’ambiente, causata ad esempio da
computer o telefoni cellulari. È necessario che il rivelatore sia tenuto lontano da questi tipi di
interferenza, altrimenti la taratura può durare molto di più o non essere mai completata.
Taratura a 100 ppm/500 ppm
Per eseguire un’altra taratura standard, premere il pulsante1.
selezionare il valore di taratura (0, 100 o 500 ppm).
Lasciare il rivelatore in una scatola sigillata contenente gas standard (ad esempio a 2.
100 ppm/500 ppm) per 15 minuti. La taratura viene eseguita automaticamente.
Controllare se la lettura corrisponde al valore di taratura; in caso affermativo la taratura è 3.
riuscita, altrimenti ripetere la procedura.
SOLUZIONE DEI PROBLEMI
Lo strumento non si accende
Accertarsi di aver premuto il pulsante di accensione per almeno 300 ms.1.
Accertarsi che le pile siano cariche e inserite con la giusta polarità.2.
Sostituire le pile e riprovare.3.
Il display si spegne
Controllare se, prima che il display si spegne, compare la spia di bassa carica della batteria; in
caso affermativo, sostituire le pile.
Taratura non riuscita
Controllare se, prima dell’inizio della taratura, compare la spia di bassa carica della batteria; 1.
in caso affermativo, sostituire le pile.
Accertarsi che il gas standard sia corretto.2.
E 2.: valore sotto il limite inferiore.
E 3.: valore sopra il limite superiore.
E 4.: “errore” nel valore a causa di alcuni dati originali.
E 31.: guasto al circuito A/D; restituire lo strumento al rivenditore per farlo riparare.
e tenerlo premuto per
31
Page 33

E 33.: guasto ai circuiti di misura; restituire lo strumento al rivenditore per farlo sostituire o
riparare.
E 35.: Autotest non riuscito. Riaccendere lo strumento in un’altra area in cui non è
presente CO.
Guasto al sensore. Restituire lo strumento al rivenditore per farlo riparare.
PRECAUZIONI
Tenere lo strumento lontano da interferenza elettromagnetica, che può causare letture 1.
irregolari.
Se lo strumento viene esposto a livelli elevati di CO, è necessario un certo tempo di 2.
recupero, tanto più lungo quanto più lunga è la durata di esposizione.
L’autotest all’accensione verifica le condizioni del sensore e dei circuiti. 3.
DATI TECNICI
Intervallo di valori CO: 0~999 ppm
Risoluzione: 1 ppm
Precisione: ± 20% a 0~100 ppm; ± 15% a 100~500 ppm (a 20 °C ± 5% e 50% ± 20% di
umidità relativa)
Batteria: tre pile alcaline ministilo (AAA). La durata della batteria è di 250 ore senza
retroilluminazione e di 25 ore se la retroilluminazione è attivata.
32
Page 34

CM100
Medidor de monóxido
de carbono
Manual del usuario
CM100_Rev001
© 2008 Amprobe Test Tools.
Reservados todos los derechos.
Español
Page 35

Garantía limitada y limitación de responsabilidad
Su producto Amprobe estará libre de defectos de material y mano de obra durante 1 año a p artir de la
fecha de adquisición. Esta g arantía no cubre fusibles, baterías de scartables o daños que s ean consecuencia
de accide ntes, negligencia, uso indebido, alteració n, contaminación o condiciones anorm ales de uso o
manipula ción. La obligaci ón de garantía de Amprobe est á limitada, a crite rio de Amprobe, a la d evolución del
precio de l a compra, la reparación sin gas tos o la sustitució n de un producto defectuoso. Los revendedores no
están autorizados a exten der ninguna otra garantía en nom bre de Amprobe. Pa ra obtener serv icio durante el
período de garantía , devuelva el producto con un comproba nte de compra a un centro de serv icio autorizado
por Amprobe de equipos de com probación o a un concesionario o distribuidor de Am probe. Consulte la sección
Reparación para obtener infor mación más detall ada. ESTA GARANTÍA CONS TITUYE SU ÚNICO RESARCIM IENTO.
LAS DEMÁS GAR ANTÍAS, TANTO EXPRES AS O IMPLÍCITAS CO MO ESTATUTARIAS, INCLUYENDO LAS
GARA NTÍAS IMPLÍCITAS DE ADEC UACIÓN PARA UN PROP ÓSITO DETERMINADO O COMERCIABI LIDAD,
QUEDAN PO R LA PRESENTE EXCLUIDAS . NI AMPROBE, NI SU MATRIZ NI SUS AFILIADAS SERÁN RESPONSABLES
DE NINGÚ N DAÑO O PÉRDIDA, TANTO ESPECIAL COMO INDI RECTO, CONTINGENTE O RESULTANTE, QUE SURJA
DE CUALQUI ER CAUSA O TEORÍA . Debido a que cier tos estados o países no permiten la exclusión o lim itación
de una garantía implíci ta o de los daños contingentes o resultantes, es ta limitación de respons abilidad puede
no regir para usted.
Reparación
Todas las her ramientas de pru eba devueltas para calibra ción o reparación cubierta o n o por la garantía deben
ir acompa ñadas por: su nomb re, el nombre de la com pañía, la dirección, el número de teléfon o y una prueba
de compra . Además, incluya una breve de scripción del problema o del servicio solicit ado y los conductores de
prueba d el medidor. La reparación fuera de garantía o l os cargos de reemplazo debe n remitirse en la for ma de
un cheque, un giro postal, una t arjeta de crédito con fecha de vencimiento o una orde n de compra pagadera a
Amprobe® Test Tools.
Reparac iones y reemplazo s cubiertos por l a garantía (todos los países)
Sírvas e leer la declaración de garantía y comprue be su batería antes d e solicitar la reparación. Du rante el
período de garantía , cualquier herramienta de co mprobación defectuos a puede ser devuelta a su dis tribuidor
de Ampro be® Test Tools para un intercam bio por el mismo pro ducto u otro similar. Consulte la se cción “Where
to Buy” del s itio www.amprobe.com en Interne t para obtener una lista de los distribuidores cercanos a usted.
Además , en Estados Unidos y Canad á, las unidades pa ra reparación y reem plazo cubierta s por la garantía
también se puede n enviar a un Centro de Servicio d e Amprobe® Test Tools (las d irecciones se inc luyen en la
página siguiente).
Reparac iones y reemplazo s no cubiertos po r la garantía (Estados Unidos y Canadá)
Las reparaciones fuera de la garantía en lo s Estados Unido s y Canadá deben env iarse a un centro de s ervicio de
Amprobe® Test Tools. Llame a Ampro be® Test Tools o solicite en su pun to de compra para cono cer las tarifas
actual es de reparación y re emplazo.
En Est ados Unidos En Canadá
Amprobe Test Tools Amprob e Test Tools
Evere tt, WA 98203 Missis sauga, Ontario L4Z 1X9
Tel.: 877-993-5853 Tel.: 905 -890-7600
Fax: 425-4 46-6390 Fax: 905 -890- 6866
Reparac iones y reemplazo s no cubiertos po r la garantía (Europa)
El distrib uidor de Amprobe® Test Tools pue de reemplazar las u nidades vendidas en Europa n o cubiertas por la
garantía por un costo n ominal. Consulte la sección “ Where to Buy” del si tio www.ampro be.com en Interne t
para obte ner una lista de los distribu idores cercano s a usted.
Dire cción para envío de correspon dencia en Europa*
Amprobe® Test Tools Europ e
Beha -Amprobe GmbH
In den Engemat ten 14
79286 Glotter tal, Germany
Tel.: +49 (0) 7684 8009 – 0
*(Sólo para correspondencia. En esta di rección no se propo rcionan reparaciones ni ree mplazos. Los clientes
europeos deben p onerse en conta cto con su distribuidor).
34
Page 36

ppm
Max
1
2
3
CO Meter
Pantalla LCD
1
2
3
➊ Indica el valor de CO actual.
Indica el valor máximo de CO.
➋
Indicador de batería baja.
➌
Teclas de funciones
Enciende y apaga el multímetro. Selecciona el valor
➊
de la alarma.
➋ Apaga y enciende la retroiluminación. Restablece el
valor máximo de CO. Selecciona el valor
de calibración.
Para pasar al modo de calibración, pulse los
➌
dos botones.
35
Page 37

Medidor de monóxido de carbono
CM100
CONTENIDO
Desembalaje e inspección ...................................................................................................................5
Introducción ........................................................................................................................................5
Características ................................................................................................................................5
Niveles y estándares de CO .................................................................................................................5
Operación ............................................................................................................................................6
1. Encendido/apagado ...................................................................................................................6
2. Ajuste de la alarma ....................................................................................................................6
3. Medición .....................................................................................................................................6
4. Retroiluminación .......................................................................................................................6
5. Indicador de batería baja ..........................................................................................................7
6. Apagado automático .................................................................................................................7
Calibración ...........................................................................................................................................7
Calibración a 0 ppm .......................................................................................................................7
Calibración a 100/500 ppm ...........................................................................................................7
Solución de fallos ................................................................................................................................7
Precauciones ........................................................................................................................................8
Especificaciones técnicas .....................................................................................................................8
36
Page 38

DESEMBALAJE E INSPECCIÓN
La caja de envío debe incluir:
1 detector de monóxido de carbono CM100
3 pilas AAA
1 estuche de transporte
1 manual del usuario
INTRODUCCIÓN
Enhorabuena por comprar este medidor digital de CO de tipo bolígrafo. Antes de utilizar el
medidor, lea todo el manual.
Características
Nivel de advertencia de CO ajustable•
Pantalla doble y digital•
Retroiluminación para lugares oscuros•
Indicador de batería baja•
Función de apagado automático•
NIVELES Y ESTÁNDARES DE CO
ppm Síntomas y estándar correspondiente
0-1 Niveles de fondo normales.
Nivel máximo de calidad de aire en interiores:
9
concentración máxima permisible conforme a las normas ASHRAE Residential
62-1989 para zonas habitadas.
Límite máximo de 8 horas de exposición continua conforme a las normas OSHA
25
para lugares de trabajo en California.
Nivel máximo medio de 8 horas de exposición conforme a las normas OHSA para
35
lugares de trabajo de EE.UU.
Nivel medio de concentración máxima para exposición continua en un total de
50
8 horas conforme a normas OHSA.
Evacuar a los empleados de los espacios cerrados si la concentración de CO supera
100
las 100 ppm conforme a los límites de exposición de la norma OHSA.
200 Ligero dolor de cabeza, fatiga, náuseas y mareos en un plazo de 2 o 3 horas.
Dolor de cabeza frontal, puede ser letal tras 3 horas. Concentración máxima de
400
gas de escape conforme a EPA y AGA.
800 Mareos, náuseas, convulsiones, muerte en un plazo de 2 o 3 horas.
37
Page 39

ppm Síntomas y estándar correspondiente
1600 Náuseas en un plazo de 20 minutos; muerte en un plazo de 2 o 3 horas.
OPERACIÓN
1. Encendido/apagado
Pulse • � para encender y apagar el medidor. Cuando está encendido el medidor, el valor
de alarma preestablecido y la temperatura actual del aire aparecerán parpadeando en la
pantalla LCD.
El medidor realizará una prueba de autocomprobación durante 15 segundos. Después de la •
prueba, suena un pitido para indicar que el medidor está listo para usar.
A 25 ppm
26 C
IMPORTANTE:
Se recomienda encender el medidor en una zona libre de CO, ya que la prueba de
autocomprobación podría no realizarse de forma satisfactoria en presencia de altas
concentraciones de CO.
2. Ajuste de la alarma
La alarma del medidor está preestablecida en 25 ppm para advertir del posible peligro. •
El usuario puede elegir el nivel de alarma. Niveles de gas CO disponibles: 25, 30, 35, 45, 50, •
70, 100 y 200 ppm.
Suelte el botón para seleccionar el valor deseado. El medidor volverá a realizar una •
autocomprobación transcurridos unos segundos.
3. Medición
El medidor detecta la existencia de CO en el ambiente y muestra la lectura en ppm. También •
indica el valor máximo (en la parte inferior de la pantalla LCD) de todas las lecturas.
Para restablecer el valor máximo, mantenga pulsado el botón •
el modo de medición.
4. Retroiluminación
Pulse el botón
5. Indicador de batería baja
Aparece en la pantalla LCD cuando la batería tiene poco voltaje.
6. Apagado automático
El medidor se apaga automáticamente una vez transcurridos 15 minutos sin utilizarlo.
para encender y apagar la retroiluminación.
durante dos segundos en
38
Page 40

CALIBRACIÓN
Para pasar al modo de calibración, apague el medidor y pulse los botones � +
simultáneamente durante 2 segundos. En la parte superior de la pantalla aparecerá ppm
parpadeando, y el valor de calibración ”0” aparecerá en la parte inferior. Ahora, el medidor se
calibra a 0 ppm por defecto.
Calibración a 0 ppm
El valor de calibración preestablecido es de 0 ppm. Ponga el medidor en una zona libre de CO
y pase al modo de calibración. Se calibrará automáticamente. La pantalla LCD muestra ahora
un valor de ppm que parpadea en la parte superior y que poco a poco va bajando hasta 0 o
hasta un valor negativo, tras lo cual deja de parpadear cuando la calibración ha concluido. Este
proceso dura cerca de 10 minutos.
Nota:
No se alarme si al pasar al modo de calibración aparece un nivel elevado o negativo de ppm.
El valor irá bajando y se acercará a cero en pocos segundos. Las lecturas erráticas se deben a
interferencias electromagnéticas (EMI) presentes en el ambiente y causadas por ordenadores o
móviles. Es necesario alejar el medido de este tipo de interferencias, ya que en caso contrario la
calibración puede tardar mucho más tiempo, o podría incluso no llegar a completarse.
Calibración a 100/500 ppm
Para calibración según otros estándares, pulse el botón 1.
seleccionar el valor de calibración. (0, 100, 500 ppm).
Coloque el medidor en la caja hermética llena de gas estándar (p.ej. 100 ppm/500 ppm) 2.
durante 15 minutos. La calibración se realizará automáticamente.
Compruebe si la lectura cumple el valor de calibración. Si es así, la calibración se habrá 3.
realizado de forma satisfactoria. En caso contrario, repita el procedimiento.
SOLUCIÓN DE FALLOS
El dispositivo no se enciende
1. Compruebe si el tiempo posterior al encendido es superior a 300 ms.
2. Cerciórese de que las baterías tengan buen contacto y la polaridad correcta.
3. Cambie las baterías y vuelva a intentarlo.
La pantalla se borra
Compruebe si aparece el indicador de batería baja antes de que se borre la pantalla. Si es así,
cambie las baterías.
Fallo de calibración
Compruebe si aparece el indicador de batería baja antes de la calibración. Si es así, cambie 1.
las baterías y vuelva a intentarlo.
Compruebe que el gas estándar es correcto.2.
E 2.: El valor es de flujo insuficiente.
E 3.: El valor es de flujo excesivo.
E 4.: El valor es “error” debido a algún dato original.
E 31.: Fallo A/D, devuelva el medidor al distribuidor para su reparación.
39
y manténgalo pulsado para
Page 41

E 33.: Fallo en algún circuito de medición, devuelva el medidor al distribuidor para su
sustitución o reparación.
E 35.: Fallo de autocomprobación. Vueva a encender el medidor en otra zona libre de CO.
Fallo del sensor. Devuelva el medidor al distribuidor para su reparación.
PRECAUCIONES
Aleje el medidor de las interferencias electromagnéticas (EMI) que causan las 1.
lecturas erráticas.
Es necesario dejar tiempo de recuperación cuando el medidor se expone a concentraciones 2.
altas de CO. Cuanto más dure la exposición, más tiempo de recuperación será necesario.
La autocomprobación que se realiza al encender el medidor es para probar el estado del 3.
sensor y los circuitos.
ESPECIFICACIONES TÉCNICAS
Rango de CO: 0~999 ppm
Resolución: 1 ppm
Exactitud: ± 20 % a 0~100 ppm; ± 15 % a 100~500 ppm (a 20 °C ± 5 % y 50 % ± 20 %HR)
Batería: 3 AAA alcalinas. La batería tiene una vida de 250 horas cuando está apagada la
retroiluminación y 35 horas cuando está encendida.
40
Page 42

CM100
Koloxidmätare
Användarhandbok
CM100_Rev001
© 2008 Amprobe Test Tools.
Med ensamrätt.
Svenska
41
Page 43

Begränsad garanti och begränsning av ansvar
Din Amprobe-produk t garanteras vara fri från felaktighete r i material och utförande i et t år
från inköpsdatum. Denna garanti innefattar inte säkringar, engångsbatterier eller skador som
uppkommer till följd av olyckshändelser, försummelser, missbruk, ändringar, nedsmutsning
eller onormala användningsförhållanden eller hantering. Amprobes garantiförpliktelse är
begränsad, enligt Amprobes gottfinnande, till återbetalning av inköpspriset, gratis reparation
eller ersättning av en defekt produkt. Återförsäljare är ej berättigade at t lämna några ytterligare
garantier på Amprobes vägnar. Om du behöver service under garantiperioden, skall du returnera
produk ten tillsammans med inköps bevis till ett auktoriserat Amprobe Test Tools Service Center
eller en Amprobe -leverantör eller distributör. Avsnittet Re paration innehåller uppgifter om
detta. DENNA GARAN TI UTGÖR DIN ENDA GOT TGÖRELSE. ALLA ANDRA GARANTIER, VARE SIG
DESSA ÄR U TTRYCK TA, UNDERFÖRSTÅDDA ELLER LAGSTADGADE, INKLUSIVE UNDERFÖRSTÅDDA
GARA NTIER OM LÄMPLIGHET FÖR ET T VISST ÄNDAMÅL ELLER SÄLJBARHET, EXKLUDERA S
HÄRMED. VARKEN AMP ROBE ELLER DESS MODERBOL AG ELLER DOTTERBOLAG AN SVARA R FÖR
SPECIELLA SK ADOR , INDIREKTA SKA DOR ELLER OFÖRUTSEDDA SK ADOR ELLER FÖLJDSK ADOR ELLER
FÖRLUSTER, OAVSETT OM DE INTRÄFFAR PÅ GRUND AV GARANTIBROTT ELLER OM DE BASERAS PÅ
KON TRA KT. Ef tersom det i vissa delstater eller länder inte är tillåtet att begränsa eller exkludera en
under förstådd garanti eller oförutsedda skador eller följdskador, gäller denna ansvarsbegränsning
kanske inte dig.
Reparation
Följande uppgif ter skall medfölja alla testverktyg som re turnera s för garantireparation, reparation
utanför garantiåtagandet eller för kalibrering: ditt namn, företagets namn, adress , telefonnummer
och inköpsbevis. Inkludera dessutom en kor t beskrivning av problemet eller den begärda tjänsten
och skicka också in testsladdarna tillsammans med mätaren. Betalning för reparation som ej faller
under garantin eller utbyte skall ske me d check, postanvisning, kreditkort med utgångsdatum eller
en inköpsorder me d betalningsmottagare Amprobe
Reparationer och utbyten under garanti – Alla länder
Läs garantiuttalandet och kontrollera batteriet innan du begär reparation. Defekta
testverkt yg kan under garantiperioden returneras till din Amprobe® Test Tools- distributör
för utby te mot samma eller liknande produkt. Avsnittet “Where to Buy” på www.amprobe.
com innehåller en lista över distributörer i närheten av dig. Om du befinner dig i USA eller
Kanada och din enhet täcks av garanti kan du få den reparerad eller utbytt genom att skicka
in den till ett Amprobe® Test Tools Service Center (se nästa sida för adresser).
Reparationer och utbyten ej under garanti – USA och Kanada
Enheter som kräver reparation, men som ej täcks av garanti i USA och Kana da, ska skickas till ett
®
Test Tools Ser vice Center. Ring till A mprobe® Test Tools eller kontakta inköpsstället för att
Amprobe
få uppgift om aktuella kostnader för reparation och utbyte.
I USA I Kanada
Amprobe Test Tools Amprobe Test Tools
Everett, WA 98203 Mississauga, ON L4Z 1X9
Tel: 877-AMPROBE (267-7623) Tel: 905-890-7600
Fax: 425 -446- 6390 Fax: 905-890-6866
Reparationer och utbyten utan garanti – Europa
Enheter i Europa, som ej täck s av garanti, kan bytas ut av din Amprobe® Test Tools- distributör för
en nominell kostnad. Avsnit tet “Where to Buy” på ww w.amprobe.com innehåller en lista över
distributörer i närheten av dig.
Adress för korrespondens i Europa*
Beha-Amprobe GmbH
Amprobe® Test Tools Europe
In den Engematten 14
79286 Glotter tal, Germany
Tel.: +49 (0) 7684 8009 - 0
*(Endast korrespondens – inga reparationer eller utby ten är tillgängliga från denna adress. Kunder i
Europa ska kontakta respektive dis tributör.)
®
Test Tools.
42
Page 44

ppm
Max
1
2
3
CO Meter
LCD-skärm
1
2
3
➊ Visar aktuellt koloxidvärde.
Visar maximalt koloxidvärde.
➋
Indikator för svaga batterier.
➌
Funktionsknappar
Slå på och stäng av mätaren. Välj larmvärde.
➊
Slå på och stäng av bakgrundsbelysningen. Återställ
➋
maximalt koloxidvärde. Välj kalibreringsvärde.
Växla till kalibreringsläge genom att trycka in
➌
båda knapparna.
43
Page 45

Koloxidmätare
CM100
INNEHÅLL
Uppackning och inspektion ................................................................................................................5
Inledning ..............................................................................................................................................5
Funktioner ......................................................................................................................................5
Koloxidnivåer och -normer .................................................................................................................5
Handhavande ......................................................................................................................................6
1. Ström på/av ................................................................................................................................6
2. Larminställning ..........................................................................................................................6
3. Mätning ......................................................................................................................................6
4. Bakgrundsbelysning ..................................................................................................................6
5. Indikator för svaga batterier .....................................................................................................7
6. Automatisk avstängning ...........................................................................................................7
Kalibrering ...........................................................................................................................................7
Kalibrera 0 ppm .............................................................................................................................7
Kalibrera 100 ppm/500 ppm .........................................................................................................7
Felsökning ............................................................................................................................................7
Försiktighetsåtgärder ..........................................................................................................................8
Tekniska specifikationer .....................................................................................................................8
44
Page 46

UPPACKNING OCH INSPEKTION
Förpackningen ska innehålla:
1 CM100 koloxiddetektor
3 AAA-batterier
1 väska
1 användarhandbok
INLEDNING
Grattis till ditt inköp av denna digitala koloxidmätare av penntyp. Läs hela handboken innan
du använder mätaren.
Funktioner
Justerbar varningsnivå för koloxid•
Dubbel och digital display•
Bakgrundsbelysning för användning i mörka områden•
Indikator för svaga batterier•
Automatisk avstängningsfunktion•
KOLOXIDNIVÅER OCH -NORMER
ppm Symtom och tillämplig norm
0-1 Normal bakgrundsnivå.
Maximal luftkvalitetsnivå inomhus:
9
Maximal tillåten koncentration enligt ASHRAE-bostadsnormer 62-1989 för boytor.
Maximal gräns för 8 timmars kontinuerlig exponering enligt Kaliforniens OSHA
25
Workplace-normer.
Maximal 8 timmars genomsnittlig exponeringsnivå enligt USA:s OSHA-
35
arbetsplatsnormer.
Maximal koncentration för kontinuerlig exponering under 8 timmars
50
genomsnittsnivå enligt OSHA-normer.
Utrym personalen ur stängda utrymmen om koloxidkoncentrationen överstiger
100
100 ppm per OSHA-exponeringsgräns.
200 Mild huvudvärk, trötthet, illamående och yrsel inom 2-3 timmar.
Frontal huvudvärk, livshotande efter 3 timmar. Maximal koncentration i rökgas
400
enligt EPA och AGA.
800 Yrsel, illamående, konvulsioner, dödsfall inom 2-3 timmar.
45
Page 47

ppm Symtom och tillämplig norm
1600 Illamående inom 20 minuter. Dödsfall inom 2-3 timmar.
HANDHAVANDE
1. Ström på/av
Tryck på • � för att slå på eller stänga av mätaren. När mätaren slås på blinkar det
förinställda larmvärdet och den aktuella lufttemperaturen på displayen.
Mätaren utför ett självtest under 15 sekunder. En pipton efter självtestet indikerar att •
mätaren är färdig att användas.
A 25 ppm
26 C
VIKTIGT:
Vi rekommenderar att du slår på mätaren i ett utrymme som är fritt från koloxid, eftersom hög
koloxidnivå kan leda till att självtestet misslyckas.
2. Larminställning
Mätarens larm är förinställt på 25 ppm för att varna om möjliga faror. •
Användaren kan justera larmnivån genom att välja en av de tillgängliga koloxidnivåerna: •
25, 30, 35, 45, 50, 70, 100 och 200 ppm.
Släpp knapen för att välja det önskade värdet. Mätaren återgår till självtestläget efter några •
sekunder.
3. Mätning
Mätaren detekterar närvaron av koloxid i miljön och visar det avlästa värdet i ppm. Den •
indikerar också det högsta värdet (längs displayens underkant) för alla avläsningar.
Det högsta värdet kan återställas genom att hålla knappen •
i mätningsläget.
4. Bakgrundsbelysning
Tryck på
5. Indikator för svaga batterier
Visas på displayen när batterispänningen sjunker.
6. Automatisk avstängning
Mätaren stängs av automatiskt efter 15 minuter utan aktivitet.
för att slå på eller stänga av bakgrundsbelysningen.
46
intryckt under två sekunder
Page 48

KALIBRERING
Aktivera kalibreringsläget genom att stänga av mätaren och trycka in knapparna � +
samtidigt under två sekunder. Ett blinkande ppm-värde visas överst på displayen och
kalibreringsvärdet ”0” visas undertill. Nu är mätaren kalibrerad till standarvärdet 0 ppm.
Kalibrera 0 ppm
Det förinställda kalibreringsvärdet är 0 ppm. Ställ mätaren i ett utrymme som är fritt från
koloxid och aktivera kalibreringsläget. Den kalibreras automatiskt. Displayen visar ett
blinkande ppm-värde i den övre delen. Detta värde minskar sakta till noll eller ett negativt
värde och slutar blinka när kalibreringen är avslutad. Detta tar ca. 10 minuter.
Obs!
Bli inte orolig om hög ppm eller ett negativt värde visas när kalibreringsläget aktiveras.
Det förändras och når noll på några sekunder. De ostadiga avläsningarna orsakas av
elektromagnetiska störningar (EMI) i miljön, från exempelvis datorer eller mobiltelefoner. Det
är nödvändigt att hålla mätaren på avstånd från dessa typer av störningar. I annat fall tar det
mycket längre tid innan kalibreringen avslutas eller också blir den aldrig klar.
Kalibrera 100 ppm/500 ppm
För annan standardkalibrering ska du trycka på knappen1.
välja kalibreringsvärde (0, 100, 500 ppm).
Placera mätaren i en förseglad låda fylld med standardgas (t.ex. 100 ppm/500 ppm) under 2.
15 minuter. Kalibreringen utförs automatiskt.
Kontrollera om avläsningen stämmer med kalibreringsvärdet. Om så är fallet är 3.
kalibreringen helt klar. I annat fall måste proceduren upprepas.
FELSÖKNING
Det går inte att slå på enheten
Kontrollera att det har gått längre tid än 300 ms sedan strömmen slogs på.1.
Kontrollera att batterierna har god kontakt och rätt polaritet.2.
Byt ut batterierna och försök igen.3.
Displayen släcks
Kontrollera om indikatorn för svaga batterier visas innan displayen släcks. I så fall måste du
byta ut batterierna.
Kalibreringsfel
Kontrollera om indikatorn för svaga batterier visas före kalibreringen. I så fall måste du byta 1.
ut batterierna och försöka igen.
Kontrollera att standardgasen är korrekt.2.
E 2.: Värdet är för lågt.
E 3.: Värdet är för högt.
E 4.: Värdet är ett ”fel” på grund av vissa ursprungliga data.
E 31.: A/D-fel. Returnera mätaren till återförsäljaren för reparation.
och hålla den intryckt för att
47
Page 49

E 33.: Fel i vissa mätkretsar. Returnera mätaren till återförsäljaren för utbyte eller reparation.
E 35.: Misslyckat självtest. Slå på mätaren igen i ett utrymme som är fritt från koloxid.
Sensorfel. Returnera mätaren till återförsäljaren för reparation.
FÖRSIKTIGHETSÅTGÄRDER
Håll mätaren på avstånd från elektromagnetiska störningar (EMI), eftersom dessa kan 1.
orsaka opålitliga avläsningar.
Återhämtningstid är nödvändig när mätaren har exponerats mot höga koloxidnivåer. Ju 2.
längre tid den har exponerats, desto längre måste återhämtningstiden vara.
Självtestet efter påslagning används för att kontrollera sensorns och kretsarnas tillstånd. 3.
TEKNISKA SPECIFIKATIONER
Mätområde: 0~999 ppm
Upplösning: 1 ppm
Noggrannhet: ± 20 % vid 0~100 ppm, ± 15 % vid 100~500 ppm (vid 20 °C ± 5 % och
50 % ± 20 % relativ fuktighet)
Batteri: 3 st. alkaliska AAA. Driftstiden är 250 timmar utan bakgrundsbelysning och 35 timmar
med bakgrundsbelysning.
48
Page 50

Visit www.Amprobe.com for
Catalog•
Application notes•
Product specifications•
User manuals•
Please Recycle
 Loading...