

Page 1
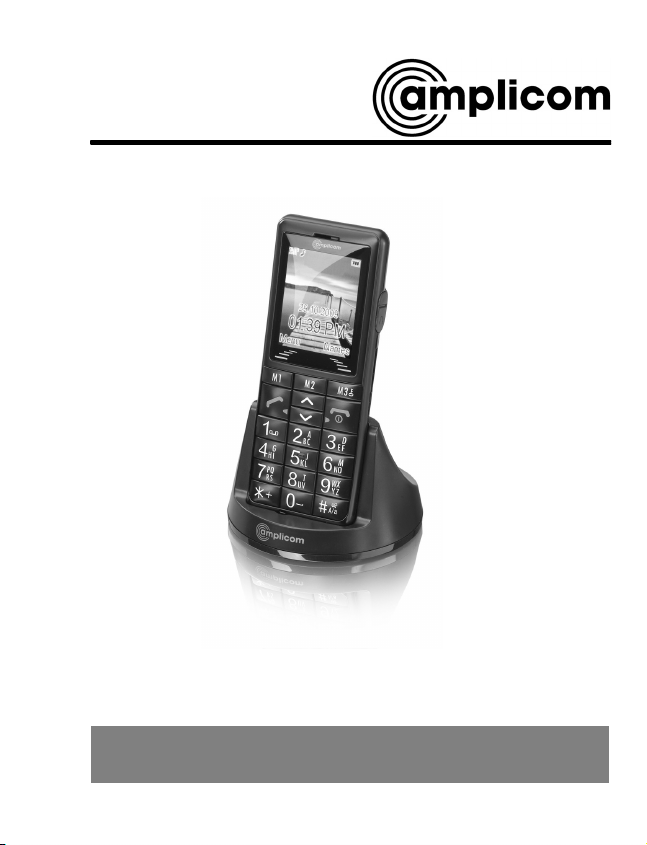
Mobile Phone
Operating Instructions
PowerTel M6000
Page 2

HAC Hearing Aid Compatible
to M4 / T4 Rating
The M6000 Phone has a built in Induction Coil and is
hearing aid compatible.
To ensure optimum benefit, users with hearing aids
may wish to select the T setting on their hearing aids.
Exposure to the receiver at full volume
for a long period could cause ear
damage.
2
Page 3

1
Contents
1 Quick Start Guide 4. . . . . . . . . . . . . .
2 At a Glance 16. . . . . . . . . . . . . . . . . .
3 How does it work 20. . . . . . . . . . . . . . .
4 Getting Started 24. . . . . . . . . . . . . . . .
5 Phone Book Set Up 30. . . . . . . . . . . . .
6 Making and Receiving Calls 34. . . . . . .
7 Call Lists 38. . . . . . . . . . . . . . . . . . . .
8 SMS − Text Messages 40. . . . . . . . . . .
9 Voice Mail 46. . . . . . . . . . . . . . . . . . .
10 Other Useful Features 48. . . . . . . . . . .
11 Bluetooth 72. . . . . . . . . . . . . . . . . . . .
12 Emergency Call Function 74. . . . . . . . .
13 Services 83. . . . . . . . . . . . . . . . . . . . .
14 Menu Structure 84. . . . . . . . . . . . . . . .
15 Trouble Shooting 98. . . . . . . . . . . . . . .
16 Technical Properties 101. . . . . . . . . . . .
17 Safety Information 104. . . . . . . . . . . . . .
18 Maintenance / Guarantee 109. . . . . . . . .
19 Index 111. . . . . . . . . . . . . . . . . . . . . . .
Service−Hotline: Tel. 0844 800 6503 (Monday to Friday 9.00 − 17.00)
3
Page 4

Quick Start Guide
1 Quick Start Guide
Important: Before you start, please read the
safety information on page 104.
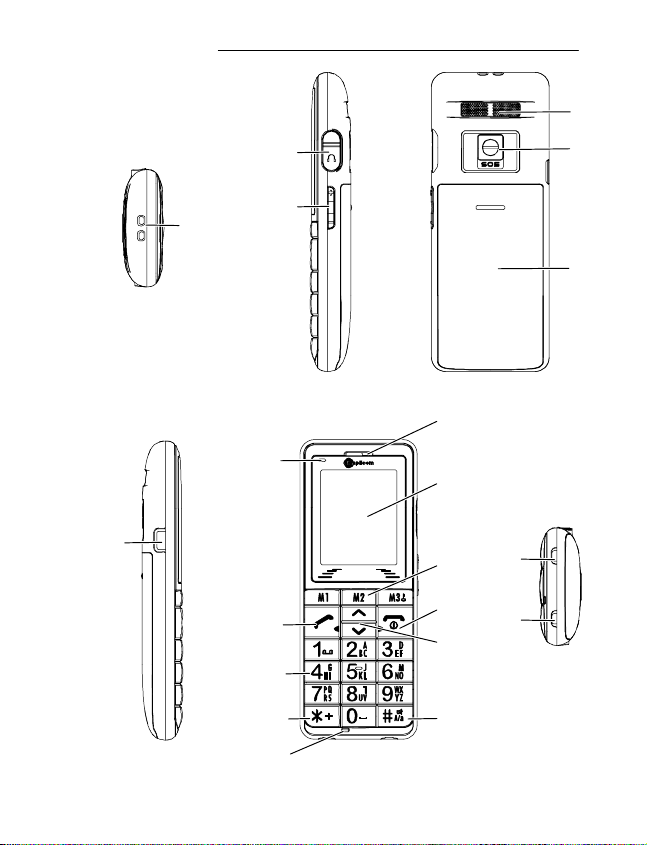
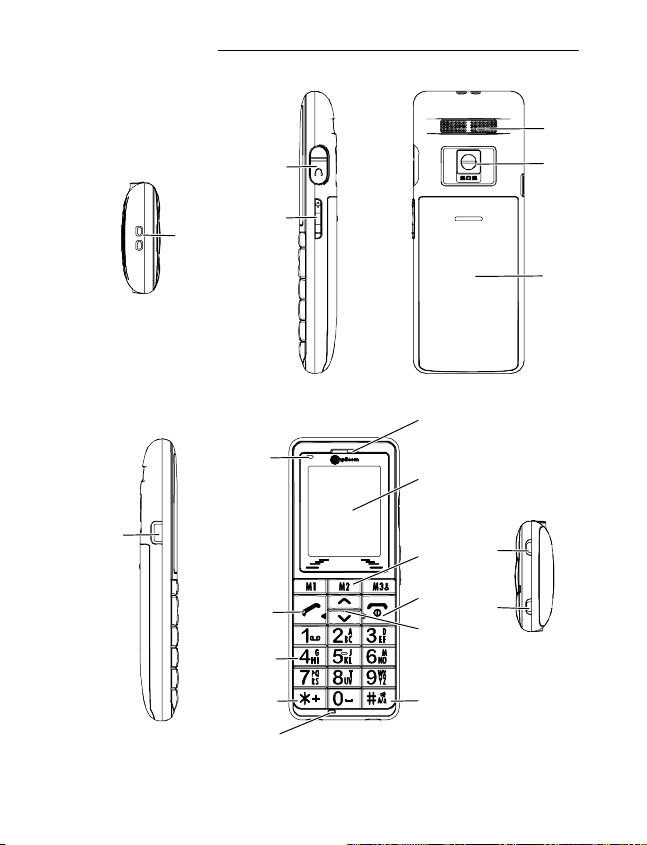
Quick Glance
1 Earpiece
2 Display
3 One−touch dialling keys / Softkeys
4 On/Off key / End call key
5 Scroll up/down keys
6 Hash key
7 Microphone
8 Star key
9 Keypad
10 Call key
11 LED
12 Attachment for Lanyard (not supplied)
13 Mini USB charging socket
14 Charge contacts
15 Headset socket (Headset not supplied)
16 Volume control
17 Loudspeaker
18 Emergency call switch
19 Battery compartment cover
4
Service−Hotline: Tel. 0844 800 6503 (Monday to Friday 9.00 − 17.00)
Page 5
Quick Start Guide
17
13
12
11
10
15
16
1
2
14
3
4
14
5
9
8
6
18
19
7
5
Page 6
Quick Start Guide
What is in the box
The box contains:
1 mobile phone 1 power adapter plug
1 li−ion battery 1 operating manual
1 desktop charging unit
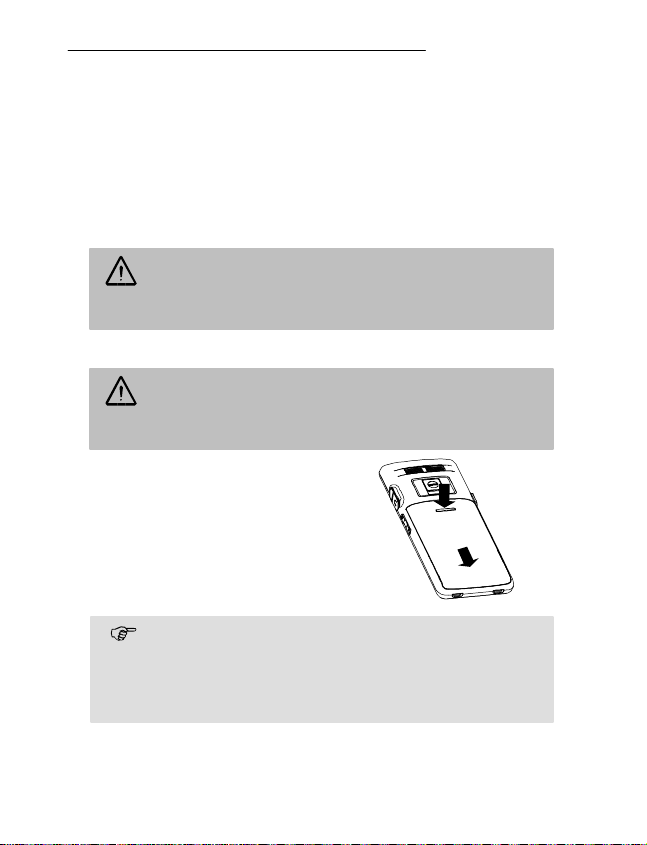
Installing the SIM card and battery
Risk of swallowing small objects!
The SIM card can be removed.
Small children can swallow them.
Switch the phone off.
Pay attention that the SIM card is not bent or
scratched. Prevent any contact with water, dirt
or electrical charges.
Slide the mobile phone’s
battery compartment cover
towards the bottom using a
little force. Lift the battery
compartment cover off the
phone completely.
Your telephone number is carried by the SIM
card, not the phone. Therefore if you use a
SIM card you had in a previous phone, you will
keep the same phone number.
2
1
2
6
Page 7
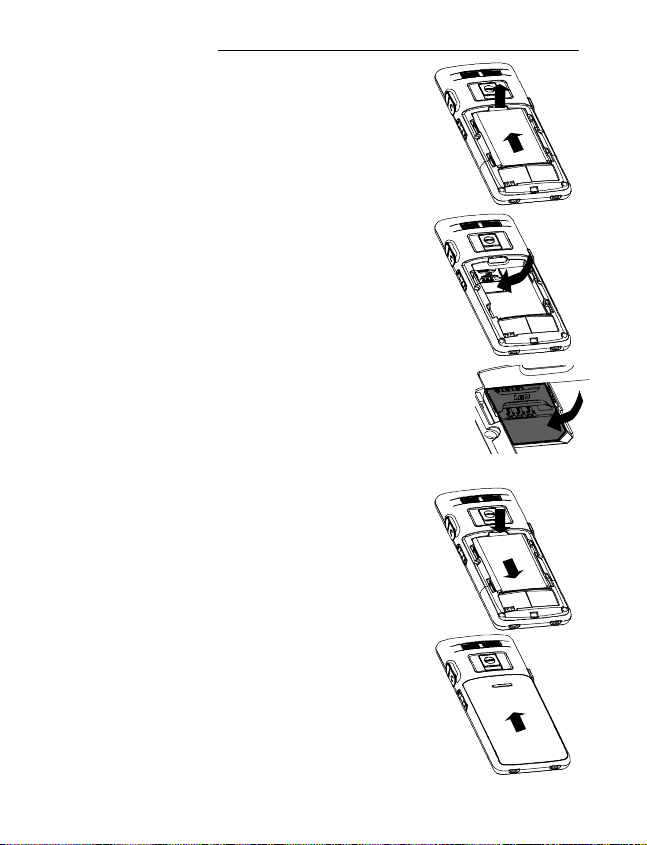
Quick Start Guide
If there is already a battery
inside, remove it.
Slide the SIM card with the
golden contacts facing down
in the moulded SIM card
holder. The SIM card must be
located under the metal
retaining bar to be in the
correct position.
Insert the battery. The golden
contacts on the battery must
face towards the bottom right.
Press lightly on the top end of
the battery until it snaps into
place.
1
2
2
1
Replace the battery
compartment cover back on
the phone. Slide the battery
compartment cover upwards
until it snaps in to place.
7
Page 8
Quick Start Guide
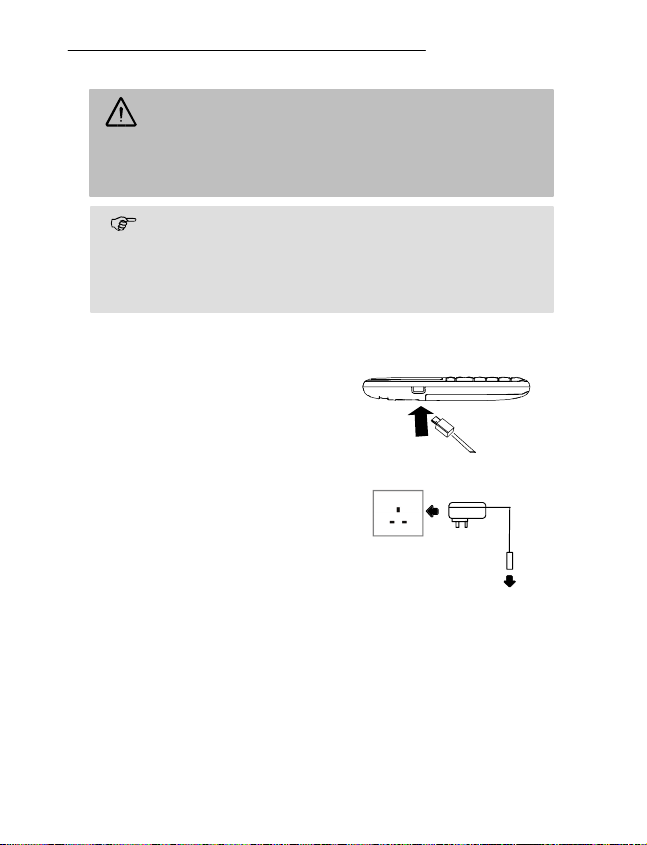
Charging the battery
Before starting to charge the battery, check
that it has been installed properly.
Do not remove the battery while it is being
charged. This could damage the phone.
When charging the battery for the first time, it
should be charged for at least 4 hours. Some
batteries only reach their full capacity after
several complete charge/discharge cycles.
Charging via the mini USB charging socket
3
Plug the power adapter in the
mini USB charging socket.
Connect the power adapter
plug as illustrated in the
diagram. For safety reasons,
only use the power adapter
plug supplied.
Mains power
outlet
8
Page 9
Quick Start Guide
4
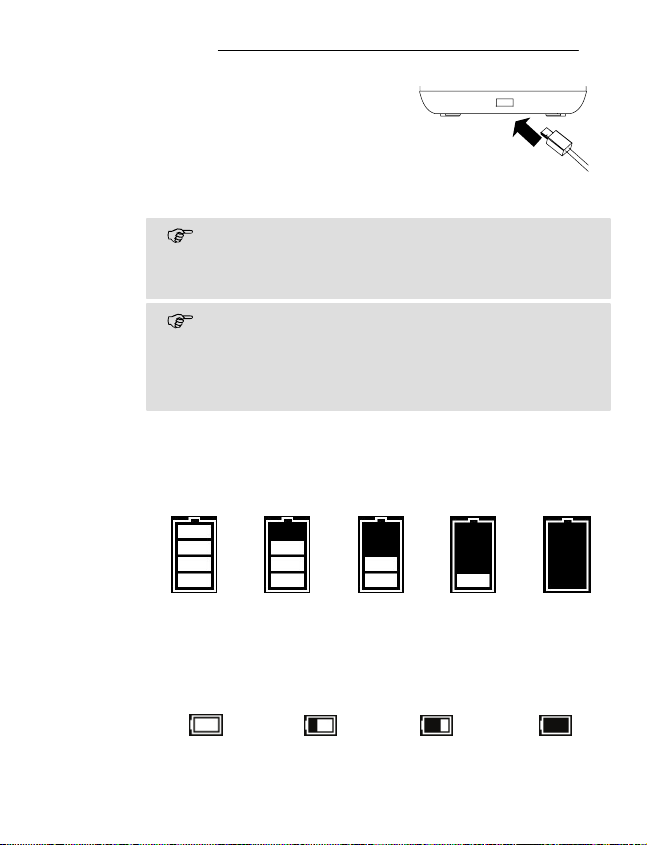
Charging via the desktop charging unit
Plug the power adapter plug
in the mini USB charging
socket on the charging unit.
Insert the phone in the
charging unit to charge it.
The display will go blank but even so the
battery is still being charged. This is correct
operation.
It may take a few seconds before the phone
indicates the charging process.
You can use the phone during the charging
process.
When the phone is switched off there is a different
view in the display − the charge icon is shown
pumping with the red LED.
Battery status warning
The current battery charge status is indicated in the
display as follows:
Full Half empty Low Empty
5
9
Page 10
Quick Start Guide
When the battery charge is low, a corresponding
warning message appears in the display.
Charge the battery.
In cases where the battery charge is extremely low, it
is possible that the back−lighting no longer works and
certain functions are no longer available.
Charge the battery.
When the battery charge drops below the minimum
status, the phone switches off automatically.
Switching the mobile phone on and off
3 sec. Switch the mobile phone on
3 sec. Switch the mobile phone off
Some SIM cards will require you to enter a PIN
code. Follow the prompts on the screen or
read more details about PIN & PIN2 on
Page 59.
Make sure you are in range of your Network
Some networks offer better coverage than others in
different areas. The icon indicates you have a
signal and are connected to the network. The
network will also appear in the display.
10
Page 11

Quick Start Guide
Setting the display language
If you want to select a different language please refer
to Page 51.
The following languages are available: German,
English, French, Spanish, Italian, Dutch, Portuguese,
Swedish, Danish, Norwegian, Finnish and Turkish.
Setting the time and date
Refer to Page 50.
Setting the loudest Ringer
Refer to Page 61.
Now you are ready to make and receive calls.
Taking a call
{í} Take the call
Rejecting a call
{í} Reject the call
Ending a call
End the call
Making a call
ë Enter the phone number
Clear
Dial the phone number
Delete the last digit if incorrect
11
Page 12
Quick Start Guide
Advanced Settings and Functions
For more details about setting up your Amplicom
M6000 and other functions follow the descriptions in
this user guide.
Examples;
Set your one−touch dialling M1 / M2 / M3 keys;
Page 48.
Store numbers in the phone book; Page 27.
Use the Index; Page 111.
If you have any questions please call the
Service−Hotline: Tel. 0844 800 6503 (Monday
to Friday 9.00 − 17.00)
Questions and Answers
In the majority of cases your M6000 phone is
supplied without a SIM card. You may find the
following ˆQuestions and Answers˜ (Q & A)
helpful.
Q − Why hasn’t the mobile phone been supplied with
a SIM card?
A − Many people already have a mobile phone and
wish to transfer their existing SIM card over to the
new phone. This has the advantage of keeping the
same telephone number and if the card is subscribed
to a Pay−as−you−go service then you also benefit
from being able to carry over any credit that has
been paid the card.
12
Page 13

Quick Start Guide
Q − Where can I get a SIM card from?
A − Any high street mobile phone shop will be able to
provide you with a SIM card. Some of the major
supermarket chains also provide mobile phone
services and can supply a SIM card. A useful tip
when choosing a SIM card / service provider
however is to make sure that you have adequate
signal coverage at home; this particularly important if
you live in a very rural area.
Q − Why doesn’t the Amplicom mobile phone have a
telephone number?
A − The telephone number is supplied by the service
provider and will be registered onto the SIM card.
Q − Can I use the SIM card from my old mobile
phone?
A − Yes as long as the SIM card is less than three
years old you can transfer the card over. Some old
SIM cards however are not compatible with the
Amplicom mobile phone as they are from an earlier
generation of SIM card design.
Q − Can I use a SIM card from any mobile phone
company?
A − Yes. The Amplicom mobile phone is what is
termed as an open SIM card phone and so it is not
restricted to any particular service provider or mobile
phone company.
13
Page 14

Quick Start Guide
Q − How do I pay for my calls?
A − There are two main types of registration with a
service provider or mobile phone company. One is a
contract − this is where you sign up for agreed
contract over several months / year and pay an
agreed monthly fee. This is more suited to people
who are using their mobile phone as part of their job
for example. The other is Pay−as−you−go, sometimes
abbreviated to PAYG. With this type of service you
add credit to the card and top up as and when
required. Topping up the card is easy, you can do
this over the phone, on−line, at many shops and even
some cash points allow you to do this. PAYG is more
suited to less frequent users.
Q − How do I find out my credit balance?
A − The service provider of the SIM card should have
provided an information pack with the card. This will
give details of a short number to dial in order to
check your balance. These access codes differ
between mobile phone companies so please check
the details specific to your service provider. Key in
your number, press the talk button and the credit
balance will be announced to you.
14
Page 15

Notes
Notes
15
Page 16

At a Glance
2 At a Glance
Keys and Parts
1 Earpiece
2 Display
3 One−touch dialling keys / Softkeys
4 On/Off key / End call key
5 Scroll up/down keys
6 Hash key
7 Microphone
8 Star key
9 Keypad
10 Call key
11 LED
12 Attachment for Lanyard (not supplied)
13 Mini USB charging socket
14 Charge contacts
15 Headset socket (Headset not supplied)
16 Volume control
17 Loudspeaker
18 Emergency call switch
19 Battery compartment cover
The keys in this operating manual are subsequently
depicted with a uniform contour. Therefore, slight
deviations in the appearance of the symbols on the
mobile phone keys compared to those depicted here are
possible.
16
Service−Hotline: Tel. 0844 800 6503 (Monday to Friday 9.00 − 17.00)
Page 17
12
15
16
At a Glance
17
18
19
1
13
11
10
2
14
3
4
14
5
9
8
7
6
17
Page 18
At a Glance
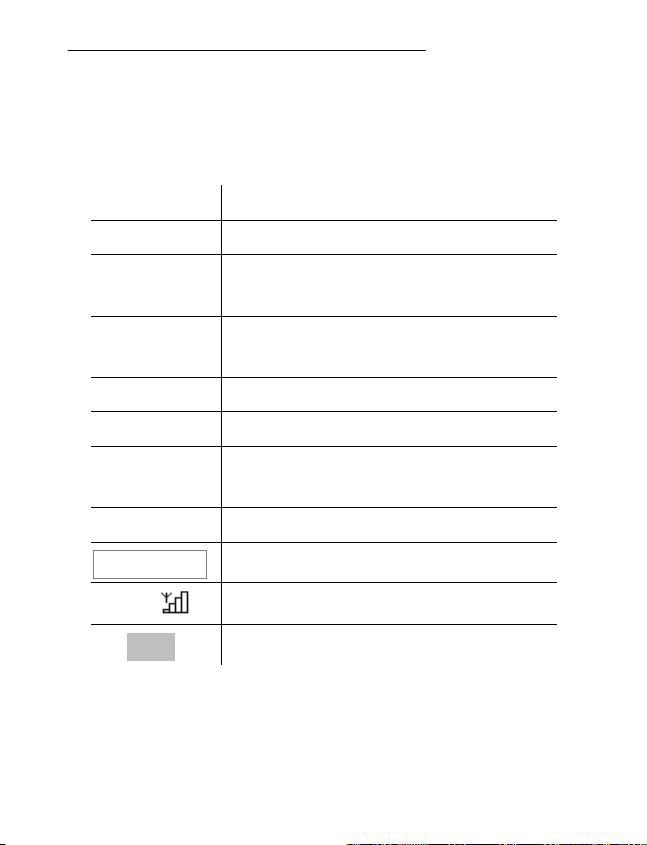
Icons and texts in the handset display
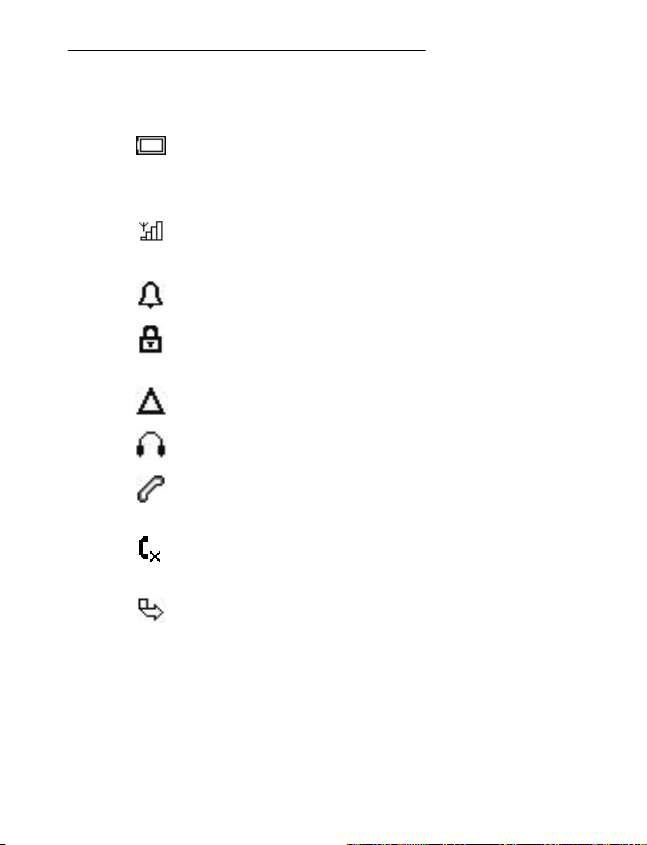
Icon Description
Displays the battery capacity.
Running−through segments, the
battery is being charged.
Signal strength of the phone’s
connection
Alarm is activated
The key lock function is activated;
Page 36
A roaming1 call is in progress
A headset is connected
There are new calls in the call list;
Page 38
The microphone is deactivated
(muted); Page 36
Call forwarding is active
18
1
Cost of roaming calls and SMS will vary
considerably from country to country. Check with
your Operator.
Page 19
At a Glance
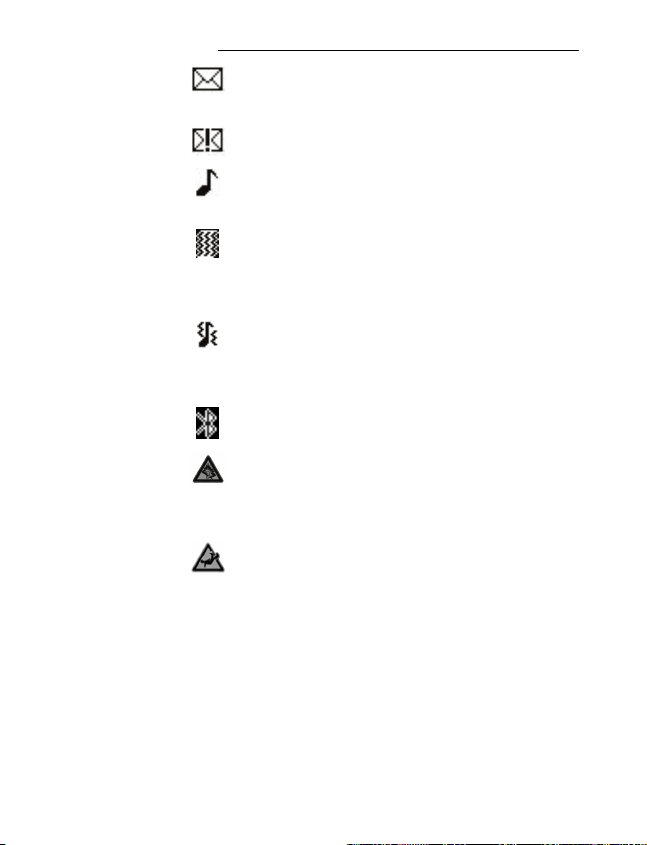
A new SMS1 text message has been
received; Page 40
SMS text memory is full; Page 45
Ringing tone only is activated
Vibration alert only is activated /
Silent mode activated
Vibration alert and ringing tone are
activated or first the vibration alert
then ringing tone is activated
Bluetooth
The volume is set high and care
should be taken when using the
phone.
"Fall Down" is switched on;
Page 78
® 2
is activated
1
SMS: Short Message Service = Service for
sending text messages.
2
Bluetooth®: Industrial standard for communication
between devices over short distances.
19
Page 20

How does it work
3 How does it work
1 Earpiece The voice of the caller can be
heard here when no headset
is being worn or the handsfree
equipment has not been
installed and activated and the
device not set to Handsfree
mode.
2 Display The information which
appears in the display guides
you through the menu
structure and helps operate
the mobile phone
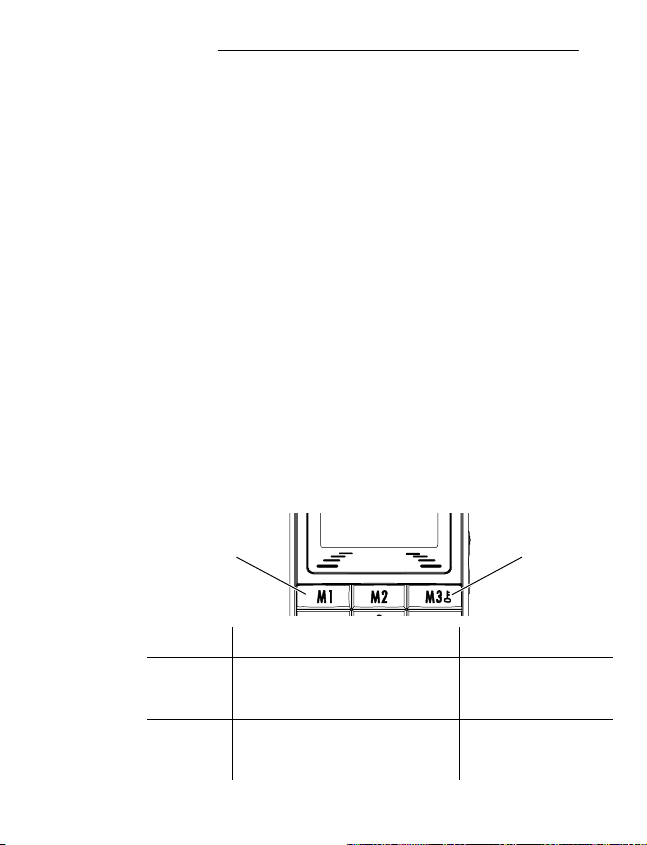
3 ^_` One−touch dialling keys / Softkeys
A phone number can be
assigned to each one−touch
dialling key and then dialled
directly by pressing and
holding the respective key.
^` are also softkeys.
The softkeys are assigned
different functions in the
various menus. The current
function is always indicated by
a text directly above the key in
the display.
` = Initiate key lock
20
Service−Hotline: Tel. 0844 800 6503 (Monday to Friday 9.00 − 17.00)
Page 21

How does it work
4 On/Off key, End call key
Switch the mobile phone on
and off
Cancel the current process
End or reject a call
Scroll to the right
5 +, Scroll up / down
Navigate in the menus
6 # Hash key Switch ringing tone on/off,
Switch upper/lower case,
Key lock
7 Microphone Is activated during a call
8 * Star key Enter special characters
9 1−0 Keypad Enter phone numbers and
names or write a text
10 Call key Take a call or dial a number
Open the call list
Scroll to the left
11 LED Indicates the phone operating
status. The LED will stay on
while charging and will flash if
no signal is detected or no
network to be clamp on to
alert the user.
12 Attachment eye Attachment for Lanyard
(not supplied)
21
Page 22
How does it work
13 Mini USB charging socket
To connect the USB charger
14 Charging contacts The phone is charged via
these contacts when in the
charging unit
15 î Headset socket (Headset not supplied)
Connect a headset.
The earpiece, loudspeaker
and microphone are
deactivated. You can only
hear and speak via the
headset.
16 :; Volume control
Regulates the volume of the
caller
17 Loudspeaker You can hear the caller’s
voice from here when the
phone is in Handsfree mode
18 Emergency call switch
Activate emergency call
(SOS)
19 Battery compartment cover
Cover of the battery
compartment
22
Page 23

How does it work
Special Functions Keys
Mode Hold #
Standby Switched ringer Off / On −
Silent Mode
Hold 1
A connection is established to your mailbox and you
can play messages recorded; Page 46.
23
Page 24
Getting Started
4 Getting Started
This chapter provides basic information on using the
operating instruction manual and the telephone.
Description of operating sequences in the manual
Display Description
6 Press the key depicted briefly
2 sec. 7 Press the key depicted for
2 seconds
Hold 1 Press and hold down the key
depicted
ë Enter numbers or letters
{í} Mobile phone rings
è Remove the phone from the
charging unit
é Place the phone in the charging unit
24
Options
E.g.
Represents text in the display
Indicates icons in the display
OK
Service−Hotline: Tel. 0844 800 6503 (Monday to Friday 9.00 − 17.00)
Press the softkey; Page 25
Page 25
Getting Started
Standby mode
All descriptions in this operating manual assume that
the mobile phone is in Standby mode. The system
switches to Standby mode by pressing the key,
several times if necessary. It may be necessary to
deactivate the key lock function.
Energy−save mode
When the phone has been in Standby mode for
some time, it automatically switches to energy−save
mode. The display no longer lights up. Press any key
to reactivate Standby mode.
Softkeys
The softkeys ^ (3) and ` (3) are assigned
different functions in the different menus. The
softkeys are always referred to in this manual
according to the texts directly above them in the
display.
6
7
3
Menu Names
3
Key In Standby mode In a menu
^ − Open the main menu − Various
functions
` − Open the phone book
− Activate the key lock
− Various
functions
25
Page 26

Getting Started
Navigating in the menu
All the functions can be accessed via the various
menus. Refer to Menu Structure, Page 84, for
information on how to access each respective
function.
Menu
+ / , Select the submenu required
OK
+ / , Select the function required
(^) Open the main menu
(^) Open the submenu
8
OK
+ / ,
OK
Open the function
Select the setting required
ë Use the keypad to enter
numbers or letters
^ (softkey) Confirm the entries
` (softkey) Move one level back
Cancel the programming and
saving processes and return
to Standby mode
26
Page 27
Getting Started
Creating phone book entries − example
The way in which to navigate through the menus and
define settings is explained by means of the example
Creating phone book entries. Proceed as in this
example for all the settings.
Menu
Open the main menu
9
+ / ,
+ / ,
+ / ,
Name
+ / ,
Save?
Phonebook
Add new contact
To SIM
OK
Number
Yes
ë
or
or
OK
ë
No
OK
Select Phonebook" and
confirm it
OK
Select the submenu and
confirm it
To phone OK
Select the memory location
and confirm it
Open Edit mode, enter the
name and confirm it
OK
Open Edit mode, enter the
number and confirm it
Save or reject the entry
27
Page 28
Getting Started
How to enter text and numbers
The keypad is also labelled with letters for the entry
of text.
The phone provides various methods by which text
can be entered. These are used when creating or
editing contacts in the phone book, when searching
for names in the phone book and when writing SMS
text messages.
Not every method is always available for each
application.
Entering Text
Multitap
In order to enter text in Multitap mode, press the key
labelled with the corresponding letter/character. If the
first character of the group is required, press the key
once. If the second character is required, press it
twice, and so on.
To enter two characters assigned to the
same key, press the key the respective
number of times to enter the first character.
Then wait for approx. 2 sec. and enter the
second letter.
10
28
Page 29
Getting Started
Multitap upper case
Multitap lower case
Numbers
To switch between the text and numbers,
press the # key.
Punctuation and special characters
When entering text, press the * key. Punctuation
marks and special characters are displayed. Use the
+ / , keys to select the required character and
insert it by pressing the
space, press the 0 key.
OK
softkey. To enter a
29
Page 30

Phone Book Set Up
5 Phone Book Set Up
11
The phone book in the phone can store up to 500
entries.
Always enter the area code with all the phone
numbers.
When the memory capacity is used up, the
corresponding message appears when an
attempt is made to store another entry. Before
new entries can be stored, old entries must be
deleted.
The phone book entries are arranged
alphabetically. To skip directly to a required phone
book entry, press the corresponding first letter. To
search for the entries manually, use the + / ,
keys.
Your provider can state how many entries
you can store on your SIM card.
30
Service−Hotline: Tel. 0844 800 6503 (Monday to Friday 9.00 − 17.00)
Page 31

Phone Book Set Up
Entering names
The keypad is also labelled with letters for the entry
of names. Press the corresponding key the
respective number of times to enter letters.
Information on ways of entering text; Page 28.
0 Enter a space
Clear
/ Move the cursor to left or right
Creating phone book entries
Refer to Page 27.
Delete
1213
Saving in Standby mode
ë Enter the phone number
Save
+ / ,
Edit OK
+ / ,
To SIM
ë
Number
Open the menu
To phone OK
or
Select the memory location
and confirm it
Done
Open Edit mode, enter the
name and confirm it
OK
ë
Open Edit mode, edit the
number and confirm it
31
Page 32

Phone Book Set Up
Save?
Yes
or
No
Save or reject the entry
Modifying, editing, deleting phone book entries
Names
Search for the required entry as described at the
beginning of this chapter.
OK
The following functions can also be used:
Call
View
Edit
Delete
Copy
Move
Execute the functions and then confirm them.
Editing or deleting all entries
Menu
Open the phone book
Open the menu
Dial the entry
View the entry
Edit the entry
Delete the entry
Copy the entry
(SIM ↔ phone)
Move the entry
(SIM ↔ phone)
Open the main menu
14
32
+ / ,
Phonebook
OK
Select Phonebook" and
confirm it
Page 33

Phone Book Set Up
The following functions can also be used:
Copy all
Delete all
Execute the functions and then confirm them.
Settings
Menu
Copy all the entries
(SIM or phone)
Delete all the entries
(SIM or phone)
Open the main menu
+ / ,
+ / ,
The following functions are available
Extra numbers
Memory status
Preferred storage
Phonebook
Phonebook settings
OK
Select Phonebook" and
confirm it
OK
Select the menu and confirm it
View the additional numbers
(e.g. own phone number)
The status of the SIM and
phone memory is displayed
Select your preferred storage
medium (SIM or phone)
33
Page 34

Making and Receiving Calls
6 Making and Receiving Calls
Taking a call
{í} Take the call
Rejecting a call
{í} Reject the call
Ending a call
End the call
Making a call
ë Enter the phone number
Clear
Delete the last digit if incorrect
Dial the phone number
Call list
Your mobile phone stores the last phone numbers
dialled (redialling), calls received and missed calls
in a call list.
Open the calls list
+ / , Select the entry and dial it
Dialling numbers from the phone book
Phone numbers must have been stored in the phone
book for this function; Page 27.
Names
+ / , Select the entry and dial it
34
Service−Hotline: Tel. 0844 800 6503 (Monday to Friday 9.00 − 17.00)
Open the phone book
Page 35

Making and Receiving Calls
One−touch dialling keys
You must have already assigned phone numbers to
the one−touch keys; Page 48.
3 sec. ^, _ or `
Setting the receiver volume
The volume can be adjusted during a call.
: or ; Select the required volume
Exposure to the receiver at full volume for a
long period could cause ear damage.
Talk time display
The duration of a call is displayed in hours, minutes
and seconds during the call.
15
Press the key
Handsfree
16
This function is used to listen to the caller via the
loudspeaker.
Speaker
H−Held
Activate the handsfree facility
Deactivate the handsfree
facility
35
Page 36

Making and Receiving Calls
Muting the microphone in the handset
The microphone in the handset can be activated and
deactivated during a telephone conversation.
Options
Open the menu
17
+ / ,
On
Mute
Deactivate the microphone
(muting function activated)
Off
Keypad lock
18
Activate the microphone
The keypad lock is intended to prevent functions
being triggered unintentionally.
` and then # immediately
Activates the key lock function
Calls can still be taken in the normal way even
when the key lock function is activated.
` and then # immediately
Deactivates the key lock
function
Turn ringer Off/On
19
The ringer can be set to silent − vibrate only.
3 sec. # Switch the ringer off
3 sec. # Switch the ringer on
When you have set the ringer "Off" you will notice
this icon in the display.
36
Page 37

Making and Receiving Calls
Options during a call
Options
This menu provides access to functions which can
be executed during a call:
Hold
+ / ,
When a call is put on hold, the menu option
To retrieve the call put on hold
+ / ,
New call
+ / ,
ë Enter the phone number and
The first call is put on hold.
Hold single call
changes to Retrieve single call.
Retrieve single call
New call
Open the Options" menu
OK
Put the current call on hold
OK
Resume the call
OK
Select the function
dial it
Phone book
+ / ,
Muting function
+ / ,
Phonebook
Mute
On
OK
Open the phone book
37
Page 38

Call Lists
7 Call Lists
20
The mobile phone is equipped with a calls list.
Your mobile stores the last phone numbers dialled,
taken and received but missed.
If one of the phone numbers received
matches an entry in the phone book, the
associated name appears.
The following icons appear to indicate
numbers dialled
calls received
missed calls
21
Dialling from the calls list
Open the calls list
+ / , Select an entry and dial it
38
Service−Hotline: Tel. 0844 800 6503 (Monday to Friday 9.00 − 17.00)
Page 39

Displaying list details
Open the calls list.
+ / ,
OK
Call Lists
Select an entry and display
details
Options
The following functions are available:
Delete
Save to Phonebook
Call
Send text message
Execute the functions and then confirm them.
Open the Options menu
Delete the entry
Save the entry (SIM or phone)
Dial the entry
Send the text message
39
Page 40

SMS − Text Messages
8 SMS − Text Messages
It is possible that not all functions described
are supported by every network. Therefore,
please contact your local mobile phone
provider for details.
SMS settings
Text messages are distributed via a Service
Centre. If you want to send and receive SMS
text messages, you must program a service
centre number in your mobile phone.
Normally, this has already been set up by your
service provider.
Navigate to the SMS settings" menu.
Menu
Open the main menu
40
+ / ,
+ / ,
Messages
OK
Select the menu and confirm it
SMS settings
OK
Select the menu and confirm it
Service−Hotline: Tel. 0844 800 6503 (Monday to Friday 9.00 − 17.00)
Page 41

SMS − Text Messages
Profile settings
Navigate to the SMS settings" menu.
+ / ,
Profile settings
OK
Select the menu and confirm it
+ / ,
The following functions are available:
Profile name
SMSC address
Validity period
You can use this feature to define how long an
attempt should be made to deliver a message which
you have sent.
Message type
Execute the functions and then confirm them.
Profile 1
Profile 2
or
Select a profile and confirm it
Edit the profile name
Edit the SMS Service Center
number
Define the period of validity
Set the type of message
Edit
41
Page 42

SMS − Text Messages
General settings
Delivery report
Select Delivery report − On" to receive the
corresponding delivery confirmation report that a
message sent has been received.
Reply path
Select Reply path − On" to send the reply path of
your provider with an SMS message. Contact your
provider for further details.
Navigate to the SMS settings" menu.
+ / ,
Common settings
Select the menu and confirm it
OK
Delivery report
Reply path
Memory status
Navigate to the SMS settings" menu.
+ / ,
The memory locations occupied and free on
the both the mobile phone and SIM card are
displayed.
42
Switch on or off
Switch on or off
Memory status
OK
Select the menu and confirm it
Page 43

Writing an SMS text
A text message can contain up to 457
characters, including spaces. A standard
message contains 160 characters. Additional
costs may ensue in the case of messages
containing more than 160 characters.
SMS − Text Messages
Menu
+ / ,
Messages
Open the main menu
OK
Select the menu and confirm it
+ / ,
Write message
OK
Select the menu and confirm it
ë Write the text.
Information on ways of entering text;
Page 28.
Options
Open the menu
Insert templates OK
Done OK
The following functions are available
Send only
ë or
Search
OK
Enter the number or select
from the phone book.
43
Page 44

SMS − Text Messages
Save and send
OK
Enter the number or select
from the phone book.
The SMS text is saved in the
Outbox" folder and sent to
the number dialled.
Save OK
The SMS text is saved in the
Outbox" folder.
Send to many
OK
The message can be sent to
several recipients selected
from the phone book.
Execute the functions and then confirm them.
SMS text messages sent and received
Texts received are indicated by a ringing tone
which you have set. A message appears in the
display. Press the Read softkey to display
the message.
SMS texts received are stored in the Inbox" folder.
SMS texts sent are saved in the Outbox" folder as
are the drafts.
44
Page 45

Editing stored texts
Menu
SMS − Text Messages
22
Open the main menu
+ / ,
Messages
OK
Select the menu and confirm it
+ / ,
Inbox
/
Outbox
OK
Select the menu and confirm it
+ / ,
Options
OK
Select SMS and confirm it
Open the menu
The following functions are available:
Reply
Reply to the number from
which the text was sent
Delete
Forward
Delete the SMS text
Forward the text to a different
number
Copy to phone
Copy to SIM
/
Copy the SMS text
Move to phone
Move to SIM
/
Move the SMS text
Use number
Use the number from which
the text was sent
Execute the functions and then confirm them.
45
Page 46

Voice Mail
9 Voice Mail
23
It is possible that not all functions described
are supported by every provider. Therefore,
please contact your local mobile phone
provider for details. They may concern
services which are subject to charges.
In order to use the Voice Mail"1 feature, the relevant
phone number must be programmed in your mobile
phone. Normally, this has already been set up by
your service provider.
Setting up the Voice Mail feature
46
Menu
+ / ,
+ / ,
+ / ,
+ / ,
1
Voice Mail, also referred to as mailbox
Messages
Voicemail server
<Empty>
Edit OK
(answering machine in mobile telecommunication
network)
Service−Hotline: Tel. 0844 800 6503 (Monday to Friday 9.00 − 17.00)
Open the main menu
OK
Select the menu and confirm it
OK
Select the menu and confirm it
Options
Select a Voicemail server and
open options
Select the menu and start
editing
Page 47

Voice Mail
+ / ,
+ / ,
Save?
The following function is also available in the
Voicemail server" option.
Call voicemail OK
Execute the functions and then confirm them.
Name Edit
Number
Yes
,
or
Open Edit mode, enter the
name and confirm it
ë
Open Edit mode, edit the
number and confirm it
No
Confirm or cancel changes
The Voice Mail number is
dialled
ë
OK
Done
Playing the Voice Mail messages
Navigate to the Call voicemail menu option, as
previously described, and press the
Hold 1
A connection is established to your Voice Mail" and
you can play messages recorded.
OK
softkey or
47
Page 48

Other Useful Features
10 Other Useful Features
One−touch dialling keys
24
It is possible to assign phone numbers to the
one−touch dialling keys ^, _ or ` which are
then dialled directly by pressing and holding the
corresponding key; Page 35.
Each number you want to define as a
one−touch dialling number must be stored in
the phone book.
Assigning a phone number to a one−touch dialling
key:
Menu
+ / ,
Phonebook
Open the main menu
OK
Select the menu and confirm it
+ / ,
Set M1/M2/M3 OK
Select the menu and confirm it
+ / ,
Edit
Select the one−touch dialling
key and confirm it
Select
View
To display the number
48
Change
To edit a phone number in the
phone book
Service−Hotline: Tel. 0844 800 6503 (Monday to Friday 9.00 − 17.00)
Page 49

Other Useful Features
Delete
Execute the functions and then confirm them.
To delete the number
assigned
Speed dialling
Phone numbers can be assigned to the keypad 2
to 9. Then hold the corresponding key pressed
longer than 3 seconds to dial the corresponding
number.
Each number you want to define as a speed
dial number must be stored in the phone book.
Menu
+ / ,
+ / ,
+ / ,
+ / ,
+ / ,
Phonebook
Speed dial
Status
Set number
Open the main menu
OK
Select the menu and confirm it
OK
Select the menu and confirm it
On
Activate speed dialling
OK
Select the menu and confirm it
Add
Select the required key and
confirm it
+ / ,
OK
Select an entry and confirm it
49
Page 50

Other Useful Features
Time and date
This menu option can be used to set and change the
date and time.
Open the main menu:
Menu
25
Open the main menu
+ / ,
+ / ,
+ / ,
+ / ,
HH:MM
Settings
Phone settings
Time and date
Set time/date
ë , Enter hours:minutes and jump
DD/MM/YYYY
+ / ,
Time
Set format
/ , , Select 12" or 24" and jump
OK
Select the menu and confirm it
OK
Select the menu and confirm it
OK
Select the menu and confirm it
OK
Select the menu and confirm it
to date
OK
ë
Enter day:month:year and
confirm it
OK
Select the menu and confirm it
to Date
50
Page 51

Other Useful Features
Date
/ , , Select MM DD YYYY",
YYYY MM DD" or
DD MM YYYY" and jump to
Date separator
Date separator
/ ,
OK
Select . " : " / or − " and
confirm it
Language
26
This menu option can be used to set and change the
display language.
Open the main menu:
Menu
+ / ,
Settings
Open the main menu
OK
Select the menu and confirm it
+ / ,
Phone settings
OK
Select the menu and confirm it
+ / ,
Language
OK
Select the menu and confirm it
+ / ,
OK
Select your preferred
language and confirm it
51
Page 52

Other Useful Features
Calendar
This menu option opens the calendar. You can select
other days. Use the + / , and / keys to
navigate.
Open the Calendar:
Menu
Open the main menu
+ / ,
+ / ,
Extra
Calendar
OK
Select the menu and confirm it
OK
Select the menu and confirm it
Alarm
This menu option can be used to programme 5
different alarms.
Open the Alarm:
52
Menu
+ / ,
+ / ,
+ / ,
Off
Extra
Alarm
00:00
/ , , Select On" or Off" and jump
Open the main menu
OK
Select the menu and confirm it
OK
Select the menu and confirm it
Edit
Select one Alarm and open
Edit mode
down
Page 53

Other Useful Features
00:00
Repeat
If you select Custom:
SMTWTFS
S = Sunday, M = Monday, T = Tuesday, W =
Wednesday, T = Thursday, F = Friday, S = Saturday
On
Configure the other days for your preferred situation.
Active days are highlighted with a frame.
, Jump to Snooze
Snooze (min)
Alert type
Save?
ë, , Enter hours:minutes and jump
to Repeat
/ , ,
Select Once", Everyday" or
Custom" and jump to Snooze
/
Select a day
Off
or
,
/ , ,
/ ,
Yes
or
Select whether the alarm is
active or not this day
Select between 1" to 10"
minutes and jump to Alert type
Done
Select Vib. and ring", Ring
only" or Vib. only" and
confirm it
No
Confirm or cancel changes
53
Page 54

Other Useful Features
Calculator
This feature provides a simple calculator feature with
which to solve simple basic calculations.
Use the + and , keys to select the required
arithmetic operation (+, −, x, ÷).
Use the # key to set a decimal point.
Use the * key to change the sign (±).
Menu
Open the main menu
+ / ,
+ / ,
Example
To execute the calculation −5 x 2.5 you have to
type the following keys;
5*= −5
+++ = x
2#5= 2.5
OK
Clear
54
Extra
Calculator
= −12.5
= Delete
OK
Select the menu and confirm it
OK
Select the menu and confirm it
Page 55

Other Useful Features
Tone Control
Users of hearing aids and non users will appreciate
this unique feature. The Phone is delivered with the
Tone Control set in the normal position and there are
two additional options available;
Low Frequency setting
High Frequency setting
Menu
Open the main menu
+ / ,
Settings
OK
Select the menu and confirm it
+ / ,
Tone control
OK
Select the menu and confirm it
+ / ,
High frequency
Normal, Low frequency
OK
or
Select a setting and confirm it
Select your preferred frequency that provides the
best hearing experience.
55
Page 56

Other Useful Features
Network settings
Network selection: This menu can be used to select
mobile telecommunication networks other than your
own mobile network provider. However, the
corresponding agreements must have been
concluded.
Preferences: You can select and edit the mobile
telecommunication networks prescribed on the SIM
card. Use the + / , keys to change the priority.
It is possible that not all functions described
are supported by every provider. Therefore,
please contact your local mobile phone
provider for details.
Menu
+ / ,
+ / ,
Network selection
Refer to Menu Structure; Page 93.
56
Settings
Network settings
or
OK
Open the main menu
Select the menu and confirm it
OK
Select the menu and confirm it
Preferences
Page 57

Other Useful Features
Security settings
This menu is used to define which functions on the
phone or SIM card should be protected by a
password/PIN. The PIN and password can be
changed.
PIN and PIN2 are supplied together with the
SIM card. Further information is available from
your SIM card service provider.
Menu
+ / ,
+ / ,
SIM lock
The PIN is supplied together with the SIM
Settings
Security settings
card. If you deactivate the SIM lock, you need
not enter the PIN after switching the mobile
phone on.
It is recommended to leave the SIM lock on to
prevent unauthorised persons from using the
mobile phone.
Open the main menu
OK
Select the menu and confirm it
OK
Select the menu and confirm it
57
Page 58

Other Useful Features
Phone lock
The default setting for the password is 1234.
If this lock is active, you must first enter the
password for the phone lock after switching
the mobile phone on and then enter the PIN.
Change password
Refer to Menu Structure; Page 94.
Change the passwords/PIN
Tips
Locking your phone with your own personal PIN. You
can lock your mobile phone to prevent
unauthourised use by setting up a personal PIN
number.
58
Menu
+ / ,
+ / ,
+ / ,
+ / ,
Input old PIN
New PIN
Input again
Settings
Security settings
Change password OK
PIN OK
ë
ë
ë
Open the main menu
OK
Select the menu and confirm it
OK
Select the menu and confirm it
Select the menu and confirm it
Select the menu and confirm it
OK
OK
OK
Page 59

Other Useful Features
27
PIN & PIN2 codes
The PIN (Personal Identity Number) and PIN2 codes
are 4 to 8−digit numbers. The PIN and PIN2 codes
are given to you, together with the SIM card, by your
network provider.
PUK & PUK2 codes
28
The PUK (Personal Unblocking Key) and PUK2
codes are 4 to 8−digit numbers. These are only
necessary if you enter the PIN code for the SIM card
incorrectly three times in succession and the SIM
card is blocked. The PUK and PUK2 codes are given
to you, together with the SIM card, by your network
provider.
Phone settings
Navigating to the Phone settings" menu.
Menu
Open the main menu
+ / ,
Settings
OK
Select the menu and confirm it
+ / ,
Phone settings
OK
Select the menu and confirm it
Display settings
Use this menu to adapt the phone display to your
own personal needs.
Navigate to the Phone settings" menu.
59
Page 60

Other Useful Features
+ / ,
Select
Wallpaper
Show date and time
LCD backlight
Themes
Refer to Menu Structure; Page 92.
Ringer Profile settings
Use this menu to adapt the phone’s ringing tones to
your own personal needs.
Menu
+ / ,
+ / ,
Select
Tone settings
Display characteristics
Select the menu and confirm it
To display a wallpaper
To display the date and time
To set the brightness and
lighting duration of the
back−lighting
To display a colour scheme
Open the main menu
User profiles
Options
OK
Select the menu and confirm it
+ / ,
Select a profile and open the
Options menu
To select specific ringing
Customize
OK
OK
60
Page 61

Other Useful Features
melodies for various alert
ringing signals
Volume
To select specific volumes for
the various alert ringing
signals
Exposure to the receiver at full volume for a
long period could cause ear damage.
Alert type
To select whether you are
alerted of incoming calls via a
ringing tone or vibration
Ring type
To set the ringing type for the
alerts
Extra tone
To set extra tones for certain
situations
Answer mode
To select the key with which
incoming calls can be taken
Refer to Menu Structure; Page 95.
Example − Setting the loudest Ringer
29
The loudest ringer is MIDI 1 + Volume 7 = 100dB.
Menu
+ / ,
User profiles
Open the main menu
OK
Select the menu and confirm it
61
Page 62

Other Useful Features
+ / ,
+ / ,
+ / ,
+ / ,
Back
+ / ,
+ / ,
+ 7
Automatic key lock
You can set up the mobile phone so that the key lock
is automatically activated after a certain time in
Standby mode.
Menu
Options
Tone settings
Incoming call
MIDI 1
Volume OK
Ringtone OK
OK
+ / ,
OK
Select your profile and open
the Options menu
Select the menu and confirm it
Select the menu and confirm it
Select the ringer and
confirm it
Select the menu and confirm it
Select the menu and confirm it
Select the volume and
confirm it
Open the main menu
OK
OK
Customize
OK
62
Page 63

Other Useful Features
+ / ,
+ / ,
+ / ,
Dedicated function keys
You can define which menu or function should be
opened on pressing the + / , keys in Standby
mode.
Menu
+ / ,
+ / ,
+ / ,
+ / ,
Settings
Security settings
Auto keypad lock
Settings
Phone settings
Dedicated key
Up
or
OK
Select the menu and confirm it
OK
Select the menu and confirm it
OK
Select the menu and confirm it
Open the main menu
OK
Select the menu and confirm it
OK
Select the menu and confirm it
OK
Select the menu and confirm it
Down
Edit
Select the key
+ / ,
OK
Select the required menu or
function and confirm it
63
Page 64

Other Useful Features
Call Settings
It is possible that not all functions described
are supported by every provider. Therefore,
please contact your local mobile phone
provider for details. They may concern
services which are subject to charges.
Caller ID
This function is used to activate/deactivate
transmission of the phone number, with which you
are making the call, with the call.
Menu
Open the main menu
64
+ / ,
+ / ,
+ / ,
+ / ,
Send ID
or
Call centre
Call settings
Caller ID
Set by network, Hide ID
OK
OK
Select the menu and confirm it
OK
Select the menu and confirm it
OK
Select the menu and confirm it
Select a setting and confirm it
Page 65

Other Useful Features
Call waiting
This function issues an audible signal to inform you
that another call has been received while the current
call is in progress.
Menu
Open the main menu
+ / ,
+ / ,
+ / ,
and then select
Activate
Deactivate OK
Query status
Call centre
Call settings
Call waiting
OK
OK
Select the menu and confirm it
OK
Select the menu and confirm it
OK
Select the menu and confirm it
The call waiting function is
then active.
The call waiting function is
deactivated
OK
Display the current setting
65
Page 66

Other Useful Features
Forwarding calls
The following functions enable incoming calls to be
transferred to other phone numbers.
Menu
Open the main menu
+ / ,
+ / ,
+ / ,
+ / ,
Select the setting for which calls should be
redirected
Divert all voice calls
Divert if unreachable
Divert if no answer
Divert if busy
Divert all data calls
OK
Call centre
Call settings
Call divert
Cancel all diverts
OK
Select the menu and confirm it
OK
Select the menu and confirm it
OK
Select the menu and confirm it
OK
To stop all the calls being
transferred
66
Page 67

and then select
Activate
To new number
or
To voice mail
Deactivate OK
Query status
OK
Other Useful Features
OK
ë or
Enter the number or select
it from the phone book.
OK
The call forwarding function is
then active.
The corresponding call
forwarding function is
deactivated
OK
Display the current setting
Search OK
67
Page 68

Other Useful Features
Call barring
The following function is used to restrict calls which
can be received and made.
Menu
Open the main menu
+ / ,
+ / ,
+ / ,
Select the setting for which calls should be restricted
Outgoing calls
The home PLMN (Public Land Mobile
Incoming calls
Activate all
68
Call centre
Call settings
Call barring
All calls
International calls
International calls except to home PLMN
Network) is the network your SIM card is
registered to.
All calls
When roaming
Call barring password
OK
Select the menu and confirm it
OK
Select the menu and confirm it
OK
Select the menu and confirm it
ë
Page 69

Other Useful Features
Cancel all
Call barring password
or
Change barring password
Old password
New password
Confirm new password
OK
The default password is 1234.
Automatic redialling
When this function is activated, redialling is initiated
automatically if the number dialled is engaged".
Menu
ë
ë
ë
ë
Open the main menu
+ / ,
+ / ,
+ / ,
+ / ,
Call centre
Call settings
Advance settings
Auto redial
OK
Select the menu and confirm it
Select the menu and confirm it
Select the menu and confirm it
On
Activate the function
OK
OK
69
Page 70

Other Useful Features
Broadcast messages
You mobile phone supports receiving broadcast
messages.
You receive information on broadcast
messages, charge rates, data and offers from
your SIM card service provider.
1
Menu
+ / ,
+ / ,
Messages
Broadcast message
Refer to Menu Structure; Page 86.
1
Broadcast, is also referred to as CB = Cell
Broadcast (information services from your
telephone network provider)
70
Open the main menu
OK
Select the menu and confirm it
OK
Select the menu and confirm it
Page 71

Other Useful Features
Default settings
The mobile phone can be reset to its default (factory)
settings.
Menu
Open the main menu
+ / ,
+ / ,
+ / ,
OK
The default password is 1234.
Settings
Security settings
Restore factory settings
OK
Select the menu and confirm it
OK
Select the menu and confirm it
Select the menu and confirm it
71
Page 72

Bluetooth
11 Bluetooth
)
)
How to turn Bluetooth) On & Off
Menu
Open the main menu
+ / ,
Extra
OK
Select the menu and confirm it
+ / ,
Bluetooth
OK
Select the menu and confirm it
+ / ,
Power
On
Turn Bluetooth® on
or
+ / ,
Power
Off
Turn Bluetooth® off
When Bluetooth® is on, the battery life is
reduced, so we recommend that it should be
switched off when not required!
Connect your M6000 to a Bluetooth) headset
It is possible to connect your M6000 mobile phone to
a Bluetooth® headset via a Bluetooth
communication network.
Menu
+ / ,
Extra
Open the main menu
OK
Select the menu and confirm it
®
72
Service−Hotline: Tel. 0844 800 6503 (Monday to Friday 9.00 − 17.00)
Page 73

Bluetooth
)
+ / ,
Bluetooth
OK
Select the menu and confirm it
+ / ,
Inquiry audio device
OK
Select the menu and confirm it
Please refer to the manual supplied with your
Bluetooth® headset for instructions on how to
set the Bluetooth® headset to pairing mode.
+ / ,
Pair
Select the device and
establish a connection
ë 0000
OK
Enter the PIN and confirm it
The PIN required is stipulated in the manual
supplied with your Bluetooth® headset.
After the devices have been successfully paired,
further functions are available for selection;
Page 97.
Please refer to the manual supplied with your
Bluetooth® headset for information on using
the headset for phoning.
73
Page 74

Emergency Call Function
12 Emergency Call Function
This mobile phone is equipped with a convenient
emergency call function. Up to 5 phone numbers can
be entered for emergency calls. For this function to
work correctly it is necessary to record your personal
message. See section below Page 76 Recording an
SOS message.
Entering/Deleting emergency call numbers
Proceed as follows to define an entry in the phone
book as an emergency call number.
Each number you want to define as an
emergency call number must be already
stored in the phone book.
74
Menu
+ / ,
+ / ,
+ / ,
+ / ,
Open the main menu
Settings
OK
Select the menu and confirm it
Help Setting
OK
Select the menu and confirm it
SOS setting
OK
Select the menu and confirm it
Set SOS numbers
OK
Select the menu and confirm it
Service−Hotline: Tel. 0844 800 6503 (Monday to Friday 9.00 − 17.00)
Page 75

Emergency Call Function
+ / ,
+ / ,
+ / ,
The following functions can also be used:
View
Delete
Change
OK
Options
Select a memory location and
open the options
OK
Select the function and
confirm it
Select entry and confirm it
View the entry
Delete the entry
Sending an emergency call
You can define whether an emergency call should
only be sent to the numbers entered in Set SOS
numbers" or to a specific call centre.
Menu
+ / ,
+ / ,
Settings
Help Setting
Open the main menu
OK
Select the menu and confirm it
OK
Select the menu and confirm it
+ / ,
+ / ,
SOS setting
SOS mode setting
OK
Select the menu and confirm it
Select the menu and confirm it
OK
75
Page 76

Emergency Call Function
+ / ,
Set call centre
Set 5 numbers
Off
or
or
OK
Select the mode and confirm it
Setting up a call centre number
Proceed as follows to set up a number.
Menu
+ / ,
+ / ,
+ / ,
+ / ,
ë
Settings
Help Setting
SOS setting
Set call centre number
OK
Recording an SOS message
When you make an emergency call, a message is
sent. It is important for the person being called to
understands that to accept this emergency call they
need to press the ˆ0˜ key. The M6000 will switch to
hands free and the called party can listen in and
have a conversation. The maximum length of this
message is 15 seconds. We suggest the typical
voice message should contain the following;
Open the main menu
OK
Select the menu and confirm it
OK
Select the menu and confirm it
OK
Select the menu and confirm it
OK
Select the menu and confirm it
Edit the number and confirm it
30
76
Page 77

Emergency Call Function
This is ... your name ...
I need assistance − please press zero to accept my
call.
Menu
Open the main menu
+ / ,
+ / ,
+ / ,
Options
Stop
ð
Save audio?
The following functions can also be used:
Play
Delete
Settings
Help Setting
Record SOS message
+ / ,
OK
Select the menu and confirm it
OK
Select the menu and confirm it
OK
Select the menu and confirm it
Record
Start recording
Speak your message into the
microphone and confirm it
Yes
No
/
Save or reject the recording
Play the message
Delete the message
OK
77
Page 78

Emergency Call Function
Fall Down Alarm − Please read carefully
The innovative and sophisticated sensor built into
your telephone will function reliably, provided your
telephone is always hung round your neck with a
lanyard which can be purchased in any telephone
shop. Should you fall, it will trigger your alarm and
make the calls you have programmed without your
having to locate your telephone and press the alarm
key. In case the alarm is triggered inadvertently,
simply press the alarm key up and down to cancel.
You can choose to set the M6000 to normal or
sensitive mode. This function should not be the sole
method of seeking assistance.
When fall down is on you will see this icon in
the display of the phone.
If it is your intention to carry your telephone in
your pocket, briefcase, or bag, false alarms
may occur and you may prefer to switch the
fall down sensor off as instructed.
False alarms to emergency call centres can
result in considerable costs which could then
be charged to you. Therefore, treat this
function with due care and attention.
31
78
Menu
+ / ,
Settings
Open the main menu
OK
Select the menu and confirm it
Page 79

Emergency Call Function
+ / ,
+ / ,
+ / ,
or
+ / ,
Help Setting
Man down SOS
Normal
Off
or
OK
OK
Select the menu and confirm it
OK
Select the menu and confirm it
Sensitive
Select the sensitivity and
activate the function
Deactivate the function
OK
Emergency Call Function, Examples
The emergency call function is explained here
according to two examples.
Emergency calls to an emergency call centre
False alarms to official emergency call
centers can result in considerable costs which
could then be charged to you.
It may be necessary for you to register with an
emergency call centre. Ask your doctor or
community services for details.
Carry out the following settings:
Menu
Open the main menu
+ / ,
Settings
OK
Select the menu and confirm it
79
Page 80

Emergency Call Function
+ / ,
+ / ,
+ / ,
ë
+ / ,
+ / ,
In the case of an emergency call:
The phone dials the emergency call centre number.
When a connection is established, the SOS
message you recorded is sent. The connection then
remains active for approx. 10 seconds. If the number
of the emergency call centre is engaged", up to
three further attempts are automatically made to dial
the number.
Help Setting
SOS setting
Set call centre number
OK
SOS mode setting
Set call centre
OK
Select the menu and confirm it
OK
Select the menu and confirm it
OK
Select the menu and confirm it
Edit the number and confirm it
OK
Select the menu and confirm it
OK
Select the mode and then
confirm it
Emergency call to several numbers
The required phone numbers must be stored in the
phone book (relatives/friends).
Carry out the following settings:
80
Page 81

Emergency Call Function
Menu
+ / ,
+ / ,
+ / ,
+ / ,
+ / ,
+ / ,
+ / ,
After up to 5 emergency numbers have been set
Back
+ / ,
Settings
Help Setting
SOS setting
Set SOS numbers
Change
OK
SOS mode setting
Open the main menu
OK
Select the menu and confirm it
OK
Select the menu and confirm it
OK
Select the menu and confirm it
OK
Select the menu and confirm it
Options
Select a memory location and
open the options
OK
Select the function and
confirm it
Select entry and confirm it
OK
Select the menu and confirm it
+ / ,
Set 5 numbers
Select the mode and then
confirm it
OK
81
Page 82

Emergency Call Function
In the case of an emergency call:
The phone dials the 1st emergency call number.
When a connection is established, the SOS
message you recorded is sent. The connection then
remains active for approx. 10 seconds before the
next number is dialled. If a phone number is
engaged" or an answering machine takes the call,
the mobile phone automatically dials the next
emergency call number (after approx. 1−2 minutes).
When the called party receives your emergency call
they will hear your recorded voice message and
must accept the call by pressing 0. Your Emergency
call is now in hands free mode. Remember to switch
the emergency call switch off.
Starting the emergency call
Slide the emergency call switch upwards. A siren is
sounded. The phone dials the set number.
Depending on the settings selected, the number is
redialled or the next number is dialled.
Ending the emergency call
After making the call or to cancel the emergency call,
slide the Emergency call switch back down.
Terminating the man down" SOS
If the function is triggered unintentionally, slide the
Emergency call switch up and then immediately
back down again.
82
Page 83

Services
13 Services
32
This menu contains the SIM Application Toolkit
(commonly referred to as STK) of your mobile phone
provider. The content and functions available vary
from provider to provider and are dependent on the
SIM card used.
SIM Application Toolkit (STK) is a GSM system
standard which enables the SIM to initiate actions
which can be used for various value−added services.
Please contact your local mobile phone
provider for details. They may concern
services which are subject to charges.
Service−Hotline: Tel. 0844 800 6503 (Monday to Friday 9.00 − 17.00)
83
Page 84

Menu Structure
14 Menu Structure
Main menu
Pressing the ^ =
menu. Then use the + / , keys to select a menu
option and confirm the selection. For further
information on the menu and operation, Chapter
4.
Messages
Write message
ë Options
Done
Insert templates
Inbox
Menu
Send only
Save and send
Save
Send to many
key to open the main
84
Options
Reply
Delete
Service−Hotline: Tel. 0844 800 6503 (Monday to Friday 9.00 − 17.00)
Page 85

Outbox
Options
Templates
Menu Structure
Forward
Copy to phone /
Copy to SIM
Move to phone /
Move to SIM
Use number
Send
Edit
Delete
Copy to phone /
Copy to SIM
Move to phone /
Move to SIM
Use number
SMS settings
Profile settings
Common settings
Delivery report
85
Page 86

Menu Structure
Reply path
Memory status
Preferred storage
SIM
Phone
Voicemail server
Broadcast message
Receive mode
Read message
Languages
Channel settings
33
86
Page 87

34
Call centre
Call lists
Menu Structure
Missed calls
Options
Delete
Save to Phonebook
Call
Send text message
Dialled calls
see Missed calls
Received calls
see Missed calls
Delete call lists
Missed calls
Dialled calls
Received calls
Delete all
Call timers
Last call
87
Page 88

Menu Structure
Call cost
Call settings
Caller ID
Call waiting
Dialled calls
Received calls
Reset all
Last call cost
Total cost
Reset cost
Max cost
Price per unit
Set by network
Hide ID
Send ID
35
Activate
88
Deactivate
Query status
Call divert
Divert all voice calls
Page 89

Divert if unreachable
Divert if no answer
Divert if busy
Divert all data calls
Cancel all diverts
Call barring
Outgoing calls
Incoming calls
Activate all
Cancel all
Menu Structure
36
All calls
International calls
International calls ex-
cept to home PLMN
All calls
When roaming
Change barring password
Closed user group
Advance settings
Auto redial
Call time display
89
Page 90

Menu Structure
37
Phonebook
Add new contact
To SIM
To phone
Set M1/M2/M3
M1 call number
M2 call number
M3 call number
Copy
To phone
To SIM
Copy all
From SIM
From phone
Delete
Delete all
90
From SIM
From phone
Page 91

Speed dial
Status
Set number
Phonebook settings
Extra numbers
Owner number
Service dialing number
SOS number
Memory status
Preferred storage
SIM
Phone
Menu Structure
91
Page 92

Menu Structure
38
Settings
Phone settings
Time and date
Schedule power on/off
Language
Display characteristics
Dedicated key
Set time/date
Set format
Wallpaper
Show date and time
LCD backlight
Brightness
Time
Themes
92
Up
Down
Page 93

Tone control
Normal
Low frequency
High frequency
Help Setting
SOS setting
Man down SOS
Menu Structure
SOS mode setting
Set 5 numbers
Set call centre
Off
Set SOS numbers
Set call centre number
Normal
Sensitive
Off
Record SOS message
Network settings
Network selection
New search
39
93
Page 94

Menu Structure
Select network
Selection mode
Preferences
Security settings
SIM lock
Phone lock
Auto keypad lock
Fixed dial
Mode
Fixed dial list
Barred dial
Mode
Barred dial list
Change password
PIN
PIN2
40
Phone password
Restore factory settings
94
Page 95

41
User profiles
General
Activate
Customize
Menu Structure
Tone settings
Incoming call
Alarm
Power on
Power off
Message
Keypad
Volume
Ringtone
Key tone
Alert type
Ring only
Vib. only
Vib. and ring
Vib. then ring
95
Page 96

Menu Structure
Ring type
Extra tone
Answer mode
Meeting
Outdoor
Single
Repeat
Ascending
Warning
Error
Camp on
Connect
Any key
Indoor
Headset
Bluetooth
96
see General
Page 97

42
Extra
Calendar
Alarm
Calculator
Bluetooth
Power
Inquiry audio device
My device
Active devices
About
Services Page 83
(provider−dependent menu)
Menu Structure
97
Page 98

Trouble Shooting
15 Trouble Shooting
Service hotline
Should problems arise with the telephone, please
refer to the following information first. In the event of
technical problems, please contact out service
hotline under tel. 0844 800 6503 (Monday to
Friday 9.00 − 17.00). In the case of claims under the
terms of guarantee, contact your sales outlet. There
is a 2 year period of guarantee.
Problems and solutions
Problems Solutions
98
The mobile phone
cannot be switched on.
The display is locked"
when the mobile is
switched on.
No signal quality is
displayed.
Service−Hotline: Tel. 0844 800 6503 (Monday to Friday 9.00 − 17.00)
− No battery inserted.
− Battery is not charged.
− Enter the PUK to
unlock" the SIM card.
Contact your service
provider.
− No network
connection. The mobile
phone is in a location
where there is no
network service. Move
to a different location or
contact your service
provider.
Page 99

Trouble Shooting
Keypad does not
function or only
functions very slowly.
A message appears in
the display for some
functions, indicating
execution/use is not
possible.
Screen frozen or no
response when
pressing keys.
No connection to the
mobile
telecommunication
network.
The Insert SIM"
message appears in the
display.
− The operating speed of
the display is reduced
in the case of low
temperatures. This is
normal. Use the phone
in a warmer location.
− Many functions can
only be used after the
respective service has
been applied for.
Contact your service
provider for more
details.
− Remove the battery for
3 minutes and try
again.
− Contact your service
provider.
− Ensure that the SIM
card has been installed
correctly. Contact your
service provider, if
necessary.
99
Page 100

Trouble Shooting
The battery cannot be
charged or is empty
within a short time.
− Battery is defect.
− Place the phone
correctly in the
charging unit or
connect the charging
unit properly. Clean the
contact surfaces on the
mobile phone and
charging unit with a
soft, dry cloth.
− Charge the mobile for
4 hours.
Tips on the battery
Only use batteries, cables and charging unit
approved by the manufacturer, otherwise the battery
could be damaged.
Do not short circuit the battery. Always leave the
battery in the phone to avoid accidentally short
circuiting the battery contacts.
Keep the battery contacts clean and free of dirt.
The battery can be charged/discharged hundreds of
times but its service life is limited. Replace the
battery when the battery power has decreased
noticeably.
100
 Loading...