

Page 1
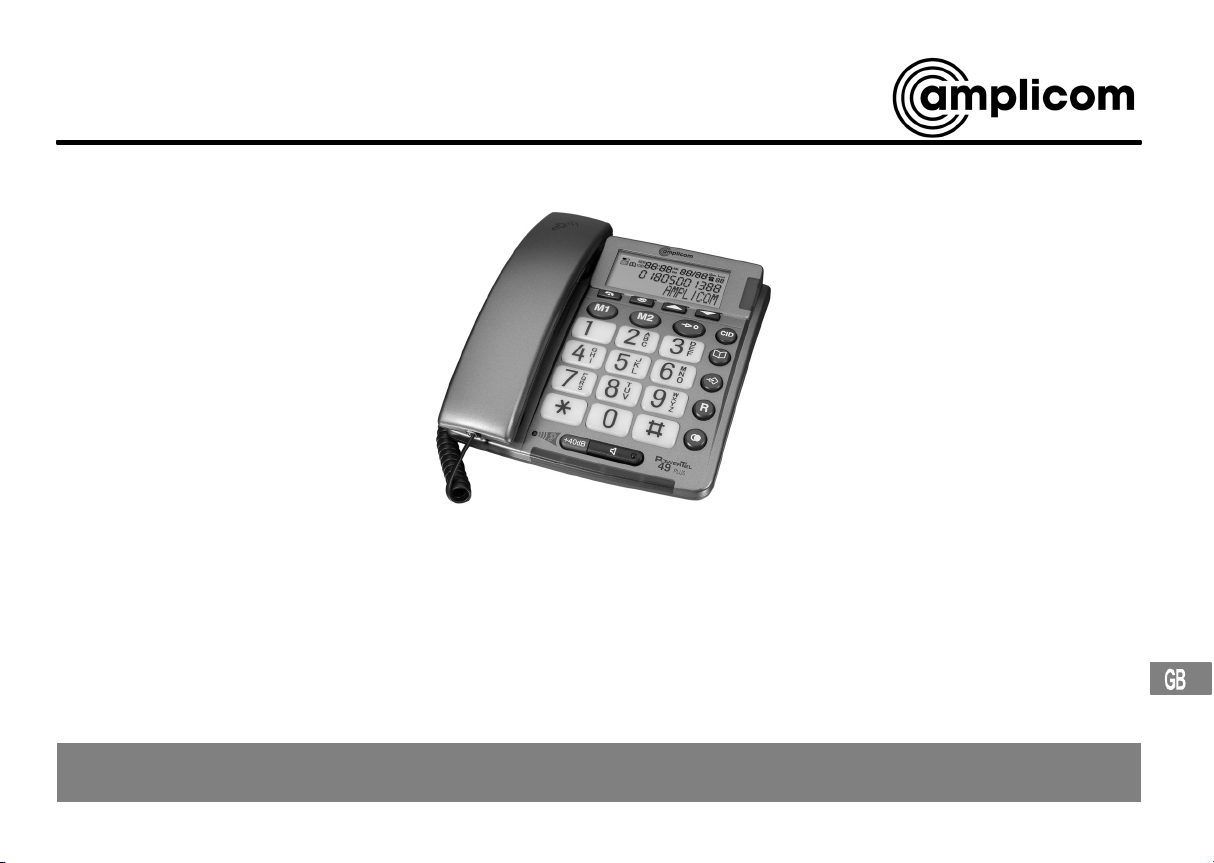
Emergency telephone
Operating Instructions
POWERTEL 49 PLUS
Page 2

2
Page 3

1 Safety Information 4. . . . . . . . . . . . . . . .
2 Putting the Telephone into Operation 5. . .
3 Operating Elements 7. . . . . . . . . . . . . . .
4 Operating the Telephone 8. . . . . . . . . . .
5 Telephoning 9. . . . . . . . . . . . . . . . . . . .
6 Private Branch Exchanges /
Suppl. Services 11. . . . . . . . . . . . . . . .
7 Menu Structure 12. . . . . . . . . . . . . . . . . .
8 Phone Book 13. . . . . . . . . . . . . . . . . . . .
9 Calls List / CID 14. . . . . . . . . . . . . . . . . .
10 Emergency Call 15. . . . . . . . . . . . . . . . .
11 If Problems Occur 16. . . . . . . . . . . . . . . .
12 Maintenance / Guarantee 17. . . . . . . . . . .
13 Index 18. . . . . . . . . . . . . . . . . . . . . . . . .
1
Contents
Service−Hotline: Tel. 0844 800 6503
3
Page 4
Safety Information
1 Safety Information
Please read this operating instruction manual thoroughly.
Intended use
The telephone is suitable for telephoning within a public telephone network system. Any other use is considered unintended use. Unauthorised
modification or reconstruction is not permitted. Under no circumstances
open the device or complete any repair work yourself.
Installation location
Prevent excessive exposure to smoke, dust, vibration, chemicals, moisture, heat and direct sunlight.
Power supply
Caution: Only use the power adapter plug supplied because
other power supplies could damage the telephone. Ensure access to the power adapter plug is not obstructed by furniture or
such.
Hearing aid compatibility
Using the premium receiver, the telephone is perfectly compatible with
most popular hearing aids on the market. However, due to the wide range
of hearing aids available, there is no guarantee that the telephone will
function problem−free with every model.
Caution: This telephone is capable of producing very volume le-
vels when the amplifier is switched on and the volume control is
set to maximum. Extreme caution should be taken if the handset
is to be shared between users with normal hearing and those with
hearing impairment.
Disposal
You are obliged to dispose of consumable goods properly in accordance with the applicable legal regulations. The adjacent symbol on the telephone indicates that electrical and electronic apparatus and batteries no longer required must be disposed of
separate from domestic waste.
Electrical and electronic devices must be disposed of at suitable collection points provided by the public waste authorities.
Batteries must be disposed of at the point of sale or at the appropriate collection points provided by the public waste authorities.
Packaging materials must be disposed of according to local regulations.
4
Service−Hotline: Tel. 0844 800 6503
Page 5
2 Putting the Telephone into Operation
Safety notes
Caution: It is essential to read the safety information in Chapter
1 before preparing the telephone for use.
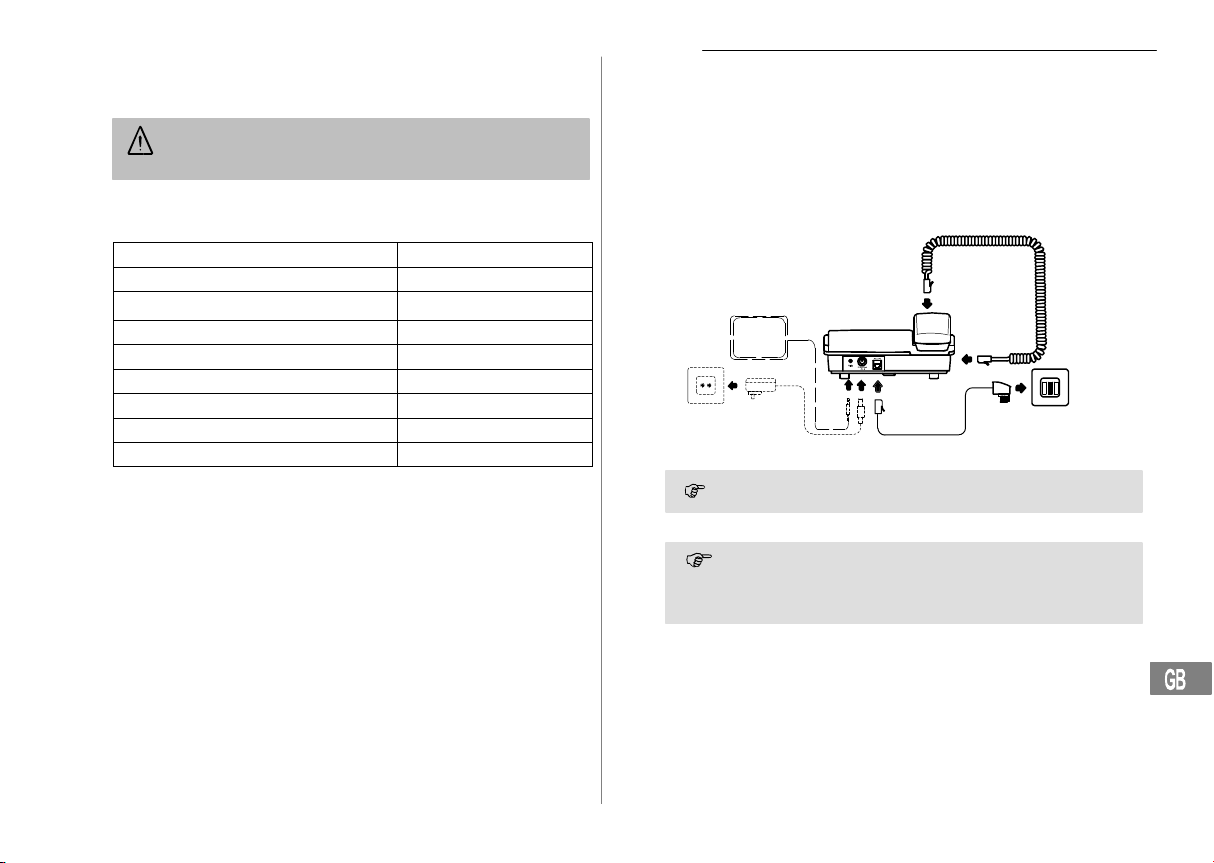
Putting the Telephone into Operation
Connecting the telephone
Connect the telephone as illustrated in the diagram. Only use the telephone connection line supplied because the equipment may not function if
another telephone connection line is used.
Checking the contents of the package
The package contains:
Content
Base unit 1
Power adapter plug 1
Premium receiver 1
Coil cable for the receiver 1
Telephone connection cable 1
Batteries AA 1.5 V 4
Wall−mounting bracket 1
Operating manual 1
POWERTEL 49 PLUS
Receiver connection
Shaker unit
(option)
Power adapter plug
The full range of telephone functions can only be used when the
power adapter plug is fitted.
In order to use an approved shaker unit, connect the shaker unit
plug to the VIB socket in the telephone. No other work is necessary. The shaker unit is ready to operate immediately after connection. The shaker unit does not belong to the material supplied.
Telephone line socket
Service−Hotline: Tel. 0844 800 6503
5
Page 6
Putting the Telephone into Operation
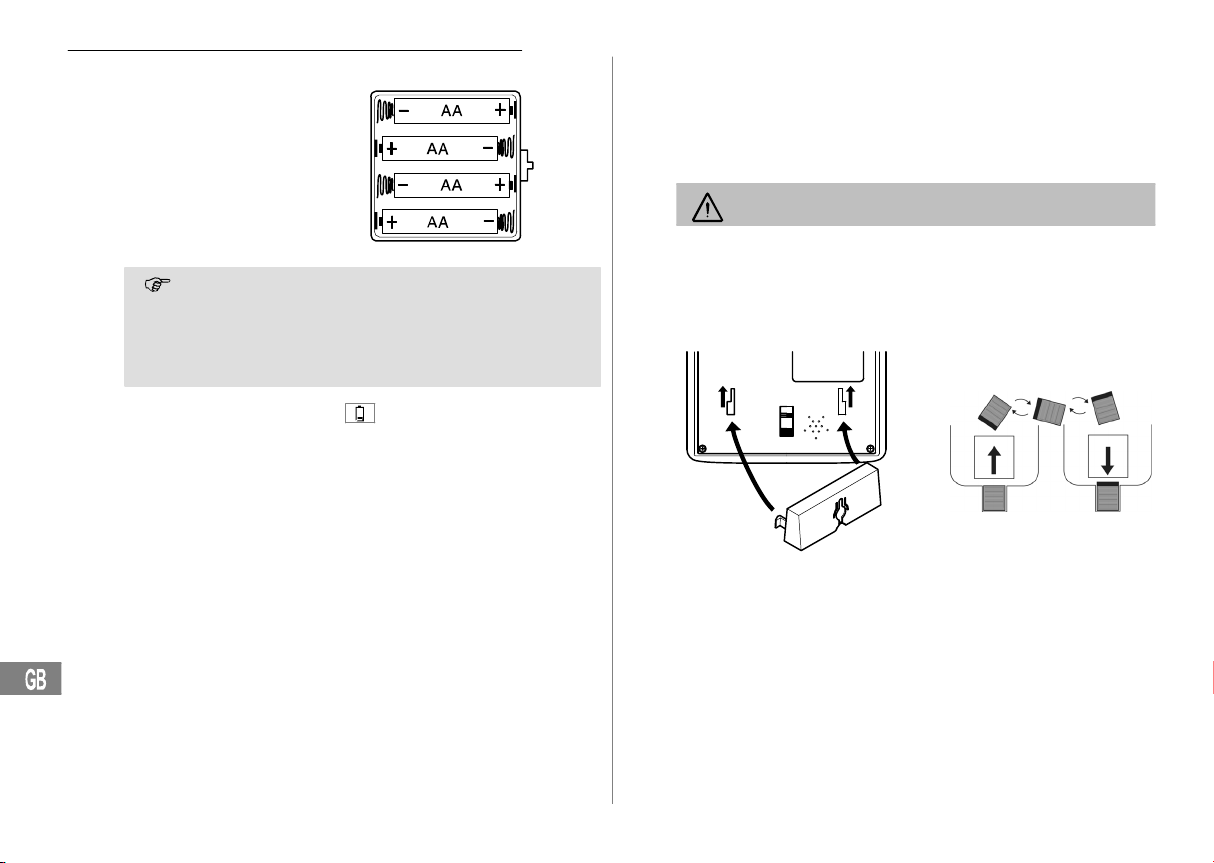
Inserting the batteries
Insert the batteries in the open
battery compartment.
Only use batteries of the type
AA 1.5 V. Pay attention to the
correct polarity. Close the
battery compartment cover.
Insertion of batteries is not absolutely essential. The telephone
can be operated with or without batteries. The full range of telephone functions can only be used when the power adapter plug
are fitted. Pay attention that the telephone is not connected to the
telephone line socket and/or mains power connection when the
batteries are being inserted or replaced.
When the batteries are empty, the icon appears in the display.
Replace the batteries.
Setting the time and date
The time and date are set via the menu. Refer to Page 12 for the sequence of menu option selections necessary.
Private branch exchanges
The information on Page 11 explains how to install your telephone in a private branch exchange.
Wall installation
The telephone can also be installed on a wall. You require two screws in
order to fix the telephone on a wall.
Feed the guide tabs (1) on the wall−mounting bracket (2) in the slots (3) on
the rear side of the telephone. Slide the wall bracket (2) 10 mm upwards
until it audibly snaps into place.
Warning: Ensure that there are no cables or pipes etc. under
the surface of the wall where you want to drill the holes.
Drill two holes whose distance apart corresponds to the bracket to be
used, insert the screws and allow them to project 5 mm from the wall.
Position the telephone on the bracket, fit the screws in the slots and slide
the telephone downwards a little.
Turn the receiver hook (4) in the receiver cradle 180° so that the receiver
can be hooked in.
3
1
3
2
4
4
4
4
4
6
Service−Hotline: Tel. 0844 800 6503
Page 7

3 Operating Elements
Telephone
1 Call back button
2 One−touch dialling
button M1
(emergency call number 1)
3 Delete
4 One−touch dialling
button M2
(emergency call number 2)
5 Scroll upwards
6 Quick dial button
7 Scroll downwards
1
8 Calls list (CID
Cancel
) /
2
9 New call indication
10 Phone book
11 Save number button
12 R button
The buttons in this operating manual are depicted with a uniform contour.
Variations in the symbols on the telephone buttons compared to those
depicted here are possible.
2
Each process is automatically cancelled if no input is made
within a period of 60 seconds or if the CID button is pressed.
13 Redial button
14 LED, telephone is
ringing
15 LED, handsfree mode
16 Handsfree mode button
17 Receiver +40 dB boost
button
18 Volume boost on LED
19 Control knob,
receiver volume
(hidden under premium
handset)
20 Ringing volume"
slide control
21 Tone" slide control
22 Handsfree volume"
slide control
Operating Elements
1
2
CID: Connection Identification = Displays the number of a caller.
Service−Hotline: Tel. 0844 800 6503
7
Page 8

Operating the Telephone
4 Operating the Telephone
Display and explanation of operation sequences
Enter digits or letters
Press the button depicted briefly
2 x Press the button depicted twice, briefly
2 sec Press the button depicted for
Press and hold Press and hold the button depicted
Release Release the button depicted
Telephone rings
Lift the receiver
Replace the receiver on−hook
Text
GERMAN
The translucent digit key block is illuminated from inside as soon
or
as you lift the receiver, press a button or an incoming call is received.
2 seconds
Text flashes in the display
Text or icon in the display
Icons and texts in the display
Icon Description
On: Replace the batteries.
14:45 Display of the time.
19/09 Display of the date.
The phone book is open Page 13.
CID The calls list is open Page 14.
NEW The entry in the calls list is new Page 14.
Position number in the call list.
01
TOTAL:XXThere are XX entries in the call list.
NEW:XXThere are XX new entries in the call list.
Creating phone book entries − example
The example in Creating phone book entries explains how to navigate
and make entries in the phone book. Proceed as in this example for all the
settings.
Creating phone book entries
Open the phone book
SAVE?
,
confirm it
, Enter the phone number
, Enter the name (max. 16 letters)
SAVED
Activate the saving process and
(max. 22 digits) and confirm it
and confirm it
Entry is saved
8
Service−Hotline: Tel. 0844 800 6503
Page 9

5 Telephoning
Taking a call
, or Take the call
Ending a call
or End the call
Making a call
Enter the phone number
Following incorrect input, press to
or
It is also possible to lift the receiver first to obtain the dialling tone.
or Dial the number
The digits in the phone number then entered are dialled immediately. It is not possible to correct wrong digits individually using
this dialling procedure.
Redialling
Your telephone stores the last phone number dialled.
or , Redial the last phone number dialled
Calling back missed calls
The telephone stores the numbers of the last 32 calls received in a calls
list.
or Select an entry
or Dial the number
Dialling phone numbers from the phone book
There must be phone numbers stored in the phone book Page 13.
Open the phone book
or Select an entry
or Dial the number
(max. 22 digits)
delete the last digit
One−touch dialling
The quick dial buttons M1 or M2 can be used for normal quick dial numbers or as a memory location for automatic emergency call dialling. Phone
numbers must have been stored as quick dial numbers. Page 15.
or Press the required quick dial button
or
or Dial the number
Quick dialling
It is possible to store 10 phone numbers so that they are dialled simply by
pressing three buttons (quick dialling).
Programming quick dial buttons
Press the Save number button
, Enter the phone number
, Enter the name (max. 16 letters)
Enter the memory location number
(max. 22 digits) and confirm it
and confirm it
(e.g. in this case, memory location 0)
Making calls using the quick dial buttons
or Lift the receiver or handsfree
Press the quick dial button
Enter the memory location number
The phone number stored is automatically dialled.
(e.g. in this case, memory location 0)
Adjusting the receiver volume
The receiver volume can be adjusted when the +40 dB volume boost button is activated.
Adjust the volume with the control knob
Telephoning
Service−Hotline: Tel. 0844 800 6503
9
Page 10

Telephoning
Increasing the receiver volume on +40 dB.
The receiver volume can be increased by pressing the left−hand side of
the loudspeaker key marked +40 dB
Increasing the volume on + 40 dB
Tone control
The tone of the receiver can be adjusted using the corresponding slide
control on the right−hand side of the housing.
Adjust the tone using the slide control
Tone adjustment is only possible when the receiver volume
+40 dB boost button is on.
Ringing volume
The ringing volume can be adjusted using the corresponding slide control
on the right−hand side of the housing.
Adjust the volume using the slide
control
Talk time display
The duration of a call is displayed in minutes and seconds during the call.
Handsfree
Use this function to listen to the caller via the loudspeaker.
Switch on handsfree mode
Deactivate handsfree mode
Adjusting the handsfree volume
The handsfree volume can be adjusted using the corresponding slide control on the right−hand side of the housing.
Adjust the volume using the slide
control
10
Service−Hotline: Tel. 0844 800 6503
Page 11

6 Private Branch Exchanges / Suppl. Services
R button on private branch exchanges
If the telephone is connected to a private branch exchange, functions such
as transferring calls and automatic call back can be used via the R button.
Please refer to the operating manual supplied with your private branch exchange to determine, whether the telephone will work properly with the exchange.
Dialling pause
In the case of private branch exchanges, it is necessary to enter an access
code to get an outside line with its corresponding dialling tone. When using some older private branch exchanges, it takes a little time before the
dialling tone becomes audible. Particularly in the case of such private
branch exchanges, it is possible to insert a dialling pause after the number
for the outside line so that the number can be dialled in a continuous process without having to wait for the dialling tone.
Insert a dialling pause
After dialling the number for the outside line, the telephone then waits
approx. 3 seconds before dialling the actual phone number.
The pause can also be entered with the phone number in the
phone book.
R button and supplementary services
Your telephone supports the supplementary services offered by your telephone network provider, such as brokering, call waiting and conference
calls. The supplementary services can be used in conjunction with the
R button. Please contact the telephone network provider with regard to
enabling the supplementary services.
3 4
P" is shown in the display.
Private Branch Exchanges / Suppl. Services
Caller number display (CID1)
If this function is available with your telephone line, the number of the
caller appears in the display when the phone rings. If the caller has suppressed transmission of his phone number, a corresponding message appears in the display. The phone number is not displayed and, as a result,
is not stored in the calls list.
The caller number display function is a supplementary service
offered by telephone network providers. Contact your network
provider for further information.
1
Service−Hotline: Tel. 0844 800 6503
CID: Connection Identification = Displays the number of a caller.
11
Page 12

Menu Structure
7 Menu Structure
Main menu
5
Press button for 4 sec to open the main menu. Press button
or to select the required setting. Press button to confirm your
selection.
LANGUAGE DEUTSCH
FRANCAIS
ENGLISH
SVENSKA
POLSKI
NORSK
SUOMI
DANSK
LCD CONTRAST LCD CONTRAST 1−4
SET TIME/DATE ,
DIALLING MODE
FLASH TIME 100, 300, 600
ENTER TIME
TONE
PULSE
,
ENTER DATE
12
Service−Hotline: Tel. 0844 800 6503
Page 13

Phone Book
8 Phone Book
Thirty−two phone numbers can be stored in the phone book together with
the associated names.
Always enter the area access code with the phone numbers so that
the telephone can also assign incoming local calls to a phone book
entry.
When the memory capacity of the phone book is used up, the
message
store another number. To create space, an existing entry must first be
deleted.
The phone book entries are arranged alphabetically. To skip to the
required phone book entry directly, enter the first letter of the
corresponding entry.
6
MEMORY FULL
appears when an attempt is made to
Entering a name
The digit keys are also labelled with letters for the entry of the respective
letters. Pressing the respective key the necessary number of times enables capital letters and digits to be entered.
Space
Delete
To enter the same letter twice, press the button to enter the letter.
Wait until the cursor skips one place forward. Enter the letter
again.
Creating phone book entries
Open the phone book
SAVE?
,
confirm it
, Enter the phone number
, Enter the name (max. 16 letters)
SAVED
Activate the saving process and
(max. 22 digits) and confirm it
and confirm it
Entry is saved
Editing entries in the phone book
Open the phone book
or Select a phone book entry
3 sec Activate the editing process
EDIT?
, Edit the phone number
, Edit the name (max. 16 letters)
, and confirm it
SAVED
7
(max. 22 digits) and confirm it
and confirm it
Entry is saved
Deleting entries from the phone book
Deleting a single entry
Open the phone book
or Select a phone book entry
DELETE?
4 sec or Confirm the deleting process
Activate the deleting process
or Cancel the deleting process
Delete all entries
Open the phone book
or Select any phone book entry
4 sec
4 sec or Confirm the deleting process
DELETE ALL?
Activate the deleting process
or Cancel the deleting process
Service−Hotline: Tel. 0844 800 6503
13
Page 14

Calls List / CID
9 Calls List / CID
A total of 32 call numbers can be stored in the calls list. The flashing red
LED indicates new calls in the calls list.
8
Displaying phone numbers in the calls list
, or Open the calls list and select an entry
Display messages:
Display Description
NEW The entry in the calls list is new.
The caller in the calls list has called several
times.
NO NUMBER The caller’s number is only received in part
PRIVATE The caller has suppressed transmission of
OUT OF AREA The call concerns an international call or it is
As soon as the phone number in the phone book has been saved
together with a name, the name entered appears in the call list.
or is erroneous. The information on the caller’s number is not available.
his number or the call is from a PBX.
from a PBX.
Storing numbers from the calls list in the phone book
A phone number stored in the calls list can be transferred directly to the
phone book.
or Open the calls list and select an entry
COPY NUMBER? Activate the copy process and
,
confirm it
SAVED
The phone number is stored in the phone book without a name being assigned. Then enter a name for the phone number. Editing entries in
the phone book Page 13.
Entry is saved
Deleting phone numbers from the calls list
Deleting phone numbers individually
or Open the calls list and select an entry
DELETE?
4 sec Confirm the deleting process
or Cancel the deleting process
Activate the deleting process
or
Deleting all the phone numbers
or Open the calls list and select an entry
4 sec
4 sec Confirm the deleting process
or Cancel the deleting process
Before deleting the phone numbers, check that the entries have
DELETE ALL?
been viewed.
Activate the deleting process
or
14
Service−Hotline: Tel. 0844 800 6503
Page 15

10 Emergency Call
The emergency call unit can be used to dial an emergency services exchange or persons for assistance.
There are several appropriate emergency service call numbers
available, such as the Red Cross, St. John’s Ambulance Brigade,
etc. In some countries emergency calls are not free of charge.
The unit can also be used for private emergency calls within the
family, for example.
Storing emergency call / quick dial numbers
The quick dial buttons M1 and M2 can be used for normal quick dial numbers or as memory locations for automatic emergency call dialling.
STORE NUMBER
,
, Enter the phone number
, Edit the name (max. 16 letters)
LOCATION?
SAVED
The phone numbers assigned to the quick dial keys cannot be
or Select the quick dial button
deleted. When storing new numbers, the existing entries are
overwritten.
Activate the saving process
(max. 22 digits) and confirm it
and confirm it
Entry is saved
9
Emergency Call
Starting the emergency call
or Select the quick dial button
or Dial the number
Service−Hotline: Tel. 0844 800 6503
15
Page 16

If Problems Occur
11 If Problems Occur
Service Hotline
Should problems arise with the telephone, please refer to the following information
first. In the case of technical problems, you can also contact our hotline service,
tel. 0844 800 6503. In the case of claims under the terms of guarantee, contact your
sales outlet. There is a 2 year period of guarantee.
Problems Reply
No telephone calls possible − The telephone line is not connec-
Some functions eg +40 dB amplifier or handsfree not working
The caller number display
1
(CID
) does not function
ted properly or is defective. Only
use the telephone connection cable supplied.
− Check the batteries are fitted and
they are not exhausted.
− The caller number display fun−
ction is a supplementary service
offered by telephone network
providers. Contact your network
provider for further information.
− The caller has suppressed the
transmission of their phone number.
16
1
CID: Calling Identification
Service−Hotline: Tel. 0844 800 6503
Page 17

12 Maintenance / Guarantee
Maintenance
Clean the housing surfaces with a soft, fluff−free cloth.
Never use cleaning agents or solvents.
Guarantee
AMPLICOM equipment is produced and tested according to the latest production methods. The implementation of carefully chosen materials and
highly developed technologies ensure trouble−free functioning and a long
service life. The terms of guarantee do not apply where the cause of
equipment malfunction is the fault of the telephone network operator or
any interposed private branch extension system. The terms of guarantee
do not apply to the batteries, rechargeable batteries or power packs used
in the products. The period of guarantee is 24 months from the date of purchase.
All deficiencies resulting from material or production faults which occur during the period of guarantee will be eliminated free of charge. Rights to
claims under the terms of guarantee are annulled following intervention by
the purchaser or third parties. Damage caused as a result of improper
handling or operation, incorrect positioning or storing, improper connection
or installation, Acts of God or other external influence are not covered by
the terms of guarantee. In the case of complaints, we reserve the right to
repair or replace defect parts or provide a replacement device. Replacement parts or devices become our property. Rights to compensation in the
case of damage are excluded where there is no evidence of intent or
gross negligence by the manufacturer.
If your equipment shows signs of defect during the period of guarantee,
please return it to the sales outlet in which you purchased the AMPLICOM
equipment together with the purchase receipt. All rights to claims under
the terms of guarantee in accordance with this agreement must be asserted exclusively with regard to your sales outlet. Two years after the purchase and transfer of our products, claims under the terms of guarantee
can no longer be asserted.
Maintenance / Guarantee
Declaration of Conformity
This device fulfils the requirements stipulated in the EU
directive:
1999/5/EU directive on radio equipment and telecommunications terminal equipment and the mutual recognition of their
conformity. Conformity with the above mentioned directive is
confirmed by the CE symbol on the device.
To view the complete Declaration of Conformity, please refer to
the free download available on our web site www.amplicom.eu.
Service−Hotline: Tel. 0844 800 6503
17
Page 18

Index
13 Index
C
Caller number display, 11
Calling back missed calls, 9
Calls list, 14
CID, 14
Connecting the telephone, 5
Contrast setting, 12
Creating phone book entries, 8, 13
D
Date, 6
Date and time setting, 12
Declaration of Conformity, 17
Deleting entries from the phone book, 13
Deleting phone numbers
from the calls list, 14
Dialling pause, 11
Dialling phone numbers
from the phone book, 9
Display, 8
Displaying phone numbers
in the calls list, 14
E
Editing entries in the phone book, 13
Emergency call unit, 15
Ending a call, 9
Entering a name, 13
Explanations, 8
G
Guarantee, 17
H
Handsfree, 10
Handsfree volume, 10
I
Icons and texts in the display, 8
Inserting batteries, 6
L
Language setting, 12
M
Main menu, 12
Maintenance, 17
Making a call, 9
Making calls using
the quick dial buttons, 9
Menu structure, 12
O
One−touch dialling, 9
Operating elements, 7
Operating the Telephone, 8
P
Package contents, 5
Phone book, 13
Private branch exchanges, 11
Programming quick dial buttons, 9
Putting the telephone into operation, 5
Q
Quick dialling, 9
R
R button and supplementary services, 11
R button on private branch exchanges, 11
Receiver volume, 9
Redialling, 9
Reinforcement the receiver volume
on +40 dB. , 10
Ringing volume, 10
S
Safety information, 4
Service Hotline, 16
Storing emergency call numbers, 15
Storing numbers from the
calls list in the phone book, 14
Storing quick dial numbers, 15
Supplementary services, 11
T
Taking a call, 9
Talk time, 10
Telephoning, 9
Time, 6
Tone control, 10
W
Wall installation, 6
18
Service−Hotline: Tel. 0844 800 6503
Page 19

Notes
Notes
19
Page 20

Important Notes on the Guarantee
The period of guarantee for the AMPLICOM product begins on the date of purchase. Rights to claims under the terms of guarantee relate to deficiencies resulting from
material or production faults. Rights to claims under the terms of guarantee are annulled following intervention by the purchaser or third parties. Damage caused as a
result of improper handling or operation, normal wear and tear, incorrect positioning or storing, improper connection or installation, Acts of God or other external influence
are not covered by the terms of guarantee.
CLAIMS UNDER THE TERMS OF GUARANTEE MAY ONLY BE ASSERTED
TO THE RETAILER WHERE THE EQUIPMENT WAS PURCHASED,
WHEREBY THE PURCHASE RECEIPT MUST ALSO BE SUBMITTED.
TO PREVENT UNNECESSARY LONG DELAYS, PLEASE DO NOT SEND
EQUIPMENT UNDER COMPLAINT TO OUR OFFICE ADDRESS.
IN THE CASE OF QUESTIONS CONCERNING OPERATION OR THE TERMS
OF GUARANTEE, PLEASE REFER TO THE OPERATING MANUAL OR
CONTACT OUR HOTLINE:
0844 800 6503
AUDIOLINE GmbH
Neuss
Internet: www.amplicom.eu − E−mail: info@audioline.de
Version 1.1 − 16.10.2008
 Loading...