

Page 1
User
Guide
Answering
Machine
AB 900
Page 2

2
CONTENTS
Important Safety Instructions ...........5
Getting Started ...................................7
Answering Machine Functions ..........9
Remote Access .................................. 15
Help and Support .............................. 21
Technical details ................................20
Maintenance and Warranty ..............20
Instructions available in other languages at
www.amplicomusa.com.
Important Safety Instructions
When using your telephone equipment, basic safety
precautions should always be followed to reduce the risk
of re, electric shock and injury to persons, including the
following:
1. Do not use this product near water, for example, near
a bath tub, wash bowl, kitchen sink or laundry tub, in a
wet basement or near a swimming pool.
2. Avoid using this product (other than a cordless type)
during an electrical storm. There may be a remote risk
of electric shock from lightning.
3. Do not use this product to report a gas leak in the
vicinity of the leak.
4. Use only the power adapter indicated in this manual.
Do not dispose of batteries in a re. They may
explode. Check with local codes for possible special
disposal instructions.
SAVE THESE INSTRUCTIONS
Page 3

The FC C requ ires th at you ar e to be ad vise d of cer tain requir emen ts invo lving t he use o f this eq uipme nt.
1. This eq uipme nt com plies w ith Par t 68 of the FCC r ules an d the re quire ment s adop ted by t he ACTA. O n the bo tto m of
this eq uipme nt is a lab el tha t cont ains , among o ther in forma tion, a p rodu ct ide nti er i n the for mat US: AA AEQ##T XX XX. If
reque ste d, this n umber m ust b e provi ded to t he tele phon e comp any.
2. An app lica ble ce rti cati on jack s Unive rsal S erv ice Or der C odes (U SOC) for t he equ ipmen t is prov ided (e .g., RJ11C) in the
pack aging w ith ea ch pie ce of ap prove d termi nal equ ipmen t.
3. A plug a nd jac k used t o conne ct th is equi pmen t to the pr emis es wir ing and te leph one ne twor k mus t comp ly wit h the
appli cabl e FCC Par t 68 rules and r equir emen ts ad opted b y the AC TA. A comp liant t elep hone c ord and m odula r plug
is prov ided w ith thi s prod uct . It is de signe d to be c onnec ted to a compat ible m odular j ack th at is al so com pliant . See
inst allat ion ins truc tions for det ails .
4. The R EN is use ful to d eter mine th e quant ity o f devi ces you m ay con nec t to your te leph one lin e and st ill have al l of thos e
devic es rin g when y our numb er is c alled . In mos t, but n ot all ar eas, t he sum of t he REN of a ll devi ces sh ould no t exce ed ve
(5.0). To be ce rta in of the n umbe r of devi ces yo u may co nnec t to your li ne, as d eter mined b y the REN, y ou sho uld cal l your
loca l telep hone c ompan y to det ermin e the ma ximum R EN for your c alling area.
NOTIC E: If you r home ha s spec ially w ired a larm e quipm ent co nnec ted to t he tele phon e line, en sure t he ins talla tion of t his
equip ment d oes no t disab le your a larm eq uipme nt. If y ou have q uest ions ab out wh at will d isab le alar m equip ment , cons ult
your tel epho ne comp any or a qu ali ed in sta ller.
5. If you r produ ct eq uipme nt cau ses ha rm to the t elep hone ne two rk, th e tele phon e compa ny may di scon tinue y our ser vice
tempo raril y. If pos sible , they w ill noti fy yo u in adva nce. B ut if ad vanc e notic e is not p rac tica l, you wil l be not i ed as so on as
poss ible. You w ill be ad vise d of your r ight to le a c ompl aint wi th the F CC.
6. Your tele phon e comp any may ma ke chan ges to i ts fa cilit ies, e quipm ent, op era tions o r proc edur es that c ould affe ct
the pro per op erat ion of you r equip ment . If the y do, you w ill be gi ven adv ance n otic e so as to gi ve you an o ppor tuni ty to
maint ain unin terr upte d ser vice .
7. If you expe rien ce tro uble wi th this e quip ment , pleas e con tac t the Amp lico m Ser vice C ente r at 1-8 66 -AMP LICO M (267-
5426) f or rep air/w arran ty in forma tion . The te lepho ne com pany ma y ask you t o disc onne ct thi s equip ment f rom the n et work
until th e prob lem has b een c orre cte d or you are s ure th at the e quipm ent is no t malf unct ionin g.
8. Thi s equip ment ma y not be u sed on c oin ser vice provi ded by t he tele phon e compa ny. Conn ecti on to par ty lines is
subje ct to s tate t arif fs. (Conta ct you r sta te publ ic util ity c ommis sion o r corp orati on com missi on for in forma tion .)
This de vice c ompl ies wi th Par t 15 of the FC C Rule s. Ope rati on is sub ject t o the fo llowi ng two c ondi tions : (1) This devi ce
may not c ause h armf ul inter ference, a nd (2) thi s devic e mus t acc ept any i nter fere nce r ecei ved, in clud ing int erf eren ce
that ma y caus e unde sired o pera tion. P riva cy of co mmuni cati ons may n ot be en sure d when u sing th is phon e. Chan ges or
modi c ation s not ex pres sly ap prove d in wri ting by A mplic om may vo id the u ser’s au thor ity t o opera te thi s equip ment .
NOTE: T his equ ipmen t has be en tes ted and found t o compl y with t he limi ts for a C lass B d igita l devi ce, pur suant to
Part 15 of t he FCC r ules . The se limit s are designe d to prov ide re ason able pr otec tion against h armf ul inte rfe renc e in a
resid enti al ins talla tion. T his eq uipme nt gen erat es, us es, and c an radiate ra dio fr equen cy ene rgy an d, if no t inst alled a nd
used in a cco rdanc e wit h the ins truc tions, may ca use har mful in ter fere nce to r adio c ommun icat ions . Howev er, there i s no
guaran tee th at int erf erenc e will not occu r in a par ticu lar ins tall ation . If this e quipm ent do es ca use har mful in ter fere nce
to radi o or tele visio n rec eptio n, whic h can b e dete rmine d by tur ning th e equip ment of f and on, the use r is enc oura ged to
try to c orre ct th e inter ference by o ne or mor e of the f ollow ing mea sure s: (1) Reorie nt or re loca te the r ecei ving an tenn a. (2)
Incre ase th e sepa rati on bet ween the equi pment a nd rec eive r. (3) Conne ct th e equip ment in to an ou tlet on a c ircu it dif ferent
from th at to wh ich th e rece iver is c onnected . (4) Cons ult the d eale r or an exp erie nced r adio T V technicia n for hel p.
FCC Compliance
CONTENTS
3
Page 4

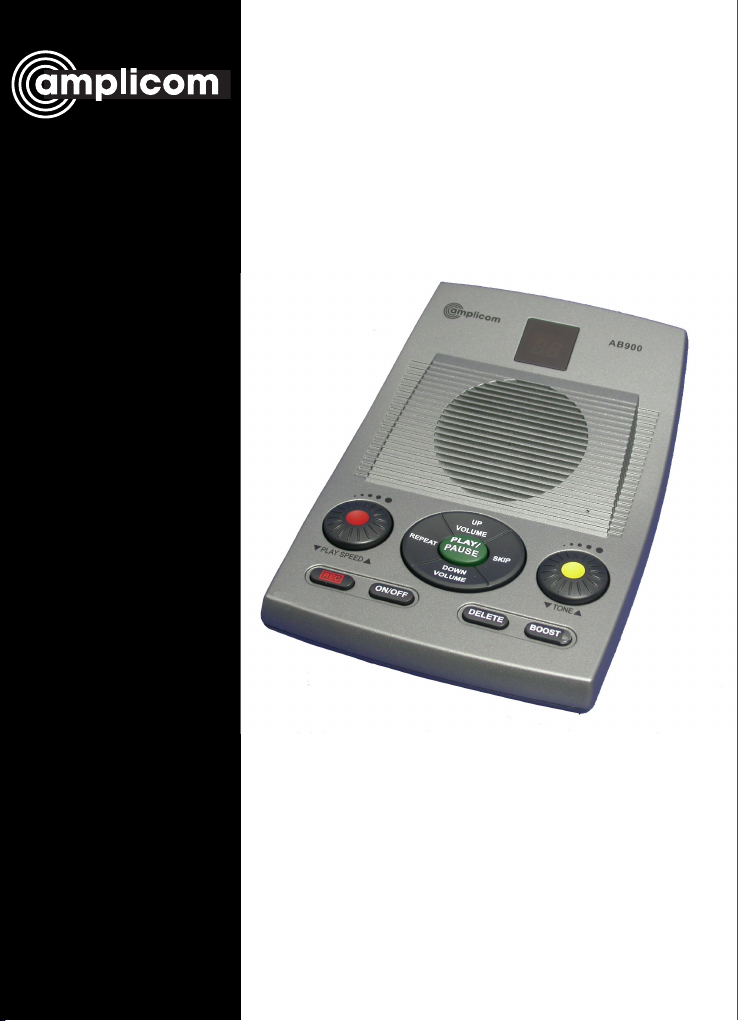
AB 900 Answering Machine
1
4
6
7
8
10
11
12
13
14
15
16
17
18
2
5
3
9
1
Display window
2
Speaker
3
Microphone
4
Volume up
5
Next message
6
Tone control
7
Boost on / off
8
Delete
9
Play / pause
10
Volume down
11
On / off / stop
12
Record
13
Speed control
14
Previous message
15
Power adapter
socket
16
Headset jack
17
Ring delay switch
18
Telephone line jack
ANSWERING MACHINE GUIDE
4
Service Center
Page 5

Intended use
This answering machine is suitable for use on a public
telephone network. Any other use is considered
unintended use. Unauthorized modi cation or
reconstruction is not permitted. Do not open the device
and attempt any repair work yourself.
Installation location
Locate answering machine:
• On a dry, at and stable surface
• Where the power cable will not be a trip hazard
• Where it is not obstructed by furniture
• At least three feet from other electrical appliances
• Away from smoke, dust, vibration, chemicals, moisture,
heat or direct sunlight
SAFETY
1-866-AMPLICOM (267-5426)
5
Page 6
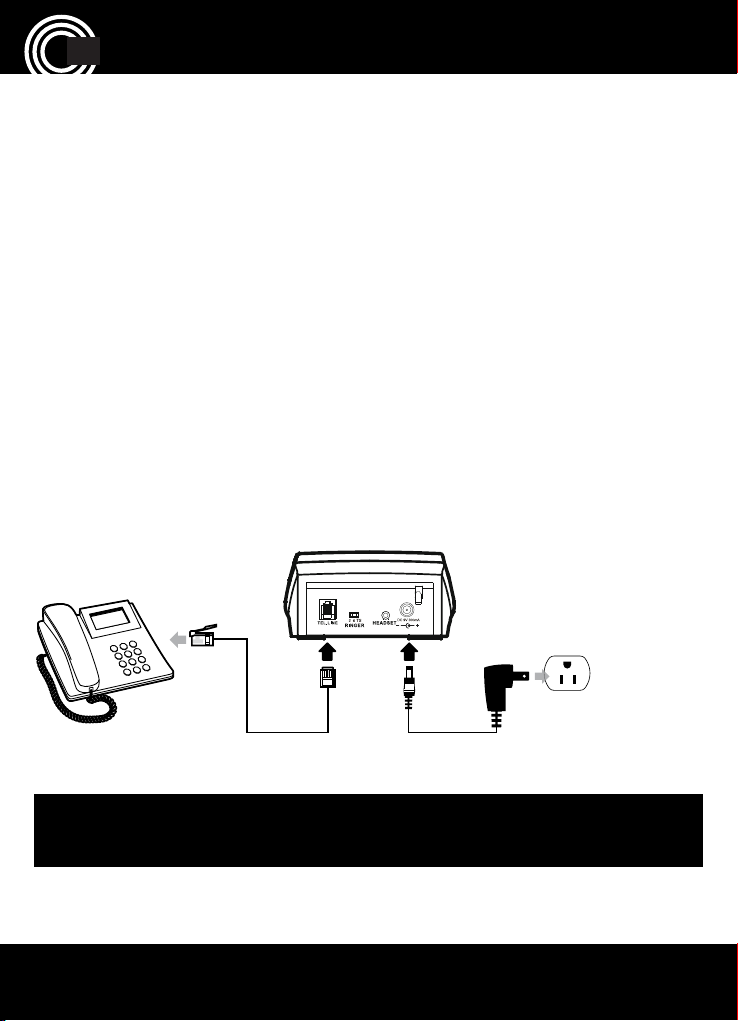
Getting Started — Included Equipment
• 1 Answering Machine
• 1 Power Adapter
• 1 Telephone Cable
Setup
Connect answering machine
1. Plug the power adapter into the back of the answering
machine and the other end into a wall socket. Turn the
power on.
2. Plug the telephone cable into the TEL.LINE jack on the
back of the answering machine and the other end into
the phone. If your phone does not have a second jack, a
line splitter may be necessary.
Important: Use only Power Adapter model U090030D
supplied by Ten Pao Industrial Co., Ltd. for unit.
The answering machine is now ready for use!
GETTING STARTED
6
Service Center
Page 7

GETTING STARTED
Display window icons
The following icons may appear in the display window:
-- (steady) answering machine off
-- ( ashing) alternating with 00 or any other
number: answering machine is on, day
and time are not set
00 to 99 (steady) number of messages (already played)
00 to 99 ( ashing) number of messages (not yet played)
R1 (steady) recording outgoing message
R1 ( ashing) 10 seconds of recording time remaining
FL memory is full
L
n
Remote access
PA Pause of currently playing message
Set the day and time
The answering machine always saves the day of the
week and the time of day with each recorded message to
identify when callers left their messages.
1. Press and hold the
button for two seconds. The
speaker announces the day of the week that is currently
set.
2. Press the
button until the correct day of the week is
1-866-AMPLICOM (267-5426)
7
Page 8

announced.
3. Press the
button. The speaker announces the hour
that is currently set.
4. Press the
button until the correct hour is announced.
5. Press the
button. The speaker announces the minute
that is currently set.
6. Press the
button until the correct minute is
announced.
7. Con rm the selection by pressing the
button. The
complete day and time setting is announced.
The day and time can be checked at any time by pressing
the button.
Set the language
1. Press and hold the
button for two seconds. The
display shows the language currently set.
2. Press the
button until the desired language is
displayed and press the
button to con rm the
selection.
Note: If there is a pause of more than 20 seconds
while entering the day, time, and language, the settings will not be saved.
GETTING STARTED
8
Service Center
Page 9

Answering machine functions
Record, change, or delete the greeting
message
The answering machine comes with a pre-recorded,
standard greeting message that will play by default
when the answering machine picks up a call. Otherwise,
a custom greeting of up to 60 seconds can be recorded to
replace the standard greeting.
Example of a greeting message: Hello, you have reached
555-1234. We are unavailable to take your call at the
moment. Please leave a message after the tone.
Wording of the standard greeting: Hello. I am sorry but we
are unable to answer your call personally at the moment.
Please leave your message and telephone number after
the tone.
The length of any custom greeting must be at least three
seconds and must not exceed 60 seconds. Please note that
the longer the custom greeting is, the less recording time
will be available for incoming messages. The maximum
recording time available, including messages and the
custom greeting, is approximately 15 minutes.
ANSWERING MACHINE FUNCTIONS
1-866-AMPLICOM (267-5426)
9
Page 10

Recording a custom greeting
1. Press and hold the button until the recording tone
sounds. Continue holding down the button.
2. Start the greeting immediately after hearing the
tone. The display will show R1 during the recording.
Keep a distance of approximately six inches from the
microphone while recording. The display will ash
R1
during the last ten seconds available for recording to
indicate that recording time is nearly over.
3. Release the
button when nished recording. The
greeting is played back automatically.
4. The display will show
R1 to indicate that the volume
for the custom message can be adjusted. Use the UP
VOLUME and DOWN VOLUME buttons to adjust the
volume.
Play back the custom greeting at any time by brie y
pressing the
button.
Deleting the custom greeting
1. Press and hold the button until the recording tone
sounds, and immediately release the button.
2. The pre-recorded standard greeting will play, indicating
that the custom greeting has been deleted.
ANSWERING MACHINE FUNCTIONS
10
Service Center
Page 11

Setting up the ring delay
Use the slide switch on the back of the answering machine
to set how many times the phone rings before incoming
calls are answered.
2 The call is answered after two rings.
6 The call is answered after six rings.
TS (Toll Saver) Incoming calls are answered after six
rings until the rst new message has been recorded. Once
a message has been recorded the answering machine will
answer after approximately two rings.
Note: The Toll Saver function enables the user to check
remotely whether any new messages are available on
the answering machine without incurring a toll charge.
See “Toll-free remote pre-access” for more information.
General operation
Switch the answering machine off (standby) or on using
the
button. When the answering machine is off, the
display shows
-- for standby and no messages will be
recorded.
The maximum length for incoming messages is 120
seconds. If the caller speaks for longer, a signal tone
sounds and the call is cut off. If there is a pause of
ANSWERING MACHINE FUNCTIONS
1-866-AMPLICOM (267-5426)
11
Page 12

more than seven seconds during recording, the call is
automatically terminated with a signal tone. If memory is
full, the display window shows
FL and no more calls will
be recorded unless existing messages are deleted.
Listen to incoming messages
The integrated speaker makes it possible to listen to
incoming calls as they are being recorded. Use the UP
VOLUME and DOWN VOLUME buttons to adjust the
speaker volume. To mute the incoming call volume, press
the DOWN VOLUME button repeatedly.
Interrupt the answering machine
To intervene while a message is recording, pick up
the telephone receiver. The answering machine will
immediately stop recording.
Listen to messages
The display window shows the total number of messages
recorded, including notes (MEMO) and recorded telephone
calls.
1. To listen to messages, press the
button once.
The answering machine will begin playing any newly
recorded messages. If there are no new messages, all
recorded messages will play. If no messages have been
saved, several signal tones will sound.
ANSWERING MACHINE FUNCTIONS
12
Service Center
Page 13

2. Press the button while messages are playing to
pause the playback. If the button is pressed again within
seven seconds, playback will resume. After the last
message is played, the unit will respond with two signal
tones.
3. Stop listening to messages at any time by pressing the
button.
The speaker volume can be boosted up to +40dB max
while a message is playing by pressing the
button. The
BOOST LED will light up. Pressing the button again at any
time will revert the speaker volume back to normal level.
Use a headset (not included)
Plug a headset into the socket on the back of the unit.
For servicing or replacement, you can purchase a headset
through the service center or your retailer.
Repeat the current message
Press the button to repeat the message currently playing.
Repeat the previous message
Press and hold the button until a signal tone is played to
repeat the previous message.
Skip one message
Press the button once to skip the message currently
playing. The unit will play the next message.
ANSWERING MACHINE FUNCTIONS
1-866-AMPLICOM (267-5426)
13
Page 14

Fast forward
Press the button several times in succession to rapidly
skip several messages.
Adjust the speed of the message
Adjust the speed of the message by turning the rotary
button on the left side of the unit.
Adjust the tone of the message
Adjust the tone of the message by turning the rotary
button on the right side of the unit.
Delete one message
Press and hold the button until a signal tone sounds
while a message is playing to delete the message.
Delete all messages
After the last message is played, the unit will respond with
ANSWERING MACHINE FUNCTIONS
14
Service Center
Page 15

two signal tones. Press the button and hold until the
unit plays a nal signal tone.
Remote Access
Remote access authorization code
This answering machine allows for remote access to
incoming messages using a remote access authorization
code. This code is a three-digit number, and can be found
on the underside of the unit, labeled Remote Code.
Toll-free remote pre-access
Use the toll-free remote pre-access function to nd
out whether there are any messages on the answering
machine without incurring any toll charges.
1. Set the slide control on the back of the answering
machine to the TS position. When calling the machine
while away, the machine answers as follows:
A. If the call is answered after two rings, there are new
messages on the answering machine. See Remote
access functions for instructions on how to listen to the
new messages.
B. If no new messages have been recorded, the call will
not be answered until the sixth ring, giving time to end
the call before the answering machine answers and toll
charges are incurred.
REMOTE ACCESS
1-866-AMPLICOM (267-5426)
15
Page 16

Remote access functions
Call the phone number associated with the answering
machine and allow the greeting to play to the end. Wait
until the answering machine is ready to record a message.
After the tone, enter the remote access authorization code
on the telephone.
Two signal tones con rm that the correct code has been
entered. Select one of the functions below by pressing
the appropriate buttons on the telephone. If more than 20
seconds elapse without entering a function, the call will be
disconnected.
Replay all recorded messages Press 2 #
Replay newly recorded messages Press 2 5
Room monitoring Press 0 #
While messages are playing, the following functions are
available:
Skip to next message Press 7 #
Repeat current message Press 8 #
Repeat previous message Press 6 #
Delete current message Press 3 #
Stop current message Press # #
After the last message, the machine answers with several
signal tones. If more than 20 seconds elapse without
REMOTE ACCESS
16
Service Center
Page 17

entering a function, the call is disconnected.
Record memo Press 8 #
Repeat all messages Press 2 #
Delete all messages Press 3 #
Turn off answering machine Press 9 #
Re-record greeting using remote access
1. Call the telephone number associated with the
answering machine and allow the greeting message to
play to the end. Wait until the answering machine is
ready to record a message.
2. After the tone, enter the personal authorization code on
the telephone. Two signal tones con rm that the correct
code has been entered.
3. Press the key combination 7 #. Dictate the new greeting
after the tone.
4. End the recording by pressing 7 # again. The new
greeting will repeat automatically.
5. Finish the call by hanging up the telephone receiver.
Turning the answering machine on remotely
Using the remote access function, the answering machine
may be turned on from another telephone.
1. Call the telephone number associated with the
answering machine and let the phone ring until the call
REMOTE ACCESS
1-866-AMPLICOM (267-5426)
17
Page 18

is answered by the machine (approximately ten
rings).
2. After the tone, enter the remote access authorization
code on the telephone. Two signal tones con rm that
the correct code has been entered.
3. Press 9 # and the answering machine will be turned on.
4. Hang up the call or make use of the other remote
access functions.
Remote access with insuf cient memory
capacity
If there is no memory left for new messages, the
answering machine will no longer accept calls. To access
messages remotely in this case, proceed as follows:
1. Call the telephone number associated with the
answering machine.
2. Let the phone ring approximately ten times and the
answering machine will respond with several signal
tones.
3. Enter the remote access authorization code. Two signal
tones con rm that the correct code has been entered.
Remote access functionality is now available (see
Remote access functions).
4. Create more memory space by deleting messages.
REMOTE ACCESS
18
Service Center
Page 19

Help and support
Troubleshooting guide
Answering machine will not turn on
1. Make sure the power adapter is connected properly to
the answering machine and the power outlet.
2. Make sure that power is available at the power outlet by
plugging in another electric device.
No messages are recorded
1. Check that the telephone line is properly connected in
the telephone line socket.
2. Memory may be full. Delete messages to create
memory space.
HELP AND SUPPORT
1-866-AMPLICOM (267-5426)
19
Page 20

Disposal
The
symbol on this product indicates that electrical and
electronic apparatus must be disposed of separately from
domestic waste at suitable collection points provided by
the public waste authorities.
Packaging materials must be disposed of according to
local regulations.
Technical details
Power supply Input: 120VAC 60Hz 8W
Output: 9VDC 300mA
Optimum ambient temperature 32˚F to 113˚F (0˚C to 45˚C)
Optimum relative humidity 30% to 80%
Maintenance and Warranty
Maintenance
• Please clean your equipment’s surfaces with a soft, lintfree cloth.
• Never use cleaning agents or solvents.
Warranty
AMPLICOM equipment is produced and tested according
to the latest production methods. The implementation
of carefully chosen materials and highly developed
GENERAL INFORMATION
20
Service Center
Page 21

technologies ensure trouble free functioning and a long
service life. The terms of the warranty do not apply where
the cause of the equipment malfunction is the fault of the
telephone network operator or any interposed private
branch extension system. The terms of the warranty do
not apply to the rechargeable battery pack or power packs
used in the products. The period of warranty is 24 months
from the date of purchase.
All de ciencies resulting from material or production
faults which occur during the period of warranty will be
eliminated free of charge. Rights to claims under the terms
of warranty are annulled following intervention by the
purchaser or third parties. Damage caused as a result of
improper handling or operation, incorrect positioning or
storing, improper connection or installation, Acts of God
or other external in uence are not covered by the terms of
warranty.
In the case of complaints, we reserve the right to repair or
replace defective parts or provide a replacement device.
Replaced parts or devices become our property.
Rights to compensation in the case of damage are
excluded where there is no evidence of intent or gross
negligence by the manufacturer.
If your equipment shows signs of defect during the period
GENERAL INFORMATION
1-866-AMPLICOM (267-5426)
21
Page 22

of warranty, please return to the sales outlet in which
you purchased the AMPLICOM equipment together with
the purchase receipt. All rights to claims under the terms
of warranty in accordance with this agreement must be
asserted exclusively with regard to your sales outlet.
Two years after the purchase of our products, claims under
the terms of warranty can no longer be asserted.
Declaration of conformity
The ETL Listed Mark is an alternative to the CSA and UL
marks. ETL Testing Laboratories owned by Intertek Testing
Services (ITS) is recognized by OSHA as a
Nationally Recognized Testing Laboratory
(NRTL). ITS tests products according to nearly
200 safety and performance standards. The
ETL Listed Mark is accepted throughout
theUnited States when denoting compliance
with nationally recognized standards such as
ANSI, IEC, UL, and CSA.
This certi cation mark indicates that the product has
been tested to and has met the minimum requirements
of a widely recognized (consensus) U.S. product safety
standard, that the manufacturing site has been audited,
and that the applicant has agreed to a program of
periodic factory follow-up inspections to verify continued
conformance.
GENERAL INFORMATION
22
Service Center
Page 23

1-866-AMPLICOM (267-5426)
23
A
Authorization code 15
B
Box contents 7
C
Connecting the answering
machine 7
D
Declaration of conformity 22
Deleting messages 15
Disposal 20
I
Installation location 6
Intended use 6
L
Language 9
Listening to incoming
messages 13
M
Maintenance 20
Messages 12
O
Options during playback 15
Outgoing message 10, 17
P
Power supply 6
R
Remote access 15
Remote access functions 15
Remote code 15
Repeating a message 16
S
Safety notes 5
Skip 16
Speaker volume 15
Speed of message 16
T
Toll saver 15
W
Warranty 20
INDEX
Page 24

Contestador
automático
AB 900
Guía del
usuario
Page 25

2
CONTENIDO
Instrucciones de seguridad importantes ...... 2
Cómo comenzar .............................................. 6
Funciones del contestador automático ........9
Acceso remoto ................................................15
Ayuda y asistencia técnica ............................20
Detalles técnicos ............................................21
Mantenimiento y garantía .............................21
Las instrucciones en otros idiomas están disponibles en
www.amplicomusa.com.
Instrucciones de seguridad importantes
Cuando utilice su equipo telefónico, siga siempre las
precauciones básicas de seguridad para reducir el riesgo
de incendios, choque eléctrico y lesiones personales,
entre ellas:
1. No utilice este producto cerca del agua, por ejemplo,
bañeras, piletones o fregaderos de la cocina o el
lavadero, ni tampoco en sótanos húmedos o cerca de
una alberca.
2. Evite usar este producto durante tormentas eléctricas
(a menos que sea inalámbrico). Existe un riesgo
remoto de que un relámpago pueda provocar un
choque eléctrico.
3. No utilice este producto para reportar una fuga de gas
cerca de dicha fuga.
4. Utilice únicamente el adaptador de alimentación
indicado en este manual. No deseche las baterías
quemándolas, ya que podrían explotar. Consulte
las normas locales donde posiblemente encontrará
instrucciones especiales para desecharlas.
GUARDE ESTAS INSTRUCCIONES
Page 26

3
La FCC n os obli ga a info rmarl e de cie rto s requ isito s rela ciona dos c on el uso d el equ ipo.
1. Este eq uipo c umple c on la Se cció n 68 de la s norm as de la F CC y los r equis itos a dopt ados p or ACTA. En l a par te infe rior
de est e equip o hay una e tiqu eta qu e, ade más de ot ra inf ormac ión, c ontie ne un ide nti c ador de l prod ucto e n form ato
US:A AA EQ# #TX XXX. Si se l o pide n, debe rá pas ar es te núme ro a la co mpañí a telef ónic a.
2. En la caj a del eq uipo gur an los c ódigo s USOC (Un iver sal Ser vice Order C ode s) de con ect ores c ert i cad os, por e jemp lo
RJ11C, para ca da piez a de equ ipo te rminal a prob ada.
3. El enc hufe y e l cone ctor u tiliz ados p ara co nect ar este equip o al cab lead o y la red t elef ónica d e cada s itio d eben c umpli r
con la Se cci ón 68 de l as norm as de la F CC y los r equis itos a dopt ados p or ACTA que c orre spon dan. C on est e prod uct o se
entre ga un ca ble te lefón ico c on ench ufe mo dular h omolo gado. E stá d iseña do par a cone cta rse a un c onec tor modular
compa tibl e que tam bién e sté ho molog ado. C onsul te las i nstr ucc iones d e inst alac ión par a ver los d eta lles.
4. El REN (nú mero de e quiv alenc ia de lla madas ) es útil p ara de term inar cuá ntos d ispo sitiv os se pu eden c onec tar a una
línea te lefó nica d e modo q ue todo s ello s suene n cuan do se re ciba un a llama da. En la ma yoría d e las áre as, au nque no e n
todas , la suma d e los nú meros R EN de tod os los d ispo siti vos no de be ser s uper ior a cin co (5.0 ). Para c on rmar e l númer o
de disp osit ivos qu e pued e cone cta r a su líne a, seg ún el núm ero REN , llame a la c ompa ñía tel efóni ca loc al y pregunte c uál
es el REN m áximo p ara su á rea.
NOTA: Si su c asa di spon e de un sis tema de alarma s con un c able ado es peci al con ect ado a la lí nea tel efón ica, a segúr ese d e
no des acti var dic ho sis tema a l inst alar e ste eq uipo. S i tiene a lguna p regun ta ac erca d e qué pu ede de sac tivar e l sist ema de
alarma s, con sult e con su c ompa ñía tel efóni ca o con u n inst alad or cual i cad o.
5. Si su eq uipo d aña la re d tele fónic a, la co mpañí a tele fónic a podr ía des cone cta r temp oralm ente s u ser vicio . Si es po sible ,
se lo not i carán antes d e hace rlo. Si n o, se lo no ti car án tan p ronto c omo sea posib le. Us ted se rá inf ormad o de su de rech o
a pres enta r una que ja ante la F CC.
6. Su co mpañía t elef ónic a pued e efec tuar cambio s en sus in sta lacio nes, e quipo s, ope raci ones o p roce dimie ntos q ue
podrí an alte rar el f unci onamie nto co rrec to de su equipo . Si lo hac en, le av isar án por a delan tado p ara dar le la op ortu nidad
de mant ener e l ser vicio s in inte rrup cion es.
7. Si tiene alg ún prob lema c on es te equi po, llam e al Cen tro de S erv icio d e Ampli com al 1- 866-AM PLIC OM (267- 542 6) para
pedir i nform ació n sobre l as rep arac ione s y la gara ntía. L a comp añía te lefó nica p uede p edirl e que de scon ect e este e quip o
de la red h ast a que el pr oble ma se co rrija o h ast a que us ted es té seg uro de q ue el equ ipo no e stá f uncio nand o mal.
8. Est e equip o no pue de uti lizar se con e l ser vici o de mon edas p rovis to por l a comp añía tel efón ica. L a cone xión a lín eas
compa rti das es tá suj eta a la s tari fas es tatales. (C onsulte con l a comis ión de s erv icios p úbli cos es tat ales o d e la empr esa
para ob tene r más inf orma ción.)
Este e quipo c umpl e con la Se cci ón 15 de las n ormas d e la FCC . El fun ciona mient o est á suje to a las do s cond icion es
siguie ntes : (1) este dis posi tivo no p uede c ausar inter fer encia s perj udic iales , y (2) est e disp ositi vo deb e acep tar la s
inter efer enci as rec ibida s, inc luida s aque llas que p uede n provo car un f unci onamie nto er ráti co. La p riva cidad d e las
comun icac ione s no pue de gara ntiza rse c uando s e usa es te teléfono . Los ca mbios o m odi c acion es no ap roba dos
expre same nte po r Ampli con en f orma e scri ta pue den an ular la au torid ad del u suari o para u tiliz ar est e equip o.
NOTA: Las p rueb as rea lizad as en es te equipo per mite n a rmar qu e cump le con l os límit es de un d ispo sitiv o digit al de
Clase B , según l o est ipulad o en la Se cci ón 15 de las n ormas d e la FCC . Esto s límit es es tán de nidos p ara ofr ece r una
prote cci ón razo nable c ontr a inter ferencia s perj udici ales e n una ins tala ción r eside ncia l. Est e equip o gene ra, ut iliza y pu ede
emiti r energ ía de rad iofr ecue ncia y, si n o se ins tala y u tiliza d e acue rdo c on las in stru ccio nes, p uede c ausa r inter ferencia s
perju dicia les en l as rad ioco munic acion es. N o obst ante , es impo sibl e garan tizar q ue no se p rodu cirán in ter fere ncia s en una
inst alaci ón en par ticular. Si es te equi po cau sa int erf eren cias p erjud icial es en la r ecep ción de señal es de ra dio o tel evisi ón,
las cua les pu eden d etec tarse al apa gar y enc ende r el equ ipo, el us uari o pued e trat ar de co rregi r el prob lema t omand o una
o más de la s sigui ente s medid as: (1) Reori enta r o reub icar la a nten a rece ptor a. (2) Aume ntar l a sepa raci ón entr e el equ ipo
y el rec epto r. (3) Conec tar el equipo e n un enc hufe d e un circ uito d ifer ente al q ue est á conecta do el re cept or. (4) Cons ulta r
con el di str ibuido r o con un t écni co de ra dio y tel evis ión cua li cad o.
Cumplimiento de las normas de la FCC
CONTENIDO
Page 27

Centro de servicio
4
Contestador automático AB 900
1
4
6
7
8
10
11
12
13
14
15
16
17
18
2
5
3
9
1
Pantalla
2
Altavoz
3
Micrófono
4
Subir volumen
5
Mensaje siguiente
6
Control de tono
7
Activar / desactivar
elevación de volumen
8
Eliminar
9
Reproducir / pausar
10
Bajar volumen
11
Encender / apagar /
detener
12
Grabar
13
Control de velocidad
14
Mensaje anterior
15
Enchufe del
adaptador de
alimentación
16
Conector de los
auriculares
17
Selector de retardo de
respuesta a llamada
18
Conector de línea
telefónica
GUÍA DEL CONTESTADOR AUTOMÁTICO
Page 28

1-866-AMPLICOM (267-5426)
5
Uso previsto
Este contestador automático es apto para utilizarse en una
red telefónica pública. Todo uso diferente se considera
como uso no previsto. La reconstrucción o modi cación
sin autorización está prohibida. No abra el dispositivo ni
intente repararlo.
Sitio para la instalación
Coloque el contestador automático:
• Sobre una super cie plana, seca y estable
• Donde nadie pueda tropezar con el cable de
alimentación
• Donde no quede obstruido por ningún mueble
• A una distancia mínima de 3 pies (90 cm) de otros
electrodomésticos
• Lejos de áreas donde haya humo, polvo, vibraciones,
productos químicos, humedad, calor o exposición
directa al sol
SEGURIDAD
Page 29

Centro de servicio
6
Cómo comenzar — Equipo incluido
• 1 Contestador automático
• 1 Adaptador de alimentación
• 1 Cable telefónico
Instalación
Conecte el contestador automático
1. Enchufe el adaptador de alimentación en la parte
posterior del contestador automático y el otro extremo
en un wall socket. Encienda el contestador automático.
2. Enchufe el cable telefónico en el conector TEL.LINE
en la parte posterior del contestador automático y el
otro extremo en el teléfono. Si su teléfono no tiene dos
conectores, es posible que necesite un divisor.
Importante: Con esta unidad sólo se debe utilizar
el adaptador de alimentación modelo U090030D
suministrado por Ten Pao Industrial Co., Ltd.
El contestador automático está ahora listo para usar.
CÓMO COMENZAR
Page 30

1-866-AMPLICOM (267-5426)
7
CÓMO COMENZAR
Iconos de la pantalla
En la pantalla pueden aparecer los siguientes iconos:
-- ( jo) el contestador automático
está apagado
-- (parpadeante) si alternan con 00 o cualquier otro
número: el contestador automático
está encendido, pero no se ha
establecido la fecha ni la hora
00 a 99 ( jo) cantidad de mensajes
(ya reproducidos)
00 a 99 (parpadeante) cantidad de mensajes
(sin reproducir)
R1 ( jo) grabación de mensaje saliente
R1 (parpadeante) quedan 10 segundos
de grabación
FL la memoria está llena
L
n
acceso remoto
PA pausa del mensaje que
está reproduciéndose
Cómo establecer el día y la hora
El contestador automático siempre guarda el día de la
semana y la hora del día de cada mensaje grabado para
identi car el momento en que se recibió.
1. Oprima el botón
durante dos segundos. El
altavoz anunciará el día de la semana establecido
en ese momento.
Page 31

Centro de servicio
8
2. Oprima el botón hasta que se anuncie el día correcto.
3. Oprima el botón
. El altavoz anunciará la hora
establecida en ese momento.
4. Oprima el botón
hasta que se anuncie la hora correcta.
5. Oprima el botón
. El altavoz anunciará el minuto
establecido en ese momento.
6. Oprima el botón
hasta que se anuncie el
minuto correcto.
7. Con rme las opciones seleccionadas oprimiendo el
botón
. El altavoz anunciará el día y la
hora establecidos.
El día y la hora pueden comprobarse en cualquier
momento oprimiendo el botón
.
Como con gurar el idioma
1. Oprima el botón durante dos segundos. La pantalla
mostrará el idioma establecido en ese momento.
2. Oprima el botón
hasta que aparezca el idioma
que desea y luego oprima el botón
para con rmar
la selección.
Nota: Si realiza una pausa de más de 20 segundos
mientras ingresa el día, la hora y el idioma, los
valores no se guardarán.
CÓMO COMENZAR
Page 32

1-866-AMPLICOM (267-5426)
9
Funciones del contestador
automático
Cómo grabar, cambiar o borrar el mensaje
de saludo
El contestador automático se entrega con un mensaje
de saludo estándar pregrabado que se reproduce de
forma predeterminada cuando se contesta una llamada.
Si se desea cambiar el saludo estándar, se puede grabar
otro mensaje personalizado de hasta 60 segundos para
utilizarlo en su lugar.
Ejemplo de un mensaje de saludo: Hola, ha llamado al
555-1234. No podemos contestar su llamada en este
momento. Por favor, deje su mensaje después del tono.
Texto del mensaje estándar: Hello. I am sorry but we are
unable to answer your call personally at the moment.
Please leave your message and telephone number after
the tone. (Hola. Sentimos no poder contestar su llamada
en este momento. Por favor, deje su mensaje y su número
de teléfono después del tono.)
La duración del mensaje de saludo personalizado debe ser
entre 3 y 60 segundos. Recuerde que cuanto más largo
sea el mensaje de saludo personalizado, menos tiempo
quedará para grabar los mensajes entrantes. El máximo
FUNCIONES DEL CONTESTADOR AUTOMÁTICO
Page 33

Centro de servicio
10
tiempo de grabación disponible, incluidos los mensajes y
el saludo, es de aproximadamente 15 minutos.
Cómo grabar un saludo personalizado
1. Oprima el botón hasta que escuche el tono de
grabación. Mantenga el botón oprimido.
2. Comience a grabar el saludo tan pronto como escuche
el tono. Durante la grabación, la pantalla mostrará
R1. Mantenga el micrófono a una distancia de
aproximadamente 6 pulgadas (15 cm) mientras graba.
En la pantalla,
R1 comenzará a parpadear durante los
últimos 10 segundos para indicar que el tiempo de
grabación se está acabando.
3. Cuando termine de grabar, suelte el botón
. El saludo
se reproducirá automáticamente.
4. La pantalla mostrará
R1 para indicar que se puede
ajustar el volumen del mensaje personalizado. Use
los botones UP VOLUME (Subir volumen) y DOWN
VOLUME (Bajar volumen) para ajustar el volumen.
Oprima el botón para repetir el saludo personalizado en
cualquier momento.
Cómo borrar un saludo personalizado
1. Oprima el botón hasta que escuche el tono de
grabación y suéltelo inmediatemente al escucharlo.
FUNCIONES DEL CONTESTADOR AUTOMÁTICO
Page 34

1-866-AMPLICOM (267-5426)
11
2. Se reproducirá el saludo estándar pregrabado para
indicar que se ha borrado el saludo personalizado.
Cómo con gurar el retardo de respuesta
a llamada
Utilice el selector deslizante en la parte posterior del
contestador automático para de nir cuántos tonos de
llamada deben registrarse antes de contestar una llamada
entrante.
2 La llamada se responde después de dos tonos.
6 La llamada se responde después de seis tonos.
TS (Modo de ahorro) Las llamadas entrantes se
responden después de seis tonos hasta que se graba el
primer mensaje nuevo. Una vez que se ha grabado un
mensaje, el contestador automático responderá después
de aproximadamente dos tonos.
Nota: La función Toll Saver (modo de ahorro) permite
al usuario comprobar en forma remota si tiene nuevos
mensajes en su contestador automático sin cargo
alguno. Consulte la sección "Preacceso remoto sin
cargo" para obtener más información.
FUNCIONES DEL CONTESTADOR AUTOMÁTICO
Page 35

Centro de servicio
12
Funcionamiento general
Para encender o apagar (poner en modo de espera)
el contestador automático, use el botón
. Cuando el
contestador automático está apagado, la pantalla
mostrará el signo -- del modo en espera y no se grabará
ningún mensaje.
La duración máxima para los mensajes entrantes es de
120 segundos. Si el mensaje se prolonga más tiempo,
sonará un tono de señal y se cortará la llamada. Si se
produce una pausa de más de 7 segundos durante la
grabación, la llamada terminará automáticamente con
un tono de señal. Si la memoria se llena, la pantalla
mostrará
FL y no se grabarán más mensajes hasta que
se borren los existentes.
Cómo escuchar los mensajes entrantes
El altavoz incorporado permite escuchar los mensajes
entrantes a medida que se graban. Use los botones
UP VOLUME (Subir volumen) y DOWN VOLUME (Bajar
volumen) para ajustar el volumen del altavoz. Para
silenciar el volumen de una llamada entrante, oprima
varias veces el botón DOWN VOLUME.
FUNCIONES DEL CONTESTADOR AUTOMÁTICO
Page 36

1-866-AMPLICOM (267-5426)
13
Cómo interrumpir el contestador automático
Para intervenir mientras se está grabando un mensaje,
levante el receptor del teléfono. El contestador automático
detendrá inmediatamente la grabación.
Cómo escuchar los mensajes
La pantalla muestra el número total de mensajes grabados,
incluidas las notas (MEMO) y las llamadas grabadas.
1. Para escuchar los mensajes, oprima el botón
una sola vez. El contestador automático comenzará
a reproducir todos los nuevos mensajes grabados.
Si no hay mensajes nuevos, reproducirá todos los
mensajes grabados. Si no hay mensajes guardados, se
escucharán varios tonos de señal.
2. Para pausar la reproducción de un mensaje, oprima el
botón
mientras lo escucha. Si el botón se oprime
nuevamente durante los 7 segundos siguientes, se
reanudará la reproducción. Después de reproducir el
último mensaje, la unidad responderá con dos tonos de
señal.
3. Oprima el botón
para dejar de escuchar los mensajes
en cualquier momento.
El volumen del altavoz puede ampliarse hasta los +40 dB
mientras el mensaje se reproduce; para hacerlo, oprima el
botón . Se encenderá el indicador LED de elevación de
FUNCIONES DEL CONTESTADOR AUTOMÁTICO
Page 37

Centro de servicio
14
volumen. Al oprimir el botón nuevamente, el volumen del
altavoz volverá al nivel normal.
Cómo usar auriculares (no incluidos)
Conecte los auriculares en el enchufe en la parte
posterior de la unidad.
Puede comprar unos auriculares a través del centro de
servicio o de su distribuidor. Póngase en contacto con
ellos también si necesita reparar o reemplazar
los auriculares.
Cómo repetir el mensaje actual
Para repetir el mensaje que está reproduciéndose, oprima
el botón
.
Cómo repetir el mensaje anterior
Para repetir el mensaje anterior, oprima el botón hasta
escuchar un tono.
Cómo saltar un mensaje
Para saltar el mensaje que está reproduciéndose, oprima
una vez el botón
. La unidad reproducirá el mensaje
siguiente.
Cómo avanzar de forma rápida
Para saltar rápidamente varios mensajes, oprima el botón
varias veces seguidas.
FUNCIONES DEL CONTESTADOR AUTOMÁTICO
Page 38

1-866-AMPLICOM (267-5426)
15
Cómo ajustar la velocidad del mensaje
Para ajustar la velocidad del mensaje, gire el botón
rotatorio ubicado en el lado izquierdo de la unidad.
Cómo ajustar el tono del mensaje
Para ajustar el tono del mensaje, gire el botón rotatorio
ubicado en el lado derecho de la unidad.
Cómo borrar un mensaje
Para borrar un mensaje, oprima el botón hasta
que escuche un tono de señal mientras el mensaje
se reproduce.
Cómo borrar todos los mensajes
Después de reproducir el último mensaje, la unidad
responderá con dos tonos de señal. Oprima el botón
hasta que la unidad reproduzca un tono de señal nal.
Acceso remoto
Código de autorización para acceso remoto
Este contestador automático permite el acceso remoto
a los mensajes entrantes con el uso de un código de
autorización. El código, de tres dígitos, se encuentra en
la base de la unidad bajo el rótulo Remote Code
(código remoto).
ACCESO REMOTO
Page 39

Centro de servicio
16
Preacceso remoto sin cargo
La función de preacceso remoto sin cargo le permite
averiguar si tiene mensajes en su contestador automático
sin incurrir en cargo alguno.
1. Lleve el selector deslizante en la parte posterior del
contestador automático a la posición TS. Cuando se le
llama desde un sitio remoto, el contestador automático
responde de la siguiente forma:
A. Si responde después de dos tonos de llamada, hay
nuevos mensajes en el contestador automático.
Consulte la sección Funciones de acceso remoto para
obtener instrucciones sobre cómo escuchar los nuevos
mensajes.
B. Si no hay nuevos mensajes grabados, no contesta
hasta el sexto tono de llamada, con lo que tiene tiempo
para terminar la llamada antes de que el contestador
automático responda y se incurra en un cargo.
Funciones de acceso remoto
Llame al número de teléfono asociado al contestador
automático y deje que el mensaje de saludo se reproduzca
hasta el nal. Espere hasta que el contestador automático
esté listo para grabar un mensaje. Después del tono,
ingrese el código de autorización para acceso remoto
en el teléfono.
ACCESO REMOTO
Page 40

1-866-AMPLICOM (267-5426)
17
Si el código ingresado es correcto, escuchará dos tonos
de señal. Seleccione una de las funciones siguientes
oprimiendo los botones correspondientes en el teléfono. Si
transcurren más de 20 segundos sin ingresar una función,
la llamada se desconectará.
Reproducir todos los mensajes grabados Oprima 2 #
Reproducir los nuevos mensajes grabados Oprima 2 5
Monitorización de espacio Oprima 0 #
Mientras se reproducen los mensajes,
las funciones siguientes están disponibles:
Saltar al mensaje siguiente Oprima 7 #
Repetir el mensaje actual Oprima 8 #
Repetir el mensaje anterior Oprima 6 #
Borrar el mensaje actual Oprima 3 #
Detener el mensaje actual Oprima # #
Después del último mensaje, el contestador automático
responde con varios tonos de señal. Si transcurren más
de 20 segundos sin ingresar una función, la llamada se
desconecta.
Grabar una nota (memo) Oprima 8 #
Repetir todos los mensajes Oprima 2 #
Borrar todos los mensajes Oprima 3 #
ACCESO REMOTO
Page 41

Centro de servicio
18
Apagar el contestador automático Oprima 9 #
Cómo regrabar un saludo mediante
acceso remoto
1. Llame al número de teléfono asociado al contestador
automático y deje que el mensaje de saludo se
reproduzca hasta el nal. Espere hasta que el
contestador automático esté listo para grabar
un mensaje.
2. Después del tono, ingrese el código de autorización
personal en el teléfono. Si el código ingresado es
correcto, escuchará dos tonos de señal.
3. Oprima las teclas 7 # al mismo tiempo. Grabe el nuevo
saludo después del tono.
4. Oprima nuevamente las teclas 7 # para
terminar la grabación. El nuevo saludo se
reproducirá automáticamente.
5. Para terminar la llamada, cuelgue el receptor.
Cómo encender el contestador automático
en forma remota
La función de acceso remoto permite encender el
contestador automático desde otro teléfono.
1. Llame al número de teléfono asociado al contestador
automático y deje sonar el teléfono hasta que
ACCESO REMOTO
Page 42

1-866-AMPLICOM (267-5426)
19
el contestador automático conteste la llamada
(aproximadamente diez tonos de llamada).
2. Después del tono, ingrese el código de autorización
para acceso remoto en el teléfono. Si el código
ingresado es correcto, escuchará dos tonos de señal.
3. Oprima 9 # y el contestador automático se encenderá.
4. Finalice la llamada o utilice las otras funciones remotas.
Acceso remoto sin la memoria necesaria
Si no hay memoria su ciente para los nuevos mensajes, el
contestador automático dejará de aceptar llamadas. En ese
caso, para acceder en forma remota a los mensajes haga
lo siguiente:
1. Llame al número de teléfono asociado al
contestador automático.
2. Deje sonar el teléfono aproximadamente diez veces y
el contestador automático responderá con varios
tonos de señal.
3. Ingrese el código de autorización para acceso remoto.
Si el código ingresado es correcto, escuchará dos tonos
de señal. Las funciones de acceso remoto ya están
disponibles (vea Funciones de acceso remoto).
4. Si desea más espacio en la memoria, debe borrar
mensajes.
ACCESO REMOTO
Page 43

Centro de servicio
20
Ayuda y asistencia técnica
Guía para resolución de problemas
El contestador automático no se enciende
1. Asegúrese de que el adaptador de alimentación esté
correctamente conectado al contestador automático y
al enchufe eléctrico.
2. Asegúrese de que haya alimentación disponible en el
enchufe eléctrico enchufando otro dispositivo eléctrico.
Los mensajes no se graban
1. Compruebe que la línea telefónica esté bien conectada
en el conector correspondiente.
2. Es posible que la memoria esté llena. Borre mensajes
para crear espacio.
Desecho
El símbolo que lleva este producto indica que los
aparatos eléctricos y electrónicos deben desecharse por
separado de los desechos domésticos y en puntos de
recogida adecuados provistos por las autoridades de
desechos públicos.
Los materiales de embalaje deben desecharse según las
regulaciones locales.
AYUDA Y ASISTENCIA TÉCNICA
Page 44

1-866-AMPLICOM (267-5426)
21
Detalles técnicos
Alimentación Entrada: 120 V CA 60 Hz 8 W
Salida: 9 V CC 300 mA
Temperatura ambiente óptima 32 a 113 ˚F (0 a 45 ˚C)
Humedad relativa óptima 30% a 80%
Mantenimiento y garantía
Mantenimiento
• Limpie las super cies del equipo con un trapo limpio y
sin pelusa.
• Nunca use limpiadores o solventes.
Garantía
El equipo de AMPLICOM se ha fabricado y probado de
acuerdo con los métodos de producción más recientes.
El uso de materiales y tecnologías de amplio desarrollo
seleccionados cuidadosamente asegura el funcionamiento
sin problemas y la duración prolongada del producto. Los
términos de la garantía no se aplican si el funcionamiento
incorrecto del equipo es causado por el operador de la red
telefónica o por cualquier sistema de extensión de línea
secundaria privada interpuesto. Estos términos tampoco
se aplican al paquete de baterías recargables ni a los
paquetes de alimentación utilizados con el producto.
El período de garantía es de 24 meses a partir de la fecha
de compra.
INFORMACIÓN GENERAL
Page 45

Centro de servicio
22
Todos los defectos causados por fallas de fabricación o
materiales que ocurran durante el período de garantía
serán corregidos sin costo alguno. El derecho a
reclamaciones en virtud de esta garantía será anulado
tras la intervención del comprador o de terceras partes.
Los daños causados por el manejo u operación indebidos,
la ubicación o almacenamiento impropios, la conexión o
instalación incorrectas, causas de fuerza mayor u otros
motivos externos, no están cubiertos por los términos de
esta garantía.
En caso de reclamaciones, nos reservamos el derecho de
reparar o reemplazar las piezas defectuosas o suministrar
un dispositivo de reemplazo. Las piezas o los dispositivos
reemplazados pasan a ser de nuestra propiedad.
Los derechos a una compensación en caso de daños se
excluyen donde no haya prueba de negligencia grave sin
intencionalidad o intencionada por parte del fabricante.
Si observa indicios de defectos en su equipo durante el
período de garantía, devuelva el equipo de AMPLICON
al punto de venta donde lo compró junto con el recibo
de compra. Todos los derechos a reclamaciones bajo los
términos de la garantía en virtud de este acuerdo deben
exigirse exclusivamente en el punto de venta.
INFORMACIÓN GENERAL
Page 46

1-866-AMPLICOM (267-5426)
23
Una vez transcurridos dos años de la compra del producto,
los derechos emanados de esta garantía no tendrán
más validez.
Declaración de conformidad
La marca de lista ETL es una alternativa a las marcas CSA
y UL. ETL Testing Laboratories, propiedad de Intertek
Testing Services (ITS), está reconocido por OSHA como
un laboratorio NRTL (Nationally Recognized Testing
Laboratory). ITS prueba los productos de acuerdo con
aproximadamente 200 normas de seguridad
y rendimiento. La marca de certi cación ETL
está aceptada en todos los Estados Unidos
cuando denota homologación con normas
reconocidas a nivel nacional como ANSI,
IEC, UL y CSA.
Esta marca de certi cación indica que
el producto ha sido probado y cumple
los requisitos mínimos de una norma de seguridad
de productos de EE. UU. ampliamente reconocida
(consensuada), que el sitio de fabricación ha sido
auditado, y que el solicitante ha aceptado un programa de
inspecciones de seguimiento periódicas de la fábrica para
veri car la conformidad continua.
INFORMACIÓN GENERAL
Page 47

24
A
Acceso remoto 15
Alimentación 6
C
Código de autorización 15
Código remoto 15
Cómo borrar los
mensajes 15
Cómo conectar el
contestador automático 7
Cómo escuchar los
mensajes entrantes 13
Contenido de la caja 7
D
Declaración de
conformidad 22
Desecho 20
F
Funciones de acceso
remoto 15
G
Garantía 20
I
Idioma 9
M
Mantenimiento 20
Mensajes 12
Mensaje saliente 10, 17
Modo de ahorro 15
N
Notas de seguridad 5
O
Opciones de
reproducción 15
R
Repetir un mensaje 16
ÍNDICE
Page 48

ÍNDICE
S
Saltar mensajes 16
Sitio para la instalación 6
U
Uso previsto 6
V
Velocidad del mensaje 16
Volumen del altavoz 15
Page 49

Distributed by: Amplicom USA LLC
Distribuido por: Amplicom USA LLC
Questions?
¿Dudas?
Amplicom USA Service Center
310 Ambrose Avenue
Nashville, TN 37207
V/TTY:
1-866-267-5426
www.amplicomusa.com
Made in China
Hecho en China
 Loading...