

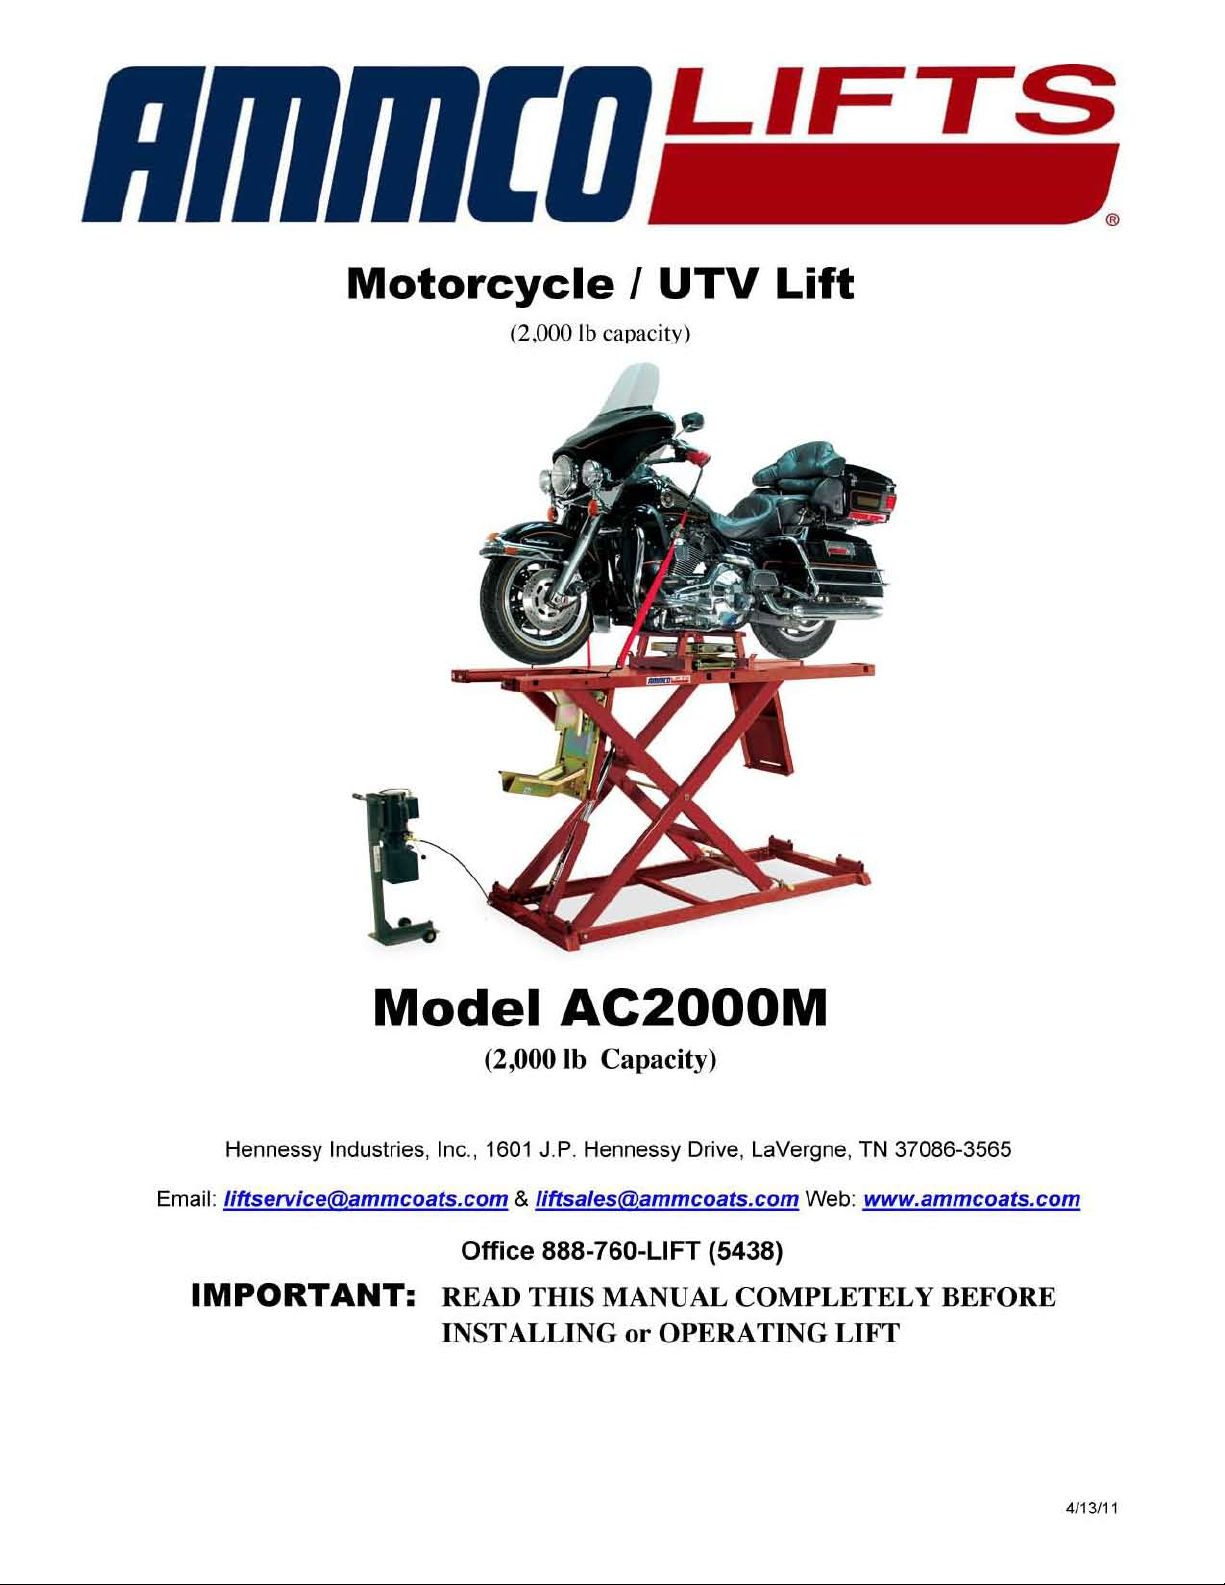
Page 1
Page 2

NOTE TO THE USER
Thank you for purchasing this MOTORCYCLE LIFT.
Please read these instructions carefully for safe and
proper use of the lift, and keep for future reference.
This Manual is for AC2000M
1. READ MANUAL FOR ASSURANCE OF SAFETY IN
DESIGN AND CONSTRUCTION OF LIFT.
2. PLEASE MAKE SURE THAT THIS MANUAL IS
DELIVERED TO END USERS TO ENSURE
PROPER OPERATION OF LIFT.
3.
DO NOT USE THE MOTORCYCLE LIFT IN A
POTENTIALLY EXPLOSIVE ATMOSPHERE
NO PART OF THIS MANUAL MAY BE REPRODUCED IN ANY FORM
WITHOUT PERMISSION OF QUALITY LIFTS, LLC.
THIS PRINT IS SUBJECT TO CHANGE WITHOUT NOTICE.
2 Rev: 4/13/11
QML02E-IOM-E
Page 3

Model: AC2000M
Installation, Operation & Maintenance
WARRANTY
The warranty period of the Motorcycle Lift shall be for a period of one year from
the date of delivery to sales agent.
Subject to the limitations set forth below,
Contractor warrants that the Motorcycle Lift will be free from defects in material and
workmanship and agree to, at part, including repaired or replaced parts, in the
which they are (1) due solely to be defective material and/or poor workmanship on
the part of contractor and/or its sub-contractors and (2) for which a 30 day notice
given to the contractor in writing or by FAX. Please confirm in writing within (30)
thirty days after discovery of any defects that will be claimed.
This warranty is subject to the following conditions:
1) Motorcycle Lift shall be properly used and operated by the company's operator
solely in accordance with the specifications and operating instructions provided
by contractor.
2) This warranty shall not be constructed to cover any defects
due to;
Normal wear and tear;
Bad operation and maintenance not in accordance with the
operating and maintenance manuals to be provided by contractor;
Operation under conditions other than those listed in the
specification and drawings;
Change in design or other modification by company without
contractor's consent;
Movement or transfer without contractor's consent;
Consumable items within normal operation;
Any other carelessness not attributable to contractor.
Contact your sales agent for warranty coverage.
Hennessy Industries, Inc.
1601 J.P. Hennessy Drive
LaVergne, TN 37086-3565
Office 888-760-LIFT (5438)
3 Rev: 4/13/11
QML02E-IOM-E
Page 4

Installation, Operation & Maintenance
TABLE OF CONTENTS
Model: AC2000M
NOTE TO THE USER ......................................................................... S-2
WARRANTY
TABLE OF CONTENTS ..................................................................... S-4
CHAPTER 1. SAFEGUARDS
.......................................................................................... S-3
1-1 Important Notices
1-2 Qualified Personnel
1-3 Danger Notices
1-4 Principle Safety Objective
1-5 Safety Notices
1-6 Essential Safety Checks (ESC's)
1-7 Illumination
....................................................................... 1-12
............................................................... 1-6
............................................................ 1-6
.................................................................. 1 -7
................................................. 1-7
.................................................................... 1-8
.................................... 1-11
1-8 Level of Sound Pressure
1-9 Training ............................................................................. 1-12
CHAPTER 2. OVERVIEW OF MACHINE
2-1 Specifications .................................................................... 2-13
2-2 Diagram ............................................................................ 2-14
2-3 Picture ............................................................................... 2-15
CHAPTER 3. INSTRUCTION
3-1 INSTRUCTION .................................................................. 3-16
CHAPTER 4. MAINTENANCE
4-1 General caution during maintenance
................................................. 1-12
4 Rev: 4/13/11
............................... 4-17
QML02E-IOM-E
Page 5

Model: AC2000M
Installation, Operation & Maintenance
4-2 Check List and periodic maintenance
APPENDIX
1-1 Spare Part .................................................................. A-18
1-2 Spare Part L i st ........................................................... A-19
1. SPARE PART .................................................................... A-18
2. OPTIONAL EQUIPMENT ................................................... A-21
............................... 4-17
5 Rev: 4/13/11
QML02E-IOM-E
Page 6

Model: AC2000M
Installation, Operation & Maintenance
CHAPTER 1.
SAFEGUARDS
Please read this chapter carefully for safe and
proper use of the motorcycle lift. Ammco Lifts will
not be held responsibilities for any injuries or
accidents that occur due to the motorcycle lift
being operated without having understood the
contents of this instruction manual. Keep the
Instruction Manual close to the motorcycle lift so
that anyone can refer to it when necessary. Also,
designate a person to take care of the manual.
1-1 Important Notices
A Motorcycle lift must be considered to be
a potential hazard to the health and safety
of the motorcycle lift's operator and service
personnel. It is important that this
motorcycle lift is installed, maintained, and
operated according to the instructions set
out within this manual
No modification, alteration or addition to the
motorcycle lift should occur. Ammco Lifts
does not accept any liability whatsoever,
which can result in legal action from failure
to comply with this policy.
Knowledge of the safety instructions and
warnings contained in this document and
the appropriate application are
prerequisites for safe installation as well as
safety in operation and maintenance of the
motorcycle lift as described.
Only qualified personnel who have the
specialized knowledge that is necessary to
correctly interpret the general guidelines
relating to the safety instructions, warnings
and implement them in each particular case.
For the sake of clarity, not all details of all
versions of the product are described in
these documents, nor can it cover all
conceivable cases regarding installation,
operation and maintenance. Should you
require further information or face special
problems that have not been dealt with
sufficient detail in this document, please
contact the manufacturer specified on
cover page.
We would also point out that the contents
of this product documentation should not
become a part of or modify any prior or
existing agreement, commitment or legal
relationship. The purchase agreement
contains the complete and exclusive
obligations of Ammco Lifts. Any
statements contained in this document do
not create new warranties or restrict the
existing warranty.
1-2 Qualified Personnel
Persons who are not qualified should not be
allowed to operate the motorcycle lift. Noncompliance of the warnin gs c ontained in this
document or appearing on the motorcycle lift
can result in severe personal injury or
damage to property.
Only qualified personnel should be allowed
to work on this motorcycle lift.
Qualified persons as referred to in the safety
precautions in this document as well as on the
motorcycle lift itself are defined as follows:
Operating personnel who have been
6 Rev: 4/13/11
QML02E-IOM-E
Page 7

trained to work with the motorcycle lift and
are conversant with the contents of these
documents are allowed to perform actual
operation of lift;
Service personnel who are trained to
repair the motorcycle lift and who are
authorized to energize, clear, ground, and
tag circuits, equipment and systems in
accordance with established safety
practices.
1-3 Danger Notices
The safety precautions in this manual are
classified into the following four levels.
Please be particularly careful when
performing operations that have a high
degree of danger.
DANGER
CAUTION:
WARNING: Failure to follow this safety
NOTICE:
: Failure to follow this safety
precaution can result in great
physical danger to the operator,
or even death.
Failure to follow this safety
precaution can result in great
physical danger to the operator,
or severe damage to the
motorcycle lift.
precaution can result in an
injury to the operator, or
damage to the motorcycle lift.
Failure to follow this safety
precaution can result in
damage to the motorcycle lift.
Model: AC2000M
Installation, Operation & Maintenance
1-4 Principle Safety Objective
1) The principle safety objective is to
remove the possibility of any hazard or
risk to the health or safety of the lift's
operator or service personnel.
2) Extreme caution must be exercised
while servicing or installing the
motorcycle lift.
3) The only safe policy when operating or
inspecting this motorcycle lift is to follow
the instructions in this manual.
Wherever possible shut off all electrical
power and follow the procedures
outlined in this manual.
4) Accident prevention should become
part of standard working, operating and
maintenance procedures, and training
should be provided to ensure safety
standards are understood. Part of
safety training should include the
instructions outlined in this section.
5) Always ensure suitable qualified
personnel carry out servicing and
maintenance tasks. The operator
should understand the limits of their
responsibility, and the training should
reinforce the importance of not
exceeding them.
6) The essential safety checks (ESC’s)
serve an important function in ensuring
the motorcycle lift continues to operate
in a safe manner. These checks must
be carried out according to the
7 Rev: 4/13/11
QML02E-IOM-E
Page 8

Model: AC2000M
Installation, Operation & Maintenance
instructions and intervals covered in this
manual.
General Safeguards
7) If there are any questions or doubts
regarding any aspect of motorcycle lift
safety or operation or maintenance,
please contact the company shown on
the front of this manual.
1-5 Safety Notices
To protect the operator or service
personnel from any injuries or accidents
during operating the motorcycle lift, please
read this section carefully for safe and
proper use of the motorcycle lift.
Danger Notices
1. Only qualified personnel should be
allowed to operate or service this
motorcycle lift.
2. Prior to operation routine inspection
should be carried out in accordance
with the procedures described in the
manual.
3. When abnormal conditions not
specified in this instruction manual
occur during operation, stop
operation of the motorcycle lift and
contact the manufacturer specified
on cover page or distributor.
4. This lift is for motorcycle use only.
8 Rev: 4/13/11
QML02E-IOM-E
Page 9

Caution Notices
Model: AC2000M
Installation, Operation & Maintenance
9 Rev: 4/13/11
QML02E-IOM-E
Page 10

Model: AC2000M
Installation, Operation & Maintenance
Warning Notice
WARNING
Use the lift after carefully reading the instruction manual and
understand the contents of them for safe and proper use of the
motorcycle lift.
< During preparation>
1. This Lift is for motorcycle use only. Do not use for any other
purpose.
2. Do not use the lift whenever any of the safety devices are not
operating properly.
3. Be cautious and smooth when loading or removing motorcycles
from lift.
4. Be careful of footing when the tire, floor, or lift is wet.
< During lifting and lowering the lift >
5. Always watch the motorcycle while operating the lift to ensure
that there are no problems taking place while raising or lowering.
6. If several lif ts are installed, observe the l o cation of the switch to
be clear of any obstacles.
7. Do not lift a motorcycle exceeding the rated capacity of the lift.
8. Do not lift a motorcycle with people or any other load.
9. Check for oil or foreign material on the lift.
10. Only raise the lift after verifying that the motorcycle is properly
positioned.
11. Stop raising the lift after it has reached its maximum height.
12. When raising or lowering the lift, wait 1 or 2 seconds before the
next operation is carried out.
13. Do not shake the motorcycle during lifting and lowering of the
lift. If the motorcycle is settling to one side, stop the operation of
the lift immediately.
14. If the lift is not lowering in spite of pressing the down pedal, raise
the lift and then press the down pedal again.
15. After the lift is completely lowered, the motorcycle can be loaded
or removed from the lift.
16. Prohibit unauthorized persons from standing near the lift while it
is being raised or lowered.
10 Rev: 4/13/11
QML02E-IOM-E
Page 11

Installation, Operation & Maintenance
17. Do not operate the lift with tools or components near the moving
parts of the lift. Damage can occur to the lift and motorcycle.
18. When lowering lift, make sure not hing will interf ere wit h its
descent.
< During motorcycle repair >
19. Check if the safety lock device is working properly before
operation.
20. Prohibit unauthorized persons from accessing the lift.
21. When the lift is not in use, or will not be in use for a long period,
lower the lift completely.
< Other >
22. Do not change or modify the lift without permission. If the lift is
modified or changed, the lift cannot operate properly, or a
serious accident can occur.
Model: AC2000M
WARNING
23. If you find a problem with the lift during use or inspection, stop
operation and request maintenance from the sales agency. Do
not use until the lift is repaired.
24. Please note that this lift is not designed to be waterproof. Do not
use the lift in a hot environment, motorcycle-washing or outdoor
use.
25.
Use the lift after reading the instruction manual carefully and
understand the
contents of them for safe and proper use.
1-6 Essential Safety Checks
(ESC's)
The essential safety checks are
the most important part of the
operator’s responsibility. The
purpose of the ESC's is to
ensure the safety features of the
motorcycle lift are functioning
properly, and thus the
motorcycle lift is in a safe
condition for use.
In addition to the operator it is
11 Rev: 4/13/11
recommended that a responsible
person carry out regular
additional ESC’s and that a
record is maintained.
If any of the ESC's result in a
"Fail" condition do not operate
the motorcycle lift, immediately
notify the responsible person
within the company and contact
the manufacturer as soon as
possible.
QML02E-IOM-E
Page 12

Model: AC2000M
Installation, Operation & Maintenance
ESSENTIAL SAFETY CHECKS (ESC'S)
GROUP 1 GENERAL - Visual Inspection
ESC Description O.K. Fail
1A Safety Lock Mechanism
2B
Lift Deflection or Distortion
1-7 Illumination
This machine does not provide
local lighting since it is designed
for indoor use only. The factory
in accordance with the
appropriate code of practice and
factory regulations must fulfill
sufficient illumination of the
working area. Minimum 300 lx is
required. Flicker, dazzling,
shadows and stroboscopic
effects must be avoided to
prevent risk.
1-8 Level of Sound
Pressure
The equivalent continuous Aweighted sound pressure levels
of the motorcycle lift do not
1-9 Training
Contact the manufacturer
specified on cover page for
information on training courses to
aid you in becoming familiar with
this motorcycle lift.
exceed 85dB (A).
The factory must provide operator(s) with the appropriate
measures including but not limited to an ear protection
!
and a warning sign(s)
If the sound pressure WARNING of 85dB (A) is
exceeded.
12 Rev: 4/13/11
QML02E-IOM-E
Page 13

Model: AC2000M
Installation, Operation & Maintenance
CHAPTER 2.
OVERVIEW OF MACHINE
2-1 Specifications
AC2000M
Capacity 2,000 lb s (450kg)
Width 29.5 “ (749 mm)
Length 86.5” (2,197 mm)
Maximum Height 47.25” (1200 mm)
Minimum Height 7.25” (182 mm)
Platform Thickness 0.12” (3.04 mm)
Weight 470 Lbs (213 kg)
Lifting Time Approx: 20-30 Sec
Electric Hydraulic Power Unit .75 kw, 115v
13 Rev: 4/13/11
QML02E-IOM-E
Page 14

2-2 Diagram
AC2000M
Model: AC2000M
Installation, Operation & Maintenance
14 Rev: 4/13/11
QML02E-IOM-E
Page 15

Model: AC2000M
Installation, Operation & Maintenance
2-3 Picture
AC2000M
15 Rev: 4/13/11
QML02E-IOM-E
Page 16

Model: AC2000M
Installation, Operation & Maintenance
CHAPTER 3.
INSTRUCTION
3-1 INSTRUCTION
Caution: Never operate lift while drop down
tables are in the down position. Return them to
the level position until safety lock is set.
STEP 1. Check product and bill of materials to
make certain all required parts are accounted
for and in good condition.
STEP 2. Unit should be placed on a concrete
surface free from as many defects as possible
to prevent unit from tipping or rocking. Place
unit in the area intended for use and adjust
leveling feet to make certain that unit is level
and stable. Unit should be in close proximity to
110 volt electrical outlet.
STEP 3. Raise lift to first locking stop (16in).
Attach hose to lift using supplied fittings, hose
should run along the inside of bumper stop
of lift so that it will not be pinched when lift is in
down position.
STEP 4. Pump Installation procedure.
Carefully unpack pump from shipping box and
check for damage. Connect one end of
hydraulic line (supplied) to pump body. Fill
reservoir with appropriate hydraulic fluid. (Total
capacity is about 1 gallon) Attach the other end
of the hydraulic line to the ram. Plug pump into
110 ACV outlet, press start button to prime
pump mechanism. Hold button until lift is in the
fully raised position. (This may take several
moments) Disengage the safety mechanism on
lift and slowly relieve pressure from pump by
pushing the release bar. As pump lowers air
will be bled out of the hydraulic ram and
passed out the reservoir breather. (Repeat
process several times to insure proper
bleeding of ram and hose)
STEP 5. Raise lift to comfortable working
height (approx 35 inches) to make certain that
drop down tables (front and rear) operate
smoothly. Slide catches off of retention bolts
and the tables will drop down, make certain to
hold onto the table and not let it fall freely.
STEP 6. Loosely attach vice rails in the
appropriate holes in deck of lift, slide
vice into rails and make certain there is
clearance to allow a smooth
sliding motion. Tighten rails to deck and
recheck sliding of clamp.
Tighten pinch bolts to hold vice to deck of lift.
STEP 7. Attach ramp to rear of lift while in
down position.
Caution: Do not leave ramp attached to lift
while in operation or in up
position.
STEP 8. Always use tie downs to secure
vehicle to lift while operating.
STEP 9. If applicable, attach side extensions,
as needed using the supplied
hardware.
Caution: Do not leave ramps for the
extensions attached while in operation
or in the up position.
Notes: Be aware of all marked pinch points.
Lubricate all points at least 3 times a year or
more depending on frequency of use.
16 Rev: 4/13/11
QML02E-IOM-E
Page 17

Installation, Operation & Maintenance
CHAPTER 4.
MAINTENANCE
4-1 General caution during
maintenance
1) Two or more persons should perform
maintenance.
2) Maintenance should be carried out after
putting a signboard of "NO ENTRANCE"
at work area.
3) Do not disassemble the system before
you are familiar with the disassembling
4-2 Check List and periodic maintenance
Model: AC2000M
sequence.
4) Record the place or parts where
maintenance is needed.
5) Keep disassembled parts stored where
they can be easily accessed.
6) Be sure to fasten bolts and nuts position
correctly during assembly.
7) During maintenance, verify locks are in
“engaged” position.
8) Check weekly for loose nuts and bolts.
Retighten if needed.
Maintenance Interval Chart
The following chart should be considered strictly as a guide to general maintenance
intervals. Depending on operating conditions, the intervals of maintenance should be
changed
17 Rev: 4/13/11
QML02E-IOM-E
Page 18

APPENDIX
1. SPARE PART
1-1. Spare Part
AC2000M Lift
Model: AC2000M
Installation, Operation & Maintenance
18 Rev: 4/13/11
QML02E-IOM-E
Page 19

Model: AC2000M
Installation, Operation & Maintenance
1-2. Spare Part List
PART NO. AC2000M
NO. DESCRIPTION
1 LIFT BASE 1
2 MAIN SUPPORT (A) 1
3 MAIN SUPPORT (B) 1 601
TABLE TOP
4
FRONT DROP
5A
PLATE
REAR DROP
5B
PLATE
SAFETY LOCK
6
ASSEMBLE
HYDRAULIC
7
CYLINDER
ROLLER - A Ø43 x
8
ROLLER - B Ø43 x
9
10 PIN - A Ø20 x 104 2 609 CIRCLIP S20 12
PIN - B
11
WEIGHT/
SIZE
1 602
1 603
1 604
1 605
1 606 FLAT WASHER Ø6 2
24.5
21.5
Ø20 x 93 2 610 CIRCLIP S12 8
Q'TY/EA NO.
2 607 FLAT WASHER Ø16 x 3t 2
2 608 NIPPLE PTl/4 1
DESCRIPTION
SLIDE LOCK
BOLT
SLIDE LOCK
FLAT WASHER
SLIDE LOCK
FLANGE BOLT
ROUND HEAD
ALLEN BOLT
ROUND HEAD
ALLEN BOLT
WEIGHT/
SIZE
M10 x 25 4
Ø10xØ30x3t 6
M10 x 25 4
M10 X 15 2
M6 x 12 2
Q'TY/EA
SLIDE LOCK
12R
(RIGHT)
SLIDE LOCK (LEFT)
12L
SUPPORT PIVOT
13
SHAFT
DROP PLATE PIN
14
CYLINDER PIN A
15
(LOWER )
CYLINDER PIN B
16
(UPPER)
SAFETY LOCK
17
GUIDE
18 RAMP
19 CAP
2 611 RUBBER FDDT 8
2 612
Ø25 x 701 1
Ø12 x 88 4
Ø20 x 112 1
Ø20 x 70 1
2
1
4
YELLOW
RUBBER CAP
TOOL HOLDER
(OPTIONAL)
Ø16 2
2
19 Rev: 4/13/11
QML02E-IOM-E
Page 20

Model: AC2000M
Installation, Operation & Maintenance
AC2000M HYDRAULIC LIFT PUMP STAND PART LIST
NO. DESCRIPTION
P1 PUMP STAND 1 P-601
P2 PIN 1 P-602
P-603
< PART "A"
A-1 ELECTRIC MOTOR 0.75Kw x 2P x
CENTRAL
A2
MANIFOLD
OIL TANK
A-3
SWITCH (FOR UP
A-4
MOTION CONTROL)
LEVER (FOR DOWN
A-5
MOTOR CONTROL)
SUPPORT
A-6
BRACKET
#6 JIC Elbow (16167)
A-7
WEIGHT/ SIZE
P-604
115V
1 P-606
1.2 GAL 1 P-607
1 P-608
1 P-609
1 P-610
Q'TY/
EA
NO.
P-605
P-611
DESCRIPTION
SNAP RING
FLAT WASHER
R PIN
WHEEL
PLASTIC CAP
RUBBER HANDLE
HEX BOLT
SPRING WASHER
NUT
NIPPLE
HOSE (QML02-001)
20 Rev: 4/13/11
QML02E-IOM-E
WEIGHT/
SIZE
S12 2
Ø12 2
R16 2
3” (LDP) 2
1
Ø22 2
M8 x 20 4
Ø8 4
M8 4
1/4"
NPT
2M
Q'TY/
EA
1
1
Page 21

2. OPTIONAL EQUIPMENT
Model: AC2000M
Installation, Operation & Maintenance
QML01WC - Deluxe Wheel Clamp
Deluxe Wheel Clamp. Self-locking clamp allows one person to
load motorcycle on lifts. Comes with std. width rocker. (Fits120 to
160 series tire
s)
QML01CC - Crank Style Wheel Vice
Can be used on front or rear tires
QML02SP UTV Side Panels
Complete Side Panel Set. Increases width from 29.5” to 56”.
Includes side panels (qt 4) and ramps (qt 2)
QML01CJ QML01SD -
Center Jack
Shop Dolly
(shown with Adapter kit)
35-0321 - Retractable Wheel Set
Set of wheels for motorcycle lift. This accessory allows the lift to
be easily moved.
QML01FE - Front Extension Kit
Adds 30” to your lift; and features easy bolt-on installation. Fits all
flat deck style lifts
.
35-6770 – Nose wheel
Use with 35-0321 retractable wheels for easy moving of lift.
21 Rev: 4/13/11
QML02E-IOM-E
Page 22

Model: AC2000M
Installation, Operation & Maintenance
NO. DESCRIPTION
1 PANEL 4 601
2 RAMP 2 602
WEIGHT/
SIZE
Q'TY/
EA
NO.
HEX BOLT (CM)
NUT (CM)
DESCRIPTION
WEIGHT/
SIZE
M10 X 30 2
M10 2
Q'TY/
EA
Hennessy Industries, Inc., 1601 J.P. Hennessy Drive, LaVergne, TN 37086-3565
Email: liftservice@ammcoats.com
www.ammcoats.com
& liftsales@ammcoats.com Web:
Office 888-760-LIFT (5438)
22 Rev: 4/13/11
QML02E-IOM-E
 Loading...