

Page 1
No. 9310
No. 9311
No. 9312
No. 9313
ADAPTEK®Adapter Sets
for Hubless/Composite Rotors
and Odd Configured Rotors
AMMCO Tools, Inc. • Hennessy Industries • 1601 J.P. Hennessy Drive, LaVergne, TN 37086-3565
(800) 688-6359 • (615) 641-7533 • (615) 641-5104 FAX
These AMMCO brake lathe adapter sets are for use
with applications that include cast hubless rotors,
composite rotors, drums and flywheels. The flange
plates included in the sets simulate actual vehicle
mounting. These sets are for use on any brake lathe
with a 1 inch arbor.
Before You Begin
It is important in any machining operation that all
adapters and mounting hardware, as well as the
rotor, drum or flywheel to be machined, are clean
and free of nicks.
Typical Adapter Usage for Rotors
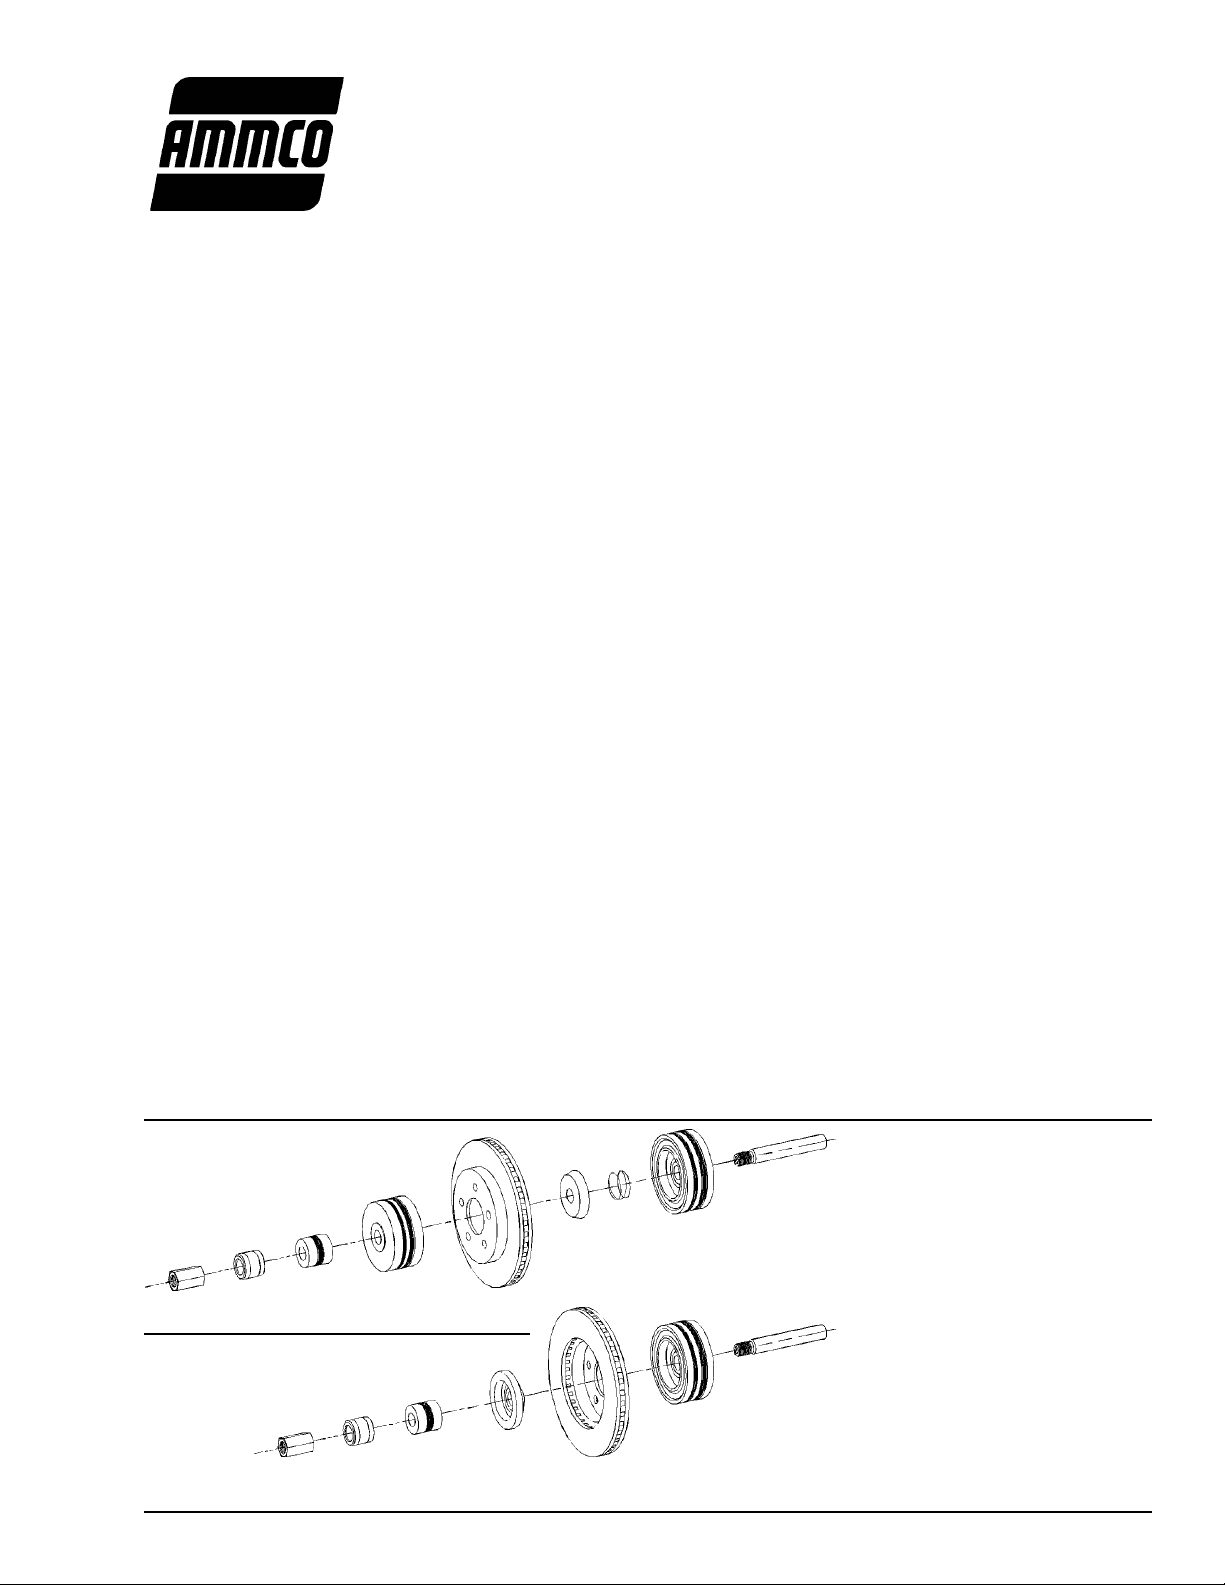
Figure 1 illustrates the typical adapter usage.
1. Determine which flange plate is most
appropriate for the current application and place
it on the arbor.
IMPORTANT: The flange plate must contact the
flat portion of the rotor hat, but must not contact
the rotor anywhere around the outside radius.
Always use the largest flange plate possible.
2. Place the spring onto the arbor and into the
flange plate. Twist it counterclockwise to hold it
in place.
3. Select the cone that best fits the rotor center
hole and slide it onto the arbor wide end first.
4. Slide the rotor onto the arbor, locating the center
hole over the cone. Push rotor and cone back
against spring and flange plate.
5. Slide the largest remaining flange plate (that fits
rotor as specified in step 1) onto the arbor.
6. Fill out the arbor with spacers as required to
secure entire rotor assembly to the arbor.
NOTE: On AMMCO lathes, the last item placed
on the arbor before the arbor nut must be the
self-aligning spacer.
7. Tighten the arbor nut by either rotating the rotor
while holding the arbor nut until they lock up, or
by using a wrench to turn the nut until the rotor
begins to turn and then continuing to advance
the wrench Z\zn of a turn. Do not overtighten.
Odd Configured Cast Hubless Rotor Mounting
Figure 2 illustrates these mounting procedures.
1. Determine which flange plate is most
appropriate for the current application and place
it on the arbor.
IMPORTANT: The flange plate must contact the
flat portion of the rotor hat, but must not contact
the rotor anywhere around the outside radius.
Always use the largest flange plate possible.
2. Place rotor onto arbor. Note that some rotors
may need to be mounted backwards so that the
rotor’s machined surface contacts the first
flange plate.
3. Slide the 29573 reversible centering cone onto
arbor and into the rotor center hole with the
cone taper facing the rotor.
Figure 1 - Typical Adapter Usage
1 1” Arbor
2 Flange Plate
3 Spring
4 Centering Cone
5 Rotor, Drum or Flywheel
6 Flange Plate
7 Spacer(s)
8 Self-Aligning Spacer (AMMCO)
9 Arbor Nut
Figure 2 - Odd Configured Mounting
Page 2

4. Fill out the arbor with spacers as required to
secure entire rotor assembly to the arbor.
NOTE: On AMMCO lathes, the last item placed
on the arbor before the arbor nut must be the
self-aligning spacer.
5. Tighten the arbor nut by either rotating the rotor
while holding the arbor nut until they lock up, or
by using a wrench to turn the nut until the rotor
begins to turn and then continuing to advance
the wrench Z\zn of a turn. Do not overtighten.
Mounting Drums and Flywheels
For drums and flywheels, refer to Figure 1. Use the
same techniques as described in Typical Adapter
Usage for Rotors.
NOTE: When mounting drums, use the largest
flange plate possible inside the drum. The flange
plate must be as large as possible but still allow
clearance for the boring bar. On smaller drums, use
the 29573 Reversible Centering Cone as the inside
flange plate to allow for proper boring bar clearance.
Always refer to your lathe operating instructions for
additional information and procedures about
reconditioning rotors, drums and flywheels.
Parts List
Set No.
Part Auto & Truck Auto Lt. Truck Truck
No. For Description 9310 9311 9312 9313
29572 Auto Hubless Rotor Flange Plate 1 1
29573 Auto Reversible Centering Cone 1 1
29574 Auto/Trk Spacer 2 2
29575 Auto Composite Flange Plate 1 1
29576 Trk Large Lt. Truck Flange Plate 1
29577 Trk Large Lt. Truck Flange Plate 1
29578 Trk Composite Flange Plate 1 1
29579 Auto Centering Cone 1 1
29580 Auto Centering Cone 1 1
29581 Auto Centering Cone 1 1
29582 Auto Centering Cone 1 1
29583 Auto Centering Cone 1 1
29584 Trk Centering Cone 1 1
29585 Trk Centering Cone 1 1
29586 Trk Centering Cone 1
29587 Trk Centering Cone 1
29588 Trk Centering Cone 1
29589 Trk Centering Cone 1
29590 Trk Centering Cone 1
29591 Auto/Trk Spring 1 1 1
29727 Trk Centering Cone 1
929632 01 08/02 © COPYRIGHT 1994 HENNESSY INDUSTRIES AND AMMCO TOOLS ALL RIGHTS RESERVED PRINTED IN U.S.A.
 Loading...