


M7220
Wireless Handheld Terminal
User’s Guide
Effective date: September 2010

GETTING STARTED |
M7220 Wireless Hand-held Terminal |
|
|
|
|
Introduction
Introducing the M7220
The M7220 hand-held terminal is an ultra-versatile, high-performance, designed-to-fit-your- budget terminal. The ergonomic design easily fits in even the smallest of hands. It is rugged, lightweight, compact and easy-to-use. The high resolution graphical display is capable of presenting a multitude of fonts and images.
The M7220 utilizes a true, fully functional, Linux® operating system. The Linux operating system is well known for its stability, speed and conservative memory usage. The Linux operating system coupled with the M7220’s high speed processor makes the M7220 one of the fastest handheld terminals on the market today. In test after test the Linux operating system has out-performed DOS and Windows operating systems when compared on similar hardware platforms.
The power saving features of the M7220 include auto-off and power save modes, which reduce power consumption until an operator provides input. These features conserve battery power and lengthen the time between charges or battery replacement. The M7220 will operate for a full 8 hour shift without requiring the battery to be re-charged or replaced.
Introduction-1

GETTING STARTED |
M7220 Wireless Hand-held Terminal |
|
|
|
|
Warranty
A one-year warranty against material defects and workmanship from the date of shipment is guaranteed by American Microsystems, Ltd. Products are sold on the basis of specifications applicable at the time of manufacture. American Microsystems, Ltd. shall have no obligation to modify or update products once sold. At our option, we will repair or replace, at no charge, any unit that proves to be defective providing the appropriate steps are taken to procure an RMA (Return Materials Authorization) number and shipping instructions from American Microsystems, Ltd.
General Conventions
Before you begin to use the M7220 wireless hand-held terminal, it is important that you understand key conventions and terms used in this manual.
Keys |
Description |
[KEY] |
The square brackets indicate a specific key on the M7220 handheld |
|
terminal’s key pad. |
Bold |
Words you type – for example when you are instructed to type |
|
A:\setup. Bold also refers to existing filenames. |
Italic |
**Notes |
Italic/Bold |
Warning! And section references. |
Select |
After selecting a procedure or menu, “Select” means that after you select the |
|
menu item or action, you should press ENTER. |
Introduction-2

Table of Contents
Introduction
Notational Conventions
Warranty and Service
Getting Started |
1 |
General Specifications |
1-1 |
Architecture Specifications |
1-1 |
Included Software Specifications |
1-2 |
Wireless Radio Specifications |
1-2 |
System Features |
1-3 |
Processor and Memory |
1-3 |
Operating System |
1-3 |
Included Software |
1-3 |
Communications Ports |
1-4 |
Description of the RS-232 |
1-4 |
M7220 Keyboard |
1-5 |
Using the 35-key Keypad |
1-6 |
Using the Alpha Key on the 35-key Keypad |
1-7 |
Using Lock and Unlock on the 35-key Keypad |
1-8 |
Locking the Keypad |
1-8 |
Using the 55-key Keypad |
1-9 |
Data Capture and Bar Code Scanners |
1-10 |
Laser Style Scan Engines |
1-10 |
Reading Distance for the Standard High Speed Laser |
1-11 |
Reading Distance for the Long Range Laser |
1-12 |
Reading Distance for the Advanced Long Range Laser |
1-12 |
Imager Style Scan Engines |
1-13 |
The M7220 Scanner LED |
1-14 |
Scanner Information and Labeling |
1-15 |
The M7220 Internal Radio |
1-17 |
802.11b/g Fallback Mode |
1-17 |
Interference and Coexistence |
1-17 |
Security Issues |
1-18 |
Battery |
1-18 |
Accessories |
1-19 |
The M7220 Cradle |
1-19 |
The M7220 Cradle’s Communication Ports |
1-20 |
M7220 Menu System |
2 |
Overview |
2-1 |
Navigating the Primary and Icon Menus |
2-4 |
Navigating the Settings Menus and “Connect / Reconnect” |
2-5 |
Controlling Options and Settings |
2-7 |
Table of Contents

Table of Contents
M7220 Menu System - cont’d. |
2 |
Boolean / Enable-Disable |
2-7 |
Combo / Multiple Options |
2-7 |
Sliders / Numeric Options |
2-8 |
Text Entry |
2-8 |
M7220 Connect / Reconnect Menu |
2-9 |
M7220 Tools & Utilities Menu |
2-10 |
Calculator |
2-10 |
Barcode Viewer |
2-11 |
Transmit |
2-12 |
2-12 |
|
Linux Prompt |
2-13 |
Camera |
2-13 |
M7220 User Preferences Menu |
2-14 |
Contrast |
2-14 |
M7220 Administration Menu |
2-14 |
Scanner Options |
2-15 |
Network Setup |
2-16 |
Port Options |
2-16 |
Security Options |
2-16 |
Power Options |
2-17 |
Keyboard Options |
2-17 |
Terminal Emulation & Host Connection Options |
2-17 |
Audio Options |
2-18 |
Startup / Boot Options |
2-18 |
Complete M7220 Option Parameters (Chart) |
2-19 |
Bar Code Type ID’s (Chart) |
2-22 |
Laser Symbology Settings - SL, LR, ALR (Chart) |
2-23 |
Laser Data Lengths Explanation (Chart) |
2-27 |
2-Dimensional Imager Symbology Settings (Chart) |
2-28 |
Networking Options (Chart) |
2-36 |
Port Options (Chart) |
2-38 |
Local Security Settings (Chart) |
2-39 |
Power Management Settings (Chart) |
2-39 |
Keyboard Settings (Chart) |
2-40 |
Host / Terminal Setup (Chart) |
2-40 |
General Settings (Chart) |
2-43 |
VTxxx ENQ Answerback Macros (Chart) |
2-44 |
Audio Setup (Chart) |
2-44 |
Startup Options (Chart) |
2-44 |
M7220 Diagnostic Menu |
2-45 |
System Information |
2-45 |
Scan Engine ID String Definitions (Chart) |
2-45 |
Software Information |
2-46 |
Table of Contents

Table of Contents
M7220 Menu System - cont’d. |
2 |
Network Status |
2-46 |
Network Status Screen Information (Chart) |
2-46 |
802.11b/g Data Rates and Theoretical Ranges (Chart) |
2-47 |
802.11 Channel Frequency (Chart) |
2-48 |
Resource Usage |
2-49 |
Ping Server |
2-49 |
Ping Server (Chart) |
2-50 |
Hardware Tests |
2-50 |
Bar Code Data Viewer |
2-50 |
SSH Client Setup |
2-51 |
Setting up a Connection with the SSH Client Setup |
2-51 |
Unique Encryption Keys and Using SSH Paraphrases |
2-53 |
M7220 Embedded Website |
3 |
Update Firmware |
3-3 |
View System Info |
3-4 |
View System Log |
3-5 |
View Live Screen |
3-6 |
M7220 Configuration Utility for Windows |
4 |
Overview & System Requirements (Chart) |
4-1 |
Obtaining and Installing the Software |
4-2 |
Quick Comparison Index (Chart) |
4-2 |
Using the Utility |
4-3 |
Retrieving Settings from an M7220 |
4-4 |
Sending Settings to an M7220 |
4-5 |
Sending Other Files to an M7220 |
4-5 |
Updating the M7220 Operating System Firmware |
4-5 |
The M7220 Configuration Utility Menu and Tabs |
4-6 |
File Menu |
4-6 |
Edit Menu |
4-6 |
Communications Menu |
4-7 |
Help Menu |
4-7 |
The System Tab |
4-8 |
The Ports Tab |
4-9 |
The Startup Tab |
4-10 |
The Keyboard Tab |
4-11 |
The Terminals Tab |
4-12 |
The Wireless Tab |
4-13 |
The Hosts Tab |
4-14 |
The Scanner Tab |
4-15 |
Table of Contents

USER’S GUIDE |
M7220 Wireless Hand-held Terminal |
|
|
|
|
|
|
Chapter 1 |
M7220 Terminal Overview |
||
Technical Specifications |
|
|
General Specifications |
|
|
|
|
|
Dimensions |
8.9” L x 3.5” H x 2.3” D (225 L x 89 H x 57 D mm) without optional handle |
|
|
8.9” L x 3.5” H x 8.2” D (225 L x 89 H x 208 D mm) with optional handle) |
|
|
|
|
Weight |
16 oz (454 g) without optional handle |
|
|
25 oz (709 g) with optional handle |
|
|
|
|
Display |
160 x 160 pixel Grayscale LCD with EL backlight |
|
|
|
|
Keyboard Options |
35-key Numeric Keypad |
|
|
55-key Alpha-Numeric Keyboard |
|
|
|
|
Data Capture & Bar Code Scanner |
Standard High-Speed Laser with aiming capability |
|
Options |
Long Range Laser with aiming capability |
|
|
Advanced Long Range Laser with aiming capability |
|
|
2-Dimensional Area Imager |
|
Battery |
Lithium-Ion 2600 mAh, 19.2 Watt-hour |
|
I/O Ports |
USB Type B (Slave) |
|
|
Serial RS-232 (max. rate 115200 baud) |
|
Sound |
Integrated system bell (beeper) |
|
Operating Temperature |
14° to 122° F |
(-10° to 50° C) |
|
|
|
Storage Temperature |
-13° to 122° F |
(-25° to 50° C) |
Humidity |
90% humidity, non-condensing |
|
Static Discharge |
15 kVdc through air / 4kVdc contact, all sides |
|
Drop Rating |
5 ft. (1.5m) drop to concrete |
|
Regulatory |
FCC Part 15 Class A |
|
|
RoHS Compliant / Pb-Free |
|
|
Laser (if equipped): CDRH Class II, IEC Class 2 |
|
Architecture Specifications |
|
|
|
|
|
|
|
|
Processor |
Samsung S3C2410 32-bit ARM9 @ 202 MHz with Advanced Microcontroller |
|
|
Bus Architecture (AMBA) |
|
|
|
|
Memory |
32 MiB SDRAM @ 101MHz, 16 MiB Non-volatile NOR Flash |
|
|
|
|
Operating System |
AML Embedded Linux OS, Linux Kernel 2.6.16 |
|
|
|
|
Development Environment |
AML M7220 SDK for Linux supporting C and C++ |
|
|
GNU GCC 3.3.5 for ARM-Linux |
|
|
Fully Open-Sourced Licensing |
|
|
|
|
1-1

USER’S GUIDE |
M7220 Wireless Hand-held Terminal |
|
|
|
|
Included Software
Terminal Emulation |
VT100/102 |
|
VT220 |
|
TN5250 |
|
SSH |
Web Browser |
'Links2' graphical and text based web browser |
Utilities |
Calculator |
|
Bar Code Data Viewer |
|
Linux Console |
|
Camera Utility (If equipped with optional 2-Dimensional Imager) |
Servers |
TELNET |
|
FTP |
|
SSH/SFTP |
|
HTTP |
Diagnostic Tools |
Printer Test |
|
Network Status Application |
|
System Resource Usage |
|
Network Ping Utility |
Wireless Radio Specifications
Radio Type |
IEEE 802.11b/g |
Frequency (GHz) |
North America: 2.412 – 2.462 GHz |
|
Japan TELEC: 2.412 – 2.484 802.11b |
|
Japan TELEC: 2.412 – 2.472 802.11g |
|
Europe ETSI: 2.412 – 2.472 |
|
Spain: 2.457 – 2.462 |
Bitrates (Mbps) |
802.11b: 11, 5.5, 2, 1 |
|
802.11g: 54, 48, 36, 24, 18, 12, 9, 6 with auto-fallback |
Transmit Power (dBm) |
802.11b: 17 dBm (40 mW) |
|
802.11b/g: 14 dBm (32 mW) |
Receiver Sensitivity (dBm) |
54/48 Mbps: -65 dBm / -66 dBm |
|
24/36 Mbps: -70 dBm / -74 dBm |
|
12/18 Mbps: -77 dBm / -79 dBm |
|
11 Mbps: -80 dBm (802.11b) |
|
6/9 Mbps: -81 dBm / -82 dBm |
Modulation |
48/54 Mbps (QAM-64) |
|
24/36 Mbps (QAM-16) |
|
12/18 Mbps (QPSK) |
|
6/9 Mbps (BPSK) |
Antenna |
Internal Diversity |
Security |
None |
|
64 (40)-bit WEP |
|
128 (104)-bit WEP |
|
WPA/WPA2 Personal (PSK) |
|
WPA/WPA2 Enterprise (EAP802.1x Supplicants) |
This product is covered under U.S. Patent Nos. 5,400,338 and 6,480,497
1-2

USER’S GUIDE |
M7220 Wireless Hand-held Terminal |
|
|
|
|
System Features
Processor and Memory
The M7220 is based on the Samsung S3C2410 System-on-a-chip (SoC) with Advanced Microcontroller Bus Architecture (AMBA) clocked at 202 MHz. In standard benchmark tests, the M7220's processor has out preformed Intel X-Scale processors clocked at twice the speed of the S3C2410. Coupled with a 100 MHz system bus and 32 MiB of 100 MHz SDRAM, the Samsung processor makes the M7220 hand-held computer one of the most powerful devices available. Furthermore, the M7220 comes complete with 16 MiB of industry standard NOR flash for storing the operating system, user settings, and third party applications.
Operating System
The M7220 runs a complete Linux based operating system along with other Open Sourced tools. The benefits of Linux are in its speed, reliability, and freely available source code. Nearly all applications and the entire operating system software and source code is available free of charge and licensed under open source licenses include the General Purpose License and Lesser General Purpose License.
Included Software
The M7220 hand-held computer comes complete with all of the most common terminal emulation capabilities including VT100/102, VT220, and TN5250. Furthermore, the M7220 comes standard with the Links2 web browser for Web and Internet based applications along with many other integrated tools, utilities, and diagnostics.
1-3

USER’S GUIDE |
M7220 Wireless Hand-held Terminal |
|
|
|
|
Communication Ports
The M7220 has two types of communication ports on the bottom of the unit. The ports are shown here.
Communication Ports
4 |
3 |
1 |
2 |
10987654321
USB port
RS-232
Description of the RJ-45 10 Pin Connector (RS-232)
1.USB Ground
2.RxD (in to terminal)
3.TxD (out from terminal)
4.RTS (out from terminal)
5.GND
6.In Cradle Sensor
7.CTS (in to terminal)
8.UDC+ (USB data +)
9.UDC – (USB data -)
10.Battery
WARNING: Using an 8 Pin RJ-45 connector can cause damage to the devices’s 10 Pin RJ-45 interface connection.
1-4
USER’S GUIDE |
M7220 Wireless Hand-held Terminal |
|
|
|
|
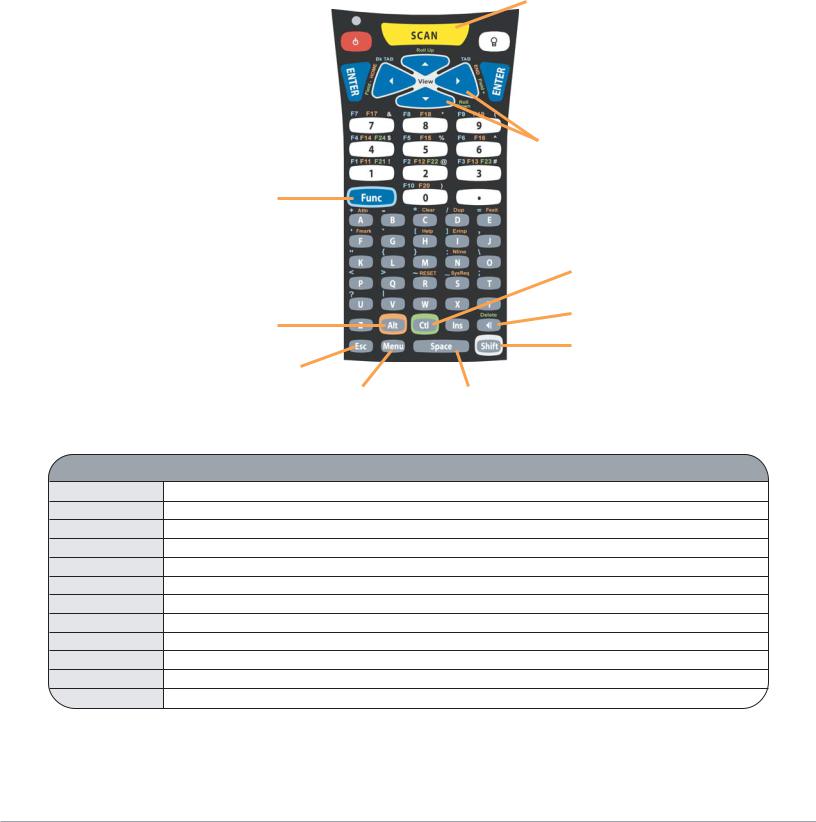
M7220 Keyboard
The M7220 has two keyboard options:
-55-key Alphanumeric Keyboard
-35-key Numeric Keyboard
The high contrast, color coded overlay surrounding the keyboard keys indicates alternate functions of each key. Pressing a modifier key (Shift, Alt, Ctl, Lock, Unlock, Func) will enable that modification for the next key press only.
1-5

USER’S GUIDE M7220 Wireless Hand-held Terminal
Using the 35-key Keypad
|
|
|
Scan Key |
|
Power Key |
|
|
|
Backlight Key |
|
|
|
||
Unlock Key/Yellow Modifier |
|
|
|
Lock Key/Blue Modifier |
|
|
|
||
|
|
|
Cursor Keys |
|
Enter Key
Alpha Modifier Shift Modifier
Escape Key
Menu Key |
Space Key |
Key |
Function |
Power Button |
Turn on/off the M7220 unit or wake the M7220 from Suspend Mode |
SCAN Key |
Enable the bar code scanner or wake the M7220 from Suspend Mode |
Unlock Key |
Enable the Blue Modifier |
Lock Key |
Enable the Yellow Modifier |
ENTER |
Select an option or send a standard Enter key |
Space |
Send a standard space or move the cursor to the right one position |
<| |
Send a standard backspace or move the cursor to the left one position |
Esc |
Send a standard Escape or Exit the current menu |
“Light Bulb” |
Enable/Disable the LCD Backlight |
Ins |
If the current application supports it, toggle between Insert mode and Replace mode |
Menu |
Return to the Main Menu or cycle through available menus |
Alpha Key |
Enable the Alpha modifier to type alphabetic data |
Shift |
Enable the Shift modifier for the next key press |
1-6

USER’S GUIDE |
M7220 Wireless Hand-held Terminal |
|
|
|
|
Using the 35-key Keypad - cont’d.
Using the Alpha key on the 35-key Keypad
If the M7220 hand-held computer is equipped with the numeric keypad, the unit will allow alphabetic input in a mobile phone style interface.
Pressing the Alpha key once, will put the keyboard into Alpha Mode. Within Alpha Mode, a numeric key (0 – 9 or period) can be pressed and released multiple times to allow input of any of the three or four red symbols on the key. After no other key has been pressed for 200 milliseconds, the input will be processed.
For example, to type the letter 'b', the user would press the [Alpha] key ONCE, followed by the [2] key TWICE. If the user does not press any other key for 200 milliseconds, the input will be processed as a lower case letter 'b'. If the user had pressed any key other than the [2] key within the 200 milliseconds timeout, the system would have processed the 'b' and followed it with the next key. If the user had pressed the [2] key a third time within the timeout period, the input would have been processed as a lower case letter 'c'.
To input a capital letter, the user must press the [Shift] key before the [Alpha] key, or directly after the press of the [Alpha] key.
For example, to type the capital letter 'B', the user could press the [Shift] key ONCE, followed by the [Alpha] key ONCE, followed by the [2] key TWICE, or, alternatively they could press the [Alpha] key ONCE, followed by the [Shift] key ONCE, followed by the [2] key TWICE. The system will respond to either input with a capital letter 'B'.
1-7

USER’S GUIDE |
M7220 Wireless Hand-held Terminal |
|
|
|
|
Using the 35-key Keypad - cont’d.
Using Lock and Unlock on the 35-key Keypad
If the user needs to input a large amount of alphabetic data, they can temporarily enable the Alpha-Lock feature by pressing the Lock/Blue Modifier followed by the [Alpha] key. To disable Alpha-Lock, the user can press the Unlock/Yellow Modifier followed by the [Alpha] key.
The [Shift] key can be locked and unlocked in the same manner to create a CAPS lock.
Locking the Keypad
The M7220 35-key numeric keypad can also be completely disabled to prevent unwanted key presses. This is useful if the user is transporting the M7220 hand-held computer in a holster but does not wish to power off the device.
To lock the M7220 35-key Keypad, press the Lock/Blue Modifier followed by the [Esc] key. The unit will disregard any further key presses and display a warning to the user. To re-enable the keypad, press the Unlock/Yellow Modifier followed by the [Esc] key.
1-8
USER’S GUIDE |
M7220 Wireless Hand-held Terminal |
|
|
|
|
Using the 55-key Keypad
Scan Key
Power Key |
|
|
|
Backlight Key |
|
|
|
 Enter Keys
Cursor Keys
Blue Modifier
Green Modifier
Backspace Key
Orange Modifier
Shift Modifier
Escape Key
Menu Key |
Space Key |
Key |
Function |
Power Button |
Turn on/off the M7220 unit or wake the M7220 from Suspend Mode |
SCAN Key |
Enable the bar code scanner or wake the M7220 from Suspend Mode |
ENTER |
Select an option or send a standard Enter key |
Space |
Send a standard space or move the cursor to the right one position |
<| |
Send a standard backspace or move the cursor to the left one position |
Esc |
Send a standard Escape or Exit the current menu |
“Light Bulb” |
Enable/Disable the LCD Backlight |
Ins |
If the current application supports it, toggle between Insert mode and Replace mode |
Menu |
Return to the Main Menu or cycle through available menus |
Shift |
Enable the Shift modifier for the next key press |
Alt |
Enable the Orange Modifier |
Ctl |
Enable the Green Modifier |
1-9

USER’S GUIDE |
M7220 Wireless Hand-held Terminal |
|
|
|
|
Data Capture and Bar Code Scanners
The M7220 hand-held computer comes standard with a laser scan engine that is capable of scanning single dimensional bar codes. Optionally, Long Range Lasers and 2-Dimensional Area Imagers can be ordered for the M7220.
Bar code symbologies are always measured in mils. This usually refers to the narrowest bar width. One mil equals 0.001”, therefore a 0.01” wide narrow bar would be a 10 mil bar code.
Conversion: 1 mil = 0.0254 mm 1 inch = 25.4 mm
Laser Style Scan Engines
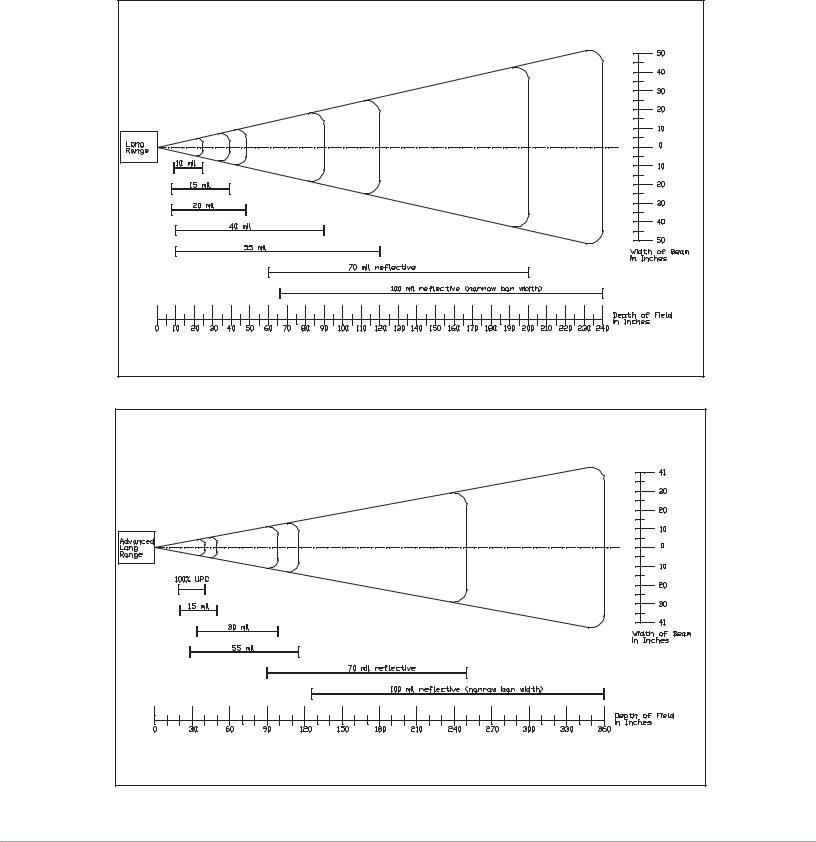
Laser-type scan engines use a stationary laser reflected by a moving mirror and a highly sensitive laser detector. The Long Range and Advanced Long Range scan engines allow for a much greater distance between the symbol and operator. All laser scan engines have the ability to produce a aiming dot to assist the operator in correctly reading symbols at longer distances.
Laser Decoder Symbologies
UPC w/ supplements |
Code 11 |
EAN/JAN |
Interleaved 2 of 5 |
Code 128 |
Discrete 2 of 5 |
EAN 128 |
Chinese 2 of 5 |
ISBT 128 |
Codabar |
Code 39 |
MSI / Plessy |
Code 93 |
GS1 (RSS) Databar |
GS1 (RSS) Limited |
GS1 (RSS) Expanded |
Laser Engine |
Scan Rate |
Scan Angle |
Standard High |
116 ±5 scans / second |
47° ±2.5° or 35° ±2.5° |
Speed Laser |
|
Software Controlled |
Long Range |
35 ±5 scans / second |
23° ±2° |
Laser |
|
|
Advanced Long |
35 ±5 scans / second |
13° ±2° |
Range Laser |
|
|
Min. Print Contrast (%)
Dark Light Reflectance @ 650 nm
20%
40%
40%
1-10

USER’S GUIDE |
M7220 Wireless Hand-held Terminal |
|
|
|
|
Data Capture and Bar Code Scanners - cont’d.
Reading distance for the Standard High Speed Laser
1-11
USER’S GUIDE |
M7220 Wireless Hand-held Terminal |
|
|
|
|
Data Capture and Bar Code Scanners - cont’d.
Reading distance for the Long Range Laser
Reading distance for the Advanced Long Range Laser
1-12

USER’S GUIDE |
M7220 Wireless Hand-held Terminal |
|
|
|
|
Data Capture and Bar Code Scanners - cont’d.
Imager Style Scan Engines
The Area Imager uses a camera type sensor to acquire images of the target symbol. Unlike the linear laser engines, the Area Imager can decode symbols at any orientation and is capable of reading 2- Dimensional symbologies.
Area Imager Symbologies
UPC w/ supplements |
Code 11 |
Codablock F |
QR Code |
EAN/JAN |
Interleaved 2 of 5 |
Code 16K |
TCIF Linked Code 39 |
Code 128 |
Discrete 2 of 5 |
Data Matrix |
Telepen |
EAN 128 |
Industrial 2 of 5 |
EAN-UCC Composite |
PosiCode A |
ISBT 128 |
Codabar |
Matrix 2 of 5 |
PosiCode B |
Code 39 |
MSI / Plessy |
MaxiCode |
MicroPDF417 |
Code 93 |
GS1 (RSS) Databar |
Aztec |
PDF417 |
GS1 (RSS) Limited |
GS1 (RSS) Expanded |
|
|
Area Imager Postal Codes
Planet Code |
Postnet |
British Post |
Canadian Post |
Chinese Post |
Japanese Post |
Kix (Netherlands) Post |
Korean Post |
Area Imager OCR Fonts
OCR-A |
OCR-B |
SEMI |
U.S. Currency |
MICR E-13B |
|
|
|
1-13

USER’S GUIDE |
M7220 Wireless Hand-held Terminal |
|
|
|
|
Data Capture and Bar Code Scanners - cont’d.
The M7220 Scanner LED
The M7220 has a multi-color LED to indicate when the unit has scanned a bar code successfully. When the scan button is pushed, the LED above the on/off button will turn a solid red. Once the scanner has successfully read the bar code, this LED will turn a bright green.
This visual indication of a good read is useful in very noisy environments where the audio beeper can not be heard.
Note: When the M7220 is in sleep mode the scanner LED will be flashing green.
1-14
USER’S GUIDE |
M7220 Wireless Hand-held Terminal |
|
|
|
|
Scanner Information and Labeling
The M7220 Integrated Laser Scanner uses a low-power visible laser diode. Avoid staring directly into the light beam. Momentary exposure to a CDRH Class II laser is not known to be harmful.
Laser Classification: |
CDRH Class II |
Light Source: |
630 – 680 nm laser diode |
Laser Output Power: |
1.0 milliwatt maximum output |
FCC Information: |
This device complies with Part 15 of the FCC Rules. Operation is |
|
subject to the following two conditions: (1) this device may not cause |
|
harmful interference, and (2) this device must accept any interference |
|
received, including interference that may cause undesired operation. |
CAUTION: Use of controls, adjustment, or performance of procedures other than those specified herein may result in hazardous visible laser light exposure.
1-15

USER’S GUIDE |
M7220 Wireless Hand-held Terminal |
||
|
|
|
|
|
|
|
|
|
|
|
|
|
|
|
|
|
|
|
|
|
|
|
|
|
|
|
|
|
|
|
|
1-16

USER’S GUIDE |
M7220 Wireless Hand-held Terminal |
|
|
|
|
The M7220 Internal Radio
The M7220 Hand-held Terminal comes equipped with an internal 802.11b/g radio and diversity antenna. This internal radio is specifically designed to communicate with any 802.11b/g Access Point. The range of the internal radio depends greatly on the quality of the Access Point and the RF communications characteristic of the environment where the device is used. The typical range for an 802.11b/g radio is 500 feet through free air. Additional Access Points must be added to improve coverage in a larger area, or in electrically noisy RF environments.
802.11b/g Fallback Mode
Wireless LAN technology is designed to make maintaining a connection between two devices as reliable and consistent as possible. Since the speed of the connection between wireless devices will vary as range and signal quality varies, the wireless devices will intentionally sacrifice throughput (data rate or connection speed as measured in bits per second) in exchange for maintaining a reliable connection. In other words, a reliable connection at a lower speed is preferred over an unreliable connection at a higher speed (i.e., it is easier to maintain the connection if data rate is deliberately reduced, or put another way, lower data rates will tolerate a higher range and/or worse signal quality). This characteristic is known as fallback. As example, an 802.11b/g system will fallback from 11 Mbps to 5.5 Mbps as range increases or signal quality decreases. Subsequent fallbacks from 5.5 Mbps to 2 Mbps and 1 Mbps are also supported.
Interference and Coexistence
802.11b/g operates in a range of radio frequencies known as an "unlicensed" band (i.e. the FCC does NOT require the use of a license in order to operate a radio transmitter in this range). This means that commercially available radio devices other than wireless LAN devices are permitted to use the same frequency band as 802.11b/g. Consequently, these co-existing radio devices can interfere or "jam" the wireless LAN (and vice versa). Ironically, the most troublesome devices are cordless telephones and microwave ovens.
Fortunately, higher quality cordless phones tend to "listen" for a clear channel before becoming active and will thus avoid interfering with a wireless LAN (i.e., the cordless phone seeks a clear channel for itself so naturally avoids being interfered with or being a source of interference). Jamming from microwave ovens is more severe but is usually restricted to the upper frequency range for 802.11b/g (it should be noted that 802.11b/g divides the available frequency band into 11 channels. The higher numbered channels are most susceptible to microwave oven interference).
In each instance, jamming occurs only when the cordless telephone or microwave oven is active.
1-17

USER’S GUIDE |
M7220 Wireless Hand-held Terminal |
|
|
|
|
Security Issues
Much has been publicized in the media about security problems with wireless LANs. It is highly recommended that WPA encryption be used and in some cases the access points should be set for MAC filtering. When an access point has MAC filtering enabled, the only devices that can communicate through them are the ones which the MAC address has been set.
The primary issue is that many current users of wireless LAN have opted NOT to turn on security features. If users were to enable the security features currently available (including only allowing known systems access to the network and enabling WEP (Wired Equivalent Privacy) or WPA (WiFi Protected Access) encryption the intruder's work is much harder. Much as a burglar will bypass a house whose doors and windows are securely locked, so too will a hacker tend to bypass a network where security measures are enabled.
Battery
The M7220 hand-held computer uses a single battery to supply power to the entire unit. The standard 7.2 Volt, 19.2 Watt-hour battery allows the unit to run continuously for over eight hours, even in the most demanding environments.
WARNING: Use only Lithium-Ion batteries provided by American Microsystems, Ltd. The use of other batteries can result in improper charging, short circuits, fire, and explosion. The use of improper batteries will void all warranties on the M7220 hand-held computer.
NOTE: Lithium-Ion batteries and battery packs provide 300-500 charge/discharge cycles, and although they are not susceptible to “battery memory” like older Nickel-Cadmium technologies, they do loose capacity as they age. When a battery is no longer able to supply ample charge for the application it should be recycled.
The M7220 battery can be charged either through an external battery charger or from within the handheld computer when the unit is placed in the charging and communication cradle. Typical charging time will vary depending on the charging method and charger.
WARNING: M7220 Batteries should only be charged with American Microsystems, Ltd. battery chargers approved for M7220 batteries.
The M7220 hand-held computer will alert the user when the battery has reached a critical level. The unit's battery should be replaced with a fully charged M7220 battery or the unit should be placed back into the charging and communication cradle.
1-18

USER’S GUIDE |
M7220 Wireless Hand-held Terminal |
|
|
|
|
Accessories
The M7220 Hand-held Terminal has available an optional charging and communications cradle. The cradle automatically charges the M7220 battery while it is resting in the cradle and the unit is turned off. The cradle also includes an extra slot to charge a spare battery. The M7220 cradle can accommodate the M7220 with or without the optional M7220 handle.
M7220 and Cradle
The ACC-5925 Cradle has three indicator lights:
 - Indicates that the M7220 Cradle is plugged in.
  - Indicates the M7220 main battery is charging.
  - Indicates the spare battery is charging.
When the battery charging LED is red, the battery is charging. When the battery charge LED is green the battery is fully charged. A fully discharged battery takes about 6 hours to completely recharge.
1-19

USER’S GUIDE |
M7220 Wireless Hand-held Terminal |
|
|
|
|
The M7220 Cradle’s Communication Ports
The M7220 hand-held terminal has 2 different styles of communications ports, RS-232 (RJ-45) and USB (Type II). The M7220 Cradle also has 2 communications ports, RS-232 (DB-9) and USB (Type II). The M7220 Communications Cradle uses a standard RS-232 (DB-9 Male – DB-9 Female) cable.
ACC-5925 Cradle
Both communication connectors on the back of the M7220 cradle are wired “straight through”. This means that the communications settings on the M7220 handheld terminal will determine the settings on the communication cradle. The M7220 Cradle has no internal or external settings that can be changed.
The high speed USB data port is used to load a new or updated operating system or settings into the M7220 hand-held.
DB-9 Pin out (RS-232)
1 |
– DCD (Data Carrier Detect) |
6 |
– DSR (Data Set Ready) |
2 |
– RXD (Receive Data) |
7 |
– RTS (Request To Send) |
3 |
– TXD (Transmit Data) |
8 |
–CTS (Clear To Send) |
4 |
– DTR (Data Terminal Ready) |
9 |
– NC (No Connection) |
5 |
- GND (Signal Ground) |
|
|
1-20

USER’S GUIDE |
M7220 Wireless Hand-held Terminal |
|
|
|
|
Chapter 2
The M7220 Menu System
Overview
The M7220 uses a modern menu system to access its available features and settings. From an active telnet or browser session, the menu can be accessed by pressing the [Menu] key. Subsequent presses of the [Menu] key will cycle through the available menus, described below.
The menu system also shows some basic information about the status of the system along the left and right sides of the screen:
All of the M7220 options, applications, and features are divided into five primary menu catagories:
“Connect / Reconnect” “Tools & Utilities” “Preferences” “Administration” “Diagnostics”
Alternative to cycling through the menus via the [Menu] key, the function keys can be used to quickly access any desired menu.
With the 55-key Alpha-numeric keypad, pressing the [Func] key followed by the designated number key will jump the screen to the desired menu. The M7220 35-key Numeric keypad has discrete function keys that can be directly pressed.
2-1

USER’S GUIDE M7220 Wireless Hand-held Terminal
F1 - “Connect / Reconnect” - Starting or Re-starting a configured TELNET or browser session
F2 - “Tools & Utilities” - System tools and useful applications (Calculator, Bar Code Data Viewer, etc...)
F3 - “Preferences” - End user preferences (Contrast, etc...)
2-2

USER’S GUIDE |
M7220 Wireless Hand-held Terminal |
|
|
|
|
F4 - “Administration” - M7220 system-wide setup (Wireless Networking, Power Management, Telnet session setup, etc...)
F5 - “Diagnostics” - Advanced debugging and diagnostic tools (Software versions, Network Status, Hardware Tests, etc...)
From any primary menu, pressing [Esc] will bring the screen back the the “Connect” menu.
2-3

USER’S GUIDE |
M7220 Wireless Hand-held Terminal |
|
|
|
|
Navigating the Primary and Icon Menus
All of the primary menus, with the exception of the “Connect / Reconnect” menu and along with some of the “Administration” options, use a series of icons and graphics to allow for easy identification of the available items. Each of these items can be selected in a variety of ways to allow for easy access no matter the keyboard layout or operator preference.
Normal selection is done via the numeric keys, as each icon displays a small number on the top right of its identifying graphic. The number keys on the keyboard correspond to these numbers and can be directly pressed to access the desired function.
Number keys
Alternatively, the arrow keys can be used to move through the icons and pressing [ENTER] will activate the selected function. Once an arrow key has been pressed, an icon cursor will be visible around the currently selected graphic.
Cursor
2-4
 Loading...