

Page 1

WTK 14312 W
OPERATING INSTRUCTIONS EN
DRYER
Please carefully read these Operating Instructions before using the appliance!
IO-WMS-0043
(12.2015/1)
Page 2

CONTENTS
Basic Information........................................................................................................................3
Safety instructions...................................................................................................................4
Installing the dryer.......................................................................................................8
Understanding the symbols on clothes labels...............................................................11
Display and control panel........................................................................................12
Using the appliance................................................................................................15
Table of programmes.........................................................................................16
Troubleshooting..............................................................................................................17
Maintenance and Cleaning.......................................................................................19
Specification..............................................................................................................20
Service and Warranty..................................................................................................20
Product fiche..........................................................................................................21
In accordance with European Directive 2012/19/EC and Polish legislation regarding
used electrical and electronic goods, this appliance is marked with the symbol of the
crossed-out waste container.
This marking indicates that the appliance must not be disposed of together with other
household waste after it has been used.
The user is obliged to hand it over to waste collection centre collecting used electrical
and electronic goods. The collectors, including local collection points, shops and local
electronic goods helps avoid environmental and health hazards resulting from the presence of dangerous components and the inappropriate storage and processing of such goods.
authority departments provide recycling schemes. Proper handling of used electrical and
2
Page 3
BASIC INFORMATION
Dear customer,
From today, DRYING will be easier than ever before. Your Amica DRYER is exceptionally
easy to use and extremely efcient. After reading these Operating Instructions, operating the
appliance will be easy.
Before being packaged and leaving the manufacturer, the appliance was thoroughly checked
with regard to safety and functionality. After these tests some moisture or water may remain
in the appliance.
Before using the appliance, please carefully read these Operating Instructions
By following these instructions carefully you will be able to avoid any problems in using the
appliance.
It is important to keep these Operating Instructions and store them in a safe place so that
they can be consulted at any time.
Follow these instructions carefully in order to avoid possible accidents.
Important!
This dryer is intended for household use only for drying textiles and clothing.
Level the appliance before connecting it to a wall socket.
The manufacturer reserves the right to introduce changes, which do not affect operation of
the appliance.
Use
l Carefully read the instructions below before using the appliance.
l Never use the appliance outdoors or anywhere the temperature may fall below freezing.
l The appliance should not be operated by children or anyone who has not read the
instructions.
Important! Temperatures below 0°C can damage the appliance!
In the event of the appliance being stored or transported in sub-zero temperatures, it should
be left to acclimatise in a temperature above 0°C for 8 hours before being used.
Manufacturer’s Declaration
The manufacturer hereby declares that this product meets the requirements of the following European directives:
l Low Voltage Directive 2014/35/EU,
l Electromagnetic Compatibility (EMC) Directive 2014/30/EU,
and has been marked with the symbol and issued with a declaration of compliance
made available to market regulators.
3
Page 4

NOTES ON SAFETY
l This product is an electrical appliance that is used
exclusively for indoor drying fabrics washed in water. Use
of safe power supply during the operation!
l The power source must be grounded. The grounding cable must be buried underground and must not be
connected to the utilities network, such as water pipe or
gas pipe. Grounding and neutral wire and must be distinguished and may not be connected together.
l The power cord must comply with IEC standards
and withstand current greater than 10A. If these requirements are not met, you should immediately adapt your
domestic electrical system to ensure the safety of your
household.
l The appliance can dry up to 8 kg of washed laundry.
l Do not dry chemically cleaned clothes in the dryer
l Do not dry dirty laundry.
l Laundry contaminated with substances such as
cooking oil, acetone, alcohol, petrol, kerosene, stain
removers, turpentine, wax and wax removers must be
washed in warm water with detergent before drying in the
dryer.
l Do not attempt to dry the foam rubber (latex foam),
bathing caps, waterproof textiles, rubber-lined clothing or
pillows tted with rubber pads in your tumble dryer.
l Fabric softeners or similar products should be as
specied in the relevant directions for use.
4
Page 5

NOTES ON SAFETY
l Laundry is not heated in the last part of the drying
cycle. It is the cooling cycle to make sure the laundry is
not damaged and has the right temperature.
l Filters should be cleaned each you use the appliance.
l Always keep the appliance clean.
l The room where the appliance is used must have
adequate ventilation. Do not install the appliance in the
same room where you use other appliances that produce
exhaust fumes and other combustion gases..
l CAUTION: Do not turn off the dryer before the drying cycle ends unless the laundry will be quickly removed
and hung out in order to dissipate heat.
l Air from the appliance must not be discharged to a
chimney used for discharging ue gas from combustion
appliances that burn gas or other fuels.
l The appliance must be installed in such a way as to
ensure unlimited access to it and the dryer door may be
fully opened.
l Keep pets away from the machine.
l Laundry contaminated with oil may ignite sponta-
neously, especially in the heat generated in a tumble dryer. Heating oil causes oxidation reaction. The oxidation
produces additional heat. If the heat cannot dissipate,
the laundry can become hot enough that ignition occurs.
Stacking fabrics soiled with oil can prevent heat dissipa-
tion and create a re hazard.
5
Page 6

NOTES ON SAFETY
l If you cannot avoid tumble drying fabrics soiled with
vegetable oil, cooking oil or dirty hair care products, you
must rst wash dirty laundry in hot water with detergent. In
this way you can reduce, but not eliminate the risk.
l Do not overturn the appliance during normal use
and maintenance.
l Before drying, make sure there are no foreign objects such as coins, lighters, matches, etc. in clothing
pockets.
l This appliance can be used by children aged 8
years and older or persons with physical, mental or sensory handicaps, or those who are inexperienced or unfamiliar with the appliance, provided they are supervised or
have been instructed how to safely use the appliance and
are familiar with the associated risks. Ensure that children
do not play with the appliance. Children should not be
allowed to clean or maintain the appliance.
Children less than 3 years of age shall be kept away unless
continuously supervised.
l If the power cord is damaged it must be replaced
to prevent danger. The power cord can be replaced by a
service centre authorized by the manufacturer or by other
suitably qualied person.
l This appliance is intended solely for indoor use.
l Make sure aby dryer ventilation openings are not
blocked by the carpet.
6
Page 7

NOTES ON SAFETY
l If the appliance excessively heats up, immediately
remove the plug from the wall outlet.
l Do not pull the power cord when removing the plug
from the wall outlet.
l Do not insert or remove the plug from the wall outlet
with wet hands.
l Do not damage the cord or plug.
l Do not install or disassemble the dryer before you
carefully read the operating instructions.
l Do not place the dryer on top of the washing machine
without a special kit (You must purchase the stacking kit to
install the dryer on top of the washing machine. To avoid the
danger hair the dryer must by installed the manufacturer's
service technician or other suitably qualied person).
l Do not lean on the open dryer door.
l Do not place objects such as candles or electric stove
on the dryer.
l Do not exceed the maximum appliance load.
l Do not use the dryer without the lter base and its
cover.
l Do not dry wet laundry that has not been spun.
l Do not expose the dryer to direct sunlight. The appli-
ance is designed for household use only.
l Do not install dryer in rooms with high humidity.
l Unplug the appliance from the wall outlet before any
cleaning and maintenance. Do not clean the appliance with
water jet.
l Do not dry laundry contaminated with flammable
substances, such as oil or alcohol. This could result in an
explosion.
7
Page 8
INSTALL THE DRYER
I. Position and level the appliance
l For convenience, it is recommended to place the appliance near a washing
machine.
l Do not place the appliance on a carpet!
l The dryer must be installed in a clean place, where dirt does not accumu-
late. There must inow of fresh air near the appliance. Do not block the front air
inlet or air intake grilles at the back of the appliance.
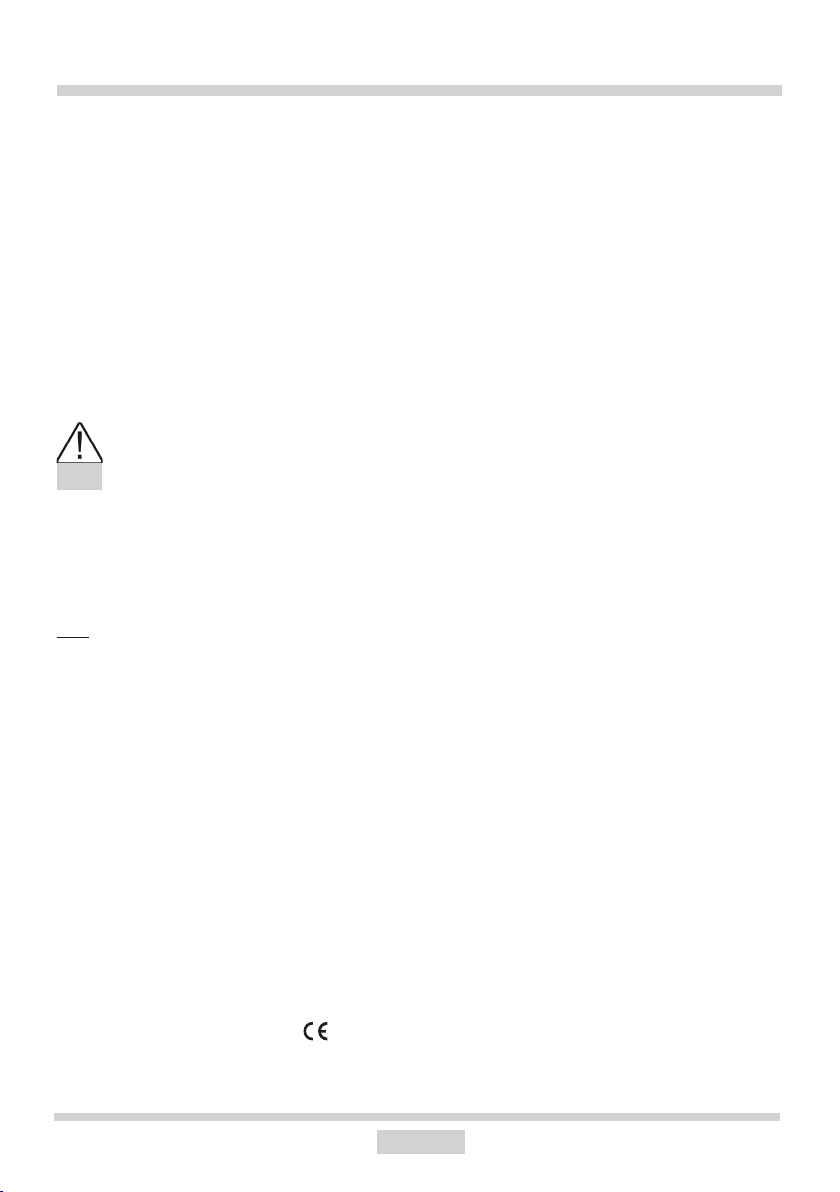
l The oor surface should not be either concave or sloping!
l Pay attention to the shape of the oor surface, and make sure the entire
appliance weight of the rests on its legs (not its body)!
l Place the appliance on a solid, even surface.
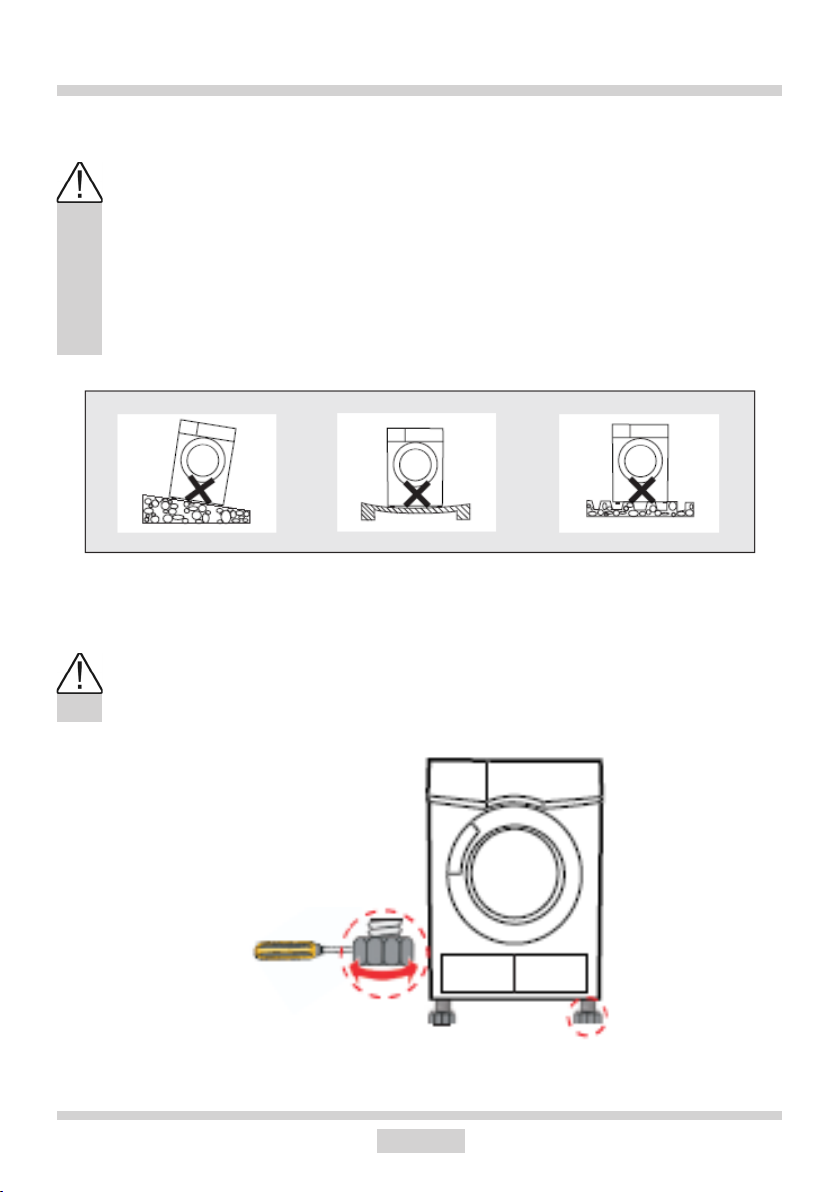
l Level the machine by adjusting the legs (1)
After positioning and levelling the appliance,
check that it is stable by pressing down each
corner and ensuring it does not move!
8
Page 9

INSTALL THE DRYER
II. Water drain (option)
Installation Steps:
Using pliers remove the drain tube from the
connector
Quick Start:
Normally condensed water
drains into the container in
the upper left corner of the
dryer. Optionally, you can
use the drain hose in the
accessory bag and connect
it to the dryer. Connect the
hose as shown here.
Insert the external drainage hose
9
Page 10

INSTALL THE DRYER
III. Connect to power supply
l The appliance's mains connection (electrical wall socket) should be in
a visible and accessible place!
l Only plug the appliance into a properly installed socket with an earth pin!
l Do not connect the appliance through any extension cord or an adapter!
l In the event of the power cord being damaged, it must be replaced by
an authorised technician.
l The electrical system to which the appliance is to be connected must be
protected with a 10 A fuse.
10
Page 11

INSTALL THE DRYER
IV. Tips
1. Spin the laundry in the washing machine before tumble drying. The high spin speed can
reduce the drying time and save energy.
2. To make sure the drying effects are uniform, sort the laundry by fabric type and drying
program.
3. Before the drying close the locks, hooks and buttons, etc.
4. Do not over-dry clothes, as they can easily crease or shrink.
5. Do not dry articles such as raincoats, bike covers or similar exible materials containing
rubber parts.
6. The appliance door can be opened only once the drying programme has completed.
Do not open the door during the drying programme as this may result in scalding by hot
appliance parts or hot clothing.
7. To avoid extended drying cycles and increased energy consumption, clean the appli-
ance lters after each use. Remember to empty the container with water discharged during
drying.
8. Use only the dedicated programme to dry woollen garments.
9. Recommended load depending on the kind of laundry to be dried.
Coats
(approx. 800 g)
Sheets
(about 600g cotton)
T-shirts
(about 180g cotton)
Jackets
(about 800g cotton)
Working clothes (upper and lower)
(about 1120g cotton)
Briefs, panties
(about 70g cotton)
Jeans
(approx. 800 g)
Pyjamas
(approx. 200g)
Socks
(about 30g ber mix)
Quilts
(about 900g cotton)
Shirts
(about 300g cotton)
11
Page 12

UNDERSTANDING THE SYMBOLS ON CLOTHES LABELS
Before drying pay attention to the symbols on the apparel label.
Failure to follow the symbol instructions may damage or destroy clothes to be dried.
The symbols are explained in the following table:
Dry Tumble dry Do not tumble dry Do not dry
Line dry/hang to
dry
Dry clean Do not dry clean Dry clean normal
Dryer description
Condensed water
container
Dryer drum
Drip dry Dry at Dry in the shade
cycle with any
solvent
■
■
Dry clean normal
cycle petroleum
solvent only
Control Panel
■
■
Door handle
Bottom lter cover
■
Top lter
■
12
Page 13

DISPLAY AND CONTROL PANEL
■
3
1. Programme selector dial
2. Display
3. Indicators of progress of the program
4. Start/Pause button
5. Anti-Crease button
6. Gentle button
7. On/Off button
8. Delay button
9. Time button
5 + 6. Child Lock
2
9
8
■
■
1
■
■
■
■
4
■
■
6
5
+
5
6
■
7
13
Page 14

DISPLAY AND CONTROL PANEL
1. Programme selector dial
1. Press the [On/Off] button.
2. Rotate the programme knob to select the desired programme.
3. Select the [Delay], [Anti-Crease] or [Gentle] optional functions for additional option.
4. Press the [Start/Pause] key.
2. Display
Only indicators (DELAY/REMAIN) relevant to the phase that is currently being carried out
will remain on the display during the drying process.
When the drying cycle begins, [REMAIN ] will indicate the remaining time [x:xx] until the
drying cycle completes. The dash “-’’means “Standby” status. You can press any buttons
to resume the programme or open the door.
3. Indicators of progress of the program
The four LED lights indicate the status of the drying programme.
4. START/PAUSE button
Press Start/Pause to start or pause a programme.
When this button is pressed, this machine is switched between start and pause.
5. Anti-Crease button
The “Anti-Crease” phase time is the last 30 minutes (default) or 120 minutes (selected)
of the drying cycle. When the anti-crease function is selected, the anti-crease LED
indicator will illuminate on the display, and the drum will intermittently rotate during the
drying programme to make sure, the sensitive textiles will not crease. The function can
be selected for all programmes, except [Warm], [Cool] and [Refresh].
6. Gentle button
You can select this function in all programmes except “Refresh”, “Cool” and “Warm”.
20 minutes will be added to the programme and the gentle LED indicator will illuminate
on the display. The programme temperature will be reduced to protect sensitive textiles,
such as acetate, elastane and etc.
7. On/Off button
On/Off button has the on and off function. When this button is pressed, this machine is
switched between on and off.
14
Page 15

DISPLAY AND CONTROL PANEL
8. Delay button
You can delay the drying cycle for up to 24 hours. Press the button multiple times to select delay from 1 to -24 hours. The drying will start in x:xx hours.
When the delay start function is active the display will only show the delay start time and
the [DELAY] indicator will ash. After 30s, the display will only show “-”.
Procedure detail:
1). Load your laundry and make sure the appliance door is closed.
2). Press the [On/Off] button, then turn the programme selector knob and select
a desired programme.
3). You can select the [Anti-Crease] or [Gentle] options as needed
4). Press the [Delay] button.
5). Press [Delay] repeatedly to select the delay time.
6). Press [Start/Pause] to start countdown.
The drying cycle will start when the delay time has elapsed.
7). Press [Start/Pause] again to pause, the delay function.
8). Press [On/Off] to cancel the “Delay” function.
9. Time button
Press the “Time” button to adjust the drying time from 20 to 60 minutes. This function is
ideal for few small clothes, for example, one facecloth or two pairs of socks.
It is equivalent to using timer to control the drying process, but for “Warm” programme
only.
5 + 6. Child Lock
This function locks function buttons to prevent settings being changed or operation
interrupted by children. Pres and hold Gentle and Anti-Crease button for 3 seconds to
activate the Child Lock during a drying cycle. When child lock function is set, the display
will show [ ] icon and only [On/Off] button can be used. To disable Child Lock,
press and hold Signal and Anti-Crease buttons for 3 seconds.
Important! If the Child Lock function is activated, the display will show the [ ] symbol.
Important! When you turn off or unplug the dryer or the drying cycle ends,
the Child Lock function will deactivate.
Moisture sensor
An appliance with a moisture sensor determines the laundry moisture and automatically
adjusts the drying time depending on the load. This function will automatically activate
during the drying cycle except in “Warm” “Cool” and “Refresh” programme.
15
Page 16

USING THE APPLIANCE
I. Select Programme
1. Press [On / Off]. When the LED display lights up turn the programme selection dial
and select the desired programme
2. Select the additional option [Delay], [Time], [Gentle] or [Anti-Crease] — if the programme allows you to select additional options.
3. Press the [Start/ Pause] button.
II. Set Delay Start
The delayed start function may be used when, for example, taking advantage of discounted electricity tariffs.
Procedure:
1. Close the appliance door.
2. Set the programme selector knob to the desired programme (see the table further on).
3. Select additional functions or drying cycle parameters as required.
4. Press the Delay Start button.
5. Select time ranging from 1 to 24 hours. The display will show the setting from 1H to
24H.
6. Press the [Start/ Pause] button. The appliance will be set in delay mode. Drying cycle
will commence immediately after the delay time has elapsed.
Note: If you set delay start, the display will show the time remaining to start the drying
program.
III. End of drying cycle
1. Once the programme is complete drum will stop rotating and the display shows "0:00".
The last programme phase indicator will ash. If you do not remove clothes from the
dryer with a specied time, the appliance will start the [Anti-Crease] programme. Press
[On/Off] and remove the plug from the wall outlet.
2. If the appliance suddenly stops during the drying programme and displays an error
message, follow the information in the "Troubleshooting" section.
IV. Cancel or modify programme
Press the On/Off button to interrupt the programme. Then press on/off button again to
turn on the appliance and select the desired drying programme.
16
Page 17

TABLE OF PROGRAMMES
Programme name Weight
Light 8 √ √ For cottons and coloureds made of cotton or linen. 1:05 3.9
Iron √ √ 1:30 3.0
Standard √ √ 2:10 4.9
Cotton
Extra √ √ 2:30 5.5
Light 3.5 √ √ To dry thick or multi-layered synthetic fabrics. Drying
Standard √ √
Extra √ √ To dry thin synthetic fabrics which are also to be ironed,
Synthetics
Delicate 3.0 √ √
Warm/Cool
(20min/30min)
Quick 3.0 √ √
Refresh 1.0 X X
Additional functions
(Max)
kg
3.0 X X
available
Anti-Crease Gentle
Recommendations Time
level: extra dry.
To dry thin synthetic fabrics which are not ironed, such as
easy care shirts, table linen, baby clothes, socks. Drying level:
cupboard dry.
such as knitwear, shirts.
Drying level: applicable to iron.
For machine-washable woollen textiles. Textiles are
ufer, but not dried. Remove and hang up textiles
when the programme ends.
For timer programme , delicate textiles made of acryl-
ic bres or small items. Use [Time] function to adjust
[Warm] time.
For laundry which is to be dried quickly, e.g. made of
acrylic bres or for individual small items. Also for subsequent drying.
For refreshing or gently cleaning textiles with commercially available dry cleaning products.
[H:min]
0:20 / 0:30
Energy con-
sumption
0:42 1.2
0:57
1:00
1:00
0.7 / 0.1
1:05
0:32
[KWh]
1.6
1.8
2.0
2.8
0.4
Note: the above programme is recommended.The user can select the right programme to suit their needs.
Thick or multi-layered fabrics, e.g. bedlinen, jeans, jackets etc, are hard to dry. It is preferable to choose the Cotton
Extra programme.
17
Page 18

TROUBLESHOOTING
Problem Probable cause/Solution
No information on the display
- Make sure the plug is properly inserted into the wall outlet.
- Check the main power supply.
The dryer does not start
The door opens spontaneously
The laundry is not sufciently dry
or drying time is too long
- Check if the Start / Pause button is pressed.
- Make sure the door is properly closed.
- Push the door in until it clicks shut.
- Make sure the dryer is not overloaded.
- Clean the top and bottom lter.
- Select the appropriate programme.
- Do not block the air intake.
Note:
If you can not correct the problem yourself, ask for assistance:
1. Press [On / Off].
2. Unplug the appliance and call service.
18
Page 19

TROUBLESHOOTING
Precautions
Only authorised technicians can carry out repairs.
Before you call customer service, please check if you can correct fault by following the
instructions below.
A technician will charge you for advice, even during the warranty period.
Display indica-
tion
is ashing
is ashing
E30
E32
E33 Temperature
E34 Check the rear temperature sensor
Reason Alarm Solution
Water tank full
or pump error
Poor ow Check the lter and the air ow
Heater problem The Error
Humidity sensor
error
sensor error
Code is
ashing on
the display
[X:XX] The
beep is
sounded
every 15
minutes.
Check the water tank and pump.
Check the heater and the thermostat
Check the humidity sensor and its electronic
board
Check the front temperature sensor
If you cannot correct the fault by yourself and still need help:
1. Press the [On/Off] button.
2. Unplug the appliance and call service.
19
Page 20

MAINTENANCE AND CLEANING
I. Empty the water container
1. Hold and pull out the water container with both hands.
2. Tilt the water container, pour out the condensed water.
3. Insert the water container.
WARNING:
1. Empty the water container after each use. If the water container is full during the drying process, the
programme will be paused and the [ ] icon will ash. When the container is emptied, you can restart
the dryer by pushing the [Start/Pause] button.
2. Do not drink the condensed water.
II. Clean the lint lter
1. Open the appliance door.
2. Pull the lint lter upward to take it out.
3. Clean the lint lter; scrape off the threads accumulated on the lint
lter, with your hand or rinse with water and dry thoroughly.
4. Replace the lint lter.
NOTE!
1. Accumulation of lint on the lter impedes the air circulation, which will
cause the extension of drying time and energy use; therefore, the lint lter must be cleaned after each
use.
2. Unplug the power cord before cleaning!
3. Do not operate the dryer without the lint lter !
4. Clean the lint lter after each use to prevent lint accumulation inside the dryer.
III. Clean air condenser
- Allow the dryer to cool down.
- Residual water may escape, so place an absorbent cloth under the maintenance
ap.
1. Unlock the maintenance ap.
2. Completely open the maintenance ap.
3. Undo both locking levers towards each other.
4. Pull out the air condenser.
5. Clean the air condenser completely, drain thoroughly.
6. Clean the seals.
7. Re-insert the air condenser.
8. Tighten both locking levers.
9. Close the maintenance ap until it locks into position. Clean the air condenser
once every 3 months if frequently used. Do not damage the air condenser!
1. Clean with water only. Do not use hard/sharp-edged objects!
Do not operate the dryer without the air condenser!
2. During drying, water may collect between the window and the seal, but
this does not affect the function of your dryer!
20
Page 21

SPECIFICATION
-Type WTK 14312 W
-Rated voltage 220-240V / ~ 50Hz.
-Rated power 2700 W
- Ambient temperature + 5°C ~+ 35°C
- Maximum Load max 8 kg
- Dimensions Height x Depth x Width 845/595/615 [mm]
- Weight 43 kg
Meets the requirements of EU legislation, EN- 61121 standard
Note:
1. The rated capacity is the maximum capacity. Make sure the dry clothes loaded into the appliance
never exceed the rated capacity.
2. Do not install the tumble dryer in a room where there is a risk of freezing temperature.
At temperatures around freezing point the tumble dryer may not be able to operate properly.
3. There is a risk of damage if the condensed water freezes in the pump, hoses and / or condensed
water container.
Testing for label information in accordance with EN 61121 using the standard cotton drying programmes:
- at full load
- at partial load
l weighted average electricity consumption is 561 kWh/year
21
Page 22

PRODUCT SHEET
(In accordance with Commission Delegated Regulation (EU) No. 392/2012 of 1 March 2012 supplementing Directive 2010/30/EU of the
European Parliament and of the Council with regard to energy labelling of household tumble dryers).
Supplier's name or trade mark
Type
Amica
WTK 14312 W
Rated load 8.0 kg
Energy efciency class
1)2)
B
Dryer Type condensing
Annual weighted average energy consumption AE
3)
c
561 kWh / year
Energy consumption of the standard cotton drying programme:
- At full load E
- At partial load E
dry
dry1/2
Power consumption in the off-mode P
Power consumption in standby mode P
o
I
4,76 kWh
2,56 kWh
0,28 W
0,8 W
Duration of the left-on mode: 10 min
Condensation efciency class on a scale from G (lowest
efciency) to A (highest efciency)
1)
The average condensation efciency in the standard
cotton programme at full load C
t
The average condensation efciency for the standard
cotton programme at partial load C
dry
The weighted condensation efciency for the standard
cotton programme at full and partial load C
dry1/2
The weighted duration of the standard cotton programme at full and partial load T
t
Duration of the standard cotton programme at full load
T
dry
Duration of the standard cotton programme at partial
load T
dry1/2
Sound level in the standard cotton program at full load
L
wa
B
80.1%
80.1%
80.1%
112 min.
140 min.
90 min.
69 dB (A) re 1 pW
Equipment designed for tting No
Automatic tumble dryer No
1)
Energy efciency class on a scale from A+++ (more efcient) to D (least efcient)
2)
"Standard cotton drying programme" is the programme referred to on label and in the datasheet — it is suitable for drying cotton at
normal humidity levels and is the most energy efcient programme for drying cotton.
This programme is suitable for drying normal, wet cotton products.
It is the most energy efcient cotton drying programme.
3)
Estimated weighted annual energy consumption based on 160 standard cotton drying cycles at full and partial load and power consumption in standby and off modes.
Actual energy consumption depends on how the appliance is used.
The dryer is equipped with a power management system. Standby time 1 minute.
22
Page 23

23
Page 24

 Loading...