

Page 1

Drzwi ozdobne do zabudowy
INSTRUKCJA MONTAŻU
PL
Decorative housing doors
ASSEMBLY I NSTRUCTIONS
Einbauschrank Fronttür
MONTAGEANLEITUNG
Porte décorative à encastrement
NOTICE D’INSTALLATION
Dekorativní vestavná dvířka
MONTÁŽNÍ NÁVOD
Dekoračné vstavané dvere
NÁVOD NA MONTÁŽ
DI 600
GB
D
F
CZ
SK
IOAA - 576 (08.2010)
8048583
Page 2

2
Page 3
ZASTOSOWANIE
40
560
560
446
2x19-
C
O
M
E
N
U
PL
Szyba ta służy do maskowania wnęki mebla kuchennego, poprawia estetykę kuchni.
We wnęce można przechowywać wszelkiego rodzaju drobny sprzęt AGD.
WYPOSAŻENIE
- ramiona wspornika szyby (1 sztuka),
- szyba drzwi ozdobnych (1 sztuka) wraz z uchwytem INOX i nalepionym paskiem
ozdobnym INOX,
MONTAŻ
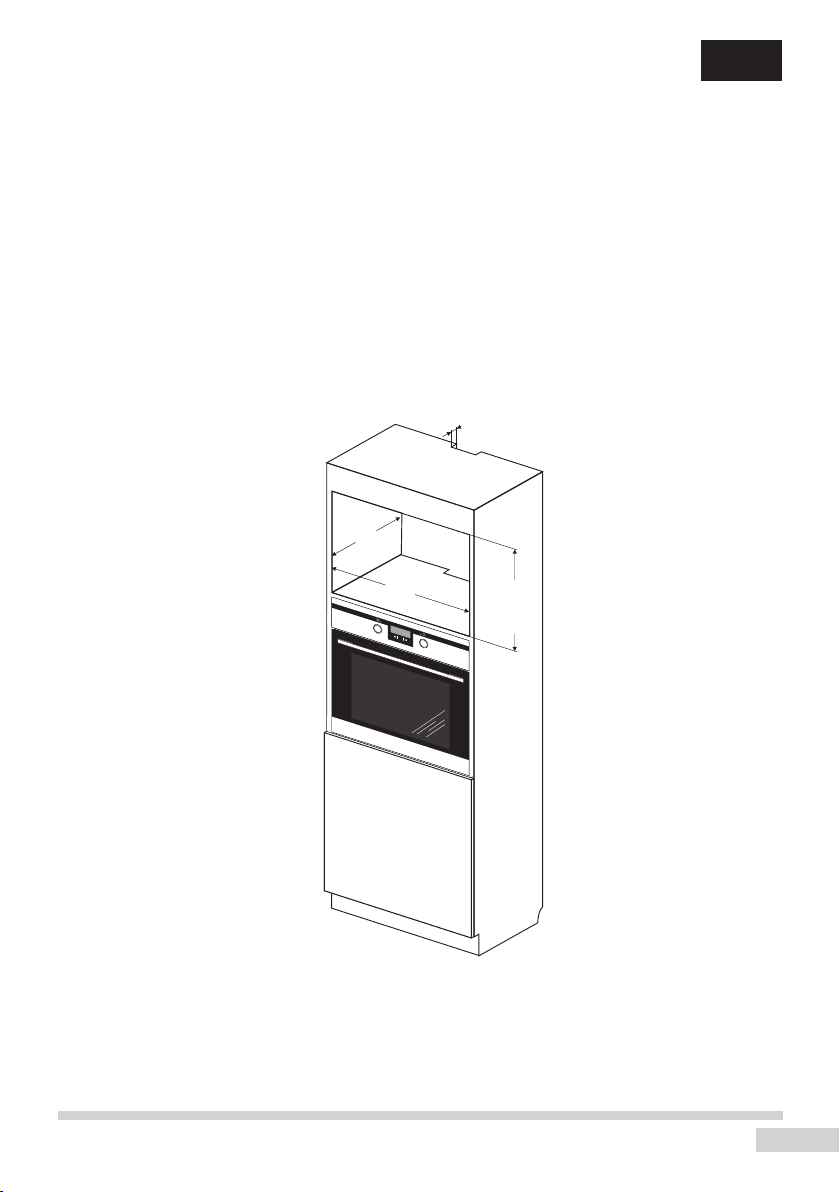
Przygotować otwór w meblu o wymiarach podanych na rysunku 1. W przypadku
istnienia w szafce ściany tylniej należy w niej wyciąć otwór (patrz rys.1).
Rys.1
W celu zamocowania uchwytu szyby należy:
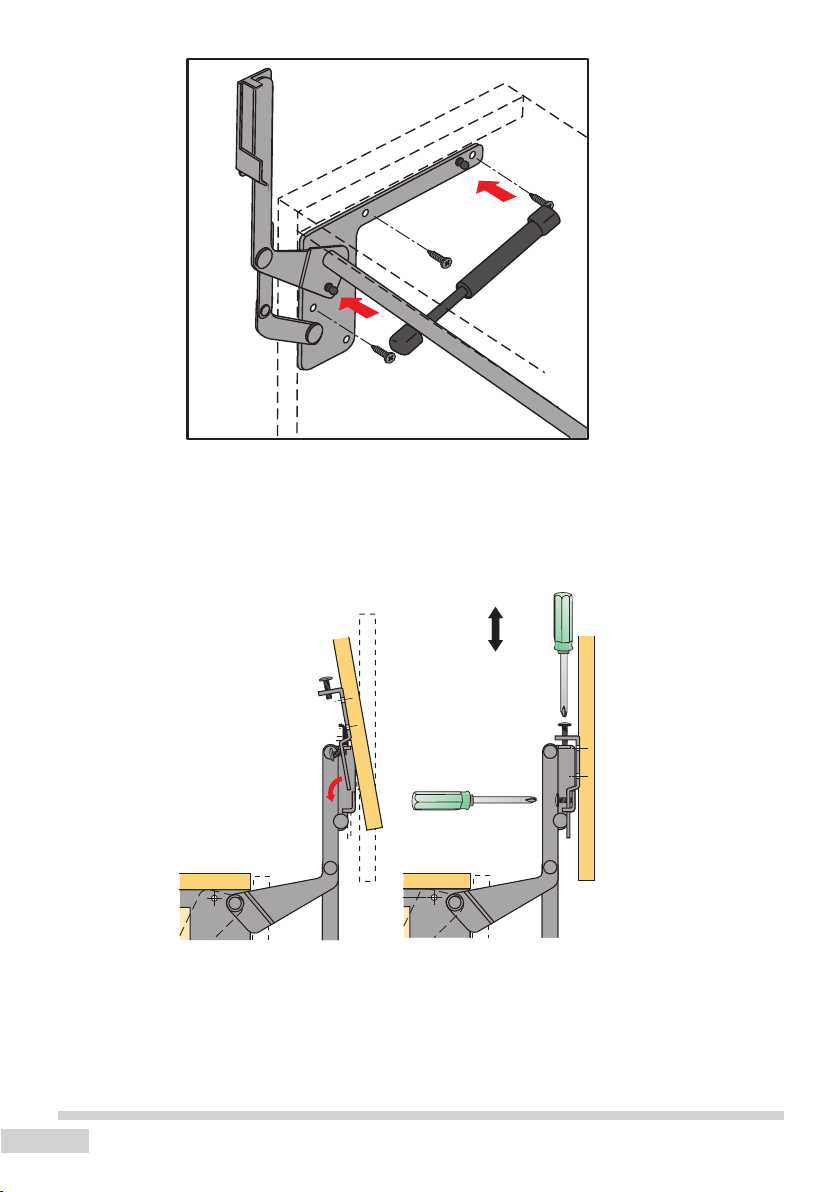
- rozłożyć ramiona wspornika szyby (patrz rysunek 2 )
- zgrać krawędzie uchwytu wspornika z powierzchnią zewnętrzną oraz złożenia mebla,
- zaznaczyć po obu stronach w odpowiednich miejscach położenie trzech wkrętów
mocujących wspornik szyby (patrz rysunek 2),
3
Page 4
Rys.2
A
B
3
-
+
- wyjąć wspornik z wnęki meblowej i w zaznaczonych uprzednio miejscach wywiercić
otwory ułatwiające montaż wkrętów 3,9 x 13 (3 sztuki), - wstawić ponownie wspornik
do wnęki meblowej i przymocować go za pomocą trzech wkrętów 3,9 x 13 (patrz rysunek 2),
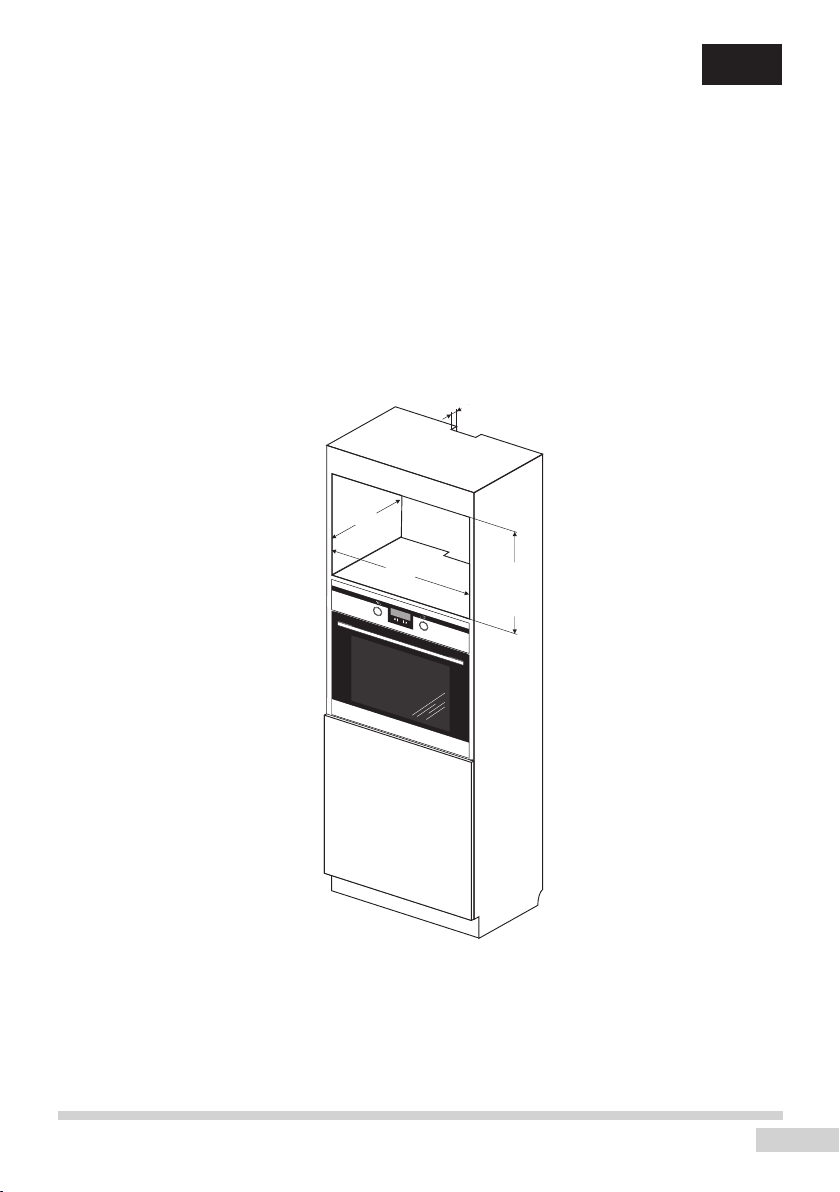
- osadzić szybę na przykręconym wsporniku (patrz rysunek 3),
Rys.3
- przykręcić wkrętakiem krzyżowym boczne śruby kontrujące (patrz rysunek 3 poz. A) ,
- wyregulować wkrętakiem krzyżowym położenie szyby względem pozostałej części
zabudowy meblowej ( ± 3 mm) za pomocą dwóch górnych wkrętów nastawczych (patrz
rysunek 3 poz. B).
4
Page 5
APPLICATION
40
560
560
446
2x19-
C
O
M
E
N
U
GB
This pane serves to mask the furniture alcove, and improves the aesthetics of the
kitchen. Various types of small household items can be stored in the alcove.
FITTINGS
- arms of the pane support bracket (1 piece),
- pane of the decorative door (1 piece) with an INOX handle and an INOX glued on
decorative strip
ASSEMBLY
Prepare a hole in the furniture piece measuring as shown in gure 1. A hole should
be cut out in the back wall of the cupboard, in an event the cabinet has the said wall
(see gure 1).
Fig.1
To fasten the pane handle follow the instructions below:
- spread the arms of the pane support bracket (see gure 2 )
- align together the edges of the support bracket with the external surface and assembly of the furniture item,
- on both sides mark the position of the three screws fastening the pane support bracket in appropriate places (see gure 2),
5
Page 6

Fig.2
A
B
3
-
+
- remove the bracket from the furniture alcove and drill holes facilitating the installation
of the screws 3,9 x 13 (3 pieces) in the previously marked places, - place the support
bracket again into the furniture alcove and afx it using the three 3,9 x 13 screws (see
gure 2),
- fasten the pane onto the screwed in bracket (see gure 3),
Fig.3
- using a Phillips (cross slot) screwdriver screw in the side countering screws (see
gure 3 A) ,
- with the Phillips (cross slot) screwdriver adjust the position of the pane in relation to
the remaining part of the furniture housing ( ± 3 mm) using two top adjusting screws
(see gure 3B).
6
Page 7

ANWENDUNG
40
560
560
446
2x19-
C
O
M
E
N
U
D
Diese Scheibe dient zur Maskierung von Fächern in Küchenmöbeln und wertet die
Küche ästhetisch auf. In dem Fach können sämtliche Kleinküchengeräte untergebracht
werden.
AUSSTATTUNG
- Scheibenhalterung (1 Stück)
- Fronttür (1 Stück) einschließlich INOX Griff und INOX Zierklebestreifen.
MONTAGE
Eine Öffnung mit den in der Abbildung 1 angegebenen Maßen in dem Möbel vorbereiten. Falls in dem Schrank eine Rückwand vorhanden ist, ist in dieser Wand eine
Öffnung auszuschneiden (siehe Abb. 1).
Abb.1
Um die Befestigungskonsole der Scheibe zu befestigen, ist wie folgt vorzugehen:
- Spreizen Sie die Schenkel der Befestigungskonsole auseinander (siehe Abb. 2)
- Richten Sie die Ränder der Konsole auf die Stirnseite sowie die obere Wand des
Möbels aus.
- Kennzeichnen Sie auf beiden Seiten an den entsprechenden Stellen die Positionen
der drei Befestigungsschrauben der Konsole (siehe Abbildung 2),
7
Page 8

Abb.2
A
B
3
-
+
- Nehmen Sie die Konsole aus dem Fach heraus und bohren Sie an den zuvor gekennzeichneten Stellen kleine Öffnungen, um das Eindrehen der 3,9 x 13 Schrauben (3
Stück) zu erleichtern,
- Setzen Sie die Konsole erneut an, und befestigen Sie sie mit Hilfe der drei 3,9 x 13
Schrauben (siehe Abbildung 2),
- Setzen Sie die Scheibe an der festgeschraubten Konsole an (siehe Abbildung 3),
Abb.3
- Schrauben Sie mit einem Kreuzschlitzschraubenzieher die seitlichen Konterschrauben ein (siehe Abbildung 3, Pos. A),
- Stellen Sie mit einem Kreuzschlitzschraubenzieher die Position der Scheibe gegenüber dem restlichen Teil des Möbels ( ± 3 mm) mit Hilfe der beiden oberen Einstellschrauben ein (siehe Abbildung 3, Pos. A).
8
Page 9

USAGE
40
560
560
446
2x19-
C
O
M
E
N
U
F
Ce vitre esthétique sert à masquer la niche du meuble. Vous pouvez garder dans
cette niche des petits appareils électroménagers.
MATÉRIEL D’ÉQUIPEMENT
- bras de support du vitre (1 pièce),
- vitre de la porte décorative (1 pièce) avec la poignée en INOX et avec une ceinture
collée en INOX,
INSTALLATION
Préparez l’ouverture pour l’encastrement dans le meuble dont les dimensions sont indiquées sur la gure 1. S’il existe la paroi arrière dans le meuble, vous devez y découper
l’ouverture (voir la gure 1)
Fig.1
Pour xer le manchon du vitre :
- placez le bras de support du vitre (voir la gure 2),
- ajustez les arêtes du manchon avec la surface extérieure et le pli du meuble,
- marquez sur les deux côtés le placement de trois vis de montage du support du vitre
(voir la gure 2),
9
Page 10

Fig.2
A
B
3
-
+
- retirez le support de la niche du meuble et percez les trous dans les points indiqués
préalablement qui facilitent le montage des vis 3,9 x 13 (3 pièces) – remettez le support dans la niche et xez-le à l’aide de trois vis 3,9 x 13 (voir la gure 2),
- placez le vitre sur le support vissé (voir la gure 3),
Fig.3
- vissez les vis latéraux de contrôle (voir la gure 3 pos. A) à l’aide du tournevis en
croix,
- réglez à l’aide du tournevis en croix le placement du vitre par rapport à la partie
restante du meuble (± 3 mm) à l’aide de deux vis supérieures de réglage (voir la gure
3 pos. B).
10
Page 11

POUŽITÍ
40
560
560
446
2x19-
C
O
M
E
N
U
CZ
Skleněná tabule slouží jako čelo kuchyňského nábytku, zlepšuje vzhled kuchyně. Ve
výklenku lze uschovávat veškerou spotřební elektroniku.
VÝBAVA
- ramena podpěry skleněné tabule (1 kus)
- skleněná tabule dekorativních dvířek (1 kus) s úchytkou INOX a přilepeným dekorativním páskem INOX,
MONTÁŽ
V nábytku proveďte otvor s rozměry uvedenými na obrázku č. 1. Má-li skříňka zadní
stěnu, připravte v zadní stěně otvor (viz obrázek č. 1).
Obr. č.1
Postup připevnění podpěry skla:
- rozložte ramena podpěry skleněné tabule (viz obrázek č. 2)
- seřiďte okraje kování podpěry s vnitřními hranami nábytku
- vyznačte na obou stranách v příslušných místech polohu tří vrutů pro upevnění podpěry skleněné tabule (viz obr. č. 2)
11
Page 12

Obr. č.2
A
B
3
-
+
- vyjměte podpěru, ve vyznačených místech vyvrtejte montážní otvory pro vruty
3,9 ´ 13 (3 ks), přišroubujte podpěru k nábytku pomocí tří vrutů 3,9 ´ 13 (viz obr. č. 2)
- na upevněnou podpěru namontujte skleněnou tabuli (viz obr. č. 3)
Obr. č.3
- křížovým šroubovákem připevněte boční šrouby (viz obr. 3 písm. A)
- křížovým šroubovákem seřiďte polohu skleněné tabule vůči nábytku ( ± 3 mm) pomocí dvou horní stavěcích vrutů (viz obr. č. 3 písm. B)
12
Page 13

POUŽITIE
40
560
560
446
2x19-
C
O
M
E
N
U
SK
Toto sklo sa používa na dekoratívne riešenie uzatvárania výklenkov pre kuchynský
nábytok, zlepšuje vzhľad kuchyne. V takomto výklenku je možné uchovávať všetky
druhy drobnej bielej techniky.
PRÍSLUŠENSTVO
- ramená podpery skla (1 kus),
- sklo dekoratívnych dverí (1 kus) spolu s držiakom INOX a nalepenou dekoratívnou
páskou INOX.
MONTÁŽ
Pripravte otvor v kuse nábytku s rozmermi uvedenými na výkrese 1. V prípade, že je
v tom kuse nábytku zadná stena, je potrebné vyrezať v nej otvor (viď výkr. 1).
Výkres.1
Pre pripevnenie držiaka skla je potrebné:
- rozložiť ramená podpery skla (viď výkres 2)
- zladiť hrany držiaka podpery s vonkajším povrchom a hranami nábytku,
- na oboch stranách vo vhodných miestach označte polohu troch samorezných skrutiek pripevňujúcich podperu skla (viď výkr. 2),
13
Page 14

Výkres.2
A
B
3
-
+
- vyberte podperu z výklenku a vo vopred označených bodoch vyvŕtajte otvory pre
jednoduchšiu montáž samorezných skrutiek 3,9 x 13 (3 kusy),
- opätovne vložte podperu do výklenku v nábytku a pripevnite ju pomocou troch samorezných skrutiek 3,9 x 13 (viď výkres 2),
- sklo umiestnite na priskrutkovanej podpere (viď výkres 3),
Výkres.3
- pomocou krížového skrutkovača priskrutkujte bočné xačné skrutky (viď výkres 3
pol. A),
- pomocou krížového skrutkovača zlaďte polohu skla podľa ostatného nábytku (± 3
mm), polohu je možné upravovať pomocou dvoch horných polohovacích skrutiek (viď
výkres 3 pol. B).
14
Page 15

15
Page 16

Amica Wronki S.A.
ul.Mickiewicza 52
64-510 Wronki
tel. 067 25 46 100
fax 067 25 40 320
www.amica.com.pl
Záruční a pozáruční servis spotřebičů značky Amica zajišťuje
rma Martykán servis v ČR a Fastplus v SR a jejich servisní střediska.
Martykán servis
Zámecká 3
698 01 Veselí nad Moravou
Tel: 518 324 555
e-mail: servis@martykanservis.cz
www.martykanservis.cz
Fastplus s.r.o.
Na pántoch 18
831 06 Bratislava - Rača
Tel: 2 4910 5853-54
www.fastplus.sk
 Loading...