

Page 1

AMM20BI / EMW13180E
EN INSTALLATION MANUAL 2
ES MANUAL DE INSTALACIÓN 8
PL INSTRUKCJAMONTAŻU 14
CZ INSTALAČNÍLETÁK 20
SK NÁVODNAPOUŽÍVANIE 26
DE INSTALATIONSANLEITUNG DER MIKROWELLE 32
Page 2
THANK YOU FOR PURCHASING AN AMICA APPLIANCE
i
Please read this manual carefully before you start to use this microwave. This way,
you can ensure its proper and correct operation.
Please preserve this manual and store it near the appliance, so that it is available
at all times for reference.
Observe the instructions contained herein to prevent accidents.
Before using the microwave, please carefully read this manual. Store it in
such a place, so that it may be used in future. Please follow the instructions
to ensure many years of reliable operation of your oven.
Important!
The appliance is designed for household use only.
The manufacturer reserves the right to introduce changes which do not affect the operation of the appliance.
The appliance is designed for household
use only.
The manufacturer reserves the right to
introduce changes, which do not affect
operation of the appliance.
The pictures in this operating instructions
are for illustration only. Full list of the
appliance accessories may be found in
an appropriate section of this operating
instructions.
2
Page 3
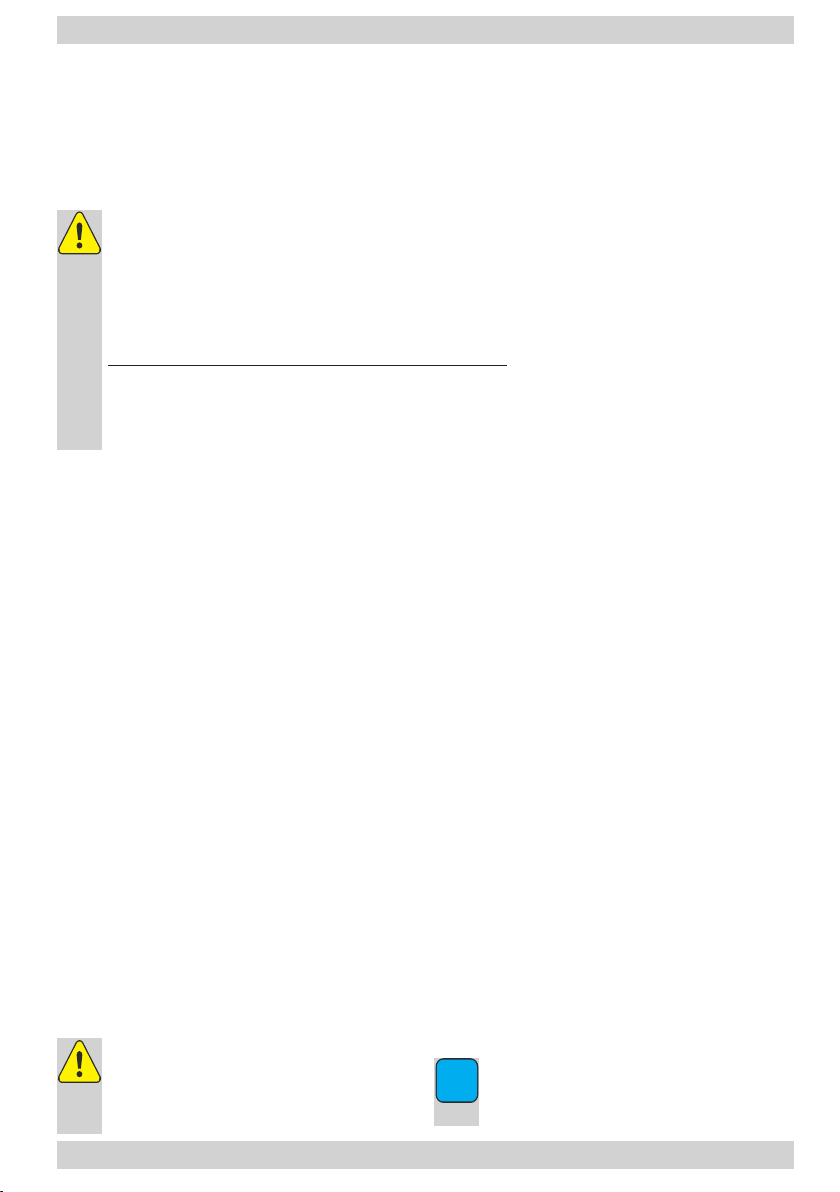
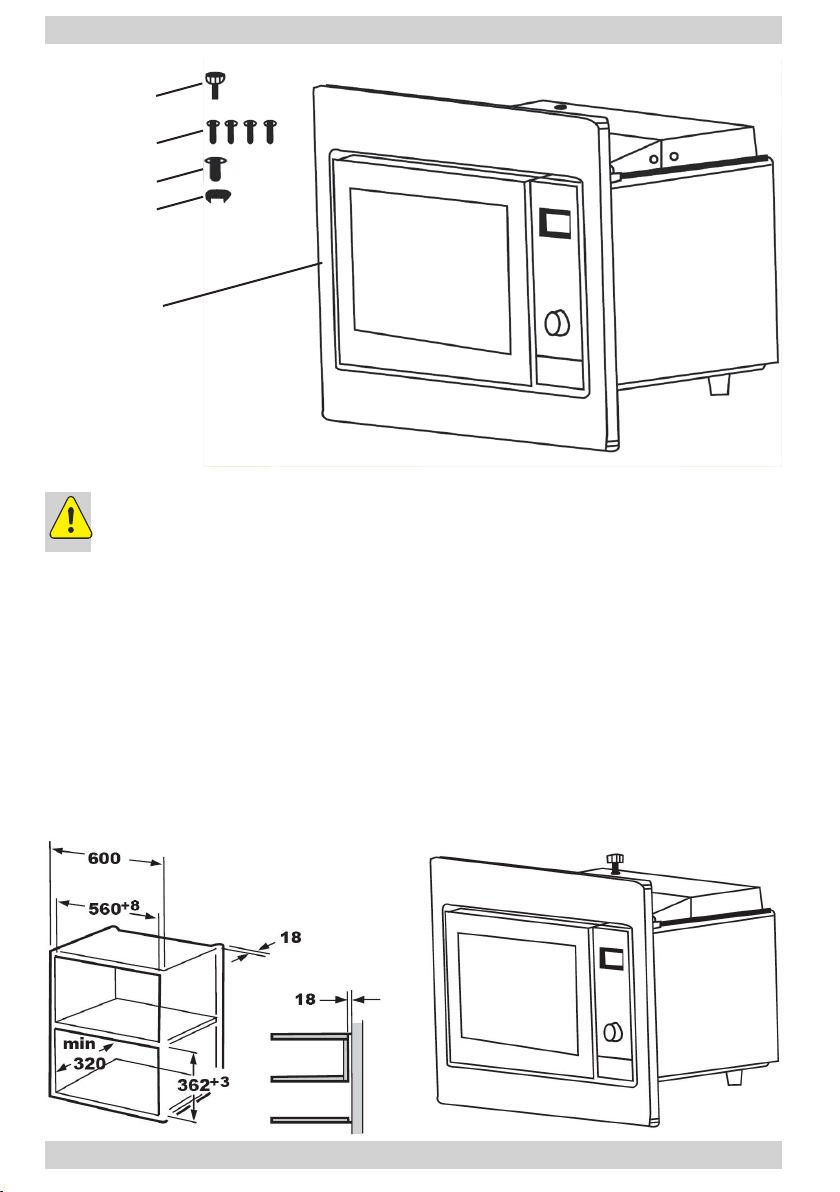
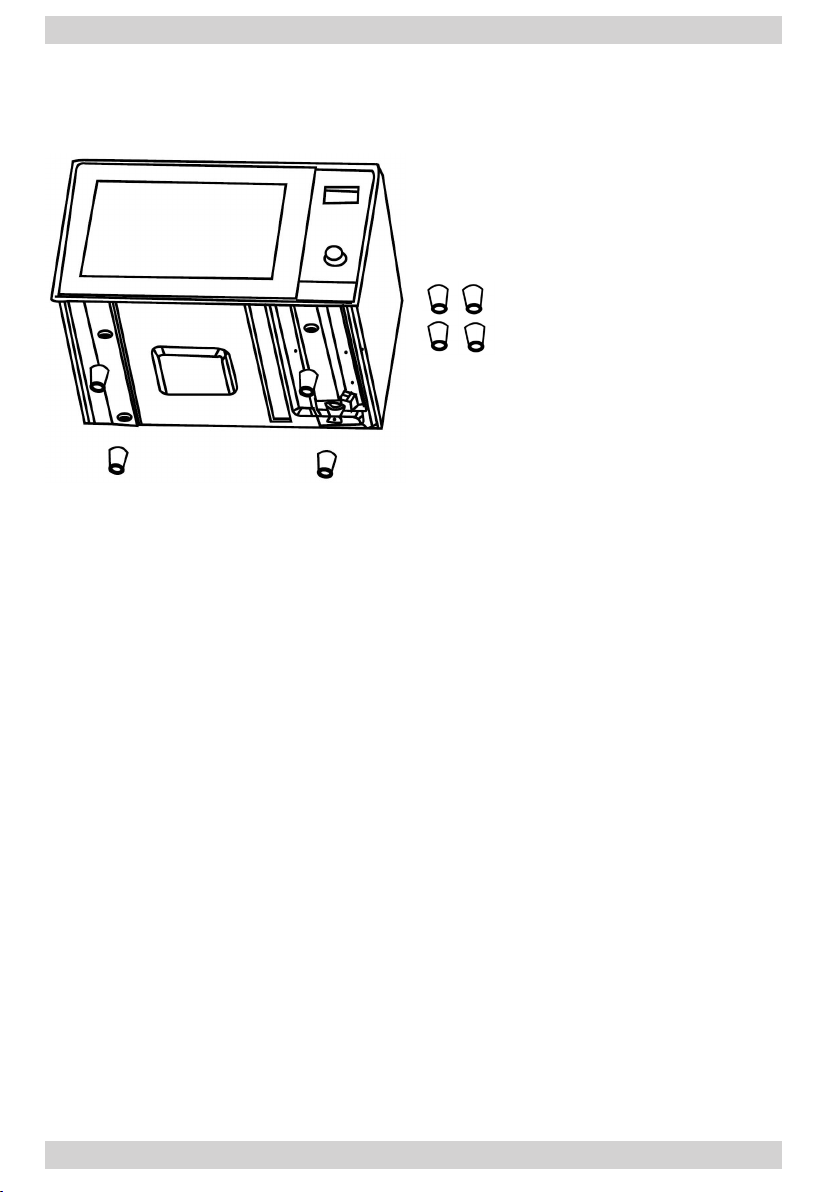
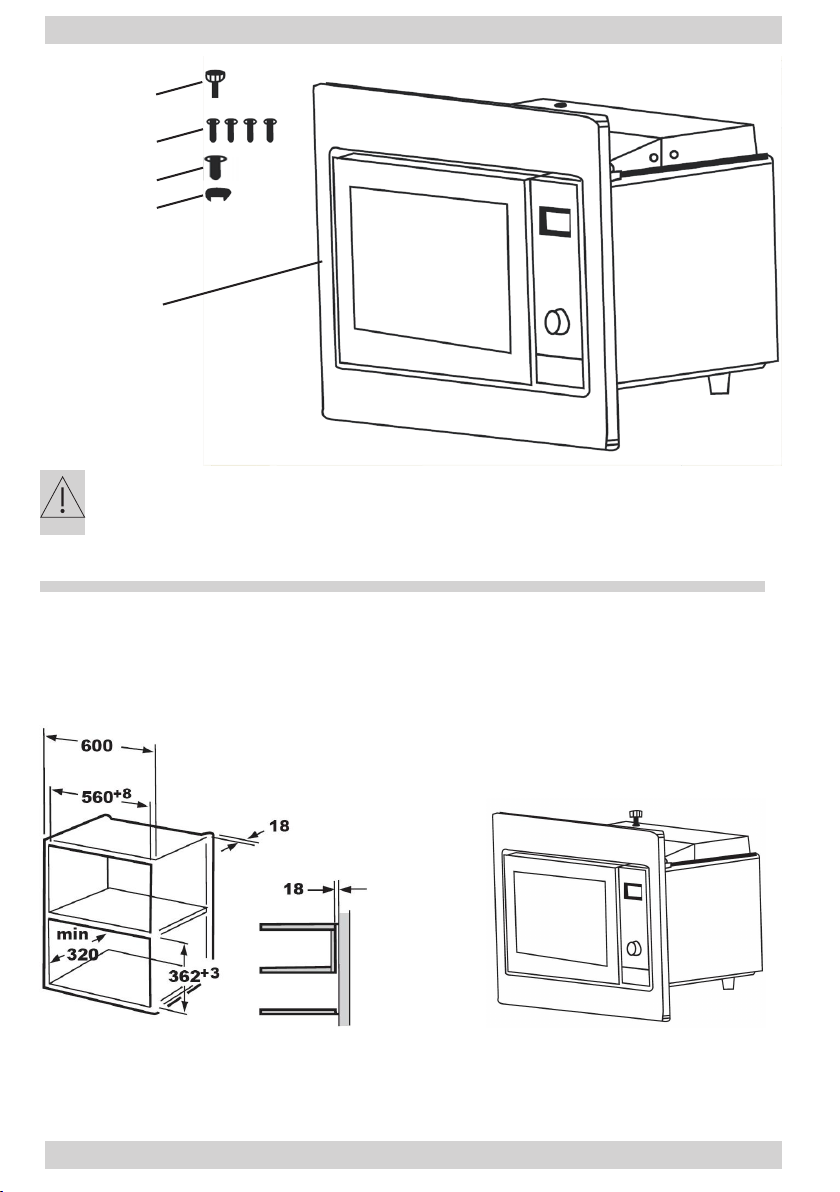
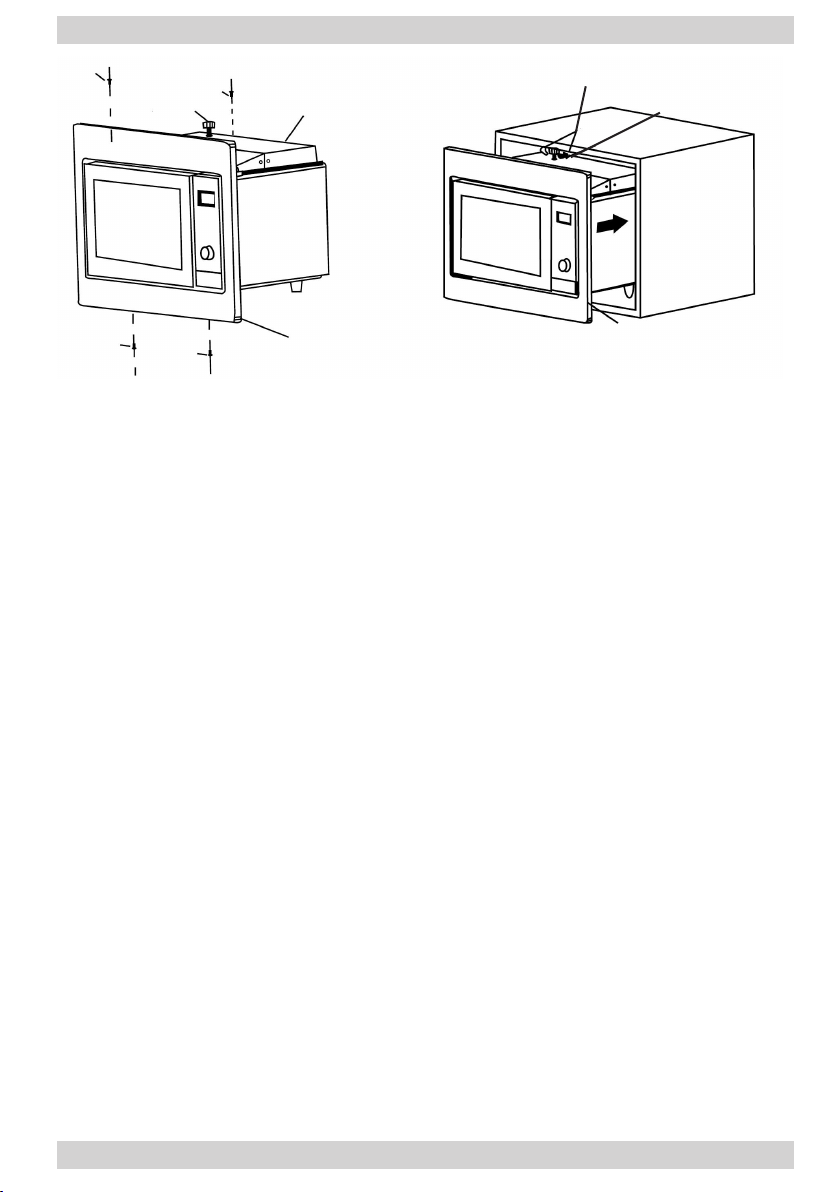
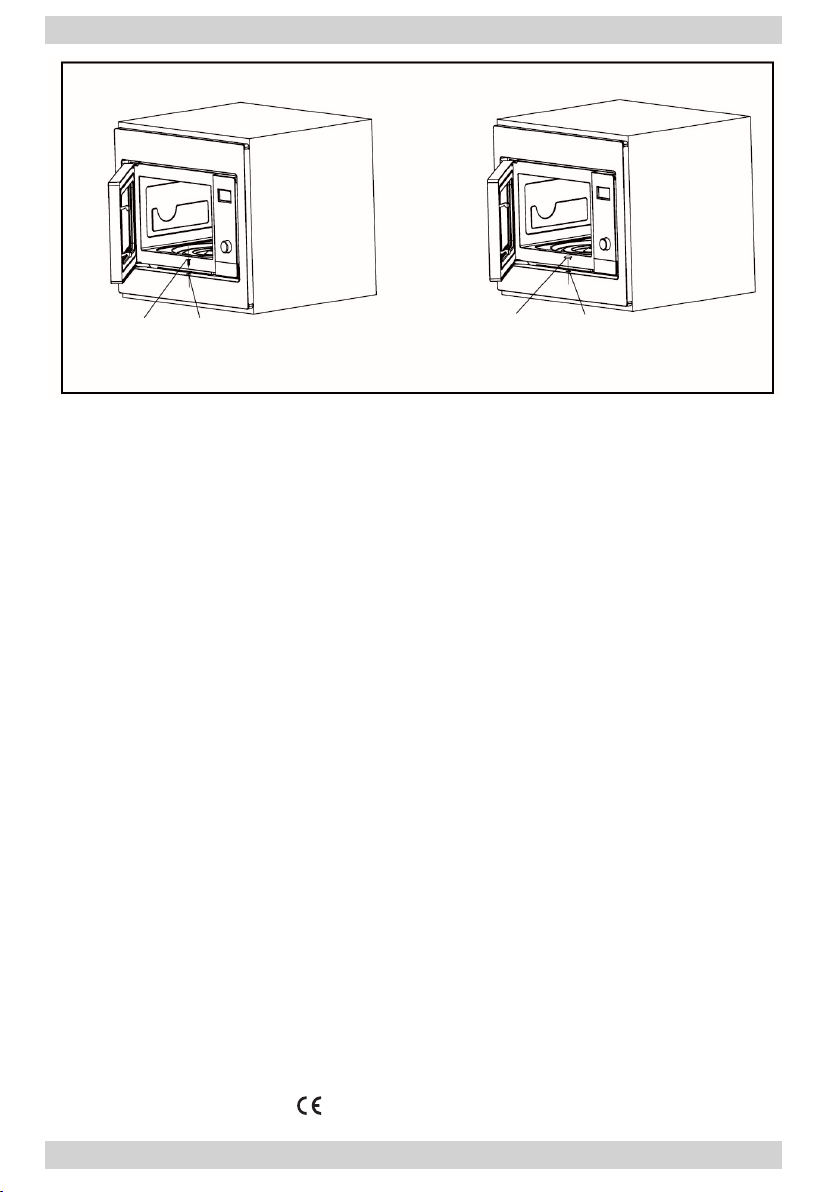
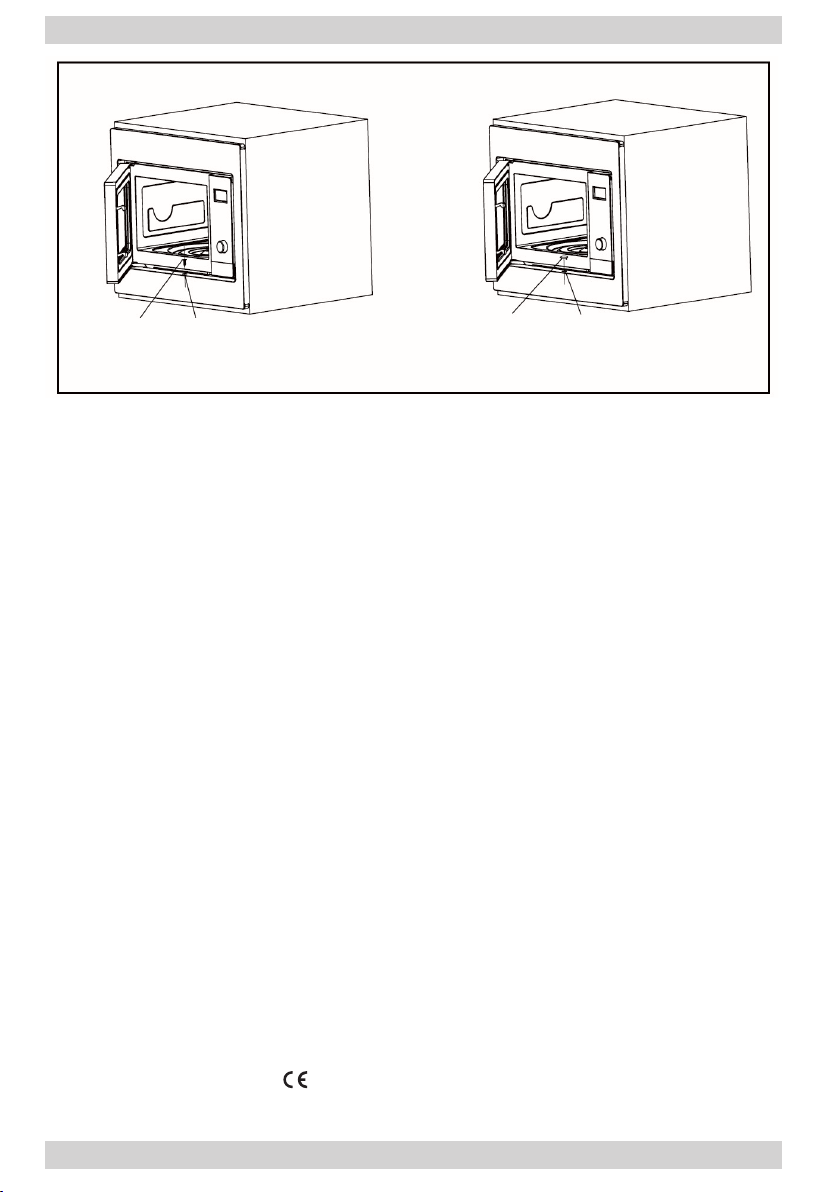
ACCESSORIES
ADJUST SCREW A
SCREW B
SCREW C
TRIM-KIT PLASTIC
COVER
Frame
Electrical connection
The oven is tted with a plug and must be only connected to a properly installed earthed socket. In accordance with the appropriate regulations, the socket must only be
installed and the connecting cable must only be replaced by a qualied electrician. If
the plug is no longer accessible following installation and all-pole isolating switch must
be present on the installation side with a contact gap of at least 3mm.
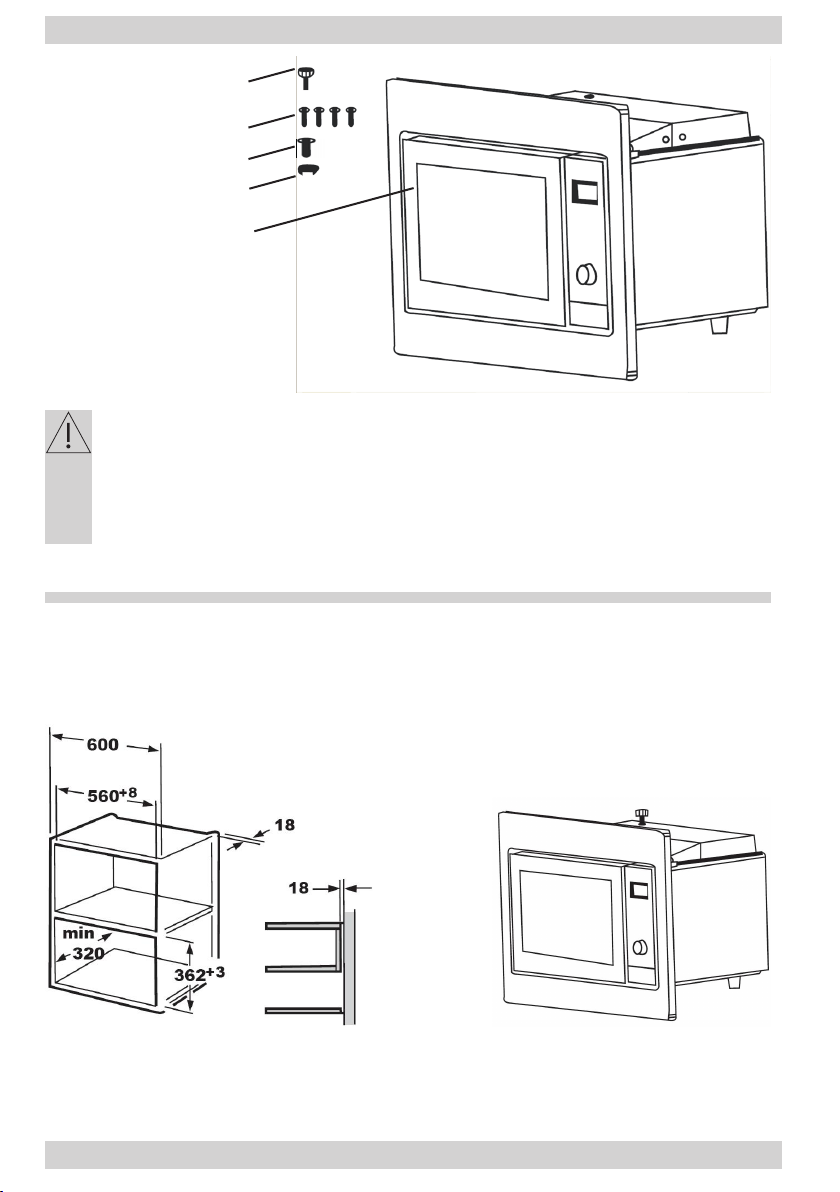
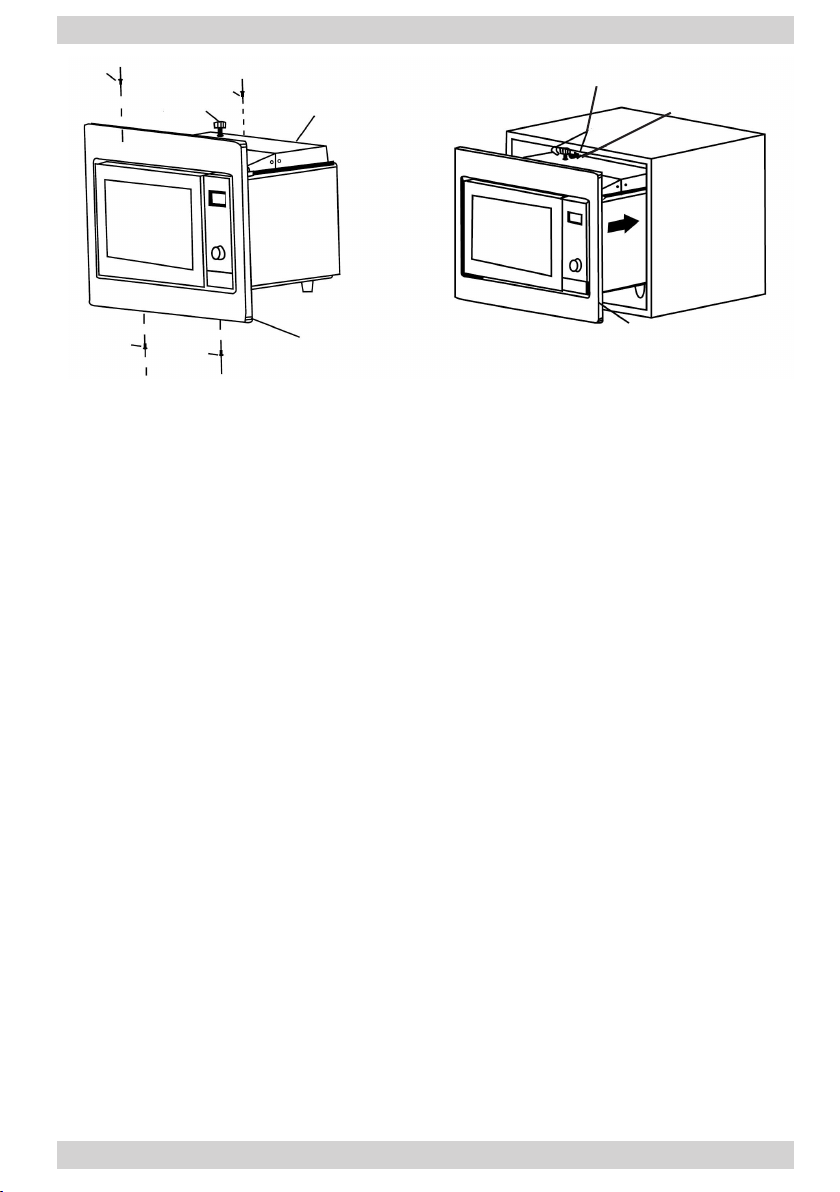
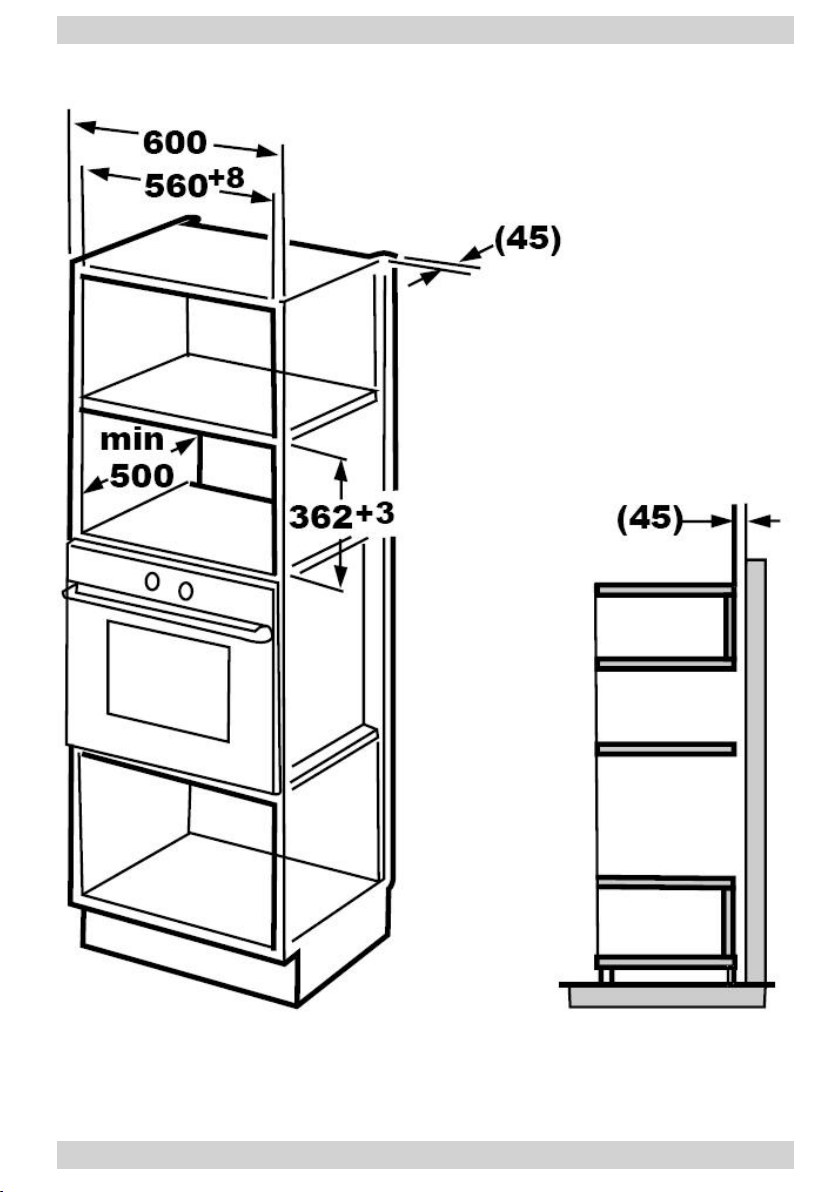
BUILT-IN FURNITURE
The built-in cabinet shall not have a rear wall behind the appliance.
Minimum installation height is 85cm.
Do not cover ventilation slots and air intake points.
3
Page 4
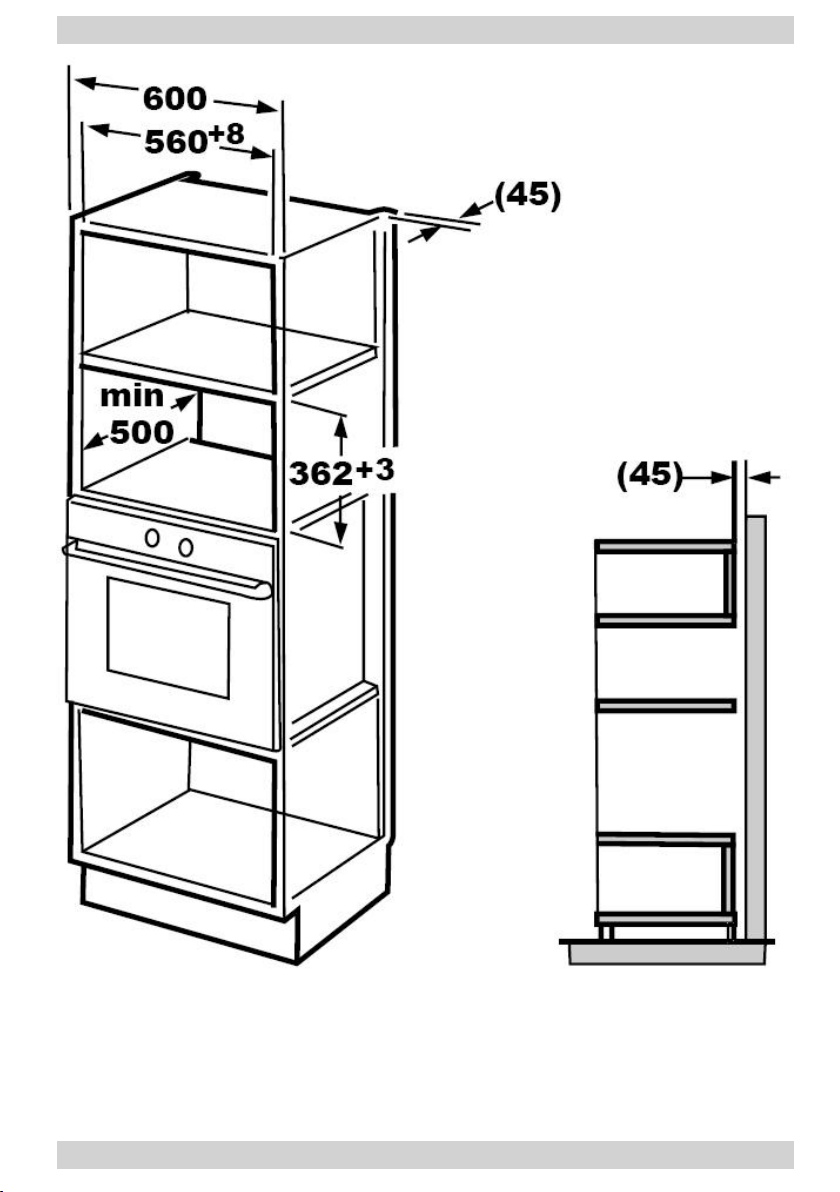
BUILT-IN FURNITURE
4
Page 5
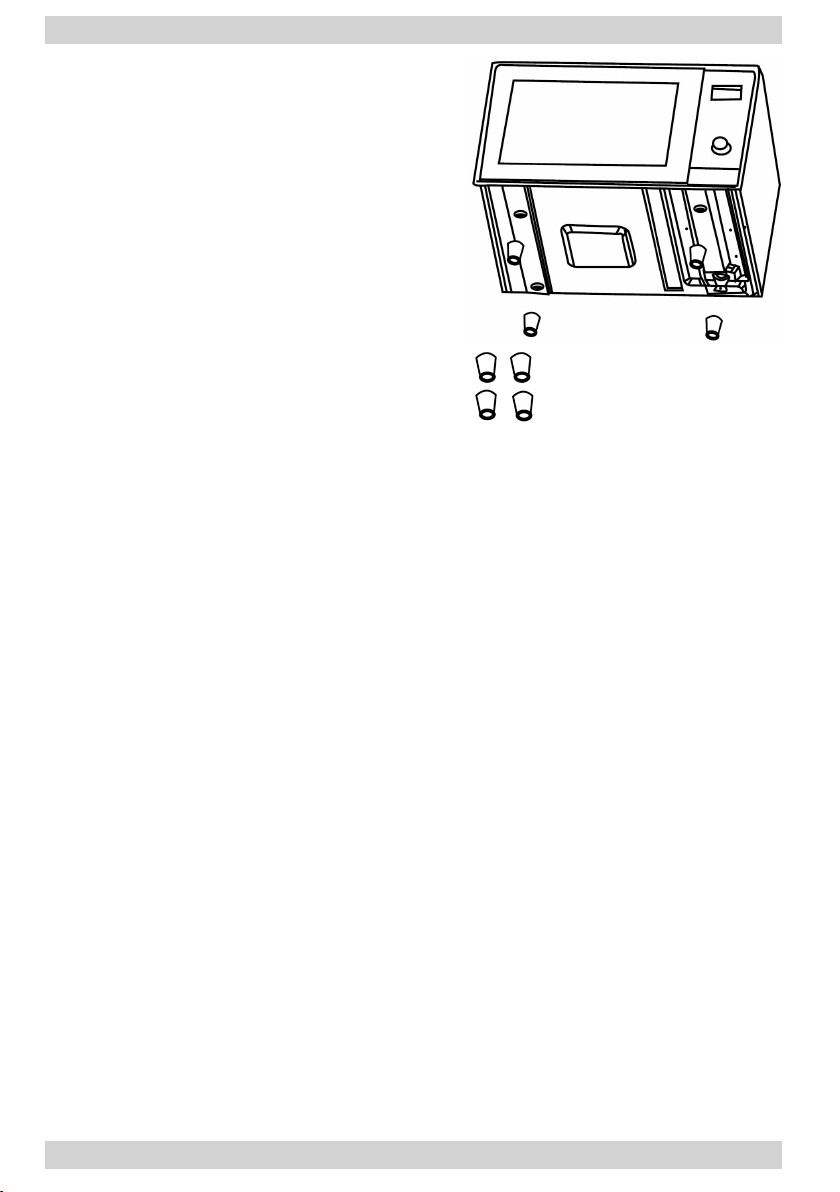
INSTALLTHEOVEN
a) Turn over the oven and install LONG
FEET provided in the accessory package.
LONG FEET
5
Page 6
SCREW B
SCREW B
ADJUST SCREW A
INSTALLTHEOVEN
UPPER AIR TUNNEL
ADJUST HEIGHT
ADJUST SCREW A
SCREW B
SCREW B
TRIM-KIT
TRIM KIT
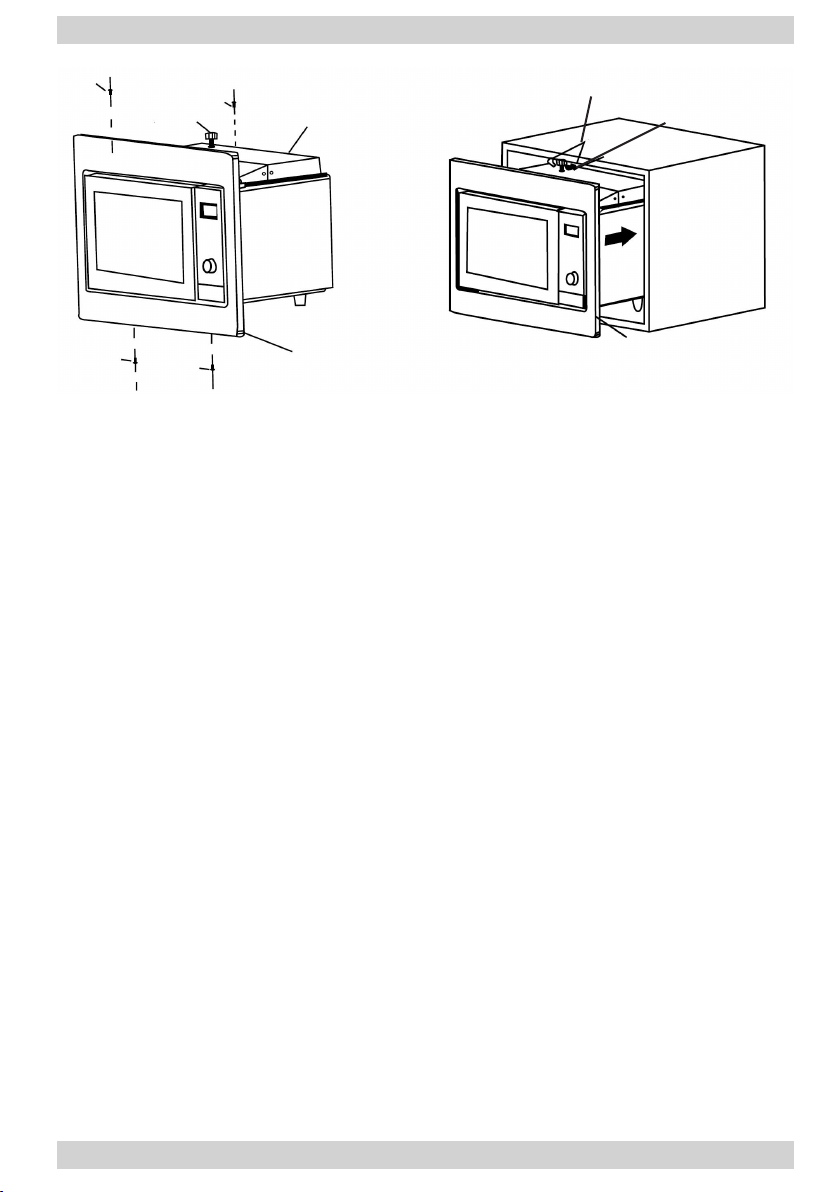
b) Fix ADJSUT SCREW A on the UPPER AIR TUNNEL of the oven, and x
the TRIM KIT with SCREW B. Then install the oven into the cabinet.
Make sure that the upper side gap between the TRIM KIT and the oven is
the same as the bottom side.
Make sure that the minimum left side gap between the TRIM KIT and the
oven is at least 9 mm.
Adjust the height of ADJUST SCREW A to keep 1 mm gap between the
ADJUST SCREW A and the top plane of cabinet. Do not trap or kink the
power cord.
6
Page 7

INSTALLTHEOVEN
SCREW C TRIM-KIT PLASTIC
INSTALLATION
HOLE
COVER
INSTALLATION
HOLE
c) Open the door; x the oven in the cabinet with SCREW C at the
INSTALLATION HOLE of TRIM KIT. Then x the TRIM-KIT PLASTIC
COVER to the INSTALLATION HOLE.
Manufacturer’s Declaration
The manufacturer hereby declares that this product meets the requirements of the following European
directives:
l Low Voltage Directive 2006/95/EC,
l Electromagnetic Compatibility (EMC) Directive 2004/108/EC,
l Eco-design Directive 2009/125/EC,
and has been marked with the symbol and issued with a declaration of compliance made available
to market regulators.
7
Page 8
FELICITAMOS LA ELECCIÓN DEL EQUIPO DE LA MARCA AMICA
i
ESTIMADO CLIENTES: Le rogamos que lea detenidamente el presente manual
de uso antes de instalar el aparato. Seguir las instrucciones incluidas en el
presente manual le protegerá del uso inadecuado.
Guarde este manual y consérvelo de modo que esté siempre a mano. Siga
estrictamente las instrucciones de uso para evitar siniestros.
Nota!
El microondas solo está indicado para uso doméstico. El microondas debe estar
siempre alejado de fuentes de calor y vapor. Antes de conectar el microondas
a la red, asegúrese de que la tensión y la frecuencia de corriente de la red
tienen los mismo valores que la placa de características. La toma de corriente
a la que se va a enchufar el microondas debe estar obligatoriamente equipada
con un perno de protección ecaz (toma de tierra). El fabricante no se hace
responsable de los daños o lesiones resultantes de enchufar el microondas
a la fuente de alimentación sin un circuito de protección o con un circuito de
protección estropeado.
La instalación del microondas debe hacerla un instalador cualicado. .
Durante la instalación, así como antes de cada operación de limpieza o trabajo
de reparación (servicio de fábrica), hay que sacar la clavija de la toma de
corriente o desenchufar la alimentación de la toma de corriente.
El aparato está destinado solamente para
uso doméstico.
El fabricante se reserva el derecho a
realizar cambios que no inuyan en la
forma de funcionamiento del aparato.
Las guras del presente manual de uso
tienen carácter ejemplar. El equipamiento
completo del aparato se encuentra en el
capítulo oportuno.
8
Page 9
EQUIPACIÓN
Tornillo de regulación A
Tornillo B
Tornillo C
Protección de plás-
tico del marco de
encastre
Marco decorativo del
microondas
Atención! No tape ningún oricio de ventilación en la parte trasera del aparato
ni entre el microondas y el marco decorativo.
ENCASTRADO
El armario no debe tener pared trasera detrás del microondas (ver dibujo).
1. Montaje del microondas en un armario colgante
9
Page 10
ENCASTRADO
2. Montaje del microondas en columna con horno
10
Page 11
ENCASTRADO
3. Instalación del microondas
a) Gire el microondas e instale las patas altas incluidas en la entrega como accesorios.
Patas altas
11
Page 12
INSTALACIÓN DEL MICROONDAS
Tornillo B
Tornillo B
Tornillo de
regulación A
Tornillo B
Tornillo B
Conducto de aire superio
Marco decorativo
Regulación de altura
Tornillo de regulación A
Marco decorativo
b) Fije el tornillo de regulación A en el conducto de aire superior del microondas y
je el marco de encastre con el tornillo B. Instale el microondas en el armario.
• Compruebe que el oricio superior e inferior entre el marco de encastre y el
microondas sean iguales.
• Compruebe que el oricio de la izquierda entre el marco de encastre y el microondas sea de por lo menos 9 mm.
• Regule la altura del tornillo de regulación de modo que haya 1 mm de distancia
entre el tornillo de regulación y la supercie superior del armario.
No apriete ni doble el cable de alimentación.
c) Meta la clavija del microondas en la toma de corriente (con un circuito de
protección ecaz); durante el montaje hay que desconectar la alimentación de
la toma de corriente (p.ej. apagar el fusible oportuno). Asegúrese de que el
microondas está en el centro del hueco del mueble y, a continuación, métalo
dentro del armario.
12
Page 13

INSTALACIÓN DEL MICROONDAS
Tornillo C
Espacio de instalación
Protección de plástico del marco de
enmascaramiento
Espacio de
instalación
d) Finalmente, je la posición deseada del microondas (el marco debe estar en el
centro del armario).
e) Abra la puerta; je el microondas en el armario con el tornillo C en el oricio de
instalación del marco de encastre. A continuación, je la protección de plástico
del marco de encastre en el espacio de instalación.
Declaración del fabricante
El fabricante declara con la presente que el producto cumple los requisitos esenciales de las siguientes
directivas europeas:
l directiva de baja tensión 2006/95/CE,
l directiva de compatibilidad electromagnética 2004/108/CE,
l directiva de diseño ecológico 2009/125/CE
y por eso el producto está marcado y se ha emitido para él una declaración de conformidad facilitada a los órganos de supervisión del mercado.
13
Page 14
GRATULUJEMYWYBORUSPRZĘTUMARKIAMICA
i
Prosimy Państwa o uważną lekturę niniejszej ulotki obsługi przed zainstalowaniem
urządzenia.
Przestrzeganie zawartych w niej wskazówek uchroni Państwa przed niewłaściwym
użyt ko wa niem.
Ulotkę tą należy zachować i przechowywać tak, aby mieć ją zawsze pod ręką.
Należy dokładnie przestrzegać instrukcji obsługi w celu uniknięcia
nieszczęśliwych wypadków.
Uwaga!
Kuchenka mikrofalowa przeznaczona jest wyłącznie do użytku domowego.
Kuchenka powinna znajdować się z dala od źródeł ciepła i oparów. Przed
podłączeniem kuchenki do sieci należy upewnić się, że napięcie i częstotliwość prądu w sieci mają wartości identyczne jak na tabliczce znamionowej.
Gniazdo zasilające, do którego zostanie podłączona kuchenka mikrofalowa
musi być bezwzględnie wyposażone w sprawny bolec ochronny (uziemienie). Producent nie ponosi odpowiedzialności za szkody bądź obrażenia
będące wynikiem podłączenia kuchenki do źródła zasilania bez obwodu
ochronnego lub z niesprawnym obwodem ochronnym.
Instalacji kuchenki powinien dokonać wykwalikowany instalator.
Podczas instalacji jak i przed każdą operacją czyszczenia, lub przed podjęciem prac naprawczych (Serwis Fabryczny), należy wyjąć wtyczkę kuchenki
z gniazdka lub odłączyć zasilanie od gniazdka.
Urządzenie przeznaczone jest wyłącznie
do użytku domowego.
Producent zastrzega sobie możliwość
dokonywania zmian niewpływających na
działanie urządzenia.
Ilustracje w niniejszej instrukcji obsługi
mają charakter poglądowy. Pełne
wyposażenie urządzenia znajduje się w
odpowiednim rozdziale.
14
Page 15
Śruba regulacyjna A
Wkręt B
Wkręt C
Plastikowa osłona
ramki maskującej
Ramka ozdobna kuchenki mikrofalowej
Uwaga! Nie zakrywaj żadnych szczelin wentylacyjnych powietrza z tyłu urządzenia jak i pomiędzy kuchenką a ramką ozdobną.
ZABUDOWA MEBLOWA
WYPOSAŻENIE
Szafka meblowa nie powinna mieć tylnej ściany za kuchenką mikrofalową (patrz
rysunek).
1. Montaż kuchenki w szafce wolnowiszącej
15
Page 16

ZABUDOWA MEBLOWA
2. Montaż kuchenki w kolumnie z piekarnikiem
16
Page 17

INSTALACJA KUCHENKI
a) Odwrócić kuchenkę i zainstalować
wysokie nóżki dostarczone w zestawie
akcesoriów.
Wysokie nóżki
17
Page 18
Wkręt B
Wkręt B
Śruba regula-
cyjna A
INSTALACJA KUCHENKI
Górny kanał powietrzny
Regulacja wysokości
Śruba regulacyjna A
Wkręt B
Wkręt B
Ramka ozdobna
Ramka ozdobna
b) Zamocować śrubę regulacyjną a w górnym kanale powietrznym kuchenki
i zamocować ramkę maskującą za pomocą wkrętu B. Zainstalować
kuchenkę w szafce.
• Sprawdzić czy górna i dolna szczelina pomiędzy ramką maskującą
i kuchenką są takie same.
• Sprawdzić czy szczelina po lewej stronie pomiędzy ramką maskującą
i kuchenką wynosi co najmniej 9mm.
• Wyregulować wysokość śruby regulacyjnej, tak aby powstała 1 mm
przerwa pomiędzy śrubą regulacyjną i górną powierzchnią szafki.
Nie przyciskać i nie załamywać kabla zasilającego.
c) Podłączyć wtyczkę kuchenki do gniazdka zasilającego (ze sprawnym
obwodem ochronnym); na czas montażu należy jednak odłączyć
zasilanie do gniazdka zasilającego (np. rozłączyć odpowiedni
bezpiecznik).Upewnić się, że kuchenka stoi na środku wnęki meblowej
i następnie wsunąć ją do środka szafki.
18
Page 19
INSTALACJA KUCHENKI
Otwór instalacyjny
ramki maskującej
Otwór instalacyjnyWkręt C Plastikowa osłonka
d) Ostatecznie ustalić żądaną pozycję kuchenki (ramka powinna znajdować
się na środku szafki).
e) Otworzyć drzwi; zamocować kuchenkę w szafce za pomocą wkrętu C
w otworze instalacyjnym ramki maskującej. Następnie zamocować
plastikową osłonkę ramki maskującej w otworze instalacyjnym.
Oświadczenieproducenta
Producent deklaruje niniejszym, że wyrób ten spełnia zasadnicze wymagania wy mie nio nych poniżej
dyrektyw europejskich:
l dyrektywy niskonapięciowej 2006/95/WE,
l dyrektywy kompatybilności elek tro ma gne tycz nej 2004/108/WE,
l dyrektywy ekoprojektowania 2009/125/WE
i dlatego wyrób został oznakowany oraz została wystawiona dla niego deklaracja zgodności udostępniana organom nadzorującym rynek.
19
Page 20

BLAHOPŘEJEMEKVOLBĚZNAČKYAMICA
i
Prosíme Vás o pečlivé prostudování tohoto návodu k obsluze před instalací
zařízení.
Dodržování obsažených v něm pokynů Vás uchrání před nevhodnou exploatací.
Tento návod si ponechejte a přechovávejte ho takovým způsobem, abyste jej měli
vždy k dispozici. Návod obsluhy důsledně dodržujte, abyste se vyhnuli vzniku
nehod.
Pozor!
Mikrovlnná trouba je určená výlučně k domácímu používání. Mikrovlnka se
musí nacházet v bezpečné vzdálenosti od zdrojů tepla a výparů. Před připojením mikrovlnky k elektrické síti, přesvědčte se, že napětí a frekvence proudu v síti mají identické hodnoty s hodnotami uvedenými na popisném štítku.
Napájecí zásuvka, ke které bude mikrovlnná trouba připojená, musí být bezpodmínečně vybavená fungujícím ochranným kolíkem (uzemnění).
Výrobce není zodpovědný za škody anebo úrazy vzniklé připojením mikro-
vlnky k napájecímu zdroji bez ochranného obvodu anebo s nefungujícím
ochranným obvodem.
Instalaci mikrovlnky musí vykonat kvalikovaný instalátor.
V průběhu instalace, jak i před každou činností čištění, anebo před prováděním opravy (Tovární servis), vyjměte zástrčku mikrovlnky ze zásuvky
anebo odpojte napájení od zásuvky.
Myčka nádobí je určena výlučně pro
domácí použití.
Výrobce si vyhrazuje možnost provádění
změn neovlivňujících fungování spotřebiče.
20
Ilustrace v tomto návodu k obsluze mají
názorný charakter. Úplné vybavení spotřebiče se nachází v příslušné kapitole.
Page 21

REGULAČNÍ ŠROUB A
VRUT B
VRUT C
PLASTOVÝ KRYT
MASKOVACÍ
LIŠTY
Ozdobný rámek
mikrovlnné trouby
Pozor!Nezakrývejte žádné ventilační otvory vzduchu umístěné v zadní části zařízení
jak i mezi mikrovlnkou a ozdobným rámkem.
VESTAVĚNÍDONÁBYTKU
VYBAVENÍ
Nábytková skřínka nemá mít zadní stěnu za mikrovlnnou troubou (viz výkres).
Minimální výška instalace mikrovlnky od podlahy kuchyně je 85cm.
1. Montáž mikrovlnky ve volně zavěšené skřínce
21
Page 22

NÁBYTKOVÁVESTAVBA
2. Montáž mikrovlnky v soupravě s pečicí troubou
22
Page 23

INSTALACE TROUBY
a) Kuchynku obraťte a namontujte VYSOKÉ NOŽIČKY dodané v kompletu
příslušenství.
Vysoké nožičky
23
Page 24

VRUT B
VRUT B
REGULAČNÍ
ŠROUB A
INSTALACE TROUBY
HORNÍ VZDUŠNÝ
KANÁL
REGULACE VÝŠKY
REGULAČNÍ ŠROUB A
VRUT B
VRUT B
OCHRANNÝ RÁM
MASKOVACÍ LIŠTA
b) Připevněte REGULAČNÍ ŠROUB A v HORNÍM VZDUŠNÉM KANÁLU
kuchyňky a připevněte MASKOVACÍ LIŠTU pomocí VRUTU B. Instalujte
kuchyňku ve skřínce.
• Zkontrolujte, zda horní a dolní mezery mezi MASKOVACÍ LIŠTOU
a kuchyňkou jsou identické.
• Zkontrolujte, zda mezera na levé straně mezi MASKOVACÍ LIŠTOU
a kuchyňkou je nejméně 9mm.
• Vyregulujte výšku REGULAČNÍHO ŠROUBU, tak aby vznikla 1 mm
mezera mezi REGULAČNÍM ŠROUBEM a horní deskou skřínky.
Nestlačujte a nezalamujte napájecí kabel.
c) Připojte zástrčku mikrovlnky do napájecí zásuvky (se správným
ochranným obvodem); na čas montáže ale náleží odpojit napájení do
napájecí zásuvky (např. rozpojit odpovídající pojistku).
Přesvědčte se, že mikrovlnka stojí uprostřed výklenku skřínky
a následně ji zasuňte doprostřed skřínky.
24
Page 25

INSTALACE TROUBY
VRUT C PLASTOVÝ KRYT
INSTALAČNÍ
OTVOR
MASKOVACÍ
LIŠTY
INSTALAČNÍ
OTVOR
d) Denitivně ustalte požadovanou pozici mikrovlnky (rám by se měl nacházet
uprostřed skřínky).
e) Otevřete dvířka; připevněte kuchyňku v skřínce pomocí VRUTU C v
INSTALAČNÍM OTVORU MASKOVACÍ LIŠTY. Poté připevněte
PLASTOVÝ KRYT MASKOVACÍ LIŠTY v INSTALAČNÍM OTVORU.
Prohlášení výrobce
Producent tímto prohlašuje, že tento výrobek splňuje základní požadavky níže uvedených evropských
směrnic:
l směrnice pro nízkonapěťová zařízení 2006/95/EC,
l směrnice o elektromagnetické kompatibilitě 2004/108/EC,
l směrnice ErP - 2009/125/EC
a proto byl spotřebič označen a také bylo pro něho vystaveno prohlášení o shodě poskytované
orgánům pro dohled nad trhem.
25
Page 26
BLAHOPRAJEMEKVOĽBEZNAČKYAMICA
i
Prosíme Vás o starostlivé preštudovanie tohto návodu k obsluhe pred inštaláciou
zariadenia.
Dodržovanie obsiahnutých v ňom pokynov Vás uchráni pred nevhodným
prevádzkovaním.
Tento návod si ponechajte a prechovávajte ho takým spôsobom aby ste ho mali
vždy k dispozícii. Návod obsluhy dôsledne dodržujte, aby ste sa vyhli vzniku
nehôd.
Pozor!
Mikrovlnná rúra je určená výlučne k domácemu používaniu. Mikrovlná rúra
sa musí nachádzať v bezpečnej vzdialenosti od zdrojov tepla a výparov.
Pred pripájaniam mikrovlnej rúry k elektrickej sieti, sa presvedčte, že napätie
a frekvencia prúdu v sieti majú identické hodnoty s hodnotami uvedenými na
popisnom štítku. Napájacia zásuvka, ku ktorej bude mikrovlnná rúra pripojená, musí byť bezpodmienečne vybavená fungujúcim ochranným kolíkom
(uzemnenie).
Výrobca nie je zodpovedný za škody alebo úrazy ktoré vznikli pripájaním
mikrovlnej rúry k napájaciemu zdroju bez ochranného obvodu alebo s nefun-
gujúcim ochranným obvodom
Inštaláciu mikrovlnej rúry musí vykonať kvalikovaný inštalátor.
V priebehu inštalácie, ako aj pred každou činnosťou čistenia, alebo pred vykonávaním opravy (Tovární servis), vyjmite zástrčku mikrovlnej rúry zo zásu-
vky alebo odpojte napájanie od zásuvky.
Umývačka riadu je určená výlučne pre
domáce použitie.
Výrobca si vyhradzuje možnosť prevádzania zmien neovplyvňujúcich fungovanie
spotrebiča.
Ilustrace v tomto návodu k obsluze mají
názorný charakter. Úplné vybavení spotřebiče se nachází v příslušné kapitole.
26
Page 27

VYBAVENIE
REGULAČNÁ
SKRUTKA A
SKRUTKA B
SKRUTKA C
PLASTOVÝ KRYT
MASKOVACEJ
LÍŠTY
Ozdobný rámček
mikrovlnej rúry
Pozor!Nezakrývajte žiadne ventilační otvory vzduchu umiestené v zadnej časti zariadenia ako aj medzi mikrovlnou rúrou a ozdobným rámčekom.
ZABUDOVANIEDONÁBYTKU
Nábytková skrinka nemôže mať zadnú stenu za mikrovlnnou rúrou (viď výkres).
Minimálna výška inštalácie mikrovlnej rúry od podlahy kuchyne je 85cm.
1. Montáž mikrovlnej rúry do voľne zavesenej skrinky
27
Page 28

NÁBYTKOVÁVOSTAVBA
2.Montáž mikrovlnej rúry v súprave s pečiacou rúrou
28
Page 29

INŠTALÁCIARÚRY
a) Kuchynku obráťte a inštalujte VYSOKÉ NOŽIČKY dodané v kompletu
príslušenstva.
Vysoké nožičky
29
Page 30

SKRUTKA B
SKRUTKA B
REGULAČNÁ
SKRUTKA A
INŠTALÁCIARÚRY
HORNÝ VZDUŠNÝ
KANÁL
REGULÁCIA VÝŠKY
REGULAČNÁ SKRUTKA A
SKRUTKA B
SKRUTKA B
OCHRANNÝ RÁM
MASKOVACIA
LÍŠTA
b) Pripevnite REGULAČNÚ SKRUTKU A v Hornom vzdušnom kanálu
kuchynky a pripevnite MASKOVACIU LÍŠTU pomocou SKRUTKY B.
Inštalujte kuchynku v skrinke.
• Skontrolujte, či horná a dolná medzera medzi MASKOVACOU LIŠTOU
a kuchynkou je identická.
• Skontrolujte, či medzera po ľavej strane medzi maskovacou lištou
a kuchynkou je čo najmenej 9mm.
• Vyregulujte výšku REGULAČNEJ SKRUTKY, tak aby vznikla 1 mm
medzera medzi REGULAČNOU SKRUTKOU a hornou doskou skrinky.
Nepritláčajte a nezalamujte napájací kábel.
c) Pripojte zástrčku mikrovlnej rúry do napájacej zásuvky (so správnym
ochranným obvodom); na čas montáže je potrebné odpojiť napájanie
do napájacej zásuvky (napr. rozpojiť odpovedajúcu poistku).
Presvedčte sa, že mikrovlná rúra stojí uprostred výklenku skrinky
a následne ju zasuňte doprostred skrinky.
30
Page 31
INŠTALÁCIARÚRY
SKRUTKA C PLASTOVÝ KRYT
INŠTALAČNÝ
OTVOR
MASKOVACEJ
LIŠTY
INŠTALAČNÝ
OTVOR
d) Denitívne ustáľte požadovanú pozíciu mikrovlnej rúry (rámček by sa
mal nachádzať uprostred skrinky).
e) Otvorte dvierka; pripevnite kuchynku v skrinke pomocou SKRUTKY C v
INŠTALAČNOM OTVORE MASKOVACEJ LIŠTY. Potom pripevnite
PLASTOVÝ KRYT MASKOVACEJ LIŠTY v INŠTALAČNOM OTVORE.
Vyhlásenievýrobcu
Výrobca týmto vyhlasuje, že výrobok spĺňa dôležité požiadavky nasledujúcich európskych smerníc:
lsmernica pre nízke napätie 2006/95/EC
lsmernica elektromagnetickej kompatibility 2004/108/EC,
lsmernica ErP - 2009/125/EC
a preto výrobok získal označenie a bolo preň vydané Vyhlásenie o zhode, a toto vyhlásenie bolo
sprístupnené orgánom obchodnej inšpekcie.
31
Page 32
WIR GRATULIEREN IHNEN ZUM KAUF DES GERÄTES DER MARKE AMICA
i
Vor der Inbetriebnahme lesen Sie bitte die kurze Bedienungsanleitung aufmerksam
durch. Durch Befolgung der darin enthaltenen Hinweise vermeiden Sie
Bedienungsfeh¬ler.
Diese Bedienungsanleitung ist zu behalten und so aufzubewahren, dass sie im
Bedarfsfall jede¬rzeit griffbereit ist. Befolgen Sie ihre Hinweise sorgfältig, um
mögliche Unfälle zu vermeiden.
Achtung!
Das Mikrowellengerät ist ausschließlich zur Verwendung im Haushalt bestimmt. Das Mikrowellengerät nicht in der Nähe von Wärme- und Dampfqu-
ellen nicht aufstellen.
Vor dem Anschließen des Mikrowellengeräts an das Stromnetz sicherstellen,
dass die Stromspannung und Stromhäugkeit im Stromnetz den Angaben
auf dem Typenschild entsprechen. Die Steckdose, an die das Mikrowellengerät angeschlossen wird, muss unbedingt mit einem funktionstüchtigen
Schutzbolzen (Erdung) ausgestattet sein.
Der Hersteller übernimmt keine Haftung für Schäden oder Verletzungen, die
durch Anschließen des Mikrowellengerätes an das Stromnetz ohne Schutz-
kreis oder mit einem defekten Schutzkreis entstehen.
Das Anschließen des Mikrowellengerätes sollte durch einen qualizierten
Fachmann erfolgen.
Beim Anschließen sowie vor jeder Reinigung oder vor der Durchführung von
Reparaturen (Werkservice) den Netzstecker des Gerätes aus der Netzsteck-
dose ziehen oder die Steckdose von der Stromversorgung trennen.
Das Gerät ist ausschließlich für den
Einsatz im Haushalt bestimmt.
Der Hersteller behält sich das Recht
vor, Änderungen vorzunehmen, die die
Gerätefunktion nicht beeinträchtigen.
32
Die Abbildungen in dieser Bedienungsanleitung dienen nur der Orientierung.
Volle Ausstattung des Gerätes ist in dem
entsprechenden Kapitel enthalten.
Page 33

Einstellschraube A
Schraube B
Schraube C
Kunststoff-Blende
Einbaurahmen des
Mikrowellengeräts
Hinweis! Die Lüftungsschlitze im hinteren Bereich des Geräts sowie zwischen dem
Mikrowellengerät und dem Einbaurahmen nicht verdecken.
MÖBELEINBAU
AUSSTATTUNG
Der Schrank sollte keine Rückwand hinter dem Mikrowellengerät (siehe Abbildung) haben.
1. Montage der Mikrowelle in einem Hängeschrank
33
Page 34

EINBAU IN EINEN SCHRANK
2. Einbau der Mikrowelle mit Einbaubackofen im Hochschrank
34
Page 35

EINBAU IN EINEN SCHRANK
a) Die Mikrowelle umdrehen und hohe
Füße, die im Zubehör-Set mitgeliefert
wurden, installieren.
Hohe Füße
35
Page 36

Schraube B
Schraube B
Einstellschraube A
EINBAU IN EINEN SCHRANK
Höheneinstellung
Oberes Luftkanal
Einstellschraube A
Schraube B
Schraube B
Rahmen
Rahmen
b) Die Einstellschraube A im oberen Luftkanal des Mikrowellengerätes
einsetzen und den Tarnrahmen mit der Schraube B befestigen. Das
Mikrowellengerät in den Schrank einbauen.
• Prüfen, ob der obere und untere Schlitz zwischen dem Einbaurahmen
und dem Mikrowellengerät identisch sind.
• Prüfen, ob der Schlitz links zwischen dem Einbaurahmen und dem
Mikrowellengerät mindestens 9mm beträgt.
• Die Höhe der Einstellschraube so regulieren, dass zwischen der
Einstellschraube und der oberen Fläche des Schranks ein Abstand von
1mm entsteht. Nicht andrücken und das Netzkabel nicht knicken.
c) Den Netzstecker des Mikrowellengeräts mit der Netzsteckdose (mit
funktionstüchtigen Schutzkreis) verbinden; die Steckdose für die Dauer
der Montage von der Stromversorgung trennen (z.B. eine entsprechende
Sicherung ausschalten).Sicherstellen, dass das Mikrowellengerät mitten
in der Möbelnische steht und dieses anschließend ins Innere des
Einbauschranks einschieben.
36
Page 37

EINBAU IN EINEN SCHRANK
Montageöffnung
MontageöffnungSchraube C Kunststoff-Blende
d) Die gewünschte Position des Mikrowellengerätes endgültig feststellen
(Der Einbaurahmen sollte sich in der Schrankmitte benden).
e) Die Tür öffnen; das Mikrowellengerät im Schrank in der Montageöffnung
im Tarnrahmen mit der Schraube C befestigen. Abschließend die
Kunststoff-Blende in der Montageöffnung befestigen.
CE-Konformitätserklärung
Der Hersteller dieses Produktes erklärt hiermit in alleiniger Verantwortung, dass dieses Produkt den
einschlägigen, grundlegenden Anforderungen der nachfolgenden EU-Richtlinien entspricht:
l Niederspannungsrichtlinie 2006/95/EG,
l Elektromagnetische Verträglichkeit 2004/108/EG,
l ErP – Richtlinie 2009/125/EG
Das Gerät ist mit dem Zeichen gekennzeichnet und verfügt über eine Konformitätserklärung zur
Einsichtnahme durch die zuständigen Marktüberwachungsbehörden
37
Page 38

38
Page 39

39
Page 40

Amica Wronki S.A.
ul.Mickiewicza 52
64-510 Wronki
tél. 67 25 46 100
fax 67 25 40 320
www.amica.com.pl
IO-MWS-0054
(03.2015)
 Loading...