

Page 1

XFR 2800 Watt
Series
Programmable DC
Power Supply
XFR 7.5-300
XFR 12-220
XFR 20-130
XFR 33-85
XFR 40-70
XFR 60-46
XFR 100-28
XFR 150-18
XFR 300-9
XFR 600-4
TM-F2OP-C1XN Rev E www.programmablepower.com
Page 2

About AMETEK
AMETEK Programmable Power, Inc., a Division of AMETEK, Inc., is a global leader in the design
and manufacture of precision, programmable power supplies for R&D, test and measurement,
process control, power bus simulation and power conditioning applications across diverse
industrial segments. From bench top supplies to rack-mounted industrial power subsystems,
AMETEK Programmable Power is the proud manufacturer of Elgar, Sorensen, California
Instruments and Power Ten brand power supplies.
AMETEK, Inc. is a leading global manufacturer of ele
devices with annualized sales of $2.5 billion. The Company has over 11,000 colleagues working
at more than 80 manufacturing facilities and more than 80 sales and service centers in the United
States and around the world.
ctronic instruments and electromechanical
Trademarks
AMETEK is a registered trademark of AMETEK, Inc. Sorensen is a trademark owned by AMETEK,
Inc. Other trademarks, registered trademarks, and product names are the property of their
respective owners and are used herein for identification purposes only.
Notice of Copyright
XFR 1200 Watt Series Programmable DC Power Supply Operation Manual
Programmable Power, Inc. All rights reserved.
© 2007 AMETEK
Exclusion for Documentation
UNLESS SPECIFICALLY AGREED TO IN WRITING, AMETEK PROGRAMMABLE POWER, INC.
(“AMETEK”):
(a) MAKES NO WARRANTY AS TO THE ACCURACY, SUFFICIENCY OR SUITABILITY OF ANY
HNICAL OR OTHER INFORMATION PROVIDED IN ITS MANUALS OR OT
TEC
DOCUMENTATION.
(b)
ASSUMES NO RESPONSIBILITY OR LIABILITY FOR LOSSES, DAMAGES, COSTS OR
EXPENSES,
WHICH
INFORMA
REMINDS YOU THAT IF THIS MANUAL IS IN ANY LANGUAGE OTHER THAN ENGLISH,
(c)
ALTHO
TRANSLATIO
IS CONT
WW
W.PROGRAMMABLEPOWER.COM.
WHETHER SPECIAL, DIRECT, INDIRECT,
MIGHT ARISE OUT OF THE USE OF SUCH INFORMATION. THE USE OF
TION WILL BE ENTIRELY AT THE USER’S
UGH STEPS HAVE BEEN TAKEN TO MAINTAIN THE ACCURACY OF TH
N, THE ACCURACY CANNOT BE GUARANTEED. APPROVED AMETEK
AINED WITH THE ENGLISH LANGUAGE VERSION, WHICH
CONSEQUENTIAL OR INCIDENTAL,
RISK, AND
IS POSTED AT
HER
ANY SUCH
E
CONTENT
Date and Revision
May 2018, Revision E
Part Number
TM-F1OP-C1XN
Contact Information
Telephone: 800 733 5427 (toll free in North America)
858 450 0085 (direct)
Fax: 858 458 0267
Email:
Web: www.programmablepower.com
sales@programmablepower.com
service@programmablep
ower.com
i
Page 3

This page intentionally left blank.
ii
Page 4
Important Safety Instructions
G
G
Before applying power to the system, verify that your product is configured properly for your
particular application.
Hazardous voltages may be present when covers are removed. Qualified
personnel must use extreme caution when servicing this equipment.
WARNIN
WARNIN
Only qualified personnel who deal with attendant hazards in power supplies, are allowed to perform
installation and servicing.
Ensure that the AC power line ground is connected properly to the Power Rack input connector or
ssis. Similarly, other power ground lines including those to application and maintenance
cha
equipment must be grounded properly for both personnel and equipment safety.
Always ensure that facility AC input power is de-e
cable.
In normal operation, the operator does not have acce
However, depending on the user’s application configuration, HIGH VOLTAGES HAZARDOUS TO
HUMAN SAFETY may be normally generated on the output terminals. The customer/user must
ensure that the output power lines are labeled properly as to the safety hazards and that any
inadvertent contact with hazardous voltages is eliminated.
Guard against risks of electrical shock during open cover ch
electrical circuits. Even when power is off, capacitors may retain an electrical charge. Use safety
glasses during open cover checks to avoid personal injury by any sudden component failure.
Neither AMETEK Programmable Power Inc., San Diego, California
sales organizations can accept any responsibility for personnel, material or inconsequential injury,
loss or damage that results from improper use of the equipment and accessories.
Circuit boards, test points, and output voltages also may be floating above
(below) chassis ground.
The equipment used contains ESD sensitive parts. When installing
equipment, follow ESD Safety Procedures. Electrostatic discharges might
cause damage to the equipment.
nergized prior to connecting or disconnecting any
ss to hazardous voltages within the cha ssis.
ecks by not touching any portion of the
, USA, nor any of the subsidiary
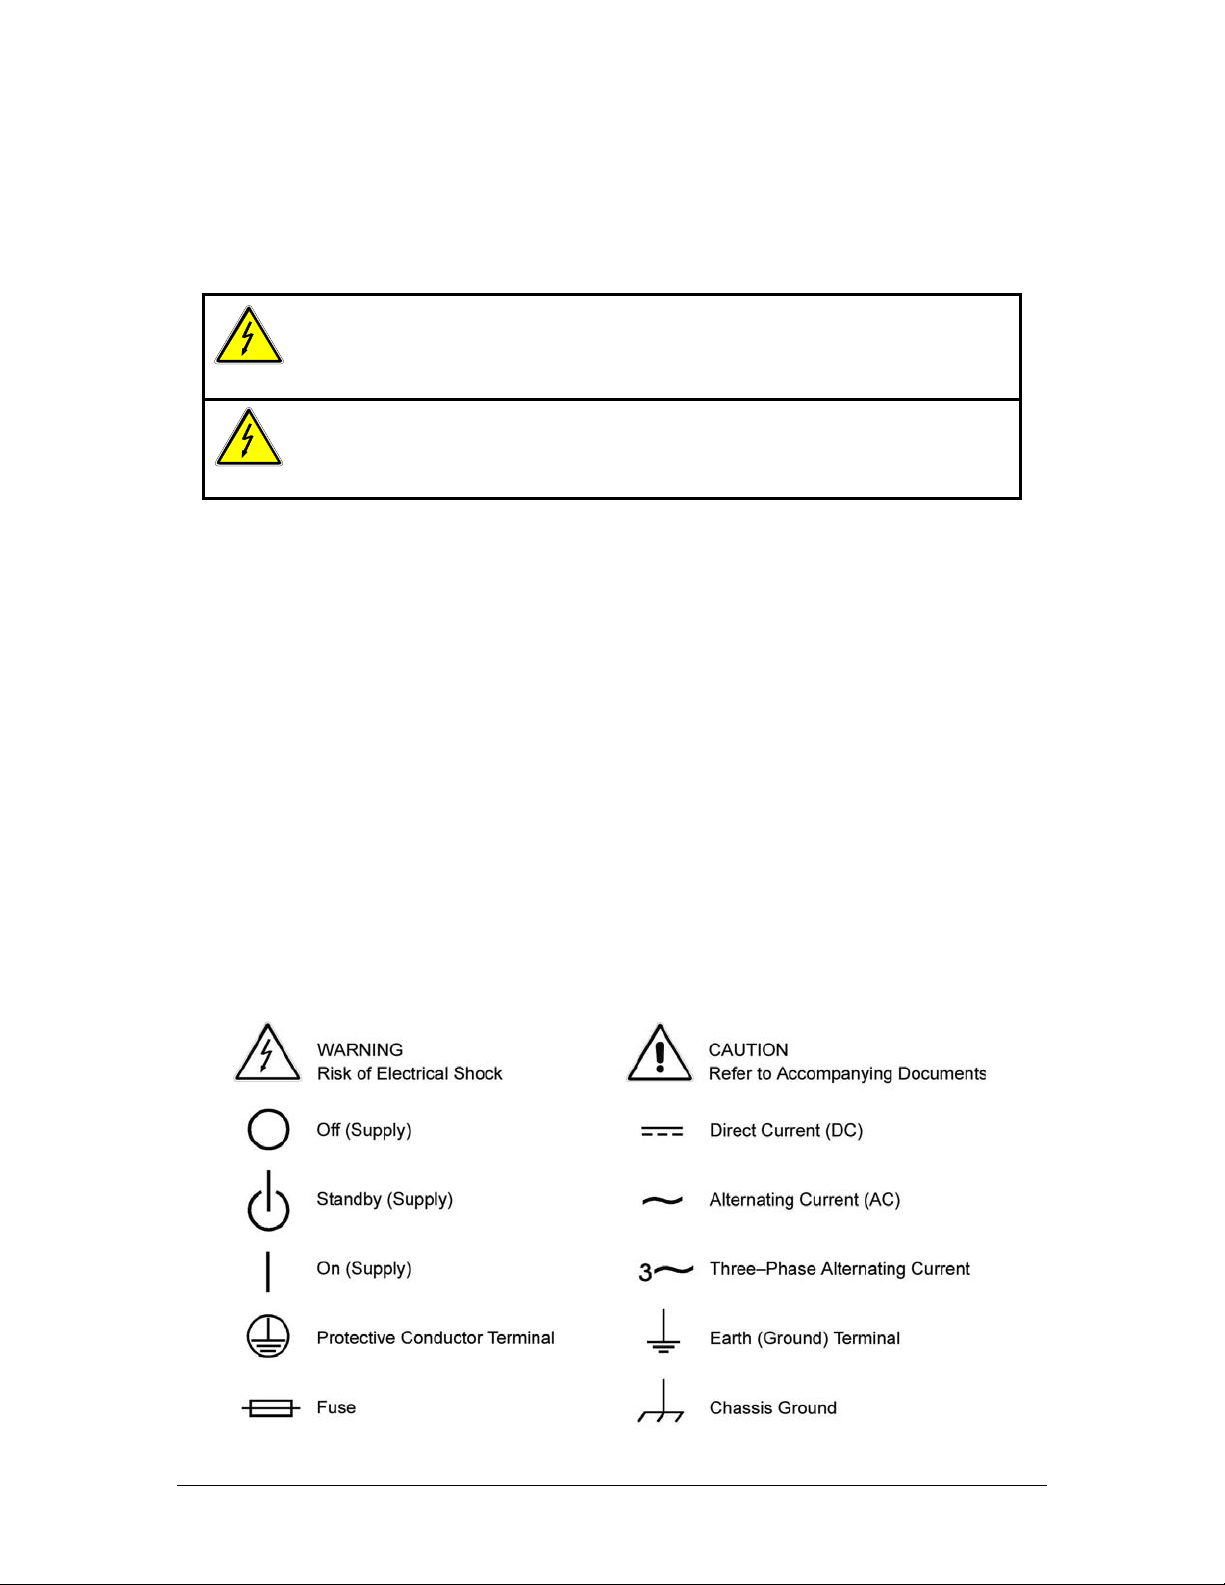
SAFETY SYMBOLS
iii
Page 5

This page intentionally left blank.
iv
Page 6

Product Family: XFR 1200 Watt Series Programmable DC Power Supply
Warranty Period: Five Years
WARRANTY TERMS
AMETEK Programmable Power, Inc. (“AMETEK”), provides this written warranty covering the
Product stated above, and if the Buyer discovers and notifies AMETEK in writing of any defect in
material or workmanship within the applicable warranty period stated above, then AMETEK may,
at its option: repair or replace the Product; or issue a credit note for the defective Product; or
provide the Buyer with replacement parts for the Product.
The Buyer will, at its expense, return the defective Product or parts thereof to AMETEK in
accordance with the return procedure specified below. AMETEK will, at its expense, deliver the
repaired or replaced Product or parts to the Buyer. Any warranty of AMETEK will not apply if the
Buyer is in default under the Purchase Order Agreement or where the Product or any part
thereof:
• is damaged by misuse, accident, negligence or failure to maintain the same as
specified or required by AMETEK;
• is damaged by modifications, alterations or attachments thereto which are not
authorized by AMETEK;
• is installed or operated contrary to the instructions of AMETEK;
• is opened, modified or disassembled in any way without AMETEK’s consent; or
• is used in combination with items, articles or materials not authorized by AMETEK.
The Buyer may not assert any claim that the Products are not in conformity with any warranty
until the Buyer has made all payments to AMETEK provided for in the Purchase Order Agreement.
PRODUCT RETURN PROCEDURE
1. Request a Return Material Authorization (RMA) number from the repair facility (must be
done in the country in which it was purchased):
• In the USA, contact the AMETEK Repair Department prior to the return of the
product to AMETEK for repair:
Telephone: 800-733-5427, ext. 2295 or ext. 2463 (toll free North America)
858-450-0085, ext. 2295 or ext. 2463 (direct)
• Outside the United States, contact the nearest Authorized Service Center
(ASC). A full listing can be found either through your local distributor or our
website, www.programmablepower.com, by clicking Support and going to the
Service Centers tab.
2. When requesting an RMA, have the following information ready:
• Model number
• Serial number
• Description of the problem
NOTE: Unauthorized returns will not be accepted and will be returned at the shipper’s expense.
NOTE: A returned product found upon inspection by AMETEK, to be in specification is subject to
an evaluation fee and applicable freight charges.
v
Page 7

This page intentionally left blank.
vi
Page 8

Contents
Important Safety Instructions
1
Features and Specifications
Description - - - - - - - - - - - - - - - - - - - - - - - - - - - - - - - - - - - - - - - - - - - - - - - - - -1–2
Features and Options - - - - - - - - - - - - - - - - - - - - - - - - - - - - - - - - - - - - - - - - - - -1–3
Front Panel Controls- - - - - - - - - - - - - - - - - - - - - - - - - - - - - - - - - - - - - - - - - - - -1–3
Rear Panel Connectors and Switch - - - - - - - - - - - - - - - - - - - - - - - - - - - - - - - - - -1–5
Rear Panel SW1 Switch - - - - - - - - - - - - - - - - - - - - - - - - - - - - - - - - - - - - - - -1–6
Resetting the Switches - - - - - - - - - - - - - - - - - - - - - - - - - - - - - - - - - - - - -1–7
Rear Panel J2 Connector - - - - - - - - - - - - - - - - - - - - - - - - - - - - - - - - - - - - - -1–7
Making J2 Connections - - - - - - - - - - - - - - - - - - - - - - - - - - - - - - - - - - - -1–9
Wiring - - - - - - - - - - - - - - - - - - - - - - - - - - - - - - - - - - - - - - - - - - - - - - - -1–9
2
Installation
Basic Setup Procedure - - - - - - - - - - - - - - - - - - - - - - - - - - - - - - - - - - - - - - - - - -2–2
Inspection, Cleaning, and Packaging- - - - - - - - - - - - - - - - - - - - - - - - - - - - - - - - -2–3
Initial Inspection - - - - - - - - - - - - - - - - - - - - - - - - - - - - - - - - - - - - - - - - -2–3
Periodic Cleaning - - - - - - - - - - - - - - - - - - - - - - - - - - - - - - - - - - - - - - - -2–3
Packaging for Shipping or Storage - - - - - - - - - - - - - - - - - - - - - - - - - - - - -2–3
Location, Mounting, and Ventilation- - - - - - - - - - - - - - - - - - - - - - - - - - - - - - - - -2–4
Rack Mounting - - - - - - - - - - - - - - - - - - - - - - - - - - - - - - - - - - - - - - - - - -2–4
Ventilation - - - - - - - - - - - - - - - - - - - - - - - - - - - - - - - - - - - - - - - - - - - - -2–5
AC Input Power- - - - - - - - - - - - - - - - - - - - - - - - - - - - - - - - - - - - - - - - - - - - - - -2–5
AC Input Connector and Voltage Selection - - - - - - - - - - - - - - - - - - - - - - - - - -2–6
AC Input Cord - - - - - - - - - - - - - - - - - - - - - - - - - - - - - - - - - - - - - - - - - - - - -2–6
AC Input Wire Connection - - - - - - - - - - - - - - - - - - - - - - - - - - - - - - - - - - - - -2–7
Functional Tests - - - - - - - - - - - - - - - - - - - - - - - - - - - - - - - - - - - - - - - - - - - - - -2–9
Equipment Required - - - - - - - - - - - - - - - - - - - - - - - - - - - - - - - - - - - - - - - - -2–9
Power-on Check - - - - - - - - - - - - - - - - - - - - - - - - - - - - - - - - - - - - - - - - - - - -2–9
Voltage Mode Operation Check - - - - - - - - - - - - - - - - - - - - - - - - - - - - - - - - 2–10
Current Mode Operation Check - - - - - - - - - - - - - - - - - - - - - - - - - - - - - - - - 2–10
Front Panel Function Checks - - - - - - - - - - - - - - - - - - - - - - - - - - - - - - - - - - 2–11
- - - - - - - - - - - - - - - - - - - - - - - - - - - - - - - - - - v
TM-F2OP-C1XN-01 vii
Page 9

Contents
Load Connection - - - - - - - - - - - - - - - - - - - - - - - - - - - - - - - - - - - - - - - - - - - - - 2–12
Load Wiring - - - - - - - - - - - - - - - - - - - - - - - - - - - - - - - - - - - - - - - - - - - - - 2–12
Insulation Rating - - - - - - - - - - - - - - - - - - - - - - - - - - - - - - - - - - - - - - - 2–12
Current Carrying Capacity - - - - - - - - - - - - - - - - - - - - - - - - - - - - - - - - - 2–12
Load Wiring Length for Operation with Sense Lines - - - - - - - - - - - - - - - 2–13
Noise and Impedance Effects - - - - - - - - - - - - - - - - - - - - - - - - - - - - - - - 2–14
Making Load Connections - - - - - - - - - - - - - - - - - - - - - - - - - - - - - - - - - - - - 2–14
Output Cover - - - - - - - - - - - - - - - - - - - - - - - - - - - - - - - - - - - - - - - - - - 2–14
7.5 V to 100 V Models - - - - - - - - - - - - - - - - - - - - - - - - - - - - - - - - - - - 2–16
150 V to 600 V Models - - - - - - - - - - - - - - - - - - - - - - - - - - - - - - - - - - - 2–17
Inductive Loads - - - - - - - - - - - - - - - - - - - - - - - - - - - - - - - - - - - - - - - - - - - 2–18
Connecting Single Loads - - - - - - - - - - - - - - - - - - - - - - - - - - - - - - - - - - - - - 2–18
Connecting Multiple Loads - - - - - - - - - - - - - - - - - - - - - - - - - - - - - - - - - - - 2–19
Local and Remote Sensing - - - - - - - - - - - - - - - - - - - - - - - - - - - - - - - - - - - - - - 2–21
Sense Wiring - - - - - - - - - - - - - - - - - - - - - - - - - - - - - - - - - - - - - - - - - - - - - 2–21
Local Sensing - - - - - - - - - - - - - - - - - - - - - - - - - - - - - - - - - - - - - - - - - - - - 2–21
Using Remote Sensing - - - - - - - - - - - - - - - - - - - - - - - - - - - - - - - - - - - - - - 2–23
3
Local Operation
Introduction - - - - - - - - - - - - - - - - - - - - - - - - - - - - - - - - - - - - - - - - - - - - - - - - -3–2
Standard Operation - - - - - - - - - - - - - - - - - - - - - - - - - - - - - - - - - - - - - - - - - - - -3–3
Operating Modes and Automatic Crossover - - - - - - - - - - - - - - - - - - - - - - - - - 3–3
Constant Voltage Mode Operation - - - - - - - - - - - - - - - - - - - - - - - - - - - - -3–4
Constant Current Mode Operation - - - - - - - - - - - - - - - - - - - - - - - - - - - - - 3–4
Automatic Mode Crossover - - - - - - - - - - - - - - - - - - - - - - - - - - - - - - - - - 3–4
Shipped Configuration (Local Control Mode) - - - - - - - - - - - - - - - - - - - - - - - - 3–5
Setting Output Voltage and Current Limit - - - - - - - - - - - - - - - - - - - - - - - - - -3–6
Using Over Voltage Protection (OVP) - - - - - - - - - - - - - - - - - - - - - - - - - - - - - - - 3–7
Front Panel OVP Operation - - - - - - - - - - - - - - - - - - - - - - - - - - - - - - - - - - - -3–7
Resetting the OVP Circuit - - - - - - - - - - - - - - - - - - - - - - - - - - - - - - - - - - - - -3–8
Using the Shutdown Function - - - - - - - - - - - - - - - - - - - - - - - - - - - - - - - - - - - - -3–9
STANDBY Switch - - - - - - - - - - - - - - - - - - - - - - - - - - - - - - - - - - - - - - - - - -3–9
Controlling the Shutdown Function via the J2 Connector - - - - - - - - - - - - - - - - 3–9
Using Multiple Supplies - - - - - - - - - - - - - - - - - - - - - - - - - - - - - - - - - - - - - - - - 3–11
Configuring Multiple Supplies for Series Operation - - - - - - - - - - - - - - - - - - - 3–12
Configuring Multiple Supplies for Parallel Operation - - - - - - - - - - - - - - - - - - 3–13
Sensing for Parallel Operation - - - - - - - - - - - - - - - - - - - - - - - - - - - - - - 3–14
viii TM-F2OP-C1XN-01
Page 10

Configuring Multiple Supplies for Split Supply Operation - - - - - - - - - - - - - -3–15
Two Positive Voltages - - - - - - - - - - - - - - - - - - - - - - - - - - - - - - - - - - - -3–15
Positive-negative Supply - - - - - - - - - - - - - - - - - - - - - - - - - - - - - - - - - -3–16
Over Temperature Protection (OTP) - - - - - - - - - - - - - - - - - - - - - - - - - - - - - - - -3–17
4
Remote Operation
Introduction - - - - - - - - - - - - - - - - - - - - - - - - - - - - - - - - - - - - - - - - - - - - - - - - -4–2
Isolated Programming - - - - - - - - - - - - - - - - - - - - - - - - - - - - - - - - - - - - -4–2
Remote Digital Programming - - - - - - - - - - - - - - - - - - - - - - - - - - - - - - - -4–2
Remote Analog Programming of Output Voltage and Current Limit - - - - - - - - - - -4–3
Remote Programming Options - - - - - - - - - - - - - - - - - - - - - - - - - - - - - - - - - -4–3
Remote Analog Programming Procedure - - - - - - - - - - - - - - - - - - - - - - - - - - -4–3
Remote Monitoring of Output Voltage and Current- - - - - - - - - - - - - - - - - - - - - - -4–7
Readback Signals - - - - - - - - - - - - - - - - - - - - - - - - - - - - - - - - - - - - - - - - - - -4–7
5
Calibration and Troubleshooting
Calibration Setup - - - - - - - - - - - - - - - - - - - - - - - - - - - - - - - - - - - - - - - - - - - - - -5–2
Service Environment and Precautions - - - - - - - - - - - - - - - - - - - - - - - - - - - - -5–2
Equipment Required - - - - - - - - - - - - - - - - - - - - - - - - - - - - - - - - - - - - - - - - -5–2
Accessing Calibration Potentiometers - - - - - - - - - - - - - - - - - - - - - - - - - - - - - 5–3
Removing Option Card - - - - - - - - - - - - - - - - - - - - - - - - - - - - - - - - - - - -5–3
Calibrating for Programming Accuracy - - - - - - - - - - - - - - - - - - - - - - - - - - - - - - -5–5
Voltage Programming Circuit Calibration - - - - - - - - - - - - - - - - - - - - - - - - - - -5–5
Current Limit Programming Circuit Calibration - - - - - - - - - - - - - - - - - - - - - - -5–6
Calibrating for Readback Accuracy- - - - - - - - - - - - - - - - - - - - - - - - - - - - - - - - - -5–7
Output Voltage Monitor Circuit Calibration - - - - - - - - - - - - - - - - - - - - - - - - -5–7
Output Current Monitor Circuit Calibration - - - - - - - - - - - - - - - - - - - - - - - - -5–8
User Diagnostics - - - - - - - - - - - - - - - - - - - - - - - - - - - - - - - - - - - - - - - - - - - - - -5–9
Emergency Shutdown - - - - - - - - - - - - - - - - - - - - - - - - - - - - - - - - - - - - - - - -5–9
Unusual or Erratic Operation - - - - - - - - - - - - - - - - - - - - - - - - - - - - - - - - - - -5–9
Troubleshooting for Operators - - - - - - - - - - - - - - - - - - - - - - - - - - - - - - - - - 5–10
Contents
TM-F2OP-C1XN-01 ix
Page 11

Contents
A
Specifications
Electrical Specifications - - - - - - - - - - - - - - - - - - - - - - - - - - - - - - - - - - - - - - - - A–2
Additional Specifications - - - - - - - - - - - - - - - - - - - - - - - - - - - - - - - - - - - - - - - A–6
Input Conditions - - - - - - - - - - - - - - - - - - - - - - - - - - - - - - - - - - - - - - - - - - - - - A–7
Additional Features - - - - - - - - - - - - - - - - - - - - - - - - - - - - - - - - - - - - - - - - - - - A–8
Remote Programming and Monitoring - - - - - - - - - - - - - - - - - - - - - - - - - - - - - - A–8
Environmental Specifications - - - - - - - - - - - - - - - - - - - - - - - - - - - - - - - - - - - - A–9
Mechanical Specifications- - - - - - - - - - - - - - - - - - - - - - - - - - - - - - - - - - - - - - -A–10
Warranty and Return Information
Warranty - - - - - - - - - - - - - - - - - - - - - - - - - - - - - - - - - - - - - - - - - - - - - - - - - WA–1
Return Material Authorization Policy - - - - - - - - - - - - - - - - - - - - - - - - - - - - - - WA–3
Return Procedure- - - - - - - - - - - - - - - - - - - - - - - - - - - - - - - - - - - - - - - - - - - -WA–4
Out of Warranty Service- - - - - - - - - - - - - - - - - - - - - - - - - - - - - - - - - - - - - - - WA–4
Information About Your System - - - - - - - - - - - - - - - - - - - - - - - - - - - - - - - - -WA–4
- - - - - - - - - - - - - - - - - - - - - - - - - - -WA–1
x TM-F2OP-C1XN-01
Page 12

Figures
Figure 1-1 Power Supply Front Panel- - - - - - - - - - - - - - - - - - - - - - - - - - - - - - - - - 1–4
Figure 1-2 Power Supply Rear Panel (Low voltage (7.5 V to 10 0 V) model shown.) - 1–5
Figure 1-3 Programming and Monitoring SW1 Switch - - - - - - - - - - - - - - - - - - - - - 1–6
Figure 1-4 Programming and Monitoring J2 Connector- - - - - - - - - - - - - - - - - - - - - 1–7
Figure 2-1 Shipping or Storage Carton Label- - - - - - - - - - - - - - - - - - - - - - - - - - - - 2–4
Figure 2-2 AC Input Cover and Strain Relief- - - - - - - - - - - - - - - - - - - - - - - - - - - - 2–8
Figure 2-3 Maximum Load Wire Length for 1 V Line Drop- - - - - - - - - - - - - - - - - 2–13
Figure 2-4 Output Strain Relief and Cover - - - - - - - - - - - - - - - - - - - - - - - - - - - - 2–15
Figure 2-5 Typical Load Connection Hardware - - - - - - - - - - - - - - - - - - - - - - - - - 2–16
Figure 2-6 Output Voltage Connector- - - - - - - - - - - - - - - - - - - - - - - - - - - - - - - - 2–17
Figure 2-7 Single Load with Local Sensing (Default) - - - - - - - - - - - - - - - - - - - - - 2–18
Figure 2-8 Single Load with Remote Sensing - - - - - - - - - - - - - - - - - - - - - - - - - - 2–19
Figure 2-9 Multiple Loads with Local Sensing - - - - - - - - - - - - - - - - - - - - - - - - - 2–20
Figure 2-10 Multiple Loads with Remote Sensing - - - - - - - - - - - - - - - - - - - - - - - - 2–20
Figure 2-11 J10 Sense Connector - - - - - - - - - - - - - - - - - - - - - - - - - - - - - - - - - - - 2–22
Figure 2-12 Connecting Remote Sense Lines - - - - - - - - - - - - - - - - - - - - - - - - - - - 2–24
Figure 3-1 Operating Modes- - - - - - - - - - - - - - - - - - - - - - - - - - - - - - - - - - - - - - - 3–3
Figure 3-2 Series Operation of Multiple Supplies- - - - - - - - - - - - - - - - - - - - - - - - 3–12
Figure 3-3 Parallel Operation of Multiple Supplies- - - - - - - - - - - - - - - - - - - - - - - 3–14
Figure 3-4 Split Supply Operation of Multiple Supplies - - - - - - - - - - - - - - - - - - - 3–15
Figure 3-5 Split Supply Operation of Multiple Supplies - - - - - - - - - - - - - - - - - - - 3–16
Figure 4-1 Connecting Programming Sources to J2 Connector - - - - - - - - - - - - - - - - 4–6
Figure 5-1 Programming and Monitoring Calibration Locations - - - - - - - - - - - - - - - 5–4
Figure A-1 Typical Input Current Characteristics - - - - - - - - - - - - - - - - - - - - - - - - - A–7
Figure A-2 Dimensional Drawings - - - - - - - - - - - - - - - - - - - - - - - - - - - - - - - - - - A–12
TM-F2OP-C1XN-01 xi
Page 13

xii
Page 14

Tables
Table 1-1 Available Voltage and Current Ranges - - - - - - - - - - - - - - - - - - - - - - - - 1–2
Table 1-2 Rear Panel SW1 Switch Assignments - - - - - - - - - - - - - - - - - - - - - - - - - 1–6
Table 1-3 Rear Panel J2 Connector Terminals and Functions - - - - - - - - - - - - - - - - 1–8
Table 2-1 Basic Setup Procedure - - - - - - - - - - - - - - - - - - - - - - - - - - - - - - - - - - - 2–2
Table 2-2 Operation AC Input Voltage Range and Frequency- - - - - - - - - - - - - - - - 2–6
Table 2-3 AC Wire Specification - - - - - - - - - - - - - - - - - - - - - - - - - - - - - - - - - - - 2–6
Table 2-4 Current Carrying Capacity for Load Wiring- - - - - - - - - - - - - - - - - - - - 2–13
Table 2-5 Rear Panel J10 Sense Connector Terminals and Functions - - - - - - - - - - 2–22
Table 3-1 Shipped Configuration (Local Control Mode) - - - - - - - - - - - - - - - - - - - 3–5
Table 3-2 Switch Settings for Shutdown Circuit Logic- - - - - - - - - - - - - - - - - - - - 3–10
Table 3-3 Switch Settings for Over Temperature Recovery Options- - - - - - - - - - - 3–17
Table 4-1 Remote Programming Options- - - - - - - - - - - - - - - - - - - - - - - - - - - - - - 4–3
Table 4-2 Power Supply Settings for Different Programming Sources - - - - - - - - - - 4–5
Table 4-3 Settings for Remote Monitoring of Readback Signals - - - - - - - - - - - - - - 4–7
Table 5-1 User Diagnostics - - - - - - - - - - - - - - - - - - - - - - - - - - - - - - - - - - - - - - 5–10
Table A-1 Specifications for 7.5 V to 40 V Models - - - - - - - - - - - - - - - - - - - - - - - A–2
Table A-2 Specifications for 60 V to 600 V Models- - - - - - - - - - - - - - - - - - - - - - - A–4
TM-F2OP-C1XN-01 xiii
Page 15

xiv
Page 16

Features and
1
Specifications
Chapter 1 describes the XFR 2800 Watt Series
Programmable DC Power Supply and lists the features.
Page 17

Features and Specifications
Description
This series of power supplies provides low noise, precisely regulated,
variable DC output at 2800 watts of output power. Over voltage
protection (OVP) and thermal shutdown are standard. Front panel
controls and indicators are extensive. Select from several remote control
choices: standard analog programming, optional isolated programming or
readback, and optional GPIB programming or RS-232 control. Remote
monitoring of output voltage and current is a standard feature. Use this
power supply either on your bench or in a standard 19 in. (483 mm) rack:
the unit occupies only 3.5 in. (2 U) of vertical rac k space . Designed for
continuous use in standalone or systems applications, this power supply is
typically used to power DC equipment, control magnets, or burn in
components. See T able 1-1 for the list of available models.
Table 1-1
Model Voltage Range Current Range
7.5-300 0-7.5 V 0-300 A
12-220 0-12 V 0-220 A
20-130 0-20 V 0-130 A
33-85 0-33 V 0-85 A
40-70 0-40 V 0-70 A
60-46 0-60 V 0-46 A
100-28 0-100 V 0-28 A
150-18 0-150 V 0-18 A
300-9 0-300 V 0-9 A
600-4 0-600 V 0-4 A
Available Vo ltage and Curre nt Ranges
1-2 TM-F2OP-C1XN-01
Page 18

Features and Options
• Simultaneous digital display of both voltage and current.
• Ten-turn front panel voltage and current controls for high resolution
setting of the output voltage and current from zero to the rated output.
• Automatic mode crossover into current or voltage mode.
• Front panel push-button control of output standby mode and preview
of voltage, current, or over voltage protection setpoints. Front panel
light emitting diode (LED) indicators for voltage and current mode
operation, OVP, remote programming mode, and shutdown. Front
panel control of OVP.
• Multiple units can be connected in parallel or in series to provide
increased current or voltage.
• Over temperature protection (OTP) shutdown; latches or
automatically resets.
• Remote analog voltage and current limit programming with selectable
programming ranges.
• External monitor signals for output voltage and current.
• Isolated analog remote programming control of the output voltage or
current and isolated readback of output voltage and current with the
optional ISOL Interface.
• Optional internal GPIB or RS-232 control for remote digital
programming and readback from a computer.
• Rack mount brackets at the front panel are standard.
Features and Options
Front Panel Controls
See Figure 1-1 to review the controls, LEDs, and meters located on the
power supply’s front panel. Check the following sections for additional
descriptions of front panel controls and functions.
• “Mechanical Specifications” on page A–10
• “Functional Tests” on page 2–9
• Chapter 3, “Local Operation”
TM-F2OP-C1XN-01 1-3
Page 19
Features and Specifications
6
7
8
9
10
14 1615
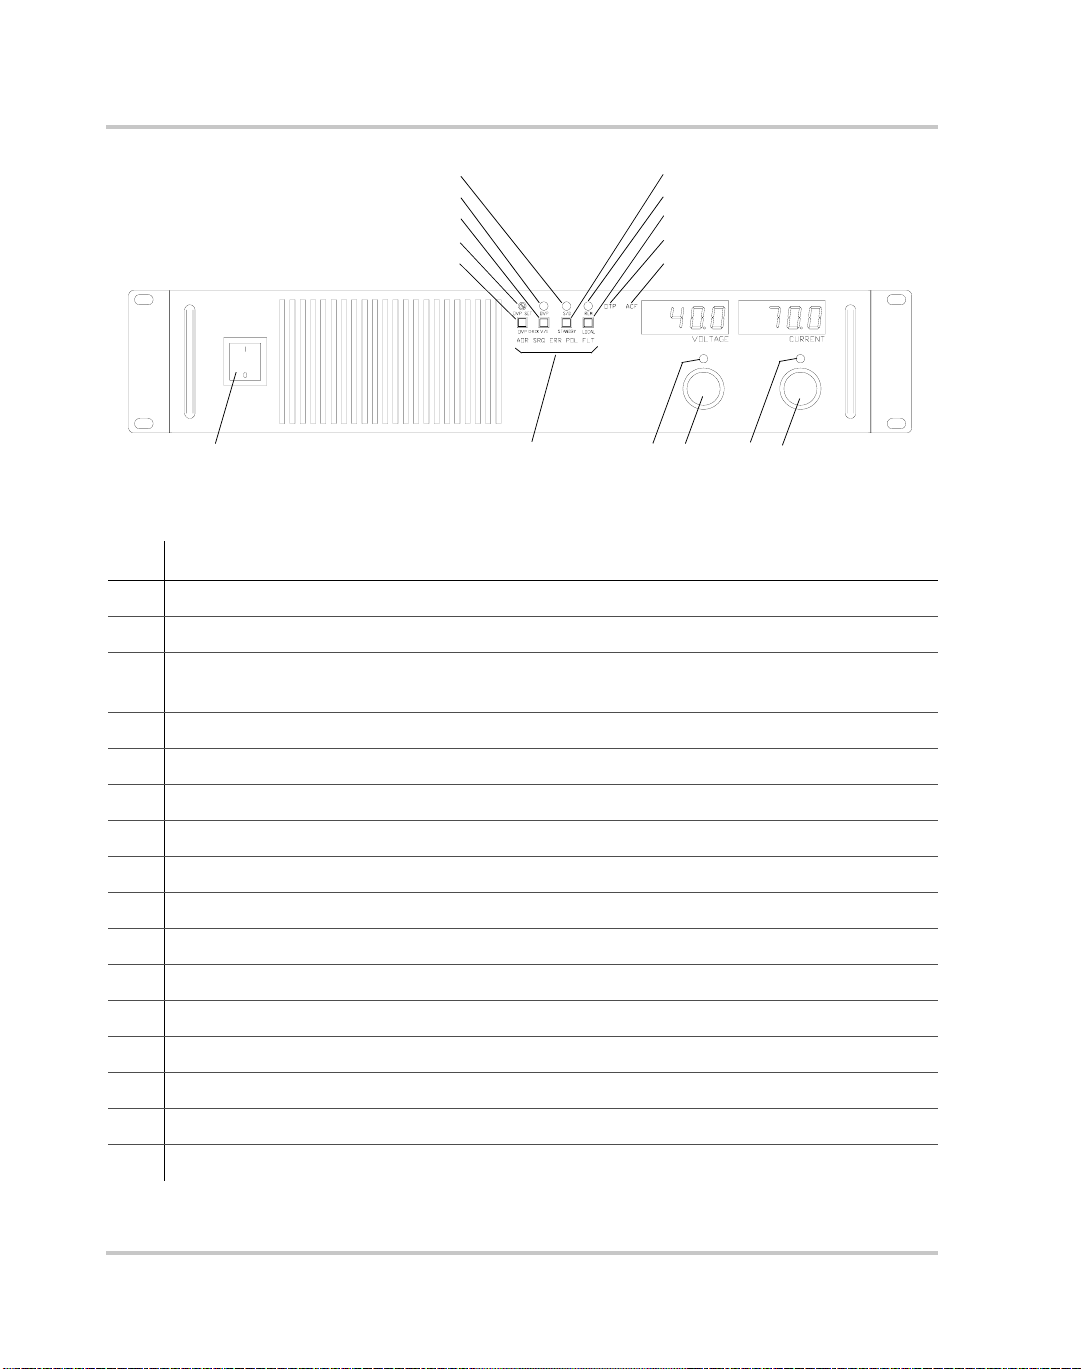
Figure 1-1
5
4
3
2
1
11 12 13
Power Supply Front Panel
No. Description
1 OVP Check: OVP Setting Preview Switch (See page 3–7 for more information.)
2 OVP Set: OVP Adjust Potentiometer (See page 3–7 for more information.)
3 V/I Check: Local Voltage & Current Limit Setting Preview Switch (See page 2–9 for more
information.)
4 OVP Shutdown LED
5 S/D: Shutdown LED
6 Standby Switch (See page 3–9 for more information.
7 Rem: Remote Programming LED
8 Local: Return to Local Programming, for units with digital programming interface installed
9 OTP: Over Temperature Shutdown LED
10 ACF: AC Fail LED
11 AC Power Switch
12 Remote Programming LEDs: For units with digital programming interface installed
13 Voltage Mode LED
14 Output Voltage Control Knob
15 Current Mode LED
16 Output Current Control Knob
1-4 TM-F2OP-C1XN-01
Page 20
Rear Panel Connectors and Switch
Use the rear panel SW1 Programming, Monitoring, and Shutdown Select
switch and the rear panel J2 Programming and Monitoring connector to
choose among several remote programming and monitoring options. See
Figure 1-2 for switches and connectors available at the rear panel. See
“Rear Panel SW1 Switch” on page 1–6 and “Rear Panel J2 Connector” on
page 1–7 for a list of switches and connector functions, and procedures
for using them.
1 2 3
Rear Panel Connectors and Switch
4 5 6 78
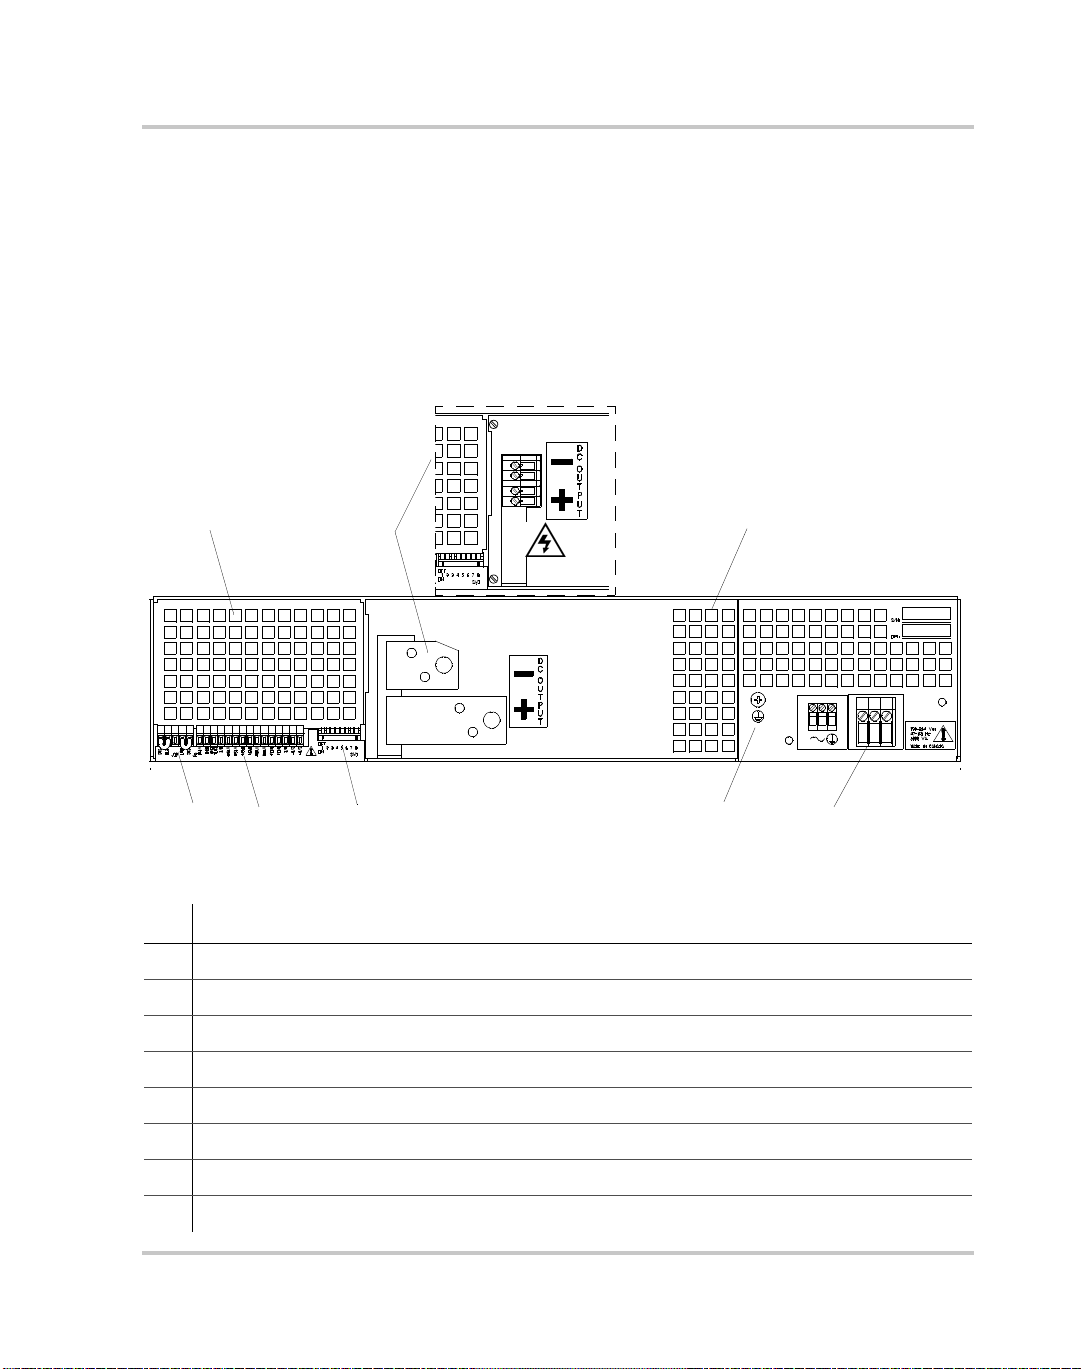
Figure 1-2
No. Description
1 Blank Subplate: Replaced if digital programming interface installed.
2 DC Output Connector: For high vol tage (150 V to 600 V) models. See inset and page 2–12.
3 Fan Exhaust Vents: Do not block.
4 J10 Sense Connector. See page 2–21 for more information.
5 J2 Programming and Monito ring Connector. See page 1–7 for more information.
6 SW1 Switch. See page 1–6 for more information.
7 Chassis Ground Screw: 3/8 in. (9 mm ) m a xim um penetration into unit.
8 AC Input Connector: See page 2–5 for more inform ation.
TM-F2OP-C1XN-01 1-5
Power Supply Rear Panel (Low voltage (7.5 V to 100 V) model shown.)
Page 21

Features and Specifications
Rear Panel SW1 Switch
The SW1 Programming, Monitoring, and Shutdown Select switch is an
8-position piano DIP switch located on the power supply’ s rear panel. See
Figure 1-3. The SW1 switch enables you to choose:
• Resistive programming of output voltage or current limit
• Output voltage and current limit programming scales
• Output voltage and current monitor scales
• Remote shutdown circuit logic
• Over temperature shutdown mode
1 Resistive Programming of Output Voltage
2 Resistive Programming of Output Current
3 Selects Output Voltage Programming Source Range
4 Selects Output Current Limit Programming Source Range
5 Selects Output Voltage Monitor Range
6 Selects Output Current Monitor Range
7 Selects Remote Shutdown Logic
8 Selects Over Temperature Shutdown Reset Mode
Figure 1-3
Programming and Monitoring SW1 Switch
(Switch is shown in factory default configuration.)
Table 1-2 shows the functions assigned to each SW1 switch.
Table 1-2
Switch Function Open
SW1-1 1 mA current source for resistive programming
SW1-2 1 mA current source for resistive programming
SW1-3 Output voltage programming source range select 0-5 V (0-5 k) 0-10 V
SW1-4 Output current limit programming source range
SW1-5 Output voltage monitor range select 0-5 V 0-10 V
SW1-6 Output current monitor range select 0-5 V 0-10 V
SW1-7 Remote shutdown logic select HIGH=OFF HIGH=ON
SW1-8 Over temperature shutdown reset mode select Auto reset
a. Factory defaults underlined.
1-6 TM-F2OP-C1XN-01
Rear Panel SW1 Switch Assignments
of output voltage
of output current limit
select
a
Voltage source
programming
Voltage source
programming
0-5 V (0-5 k) 0-10 V
Closed
Resistive programming
(0-5 k, 0-10 k)
Resistive programming
(0-5 k, 0-10 k)
Latch OFF
(0-10 k)
(0-10 k)
Page 22
Resetting the Switches
Before making any changes to the switch settings, disable the power
supply output by pushing the front panel STANDBY switch to its IN
position. This temporarily shuts down the power supply. The front panel
S/D LED turns on. Then, use any small, flat-bladed screwdriver to change
the switch settings.
Any of the eight switches on SW1 is OFF when it has been flipped up to
break contact, ON when flipped down to close contact.
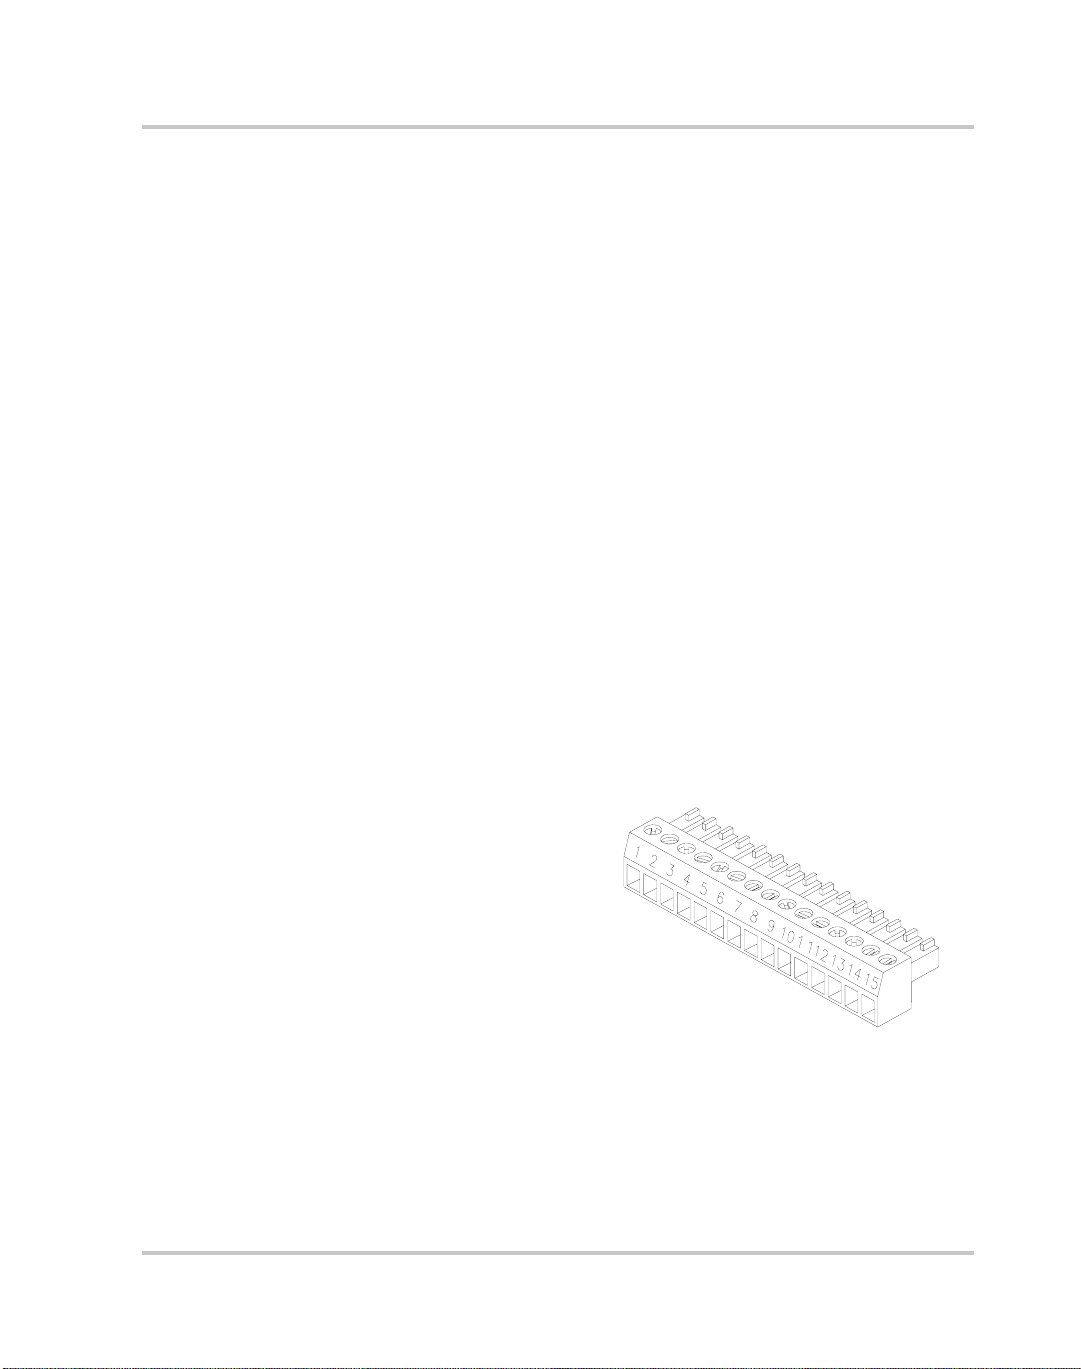
Rear Panel J2 Connector
The J2 Programming and Monitoring connector is a 15-terminal wire
clamp connector located on the power supply’s rear panel. See Figure 1-4.
The J2 connector provides access to the following functions:
• Remote programming of output voltage AND/OR current limit
• Remote monitoring of calibrated readback signals for output voltage
and output current
• Remote control of the shutdown function using a 2.5 V to 15 V signal
Rear Panel Connectors and Switch
Figure 1-4
1 Remote Output Voltage Programming Select
2 Remote Output Current Limit Programming Select
3 Control Ground
4 No connection
5 Voltage Program Signal Return
6 Output Voltage Programming Input
7 Current Program Signal Return
8 Output Current Limit Programming Input
9 Voltage Monitor Signal Return
10 Output Voltage Monitor
11 Current Monitor Signal Return
12 Output Current Monitor
13 No connection
14 Shutdown (S/D) Signal Return (–)
15 S/D Input (+)
Programming and Monitoring J2 Connector
See Table 1-3 for the list of the J2 connector terminal numbers, their
references, and corresponding functions.
TM-F2OP-C1XN-01 1-7
Page 23

Features and Specifications
Table 1-3
Connector Reference Name Function
J2-1 VRMT Remote Output Voltage
J2-2 IRMT Remote Output Current Limit
J2-3 CNTL
J2-4 N/C No connection None.
J2-5 VPGM– Voltage Program Signal Return Return for voltage program signal.
J2-6 VPGM Output Voltage Programming
J2-7 IPGM– Current Program Signal Return Return for current program signal.
J2-8 IPGM Output Current Limit
J2-9 VMON– Voltage Monitor Signal Return Return for voltage monitor signal.
J2-10 VMON Output Voltage Monitor Output for output voltage monitor
Rear Panel J2 Connector Terminals and Functions
Selects remote output voltage
Programming Select
Programming Select
Control Ground Control ground.
GND
Input
Programming Input
programming when jumpered to pin 3.
Selects remote output current limit
programming when jumpered to pin 3.
Input for voltage programming signals
from an analog device.
Input for current limit programming
signals from an analog device.
signal.
J2-11 IMON– Current Monitor Signal Return Return for current monitor signal.
J2-12 IMON Output Current Monitor Output for output current monitor
signal.
J2-13 N/C No connection None.
J2-14 S/D– Shutdown Signal Return (–) Return for shutdown signal.
J2-15 S/D S/D Input (+) Input for shutdown signal.
1-8 TM-F2OP-C1XN-01
Page 24
Making J2 Connections
CAUTION
Do not attempt to bias program/monitor signal return (J2 terminals 5, 7, 9, and
11) relative to the supply output because control ground (J2-3) and the program/
monitor signal returns are at the same potential as the power supply return in a
standard unit. Use the Isolated Programming (ISOL) Interface option to allow
control from a programming source at a different potential relative to the supply’s
output.
CAUTION
To maintain the isolation of the power supply output and prevent ground loops,
use an isolated (ungrounded) programming source when operating the power
supply via remote analog control at the J2 connector.
Make connections to the J2 connector using its screw-type wire clamps.
Before making any connections, turn the power supply OFF and wait
until the front panel displays have gone out. You can unplug the connector
from the back of the unit in order to make it easier to install the required
wiring.
Rear Panel Connectors and Switch
Wiring
WARNING: Shock hazard
There is a potential shock hazard when using a power supply with a rated output
greater than 40 V. Use wiring with a minimum insulation rating equivalent to the
maximum output voltage of the power supply. For example, select TEW-105,
105 °C, 600 V wiring for use with a 600 V, 4 A model po wer supply.
For most connectors and jumpers, use any suitable wire such as 16 to
24 AWG stranded wire. For lowest noise performance, use shielded pair
wiring. Strip wires 0.26 in. (6.5 mm), insert, and tighten the wire clamp.
TM-F2OP-C1XN-01 1-9
Page 25

1-10
Page 26

2
Installation
Chapter 2 provides recommendations and procedures for
inspecting, installing, and testing the power supply.
Page 27

Installation
Basic Setup Procedure
See Table 2-1 for a summary of the basic setup procedure and an overall
view of the subsections in Chapter 2. Use the procedure as a quick
reference if you are familiar with the installation requirements for the
power supply. If you want more information, each step in the procedure
refers to subsequent sections which contain more details. Execute each
step in the sequence given.
Table 2-1
Step # Description Action Reference
1 Inspection Perform an initial physical inspection of
2 Installation Install the supply (bench or rack
3 Input Power Connect AC input power. “AC Input Power” on page 2–5
4 Test Perform functional tests for voltage
5 Load Connect the load. “Load Connection” on page 2–12
6 Sensing Connect sensing lines. “Local and Remote Sensing” on
Basic Setup Procedure
the supply.
mount), ensuring adequate ventilation.
mode operation, current mode
operation, and front panel controls.
“Inspection, Cleaning, and
Packaging” on page 2–3
“Location, Mounting, and
Venti lation” on page 2–4
“Functional Tests” on page 2–9
page 2–21
See Chapter 3 for instructions about front panel operation, OVP, OTP,
shutdown, and using multiple supplies. You will find remote
programming and monitoring described in Chapter 4.
2-2 TM-F2OP-C1XN-01
Page 28

Inspection, Cleaning, and Packaging
Inspection, Cleaning, and Packaging
Initial Inspection
When you first receive your unit:
1. Inspect the unit for scratches and cracks, and for broken switches,
connectors, and displays.
2. Ensure that the packing box contains the AC input cover and strain
relief kit (see Figure 2-2).
3. Have the service technician check the printed circuit board and its
components if you suspect internal damage.
If the unit is damaged, save all packing materials and notify the carrier
immediately. See packing instructions on page 2–3.
Periodic Cleaning
No routine servicing of the power supply is required except for periodic
cleaning. Whenever a unit is removed from operation, clean metal
surfaces with naphtha or an equivalent solvent and the front panel with a
weak solution of soap and water. Use low-pressure compressed air to
blow dust from in and around components on the printed circuit boards.
Packaging for Shipping or Storage
Follow these instructions to prepare the unit for shipping or storage.
1. When returning the unit or sending it to the service center, attach a tag
to the unit stating its model number, available from the front panel
label, and its serial number, available from the rear panel label. Give
the date of purchase and an invoice number, if you have it, as well as
a brief description of the problem.
2. For storage or shipping, repack the power supply in its original
container. If the original container is not available, seal the unit in a
plastic bag and then pack it in a 200 lb. (90 kg) test, corrugated
cardboard carton large enough to allow 2 in. (5 cm) of cushioning
material to surround the unit. Use a material such as foam slabs or
chips.
3. Label the carton as shown in Figure 2-1.
4. If shipping, mark the address of the service center and your return
address on the carton.
TM-F2OP-C1XN-01 2-3
Page 29

Installation
5. If storing, stack no more than eight cartons high. Check the storage
temperature range and storage altitude specification in
“Environmental Specifications” on page A–9.
POWER SUPPLY
Model Number:
Serial Number:
FRAGILE — ELECTRONIC EQUIPMENT
Figure 2-1
Shipping or Storage Carton Label
Location, Mounting, and Ventilation
Use the power supply in rack-mounted or benchtop applications.
Rack Mounting
WARNING: Shock hazard
Ensure that any mounting screws do not penetrate more than 1/8 in. (3.0 mm) into
the sides of the unit.
The power supply is designed to fit in a standard 19 in. (483 mm)
equipment rack. To install:
1. Use the rack mount brackets at either side of the front panel to install
the power supply in a rack.
2. Provide adequate support fo r the rear of the unit without obstructing
the ventilation inlets on the sides of the unit. Use a support bar at the
rear of the unit. Follow the manufacturer's instructions to install the
support bar.
To install the power supply with rack mount slides, use a commercially–
available slide kit. Follow the manufacturer’s instructions to install the
slides. Add a 1/8 in. (3.0 mm) spacer between the chassis and the slides.
2-4 TM-F2OP-C1XN-01
Page 30
Ventilation
Whether you place the power supply in a rack or on a bench, allow
cooling air to reach the ventilation inlets on the front and sides of the unit
and allow 4 in. (10 cm) of unrestricted air space at the rear of the unit for
the fan exhaust. Any ventilation space at the top and bottom of the supply
will further lower internal operating temperatures.
Check page A–9 for the operating ambient temperature range and the
operating altitude specification.
AC Input Power
WARNING: Shock hazard
There is a potential shock hazard if the power supply chassis and cover are not
connected to an electrical ground via the safety ground in the AC input connector.
Ensure that the power supply is connected to a grounded AC outlet with the
recommended AC input connector configured for the available line voltage as
described in this section.
WARNING: Shock hazard
Disconnect AC power from the unit before removing the cover. Even with the
front panel power switch in the OFF position, live line voltages are exposed when
the cover is removed. Repairs must be made by experienced service technicians
only.
AC Input Power
CAUTION
When power switch is turned on, output voltage or current previously set will be
applied to loads.
TM-F2OP-C1XN-01 2-5
Page 31

Installation
AC Input Connector and Voltage Selection
The AC input connector is a 3-terminal wire clamp located on the power
supply’s rear panel. See Figure 2-2 on page 2–8. See Table 2-2 for the
input voltage ranges and frequency required to operate the power supply.
AC Input Cord
Table 2-2
AC Voltage Range Frequency
190-264 Vac 1
(24.3 A maximum at 208 Vac; 22.4 A maximum at 230 Vac)
Operation AC Input Voltage Range and Frequency
φ
47-63 Hz
AC Fail LED The AC Fail (ACF) LED turns on when the input voltage
is outside of the range specified for the power supply. The LED turns off
when the input voltage is within the range.
WARNING
The AC input cord is the disconnect device for the power supply. The plug must
be readily identifiable by and accessible to the operator. The input cord must be
no longer than 9.84 feet (3 m).
The AC input cord we recommend is specified in Table 2-3. Add a nonlocking plug suitable for use in the country in which you are operating. If
you require a special cord, call us.
Table 2-3
AC Wire Specification
Wire Size Ratings Cable Outside Diameter
3 x 12 AWG stranded
copper
2-6 TM-F2OP-C1XN-01
60 °C minimum,
300 V
0.545-0.708 in.
(13.63-17.7 mm)
Page 32

AC Input Wire Connection
WARNING: Shock hazard
Ensure that the chassis ground screw does not penetrate more than 3/8 in. (9 mm)
into the rear panel of the unit.
1. Strip the outside insulation on the AC cable approximately 4 in.
(10 cm). Trim the wires so that the ground wire is 0.5 in. (12 mm)
longer than the other wires. Strip 0.55 in. (14 mm) at the end of each
of the wires. See Figure 2-2 on page 2–8 detail (top).
2. Unscrew the base of the strain relief from the helix-shaped body.
Insert the base through the outside opening in the AC input cover and,
from the inside, screw the locknut securely onto the base.
3. Slide the helix-shaped body onto the AC cable. Insert the stripped
wires through the strain relief base until the outer cable jacket is flush
with the edge of the base. Tighten the body to the base while holding
the cable in place. The cable is now securely fastened inside the strain
relief.
4. Route the AC wires to the input connector terminals as required. For
input connector terminal locations, see lower inset in Figure 2-2. To
connect the wiring, loosen the terminal screw, insert the stripped wire
into the terminal, and tighten the screw securely.
AC Input Power
5. Route the wires inside the cover to prevent pinching. Fasten the AC
input cover to the unit using the (6-32 x 1 1/4 in. (2)) screws, flat
washers, and lock washers provided. See Figure 2-2.
TM-F2OP-C1XN-01 2-7
Page 33

Installation
Screw-on
Locknut
Stripped Wire Inst alled in Strain Relief
Connector Terminal Locations
Assembled Strain
Relief
Chassis
Ground Screw
Cover
Flat Washer (2 places)
Lock Washer (2 places)
Screw (2 places)
Figure 2-2
AC Input Cover and Strain Relief
2-8 TM-F2OP-C1XN-01
Page 34

Functional Tests
These functional test procedures include power-on and front panel
function checks as well as voltage and current mode operation checks.
Refer to front and rear panel diagrams in “Front Panel Controls” on
page 1–3 and “Rear Panel Connectors and Switch” on page 1–5.
Equipment Required
• Digital voltmeter (DVM) rated better than 0.5% accuracy.
• DC shunt 1 mV/A (±0.25%) with connecting wire. The recommended
current ratings for the DC shunt and the wire must be at least 10%
more than the output current of the power supply.
Power-on Check
1. Ensure that the AC power switch is in the OFF position.
2. Ensure that the output sense lines are connected in the default
configuration. (The local sense lines are connected between
terminals 1 and 2 and between terminals 4 and 5 on the J10 sense
connector as shown on the rear panel diagram in Figure 1-2 on
page 1–5.)
3. Turn the voltage and current controls fully counter-clockwise.
4. Connect the unit to an AC outlet.
Functional Tests
5. Turn the front panel AC power switch to ON.
After a short, power-on delay, the front panel digital meters light up and
the green voltage mode LED turns on. Both voltmeter and ammeter
displays read zero.
TM-F2OP-C1XN-01 2-9
Page 35

Installation
Voltage Mode Operation Check
1. Ensure the voltage and current controls on the front panel are turned
fully counter-clockwise.
2. Connect that the output sense lines are connected in the default
configuration. (The local sense lines are connected between
terminals 1 and 2 and between terminals 4 and 5 on the J10 sense
connector as shown on the rear panel diagram in Figure 1-2 on
page 1–5.)
3. Turn the voltage and current controls fully counter-clockwise.
4. Compare the DVM reading with the front panel voltmeter reading to
verify the accuracy of the internal voltmeter. Both readings should be
the same. The minimum control range is from zero to the maximum
rated output for the power supply model. The voltage mode LED
turns on.
5. Turn the front panel AC power switch to OFF.
Current Mode Operation Check
1. Ensure the front panel AC power switch is set to OFF.
2. Turn the voltage and current controls on the front panel fully
counter-clockwise.
3. Connect the DC shunt across the output terminals on the rear panel.
4. Connect the DVM across the DC shunt.
5. Turn the AC power switch to ON.
6. Turn the voltage control 1 or 2 turns clockwise.
7. Turn the current control slowly clockwise.
8. Compare the DVM reading with the front panel ammeter reading
using I=V/R where I is the current, V is the DVM reading, and R is
the DC shunt resistance. The minimum control range is from zero to
the maximum rated output for the power supply model. The current
mode LED turns on.
9. Turn the AC power switch to OFF.
10. Disconnec t the DVM and the shunt.
2-10 TM-F2OP-C1XN-01
Page 36

Front Panel Function Checks
1. Turn the front panel AC switch to ON.
2. Set voltage and current controls fully clockwise. Push the ST ANDBY
switch to its IN position and check that the voltmeter reading falls to
zero and the red S/D (Shutdown) LED turns on. Push the STANDBY
switch once again to reset it to its OUT position. The S/D LED turns
off and the voltmeter reading returns to its previous value.
3. Press the STANDBY switch to its IN position.
4. Press the OVP CHECK switch and check that the voltmeter displays
approximately the model-rated output voltage plus 10%.
5. Turn the OVP SET potentiometer counter-clockwise and check that
the voltmeter reading decreases. Continued turning (up to 20 turns)
will see the reading decrease to approximately 5% of the model-rated
voltage output. Turn the OVP SET potentiometer clockwise until the
voltmeter once again displays approximately the model-rated o utput
voltage plus 10%.
6. Press the STANDBY switch to its OUT position.
7. Press the V/I CHECK switch and check that the voltmeter and
ammeter display the power supply output ratings.
8. Turn the front panel AC power switch to OFF.
Note:You can use the front panel LOCAL button only when a digital
programming interface has been installed in your power supply
Functional Tests
TM-F2OP-C1XN-01 2-11
Page 37

Installation
Load Connection
This section provides recommendations for load wires and how to
connect them for both single and multiple load configurations.
Load Wiring
WARNING
Ensure that the chassis ground screw does not penetrate more than 3/8 in. (9 mm)
into the rear panel of the unit.
When connecting load wiring to the power supply, consider the following
factors:
• insulation rating of the wire
• current carrying capacity of the wire
• maximum load wiring length for operation with sense lines
• noise and impedance effects of the load lines
Insulation Rating
Use load wiring with a minimum insulation rating equivalent to the
maximum output voltage of the power supply. For example, select
TEW-105, 105 °C, 600 V wiring for use with a 600 V, 4 A model power
supply
Current Carrying Capacity
As a minimum, load wiring must have a current capacity greater than the
output current rating of the power supply. This ensures that the wiring
will not be damaged even if the load is shorted. Table 2-4 shows the
maximum current rating, based on 450 A/cm
rated for 105 °C operation. Operating at the maximum current rating
results in an approximately 30 °C temperature rise for a wire operating in
free air. Where load wiring must operate in areas with elevated ambient
temperatures or bundled with other wiring, use larger gauges or wiring
rated for higher temperatures.
2-12 TM-F2OP-C1XN-01
2
, for various gauges of wire
Page 38

Load Connection
Table 2-4
Current Carrying Capacity for Load Wiring
Wire Size
(AWG) Maximum Current (A)
20 2.5 6 61
18 4 4 97
16 6 2 155
14 10 1 192
12 16 1/0 247
10 21 2/0 303
836
Load Wiring Length for Operation with Sense Lines
For applications using remote sensing, you must limit the voltage drop
across each load wire. Figure 2-3 shows some allowable wire lengths for
a given load current and wire size. We recommend that you use the larger
load wiring to ensure a smaller voltage drop (1 V typical maximum),
although units will compensate for up to 5 V drop in each line. See also
“Local and Remote Sensing” on page 2–21.
WIRE GAUGE (AWG)
16
100
90
80
70
60
50
40
30
WIRE LENGTH (FEET)
20
10
1
2
12
14
3456789
10
8
6
10
20
Wire Size
(AWG) Maximum Current (A)
4
1 2/0
2 1/0
30405060708090
100
200
300
400
500
1000
LOAD CURRENT (AMPS)
Figure 2-3
)
Maximum Load Wire Length for 1 V Line Drop
TM-F2OP-C1XN-01 2-13
Page 39

Installation
Noise and Impedance Effects
To minimize noise pickup or radiation, use shielded pair wiring of the
shortest possible length for load wires. Connect the shield to the chassis
via a rear panel mounting screw. Where shielding is impossible or
impractical, simply twisting the wires together will offer some noise
immunity. When using local sense connections, use the largest practical
wire size to minimize the effects of load line impedance on the regulation
of the supply.
Making Load Connections
CAUTION
When making connections to the bus bars, ensure that each terminal's mounting
hardware and wiring assembly are placed to avoid touching the other terminal
and shorting the power supply output. Heavy connecting cables must have some
form of strain relief to avoid loosening the connections or bending the bus bars.
Make load connections at the rear of the power supply at the positive and
negative output bus bars or to the 4-terminal wire clamp connector,
depending on the model.
Output Cover
The power supply comes with a bus bar cover and strain relief. See
Figure 2-4. This cover is also installed on models fitted with the high
voltage output connector.
To detach the 2-part cover:
1. Undo 6-32 x 5/16 in. Phillips pan head screws, 6 x 0.288 in. lock
washers, and 6 x 5/16 in. flat washers (3 places) from the top cover.
2. Pull up on the top cover to remove it.
3. Undo 6-32 x 1/4 in. Keps nuts and 6 x 5/16 in. flat washers from the
chassis-mounted PEM studs (3 places) to remove the chassis cover.
2-14 TM-F2OP-C1XN-01
Page 40

Screw, Lo ck Washer,
and Flat Washer
(3 places)
Keps Nut and
Flat Washer
(3 places)
Load Connection
Wire Clamp
and Screw
Strain Relief
Chassis Cover
Top Cover
Figure 2-4
Output Strain Relief and Cover
TM-F2OP-C1XN-01 2-15
Page 41

Installation
7.5 V to 100 V Models
The 7.5 V to 100 V models are equipped with output bus bars. To make a
typical load connection to a 7.5 V, 300 A power supply:
1. Strip the ends of the wires.
2. Remove the top part of the output cover. Do not remove the
3. Loosen wire clamp screws (part of strain relief). Do not disassemble
4. Insert load wire in strain relief.
5. Install connectors to load wiring.
6. Fasten connectors to bus bars with 5/16 in. x 5/8 in. (M8 x 16 mm)
7. Tighten the strain relief clamp.
8. Replace the top cover.
Note:Bus bar hole sizes are one of 0.343 in. (8.7 mm) D; two of 0.197 in.
(5.0 mm) D.
chassis-mounted part of the cover.
the strain relief.
screws, 5/16 in. (M8) flat washers, lock washers, and hex nuts as
shown in Figure 2-5.
Hex Nut (2 places)
Lock Washer (2 places)
Flat Washer (2 places)
Screw (2 places)
Wire connector (2 places)
Assembled View
Figure 2-5
2-16 TM-F2OP-C1XN-01
Typical Load Connection Hardware
(For 7.5 V to 100 V models)
Page 42

150 V to 600 V Models
WARNING: Shock hazard
To protect personnel against accidental contact with hazardous voltages, ensure
that the load, including connections, has no live parts which are accessible. Also
ensure that the insulation rating of the load wiring and circuitry is greater than or
equal to the maximum output voltage of the power supply.
The 150 V to 600 V models have a 4-terminal, wire clamp output
connector. See Figure 2-6 for a labelled drawing of the wire clamp
connector. To prepare and connect the load wiring:
1. Strip 0.4 in. (10 mm) at the ends of the wires.
2. Remove the top part of the output cover. Do not remove the
3. Loosen wire clamp screws (part of strain relief). Do not disassemble
4. Insert load wire in strain relief.
5. To connect the wiring, loosen each terminal screw, insert a stripped
6. Tighten the strain relief clamp.
7. Replace the top cover.
Load Connection
chassis-mounted part of the cover.
the strain relief.
wire into the terminal, and tighten the screw securely.
Negative Output/Return (–)
Positive Output (+)
Figure 2-6
TM-F2OP-C1XN-01 2-17
Output Voltage Connector
(For 150 V to 600 V models.)
Page 43

Installation
Inductive Loads
T o prevent damage to the power supp ly from inductive kickback, connect
a diode across the output. The diode must be rated at greater than or equal
to the supply’s output voltage and have a current surge rating greater than
or equal to the supply’s output rating. Connect the cathode to the positive
output and the anode to the negative output/return.
Where positive load transients such as back EMF from a motor may
occur, connect a transorb or a varistor across the output to protect the
power supply. The breakdown voltage rating for the transorb or varistor
must be approximately 10% higher than the rated supply output.
Connecting Single Loads
Figure 2-7 and Figure 2-8 show recommended load and sensing
connections for single loads. Local sense lines shown are default
connections at the rear panel J10 sense connector as identified on Figure
1-2 on page 1–5.
You do not need remote sensing for basic operation of your supply.
However, if you wish to correct any small drops in your load lines, then
use the remote sensing feature. See “Local and Remote Sensing” on
page 2–21 for more information.
Figure 2-7
2-18 TM-F2OP-C1XN-01
Single Load with Local Sensing (Default)
Page 44

Load Connection
Figure 2-8
Single Load with Remote Sensing
Connecting Multiple Loads
Proper connection of distributed loads is an important aspect of power
supply use. Two common methods of connection are the parallel power
distribution method and the radial power distribution method.
Parallel Power Distribution This distribution method involves
connecting leads from the power supply to one load, from that load to the
next load, and so on for each load in the system. This method results in
the voltage at each load depending on the current drawn by the other loads
and allows DC ground loops to develop. Except for low current
applications, we do not recommend using this method.
Radial Power Distribution Method To connect distributed loads, we
recommend that you use radial power distribution. With th is method, you
connect power to each load individually from a single pair of terminals
designated as the positive and negative distribution terminals. These
terminals may be the power supply output terminals, the terminals of one
of the loads, or a distinct set of terminals especially established for
distribution use. Connect the sense leads to these terminals to compensate
for losses and to minimize the effect of one load upon another.
Figure 2-9 and Figure 2-10 show recommended load and sensing
connections for multiple loads. Local sense lines shown are default J10
sense connections. See “Local and Remote Sensing” on page 2–21 for
more information about using remote sensing and grounding the sense
line shield.
TM-F2OP-C1XN-01 2-19
Page 45

Installation
Figure 2-9
Figure 2-10
Multiple Loads with Local Sensing
Multiple Loads with Remote Sensing
2-20 TM-F2OP-C1XN-01
Page 46

Local and Remote Sensing
Use connections at the rear panel J10 sense connector to configure the
power supply for local or remote sensing of output voltage. See Figure 211 for a drawing of the sense connector.
Sense Wiring
WARNING: Shock hazard
There is a potential shock hazard at the sense connector when using a power supply
with a rated output greater than 40 V. Select wiring with a minimum insulation
rating equivalent to the maximum output voltage of the power supply for use as
local sense jumpers or for remote sense wires. For example, select TEW-105,
105 °C, 600 V wiring for use with a model 600 V, 4 A power supply. Ensure that
connections at the load end are shielded to prevent contact with hazardous
voltages.
For lowest noise performance, use shielded pair wiring of 16 to 24 AWG
for remote sense lines. Strip wires 0.26 in. (6.5 mm) and insert securely as
with any wire clamp connector.
Local and Remote Sensing
Local Sensing
We ship the power supply with the rear panel J10 sense connector
jumpered for local sensing of the output voltage. See T able 2-5 for t he list
of connector functions and a description of local sense connections. With
local sensing, the output voltage is regulated at the output terminals (or
bus bars). This method does not compensate for voltage losses in the load
lines, so it is recommended only for low current applications or
applications for which precise load regulation is not essential.
Note:When using local sense connections, use the largest practical load
wire size to minimize the effects of line impedance on the regulation of
the supply .
TM-F2OP-C1XN-01 2-21
Page 47

Installation
Figure 2-11
Table 2-5
Terminal Name Function
J10-1 Return Sense (–SNS) Remote negative sense connection.
J10-2 Negative Output (Return
J10-3 N/C No connection.
J10-4 Positive Output (+OUT) Connected internally to positive bus bar.
J10-5 Positive Sense (+SNS) Remote positive sense connection.
J10 Sense Connector
(Shown with local sense jumpers connected)
Rear Panel J10 Sense Connector Terminals and Functions
Default connection to terminal 2.
Connected internally to negative bus bar.
or RTN)
Default connection to terminal 4.
2-22 TM-F2OP-C1XN-01
Page 48

Using Remote Sensing
WARNING: Shock hazard
There is a potential shock hazard at the sense points when using a power supply
with a rated output greater than 40 V. Ensure that connections at the load end are
shielded to prevent contact with hazardous voltages.
WARNING: Shock hazard
Ensure that the chassis ground screw does not penetrate more than 3/8 in. (9 mm)
into the rear panel of the unit.
CAUTION
Ground the sense line shield in one place only. Locations include: the power
supply’s return output connection at the load, the power supply’s return output at
its negative output terminal, or the power supply's chassis.
CAUTION
Do not use remote sensing with multiple supplies connected in series.
Local and Remote Sensing
Use remote sensing during voltage mode operation to shift the power
supply’s regul ation point from it s default position at the rear panel output
terminals to the load or distribution terminals by using a separate pair of
wires to allow the control circuitry to monitor the load voltage. This
allows the power supply to compensate for voltage losses in the load lines
which will otherwise degrade the regulation of the supply. Line drop is
subtracted from the voltage available at the power supply's output.
To connect remote sense lines:
1. Turn OFF the power supply.
2. Remove the local sense jumpers connecting J10 mating connector
terminal 5 (positive sense) to terminal 4 (positive output) and
terminal 1 (return sense) to terminal 2 (power supply return).
3. Connect the positive remote sense lead to J10 mating connector
terminal 5 (positive sense) and the negative lead to terminal 1 (return
sense). Ensure that the mating connector is plugged securely into the
rear panel sense connector. Connect the other ends of the sense wires
to the corresponding sense points at the load.
TM-F2OP-C1XN-01 2-23
Page 49

Installation
4. To prevent ground loops, ground the sense line shield, at one point
only , to the power supply’ s return output connection at the load, to the
power supply’s return output at its negative output terminal, or to the
power supply’s chassis.
5. Turn the power supply ON.
Notes:
1. If you operate the power supply with remote sense lines connected to
the load and with either of the positive or negative load lines not
connected, the power supply shutdown circuit will activate, causing
the output voltage and current to fall to zero.
2. If you operate the power supply without remote sense lines or local
sense jumpers in place, the supply will continue to work, but supply
regulation will be degraded and/or erratic, or, the OVP circuit may
activate.
Figure 2-12 shows a sample setup for using remote sensing.
Figure 2-12
2-24 TM-F2OP-C1XN-01
Connecting Remote Sense Lines
Page 50

3
Local Operation
Chapter 3 provides procedures for local (front panel)
operation. It includes procedures for using over voltage
protection, shutdown function, multiple supplies, and over
temperature protection.
Page 51

Local Operation
Introduction
Once you have installed the power supply and have connected both the
AC input power and the load as covered in Chapter 2, “Installation”, the
power supply is ready to operate in local control mode (that is, operation
at the unit’s front panel).
• See “Standard Operation” on page 3–3 for a brief explanation of
Constant Voltage and Constant Current Mode operat ion and see
page 3–7 to page 3–17 for more about power supply functions such as
over voltage protection, shutdown function, over temperature
protection, and using multiple supplies.
•See “User Diagnostics” on page 5–9 for troubleshooting information
for the operator.
• Turn to Chapter 4, “Remote Operation” for descriptions of remote
programming options and remote monitoring of the power supply.
3-2 TM-F2OP-C1XN-01
Page 52

Standard Operation
This power supply has two basic operating modes: Constant Voltage
Mode and Constant Current Mode, and two control modes: Local Control
Mode (default setting) and Remote Programming Mode. Both operating
modes are available regardless of which control mode is used.
Operating Modes and Automatic Crossover
Whether controlled by local or remote programming, the power supply
has two basic operating modes: Constant Voltage Mode and Constant
Current Mode. The mode in which the power supply operates at any given
time depends on the combination of:
Standard Operation
Output
Voltage
V SET
O
O
Figure 3-1
• output voltage setting V
• output current limit setting I
• resistance of the attached load R
See Figure 3-1 for a graphical representation of the relationships between
these variables.
Constant Voltage
Mode Region
Constant
Current Mode
Region
I SET
Operating Modes
RL > V
Crossover
Point
Output
Current
SET
I
R
SET
R
L
SET
SET
L
V
L
SET
=
I
SET
V
SET
<
I
SET
Where:
= Load Resistance
R
L
V
= Output Voltage Setting
SET
I
= Output Current Setting
SET
TM-F2OP-C1XN-01 3-3
Page 53

Local Operation
Constant Voltage Mode Operation
The power supply will operate in constant voltage mode whenever the
load current I
(Note: I
L is less than the current limit setting I
= V
L
SET
/ RL)
In constant voltage mode, the power supply maintains the output voltage
at the selected value (V
requirements.
Constant Current Mode Operation
The power supply will operate in constant current mode whenever the
load resistance is low enough that the load current I
current limit setting I
In constant current mode, the power supply maintains the output current
at the selected value (I
requirements.
Automatic Mode Crossover
This feature allows the power supply to automatically switch operating
modes in response to changing load requirements. If, for instance, the
power supply was operating in Constant Voltage Mode (I
load changed so that the load current (I
limit setting (I
Constant Current Mode and the output voltage would va ry in response to
changes in load current. If the additional load was subsequently removed
so that the load current was again less than the current limit setting, the
supply would automatically return to Constant Voltage Mode.
SET
, or: IL < I
SET
) while the load current IL varies with the load
SET
L is equal to the
(Note: VL=I
SET
) while the load voltage varies with the load
SET
)
SETRL
L < I
) became equal to the current
L
SET
), and the
SET
), the power supply would automatically switch into
3-4 TM-F2OP-C1XN-01
Page 54

Shipped Configuration (Local Control Mode)
The factory ships units already configured for local control (front panel)
operation. See Table 3-1 for a summary of this configuration. See Figure
1-4 on page 1–7 and Figure 1-2 on page 1–5 for front and rear panel
diagrams.
Standard Operation
Table 3-1
Local Control Configuration Additional References
Use the front panel controls to adjust
the output voltage and current limit
settings. (Note: Use the LOCAL button
only when you have a digital
programming interface installed.)
The supply's sense point is at the rear
panel J10 sense connector terminals.
The OVP set point is adjusted at the
front panel to approximately 110% of
rated output voltage.
The over temperature shutdown
function automatically resets when
activated as determined by the position
of rear panel switch SW1-8. A latch off
setting is also available.
Shipped Configuration (Local Control Mode)
See Chapter 3 for front panel
operation. See Chapter 4 for remote
analog programming procedure(s).
See “Local and Remote Sensing” on
page 2–21 for how to change from
local to remote sensing.
See “Using Over Voltage Protection
(OVP)” on page 3–7 for the
adjustment procedure.
See “Over Temperature Protection
(OTP)” on page 3–17 for more
information about switch SW1-8
settings.
TM-F2OP-C1XN-01 3-5
Page 55

Local Operation
Setting Output Voltage and Current Limit
Install the power supply and connect the load as described in
“Installation”. Ensure that the power supply is set up for local control as
described in “Shipped Configuration (Local Control Mode)” on p age 3–5.
Then, set the output voltage and current limit at the front panel with the
following procedure.
1. Turn both the voltage and current controls fully counter-clockwise.
2. Turn the AC power ON.
3. Press the STANDBY switch to its IN position to disable the power
supply output. The red Shutdown (S/D) LED turns on.
4. Press and hold the V/I CHECK button to display the voltage and
current control settings on the voltmeter and ammeter displays.
5. Adjust the voltage control to the desired voltage (the compliance
voltage for applications using current mode operation).
6. Adjust the current control to the desired current limit setting.
7. Release the V/I CHECK button.
8. Press the STANDBY switch to its OUT position to apply power to the
load. The S/D LED turns off.
Note:The control circuits have been designed to allow you to set output
voltage and current up to 5% over the model-rated maximum values. The
power supply will operate within these extended ranges, but we cannot
guarantee full performance to specification.
3-6 TM-F2OP-C1XN-01
Page 56

Using Over Voltage Protectio n (OVP)
Using Over Voltage Protection (OVP)
The OVP circuit protects the load in the event of a remote programming
error, an incorrect voltage control adjustment, or a power supply failure.
The protection circuit monitors the output voltage at the output of the
power supply and will shut down the main power converter whenever a
preset voltage limit is exceeded. Set the preset voltage limit (also called
the set point or trip level) using the screwdriver-adjustable, front panel
OVP potentiometer, or via one of the optional GPIB or RS-232
programming interfaces.
Notes:
1. The default preset limit is approximately 110% of the rated output
voltage.
2. When using OVP with remote sensing lines connected, compensate
for the voltage line drop across the output return line by measuring or
calculating the line drop, then adding this value to the desired OVP
setpoint.
Front Panel OVP Operation
In local control mode, check the OVP set point at any time by pressing the
OVP CHECK switch. The OVP set point is the value displayed on the
digital voltmeter.
To set the trip level from the front panel:
1. Disconnect any loads. Turn the power supply ON.
2. Adjust the power supply output voltage to any voltage lower than the
desired trip level.
3. Press the front panel STANDBY (output shutdown) switch to its IN
position. The red S/D LED
turns on.
4. Press the OVP CHECK switch to see the OVP set point on the
voltmeter display.
5. Holding down the OVP CHECK switch, turn the OVP SET
potentiometer until the desired set point is reached. Release the OVP
CHECK switch.
6. Press the STANDBY switch to its OUT position. The S/D LED turns
off.
TM-F2OP-C1XN-01 3-7
Page 57

Local Operation
7. To check that the power supply shuts off at the desired set point,
slowly increase the output voltage while monitoring the front panel
voltmeter. The OVP LED on the front panel turns on when the OVP
circuit activates.
Resetting the OVP Circuit
To reset the OVP circuit after it activates:
1. Reduce the power supply’s output voltage setting to below the OVP
set point.
2. Press the STANDBY switch IN. The red S/D LED on the front panel
turns on. The OVP LED turns off.
3. Press the STANDBY switch again to return power to the load and
resume normal operation.
OR
1. Reduce the power supply’s output voltage setting to below the OVP
set point.
2. Turn the power supply OFF using the AC power switch, wait until the
front panel displays go out, then turn the power supply back ON
again.
3-8 TM-F2OP-C1XN-01
Page 58

Using the Shutdown Function
Using the Shutdown Function
Use the Shutdown function to disable or enable the supply’s output so that
you can make adjustments to either the load or the power supply without
shutting off the power supply. Activate this function from the front panel
at any time by using the STANDBY switch. You can also activate it via
remote control through the rear panel J2 Programming and Monitoring
connector, using a 2.5 V to 15 V signal or a transistor-transistor logic
(TTL) compatible signal. The input lines for the Shutdown circuit are
optically isolated.
STANDBY Switch
The STANDBY switch is a press ON/press OFF switch located on the
power supply’s front panel. See the front panel diagram in “Front Panel
Controls” on page 1–3. Push the switch to its IN position to activate the
Shutdown circuit. The output voltage and current fall to zero and the red
S/D (Shutdown) LED turns on. Push the switch once more to reset it to its
OUT position and resume normal power supply operation.
Controlling the Shutdown Function via the J2 Connector
The shutdown circuit accepts a 2.5 V to 15 V signal to disable or enable
the power supply output. Make connections for signals at connector J2,
located on the unit’s rear panel. Set rear panel switch SW1-7 to select
signal logic. See “Front Panel Controls” on page 1–3 for more
information about making J2 connector and SW1 switch changes.
To activate the shutdown function:
1. Turn OFF the power supply.
2. Connect the signal source to J2 connector terminal 15 (Shutdown
Input/positive) and terminal 14 (Shutdown Return).
3. Set switch SW1-7 to select the desired circuit logic as set out in Table
3-2.
4. Turn on the power supply . The power supply will operate as described
in the
Supply Output column in Table 3-2, according to the logic you
select and the level of the input signal. The S/D (Shutdown) LED on
the front panel turns on when the Shutdown circuit is activated.
TM-F2OP-C1XN-01 3-9
Page 59

Local Operation
Table 3-2
Switch SW1-7 Setting
OFF (OPEN)
(Active low, default)
ON (CLOSED)
(Active high)
Switch Settings for Shutdown Circuit Logic
Source
Signal
2-15 V HIGH OFF ON
0-0.4 V LOW ON OFF
2-15 V HIGH ON OFF
0-0.4 V LOW OFF ON
Signal
Level
Supply
Output S/D LED
Notes:
1. If switch SW1-7 is ON but there is no signal applied, the S/D LED
turns on and the power supply will not provide an output until the
HIGH signal level is applied.
2. Any of the eight switches on SW1 is OFF (OPEN) when it has been
flipped up to break contact, ON (CLOSED) when flipped down to
close contact.
3-10 TM-F2OP-C1XN-01
Page 60

Using Multiple Supplies
WARNING
There is a shock hazard at the load when using a power supply with a rated or
combined output greater than 40 V. To protect personnel against accidental contact
with hazardous voltages created by series connection, ensure that the load,
including connections, has no live parts which are accessible. Also ensure that the
insulation rating of the load wiring and circuitry is greater than or equal to the
maximum or combined output voltage of the power supply.
CAUTION
Do not connect power supplies from different manufacturers in parallel or in
series.
CAUTION
The remote programming inputs are internally referenced to the supply’s negative
output. Do not connect remote programming ground lines (J2 terminals 3, 5,
and 7) to the supply’s positive output.
Using Multiple Supplies
You can operate power supplies of the SAME MODEL with outputs in
series or in parallel to obtain increased load voltage or increased current.
Split supply operation gives you two positive outputs or a positive and a
negative output.
Note:If your application requires the use of isolated programming inputs,
contact the manufacturer about the optional ISOL Interface.
TM-F2OP-C1XN-01 3-11
Page 61

Local Operation
Configuring Multiple Supplies for Series Operation
CAUTION
Do not use remote sensing during series operation.
CAUTION
The maximum allowable sum of the output voltages is 600 Vdc.
Use series operation to obtain a single higher voltage output using two or
more supplies. Connect the negative (–) output terminal of one supply to
the positive (+) output terminal of the next supply. See Figure 3-2. The
total voltage available is the sum of the maximum voltages of each supply
(add voltmeter readings, to a maximum of 600 V). The maximum
allowable current for a series string of power supplies is the output current
of a single supply in the string.
Figure 3-2
3-12 TM-F2OP-C1XN-01
Series Operation of Multiple Supplies
Page 62

Configuring Multiple Supplies for Parallel Operation
Use parallel operation to obtain a higher current through a single output
using two or more supplies. Set all of the OVP setpoints to maximum.
(See “Using Over Voltage Protection (OVP)” on page 3–7.) Set all of the
outputs to the same voltage before connecting the positive (+) output
terminals and negative (–) output terminals in parallel. See Figure 3-3.
The total current available is the sum of the maximum currents of each
supply.
When operating multiple supplies in parallel, the operating mode of each
supply depends on the load current being drawn. For example, with two
40 V, 70 A power supplies operating in parallel with a 100 A load, one
supply operates in constant current mode supplying 70 A and the other
supply operates in voltage mode supplying the remaining 30 A. The level
of current sharing between units depends on how accurately the output
voltages are matched.
Note:If you do not fix the OVP setpoints at maximum, the OVP circuit
may trip on one unit, reducing the current available to the load.
Using Multiple Supplies
TM-F2OP-C1XN-01 3-13
Page 63

Local Operation
Sensing for Parallel Operation
Use default local sensing to enhance power sharing between units, as the
impedance of the load lines will tend to correct for current imbalance. If
you use remote sensing at the load for better voltage regulation, one
supply always operates in current limit mode and supplies most of the
power.
Figure 3-3
3-14 TM-F2OP-C1XN-01
Parallel Operation of Multiple Supplies
(Local sense lines shown are default J10 connections.)
Page 64

Using Multiple Supplies
Configuring Multiple Supplies for Split Supply Operation
Split supply operation uses two power supplies to obtain two positive
voltages with a common ground, or to obtain a positive-negative supply.
Two Positive Voltages
To obtain two positive voltages, connect the negative output terminals of
both supplies together in a common connection. The positive output
terminals will provide the required voltages with respect to the common
connection. See Figure 3-4.
Figure 3-4
TM-F2OP-C1XN-01 3-15
Split Supply Operation of Multiple Supplies
(Two Posi tive Voltages)
(Local sense lines shown are default J10 connections.)
Page 65

Local Operation
Positive-negative Supply
CAUTION
To prevent possible damage to the supply, do not connect the remote program
return line of the negative supply to the common connection.
T o obtain a positive-negative supply, connect the negative output terminal
of one supply to the positive output terminal of the second supply. The
positive output terminal of the first supply then provides a positive
voltage relative to the common connection while the negative output
terminal of the second supply provides a negative voltage. Y ou can set the
current limits independently . The maximum current available in split
supply operation is equal to the rated output of the supplies. For example,
70 A for two 40 V, 70 A models. See Figure 3-5.
Figure 3-5
3-16 TM-F2OP-C1XN-01
Split Supply Operation of Multiple Supplies
(Positive-negative Supply)
(Local sense lines shown are default J10 connections.)
Page 66

Over Temperature Protection (OTP)
The OTP function allows you to select how the power supply recovers
from an over temperature shutdown using the rear panel switch SW1-8.
See Table 3-3 for switch settings and selections. See “Rear Panel
Connectors and Switch” on page 1–5 for more information about the
switch. The OTP shutdown circuit activates before the internal
components can exceed their safe internal operating temperatures. When
an OTP shutdown occurs, the front panel OTP LED turns on.
Over Temperature Protection (OTP)
Table 3-3
Switch SW1-8
OFF (OPEN) Auto Reset (Default) The supply recovers to normal
ON (CLOSED) Latch OFF After an over temperat ure shut down,
Switch Settings for Over Temperature Recovery Options
OTP Shutdown
Selection Description
operation when the over temperature
condition no longer exists.
the supply stays off until you turn the
AC power switch OFF, then you turn
the power supply ON to continue use.
TM-F2OP-C1XN-01 3-17
Page 67

3-18
Page 68

4
Remote Operation
Chapter 4 details remote analog programming operation
and remote monitoring of output voltage and current.
Page 69

Remote Operation
Introduction
The rear panel switches and connector on the power supply allow you to
program the supply with an analog device or to output readback signals.
This section covers the following topics:
•See “Remote Analog Programming of Output Voltage and Cu
•See “Remote Monitoring of Ou tput Voltage and Current” on page 4–7
Isolated Programming
The four-channel Isolated (ISOL) Programming Interface is an internal
card which is ordered as an option. It allows remote programming and
readback of the power supply’ s output voltage and current limit with 0-5V
analog signals at a different potential relative to the power supply’s
output. Contact the manufacturer to order.
rrent
Limit” on
programming of output voltage and current limit with 0-5 V
0-10
for the connector and switch settings when using calibr
signals for output voltage and output current with selectable 0-5 V or
0-10
page 4–3 for information about remote analog
and
V voltage sources and 0-5 k and 0-10 k resistances.
ated readback
V scales.
Remote Digital Programming
You can operate the power supply from a computer if you have had the
GPIB or RS-232 Interface card installed as an option. Refer to the
separate interface manual for all setup and operation instructions for
remote digital programming.
4-2 TM-F2OP-C1XN-01
Page 70

Remote Analog Programming of Output Voltage and Current Limit
Remote Analog Programming of Output Voltage and
Current Limit
Remote analog programming allows control of the power supply’s output
voltage and/or current limit to shift from local operation at the front panel
voltage and current controls to external analog sources. As you vary the
external programming source, the power supply’s output varies
proportionally over its output range.
Using remote analog programming requires that you reset switch SW1
and make connections to the J2 connector on the power supply’s rear
panel. See “Rear Panel Connectors and Switch” on page 1–5.
Remote Programming Options
See Table 4-1 for a summary of the options available to you for
programming output voltage and current limit using an analog source.
Table 4-1
Control of... Programming Scales
Output Voltage and/or
Current Limit
a. These scales may be used in any combination.
Remote Programming Options
0-5 V and 0-10 V voltage sources
0-5 k and 0-10 k resistances
Remote Analog Programming Procedure
CAUTION
To maintain the isolation of the power supply output and prevent ground loops,
use an isolated (ungrounded) programming source when operating the power
supply via remote analog control at the J2 connector.
CAUTION
The remote programming inputs are internally referenced to the supply’s
negative output. Do not connect control ground (J2 terminals 3, 5, or 7) to the
supply’s positive output.
a
TM-F2OP-C1XN-01 4-3
Page 71

Remote Operation
To set up remote analog programming:
1. Turn the power supply OFF.
2. Using Table 4-2, set switches SW1-1, SW1-2, SW1-3, and SW1-4
according to the selected programming sources. See
this procedure for more information about switch settings.
end of
the Notes at the
3. Install any J2 connector jumpers as indicate d in Table 4-2.
4. Connect the programming source(s) to the mating J2
wn in Figure 4-1 on page 4–6, observing the correct polarity
sho
v
oltage sources. Ensure that the mating connector is plugged securely
connector as
into the rear panel connector.
5. Set the programming sources to the desired levels and turn the
supply ON. The
Adjust the external programming source
6.
supply’
s output.
REM
LED turns on.
to change the power
Notes:
1. Switches SW1 to SW4 can be set to their defa
o
therwise specified in Table 4-2. Switches SW1-5, SW1-6, SW1-7,
and SW1-8 are not required for
remain at the settings you
2. Resetting switches SW1-3 or SW
sele
ction switches, may require that you reca
circuit to
maintain programming accuracy. See Chapter 5.
remote programming. They can
have selected for your application.
1-4, the programming scale
ults (all open) unless
librate the programming
3. Any of the eight switches on SW1 is OFF (OPEN) when it has
ped up to break contact, ON (CLOSED) when flipped down to
flip
close contact.
4. The control circuits have been designed to allow you to set
oltage and current up to 5% over the model-rated maximum valu
v
The
power supply will operate within these extended ranges, but
cannot guara
ntee full performance to specification.
output
for
power
been
es.
we
4-4 TM-F2OP-C1XN-01
Page 72

Remote Analog Programming of Output Voltage and Current Limit
Table 4-2
Power Supply Settings for Different Programming Sources
Output V oltage
Programming
Source
0-5 Vdc
0-10 Vdc
0-5 k Resistor
0-10 k Resistor
Output Current Limit Programming Source
0-5 Vdc 0-10 Vdc 0-5 k Resistor 0-10 k Resistor
SW1: set 3 and 4
open.
J2: jumper 1 to 3
and 2 to 3.
SW1: set 4 open.
J2: jumper 1 to 3
and 2 to 3.
SW1: set 1
closed, 3 and 4
open.
J2: jumper 1 to 3
and 2 to 3.
SW1: set 1
closed, 4 open.
J2: jumper 1 to 3
and 2 to 3.
SW1: set 3 open.
J2: jumper 1 to 3
and 2 to 3.
SW1: default
settings.
J2: jumper 1 to 3
and 2 to 3.
SW1: set 1
closed, 3 open.
J2: jumper 1 to 3
and 2 to 3.
SW1: set 1
closed.
J2: jumper 1 to 3
and 2 to 3.
SW1: set 2
closed, 3 and 4
open.
J2: jumper 1 to 3
and 2 to 3.
SW1: set 2
closed, 4 open.
J2: jumper 1 to 3
and 2 to 3.
SW1: set 1 and 2
closed, 3 and 4
open.
J2: jumper 1 to 3
and 2 to 3.
SW1: set 1 and 2
closed, 4 open.
J2: jumper 1 to 3
and 2 to 3.
SW1: set 2
closed, 3 open.
J2: jumper 1 to 3
and 2 to 3.
SW1: set 2
closed.
J2: jumper 1 to 3
and 2 to 3.
SW1: set 1 and 2
closed, 3 open.
J2: jumper 1 to 3
and 2 to 3.
SW1: set 1 and 2
closed.
J2: jumper 1 to 3
and 2 to 3.
None (Front
Panel Control)
SW1: set 3 open.
J2: jumper 1 to 3.
SW1: default
settings.
J2: jumper 1 to 3.
SW1: set 3 open,
1 closed.
J2: jumper 1 to 3.
SW1: set 1
closed.
J2: jumper 1 to 3.
None (Front
Panel Control)
SW1: set 4 open.
J2: jumper 2 to 3.
SW1: default
settings.
J2: jumper 2 to 3.
SW1: set 2
closed, 4 open.
J2: jumper 2 to 3.
SW1: set 2
closed.
J2: jumper 2 to 3.
SW1:
default settings.
J2: no jumper.
TM-F2OP-C1XN-01 4-5
Page 73

Remote Operation
Figure 4-1
Connecting Programming Sources to J2 Connector
4-6 TM-F2OP-C1XN-01
Page 74

Remote Monitoring of Output Voltage and Current
Remote Monitoring of Output Voltage and Current
Readback Signals
The J2 connector on the rear panel provides access to calibrated readback
signals for remote monitoring of the output voltage and current. Rear
panel switches SW1-5 and SW1-6 allow you to select either a 0-5 Vdc or
a 0-10 Vdc range for the output. The readback signal represents 0 to
100% of the power supply’s output.
See Table 4-1 for the required J2 connections and switch settings for
remote monitoring of readback signals with 0-5 Vdc or 0-10 Vdc outputs.
Use shielded pair wiring (20 to 24 AWG) and ground the shield to J10
sense connector terminal 1 (return sense) or to the chassis.
Table 4-3
Readback Signal
Output Voltage
(0-5 Vdc)
Output Voltage
(0-10 Vdc)
Output Current
(0-5 Vdc)
Output Current
(0-10 Vdc)
Settings for Remote Monitoring of Readback Signals
J2 Connection
Signal (+)
J2-10 J2-9 SW1-5 OFF
J2-10 J2-9 SW1-5 ON
J2-12 J2-1 1 SW1-6 OFF
J2-12 J2-1 1 SW1-6 ON
J2 Connection
Return (–) Switch SW1 Setting
(OPEN)
(CLOSED)
(OPEN)
(CLOSED)
Note: Check the readback accuracy any time you reset switches SW1-5
and SW1-6. See Chapter 5.
TM-F2OP-C1XN-01 4-7
Page 75

4-8
Page 76

Calibration and
5
Troubleshooting
Chapter 5 details remote analog programming operation
and remote monitoring of output voltage and current. It
also provides troubleshooting information.
Page 77

Calibration and Troubleshooting
WARNING: Shock hazard
Exercise caution when using and calibrating a power supply. High energy levels
can be stored at the output voltage terminals on a power supply in normal
operation. In addition, potentially lethal voltages exist in the power circuit and on
the output and sense connectors of a power supply with a rated output greater
than 40 V. Filter capacitors store potentially dangerous energy for some time
after power is removed.
Adjustments to programming and readback accuracy for the power supply
are made using cover-off procedures which must be performed by a
service technician.
Calibration Setup
Service Environment and Precautions
• Follow established antistatic procedures.
• Work at a bench with adequate room and support for the unit under
test and for all equipment required.
• To reduce shock hazard, use only an insulated, straight-blade
screwdriver when calibrating trim potentiometers.
• NEVER calibrate these units alone. Ensure that someone is present
who can help should an accident occur.
Equipment Required
You will need the following equipment when calibrating your power
supply.
• 5 1/2 digit true RMS voltmeters (DVMs) (±0.05% accuracy) with test
leads
• Current shunt 1 mV/A (±0.25%) and connecting wire. The
recommended current ratings for the DC shunt and connecting wire
must be at least 10% greater than the power supply's output current
rating. Please see Table 2-4 on page 2–13.
• Non-conducting, straight-bladed screwdriver
5-2 TM-F2OP-C1XN-01
Page 78

Accessing Calibration Potentiometers
WARNING: Shock hazard
Disconnect AC power from the unit before removing the cover. Even when the
front panel power switch is in the OFF position, live line voltages are exposed
when the cover is removed. Repairs and adjustments must be made by
experienced service technicians only.
WARNING: Shock hazard
Use a non-conducting, straight-blade screwdriver to adjust the trim pots.
CAUTION
Follow established antistatic procedures. There are static-sensitive parts on the
printed circuit boards.
You will need to remove the power supply’s cover to access the
programming and readback calibration potentiometers which are located
on the A2 PCB. See Figure 5-1 to locate the potentiometers.
Calibration Setup
Removing Option Card
If there is a GPIB or RS-232 option card (PCB) installed inside the power
supply, you will have to remove it to access the calibration
potentiometers.
Tool Required: Phillips #2 screwdriver
1. Turn OFF the power supply. Disconnect AC Power. Remove th
cove
r.
2. Remove 4 screws from their standoffs inside the power su
release the opti
3. Remove 2 screws at the rear panel to release the option card’s sub-
plate.
4. Unplug the ribbon cable connectors from the option card. Lift ou
card.
. Remove the four screws holding the option ca
5
ve the plate.
remo
TM-F2OP-C1XN-01 5-3
on card.
rd support plate and
e
pply to
t
Page 79

Calibration and Troubleshooting
Figure 5-1
Programming and Monitoring Calibration Locations
(Top view)
5-4 TM-F2OP-C1XN-01
Page 80

Calibrating for Programming Accuracy
Calibrating for Programming Accuracy
The factory calibrates the offset and range of the voltage and current
programming circuits to within 1% for the default 0-10 Vdc programming
signals. You may need to recalibrate when you use 0-5 Vdc programming
or when you switch back to 0-10 Vdc programming after previously
calibrating for 0-5 Vdc programming.
See “Calibration Setup” on page 5–2 for instructions to remove the cover
and any option card. Follow all procedure steps in the sequence given.
Voltage Programming Circuit Calibration
To perform voltage programming circuit calibration:
1. Ensure that the power supply is turned OFF. Disconnect any load.
2. Connect the program source between J2 connector terminals 6
(output voltage program input) and 5 voltage program signal return).
3. Connect the DVM across the power supply outp ut.
4. Turn the power supply ON.
5. Apply 1% of program voltage.
6. Adjust the voltage program offset potentiometer (R472) until the
DVM reads 1% of the model-rated output voltage.
7. Apply 100% of program voltage.
8. Adjust the voltage program range potentiometer (R462) until the
DVM reads the model-rated output voltage.
Repeat this procedure until output levels are adjusted to power supply
specifications (see Appendix A, “Specifications”) or to the accuracy that
your application requires.
TM-F2OP-C1XN-01 5-5
Page 81

Calibration and Troubleshooting
Current Limit Programming Circuit Calibration
To perform current limit programming circuit calibration:
1. Ensure that the power supply is turned OFF. Disconnect any load.
2. Connect the program source between J2 connector terminals 8
(output current limit programming input) and 7 (current program
signal return).
3. Connect the shunt and DVM across the power supply output.
4. Turn the power supply ON.
5. Apply 1% of program voltage.
6. Adjust the current limit program offset (R469) until the shunt/DVM
indicates 1% of the model-rated output current. See Note.
7. Apply 100% of program voltage.
8. Adjust the current limit program range (R459) until the shunt/DVM
indicates the model-rated output current. See Note.
Repeat this procedure until output levels are adjusted to power supply
specifications (see Appendix A, “Specifications”) or to the accuracy that
your application requires.
Note:Calculate the required DVM reading using V= IR where V is the
DVM reading, I is the current, and R is the DC shunt resistance.
5-6 TM-F2OP-C1XN-01
Page 82

Calibrating for Readback Accuracy
The factory calibrates the offset and range of the output voltage and
current monitor circuits to within 1% for the default 0-10 Vdc scales. Y ou
may need to recalibrate when you select the 0-5 Vdc scale or when you
switch back to the 0-10 Vdc scale after previously calibrating for 0-5 Vdc
operation.
See “Calibration Setup” on page 5–2 for instructions to remove the cover
and any option card. Follow all procedure steps in the sequence given.
Output Voltage Monitor Circuit Calibration
To perform output voltage monitor circuit calibration:
1. Ensure that the power supply is turned OFF. Disconnect any load.
2. Set SW1 switch 5 OPEN to select 0-5 V output voltage monitor
range, CLOSED for 0-10 V.
3. Connect a DVM across the power supply output to read the output
voltage. Connect a second DVM between the rear panel J2 connector
terminals 10 (output voltage monitor) and 9 (voltage monitor signal
return).
Calibrating for Readback Accuracy
4. Turn the power supply ON.
5. Set the power supply output voltage to 1% of the model-rated output.
6. Adjust the output voltage monitor offset (R397) until the monitor
DVM reads 1% of the readback scale. (50 mVdc for 0-5 V readbac k
or 100 mVdc for 0-10 Vdc readback.)
7. Set the power supply output voltage to the model-rated maximum.
8. Adjust the output voltage monitor range (R387) until the monitor
DVM reads 100% of the readback scale. (5 Vdc for 0-5 V readback or
10 Vdc for 0-10 Vdc rea dback.)
Repeat this procedure until the monitor signal is adjusted to power supply
specifications (see Appendix A, “Specifications”) or to the accuracy that
your application requires.
TM-F2OP-C1XN-01 5-7
Page 83

Calibration and Troubleshooting
Output Current Monitor Circuit Calibration
To perform output current monitor circuit calibration:
1. Ensure that the power supply is turned OFF. Disconnect any load.
2. Set SW1 switch 6 OPEN to select 0-5 V output current monitor
range, CLOSED for 0-10 V.
3. Connect the shunt and DVM across the power supply output to read
the output current. Connect a second DVM between the rear panel J2
connector terminals 12 (output current monitor) and 11 (current
monitor signal return).
4. Turn the current control fully counter clockwise, then turn on the
power supply.
5. Set the power supply’s output current to 1% of the model-rated
output. See Note.
6. Adjust the output current monitor offset (R394) until the monitor
DVM indicates 1% of the readback scale. (50 mVdc for 0-5 V
readback or 100 mVdc for 0-10 Vdc readback.)
7. Set the power supply output current to the model-rated output.
8. Adjust the output current monitor range (R383) until the monitor
DVM indicates 100% of the readback scale. (5 Vdc for 0-5 V
readback or 10 Vdc for 0-10 Vdc readback.)
Repeat this procedure until the monitor signal is adjusted to power supply
specifications (see Appendix A, “Specifications”) or to the accuracy that
your application requires.
Note:Calculate the required DVM reading using V= IR where V is the
DVM reading, I is the current, and R is the DC shunt resistance.
5-8 TM-F2OP-C1XN-01
Page 84

User Diagnostics
If your power supply is not performing as described in this operating
manual, run through the procedures and checks in this section before
calling your service technician. These procedures are confined to
operator-level functions only and do not require cover-off servicing.
Emergency Shutdown
In an emergency, carry out both of these steps:
1. Shut the power supply OFF immediately.
2. Disconnect the power supply from the load.
Unusual or Erratic Operation
If the power supply displays any unusual or erratic operation, follow
these steps:
1. Shut the power supply OFF immediately.
2. Disconnect the power supply from the load.
3. Test the power supply with no load, running the tests in “Functional
Tests” on page 2–9.
4. If the tests show that the power supply is functioning normally, check
all load, programming, and monitoring connections and circuits.
5. Check the AC input for correct voltage and frequency.
If the problem is not solved after following this procedure, or if the unit
fails to operate correctly upon retesting, call your service technician.
Turn to the next page for more information about troubleshooting for
operators.
User Diagnostics
TM-F2OP-C1XN-01 5-9
Page 85

Calibration and Troubleshooting
Troubleshooting for Operators
Use the checks in Table 5-1 to ensure that the power supply is configured
and connected for normal operation.
Abbreviated References Used in Table
ACF AC Fail
OTP over temperature protection
OVP over voltage protection
REM remote m ode
S/D shutdown
Table 5-1
Symptom Check Further Checks and Corrections
No output and the
display is blank.
No output but the
display turns on.
User Diagnostics
Is input voltage within specified
range?
Power switch ON? Turn on power.
Internal circuit? See your service technician.
OVP LED turned on? See page 3–7.
Front panel S/D LED turned on? See page 3–9.
OTP LED turned on? See page 3–17.
Current limit set to zero? See page 3–6.
Voltage control set to zero? See page 3–6.
REM LED turned on? If using remote analog control, check
Is front panel ACF LED turned on? Connect unit to AC supply in
Connect to appropriate voltage
source.
See page 2–6.
your analog programming source
(Chapter 4). If not, refer to your
digital interface manual.
specified range. See page 2–6.
Internal circuit. See your service technician.
5-10 TM-F2OP-C1XN-01
Page 86

User Diagnostics
Table 5-1
Symptom Check Further Checks and Corrections
Output not
adjustable.
Output voltage
fluctuating or
regulation poor.
User Diagnostics
Is unit in current limit mode?
(Red Current Mode LED turned on.)
Is unit in remote mode?
(Green REM LED turned on.)
Is unit at maximum voltage or current
limit?
Is unit at current limit? Increase current limit setting or
Is input voltage within specified
range?
Are sense lines connected? See page 2–9 and page 2–18.
Is unit under remote analog control? Ensure that program source is stable.
Internal circuit. See your service technician.
Turn current knob clockwise to
increase current limit. Reduce load if
current is at maximum. See page3–6.
If using remote analog control, check
your analog programming source
(Chapter 4). If not, refer to your
digital interface manual.
Reduce load for lower voltage or
current requirement.
reduce load. See page 3–6.
Connect to appropriate AC voltage
source.
See page 2–6.
Output oscillating. Internal circuit. See your service technician.
TM-F2OP-C1XN-01 5-11
Page 87

5-12
Page 88

A
Specifications
Appendix A contains electrical, mechanical and
environmental specifications and characteristics of the
XFR 2800 Watt Series Programmable DC Power Supply.
These specifications are warranted over a temperature
range of 0 °C to 50 °C.
Nominal ambient temperature assumed is 25 °C.
Nominal line voltages are 120 Vac and 230 Vac.
See Table A-1 and Table A-2 for maximum values for
model-dependent specifications.
Specifications are subject to change without notice.
Page 89

Specifications
Electrical Specifications
These specifications are warranted over a temperature range of 0 °C to
50 °C.
Nominal ambient temperature assumed is 25 °C.
Nominal line voltage is 208 Vac, 60 Hz.
See Table A-1 and Table A-2 for maximum values for model-dependent
specifications.
Specifications are subject to change without notice.
Table A-1
Models 7.5-300 12-220 20-130 33-85 40-70
Output Ratings:
Output Voltage
Output Current
Output Power
Line Regulation:
Voltage (0.01% of Vmax +
2mV)
Current (0.01% of Imax + 2 mA)
Load Regulation:
Voltage (0.02% of Vmax +
5mV)
Current (0.02% of Imax + 5 mA)
Meter Accuracy:
Voltage (1% of Vmax + 1 count)
Current (1% of Imax + 1 count)
Output Noise (0-20 MHz):
Voltage (p-p) 100 mV 100 mV 100 mV 1 00 mV 150 mV
Output Ripple (rms):
Voltage
Current
Drift (30 minutes):
Voltage (0.07% of Vmax)
Current (0.7% of Imax)
For Resistive Programming:
Voltage (0.6% of Vmax )
Current (0.6% of Imax)
Specifications for 7.5 V to 40 V Models
a
b
c
d
e
f
0-7.5 V
0-300 A
2250 W
2.75 mV
32 mA
6.5 mV
65 mA
0.09 V
4A
10 mV
1600 mA
3.75 mV
2100 mA
45 mV
1800 mA
0-12 V
0-220 A
2640 W
3.2 mV
24 mA
7.4 mV
49 mA
0.13 V
2.3 A
10 mV
1200 mA
6mV
1540 mA
72 mV
1320 mA
0-20 V
0-130 A
2600 W
4mV
15 mA
9mV
31 mA
0.3 V
1.4 A
10 mV
400 mA
10 mV
910 mA
120 mV
780 mA
0-33 V
0-85 A
2805 W
5.3 mV
10.5 mA
11.6 mV
22 mA
0.43 V
0.95 A
15 mV
300 mA
16.5 mV
595 mA
198 mV
510 mA
0-40 V
0-70 A
2800 W
6mV
9mA
13 mV
19 mA
0.5 V
0.8 A
15 mV
200 mA
20 mV
490 mA
240 mV
420 mA
A-2 TM-F2OP-C1XN-01
Page 90

Electrical Specifications
Table A-1
Specifications for 7.5 V to 40 V Models
Models 7.5-300 12-220 20-130 33-85 40-70
Drift (8 hours):
Voltage (0.05% of Vmax)
Current (0.05% of Imax)
g
3.75 mV
150 mA
6mV
110 mA
10 mV
65 mA
16.5 mV
42.5 mA
20 mV
35 mA
For Resistive Programming:
Voltage (0.3% of Vmax)
Current (0.3% of Imax)
Temperature Coefficient:
Voltage (0.02% of Vmax/°C)
Current (0.03% of Imax/°C)
22.5 mV
900 mA
h
1.5 mV
90 mA
36 mV
660 mA
2.4 mV
66 mA
60 mV
390 mA
4mV
39 mA
99 mV
255 mA
6.6 mV
25.5 mA
120 mV
210 mA
8mV
21 mA
For Resistive Programming:
Voltage (0.06% of Vmax/°C)
Current (0.06% of Imax/°C)
4.5 mV
180 mA
7.2 mV
132 mA
12 mV
78 mA
19.8 mV
51 mA
24 mV
42 mA
OVP Adjustment Range:
(5% to 110% of Vmax) 0.375-
8.25 V
Efficiency:
a. Minimum output voltage is <0.15% of rated voltage at zero output setting.
b. Minimum output current is <0.5% of rated current at zero output setting when measured at minimum 10% of full power
load.
c. For input voltage variation over the AC input voltage range, with constant rated load.
d. For 0-100% load variation, with constant nominal line voltage.
e. Current mode noise is measured from 10% to 100% of rated output voltage, full current.
f. Maximum drift over 30 minutes with constant line, load, and temperature, after power on.
g. Maximum drift over 8 hours with constant line, load, and temperature, after 30-minute warm-up.
h. Change in output per °C change in ambient temperature, with constant line and load.
i. Typical efficiency at nominal input voltage and full output power.
i
0.80 0.82 0.85 0.85 0.87
0.6-13.2 V 1-22 V 1.65-
36.3 V
2-44 V
TM-F2OP-C1XN-01 A-3
Page 91

Specifications
Table A-2
Specifications for 60 V to 600 V Models
Models 60-46 100-28 150-18 300-9 600-4
Output Ratings:
Output Voltage
Output Current
Output Power
Line Regulation:
Voltage (0.01% of Vmax +
2mV)
a
b
c
0-60 V
0-46 A
2760 W
8mV
6.6 mA
0-100 V
0-28 A
2800 W
12 mV
4.8 mA
0-150 V
0-18 A
2700 W
17mV
3.8 mA
0-300 V
0-9 A
2700 W
32 mV
2.9 mA
0-600 V
0-4 A
2400 W
62 mV
2.4 mA
Current (0.01% of Imax + 2 mA)
Load Regulation:
Voltage (0.02% of Vmax +
5mV)
d
17 mV
14.2 mA
27 mV
10.6 mA
35 mV
8.6 mA
65 mV
6.8 mA
125 mV
5.8 mA
Current (0.02% of Imax + 5 mA)
Meter Accuracy:
Voltage (1% of Vmax + 1 count)
Current (1% of Imax + 1 count)
0.7 V
0.56 A
1.1 V
0.38 A
1.6 V
0.19 A
4V
0.1 A
7V
0.05 A
Output Noise (0-20 MHz):
Voltage (p-p) 150 mV 175 mV 200 mV 4 00 mV 500 mV
Output Ripple (rms):
Voltage
Current
e
Drift (30 minutes):
Voltage (0.05% of Vmax)
Current (0.7% of Imax)
f
15 mV
100 mA
30 mV
322 mA
25 mV
80 mA
50m V
196m A
25 mV
40 mA
75 mV
126 mA
40 mV
20 mA
150 mV
63 mA
100 mV
10 mA
300 mV
28 mA
For Resistive Programming:
Voltage (0.6% of Vmax )
Current (0.6% of Imax)
Drift (8 hours):
g
Voltage (0.05% of Vmax)
Current (0.05% of Imax)
360 mV
276 mA
30 mV
23 mA
600 mV
168 mA
50 mV
14 mA
900 mV
108 mA
75 mV
9mA
1800 mV
54 mA
150 mV
4.5 mA
3600 mV
24 mA
300 mV
2mA
For Resistive Programming:
Voltage (0.3% of Vmax )
Current (0.3% of Imax)
180 mV
138 mA
300 mV
84 mA
450 mV
54 mA
900 mV
27 mA
1800 mV
12 mA
A-4 TM-F2OP-C1XN-01
Page 92

Electrical Specifications
Table A-2
Specifications for 60 V to 600 V Models
Models 60-46 100-28 150-18 300-9 600-4
Temperature Coefficient:
Voltage (0.02% of Vmax/°C)
Current (0.03% of Imax/°C)
h
12 mV
13.8 mA
20 mV
8.4 mA
30 mV
5.4 mA
60 mV
2.7 mA
120 mV
1.2 mA
For Resistive Programming:
Voltage (0.06% of Vmax/°C)
Current (0.06% of Imax/°C)
36 mV
28 mA
60 mV
16.8 mA
90 mV
10.8 mA
180 mV
5.4 mA
360 mV
2.4 mA
OVP Adjustment Range:
(5% to 110% of Vmax) 3-66 V 5-110 V 7.5-165 V 15-330 V 30-660 V
Efficiency:
a. Minimum output voltage is <0.15% of rated voltage at zero output setting.
b. Minimum output current is <0.5% of rated current at zero output setting when measured at minimum 10% of full power
load.
c. For input voltage variation over the AC input voltage range, with constant rated load.
d. For 0-100% load variation, with constant nominal line voltage.
e. Current mode noise is measured from 10% to 100% of rated output voltage, full current.
f. Maximum drift over 30 minutes with constant line, load, and temperature, after power on.
g. Maximum drift over 8 hours with constant line, load, and temperature, after 30-minute warm-up.
h. Change in output per °C change in ambient temperature, with constant line and load.
i. Typical efficiency at nominal input voltage and full output power.
i
0.90 0.90 0.90 0.91 0.91
TM-F2OP-C1XN-01 A-5
Page 93

Specifications
Additional Specifications
Rise Time (No Load, Full Load):
a
7.5 V to 60 V models: 100 ms;
100 V to 600 V models: 170 ms
Fall Time (No Load):
Fall Time (Full Load):
a
a
4 s
7.5 V to 60 V models: 100 ms;
100 V to 600 V models: 170 ms
Voltage Mode Transient
Response:
b
Time Delay from power on until
<3 ms
7 s maximum
output stable
a. Measured with stepped 0-10 V analog programming source and a resistive
load.
b. Time for the output voltage to recover within 0.5% of its rated value after a
step change in load current of 10% to 90% of rated output with an output
setpoint between 50-100% of rated value. Load slew rate <6 A/ms.
A-6 TM-F2OP-C1XN-01
Page 94

Input Conditions
Rated AC Input Voltage 200/208/220/230/240 Vac (nominal)
Maximum AC Input Power 50 00 VA
Input Conditions
30
I
N
P
25
U
T
20
C
U
15
R
R
10
E
N
5
T
(A)
0
Figure A-1
Operational AC Input Voltage 190-264 Vac
Input Frequency Range 47-63 Hz
Power Factor 0.65 typical
50% 100%
OUTPUT VOLTAGE
Typical Input Current Characteristics
(Based on 100 V, 28 A model.)
, 1φ (24.3 A maximum at
208 Vac; 22.4 A maximum at 230 Vac.)
Auto range select function.
O
100% at 190 V ac
100% at 264 Vac
50% at 190 Vac
50% at 264 Vac
U
T
P
U
T
C
U
R
R
E
N
T
TM-F2OP-C1XN-01 A-7
Page 95

Specifications
Additional Features
Switching Frequency nominal 31 kHz (62 kHz output ripple).
Output Hold-up Time Greater than 10 ms with int e rrupti on of
AC line, for nominal AC input and
full load.
Maximum Voltage Differential
from either output to safety
ground
Insulation Resistance Input to chassis: >30 MΩ, with 500 Vdc;
Isolation Voltage Input to output: 1350 Vac
±600 Vdc
Output to chassis: >20 MΩ, with
1000 Vdc.
Remote Programming and Monitoring
Remote Start/Stop and
Interlock
Remote Analog Programming
(Full Scale Input)
Remote Monitoring Output voltage and current: 0-5 V, 0-10 V
2.5-15 V signal or TTL-compatible input,
selectable logic. TTL input impedance: 2 k
(in series with one diode drop).
Voltage and current programming inputs
(source must be isolated): 0-5 k, 0-10 k
resistances; 0-5 V, 0-10 V (default) voltage
sources. Input impedance (V and I):
approximately 100 k.
(default);
Output impedance (V and I): approx 221 Ω.
Output short circuit current: approx. 50 mA.
Remote Programming and
Monitoring Accuracy
Maximum Remote Sense Line
Drop Compensation
Optional Isolated Program
and Readback (V&I)
Optional Digital Control RS-232, GPIB interfaces
A-8 TM-F2OP-C1XN-01
1% zero to full scale output for the default
range.
5 V/line (Line drop is subtracted from total
voltage available at supply output.)
0-5 V (ISOL interface); input impedance:
200 k; output impedance: 221 Ω.
Page 96

Environmental Specifications
Operating Temperature Range 0 °C to 50 °C.
Storage Temperature Range -20 °C to +70 °C
Environmental Specifications
Humidity Range
Operating Altitude Up to 6,500 feet (2000 m)
Storage Altitude Up to 50,000 feet (15 000 m)
Installation Category Intended for use in installation category
Pollution Degree Category 2 (IEC 1010-1 standard).
30% to 60% RH non-cond
(over voltage category) II (IEC 1010-1
standard).
ensing
TM-F2OP-C1XN-01 A-9
Page 97

Specifications
Mechanical Specifications
Front Panel V and I Control 10-turn voltage and current
potentiometers
Front Panel Voltage Control
Resolution
Front Panel Voltage and Current
Meters
AC Input Connector Type 3-terminal 34 A, 250 V, right angl
Input Fuses
Output Connector 7.5 V to 100 V models: nickel-plated
a
0.02% of maximum voltage
3.5-digit green numeric LED displays. For
accuracy specifications, see Table A-1 on
page A–2 and Table A-2 on page A–4.
e, PC
mount, wire clamp connector with
rem
ovable strain relief cover
1 A, 250 V, 5 x 20 mm slow fuse (T),
location: F34;
1.5 A, 250 V, 5 x 20 mm time delay (T),
location: F33; 20 A, 250 Vac, 5 x 20 mm
fast high interrupt (F), location: F36;
30 A, 300 Vac, 10.3 x 41.3 mm medium
time lag (T), locations: F2, F3.
copper bus bars with removable bus bar
shield; bus bar holes: 0.343 in. (8.7 mm)
diameter (D) (1), 0.197 in. (5.0 mm) D
(2);
150 V to 600 V models: 4-terminal, right
angle, PC mount, wire clamp connector
with removable strain relief cover.
Sense Connector 5-terminal wire clamp connector (2 piece)
Analog Programming Connector 15-terminal wire clamp connector (2
piece)
Chassis Ground One chassis ground screw located on rear
panel for bonding connections or for wire
shield grounding. Maximum penetration
into unit is 0.375 in. (9 mm).
Cooling Fan cooled. Air exhausts to rear. Over
temperature shutdown: automatic restart
or latch off (switch-selectable).
A-10 TM-F2OP-C1XN-01
Page 98

Mechanical Specifications
Mounting Rack mount brackets. Mount at front
panel.
Weight Approximately 33lb. (15 kg)
Approvals CE mark: Meets EMC standards
EN50081-2 and EN50082-2 and safety
standard IEC1010-1
c(UL)us: UL certified to UL3111-1, 1st
edition and to CAN/CSA C22.2 No.
1010.1-92
FCC: Meets Class A limits of Part 15
subpart B
a. Fuses are located on the A4 PCB (printed circuit board). The fuses are
NOT operator-replaceable.
TM-F2OP-C1XN-01 A-11
Page 99

Specifications
3.45"
(87.63 mm)
19 in. (483 mm)
16.9in. (429 mm)
20.975in. (533 mm)
17.475 in. (444 mm)
Figure A-2
Dimensional Drawings
A-12 TM-F2OP-C1XN-01
 Loading...