

Page 1
Installation
Instructions
DECK MOUNT
T038.900
TUB SYSTEMS
TROPIC TRIM KIT
with EverClean™ Finish
Congratulations on purchasing your American Standard
faucet with EverClean finish found only on American
Standard faucets.
EverClean Finish
• One wipe effortlessly removes spots
• Eliminates the need for cleaners and scrubbing
• Permanent surface protectant remains beautiful
for the life of the faucet
• EverClean™ available on: Polished Chrome, Satin Nickel,
Stainless Steel, Polished Brass (or any combination of these finishes)
To ensure that your installation proceeds smoothly-please read these instructions carefully before you begin.
Required Tools
Phillips Screwdriver
Drill with 3/16" bit
Flat Blade Screwdriver
Certified to comply with ANSI A112.18.1
U.S. Patent No. D403,750
Adjustable Wrench
Channel Locks
M968896
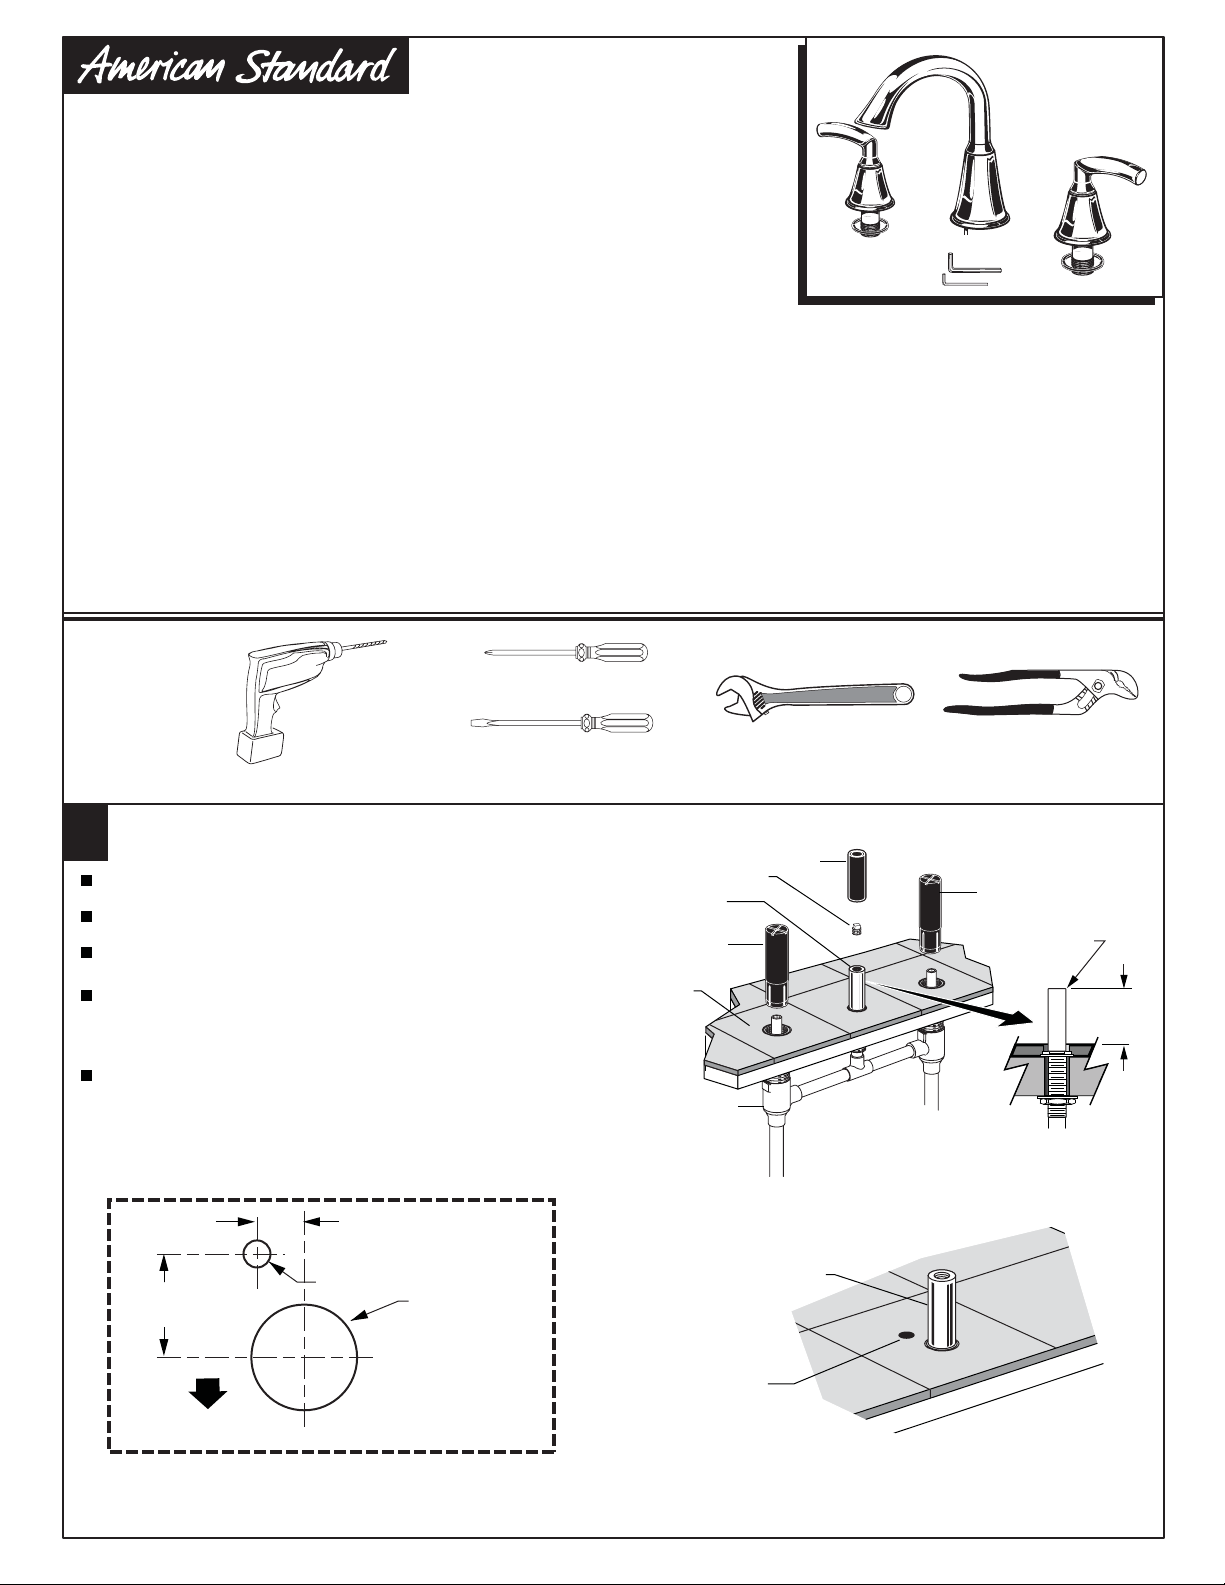
SPOUT INSTALLATION
1
Complete FINISHED DECK before trim installation.
Turn off the water supplies.
Remove the GUARDS (1) from the VALVE BODIES (2). Remove the
GUARD (3) and 1/4" PLUG (4) from the SPOUT SHANK (5).
The SPOUT SHANK (5) height should be 1" to 2" above the FINISHED
DECK. Cut the SPOUT SHANK (5) if necessary. Remove all burrs
and bevel the end of the shank. Failure to do so may damage
the SPOUT O-ring during installation and cause water leakage.
Drill a 3/16" hole in the finished deckfor spout locking pin. See
TEMPLATE for location.
8.4mm
(21/64")
19.8mm
(23/32")
FRONT
3/16" DIA. HOLE
18.6mm DIA.
(47/64")
SPOUT SHANK
TEMPLATE FOR
SPOUT ROLL
PIN LOCATION
5
1
FINISHED
DECK
2
3/16" DRILLED
HOLE
3
4
1
REMOVE ALL
BURRS AND
BEVEL
1"- 2"
5
Page 2

1A
SPOUT INSTALLATION
Lubricate the SPOUT ADAPTER O-RING (6) and
SPOUT O-RING (7).
Push SPOUT ADAPTER (8) on SPOUT SHANK (5)
and align slot in SPOUT ADAPTER (8) with 3/16"
drilled hole.
Tighten SPOUT ADAPTER SET SCREW (9) securely
with 4mm HEX KEY (10) supplied.
Position the RUBBER RING (14) in the groove in
the base of the ESCUTCHEON (11). Push the
SPOUT (12) with ESCUTCHEON (11) down onto
the SPOUT ADAPTER (8) and tighten the SET
SCREW (13) securely with the 5mm HEX
KEY (15) supplied.
10
FINISHED
DECK
3/16" DRILLED
HOLE
SLOT
9
6
8
7
15
12
5
13
11
11
GROOVE
INSTALL HANDLE ADAPTERS
2
Place the ESCUTCHEON SEALS (1) into groove of DECK ADAPTERS (2).
Align the HANDLE STEM (3) with the SLEEVE (4) as necessary.
Thread the HANDLE ADAPTER (5) into the VALVE BODY (6) until the
DECK ADAPTERS (2) contacts tight against the finished deck.
INSTALL HANDLES
3
Push ADAPTER (1) on VALVE STEM (2), so that the hole of the
ADAPTER (1) without a spline is facing up. See figure "A". Tighten
STEM SCREW (3) to secure ADAPTER (1).
2
GROOVE
1
4
8
14
3
7
5
6
Find correct position of LEVER HANDLE ASSEMBLY (4) by adjusting
male teeth on ADAPTER (1) to female teeth in HANDLE (4).
Thread LEVER HANDLE ASSEMBLY (4) onto DECK
ADAPTER (5) until snug against mounting surface.
Repeat steps for opposite handle.
Figure "A"
SPLINE END DOWN
TOP
THREAD ON
TO DECK
ADAPTER
3
2
5
4
1
M968896
Page 3

TESTING
4
Turn the HOT HANDLE clockwise and the COLD
HANDLE counterclockwise to the off position.
Unscrew and remove the STREAM STRAIGHTENER.
Slowly turn on the water supplies.
Operate the HANDLES to flush water lines thoroughly.
Check SPOUT connection for leakage.
Turn the Handles off. Replace the SPOUT END.
SERVICE
To change the direction of handle rotation
5
Turn off the water supplies
Turn HANDLE (1) to the off position.
Unthread the HANDLE BASE (2) from HANDLE ADAPTER (3).
Unthread HANDLE ADAPTER (3) and remove.
HOT
HANDLE
STREAM
COLD
HANDLE
STRAIGHTENER
1
2
Remove VALVE LOCKNUT (4). A 17mm deep socket
is required.
Remove the CARTRIDGE (5) by pulling up
on the SLEEVE (6).
Remove SCREW (7) and pull off SLEEVE (6).
Remove the SPRING CLIP (8).
Remove the STOP WASHER (9). Turn it 90˚ and replace.
Replace the SPRING CLIP (8).
Reverse the above steps to reassembly the components.
If the spout drips, operate the handles several times from
the off to the on position. Do not force - the handles only turn 90˚.
3
90˚
4
9
7
6
8
5
CARE INSTRUCTIONS
6
EverClean™ Finish Care Instructions
American Standard’s EverClean finish will wipe clean with a soft, dry cloth. A soft cloth with
clean water may also be used, if desired. No additional cleaning products are required.
DO NOT USE: Soaps, acid, polish, abrasives, harsh cleaners, or a cloth with a coarse surface.
M968896
Page 4

Installation
Instructions
DECK MOUNT
TUB FILLERS
TROPIC DIVERTER & PERSONAL
SHOWER TRIM KITS
with EverClean™ Finish
Congratulations on purchasing your American Standard
faucet with EverClean finish found only on American
Standard faucets.
EverClean Finish
• One wipe effortlessly removes spots
• Eliminates the need for cleaners and scrubbing
• Permanent surface protectant remains beautiful
for the life of the faucet
• EverClean™ available on: Polished Chrome, Satin Nickel,
Stainless Steel, Polished Brass (or any combination of these finishes)
To ensure that your installation proceeds smoothly-please read these instructions carefully before you begin.
INSTALL HANDLE ADAPTER
1
Remove DIVERTER GUARD (1) from valve.
T038.990
3
2
Certified to comply with ANSI A112.18.1
U.S. Patent No. D403,750
M968897
5
Place the ESCUTCHEON SEAL (7) into groove of DECK ADAPTER (2).
Align the HANDLE STEM (3) with the SLEEVE (4) as necessary.
Thread the HANDLE ADAPTER (5) into the VALVE BODY (6) until
the DECK ADAPTER (2) contacts tight against the finished
mounting surface.
INSTALL HANDLES
2
Push ADAPTER (1) on VALVE STEM (2), so that
the hole of the ADAPTER (1) without a spline is
facing up. Fig. A. Tighten STEM SCREW (3) to
secure ADAPTER (1).
Find correct position of LEVER HANDLE ASSEMBLY (4)
by adjusting male teeth on ADAPTER (1) to female teeth
in HANDLE (4).
Thread LEVER HANDLE ASSEMBLY (4) onto DECK
ADAPTER (5) until snug against mounting surface.
4
TOP
GROOVE
7
4
2
1
6
THREAD ON
TO DECK
ADAPTER
1
3
SPLINE END DOWN
Fig. A.
5
Page 5

INSTALL HAND SHOWER
3
Unscrew the HOLDER (1) from the SHOWER ESCUTCHEON (2). Slip the
SHOWER HOSE (3) through the SHOWER ESCUTCHEON (2) and the
HOLDER (1).
Pull out the SLEEVE GUARD (6) and HOSE (7). Unthread the SLEEVE GUARD
(6) from the HOSE END (8) connection. Be careful not to allow the HOSE
(7) to fall back through the SLEEVE (9).
Insert SEAL WASHER (10) into the SHOWER HOSE CONNECTOR (11).
Thread the SHOWER HOSE CONNECTOR (11) onto the HOSE END (8) and
tighten securely.
Thread the SHOWER ESCUTCHEON (2) into the SLEEVE (9) until the
SHOWER ESCUTCHEON (2) contacts the finished deck.
Loosen the SET SCREW (12) in the SHOWER ESCUTCHEON (2) and rotate
the ESCUTCHEON (2) so that SET SCREW (12) faces the center of the tub.
Retighten the SET SCREW (12).
Thread the HOLDER (1) into the SHOWER ESCUTCHEON (2).
Insert a SEAL WASHER (4) into the SHOWER HOSE CONNECTOR (5)
and hand tighten HAND SHOWER (13) into
SHOWER HOSE CONNECTOR (5).
Place the HAND SHOWER (13)
into the HOLDER (1).
6
11
10
8
7
13
5
1
2
3
4
13
1
12
2
TEST INSTALLED DIVERTER
4
Turn DIVERTER VALVE (1) fully clockwise (Tub fill position).
Turn on control valves and check all connections for leaks. With
DIVERTER VALVE (1) in clockwise position, flow should only come
from tub spout.
Lift HANDSHOWER (2) from holder, direct spray into tub, turn
DIVERTER VALVE (1) fully counter-clockwise to check
HANDSHOWER (2) and HOSES (3) for leaks. With DIVERTER
VALVE (1) in counter-clockwise position, flow should only
come from HANDSHOWER (2).
Turn control valves "off."
EverClean™ Finish Care Instructions
5
9
2
1
3
American Standard’s EverClean finish will wipe clean with a soft, dry cloth. A soft cloth with
clean water may also be used, if desired. No additional cleaning products are required.
DO NOT USE: Soaps, acid, polish, abrasives, harsh cleaners, or a cloth with a coarse surface.
M968897
 Loading...