

American Metal Ware 87710 Service Manual
American Metal Ware
®
Installation, Operation & Service Manual
For
High Speed Brewing Urn (Top Line)
TABLE OF CONTENTS
General Description.................................3
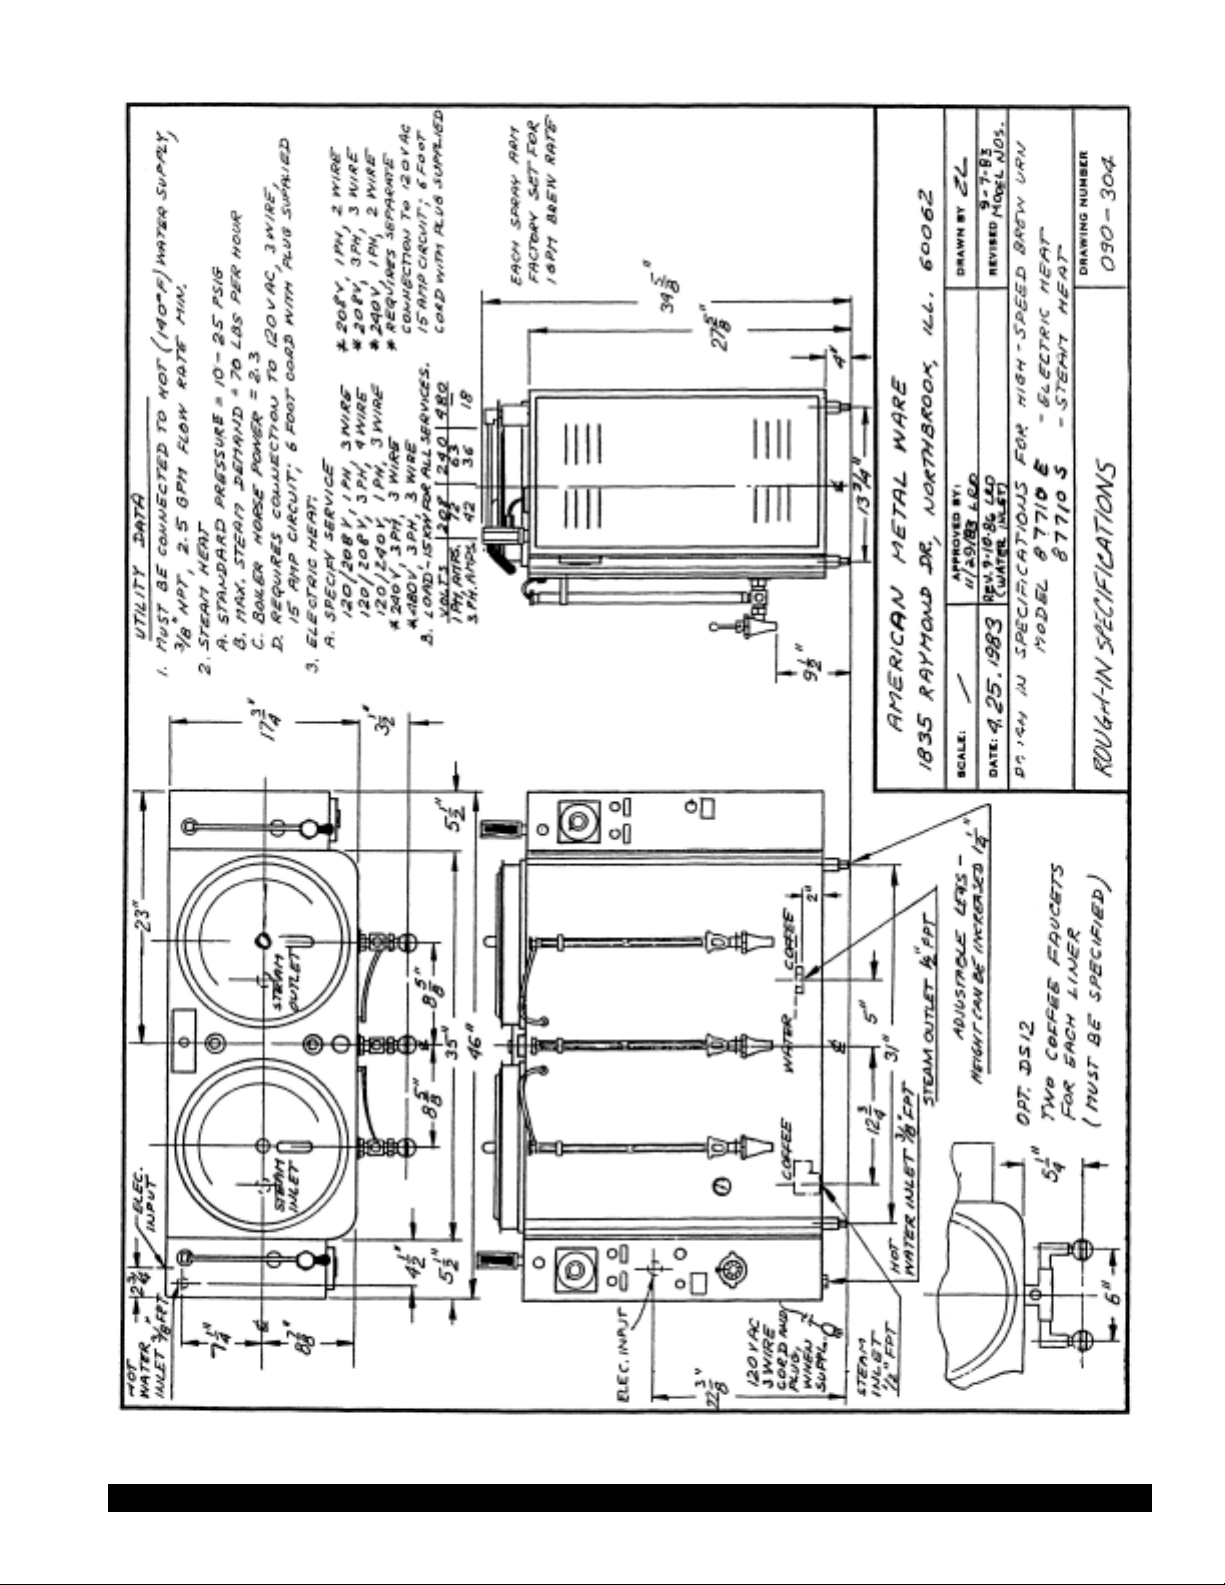
Roughing-In Drawing...............................4
Installation...............................................5
Spray-Over Time/Volume/Rate................6
How To Brew............................................7
Thermostat/Adjustments/Timer...............8
Care and Cleaning..................................9
Explanation of Agitation System............10
Operation Malfunction and Service........11
Dual Lever Control................................12
Troubleshooting Level Control...............14
Service/Troubleshooting Agitation.........18
Installation/Service for Solenoid Valve...18
Sprayover Pump Breakdown.................20
Illustrated Parts Breakdown...................21
List of Illustrated Parts...........................22
Parts List...............................................23
Wiring Diagram - Controls.....................24
Heater Wiring Diagram - 208V/240V......25
Heater Wiring Diagram - 480V..............26
Model 87710
Dual Wall Insulated
X
Electric Steam
Special Features
After completing installation and set-up, the
equipment owner should keep this manual for
future reference.
© Grindmaster Corporation™, 1995
PRINTED IN USA
Grindmaster Corporation™
4003 Collins Lane
Louisville, Kentucky 40245 USA
(502) 425-4776
(800) 695-4500 (USA and Canada only)
(800) 568-5715 (technical service only)
FAX: (502) 425-4664
www.grindmaster.com
1104 Form # AM-307-02

General Description
This urn is an automatic, push button operated, volume brewing unit. It consists of a nonpressure vented water compartment of large capacity into which two stainless steel coffee
liners are inserted. Also installed within this water compartment are electric immersion
heaters thermostatically controlled through a contactor relay, to keep the water always at
the desired temperature. Measurement of water quantity sprayed over coffee is by push
button start, electric reset timer, timing a constant water flow rate to the spray nozzle.
Hot water from the water compartment is pumped to the spray nozzle, controlled by the
reset timer. Automatic refill maintains water level in water compartment. Control system
components are enclosed in stainless steel housings on both ends of the urn for the 87710
urn.
Air agitation of coffee mixes the brew with compressed air automatically at the end of the
brew cycle or, if desired, manually at any time with a push button.
American Metal Ware 87710E Coffee Urn Page 3
Page 4 American Metal Ware 87710E Coffee Urn

Installation
IMPORTANT TO ALLOW 6” CLEAR SPACE FOR ACCESS TO CONTROL BOX.
1.
Urn should be level, both front to back and left to right.
CONNECT WATER LINE. 3/8” NPT water inlet located at left end and provide shutoff
2.
valve and union in supply line near urn. 140
mum - 70PSI maximum. We strongly recommend the use of copper or aluminum tubing to provide flexibility and avoid strain on the urn. 3/8” O.D. minimum tubing is recommended.
Model No. 87710
Actual Coffee Capacity Each Liner 10 Gal.
Water Compartment Capacity 24 Gal.
Brew Capacity, Gals. per Hour 80
Electric Supply Voltage 240V/208V
1 Phase Heater Size 15KW / 15KW
1 Phase Amperes 63 / 72
3 Phase Heater Size 15KW / 15KW
3 Phase Amperes 36 / 42
O
F. hot water must be used, 30PSI mini-
CONNECT URN TO ELECTRIC POWER. Check to be sure that the nameplate mark-
3.
ing of voltage, phase and the number of wires matches supply lines. Remove cover on
control housing. The terminal block for the line connections is located in the housing
on the left end. See drawing, as required. It is recommended that a fused disconnect
switch be installed near urn. The urn body must be grounded either through metallic
conduit or else by means of ground wire. An experienced electrician should be responsible for the installation of the urn, and its associated supply line. NOTE: Neutral wire
required on all single phase and on 208 volt 3 phase power supplies to operate 120 volt
AC control circuit.
On single phase, 2 wire service (no neutral) or 3 phase 3 wire service (no neutral) 120
volt AC power to operate control circuit must be supplied as circuit. Do not replace
cover until completing installation start-up.
FILL WATER COMPARTMENT. Turn on water supply and electric service to urn.
4.
Water compartment should fill to stop-full level in approximately 10 minutes.
Turn thermostat knob to BREW position. Pilot light over knob should light showing
heater power on. Water compartment should reach operating temperature approximately 45 minutes later. When the pointer on thermometer approaches the “W” in the
blue BREW zone, urn is ready for automatic operation.
American Metal Ware 87710E Coffee Urn Page 5

Spray-Over Time - Volume - Rate
Timer and spray-over rate are factory set as per information below. If other volumes of
water or a faster or slower spray-over rate is desired, see following instructions:
Timer Adjustment
Turn adjustment knob clockwise to decrease time, counterclockwise to increase time.
Operation Start-Up Checks/Brew Cycle Adjustments
1.
Turn thermostat dial to BREW position. Pilot light at top of thermostat bezel should light
up when thermometer pointer is at “W” in BREW zone, this pilot light should go out.
Water in urn tank is now at brew temperature. NOW and ONLY at initial start-up, we
advise checking time of flow of hot water to spray nozzle.
2.
CHECKING SPRAYOVER VOLUME AND RATE (REPEAT FOR EACH SPRAYARM)
Remove cover from brew basket over one liner. Position spray nozzle over this brew
basket. Liner should be empty and faucet shut off. Push in timer start button and brew
pilot should light up. Hot water should start to spray into brew basket. Allow to spray until
brew pilot light goes out and sprayover stops.
Measure amount sprayed over by drawing off into a calibrated one gallon measure. If
amount is more or less than desired, reset timer. Longer time, more sprayover, shorter
time - less sprayover. Each 1/4 minute increase or decrease adds or subtracts about 1/4
gallon to sprayover total. Note that setting of sprayover bypass valve (on sprayarm)
affects amount of sprayover.
Further adjustment of sprayover volume can be made using the internal
located in the side pump housing. Screwdriver adjustment is under the hole plug closest
to the urn body. Open the valve for less sprayover, close for more. Valve is wide open
when screwdriver slot is horizontal. It is closed when slot is vertical; i.e., pointing towards
sprayarm for maximum sprayover. The purpose of the internal bypass valve is to direct
excess discharge from the sprayover pump back into the urn water compartment.
Factory setting is 10 gallons sprayover water in 10 minutes (1 gallon/60 seconds) and
sprayover
or 3 gallons.
Before actual use of urn, it should be thoroughly cleaned and washed. It is also
recommended that a batch of coffee be brewed in each liner based on a final brewing
cycle timer setting and actual muslin bag or filter be used. We recommend that these first
batches be thrown out and not used. Strength of brew may be checked by hydrometer
or evaporation tests but flavor test might be poor on the first batch.
bypass valve wide open. Bypass volume is about 30% of the total sprayover,
bypass valve
Page 6 American Metal Ware 87710E Coffee Urn

How To Brew In An Automatic Urn
1.
Place filter in brew basket with designated amount of ground coffee (automatic urns are
designed to use 1, 2, 3 or 4 lbs. of coffee). Make certain you have a level bed of coffee.
Consult your coffee supplier for exact brewing specifications. (C.B.C. recommendation
is 1 lb. of coffee to each 2 1/2 gallons water).
2.
Replace cover and move spray head over center of coffee grounds.
3.
Check thermometer to make certain urn is at brewing temperature. Press timer button.
4.
When brew cycle is completed (brew light shuts off), remove brew basket and dispose of
spent grounds.
5.
Mixing of finished brew is accomplished automatically at the end of the brew cycle if the
urn has an air agitation option. Additional mixing can be performed at later time by
pressing manual air agitation push button.
Where urn is not equipped with air agitation, draw one gallon for each three gallons of
finished brew from coffee faucet, and pour over top into coffee liner.
The coffee is ready to serve.
6.
Hold coffee at 185
O
- 190OF. or HOLD setting on thermostat knob. Brewed coffee can be
held at this temperature for up to one hour with minimal deterioration of flavor and body.
Explanation Of Brewing Cycle
1.
When timer button is pushed, the timer is activated.
2.
The timer completes the circuit to the sprayover pump which delivers hot water through
the spray arm to the spray nozzle.
3.
The hot water from the spray nozzle is sprayed over the coffee grounds. The finished
brew collects in the coffee liner.
4.
As the pump delivers hot water from the water compartment through spray nozzle into
brew basket, the water level in the water compartment lowers.
5.
Drop in water level in water compartment below sensing probes activates liquid level
control which opens the refill solenoid valve, refilling the water compartment with cold
water.
6.
The entry of the cold water activates the thermostat, which allows power to go to the
heating element to maintain the brewing temperature
NOTE: Some urns may be equipped with an optional adjustable bypass valve on the spray
arm. Adjustment of this valve will allow some spray water to bypass the brewing basket for
additional control of the water/coffee brewing formula and the extraction percentage from
the coffee.
American Metal Ware 87710E Coffee Urn Page 7

Thermostat
The thermostat is factory set so that the knob on the BREW setting holds the urn at
brewing temperature toward the HI end of brew zone on the thermometer dial. Then, if
turned back to HOLD position, the thermostat should cycle on and off and hold at the LO
end of the BREW zone on the thermometer.
Thermostat Adjustment
If the water temperature is below the HI end of the BREW zone on the thermometer dial
1.
with the knob on BREW setting, remove the knob by pulling it straight outward. Using a
small screwdriver, insert in the hole in the center of the shaft, turn slotted screw counterclockwise until the red pilot light goes on. Check to see that water in the urn holds at the
HI end of the BREW zone on the thermometer and does not
If the water boils with the thermostat knob set at the BREW position, remove the knob by
2.
pulling it straight outward. Using a small screwdriver, insert into the hole in the center of
the shaft, turn slotted screw clockwise until the red pilot light goes out. Hold shaft so it
does not turn while adjusting screw. Add cold water and check that the heat comes back
on (pilot light glows), and that the thermostat cycles at temperature at HI end of the
BREW zone on thermometer dial.
boil.
If the thermostat will not cycle, replace the entire control.
Push Button Timer For Spray Over Control
The function of the timer is to start the pump and run it for a preset period of time and upon
lapse of this time, to stop the pump, thereby completing the spray over cycle.
This urn is equipped with an electric reset timer. Pushing in the START button will start the
flow of water. The timer will complete the time cycle for which it has been programmed and
on completion, the flow will be stopped and the timer will reset itself, ready for the next
brewing cycle.
If electric power is cut off anywhere in the service coming to the urn during the timer
operating cycle, the timer will reset. When the power is restored, the timer must be
restarted by pushing the START button.
Spray Rinse Of Liner
To rinse the liner after brewing coffee, swing the spray arm over the desired liner and push
START button. Allow hot water to spray from the spray arm for approximately 30 to 60
seconds and then push STOP button and drain the liner.
Page 8 American Metal Ware 87710E Coffee Urn

Care and Cleaning of Coffee Urn
1.
Always rinse the urn immediately after each use.
2.
Add small quantity of hot water, brush sides and rinse with hot water until it runs clean.
Urn is now ready for next batch.
3.
At end of each day clean and brush urn several times, then rinse thoroughly with hot
water.
4.
Remove clean-out cap at the end of the coffee faucet (or take apart faucets which have
no caps) and scrub pipe leading to center of urn. Clean urn gauge glass with brush and
urn cleaner. Rinse!
5.
Scrub the faucet, then rinse it thoroughly with hot water.
6.
Place a gallon or more of fresh water in the urn until next use.
7.
Remove cover and clean. Replace cover, and leave partly open.
8.
ALWAYS REMEMBER TO EMPTY, AND RINSE THE URN WITH HOT WATER BEFORE
USING AGAIN.
NOTE
: On automatic urns, use brew start and stop switches, or the rinse switch, to spray
scalding hot water into liner for cleaning and rinsing. On pourover urns, draw hot water
directly from urn. Make sure urn water tank is kept near full, and heat is on.
Semi-Weekly Cleaning Procedure
1.
Be sure that the outer jacket is full of water.
2.
Turn on the heat and fill the urn liner 3/4 full of water; use only urn cleaning compounds,
following manufacturer’s directions; mix thoroughly and let stand about 30 minutes.
3.
Clean the gauge glass, faucet pipe, plugs, etc. using long thin brush. Use urn cleaning
solution for scrubbing. Take faucet valve apart and clean thoroughly. Clean all tubes
well.
4.
Scrub inside of urn and inside of cover with long handled brush. Be sure to clean the
“lug nut” in the base of urn liner.
5.
Rinse the inside of the urn three or four times with hot water - scrubbing each time. Also
rinse parts well. Repeat until all traces of foreign odor and cleaning solution are
removed.
6.
Leave a gallon or more of fresh water in the urn with the cover partly open until the next
use. If cold water is used, allow urn to cool to prevent cracking liner.
7.
The urn baskets may be cleaned by immersing them in urn cleaner solution and scrubbing with a stiff brush. Rinse thoroughly and let dry. Sprayheads should be checked to
see that all holes are open. If any are clogged, remove sprayhead and use stiff wire to
open.
8.
Don’t use soap, scouring powders, or abrasives to clean coffee brewing equipment.
WARNING: Cleaner used can affect taste of coffee if not thoroughly flushed out as covered above.
NOTE: Coffee system cleaners that have been used successfully:
DIP-IT manufactured by Economics Laboratories, Inc., 4 Corporate Park Drive, White Plains, NY 10604
OXYLITE manufactured by Avril, Inc., Syndet Division, 601 N. Third Street, Reading, PA 19601
TEMP-KLEEN manufactured by Caddy Corp. of America, Pitman, NJ 08071
American Metal Ware 87710E Coffee Urn Page 9
 Loading...