


1. V isual Description.................................................................................................................................................................2
2. Power management ...............................................................................................................................................................2
2.1 Inbuilt battery ..............................................................................................................................................................2
2.2 Power adaptor and charging indicator.........................................................................................................................3
2.3 Power ON/OFF............................................................................................................................................................3
3. Inner and external storage ....................................................................................................................................................4
3.1 Classification of storage ..............................................................................................................................................4
3.2 How to use storage ......................................................................................................................................................5
4. Shake function.......................................................................................................................................................................5
5. Orientation.............................................................................................................................................................................5
6. Network.................................................................................................................................................................................6
7. Input operation ......................................................................................................................................................................8
7.1 Keyboard input............................................................................................................................................................8
7.2 Touch screen input.......................................................................................................................................................9
7.3 External mouse input...................................................................................................................................................9
8. Desktop..................................................................................................................................................................................9
8.1 Status bar and Quick bar..............................................................................................................................................9
8.2 Main menu.................................................................................................................................................................10
8.3 Desktop settings.........................................................................................................................................................10
8.4 Notifications..............................................................................................................................................................11
8.5 Desktop icon..............................................................................................................................................................11
9. Website browser..................................................................................................................................................................11
10. Application manager and installation................................................................................................................................12
10.1 Install and uninstall..................................................................................................................................................12
10.2 Application manager................................................................................................................................................12
10.3 Progress manager.....................................................................................................................................................12
11. File manager......................................................................................................................................................................12
11.1 New folder...............................................................................................................................................................13
11.2 Folder operation.......................................................................................................................................................13
11.3 File operation...........................................................................................................................................................14
12. Typical application............................................................................................................................................................15
12.1 Multimedia ..............................................................................................................................................................15
12.2 Camera.....................................................................................................................................................................15
12.3 HDMI ......................................................................................................................................................................16
12.4 GPS location............................................................................................................................................................16
12.5 Calibration...............................................................................................................................................................16
13. Important notes..................................................................................................................................................................17
13.1 Battery note .............................................................................................................................................................17
13.2 Release memory ......................................................................................................................................................17
13.3 Forced shutdown .....................................................................................................................................................17
13.4 Factory data reset.....................................................................................................................................................18
13.5 About save path .......................................................................................................................................................18

1. V isual Description
Refer to below picture:
2. Power management
2.1 Inbuilt battery
The unit build-in 2pcs 3800mAh 7.4V battery, working time for different status
is below:
Working time for sleeping status 30 hours
Working time for only Wi-F i working 5 hours

Working time for only playing multimedia 4 hours
Working time for only playing online Video 3 hours
2.2 Power adaptor and charging indicator
Power input is 9V/2A; Please don’t use other one with different specs.
Charging time, the charging indicator is red; charging full, indicator is turn off.
Charging time is 10 hours when the unit is shutdown state; the unit could be used
normally, but charging time will be longer.
2.3 Power ON/OFF
Power ON: Ensure power is sufficient firstly. Long pressing the power button
for 2s; when feeling short shake, releasing power button. After system booting,
the unit enter lock-screen image, as below:
Pull the “Unlock icon” upward to green dot position to enter main menu; Pull the
“Photo frame icon” downward to green dot position to enter photo viewer.

Power OFF: Long pressing the power button for 4s. When feeling short shake,
releasing power button, the unit will enter confirmation of shutdown as below:
Pull the “Shutdown icon” upward to green dot to shutdown; Pull the “Cancel
icon” to green dot to cancel.
Sleeping: Short pressing power button for 1s, system enters sleeping state, the
screen go black; Short pressing power button for 1s to wake up. If low power
when sleeping, the unit will wake up and shutdown automatically.
Forced shutdown: Long pressing power button for 7s to force shutdown, or
pressing the shutdown button on the bottom of unit.
3. Inner and external storage
3.1 Classification of storage
The unit has 4 storage spaces: Inner storage 1, Inner storage 2, USB type external
storage, TF card.

Inner storage 1 is Android system file space with 2GB size and ender user
couldn’t read it. The application files installed by APK will be stored here.
Inner storage 2 is 8GB size named D disk in OI file management.
USB type storage and TF card support max up to 32GB named C/E/F disk
3.2 How to use storage
Insert storage to corresponding slot, “Preparing SD card/USB device” will show
in left top of screen. Run OI file management to read these storages.
Caution: Before removing the storage, ensure all of files in the storage have been
closed. Otherwise, it is possible to break this storage; meantime, the unit will
close the running application to protect system.
4. Shake function
“Haptic feedback” could be set in the settings/Sound and display.
5. Orientation
The unit support switch orientation automatically when rotating device.

6. Network
Wire-line network:Insert network cable to RJ45 port, corresponding icon will
show in status bar on the top of screen. The unit could get the IP automatically to
connect network, or set IP manually. Tap “
settings image.
” to enter static IP
Wireless network: Tap“
”to enter Wi-Fi setting image.
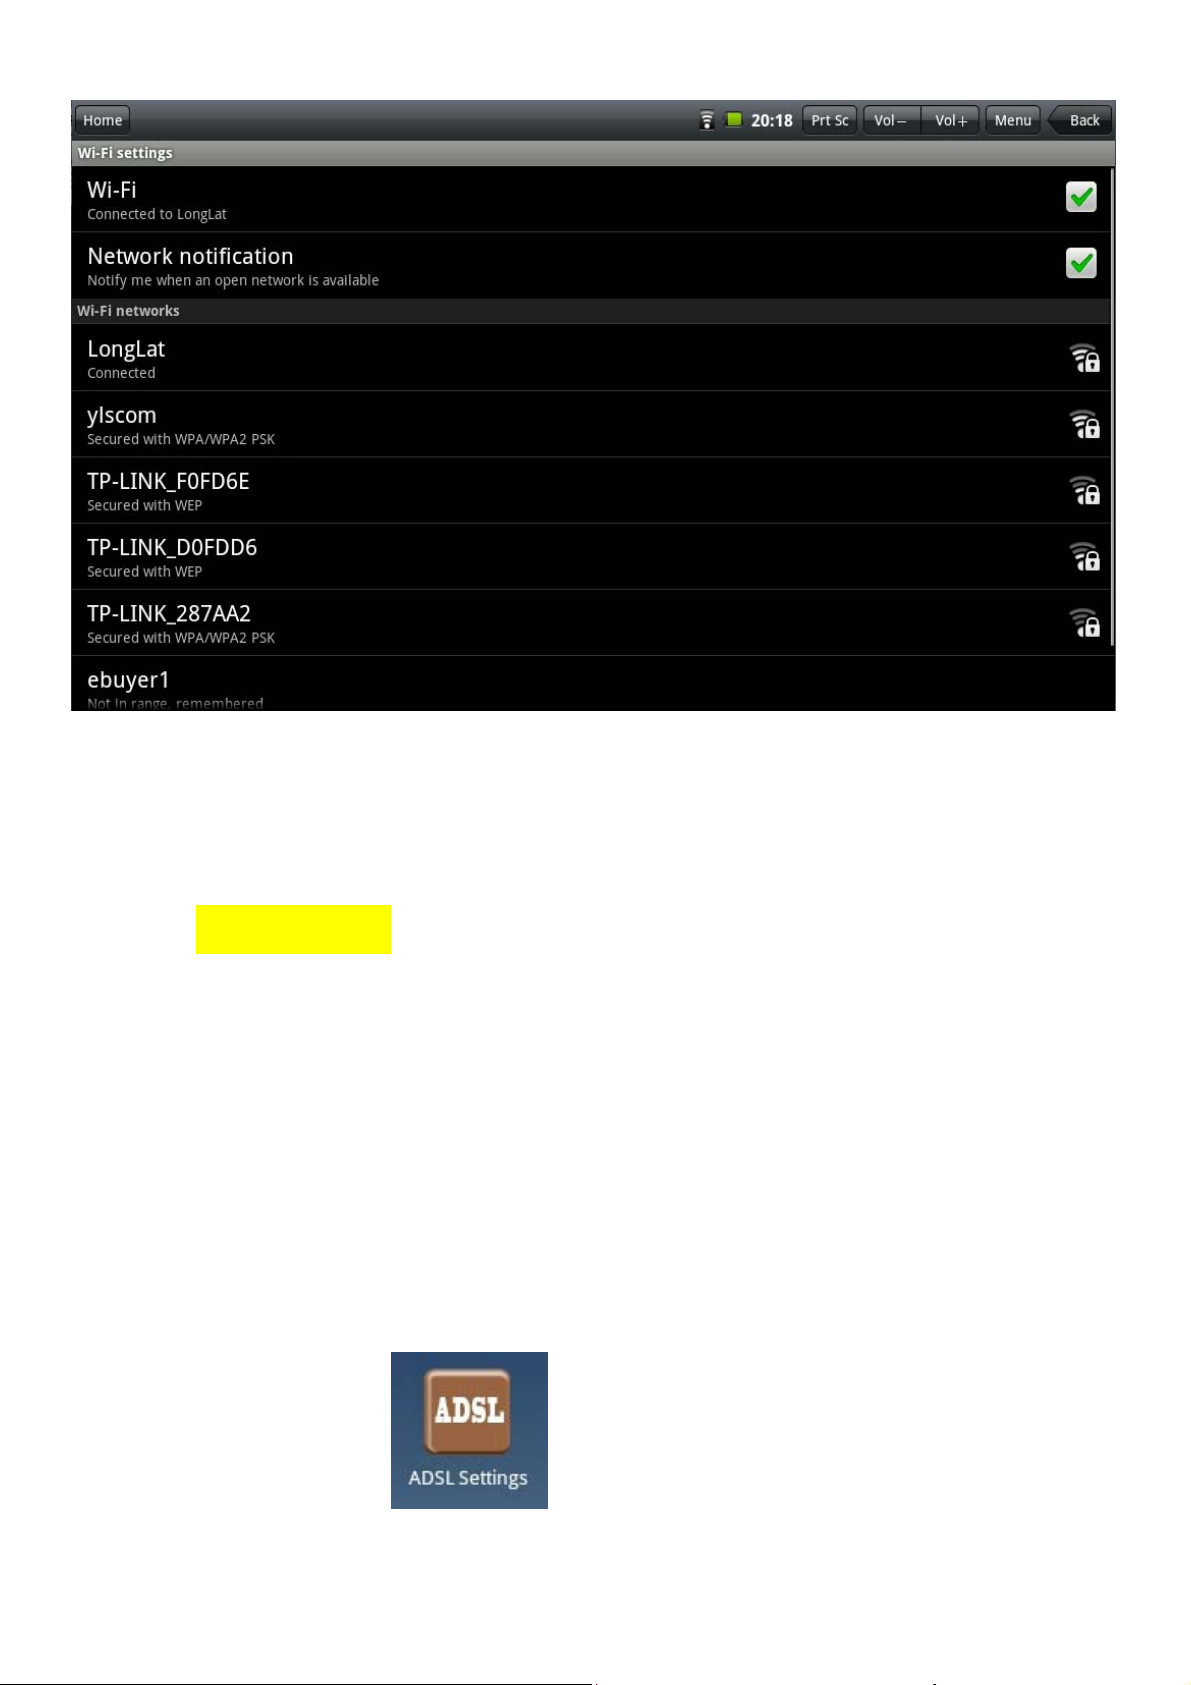
1. Turn on the Wi-Fi hardware button on the right top of unit;
2. Select “Wireless network” in the setting menu;
3. Click the check box of Wi-Fi to turn on.
4. Enter “Wi-Fi settings”, check all of AP which could be searched and select
one.
5. If this AP is connected successfully before, the details will be saved; just tap
“connect” in the pop up window, selecting “forget” will remove AP details.
6. If AP is encrypt ed, please input password of AP;
7. The wireless network icon will show in status bar after successful connection;
ADSL network: Tap “
”to enter ADSL settings, input User name
and Password to connect with network.

3G network: First of all, please purchase a 3G dongle with wireless internet card
from local telecom operator. Connect this dongle to USB port, the indicator of
dongle will light.
Tap “
the 3G icon will show in the status bar, connection is successfully.
” to enter 3G network settings. Select checkbox of 3G networks,
7. Input operation
7.1 Keyboard input
When application need input text or digit, the touch soft keyboard will show in
the screen.

Caution: The unit supports external USB keyboard, but some button in the
keyboard maybe couldn’t be used normally.
7.2 Touch screen input
Caution: Please don’t put object in the surface of touchscreen, maybe break it.
Long press and drag: Long press certain icon, which will turn light and could be
drag to anywhere of desktop.
The unit has touch pen to assist input.
7.3 External mouse input
Unit supports external mouse.
8. Desktop
8.1 Status bar and Quick bar
The top of screen is status bar, there are five software buttons: Home, Print
screen, Vol-, Vol+, Menu, Back; Some function status show here: 3G signal,
Wi-Fi signal, Network status, battery status, time etc…
The bottom is quick bar, there are 6 positions, End user could drag icon above to
quick bar.

8.2 Main menu
There are two modes for main menu: “Desk Widget mode” and “Application
mode”, switched by center button
.
Desk Widget mode Application mode
For “Desk Widget mode”, the icons could be drag to adjoining page; there are 3
continuous pages in this mode.
“Application mode” is in like manner. There is 1GB free space for third part
application to install. In this case, the page is up to amount of application, no
max limited.
8.3 Desktop settings
In Desk Widget mode, Press menu button, the shortcut menu will pop up. Menu
includes: Add, wallpaper, search, notifications, and system settings.
Add function could add shortcuts, widgets, gadgets.
Wallpaper function could select wallpaper from.

8.4 Notifications
Drag the status bar downward to get the notification image. Tap to back.
8.5 Desktop icon
Long pressing icon, this icon will turn light and could be drag to anywhere even
quick bar. Also could be drag to garbage in the quick bar to delete.
9. Website browser
Tap browser icon, type URL to connect to internet. Tap menu to open new
window, bookmarks, windows, refresh, forward, add bookmark, find on page,
select text, page info, share page, downloads, settings.
Download photo: long pressing the photo will popup the option menu, select
save photo.
Caution: The file will be saved in the folder named download in the storage.
Please delete the history of download in time, otherwise, it maybe effect
download speed or result in system abnormal.

10. Application manager and installation
10.1 Install and uninstall
The extension of installable file in android system is .APK, which could be down
load from internet directly. Run OI file manager, find the APK file, click to enter
installation image, follow installation wizard to finish the progress. Return to
main page, the icon of installed APK could be found in the desktop.
10.2 Application manager
Tap settings, select applications, select manage applications option, all of
application could be found here. The application could be uninstall here.
10.3 Progress manager
Tap settings, select applications, select running service option, all of running
application could be found here. If certain application is no need now, it could be
stop to release the memory space.
11. File manager
Tap OI file manager to enter file browser image, when 3 storages are insert into
unit, the image likes below:

Here D disk is inner storage.
11.1 New folder
Press menu button to add new folder to current directory.
11.2 Folder operation
Long pressing the folder, below option will popup:

11.3 File operation
Long pressing the icon of file, the below option will popup:

12. Typical application
12.1 Multimedia
Below player is preinstalled: CCPlayer audio/video player, Music, sound
recorder, Gallery, Photo Frame, YouTube.
Audio format supported as below:
avi/mp4/rmvb/rm/flv/mov/mpg/mpeg/mkv/asf/wmv/mpe/3gp/dat/vob/ts/tp/m4v;
Video format supported as below:
Mp3/wav/ac3/aac/ogg/ra/amr/m4a/wma.
12.2 Camera
Tap camera icon to enter operation image:
Tap
folder; Drag the switch in this icon
to take the picture, the photo will be saved in DCIM/Camera
upward to enter video from photo;
Tap the right top icon to preview the photo; tap
color effect, picture size, picture quality.
to set white balance,

12.3 HDMI
The unit support HDMI output to HDMI display device, such as TV set with
HDMI port. The max output resolution is 1080P.
1) Turn on the unit;
2) Connect unit with HDMI display device via HDMI cable, t urn on the display
device, HDMI notification will show in the status bar;
3) play the video file in the unit;
4) Press menu button, the unit will shutdown the screen; the video will switch to
HDMI display device. This progress needs 5s.
5) There are 4 methods to return to unit:
a) When the video done, the display will be return automatically;
b) Press the menu button, the video will return to unit;
c) Disconnect the HDMI cable, the video will return;
d) Press back button, the video will return to unit.
12.4 GPS location
If location accurate is to street level, please click the checkbox of Use GPS
satellites.
12.5 Calibration
Suggest make calibration regularly. The option could be found in setting image.

13. Important notes
13.1 Battery note
10” screen will consume large a lot of electricity. In order to extend battery
endurance, please reduce the use of below function:
1. Multimedia;
2. Bright display: reduce the brightness of screen in the settings/sound and
display;
3. AP search: this option could be found in settings/wireless and networks/ Wi-Fi
settings/ Network notification;
4. Wi-Fi: switch off the Wi-Fi button.
13.2 Release memory
The application is run ever, this application must take memory. If too many
applications run ever, this will affect speed of unit. In this case, it is best to stop
useless application in time to save memory.
13.3 Forced shutdown
1. Long press power button for 7s, the unit will forced shutdown;
2. Press the reset button in the bottom of unit, the unit will forced shutdown.

13.4 Factory data reset
This option could be found in settings/Privacy/ Factory data reset.
Caution: select factory reset will format the inner storage 1. the Google account,
data and setting of system and application, application download etc. Please use
with caution.
13.5 About save path
The photo and video took by camera function will be saved in /DCIM/Camera
folder;
The picture took by print screen will be saved in /Screenshot folder;
The picture download from website will be saved in /download folder.
pay special attention:
The power input is 9V/2A, please no use other spec!

FCC WARNING
This device complies with Part 15 of the FCC Rules. Operation is subject to the following two conditions:
(1) this device may not cause harmful interference, and
(2) this device must accept any interference received, including interference that may cause undesired operation.
NOTE 1: This equipment has been tested and found to comply with the limits for a Class B digital device, pursuant to part
15 of the FCC Rules. These limits are designed to provide reasonable protection against harmful interference in a
residential installation. This equipment generates, uses and can radiate radio frequency energy and, if not installed and used
in accordance with the instructions, may cause harmful interference to radio communications. However, there is no
guarantee that interference will not occur in a particular installation. If this equipment does cause harmful interference to
radio or television reception, which can be determined by turning the equipment off and on, the user is encouraged to try to
correct the interference by one or more of the following measures:
- Reorient or relocate the receiving antenna.
- Increase the separation between the equipment and receive r .
-Connect the equipment into an outlet on a circuit different from that to which the receiver is connected.
-Consult the dealer or an experienced radio/TV technician for help.
NOTE 2: Any changes or modifications not expressly approved by the manufacturer could void the user’s authority to
operate the equipment.
NOTE 3: The manufacturer is not responsible for any radio or TV interference caused by unauthorized modifications
to this equipment. Such modifications could void the user’s authority to operate the equipment.
 Loading...