

Page 1
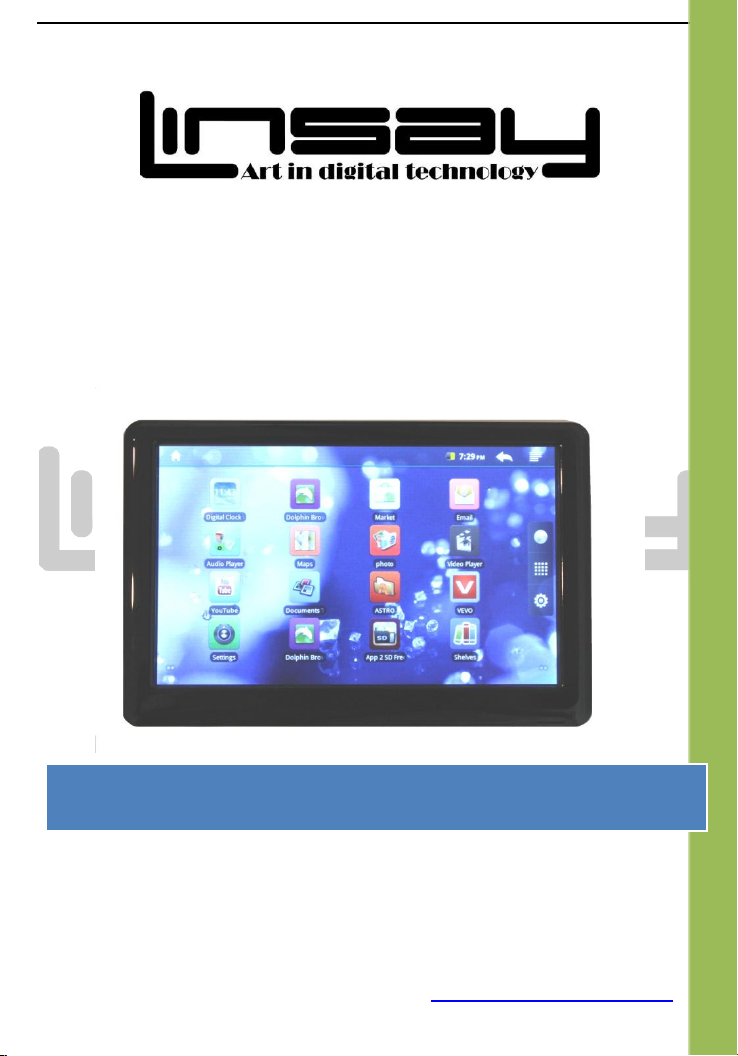
5” Tablet PC ANDROID
V-5HD
User Manual
Page 0 of 51 www.LINSAYdigital.com
Page 2
FCC Class B:
Note: This equipment has been tested and found to comply with the limits for a Class B digital
device, pursuant to part 15 of the FCC Rules. These limits are designed to provide
reasonable protection against harmful interference in a residential installation. This
equipment generates uses and can radiate radio frequency energy and, if not installed and
used in accordance with the instructions, may cause harmful interference to radio
communications. However, there is no guarantee that interference will not occur in a
particular installation. If this equipment does cause harmful interference to radio or television
reception, which can be determined by turning the equipment off and on, the user is
encouraged to try to correct the interference by one or more of the following measures:
- Reorient or relocate the receiving antenna.
- Increase the separation between the equipment and receiver.
- Connect the equipment into an outlet on a circuit different from that to which the receiver is
connected.
- Consult the dealer or an experienced radio/TV technician for help.
NOTICE:
1. The changes or modifications not expressly approved by the party responsible for
compliance could void the user’s authority to operate the equipment.
2. Shielded interface cables and AC power cord, if any, must be used in order to comply with
the Emission limits.
3. The manufacture is not responsible for any radio or tv interference caused by unauthorized
modification to the equipment. It is the responsibilities of the user to correct such interference.
This device complies with Part 15 of the FCC Rules. Operation is subject to the following two
conditions: (1) this device may not cause harmful interference, and (2) this device must
accept any interference received, including interference that may cause undesired operation.
Page 1 of 51 www.LINSAYdigital.com
Page 3
Catalogue
1. Basic Functions..............................................................................................................................4
1.1 Hardware Configurations……………………………………………………………………………...4
1.2 Software Configurations……………………………………………………………………………….4
2. Descriptions of device....................................................................................................................5
2.1TouchScreen…………………………………………………………………………………………….6
2.2 Home Key…………………..……………………………………………………………………………6
2.3 ChargingIndicator………………………………………………………………………………………6
2.4 BackKey………………………………………………………………………………………………….6
2.5 Mic Hole………………………………………………………………………………………………….6
2.6 T-FlashCard……………………………………………………………………………………………..6
2.7 MiniUSB…………………………………………………………………………………………………..6
2.8 PowerSupplySwitch…………………………………………………………………………………….6
2.9 Earjack……………………………………………………………………………………………………6
3. First-timeUse..................................................................................................................................6
3.1Battery Management and Charging…….…………………………………………..…………………6
3.2Open/Close MID Device………………………………………………………………………………..6
3.3Connect to PC……………………………………………………………………………………………6
4. Basic Operationsof Device.............................................................................................................6
4.1 Description of Main Interface ………………………………………………………………………....6
4.2 Description of Menu Interface…………………………………………………………………………8
4.3 Description of Status Bar………………………………………………………………………….....8
4.4Use Touch Screen……………………………………………………………………………………….8
5. Basic Settings of Device.................................................................................................................9
5.1Wireless Control………………………………………………………………………………………..10
5.2Sound and Display…………………………………………………………………………………….11
5.3Safty and Location…………………………………………………………………………………….12
5.4Applications…………………………………………………………………………………………….13
5.5SD Card and MID Storage…………………………………………………………………………….13
5.6Date and Time…………………………………………………………………………………………..14
5.7Region and Text………………………………………………………………………………………..14
5.8Touch Screen Calibration……………………………………………………………………………..15
5.9USB Model Selection………………………………………………………………………………….15
6. Software Installation and Management. ......................................................................................16
6.1APK Installer……………………………………………………………………………………………17
7. Software Application and Operation............................................................................................19
7.1Image Browse…………………………………………………………………………………………..20
7.2Music Play……………………………………………………………………………………………….21
7.3Video Play……………………………………………………………………………………………….23
7.4WebBrower ……………………………………………………………………………………………..24
7.5 Email……………………………………………………………………………………………..……...25
8. Troubleshoot................................................................................................................................26
Warranty..........................................................................................................................................26
Notice
Page 2 of 51 www.LINSAYdigital.com
Page 4
This manual contains important safety precautions and information of correct use. Please be
sure to read this manual carefully before use so as to avoid any accidents.
Please do not place the product in hot, wet or dusty environment.
Please do not place the product in hot environment. Especially in summer, do not place it in a car
with all windows closed.
Avoid droping or clashing the product and not shake the TFT screen voilently, or it may cause a
damage or adnormal display to the screen.
Please select a suitale volume and avoid loud sound while using earphones. Please turn down
the volume or stop using if you get a roaring in your ears.
For following situations, please charge the product.
A. The icon of the battery shows without power
B. System automatically shut down, and it turns off soon after restart.
C. Operation key shows no reation.
D. The device shows on the top right corner.
[Notes]: Chargers of other models cannot be used for this device because it may cause an
burnout, which we are not responsible for. Please contact with our relevant department if
you need original chargers.
Please do not disconnect the device while formatting, downloading and uploading, or it may
cause application errors.
We are not responsible for any memory erase loss caused by damage or maintain the product,
or other personal reasons.
Please do not disassemble the product personally, and avoid cleaning the product with ethyl
alcohol, thinner, or benzene.
Do not use this product in the areas which prohibite use of electronic devices, for example, on an
airplane.
Please do not use this product while driving or walking in the street, or it might cause a car
accident.
USD can only used for data transmission.
※ We reserve the right to improve the product. Specification and design of the product are subject
to change without prior notice!
★ This device does not support waterproof function.
[Notes]: All images on this manual are only for reference! Specification and appearance of
the products are subject to change without prior notice!
1. Basic Functions
Page 3 of 51 www.LINSAYdigital.com
Page 5
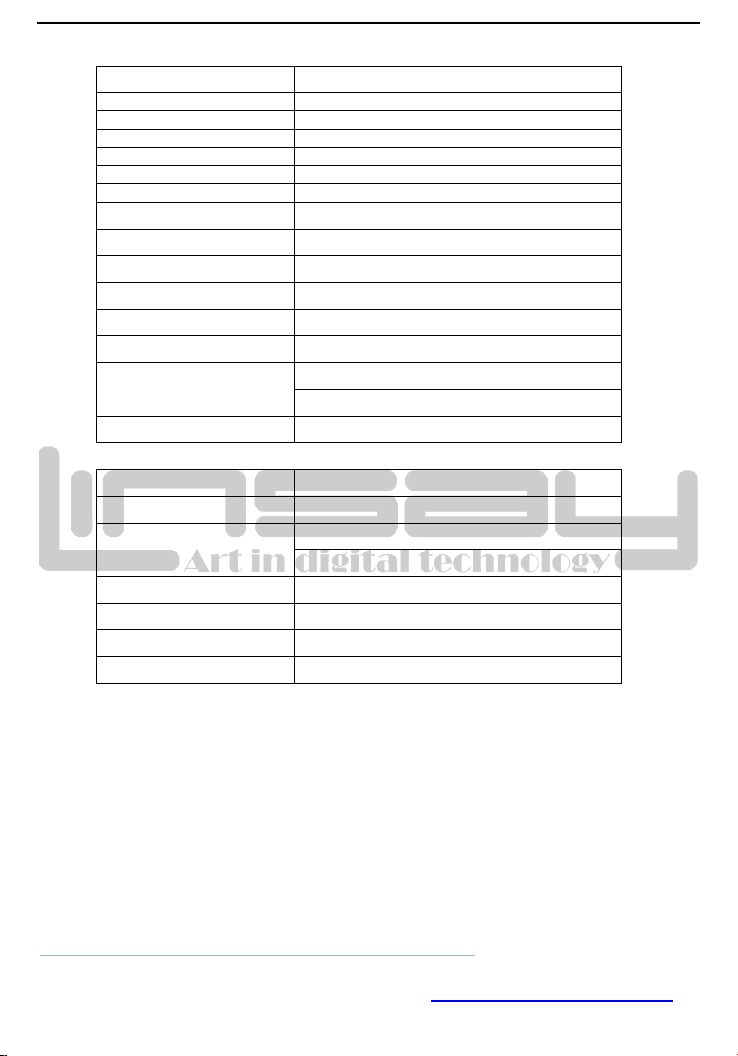
1.1 Hardware Configurations
Dimensions(HxWxD)
127.2*82.9*14.3MM
Weght
157g
CPU Processor Speed
Memory/ROM
4GB
Memory/RAM
256MB
Memory/Slot
T-flash
Color Display
5”TFT LCD with Resistance Touch Screen
Resolution
800x480 Pixels
Battery Type
Rechargeable Polymer Battery
Battery Capacity
1500mAH
USB
Yes(Mini USB 2.0)
Speaker
Yes
G Sensor
Yes
I/O ports
Mini USB 2.0,T-flash,3.5mm Headphone,
Build-in Microphone
Wireless Interface
WiFi:802.11b/g wireless Lan
Operating System
Android 2.2
Browser
Dolphin Browser
Video
MKV(H.264 HP),AVI,RM/RMVB,FLV,
MPEG-1,MPEG-2
Music
MP3,WMA,APE,FLAC,AAC,AC3,WAV
Photo
JPEG,BMP,GIF,PNG,TIFF
Email
Gmail
GPS
Google map
1.2 Software Configurations
RockChip 2818 (533MHz)
2.Descriptions of Device
Page 4 of 51 www.LINSAYdigital.com
Page 6
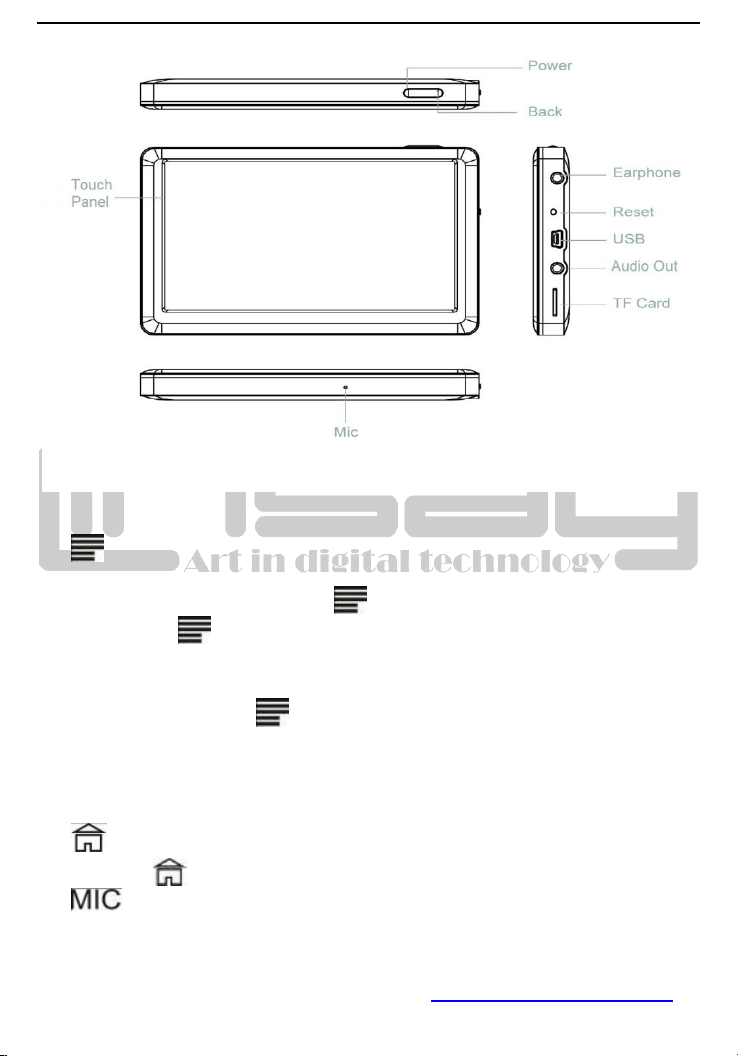
2.1 Touch Screen
• 5” resistance touch screen to support click and drag in the touch region.
2.2 Home Key
• Press and hold on to turn off the MID device.
-- Starting up: with power switch ON, press key to enter the main menu interface.
__Shutdown: press key and hold on for 5 seconds in the main interface. The system will point
out MID selection: Quiet Mode and Shutdown. MID will shut down normally after click
Shutdown.
• Enter Power Saving Mode
-- Power saving standby: press to enter the state of power saving standby.
[Notes]:1 System will shut down automatically under the status of low battery.
2 System will scan and repair disc automatically when restarted after illegal shutdown, and
the interface will stay in the image of progress bar for a while.
2.3 Charging Indicator
• The charging indicator turns on while charging.
2.4 Back Key
• Short press the key to back to previous menu interface.
2.5 Mic Hole
• MIC voice input.
2.6 T-Flash Card
Page 5 of 51 www.LINSAYdigital.com
Page 7
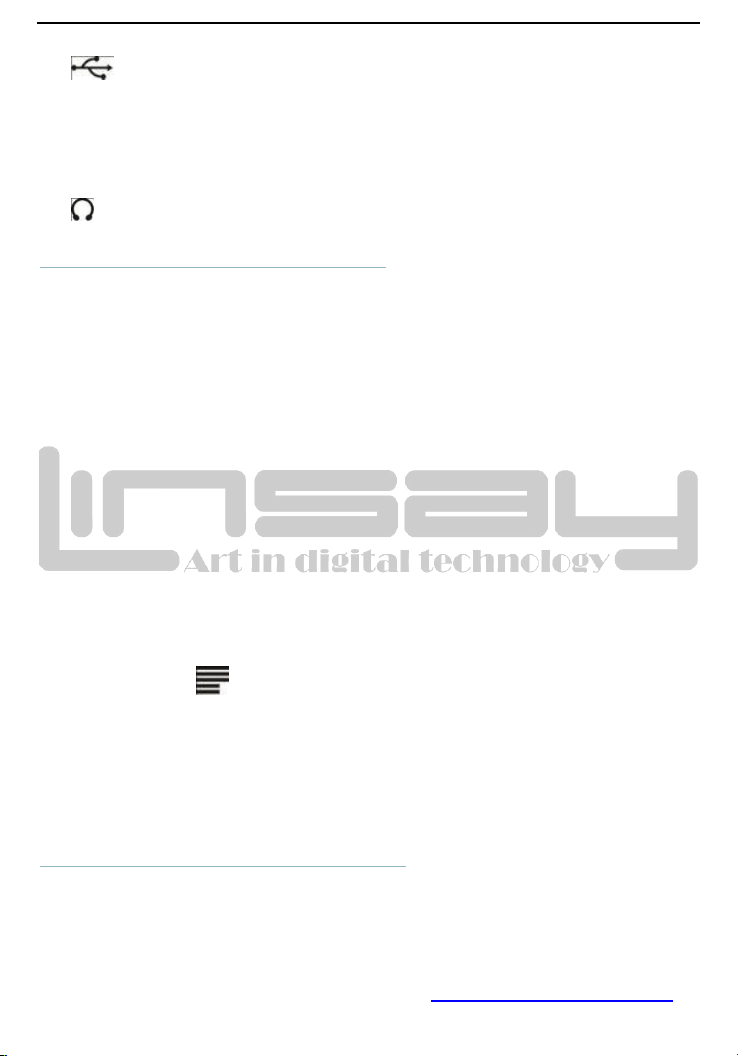
• T-Flash slot: connect to T-Flash memory card.
2.7 MiniUSB
•Mini USB: connect with computer and transmit data or connect with mouse or other external
equipments.
2.8 OFF/ON Power Switch
• Turn ON/OFF switch to open/cut off power supply
--Turn the switch to “ON” to open power supply
--Turn the switch to “OFF” to cut off power supply
2.9 Earjack
• 3.5mm standard earjack
3. first-time Use
3.1 Battery Management and Charging
For initial use, please make sure to fully charge the battery of device.
• Just plug in the charger/adaptor into the USB socket to enter the charging state.
• Make sure the charging time to be about 10 hours for the first two times to use, and be about 3
hours in future use.
[Notes]: An inner setting lithium polymer battery is applied in this device. Please sellect a
specialized charger to charge the device.
-- Battery icon will scroll while charging.
--For the first two times to use, we suggest to charge the device after the power is used up, so as to
extend the service life.
-- Please make sure to turn off the power switch when not using the device.
[Notes]: 1. If do not use for a long time, please make sure to charge and discharge the
battery for once within one month to avoid damage caused by overuse of battery.
2. When the device is shut down due to low power, the device will indicate that the
power is critically low and it is charging now. Please wait for a while at this moment. It will
enter the main interface automatically when the device gets enough power.
3. Please make sure to charge the inner setting lithium polymer battery regularly.
Damage caused by overuse of lithium polymer battery is not covered by player warranty
range. A problem caused by using an unspecialized charger is also not coverd by player
warranty range.
3.2 Turn on/off
Press and hold on the key to turn on/off the device. See also the description of device.
3.3 Connect to PC
Just use the USB cable provided by random to connect the device and PC to achieve USB power
supply or USB data transmission.
• Entered USB flash disk mode, one can copy or delete the files of player on the PC.
• DRV catalogue is the driver of USB network.
[Notes]: 1. System will shut down automatically under the status of low battery.
2. System will scan and repair disc automatically when restarted after illegal shutdown, and
the interface will stay in the image of progress bar for a while.
4. Device Operation Interface
4.1 Description of Main Interface
Enter into the main interface when is turned on .
You are allowed to do the following operations
Page 6 of 51 www.LINSAYdigital.com
Page 8
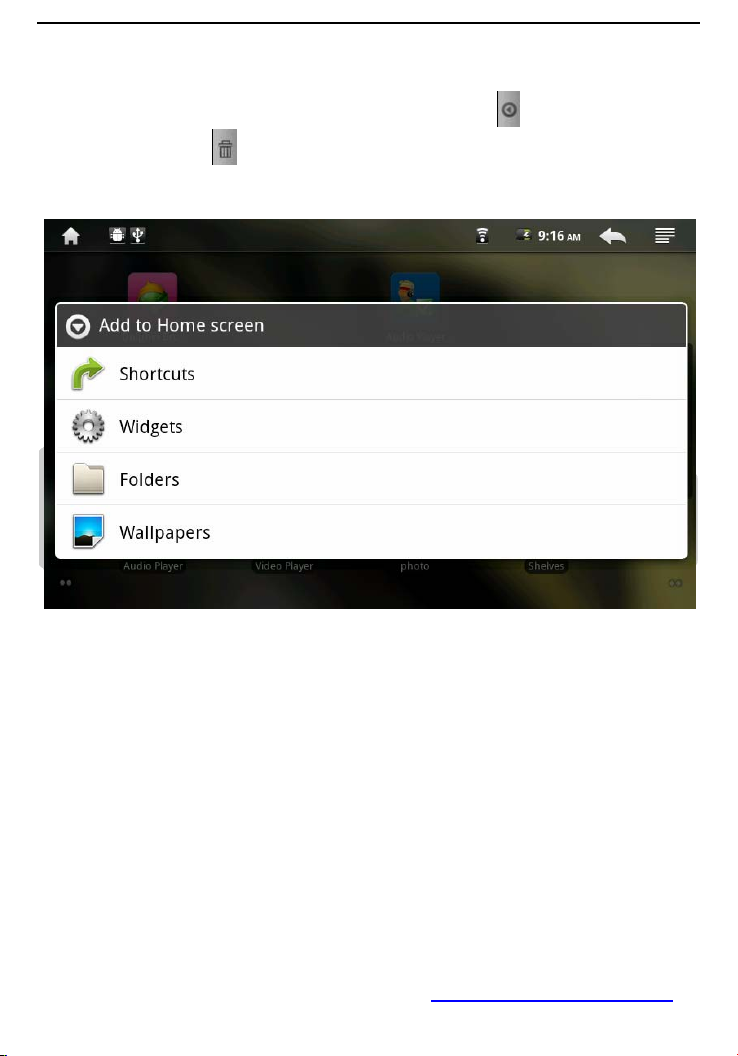
• Manage the icon of software in the main interface
-- Add a software shortcut: Move the software icon in the menu interface to the main interface , then
you can add a shortcut.
-- Delete a software shortcut: Press the main interface software icon for a long time , then it will
show the mark of Dustbin , move the software icon to the dustbin until the mark become red ,
loosen the touch screen, then you can delete the shortcut of software successfully.
Long press the touch screen, and then it pops up “add into homepage screen window”.
-- Shortcuts:
- Applications:
- Gmail label:
-Bookmarks: enter the website
-Music Playlist: enter the music playlist
-- Widgets:
-- Search: Add Google seach engines into desktop
- Calendar: Add calendar into desktop
- Analog clock: Add analog clock into desktop
- Music: Add music play key into desktop
-- Folders:
- New folder: add a new folder into desktop
- Wallpapers:
- Pictures
- Wallpapers library
4.2 The description of menu interface
Page 7 of 51 www.LINSAYdigital.com
Page 9
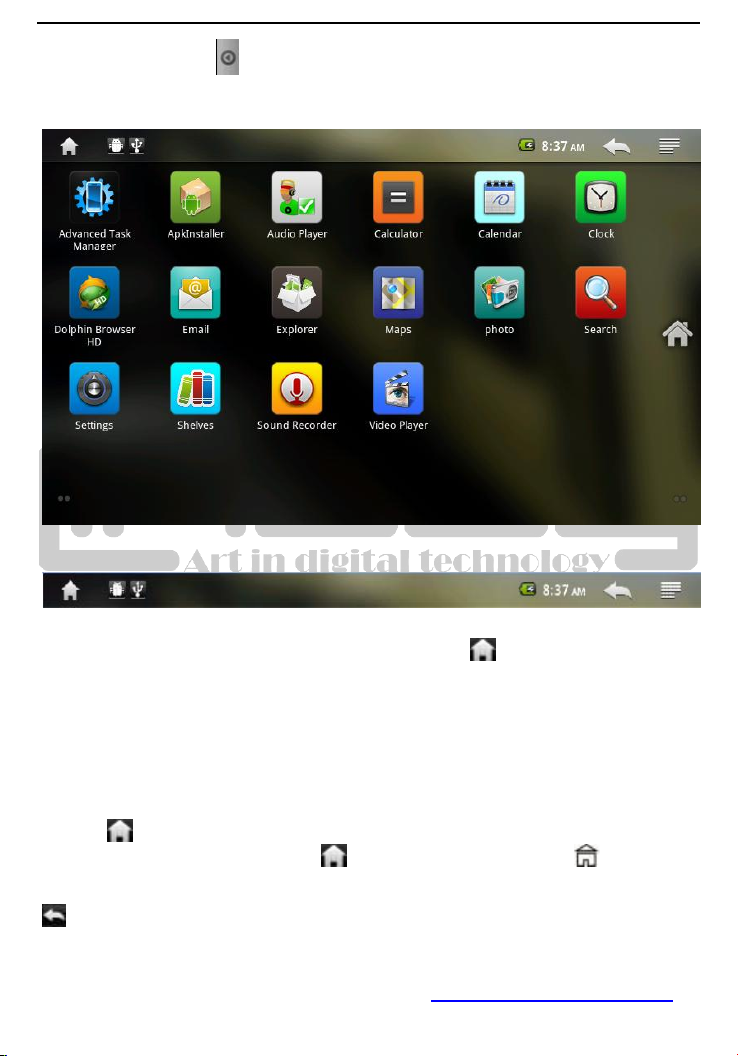
Through pressing the icon directly , you can enter into menu to choose the options you
need.such as APK installer , email , music , settings,alarm clock, browser,youku, Daniu news and
so on.
4.3 Description of Status Bar
• The status bar locateS in the top side of screen
- The top left side show the information such as Main screen key , T-Flash card, the status of
USB connector and so on
--The top right side show device’s WIFi singal, silent mode, wifi connect status, the battery
electricity , the status of battery charging , current time , Volume-key, volume + key, menu key and
back key and so on.
4.4 Use of Touch Screen
The LINSAY V-5HD Tablet have installed a 5” touch screen , The following description will show the
control area of the main touch srceen and introduce how to use the touch screen.
•No matter which interface are you in, you can return to the main screen directly by touching the
menu key lightly which locates in the top left side of screen.
Notes: The function of main menu key equals to that of the back key in the
machine.
•In different applications, you can return to the last layer of this interface by touching the back key
in the top right side of screen.
• In different applications, through touch the menu key in the top right side of screen , then it will
pop-up the relative operation and set-up interface.
Page 8 of 51 www.LINSAYdigital.com
Page 10
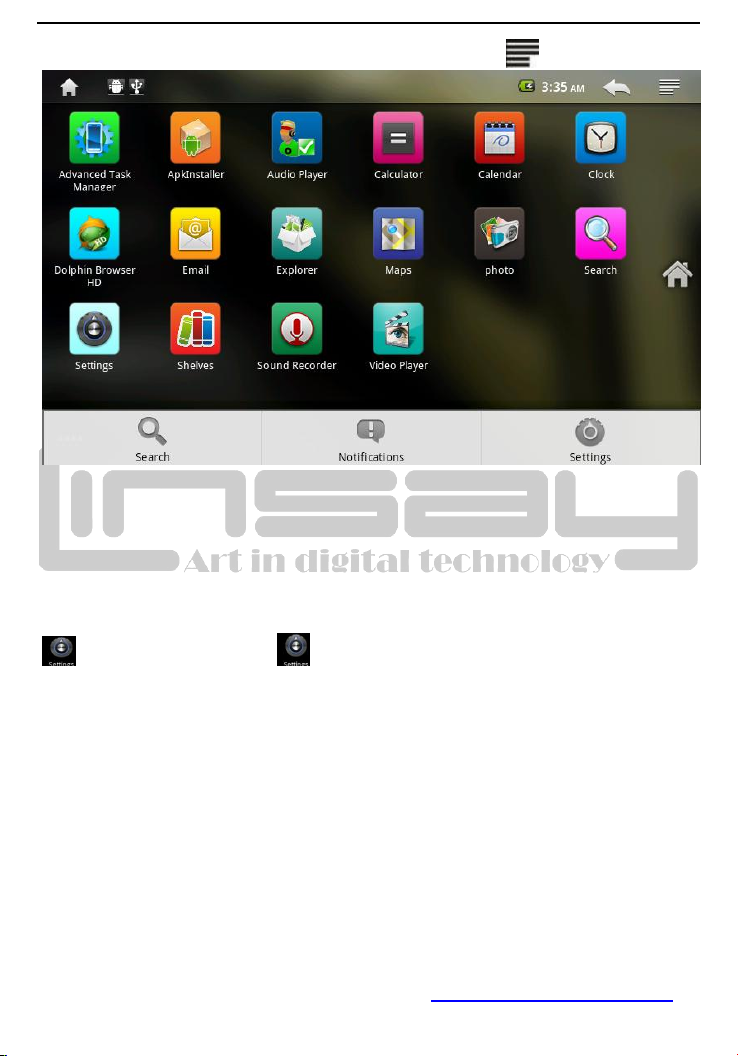
Note: Menu key in the touch screen equals to the menu key in the machjne.
•In the main menu interface , you can run a software by touching the software icon lightly
• In different browser ( file, music, video, and picture browser), you can move the scroll bar up and
down to scorll the file list up and down . you can scroll the list quickly by touching the scroll bar
cursor up and down.r
• In the internet browser and PDF reader, you can scroll the page up and down by touching the
page and move it up and down.
5. Basic Settings of Devices
set-up: Press the set-up icon in the menu page to enter into set-up interface.
Page 9 of 51 www.LINSAYdigital.com
Page 11
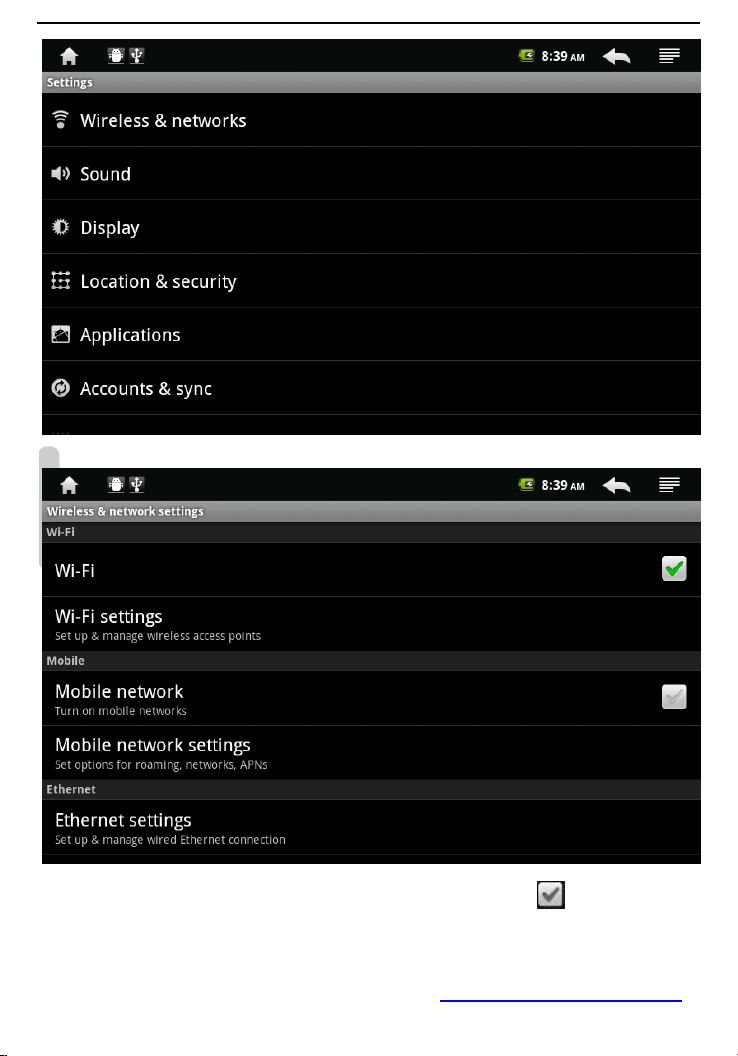
5.1 wireless control. Manager wifi set-up to connect wireness network.
• Wi-Fi: Turn on or Turn off WiFi.
-- When WiFi mentions “ Turn on WiFi” , and the icon in the right shows , it means WiFi is in
the closed position
--Click WiFi, and the status mention that it is turning on … , and the icon in the right side shows
Page 10 of 51 www.LINSAYdigital.com
Page 12
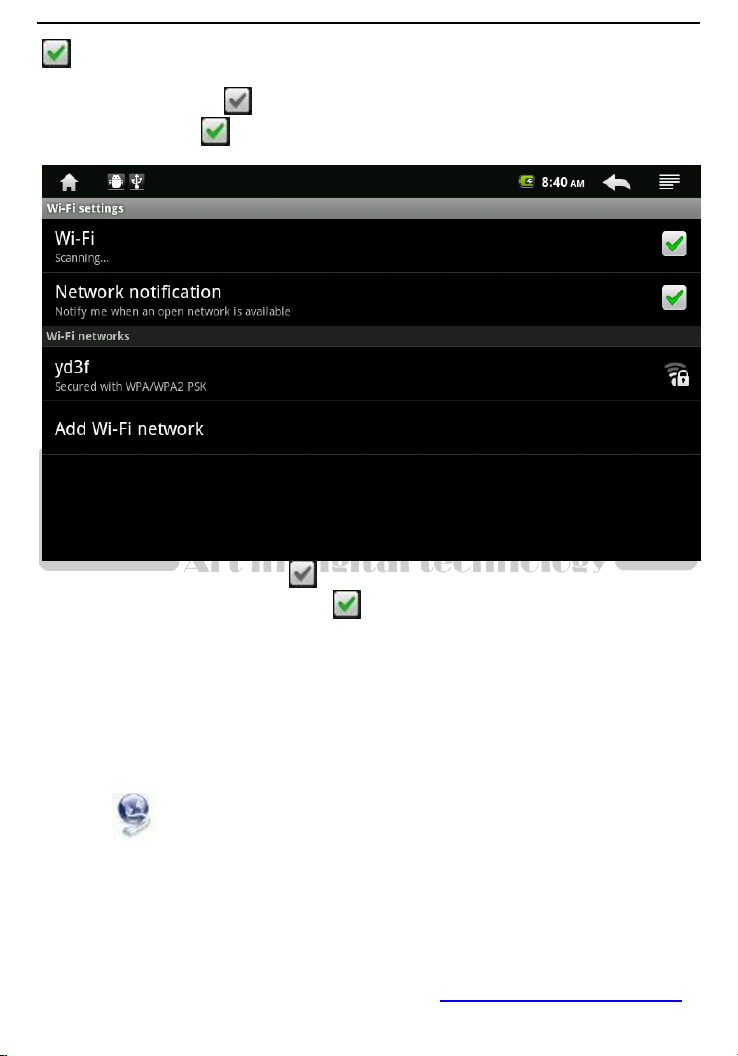
, it means that WiFi is in the open position.
Note: In the set-up of this device, other than the follwing additional description
- The right icon shows , it means that the option is in close position.
- The right icon shows , it means that the option is in open position.
• Wi-Fi Set-up: to set up and manage wireless access point
-- Network notice that the right icon is , it means that automatic scanning is in the close position.
-- Click Network notice, the right icon shows , it means that scanner is in the open position , the
deive will seach automaticly and add the nearby WiFi network which can be connected. Click
wireless network port , then you can connect network. After connectiong successful , the WiFi
set-up icon will show have connected to ……, it means that the device have connected to network
successfully.
--As to the WiFi router which have been connected before, this machine will keep record
automaticly, if you need to connect again in the future , you just need to turn on WiFi in the WiFi
set-up , or choose this WiFi router then connect it. When the status of WiFi set-up is open ( showing
turn off WiFi), the machine will search the WiFi router automaticly and then connect to it when the
device is started up each time.
Notes: You can enter into Wi-Fi set-up directly by pressing the icon network connect
manager
5.2 Sound and display
You can set up the tone, notice and the brightness of screen.
• Silent mode: All sound will become silent except for Media and alarm.
• Loudspeaker mode: you can use loudspeaker
•The volume of ring: you can set up the volume of ring.
•The volume of media: Adjust the volume of media by clicking the move point to right and left
•Notice Tone: set up the default notice tone.
Page 11 of 51 www.LINSAYdigital.com
Page 13
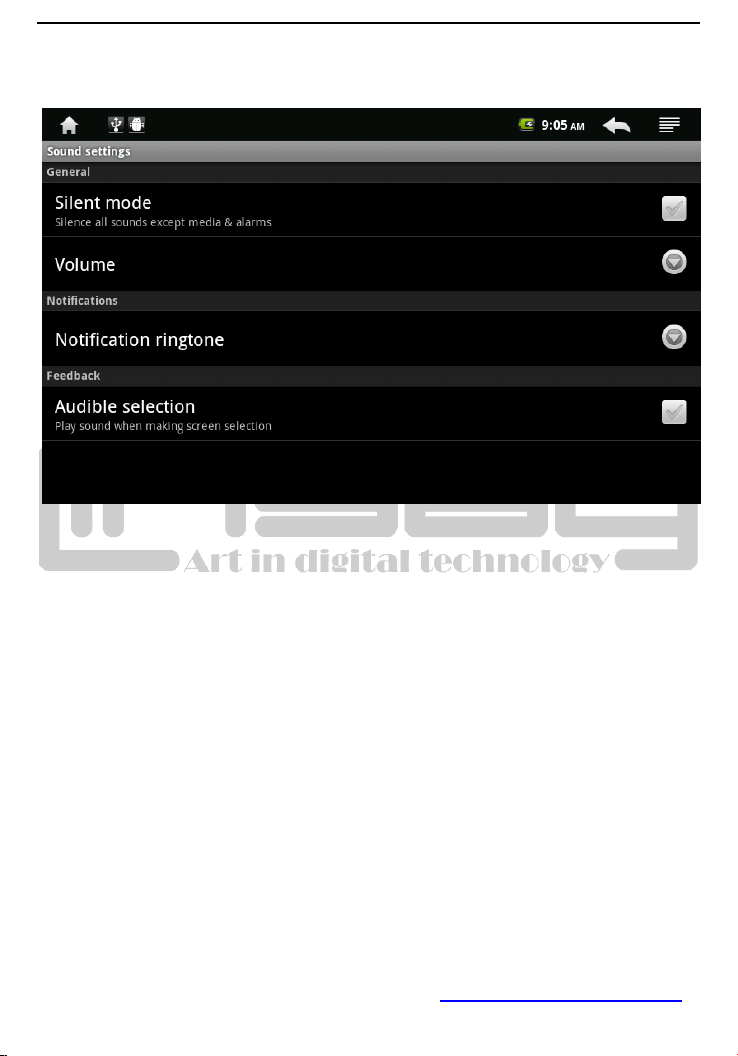
• The choose of operative tone: there are sound when you choose the screen.
• SD card notice: the volume of the prohibition of SD card/
Notes: The volume of ring , notice ring, operative sound operation , SD card notice are used to
cellphone system , in system , it will show absent.
• Direction: it will change the direction automaticly when you rotate the MID
•Cartoon: it will show cartoon when you open or close a window.
• Brightness: Adjust the brightness of screen by moving the point to left and right.
•Standby of screen: before turn off the machine automaticly, it will adjust to delay the turning off.
There are 6 kind of time for your choose such as 15 seconds, 30 seconds,1 minute, 2 minutes, 10
minutes.
5.3Safety and Location to set up my location and password
Page 12 of 51 www.LINSAYdigital.com
Page 14
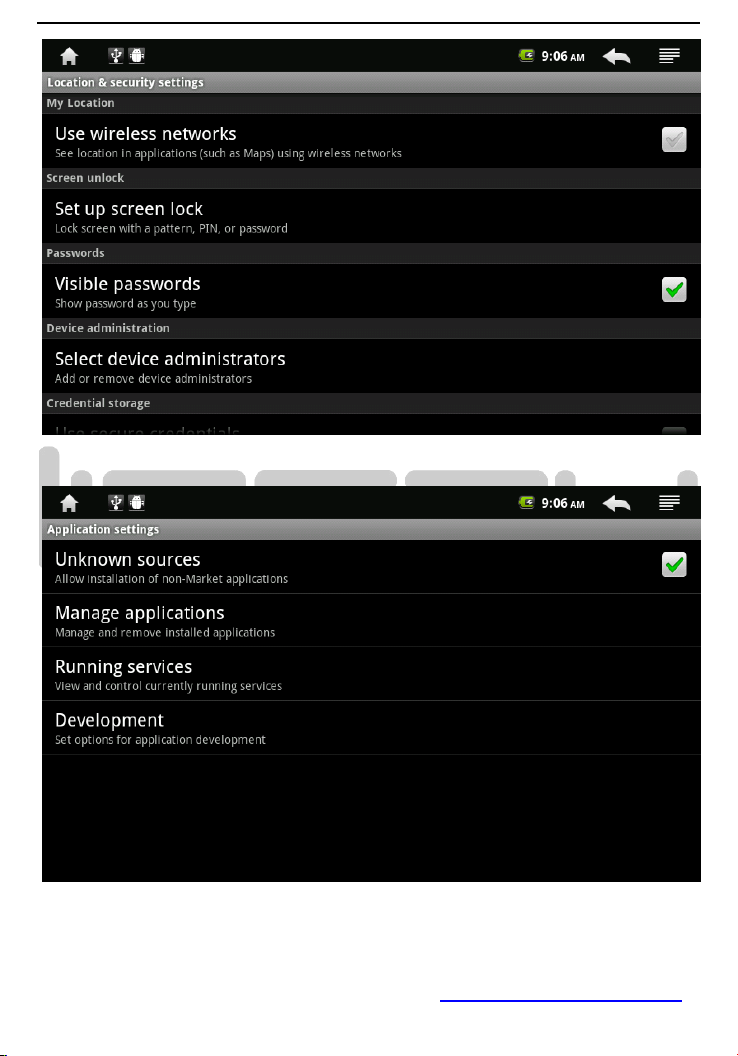
. Use of wireless network: you can check the location of application by using wireless network.
• Visible password: it will show your password when you typing them
5.4 Applications: manage application, set up shortcut directly.
• Unknown source: you can choose whether it is allowed to install non-market applications.
• Quick start-up: set-up the keyboard shortcut in the running applications
• Manage applications: Managing and deleting the installed applications
• Explore: set up the explore option in the applications.
5.5 TF card and V-5HD save: remove TF card to see the available memory space.
Page 13 of 51 www.LINSAYdigital.com
Page 15
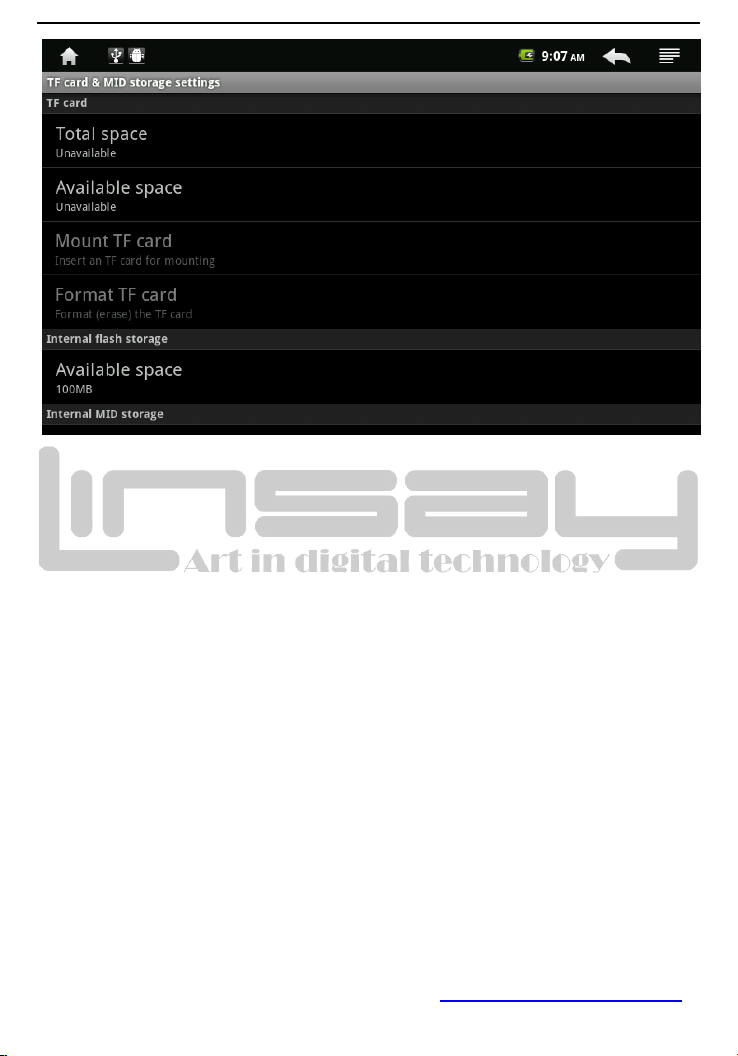
Notes: pls removing the TF card by the opotion delete the TF card safely in case of damaging
the device by remove it directly.
5.6 Date and time Set up date, time , time zone and formality
•Set up date and time: Enter into the interface of date settings to set up the date.
• Select time zone: enter into the interface of choosing time zone to set up the time zone.
• Set up time: Enter into the interface of time settings to set up the time.
• set up 24 hour formality : set up the formality of displaying time
•Select the formality of showing date: you can choose different formality to show date.
5.7 Area and text -Set up the option area ( language and are), text typing and correct automaticly.
Page 14 of 51 www.LINSAYdigital.com
Page 16
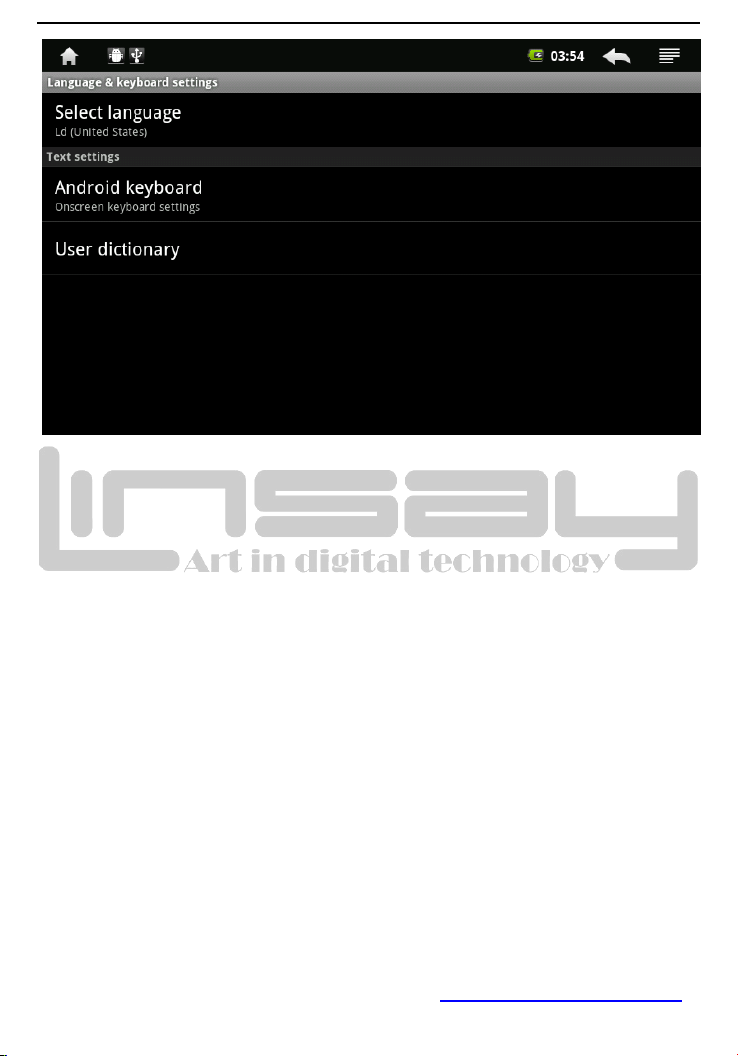
•Select area: 54 kinds of language for your choose
• Android keyboard:
• Android keyboard: Android keyboard settings
--make sound when click
-- Show capital letters automaticly
--Show suggestions: show the suggestive word and type it out
-- Auto-complete: comeplete space, point and insert focus words automaticly
-- The sound of click
--Associating Input
•. set up the keyboard: built-in keyboard settings
-- Auto-replace: correct wrong words
Auto-capital: Correct the first word of the sentence to be capital .
Punctuate automaticly: press space key two times to insert punctuation
• Dictionary of user: Add or delete words and sentences to the dictionary of user.
5.8 The carlibration of touch screen: carlibrate the touch screen.
• After entering into the option of carlibration of touch screen , you can touch the + singal which
appeared in the top right corner, top left corner , bottom right corner , bottom right corner and the
central .
5.9 Selection of USB mode: choose the workable mode of USB: HOST/SLAVE……
• Host mode: choose use work in the host mode, under this mode, you can plug U card.
5.10 About LINSAY V-5HD
You can look up the relative law information and the status of MID and the editon of software.
Page 15 of 51 www.LINSAYdigital.com
Page 17
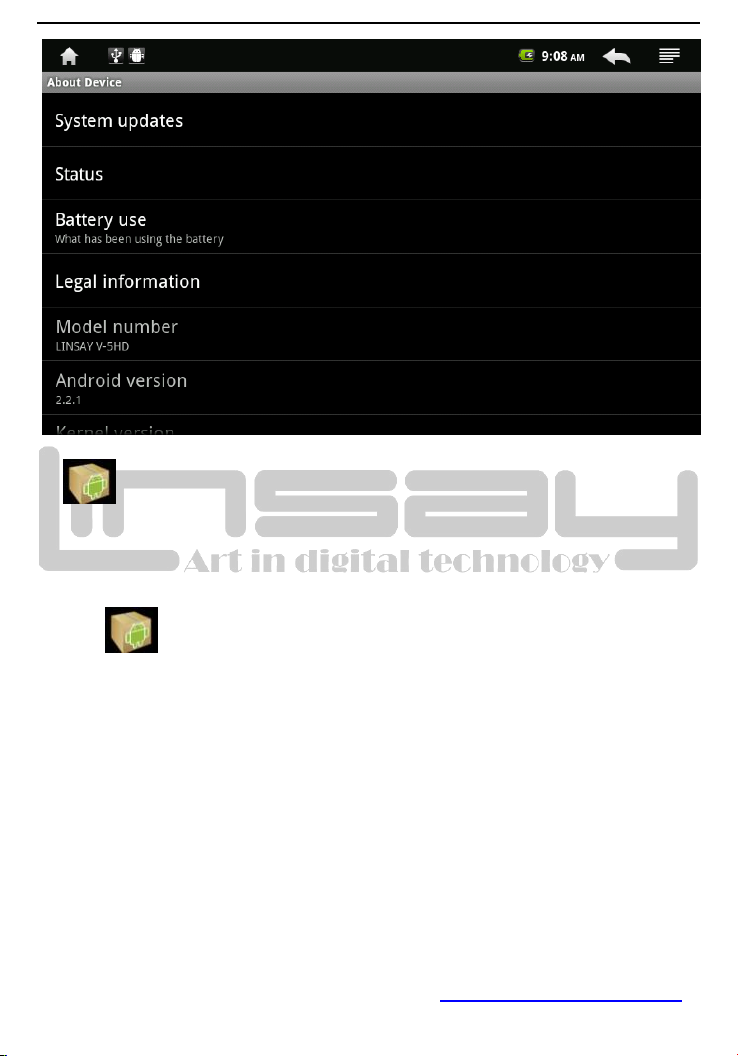
6. Software Installation and Management
6.1
APK Installer (Application Installer)
This device supports the third party’s applications on the basis of android platform. Most of the
applications can be downloaded from the website, and copoed into the flash or SD card of this
device.
Click the“ ” and the Apk installer selections pop up: Installer, Manager, and Exit.
Page 16 of 51 www.LINSAYdigital.com
Page 18
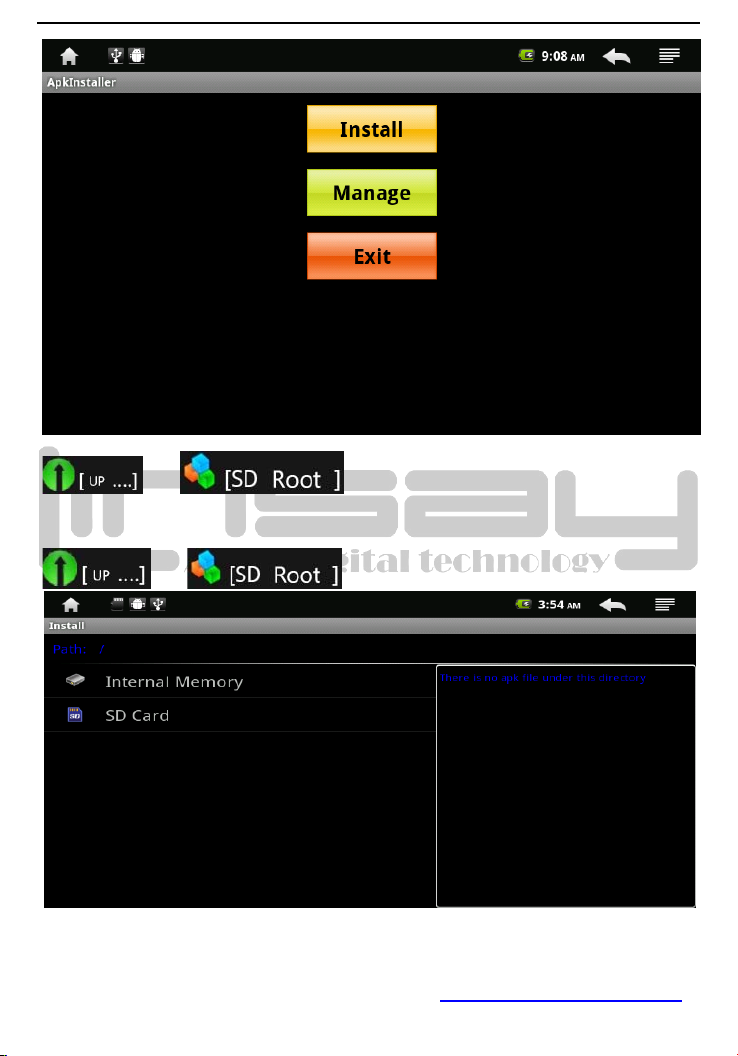
• Installation Installer: Click the Install Installer, enter the Apk installation interface.
and Correspond to the flash disk and SD card storage
control.
Select the format inside the APK setup, click on the installation, operation is completed and returned
to the main interface, that is, the corresponding software menu.
and
• Manager:click Manager,Access to third-party software interface.
Page 17 of 51 www.LINSAYdigital.com
Page 19
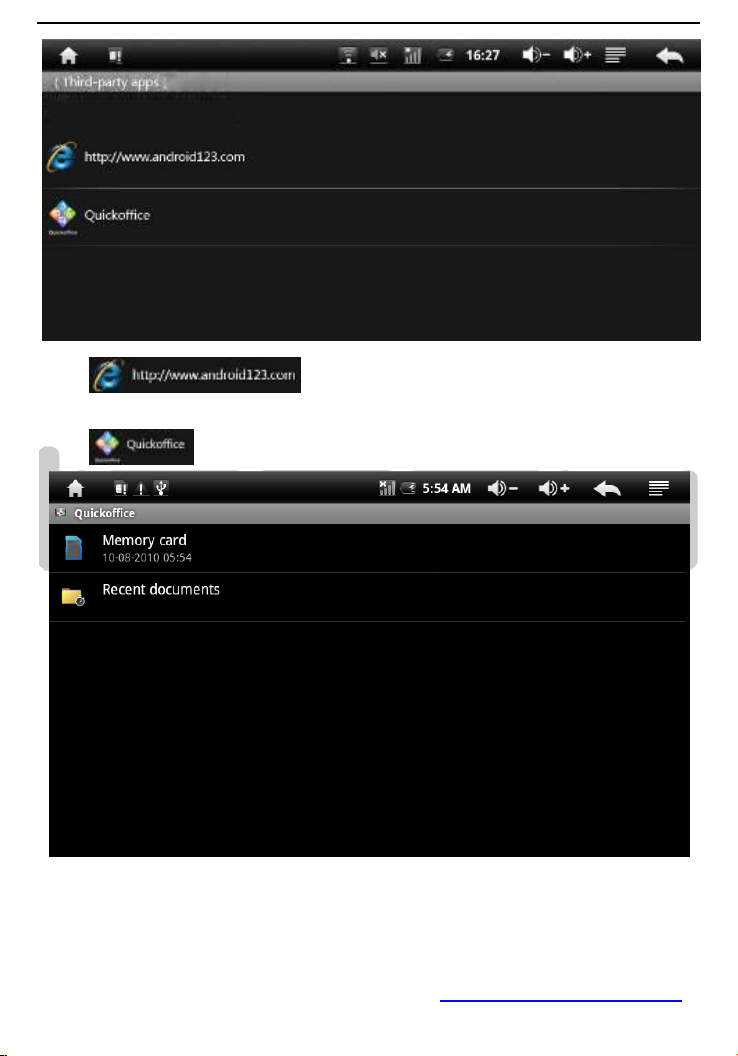
-- Click Visit the official website APK installer, point to "immediately
(Go)" into the official website. Into the official website can browse the latest Android news, Android
phone, Android video, download Android Games, Android software and so on.
-- Click once the installation of the software icon, enter the action (Action) interface:
-(Launch):Run the software
-(Export to SD):Export the software to the SD card
-(Uninstall):Uninstalling the software
-(Search at Market):Search for the software in the software store
Page 18 of 51 www.LINSAYdigital.com
Page 20
-(Cancel):Cancel the operation
• Exit EXIT: Back to the main interface
Hard drive in the device under the File menu, short press the menu button or touch screen device
menu software, a user interface Adjustable:
• Operation: the pop-up interface
-- Cut: Cut the file or folder
-- Copy: Copy a file or folder
-- Delete: delete the file or folder
-- Rename: Rename the file or folder
-- Select: Select a file or folder
• New: New interface
-- File: New File
-- Folder: New Folder
-- Search: search for files or folders
• Show Tags & Hide Tags: show tags and hidden tags state switch
• Settings: switch to the system setting interface
• More: a "refresh '," revolving "," help "," About "," Exit "and other options
The equipment installed under the Programs menu, short press the menu button or touch screen
equipment, software menu, the user interface Adjustable:
• Folder: Switch to the File menu state hard disk device
• Show All & Show Program: Show All software files and display a list of state switching process
• Properties: shows the application of information
• Backup: Backup Software
• Uninstalling: Uninstall Software
• Shortcut: Creating shortcuts
• Services: display program running in the background
Short press the menu button or touch screen device menu software, a user interface Adjustable:
• Setting: Switch to set the device to interface
• Sort: Sort mode switch
• About: Displays application information
• Exit: Exit program
7. Software applications and operating
7.1 Photo Browse
RockPhotoBrowser Player
By clicking on the proceedings “ ”,enter into RockPhotoBrowser;Into the picture list, simply
click the picture to enter and browse
Page 19 of 51 www.LINSAYdigital.com
Page 21
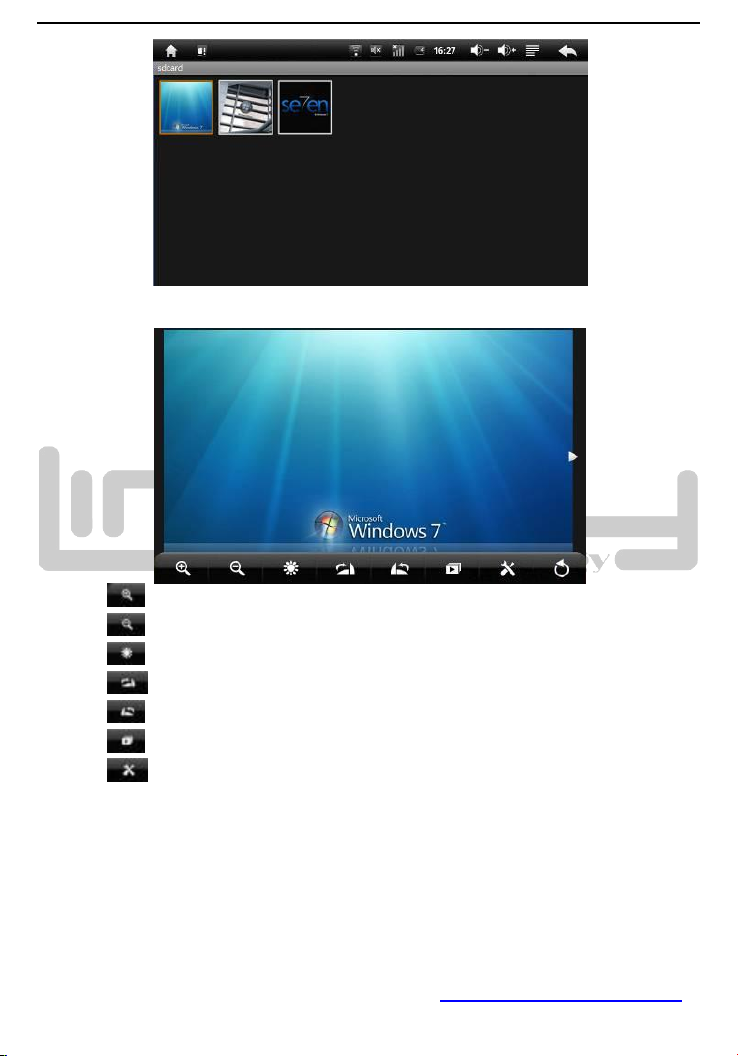
• Basic Operation
In the picture browsing mode, press the touch screen to pop-up picture playback control bar:
-- Touch “ ” Icon:Scaling the current picture
-- Touch “ ” Icon:Scaled down the current picture
-- Touch “ ” Icon:Adjust picture brightness
-- Touch “ Icon:Click the current image 90 ° clockwise rotation
-- Touch “ ” Icon:Click the current image 90 ° counterclockwise rotation
-- Touch “ ” Icon:Picture Start Slide Show
-- Touch “ ” Icon:Options pop-up submenu
Settings: Photo Available setting options
-- Full Screen: full screen image
-- Slide show interval: "2 seconds, 3 seconds, 4 seconds" three times to choose from
-- Slide show settings: a fade in & fade out, horizontal movement, up and down, random four
alternative;
-- Slide loop: Loop slideshow
-- Random show: Random display pictures
Set as desktop background: the image as your desktop background
Back to: Back to photo browsing status
Page 20 of 51 www.LINSAYdigital.com
Page 22
-- Touch “ ” Icon:Back to a list
7.2 Music
Music Player
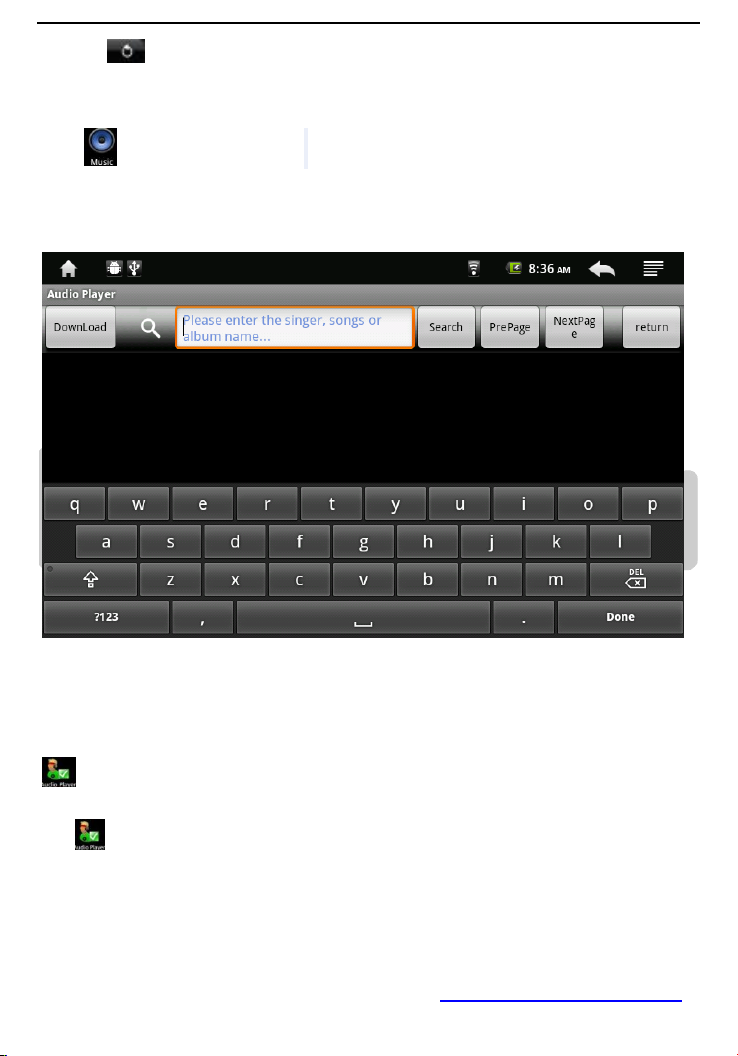
Click “ ” Icon to enter the music list. With artists, albums, songs, playlists four options, click into
the music list, select the music file, the pop-up player option, choose RockAudioPlayer player or
music player to play.
• Playlists
-- Play list is music player will automatically play the track list order.
-- You can play in the PENDO PAD equipment, create and edit any number of playlists.
【Notice】:When you delete the playlist, it will only delete the list, but does not remove the
music itself.
RockAudioPlayer
Click Icon to go directly to RockAudioPlayer music player.
• Browse music files:
Into the player, the screen shown below seven kinds of music files, browsing patterns and player
information:
- All Music: LINSAY V-5HD the player will load all the music files there.
- Playlist: The playlist classification load music files.
Page 21 of 51 www.LINSAYdigital.com
Page 23
- Search Music: Music names through search to find music files.
- Folder: The folder, find the music file.
- Artist: by artists Category music files.
- Album: music files by album category.
- Genre: genre classification of music files through.
- Player information: player version information.
When the new music is copied to the LINSAY V-5HD equipment, the music library will be updated
automatically. If the file does not contain information on some music labels in the music library will
be its classified as Unknown。
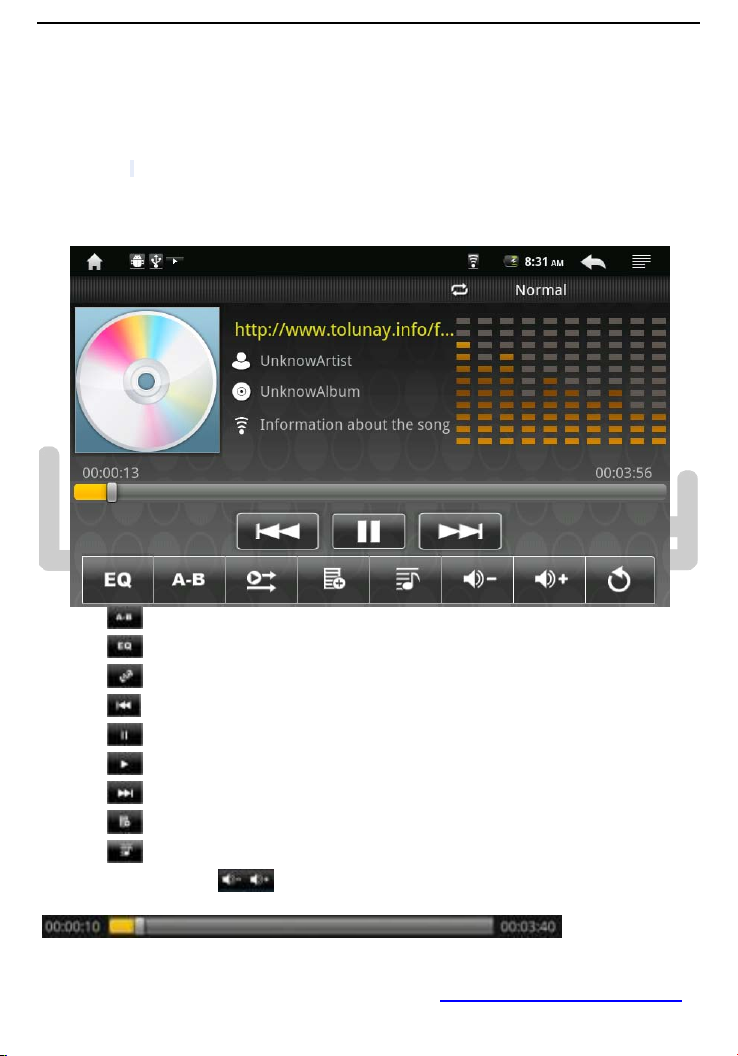
• Play music files:
Click the music file into the player to play music.
-- Touch “ ” Icon:A-B segment repeat
-- Touch “ ” Icon:Select Audio
-- Touch “ ” Icon:Select Play Mode
-- Touch “ ” Icon:On a continuous press and hold the rewind function of time to achieve
-- Touch “ ” Icon:Pause
-- Touch “ ” Icon:Play
-- Touch “ ” Icon:Next,Press and hold the fast forward function of time to achieve
-- Touch “ ” Icon:Select a playlist
-- Touch “ ” Icon:Show Lyrics
-- Tap the status bar icon “ ”:adjust the volume
-- Touch the progress bar
可 can goes directly
to track the location of the different players;use your fingers to drag the progress bar to track the
Page 22 of 51 www.LINSAYdigital.com
Page 24
cursor in the location of another player.
If you leave the music track playing screen, it will remain playing in the background. This allows you
to browse the hard disk when listening to music, view pictures or surf the Internet. To stop the
playing track, can touch the screen in the pause music icon, and then tap the home screen icon。
7.3
VideoPlayer
Click“ ” into VideoPlayer
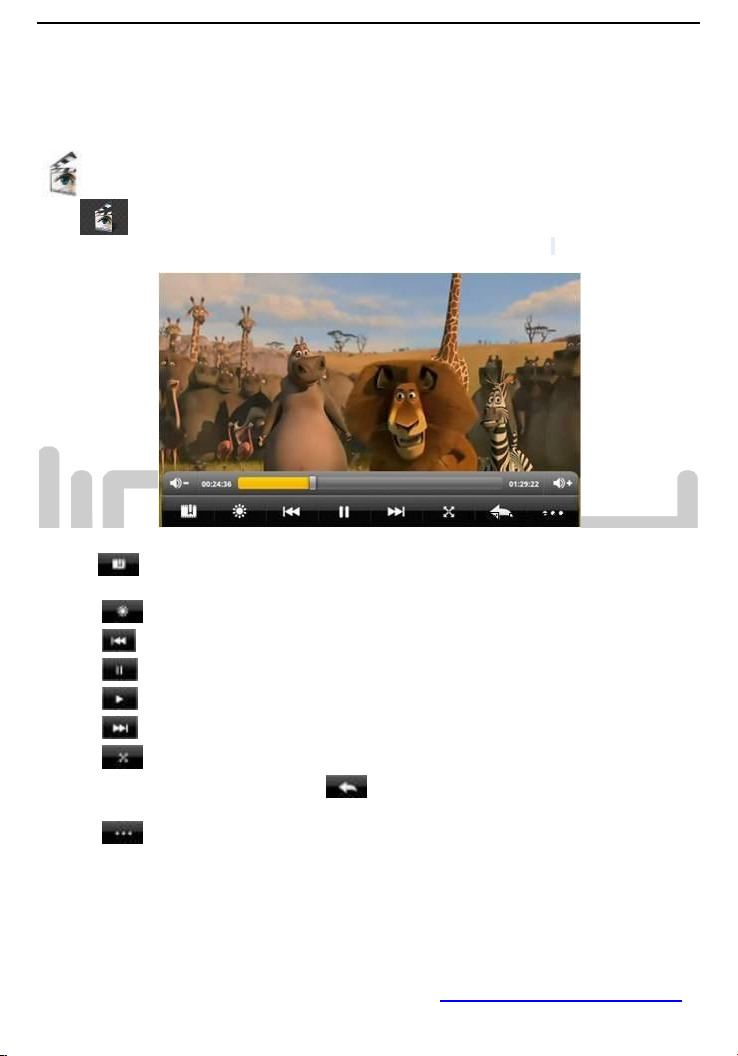
VideoPlayer list will automatically load the PENDO PAD device all video files. In the video list, click
the video file you can directly enter and play the video.
In video playback mode, press the touch screen to pop up video player control bar:
• Touch“ ”Icon:Set bookmarks, settings each time after the success of video playback from a
bookmark Department
• Touch “ ”Icon:Adjust video brightness
• Touch “ ”Icon:On a video, press and hold down rewind functions when achieving
• Touch “ ”Icon:Pause
• Touch “ ”Icon:Play
• Touch “ ”Icon:Next vedio,Press and hold the fast forward function of time to achieve
• Touch “ ”Icon:Change the display mode (full screen, the original size, 16:9,4:3), cyclic click,
choose the desired display mode;• Touch “ ”Icon:
Back to a list
• Touch “ ”Icon:Pop-up submenu
Delete bookmark from scratch play: Click to delete bookmarks from scratch, play, delete the
bookmark
Delete bookmark:click it,delete all setting bookmark
Help:Click the “help”, Display features icons
Version Information: Displays the player version information
Back: return to the playback status
Page 23 of 51 www.LINSAYdigital.com
Page 25
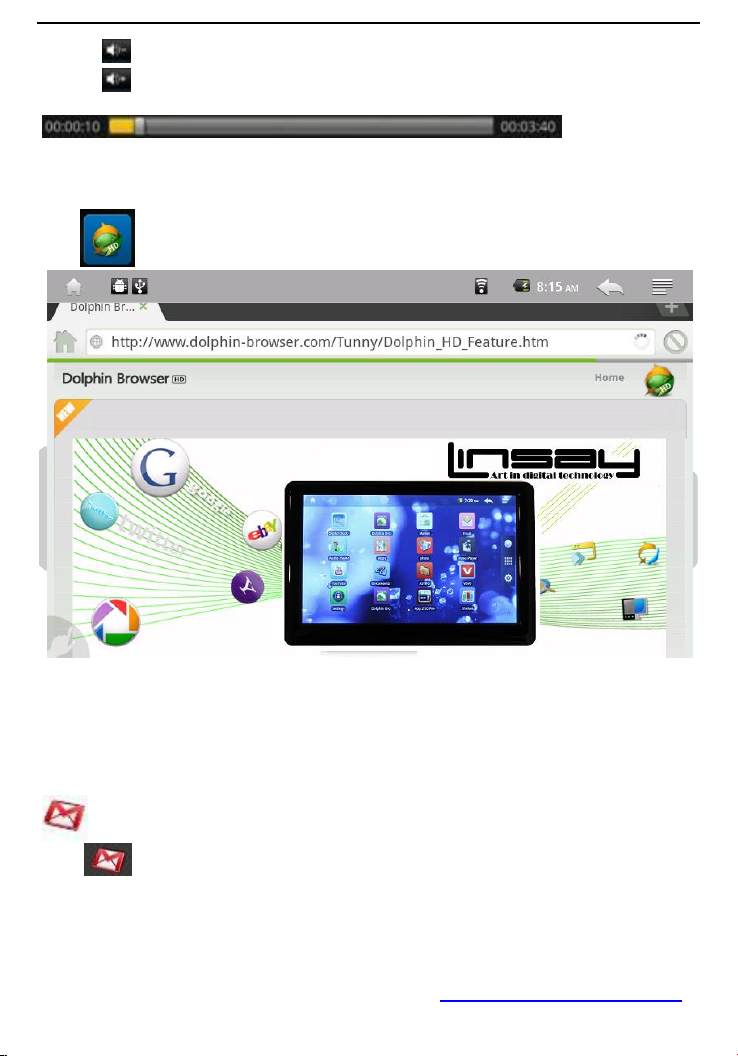
• Touch “ ”Icon:Reduce the volume, press and hold, the volume decrease continuously
• Touch “ ”Icon:The volume, press and hold, the volume increased continuously
• Touch the progress bar
the video in different play positions; use your fingers to drag the progress bar in the the cursor to the
location of the video in another player.
7.4 Internet browser
Dolphin Browser
Click“ ” to open the following web page
Can go directly to
• Click MENU on your LINSAY V-5HD to bring out Setup menu
-- Start: enter website by inputting address
-- Bookmark: add bookmark for the website
-- New window: open new web page
-- Refresh: refresh the current page
-- Forward/backward: go forward/ backward
-- More
7.5Email
Gmail
Click “ ” to enter Gmail, you can send and receive Gmail when you create a User name and
login
Page 24 of 51 www.LINSAYdigital.com
Page 26
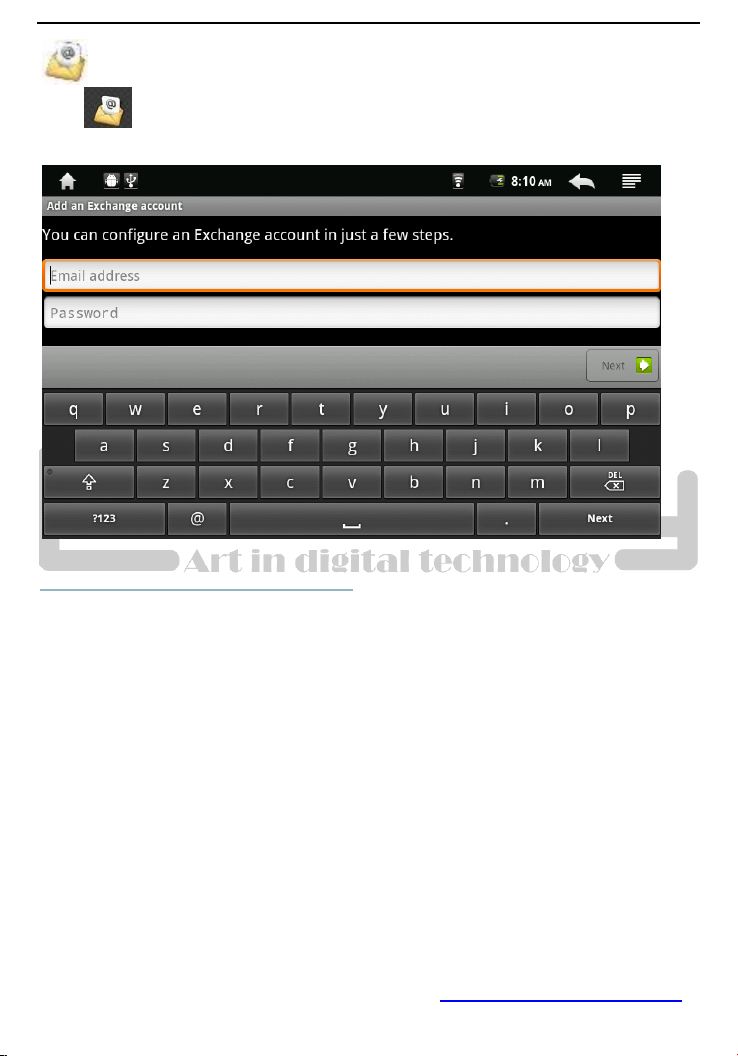
Email
Click “ ” to enter e-mail settings, after entering the email address and password, simply
setingt the limited server, you can login and send or receive email messages
8. FAQ
• Can not open the media player
-- check battery
-- connect the power adapter and check again
-- If it still can’t be opened, please contact our sales person
• Screen is flashing after starting up
-- Short of power, please charge
• Headphones can not hear sound
-- Please check whether the volume has been set to 0
-- Please check whether the music file has been damanged. Try playing other music to determine, if
the file has been damaged, it could lead to serious noise or skips.
• Can not copy the file
-- Confirm whether the computer and the player is properly connected
-- Confirm whether the storage space is full
-- Confirm whether the USB cable is damaged
Page 25 of 51 www.LINSAYdigital.com
Page 27
TOLL FREE-1-855-LINSAY-HELP
Warranty Policy
One-Year Limited Warranty on Parts and Labor
LINSAY provides a "ONE-YEAR LIMITED WARRANTY" against manufacturing defects in
materials and workmanship to the original purchaser of a new LINSAY purchased from an
authorized LINSAY U.S., which begins on the date of purchase by the customer. Customer is
responsible for maintaining proof of date of purchase and must make the registration of the
product into of 30 days of the purchase on http://www.linsaydigital.com/registration.php to
validate the warranty
LINSAY's Responsibility
LINSAY purchased new from an authorized LINSAY U.S. reseller and that are used in the fifty
(50) United States or Puerto Rico are warranted to be free from manufacturing defects in
materials and workmanship for one (1) year from the date of the original retail purchase.
LINSAY ' limited warranty covers only those defects which arise as a result of normal use of
the product, and do not apply to any improper or inadequate maintenance or modification;
software, interfacing, media, parts, or supplies not provided or supported by LINSAY; or
operation outside the product's specifications.
If LINSAY receives, during the applicable warranty period, notice of a defect in any hardware
product, which is covered by LINSAY' warranty, LINSAY shall either repair or replace the
defective product at LINSAY' option.
If LINSAY is unable to repair or replace, as applicable, a defective product which is covered
Page 26 of 51 www.LINSAYdigital.com
Page 28
by LINSAY' warranty, LINSAY shall within a reasonable time after being notified of the defect,
refund the purchase price for the product.
LINSAY shall have no obligation to repair, replace or refund until the customer returns the
defective product to LINSAY.
Units sent to LINSAY for repair will be repair or replaced with new or like-new product (s) of
the same model with the same functionality as the original unit. Original unit (s) will be
returned only at LINSAY' discretion. Please back up all content and files on the device.
LINSAY is not responsible for any content on the original unit.
LINSAY' limited warranty is only valid in the country of purchase.
LINSAY will not validate purchases made via trade or barter. This pertains to trade or barter
between individuals on sites such as E-Bay where trade or barter transactions are facilitated.
LINSAY does not warrant damage incurred to the LCD on any unit sold. Any manufacturer's
defect is at the sole discretion and discernment of LINSAY repair technicians as the unit will
need to be in possession of the return authoritation number RAN technicians for a full and
accurate evaluation to be made.
How to Obtain Warranty Service
To obtain warranty service, contact LINSAY Technical Support via email at
[email protected]. You must provide the model, serial number, and date of
purchase. LINSAY Technical Support is available from 10:00AM to 5:00PM EAST Time,
Monday through Friday, Please note that holiday hours may vary. For up to date information,
please visit www.LINSAYdigital.com .
Page 27 of 51 www.LINSAYdigital.com
Page 29
LINSAY reserves the right to assess all warranty claims and to determine if defects or
damages are covered by this limited warranty. In case of a claim that is not covered by this
warranty, you will be contacted to determine whether LINSAY should repair the damage for a
fee or whether the product should be returned to you as received by the service technician or
service center.
Parts and service labor that are LINSAY's responsibility under this limited warranty will be
provided without charge. All other service is at the customer's expense. LINSAY reserves the
right to charge the customer for any service call for anything not covered by this limited
warranty. Before you ask for warranty service, please review your User Manual. You may
avoid a service call and a service charge.
Please refer to the reverse side of this page for additional information regarding how to obtain
warranty service.
PLEASE DO NOT RETURN YOUR UNIT TO LINSAY WITHOUT PRIOR AUTHORIZATION.
Not Covered
This limited warranty does not cover the following: cosmetic defects; damage, malfunctions
or failures resulting from shipping or transit, improper or faulty installation, abuse, operation
contrary to furnished instructions, operation on incorrect power supplies, products not
supplied by LINSAY, modification, alteration, improper servicing or tampering; damage from
fire, water, lightning, power surges, abnormal environmental conditions or other acts of nature;
normal wear and tear; unsatisfactory visual or audio performance not caused by a
manufacturing defect; or displays with a missing or unreadable serial number.
THERE ARE NO EXPRESS WARRANTIES OTHER THAN THOSE LISTED OR
DESCRIBED ABOVE. ANY IMPLIED WARRANTIES, INCLUDING ANY IMPLIED
WARRANTY OF MERCHANTABILITY AND FITNESS FOR A PARTICULAR PURPOSE,
Page 28 of 51 www.LINSAYdigital.com
Page 30
SHALL BE LIMITED IN DURATION TO THE PERIOD OF TIME SET FORTH ABOVE.
LINSAY'S TOTAL LIABILITY FOR ANY AND ALL LOSSES AND DAMAGES RESULTING
FROM ANY CAUSE WHATSOEVER, INCLUDING LINSAY'S NEGLIGENCE, ALLEGED
DAMAGE, OR DEFECTIVE GOODS, WHETHER SUCH DEFECTS ARE DISCOVERABLE
OR LATENT, SHALL IN NO EVENT EXCEED THE PURCHASE PRICE OF THE PRODUCT.
LINSAY SHALL NOT BE RESPONSIBLE FOR LOSS OF USE, COMMERCIAL LOSS, LOST
REVENUE OR LOST PROFITS, OR OTHER INCIDENTAL OR CONSEQUENTIAL
DAMAGES. SOME STATES DO NOT ALLOW LIMITATIONS ON HOW LONG AN IMPLIED
WARRANTY LASTS OR THE EXCLUSION OR LIMITATION OF INCIDENTAL OR
CONSEQUENTIAL DAMAGES, SO THE ABOVE LIMITATIONS OR EXCLUSIONS MAY
NOT APPLY TO YOU.
This warranty gives you specific legal rights, and you may also have other rights, which vary
from state to state. This is the only warranty applicable; no one is authorized to extend or
modify it or to grant any other warranty on LINSAY's behalf.
Owner's Responsibility
To ensure warranty service, keep the dated bill or sales receipt as evidence of the purchase
date and location. This limited warranty applies only to original purchaser and is
non-transferable.
Warranty service conditions are subject to change. For the latest Warranty Terms and
Conditions and additional information regarding LINSAY's Limited Product Warranty, please
see complete details online at:
www.LINSAYdigital.com
Page 29 of 51 www.LINSAYdigital.com
Page 31
[Year
[Type the author name]
V-5HD
5” TABLET PC ANDROID
Manual del Usuario
Page 30 of 51 www.LINSAYdigital.com
Page 32
Tiempo de trabajo en estado de “dormir”
30 hours
Tiempo de trabajo para solo Wi-Fi
5 hours
Tiempo de trabajo para reproducir multimedia
4 hours
Tiempo de trabajo para reproducer solo Video en linea
3 hours
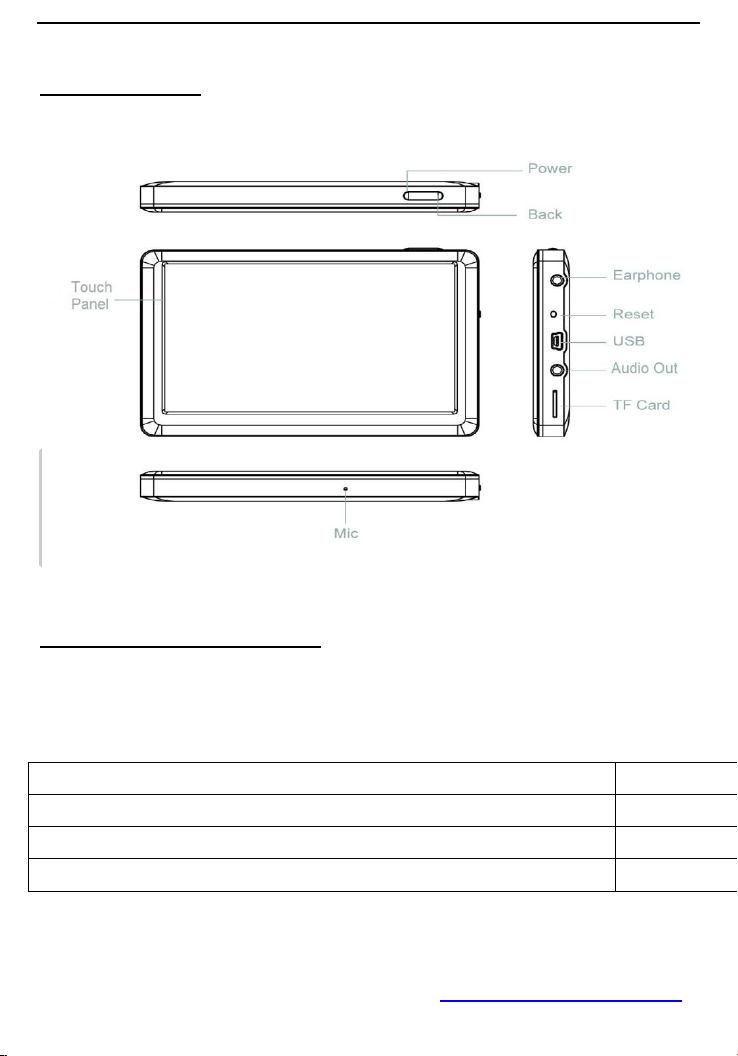
1. Descripcion Visual
Consulte la imagen de abajo:
2. Administrador de potencia/energia
2.1 Bateria incorporada
Tiempo de operacion, autonomia para diferentes estados de uso:
Page 31 of 51 www.LINSAYdigital.com
Page 33
2.2 Adaptador de Potencia e Indicador de cargado
El modo de carga del LINSAY V-5HD es a traves del cable USB desde su computadora.
En tiempo de carga, el indicador de carga es rojo; carga completa, el indicador estara apagado. Sin
luz.
El tiempo de carga es de 10 horas cuando la LINSAY Tablet este apagada, la unidad no deberia ser
usada pues el tiempo de carga seria mas largo.
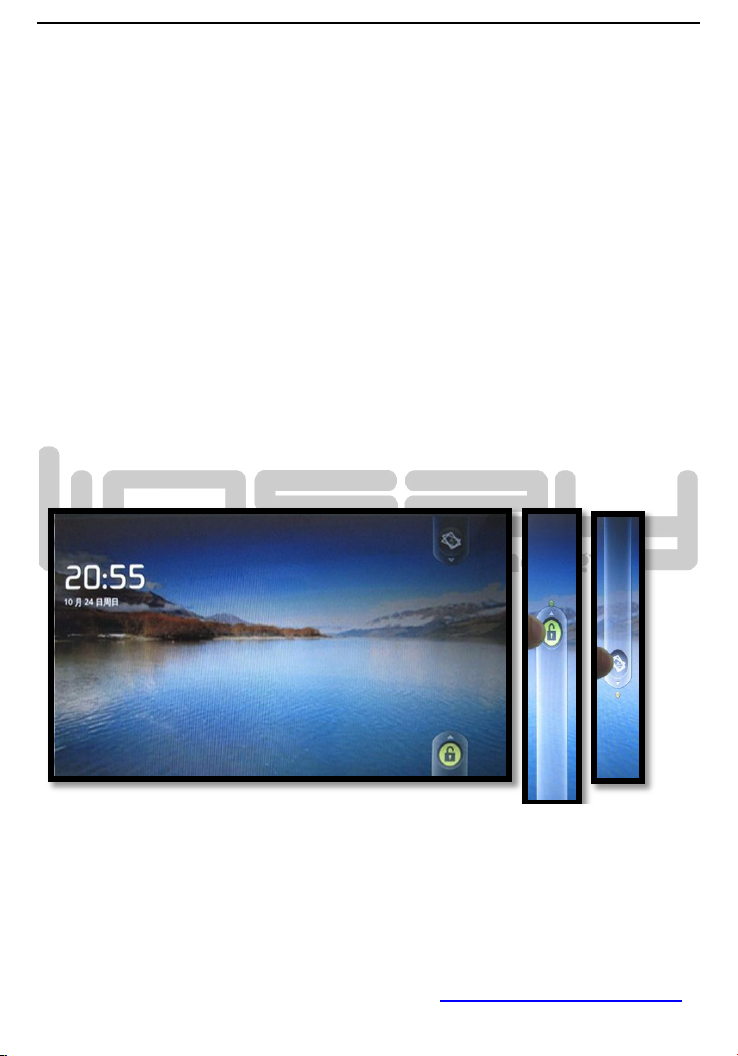
2.3 Encendido y Apagado
Encendido: Asegúrese de que el poder es suficiente en primer lugar. Una presión larga en el botón
de encendido durante 2 segundos, cuando se siente una sacudida corta, soltar el botón de
alimentación. Después de arrancar el sistema, la unidad entre la imagen de bloqueo como a
continuación:
Tire de “Icono de Desbloqueo” hacia arriba hasta el punto verde para entrar al menu principal;tire
del “Icono del Marco de foto”hacia abajo hasta el punto verde para entrar al visor de fotos e
imagenes.
APAGADO: Mantenga presionado por 4 segundos el boton de apagado/encendido. Cuando sienta
Page 32 of 51 www.LINSAYdigital.com
Page 34
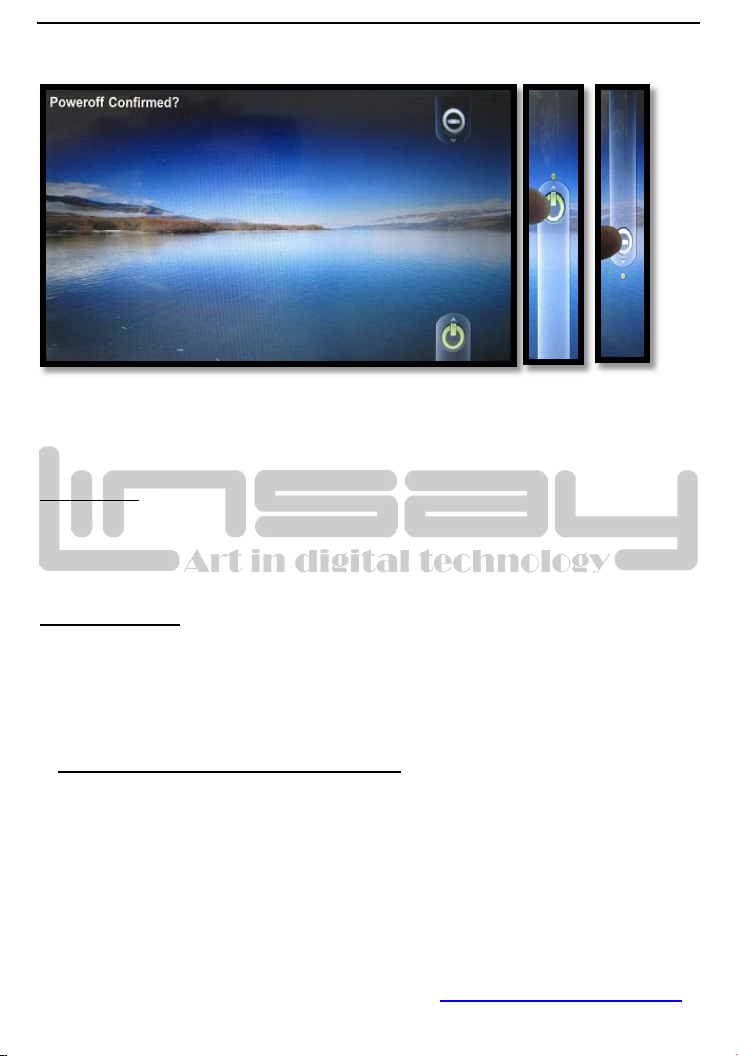
una corta vibracion suelte el boton, la unidad le pedira la reconfirmacion de apagado, ej:
Tire del ICONO the “Icono de apagado” hacia arriba hasta el punto verde para apagar, Tire el “Icono
de Cancelar” hasta el punto verde para cancelar.
Modo Dormir: Presione por solo un Segundo el boton de power, el sistema entrara en estado de
“dormir”, la pantalla se pondra negra; una corta presion nuevamente por solo 1 segundo y la
pantalla se volvera a encender “despertar”. Si la LINSAY V-5HDt tiene la bacteria baja en modo de
dormir la unidad se apagara automaticamente al cabo de un corto plazo.
Apagado Forsozo: Mantenga presionado el boton de power por lo menos 7 segundos para forzar
el apagado de la LINSAY tablet, o presione el boton de apagado de la parte de abajo de la unidad.
3. Interno y Externo almacenamiento (memoria)
3.1 Clasificacion de almacenamiento
LINSAY V-5HD posee internal memoria de 4GB esto le permite almacenar miles de canciones,
videos, fotos y peliculas, tambien posee Puerto de TF card es para Mini tarjeta de memoria externa
hasta 32GB.
Page 33 of 51 www.LINSAYdigital.com
Page 35
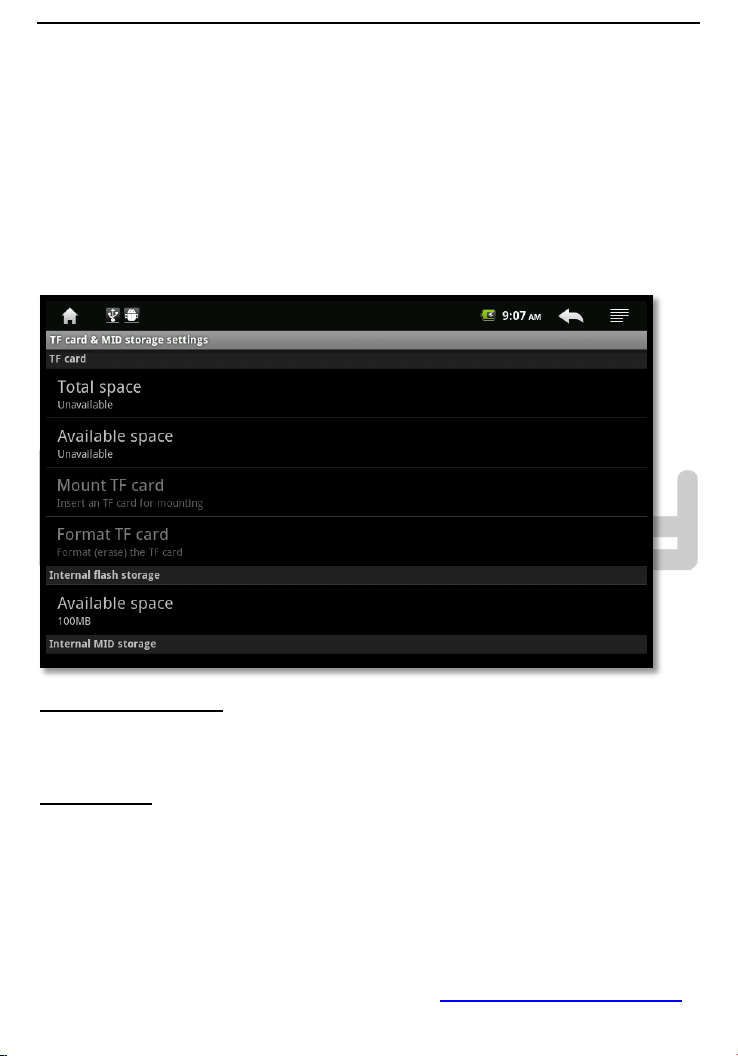
3.2 Como usar la memoria/almacenamiento
Inserte la memoria al correspondiente puerto de entrada, “Preparando SD card/USB dispositivo” le
mostrara en la pantalla en la esquina izquierda. Ejecutar la gestión de archivos de OI para leer
estos almacenes.
Precaucion: Antes de remover la memoria, asegurese que todas las filas de su memoria hayan sido
cerradas. De lo contrario, es posible que se quiebre la memoria, mientras tanto, la unidad cerrar
la aplicacion que esta corriendo para protejer el sistema.
4. Funcion de “Agitado”
“Haptica comentarios” se podría establecer en la configuración de / sonido y la pantalla.
5. Orientacion:
El soporte de la unidad de orientación cambiara automáticamente al girar el LINSAY V-5HD, esto
por el 3G-SENSOR.
Page 34 of 51 www.LINSAYdigital.com
Page 36
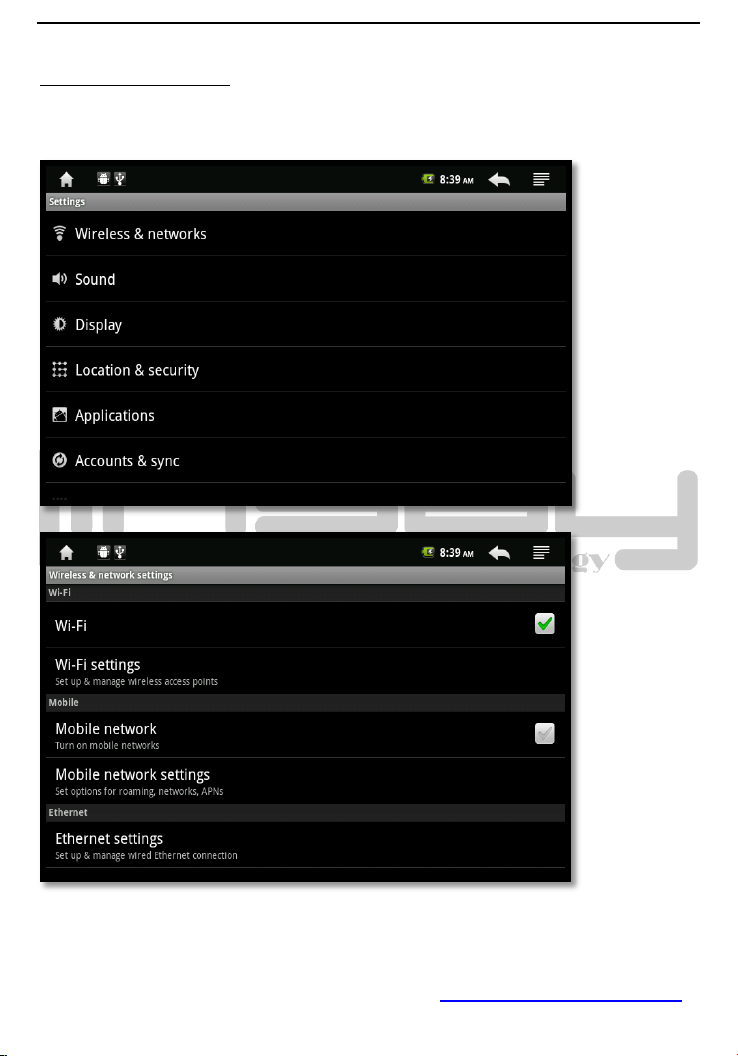
6. Red Inalambrica: Wi-Fi
Page 35 of 51 www.LINSAYdigital.com
Page 37
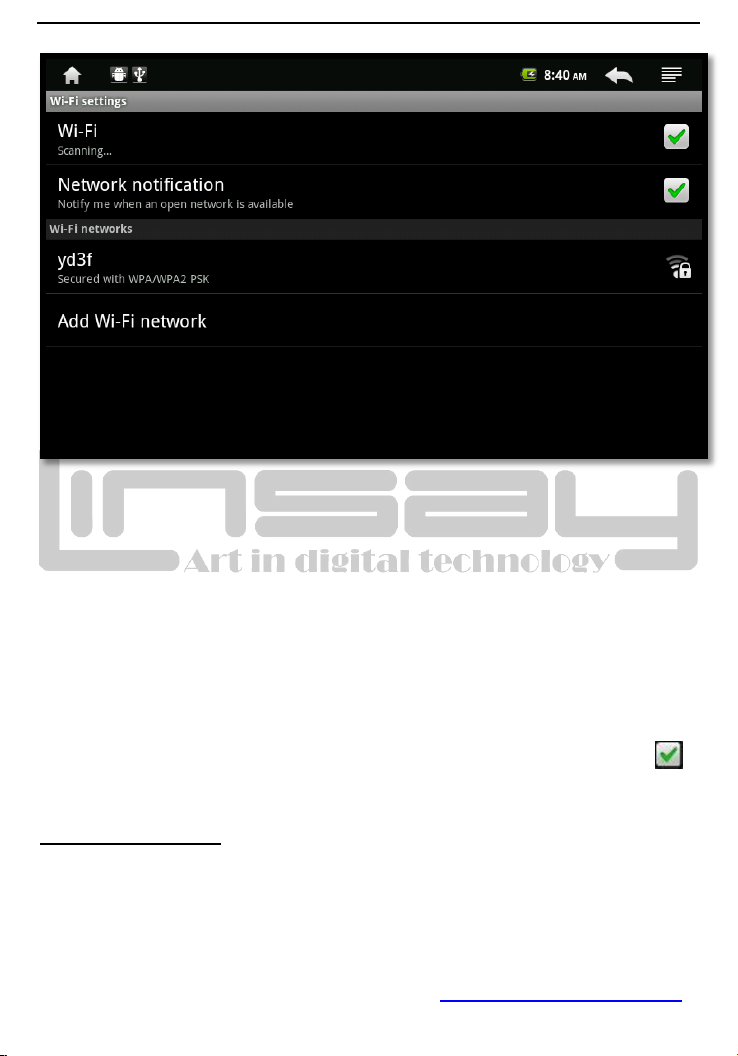
1. Encienda el botón Wi-Fi en la parte superior derecha de la unidad;
2. Seleccione “Red inalambrica (wireless network)” en el menu de ajustes;
3. Haga clic en la casilla de verificación de la conexión Wi-Fi para activar.
4. Entre “Wi-Fi ajustes”, chequee todo de AP que puede ser buscado y seleccione uno.
5. Si este AP esta conectado existosamente antes, los detalles pueden ser guardados, solo toque
“conectar” en la ventana que aparece, seleccionar "olvidar " quitará detalles AP.
6. Si AP esta encriptado (necesita contrasena), por favor entre la contrasena de AP;
7. El icono de la red inalambrica muestra la barra de estado luego de la coneccion exitosa;
7. Entrada de operacion
7.1 Teclado entrada
Cuando la aplicacion necesita la entrada de texto o digitos, el sensibley tactil teclado aparecera en
Page 36 of 51 www.LINSAYdigital.com
Page 38
la pantalla automaticamente.
7.2 Entrada de Pantalla tactil
CUIDADO: Por favor no ponga objetos en la superficie del la pantalla tactil, pueden quebrarla.
Recuerde que es una pantalla completamente SENSIBLE debe tratarse con muchisimo cuidado,
con nada punzante o filoso. Aleje de los ninios sin supervision.
Presion larga y arrastre: larga presion sobre un icono puede soltarlo en cualquier parte del
escritorio.
8. Escritorio
8.1 La barra de estado y barra de acceso rápido
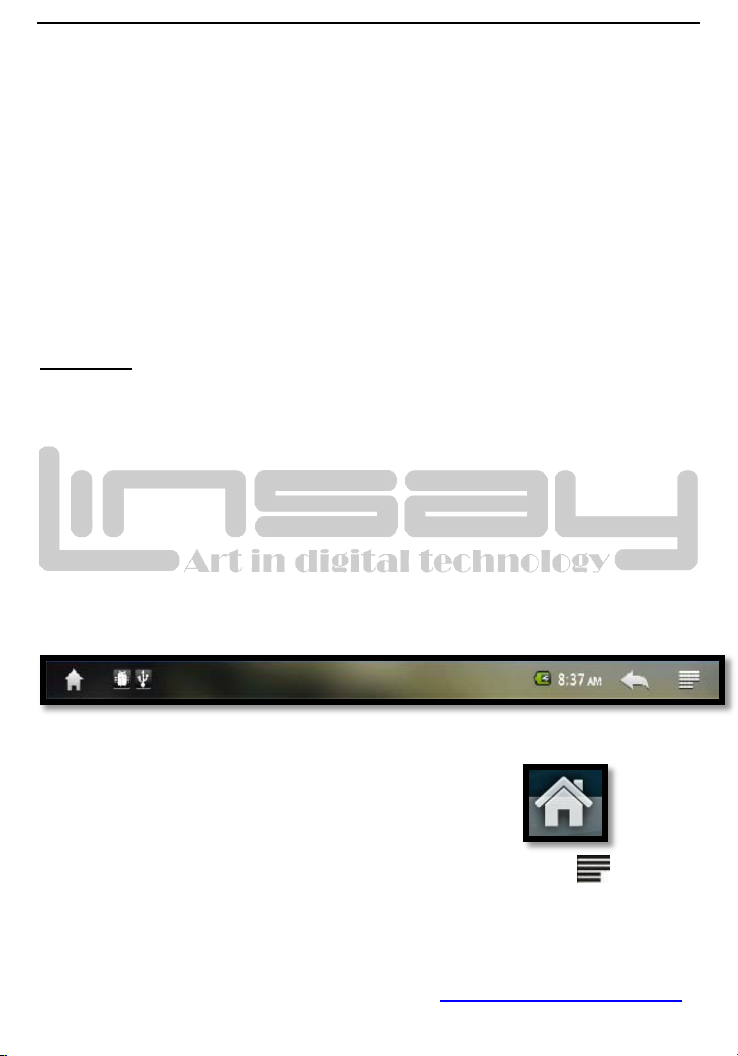
Arriba de la pantalla esta la barra de estado, hay 5 botones de programas: Casa, imprimir la
pantalla, Vol-, Vol+, Menu, Back; algunas estados de se muestran aqui: 3G signal, Wi-Fi signal,
Network status, bateria status, tiempo etc…
8.2 Menu Principal
Para el Menu principal del devide tambien asi como function atras:
Note: La Tecla de Menu key en la Pantalla tactil es igual a la tecla de menu: en el
equipo
Page 37 of 51 www.LINSAYdigital.com
Page 39
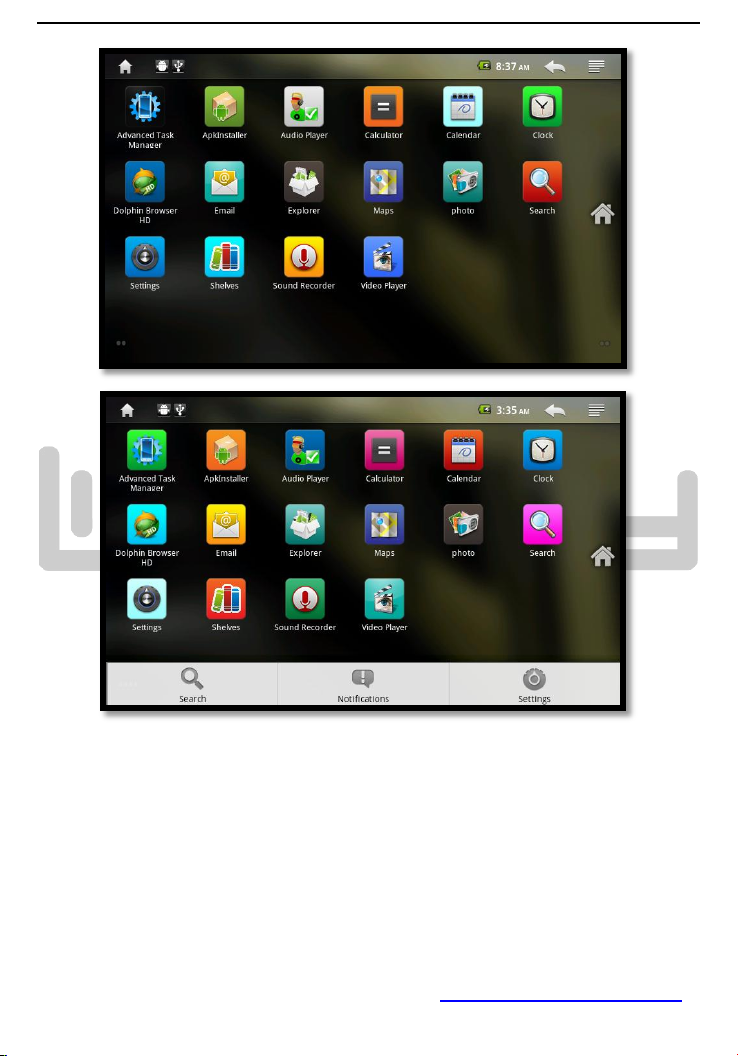
Información modo de flash modo de aplicación
Para "el modo de escritorio del flash", los iconos se podría arrastrar a la página de al lado, hay tres
páginas continúan en este modo.
"el modo de aplicación" es de la misma manera. Hay 1 GB de espacio libre para la aplicación de la
tercera parte a la instalación. En este caso, la página es hasta la cantidad de aplicación, sin
máximo limitado.
Page 38 of 51 www.LINSAYdigital.com
Page 40
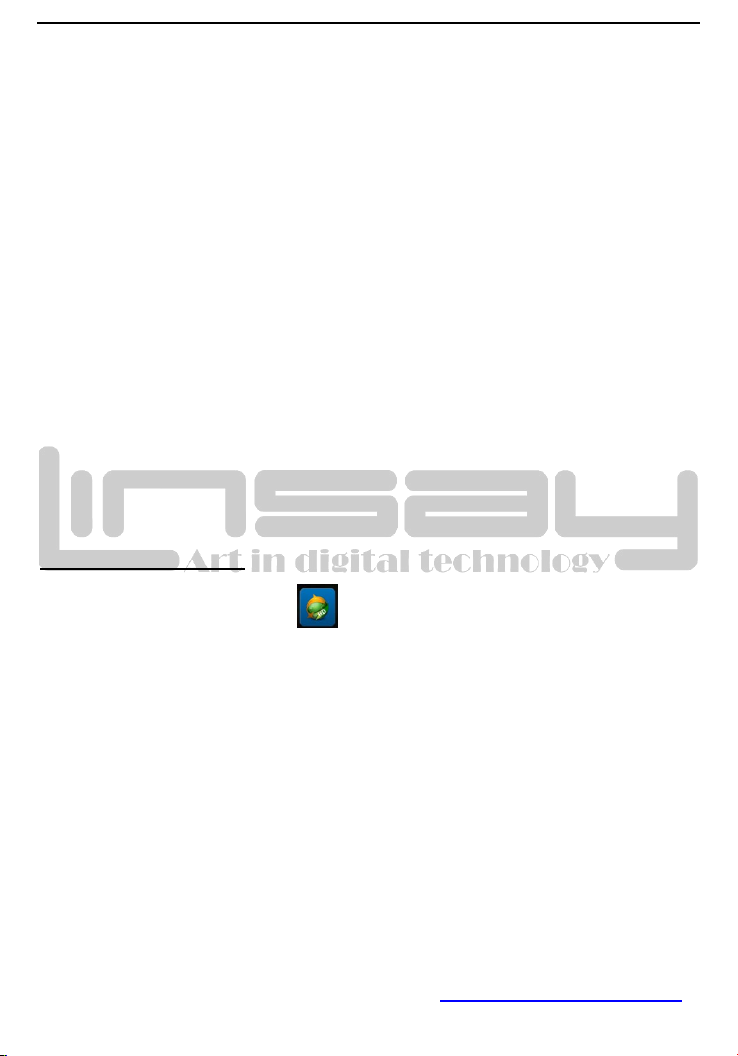
8.3 Ajustes de escritorio
En el modo de escritorio Widget, Pulse el botón de menú, el menú contextual que aparecerá. El
menú incluye: Añadir, fondos de escritorio, de la búsqueda, notificaciones, y la configuración del
sistema.
Añadir función podría añadir accesos directos, widgets, gadgets.
Fondos de la función puede seleccionar fondos de escritorio de.
8.4 Notificaciones
Arrastre la barra de estado a la baja para obtener la imagen de notificación. Pulse para volver.
8.5 Icono de Escritorio
Haga una presión larga sobre el icono, este icono se enciende la luz y podría ser arrastrar a la
barra en cualquier lugar, incluso rápida. También podría arrastrar a la basura en la barra rápida de
eliminar.
9. Sitio Web del Navegador
Toque en el icono del navegador: (Dolphin Browser) escriba la dirección URL para
conectarse a su página web favorita:
Page 39 of 51 www.LINSAYdigital.com
Page 41
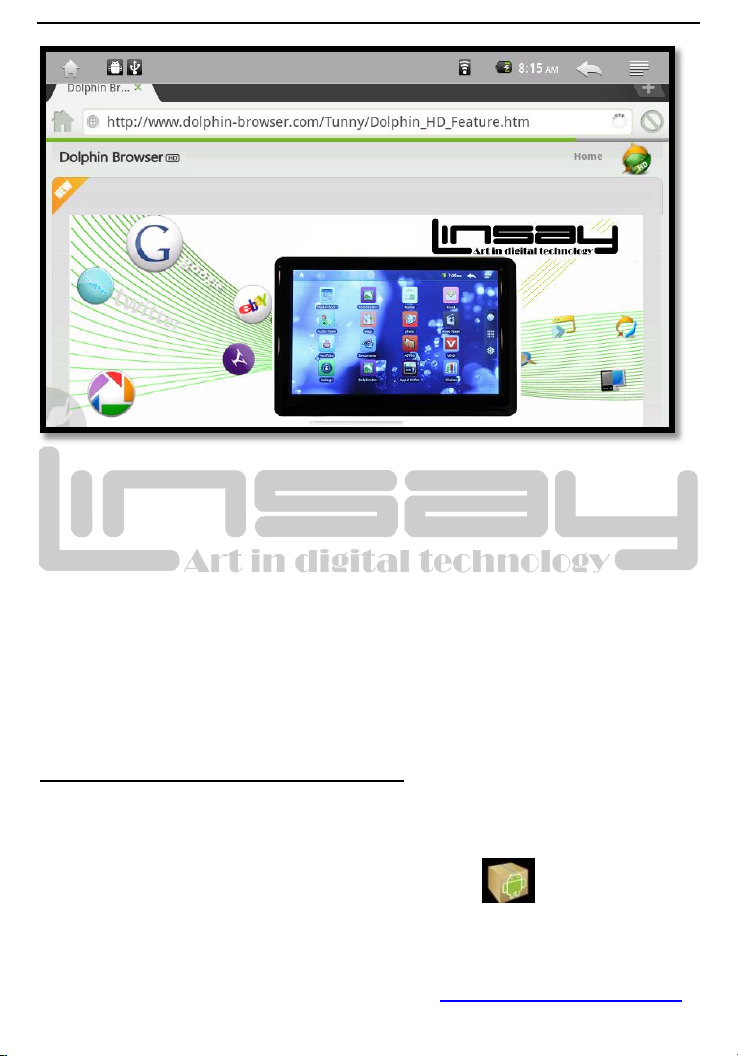
Pulse menú para abrir una nueva ventana, marcadores, ventanas, cargar, adelante, añadir
favoritos, buscar en la página, seleccione el texto, la información de la página, la página compartir,
descargas, configuración.
Descargar foto: una presión larga en la foto emergente la opción de menú, seleccione guardar la
foto.
Atención: El archivo se guardará en la carpeta de descarga en el almacenamiento. Por favor, borrar
el historial de descarga en el tiempo, de lo contrario, tal vez la velocidad del efecto o resultado de la
descarga anormal en el sistema.
10. Administrador de Aplicaciones e Instalacion
10.1 Instalar y Desinstalar
La extensión de archivo instalable en el sistema Android. Toque para instalar una APK,
que podría ser por la carga desde Internet directamente. Ejecutar administrador de archivos de OI,
busque el archivo APK, haga clic en la imagen para entrar en la instalación, siga el asistente de
Page 40 of 51 www.LINSAYdigital.com
Page 42
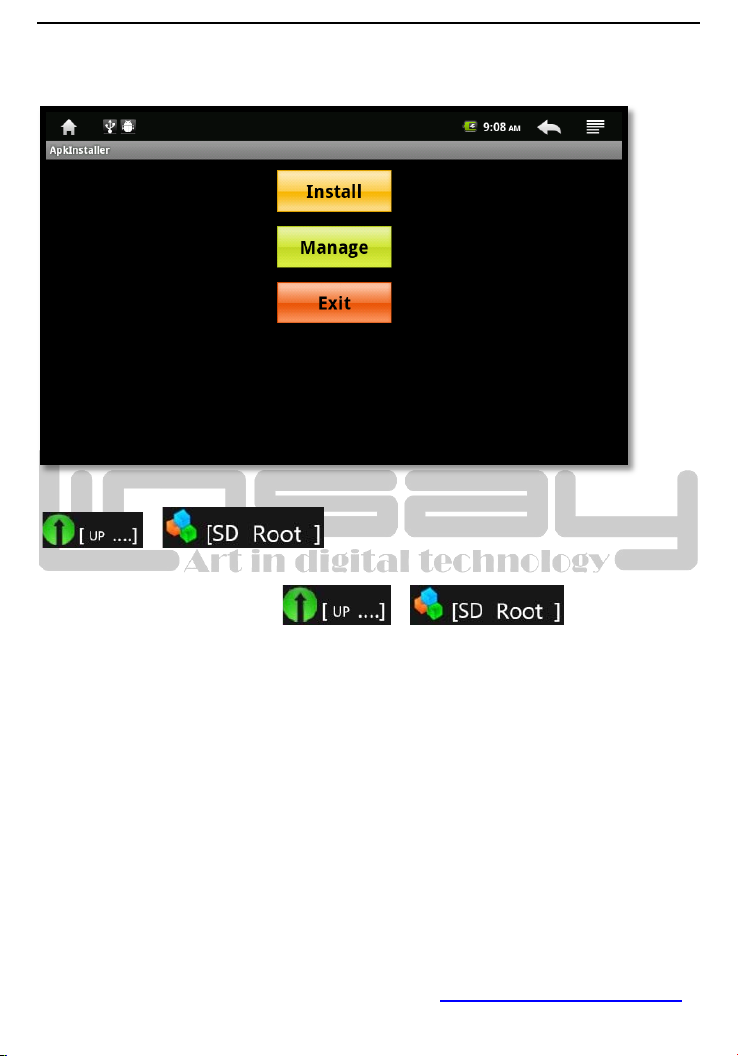
instalación para finalizar el curso. Volver a la página principal, el icono de la APK instalado se
puede encontrar en el escritorio.
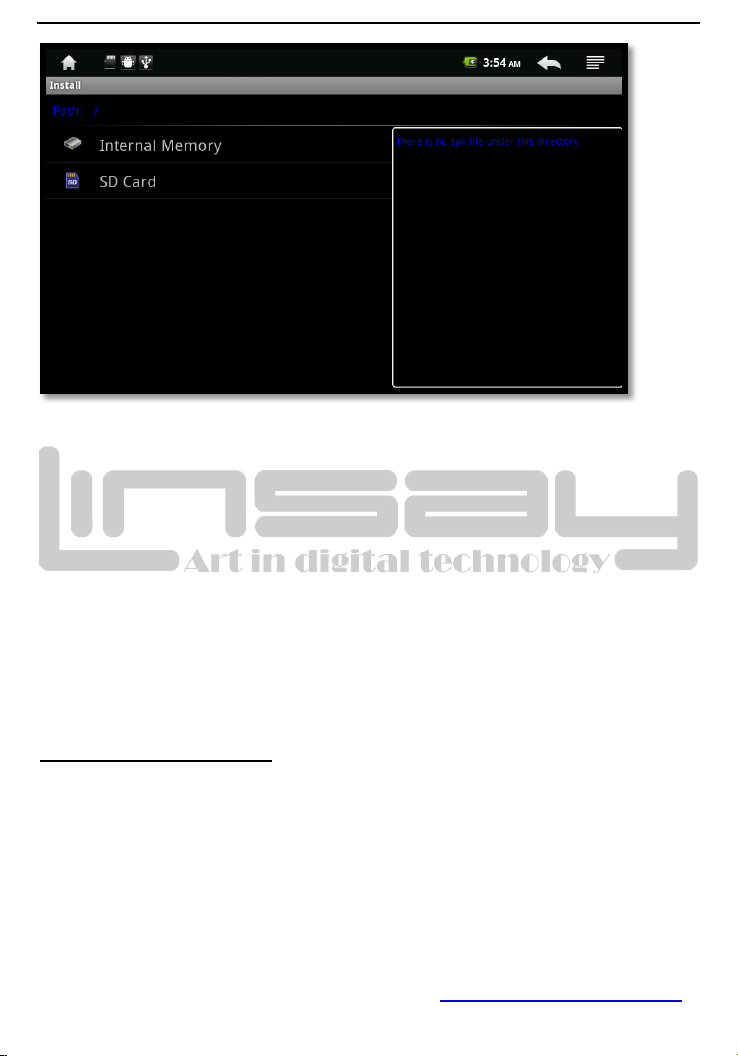
control de la tarjeta de almacenamiento.Seleccione el formato dentro de la configuración de APK,
haga clic en la instalación, la operación es completada y devuelta a la interfaz principal, es decir, el
menú del software correspondiente. y
y Corresponden a la tarjeta de memoria flash SD y el
Page 41 of 51 www.LINSAYdigital.com
Page 43
10.2 Administrador de Aplicaciones
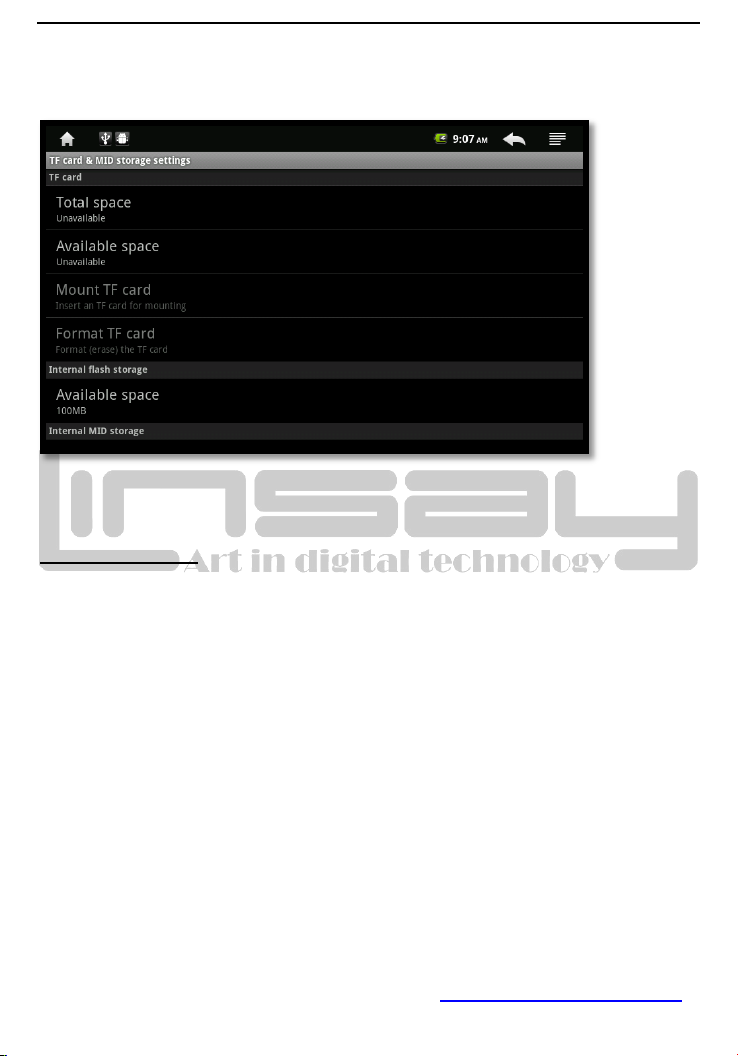
Pulse Configuración, seleccione las aplicaciones, seleccione la opción gestionar las aplicaciones,
todas las aplicaciones se puede encontrar aquí. La aplicación puede ser desinstalar aquí.
10.3 Administrador Progreso
Pulse Configuración, seleccione las aplicaciones, seleccione ejecutar opción de servicio, todos los
de funcionamiento de la aplicación se puede encontrar aquí. Si la aplicación de determinadas es
necesaria ahora, podría dejar de ser para liberar el espacio de memoria.
11. Administrador de Archivos
Toque OI gestor de archivos para introducir la imagen de archivo del navegador, cuando tres
almacenes se inserte en la unidad.
11.1 Carpeta Nueva
Presione el boton de menu para agregar una nueva carpeta a su actual directorio.
Page 42 of 51 www.LINSAYdigital.com
Page 44
11.2 Carpeta-operacion
Presione por unos segundos la carpeta, a continuacion la opcion emergente:
12. Aplicacion Tipica
12.1 Multimedia
A continuación el reproductor está preinstalado: CCPlayer de audio / vídeo, música, grabadora de
sonido, Galería, marco de fotos, YouTube.
Formato de audio compatibles de la siguiente manera:
avi/mp4/rmvb/rm/flv/mov/mpg/mpeg/mkv/asf/wmv/mpe/3gp/dat/vob/ts/tp/m4v;
Video format que LINSAY V-5HD soporta:
Mp3/wav/ac3/aac/ogg/ra/amr/m4a/wma.
Reproduccion de filas de musica:
Haga Click sobre la cancion como muestra la imagen anterior.
Page 43 of 51 www.LINSAYdigital.com
Page 45
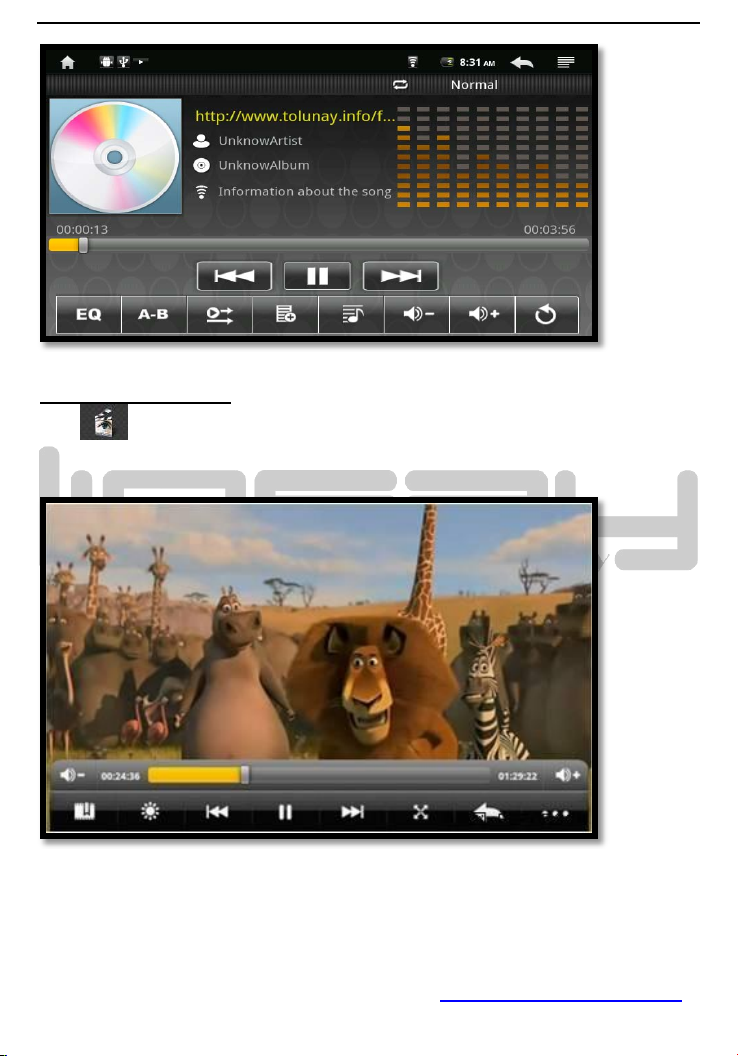
Reproduccion deVideos
Click“ dentro del Video player
VideoPlayer lista se cargará automáticamente el dispositivo PAD Pendo todos los archivos de
vídeo. En la lista de videos, haga clic en el archivo de vídeo que puede entrar directamente y
reproducir el vídeo
Page 44 of 51 www.LINSAYdigital.com
Page 46
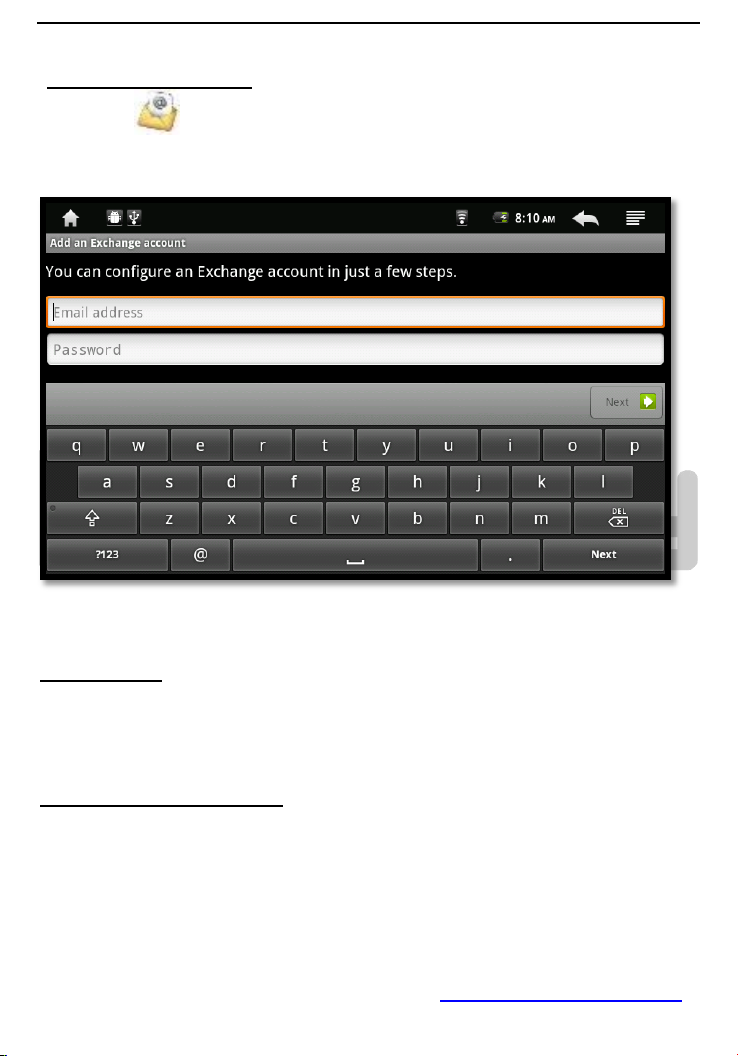
Email – Correo Electronico
Haga clic en “ " para entrar en configuración de correo electrónico, después de entrar en la
dirección de correo electrónico y una contraseña, basta con la configuración del servidor limitado,
se puede acceder y enviar o recibir mensajes de correo electrónico
12.2 Calibracion
Se sugiere calibrar regularmente. La opción se puede encontrar en la fijación de la imagen.
13. Importantes Notas y Ayudas
13.1 Bateria Nota
10” Pantalla consume mayor cantidad de energia. Para extender la vida util y autonomia de la
bacteria, por favor reduzca el uso de las siguientes funciones:
1. Multimedia;
Page 45 of 51 www.LINSAYdigital.com
Page 47
2. Brillo de la pantalla/imagen: reduzca el brillo de la pantalla en “ajustes/sonido y pantalla”;
3. AP busqueda: esta opcion puede ser encontrada en settings/wireless and networks/ Wi-Fi
settings/ Network notification;
4. Wi-Fi: Apague el boton de Wifi si no lo esta usando
13.2 Liberar memoria
La aplicación se ejecuta siempre, esta aplicación debe tener en la memoria. Si también muchas
aplicaciones de ejecución cada vez, esto afectará a la velocidad de la unidad. En este caso, es
mejor dejar de aplicación inútil a tiempo para salvar la memoria.
13.3 Apagado Forsozo
1. Pulsado el botón de encendido de 7s, la unidad de cierre forzoso;
2. Pulse el botón de reset en la parte inferior de la unidad, la unidad de cierre forzoso.
13.4 Datos de restauracion de fabrica
Esta opción se puede encontrar en los entornos / Privacidad / Fábrica de restablecer los datos.
Atención: seleccione fábrica restablecer el formato de almacenamiento interno 1. la cuenta de
Google, los datos y el establecimiento de sistemas y aplicaciones, etc descarga de aplicaciones
Utilice con precaución.
ESPECIAL ATENCION:
La potencia de entrada es 9V/2A, por favor, no use otras especificaciones! Utilice siempre en cable
USB para cargar su LINSAY V-5HD
Page 46 of 51 www.LINSAYdigital.com
Page 48
TOLL FREE-1-855-LINSAY-HELP
Política de Garantía
Garantía limitada de un año en piezas y mano de obra
LINSAY ofrece una "garantía limitada de un año" contra defectos de fabricación en materiales y
mano de obra para el comprador original de un LINSAY nuevos comprados en una agencia o
EE.UU. LINSAY, que comienza en la fecha de compra por el cliente. El cliente es responsable de
mantener la prueba de la fecha de compra y debe hacer el registro del producto en los 30 días de la
compra en http://www.linsaydigital.com/registration.php para validar la garantía
Responsabilidad de LINSAY
LINSAY comprado nuevo de un distribuidor autorizado de LINSAY EE.UU. y que se utilizan en los
cincuenta (50) Estados Unidos o Puerto Rico tienen una garantía de estar libres de defectos de
fabricación en materiales y mano de obra por un (1) año a partir de la fecha de la compra original al
por menor . Garantía limitada de LINSAY sólo cubre aquellos defectos que surjan como resultado
del uso normal del producto, y no se aplican a cualquier operación de mantenimiento incorrecto o
inadecuado o modificación, software, interfaces, los medios de comunicación, piezas o suministros
no prestados o el apoyo de LINSAY; u operación fuera de las especificaciones del producto.
Si LINSAY recibe, durante el período de garantía vigente, aviso de un defecto en cualquier
producto de hardware, que está cubierto por LINSAY la garantía, LINSAY podrá optar por reparar o
sustituir el producto defectuoso a LINSAY opción.
Si LINSAY no puede reparar o sustituir, según corresponda, un producto defectuoso que esté
cubierto por la garantía de LINSAY, LINSAY en el plazo de un plazo razonable tras recibir la
notificación del defecto, reembolsar el precio de compra del producto.
Page 47 of 51 www.LINSAYdigital.com
Page 49
LINSAY no tendrá obligación de reparar, reemplazar o reembolsar hasta que el cliente devuelva el
producto defectuoso a LINSAY.
Las unidades enviadas a LINSAY para la reparación será la reparación o sustituido por un producto
nuevo o como nuevo (s) del mismo modelo con la misma funcionalidad que la unidad original.
Unidad original (s) le será devuelto sólo a discreción de LINSAY. Por favor copia de seguridad de
todo el contenido y archivos en el dispositivo. LINSAY no se hace responsable por el contenido de
la unidad original.
Garantía limitada de LINSAY sólo es válida en el país de compra.
LINSAY no validará las compras realizadas a través del comercio o trueque. Esto se refiere al
comercio o trueque entre los individuos en sitios como E-Bay, donde se facilita el comercio o las
transacciones de trueque.
LINSAY no garantiza los daños ocasionados a la pantalla en cualquier unidad vendida. Cualquier
defecto del fabricante es a la discreción y el discernimiento de los técnicos de reparación de
LINSAY como la unidad deberá estar en posesión del número autorización retorno RAN técnicos
para una evaluación completa y precisa a realizar.
Cómo obtener servicio de garantía
Para obtener servicio de garantía, póngase en contacto LINSAY soporte técnico por correo
electrónico a [email protected]. Usted debe proporcionar el modelo, número de
serie y fecha de compra. LINSAY Soporte Técnico está disponible de 10:00 AM a 5:00 PM ESTE,
de lunes a viernes, Tenga en cuenta que las horas de vacaciones pueden variar. Para obtener
información al día, por favor visite www.LINSAYdigital.com.
Linsay se reserva el derecho de evaluar todos los reclamos y para determinar si los defectos o
daños que están cubiertos por esta garantía limitada. En caso de una reclamación que no esté
cubierta por esta garantía, usted será contactado para determinar si Linsay debe reparar el daño de
una comisión o si el producto debe ser devuelto a usted como recibida por el técnico de servicio o
Page 48 of 51 www.LINSAYdigital.com
Page 50
centro de servicio.
Piezas y mano de obra de servicios que son responsabilidad Linsay bajo esta garantía limitada
será proporcionado sin costo alguno. Todos los servicios de otros es a cargo del cliente. Linsay se
reserva el derecho a cobrar al cliente para cualquier llamada de servicio para cualquier cosa no
cubiertos por esta garantía limitada. Antes de solicitar el servicio de garantía, por favor revise su
manual del usuario. Usted puede evitar una llamada de servicio y un cargo por servicio.
Por favor, consulte el reverso de esta página para obtener información adicional acerca de cómo
obtener servicio de garantía.
POR FAVOR NO DEVUELVA SU UNIDAD A Linsay SIN AUTORIZACIÓN PREVIA.
No están cubiertos
Esta garantía limitada no cubre lo siguiente: Los defectos cosméticos; averías daños o fallos
causados por el transporte marítimo o de tránsito, instalación incorrecta o defectuosa, el abuso, en
contra de la operación a las instrucciones suministradas, el funcionamiento de las fuentes de
alimentación incorrecta, no los productos suministrados por Linsay, modificación, alteración,
servicio inadecuado, alteración, daño por incendio, agua, rayos, picos de tensión, condiciones
ambientales anormales u otros actos de la naturaleza, uso y desgaste normal, el rendimiento visual
o de audio satisfactoria no es causado por un defecto de fabricación, o muestra una falta o número
de serie ilegible.
NO HAY GARANTÍA EXPRESA O DE LO INDICADO ANTERIORMENTE DESCRITOS.
CUALQUIER GARANTÍA IMPLÍCITA, INCLUYENDO CUALQUIER GARANTÍA IMPLÍCITA DE
COMERCIALIZACIÓN Y APTITUD PARA UN PROPÓSITO PARTICULAR, ESTARÁ LIMITADA A
LA DURACIÓN DEL PERIODO DE TIEMPO ESTABLECIDO ANTERIORMENTE.
RESPONSABILIDAD TOTAL Linsay EN CASO DE TODAS LAS PÉRDIDAS Y DAÑOS
CAUSADOS POR CUALQUIER MOTIVO, INCLUYENDO LA NEGLIGENCIA DE Linsay, perjuicio
alegado, O PRODUCTOS DEFECTUOSOS, ya sean defectos TAL SON DESCUBIERTOS
LATENTE O, EN NINGÚN CASO SUPERIOR AL PRECIO DE COMPRA DEL PRODUCTO.
Linsay NO SE HACE RESPONSABLE POR PÉRDIDA DE USO, LA PÉRDIDA COMERCIAL, LA
Page 49 of 51 www.LINSAYdigital.com
Page 51
PÉRDIDA DE BENEFICIOS O PÉRDIDA DE INGRESOS, U OTROS DAÑOS O DERIVADOS.
ALGUNOS ESTADOS NO PERMITEN LA LIMITACIÓN DE LA DURACIÓN DE LAS GARANTÍAS
IMPLÍCITAS O LA EXCLUSIÓN O LIMITACIÓN DE DAÑOS O INDIRECTOS, DE MODO QUE LAS
LIMITACIONES Y EXCLUSIONES ANTERIORES NO SEAN APLICABLES EN SU CASO.
Esta garantía le otorga derechos legales específicos, y usted también puede tener otros derechos
que varían de estado a estado. Esta es la única garantía aplicable, nadie está autorizado a ampliar
o modificar ni conceder ninguna otra garantía en nombre de Linsay.
Responsabilidad del propietario
Para garantizar el servicio de garantía, mantenga el proyecto de ley de fecha o recibo de compra
como prueba de la fecha de compra y la ubicación.
Esta garantía limitada se aplica solamente al comprador original y es intransferible.
Condiciones de servicio de garantía están sujetas a cambios. Para conocer las últimas condiciones
de la garantía y la información adicional con respecto a Linsay limitada de garantía del producto,
por favor ver los detalles completos en línea en www.LINSAYdigital.com
Page 50 of 51 www.LINSAYdigital.com
 Loading...