

Page 1

IA
AMC
XCDi
Compact Disc Player
RC-S2
Page 2

Page 3

WARNING! INVISIBLE LASER RADIATION WHEN OPEN AND INTERLOCKS DEFEATED.
AVOIDEXPOSURE TOBEAM.
VORSICHT! UNSICHTBARE LASERSTRAHLENTRITT AUS, WENNDECKEL GE FFNET
UND WENN SICHERHEITSVERRIEGELUNG BERBR CKT IST. NICHT DEM STRAHL
AUSSETZEN.
ADVARSEL- USYNLIG LASERSTR LING VED BNING, N R SIKKERHEDSAFBRYDERE
ER UDEAF FUNKTION.UNDG UDS TTELSE FORSTR LUNG.
ADVARSEL- USYNLIG LASERSTR LING N R DEKSEL PNES OG SIKKERHEDSL S
BRYTES. UNNG EKSPONERING FORSTR LEN.
VARNING-OSYNLIG LASERSTR LNING N R DENNADEL R PPNAD OCHSP RRAR
R URKOPPLADE.STR LEN R FARLIG.
VAR O!- AVAT TAESSA JA SUOJALUKITUS OHITETTAESSA OLET ALTTlINA
N KYM T NNT LASERS TEILYLLE. L KATSO S TEESEEN.
SERVICE SAFETY PRECAUTIONS (UL)
1. Use exact replacement partsfor critical locations, marked " ".
2. Return lead dress to original position, and re install protective
covers.
3. Before returning to customer, test for shock hazard; use either
methodA or B:
A. Leakage test, "cold":
1. Unplug ACcord; turn power switchON.
2. Connect one lead ofHigh Voltage InsulationTester to bothprongs
ofAC plug.
3. Touchother lead to all exposed metalparts.
4. Impedance measurement must be0.3-5.0 Megohms.
B. Leakage test, "live":
1. Plug unit directly intoAC outlet;do not use isolation transformer.
2. Connect one lead ofLeakage Current Testerto earth ground.
3. Touchother lead to all exposed metalparts.
4. Leakage measurement must beless than 0.5 milliamps.
LUOKAN 1 LASERPLAITE
CLASS 1 LASER PRODUCT
KLASS 1 LASERAPPARAT
CAUTION:
ATTENTION:
FOR CONTINUED PROTECTION AGAINST RISK OF FIRE, REPLACE ONLY WITH THE SAME
TYPE OF T1A/250V FUSES.
POUR MAINTENIR PROTECTION CONTRE RISQUE D'INCENDIE, UTILISER LES FUSIBLES
DE RECHANGE DE MEMETYPE DE T1A/250V.
THIS DIGITAL APPARATUS DOES NOT EXCEED THE CLASS B LIMITS FOR RADIO NOISE EMISSIONS
FROM DIGITAL APPARATUS AS SET OUT IN THE RADIO INTERFERENCE REGULATIONS OF THE
CANADIAN DEPARTMENTOF COMMUNICATIONS.
LE PRESENT APPAREIL NUMVERIQUE N'EMET PAS DE BRUITS RADIOELECTRIQUES DEPASSANT
LES LIMITES APPLICABLES AUX APPAREILS NUMERIQUES DE LA CLASSE B PRESCRITES DANS LE
REGLEMENT SUR LE BROUILLAGE RADIO ELECTRIQUE EDICTE PAR LE MINISTERE DES
COMMUNICATIONS DU CANADA.
THIS DEVICE COMPLIES WITH PART 15 OF THE FCC RULES. OPERATION IS SUBJECT TO THE
FOLLOWING TWO CONDITIONS:
(1) THIS DEVICE MAYNOT CAUSE HARMFULINTERFERENCE, AND
(2) THIS DEVICE MUST ACCEPT ANY INTERFERENCE RECEIVED, INCLUDING INTERFERENCE THAT
MAY CAUSE UNDESIRED OPERATION.
2
Page 4

FEATURES OF THE AMC MODEL XCDi
PCM
Compact Disc CD"
TM
· The AMC model XCDi was designed to play standard non-compressed
(here after we will call it " ) .
·
·
·
·
·
·
·
The AMC model XCDi was designed to meet professional quality performance
standard and to provide superior value.
Selected grade components are utilized throughout the circuit design with special
emphasis on components within the audio path to assure stable, consistent
performance.
Premium transport and servo drive system assures constant data retrieval and
unsurpassed tracking performance,
Unique linear active LPF (Low Pass Filter) prevents interference from ultrasonic
noise commonly found in other CD playback systems.
Advanced power supply design incorporates separate windings for the digital,
analog and servo circuits to prevent interference and preserve sonic performance.
EIA calibrated audio outputs ensure proper match with preamplifiers and receivers.
Full-function infrared (IR) System Remote Control (for system including XCDi
Compact Disc Player and X7i Stereo Receiver) with direct track access.
3
Page 5

1
17
8
3
4
25
6
2
3
1. AUDIO OUTPUT
2. OPTICAL DIGITAL OUTPUT
3. AC RECEPTACLE
1. POWER SWITCH
2. OPEN/CLOSE
3. PLAY/PAUSE
4. STOP
5. TRACK UP/DOWN
6. REPEAT
7. DISPLAY
8. CD TRAY
REAR PANEL CONNECTIONS/FRONT PANEL CONTROLS
REAR PANEL
FRONT PANEL
4
Page 6

5
1. AUDIO OUTPUT 2. OPTICAL DIGITAL OUTPUT
3. AC RECEPTACLE
Connect the left and right channel
unbalanced (RCA) audio outputs to any
input on your preamplifier or receiver
except "Phono" or "Turntable". Highquality interconnection cables are
recommended.
Connect the Optical digital output to
optical digital input of amplifier or
receiver.
The AC RECEPTACLE is for you to plug
in with power cord attached in the
packing.
1. POWER SWITCH
2. OPEN / CLOSE
3. PLAY/PAUSE
Depressing the power switch turns on the
CD player. Depressing again turns the
CD player off.
AMC designs the power switch as
mechanical type for users to set the
power switch always ON and plug power
cord of XCDi to Switched AC Outlet of X7i
Stereo Receiver for making the XCDi &
X7i as a linked Hi-Fi System together.
Users can then turn the System (XCDi +
X7i) On or Off by control the power switch
of X7i only by pushing power switch on
X7i front panel or Power button on RC-S2
System Remote Control handset.
By pressing the OPEN/CLOSE button the
disc tray will open. Press it again will
close the tray. If the tray is opened while
a disc is playing, the disc will stop and the
tray will open.
An opened tray can also be closed by
pressing PLAY/PAUSE button or by
gently pushing the tray inward.
When the disc tray is open, the window
will display "OPEN"
For CD, when you press OPEN/ CLOSE
button to close disc tray, the window will
display "-- --" for around one second then
display numbers of tracks (show "##"
under "TRK")
inside the disc and total time on the disc
("##: ##" = "Minutes": "Sec")
Place CD disc into the opened tray with
the label facing up. Press the PLAY/
PAUSE button or OPEN/CLOSE button
will both close the tray and pass through
the procedure described on above item
"2.OPEN/CLOSE". When all data are
loaded, you can press PLAY/PAUSE
button and begin playback. Or you can
use Track Up/ Down buttons (5) to select
the TRACK then press PLAY/PAUSE
button and begin playback.
Playback will stop when STOP button is
pressed or when the disc has reached the
end. While the disc is playing, press the
PLAY/PAUSE button to suspend playback
(PAUSE). Press the PLAY/PAUSE button
again to resume playback.
4. STOP
To stop the CD while playing, press the
STOP button. Pressing the STOP button
will cancel any repeat play cycles and the
display will show the numbers of the
tracks and total time on the disc.
Page 7

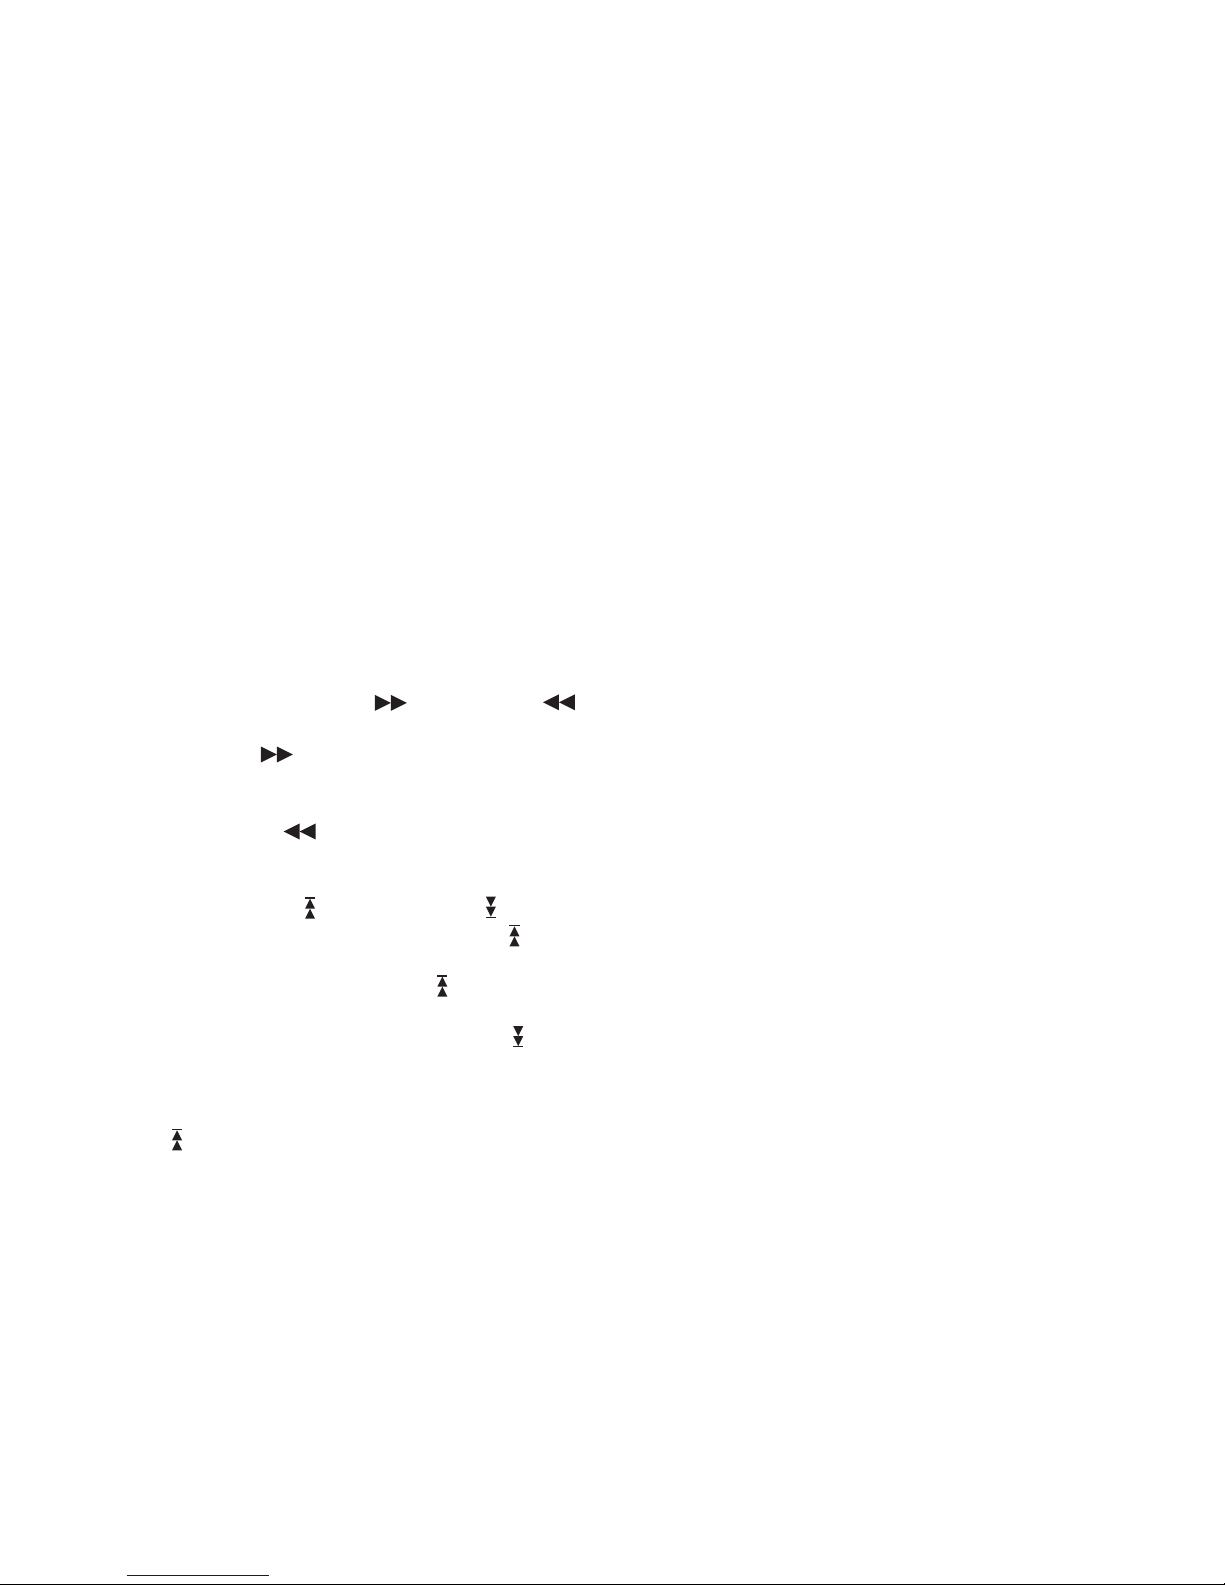
5. TRACK UP/DOWN
6. REPEAT
7. DISPLAY
TRACK
Time
RPT
RPT 1
8. CD TRAY
During play, press and hold down TRACK
UP( ) or DOWN ( ) to desired
passage.
Press TRACK UP ( ) or DOWN ( )
momentarily to desired track.
Press REPEAT button once, the word
"RPT" will appear on the display and the
entire disc will be played repeatedly until
the STOP button is pressed.
Press REPEAT button a second time, the
word "RPT1" will appear and the track will
be played repeatedly until the STOP
button is pressed.
Press REPEAT button a third time or
press the STOP button to cancel
REPEAT mode. The display and
operation will return to normal.
When loading a disc and using the
OPEN/CLOSE button to close the disc
tray, the TOC (Table of Contents) of the
disc will be read and display will show the
number of tracks and total playing time of
all the tracks on the disc. For those discs
without TOC or data of time of each track,
the display of total time on the disc will be
"00:00"
During playing, the following information
is displayed:
Track number display
Time display
Play indicator
Pause indicator
Glows during repeat play of the entire
disc
Glows during repeat play of a single track
This is a tray for placing CD into the CD
player.
6
Page 8

RC-S2
1
1
2
3
7
6
5
6
8
10
12
2
3
4
5
9
12
11
7
An infrared (IR) system remote control is provided for convenience operation of the
XCDi and AMC Receiver X7i. The handset provides XCDi control functions listed in
below.
Page 9
8
1. POWER ON, POWER STANDBY
2. SOURCES CD, FM , TAPE, AUX,
PHONO
3. VOLUME + & VOLUME -
4. REPEAT
5. Search Forward & Backward
6. Track Up & Track Down
7. TIME
8. PLAY
9. PAUSE
10. STOP
11. NUMERIC BUTTONS (0 ~ 9)
FM
FM
12. FM & MUTE buttons
These buttons are for X7i only, not for
XCDi.
AM
There is only one button "CD" apply to
XCDi.
When you want to control XCDi using the
Remote Control RC-S2, please press
"CD" button 1 .
These buttons are for X7i only, not for
XCDi.
Same function as panel "REPEAT"
button.
During play, press and hold Search
Forward button to search for a desired
passage in fast forward.
During play, press and hold Search
Backward button to search for a
desired passage in fast backward.
During play, press Track Up button
momentarily to play next track.
Press and hold Track Up button to play
desired track.
During play, press Track Down button
momentarily to play the beginning of the
track. Press a second time to play
previous track. Press and hold Track Up
button to play desired track.
During play, press TIME button once, the
remaining time of the track will appear on
the display.
Press TIME a second time, the remaining
time of disc will appear on the display.
Press TIME a third time, the display
return to normal showing elapsed time of
the track.
Same function as panel "PLAY".
Same function as panel "PAUSE".
Same function as panel "STOP".
NOTE: These 0 ~ 9 buttons initial is AMC
Receiver X7i codes.
Pressing "CD" in "SOURCES" group or
any key in "CD" group, 0 ~ 9 is changed
to XCDi codes and keep it until any key of
" AM" in "SOURCES" group or any
key in " AM" group is pressed then 0 ~
9 is changed back to initial AMC Receiver
X7i codes.
Allows directly access of desired track.
Upon entry of the desired track number,
the player shifts to the beginning of the
track and begins to play.
AM
These buttons are for X7i only, not for
XCDi.
st
Page 10

9
SPECIFICATIONS
Weltronics Corp. reserved the right to improve its products at any time. Specifications are
subject to change without notice.
AUDIO OUTPUT (Ref. 1KHz/0dB, unless otherwise stated):
OPTICAL DIGITAL OUTPUT:
PHYSICAL:
Disc capacity .....................................Single disc, 120 or 80mm
Frequency response 20Hz-20KHz................................ <+/-0.3 dB
Linearity . .......................................... +/-0.5 dB; 0 to -90 dB
Channel separation (20Hz to 20KHz) ................................ >85dB
S/N ratio (A-weighted, measured with all zeros test disc) ................. 110dB
Dynamic range .................................................. 95dB
THD (at 0dB, 1KHz, A-weighted) ................................... 0.005%
....................... Immeasurable (Quartz crystal accuracy)
Digital output level........................................... -15~-20dBm
Laser............................................. Semiconductor AlGaAs
Peak emission wave length ............ ........................... 660nm
Dimensions (WxHxD).................................... mm
Net weight .....................................................5.0Kgs
Shipping weight (4 pieces) .........................................28Kgs
Power consumption................................................12W
Output level at 0dB ...............................................2Vrms
Wow and flutter
430x98x291
Page 11

All the safety and operating instructions should be read
before the appliance is operated.
The safety and operating instructions should be retained for
future reference.
All warnings on the appliance and in the operating instructions
should be adhered to.
All operating and use instructionsshould be followed.
The appliance should not be used near water - for example,
near a bathtub, washbowl, kitchen sink, laundry tub, in a wet
basement, or near a swimmingpool, etc.
The appliance should be used only with a cart or stand that is
recommended by the manufacturer.
An appliance and cart combinationshould be
moved with care. Quick stops,excessive force,
and uneven surfaces may causethe appliance
and cart combination to overturn.
This equipment is not designed for use mounted on a wall or a
ceiling.
The appliance should be situatedso that its location or position
does not interfere with its proper ventilation. For example, the
appliance should not be situated on a bed, sofa, rug, or similar
surface that may block the ventilation openings, or placed in a
built-in installation, such as bookcase or cabinet that may
impede the flow of airthrough the ventilation openings.
The appliance should be situated away from heat sources
such as radiators, heat registers, stoves, or other appliances
(including amplifiers) that produce heat.
The appliance should be connected to a power supply only of
the type described in the operating instructions or as marked
on the appliance.
Power-supply cords should be routedso that they are not likely
to be walked on or pinched by items placed upon or against
them, paying particular attention to cords at plugs,
convenience receptacles, and the point where they exit from
the appliance
The appliance should be cleaned only as recommended by
the manufacturer.
The power cord of the appliance shouldbe unpluggedfrom the
outlet when left unused fora long period of time.
Care should be taken so that objects do not fall and liquids are
not spilled into the enclosurethrough openings.
The user should not attempt to service the appliance beyond
that described in the operating instructions.All other servicing
should be referred to qualifiedservice personnel.
The appliance should be serviced by qualified service
personnel when:
a) The power-supply cord or theplug has been damaged; or
b) Objects have fallen, or liquid has been spilled into the
appliance; or
c) The appliance has beenexposed to rain; or
d) The appliance does not appear to operate normally or
exhibits a marked change inperformance; or
e) The appliance has been dropped, or the enclosure is
damaged.
(APPLIES TO TUNER AND RECEIVERSONLY)
An outdoor antenna should belocated away from power lines.
(APPLIES TO TUNER AND RECEIVERSONLY)
If an outside antenna isconnected to the receiver, be sure the
antenna system is grounded soas to provide some protection
against voltage surges and builtup static charges.
Section 810 of the NationalElectrical Code, ANSI/NFPA No.
70-1984, provides information with respect to proper
grounding of the mast and supporting structure, grounding of
the lead-in wire to anantenna discharge unit, size of grounding
conductors, location of antenna-discharge unit, connection to
grounding electrodes, and requirements for the grounding
electrode. See Figure.
a) Use No. 10 AWG (5.3 mm ) copper, No. 8 AWG (8.4 mm )
aluminum, No. 17 AWG (1.0 mm ) copper-clad steel or
bronze wire, or larger, as a ground wire.
b) Secure antenna lead-in and ground wires to house with
stand-off insulators spaced from 4-6 feet (1.22-1.83 m)
apart.
c) Mount antennadischarge unit as close as possibleto where
lead-in enters house.
d) Use jumper wire not smaller than No.6 AWG (13.3 mm )
copper, or the equivalent, when a separate antenna-
grounding electrode is used. SeeNEC Section 810-21(j).
1. READ INSTRUCTIONS
2. RETAIN INSTRUCTIONS
3. HEED WARNINGS
4. FOLLOW INSTRUCTIONS
5. WATER AND MOISTURE
6. CARTS AND STANDS
6A.
7. WALL OR CEILING MOUNTING
8. VENTILATION
9. HEAT
10. POWER SOURCES
11. POWER-CORD PROTECTION
12. CLEANING
13. NONUSE PERIODS
14. OBJECT AND LIQUID ENTRY
15. SERVICING
16. DAMAGE REQUIRING SERVICE
17. POWER LINES
18. OUTDOOR ANTENNA GROUNDING
22
2
2
SAFETY INSTRUCTION
S3125A
PORTABLECART WARNING
Antenna Lead
In Wire
Ground
Clamp
Electric
Service
Equipment
Power Service Grounding
Electrode System
(NEC Art 250 Part H)
Ground Clamps
Antenna
Discharge
Unit (NEC
Section 810.20)
Grounding Conductors
(NEC Section 810.21)
Antenna Grounding According to
the National Electrical Code
National Electrical Code
Available from Library, book
stores, or National Fire Protection
Association (Batterymarch Park,
Quincy. MA 02269).
AMC 21-3004
Page 12

WELTRONICS CORP.
LONDON/L.A.
AMC Web: http://www.amchome.com
PN: 21R-4217
 Loading...