

Page 1
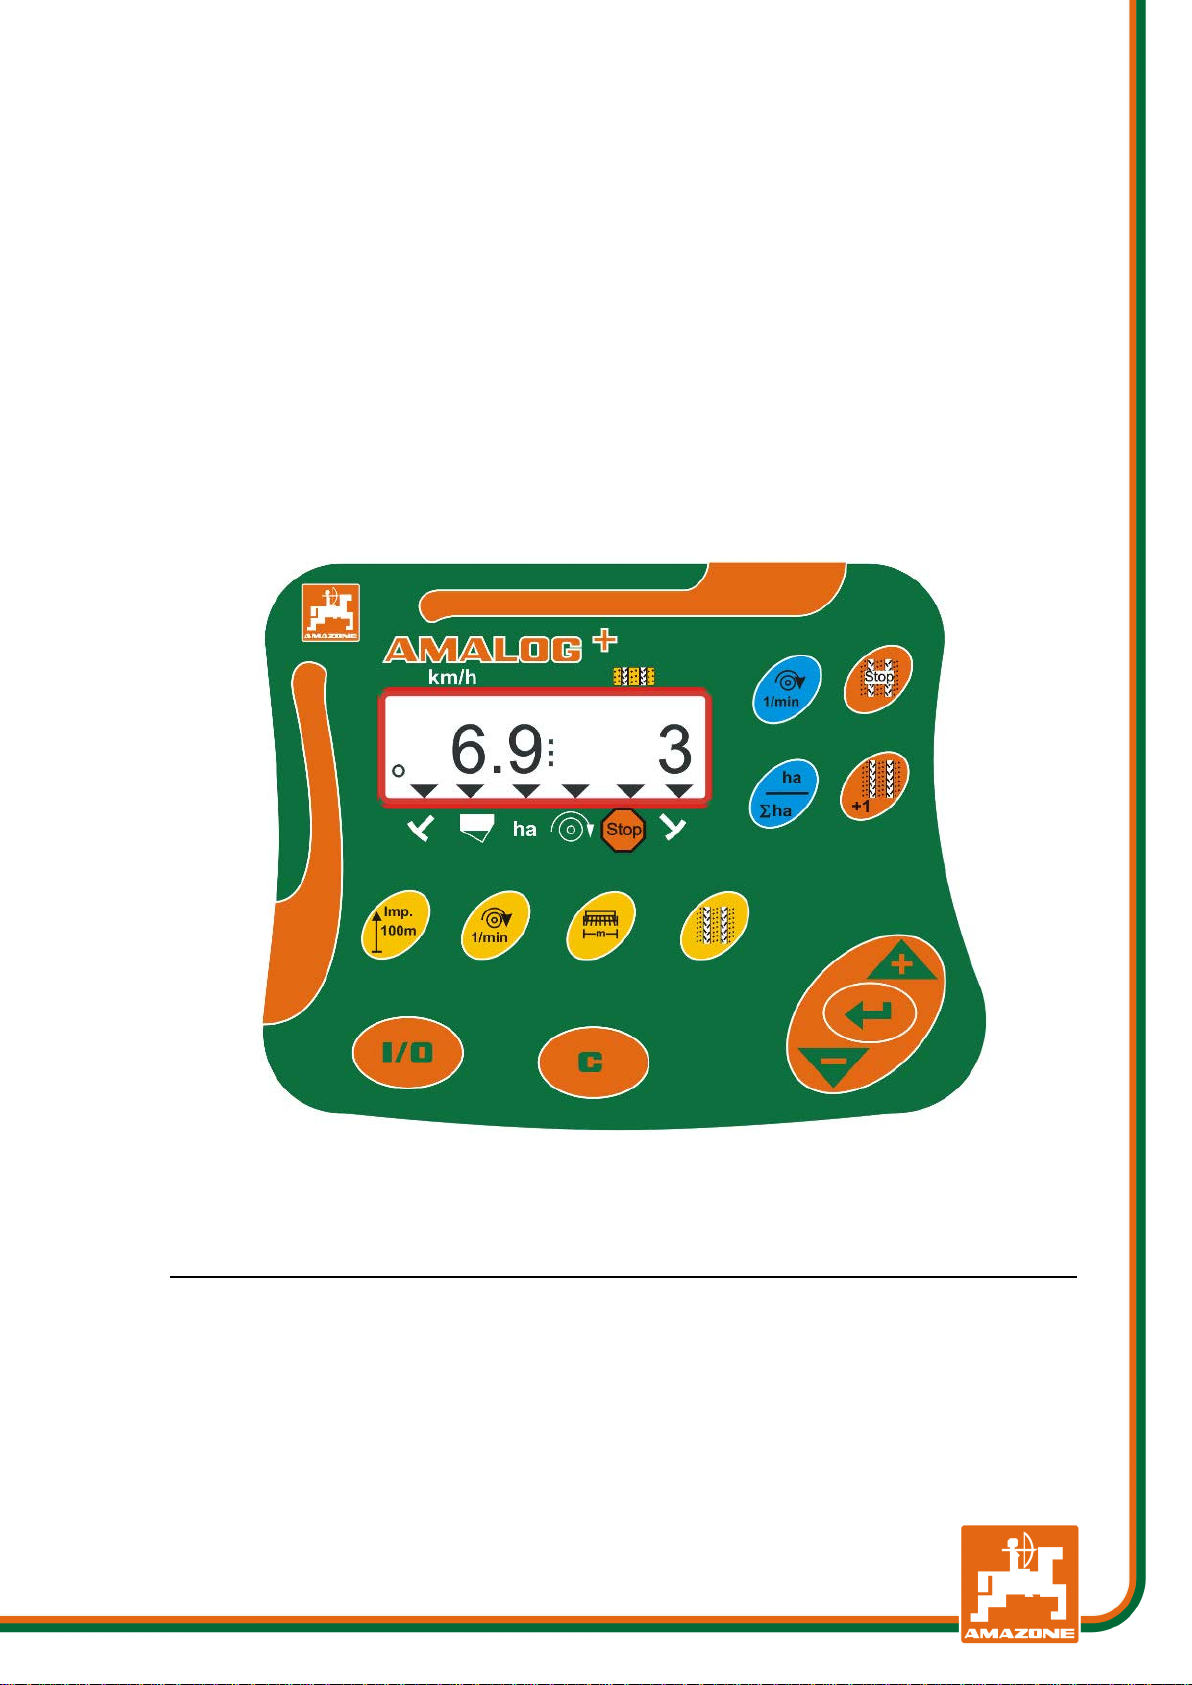
AMALOG+
MG3828
BAH0017.5
Read and follow this
operating manual before
putting the machine into
operation.
Keep it in a safe place for
future use!
en
Operating Manual
az
On-board computer
06.15
Page 2

2
Reading the instruction
manual and to adhere to it should not appear to
be inconvenient and superfluous as it is not
enough to hear from others and to realise that a
machine is good, to buy it and to believe that now
everything would work by itself. The person concerned would not only harm himself but also
make the mistake of blaming the machine for the
reason of a possible failure instead of himself. In
order to ensure a good success one should go into
the mind of a thing or make himself familiar with
every part of the machine and to get acquainted
with its handling. Only this way, you would be
satisfied both with the machine as also with
yourself. To achieve this is the purpose of this instruction manual.
Leipzig-Plagwitz 1872.
AMALOG BAH0017.5 06.15
Page 3

Identification data
AMALOG
3
AMALOG On-board Computer
AMAZONEN-WERKE
D-49202
Hasbergen, Germany
Spare parts lists are freely accessible in the spare parts portal at
Document number:
MG3828
Compilation date:
06.15
Identification data
Manufacturer's address
H. DREYER GmbH & Co. KG
Postfach 51
Tel.:
Fax:
E-mail:
Spare part orders
www.amazone.de.
Please send orders to your AMAZONE dealer.
Formalities of the operating manual
Copyright AMA Z ONEN -WERKE H. DREYER GmbH & Co. K G, 2015
All rights reserved.
Reprinting, even of sections, permitted only with the approv al of
AMAZONEN-WERKE H. DREYER GmbH & Co. KG.
+ 49 (0) 5405 50 1-0
+ 49 (0) 5405 501-234
[email protected]
BAH0017.5 06.15
Page 4

Foreword
4
Dear Customer,
Dear Reader,
D-49202
Hasbergen, Germany
Foreword
User evaluation
You have chosen one of the quality products from the wide product
range of AMAZONEN-WERKE, H. DREYER GmbH & Co. KG. We
thank you for your confidence in our products.
Before commissioning for the first time, read and understand this operating manual, particularly the safety information.
We update our operating manuals regularly. Your suggestions for improvement help us to create ever more user-friendly manuals. Send
us your suggestions by fax.
AMAZONEN-WERKE
H. DREYER GmbH & Co. KG
Postfach 51
Tel.:
Fax:
E-mail:
+ 49 (0) 5405 50 1-0
+ 49 (0) 5405 501-234
[email protected]
AMALOG BAH0017.5 06.15
Page 5

Table of Contents
AMALOG
5
1 User Information .......................................................................................... 7
1.1 Purpose of the document ......................................................................................................... 7
1.2 Locations in the operating manual ........................................................................................... 7
1.1 Diagrams used ......................................................................................................................... 7
2 General Safety Instructions ........................................................................ 8
2.1 Obligations and liability ............................................................................................................ 8
2.2 Informal safety measures ......................................................................................................... 8
2.3 User workstation ...................................................................................................................... 8
2.4 Safety-conscious work ing ........................................................................................................ 9
2.5 Handling the product ................................................................................................................ 9
2.6 Representation of safety symbols .......................................................................................... 10
3 Product description ................................................................................... 11
3.1 Intended use .......................................................................................................................... 12
3.2 CE marking ............................................................................................................................ 12
4 Layout and function ................................................................................... 13
4.1 Operation with DMC Primera direct seed drills ...................................................................... 13
4.2 Operation with rotary cultivator .............................................................................................. 13
4.3 Operation with seed drills ....................................................................................................... 14
4.3.1 Operation with cam wheel seed drill ...................................................................................... 14
4.3.2 Operation with pneumatic seed drills ..................................................................................... 15
4.4 Work display........................................................................................................................... 16
4.5 Key assignment ..................................................................................................................... 18
4.6 Creation of tramlines .............................................................................................................. 19
5 Commissioning .......................................................................................... 22
5.1 Installing the terminal ............................................................................................................. 22
5.2 Connecting the terminal ......................................................................................................... 22
5.3 Switching the terminal on/off .................................................................................................. 23
6 Settings ....................................................................................................... 24
6.1 Entering machine data ........................................................................................................... 24
6.2 Displaying / altering the work ing width ................................................................................... 25
6.3 Displaying / altering the target blower fan speed (during standstill) ...................................... 25
6.4 Displaying / altering the target blower fan speed (during operation) ..................................... 26
6.4.1 Displaying / altering the tramline rhythm ................................................................................ 26
6.5 Calibration value (impulses per 100 m) ................................................................................. 27
6.5.1 Determining / storing the calibration value (impulses per 100 m) .......................................... 27
6.5.2 Display / change the stored calibration value (pulses per 100 m) ......................................... 28
6.5.3 Calculating the number of crank turns for the calibration test ............................................... 29
7 Starting work .............................................................................................. 30
7.1 Tramline counter .................................................................................................................... 31
7.1.1 Setting the tramline counter ................................................................................................... 31
7.1.2 Block the tramline counter ..................................................................................................... 31
7.2 Worked area........................................................................................................................... 32
7.2.1 Displaying the worked part area ............................................................................................ 32
7.2.2 Erasing the part area memory ............................................................................................... 32
7.2.3 Display the total area ............................................................................................................. 32
7.3 Display during work ................................................................................................................ 33
7.4 Function keys ......................................................................................................................... 33
7.4.1 Disp lay of the current blower fan speed ................................................................................ 33
8 Faults .......................................................................................................... 34
8.1 Fault displa y A3 ..................................................................................................................... 34
BAH0017.5 06.15
Page 6

Table of Contents
6
8.2
Fault display A4 ..................................................................................................................... 34
8.3 Fault displa y A5 ..................................................................................................................... 35
8.4 Fault display A6 (DMC Primera, Condor and Citan 01 only) ................................................ 36
9 Tables ......................................................................................................... 37
9.1 Machine data table ................................................................................................................ 37
9.2 Table for adjustable tramline rhythms ................................................................................... 39
9.3 Tables: calibration values / crank turns (guide values) ......................................................... 40
9.4 Table for calibration values / crank turns for the calibration test ........................................... 43
AMALOG BAH0017.5 06.15
Page 7

User Information
AMALOG
7
The User Information section supplies information on use of the oper-
This operating manual
All the directions specified in the operating manual are always seen
Activities to be carried out by the user are given as numbered instruc-
Lists without an essential order are shown as a list with bullets.
Numbers in round brackets refer to the item numbers in the diagrams.
1 User Information
ating manual.
1.1 Purpose of the document
• describes the operation of the on-board computer
• provides important information on safe and efficient handling
• is a component of the on-board computer and should always be
kept with the machine or the traction vehicle
• keep it in a safe place for future use.
1.2 Locations in the operating manual
from the direction of travel.
1.1 Diagrams used
Handling instructions and reactions
tions. Always keep to the order of the handling instructions. The reaction to the handling instructions is given b y an arrow.
Example:
1. Handling instruction 1
Reaction of the machine to handling instruction 1
2. Handling instruction 2
Lists
Example:
• Point 1
• Point 2
Number items in diagrams
The first number refers to the diagram and the second number to the
item in the figure.
Example (Fig. 3/6)
• Figure 3
• Item 6
BAH0017.5 06.15
Page 8

General Safety Instructions
8
This section contains important information on safe operation of the
Knowledge of the fundamental safety information and safety regula-
Our "General conditions of sales and delivery" are always applicable.
As well as all the safety information in this operatin g manual, comply
with the general, national regulations pertaining to accident prevention
The on-board computer may be operated by only one person sitting in
2 General Safety Instruct ions
on-board computer.
2.1 Obligations and liability
Comply with the instructions in the operating manual
tions is a basic requirement for safe handling and fault-free operation
of the on-board computer.
Guarantee and liability
These shall be available to the operator, at the latest on the completion of the contract.
Guarantee and liability claims for damage to people or goods will be
excluded if they can be traced back to one or more of the following
causes:
• Improper use of the on-board computer
• Improper installation, commissioning and operation of the on-
board computer
• Non-compliance with the instructions in the operating manual re-
garding commissioning, operation and maintenance
• Independently executed constructive changes to the on-board
computer.
2.2 Informal safety measures
and environmental protection.
2.3 User workstation
the driver's seat of the tractor.
AMALOG BAH0017.5 06.15
Page 9

General Safety Instructions
AMALOG
9
Besides the safety inform ation in this opera tin g m anual, the nation al
• Do not subject the on-board computer to any mechanical vibra-
2.4 Safety-conscious working
general workplace safety and accident prevention regulations are
binding.
2.5 Handling the product
tions or jolts.
• Do not drop the on-board computer.
• Do not touch the on-board computer display with an y sharp ob-
jects, as this may damage the display.
• Protect the on-board computer from wetness and moisture.
• Do not place the on-board computer near heat sources such as
radiators or ovens.
• Never open the housing of the on-board computer.
If repairs are necessary, contact a specialist workshop.
BAH0017.5 06.15
Page 10
General Safety Instructions
10
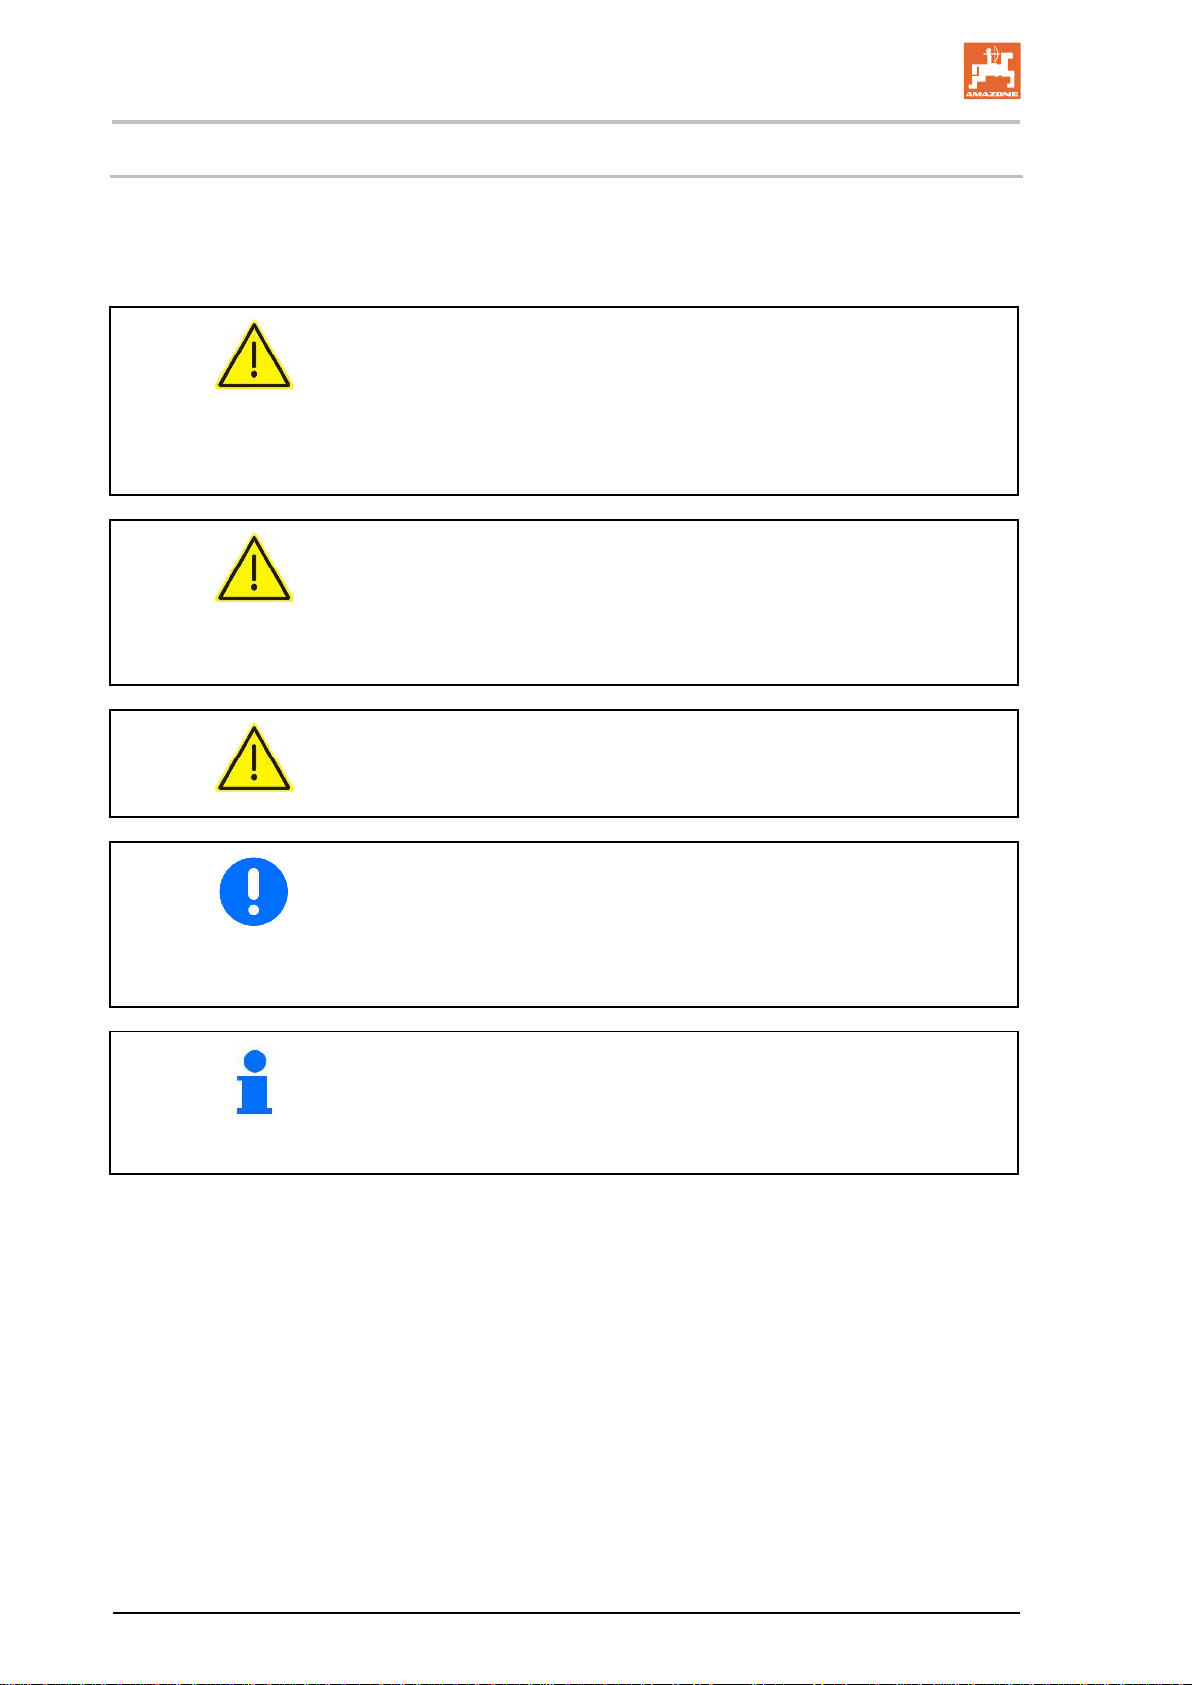
Safety instructions are indicated by the triangular safety symbol and
2.6 Representation of safety symbols
the highlighted signal word. The signal word (DANGER, WARNING,
CAUTION) describes the gravity of the risk and has the following significance:
DANGER
Indicates an immediate high risk, which will result in death or se-
rious physical injury (loss of body par ts or long-term damage) if
not avoided.
If the instructions are not followed, then this will result in immediate death or serious physical injury.
WARNING
Indicates a medium risk, which could result in death or (serious)
physical injury if not avoided.
If the instructions are not followed, then this may result in death
or serious physical injury.
CAUTION
Indicates a low risk, which could incur minor or medium-level
physical injury or damage to property if not avoided.
IMPORTANT
Indicates an obligation to special behaviour or an activity required for
proper machine handling.
Non-compliance with these instructions can cause faults on the machine or in the environment.
NOTE
Indicates handling tips and particularly useful information.
These instructions will help you to use all the functions of your ma-
chine to the optimum.
AMALOG BAH0017.5 06.15
Page 11
Product description
AMALOG
11
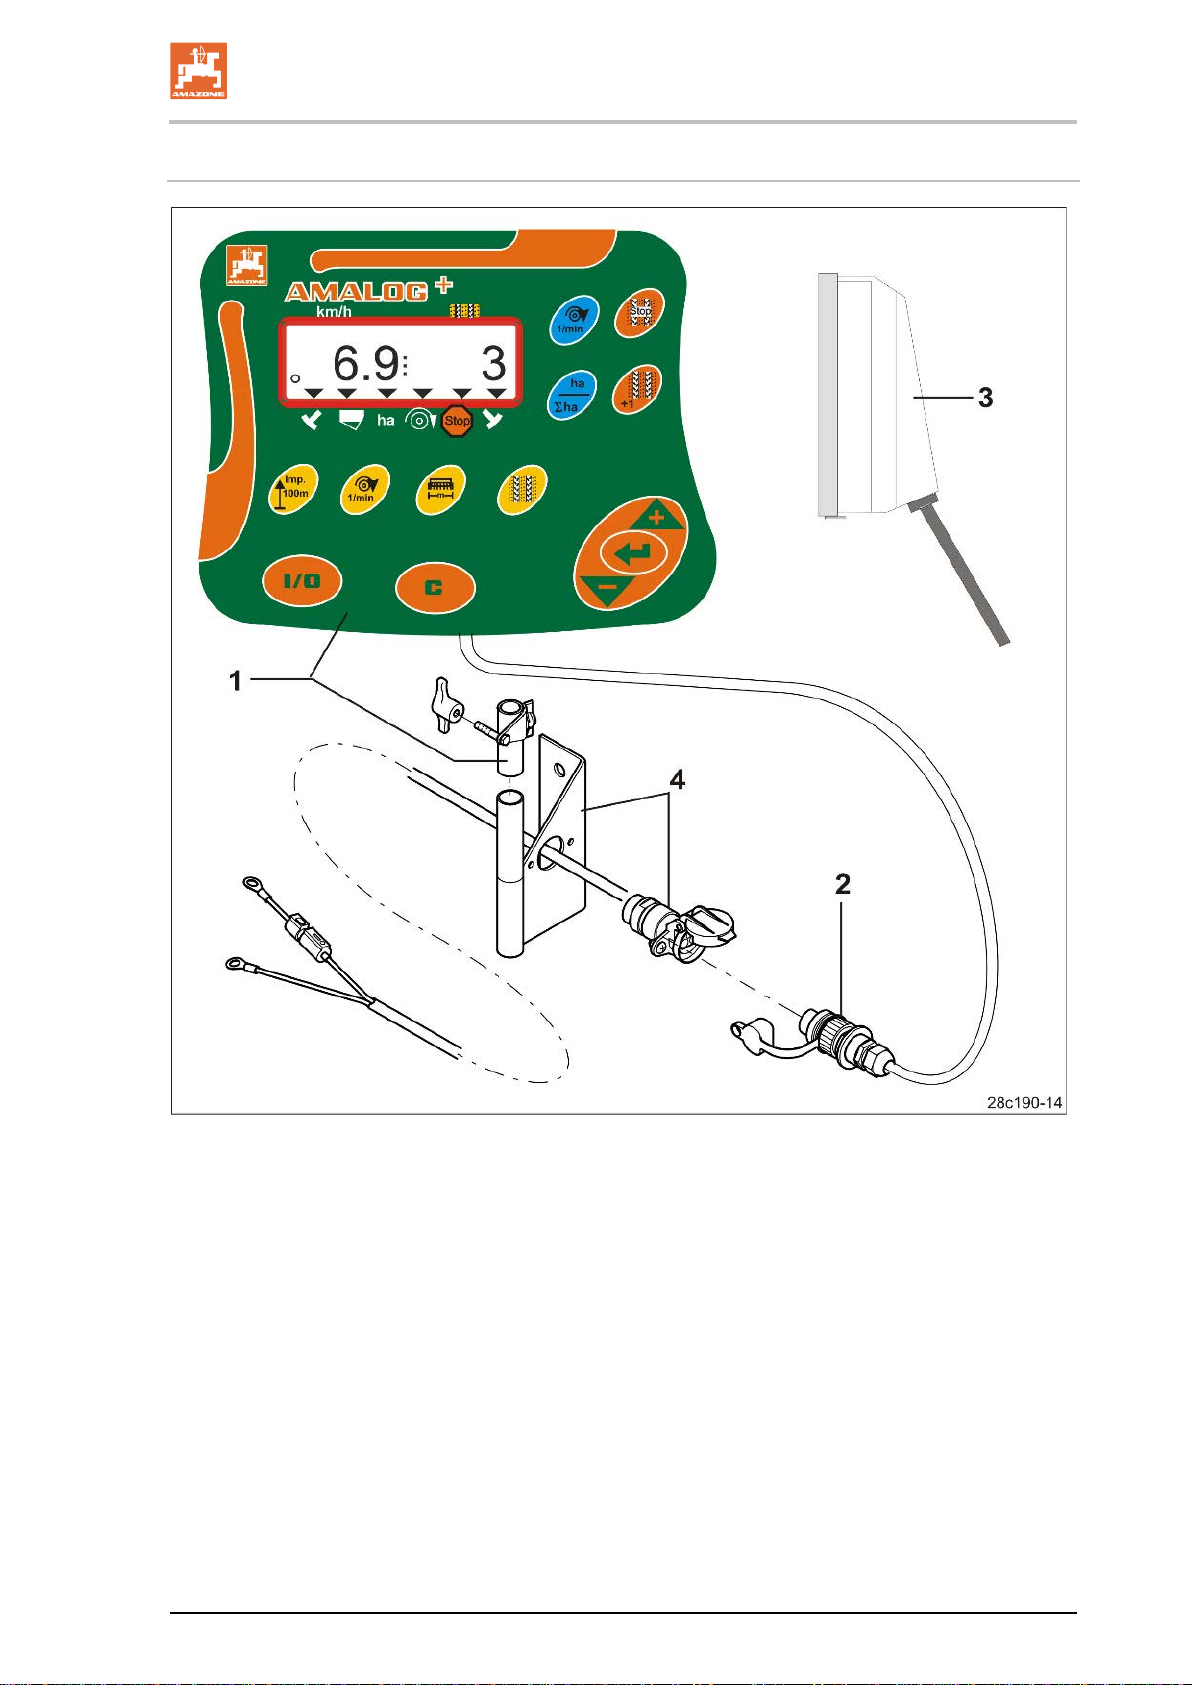
Special optional equipment
(1) On-board computer with fixing console
(4) Console with battery cable
3 Product description
Fig. 1
Standard equipment Fig. 1/...
(2) Socket connection, 12V
(3) Cable harness with 20-pi n c onnec tor
BAH0017.5 06.15
Fig. 1/...
choice of
one or two sockets
Page 12

Product description
12
The CE marking (Fig. 2) signalises compliance
Fig.
Battery voltage:
12 V (volts)
3.1 Intended use
The on-board computer is intended exclusively for conventional use as a display and monitoring unit in
agricultural applications.
Intended use also includes observing all instructions in this instruction manual.
Other uses to those specified above are forbidden and shall be considered as improper.
For any damage resulting from improper use:
• the operator bears the sole responsibility,
• AMAZONEN-WERKE assumes no liability whatsoever.
3.2 CE marking
with the stipulations of the valid EU directives.
Electrical system
2
AMALOG BAH0017.5 06.15
Page 13
Layout and function
AMALOG
13
The following section provides information on the structure of the on-board computer and the func-
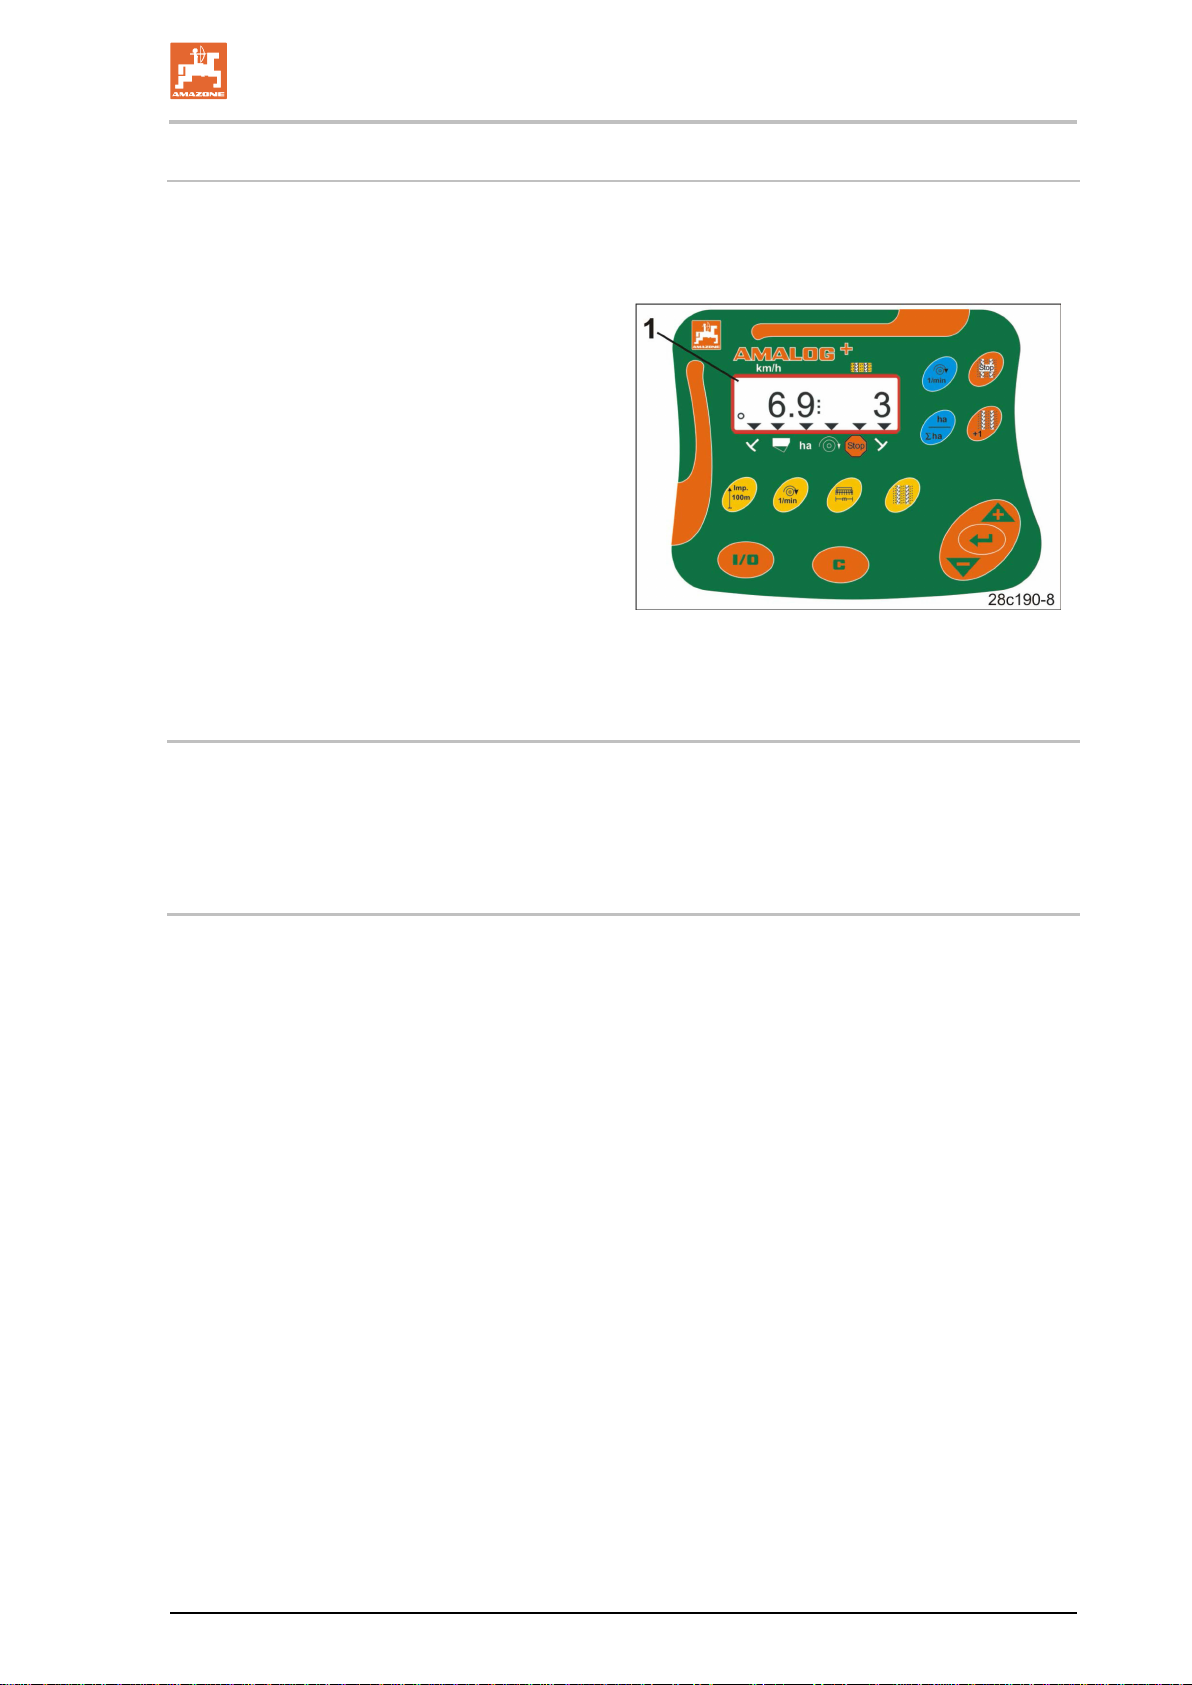
The on-board computer features a 6-digit display
Fig.
The on-board computer initiates an alarm when the set minimum fertiliser quantity is reached in the
The on-board computer monitors the function of the overload clutch.
4 Layout and function
tions of the individual components.
(Fig. 3/1).
The on-board computer is equipped with an
EEPROM (memory chip) for storing data.
The data are again available for the next use,
even after a long period of deactivation of the onboard power supply.
3
4.1 Operation with DMC Primera direct seed drills
fertiliser hopper.
4.2 Operation with rotary cultivator
Acoustic alarm in event of tool carrier standstill.
BAH0017.5 06.15
Page 14
Layout and function
14
AMALOG+
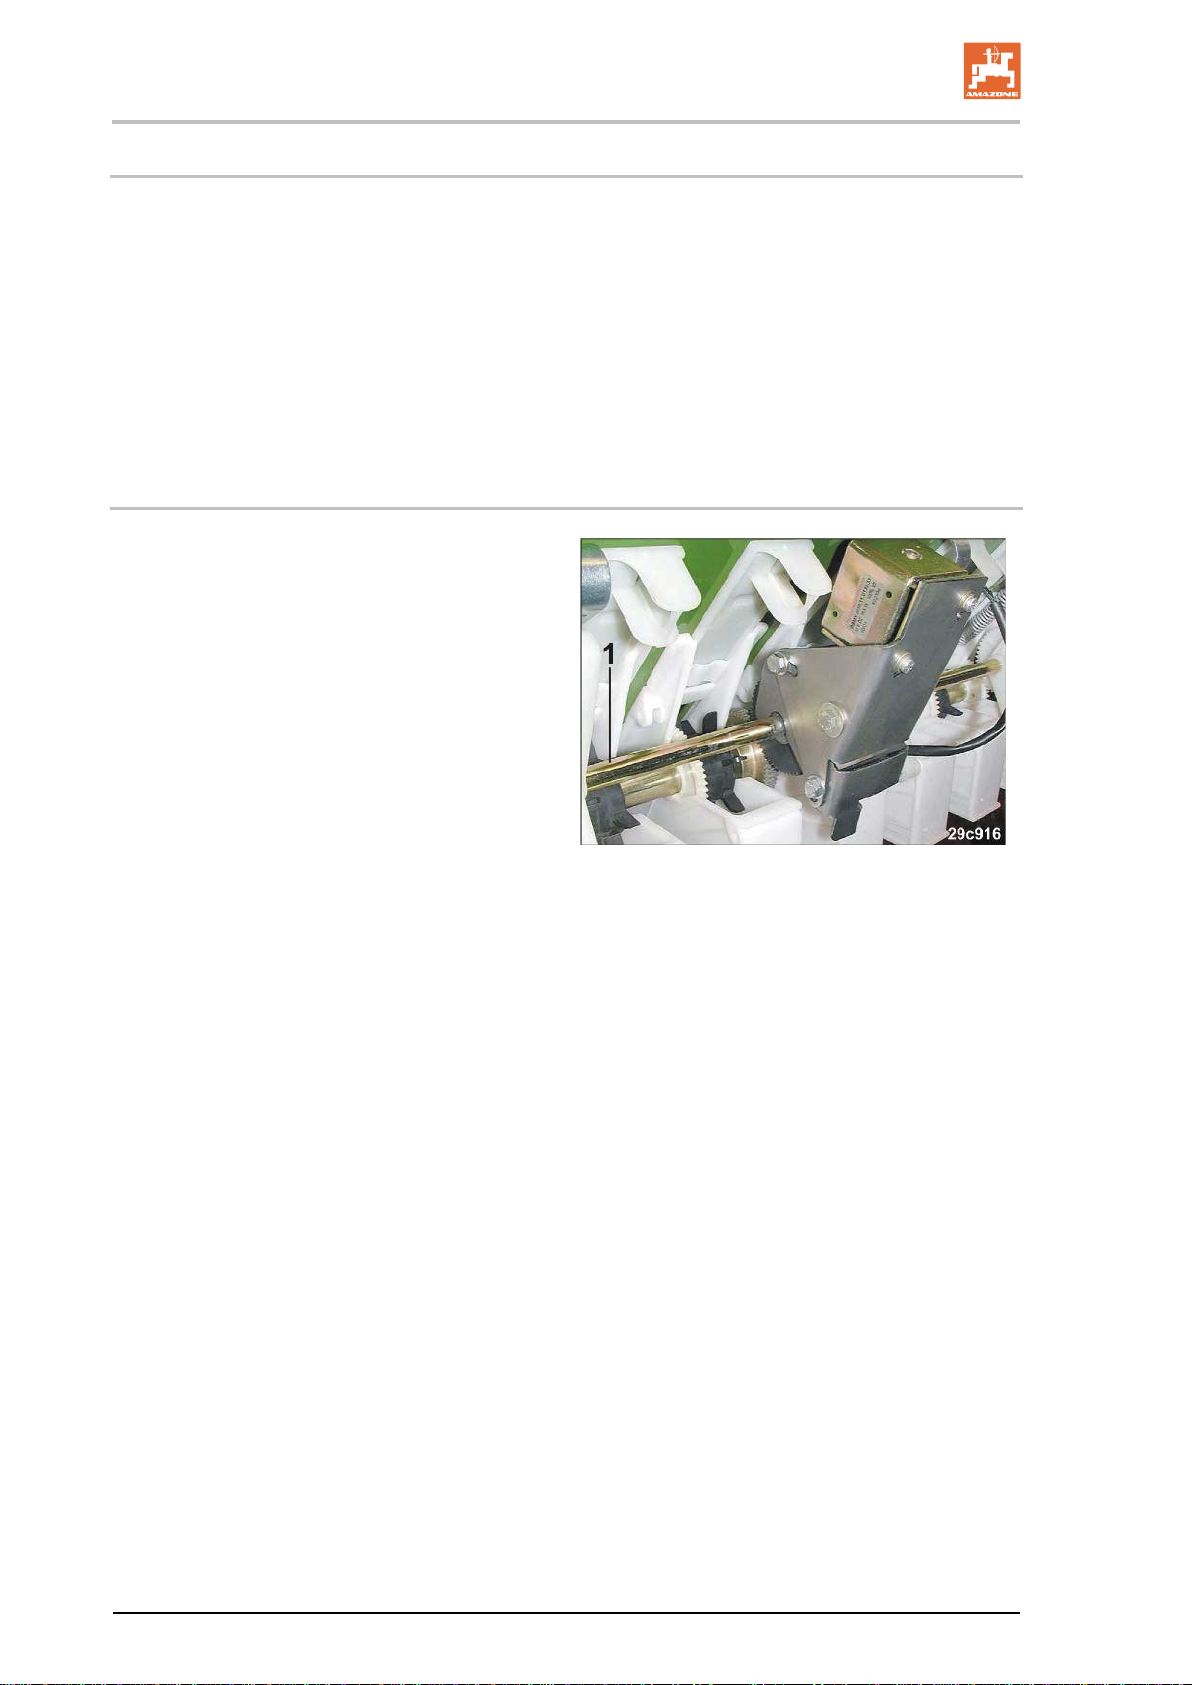
The on-board computer monitors the lay shaft
Fig.
4.3 Operation with seed drills
• determines the cultivated part area [ha]
• stores the cultivated total area [ha]
• indicates the travel speed [km/h] an
• controls the tramline control and the tramline marker
• indicates the position of the hydraulically operated track markers
• initiates an alarm when the set minimum quantity is reached in the tank (level sensor required).
4.3.1 Operation with cam wheel seed drill
drive (Fig. 4/1) for seed drills equipped with tramline control (optional).
4
AMALOG BAH0017.5 06.15
Page 15
Layout and function
AMALOG
15
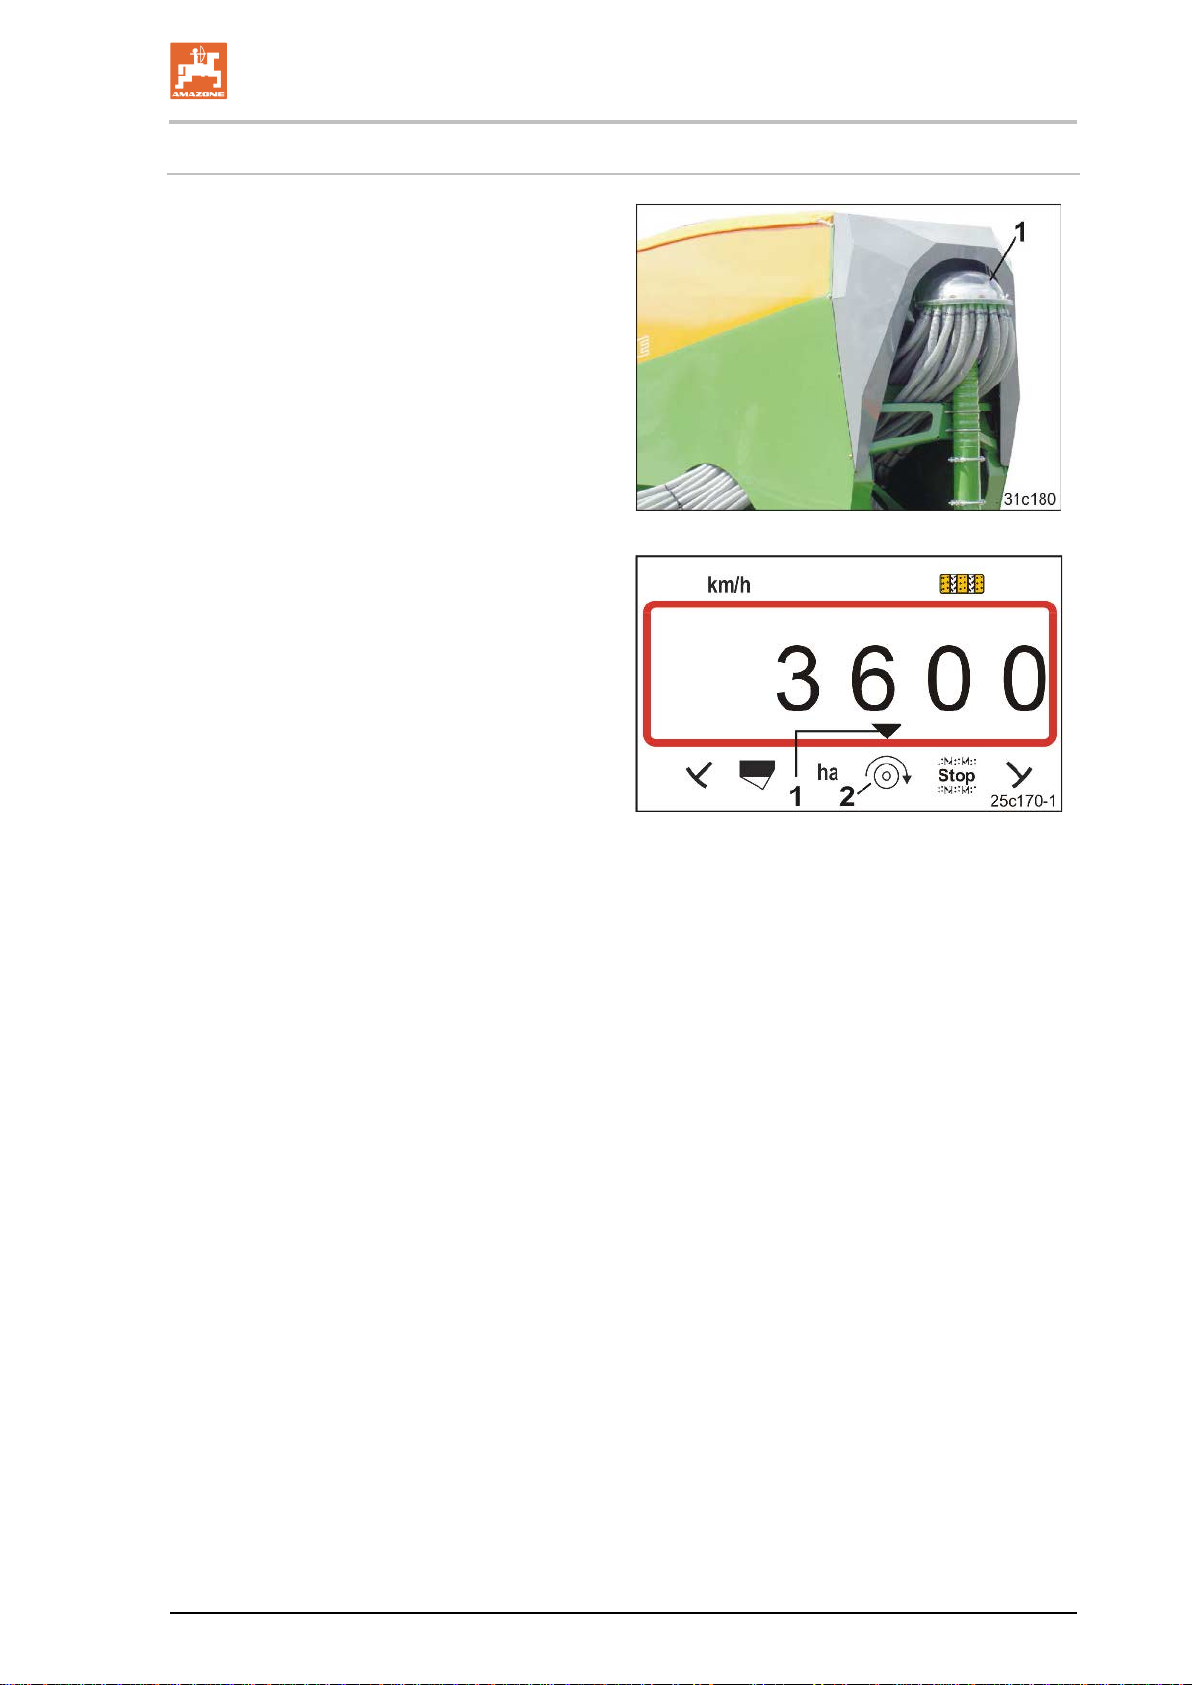
The on-board computer monitors the tramline
Fig.
The on-board computer monitors the blower fan
/1)
Fig.
4.3.2 Operation with pneumatic seed drills
control in the distributor head (Fig. 5/1). An
acoustic alarm sounds in the event of incorrect
shutter position.
speed.
If the actual speed deviates by more than 10%
from the target speed, an acoustic signal is initiated and in the display the control lamp (Fig. 6
above the speed symbol (Fig. 6/2) flashes.
5
The speed monitoring is only active when the
seed drill is working.
6
BAH0017.5 06.15
Page 16
Layout and function
16
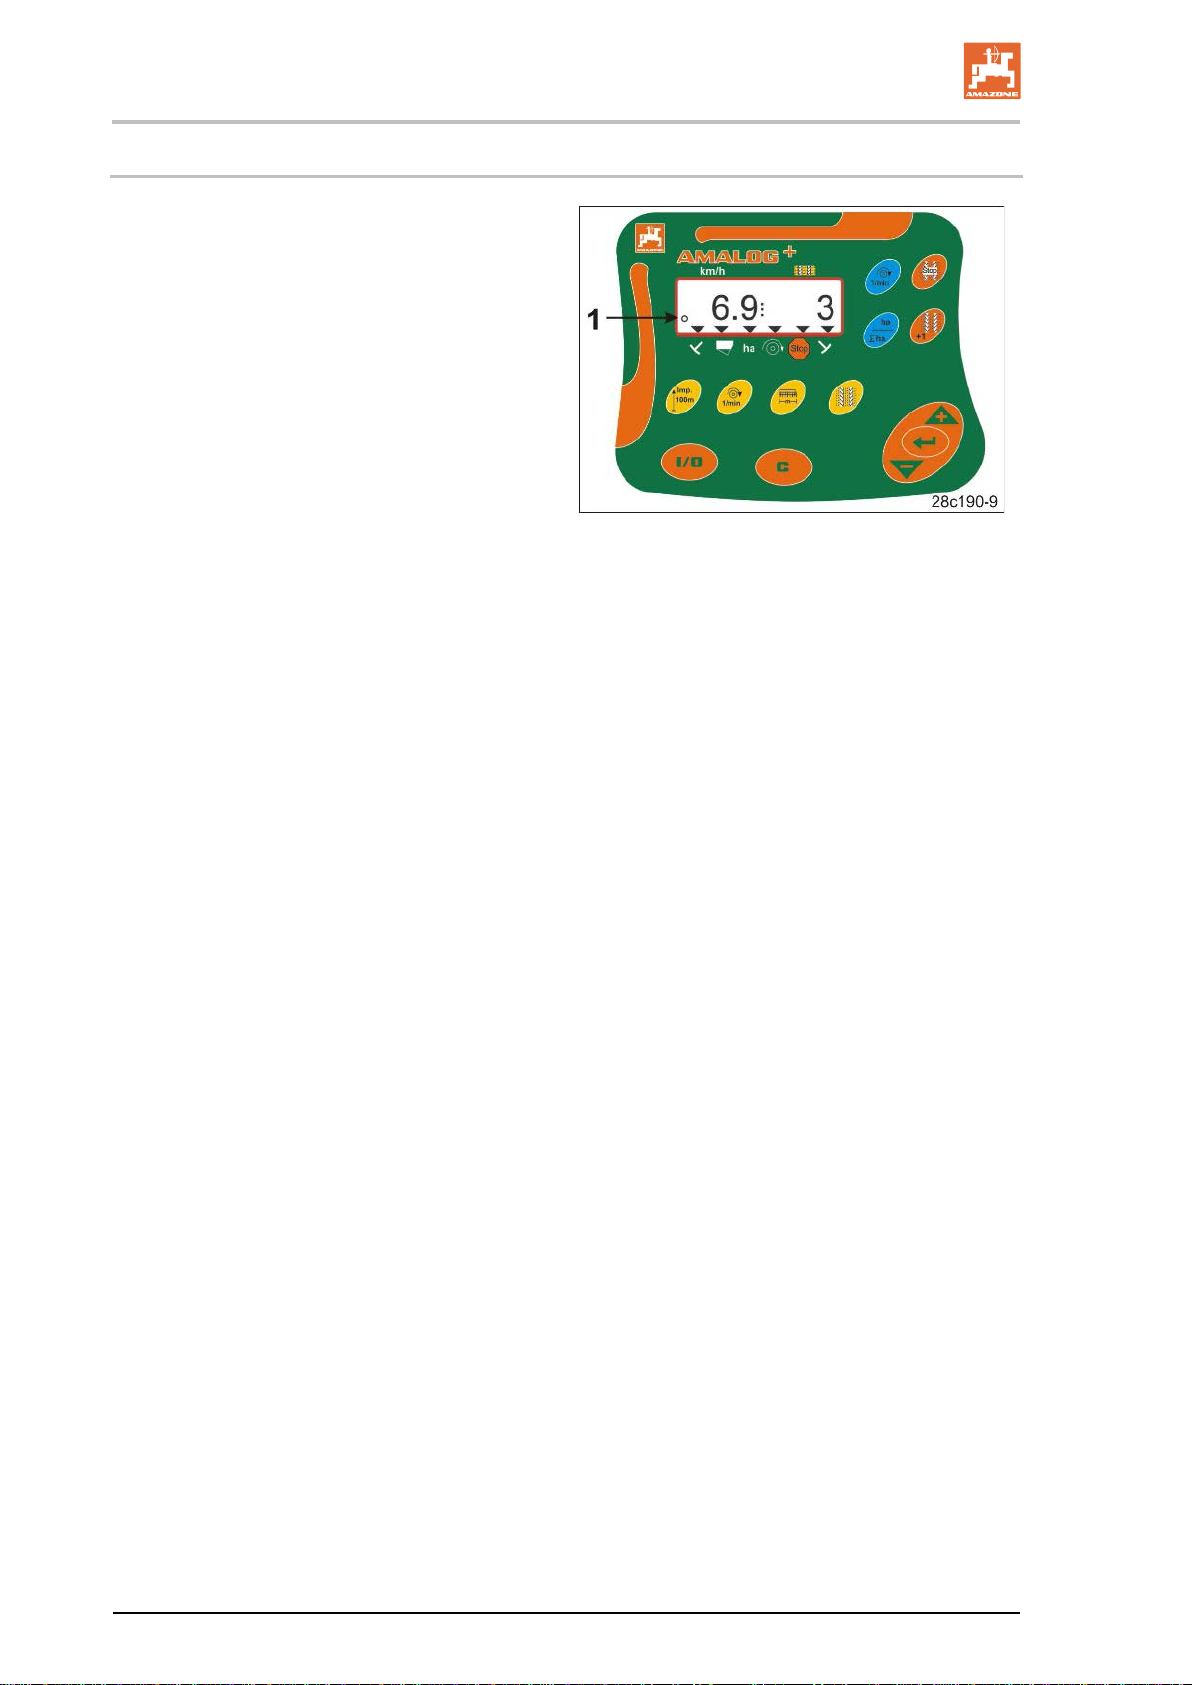
The work display (Fig. 7) appears with the first
Fig.
4.4 Work display
impulse from the distance sensor.
The flashing circle symbol (Fig. 7/1) during work
indicates that
• the on-board computer is receiving impuls-
es from the distance sensor
• the on-board computer is working correctly.
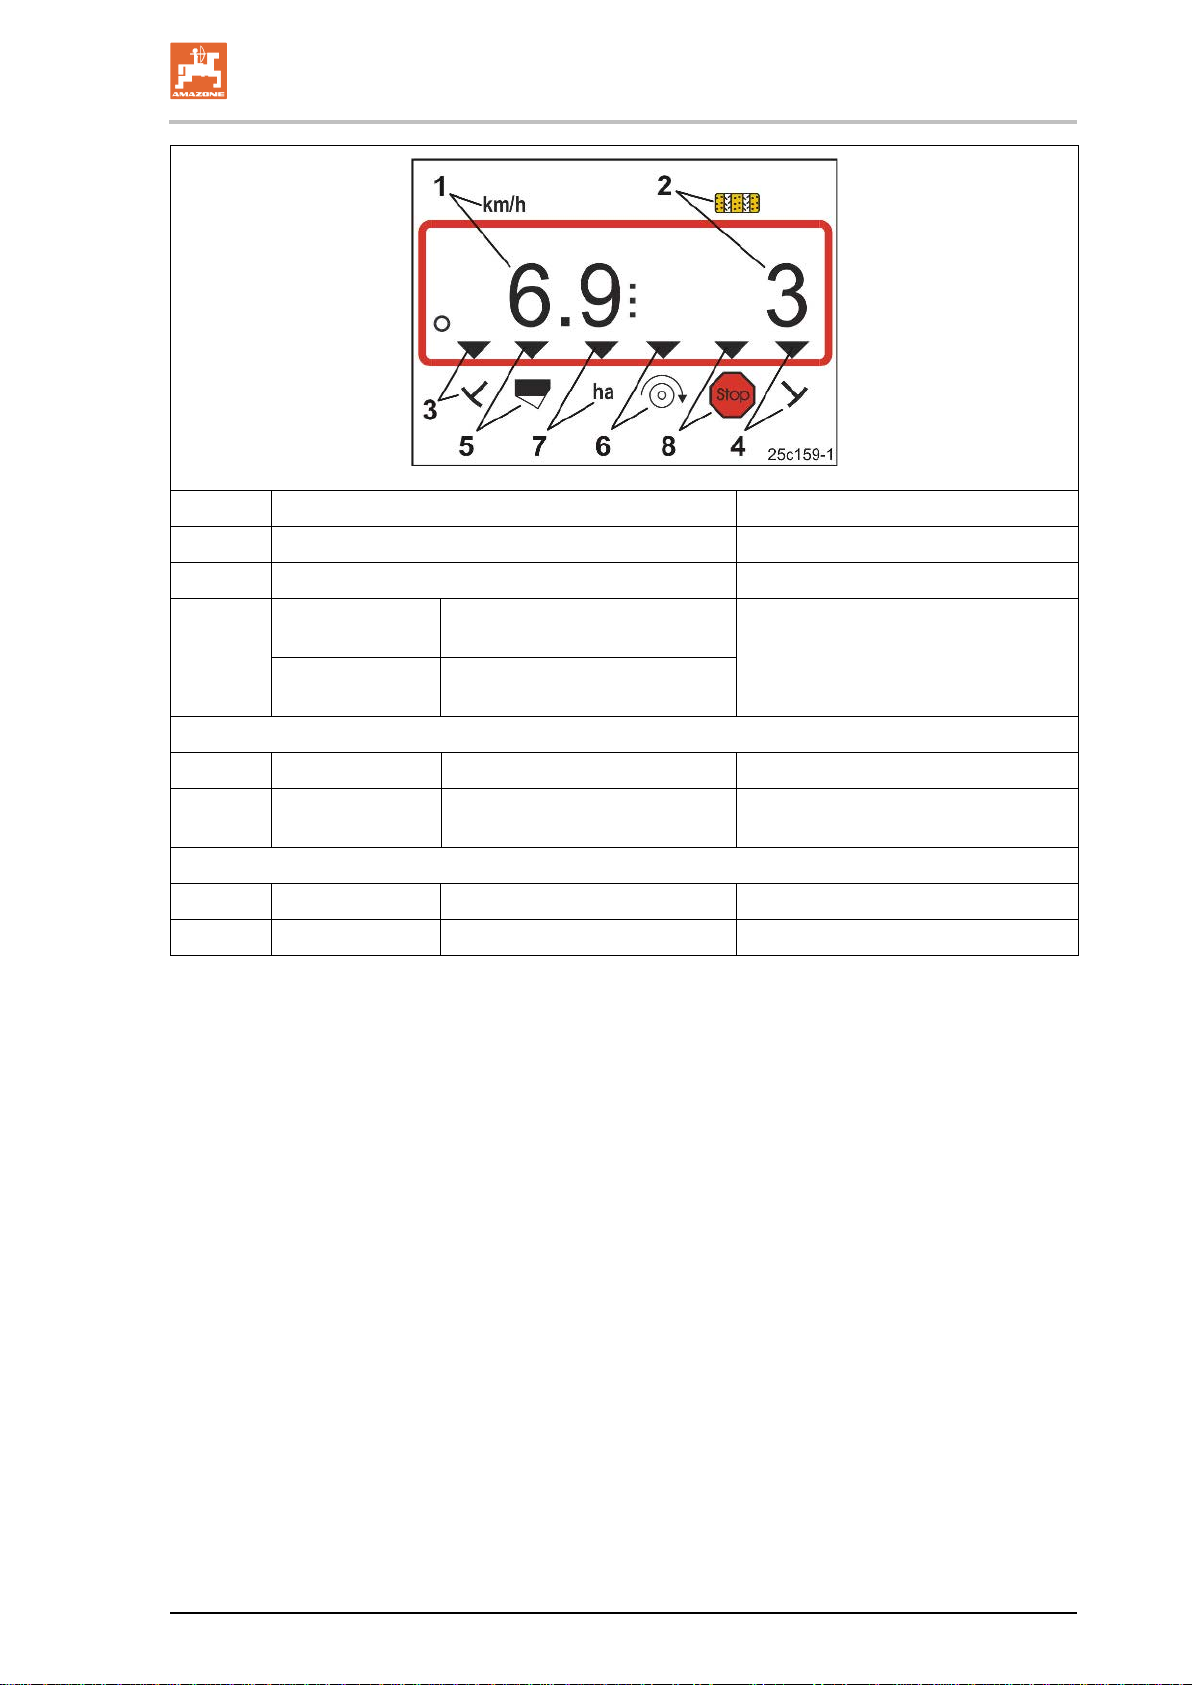
The work display depends on the working situation [see table (Fig. 8)].
7
AMALOG BAH0017.5 06.15
Page 17
Layout and function
AMALOG
17
Fig. 8/… Display and/or control symbol Sensor
1 Tractor speed [km/h] Impulses from the distance sensor
2 Tramline counter position On-board computer data
3
or
4
Control symbol
Control symbol
Left track marker
in operational position
Right track marker
in operational position
Impulse,
e.g. from track marker sensor
Display appears automatically in event of faults:
5 Control symbol Refill hop per Impulses from level sensor
6 Control symbol
Blower fan speed deviation
above 10%
Impulses from fan sensor
(pneumatic seed drills)
Displays called up via function keys:
7 Control symbol Worked area [ha] Impulses from the distance sensor
8 Control symbol Blocking the tramline counter Manual entry
Fig. 8
BAH0017.5 06.15
Page 18
Layout and function
18
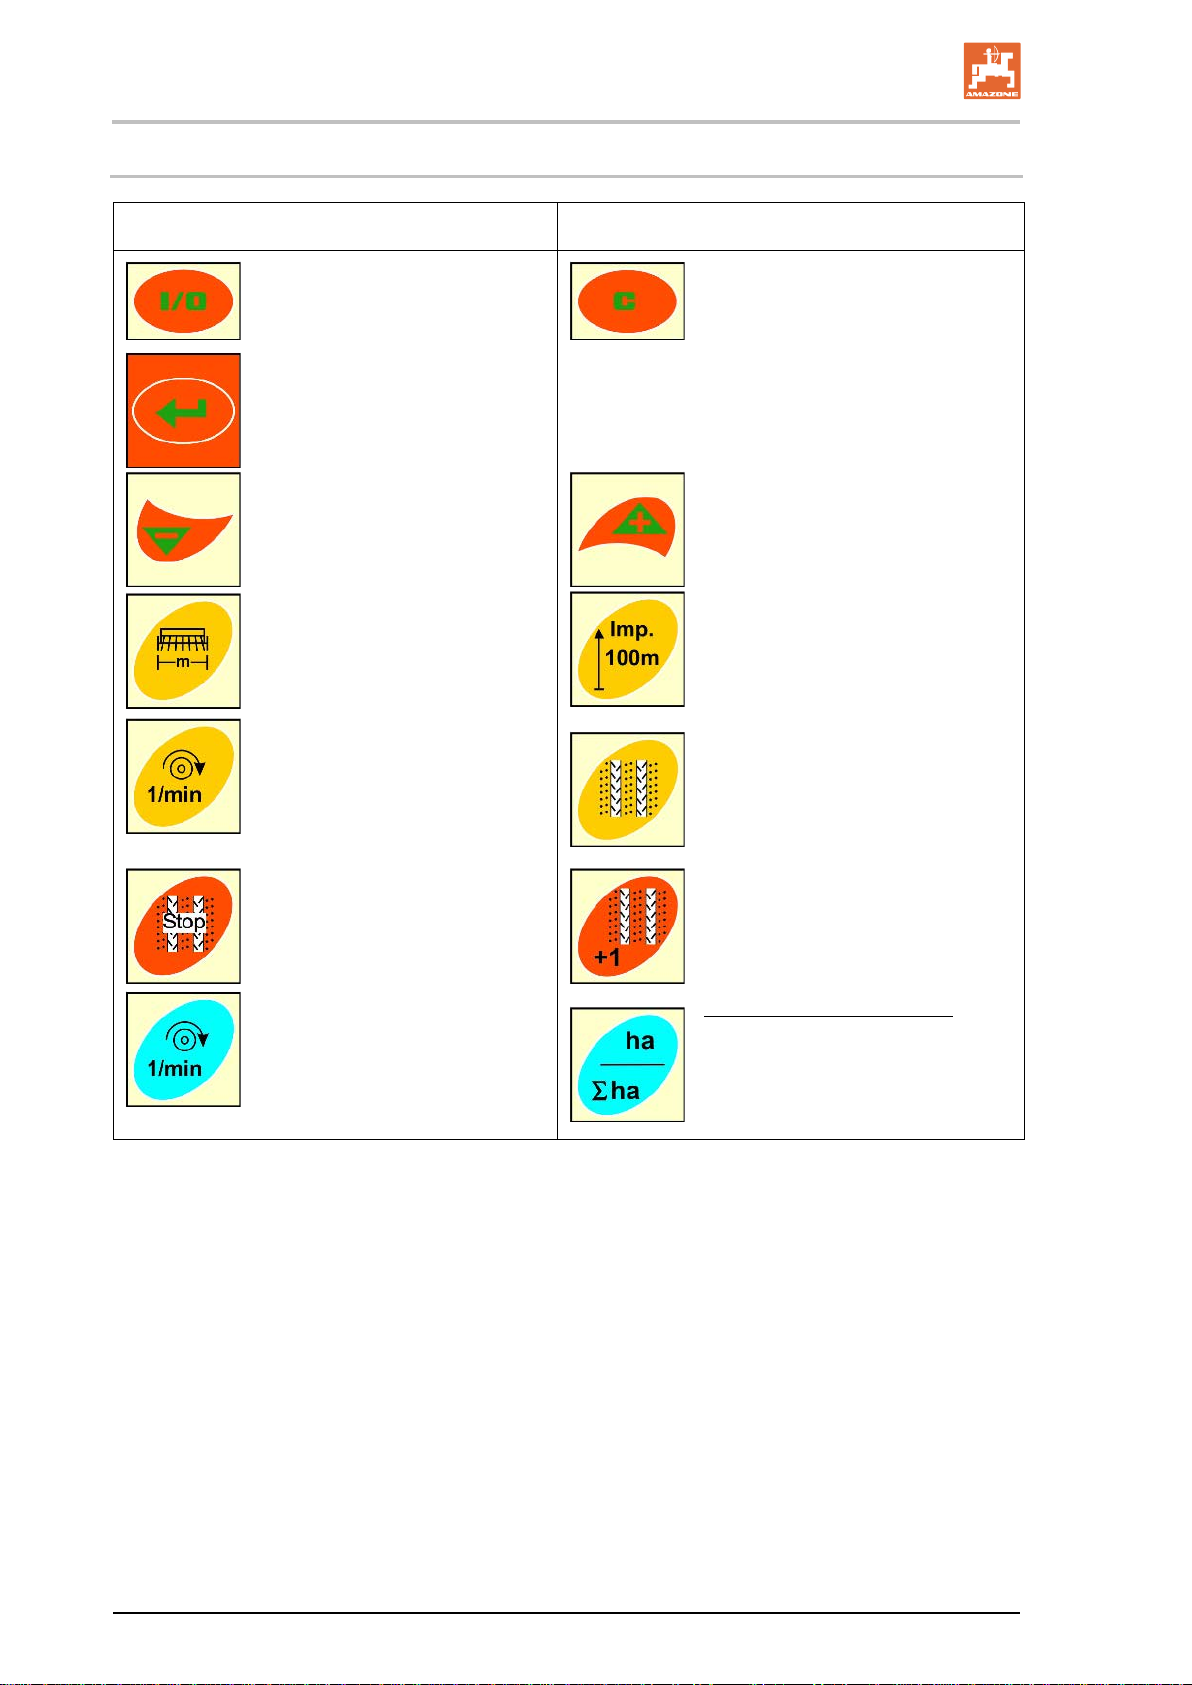
4.5 Key assignment
Key Key assignment Key Key assignment
[Yellow key]
Switching on/off
Data input confirmation
Reduction
of the value displayed
Input/display of
working width [m]
Input/display
of blower fan target speed [rpm.]
Correction key
Increasing
of the value displayed
Input/display
of a soil-dependent number of impulses of a
100 m-long calibration distance
Input of tramline rhythm
[Blue key]
Fig. 9
Block the tramline counter
Display of blower fan speed
Shift on
the tramline counter
Alternative via key actuation
Display of the cultivated
• part area [ha]
• total area [ha]
and back to the the work display
AMALOG BAH0017.5 06.15
Page 19
Layout and function
AMALOG
19
As described in the operating manual for the seed drill, the tramline control allows the creation of
The necessary tramline rhythm results from the desired tramline spacing and the s eed dril l work ing
The on-board computer counts up the tramlines in the tramline counter
4.6 Creation of tramlines
tramlines at pre-selected intervals on the field.
When creating tramlines, the tramline coulters do not deposit any seeds in the soil.
When creating tramlines the tramline counter indicates "0" on the on-board computer.
width (refer to the seed drill operating manual). All adjustable tramline rhythms can be found in the
section "Table for adjustable tramline rhythms", Seite 39. The tramline rhythm is to be entered in the
on-board computer (see section "Displaying / altering the tramline rhythm", Seite 26).
• after actuation of the track markers, e.g. before turning at the end of the field
• after the machine is raised (without track markers), e.g. for turning at the end of the field.
The tramline counter can be blocked (see section "Block the tramline counter", Seite 31)
• before raising the track marker, e.g. before an obstacle
• before machine standstill (without track markers), e.g. in the event of a work interruption on the
field.
Before resuming work
• activate the tramline counter
• check the tramline counter display.
BAH0017.5 06.15
Page 20

Layout and function
20
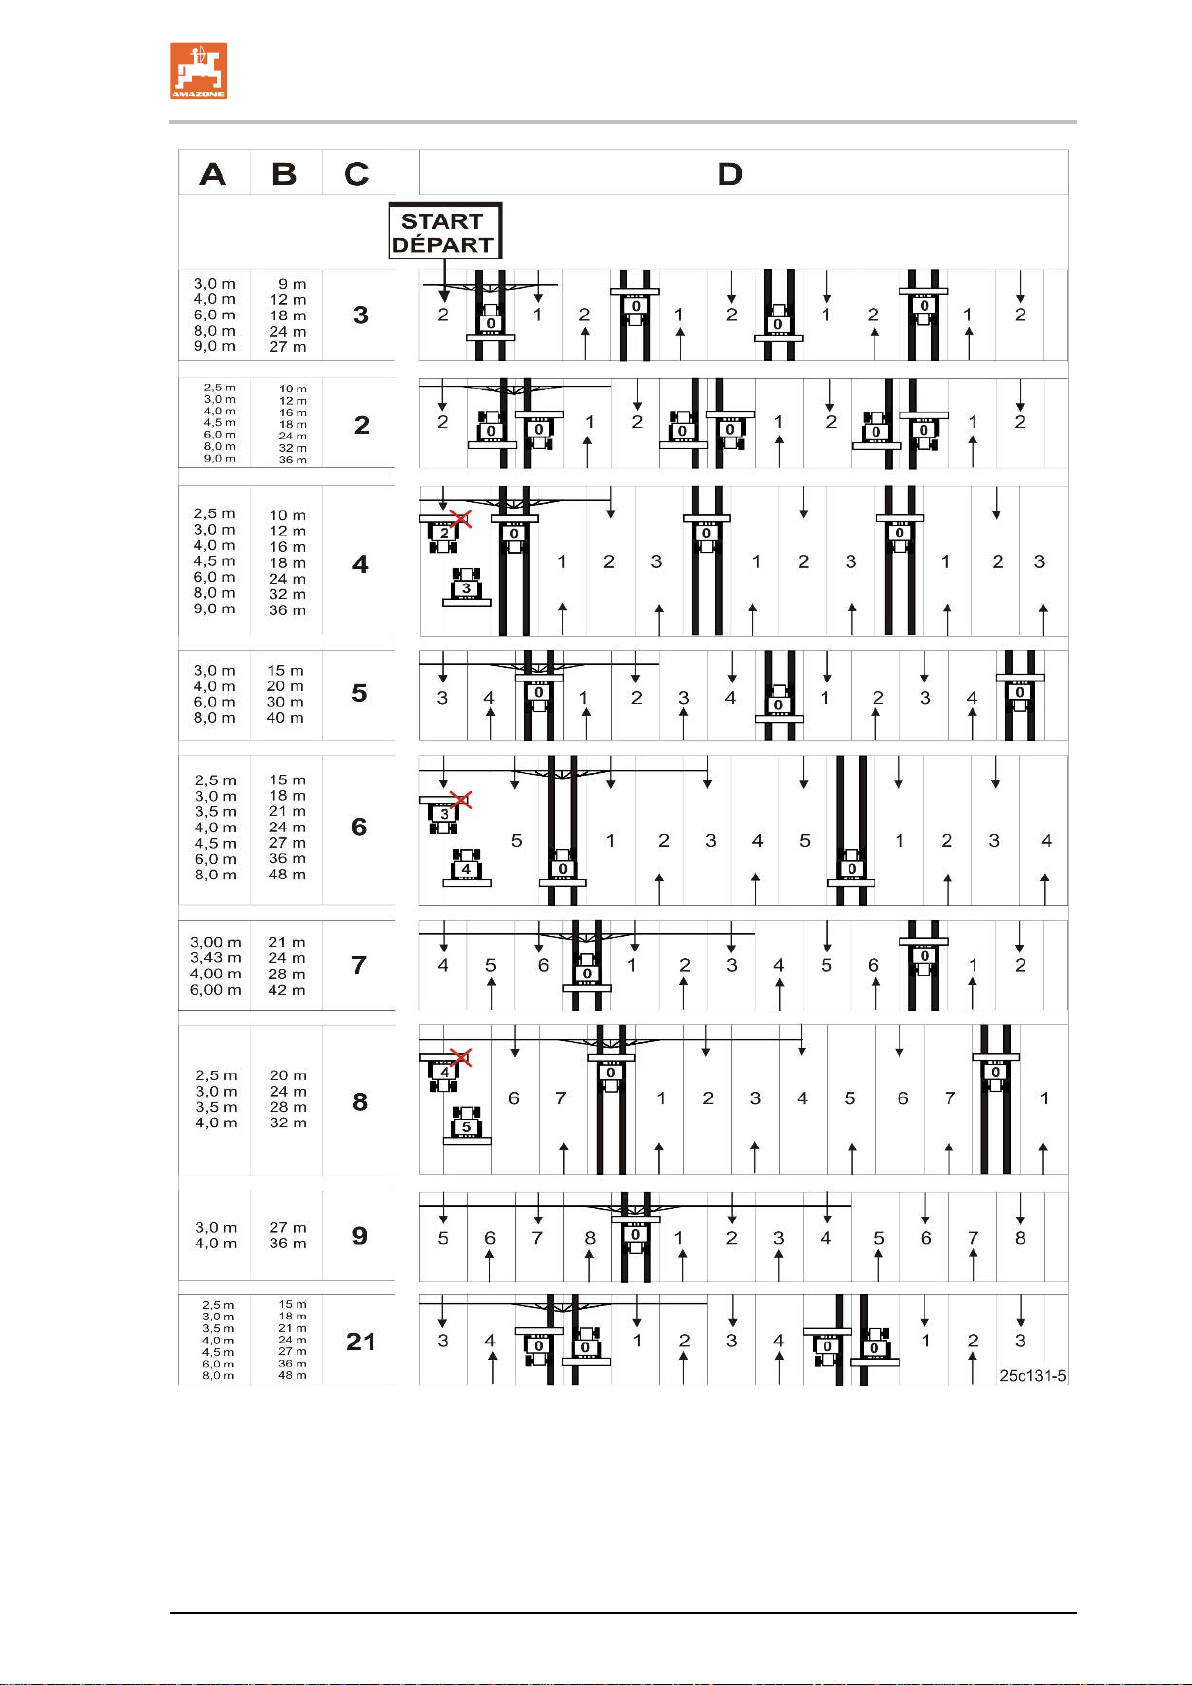
The creation of tramlines is shown in Figure (Fig. 10) using various examples:
A = Working width of the seed drill
B = Tramline spacing
(= working width of fertiliser spreader / field sprayer)
C = Tramline rhythm (entry in on-board computer)
D = Tramline counter (the field runs are numbered consecutively during work and displayed on the
on-board computer).
AMALOG BAH0017.5 06.15
Page 21
Layout and function
AMALOG
21
Fig. 10
BAH0017.5 06.15
Page 22
Commissioning
22
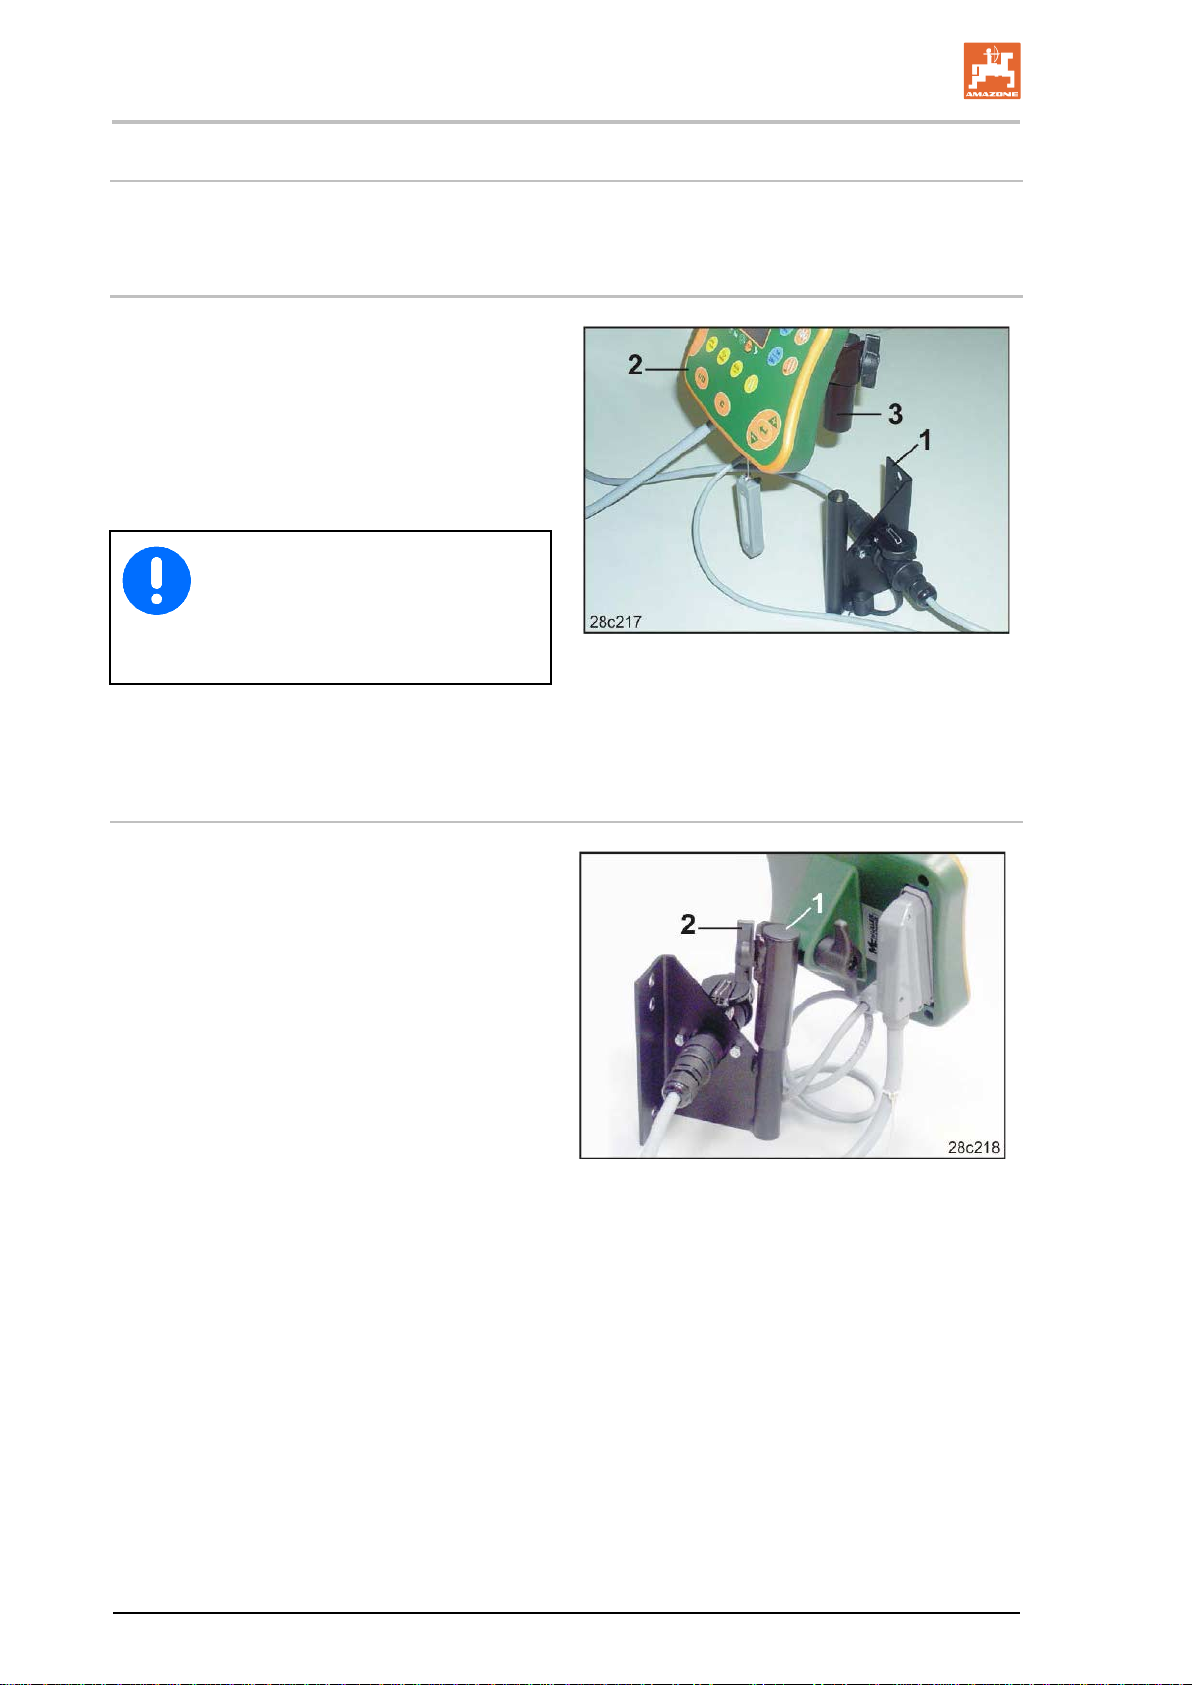
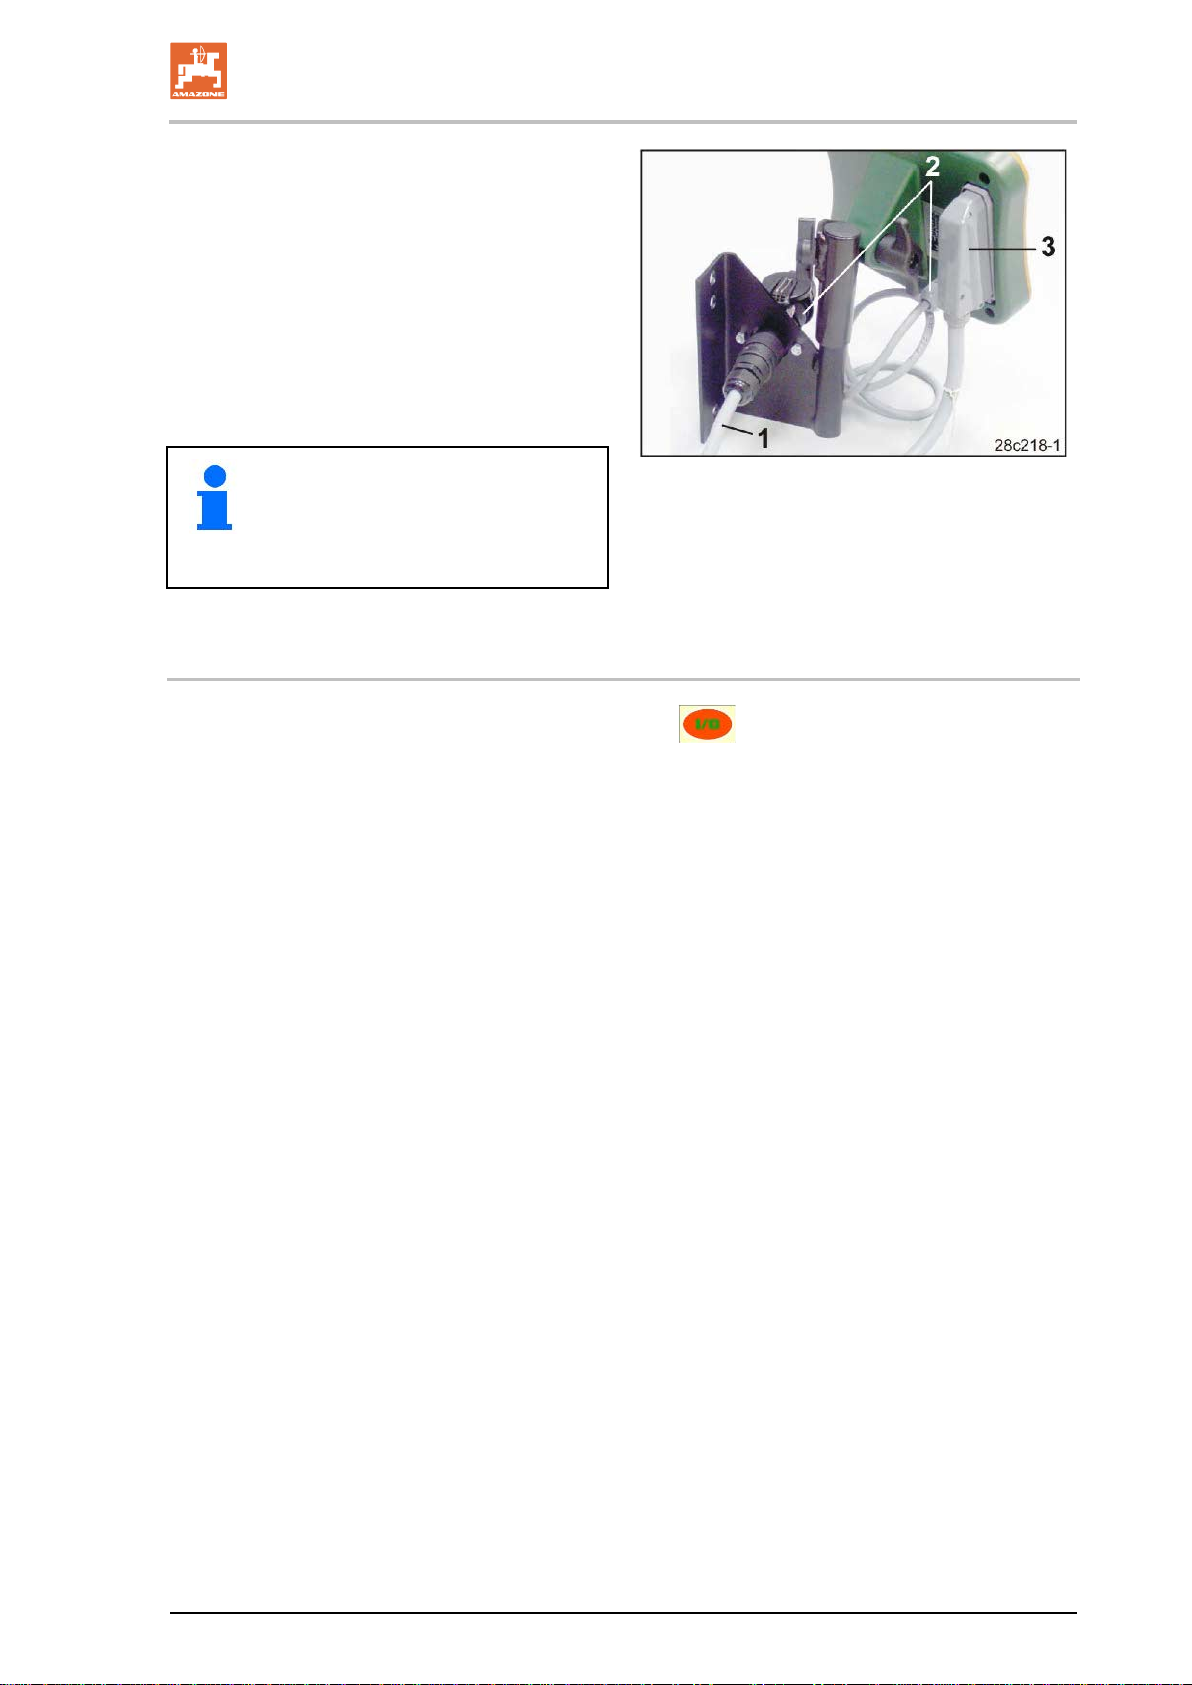
1. Screw the console (Fig. 11/1) so that is free
1. Insert the counterpiece (Fig. 12/1) into the
Fig.
5 Commissioning
5.1 Installing the terminal
from vibrations and electrically connected to
the right of the driver's position in the tractor
cab, within visual range and eas y to access
(Fig. 11/2).
The distance from the radio unit or aerial
must be at least 1 m.
The terminal must have an electrical
connection via the console to the tractor chassis!
Remove the paint at the ins tallat ion
points before installing the console!
2. Equip the terminal with the counterpiece
(Fig. 11/3).
5.2 Connecting the terminal
console and secure with the thumb screw
(Fig. 12/2).
Fig. 11
12
AMALOG BAH0017.5 06.15
Page 23
Commissioning
AMALOG
23
2. Insert the power cable (Fig. 13/1) into the
Route the cable with the machine connector
board computer switches
console and the 12V tractor socket.
3. Connect the console and the terminal with
the power cable (Fig. 13/2).
4. Couple the seed drill or soil tillage implement to the tractor vehicle (see operating
manual for seed drill or soil tillage implement).
5.
(Fig. 13/3) into the tractor cab and insert it
into the machine connector in the terminal.
The machine connector is secured
against unintentional release by
means of a spring-loaded lever.
Actuate the lever before releasing the
machine connector.
5.3 Switching the terminal on/off
Fig. 13
Switch the on-board computer on and off by pressing the key.
Enter the machine-specific data (see section "Settings", Se ite 24). When the computer is switched
back on the data is made available again.
Before using a seed drill of a different type, enter the machine-specific data in the on-board computer.
When the on-board computer is switched on, the computer software version briefly appears.
If the supply voltage, e.g. during tractor startup, drops below 10 volts, the on-
off.
BAH0017.5 06.15
Page 24
Settings
24
6 Settings
6.1 Entering machine data
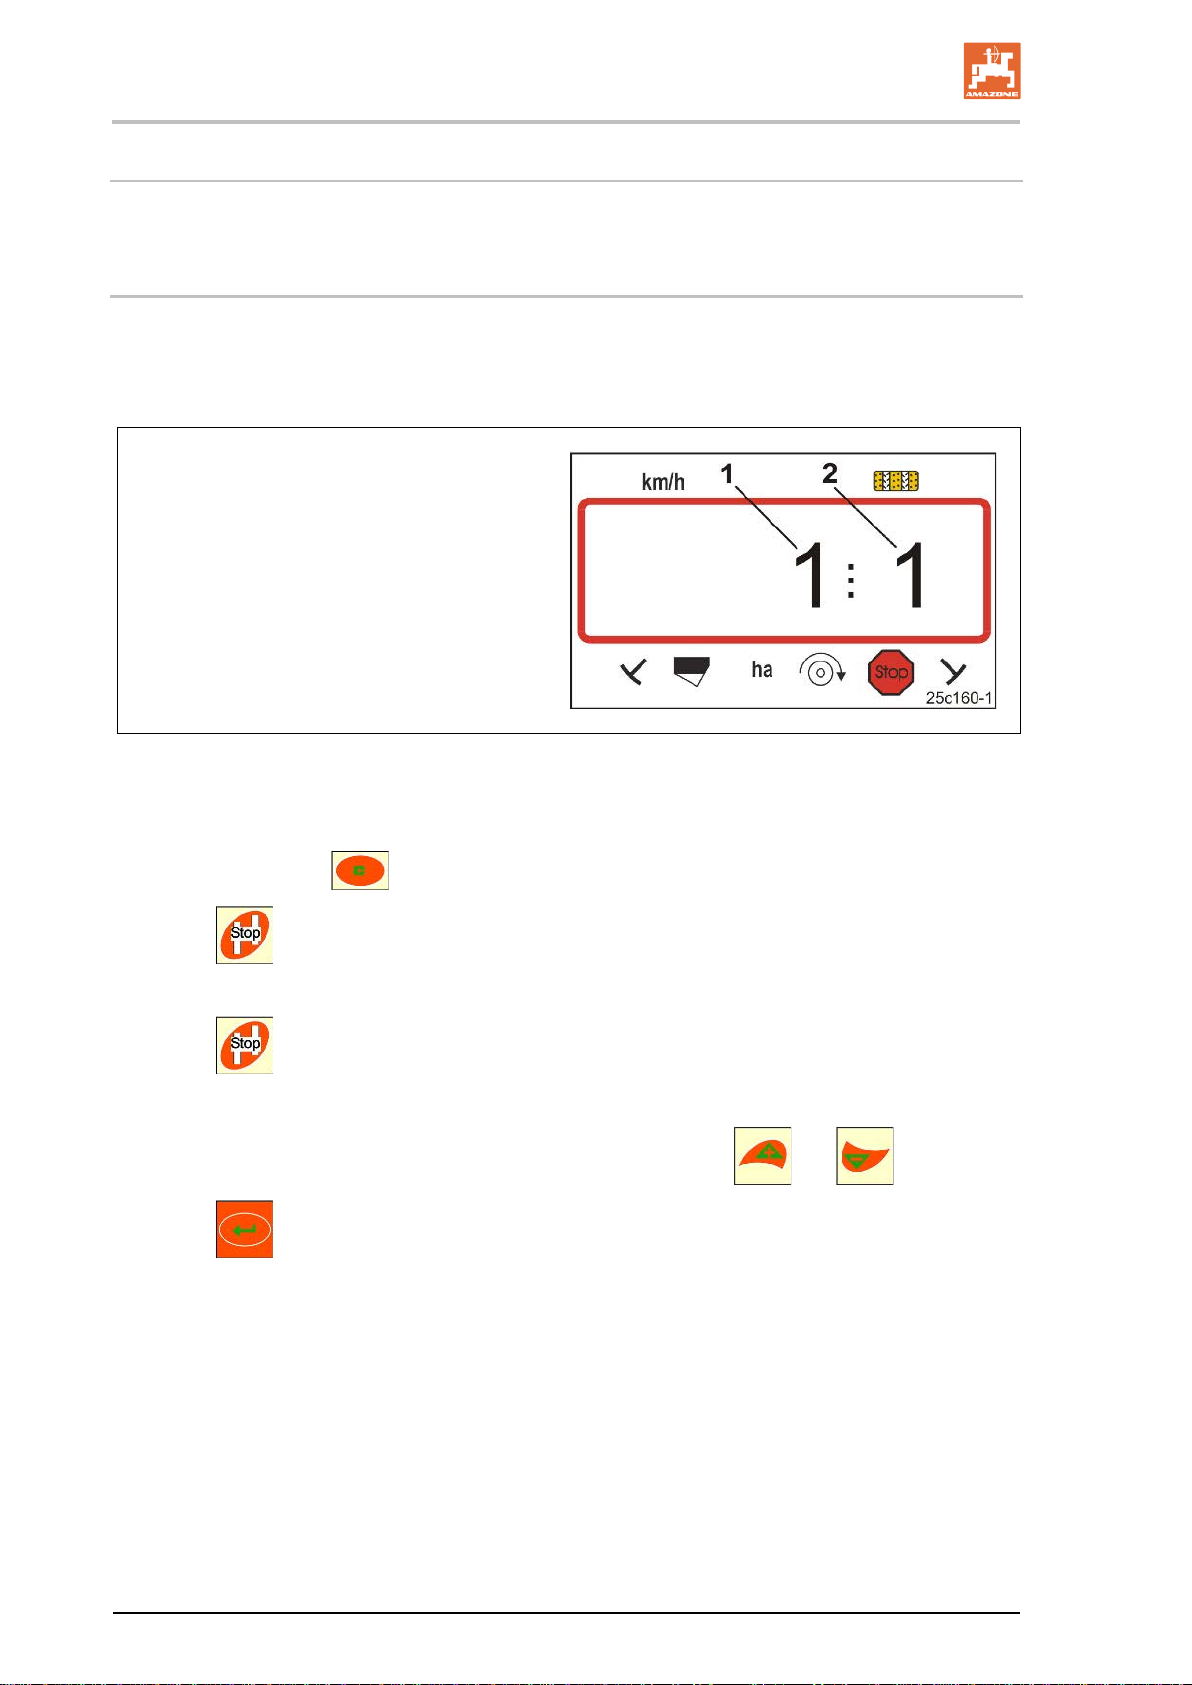
The on-board computer requires input of the machine data in coded form (see Fig. 14).
Refer to the machine data in the table (see section "Machine data table", Seite 37).
Digit 1 (1) shows the mode
Digit 2 ( 2) shows the coding
Fig. 14
Open the necessary modes (1, 2, 3, etc.) and enter the machine data in coded form:
1. Press and hold the
2. Press
→ Open mode 1 (see Fig. 14).
3. Press
→ Select the desired mode [see table (Machine data table), Seite 37].
4. Set the code [see table (Machine data table), Seite 37] using the
5. Press
→ Save the code.
.
.
.
key.
and keys.
AMALOG BAH0017.5 06.15
Page 25
Settings
AMALOG
25
Fig.
This setting is only possible for pneumatic seed
Fig.
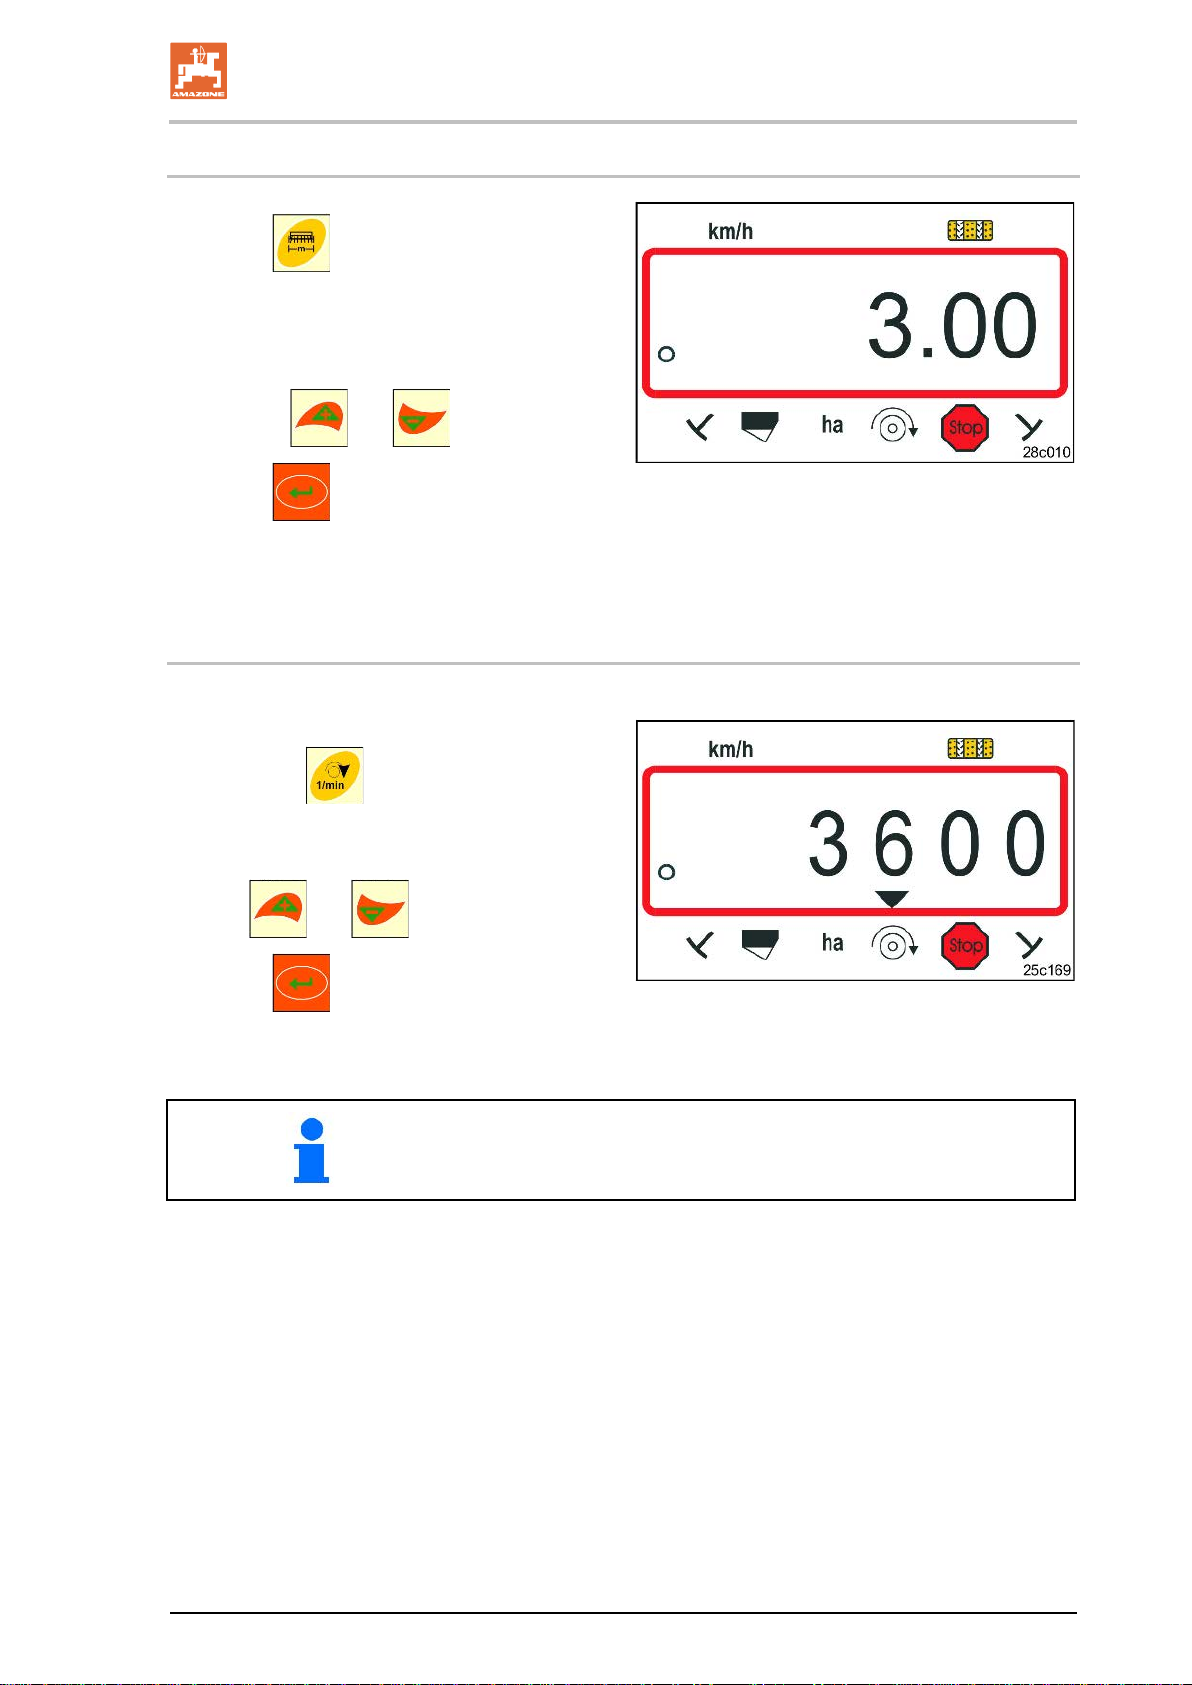
6.2 Displaying / altering the working width
1. Press .
→ Display:
stored working width [m],
e.g. 3.0 m (Fig. 15).
2. Change the working width [m]
with the
and buttons.
15
3. Press
.
→ Store the se lecte d val ue.
6.3 Displaying / altering the target blower fan speed (during standstill)
drills.
1. Press the
→ Display: Target blower fan speed [rpm.].
2. Change the target blower fan speed with
the
3. Press
button (yellow).
and keys.
.
16
→ Store the se lecte d val ue.
BAH0017.5 06.15
Switch off the blower fan speed monitoring
Set the target blower fan speed to "0".
Page 26
Settings
26
This setting is only possible for pneumatic seed
Fig.
Fig.
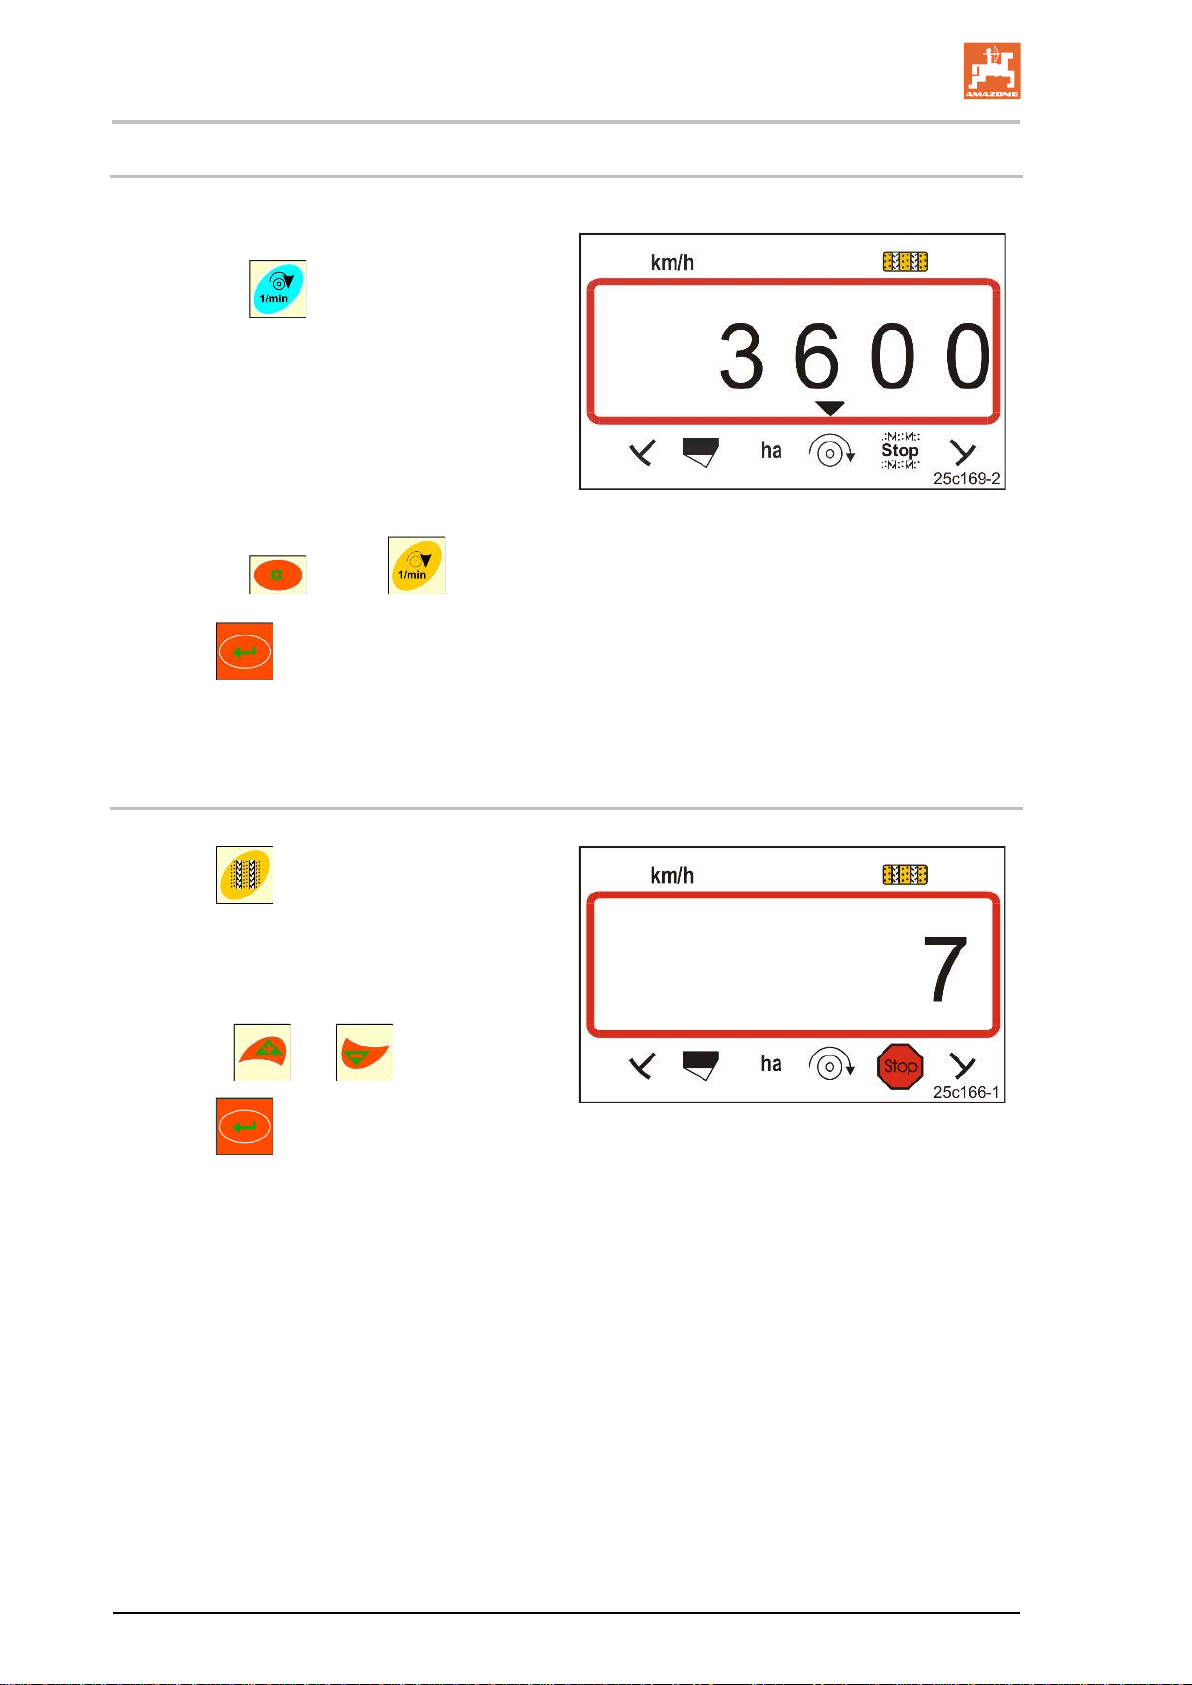
6.4 Displaying / altering the target blower fan speed (during operation)
drills.
1. Press the
→ Display of (Fig. 17)
current blower fan speed
(e.g. 3600 [rpm.]).
2. Press the
3. Press
→ Store the se lecte d val ue.
key (blue).
key and key (yellow) simultaneously.
.
6.4.1 Displaying / altering the tramline rhythm
17
1. Press .
® Display:
stored tramline rhythm,
e.g. 7 (Fig. 18).
2. Change the tramline rhythm
with the
3. Press
→ Store the se lecte d val ue.
and buttons.
.
18
AMALOG BAH0017.5 06.15
Page 27
Settings
AMALOG
27
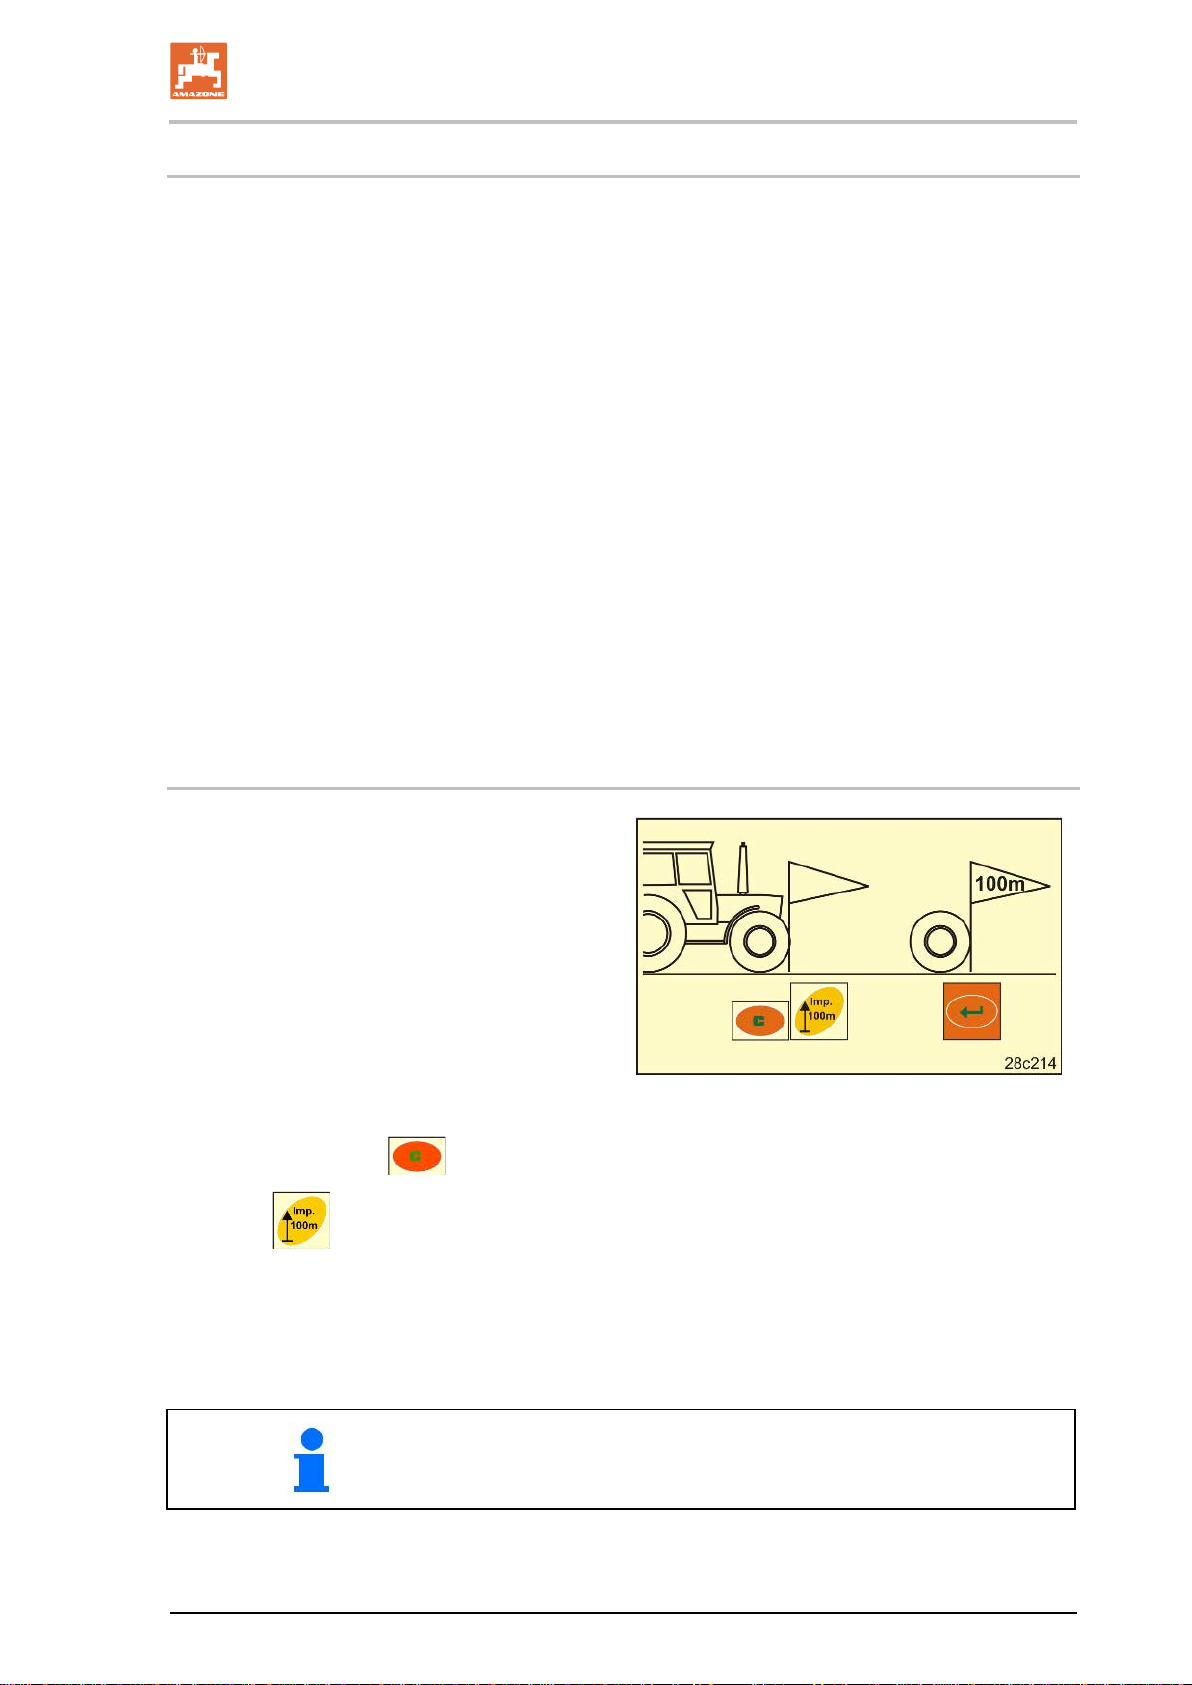
1. On the field, measure out a calibration dis-
Fig.
6.5 Calibration value (impulses per 100 m)
The on-board computer needs the "Impulses per 100 m" calibration value to determ ine
• the travel speed [km/h]
• the worked area [ha].
Determine the "Impulses per 100 m" calibration value by means of a calibration run (see section
"Determining / storing the calibration value (impulses per 100 m) ", unterhalb), if the calibration value is
unknown. The calibration value must be determined under the predominating operating conditions on
the field.
If the "Impulses per 100 m" calibration value is known, it can be entered manually (see section
"Display / change the stored calibration value (pulses per 100 m)", Seite 28).
Determine the calibration value
• before initial use.
• when changing from heavy to light soil and vice versa. The slippage of the measuring or driving
wheel may alter on different soils, thereby affecting the calibration value (imp./100 m).
• when connecting the on-board computer to another machine type
• if there is a difference between the indicated and actual travel speed
• if there are differences between the measured and actual worked area.
6.5.1 Determining / storing the calibration value (impulses per 100 m)
tance of exactly 100 m.
Mark the start and end point of the calibration distance.
2. Move tractor vehicle to starting position
(Fig. 19) and seed drill to operational position (if necessary, interrupt seed dosing).
19
3. Press and hold the key.
4. Press
→ The display shows "0".
.
5. Start.
→ The display shows the impulses.
BAH0017.5 06.15
Do not press a key during the calibration run.
Page 28
Settings
28
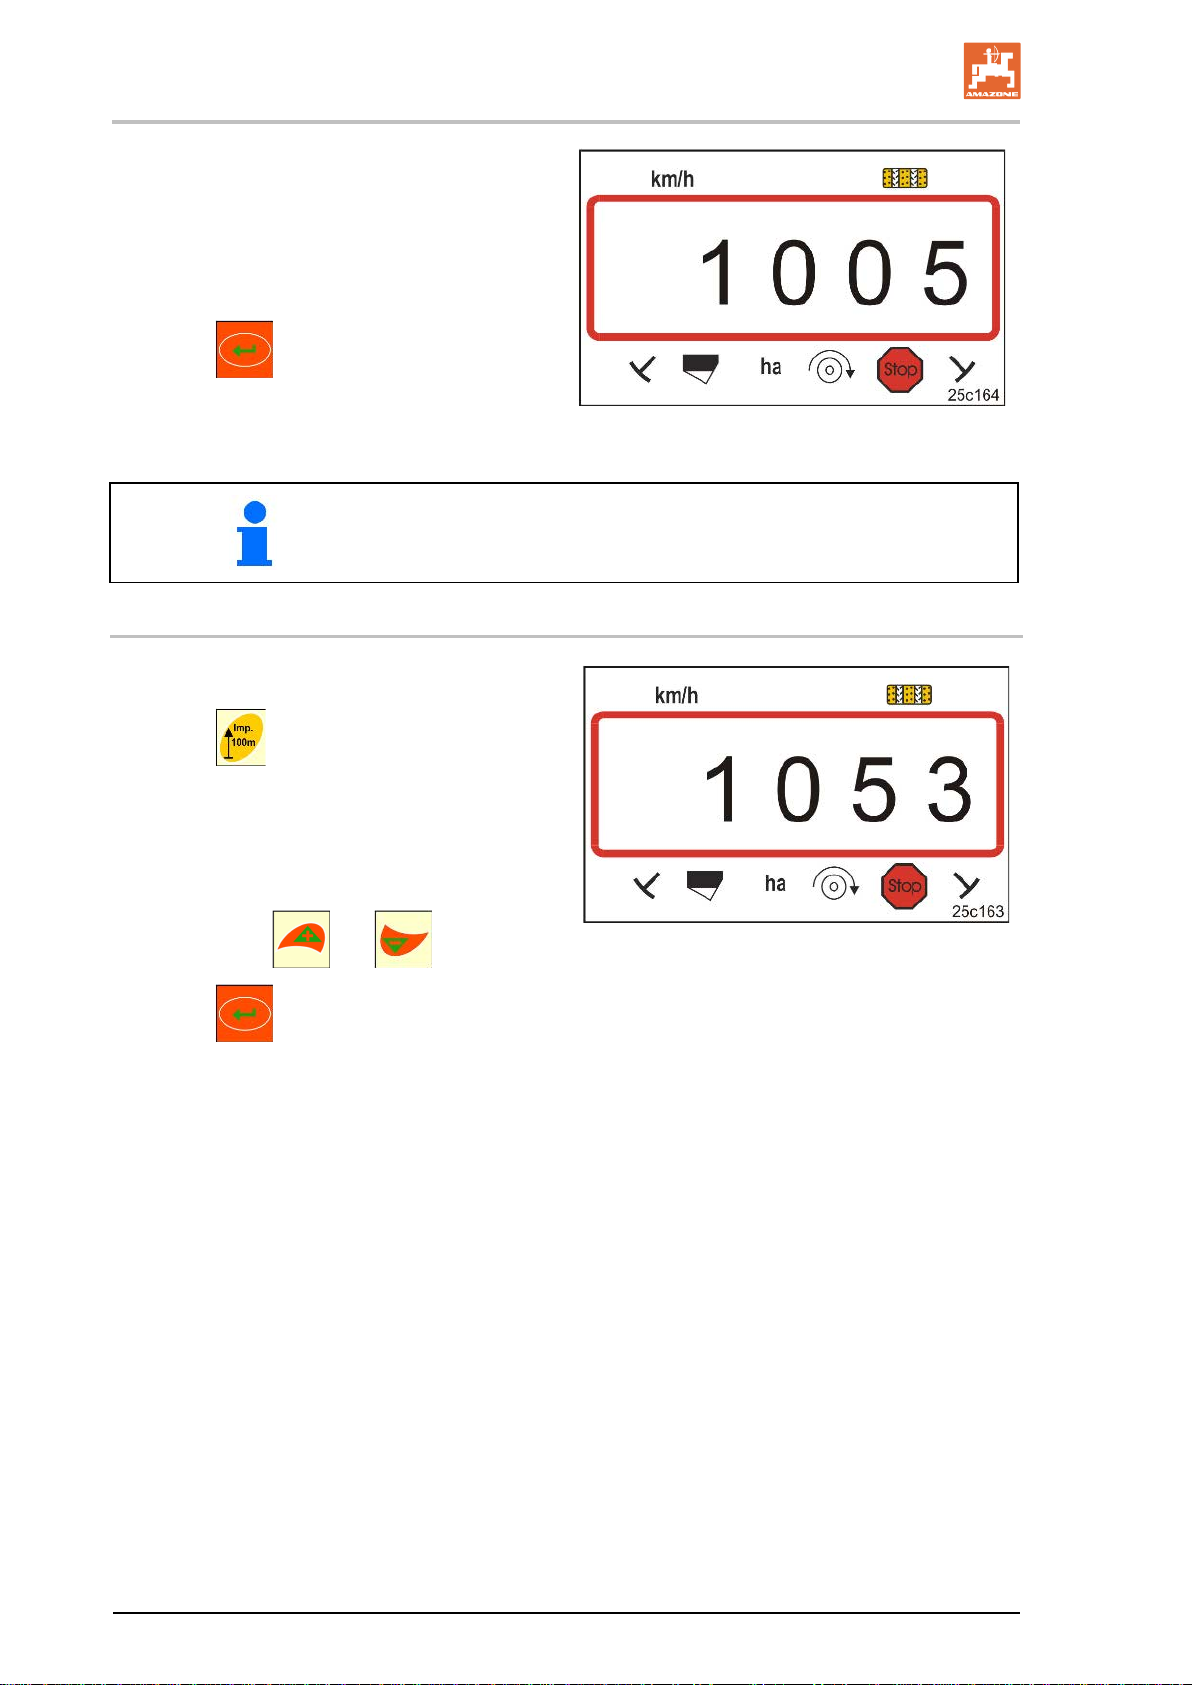
6. Stop after exactly 100 m.
Fig.
→ The display (Fig. 20) shows the calibration
value
(e.g. 1005 imp./100 m).
7. Enter the calculated calibration value in the
table (Fig. 49, Seite 43) (recommendation).
8. Press
→Store the calibration value (imp./100 m).
.
20
The calibration value (imp./100 m) must not be less than 250.
If it is, the on-board computer will not work properly.
6.5.2 Display / change the stored calibration value (pulses per 100 m)
1. Bring the implement to a standstill.
2. Press
.
→ Display:
stored calibration value (imp./100 m)
e.g. 1053 (Fig. 21).
3. Alter the stored calibration value
(imp./100 m)
by using the
and keys.
Fig. 21
4. Press
→ Store the selected value.
.
AMALOG BAH0017.5 06.15
Page 29

Settings
AMALOG
29
Pul./100 m (actual)
Pul./100 m (value from Table) 1)
6.5.3 Calculating the number of crank turns for the calibration test
If the calibration value differs from the values in the Table (see Chap. 9.3, Seite 40)
• recalculate the number of crank turns for the calibration test (see below)
• enter the number of crank turns in Table (Fig. 49)
• carry out a calibration test with the calculated number of crank turns
(see seed drill operating manual).
Conversion factor =
1)
see Tables (see Chap. 9.3, Seite 40)
Crank turns (actual) = Crank turns (value from Table) 1) x Conversion factor
1)
see Tables (see Chap. 9.3, Seite 40)
Example:
Seed drill: ................................................ AD-P0 3 Spec ial
Working width: ........................................ 3.00 m
Pul./100 m (measured): .......................... 1339
Pul./100 m
(from Tables (see Chap. 9.3, Seite 40): . 1409
Crank turns
(from Tables (see Chap. 9.3, Seite 40): . 38.5
1339
Conversion factor =
= 0.95
1409
Crank turns (actual) = 38.5 x 0.95 = 36.6
BAH0017.5 06.15
Page 30
Starting work
30
7 Starting work
1. Place machine in starting position (standstill).
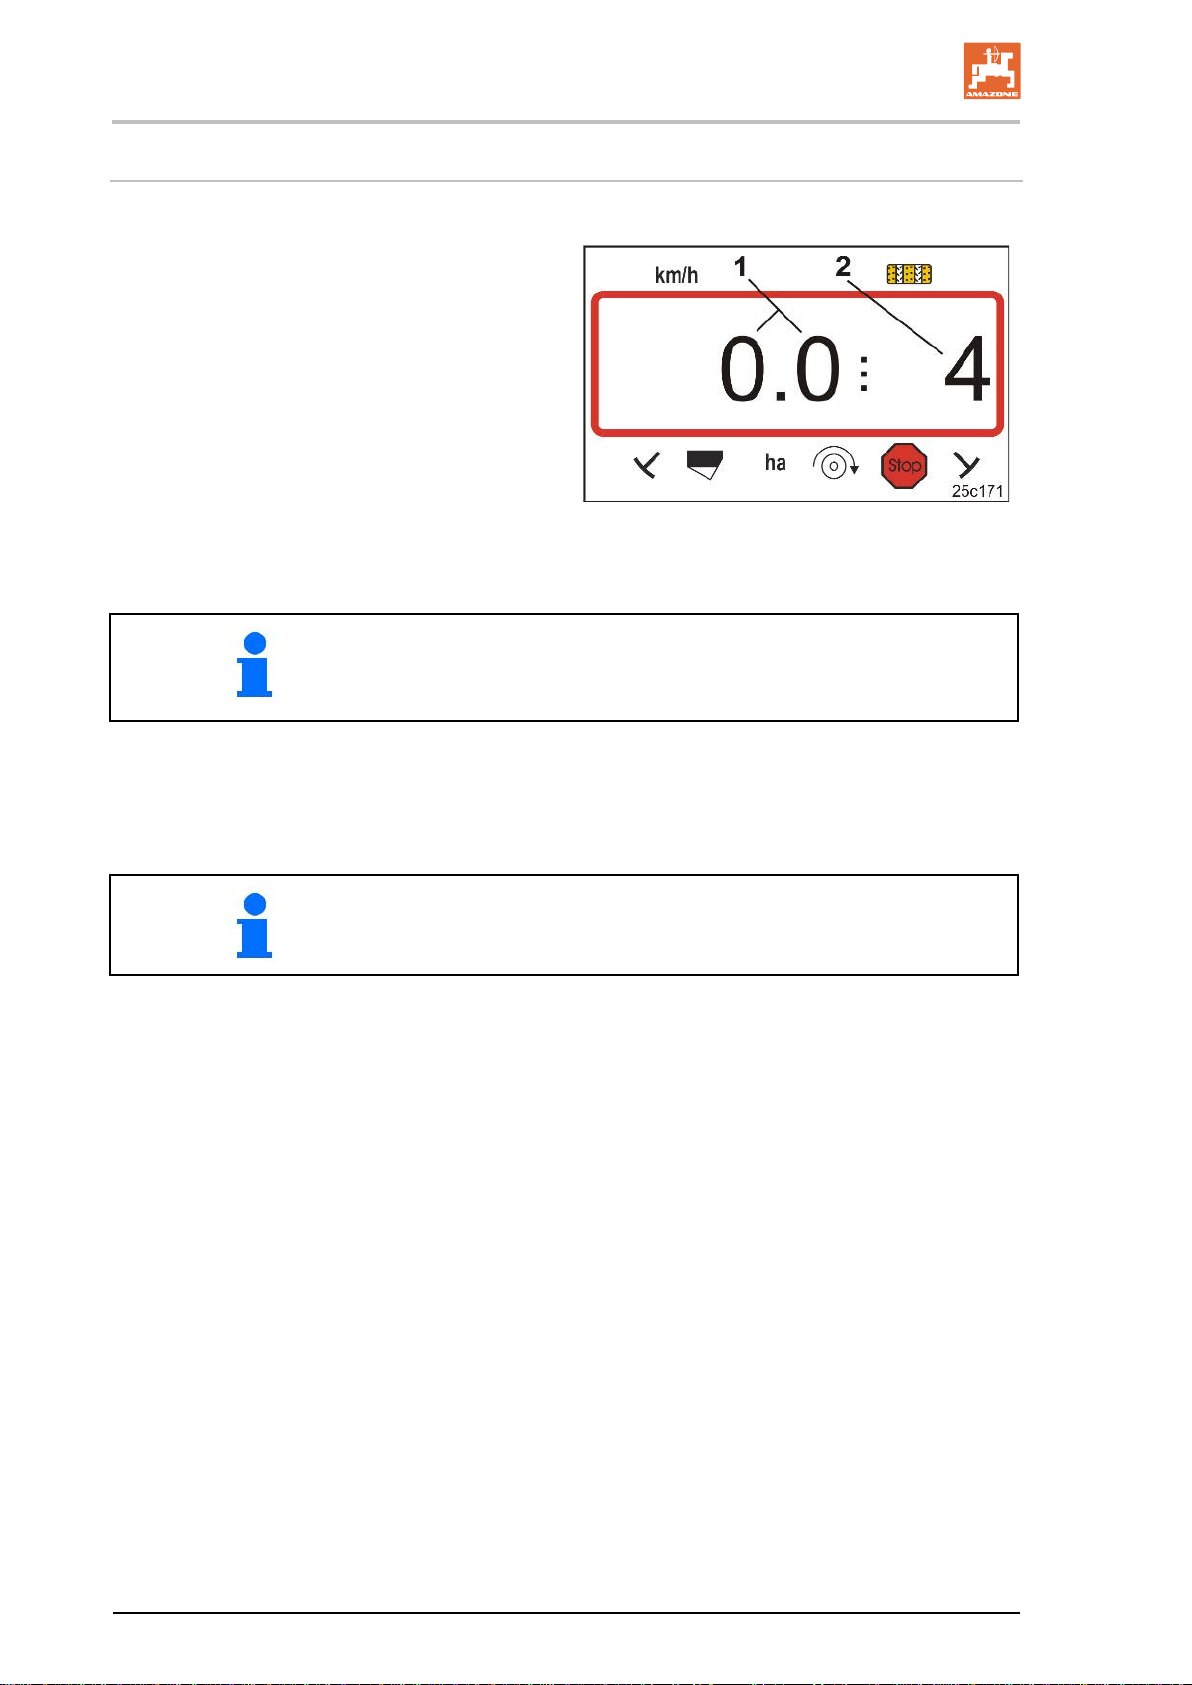
Display at standstill:
Digit 1 (Fig. 22/1) shows the
travel speed (0 km/h).
Digit 2 (Fig. 22/2) shows
the tramline counter 4.
Fig. 22
2. Lower the correct track marker (see seed drill operating manual).
The tramline control can be coupled with the track marker control.
actuated.
3. Set the tramline counter (see Chap. „Setting the tramline counter“, Seite 31).
4. Delete the part area memory (see Chap. „Erasing the part area memory“, Seite 32).
It is not mandatory to delete the part area memory.
The tramline counter can continue counting when the track marker is
5. Start.
AMALOG BAH0017.5 06.15
Page 31
Starting work
AMALOG
31
Fig.
7.1 Tramline counter
7.1.1 Setting the tramline counter
Press several times until the correct tramline counter is displayed
[e.g.: tramline counter 4, see (Fig. 10, Seite 21) under the writing "START"].
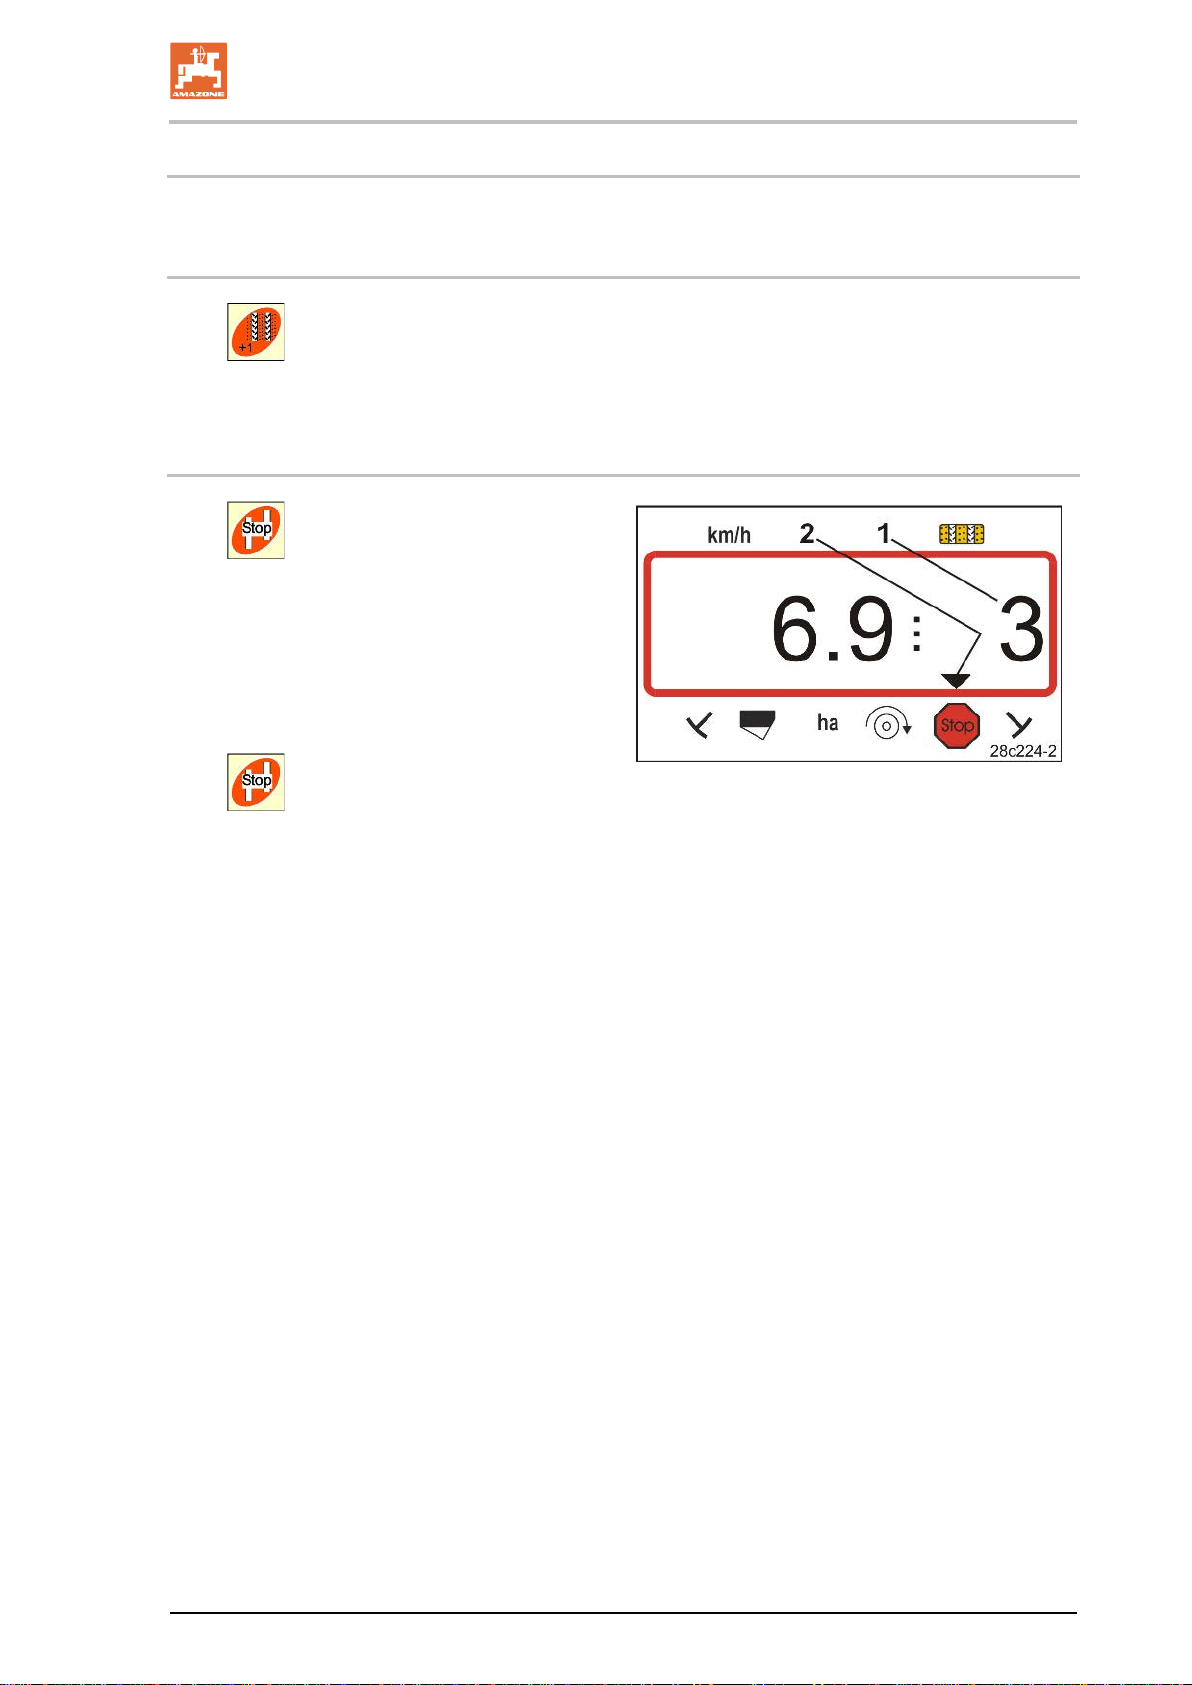
7.1.2 Block the tramline counter
Press .
→ The further shifting of the tramline counter
is blocked.
→ The number (Fig. 23/1) of the tramline
counter flashes in the display
→ The control symbol (Fig. 23/2) marks the
stop symbol.
23
Press
.
→ The tramline counter is again active.
BAH0017.5 06.15
Page 32
Starting work
32
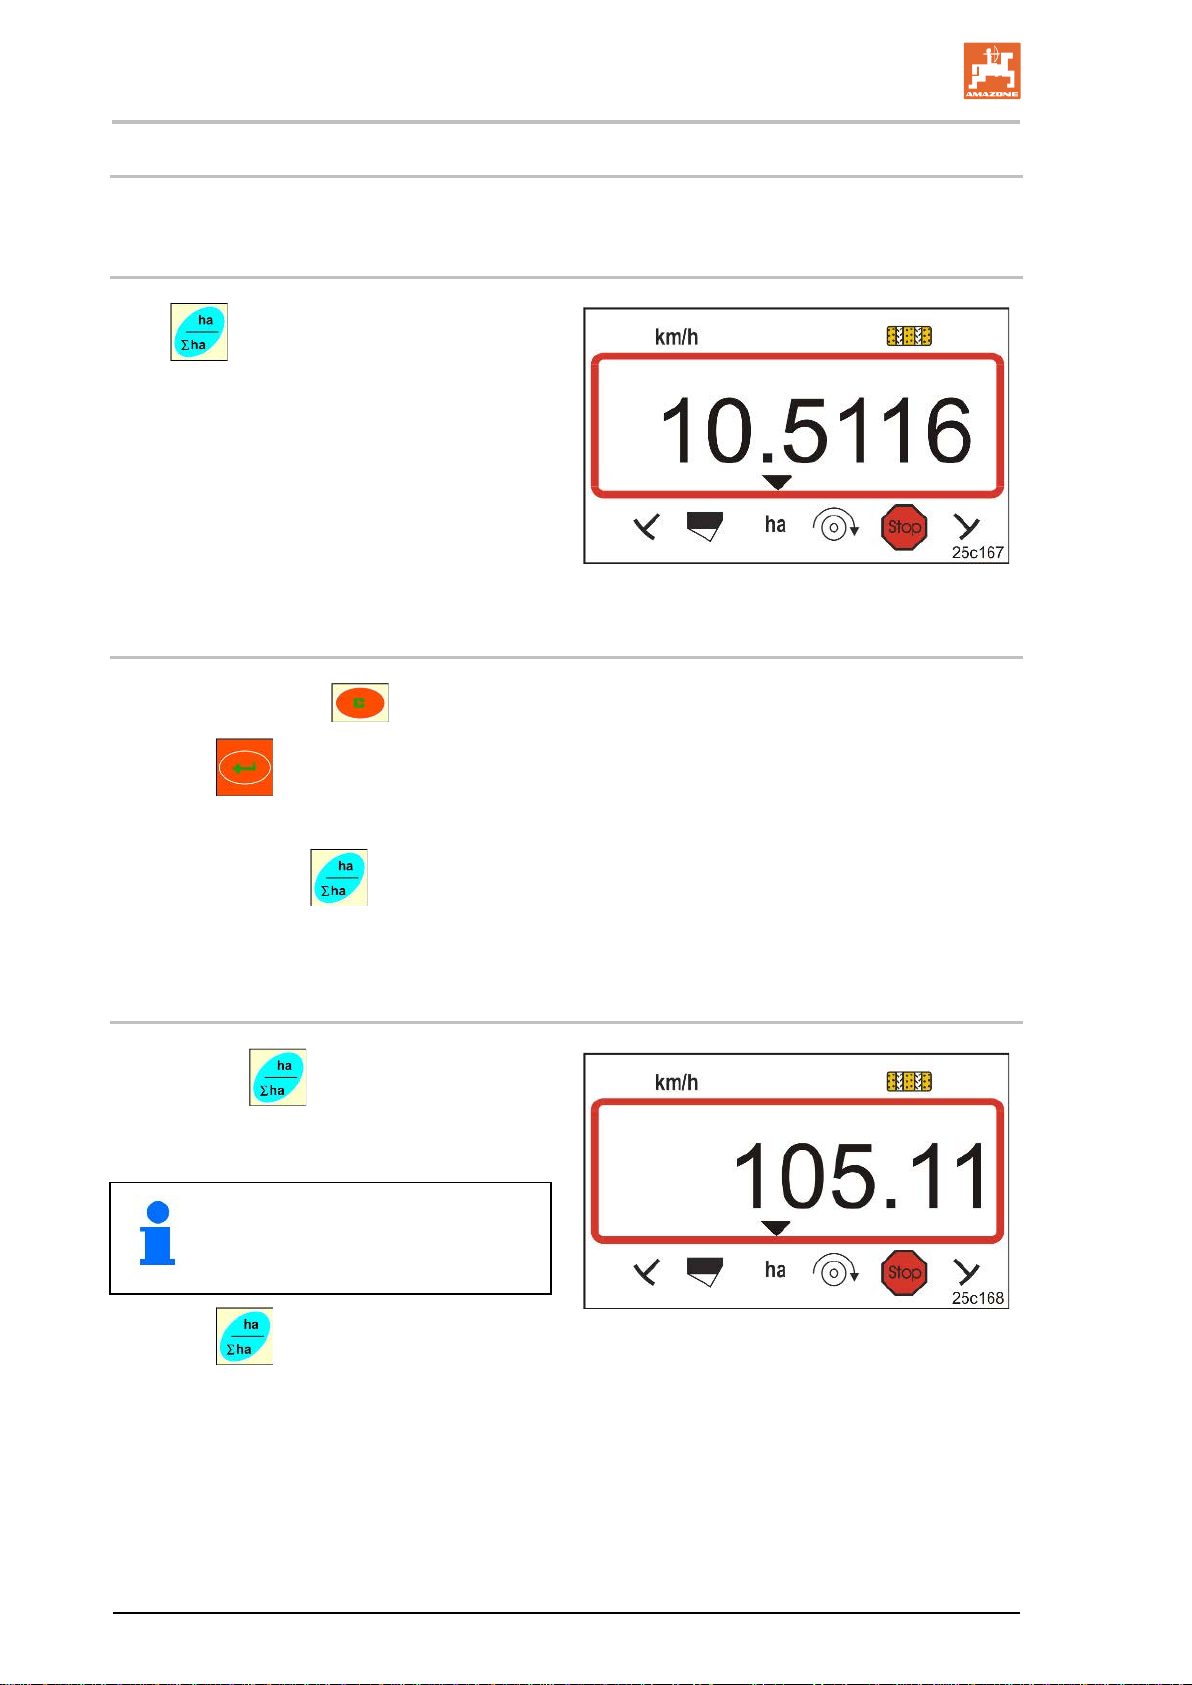
7.2 Worked area
7.2.1 Displaying the worked part area
Press .
→ Display (Fig. 24)
worked part area (e.g. 10.5 ha).
7.2.2 Erasing the part area memory
1. Press and hold the key.
2. Press
→ The part area memory is set to 0 [ha].
3. Press the button
→ Back to the work display (Fig. 26).
.
Fig. 24
7.2.3 Display the total area
1. Press the key twice.
→ Display (Fig. 25)
total worked area (e.g. 105.1 ha).
The data cannot be deleted.
2. Press .
→ Back to the work display (Fig. 26).
Fig. 25
AMALOG BAH0017.5 06.15
Page 33
Starting work
AMALOG
33
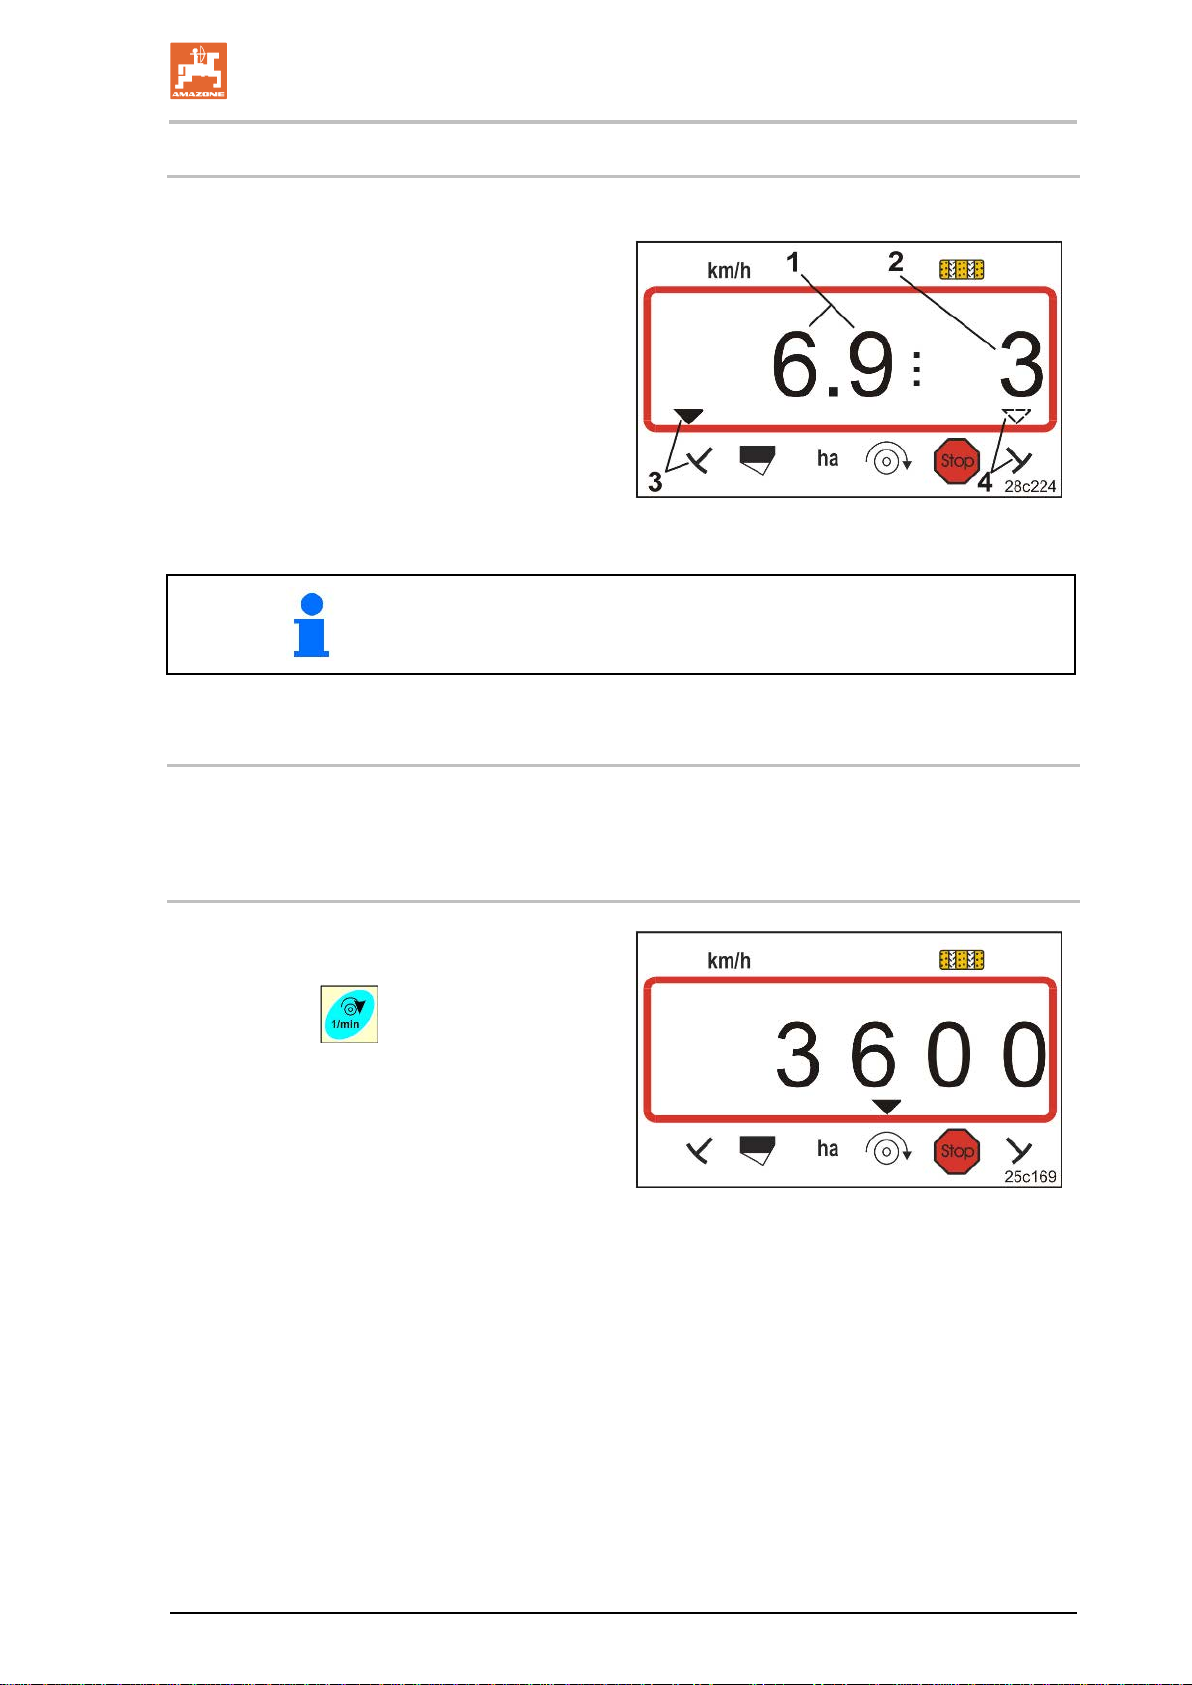
During work, the AMALOG+ displays
Fig.
Data can be displayed for approx. 10 seconds during seeding by actuating the function keys.
This display is only possible for pneumatic seed
Fig.
7.3 Display during work
• the travel speed (Fig. 26/1),
e.g. 6.9 km/h
• the setting
of the tramline counter (Fig. 26/2),
e.g. Switching position 3
• the left track marker (Fig. 26/3)
is in the operational position
• the right track marker (Fig. 26/4)
is raised.
The counting process of the tramline counter is supported by an
acoustic signal.
7.4 Function keys
7.4.1 Display of the current blower fan speed
drills.
Press key (blue)
.
26
→ Display (Fig. 27):
current blower fan speed
(e.g. 3600 [rpm]).
27
BAH0017.5 06.15
Page 34
Faults
34
Tramline fault message
Fig.
Alarm message (optional)
Fig.
8 Faults
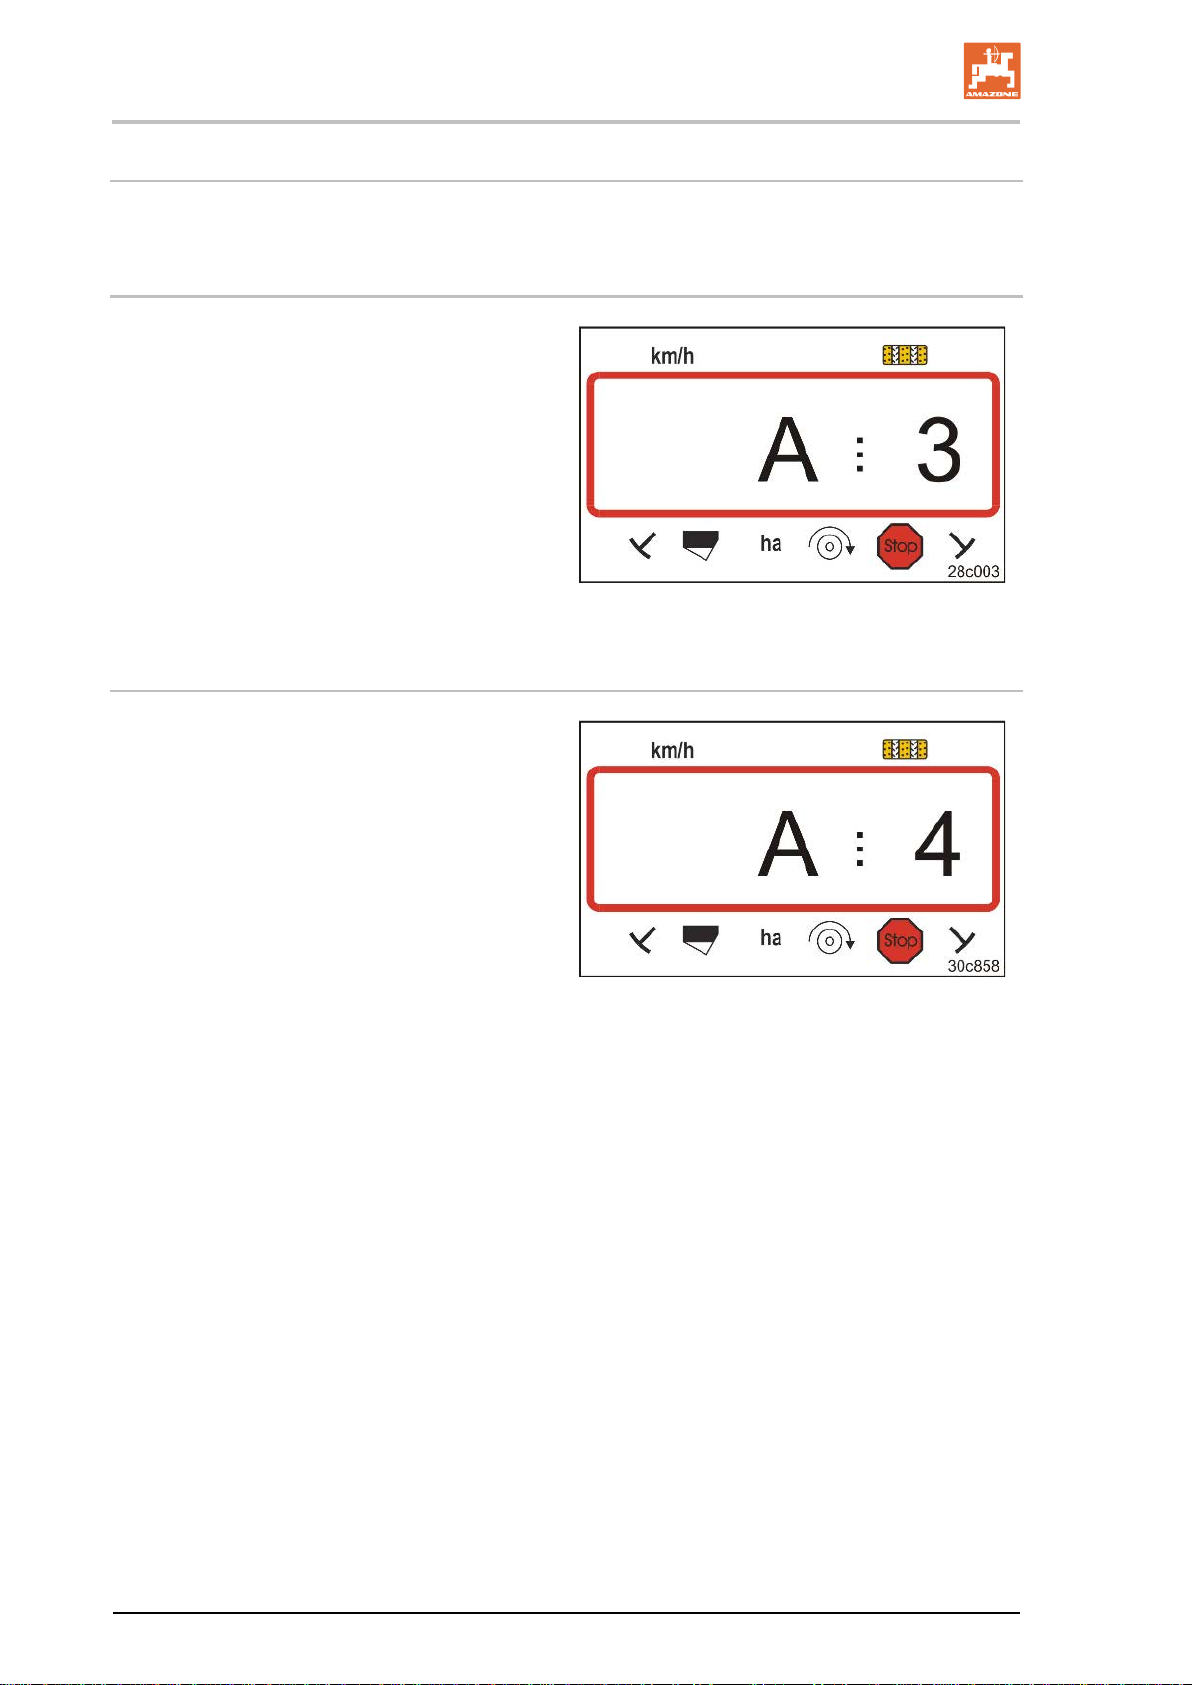
8.1 Fault display A3
The occurrence of a tramline fault activates
• the display (Fig. 28)
• an acoustic signal.
8.2 Fault display A4
28
if the PTO shaft comes to a standstill
(only with rotary cultivator operati on )
The on-board computer emits an alarm as soon
as the overload clutch of the rotary cultivator
PTO shaft is activated.
When the PTO shaft is at standstill the following
appears:
• the display (Fig. 29)
• an acoustic signal.
29
AMALOG BAH0017.5 06.15
Page 35
Faults
AMALOG
35
Alarm message
•
•
Fig.
The display switches in the event of insufficient
Fig.
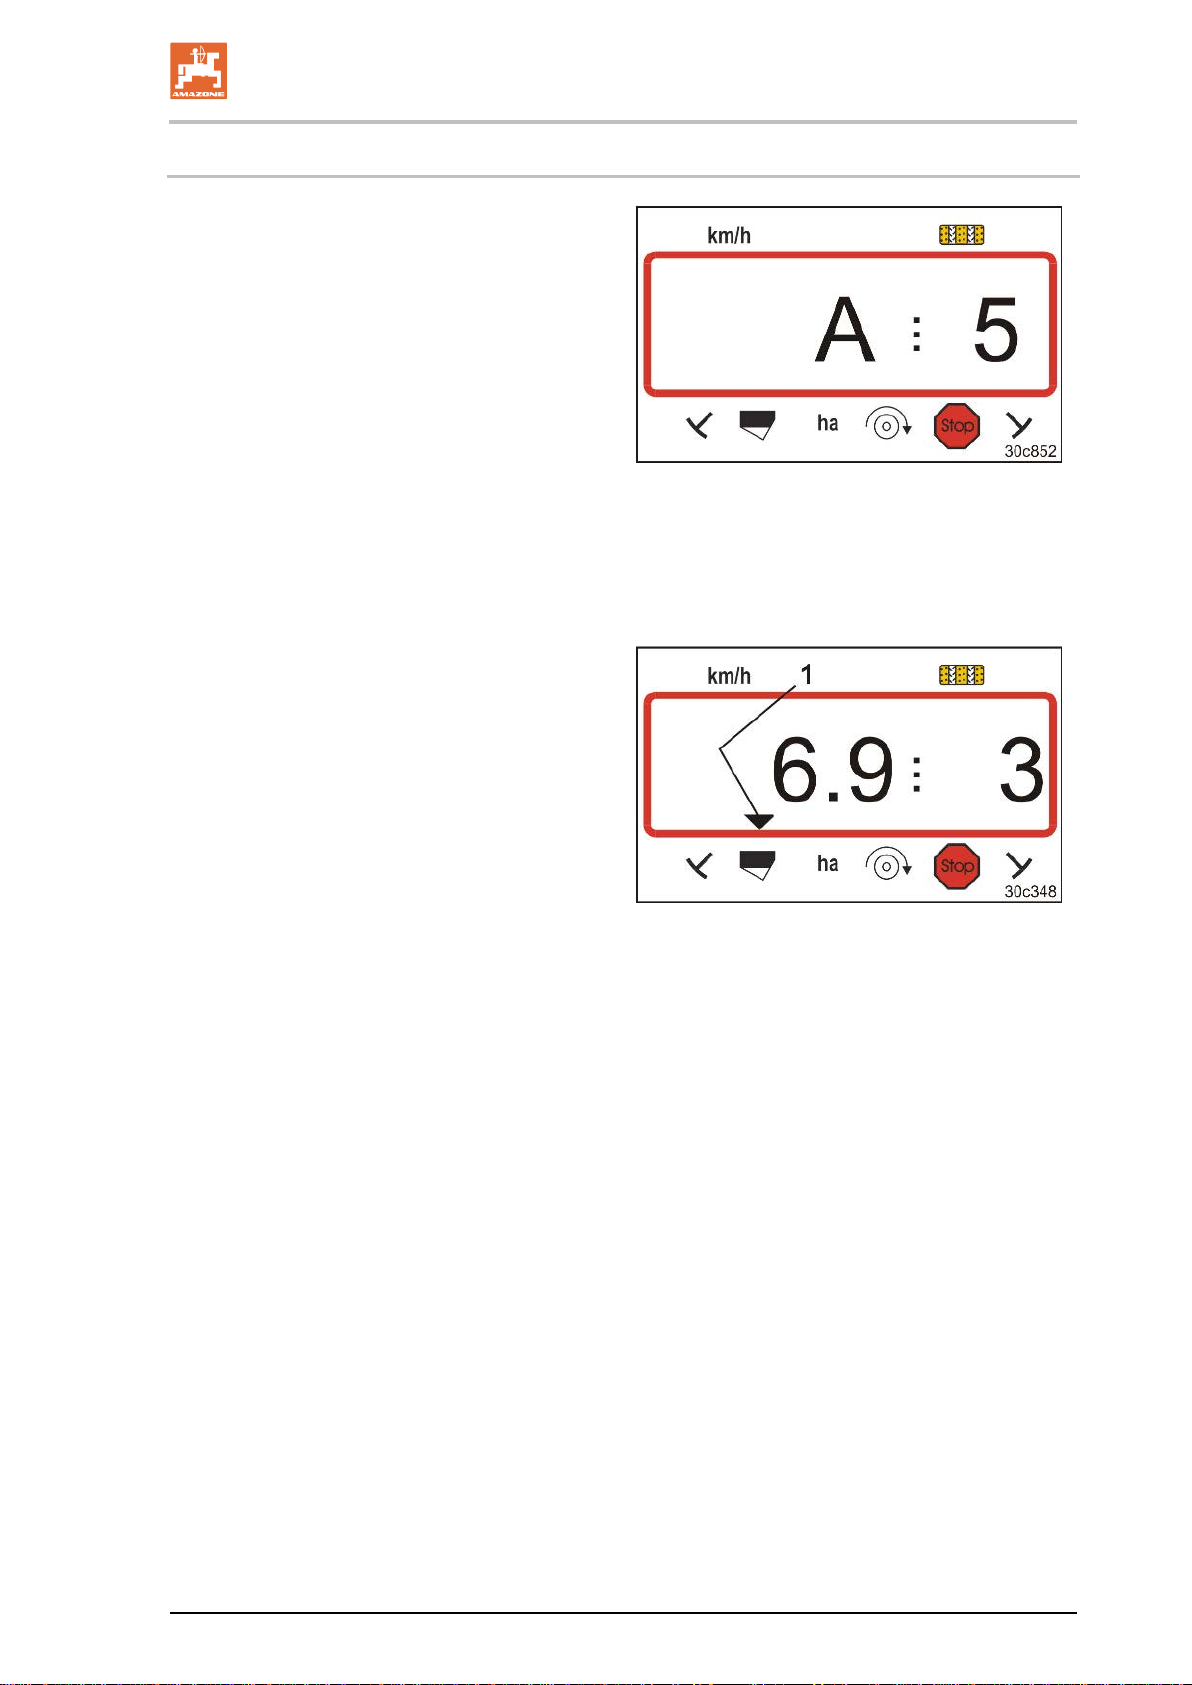
8.3 Fault display A5
in the event of insufficient seed quantity
ο for machines with level sensor
in the event of a malfunction of the seed
sowing shaft
ο only on
DMC Primera, Condor and Citan 01
ο only on machines
with combined seed level and sowing
shaft monitoring
In the event of an alarm
• the display (Fig. 30) appears
• an acoustic signal (triple signal tone) is
emitted.
seed quantity.
The control symbol (Fig. 31/1) marks the fill level
symbol.
The alarm is repeated when the machine is used
again, e.g. after turning at the end of the field.
30
31
BAH0017.5 06.15
Page 36
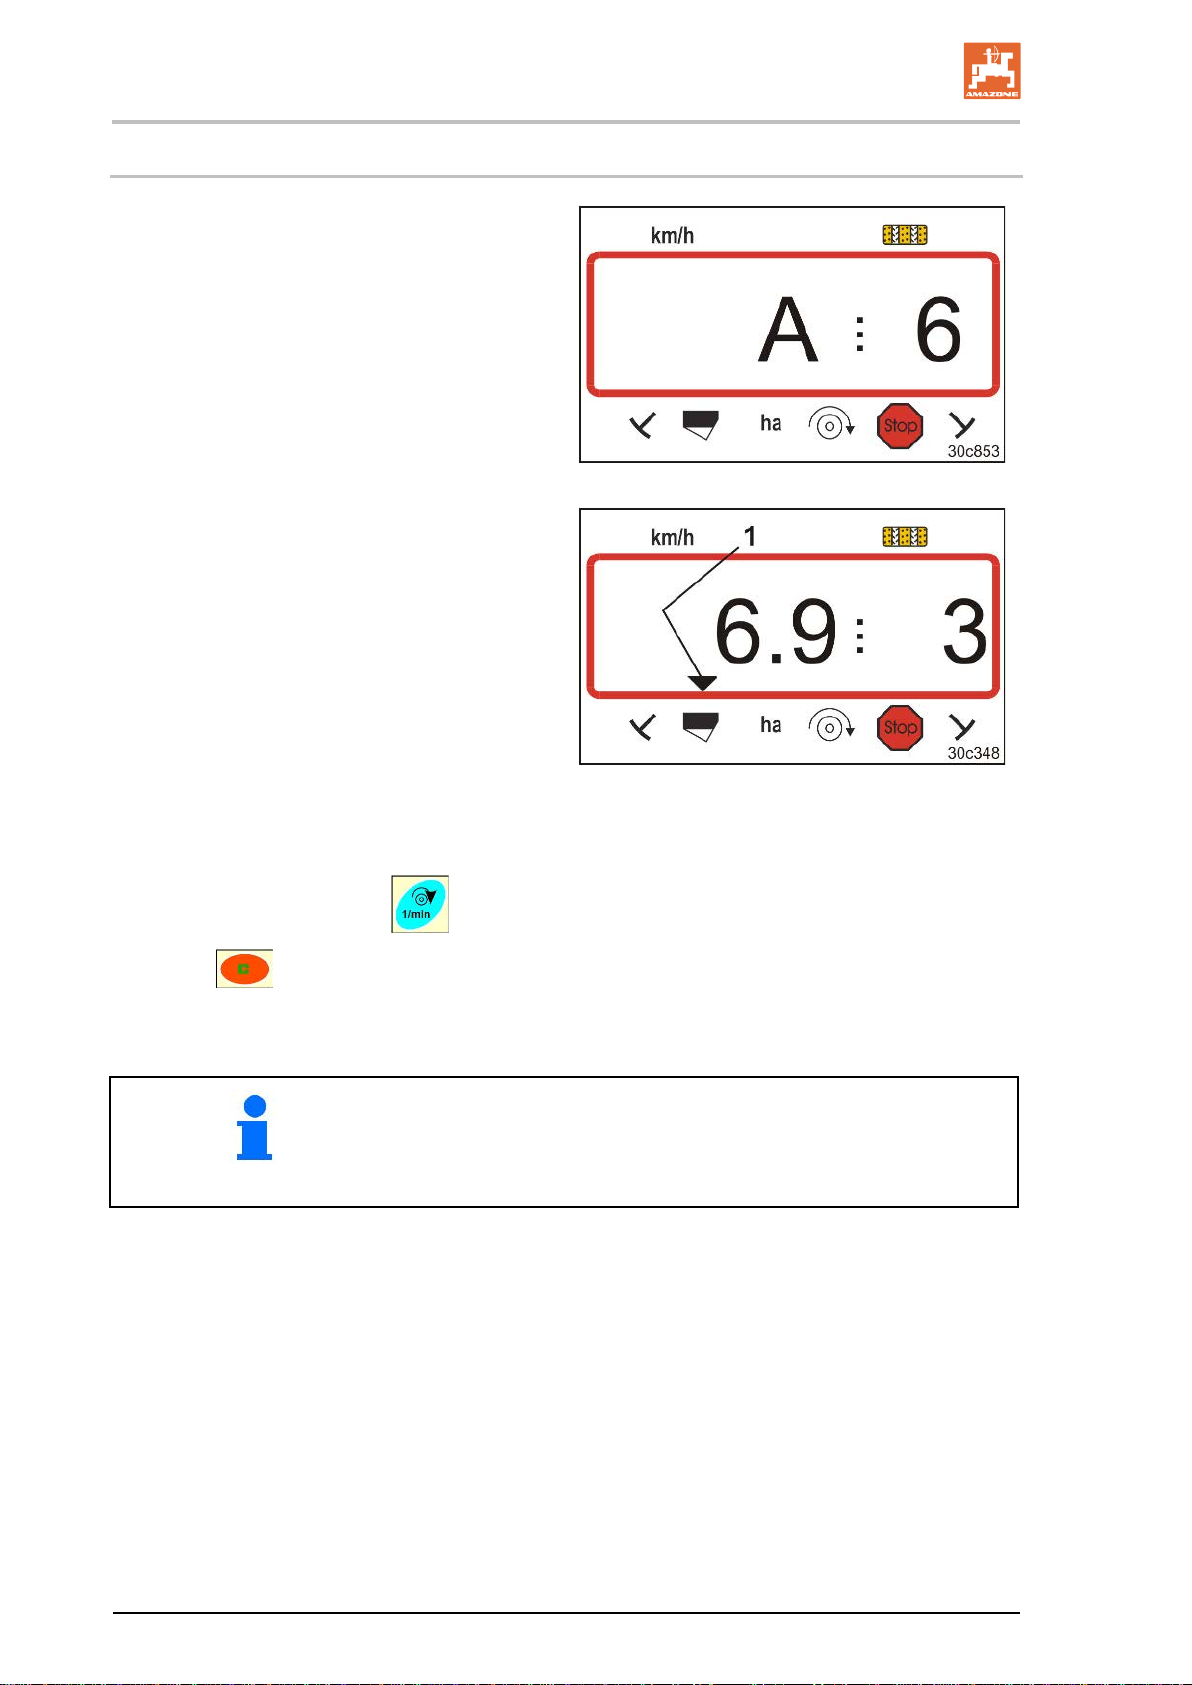
Faults
36
Alarm message
•
Fig.
The display switches in the event of insufficient
Fig.
Switching off the alarm message
8.4 Fault display A6 (DMC Primera, Condor and Citan 01 only)
in the event of insufficient fertiliser
• in the event of a malfunction of the fertiliser sowing shaft
In the event of an alarm
• the display (Fig. 32) appears
• an acoustic signal
(triple signal tone) is emitted.
fertiliser.
The control symbol (Fig. 33/1) marks the fill level
symbol.
The alarm is repeated when the machine is used
again, e.g. after turning at the end of the field.
1. Press and hold key (blue)
2. Press
.
→ The warning message is switched off.
32
33
The alarm message can only be switched off after the alarm has been
triggered.
The alarm deactivation is only effective until the on-board computer is
switched off.
AMALOG BAH0017.5 06.15
Page 37
Tables
AMALOG
37
9 Tables
9.1 Machine data table
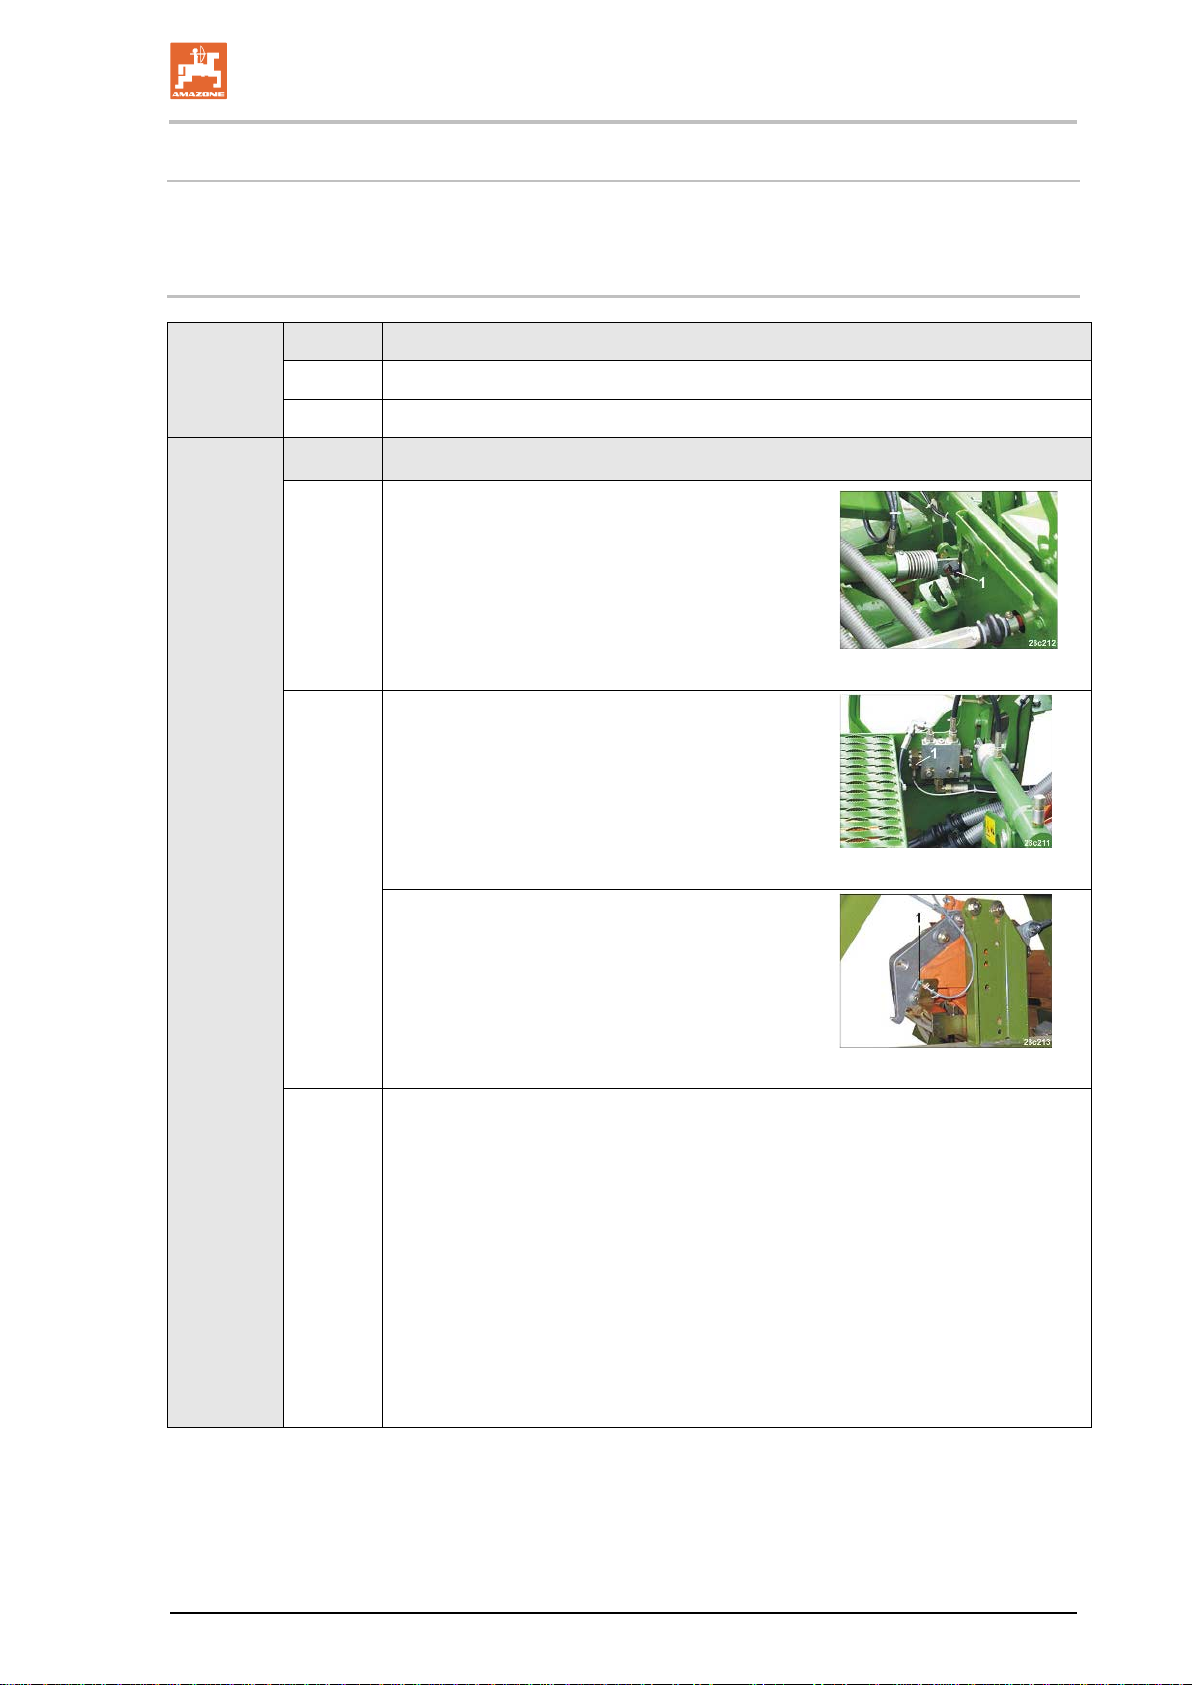
Mode 1 Code Activate functions of the on-board computer
1
Activate all of the functions of the on-board computer
2
Only activate the hectare counter of the on-board computer
Mode 2 Code Number of track marker sensors
Machine with 2 track marker sensors,
e.g. front tank drill combination with 2 track marker sensors (Fig. 34/1).
0
Machine
with 1 track marker sensor
on hydraulic valve (Fig. 35/1)
Fig. 34
1
2 to 99
Fig. 35
Machine
with 1 track marker sensor
on marker change overs (Fig. 36/1)
Fig. 36
For machine
• with track marker but without track marker sensor
• without track marker and without track marker sensor
the numbers 2 to 99 correspond to the time (seconds) between stopping
(gearbox standstill) and continued counting of the tramline counter.
For seed drills without track marker sensor, the tramline counter shifts on as
soon as the set time expires after gearbox standstill, e.g. after the seed drill is
raised for turning at the end of the field.
In event of a brief pause within the set time, the tramline counter does not continue to count.
BAH0017.5 06.15
Page 38
Tables
38
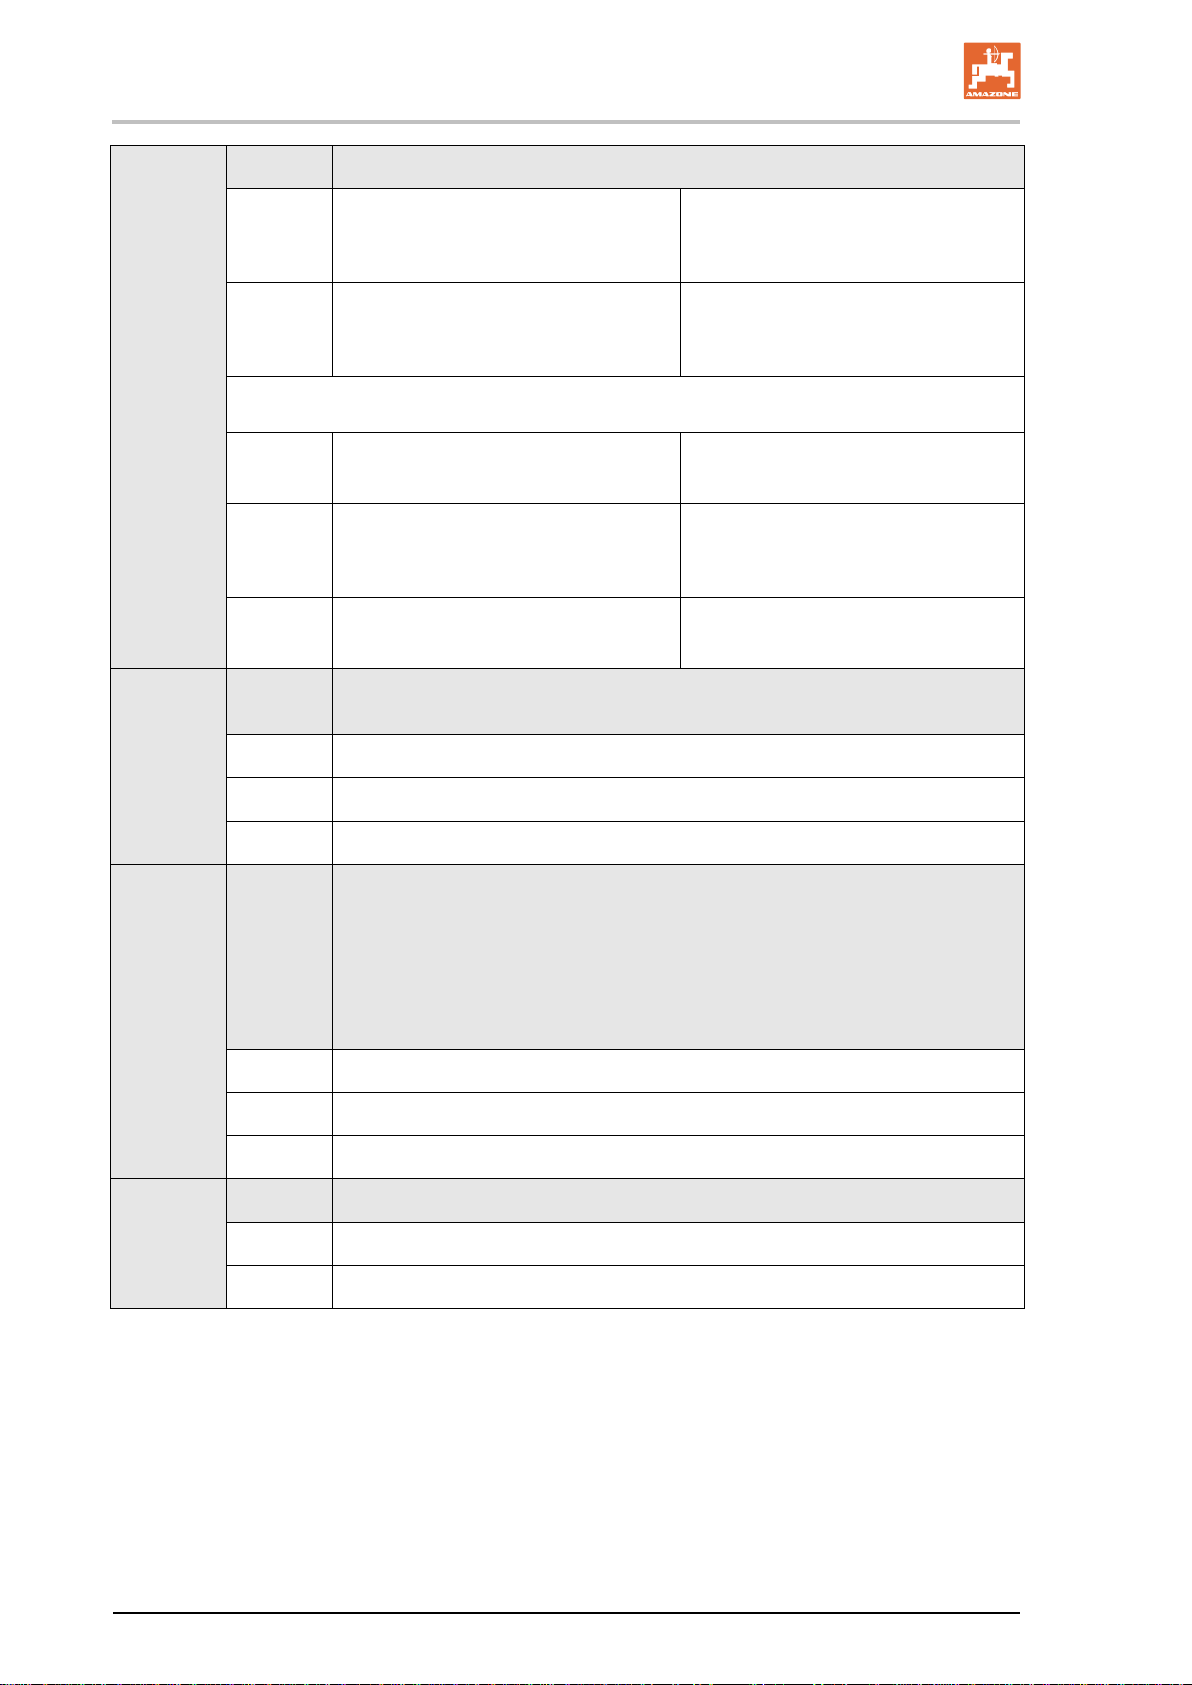
Mode 3 Code Machine type
0 Cam wheel seed drills
D9 Super / Special
D9 6000 TC
AD
D9 Super / Special
D9 6000 TC
AD
3
Cam wheel seed drills
with seed shaft monitoring
AD-P
Citan 6000
Citan 01
Condor
DMC Primera
AD-P
DMC Primera
Mode 4
1 Pneumatic seed drills
Pneumatic seed drills
2
With 2 separate hoppers and
with seed shaft monitoring
4
Code
00
10
22
Pneumatic seed drills
With seed shaft monitoring
The period between occurrence of the error in tramline control and triggering of the alarm
Alarm is switched off
Setting for pneumatic seed drills (10 seconds)
Setting for cam wheel seed drills (22 seconds)
Mode 5 Code The period in which no alarm must be triggered
• for cam wheel seed drills
between the command to create tramlines and standstill of the lay shaft
• for pneumatic seed drills
between the command to create tramlines and closing of the outlets in
the distributor head.
00
10
22
Do not make this setting (0 seconds)
Setting for pneumatic seed drills (10 seconds)
Setting for cam wheel seed drills (22 seconds)
Mode 6 Code Rotary cultivator monitoring
0
1
Setting without rotary cultivator monitoring
Setting with rotary cultivator monitoring
AMALOG BAH0017.5 06.15
Page 39
Tables
AMALOG
39
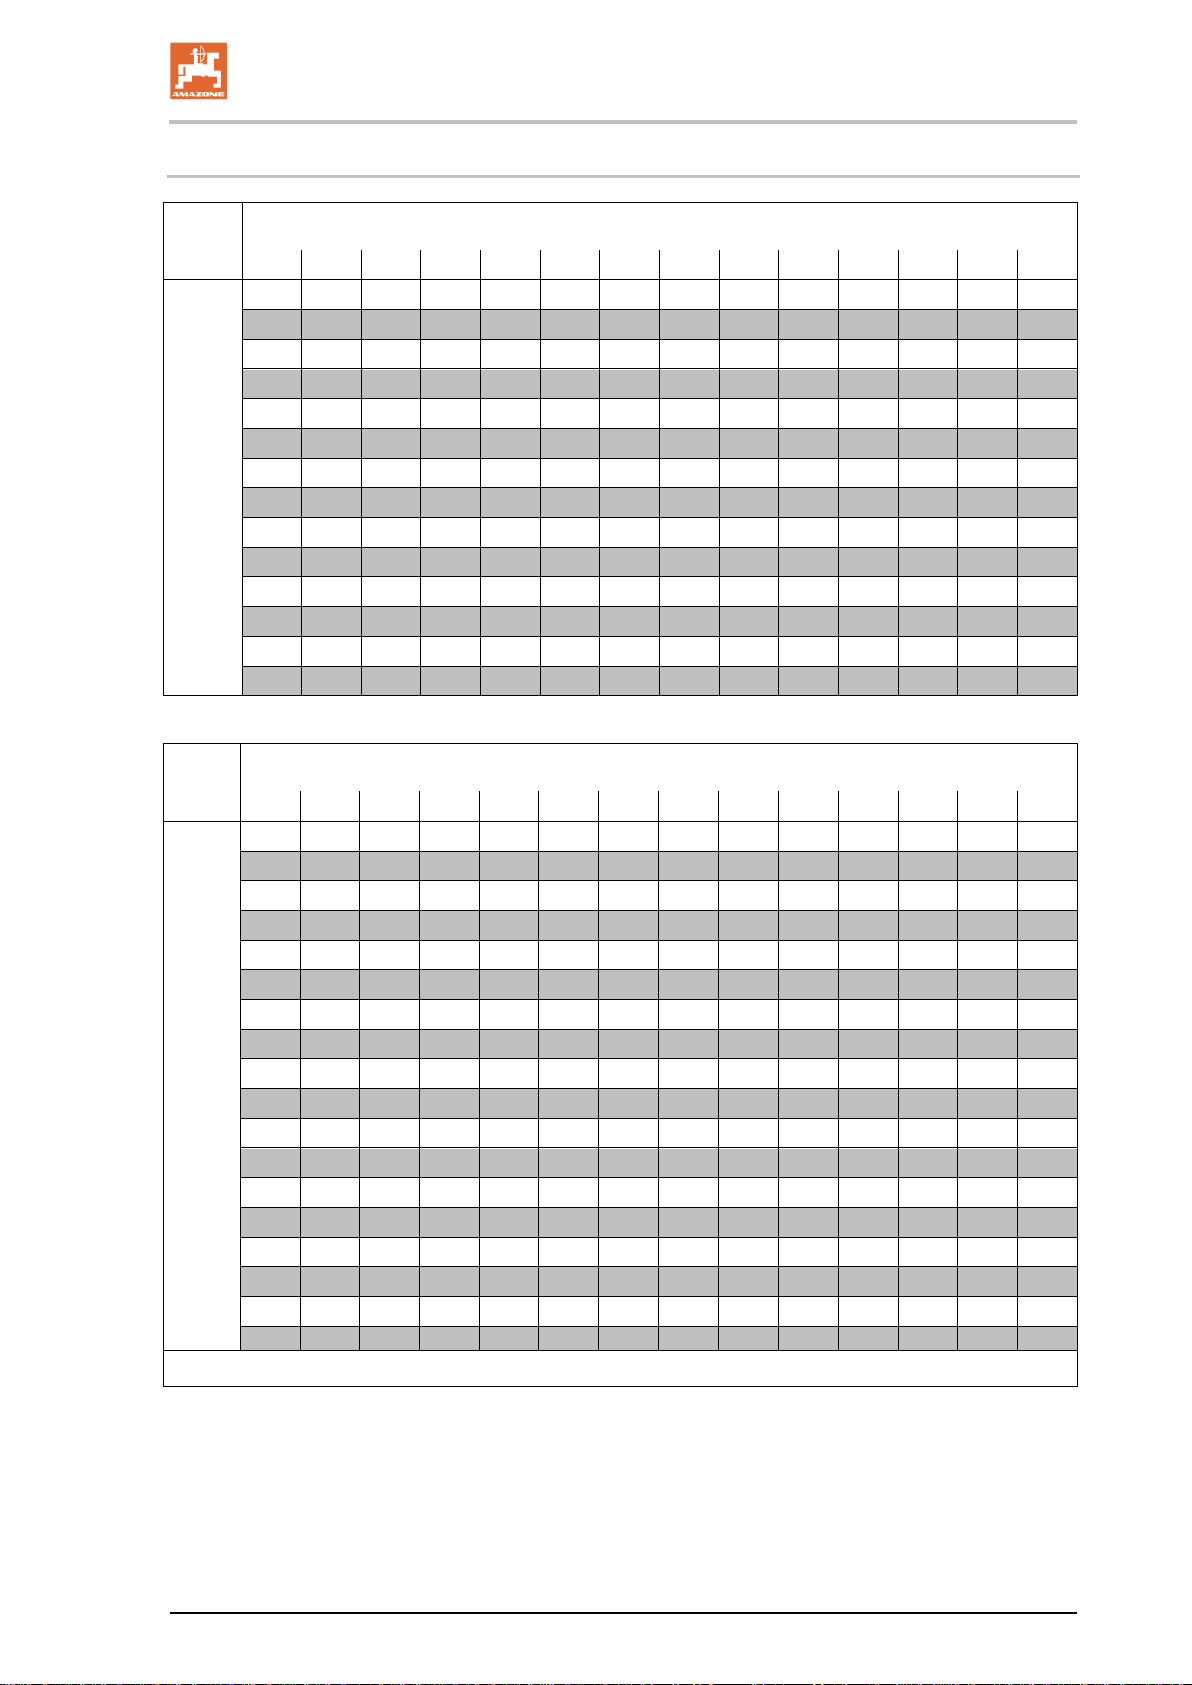
Tramline counter,
15*
16
17
20
21
22
23
26
32
35
* No tramlines are created
9.2 Table for adjustable tramline rhythms
controlled and displayed by the on-board
Fig. 37
Tramline rhythms
1 2 3 4 5 6 7 8 9 10 11 12 13 14
0 0 0 0 0 0 0 0 0 1 1 0 0 0
1 0 1 1 1 1 1 1 1 2 0 1 1 1
1 2 2 2 2 2 2 2 3 3 2 2 2
2 3 3 3 3 3 3 0 4 3 3 3
4 4 4 4 4 5 5 4 4 4
5 5 5 5 6 6 5 5 5
6 6 6 0 7 6 6 6
7 7 8 8 7 7 7
8 9 0 8 8 8
10 10 9 9 9
10 10 10
11 11 11
12 12
computer
13
Tramline rhythms
Tramline counter,
controlled and displayed by the on-board computer
Fig. 38
1 0 0 0 0 0 0 0 0 0
1 1 1 0 0 0 1 0 1
2 2 2 1 1 1 2 1 2
3 3 3 2 2 2 3 2 3
4 4 4 3 3 3 4 3 4
5 5 5 4 4 4 5 4 5
6 6 6 5 5 6 5 6
7 7 7 6 6 7 6 7
8 8 8 7 8 7 8
9 9 9 8 9 8 9
10 10 10 9 10
11 11 10 11
12 12 12
13 13 13
14 14 14
15 15
16
BAH0017.5 06.15
Page 40
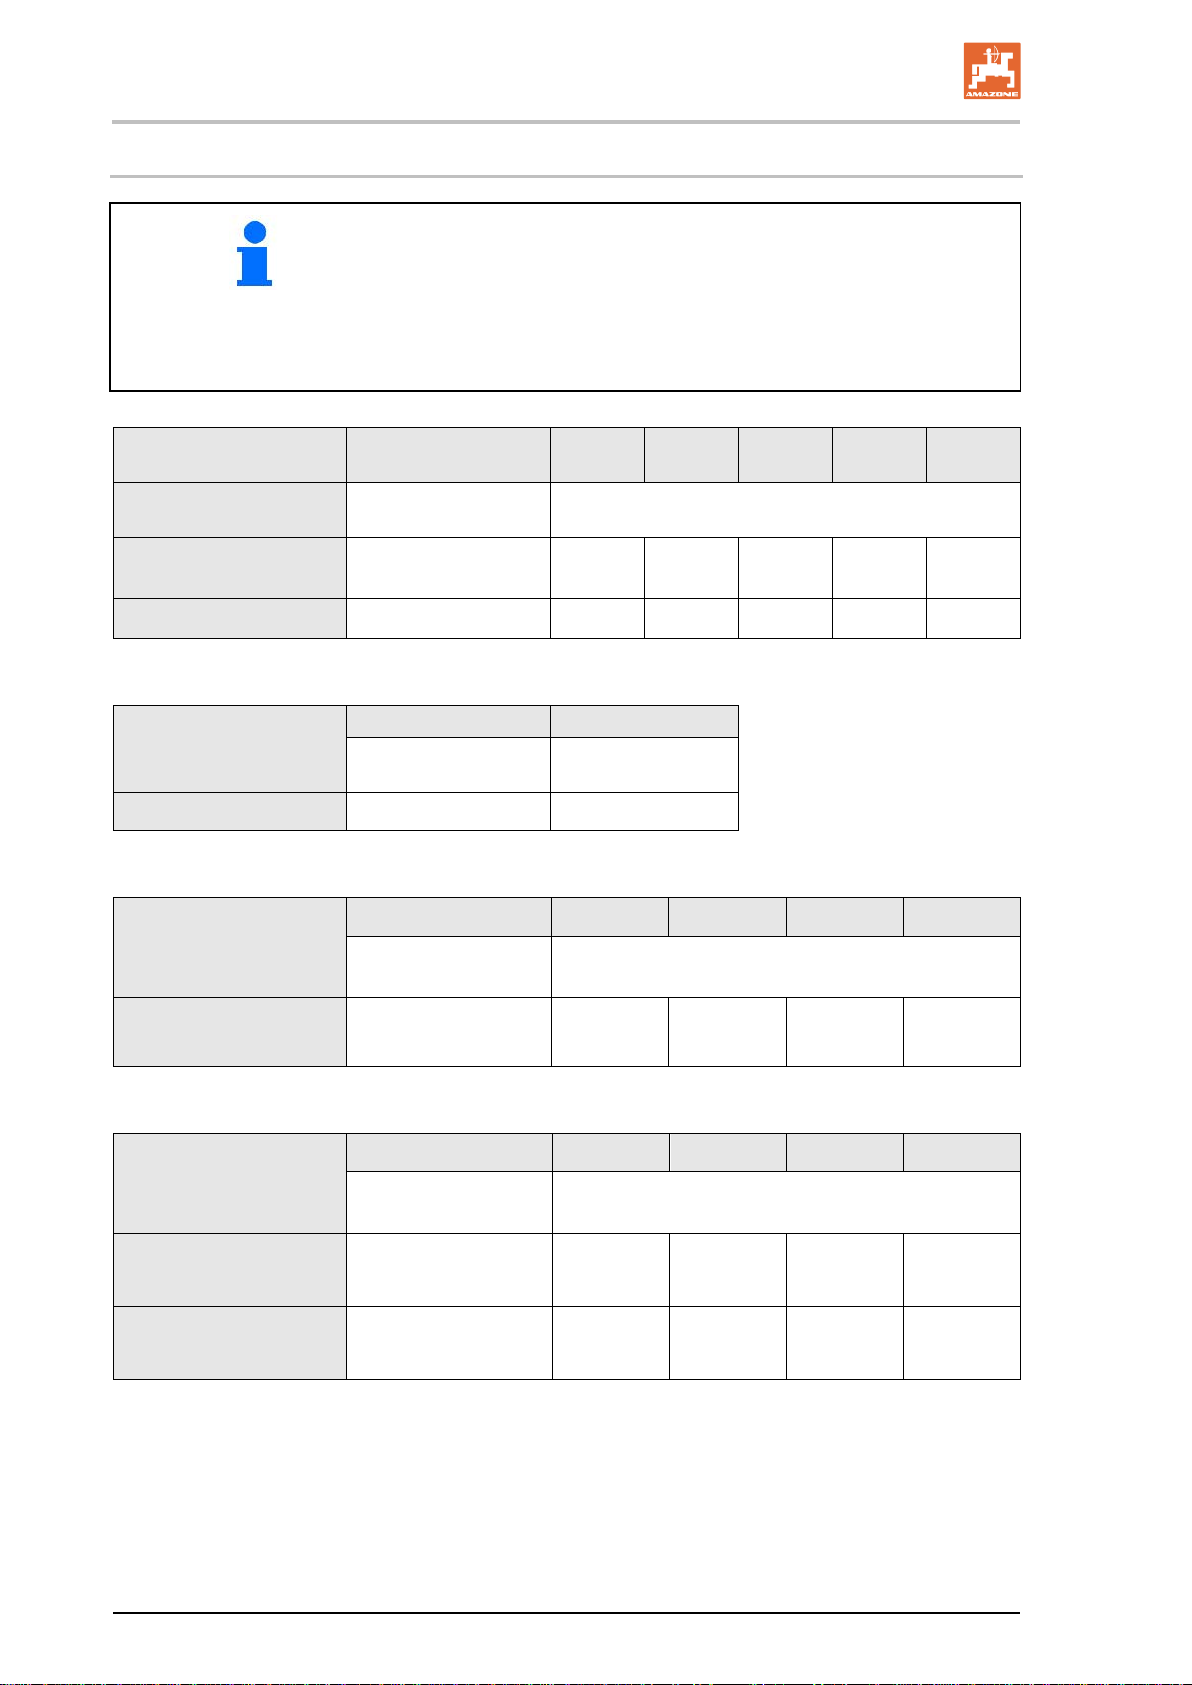
Tables
40
D9 Super / Special
(imp./100 m)
on 1/40 ha
9.3 Tables: calibration values / crank turns (guide values)
The table values in the Chapter are guide values.
Mounted seed drills
Tyres
6.00 – 16
180/90 – 16
10.0/75 - 15
Fig. 39
Sowing implement
towed
D9 6000 TC
If the actual calibration value (imp./100 m) deviates from the table
value, the number of crank turns for the calibration test will also
change.
You can enter your determined calibration values in the table (Fig.
49).
Working width 2.5m 3.0m 3.5m 4.0m 6.0m
Calibration value
(imp./100 m)
740
711
46.0 38.5 33.0
Crank turns on 1/40 ha
28.0 18.5
Working width 6.0m
Calibration value
Crank turns
648 17.0
Fig. 40
Mounted seed drills
(mechanical)
AD 25/3000 Special
AD 30/35/4000 Super
Fig. 41
Pack top seed drills
(pneumatic)
AD-P 03 Special
with star wheel drive
AD-P 03 Super
with star wheel drive
Fig. 42
Working width 2.5m 3.0m 3.5m 4.0m
Calibration value
(imp./100 m) Crank turns on 1/40 ha
617 27.0 22.5 19.0 17.0
Working width 2.5m 3.0m 3.5m 4.0m
Calibration value
(imp./100 m) Crank turns on 1/40 ha
1409
1575
38.5 33.0 29.0
29.5
22.0
AMALOG BAH0017.5 06.15
Page 41
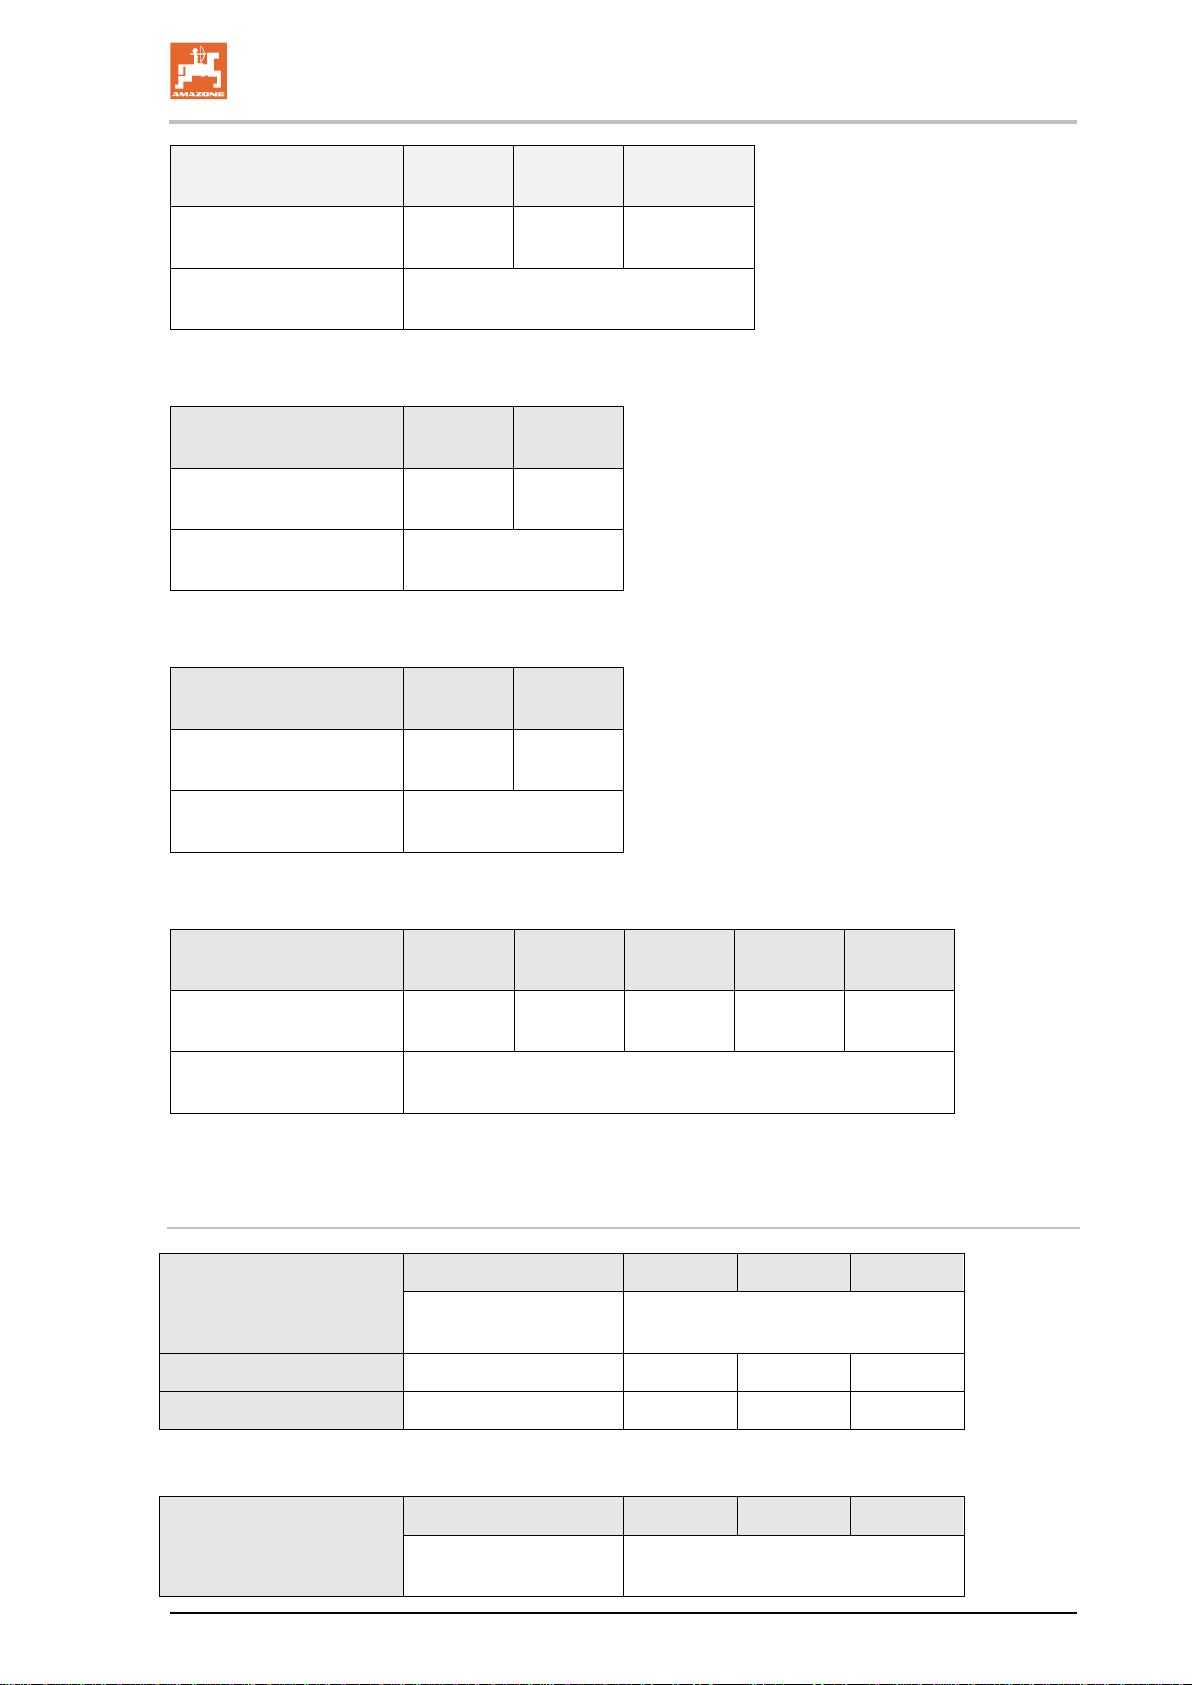
Tables
AMALOG
41
Large-area seed drill
Citan
8000
Citan
9000
Citan
12000
Crank turns
on 1/40 ha
Calibration value
(imp./100 m)
Fig. 43
Large-area seed drill
Crank turns
on 1/40 ha
Calibration value
(imp./100 m)
Fig. 44
Large-area seed drill
Crank turns
on 1/40 ha
14,5 13,0 9,5
1187
Citan
12001
Citan
15001
9.5 7.7
1410
Condor
12001
Condor
15001
9.5 7.7
Calibration value
(imp./100 m)
Fig. 45
DMC large-area seed
drills
Crank turns
on 1/40 ha
Calibration value
(imp./100 m)
Fig. 46
Predecessor machines
Mounted seed drills
(mechanical)
AD 03
1410
Primera
3000
Primera
4500
Primera
602
Primera
9000
Primera
12000
68.0 45.3 34.0 22.7 16.8
1023
Working width 2.5m 3.0m 4.0m
Calibration value
(imp./100 m) Crank turns on 1/40 ha
617 27.0 22.5 17.0
RP-AD 03
Fig. 47
Pack top seed drills
(pneumatic)
BAH0017.5 06.15
672 59.0 49.0 37.0
Working width 2.5m 3.0m 4.0m
Calibration value
(imp./100 m) Crank turns on 1/40 ha
Page 42

Tables
42
AD-P 02
1)
1053 27.0 22.5 17.0
RPAD-P 02
Fig. 48
1175 59.0 49.0 37.0
1)
with star wheel dia. 1.18
AMALOG BAH0017.5 06.15
Page 43

Tables
AMALOG
43
9.4 Table for calibration values / crank turns for the calibration test
Field
Calibration value
"imp./100 m"
Crank rotations
Fig. 49
BAH0017.5 06.15
Page 44

H. DREYER GmbH & Co. KG
Postfach 51
D
Germany
Telephone: +49 (5405) 501-0
Facsimile:
E
http://
Plants: D-27794 Hude • D-04249 Leipzig • F-57602 Forbach
Branches in England and France
Manufacturers of mineral fertiliser spreaders, field sprayers, seed drills, soil cultivation machines,
-49202 Hasbergen-Gaste
multipurpose warehouses and municipal equipment
+49 (5405) 501-234
-mail: [email protected]
www.amazone.de
 Loading...