

Amana The Big Oven ACF4215A, Distinctions DCF4205, The Big Oven ACF422GA, The Big Oven ACF4225A, THE BIG OVEN DCF4205 Owner's Manual
...Page 1
BUILT BETTER THAN IT HAS TO BE_
Owner's Manual
Covering _'mancr Distinctions'ACF4205Aand DCF4205
The BL_A CF4215A,A CF422GA and A CF4225A
_-oof ilooj
F
!
TheBb
Electric Smoothtop Range
Keep instrucdons for future reference.
Be sure manual stays with range.
Important Safety Information .............. 3
Cooking on the Smoothtop................. 6
Cookware Suggestions ...................... 7
Oven Cooking Methods ...................... 8
Before Using the Oven ....................... 9
Features ........................................... 10
Displays and Signals ........................ 11
Using the Oven Control .................... 12
Cooking
Baking .......................................... 17
Broiling .......................................... 20
Roasting ....................................... 21
Braising ........................................ 22
Care and Cleaning ............................ 23
Troubleshooting ................................ 27
Amana Warranty .............................. 32
................................................................. i, ............ F
Part No.36-32045001-0
Page 2
Thank you for buying an Amana Range!
Please take thetime tocompletethe registrationcardand returnpromptly.
If the registrationcardis missing,call Amana Consumer AffairsDepartment.
When contactingAmana, provideproductinformationfromserialplate found
on rightside ofstorage dooropening:
Mode Number. _,
Manufactudng(P) Number s=:i=l
SerialNumber (SIN) ["_ _ 7 hte
PurchaseDate
Dealer Name
Dealer Address L..... _
Dealer Phone
Keep this manual and your sales receipt together ina safe place for
future reference or ifwarranty service isrequired.
For answersto questionsor tolocate an authorized servicer,call
1-8OO-NAT-LSVC (1-800-628-5782) inside USA or 319-622-551t outside
USA. Warranty service must be performed by an authorized servicer.
Amana Appliancesalso recommendscontactingan authodzedservicerif
service isrequiredafter warrantyexpires.
Questions on cooking,cleaningor usage?
Refer to
Product Assistance at www.amana.com
or
call Consumer Affairs at 1-800-843-0304
Asure TM Extended
Service Plan
Amana Appliances offers long-term
service protection for this new range.
Asure TM Extended Service Plan,
coveting functional parts, labor, and
travel charges, is specially designed to
supplement a strong warranty.
Call 1-800-528-2682 for information.
Parts and Accessories
Purchase replacement parts and
additional accessories by phone.
To order accessories for your Amana
product, call
1-800-843-0304 inside USA or
319-622-5511 outside USA.
Save Time and Money
Ifsomething seems unusual, please
check "Troubleshooting" section,
which is designed to helpyou solve
problems beforecalling service. If you
have a question, call us at
(800) 843-0304 orwrite us at:
Consumer Affairs Department
Amana Appliances
2800 - 220th Trail
Amana, Iowa 52204
Remember to include model number
of your appliance and your phone
number.
What You Need to Know
About Safety Instructions
Warning and ImportantSafety
Instructions appearing in this manual are
not meant to cover all possible
conditions and situations thatmay
occur.Common sense, caution, and care
must be exercised when installing,
maintaining, or operating range.
Always contact your dealer, distributor,
service agent, or manufacturer about
problems or conditions you do not
understand.
Recognize Safety Symbols, Words, Labels
I _ DANGER I
DANGER--Immediate hazards whichWILL result insevere personal
injuryor death.
I WARNING I
WARNING--Hazards or unsafe practiceswhich COULD resultin severe
personalinjuryor death,
I _lb CAUTION [
CAUTION--Hazards or unsafe practiceswhichCOULD resultin minor
personalinjuryor productor propertydamage.
2
Page 3
IMPORTANT SAFETY INFORMATION
I A WARNING I
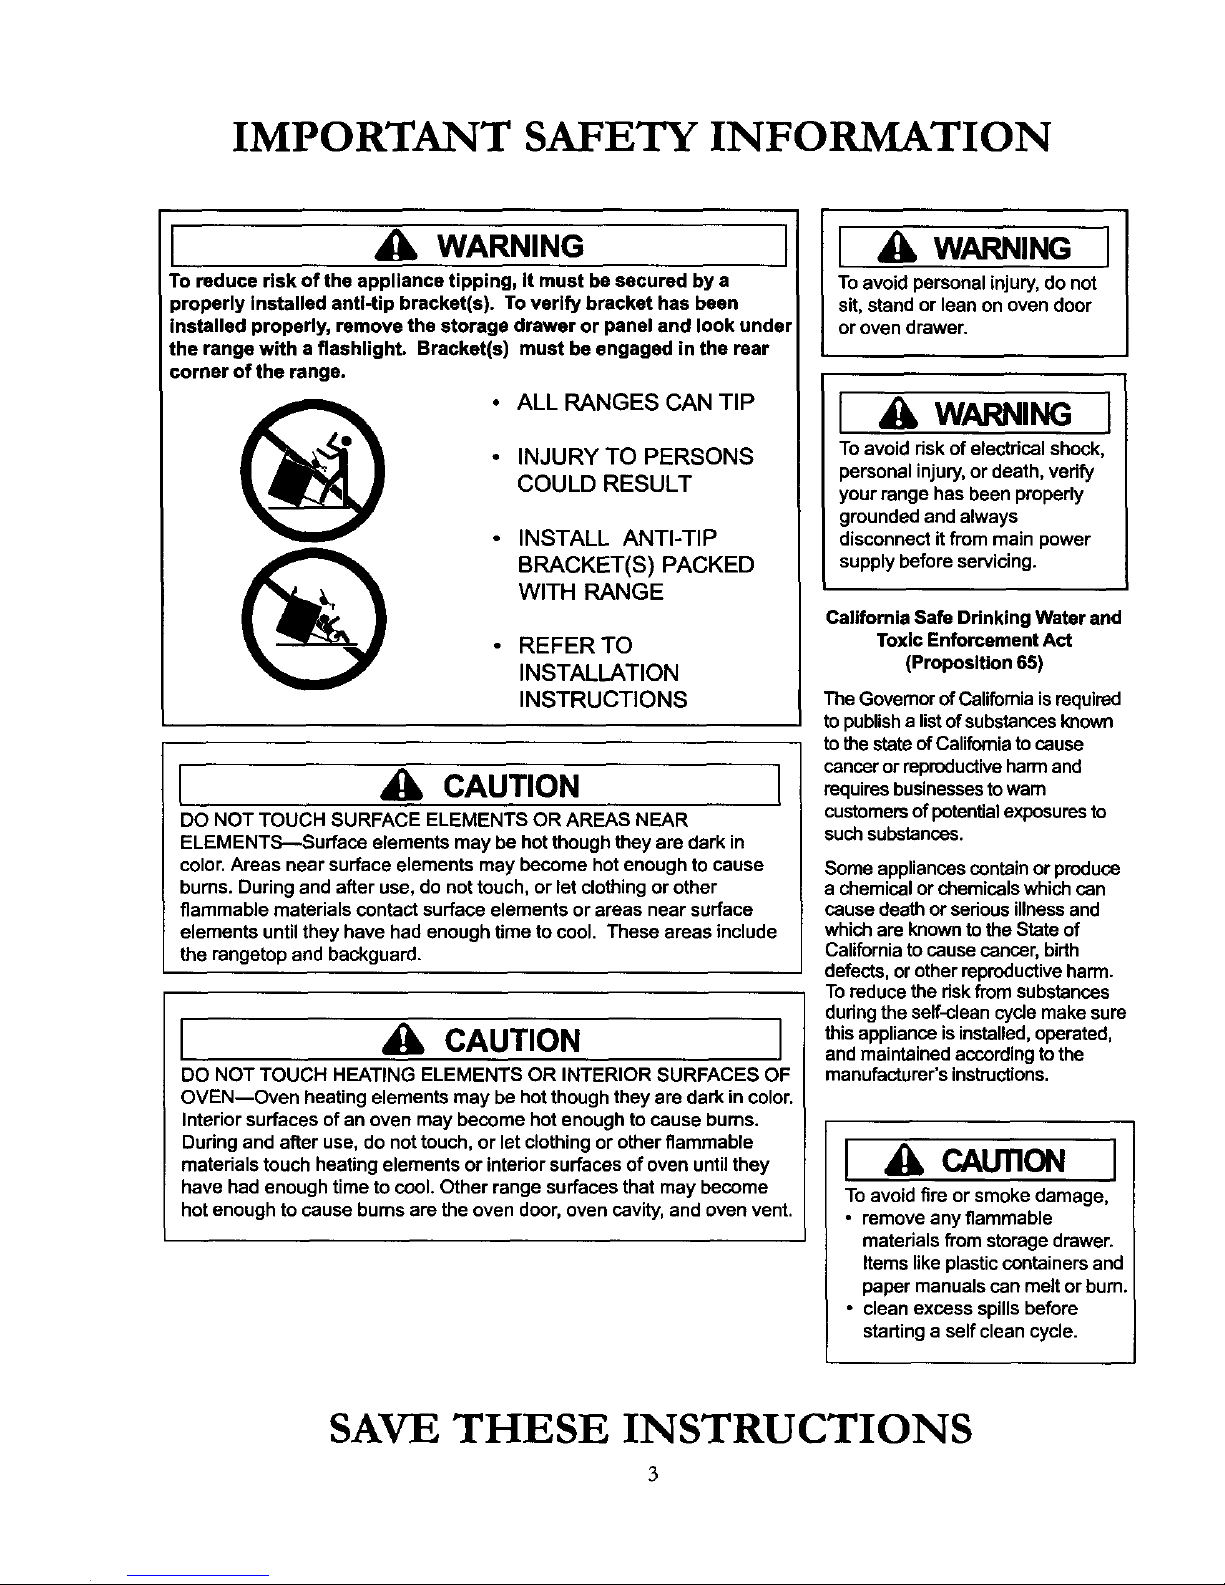
To reduce risk of the appliance tipping, It must be secured by a
properly installed anti-tip bracket(s). To verify bracket has been
installed properly, remove the storage drawer or panel and look under
the range with • flashlight. Bracket(s) must be engaged in the rear
corner of the range.
• ALL RANGES CAN TIP
• INJURYTO PERSONS
COULD RESULT
• INSTALL ANTI-TIP
BRACKET(S) PACKED
WITH RANGE
• REFER TO
INSTALLATION
INSTRUCTIONS
I _lb CAUTION I
DO NOT TOUCH SURFACE ELEMENTS OR AREAS NEAR
ELEMENTS--Surface elements may be hotthoughthey are dark in
color.Areas near surface elements may become hotenough tocause
burns. Duringand after use, do not touch,or let clothingor other
flammable materials contact surface elements or areas near surface
elements untilthey have had enough time to cool. These areas include
the rangetop and backguard.
I _lb CAUTION I
DO NOT TOUCH HEATING ELEMENTS OR INTERIOR SURFACES OF
OVEN--Oven heating elements may be hotthoughthey are dark in color.
Interiorsurfaces of an oven may become hot enough to cause bums.
During and after use, do nottouch, or let clothingor otherflammable
materialstouch heating elements or interiorsurfaces ofoven untilthey
have had enough time to cool. Other range surfaces that may become
hot enough to cause bums are the oven door, oven cavity, and oven vent.
I _ WARNING ]
To avoidpersonal injury,do not
sit, stand or leonon oven door
or oven drawer.
l& WARNINGI1
Toavoid dsk of electrical shock,
personal injury, or death, vedfy
your range has been properly
grounded and always
disconnect it from main power
supply before servicing.
Canfomia Safe Drinking Water and
Toxic Enforcement Act
(Proposition 65)
The GovernorofCaliforniaisrequired
topublishalistofsubstancesknown
tothe stateofCaliforniatocause
cancer orreproductive harmand
requiresbusinessestowarn
customersofpotentialexposuresto
suchsubstances.
Some appliancesCOntainor produce
a chemicalorchemicalswhichcan
cause deathor seriousillnessand
whichare knowntothe State of
Californiatocausecancer,birth
defects,orotherreproductiveharm.
Toreducethe dsk fromsubstances
duringtheself-cleancyclemakesure
this applianceisinstalled,operated,
and maintainedaccordingtothe
manufacturer'sinstructions.
I & CAUnONI
To avoidfire or smoke damage,
• remove any flammable
materialsfromstoragedrawer.
Itemslikeplasticcontainersand
papermanuals can melt or bum.
• clean excess spillsbefore
startinga self clean cycle.
SAVE THESE INSTRUCTIONS
Page 4
IMPORTANT SAFETY INFORMATION (cont'd)
ALL APPLIANCES
1. Proper Installation--Be sure
yourappliance is properly
installedand grounded bya
qualifiedtechnician.
2. Never UseYour Appliancefor
Warming or Heating the
Room.
3. Do Not Leave Children
Alone--Children shouldnot
be alone or unattendedinthearea where the
applianceis inuse. They shouldnever be allowed
to sit or stand on any partof the appliance.
4. Wear Proper Apparel--Loose fitting or hanging
garmentsshould never be worn while using
appliance.
5. User Servicing--Do notrepairor replace any part
ofthe appliance unlessspecificallyrecommended
inthe manual. All other servicingshould be
referredto a qualifiedtechnician.
6. Storage inor onAppliance---Flammable materials
(includingpaper and plastic)should notbe storedin
an oven, itsstoragedraweror nearsurface units.
7. Do Not Use Water On Grease Fires_Smother fire
orflame, or use dry chemicalor foam-type
extinguisher.
8. Use Only Dry Potholders--Moist or damp
potholderson hot surfaces may resultin bums
from steam. Do not letpotholder touchelements.
Do not usea towel or other bulkycloth.
I CAUTION I
Do not store items of interest to children in
cabinets above arange or on the backguard of a
range_children climbingon the rangeto reach
itemscould be seriouslyinjured.
SURFACE
COOKING UNITS
1. Use Proper Pan Size--This appliance isequipped
withone or more surface units ofdifferentsizes.
Select utensilshavingfiat bottomslarge enough to
cover the surface unit heatingelemenL The use of
undersized utensilswill expose a portionofthe
heating element to direct contactand may result in
ignitionof clothing.Use of oversizedutensils
concentrates heaton cooking surface and can
cause damage to range. Proper relationshipof
utensilto burner improvesefficiency.
2. Never Leave Surface UnitsUnattended---Boilover
causes smokingand greasyspilloversthat may
ignite.
3. Glazed CookingUtensils--Only certaintypes of
glass,ceramic, earthware, orother glazed utensils
are suitablefor rangetopservicewithoutbreaking
due tosudden change intemperature.
4. UtensilHandlesShouldBeTurned Inwardand Not
Extended Over AdjacentSurface Unit_To reduce
the riskofbums, ignitionofflammable materials,
and spillagedue to unintentionalcontactwiththe
utensil,the handle ofa utensilshouldbe positioned
sothat it isturnedinward, and does notextend over
adjacentsurface units.
GLASS/CERAMIC
COOKING SURFACES
1. Do NotCook on Broken Cooktop_lf cooktop
shouldbreak, cleaningsolutionsand spilloversmay
penetrate the brokencooktopand create a dsk of
electricalshock.Contacta qualifiedtechnician
immediately.
2. Clean CooktopWithCaution--If awetspongeor
clothis used towipespillson a hot cookingarea,
becareful to avoida steam bum. Some cleaners
can producenoxiousfumes if appliedto a hot
surface.
SAVE THESE INSTRUCTIONS
4
Page 5

IMPORTANT SAFETY INFORMATION (cont'd)
OVENS
1. Use Care When Opening
Door---Let hotair or steam
escape beforeremovingor
replacingfood.
2. Do Not Heat Unopened Food
Containers---Build-upof
pressuremay cause containerto burstand resultin
injury.
3. Keep Oven VentDuctsUnobstructed.
4. PlacementofOven Racks--Alwaysplaceoven
racksindesiredlocationwhileoven iscool.Ifrack
isremovedwhileovenishot,do notletbotholder
contacthotheatingelementinoven.
5. ProtectiveLiners--Donotusealuminumfoiltoline
oven racksoroven bottoms.Improperinstallation
oftheselinersmay resultina riskofelectrical
shock,orfire.
SELF-CLEANING OVENS
1. Do Not Clean Door Gasket--The door gasketis
essentialfor a goodseal. Care shouldbe taken not
torub, damage, or move thegasket.
2. Do Not Use Oven Cleaners--No commercialoven
cleaneror oven linerprotectivecoatingofany kind
shouldbe usedin or around any partof the liner.
3. Clean Only Parts Listedin Manual
4. BeforeSelf-Cleaningthe Oven--Remove broiler
pan, oven racks, and other utensils.
5. Remove All Items From Rangetop and Backguard.
VENTILATION HOODS
1. Clean Ventilating HoodsFrequently--Grease should
notbe allowedto accumulateon hoodor filter.
2. When flamingfoodsunderthe hood,turnthe tan on.
In Case of Fire
Fires can occurasa result of over cooking
or excessive grease. Though a fire is
unlikely,ifoneoccurs,proceedasfollows:
Surface Element Fire
1. Smother the fire witha nonfiammablelid or baking
soda, or use a ClassABC or BC extinguisher.Not
water. Not salt. Notflour.
2. As soonas it issafeto do so, turnthe surface
controlsto OFF. Turn offpower at main circuit
breakeror fuse box.
Oven Fires
1. If you see smoke from youroven, do notopen
oven.
2. Tum oven off.
3. As an added precaution,turnoffpowerat main
circuitbreaker or fuse box.
4. Turnonventto remove smoke.
5. Allowfood or grease to bum itselfoutinoven.
6. If smokeand fire persist,call fire department.
7. Ifthere is anydamage tocomponents,call an
authorizedservicer beforeusingrange.
Precautions
• Do notcookfood directlyon
rangetopsurface, alwaysuse
cookware.
• Do notmix householdcleaningproducts.Chemical
mixturesmay interactwithobjectionableor even
hazardous results.
• Do not put plasticitemsonwarm cookingareas. They
may meltand stick.
• Do not liftor move range by graspingoven door
handle.This can resultinwindowglassbreakingor
shattedng.
• Do not slideroughmetal objectsacross rangetop
surface.Scratchingor metal markingcan result.
• Do notleave fat heatingunlessyou remainnearby.
Fat can igniteif overheated byspillingonto hot
surfaces.
• Do not allowpotsto boildryas thiscan cause
damage tocooking surface and pan.
• Do not userangetop surfaceas a cuttingboard.
• Do not userange for storageorasa displaycounter.
SAVE THESE INSTRUCTIONS
Page 6
Cooking on the Smoothtop
Cooking Safely with
Surface Elements
I A WARMNGI
To avoid riskof seriouspersonal
injury,propertydamage, or fire,
do notleave surface elements
unattendedwhile inoperation.
Grease and spilloverscan ignite
causinga firs.
I_ WARMNGI
To avoidrisk of electricalshock
or serious personalinjury,
• never cook on a broken
smoothtopcooking surface.
Spilloverscanpenetrate
broken surface and cause
electricshock.
• never clean broken cooktop.
Cleaners can penetrate broken
surface and cause electric
shock.
if smoothtopcookingsurface
breaks,discontinue use and
notifyan authorizedservicer
immediately.
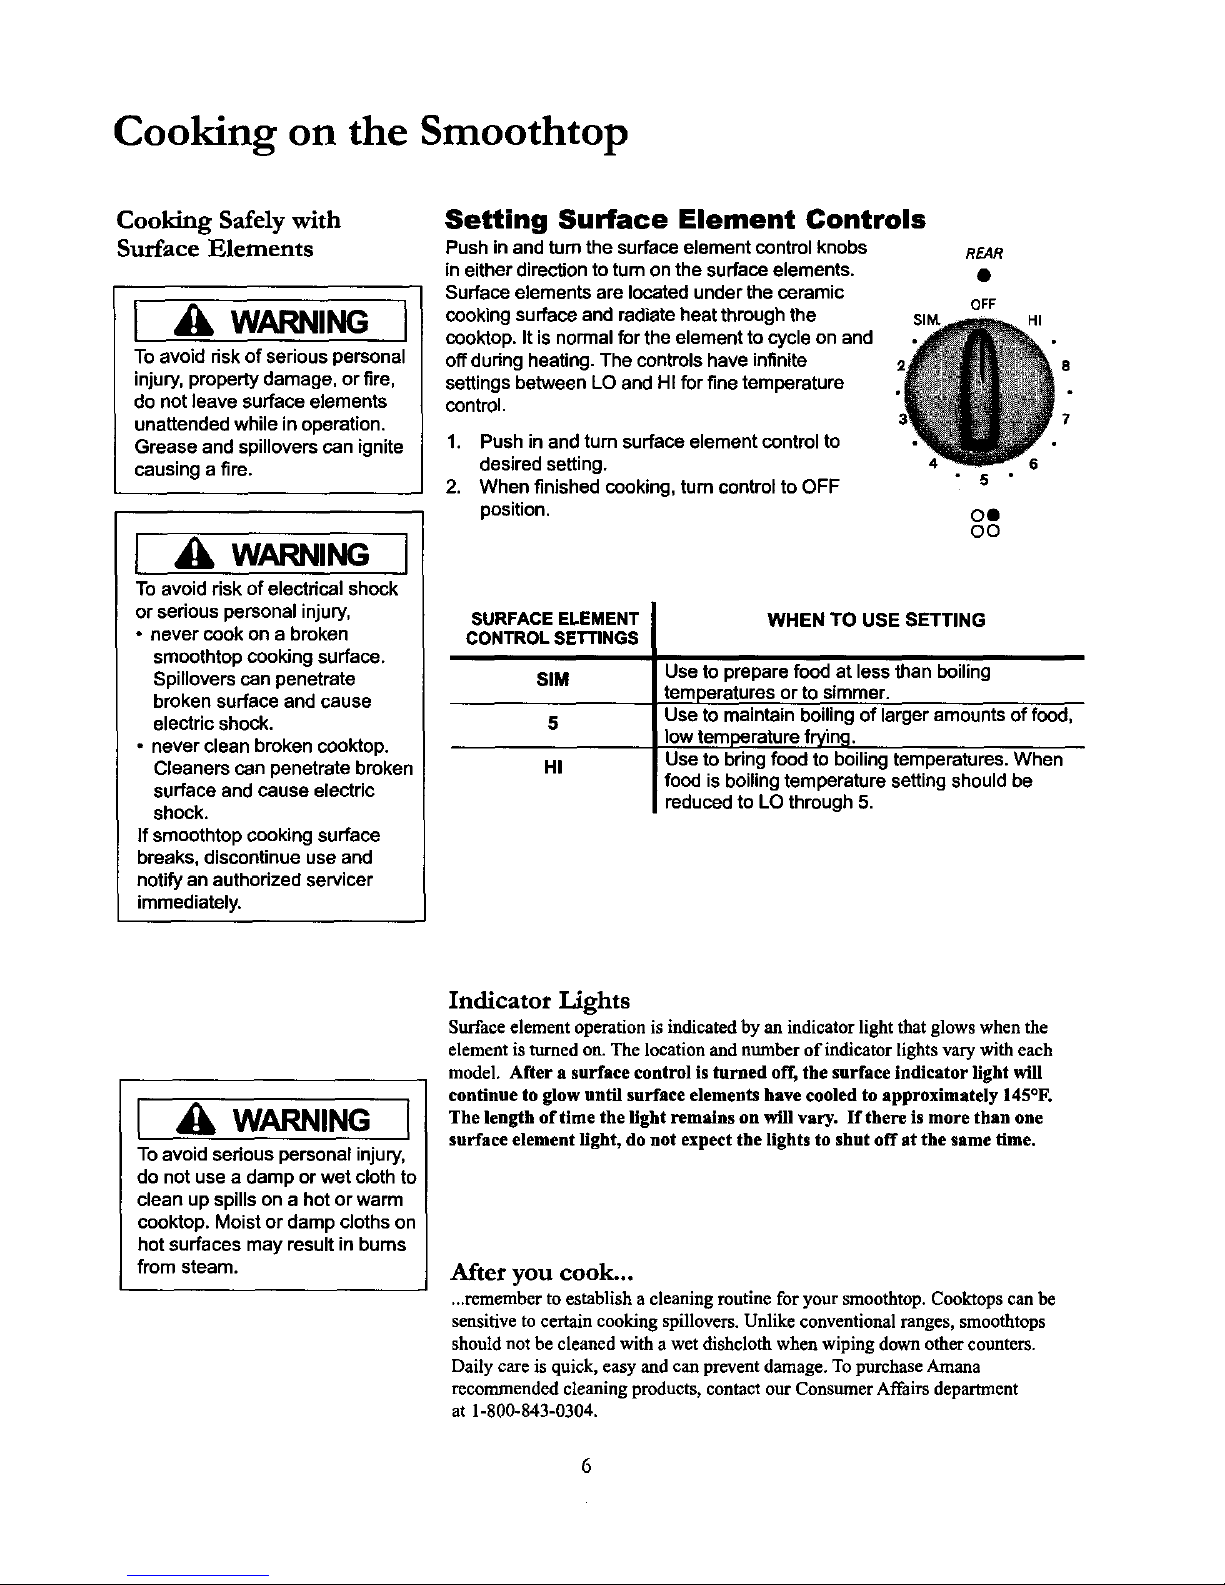
Setting Surface Element Controls
Push in and turnthe surfaceelement control knobs
in eitherdirectionto turnonthe surfaceelements.
Surface elements are located under the ceramic
cookingsurface and radiate heat throughthe
cooktop.It is normalforthe element to cycle on and
offduringheating.The controlshave infinite
settingsbetween LO and HI for fine temperature
control.
1. Pushinandturnsurface element control to
desired setting.
2. When finished cooking,turncontrolto OFF
position.
REAR
0
OFF
HI
6
5
oe
O0
8
SURFACEELEMENT
CONTROLSETTINGS
SIM
5
HI
WHEN TO USE SETTING
Use to preparefood at less than boiling
temperatures or to simmer.
Use to maintainboilingof largeramounts offood,
lowtemperature frying.
Use to bringfoodto boilingtemperatures.When
food isboilingtemperature settingshould be
reducedto LO through5.
L WARNING {
Toavoid seriouspersonal injury,
do not use a damp or wet clothto
clean up spillson a hotor warm
cooktop.Moist or damp cloths on
hot surfaces may resultinbums
from steam.
Indicator Lights
Surface element operation is indicated by an indicator light that glows when the
element is turned on. The location and number of indicator lights vary with each
model, After a surface control is turned off, the surface indicator light will
continue to glow until surface elements have cooled to approximately 145°F.
The length of time the light remains on will vary. If there is more than one
surface element light, do not expect the lights to shut off at the same lime.
After you cook...
...remember to establisha cleaning routine for your smoothtop. Cooktops can be
sensitive to certain cooking spillovers. Unlike conventional ranges, smoothtops
shouldnot be cleaned with a wet dishcloth when wiping down other counters.
Daily care is quick, easy and can prevent damage. To purchase Amana
recommended cleaning products, contactour Consumer Affairs department
at 1-800-843-0304.
6
Page 7
Cookware Suggestions
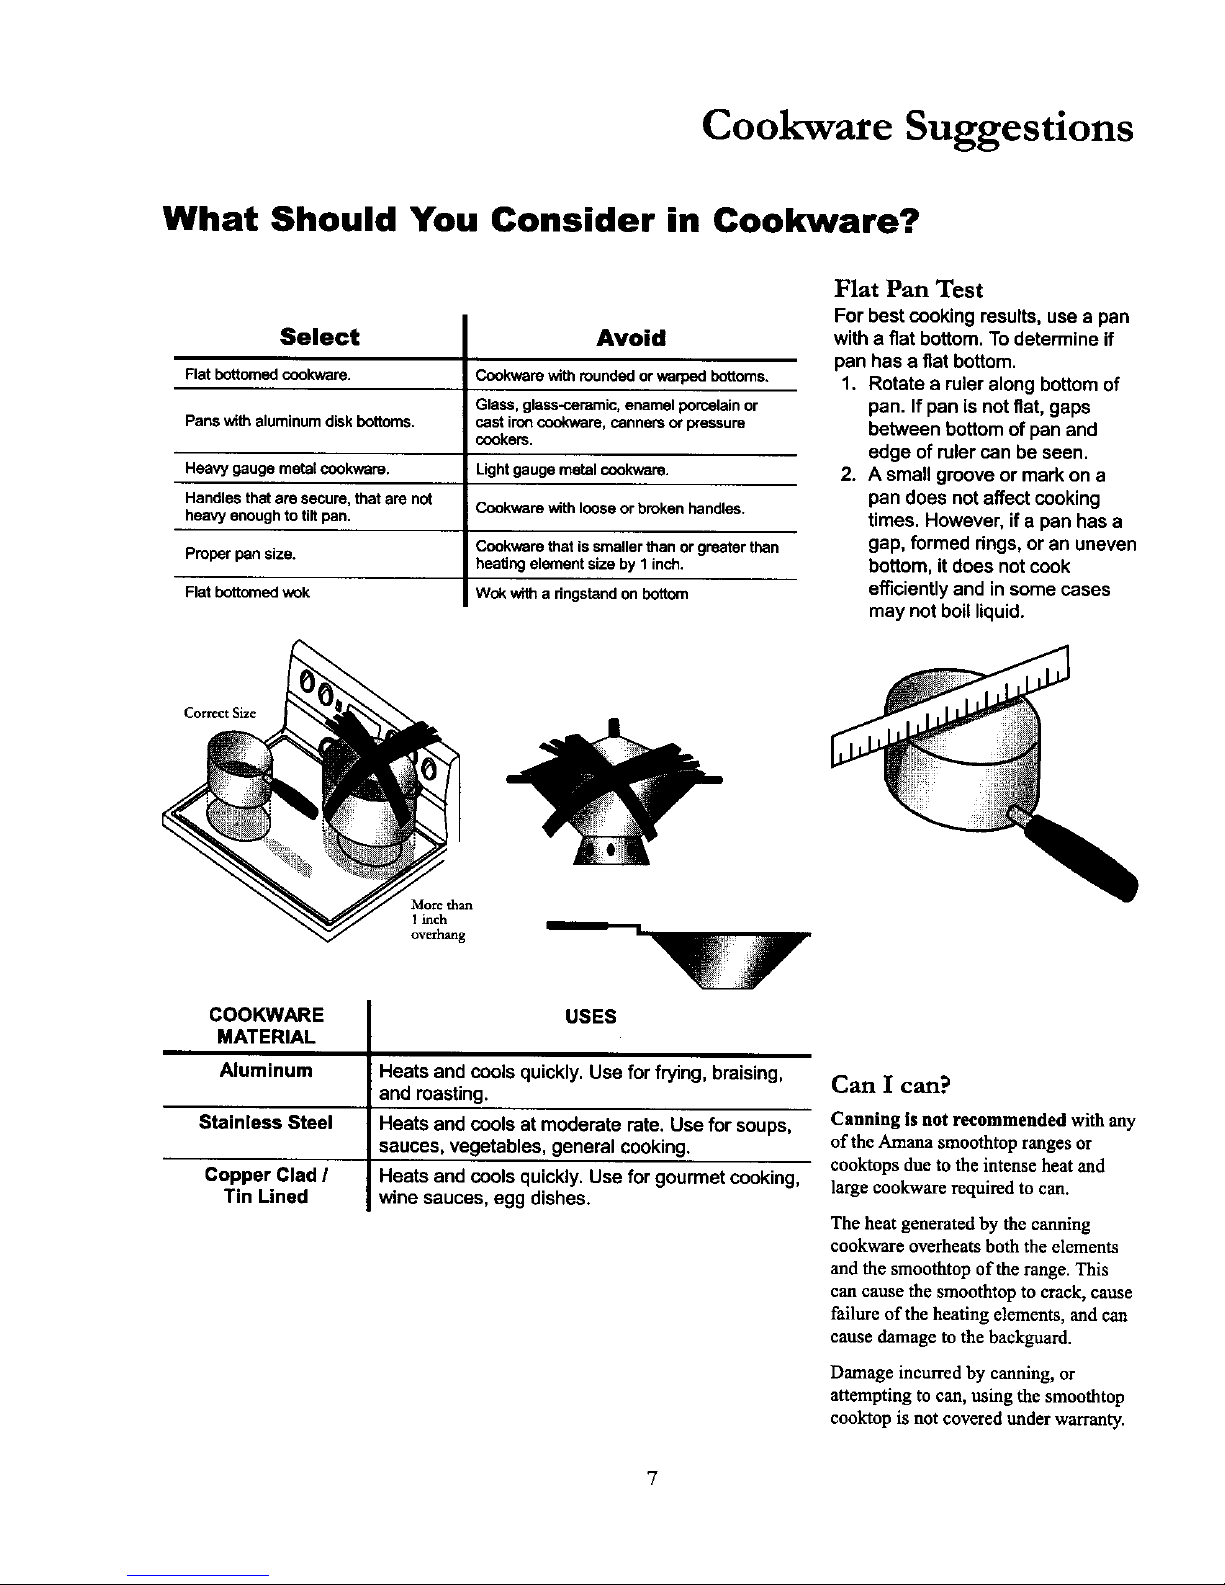
What Should You Consider in Cookware?
Select
Flat bottomed cookware.
Pans with aluminum disk bottoms.
Heavy gauge metal cookware.
Handles that are secure, that are not
heavy enough to tiltpan.
Proper pan size.
Flat bottomed wok
Avoid
Cookware with rounded or warped bottoms.
Glass. glass-ceramic, enamel porcelain or
cast iro_ cookware, canners or pressure
cookers.
Lightgauge metal cookware.
Cookware with loose or broken handles.
Cookware that issmaller than or greater than
heating element size by I inch.
Wok with a dngstand on bottom
Flat Pan Test
For best cookingresults,use a pan
with a flat bottom.To determine if
pan has a flatbottom.
1. Rotate a ruler along bottomof
pan. Ifpan is notfiat, gaps
between bottomof pan and
edge of rulercan be seen.
2. A small grooveor markona
pan does notaffect cooking
times. However, ifa pan has a
gap, formed rings,or an uneven
bottom, itdoes not cook
efficientlyand in somecases
may not boil liquid.
Correct Size
Mot-¢ than
I inch
overhang
COOKWARE
MATERIAL
Aluminum
Stainless Steel
Copper Clad I
Tin Lined
USES
Heats and cools quickly.Use for frying,braising,
:and roasting.
Heats and cools at moderate rate. Use for soups,
sauces, vegetables, general cooking.
Heats and cools quickly.Use for gourmetcooking,
wine sauces, egg dishes.
Can I can?
Canning Is not recommended with any
of the Amana smoothtoprangesor
cooktops dueto the intense heat and
largecookware requiredto can.
The heat generated by the canning
cookware overheats both the elements
and the smoothtop of the range. This
can cause the smoothtop to crack, cause
failure of the heating elements, and can
cause damage to the backguard.
Damage incurred by canning,or
att_npting to can, using the smoothtop
cooktop is not covered under warranty.
Page 8
Oven Cooking Methods
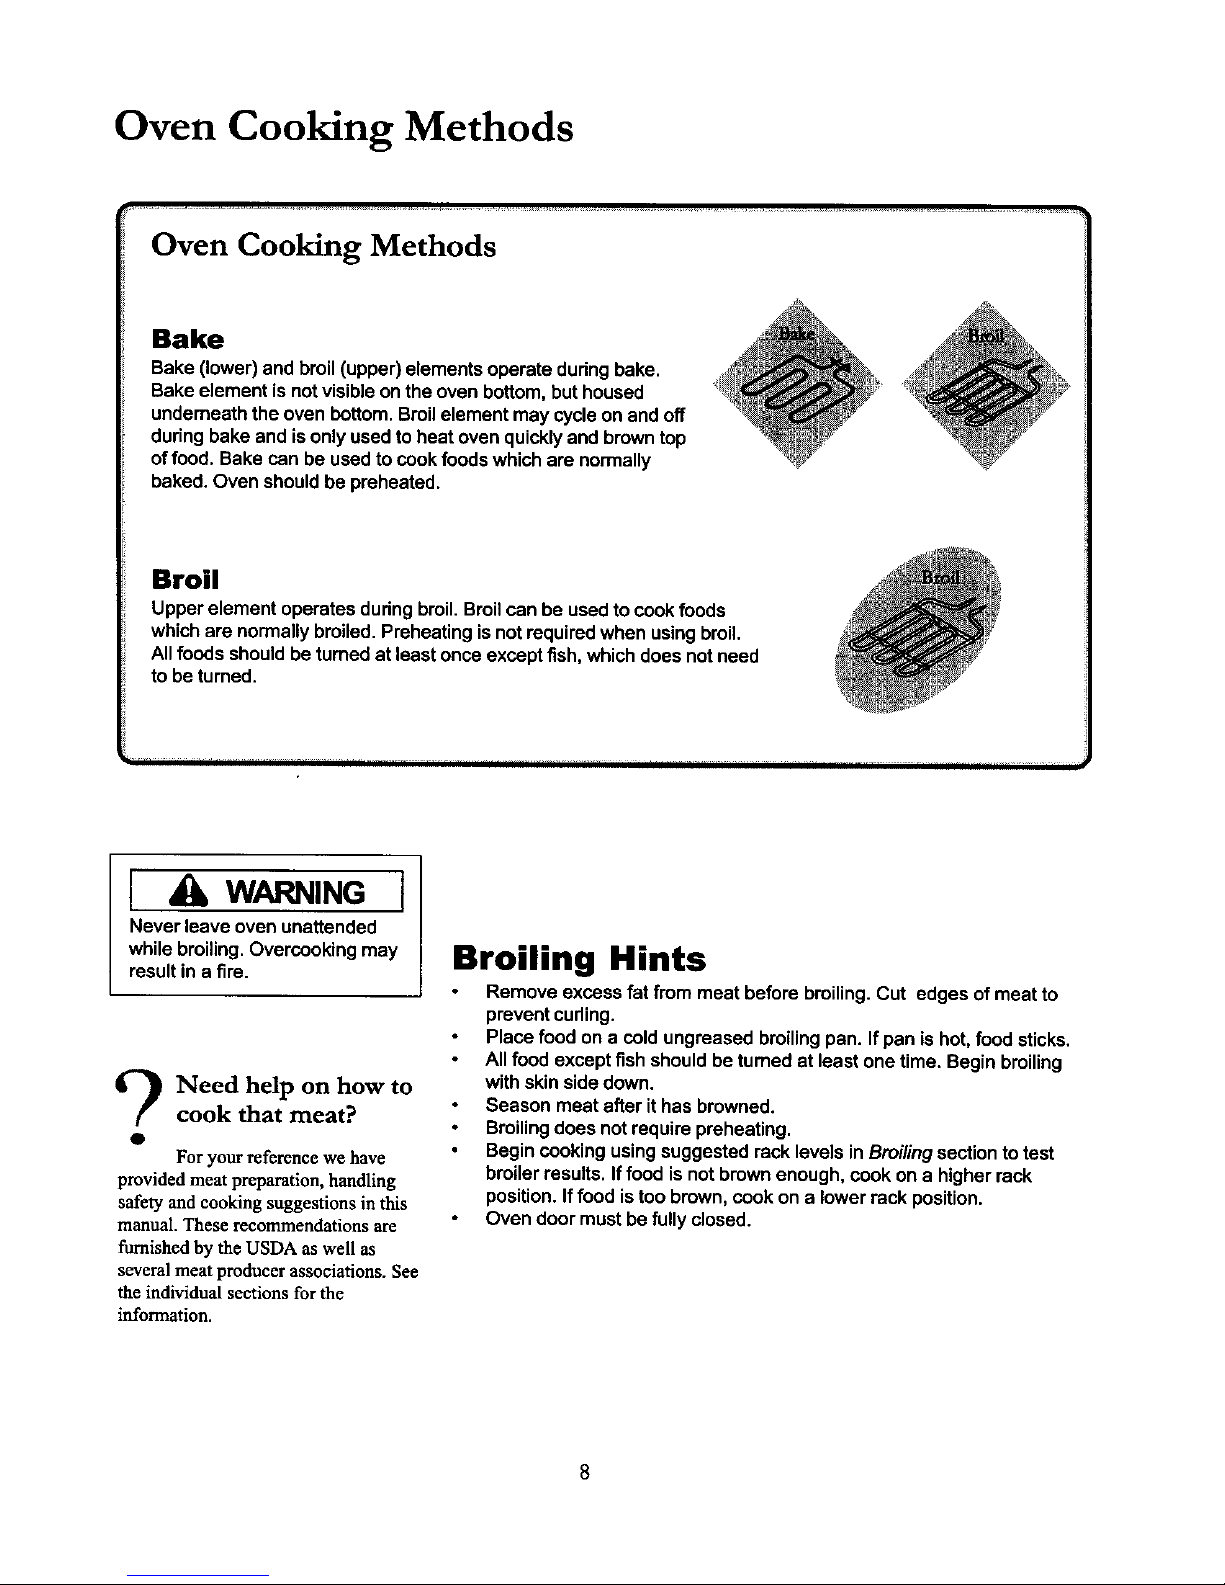
Oven Cooking Methods
Bake
Bake (lower)and broil (upper)elements operate during bake.
Bake element isnotvisibleonthe oven bottom,but housed
underneaththe oven bottom.Broilelement may cycleon and off
duringbake and isonlyusedto heat oven quicklyand browntop
offood. Bakecan be usedto cookfoods whichare normally
baked. Oven shouldbe preheated.
Broil
Upper element operates duringbroil.Broilcan be used to cookfoods
whichare normally broiled.Preheating isnot requiredwhen usingbroil.
Allfoods should beturned at least once exceptfish,which does notneed
to be turned.
I WARNING I
Never leave oven unattended
whilebroiling.Overceoking may
resultin a fire.
_-_ Need help on how to
cook that meat?
o
Foryour reference we have
provided meat preparation, handling
safety and cooking suggestions in this
manual. These recommendations are
furnished by the USDA as well as
several meat producer associations. See
the individual sections for the
information.
Broiling Hints
Remove excess fat from meat before broiling.Cut edges of meat to
preventcoding.
Place food on a coldungraased broilingpan. If pan is hot, foodsticks.
Allfood except fish shouldbe turned at least one time. Begin broiling
with skinside down.
Season meat after ithas browned.
Broilingdoes not requirepreheating.
Begincookingusingsuggested rack levels in Broilingsectiontotest
broiler results.If food is notbrown enough, cook on a higherrack
position.If food istoobrown,cook on a lower rack position.
Oven door mustbe fully closed.
Page 9
Before Using the Oven
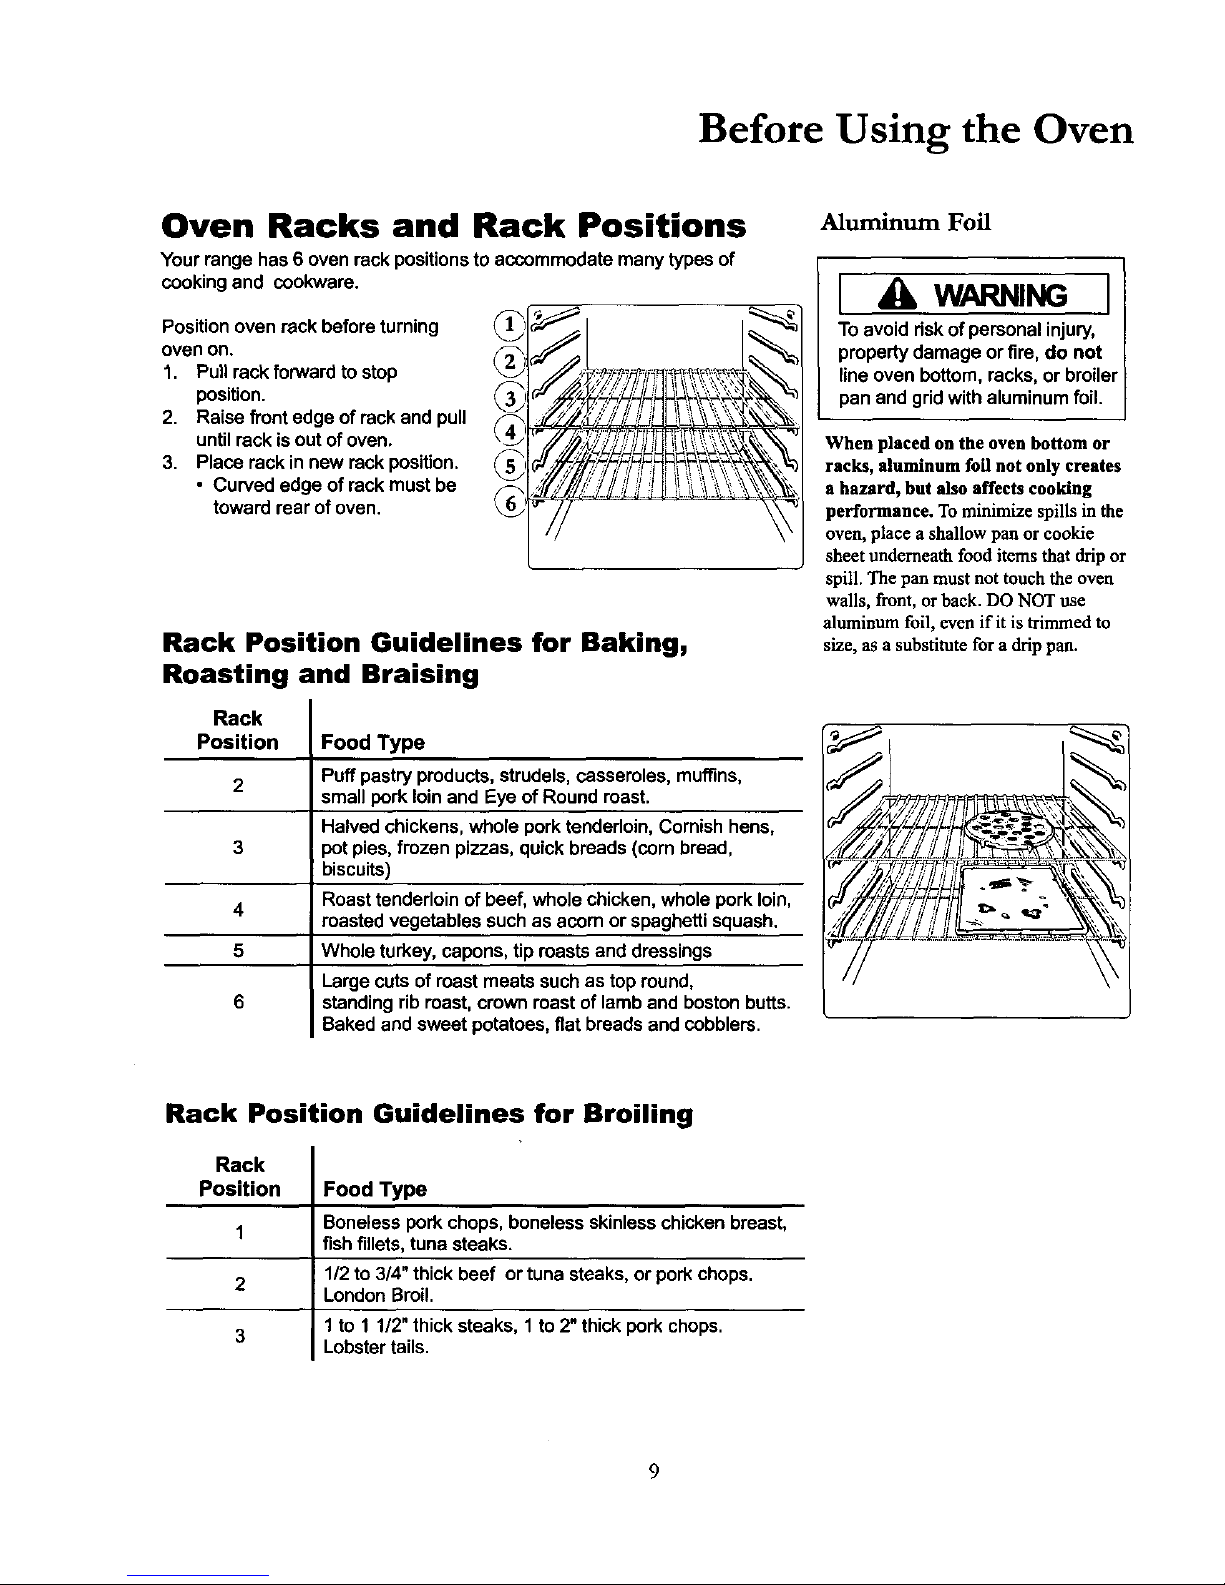
Oven Racks and Rack Positions
Yourrange has 6 oven rack positionsto accommodate many typesof
cookingand cookware.
Positionoven reck before turning
oven on.
1. Pullrackforward to stop
position.
2. Raise front edge of reck and pull
untilrack is out ofoven.
3. Place rack in new reck position.
• Curved edge of reck must be
towardrear ofoven.
/
l"
/•, /' : / ! i u X_',,. _ ',, _
%
%
Rack Position Guidelines for Baking,
Roasting and Braising
Rack
Position
2
3
4
5
6
Food Type
Puffpastryproducts,strudels,casseroles, muffins,
small porkloin and Eye of Round roast.
Halvedchickens,whomporktenderloin,Cornishhens,
potpies,frozen pizzas, quickbreads (corn bread,
biscuits)
Roast tenderloinof beef, whole chicken,whole porkloin,
roastedvegetables such as acorn or spaghettisquash.
Whole turkey,capons,tiproasts and dressings
Largecuts of roast meats such as top round,
standingrib roast, crown roastof lamb and bostonbutts.
Baked and sweet potatoes, fiatbreads and cobblers.
Aluminum Foil
I A wm im ]
To avoid dsk ofpersonal injury,
propertydamage orfire, do not
lineoven bottom, racks,or broiler
pan and gridwithaluminum foil.
When placed on the oven bottom or
racks, aluminum foil not only creates
a hazard, but also affects cooking
performance. To minimize spills in the
oven, place a shallow pan or cookie
sheet underneath food items that drip or
spill. The pan must not touch the oven
walls, front, or back. DO NOT use
aluminum foil, even if it is trimmed to
size, as a substitute for a drip pan.
Rack Position Guidelines for Broiling
Rack
Position
1
2
3
Food Type
Boneless pork chops,boneless skinlesschicken breast,
fishfillets,tuna steaks.
1/2 to 3/4"thick beef ortuna steaks, or porkchops.
LondonBroil.
1 to 1 1/2"thick steaks, 1 to2"thick pork chops.
Lobstertails•
Page 10

Features
®
12-hour automatic cancel
Thissafety feature prevents ovenfrom continuingto operate if ithas been
lefton for over 12 hours. Ifa cookingfunction continues longer than 12 hours
withoutany optionson ovencontrol beingtouched,thisfeature turns oven
off.Any time an optionistouched, 12-hourautomaticcancel is reset.
F m
code Possible Meaning
F1 Control failure
F2 Oven over temperature
F3 Sensor open or shorted
F9 Door latch circuitfailure
DOOR Door has not latched.
Oven temperature control adjustment
Yourrange iscalibratedat the factoryfor propertemperature. Due to
individualvadances and preferences, itmaybe necessarytoadjustoven
once ithas been installed.
When firstusingthe oven,followrecipe timesandtemperatures. Before
adjustingoven bakingtemperature,testa recipe,suchas ready-to-bake
biscuits,by settingoventemperature higher or lowerthan the suggested
temperature.The bakingresultsshouldhelp you todecide howmuch of a
temperature adjustmentisrequired.
An accurate digitalthermometeris necessaryto calibratetheoven. Store
purchasedoventhermometers do notaccuratelymeasure oventemperature.
Oventemperature can be increasedor decreased by 35 °F. Toavoidover
adjustingtheoven, onlyadjust thetemperature by 5 °F each time.
NOTE: Remove aluminumfoil from racksand oven bottom as this will alter
oven performance. Check for blockedheatvents. If itstillappears
oven is notperformingas expected, a calibrationmay be done.
1. Turnoven temperature knob to OFF.
2. Press and hold both arrow pads for approximately5 seconds.
3. A doubledigitwill displayrangingfrom -35 °F to 35 °F.
4. Immediately,presseither:
• • to increase oven temperature by5 °F
• • to decrease oven temperature by 5 °F
• When temperature is adjusted to a cooler setting,a minussign (-) will
displaywiththeoffsettemperature.
5. When desiredtemperature change isdisplayed,releasecontroland
change will be automaticallysaved after a few seconds. Controlwill
returnto time of day display.
• Offsettemperature change willbe retainedthrougha powerfailure.
Service codes and tones
Electronicovencontrol isequippedwitha self-diagnosticsystem.
Self-diagnosticsystemalertsyouifthere isan erroror problemwith the unit.
Ifelectronicrange control soundsa sedes of short,rapidbeeps for over
16 secondsand the displayshowsan F-code, recordF-code shown.
Some F-codes can be clearedby disconnectingpowerto the range for
approximately3 minutes.If the code continues to reoccurdisconnect
electricalsupplytorange and contact an authodzedservicer.
10
Page 11

Display and Signals
iO
d_.mm L
IHIPJlna_
mi
Digital Oven Control
am PREHEAT It LOCKED
IIi
OVEN
CLEAN OFF
0
BROIL
WM
AKE
PUSH TOTURN
Clock also
displays time
of day.
LIGHTS DESCRIPTION
CLOCK Clockpad lightremainsonwhile timeof day is set.
TIMER ON/OFF Timer On/Off pad lightremainsonwhilethetimer
countsdown.
COOK/CLEAN Cook/CleanTime lightistumadonwhen entering
cookor cleantime. Lightremainson duringthe cook
TIME or cleancycle.
START
COOK/CLEAN
StartCook/Clean lightturnsonwhen enteringthe
time a cooking or cleaning cycle isto start.
PREHEAT
Lockedlighttums on and remains on when oven
LOCKED door islocked.Lockedlightflashes when door is
automaticallylockingor unlocking.
Oven On lightturnson and remainson while
OVEN ON oven is inuse. Oven lightdoes notmonitoroven
cavity temperature.
OVEN LIGHT Turns on whenOVEN LIGHT pad ispressed.
Preheat lightturns onand remainsonwhile oven
isheating to selectedtemperature.Lightshutsoff
when oven reachesand maintainstemperature.
Timer Signal
When time elapses, timerbeeps
a single, threesecond tone.
Preheat Signal
After setting oven to bake end selecting
a temperature,oven preheats. When
oven reaches set tempemtme, oven
signals a one second beep and the
preheat light shuts off.
End-of-Cycle Signal
When atimed cooking cycle is
complete, the oven will beep four tones
approximately one second apart,
followed by a continuous series of one
second beeps every ten seconds until
the oven knob is turned to OFF.
DISPLAY
BRL
CLN
END
DESCRIPTION
Displayswhen oven isbroilingorsetto broil.
Displayswhen oven isselfcleaningor
isset toselfclean.
Displayswhen oven hasreachedthe end ofa
bakingcycle.
11
Page 12

Using the Oven Control
Digital Oven Control
ee Q
io Q
I PREHEAT I= LOCKED
I
OVEN
CLEAN OFF
a WM
BROIL
PUSH TO TURN
Flashing Display
When power is connected
or interrupted, oven display flashes.
Press CLOCK to reset display.
Clock may need to be reset.
Making the Numbers
Increase at a Faster Rate
Time increases in largerincrements
the longer the • or• padis held.
Timer Signal
When time elapses, beep will sound.
Press TIMER ON/OFF pad to stop timer
and returnto clock display.
Setting Electronic Clock
The 12 hourclockdoes not displayAM,PMor militarytime. When power
isconnectedorrestored,displayflashes until
RECALL OVEN TEMP/CLOCK pad is pressedor ,,=,
temperatureknobisturned.
1. Press RECALLOVEN TEMP/CLOCK pad.
2. Press • or • pads untilcorrect time-of-day
displays.
3. Time is locked inafter 5 seconds of no adjustment.
Setting Minute Timer
The timer is a timeronly. Electronic timer does notcontrol bake, broilor
self-cleanfunction. Timercan be set up to 11hoursand 59 minutes.
1. PressTIMER ON/OFF pad.
2. Press• or • paduntildesiredamountoftime displays.
• Time increasesin1minuteand 10 minute
increments.
• Timer beginscounting downautomatically im
aftertime is entered.
• Toview clockwhile timercounts down,
press RECALL OVEN TEMP/CLOCK pad.
"timerwillreturnafter 3 secondsof no
input.
3.
Pressand holdTIMER ON/OFF pad to canceltimer signal.
• Aftertime elapses,timer beeps a single,three second tone.
Resetting and Canceling Timer
To reset the time when remainingtime isdisplayed,press
TIMER ON/OFF pad, then• or• pad untilnew timedisplays.
To cancel timer when remainingtime isdisplayedor when signalis
beeping, pressand holdTIMER ON/OFF pad.
12
Page 13

Using the Oven Control (cont'd)
Baking
While oven is stillcool,remove any storeditemsfromthe oven cavity.
1. Place recks in desired positionand closeoven door.
2. Pushandturn oven temperature knobto =,
desiredtemperature. OVEN
• Oven indicatorlightwillturnon
and stay on. CLEANOFF
0 WM
• Temperature isdisplayedinthe clock BROIL
area in 5 degree increments.
• Temperature range is 170 °Fto 550 °F
• Displaywill returntotime of day after
approximately 15 seconds.
• To recall oven temperature, press lAKE
RECALL OVEN TEMP/CLOCK pad. PUSHTOTURN
3. PREHEAT lightwillturnon duringthe preheat cycle.
PREHEAT lightshuts offwhen oven has reached desired
temperature and oven beeps.
4. Open door carefully andplacefood inoven.
5. Aftercookingtime elapses, remove food and turn oven temperature
knobto OFF.
li................................ .............................. .............................................................................................................................
Broiling
Broilingsearsin naturaljuicesand providescharbroiledflavor.
To broil,center food on broilinggridand pan and place on properrackin
oven. Do notplace aluminumfoilover boilingpan, oven rackoroven
bottom.Oven door must be fully closed. Broilingdoes notrequire
preheatingsoyoucan place food inoven while itisstillcool.
1. Adjust oven recks to desired position.
2. Turnoventemperature knobto BROIL. ='
OVeN
• Oven indicator light will turn on and
remain on. CLEANOFF
i WM
• BRL will display. •
• Displaywill returntotime ofday BROIL
approximately 15 secondsafter
broilingbegins.
2. Close oven door.
• If oven dooris ajar for more than
3 minutes, broilcyclewill stop.
• If broilcycle stops because the door PUSHTOTURN
was opentoolong,close oven door and broil cyclewillcontinue.
3. After broiling,remove food and turn oven temperature knobto OFF.
I & w Nm ]
To avoidriskof personalinjury,
property damage orfire, do not
lineoven bottom,racks, or
broilerpan and gddwith
aluminumfoil.
[ WARNING I
Toavoid dsk ofpersonal injury,
propertydamage or fire, never
leave oven unattendedwhile
broiling.
Preheating
Inmost cases, you should preheat the
ovenbefore baking. At_erthe range
controlis set,the oven temperaturewill
begin to riseuntil the desired cooking
temperatureis reached (approximately
8 to 10 minutes). When cooking
temperatureis reached oven signal beeps.
How High or Low Can I
Set the Temperature?
Oven baketemperatorecanbe set from
170 °F to 550 °F. Some n_morsmoking
is normalwhen using oven for firsttime.
Preheat Signal
After setting oven to bake and selecting
a temperature,oven preheats. When
oven reaches set temperature,signal
sounds. The preheat light will shutoff
and remain offaffer oven has reached
the selected temperature.
13
Page 14

Using the Oven Control (cont'd)
What's the difference
between TIMED and
DELAYED cooking?
When using TIMED cooking, the oven
begins to heat immediately after the
oven control is set.Then, the oven cooks
for the specified lengthof time. When
using DELAYED cooking, the oven
begins to cook later in the day. Set the
time that you want to begin cooking and
the how long you want to cook. The
oven begins to heat when at the selected
time and cooks for the specified length
of time.
How Far Ahead Can I Set
the Time?
Cook time and start time can be set up
to 11 hours and 59 minutes ahead. To
view cook time, press and hold COOK
TIME pad. When cooking time has
elapsed, an end of cycle signal sounds,
oven automatically turnsoffand display
returnsto time of day. Oven signal
sounds 4 times, then once every 10
seconds until knob is turned to OFF.
Broil can not be set to Timed or
Delayed.
I A c trnONI
To reduce risk of food poisoning
due to bacterial growth and
productionof toxins, never hold
meat, milk, fish,or eggs for more
than 2 hours before cooking.
How much time is left?
For a delayed bake cycle, the cook time
can be viewed by pressing the COOK
pad. For a timed bake cycle, the stop
time can be viewed by pressing the
STOP pad.
Baking
Set oven tocook for desiredamount of time. Follow recipe directions for
)reheatingthe oven.
1. Placefood in oven.
2. Press COOK/CLEAN TIME pad.
3. Press • orV pad untildesired lengthof timeis
displayed.
• Cook time can be set up to 11 hours and 59 minutes.
4. Push and turnthe temperature controlknob.
• Temperature displaysin 5° incrementsstartingat 170 °F
• Clock willreturnto time ofday after approximately 15 seconds.
• Torecalloventemperature,pressRECALLOVEN TEMP/CLOCKpad.
5. Ovenwillautomaticallybegin toheat.
• Toadjust cooktime, pressCOOK/CLEAN TIME pad twicewhilethe
remainingcooktime is displayed.Cooktime canthen be adjusted.
• When cookingtime has elapsed an end of cyclesignal sounds
and END will be displayed. Oven no longermaintainscooking
temperature aftertimedbake is complete.
• Oven signalsounds 4 times, thenonce every 10 seconds until
oven controlknob isturned to OFF.
6. Turnknobto OFF to cancel baking.
i ................................................................................................................................................
DeiGed' Baking m..............
Set oven tobeginbakingat a latertime.
1. Placefood inoven.
2. Press START COOK/CLEAN button.
• Default time displayed iscurrent timeof day.
3. PressA orV pad untildesiredtime displays.
• Start time can be set up to 11 hours and
59 minutesahead of currenttime of day.
4. Press COOK/CLEAN TIME pad.
5. Press• or • pad untildesired cookingtime
displays.
• 1 minuteminimumcookingtime.
• END willbe displayedwhen cookingtimehas elapsed.
6. Pushandturnoven temperature controlknobtodesired
temperature.
• Temperature displaysin 5° incrementsstartingat 170 =F
• Displaywill returnto time of dayafter 5 secondsof no input.
• START TIME and COOK TIME lightswillremainon, but
OVEN ON light will not turnon untilcooking begins.
7. Oven willautomaticallybeginto heat at selected starttime.
• OVEN ON lightwillturn onwhen oven beginsto heat.
• Toadjustcooktime, press COOK/CLEAN TIME padtwice while the
remainingcooktimeisdisplayed.Cook timecan then be adjusted.
• When cookingtime has elapsed an end of cyclesignalsounds
and END willbe displayed.Oven signalsounds4 times, then
once every 10 secondsuntiloven control knobisturnedto OFF.
Knob must be turned to OFF for oven to stop shut off.
8. Turn knobto OFF to cancel baking.
14
Page 15

Using the Oven Control (cont'd)
Self-cleaning
Self-cleanfeature useshighoven temperatureto clean oven interior.
Forthe oven to operate througha complete self-cleancycle,the
self-cleanmust be set when the oven is cool.
1. Prepare oven for self-cleaning(see below right).Oven bottom
recess must be checkedfor grease buildup before beginninga self-
clean cycle.See Care and Cleaning.
2. Closedoor. I,
3. Pushandtum oven temperature knobto OVEN
CLEAN position.
• The default self-clean cycle lengthof CLEANOFF, WM
3 hourswill display. BROIL
4. Set cycle lengthfor self-clean.
• Use arrow keys to adjusttime as
necessary beforeoven indicatorlight
turnson. BAKE
• Clean cyclecan be set fromtwo to four PUSHTOTURN
hoursin five minute increments.
• Default settingfor the cycle isthree hours.
5. Self-clean begins.
• OVEN ON indicatorlightwill be on and willremain on untilthe end
ofthe cycle.
• At the end oftheself-cleancycle,theOVEN ON indicatorlightwill
shut off.
• At the end oftheself-cleancycle,theoven willstopheating,
however,ovenwillremainhot.
• The LOCKED indicatorlightwill remainon untilovenreachesa
coolertemperature. LOCKED lightwillflashwhiledooris
unlocking,and then shut offwhen door has unlocked.Oven cavity
willbe hotto the touch. DO NOT attemptto open doorpriorto
LOCKED indicatorlightshuttingoff.When oven is cool,tum oven
knobto OFF.
Interrupting the self-clean cycle
To stopa self-clean cyclethat hasalready startedfollowthese steps.
Ifthe interruptionoccursmid cycle,the oven willremainlocked,even
thoughthe cycle has stopped,untilthe oven cavityhascooled to a
lowertemperature.
1,
2.
Tum oven temperature knob to OFF position.
When oven hascooledtoa lower temperature, LOCKED light
toms off. Door can be unlocked. DO NOT force door.
This can cause damage to the latch.
I A CAUnONI
To avoidfire orsmoke damage,
• remove any flammable
materialsfrom storagedrawer.
Itemslike plasticcontainersand
paper manualscan melt or burn.
• clean excess spills before
starting a self-clean cycle.
I & vW ,NGI
Toavoidriskof personalinjury,
do nottouchovenvents,or area
aroundvents,duringself-cleaning.
These areascan becomehot
enoughtocause bums.
Toavoid riskof personalinjury,
propertydamage, orfirs, clean
excess grease and soilfrom
oven before beginninga self-
cleancycle.
Do I need to prepare?
To get the best resultsfrom the
self-clean cycle, follow these steps:
Clean excess spills from oven
interiorand bottom thoroughly.
Remove birds or animals
susceptible to smoke or other
fumes from the room or
adjoining room.
Open window if possible.
Make sure oven lightcover is
properly in place. Do not use
cleaning cycle if it is not.
Remove oven racks and all cooking
utensils from oven.
Remove items from range top,
backguardand storage drawer.
These areas can become hot during
self-cleaning cycle.
The range vents from the center
bottom of the backguard.Make
sure this area is unobstructed by
removing all items from backguard
and range top.
15
Page 16

Using the Oven Control (cont'd)
I A WARNINGI
To avoid riskof personalinjury,
do nottouchovenvents,or area
aroundvents,dudngself-cleaning.
These areas can become hot
enoughto causebums.
I & cmnoN I
To avoidfire or smoke damage,
• removeany flammable
materialsfrom storagedrawer.
Items likeplasticcontainers and
paper manuals can melt or bum.
• clean excess spillsbefore
startinga self-clean cycle,
I WARNINGI
To avoid riskofpersonal injury,
propertydamage, orfire, clean
excess grease and soilfrom
oven beforebeginninga self-
clean cycle.
Do I need to prepare?
To get the bestresults from the
self-clean cycle, follow these steps:
Clean excess spills from oven
interior and bottom thoroughly.
Remove birds or animals
susceptible to smoke or other
fames from the room or
adjoining room.
Open window if possible.
Make sure oven light cover is
properly in place. Do not use
cleaning cycle if it is not.
Remove oven racks and all cooking
utensils from oven.
Remove items from range top
backguard and storage drawer.
These areas can become hot
during self-cleaning cycle.
The range vents from the center
bottom of the backguard. Make
sure this area is unobstructed by
removing all items from backguard
and range top.
Delayed Self-clean Cycle
Self.clean feature useshighoventemperatureto clean oven interior.
Set oven tobeginandendcleaningat latertime. Range controlbegins
the self-clean at yourspecifiedstarttime.
1. Prepare ovenfor self-cleaning(see belowleft). Oven bottom
recessmust be checked for grease buildup beforebeginninga
self-cleancycle. See Care and C/eaning.
2. Closedoor. lid
3. Press START COOK/CLEAN pad.
4. Set startingtimeforthe cleaning cycle.
, Default time is currenttime ofday.
• Start time can be set from currenttime to
currenttime plus 11 hoursand 59 minutes.
5. Turnoventemperature knobto CLEAN.
• Default self-cleancycle length of 3 hourswill display.
6. Set cycle lengthforself-clean.
• Use arrowkeysto adjusttimeas necessary.
• Clean cycle can be set from twoto fourhoursinfive minute
increments.
• Default settingfor the cycleisthree hours.
7. Self-clean cycle isset.
• Oven cannot be useduntilcompletionoftheself-cleancycle.
• Self-clean cyclewill beginat selected start time.
• Toview starttime, pressthe START COOK/CLEAN pad.
• OVEN ON indicatorlightwill turnon when the self-cleancycle
beginsand willremainon untilthe end of the cycle.
• To view the clean cycle time, pressthe COOK/CLEAN TIME pad.
• At the end ofthe self-clean cycle, OVEN ON indicatorlightshuts
offand the oven does not maintainthe hightemperatures. Oven
willstillbe hot,however.
• The LOCKED indicatorlightwill remainon untiloven reaches a
coolertemperature. LOCKED lightwillflash while dooris
unlocking,and then shutoffwhendoorhasunlocked.Oven
cavity will be hotto the touch. DO NOT attempt toopen door
priorto LOCKED indicatorlightshuttingoff. Once oven is cool,
turnoven knobto OFF position.
Interrupting the self-clean cycle
Tostopa self-clean cycle that has alreadystartedfollowthese steps.
Ifthe interruptionoccursmid cycle,the ovenwill remain locked,even
thoughthe cyclehasstopped, untilthe ovencavity has cooledto a safe
temperature.
1. Turn oven temperature knob to OFF position.
2. When oven has cooled to a lowertemperature, LOCKED light
shutsoff. Door can be unlocked. DO NOT force door.This can
causedamage to the latch.
16
Page 17

Cooking
Baking Guidelines
When bakingwith a new oven, keep in mindtemperaturesvary from oven to oven. Store-boughtthermometersare
generally notaccurate and should notbe used tocalibrateoven temperatures.
BAKING TIME GUIDELINES
Cake Pan Pan size
Type
Oval 7¾"x5¾"
13"x9¾"
Round, 6"
2" layer
8"
14"
Round, 8"
3" layer
12"
Half Round, 18"
2" layer
Half Round, 18"
3" layer
Square 6"
10"
16"
Cups of Oven
batter Temp.
2 ½ 350°F
8 350°F
2 350°F
3
10
5
350°F
350°F
325°F
Minutes
25 to 30
25 to 30
25 to 30
30 to 35
50 to 55
60 to 65
11 325°F 75 to 80
9 325°F 60 to 65
12 325°F 60 to 65
2 350°F 25 to 30
6 350°F 35 to 40
15 112 350°F 45 to50
Hints for Cookies,
Shiny,fiat cookiesheets should
be used. Avoidcookie pans with
high sides- thiswill cause
uneven browningonthe top.
Cookie sheet should nottouch
the sides of the oven or door.
C_k:es_
Followrecipe's directionsfor
pan size. Shinypansworkbest
for cakes.
Cake baked in too large a pan
willbe thin and dry. Toosmalla
pan willbe undercooked or
unevenly cookedand may spill.
Pies
Pies should be baked indark or
dullpans to increase browning.
Frozen pies shouldbe heated
on an aluminum cookiesheet.
BAKEWARE GUIDELINES
Dark or dull pans
Shiny pans (no
sides)
Shiny pans Recommended for
(sides) cakes
Glass pans
Absorb more heat
and result in darke¢
browning.
Recommended for
pies and breads.
Recommended for
cookies.
Lower
recommended
oven temperature
by 25°F.
Bake Pan Placement
• Keep pansand bakingsheets2 inches fromoven
walls.
• Stagger pans placedondifferentracksso one is
notdirectlyover theother.
Preheating
Inmost cases, you should preheat the oven before baking. After the range controlis
set, the oven temperaturewill begin torise until the desired cooking temperatureis
reached(approximately 8 to 10 minutes). When cooking temperatureis reached
oven signal beeps. For delicate baking (such as puffpastries or souffles),
preheat approximately 15-20 minutes before placing food inside oven or wait
10 minutes aRer oven signal beeps before placing food in oven. The extra time
createsa more stable oven temperature.
17
Page 18

Cooking (cont'd)
Common Baking Problems
Ifyou begin to noticeconsistentproblemsrefer tothe chart belowfor possiblesolutions,ifresultsare still poor,
contactAmana Consumer Affairs at (800) 843-0304.
Test your cakes for doneness
while they are still in the oven. Because
of variances across individual ovens, it
is best to test for the proper consistency
rather than solely relying on time and
visual appearance as an indicator.
It may not be the oven
Cake problems may be in the mixing of
the batter. Overheating can cause cake
structure to break down and excessive
shrinkage of the cake. Underbeating
can result in lumpy cakes that may not
be cooked thoroughly. All ingredients
should be at room temperature--not
out of the refrigerator. Make sure to
follow the recipes directions for how
long the batter should be mixed.
Cake stuck?
Allow cake to cool in cake pan on a rack
for 10 rr_mutes before removing. Larger
cakes (over 14 inches in diameter) may
take 15 minutes. If the cake has cooled
too long, reheat in the oven at 250°F for
a few minutes.
Problem Cause
Lopsided cakes Panstouchingeach otherorovenwalls.
(bake unevenly) Batterspread unevenlyin pan.
Uneven heat distributioninoven.
Oven is not level.
Cakes, cookies, biscuits Oven not preheated.
too brown on bottom or top Panstouchingeach otherorovenwalls.
Using glass,darkened, warped or dull
finishmetal pans.
Rack positiontoo highor low.
Incorrect use of aluminum foil.
Oven temperaturetoo high.
Pies don't brown Incorrect rackposition.
Using shinymetal pans.
Temperatureset too low.
Cakes not done In center Temperature too high.
Pan too small.
Baking timetoo short.
Pan not centered in oven.
Cakes fall
Excessive shrinkage
Cakes high In middle
or cracked
Too much shorteningor sugar.
Too much or too littleliquid.
Temperaturetoo low.
Old ortoo littlebaking powder.
Pan too small,
Oven dooropened frequently(peeking).
Insufficientbaking,
Too littleleavening.
Mixingbattertoolong.
Pan too large.
Oven temperature too high.
Bakingtime too long.
Temperature set too high.
Overmixing.
Too much flour.
Pans touchingeach other or ovenwalls.
18
Page 19

Cooking (cont'd)
Meat Basics
While cooking has always been a talent, it is now becoming a science,also. Amana provides thisinformationasa
guide to aid in preparation. For specific questions regarding meat preparation, handling, or storagecontact
USDA (United States Department of Agriculture) Meat & Poultry Hotline at (800) 535-4555.
Handling Hints
When shopping, put meat in its
own separate plastic sack to
keep drips off other foods.
Defrost frozen meats in
refrigerator, not at room
temperature.
Keep meat cool and covered
until it is time to cook.
Wash hands with warm soapy
water before and after handling
meat or raw egg.
Thoroughly wash any surface or
utensil raw meat or egg touched.
Do not put cooked meat on the
same plate that held raw meat.
Cooking Tips
Marinate meat in the
refrigerator. Throw out excess
marinade that came intocontact
withmeat.
Use an oven-proof meat
thermometer.
Cook meat to internal
temperature recommendedby
USDA.
When reheatingfoods, heatto
an internal temperature ofat
least 165 °F.
While cooking meats, turn over
at leastonce.
Storage Safety
Once carved, refrigerateunused
portionimmediately.
Keep hotfoods hotand cold
foodscold when servingmeals.
Separate cooked foods into
small portionsfor fast cooling.
Do not storecooked ground
meats or mealscontaining
ground meats for longerthan
3 to4 days inthe refrigerator.
Do not allowcooked or
uncooked meatjuices to come
intocontactwithready-to-eat
foodssuch as fruitsor
vegetables.
Using a Meat Thermometer
When usinga meat thermometer, remember to insertit at a slightangle, in
the thickestpart of the meat, away from fat and bone.The meat should be
removedwhen 5 °F below the desiredfinaltemperature. While the meat sits
before carving, itwill continue to cookinternally,raisingthe last5 °F byitself.
A meat thermometer can
Take the guesswork out ofcookingto a desired 'doneness'.
Help reduce the dskof foodbome illness.
Oven-safe Thermometer
Inserted beforethe meat is placed in the oven, thisthermometer stays
with the meat while itcooks.
The internaltemperaturewill riseslowly as the meat cooks.
Instant-read Thermometer
Not oven safe, these thermometers are placedinthe meat when it is
removed from the oven.
While times may vary,an accurate temperature isnormallydisplayed
withinone to two minutes.
When using an instant-read, remember tocleanthe thermometer stem
withwarm, soapy water between readings.
Tenderizing
Braising is only one way to tenderize
less tender cuts. Before cooking, you
may pound, cube, marinate, or use
commercially prepared meat
tenderizers. You may then use a dry
method to cook the meat.
Marinades are acidic liquids such
as wine, citrus,or vinegar.
Marinadessoften meat fibersbut
only penetrate about one-fourth of
an inch into the interior of the
meat. Do not marinate meat for
longer than 24 hours.
Pounding with a heavy meat mallet
breaks down the connective tissue
to tenderize meat.
Cubing breaks down the structure
more thanpounding. Cubing is
done at the meat counter.
Commercial tenderizers are
primarily enzymes that work on the
outerfourth inch on a meat cut.
Make sure to follow the
manufacturer's directions.
19
Page 20

Cooking (cont'd)
Broiling Guidelines
Broilingisa dryheat cookingmethodthatallowsa restaurantquality
charbroiledflavor.Meat isexposeddirectlytothe heating element at high
temperatures.
1. Place meat on rack inbroiler pan,with the surface of cutsthe specified
distancefrom the heatingelement (specified below).
2. Broilfor halfthe recommended time, or untilthesurface is browned.
3. Turnmeat and continue broiling to desired internaltemperature.
4. Season, if desired.
5. Oven door MUST be fully closed.
Meat Cut
Recommended Internal
Temperature
Thickness
(Inches)
Weight
(pounds)
Distance Approximate
From Heat Cooking Time
(inches) (minutes)
BEEF
Chuck Shoulder Steak
Rib Eye Steak
Sirloin Steak
Pode_ouse S_ak
Filet Mignon (Tenderloin)
Flank Steak
Ground Beef Patties
Ve_ Ram 130°F
Ram 140°F
Medium Ram 145°F
Medium 160°F
Well Done t7O°F
Ve_WellDone 180°F
160°F minimum
¼
1
¾
1
1½
¾
1
1'/=
¾
1
t½
¾to1
¼to1
1to1¼
½
½to¾
¾to1
1to1¾
1 ½to3
2¼to4
¾to 1
1½to2
2to3
¼to½
1to1½
2to3
3t04
2to3
3to4
4to5
2to3
3to4
4to5
2t03
3to4
4to5
2to4
2to3
3to4
12to 14
8to 12
8to 12
10_ 15
20 to 25
10 to 15
16to21
21 to 25
8to12
1Oto 15
20 to 25
10 to 15
12 to 14
10 to 15
PORK
Chops, bone in
Chops, boneless
Tendedoin
Kabobs
Lean Ground Pork Patties
All pork must be cooked to an
internal temperature of at least
160°F to reduce the likelihOOd
of Trichinosis.
Failing to cook the meat to this
temperature could result in
personal injurJ or illness.
¾
¾
1 inch cubes
½
m
½tol
4
4
4
4
4
6to 8
6to g
15to 25
10 to 20
8tolO
LAMB
LoinChops
Rib Chops
Sidoin Steaks
Top Round Steaks
Center Leg Steaks
Cubes for Kabobs
Lamb Patties
Medium
Well Done
1
1
1
1
160"F
170°F 1
1 ¼ pieces
½ x 4 inches
-- 3t04
-- 3to4
-- 3to4
-- 3to4
-- 3to4
-- 3t04
¼ each 3 to 4
10to 15
10 to 15
12 to 15
12to15
15 to 20
lOrD 15
12
All times andrecommended temperaturesareprovided by the USDA, the Beef IndustryCouncil, the National PorkProducer's
Council, andthe American Sheep IndustryCouncil.
20
Page 21

Cooking (cont'd)
Roasting Guidelines
Tender cutssuch as riband loincutsare best cooked by dry heat methods,
such as masting. To mast:
1. Heat oven todesiredtemperature.
2. Place roastdirectlyfrom refrigeratorfat side upin a shallowroasting pan.
3. Insertovenproofmeat thermometer so tipis centered inthickest part of
roast.Make sure thermometer does not restinfat or on bone.
4. Remove roast 5 °F belowdesired degree offinishedinternal
temperature.
5. Transfer roastto carvingboardandtent looselywith aluminum foilfor
approximately 15 minutes.
Meat Cut
Recommended Internal Temperature Oven
Temperature
Weight I Approximate
Cooking Time
(pounds) (minutes)
BEEF
BonelessRumpRoast
"ripRoast
Eye RoundRoast
TenderloinRoast
Rib Roast
Rib Eye Roast
Very Rare 130°F
Rare 140°F
Medium Rare 145"F
Medium 160°F
Well Done 170°F
Very Well Done 180°F
325"F 4to6 25 to 30
325°F 3 ½ to 4 30 to 40
325°F 4 to 6 20 to 30
425=F 2 to 3 35 to 45
4to6 45 to 60
325°F 4 to 6 26 to 42
6to8 23 to 35
350°F 4to6 18to 24
PORK
Loin Roast, horm-ln
Rib Roast, boneless
Tenderloin
Ham hone-in, cook-before-estlng
All perk mustbe cooked toan internal
temperature of at least 160"F to reduce
the likelihoodof Trichinosisand other
food-borne illnesses.
350°F 3to5
350"F 2 to 4
450°F 1/=to 1
325°F 7 to 8
20 minutes
per pound
LAMB
Shoulder
Rib Roast
RibCrownRoast,notstuffed
LoinRoast
Leg,FrenchedStyleor HaWShank
Medium-Rare 150°F
Medium 160°F
Well Done 170"F
325°F
375°F
375°F
325°F
325°F
3Yzto6
1½-2½
2to3
1t/4to 1_
5to7
7to9
35 to 40
30 to 35
25 to 30
45 to 55
15to 20
20 to 25
POULTRY (unstuffed)
Capon
CornishHens, whole
Duck,whole
Goose,whole
Pheasant,whole
Quail, whole
Turkey
To reduce the risk of food-home illnesses,
poultrymust be cooked to an intamal
temperature of 180°F.
325 to 350°F
325 to 350°F
325 to 350°F
325 to 350°F
325 to 350°F
325 to 350°F
325°F
4to8
l'_to 1½
2
8 to 16
20 to 30 min/Ib.
50 to 60 total
18-20 min/Ibl
20 to 25 min/Ib.
30 min/lb.
20 minutes total
i3 ½to 5½ hours
All times and recommended temperatures are provided by the USDA, the Beef Industry Council, the National Pork Producer's
Council, and the American Sheep Industry Council.
21
Page 22

Cooking (cont'd)
Braising Guidelines
Lesstender cuts such as thosefrom the round, chuck, brisketand shank
require moist cooking. A longer cooking time at lower temperatures with
moisture helps softenthe meat.
1. Brown meat with a small amount of oilinheavy pan.
2. Pour eft excessive drippings,season, ifdesired.
3. Add smallamount of liquid(1/2 to 2 cups) and cover tightly.
Simmer gentlyoverlowheat on top ofthe range or in a 325 °F
oven, untilmeat is fork tender.
Meat Cut
BEEF
Blade Pot Roast
Arm Pot Roast
Chuck Roast (boneless)
Short Ribs
Round Steak
Flank Steak
LAMB
Shoulder Chops, Round Bone or
Blade
Riblets
Shanks
Stew Cubes
Recommended Internal Temperature
Oven Weight (pounds) Approximate
Cooking Time
Temperature OR Thickness (hours)
Meat should be cooked to a
temperature of at least 160°F
to reduce the likelihoodof food-
home illnesses.
325°F 1 _to2
3250F 2 to 3
325°F 2 to 3
325"F 1 ½to2½
325°F 1 to 1 ½
325°F 1 _ to 2
3to5
3to5
3to5
2 inches
x 2 inches
x 4 inchesthick
to 1 inch thick
1 Y2 to 2 inches
thick
Meat shouldbe cooked to a
temperature of at least 160°F
to reduce the likelihood of food-
home illnesses.
325°F
3250F
325°F
325°F
1 inchthick
3 pounds
3 pounds
1 inchpieces
1 ¼1be.
1tolY4
1 _,/2to 2
1to1½
1¼to1½
All times and recommended temperatures are provided by the USDA, the Beef Industry Council, the National Pork Producer's
Council, and the American Sheep Industry Council.
22
Page 23

Care and Cleaning
I)oor
Removing Oven Door
1. Fullyopenoven door.
2. Push hinge locksdowntoward
door frame, tothe unlocked
position.
• This may requirea flatblade
screwdriver.
3. Close door to first stopposition.
4. Firmlygrasp bothsides of top of
oven door,NOT door handle.
5. Liftdoor up untilhinge arm is
clear ofthe slot.
Replacing Oven Door
1. Graspingdoor topfirmly,seat indentation ofhinge arm intobottom edge
ofthe hinge slot.
• Doorshould beat thefirststoppositionangle.
2. Fullyopen oven door.
3. Pushhingelocksupagainstthe frontframe ofthe oven cavityto locked
position.
4. Close oven door. Door Gasket
Removing Storage
Drawer
1. Slide drawer out until itstops.
2. Remove storeditems.
3. Grasp drawer sides near back of
drawer.
4. Liftup and out. Reverse to
reinstall.
I B credo. I
To avoidpersonal injuryor
propertydamage, handle oven
doorwith care.
• Do not liftdoor by handle.
• Remove storage drawer.
• Door is heavy and can be
damaged if dropped.
• Screwdriver can scrape or
chiprange or oven finish.
• Do not scratch or chip glass
or twistdoor. Glass may break
suddenly.
Cleaning Oven Door
Not all areas of the oven are cleaned
bythe self-clean cycle.The oven
door, the gasket and area
surroundingthe gasketwillnot be
cleaned effectivelyby theself-clean
cycle. DO NOT usespraycleaners
toclean the outsideor insideofthe
oven door.Cleaner will streakthe
innerwindowarea.
DO NOT clean the gasket, Do not
wet, rub,soak or use any type of
cleaningmaterial to cleanthe oven
gasket.Any damage or defects
occurringfrom attemptingtoclean or
removethe gasket are notcovered
bywarranty.
Toclean the area around the gasket
make sure oven iscool tothe touch.
Usinga clothwith a mildsoapwipe
area needing tobe cleaned. Avoid
gasket. Gasket shouldnotbe
removedwhile cleaning.Do notallow
water or cleaningsolution to spillor
dripontogasket.
23
Page 24

Care and Cleaning ( om,d)
To avoidrisk of bums or electrical
shock:
• disconnectelectricalsupplyto
ovenbeforechanginglightbulb.
• before replacinglightbulbmake
sureoven and bulbare cool.
• Do not operate ovenwithout
bulband cover inplace.
I & cmnoN I
To avoid dsk of personal injury,
Wear gloves to protect hands
from accidental bulbbreakage.
Replacing Oven Light
1. Disconnectelectricalsupply.
2. Remove oven door ifdesired.
3. Whilewearing protectivegloves, unscrewcounter clockwisethe
lightbulb cover located in rear ofoven cavity.
Then turn light bulbcounterclockwiseto remove.
4. Replace lightbulbwith 120-volt, 40-watt appliance bulb.
Do not over tighten bulb or cover or they may be difficult to
remove later.
5. Replace lightbulb
cover and oven door
beforeuse.
6. Reconnectpower
supply.
To keep your smoothtop looking like new, Amana recommends routine cleaning. The following general instructions for routine
and tough spot cleaning are based on the performance of Amana recommended products. To order these products, contact the
Consumer Affairs department at 1-800-843-0304.
PART GENERAL DIRECTIONS
Broil element
Do not clean broilelement. Any soilwill bum off when element is heated,
Broiler pan and grid
<_ Drain fat, cool pen and grid slightly. (Do notstand soiled pen and gnd in oven to cool.) Spdnkle with soap. Fill
the pen with warm water. Let pen and gdd stand for a few minutes
Control knobs
Pull offknobs. Wash gently with mild soap and water but do not soak. Dry and return knobsto oven, making
sure to match fiat area onthe knob tothe fiat area on the shaft.
Outside finish
Wash all glass with cloth dampened insoapy water. Rinse and palish with a dry cloth. Ifknobs are removed, do
notallow water to run down inside surface while cleaning.
For heavy soil, place oven racks in large plastic bag with ammonia and water in cup. Seal tightlyand allow to
stand overnight. Wash and dnse, dry thoroughly.
For heavy soil, clean by handand dnse thoroughly. Remove drawerfor ease in cleaning. Be sure drawer is dry
before replacing.
Oven racks
Storage drawer
24
Page 25

Care and Cleaning (cont'd)
Caring for the smoothtop
For routinecleaning,allow top tocool beforecleansing.Wash surface witha dampened cloth and smoothtopcleaner
conditioner. Use another clean damp paper towel to wipe offthe cleaner. Use a drypaper towel, buff the smoothtop
tomake sure all the cleaner conditioner isremoved. The smoothtopcleaner conditioner providesa thinlayerof
protectivepolishthat helpstoprevent scratching.Do notuse a harsh cleanseror steel woolpad. Forspecific
problems,see below.
PROBLEM
Brown streaks
and specks
Blackened,
burnt on spots
Fine brown gray
lines, fine
scratches or
abrasions
Smearing or
streaking
Metal or
silver/gray
marks
Pitting or flaking
Hard water
spots
CAUSE REMOVAL
Cleaning with sponge or cloth containing Normal cleansing (providedabove)
soiled detergentwater
Spatters or spilloverson a hot cookingarea or
accidental meltingof plastic likea broad bag
Course particles, likesalt, become embedded
in top if trappedunder pan. Using abrasive
cleaning materials. Scratches from rough
ceramic, glass, or ceramic coated cookware.
Using too much smoothtopcleaner conditioner
or usinga soileddish cloth.
Slidingor scraping metal utensilsacrosstop.
Believers of sugar syrup on a hot smoothtop
can cause pitting if not removed immediately.
Condensation from cookingcan cause
mineralsfound in water and acids infood to
drip ontosmoothtop and cause gray deposits.
Spots are oftenso thin they appear to be inor
under smoothtop.
Clean area with smoothtopcleaner conditioner
with clean damp paper towel, nonabrasive nylon
rsd, or scouring brush.
Ifspot is notremoved,on cool cooktopcarefully
scrape area witha safety scraper held at a 30-
degree angle.
Fine scratches are not removable but can be
minimized by daily usa of smoothtop cleaner
conditioner.
Follow labelinstructionscarefully. See Routine
Cleaning, above.
Remove marksbefore top isused again. If marks
are not removed by normal cleaning,usea safety
scraper at a 30° angle and cooktopcleaner
conditionerto carefully scrape offthe mark.
Turn control to LOW setting. Wipe up excess spill
with dry cloth. Allow top to cool and carefully
scrape area with a safety scraper held at a 30-
degree angle.
Mix smoothtopcleaner conditionerwithwater and
apply thickpaste tostained area. Scrub
vigorously.Ifstain isnot removed, raapplycleaner
and repeat process
OR
makesure the surface iscool and put a small
amount ofwhite vinegar on the spotand let itsit a
few minutes. Usinga nonabrasive nylonpad,
gently rubthespot.Wipe offany excess with a
damp paper towel, thendry.
25
Page 26

Care and Cleaning (cont'd)
Cleaning Stainless Steel
Damage to stainless steel finish due to Improper use of cleaning
products, or using non-recommended cleaning products, is not
covered under warranty. ForAmana recommendedproducts,call
ConsumerAffairs at 1(800) 843-0304 oronline at www.amana com
Our stainlesssteelapplianceshave been factory finishedforhigh shine
and luster.To maintainthisqualityappearance:
DO NOT USE:
Abrasive powdersor liquids
Citrusbased cleaners
Ammonia
Steelwool pads
Abrasivecloths
Oven cleansers
Acidic or vinegarbased cleaners
DO USE:
Warm soapy water for routine
cleaning
Softclean clothsto dry or polish
Stainlesssteelcleanerdesigned
forappliancessuchas Amana
Cleaning Polish and
Conditioner forStainless Steel
(#31g6oaol)
Can I use liquid
cleaners on my stainless
steel?
• Justbecause a cleaneris a
liquid does not mean it is non-abrasive.
Many liquid cleansers designed to be
gentle on tile and smooth surfaces still
damage stainless steel. Cosmetic
damage fromusing non-recommended
products isnot covered under warranty.
Citric Acid
Citric acid permanently
discolors stainless steel.
To prevent damage to
the finishof your stainless steel
appliance, do not allow these
substances to remain on the steel
finish:
• mustard
• tomatojuice
• marinara sauce
• citrus based sauces
• citrus based products
For best cleaning results
1. Wash surfaces withwarm soapy water and a soft,clean clothor
sponge.
2. Rinse surfaceswithwarm water. Dry surfaceswith a soft,clean cloth.
DO NOT use thefollowingharshcleaners:
• abrasive or acidiccleaners (ammonia, chlorinebleach,vinegar-based
product,etc.)
• citrus-besedcleaners
• scouringpads (metal, textured plastic,etc.)
These items can scratch,discolor,or permanentlytarnish surfaces.
3. Followuprinsingby immediatelydryingwith a soft,clean cloth. Thiswill
avoidwater spottingon stainlesssteelfinish.
e
Questions? Comments?
Concerns? Contact us!
www.amana.com
or call Consumer Affairs at
1-800-843-0304
26
Page 27

Troubleshooting
You may save time and money by checkingitems below before ceilingfor service. Listincludescommon concerns
that are not theresultof defectiveworkmanshipor materials. Ifyourquestionis notexplained below,contactAmana
ConsumerAffairsDepartment at 800-843-0304.
Topic Possible Cause Solution
OPERATION
Power outage
Appliance not working
Frequent cycling of surface element or
warming zone
Oven not working
Clock and time" not working
Oven light not working
Self Clean not working
Oven door will not unlock
Make sure appliance isplugged in.
Venfy thatcimuit breaker is nottripped.
Replace household fuse but do notchange fuse capacity.
Normal Element cyclesto maintain proper heat and to prevent
damage to smoothtop.
Programming error Shut off power tooven for five minutes by switchingoff
circuitbreaker. Reset olrcuit breaker and try oven again.
Power outage Make sure appliance isplugged in. Verify that circuit
breaker is nottripped. Replace household fuse but do not
change fuse capacity.
Loose bulb Check for Ic_se bulb. Tighten.
Burntout bulb Check for burnt out bulb. Replace if necessary withan
appliance bulb.
Programming error Shut off power to oven for five minutes by switchingoff
circuit breaker. Reset circuitbreaker and try ovenagain.
Oven is serf-cleaning Allow cycle to complete.
Oven still hut Will not unlatch untila certain cooler temperature has
been reached. Do not force dooropen - will void
warranty. May blow cooler air on latchwith hair dryer at
cool setting toquicken process.
Oven not clean after a self clean cycle Too much soil, grime leftin Wipe out and remove excess soil priorto running self-
oven clean cyde.
Soot remains inoven after Normal.
cycle
Locked light displayed Door locked If oven is hot, allowto coolrathe" than trying to force door
latch open.
Display flashing Power failure reset clock Press CLOCK.
F-(numerlc) display Service code Shut off power tooven for one to two minutes by
switching offcircuitbreaker. Reset breaker, If continues,
contact service department.
Oven smokes the first few times used Normal Minor smoking is normalthe firstfew times the oven is
used.
COOKING
Food not baking properly
Food not roasting properly
Food not broiling properly
Oven temperature too hot or cold
Va_ouscauses
Vaeduscauees
Vanouscauses
Calibrata oven tampera_re
oven has strong odor Normal
Not boiling or cooking fast enough Improperly sized cooking
utensils
See Cooking, Common Baking Problems
See Cooking, Roestlng
See Cooking, Bretllng
See Using the oven Control, Oven Temperature
Control Adjustment
Ovens will have a 'new' odor. Run a serf-clean cycle to
remove the odor.
Make sure pans fitheating elements. See CooloNare
Requirements.
27
Page 28

Troubleshooting (cont'd)
NOISE
Frequent cycling off and on of oven. N_Tnal
Cracking or popping sound Norma
To maintain a tampemture for baking,the oven
cycles onand off.
Wet cookingutensilsor possiblespillage.
APPEARANCE
Scratches
Discoloration
Hot sugar or plastic melted to surface
Pattem fadlnghNeadng off
C_tty did or roughsurfaca on
cookingutensils
Shiny scratches
Did
Weterspots/marks
Usa recommended smoothtopcleaner
conditioner.
May be a metal mark. Make sure surface iscool.
Use a safety scraper to carefullyscrape offthe
mark. Apply smonthtopcleaner condlUooerand
gentlyrubwith nonabrasive nylon pad.
Use recommended smonthtop cleaner
conditionerto remove dirtfrom smoothtop.
Make sure surface is cool.Put a smallamount of
whitevinegar on the spot andlet sitfor a few
minutes.Rub withnonabrasive nylonpad. Wipe
off any excess with damp paper towel.
Items ontop of warm cooklop Warm slightlyand remove withsalty scrape_.
Did/filmbuildup Use recommendedcleaner cond_ocar to
remove buildup and dirtfrom sm_othtop.
28
 Loading...