

Page 1

WASHER USER INSTRUCTIONS
INSTRUCTIONS D’UTILISATION DE LA LAVEUSE
Table of Contents / Table des matières
ASSISTANCE OR SERVICE .................................................... 1
WASHER SAFETY.................................................................... 2
WASHER USE .......................................................................... 3
WASHER CARE........................................................................ 5
TROUBLESHOOTING.............................................................. 6
WARRANTY.............................................................................. 9
INSTRUCTIONS D’UTILISATION DE LA LAVEUSE ...........10
SÉCURITÉ DE LA LAVEUSE ...............................................11
UTILISATION DE LA LAVEUSE............................................12
ENTRETIEN DE LA LAVEUSE..............................................14
DÉPANNAGE .........................................................................15
GARANTIE..............................................................................19
Para obtener acceso al manual de uso y cuidado en español, o para obtener
www.maytag.com.
Tenga listo su número de modelo completo. Podrá encontrar el número de modelo y de serie en la etiqueta ubicada debajo de la tapa de la lavadora.
información adicional acerca de su producto, visite:
Assistance or Service
If you need assistance or service, first see the “Troubleshooting” section. Additional help is available by calling our Maytag Services, LLC, at 1-800-688-9900 from anywhere in the U.S.A., visiting our website at www.amana.com/help or write:
Maytag Services, LLC
A
ttn: CAIR
P.O. Box 2370
Cleveland, TN 37320-2370
In Canada, for assistance, installation and
1-800-807-6777, visit
write:
Please include a daytime phone number in your correspondence.
our website at www.amanacanada.ca or
Whirlpool Canada LP
Custom
Mississauga, Ontario L5N 3A7
er Interaction Centre
1901 Minnesota Court
®
Center
service, call
Keep this book and your sales slip together for future
reference. You must provide proof of purchase or installation
date for in-warranty service.
Write down the following information about your appliance to help
you obtain assistance or servic
to know your complete model number and serial number. You can
find this information on the model and serial number label, located
under the washer lid.
Dealer name____________________________________________________
Serial number __________________________________________________
Address ________________________________________________________
Phone number__________________________________________________
Model number __________________________________________________
e if you ever need it. You will need
Accessories
Enhance your washer with these premium accessories.
For more high-quality items or to order, call 1-8
In Canada, call 1-800-807-6777 or visit us at www.amanacanada.ca.
00-901-2042, or visit us at www.amana.com/accessories.
Part Number Accessory Part Number Accessory
8212656RP 10 ft (3.0 m) Black EPDM (2 pack) 8212641RP 5 ft (1.5 m) Black EPDM (2 pack)
8212638RP 6 ft (1.8 m) Nylon braided space-saving inlet
90° elbow, hypro-blue steel couplings.
hose,
(2-pack)
8212487RP 5 ft (1.5 m) Nylon braided inlet hose. (2-pack) 8212526 Washer drip tray, fits under all
8212637RP 6 ft (1.8 m) Black EPDM, space saving 90° elbow,
hypr
o-blue steel couplings. (2-pack)
8212545RP 5 ft (1.5 m) Red and Blue EPDM. (2-pack) 1903WH Laundry supply storage cart
This washer does not include inlet water hoses.
8212546RP 4 ft (1.2 m) Black EPDM (2 pack)
31682 All purpose appliance cleaner
W10192179A
Page 2

WASHER SAFETY
Your safety and the safety of others are very important.
We have provided many important safety messages in this manual and on your appliance. Always read and obey all safety
messages.
This is the safety alert symbol.
This symbol alerts you to potential hazards that can kill or hurt you and others.
All safety messages will follow the safety alert symbol and either the word “DANGER” or “WARNING.”
These words mean:
You can be killed or seriously injured if you don't immediately
DANGER
WARNING
All safety messages will tell you what the potential hazard is, tell you how to reduce the chance of injury, and tell you what can
happen if the instructions are not followed.
IMPORTANT SAFETY INSTRUCTIONS
WARNING:
including the following:
To reduce the risk of fire, electric shock, or injury to persons when using the washer, follow basic precautions,
follow instructions.
You
can be killed or seriously injured if you don't
instructions.
follow
■ Read all instructions before using the washer.
■ Do not wash articles that have been previously cleaned
in, washed in, soaked in, or spotted with gasoline,
dry-cleaning solvents, other flammable, or explosive
substances as they give off vapors that could ignite or
explode.
■ Do not add gasoline, dry-cleaning solvents, or other
flammable, or explosive substances to the wash water.
These substances give off vapors that could ignite or
explode.
■ Under certain conditions, hydrogen gas may be
produced in a hot water system that has not been used
for 2 weeks or more. HYDROGEN GAS IS
EXPLOSIVE. If the hot water system has not been
used for such a period, before using the washing
machine, turn on all hot water faucets and let the water
flow from each for several minutes. This will release
any accumulated hydrogen gas. As the gas is
flammable, do not smoke or use an open flame during
this time.
SAVE THESE INSTRUCTIONS
■ Do not allow children to play on or in the washer. Close
supervision of children is necessary when the washer is used
near children.
■ Before the washer is removed from service or discarded,
remove the door or lid.
■ Do not reach into the washer if the drum, tub or agitator is
moving.
■ Do not install or store the washer where it will be exposed to
the weather.
■ Do not tamper with controls.
■ Do not repair or replace any part of the washer or attempt any
servicing unless specifically recommended in this manual or in
published user-repair instructions that you understand and
have the skills to carry out.
■ See “Electrical Requirements” for grounding instructions.
2
Page 3
WASHER USE
Starting Your Washer
WARNING
Fire Hazard
Never place items in the washer that are dampened
with gasoline or other flammable fluids.
No washer can completely remove oil.
Do not dry anything that has ever had any type of oil on
it (including cooking oils).
Doing so can result in death, explosion, or fire.
1. Measure detergent and pour it into the washer. If desired, add
powdered or liquid color safe bleach.
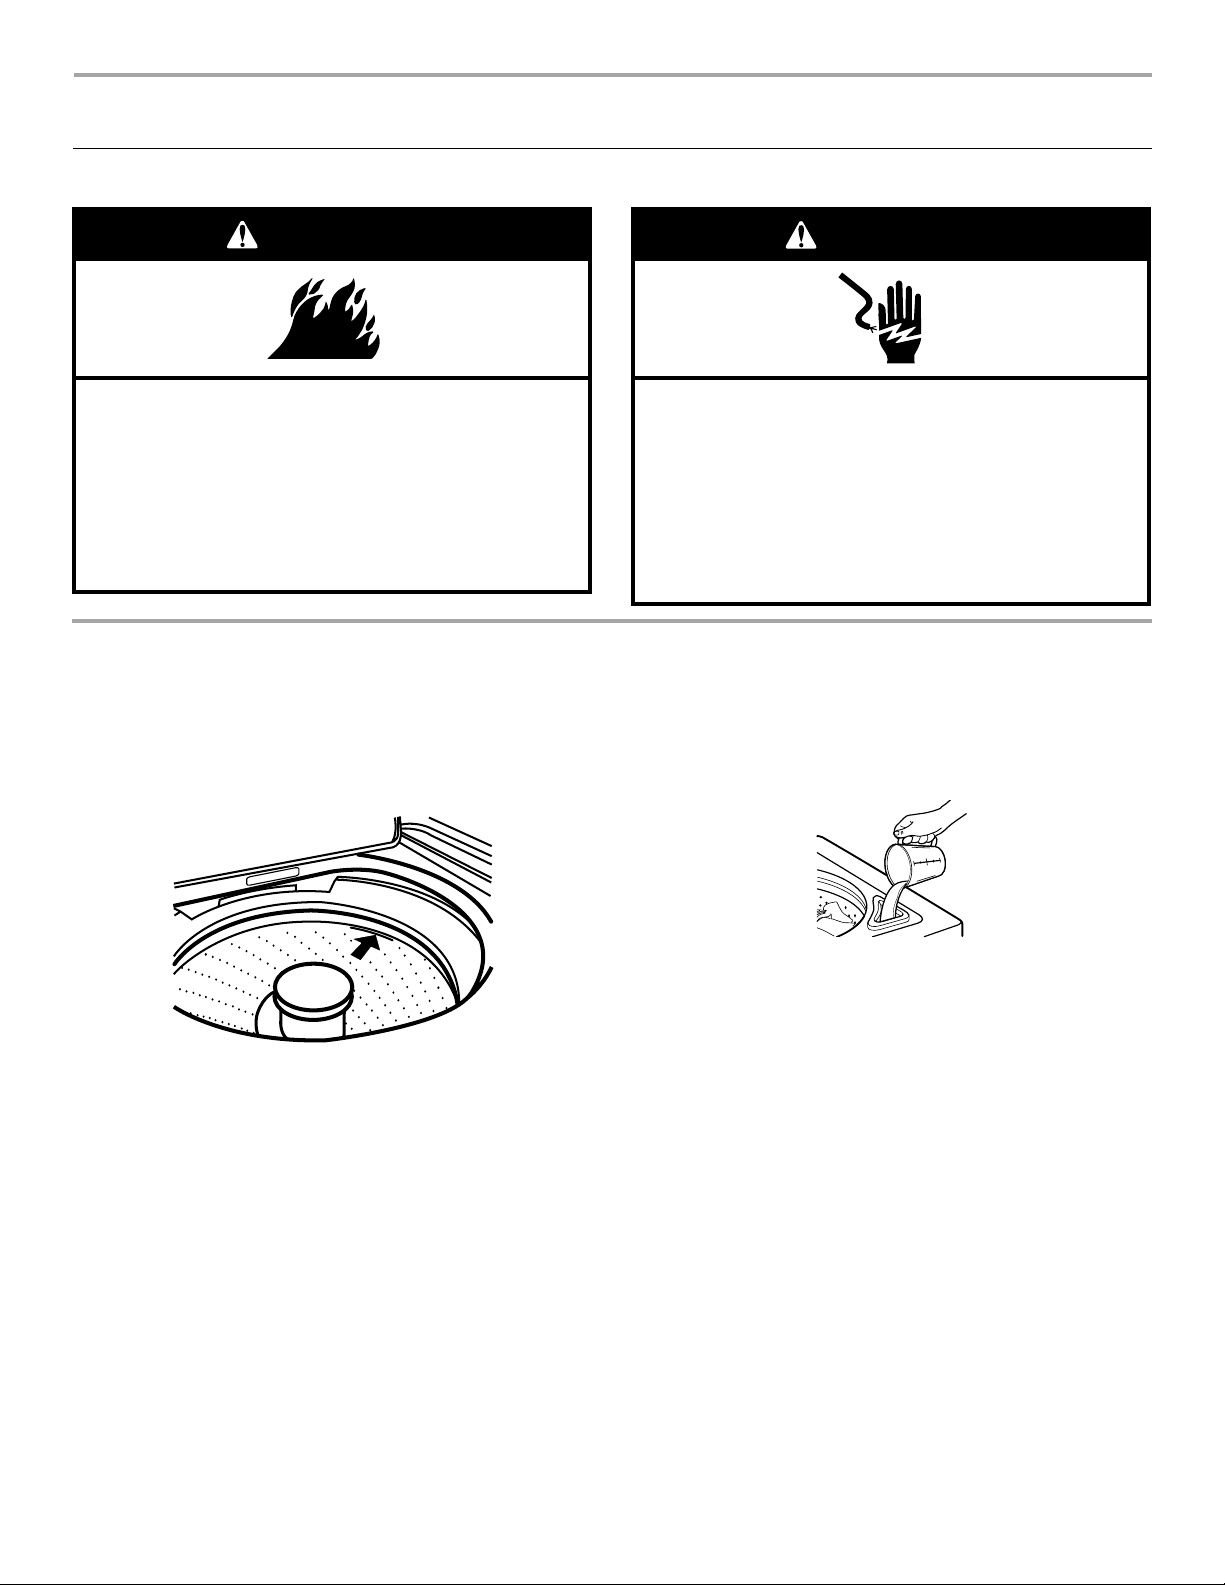
2. Drop a sorted load of clothes loosely into your washer.
■ Load evenly to maintain washer balance. Mix large and
small items. Items should move easily through the wash
water.
■ Load only to the top of the basket as shown. Overloading
can cause poor cleaning.
WARNING
Electrical Shock Hazard
Plug into a grounded 3 prong outlet.
Do not remove ground prong.
Do not use an adapter.
Do not use an extension cord.
Failure to follow these instructions can result in death,
fire, or electrical shock.
Style 1: W
models)
■ Use only liquid chlorine bleach in this dispenser. Do not
ith liquid chlorine bleach dispenser (on some
use this dispenser to add powdered chlorine or color-safe
bleach to your load. Pour measured liquid chlorine bleach
into the liquid chlorine bleach dispenser. Bleach is
immediately fed into washer and is diluted automatically
during the wash part of the cycle.
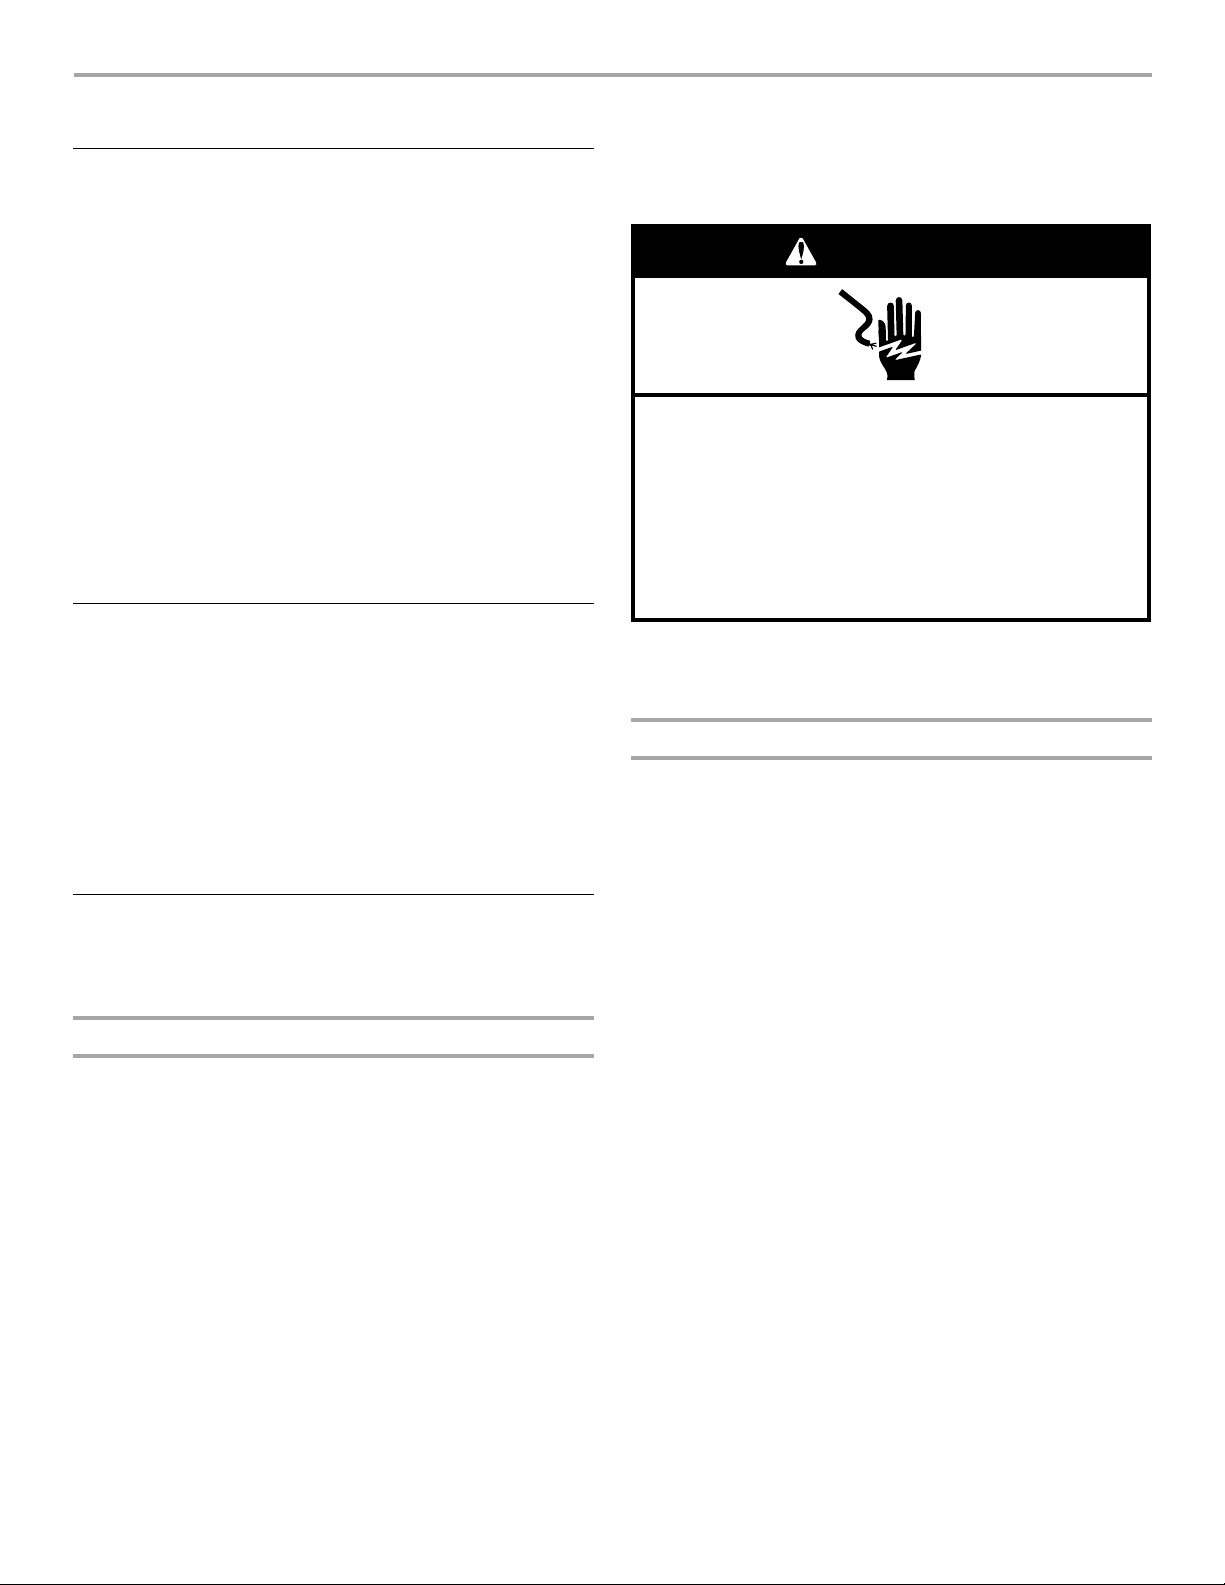
3. (OPTIONAL) Add liquid chlorine bleach. NOTE: Foll
manufacturers’ directions for proper use. Undiluted bleach
will damage any fabric it touches. The damage appears as
rips, holes, tears, or color loss and may not show up until
several washings later. To avoid spilling, use a cup with a
pouring spout. Do not let bleach splash, drip, or run down
into the washer basket. Always measure liquid chlorine
bleach. Do not guess. Do not use more than the
manufacturer’s recommended amount for a full load. Use less
with a smaller load size.
ow the garment and the chlorine bleach
Style 2: Without liquid chlorine bleach dispenser (on some
models)
■ Let the washer fill and begin agitating the load.
■ Add bleach 5 minutes into the wash cycle for best
cleaning and so that bleach can be removed in the rinse
cycle. Pour bleach around the agitator, not directly onto
the
load to avoid damaging clothing or other items in the
load.
4. (OPTIONAL) Add liquid fabric softener. NOTE:
clothes. Undiluted fabric softener can stain fabrics. Always
dilute fabric softener with warm water. Using too much fabric
softener can make some items (diapers and towels)
nonabsorbent. If this happens, do not use it in every load, or
use less of it in each load.
Do not spill or drip any fabric softener onto the
3
Page 4

Style 1: With liquid fabric softener dispenser (on some
models)
■ Use only liquid fabric softener in this dispenser. Pour
measured liquid fabric softener into the dispenser.
Softener is added automatically during the rinse portion
of the cycle. Dilute liquid fabric softener by filling the
dispenser with warm water until liquid reaches the
underside of the rim. See max fill line arrows.
Style 2: Without liquid fabric softener dispenser (on some
models)
■ In the final rinse only, add fabric softener that has been
diluted with 1/2 to 1 cup (125 to 250 mL) warm water.
5. Close th
e washer lid. Washer will not agitate or spin with the
lid open.
urn the LOAD SIZE or WATER LEVEL selector to the correct
6. T
setting for your wash load and the type of fabric being
washed.
■ You may change the load size or water level selection
after the washer has started filling by turning the selector
to a different setting.
■ On models with a variable Load Size or Water Level
control, you should turn the knob to RESET, then to
desired setting.
7. Sel
ect a Wash Temperature based on the type of fabric and
soil being washed. Use the warmest wash water safe for the
fabric. Follow garment label instructions.
The Automatic Temperature Contr
ol (ATC) (on some models)
electronically senses and maintains a uniform water
temperature by regulating incoming hot and cold water.
■ Even in Cool wash, some warm water is let into the
washer to maintain a minimum temperature.
Care Control Temps (on some models) uses Automatic
T
emperature Control (ATC) to electronically sense and
maintain a uniform water temperature by regulating incoming
hot and cold water. Care Control Temps provides higher wash
temperatures for the more aggressive, heavy-duty cycles and
slightly lower temperatures on cycles for delicate and hand
wash items, to provide better fabric care.
Temperature Guide
Wash Temp Suggested Fabrics
Hot
Care Control
Warm
Care Control
Cool Colors that bleed or fade
Cold Dark colors that bleed or fade
In wash water temperatures colder than 60°F (15.6°C),
NOTE:
detergents do not dissolve well. Soils can be difficult to
remove. Some fabrics can retain wear wrinkles and have
increased pilling (the formation of small lint-like balls on the
surface of garments).
ou can customize your wash by adding rinse Options to
8. Y
your cycle selections. This knob has settings for:
■ Extra Rinse - Selecting this option provides a second
rinse. An Extra Rinse can be added to any wash cycle.
■ Cycle Signal - A tone will sound at the end of the cycle.
The sound level cannot be adjusted.
■ Extra Rinse & Cycle Signal - This option combines both a
Extra Rinse and a Cycle Signal at the end of the wash
cycle.
9. Fabric Select (on some models). Each fabric setting is
designed for different types of fabric and soil levels.
This is an integrated set of contr
provide optimal wash temperatures, agitation times, and
agitation/spin speeds based on the Fabric Select setting. The
controls provide higher wash temperatures for more
aggressive, heavy-duty cycles
temperatures on cycles for delicate and hand wash items, to
provide better fabric care.
decrease agitation time for light soils and increase agitation
time for heavy soils.
10. Push in the
Timer knob and turn it clockwise to the wash
cycle you want. Reduce the wash time when using a small
water level setting. Pull out the Timer knob to start the
washer.
Whites and pastels
Durable garments
Heavy soils
Bright colors
Moderate to light soils
Light soils
Light soils
ols which work together to
and slightly lower
The timer knob allows you to
To stop or restart your washer:
■ To stop the washer at any time, push in the Timer knob.
■ To restart the washer, close the lid (if open) and pull out
the Timer knob.
4
Page 5
WASHER CARE
Cleaning Your Washer
Use a soft, damp cloth or sponge to wipe up any spills such as detergent or bleach from the outside of your washer.
Clean your washer interior by mixing 1 cup (250 mL) of chlorine
ch and 2 cups (500 mL) of detergent. Pour this mixture into
blea
your wa
Repeat this process if necessary.
Remove any hard water deposits using only cleaners labeled
washer safe.
Cleaning the liquid fabric softener dispenser (on some
m
1. Remove dispenser by grasping top with both hands and
2. R
NOTE:
dispenser. To avoid damage to the washer or clothing, do not
wash clothes with the liquid fabric softener dispenser removed or
add detergent or bleach to this dispenser; it is for liquid fabric
softener only.
sher and run it through a complete cycle using hot water.
as
odels):
squeezing, while pushing upward with thumbs.
inse dispenser under warm water, then replace it.
Some models are equipped with a liquid fabric softener
To use washer again
1. Flush water pip
Turn on both water faucets.
es and hoses. Reconnect water inlet hoses.
WARNING
Electrical Shock Hazard
Plug into a grounded 3 prong outlet.
Do not remove ground prong.
Do not use an adapter.
Do not use an extension cord.
Failure to follow these instructions can result in death,
fire, or electrical shock.
Water Inlet Hoses
This washer does not include inlet washer hoses. Whirlpool
Corporation recommends use of factory specified parts. A list of
factory specified hoses available for separate purchase are listed
on the first page of this user instructions. These hoses are
manufactured and tested to meet Whirlpool Corporation's
specifications.
Replace inlet hoses after 5 years of use to reduce the risk of hose failure. Periodically inspect and replace inlet hoses if bulges, kinks, cuts, wear, or leaks are found.
When replacing your inlet hoses, mark the date of replacement
label with a permanent marker.
on the
Moving and Storage
Because some water may stay in the hoses, freezing can damage your washer. If storing or moving your washer during freezing weather, winterize it.
Winterizing your washer
1. Shut off both water faucets. Disconnect and drain water inlet
hoses. Pour 1 qt (1 L) of R.V.-type antifreeze into the basket.
2. R
un washer on a drain and spin setting for about 30 seconds
to mix the antifreeze and remaining water.
3. Unplug wa
sher or disconnect power.
2. Plug in washer or reconnect power.
3. Run the
of detergent to clean out antifreeze.
washer through a complete cycle with 1 cup (250 mL)
Storage, non-use or vacation care
Operate your washer only when you are at home. If you will be on vacation or not using your washer for an extended period of time, you should:
1. Unplug
2. Turn off the water supply to the washer. This helps avoid
flooding (due to a water pressure surge) while you are away.
washer or disconnect power.
5
Page 6

TROUBLESHOOTING
First try the solutions suggested here or visit our website and reference FAQs (Frequently Asked Questions) to possibly
avoid the cost of a service call.
In U.S.A. www.amana.com/help In Canada
Washer and Components
Noisy
■ Is the load balanced and the washer level? The wash load
should be balanced and not overloaded. The washer must be
level. The front feet should be properly installed and the nuts
tightened. Reset the rear leveling legs (if needed). See the
Installation Instructions.
■ Did you completely remove the yellow shipping strap with
shipping pins? See the Installation Instructions.
■ Are the gears engaging after the drain and before spin, or
is the upper part of agitator clicking during wash? These
are normal washer noises.
Leaking
■ Check the following:
Are the fill hoses tight?
Are the fill hose washers properly seated?
Is the drain hose clamp properly installed? See the
Installation I
■ Is the sink or drain clogged? Sink and standpipe must be
able to handle 17 gal. (64 L) of water per minute.
■ Is water deflecting off the tub ring or the load? Center the
tub before starting the washer. The wash load should be
balanced and not overloaded. The fill or spray rinses can
deflect off the load. The washer must be level. The front feet
should be properly installed and the nuts tightened. Reset the
rear leveling legs (if needed). See the Installation Instructions.
■ Check household plumbing for leaks.
Basket crooked
nstructions.
www.amanacanada.ca
Dispensers clogged or bleach leaking
■ Did you follow the manufacturer’s directions when adding
detergent and fabric softener to the dispensers (on some
models)? Measure detergent and fabric softener. Slowly pour
into the dispensers. Wipe up all spills. Dilute fabric softener in
the fabric softener dispenser.
■ Did you put powdered or color-safe bleach into the liquid
chlorine bleach dispenser (on some models)? Add
powdered or liquid color-safe bleach directly to the basket.
Do not use the chlorine bleach dispenser for color-safe
bleach.
Washer Operation
Washer won’t run, fill, rinse or agitate; washer stops
WARNING
Electrical Shock Hazard
Plug into a grounded 3 prong outlet.
Do not remove ground prong.
Do not use an adapter.
Do not use an extension cord.
Failure to follow these instructions can result in death,
fire, or electrical shock.
■ Was the washer basket pulled forward during loading?
Push the basket to the center before starting wash.
■ Is the load balanced and the washer level? The wash load
should be balanced and not overloaded. The washer must be
level. The front feet should be properly installed and the nuts
tightened. Reset the rear leveling legs (if needed). See the
Installation Instructions.
■ The washer basket moves while washing. This is normal.
Agitator operation
■ The top of the agitator is loose, or moves in only one
direction. This is normal.
6
■ Is the power cord plugged into a grounded 3 prong
outlet? Plug power cord into a grounded 3 prong outlet.
■ Are you using an extension cord? Do not use an extension
cord.
■ Is the indicator on the Timer knob properly lined up with a
cycle? Turn the Timer knob to the right slightly and pull to
start.
■ Are the water inlet valve screens clogged? Tur n o ff t h e
water and remove inlet hoses from the washer. Remove any
accumulated film or particles. Reinstall hoses, turn on water
and check for leaks.
■ Are both the hot and cold water faucets turned on? Tur n
on the water.
■ Is the water inlet hose kinked? Straighten the hoses.
■ Does the water level seem too low, or does the washer
appear to not fill completely? The top of the agitator is
much higher than the highest water level. This is normal and
necessary for clothes to move freely.
Page 7

■ Has a household fuse blown, or has a circuit breaker
tripped? Replace the fuse or reset the circuit breaker. If the
problem continues, call an electrician.
■ Is the washer in a normal pause in the cycle? The washer
pauses for about 2 minutes during certain cycles. Allow the
cycle to continue. Some cycles feature periods of agitation
and soak.
■ Is the washer overloaded? Wash smaller loads.
■ Is the lid open? The lid must be closed during operation.
Washer will not agitate or spin with the lid open.
■ Did you line dry your clothing? If so, you can expect some
lint on the clothing.
■ Check the following:
Was paper or tissue left in the pockets?
Is your water colder than 60°F (15.6°C)? Wash water colder
than 60°F (15.6°C) may not completely dissolve the
detergent.
Did you use the proper cycle time for the load? Reducing
wash time (duration) is another way to reduce lint.
Washer won’t drain or spin
■ Is the drain hose clogged, or the end of the drain hose
more than 96" (244 cm) above the floor? See the
Installation Instructions for proper installation of drain hose.
■ Is the lid open? The lid must be closed during operation.
Washer will not agitate or spin with the lid open.
■ Is there excessive sudsing? Always measure detergent.
Follow manufacturer’s directions. If you have very soft water,
you might need to use less detergent.
Washer continues to fill or drain; cycle seems stuck
■ Is the top of drain hose lower than the water level in
washer? The top of the hose must be higher than the water
level in the washer for proper operation. See the Installation
Instructions.
■ Does the drain hose fit too tightly in the standpipe, or is it
taped to the standpipe? The drain hose should be loose yet
fit securely. Do not seal the drain hose with tape. The hose
needs an air gap. See the Installation Instructions.
Wash/Rinse temperature not what I selected
■ Are the hot and cold water inlet hoses reversed? See the
Installation Instructions for more information. As your
frequency of loads washed increases, the water temperature
may decrease for hot and warm temperatures. This is normal.
Washer Results
Stains on load
■ Did you follow the manufacturer’s directions when adding
detergent and fabric softener? Measure detergent and
fabric softener. Use enough detergent to remove soil and hold
it in suspension. Dilute fabric softener and add to the rinse
portion of a cycle only. Do not drip fabric softener on clothes.
■ Is there above average iron (rust) in water? You may need
to install an iron filter.
■ Did you properly sort the load? Sort dark clothes from
whites and lights.
■ Did you unload the washer promptly? To avoid the transfer
of dye, unload the washer as soon as it stops.
Load is wrinkled
■ Did you unload the washer promptly? Unload the washer
as soon as it stops.
■ Did you use the right cycle for the load being washed?
Use the cycle for Casual or Permanent Press clothes or
another cycle with low spin speeds (if available) to reduce
wrinkling.
■ Did you overload the washer? The wash load must be
balanced and not overloaded. Loads should move freely
during washing.
To reduce wrinkling of permanent press clothes and some
synthetic knits, use a large load size to provide more space.
■ Are the hot and cold water hoses reversed? Check that the
hot and cold water hoses are connected to the right faucets.
See the Installation Instructions.
Load too wet
■ Did you use the right cycle for the load being washed?
Select a cycle with a higher spin speed (if available).
■ Did you use a cold rinse? Cold rinses leave loads wetter
than warm rinses. This is normal.
Residue or lint on load
■ Did you sort properly? Sort lint givers (towels, chenille) from
lint takers (corduroy, synthetics). Also sort by color.
■ Did you overload the washer? The wash load must be
balanced and not overloaded. Clothes should move freely.
Lint can be trapped in the load if overloaded. Wash smaller
loads.
■ Did you select the correct water level? The water level
should be correct for the load size. Clothes should move
freely in the water.
■ Did you use enough detergent? Follow manufacturer’s
directions. Use enough detergent to hold the lint in the water.
7
Page 8

Load is tangled or twisted
Garments damaged
■ Did you overload the washer? The wash load must be
balanced and not overloaded. Loads should move freely
during washing.
■ Did you wrap items around the agitator? Drop items
loosely into the washer. Do not wrap items around the
agitator.
Gray whites, dingy colors
■ Did you properly sort the load? Transfer of dye can occur
when mixing whites and colors in a load. Sort dark clothes
from whites and lights.
■ Was the wash temperature too low? Use hot or warm
washes if safe for the load. Make sure your hot water system
is adequate to provide a hot water wash.
■ Did you use enough detergent, or do you have hard
water? Use more detergent for washing heavy soils in cold or
hard water.
■ Are the hot and cold water hoses reversed? Check that the
hot and cold water hoses are connected to the right faucets.
See the Installation Instructions.
■ Check the following:
Were sharp items removed from pockets before washing?
Empty pockets, zip zippers, snap or hook fasteners before
washing.
Were strings and sashes tied to avoid tangling?
Were items damaged before washing? Mend rips and broken
threads in seams before washing.
■ Did you overload the washer? The wash load must be
balanced and not overloaded. Loads should move freely
during washing.
■ Did you add chlorine bleach properly? Do not pour chlorine
bleach directly onto load. Wipe up bleach spills. Undiluted
bleach will damage fabrics. Do not place load items on top of
the bleach dispenser when loading and unloading the washer
(on some models).
■ Did you follow the manufacturer’s care label instructions?
8
Page 9

AMANA® MAJOR APPLIANCE WARRANTY
LIMITED WARRANTY
For one year from the date of purchase, when this major appliance is operated and maintained according to instructions attached to or
furnished with the product, Amana brand of Whirlpool Corporation or Whirlpool Canada LP (hereafter “Amana”) will pay for factory
specified parts and repair labor to correct defects in materials or workmanship. Service must be provided by a Amana designated
service company. This limited warranty is valid only in the United States or Canada and applies only when the major appliance is used
in the country in which it was purchased. Outside the 50 United States and Canada, this limited warranty does not apply. Proof of
original purchase date is required to obtain service under this limited warranty.
ITEMS EXCLUDED FROM WARRANTY
This limited warranty does not cover:
1. Service calls to correct the installation of your major appliance, to instruct you on how to use your major appliance, to replace or
repair house fuses, or to correct house wiring or plumbing.
2. Service calls to repair or replace appliance light bulbs, air filters or water filters. Consumable parts are excluded from warranty
coverage.
3. Repairs when your major appliance is used for other than normal, single-family household use or when it is used in a manner that is
contrary to published user or operator instructions and/or installation instructions.
4. Damage resulting from accident, alteration, misuse, abuse, fire, flood, acts of God, improper installation, installation not in
accordance with electrical or plumbing codes, or use of consumables or cleaning products not approved by Amana.
5. Cosmetic damage, including scratches, dents, chips or other damage to the finish of your major appliance, unless such damage
results from defects in materials or workmanship and is reported to Amana within 30 days from the date of purchase.
6. Any food loss due to refrigerator or freezer product failures.
7. Costs associated with the removal from your home of your major appliance for repairs. This major appliance is designed to be
repaired in the home and only in-home service is covered by this warranty.
8. Repairs to parts or systems resulting from unauthorized modifications made to the appliance.
9. Expenses for travel and transportation for product service if your major appliance is located in a remote area where service by an
authorized Amana servicer is not available.
10. The removal and reinstallation of your major appliance if it is installed in an inaccessible location or is not installed in accordance
with published installation instructions.
11. Major appliances with original model/serial numbers that have been removed, altered or cannot be easily determined. This warranty
is void if the factory applied serial number has been altered or removed from your major appliance.
The cost of repair or replacement under these excluded circumstances shall be borne by the customer.
DISCLAIMER OF IMPLIED WARRANTIES; LIMITATION OF REMEDIES
CUSTOMER'S SOLE AND EXCLUSIVE REMEDY UNDER THIS LIMITED WARRANTY SHALL BE PRODUCT REPAIR AS PROVIDED
HEREIN. IMPLIED WARRANTIES, INCLUDING WARRANTIES OF MERCHANTABILITY OR FITNESS FOR A PARTICULAR PURPOSE,
ARE LIMITED TO ONE YEAR OR THE SHORTEST PERIOD ALLOWED BY LAW. AMANA SHALL NOT BE LIABLE FOR INCIDENTAL OR
CONSEQUENTIAL DAMAGES. SOME STATES AND PROVINCES DO NOT ALLOW THE EXCLUSION OR LIMITATION OF INCIDENTAL
OR CONSEQUENTIAL DAMAGES, OR LIMITATIONS ON THE DURATION OF IMPLIED WARRANTIES OF MERCHANTABILITY OR
FITNESS, SO THESE EXCLUSIONS OR LIMITATIONS MAY NOT APPLY TO YOU. THIS WARRANTY GIVES YOU SPECIFIC LEGAL
RIGHTS, AND YOU MAY ALSO HAVE OTHER RIGHTS WHICH VARY FROM STATE TO STATE OR PROVINCE TO PROVINCE.
If outside the 50 United States and Canada, contact your authorized Amana dealer to determine if another warranty applies.
If you need service, first see the “Troubleshooting” section of the Use & Care Guide. After checking “Troubleshooting,” you may find
additional help by checking the “Assistance or Service” section or by calling Amana. In the U.S.A., call 18008430304. In Canada, call
18008076777. 9/07
9
Page 10

INSTRUCTIONS D’UTILISATION DE LA LAVEUSE
Assistance ou service
Si vous avez besoin d'assistance ou de service, consultez
d'abord la section “Dépannage”. On peut obtenir de l'aide
supplémentaire en téléphonant au Centre d'assistance à la
clientèle de Maytag Services, LLC à 1-800-688-9900 de
n'importe où
www.amana.com/help
Au Canada, pour assistance, installation et
1-800-807-6777, ou consultez le
www.amanacanada.ca ou écrire à :
Dans votre correspondance, veuillez indiquer un numéro de téléphone où l'on peut vous joindre dans la journée.
aux É.-U., ou consultez le site Internet
où ou en écrivant à :
Maytag Services, LLC
ttn: CAIR
A
P.O. Box 2370
Cleveland, TN 37320-2370
Whirlpool Canada LP
Custom
Mississauga, Ontario L5N 3A7
er Interaction Centre
1901 Minnesota Court
®
Center
service, composez le
site Internet
Accessoires
Vous pouvez faciliter l’utilisation de votre laveuse avec ces accessoires de première qualité.
Pour la commande de divers artic
Canada, composez le 1-800-807-6777 ou consultez le site Internet www.amanacanada.ca.
les de qualité, composez le 1-800-901-2042 ou consultez le site www.amana.com/accessories. Au
Conservez ce manuel et votre reçu de vente ensemble pour
référence ultérieure. Pour le service sous garantie, vous
devez présenter un document prouvant la date d'achat ou
d'installation.
Inscrivez les renseignement
ménager pour vous aider à obtenir assistance ou service en cas
de besoin. Vous devrez connaître le numéro de modèle et le
numéro de série au complet. Vous pouvez trouver cette
information sur la plaque signalétique située sous le couvercle de
la laveuse.
Nom du marchand ______________________________________________
Numéro de série ________________________________________________
Adresse ________________________________________________________
Numéro de téléphone ___________________________________________
Numéro de modèle______________________________________________
Date d'achat____________________________________________________
s suivants au sujet de votre appareil
Produit numéro Accessoire Produit numéro Accessoire
8212656RP EPDM noir de 10 pi (3 m) (Lot de 2) 8212641RP EPDM noir de 5 pi (1,5 m) (Lot de 2)
8212638RP Tuyau d'arrivée d'eau compact d
m) en nylon tressé, coude à 90° et raccords
en acier hypro-blue. (Lot de 2)
8212487RP Tuyau d'arrivée d'eau de 5 pi
nylon tressé. (Lot de 2)
8212637RP EPDM noir de 6 pi (1,8 m) coude compact
de 90º, raccord acier hypro-blue. (Lot de 2)
8212545RP EPDM rouge et bleu de 5 pi (1,5 m).
(Lot de 2)
Les tuyaux d'arrivée d'eau ne sont pas inclus avec cette laveuse.
e 6 pi (1,8
(1,5 m) en
8212546RP EPDM noir de 4 pi (1,2 m) (Lot de 2)
8212526 Plateau d'égouttement de la laveuse,
convient à tous les modèles.
31682 Produit de nettoyage polyvalent pour
appareils ménagers
1903WH Casier de rangement de fournitures de
buanderie
10
Page 11

SÉCURITÉ DE LA LAVEUSE
Votre sécurité et celle des autres est très importante.
Nous donnons de nombreux messages de sécurité importants dans ce manuel et sur votre appareil ménager. Assurez-vous de
toujours lire tous les messages de sécurité et de vous y conformer.
Voici le symbole d’alerte de sécurité.
Ce symbole d’alerte de sécurité vous signale les dangers potentiels de décès et de blessures graves à vous
et à d’autres.
Tous les messages de sécurité suivront le symbole d’alerte de sécurité et le mot “DANGER” ou
“AVERTISSEMENT”. Ces mots signifient :
Risque possible de décès ou de blessure grave si vous ne
DANGER
AVERTISSEMENT
Tous les messages de sécurité vous diront quel est le danger potentiel et vous disent comment réduire le risque de blessure et
ce qui peut se produire en cas de non-respect des instructions.
IMPORTANTES INSTRUCTIONS DE SÉCURITÉ
AVERTISSEMENT : Pour réduire les risques d’incendie, de choc électrique ou de blessures lors de l’utilisation de la
laveuse, suivre les précautions fondamentales dont les suivantes :
suivez pas immédiatement les instructions.
Risque possible de décès ou de blessure grave si vous
ne suivez pas les instructions.
■
Lire toutes les instructions avant d’utiliser la laveuse.
■
Ne pas laver des articles qui ont été nettoyés ou
lavés avec de l’essence ou imbibés d’essence,
solvants de nettoyage à sec, ou autres substances
inflammables ou explosives; ces substances
peuvent émettre des vapeurs susceptibles de
s’enflammer ou d’exploser.
■
Ne pas ajouter d’essence, solvant de nettoyage à
sec ou autre produit inflammable ou explosif dans
l’eau de lavage. Ces substances peuvent émettre
des vapeurs susceptibles de s’enflammer ou
d’exploser.
■
Dans certaines conditions, de l’hydrogène gazeux
peut se former dans un circuit d’eau chaude qui n’a
pas été utilisé pendant 2 semaines ou plus. LE GAZ
HYDROGÈNE EST EXPLOSIBLE. Si le circuit d’eau
chaude n’a pas été utilisé pendant une telle période,
avant d’utiliser la laveuse, ouvrir tous les robinets
d’eau chaude et laisser l’eau s’écouler pendant
plusieurs minutes par chaque robinet. Ceci
permettra l’évacuation de l’hydrogène gazeux
accumulé. Comme ce gaz est inflammable, ne pas
fumer ou utiliser une flamme nue au cours de cette
période.
CONSERVEZ CES INSTRUCTIONS
■
Ne pas laisser des enfants jouer sur ou à l’intérieur de la
laveuse. Bien surveiller les enfants lorsque la laveuse est
utilisée à proximité d’enfants.
■
Avant de mettre la laveuse au rebut ou hors de service,
enlever la porte ou le couvercle.
■
Ne pas tenter d’atteindre un article à l’intérieur de la cuve de
la laveuse lorsque le tambour, la cuve ou l’agitateur est en
mouvement.
■
Ne pas installer ou remiser cette laveuse à un endroit où elle
serait exposée aux intempéries.
■
Ne pas modifier les organes de commande.
■
Ne pas réparer ou remplacer un composant quelconque de
la laveuse, ni entreprendre une opération de service, si ce
n’est spécifiquement recommandé dans ce manuel ou dans
un manuel d’instructions de réparations destiné à l’utilisateur;
il est alors essentiel que la personne concernée comprenne
ces instructions et soit compétente pour les exécuter.
■
Voir “Spécifications électriques” pour les instructions de
liaison à la terre.
11
Page 12

UTILISATION DE LA LAVEUSE
Mise en marche de la laveuse
AVERTISSEMENT
Risque d’incendie
Ne jamais mettre des articles humectés d’essence ou
d’autres fluides inflammables dans la laveuse.
Aucune laveuse ne peut complètement enlever l’huile.
Ne pas faire sécher des articles qui ont été salis par
tout genre d’huile (y compris les huiles de cuisson).
Le non-respect de ces instructions peut causer un
décès, une explosion ou un incendie.
1. Mesurer la quantité de détergent et le verser dans la laveuse.
Si désiré, ajouter un agent de blanchiment en poudre ou
liquide sans danger pour les couleurs.
cer une charge de linge trié sans la tasser dans la laveuse.
2. Pla
■ Répartir la charge uniformément pour maintenir l'équilibre
de la laveuse. Mélanger les gros et les petits articles. Les
articles doivent pouvoir se déplacer facilement dans l'eau
de lavage.
■ Charger uniquement jusqu'en haut du panier - voir
l'illustration. Une surcharge peut causer un nettoyage
médiocre.
AVERTISSEMENT
Risque de choc électrique
Brancher cet appareil sur une prise reliée à la terre.
Ne pas utiliser un câble de rallonge ni une barre
portative de prise de courant.
Le non-respect de ces instructions peut causer
un décès, un incendie ou un choc électrique.
Style 1 :
modèles)
■ Utiliser seulement de l'eau de Javel dans ce distributeur.
Avec distributeur d'eau de Javel (sur certains
Ne pas utiliser ce distributeur pour ajouter un agent de
blanchiment en poudre ou sans danger pour les couleurs
à votre charge de lavage. Verser la quantité mesurée
d'eau de Javel dans le distributeur d'eau de Javel. L'eau
de Javel est immédiatement introduite dans la laveuse et
elle est diluée automatiquement durant l'opération de
lavage du programme.
3. (FACULTATIF) Ajouter l'eau de Javel. REMARQUE : Su
vêtements et de l'eau de Javel pour une utilisation en toute
sécurité. L'eau de Javel non diluée endommagera tout tissu
avec lequel elle entre en contact. L'endommagement prend
la forme de déchirures, trous ou affadissement de la couleur
et il est possible qu'il n'apparaisse pas avant plusieurs autres
lavages. Pour éviter les renversements, utiliser une tasse
avec un bec verseur. Ne pas laisser l'eau de Javel
éclabousser, se renverser ou couler dans le panier de la
laveuse. Toujours mesurer l'eau de Javel. Ne pas utiliser une
quantité approximative. Ne pas utiliser plus que la quantité
recommandée par le fabricant pour une charge complète.
Utiliser moins d'eau de Javel avec une plus petite charge.
ivre les instructions du fabricant des
12
Style 2 : Sans distributeur d'eau de Javel (sur certains
modèles)
■ Laisser la laveuse se remplir et commencer l'agitation de
la charge.
■ Ajouter l’eau de Javel 5 minutes après le démarrage du
programme de lavage pour un meilleur nettoyage et pour
qu’elle soit vidangée lors du programme de rinçage.
Verser l’eau de Javel autour de l’agitateur, pas
directement sur la charge.
4. (F
ACULTATIF) Ajouter l'assouplissant liquide pour tissu.
REMARQUE : Ne
d'assouplissant de tissu sur les vêtements. Un assouplissant
de tissu non dilué peut causer des taches sur les tissus.
Toujours diluer l'assouplissant de tissu avec de l'eau tiède.
Une trop grande quantité d'assouplissant de tissu peut
rendre certains articles (couches et serviettes) non
absorbants. Le cas échéant, ne pas l'utiliser à chaque charge
ou en utiliser moins avec chaque charge.
pas renverser ou dégoutter
Page 13

Style 1 : Avec distributeur d'assouplissant liquide pour tissu
(sur certains modèles)
■ Utiliser seulement de l'assouplissant de tissu liquide dans
ce distributeur. Verser une quantité mesurée
d'assouplissant de tissu liquide dans le distributeur.
L'assouplissant est ajouté automatiquement durant
l'opération de rinçage du programme. Diluer
l'assouplissant de tissu liquide en remplissant le
distributeur d'eau tiède jusqu'à ce que le liquide atteigne
le repère à l'intérieur de l'anneau. Voir les flèches du
repère de remplissage maximum.
Style 2 : Sans distributeur d'assouplissant de tissu liquide
(sur certains modèles)
■ Ajouter l'assouplissant de tissu dilué avec 250 mL
(1 tasse) d'eau tiède au rinçage final seulement.
5. Ra
battre le couvercle de la laveuse. La laveuse n'effectuera
pas d'agitation ni d'essorage avec le couvercle ouvert.
6. Tourner le sélecteur LOAD SIZE (volume de la charge) ou WATER LEVEL (niveau d'eau) au bon réglage pour votre charge de lavage et le type de tissu à laver.
■ Vous pouvez changer votre sélection du volume de
charge ou de niveau d'eau après que la laveuse a
commencé à se remplir en tournant le bouton de
sélection à un réglage différent.
■ Sur les modèles à commande variable du volume de la
charge ou du niveau d'eau, vous devez tourner le bouton
à RESET (réinitialisation), puis au réglage désiré.
7. Sél
ectionner la température de lavage en fonction du type de
tissu et de la saleté à laver. Utiliser l'eau de lavage la plus
chaude sans danger pour le tissu. Suivre les instructions sur
l’étiquette des vêtements.
La Commande automatique de la température (CAT) (sur
certains modèles) détecte et maintient électroniquement une
température uniforme de l'eau en régulant l’entrée d'eau
chaude et d'eau froide.
■ Même au lavage à l'eau froide, de l'eau tiède coule dans
la laveuse afin de maintenir une température minimale.
L'option Care Control Temps (températures de la commande
de soin) (sur certains modèles) utilise la Commande
automatique de température (CAT) pour détecter et maintenir
électroniquement une température uniforme de l'eau en
régulant l’entrée d'eau chaude et d'eau froide. L'option Care
Control Temps (températures de la commande de soin)
fournit des températures de lavage supérieures pour les
programmes de service intense plus vigoureux et des
températures légèrement plus basses pour les programmes
d'articles délicats et à laver à la main, pour apporter un
meilleur soin au tissu.
Guide de température
Température de
lavage
Hot (chaude)
Commande de soin
Warm (tiède)
Commande de soin
Tissus suggérés
Blancs et couleurs claires
Vêtements durables
Saleté intense
Couleurs vives
Saletés modérées à légères
Température de
Tissus suggérés
lavage
Cool (fraîche) Couleurs qui déteignent ou s'atténuent
Saletés légères
Cold (froide) Couleurs foncées qui détei
gnent ou
s'atténuent
Saletés légères
REMARQUE : Dans
les températures d'eau de lavage
inférieures à 60ºF (15,6ºC), les détergents ne se dissolvent
pas bien. Les saletés peuvent être difficiles à enlever.
Certains tissus peuvent retenir les faux plis et comporter un
boulochage accru (formation de petites boules de charpie sur
la surface des vêtements).
8. V
ous pouvez personnaliser votre lavage en ajoutant des
options de rinçage à vos sélections de programme. Ce
bouton dispose de réglages pour :
■ Extra Rinse (rinçage supplémentaire) - La sélection de
cette option fournit un second rinçage. Un rinçage
supplémentaire peut être ajouté à tout programme de
lavage.
■ Cycle Signal (signal de programme) - Un signal sonore
sera émis à la fin du programme. Le volume du signal
sonore ne peut être ajusté.
■ Extra Rinse & Cycle Signal (rinçage supplémentaire et
signal de programme) - Cette option combine à la fois le
rinçage supplémentaire et le signal de programme à la fin
du programme de lavage.
9. Fabric Select
(choix de tissu) (sur certains modèles). Chaque
réglage de tissu est conçu pour différents types de tissu et
niveaux de saleté.
Ce dispositif consiste en
un ensemble de commandes
intégrées qui se combinent pour fournir des température de
lavage, durées d'agitation, et vitesses d'agitation/d'essorage
optimales, sur la base du réglage Fabric Select (sélection de
tissu). Les commandes fournissent des températures de
lavage supérieures pour les programmes de service intense
plus agressifs et des températures légèrement plus basses
pour les programmes d'articles délicats et à laver à la main,
pour apporter un meilleur soin au tissu. Le bouton de
commande de la minuterie vous permet de réduire la durée
d'agitation pour les charges peu sales ou de l'augmenter
pour les charges très sales.
10. Appuyer sur le bouton de comman
de de la minuterie et le
tourner dans le sens horaire au programme de lavage désiré.
Réduire le temps de lavage lors de l'utilisation d'un réglage
de niveau d'eau bas. Tirer sur le bouton de commande de la
minuterie pour mettre la laveuse en marche.
Arrêt ou remise en marche de la laveuse :
■ Pour arrêter la laveuse à tout moment, appuyer sur le
bouton de commande de la minuterie.
■ Pour remettre la laveuse en marche, rabattre le couvercle
(si ouvert) et tirer sur le bouton de commande de la
minuterie.
13
Page 14

ENTRETIEN DE LA LAVEUSE
Nettoyage de votre laveuse
Utiliser un linge doux humide ou une éponge pour essuyer les renversements de détergents ou d'eau de Javel à l'extérieur de votre laveuse.
Nettoyer l'intérieur de votre laveuse en mélangeant 1 tasse
(250 mL) d'eau de Javel et 2 tasses (500 mL) de détergent. Verser
ci dans votre laveuse et lui faire faire un programme complet à
ce
l'eau chaude. Répéter ce processus au besoin.
Enlever tous les résidus de calcair
nettoyants sans danger pour la laveuse.
Nettoyage du distributeur d'assouplissant de tissu liquide
r certains modèles) :
(su
1. R
etirer le distributeur en prenant le dessus à deux mains et en
le pressant, tout en poussant vers le haut avec les pouces.
2. Rincer le distributeur sous l'eau tiède, puis le remettre en
place.
REMARQUE :
d'assouplissant liquide pour tissu, ne pas laver de vêtements
lorsque ce distributeur est retiré, afin d'éviter d'endommager la
laveuse ou le linge. Ne pas non plus ajouter de détergent ou
d'eau de Javel dans ce distributeur; il est destiné à
l'assouplissant liquide pour tissu seulement.
Si votre modèle dispose d'un distributeur
Tuyaux d'arrivée d'eau
Aucun tuyau d'arrivée d'eau n'est fourni avec cette laveuse.
Whirlpool recommande l'utilisation de pièces spécifiées par
l'usine. Une liste des tuyaux FSP disponibles à l'achat est
présentée à la première page de ces instructions pour
l'utilisateur. Ces tuyaux FSP sont fabriqués et testés afin de
répondre aux spécifications de Whirlpool Corporation.
Remplacer les tuyaux d'arrivée d'eau après 5 ans d'utilisation
afin de réduire le risque de défaillance des tuyaux. Inspecter
périodiquement les tuyaux; les remplacer en cas de renflement,
de déformation, de coupure et d'usure ou si une fuite se
manifeste.
Lorsque vous remplacez vos tuyaux d
de remplacement au marqueur indélébile sur l'étiquette.
e en utilisant seulement des
'arrivée d'eau, noter la date
Remise en marche de la laveuse
idanger les canalisations d'eau et les tuyaux. Reconnecter
1. V
les tuyaux d'arrivée d'eau. Ouvrir les deux robinets d'eau.
AVERTISSEMENT
Risque de choc électrique
Brancher sur une prise à 3 alvéoles reliée à la terre.
Ne pas enlever la broche de liaison à la terre.
Ne pas utiliser un adaptateur.
Ne pas utiliser un câble de rallonge.
Le non-respect de ces instructions peut causer
un décès, un incendie ou un choc électrique.
2. Brancher la laveuse ou reconnecter la source de courant
électrique.
re faire un programme complet à la laveuse avec 1 tasse
3. Fai
(250 mL) de détergent pour enlever les r
Entretien en cas d’entreposage, de non-utilisation ou en période de vacances
On ne doit faire fonctionner la laveuse que lorsqu'on est présent. Si l'utilisateur doit partir en vacances ou n'utilise pas la laveuse pendant une période prolongée, il convient d'exécuter les opérations suivantes :
1. Débrancher la laveuse ou déconnecter la source de courant
électrique.
2. Fermer l'alimentation
les inondations (dues à une augmentation de la pression)
quand vous êtes absent.
d'eau de la laveuse. Ceci aide à éviter
estes d'antigel.
Préparation avant un entreposage ou un
déménagement
L'eau qui peut rester dans les tuyaux risque d’abîmer votre laveuse en temps de gel. Si vous rangez ou déplacez votre laveuse quand il gèle, préparez-la pour l'hiver.
Préparation de votre laveuse pour l'hiver
1. Fermer les deux robinets d'eau. Débrancher et vidanger les
tuyaux d'arrivée d'eau. Mettre 1 pinte (1 L) d'antigel pour
cule récréatif dans le panier.
véhi
2. Fair
3. D
14
e tourner la laveuse au réglage vidange et essorage
pendant 30 secondes environ pour mélanger l'antigel à l'eau.
ébrancher la laveuse ou déconnecter la source de courant
électrique.
Page 15

DÉPANNAGE
Essayer d’abord les solutions suggérées ici ou visiter notre site Web et consulter notre FAQ (Foire aux questions), pour
éventuellement éviter le coût d'un appel de service...
Aux É.-U. www.amana.com/help - Au Canada
La laveuse et ses composants
Bruit
■ La charge est-elle équilibrée et la laveuse d'aplomb? La
charge de lavage devrait être équilibrée et pas surchargée. La
laveuse doit être d'aplomb. Les pieds avant devraient être
correctement installés et les écrous serrés. Régler les pieds
de nivellement arrière (au besoin). Voir les instructions
d'installation.
■ Avez-vous retiré complètement la sangle jaune
d'expédition avec les goupilles fendues? Voir les
instructions d'installation.
■ Les mécanismes s'enclenchent-ils après la vidange et
avant l'essorage, ou la partie supérieure de l'agitateur
fait-elle du bruit pendant le lavage? Ce sont des bruits
normaux pour la laveuse.
Fuites
■ Vérifier ce qui suit :
Les tuyaux de remplissage sont-ils
Les rondelles de tuyaux de r
correctement installées?
La bride de fixation du tuyau de vidange est-elle
correctement installée? Voir les instructions d'installation.
■ L'évier ou le conduit d'évacuation est-il obstrué? L'évier et
le tuyau de rejet à l'égout doivent pouvoir drainer 17 gal.
(64 L) d'eau par minute.
■ De l'eau est-elle déviée de l'anneau de la cuve ou de la
charge? Centrer la cuve avant de mettre la laveuse en
marche. La charge de lavage devrait être équilibrée et pas
surchargée. De l'eau de rinçage ou de remplissage peut
dévier de la charge. La laveuse doit être d'aplomb. Les pieds
avant devraient être correctement installés et les écrous
serrés. Régler les pieds de nivellement arrière (au besoin).
Voir les instructions d'installation.
■ Vérifier la plomberie du domicile pour voir s'il y a des
fuites.
Panier décentré
■ Le panier de la laveuse a-t-il été tiré en avant lors du
chargement? Pousser le panier au centre avant de
commencer le lavage.
■ La charge est-elle équilibrée et la laveuse d'aplomb? La
charge de lavage devrait être équilibrée et pas surchargée. La
laveuse doit être d'aplomb. Les pieds avant devraient être
correctement installés et les écrous serrés. Régler les pieds
de nivellement arrière (au besoin). Voir les instructions
d'installation.
■ Le panier de la laveuse se déplace pendant le lavage. Ceci
est normal.
bien serrés?
emplissage d'eau sont-elles
www.amanacanada.ca
Fonctionnement de l'agitateur
■ Le sommet de l'agitateur est lâche, ou se déplace dans
une seule direction. Ceci est normal.
Distributeurs obstrués ou fuite d'eau de Javel
■ Avez-vous suivi les directives du fabricant pour l'addition
de détergent et d'assouplissant dans les distributeurs
(sur certains modèles)? Mesurer le détergent et
l'assouplissant. Verser lentement dans les distributeurs.
Essuyer tout renversement. Diluer l'assouplissant dans le
distributeur d'assouplissant.
■ Avez-vous mis de la Javel en poudre ou sans danger pour
les couleurs dans le distributeur d'agent de blanchiment
au chlore liquide (sur certains modèles)? Ajouter de la
Javel en poudre ou liquide sans danger pour les couleurs
directement dans le panier. Ne pas utiliser le distributeur
d'agent de blanchiment au chlore pour la Javel sans danger
pour les couleurs.
Fonctionnement de la laveuse
La laveuse ne fonctionne pas, ne se remplit pas, ne rince pas, l’agitateur ne tourne pas; la laveuse s’arrête
AVERTISSEMENT
Risque de choc électrique
Brancher sur une prise à 3 alvéoles reliée à la terre.
Ne pas enlever la broche de liaison à la terre.
Ne pas utiliser un adaptateur.
Ne pas utiliser un câble de rallonge.
Le non-respect de ces instructions peut causer
un décès, un incendie ou un choc électrique.
■ Le cordon d’alimentation est-il branché dans une prise à
3 alvéoles reliée à la terre? B
d’alimentation dans une prise à 3 alvéoles reliée à la terre.
■ Utilisez-vous un câble de rallonge? Ne pas utiliser un câble
de rallonge.
■ L’indicateur sur le bouton de commande de la minuterie
est-il correctement aligné avec un programme? Tou rn er le
bouton de commande de la minuterie légèrement vers la
droite et le tirer pour mettre en marche.
rancher le cordon
15
Page 16

■ Les tamis de la valve d’arrivée d’eau sont-ils obstrués?
Couper l’arrivée d’eau et retirer les tuyaux d’arrivée d’eau de
la laveuse. Ôter toute pellicule ou particule accumulée.
Réinstaller les tuyaux, ouvrir l’arrivée d’eau et vérifier s’il y a
des fuites.
■ Les deux robinets d’eau (chaude et froide) sont-ils
ouverts? Ouvrir les robinets d’eau.
■ Le tuyau d’arrivée d’eau est-il déformé? Redresser les
tuyaux.
■ Le niveau d’eau semble-t-il trop bas, ou la laveuse ne se
remplit-elle pas complètement? Le sommet de l’agitateur
est beaucoup plus haut que le niveau d’eau le plus élevé.
Ceci est normal et nécessaire au libre mouvement des
vêtements.
■ Un fusible est-il grillé ou le disjoncteur s’est-il déclenché?
Remplacer le fusible ou réenclencher le disjoncteur. Si le
problème persiste, appeler un électricien.
■ La laveuse est-elle en pause normale du programme? La
laveuse fait une pause d'environ 2
minutes durant certains
programmes. Laisser le programme se poursuivre. Certains
programmes comprennent des périodes d'agitation et de
trempage.
■ La laveuse est-elle surchargée? Laver des charges plus
petites.
■ Le couvercle est-il ouvert? Le couvercle doit être fermé
lorsque la laveuse est en marche. La laveuse n'effectuera pas
d'agitation ni d'essorage avec le couvercle ouvert.
Absence de vidange ou d'essorage de la laveuse
■ Le tuyau de vidange est-il obstrué, ou l'extrémité du
tuyau de vidange se trouve-t-elle à plus de 96" (244
au-dessus du plancher? Voir les instructions d'installation
pour une installation correcte du tuyau de vidange.
■ Le couvercle est-il ouvert? Le couvercle doit être fermé
lorsque la laveuse est en marche. La laveuse n'effectuera pas
d'agitation ni d'essorage avec le couvercle ouvert.
■ Y a-t-il un excès de mousse? Toujours mesurer le
détergent. Suivre les directives du fabricant. Si vous avez de
l'eau très douce, il faudra peut-être utiliser moins de
détergent.
cm)
Résultats de lavage
Charge trop mouillée
■ Avez-vous utilisé le bon programme pour la charge à
laver? Choisir un programme avec une vitesse d'essorage
plus élevée (si disponible).
■ Avez-vous utilisé un rinçage à froid? Les charges sont plus
humides après un rinçage à froid qu'après un rinçage à
chaud. Ceci est normal.
Résidus ou charpie sur le linge
■ Avez-vous effectué le tri correctement? Séparer les
articles causant la charpie (serviettes, chenille) des articles
qui retiennent la charpie (velours côtelé, synthétiques). Trier
également en fonction des couleurs.
■ Avez-vous surchargé la laveuse? La charge de lavage doit
être équilibrée et pas surchargée. Les charges doivent
pouvoir culbuter librement. De la charpie peut être coincée
dans la charge s'il y a surcharge. Laver des charges plus
petites.
■ Avez-vous sélectionné le bon niveau d'eau? Le niveau
d'eau devrait être adapté à la taille de la charge. Les
vêtements devraient pouvoir culbuter librement dans l'eau.
■ Avez-vous utilisé suffisamment de détergent? Suivre les
directives du fabricant. Utiliser suffisamment de détergent
pour maintenir la charpie dans l'eau.
■ Avez-vous fait sécher vos vêtements sur une corde à
linge? Si c'est le cas, attendez-vous à trouver de la charpie
sur les vêtements.
■ Vérifier ce qui suit :
A-t-on laissé du papier ou des mouchoirs en papier dans les
poches?
Votre eau est-elle plus froide que 60°F (15,6°C)? Une eau de
lavage plus froide que 60°F (15,6°C) peut ne pas dissoudre
complètement le détergent.
Avez-vous utilisé la bonne durée de programme pour la
charge? La réduction de la durée de lavage est un autre
moyen de réduire la charpie.
La laveuse continue de se remplir ou la vidange se poursuit, le programme semble bloqué
■ Le dessus du tuyau de vidange est-il plus bas que le
niveau de l'eau dans la laveuse? Le dessus du tuyau doit
être plus haut que le niveau de l'eau dans la laveuse pour un
bon fonctionnement. Voir les instructions d'installation.
■ Le tuyau de vidange est-il trop serré dans le tuyau de
rejet à l'égout, ou est-il fixé au tuyau de rejet à l'égout
avec du ruban adhésif? Le tuyau de vidange devrait être
lâche mais bien fixé. Ne pas sceller le tuyau de vidange avec
du ruban adhésif. Le tuyau a besoin d'une ouverture pour
l’air. Voir les instructions d'installation.
La température de lavage/rinçage n'est pas celle qui a été sélectionnée
■ Les robinets d'arrivée d'eau chaude et froide ont-ils été
inversés? Voir les instructions d'installation pour plus de
renseignements. Lorsque votre fréquence de charges lavées
augmente, la température de l'eau peut baisser lorsqu'on
choisit une température chaude ou tiède. Ceci est normal.
16
Présence de taches sur le linge
■ Avez-vous suivi les directives du fabricant pour l'addition
de détergent et d'assouplissant? Mesurer le détergent et
l'assouplissant. Utiliser suffisamment de détergent pour
enlever la saleté et la maintenir en suspension. Diluer
l'assouplissant et l'ajouter à la section rinçage d'un
programme seulement. Ne pas laisser couler d'assouplissant
sur les vêtements.
■ La présence de fer (rouille) dans l'eau est-elle supérieure
à la moyenne? Vous aurez peut-être besoin d'installer un
filtre à fer.
■ Avez-vous bien trié la charge? Séparer les articles de teinte
foncée des articles blancs ou clairs.
■ Avez-vous déchargé la laveuse immédiatement? Pour
éviter le transfert de teinture, décharger la laveuse dès qu'elle
s'arrête.
Page 17

Linge froissé
Blanc grisâtre, couleurs défraîchies
■ Avez-vous déchargé la laveuse immédiatement?
Décharger la laveuse dès qu'elle s'arrête.
■ Avez-vous utilisé le bon programme pour la charge à
laver? Utiliser le programme Casual (tout-aller) ou Permanent
Press (pressage permanent) ou un autre programme avec
une vitesse d'essorage basse (si disponible) pour réduire le
froissement.
■ Avez-vous surchargé la laveuse? La charge de lavage doit
être équilibrée et pas surchargée. Les charges doivent
pouvoir culbuter librement durant le lavage.
Pour réduire les faux plis des vêtements à pressage
permanent et de certains tricots synthétiques, utiliser une
taille de charge importante pour avoir plus d'espace.
■ Les robinets d'eau chaude et froide ont-ils été inversés?
Vérifier que les tuyaux d'eau chaude et d'eau froide sont
connectés aux bons robinets. Voir les instructions
d'installation.
Le linge est enchevêtré ou entortillé
■ Avez-vous surchargé la laveuse? La charge de lavage doit
être équilibrée et pas surchargée. Les charges doivent
pouvoir culbuter librement durant le lavage.
■ Avez-vous placé des articles autour de l'agitateur?
Déposer les articles dans la laveuse sans les comprimer. Ne
pas enrouler des articles autour de l'agitateur.
■ Avez-vous bien trié la charge? Le transfert de teinture peut
se produire lors du mélange d'articles blancs et de couleur
dans une même charge. Séparer les articles de teinte foncée
des articles blancs ou clairs.
■ La température de lavage était-elle trop basse? Utiliser les
lavages à l'eau tiède ou chaude, si sans danger pour la
charge. S'assurer que votre système d'eau chaude permet
d'effectuer un lavage à l'eau chaude.
■ Avez-vous utilisé suffisamment de détergent, ou avez-
vous une eau dure? Utiliser plus de détergent pour laver la
saleté intense à l'eau froide ou dure.
■ Les robinets d'eau chaude et froide ont-ils été inversés?
Vérifier que les tuyaux d'eau chaude et d'eau froide sont
connectés aux bons robinets. Voir les instructions
d'installation.
Endommagement des vêtements
■ Vérifier ce qui suit :
Les articles pointus ont-ils été retirés des poches avant le
lavage? Vider les poches, fermer les fermetures à glissière,
les boutons pression et les agrafes avant le lavage.
Les cordons et les ceintures ont-ils été attachés pour
empêcher l'emmêlement?
Les articles étaient-ils endommagés avant le lavage?
Raccommoder les déchirures et repriser les fils cassés des
coutures avant le lavage.
■ Avez-vous surchargé la laveuse? La charge de lavage doit
être équilibrée et pas surchargée. Les charges doivent
pouvoir culbuter librement durant le lavage.
■ Avez-vous correctement ajouté l'eau de Javel? Ne pas
verser l'eau de Javel directement sur le linge. Essuyer tous
les renversements de Javel. De l'eau de Javel non diluée
endommagera les tissus. Ne pas placer des articles de la
charge sur le dessus du distributeur d’eau de Javel lorsque
vous chargez et déchargez la laveuse (sur certains modèles).
■ Avez-vous suivi les instructions d'entretien du fabricant
indiquées sur l'étiquette?
17
Page 18

Notes
18
Page 19

GARANTIE DES GROS APPAREILS MÉNAGERS AMANA
GARANTIE LIMITÉE
Pendant un an à compter de la date d'achat, lorsque ce gros appareil ménager est utilisé et entretenu conformément aux instructions
jointes à ou fournies avec le produit, la marque Amana de Whirlpool Corporation ou Whirlpool Canada LP (ci-après désignées “Amana”)
paiera pour les pièces spécifiées par l'usine et la main-d'oeuvre pour corriger les vices de matériaux ou de fabrication. Le service doit
être fourni par une compagnie de service désignée par Amana. Cette garantie limitée est valide uniquement aux États-Unis ou au
Canada et s’applique exclusivement lorsque l’appareil est utilisé dans le pays où il a été acheté. À l'extérieur du Canada et des 50 États
des États-Unis, cette garantie limitée ne s'applique pas. Une preuve de la date d’achat original est exigée pour obtenir un service dans
le cadre de la présente garantie limitée.
ARTICLES EXCLUS DE LA GARANTIE
La présente garantie limitée ne couvre pas :
1. Les visites de service pour rectifier l'installation du gros appareil ménager, montrer à l'utilisateur comment utiliser l'appareil,
remplacer ou réparer des fusibles ou rectifier le câblage ou la plomberie du domicile.
2. Les visites de service pour réparer ou remplacer les ampoules électriques de l'appareil, les filtres à air ou les filtres à eau. Les pièces
consomptibles ne sont pas couvertes par la garantie.
3. Les réparations lorsque le gros appareil ménager est utilisé à des fins autres que l'usage unifamilial normal ou lorsque les
instructions d’installation et/ou les instructions de l’opérateur ou de l’utilisateur fournies ne sont pas respectées.
4. Les dommages imputables à : accident, modification, usage impropre ou abusif, incendie, inondation, actes de Dieu, installation
fautive ou installation non conforme aux codes d'électricité ou de plomberie, ou l'utilisation de pièces consomptibles ou de produits
nettoyants non approuvés par Amana.
5. Les défauts apparents, notamment les éraflures, les bosses, fissures ou tout autre dommage au fini du gros appareil ménager, à
moins que ces dommages soient dus à des vices de matériaux ou de fabrication et soient signalés à Amana dans les 30 jours
suivant la date d’achat.
6. Toute perte d'aliments due à une défaillance du réfrigérateur ou du congélateur.
7. Les coûts associés au transport du gros appareil ménager du domicile pour réparation. Ce gros appareil ménager est conçu pour
être réparé à domicile et seul le service à domicile est couvert par la présente garantie.
8. Les réparations aux pièces ou systèmes résultant d'une modification non autorisée faite à l'appareil.
9. Les frais de transport pour le service d'un produit si votre gros appareil est situé dans une région éloignée où un service d’entretien
Amana autorisé n’est pas disponible.
10. La dépose et la réinstallation de votre gros appareil si celui-ci est installé dans un endroit inaccessible ou n'est pas installé
conformément aux instructions d'installation fournies.
11. Les gros appareils ménagers dont les numéros de série et de modèle originaux ont été enlevés, modifiés ou qui ne peuvent pas être
facilement identifiés. La présente garantie est nulle si le numéro de série d’usine a été modifié ou enlevé du gros appareil ménager.
Le coût d’une réparation ou des pièces de rechange dans le cadre de ces circonstances exclues est à la charge du client.
®
CLAUSE D'EXONÉRATION DE RESPONSABILITÉ AU TITRE DES GARANTIES IMPLICITES; LIMITATION DES RECOURS
LE SEUL ET EXCLUSIF RECOURS DU CLIENT DANS LE CADRE DE LA PRÉSENTE GARANTIE LIMITÉE CONSISTE EN LA
RÉPARATION PRÉVUE CI-DESSUS. LES GARANTIES IMPLICITES, Y COMPRIS LES GARANTIES APPLICABLES DE QUALITÉ
MARCHANDE ET D'APTITUDE À UN USAGE PARTICULIER, SONT LIMITÉES À UN AN OU À LA PLUS COURTE PÉRIODE
AUTORISÉE PAR LA LOI. AMANA N'ASSUME AUCUNE RESPONSABILITÉ POUR LES DOMMAGES FORTUITS OU INDIRECTS.
CERTAINES JURIDICTIONS NE PERMETTENT PAS L'EXCLUSION OU LA LIMITATION DES DOMMAGES FORTUITS OU INDIRECTS,
OU LES LIMITATIONS DE LA DURÉE DES GARANTIES IMPLICITES DE QUALITÉ MARCHANDE OU D'APTITUDE À UN USAGE
PARTICULIER, DE SORTE QUE CES EXCLUSIONS OU LIMITATIONS PEUVENT NE PAS S'APPLIQUER DANS VOTRE CAS. CETTE
GARANTIE VOUS CONFÈRE DES DROITS JURIDIQUES SPÉCIFIQUES ET VOUS POUVEZ ÉGALEMENT JOUIR D'AUTRES DROITS
QUI PEUVENT VARIER D'UNE JURIDICTION À UNE AUTRE.
Si vous résidez à l'extérieur du Canada et des 50 États des États-Unis, contactez votre marchand Amana autorisé pour déterminer si une autre garantie s'applique.
Si vous avez besoin de service, voir d'abord la section “Dépannage” du Guide d'utilisation et d'entretien. Après avoir vérifié la section
“Dépannage”, de l'aide supplémentaire peut être trouvée en vérifiant la section “Assistance ou service” ou en appelant Amana. Aux
É.U., composer le 18008430304. Au Canada, composer le 18008076777. 1/08
19
Page 20

A
W10192179A
SP PN W10192180A
© 2008
ll rights reserved.
Todos los derechos reservados.
Tous droits réservés.
®
Registered Trademark/™Trademark of Maytag Corporation or its related companies.
®
Marque déposée/™Marque de commerce de Maytag Corporation ou de ses compagnies affiliées.
Used under license by Maytag Limited in Canada
Emploi sous licence par Maytag Limited au Canada.
Printed in U.S.A.
Impreso en EE.UU.
Imprimé aux É.-U.
5/08
 Loading...