

Amana YNED5800DW0, YNED5700BW0, NGD5800DW0, NGD5700BW0, NED5800DW0 Owner’s Manual
...
__TflGn_ _
Use & Care Guide
Guide d'utilisation et d_entretien
ELECTRONICDRYER
SI_CHEUSEi_LECTRONIQUE
o0 °
W10562495A
WlO572490A - SP
Para obtener acceso
al Manual de uso y
cuidado en espaSol, o para
obtener iPformaci6n adicional
acerca de su producto, visite:
www.amana.com.
Ifyou have any problems or questions, visit us at www.amana.com
Pour tout probleme ou question, consulter www.amana.com
TABLE OF CONTENTS
DRYER SAFETY ....................................................................... 2
ACCESSORIES ........................................................................ 4
CHECK YOUR VENT SYSTEM FOR GOOD AIRFLOW ............ 5
CONTROL PANEL AND FEATURES ......................................... 6
CYCLE GUIDE .......................................................................... 7
USING YOUR DRYER .............................................................. 8
CYCLE STATUS iNDiCATORS ................................................ 10
ADDiTiONAL FEATURES ....................................................... 10
DRYER CARE ......................................................................... 11
TROUBLESHOOTING ............................................................ 13
WARRANTY ............................................................................ 16
ASSISTANCE OR SERVICE ..................................... Back Cover
TABLE DE MATIERES
S¢:CURIT¢: DE LA S¢:CHEUSE ............................................... 17
ACCESSOIRES ...................................................................... 19
VC:RIFICATION D'UNE CiRCULATiON D'AIR ADFtQUATE
POUR LE SYST#ME D'FtVACUATION .................................... 20
TABLEAU DE COMMANDE ET CARACTERISTIQUES .......... 21
GUIDE DES PROGRAMMES .................................................. 22
UTILISATION DE LA S¢:CHEUSE ........................................... 23
TC:MOINS LUMINEUX DE PROGRAMME .............................. 25
CARACTFtRISTIQUES SUPPLC:MENTAIRES .......................... 26
ENTRETIEN DE LA S¢:CHEUSE ............................................. 27
DEPANNAGE .......................................................................... 29
GARANTI E.............................................................................. 35
ASSISTANCE OU SERVICE ........................... Couverture arriere
DRYER SAFETY
Your safety and the safety of others are very important.
We have provided many important safety messages in this manual and on your appliance. Always read and obey all safety
messages.
This is the safety alert symbol.
This symbol alerts you to potential hazards that can kill or hurt you and others.
All safety messages will follow the safety alert symbol and either the word "DANGER" or "WARNING."
These words mean:
You can be killed or seriously injured if you don't immediately
®
All safety messages will tell you what the potential hazard is, tell you how to reduce the chance of injury, and tell you what can
happen if the instructionsare not followed.
follow instructions,
You can be killed or seriously injured if you don't follow
instructions.
- "Risk of Fire"
- Clothes dryer installation must be performed by a qualified installer.
- Install the clothes dryer according to the manufacturer's instructions and local codes.
- Do not install a clothes dryer with flexible plastic venting materials or flexible metal
(foil type) duct. If flexible metal duct is installed, it must be of a specific type identified
by the appliance manufacturer as suitable for use with clothes dryers. Flexible venting
materials are known to cofiapse, be easily crushed, and trap lint. These conditions will
obstruct clothes dryer airflow and increase the risk of fire.
- To reduce the risk of severe injury or death, follow all installation instructions.
- Save these instructions.
2
State of California Proposition 65 Warnings:
WARNING: This product contains one or more chemicals known to the State of California to cause cancer.
WARNING: This product contains one or more chemicals known to the State of California to cause birth defects or other
reproductive harm.
In the State of Massachusetts, the following installation instructions apply:
[] Installations and repairs must be performed by a qualified or licensed contractor, plumber, or gasfitter qualified or licensed by
the State of Massachusetts.
[] If using a ball valve, it shall be a T-handle type.
[] A flexible gas connector, when used, must not exceed 3 feet.
WARNING: For your safety, the information in this manual must be followed to minimize
the risk of fire or explosion, or to prevent property damage, personal injury, or death.
- Do not store or use gasoline or other flammable vapors and liquids in the vicinity of this
or any other appliance.
- WHAT TO DO IF YOU SMELL GAS:
• Do not try to light any appliance.
• Do not touch any electrical switch; do not use any phone in your building.
e Clear the room, building, or area of all occupants.
• Immediately call your gas supplier from a neighbor's phone. Follow the gas supplier's
instructions.
® If you cannot reach your gas supplier, call the fire department.
- installation and service must be performed by a qualified installer, service agency, or
the gas supplier.
WARNING: Gas leaks cannot always be detected by smell.
Gas suppliers recommend that you use a gas detector approved by UL or CSA.
For more information, contact your gas supplier.
If a gas leak is detected, follow the "What to do if you smell gas" instructions.
iMPORTANT: The gas installation must conform with local codes, or in the absence of local codes, with the National Fuel Gas
Code, ANSI Z223.1iNFPA 54.
The dryer must be electrically grounded in accordance with local codes, or in the absence of local codes, with the National
Electrical Code, ANSl/NFPA 70.
iMPORTANT: When discarding or storing your old clothes dryer, remove the door.
I
iMPORTANTSAFETYiNSTRUCTIONS
WARNING: To reduce the risk of fire, electric shock, or injury to persons when using the dryer, follow basic precautions,
including the following:
[] Read all instructions before using the dryer.
[] Do not place items exposed to cooking oils in your dryer.
kems contaminated with cooking oils may contribute to
a chemical reaction that could cause a load to catch fire.
[] Do not dry articles that have been previously cleaned in,
washed in, soaked in, or spotted with gasoline, dry-
cleaning solvents, or other flammable or explosive
substances as they give off vapors that could ignite or
explode.
[] Do not allow children to play on or in the dryer. Close
supervision of children is necessary when the dryer is
used near children.
[] Before the dryer is removed from service or discarded,
remove the door to the drying compartment.
[] Do not reach into the dryer if the drum is moving.
[] Do not install or store the dryer where it will be exposed
to the weather.
[] Do not tamper with controls.
SAVE THESE iNSTRUCTIONS
[] Do not repair or replace any part of the dryer or attempt
any servicing unless specifically recommended in this
Use and Care Guide or in published user-repair
instructions that you understand and have the skills to
carry out.
[] Do not use fabric softeners or products to eliminate static
unless recommended by the manufacturer of the fabric
softener or product.
[] Do not use heat to dry articles containing foam rubber or
similarly textured rubber-like materials.
[] Clean lint screen before or after each load.
[] Keep area around the exhaust opening and adjacent
surrounding areas free from the accumulation of lint, dust,
and dirt.
[] The interior of the dryer and exhaust vent should be
cleaned periodically by qualified service personnel.
[] See "Electrical Requirements" located in the installation
instructions for grounding instructions.
ACCESSORIES
Enhance your new washer and dryer with the following
genuine Whirlpool accessories. For more information
on options and ordering, call 1-886-616-2664, or visit us
at: www.amana.com/help. In Canada, call
1-866-587-2002 or visit us at www.amana.com/help
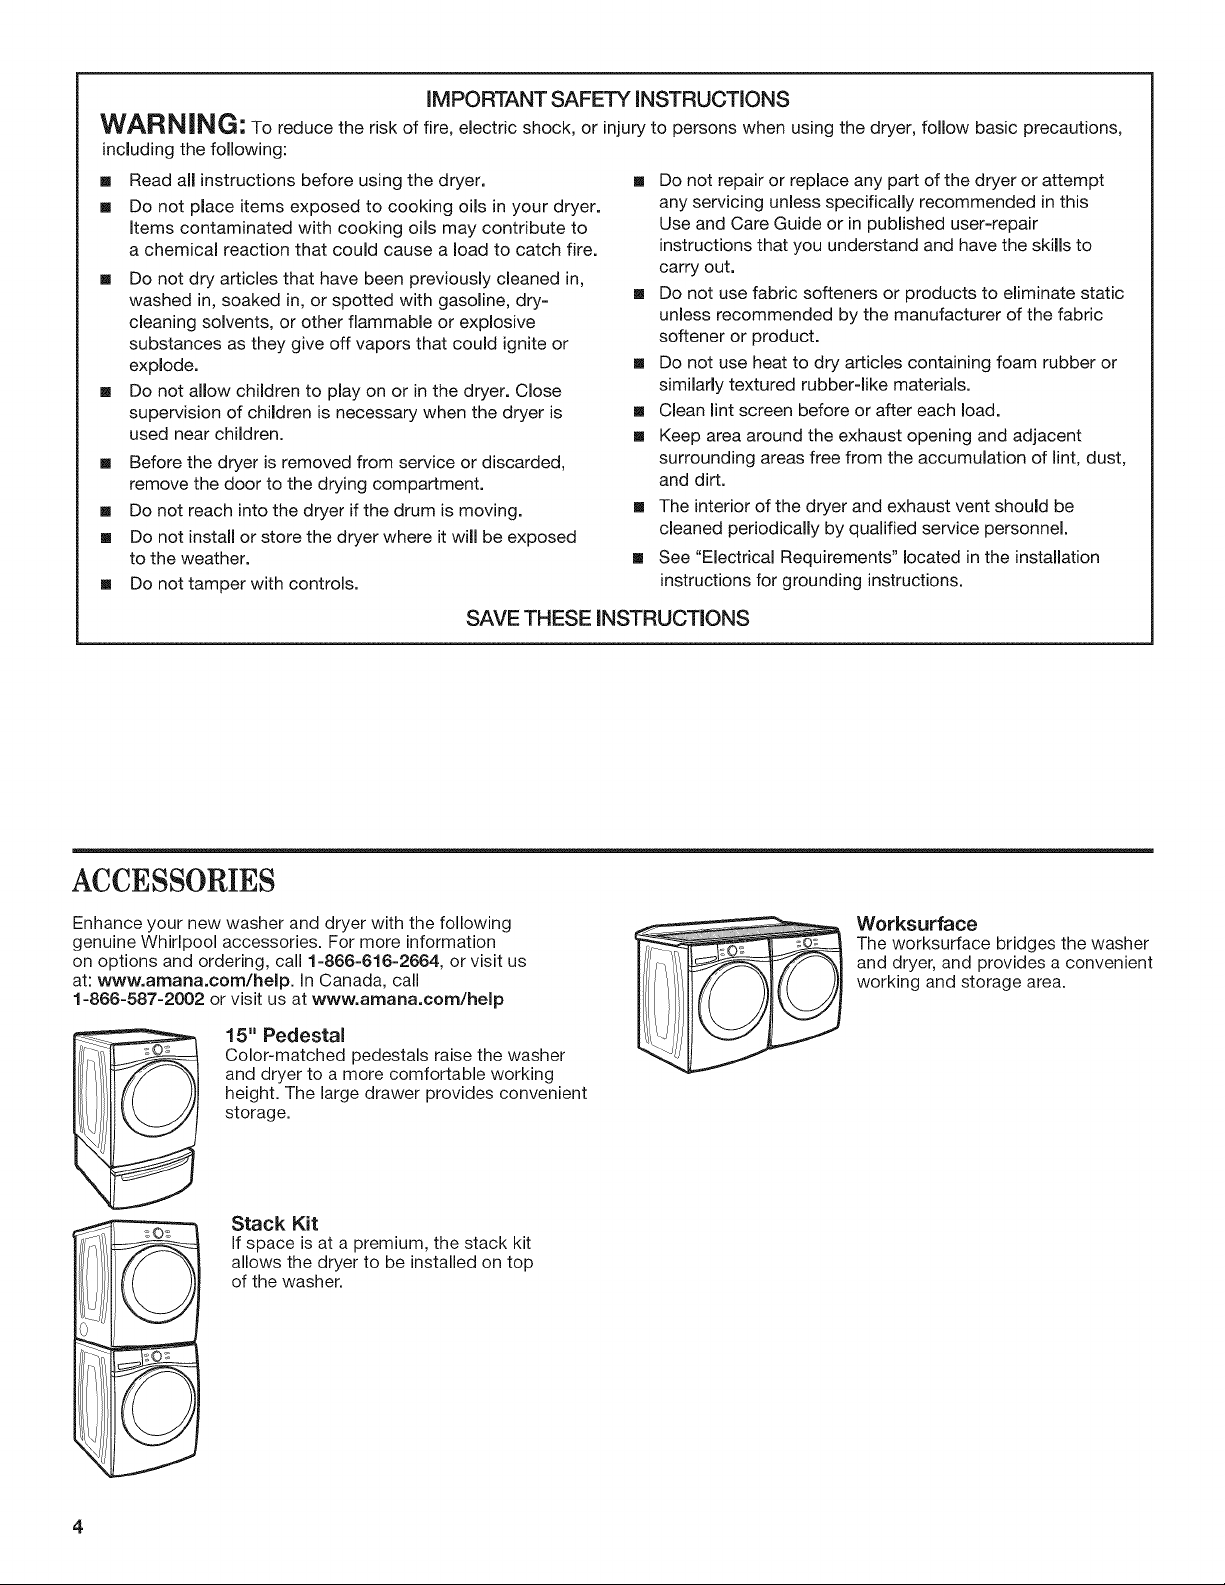
15" Pedestal
Color-matched pedestals raise the washer
and dryer to a more comfortable working
height. The large drawer provides convenient
storage.
Stack Kit
If space is at a premium, the stack kit
allows the dryer to be installed on top
of the washer.
Worksurface
The worksurface bridges the washer
and dryer, and provides a convenient
working and storage area.
4
CHECK YOUR VENT SYSTEM FOR GOOD AIRFLOW
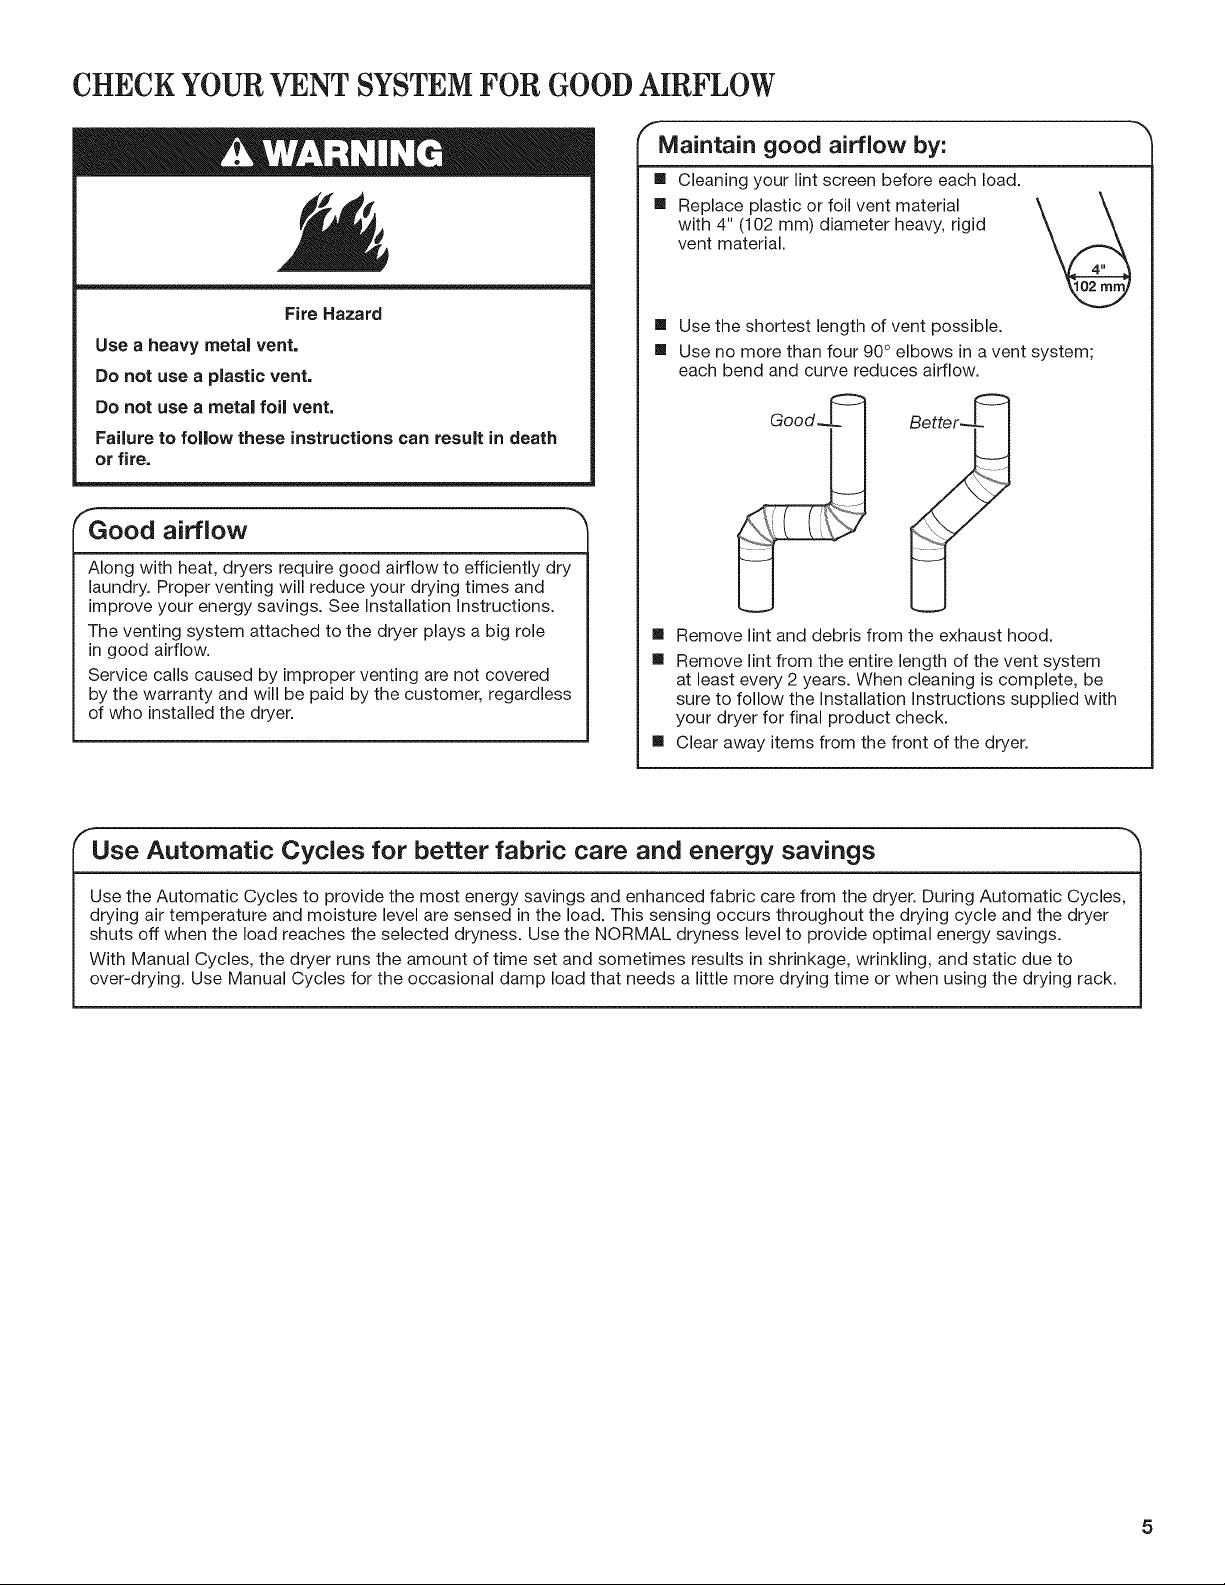
Maintain good airflow by:
[] Cleaning your lint screen before each load.
[] Replace plastic or foil vent material
with 4" (102 mm) diameter heavy, rigid
vent material.
Fire Hazard
Use a heavy metal vent,
Do not use a plastic vent.
Do not use a metal foil vent.
Failure to follow these instructions can result in death
or fire.
[] Use the shortest length of vent possible.
[] Use no more than four 90° elbows in a vent system;
each bend and curve reduces airflow.
Good airflow
Along with heat, dryers require good airflow to efficiently dry
laundry. Proper venting will reduce your drying times and
improve your energy savings. See Installation Instructions.
The venting system attached to the dryer plays a big role
in good airflow.
Service calls caused by improper venting are not covered
by the warranty and will be paid by the customer, regardless
of who installed the dryer.
[]
Remove lint and debris from the exhaust hood.
[]
Remove lint from the entire length of the vent system
at least every 2 years. When cleaning is complete, be
sure to follow the Installation Instructions supplied with
your dryer for final product check.
[]
Clear away items from the front of the dryer.
Use Automatic Cycles for better fabric care and energy savings
Better_
Use the Automatic Cycles to provide the most energy savings and enhanced fabric care from the dryer. During Automatic Cycles,
drying air temperature and moisture level are sensed in the load. This sensing occurs throughout the drying cycle and the dryer
shuts off when the load reaches the selected dryness. Use the NORMAL dryness level to provide optimal energy savings.
With Manual Cycles, the dryer runs the amount of time set and sometimes results in shrinkage, wrinkling, and static due to
over-drying. Use Manual Cycles for the occasional damp load that needs a little more drying time or when using the drying rack.
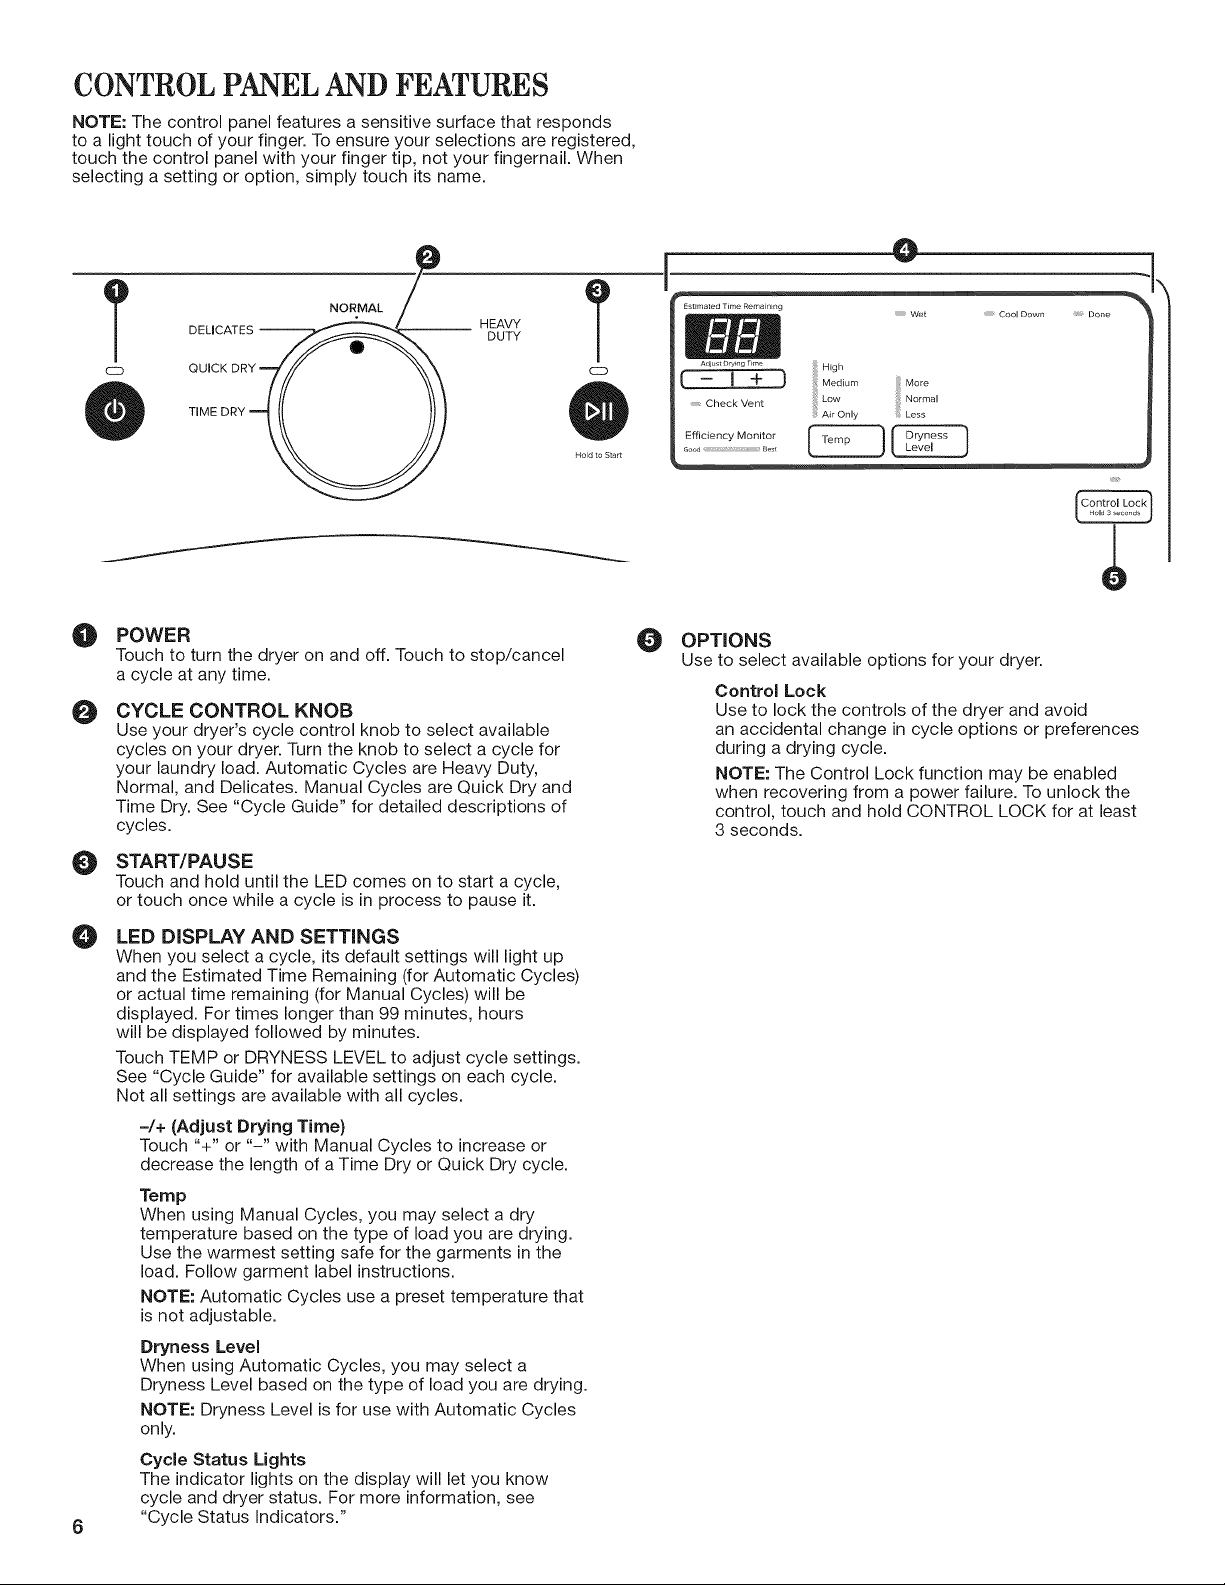
CONTROL PANEL AND FEATURES
NOTE: The control panel features a sensitive surface that responds
to a light touch of your finger. To ensure your selections are registered,
touch the control panel with your finger tip, not your fingernail. When
selecting a setting or option, simply touch its name.
0
NORMAL/
DELICATES
CC) CID
TIME DRY __
POWER
O
Touch to turn the dryer on and off. Touch to stop/cancel
a cycle at any time.
CYCLE CONTROL KNOB
O
Use your dryer's cycle control knob to select available
cycles on your dryer. Turn the knob to select a cycle for
your laundry load. Automatic Cycles are Heavy Duty,
Normal, and Delicates. Manual Cycles are Quick Dry and
Time Dry. See "Cycle Guide" for detailed descriptions of
cycles.
START/PAUSE
O
Touch and hold until the LED comes on to start a cycle,
or touch once while a cycle is in process to pause it.
LED DISPLAY AND SETTINGS
O
When you select a cycle, its default settings will light up
and the Estimated Time Remaining (for Automatic Cycles)
or actual time remaining (for Manual Cycles) will be
displayed. For times longer than 99 minutes, hours
will be displayed followed by minutes.
Touch TEMP or DRYNESS LEVEL to adjust cycle settings.
See "Cycle Guide" for available settings on each cycle.
Not all settings are available with all cycles.
-/+ (Adjust Drying Time)
Touch "+" or "-" with Manual Cycles to increase or
decrease the length of a Time Dry or Quick Dry cycle.
Temp
When using Manual Cycles, you may select a dry
temperature based on the type of load you are drying.
Use the warmest setting safe for the garments in the
load. Follow garment label instructions.
NOTE: Automatic Cycles use a preset temperature that
is not adjustable.
Dryness Level
When using Automatic Cycles, you may select a
Dryness Level based on the type of load you are drying.
NOTE: Dryness Level is for use with Automatic Cycles
only.
Cycle Status Lights
The indicator lights on the display will let you know
cycle and dryer status. For more information, see
6
"Cycle Status Indicators."
_ HEAVY
DUTY
Adjust Drying f_me
_ Check Vent
Efficiency Monitor _ _
Less
O OPTIONS
Use to select available options for your dryer.
Control Lock
Use to lock the controls of the dryer and avoid
an accidental change in cycle options or preferences
during a drying cycle.
NOTE: The Control Lock function may be enabled
when recovering from a power failure. To unlock the
control, touch and hold CONTROL LOCK for at least
3 seconds.
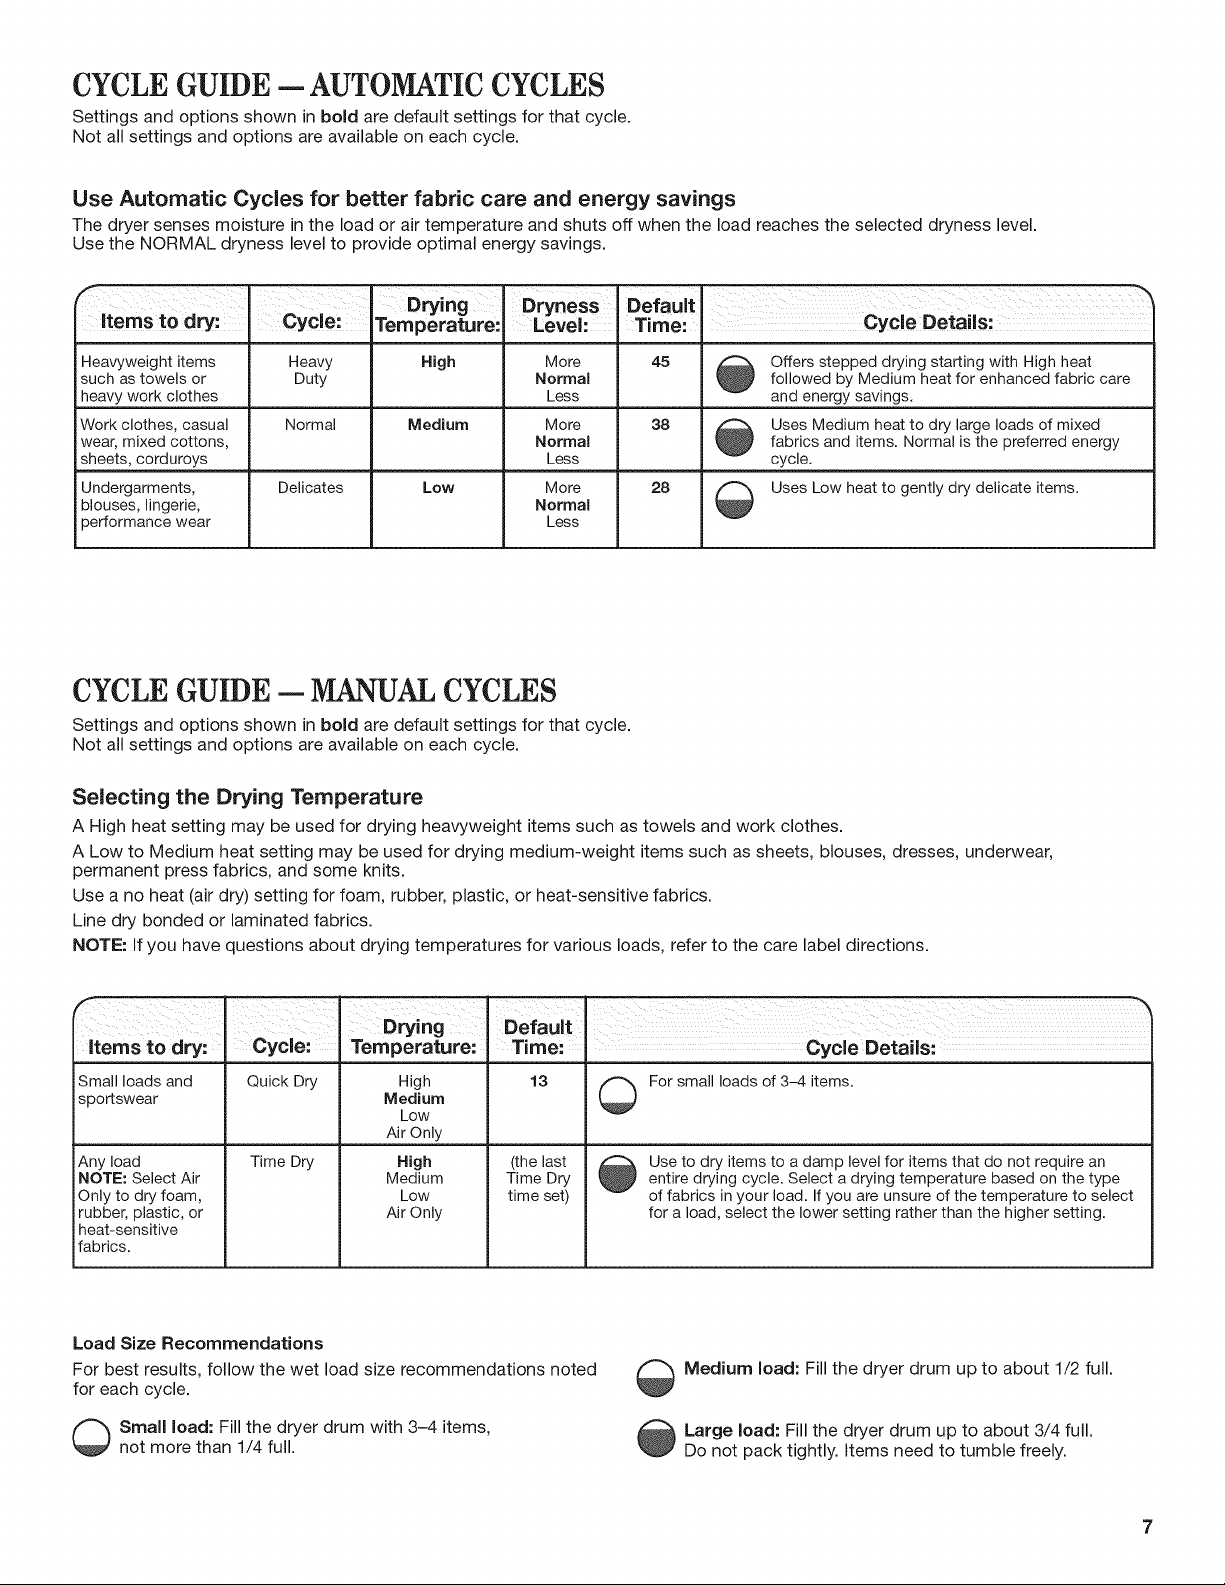
CYCLE GUIDE- AUTOMATIC CYCLES
Settings and options shown in bold are default settings for that cycle.
Not all settings and options are available on each cycle.
Use Automatic Cycles for better fabric care and energy savings
The dryer senses moisture in the load or air temperature and shuts off when the load reaches the selected dryness level.
Use the NORMAL dryness level to provide optimal energy savings.
items to dry:
, Drying Dryness Default I ; _ i,,
_ycle: Temperature: Level: Time: ' _ycle ue_aus:
Heawweight items Heavy High More 45 _ Offers stepped drying starting with High heat
such astowels or Duty Normal _ followed by Medium heatfor enhancedfabric care
heavywork clothes Less and energy savings.
Workclothes, casual Normal Medium More 38 _ Uses Medium heatto dry large loadsof mixed
wear,mixed cottons, Normal _ fabrics and items. Normal is the preferredenergy
sheets, corduroys Less cycle.
Undergarments, Delicates Low More 28 _ UsesLow heatto gently dry delicate items.
blouses, lingerie, Normal
performance wear Less
CYCLE GUIDE -- MANUAL CYCLES
Settings and options shown in bold are default settings for that cycle.
Not all settings and options are available on each cycle.
Selecting the Drying Temperature
A High heat setting may be used for drying heavyweight items such as towels and work clothes.
A Low to Medium heat setting may be used for drying medium-weight items such as sheets, blouses, dresses, underwear,
permanent press fabrics, and some knits.
Use a no heat (air dry) setting for foam, rubber, plastic, or heat-sensitive fabrics.
Line dry bonded or laminated fabrics.
NOTE: If you have questions about drying temperatures for various loads, refer to the care label directions.
items to dry:
Small loads and
sportswear
Any load
NOTE: Select Air
Only to dry foam,
rubber, plastic, or
heat-sensitive
fabrics.
Cycle:
Quick Dry
Time Dry
Temperature:
High
Medium
Low
Air Only
High
Medium
Low
Air Only
Time:. ....... Cycle Details: ...............
13 _ For small loads of 3-4 items.
(the last
Time Dry
time set)
Load Size Recommendations
For best results, follow the wet load size recommendations noted
for each cycle.
_ mall load: Fill the dryer drum with 3-4 items,
not more than 1/4 full.
Use to dry items to a damp level for items that do not require anentire drying cycle. Select a drying temperature based on the type
of fabrics inyour load. If you are unsure of the temperature to select
for a load, select the lower setting rather than the higher setting.
_ Medium load: Fill the dryer drum up to about 1/2 full.
Large load: Fill the dryer drum up to about 3/4 full.
Do not pack tightly. Items need to tumble freely.
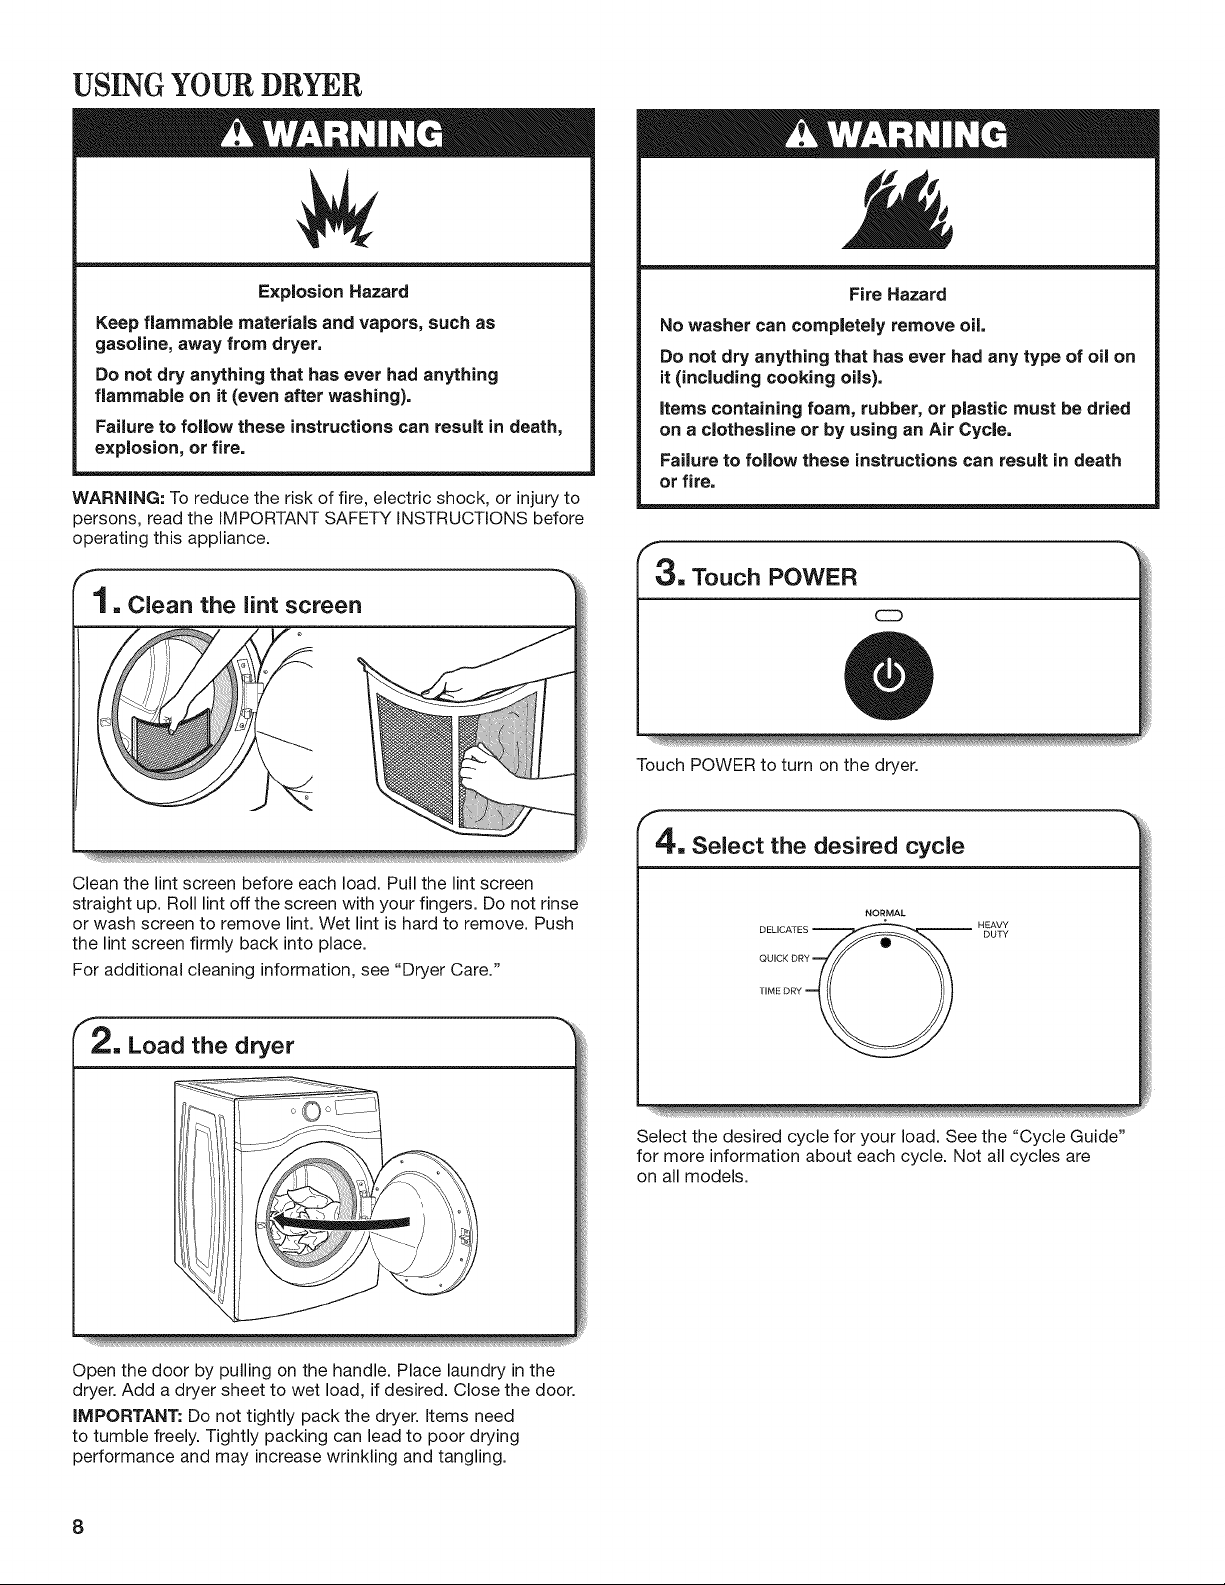
USING YOUR DRYER
Explosion Hazard
Keep flammable materials and vapors, such as
gasoline, away from dryer.
Do not dry anything that has ever had anything
flammable on it (even after washing).
Failure to follow these instructions can result in death,
explosion, or fire.
WARNING: To reduce the risk of fire, electric shock, or injury to
persons, read the IMPORTANT SAFETY INSTRUCTIONS before
operating this appliance.
1, Clean the lint screen
Clean the lint screen before each load. Pull the lint screen
straight up. Roll lint off the screen with your fingers. Do not rinse
or wash screen to remove lint. Wet lint is hard to remove. Push
the lint screen firmly back into place.
For additional cleaning information, see "Dryer Care."
2. Load the dryer
Fire Hazard
No washer can completely remove oil.
Do not dry anything that has ever had any type of oil on
it (including cooking oils).
items containing foam, rubber, or plastic must be dried
on a clothesline or by using an Air Cycle.
Failure to follow these instructions can result in death
or fire.
3.Touo.POWER
CZ3
Touch POWER to turn on the dryer.
4. Select the desired cycle
NORMAL
DELICATES DUTY
QUICK DRY
TIME DRY
o
HEAVY
o©o
-- m
Open the door by pulling on the handle. Place laundry in the
dryer. Add a dryer sheet to wet load, if desired. Close the door.
iMPORTANT: Do not tightly pack the dryer. Items need
to tumble freely. Tightly packing can lead to poor drying
performance and may increase wrinkling and tangling.
8
Select the desired cycle for your load. See the "Cycle Guide"
for more information about each cycle. Not all cycles are
on all models.
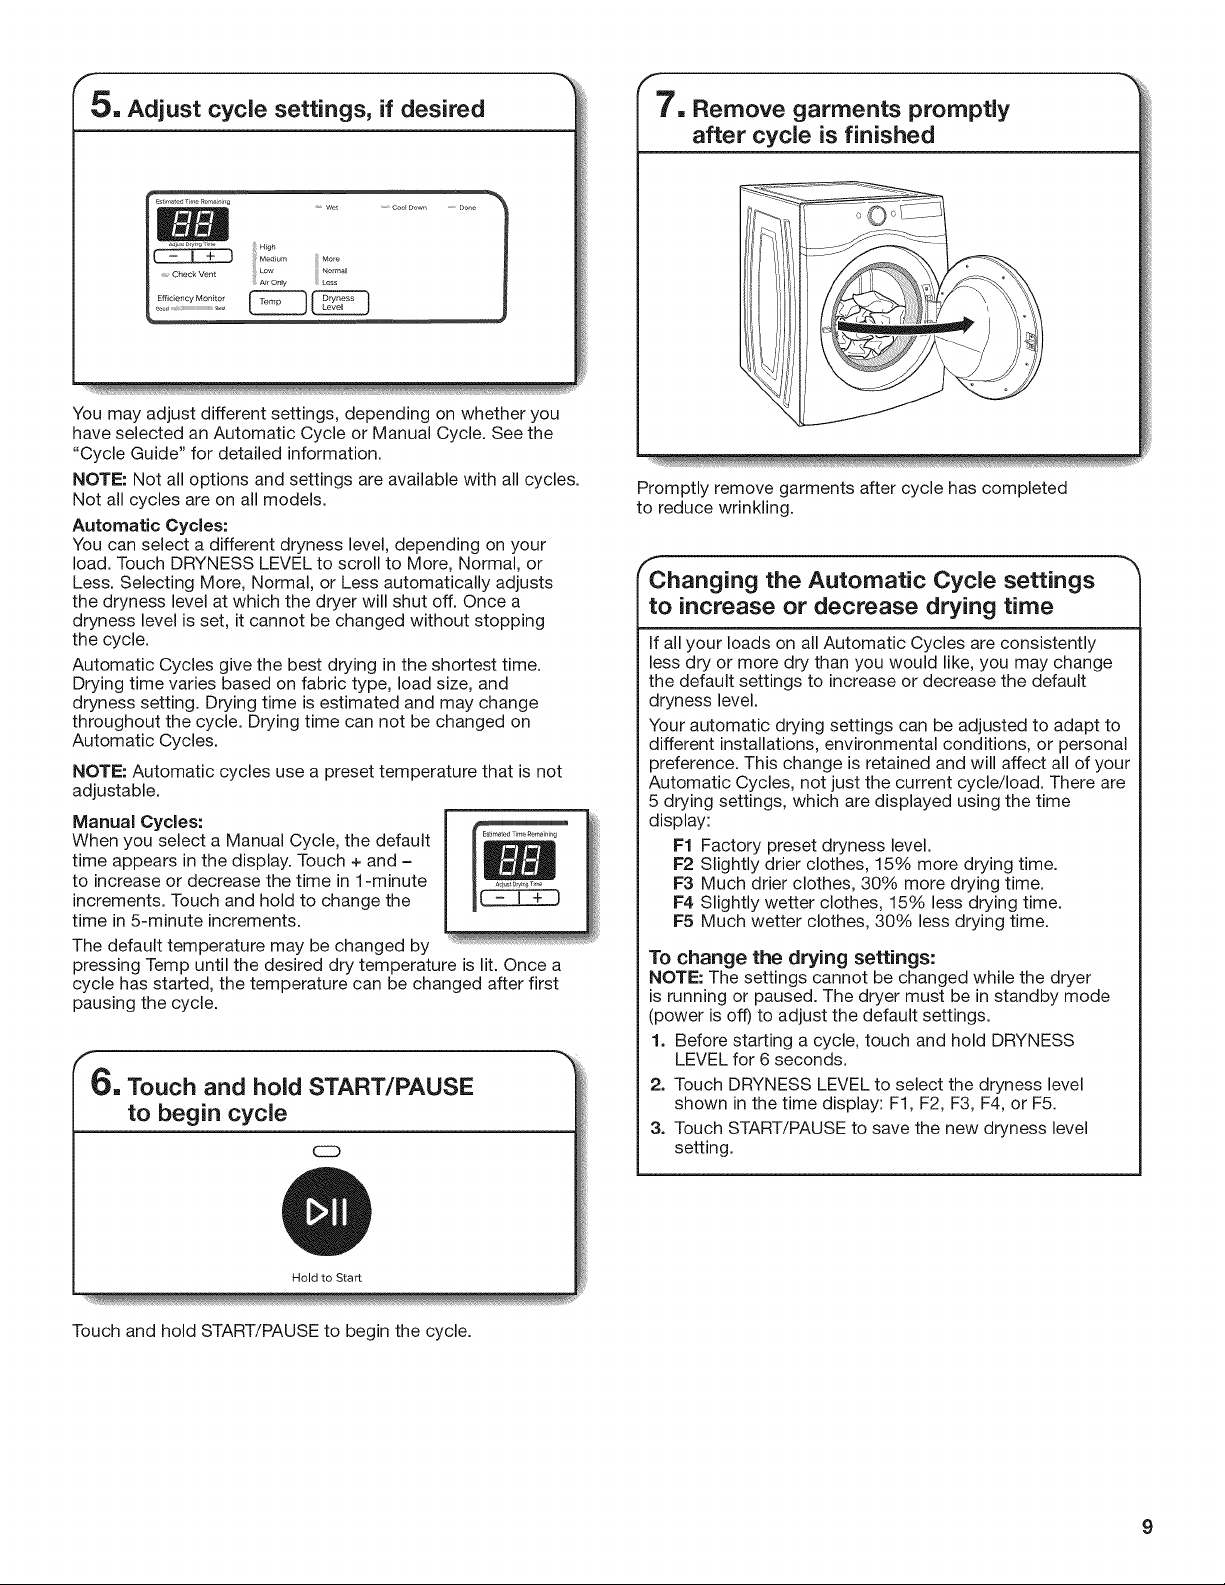
5. Adjust cycle settings, if desired
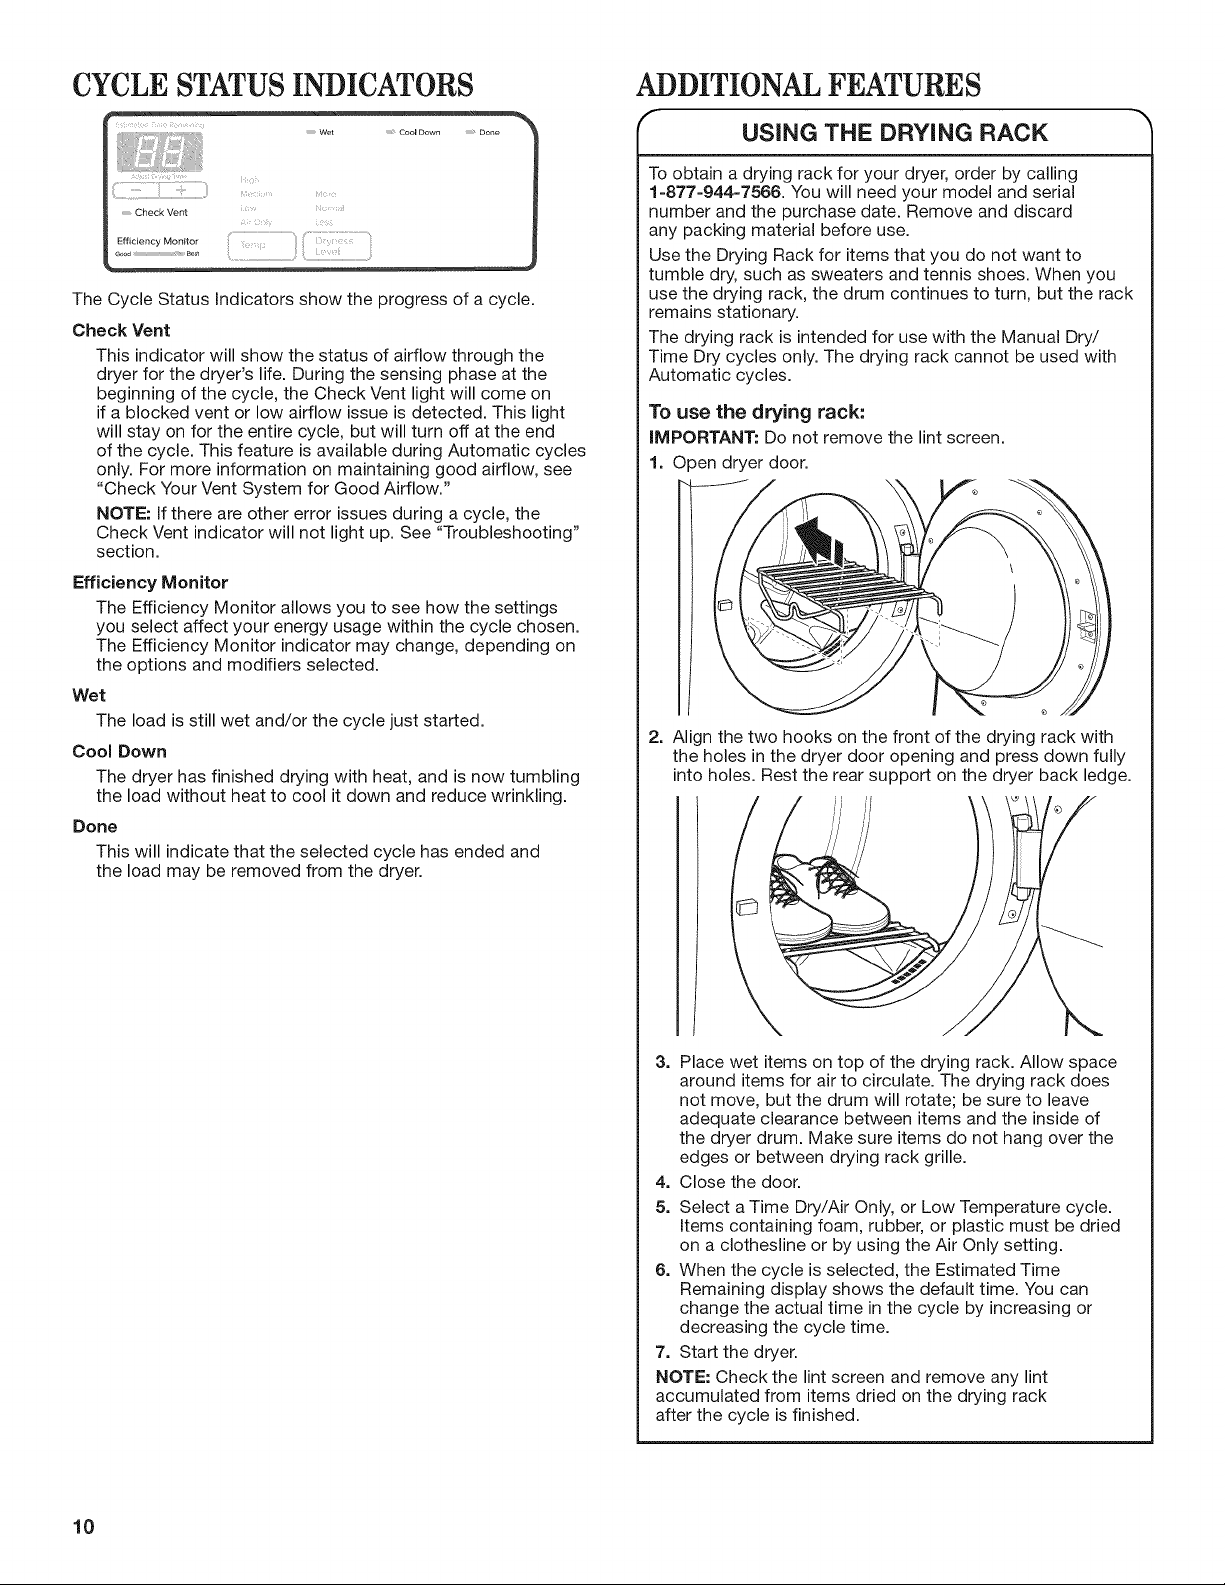
7. Remove garments promptly
after cycle is finished
H_#h wet ..... CoolUo_,, Do,,e
Check Vent
Effidency Monitor
You may adjust different settings, depending on whether you
have selected an Automatic Cycle or Manual Cycle. See the
"Cycle Guide" for detailed information.
NOTE: Not all options and settings are available with all cycles.
Not all cycles are on all models.
Automatic Cycles:
You can select a different dryness level, depending on your
load. Touch DRYNESS LEVEL to scroll to More, Normal, or
Less. Selecting More, Normal, or Less automatically adjusts
the dryness level at which the dryer will shut off. Once a
dryness level is set, it cannot be changed without stopping
the cycle.
Automatic Cycles give the best drying in the shortest time.
Drying time varies based on fabric type, load size, and
dryness setting. Drying time is estimated and may change
throughout the cycle. Drying time can not be changed on
Automatic Cycles.
NOTE: Automatic cycles use a preset temperature that is not
adjustable.
Manual Cycles:
When you select a Manual Cycle, the default
time appears in the display. Touch + and -
to increase or decrease the time in 1-minute
increments. Touch and hold to change the
time in 5-minute increments.
The default temperature may be changed by
pressing Temp until the desired dry temperature is lit. Once a
cycle has started, the temperature can be changed after first
pausing the cycle.
Air Only
More
!
6. Touch and hold START/PAUSE
to begin cycle
CZD
Promptly remove garments after cycle has completed
to reduce wrinkling.
f
Changing the Automatic Cycle settings
to increase or decrease drying time
If all your loads on all Automatic Cycles are consistently
less dry or more dry than you would like, you may change
the default settings to increase or decrease the default
dryness level.
Your automatic drying settings can be adjusted to adapt to
different installations, environmental conditions, or personal
preference. This change is retained and will affect all of your
Automatic Cycles, not just the current cycle/load. There are
5 drying settings, which are displayed using the time
display:
F1 Factory preset dryness level.
F2 Slightly drier clothes, 15% more drying time.
F3 Much drier clothes, 30% more drying time.
F4 Slightly wetter clothes, 15% less drying time.
F5 Much wetter clothes, 30% less drying time.
To change the drying settings:
NOTE: The settings cannot be changed while the dryer
is running or paused. The dryer must be in standby mode
(power is off) to adjust the default settings.
1. Before starting a cycle, touch and hold DRYNESS
LEVEL for 6 seconds.
2. Touch DRYNESS LEVEL to select the dryness level
shown in the time display: F1, F2, F3, F4, or F5.
3. Touch START/PAUSE to save the new dryness level
setting.
Hold to Start
Touch and hold START/PAUSE to begin the cycle.
CYCLE STATUS INDICATORS ADDITIONAL FEATURES
USING THE DRYING RACK
To obtain a drying rack for your dryer, order by calling
Check Vent
Efficiency Monitor
The Cycle Status Indicators show the progress of a cycle.
Check Vent
This indicator will show the status of airflow through the
dryer for the dryer's life. During the sensing phase at the
beginning of the cycle, the Check Vent light will come on
if a blocked vent or low airflow issue is detected. This light
will stay on for the entire cycle, but will turn off at the end
of the cycle. This feature is available during Automatic cycles
only. For more information on maintaining good airflow, see
"Check Your Vent System for Good Airflow."
NOTE: If there are other error issues during a cycle, the
Check Vent indicator will not light up. See "Troubleshooting"
section.
Efficiency Monitor
The Efficiency Monitor allows you to see how the settings
you select affect your energy usage within the cycle chosen.
The Efficiency Monitor indicator may change, depending on
the options and modifiers selected.
Wet
The load is still wet and/or the cycle just started.
Cool Down
The dryer has finished drying with heat, and is now tumbling
the load without heat to cool it down and reduce wrinkling.
Done
This will indicate that the selected cycle has ended and
the load may be removed from the dryer.
ili iiiilli!i i!ii i:i !i iii i"ili
1-877-944-7566. You will need your model and serial
number and the purchase date. Remove and discard
any packing material before use.
Use the Drying Rack for items that you do not want to
tumble dry, such as sweaters and tennis shoes. When you
use the drying rack, the drum continues to turn, but the rack
remains stationary.
The drying rack is intended for use with the Manual Dry/
Time Dry cycles only. The drying rack cannot be used with
Automatic cycles.
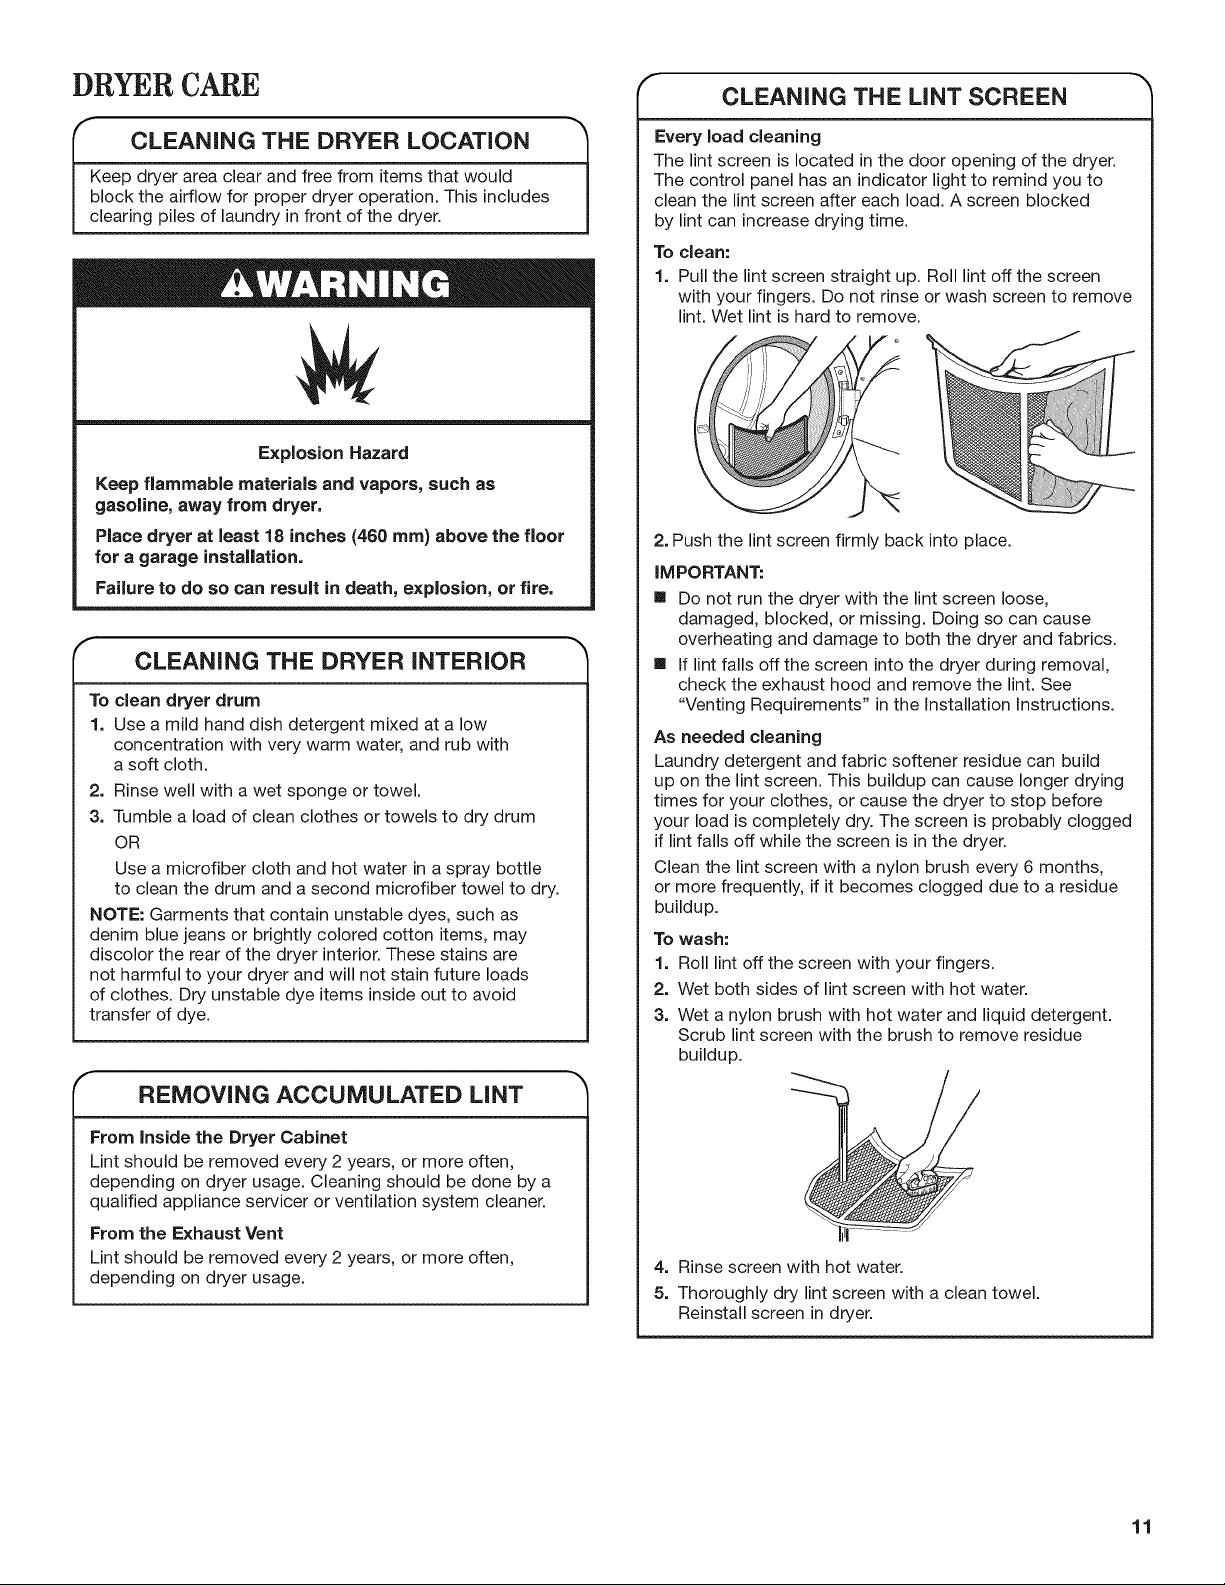
To use the drying rack:
IMPORTANT: Do not remove the lint screen.
1. Open dryer door.
2. Align the two hooks on the front of the drying rack with
the holes in the dryer door opening and press down fully
into holes. Rest the rear support on the dryer back ledge.
10
3=
Place wet items on top of the drying rack. Allow space
around items for air to circulate. The drying rack does
not move, but the drum will rotate; be sure to leave
adequate clearance between items and the inside of
the dryer drum. Make sure items do not hang over the
edges or between drying rack grille.
4=
Close the door.
5.
Select a Time Dry/Air Only, or Low Temperature cycle.
Items containing foam, rubber, or plastic must be dried
on a clothesline or by using the Air Only setting.
6. When the cycle is selected, the Estimated Time
Remaining display shows the default time. You can
change the actual time in the cycle by increasing or
decreasing the cycle time.
7. Start the dryer.
NOTE: Check the lint screen and remove any lint
accumulated from items dried on the drying rack
after the cycle is finished.
DRYER CARE
CLEANING THE LiNT SCREEN
'- LEANING THE DRYER LOCATION "_
block the airflow for proper dryer operation. This includes
l eep dryer area clear and free from items that would I
Explosion Hazard
Keep flammable materials and vapors, such as
gasoline, away from dryer.
Place dryer at least 18 inches (460 ram) above the floor
for a garage installation.
Failure to do so can result in death, explosion, or fire.
CLEANING THE DRYER iNTERiOR
To clean dryer drum
1. Use a mild hand dish detergent mixed at a low
concentration with very warm water, and rub with
a soft cloth.
2. Rinse well with a wet sponge or towel.
3. Tumble a load of clean clothes or towels to dry drum
OR
Use a microfiber cloth and hot water in a spray bottle
to clean the drum and a second microfiber towel to dry.
NOTE: Garments that contain unstable dyes, such as
denim blue jeans or brightly colored cotton items, may
discolor the rear of the dryer interior. These stains are
not harmful to your dryer and will not stain future loads
of clothes. Dry unstable dye items inside out to avoid
transfer of dye.
Every load cleaning
The lint screen is located in the door opening of the dryer.
The control panel has an indicator light to remind you to
1clearing piles of laundry infront of the dryer.
clean the lint screen after each load. A screen blocked
by lint can increase drying time.
To clean:
1. Pull the lint screen straight up. Roll lint off the screen
with your fingers. Do not rinse or wash screen to remove
lint. Wet lint is hard to remove.
2. Push the lint screen firmly back into place.
iMPORTANT:
III Do not run the dryer with the lint screen loose,
damaged, blocked, or missing. Doing so can cause
overheating and damage to both the dryer and fabrics.
III If lint falls off the screen into the dryer during removal,
check the exhaust hood and remove the lint. See
"Venting Requirements" in the Installation Instructions.
As needed cleaning
Laundry detergent and fabric softener residue can build
up on the lint screen. This buildup can cause longer drying
times for your clothes, or cause the dryer to stop before
your load is completely dry. The screen is probably clogged
if lint falls off while the screen is in the dryer.
Clean the lint screen with a nylon brush every 6 months,
or more frequently, if it becomes clogged due to a residue
buildup.
To wash:
1. Roll lint off the screen with your fingers.
2. Wet both sides of lint screen with hot water.
3. Wet a nylon brush with hot water and liquid detergent.
Scrub lint screen with the brush to remove residue
buildup.
REMOVING ACCUMULATED LiNT
From inside the Dryer Cabinet
Lint should be removed every 2 years, or more often,
depending on dryer usage. Cleaning should be done by a
qualified appliance servicer or ventilation system cleaner.
From the Exhaust Vent
Lint should be removed every 2 years, or more often,
depending on dryer usage.
4. Rinse screen with hot water.
5. Thoroughly dry lint screen with a clean towel.
Reinstall screen in dryer.
11
 Loading...