

Page 1

Over-the-Range
Microwave Oven
Owner's Manual
MVH230*
* Additional alphanumeric characters representing other
models in the series may follow each model number.
Keep these instructions for future reference. If the oven
changes ownership, be sure this manual accompanies
oven.
Page 2

Contents
Model Identification
Model Identification
Asure™ Extended Service Plan.............................. 2
Oven Features ...................................................... 2
Important Safety Instructions
Warning................................................................. 3
Caution.................................................................. 4
Precautions to Avoid Possible Exposure
to Excessive Microwave Energy ............................ 5
Grounding Instructions .......................................... 5
Installation
Unpacking Oven.................................................... 6
Oven Placement.................................................... 6
Radio Interference................................................. 6
Optional Accessories............................................. 6
Turntable............................................................... 6
Rack...................................................................... 6
Control Panel............................................................. 7
Operation
Vent Fan................................................................ 8
Surface Light ......................................................... 8
Display ON/OFF .................................................... 8
Scroll Speed.......................................................... 8
Clock ..................................................................... 8
Minute Timer ......................................................... 8
Reminder............................................................... 8
Child Lock ............................................................. 8
Pause or Cancel Cycle .......................................... 8
Complete Reminder .............................................. 8
Program 1 Microwave Cooking ............................. 8
Program 2 Microwave Cooking ............................. 8
Changing Cookmatic® Power Level ....................... 9
One-Step Cook (1-6) ............................................. 9
Auto Start .............................................................. 9
Auto Accu-Thaw®.................................................. 10
Accu-Thaw®........................................................... 10
Popcorn................................................................. 11
Cook...................................................................... 1 1
Reheat................................................................... 12
Add 30 Seconds .................................................... 12
Care and Cleaning
Interior, Exterior and Door ..................................... 12
Turntable Roller and Glass T ray............................ 12
Exhaust Maintenance............................................ 12
Charcoal Filter (recirculating installation only) ....... 13
Replacing Light Bulbs............................................ 13
Before Calling for Service .........................................15
Microwave Cooking
Microwave Cooking Principles............................... 16
Microwave Utensils ............................................... 16
Preventing Excess Moisture .................................. 16
Using Rack............................................................ 17
Cooking and Defrosting Guides
Cooking Guide ...................................................... 18
Defrosting Guide ................................................... 19
Quick Reference Instructions.................................20
Complete enclosed registration card and promptly return.
If registration card is missing, call Consumer Affairs
Department at 1-800-843-0304 inside U.S.A.
319-622-551 1 outside U.S.A. When contacting Amana,
provide product information. Record the following:
Model Number: ______________________________
Manufacturing Number:________________________
Serial or S/N Number: _________________________
Date of purchase: ____________________________
Dealer’s name and address: ____________________
___________________________________________
___________________________________________
Keep a copy of sales receipt for future reference or in
case warranty service is required. Any questions or to
locate an authorized servicer, call 1-800-NAT-LSVC
(1-800-628-5782) inside U.S.A. 319-622-5511 outside
U.S.A. Warranty service must be performed by an
authorized servicer. Amana, also recommends
contacting an authorized servicer if service is required
after warranty expires.
Asure™ Extended Service Plan
Amana offers long-term service protection for this new
microwave oven. Asure™ Extended Service Plan is
specially designed to supplement Amana’s strong
warranty. Asure™ provides budgetable protection for up
to 3 additional years. This plan covers parts, labor, and
travel charges. Call 1-800-528-2682 for information.
Oven Features
• Over the range installation
• 900 watts of cooking power, based on IEC 705 test
method
• 1.3 cu.ft. capacity
• Turntable
• Rack
2
Page 3

IMPORTANT SAFETY INSTRUCTIONS
Recognize this symbol as a SAFETY message
WARNING
When using electrical equipment, basic safety
precautions should be followed to reduce the risk of
burns, electrical shock, fire, or injury to persons.
1. READ all instructions before using equipment.
2. READ AND FOLLOW the specific
“PRECAUTIONS TO A VOID POSSIBLE
EXPOSURE TO EXCESSIVE MICROW AVE
ENERGY” on page 5.
3. This equipment MUST BE GROUNDED.
Connect only to properly GROUNDED outlet.
See “GROUNDING INSTRUCTIONS” on page
5.
4. Install or locate this equipment ONLY in
accordance with the installation instructions in
this manual.
5. Some products such as whole eggs and sealed
containers, for example, closed glass jars may
explode and SHOULD NOT be HEATED in this
oven.
6. Use this equipment ONLY for its intended use
as described in this manual. Do not use
corrosive chemicals or vapors in this
equipment. This type of oven is specifically
designed to heat or cook. It is not designed for
industrial or laboratory use.
7. As with any equipment, CLOSE SUPERVISION
is necessary when used by CHILDREN.
8. DO NOT operate this equipment if it has a
damaged cord or plug, if it is not working
properly , or if it has been damaged or dropped.
9. This equipment, including power cord, must be
serviced ONLY by qualified service personnel.
Special tools are required to service equipment.
Contact nearest authorized service facility for
examination, repair, or adjustment.
11. DO NOT store this equipment outdoors. DO
NOT use this product near water – for example,
near a kitchen sink, in a wet basement, or near a
swimming pool, and the like.
12. DO NOT immerse cord or plug in water.
13. Keep cord AWAY from HEATED surfaces.
14. DO NOT let cord hang over edge of table or
counter.
15. See door cleaning instructions in “Care and
Cleaning” section of manual on page 12.
WARNING
To avoid starting and spreading of accidental
cooking fires while the vent fan is in use.
• Clean the underside of the microwave often. Do
not allow grease to build up on the microwave or
the fan filters.
• In the event of a grease fire on the surface units
below the microwave oven, smother a flaming pan
on the surface unit by covering the pan completely
with a lid, a cookie sheet or a flat tray .
• Use care when cleaning the vent fan filters.
Corrosive cleaning agents, such as lye-based
oven cleaners, may damage the filters.
• When flaming foods under the microwave, turn the
vent fan off. The fan, if operating, may spread the
flame.
• Never leave surface units beneath your microwave
oven unattended at high heat settings. Boilovers
cause smoking and greasy spillovers that may
ignite and spread if the microwave vent fan is
operating. To minimize automatic fan operation,
use adequate sized cookware and use high heat
on surface units
10. DO NOT cover or block filter or other openings
on equipment.
SAVE THESE INSTRUCTIONS
3
Page 4

IMPORTANT SAFETY INSTRUCTIONS
CAUTION
To avoid personal injury or property damage
observe the following:
1. Always press STOP/RESET before
programming oven.
2. Do not deep fat fry in oven. Fat could overheat
and be hazardous to handle.
3. Do not cook or reheat eggs in shell or with an
unbroken yolk. Pressure may build up and
erupt. Pierce yolk with a fork or knife before
cooking. Do not reheat previously cooked eggs
in the microwave oven unless finely chopped or
scrambled.
4. Pierce skin of potatoes, tomatoes, or other foods
with a "skin" before cooking in microwave oven.
Piercing skin allows steam to escape during
cooking.
5. Do not home can in microwave oven. Home
canning is generally done with metal lids. Since
metal lids reflect heat, product may not be
heated uniformly to 212°F or above. Food could
deteriorate. USDA extension specialists do not
recommend home canning in microwave ovens.
6. Remove excess fat from meats and poultry to
prevent splattering.
7. Do not heat baby bottles in microwave oven.
8. Briskly stir or pour liquids before heating to
prevent spontaneous boiling or eruption. Do
not overheat. If air is not mixed into a liquid,
liquid can erupt in oven or after removal from
oven.
9. All uncooked foods should be heated to a final
internal temperature of at least 165°F. Some
foods require higher temperatures. These
recommended temperatures kill most food
borne, disease causing organisms. Some
common visual signs that indicate the cooking
temperature has been reached:
• Food steams throughout, not just around
edges.
• Center bottom of dish is very hot to the
touch.
10. If using a microwave popcorn popper, use
according to manufacturer's instructions. Do not
continue to heat after popping has stopped.
Popcorn will scorch or burn. Do not leave oven
unattended.
1 1. Use only popcorn in packages designed and
labeled for microwave use. Pop according to
package directions, beginning with the
minimum amount of time recommended.
Use caution when handling hot popcorn bag.
12. Microwave convenience foods are often
packaged in specially designed packaging.
Special plates, lids, containers, or other
unique packaging materials may be used.
Susceptor packing material (a thin, metalized
plastic film) is frequently used to help brown
and make crisp foods such as microwave
pizzas, French fries, or fish sticks. Be sure to
follow food package instructions carefully .
Contact convenience food manufacturer with
questions concerning these products. Amana
does not endorse any brand of microwave
convenience foods, or any type of microwave
food packaging.
13. Do not operate microwave oven empty. This
could damage the oven.
14. Do not use regular cooking thermometers in
oven. Most cooking thermometers contain
mercury and may cause “arcing”, malfunction,
and/or damage to oven.
15. Metal or ceramic accessories which are
designed to absorb microwave energy to
provide heat should be used with caution. Test
device before use (See “Microwave Utensils”
on page 16). Read and follow manufacturer's
instructions provided with the accessory .
Contact accessory manufacturer with questions
concerning these accessories. Amana does not
endorse any brand of accessory.
16. Pierce or open plastic bags (and other airtight
containers) before heating in microwave oven.
This allows steam to escape during cooking.
17. Containers may become hot and pot holders
may be needed.
18. Closely supervise any use by children. Make
sure they can read instructions and reach
controls. Never allow them to lean or swing on
oven door.
SAVE THESE INSTRUCTIONS
4
Page 5

IMPORTANT SAFETY INSTRUCTIONS
CAUTION
To reduce the risk of fire in the oven cavity:
a. DO NOT overcook food. Carefully attend
appliance if paper, plastic, or other combustible
materials are placed inside the oven to facilitate
cooking.
b. Remove wire twist-ties from paper or plastic
bags before placing bag in oven.
c. If materials inside the oven should ignite, keep
oven door closed, turn oven off, and disconnect
the power cord, or shut off power at the fuse or
circuit breaker panel. IF THE DOOR IS
OPENED THE FIRE MAY SPREAD!
d. DO NOT use the cavity for storage purposes.
DO NOT leave paper products, cooking utensils,
or food in the cavity when not in use.
Grounding Instructions
WARNING
To avoid the risk of electrical shock or death, this
oven must be grounded.
WARNING
To avoid the risk of electrical shock or death, do not
alter the plug.
This oven MUST be grounded. In the event of an
electrical short circuit, grounding reduces the risk of
electric shock by providing an escape wire for the
electric current. This oven is equipped with a cord
having a grounding wire with a grounding plug. The plug
must be plugged into an outlet that is properly installed
and grounded.
PRECAUTIONS TO
AVOID
POSSIBLE EXPOSURE
TO EXCESSIVE
MICROWAVE ENERGY
a. DO NOT attempt to operate this oven with the
door open since open-door operation can result
in harmful exposure to microwave energy . It is
important not to defeat or tamper with the safety
interlocks.
b. DO NOT place any object between the oven
front face and the door or allow soil or cleaner
residue to accumulate on sealing surfaces.
c. DO NOT operate the oven if it is damaged. It is
particularly important that the oven door close
properly and that there is no damage to the: (1)
door (bent), (2) hinges and latches (broken or
loosened), (3) door seals and sealing surfaces.
d. The oven should NOT be adjusted or repaired
by anyone except properly qualified service
personnel.
Consult a qualified electrician or servicer if grounding
instructions are not completely understood, or if doubt
exists as to whether the equipment is properly
grounded.
Do not use an extension cord. If the product power cord
is too short, have a qualified electrician install a threeslot receptacle. This oven should be plugged into a
separate 60 hertz circuit with the electrical rating as
shown in drawing. Oven requires a 120 supply voltage.
When a microwave oven is on a circuit with other
equipment, an increase in cooking times may be
required and fuses can be blown.
120V–15AMP
SAVE THESE INSTRUCTIONS
5
Page 6
Installation
Unpacking Oven
• Inspect oven for damage such as dents in door or
dents inside oven cavity .
• Report any dents or breakage to source of purchase
immediately. Do not attempt to use oven if damaged.
• Remove all materials from oven interior.
• If oven has been stored in extremely cold area, wait a
few hours before connecting power.
• Glass tray and filters are located in packing material.
Oven Placement
• This microwave oven is U.L. listed for installation over
gas and electric ranges.
• Microwave oven should not be installed over a range
wider than 42 inches.
• Do not mount this appliance over a sink.
• Install or locate this appliance only in accordance with
the provided installation instructions.
• Do not cover or block any openings on this appliance.
• Do not store anything directly on top of microwave
oven during oven operation.
Radio Interference
Microwave operation may cause interference to radio,
television, or similar equipment. Reduce or eliminate
interference by doing the following:
• Clean door and sealing surfaces of oven according to
instructions in “Care and Cleaning” section.
• Place radio, television, etc. as far as possible
from oven.
• Use a properly installed antenna on radio, television,
etc. to obtain stronger signal reception.
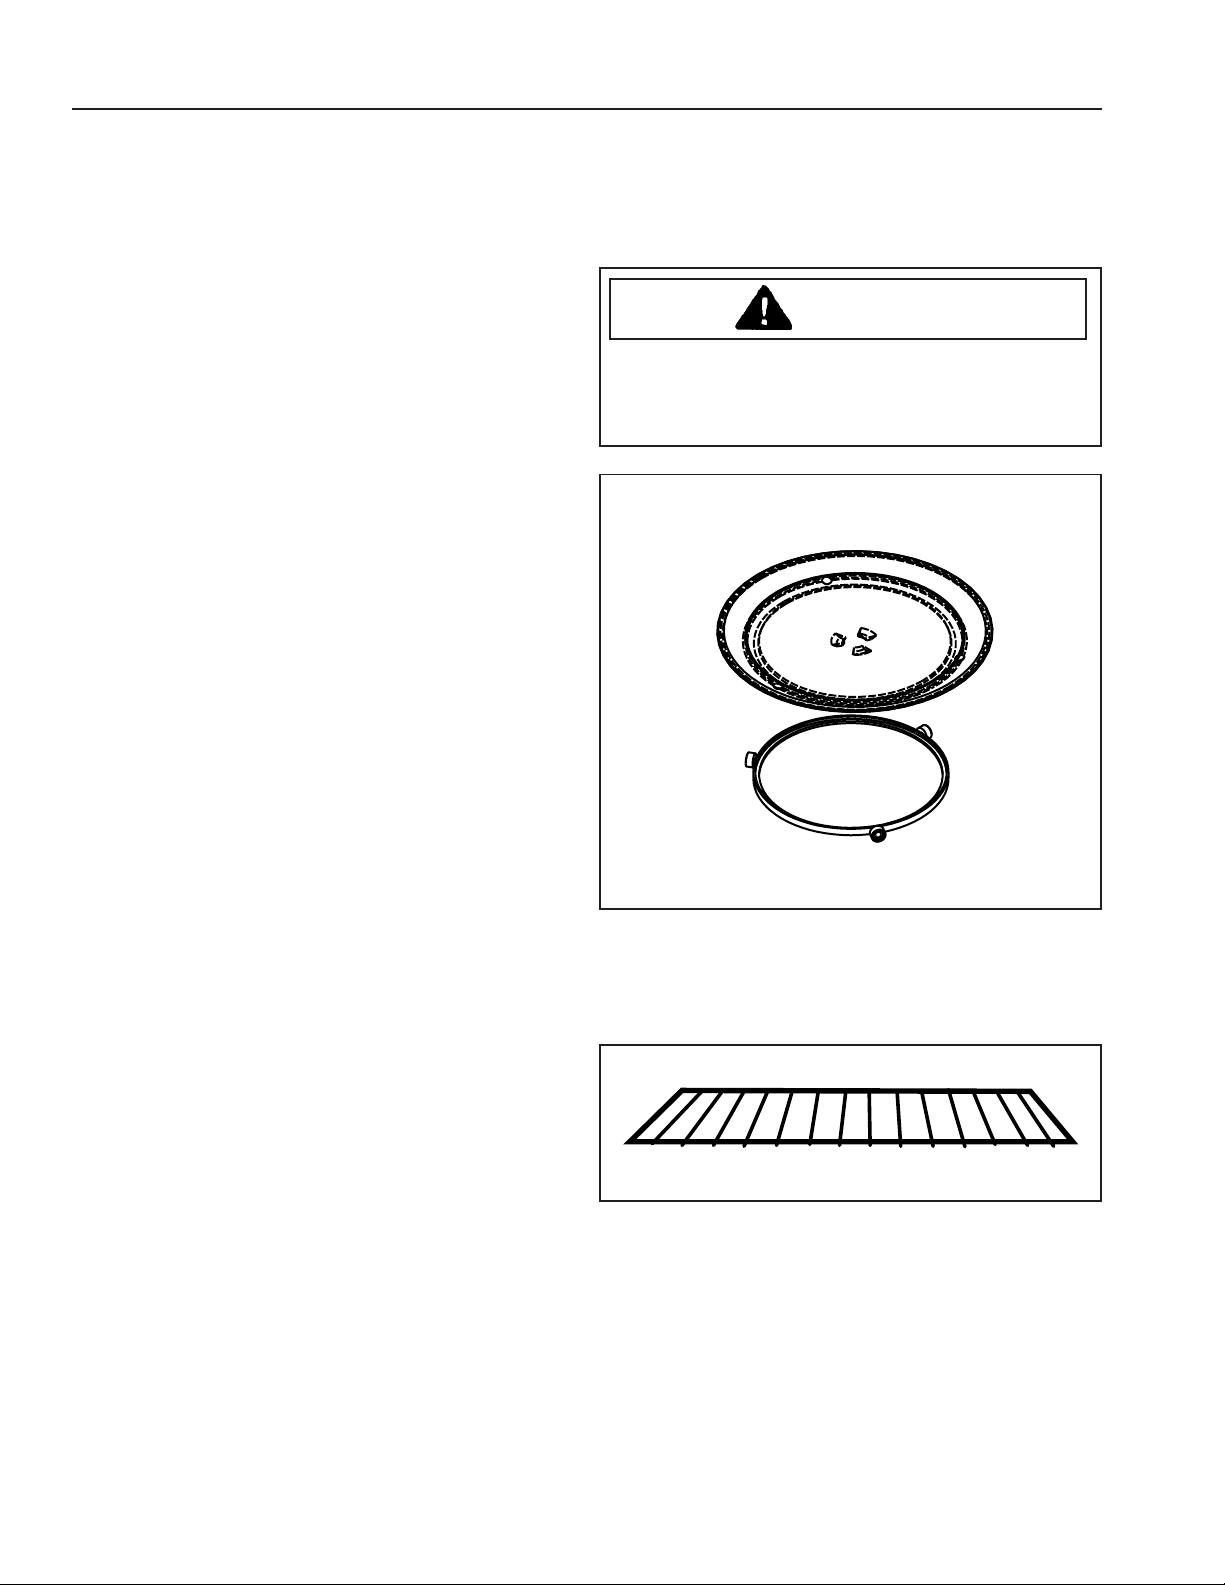
T urntable
Turntable provides even cooking. Place turntable roller
in oven cavity so wheels are in track. Place glass tray on
roller. T urntable must be in place when operating.
CAUTION
To avoid burns, allow glass tray to cool or use dry
oven mitts when handling. Tray can become hot
during heating.
Turntable
Roller
Optional Accessories
• Filler Panel kit: If space between cabinets is
greater than 30 inches, filler panel kit may be used to
fill in gap between microwave oven and cabinets.
Contact dealer to purchase filler panel kit.
• Charcoal Filter kit: Charcoal filter kit is needed for
non-vented (ductless) installation. Contact dealer to
purchase charcoal filter kit.
Rack
Rack is packed in oven cavity. Unpack and store. Do not
leave in oven while using. See “Using Rack” section.
6
Page 7
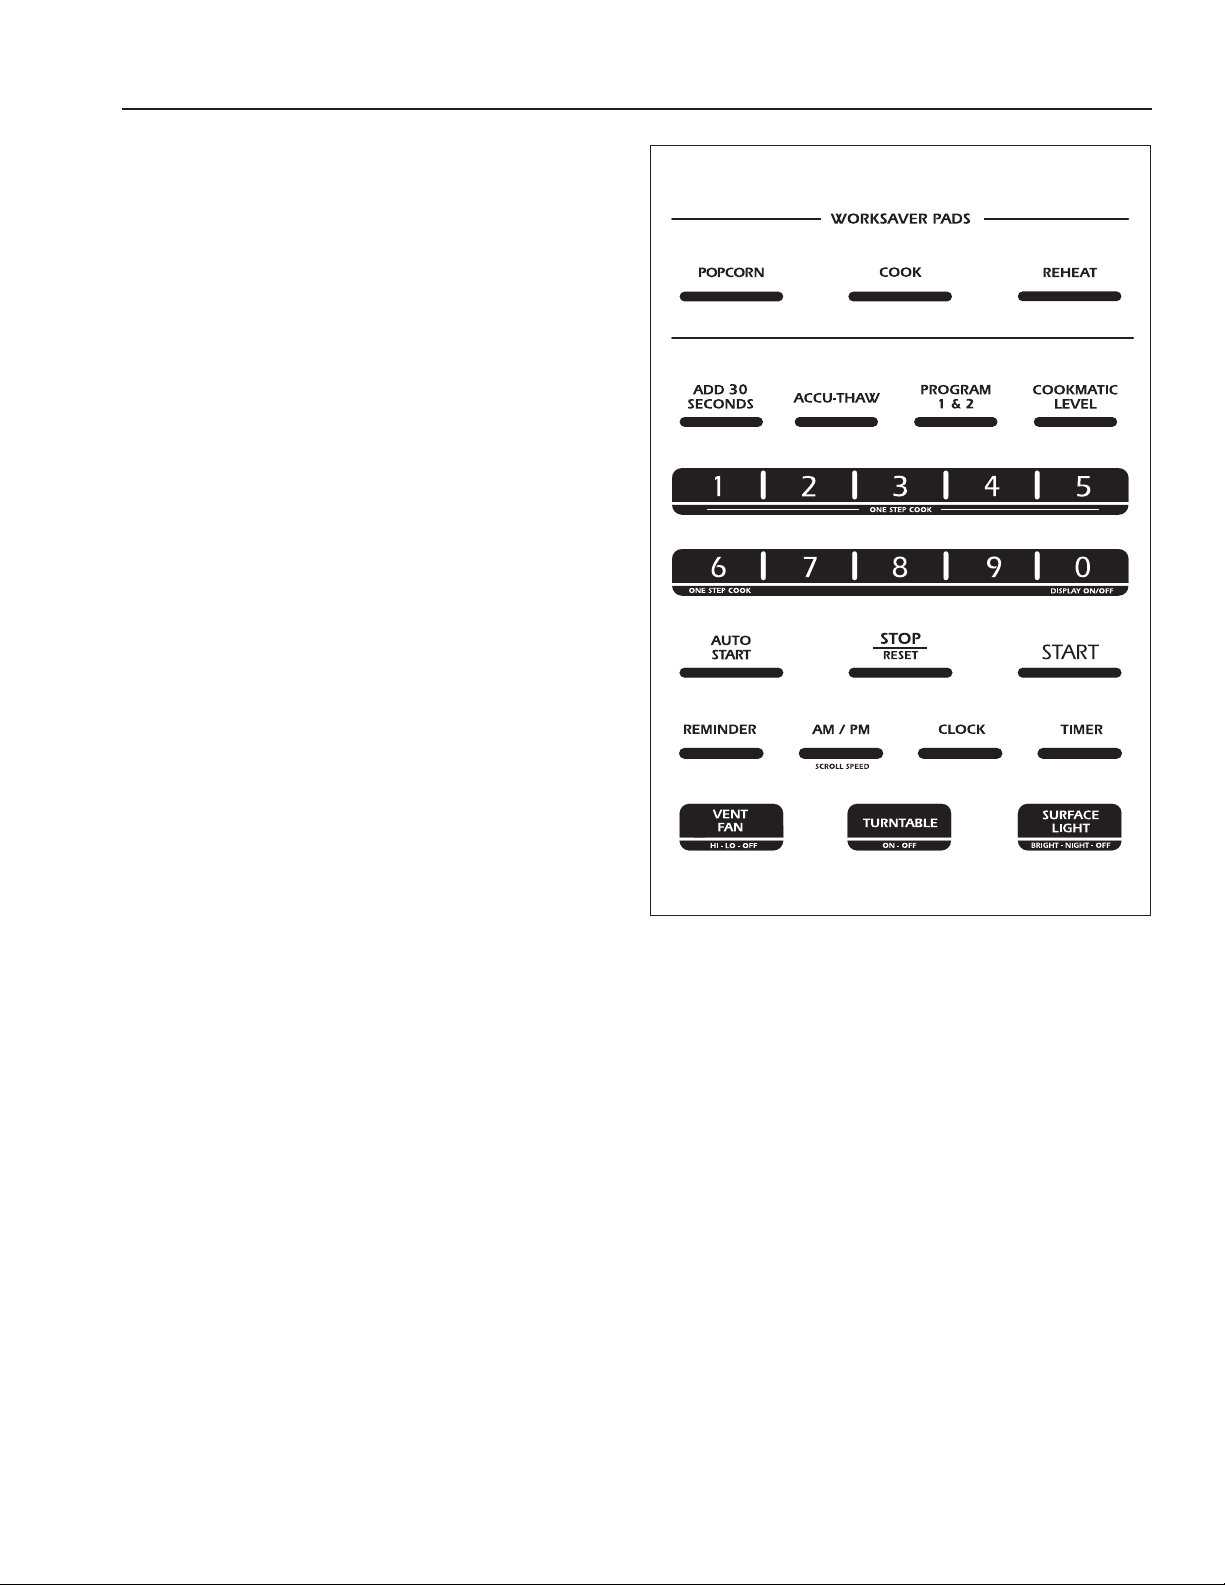
Control Panel
DISPLAY
Displays time of day , cook time, power level, and cook
mode instructions.
PROGRAM 1 & 2
Use to enter time not in oven memory. Program 1 & 2
are set to power level 10 (High).
ONE STEP COOK
Press number pads 1 through 6 for one to six minutes of
cooking. No need to press
immediately .
ST AR T
; oven will start
ACCU-THAW
Automatically sets power levels and defrosting time
according to food weight.
®
POPCORN
Cooks prepackaged microwave popcorn weighing 1.75
to 3.5 ounces.
COOK
Cook feature automatically sets cooking times and
power levels according to selected food type.
REHEA T
Use to automatically reheat previously cooked food.
ADD 30 SECONDS
Each time
is added to cooking time. Press pad and oven will start
immediately .
ADD 30 SECOND
pad is pressed 30 seconds
COOKMATIC LEVEL
Programs cooking power level.
NUMBER P ADS
Press to enter cooking time, defrosting time, time of day ,
power level or food weights for Accu-Thaw ®.
AUTO START
Programs oven to begin cooking at preset time of day
(up to 12-hour delay).
CLOCK
Use to enter time of day or check time of day while
heating.
TIMER
Functions as either kitchen timer, holding period after
defrost, or delay timer before Program I & II cooking.
No microwave energy is generated when using timer
feature.
STOP/RESET
Press to stop oven and erase all settings except time of
day .
START
Press to start oven.
REMINDER
Reminder feature is used like alarm clock. While oven is
cooking reminder can be set up to 24 hours later.
AM/PM
Press when setting clock and Auto Start feature.
VENT FAN
Press
HI, LO
or
OFF
for different fan speeds.
TURNTABLE
Allows or stops turn table from rotating. Stop turn table
from rotating when using large rectangular dishes.
SURFACE LIGHT
Press once for bright surface light, twice for softer night
light or press 3 times to turn off.
Display
Press and hold 0 pad for 3 seconds to turn display on
or off. Display cannot be turned off while oven is in
operation.
7
ON/OFF
Page 8

Operation
V ent Fan
Press
VENT F A N
OFF.
Vent fan protects microwave from excess heat
rising from cooktop or range. Fan automatically turns on
at low speed when excess heat is sensed. If excess
heat is sensed fan can't be turned off manually until
internal parts have cooled.
pad to turn vent fan to
HI, LO,
and
Surface Light
Press once for bright surface light, twice for softer night
light or press 3 times to turn off.
Display
Press and hold 0 pad for 3 seconds to turn display on or
off. Display cannot be turned off while oven is in
operation.
ON/OFF
Scroll Speed
The display scroll speed can be changed. Press and
hold
AM/PM
number pad 1-5 to set scroll speed.
pad for 3 seconds to access display . Press
Clock
1. Press
2. Enter time of day.
3. Press AM/PM pad.
4. Press
CLOCK.
• For example, for 10:35 (a.m or p.m.), press
1,0,3,5.
CLOCK
• Reset or change time by repeating above steps.
pad. Clock is set.
Minute Timer
1. Press
2. Press desired time.
3. Press
TIMER
• For example, for 3 minutes, press
TIMER
• Display counts down.
• Signal sounds and “End” displays at end of time
period. Press
day.
pad.
pad.
TIMER
3,0,0.
pad again to return to time of
Reminder
1. Press
2. Enter time of day you want the oven to signal.
3. Press
4. Press
REMINDER
• Check clock for correct time of day.
AM/PM
REMINDER
pad.
pad.
pad.
Child Lock
To lock or unlock control, press and hold STOP/RESET
pad for about 3 seconds.
Pause or Cancel Cycle
Open door or press
RESET
pad to cancel cycle.
ST ART
pad to pause. Press
STOP/
Complete Reminder
Reminds user that there is food in oven. “FOOD IS
READY” is displayed and oven signals once every
minute until door is opened, or
pressed. Complete Reminder is not adjustable.
STOP/RESET
pad is
Program 1 Microwave Cooking
Set cooking time from 1 second, to 99 minutes 99
seconds. Cooks at 100% power unless cookmatic level
is changed. See “Changing Cookmatic® Power Level”
section.
1. Place food in oven. Close door.
2. Press
3. Press number pad to select desired cooking time.
4. If power level other than 100% is desired, press
5. Press
PROGRAM 1 & 2
• For example, for 1 minute, press
COOKMATIC LEVEL
• For example, for 20% power, press
START
• Oven stops, signals, and “FOOD IS READY”
displays at end of cooking time. “READY” remains
in display until door is opened or
pad is pressed.
pad.
pad.
1,0,0
.
pad and number pad.
2 pad
STOP/RESET
.
Program 2 Microwave Cooking
PROGRAM 2 feature is designed to set two timed
cooking functions within one program.
1. Place food in oven and close door.
2. Press
3. Press number pads to select first cook time.
4. If power level other than 100% is desired, press
5. Press
6. Press number pads to select second cook time.
7. If power level other than 100% is desired, press
8. Press
PROGRAM 1 & 2
• For example, for 2 minutes 15 seconds, press
2,1,5
.
COOKMATIC LEVEL
• For example, for 20% power, press 2 pad.
PROGRAM 1 & 2
COOKMATIC LEVEL
• For example, for 20% power, press 2 pad.
START
• Oven stops, signals, and “FOOD IS READY”
displays at end of cooking time. “READY” remains
in display until door is opened or
pad is pressed.
• If program cycles are interrupted, close door and
press
pad.
ST AR T
pad to resume cooking.
pad.
pad and number pad.
pad.
pad and number pad.
STOP/RESET
8
Page 9

Changing Cookmatic® Power Level
g
Oven has ten power levels. When no power level is
selected, oven operates at 100% power during cook
mode or at power level 3 during defrost.
1. Place food in oven and close door.
2. Select cook or defrost program.
3. Enter numbers for cooking or defrosting time.
4. Press
5. Press number for desired power level. Number
6. Press
7. Oven stops, signals, and “FOOD IS READY”
COOKMATIC LEVEL
• Power level displays.
displays.
• For example, to cook at power level eight, for
80% power, press 8.
START
• Oven operates, time counts down, and power
level selected displays. Microwave power cycles
on and off.
displays at end of cooking time. “READY” remains in
display until door is opened or
pressed.
.
pad.
STOP/RESET
pad is
One-Step Cook (1-6)
One-step process to program oven at full power for 1-6
minutes.
1. Place food in oven and close door.
2. To select 1 to 6 minutes of cooking time, press
desired number pad (1-6).
• For example, to cook for 2 minutes, press 2 pad.
Oven will start immediately.
3. Oven stops, signals, and “FOOD IS READY”
displays at end of cooking time. “READY” remains
in display until door is opened or
is pressed.
STOP/RESET
pad
Auto Start
CAUTION
To avoid risk of food poisoning, do not hold foods
containing meat, dairy products or eggs in oven for
over 1 hour before cooking.
Power Level Use
10 Fish , bacon, vegetables,
boiling liquids
7 Gentle cooking of meat
or poultry, casseroles,
reheating
5 Slow cooking and
tenderizin
lesser cuts of meat
2 or 3 Defrosting without
cooking, simmering, or
delicate sauces
1 Keeping food warm or
softening butter.
stews or
Programs oven to begin cooking at preset time of day
(up to 12 hour delay). Clock must be set to use feature.
Ensure correct time of day is displayed.
1. Place food in oven and close door.
2. Press
3. Enter desired start time.
4. Press
5. Enter desired cook or defrost program.
6. Press
7. Oven stops, signals, and “FOOD IS READY”
AUTO ST A RT
• For example, for 2:30 (a.m or p.m.), press
AM/PM
STAR T
• Oven will automatically start at programmed
time. Programmed start time is displayed until
reached.
displays at end of cooking time. “READY” remains
in display until door is opened or
is pressed.
pad.
pad.
pad.
2,3,0.
STOP/RESET
pad
9
Page 10

Auto Accu-Thaw
Auto Accu-Thaw
®
®
automatically sets defrosting times
and power levels. Use to defrost meat, poultry , or fish.
Enter food weight in pounds and tenths of pounds (see
conversion guide below). Check weight guide located at
front of oven for maximum and minimum weights for
variety of foods.
1. Remove food from package, place in oven on
microwave-safe dish and close door.
2. Press
ACCU-THAW®
pad.
3. Enter food weight.
• For example, if food item weight is 2 pounds, 4
ounces, convert 4 ounces to pounds by using
conversion guide below. Press
2,3
(2 represents 2
pounds, and 3 represents 4 ounces).
• If ounces are not entered within three seconds,
“ PRESS ST AR T” displays. Press
STOP/RESET
pad and repeat steps 2 through 3.
4. Press
STAR T
pad. Display counts down defrost
time.
• Twice during defrosting cycle, oven will beep 4
times and "TURN FOOD OVER" displays. Defrost
continues while "TURN FOOD OVER" is
displayed. After manipulating food, close door and
press
ST AR T
pad.
5. Oven stops, signals, and “FOOD IS READY”
displays at end of cooking time. “READY” remains in
display until door is opened or
STOP/RESET
pad is
pressed.
• After Auto Accu-Thaw®, meat needs standing time
to allow inside to defrost. Food may be taken out
of oven for stand time.
Accu-Thaw
Accu-Thaw
®
®
automatically sets power level to defrost.
Enter defrost time. Use to defrost bread, fruits, and
baked goods.
1. Remove food from package, place in oven on
microwave-safe dish and close door.
2. Press
ACCU-THAW®
pad twice.
3. Enter defrost time.
4. Press
STAR T
pad. Display counts down defrost
time.
• After ½ of defrosting cycle passes, oven will beep
and "TURN FOOD OVER" displays. Defrost
continues while "TURN FOOD OVER" is
displayed. After manipulating food, close door and
press
ST AR T
pad.
5. Oven stops, signals, and “FOOD IS READY”
displays at end of cooking time. “READY” remains in
display until door is opened or
STOP/RESET
pad is
pressed.
• After Accu-Thaw®, meat needs standing time to
allow inside to defrost. Food may be taken out of
oven for stand time.
Conversion Guide
If wei ght of food is stat ed in pounds
and ounces , ounces m ust be c onverted
to t ent hs (.1) of pounds.
Ounces Pounds
1-2 0.1
30.2
4-5 0.3
6-7 0.4
80.5
9-10 0.6
11 0.7
12-13 0.8
14-15 0.9
10
Page 11

Popcorn
g
g
g
g
g
g
g
g
CAUTION
To avoid steam burns when opening bag, wear
protective clothing like dry oven mitts and keep face
away from bag opening. Escaping steam can burn.
Popcorn feature is designed to be used only with
prepackaged microwave popcorn weighing 1.75 to 3.5
ounces. Use popcorn feature by observing the following:
1. Remove outer wrapper from microwave popcorn.
2. Open oven door and place package of popcorn in
center of oven floor, as directed on popcorn
package. Close oven door.
3. Press
POPCORN
• To increase cooking time, immediately after
pressing
sign appears in display behind “POP”. Plus sign
indicates 20 seconds of additional cooking time.
Press 9 pad twice to add 30 seconds to cooking
time. If oven beeps before 9 pad is pressed, press
STOP/RESET
• To decrease cooking time, immediately after
pressing
sign appears in display behind “POP”. Minus sign
indicates 20 seconds less cooking time. Press
pad twice to subtract 30 seconds from cooking
time. If oven beeps before 1 pad is pressed, press
STOP/RESET
• Oven will start immediately .
pad. Oven will start immediately .
POPCORN
POPCORN
pad, press 9 pad. A plus
pad and start over.
pad, press 1 pad. A minus
pad and start over.
1
Cook
Cook feature automatically sets cooking times and
power levels according to selected food type.
1. Place food in oven and close door.
2. Press
3. Press pad for desired food code. See table below.
4. Press number pads to enter food weight in ounces.
5. Press
COOK
• For example, press 1 pad for canned vegetables.
• For example, for 18 ounces press
STAR T
• Oven stops, signals, and “FOOD IS READY”
displays at end of cooking time. “READY” remains
in display until door is opened or
pad is pressed.
pad.
1,8
.
pad. Oven will begin cooking.
STOP/RESET
Food Type Weight
1 Canned Vegetables
2 Frozen Vegetables
3 Fresh Vegetables
4 Potatoes
5 Fish
6 Chicken Pieces
7 Ground Meat
(Beef, pork, turkey)
8 Bacon
9 Pizza
(frozen microwaveable
)
Cook Pad Table
Comments
(oz.)
4-20 Use microwave-safe casserole or bowl. Cover with lid or plastic
wrap.
4-20 Use microwave-safe casserole or bowl. Follow packa
for addin
4-16 Use microwave-safe casserole or bowl. Add 2 tablespoons water for
each servin
8-40 Pierce skin with fork. Arran
turntable.
4-16 Use oblon
4-40 Use oblon
8-48 Use round casserole dish. Crumble meat into dish. Do not cover
dish. Drain and stir at si
2-10 Layer strips on a plate, 4 to a layer. Cover each layer with a paper
towel.
4-16 Follow packa
water. Cover with lid or plastic wrap.
. Cover with lid or plastic wrap.
e in star pattern on oven floor or
, square or round dish. Cover with plastic wrap.
, square or round dish. Cover with plastic wrap.
nal.
e instructions to prepare pizza for microwaving.
11
e instructions
Page 12

Care and Cleaning
Reheat
Reheat is a feature used to automatically reheat
previously cooked food. Reheat food types 1 through 5
allow up to 3 servings to be heated at once.
1. Place food in oven and close door.
2. Press
3. Press number pad from 1 to 6 to select desired food
4. To reheat two servings press 2 pad. To reheat three
5. Press
Pad Food
REHEA T
type. See Reheat table below.
servings press 3 pad. To reheat 1 serving, go to next
step.
ST ART
• Oven stops, signals, and “FOOD IS READY”
displays at end of cooking time. “READY” remains
in display until door is opened or
pad is pressed.
pad.
pad.
STOP/RESET
Comments
Type
1 Pasta Cover with lid or plastic
wrap.
2 Meats,
casseroles,
pizza
3Fruits,
vegetables
4 Beverages, Use wide mouth mug.
5 Sauces,
gravies
6 Plate of
leftovers
Cover with lid or plastic
wrap.
Cover with lid or plastic
wrap.
8-10 oz.
Cover with lid or plastic
wrap.
Cover with plastic wrap.
2-3 foods, 4 oz. each
Interior, Exterior and Door
If walls, floor, and door of microwave oven become
splattered, wipe with paper towel or clean with mild
detergent in warm water using soft sponge or cloth.
Wring sponge or cloth to remove excess water before
wiping oven. If desired, boil a cup of water in
microwave oven to loosen soil before cleaning.
• Do not use cleaners containing ammonia. These
cleaners could damage finish.
• Never pour water into microwave oven bottom.
• Do not use abrasives to clean inside of oven.
Abrasives cleaners can damage oven finish.
Turntable Roller and Glass Tray
Wash roller and glass tray in dishwasher or with mild
detergent in warm water using soft sponge or cloth.
Exhaust Maintenance
Exhaust hood is equipped with two metal filters which
collect grease. Never operate oven without filters in
place. In situations where flaming might occur on
surfaces below hood, filters will stop entry of flames
into oven. When fan is operated, air is drawn through
filters. Depending on installation, air is either
discharged through venting to outside or drawn through
charcoal filter and recirculated.
CAUTION
To avoid personal injury, do not operate microwave
oven without filters in place.
Add 30 Seconds
• Provides convenient way to extend cooking time by 30
seconds, while oven timer is counting down. Each
time
ADD 30 SECOND
added to cooking time.
• Pad may be used as express cook for 30 seconds.
Press pad and oven will start immediately.
pad is pressed 30 seconds is
Removing grease filters
1. Grasp tab on filter and slide to rear.
2. Pull filter downward to front. Filter will drop out.
12
Page 13

Cleaning grease filters
Grease filters should be cleaned at least once a month
to remove residue. Clean filters by soaking and agitating
in warm sudsy water. Do not use ammonia or ammonia
products, they will darken metal. Light brushing can be
used to remove embedded dirt. Rinse, shake and
remove moisture before replacing.
Replacing grease filters
Do not operate vent hood with filters removed.
1. Slide filter into frame slot on back of opening.
2. Pull filter upward to front.
3. Lock in place.
Charcoal Filter (recirculating installation
only)
Microwave oven can be recirculated instead of being
vented to outside. For recirculating installation,
charcoal filter must be used. Charcoal filter removes
smoke and odors caused by cooking on range top.
Charcoal filter is disposable and should be replaced
when it is noticeably dirty or discolored (approximately
every 6 to 12 months, depending on usage). Charcoal
filter may be purchased from dealer.
• Do not clean charcoal filter.
• Do not operate venthood with charcoal filter removed.
Replacing Light Bulbs
WARNING
To avoid electrical shock hazard unplug power cord
or open circuit breaker to microwave oven before
replacing light bulb.
CAUTION
Wear gloves or use clean cotton cloth to protect
hands should light bulb break. If hot, allow bulb to
cool.
Tools needed
• protective gloves
• phillips screwdriver
• two 120 volt, 40 watt, surface light bulbs available
from Amana dealer, servicer, factory service center, or
Amana Consumer Affairs (1-800-843-0304 if inside
U.S.A. and 1-319-622-551 1 if outside U.S.A.)
• 30 watt, oven light bulb available from Amana dealer,
servicer, factory service center, or Amana Consumer
Affairs (1-800-843-0304 if inside U.S.A. and 1-319622-551 1 if outside U.S.A.)
Charcoal filter
To remove charcoal filter
1. Disconnect power at main fuse, circuit breaker
panel or pull plug.
2. Remove two screws that hold grille in place.
3. Remove grille.
4. Grasp filter, slide toward front of oven and remove.
To install new charcoal filter
1. Remove plastic and other outer wrapping from new
filter.
2. Insert filter into top opening of oven as shown.
Filter will rest at an angle, on two side support tabs.
3. Replace grille.
4. Replace two screws to secure grille.
13
Page 14

Changing Oven Light Bulb
1. Unplug microwave oven.
2. Remove two screws holding grille in place and
remove grille.
Changing Surface Light Bulb
1. Unplug microwave oven.
2. Remove screw in front of light compartment covers
(underneath side of microwave oven).
3. Remove 2 screws located above door near center of
oven. Remove light bulb cover.
4. Remove bulb, being careful not to burn fingers or
break bulb and replace 30 watt bulb.
5. Replace screws located above door near center of
oven.
6. Replace grille and 2 screws.
7. Restore power to microwave oven.
3. Lower cover until it stops.
4. Remove bulb, being careful not to burn fingers
or break bulb and replace two 40 watt bulbs.
5. Replace light compartment cover and screw. Do not
operate oven without light compartment cover.
6. Restore power to microwave oven.
14
Page 15

Before Calling for Service
WARNING
To avoid electrical shock which can cause severe
personal injury or death, do not remove outer case at
any time. Only authorized servicer should remove
outer case.
Unchanged Condition
If condition remains unchanged, perform the following
steps:
1. Check to see if fuse or circuit breaker is open.
2. Unplug oven.
3. Reconnect oven to wall outlet. “RESET” appears in
display.
4. Press
STOP/RESET
or set clock.
If microwave oven does not operate:
• Confirm oven is plugged into dedicated circuit.
• Confirm oven is on grounded and polarized circuit.
• Check fuse or circuit breaker. Determine if circuit
is operable by plugging another item in outlet.
• Confirm microwave oven door is securely closed.
• If condition remains unchanged, see “Unchanged
Condition” instructions below.
If control will not accept instructions:
• For cooking by time, see “Unchanged Condition”
instructions below.
If readout appears wrong:
• Press
• See “Unchanged Condition” instructions below.
If oven light does not work:
• Confirm light bulb is screwed in tightly .
• Confirm light bulb is not defective.
If room lights dim or pulse when oven is in use:
• Confirm microwave is on proper circuit. See
STOP/RESET
“Grounding Instructions” section.
.
Normal Operation
• The oven floor is warm when the oven has not been
operating. Oven light is on.
• Steam or vapor escaping around oven door.
• Dimming oven light or change in blower sound when
heating at power level other than 100%. Dull thumping
sound while oven is operating.
Keep a copy of sales receipt for future reference or in
case warranty service is required. Any questions or to
locate an authorized servicer, call 1-800-NAT-LSVC
(1-800-628-5782) inside U.S.A. 319-622-551 1 outside
U.S.A. Warranty service must be performed by an
authorized servicer. Amana, also recommends
contacting an authorized servicer if service is required
after warranty expires.
If oven operates, but will not heat food:
• Place one cup cool water in oven. Heat for one
minute. If water temperature does not rise, oven is
operating incorrectly .
If “RESET” appears in display:
• This is a power interruption signal and will appear
whenever oven is initially plugged in or when
power is interrupted. Set the clock to clear.
15
Page 16

Microwave Cooking
Microwave Cooking Principles
Decrease cooking times when:
• Foods are high in fat and sugar.
• Foods are porous.
• Foods are flat, thin or prepared in shallow pan.
Increase cooking times when:
• Foods are thick and dense.
• Foods are frozen or refrigerator temperature.
• Food volume increases.
Food Placement
Allow space between foods for proper cooking results.
For best results, arrange thickest or hardest to cook
portion of food toward outside of dish. Place smaller,
easier to cook portions toward center.
Reheating
When reheating food, cover dish loosely with plastic
wrap. Heat at full power. Reheat porous items such as
breads and cakes for a minimum amount of time. Stir
soups, sauces and beverages vigorously before
reheating.
Browning
Some foods prepared in microwave will not brown the
same as if done in conventional oven. This is
particularly true for baked goods, such as breads and
cakes.
Shielding
Porous, thin and protruding portions of large food items,
such as poultry drumsticks, can be covered with thin
strips of foil to prevent overcooking.
Piercing
Membranes or tight skins on foods, such as egg yolks,
potatoes, tomatoes, and squash must be pierced.
Piercing allows steam to escape during cooking.
Defrosting
Frozen foods in paper or plastic can be defrosted in
package. Slit, pierce, or vent sealed packages.
Microwave Utensils
Recommended utensils include: glass, glass-ceramic,
natural fiber cloth, non-recycled paper, plastic and
wood.
Not Recommended utensils include: aluminum foil,
grocery bags, lead crystal, metal, metallic trimmed
china, newspapers and recycled paper.
Utensil Check Test
Use the following test to check utensils for microwave
safeness.
1. Place glass measuring cup of water next to
empty dish to be tested in microwave oven.
2. Heat on full power for one minute.
3. Check temperature of dish and water.
• If dish remains cool and water is hot, dish is
microwave safe.
• If dish is slightly warm, use for short term cooking
only.
• If dish is hot and water is cool, do not use. Dish
remains cool if not absorbing microwaves and
microwaves are being absorbed by water. Dish
becomes hot if absorbing microwaves.
Preventing Excess Moisture
When cooking foods in a microwave oven, a
considerable amount of steam/water vapor can be
generated and accumulate on foods and inside of oven.
This is caused by hot moist air from food coming in
contact with cool surfaces inside oven. Use the
following procedures to help reduce moisture buildup.
• Cover foods before cooking in microwave.
• Cover potatoes and fresh vegetables with a
microwave-safe paper towel before cooking to help
absorb excess moisture. Remove paper towel
immediately after cooking to prevent vegetables from
reabsorbing moisture.
• Open microwave door immediately after cooking to
reduce moisture inside oven.
Foods that spoil easily like milk eggs, fish, stuffing,
poultry, and pork should not be allowed to sit out for
more than 1 hour after defrosting.
It is important that most foods, especially meats, be
totally defrosted before cooking. Determine foods are
totally defrosted, by inserting sharp knife in center of
food and checking for remaining ice crystals. Turn large
food items over during defrosting, for best results.
16
Page 17

Using Rack
Food microwaves best when placed on the turntable or
on the rack. For best cooking results, remove the rack
unless you are cooking on two levels.
Rack
Rack provides a flat surface for placing dishes that may
tilt if placed on the turntable.
Rack allows you to place 2 dishes side-by-side. This is
helpful for casseroles or other cookware that may be too
tall to cook on two levels.
Rack gives you the option to reheat or cook more than
one dish of food at the same time.
To cook on 2 levels or to cook 2 dishes:
1. Double the cooking time.
2. Switch places after ½ the time and give dishes
½ turn.
• Place dense foods, or those that require a longer
cook time, on the shelf first.
Even results
Uneven results
17
Page 18

Cooking and Defrosting Guides
Cooking Guide
Vegetable Quantity Time (Min.) Comments
Asparagus
Fresh spears
Frozen spears
Beans
Fresh green
Frozen green
Frozen lima
Beets
Fresh whole
Broccoli
Fresh cut
Fresh spears
Frozen chopped
Frozen spears
Cabbage
Fresh
Wedges
Carrots
Fresh sliced
Frozen
Cauliflower
Flowerets
Fresh whole
Frozen
Corn
Frozen kernel
Corn on the cob
Fresh
Frozen
Mixed vegetables
Frozen
Peas
Fresh shelled
Frozen
Potatoes
Fresh cubed white
Fresh whole sweet
or white
1 lb.
10 oz. pkg.
1 lb. cut in
half
10 oz. pkg.
10 oz. pkg.
1 bunch 18-22 In 2 qt. casserole, place ½ cup water.
1 bunch
(1¼-1½ lbs.)
1 bunch
(1¼-1½ lbs.)
10 oz. pkg.
10 oz. pkg.
1 med. head
(about 2 lbs.)
1 lb.
10 oz. pkg.
1 med. head
1 med. head
10 oz. pkg.
10 oz. pkg. 5-7 In 1 qt. casserole, place 2 tablespoons water.
1-5 ears
1 ear
2-6 ears
10 oz. pkg. 5-7 In 1 qt. casserole, place 3 tablespoons water.
2 lbs.
unshelled
10 oz. pkg.
4 potatoes
(6-8 oz.
each)
1 (6-8 oz.)
7-9, level 7
5-7
10-12
6-8
6-8
8-10
10-13
5-7
5-7
9-11
8-10
7-9
5-7
10-14
10-17
5-7
3-4 per ear
5-6
3-4 per ear
10-12
5-7
10-12
3-4
Use 100% power unless instructed otherwise.
1½ qt. oblong glass baking dish. Add ¼ cup of water.
1 qt. casserole dish.
1½ qt. casserole, place ½ cup water.
In 1 qt. casserole, place 2 tablespoons water.
In 1 qt. casserole, place ¼ cup water.
In 2 qt. casserole, place ½ cup water.
In 2 qt. oblong glass baking dish, place ¼ cup water.
Rotate dish after half of time. (Turntable should be
turned off.)
In 1 qt. casserole.
In 1 qt. casserole, place 3 tablespoons water.
In 1½ or 2 qt. casserole, place ¼ cup water.
In 2 or 3 qt. casserole, place ¼ cup water.
In 1½ qt. casserole, place ¼ cup water.
In 1 qt. casserole, place 2 tablespoons water.
In 2 qt. casserole, place ½ cup water.
In 2 qt. casserole, place ½ cup water.
In 1 qt. casserole, place 2 tablespoons water.
In 2 qt. oblong glass baking dish, place corn. If corn is
in husk, use no water; if corn has been husked, add ¼
cup water. Rearrange after half of time. (Turntable
should be turned off.)
Place in 2 qt. oblong glass baking dish.
Cover with vented plastic wrap.
Rearrange after half of time. (Turntable should be
turned off.)
In 1 qt. casserole, place ¼ cup water.
In 1 qt. casserole, place 2 tablespoons water.
Peel and cut into 1 inch cubes. Place in 2 qt. casserole
with ½ cup water. Stir after half of time.
Pierce with cooking fork. Place in center of the oven.
Let stand 5 minutes.
18
Page 19

Vegetable Quantity Time (Min.) Comments
g
Spinach
Fresh
Frozen chopped
and leaf
Squash
Fresh summer and
yellow
Winter acorn
butternut
10-16 oz.
10 oz. pkg.
1 lb. sliced
1-2 squash
(about 1 lb.
each)
5-7
5-7
5-7
8-11
Use 100% power unless instructed otherwise.
In 2 qt. casserole, place washed spinach.
In 1 qt. casserole, place 3 tablespoons water.
In 1½ qt. casserole, place ¼ cup water.
Cut in half and remove fibrous membranes. In 2 qt.
oblong glass baking dish, place squash cut-side-down.
Turn cut-side-up after 4 minutes. (Turntable should be
turned off.)
Defrosting Guide
Food Quantity Time (Min.) Comments
Bread, Cakes
Bread, buns or rolls
Sweet Rolls
Fish and Seafood
Fillets, frozen
Shellfish, small pcs.
Fruit
Plastic pouch
Meat
Bacon
Franks
Ground meat
Roast: beef, lamb,
veal, pork
Steaks, chops and
cutlets
Poultry
Chicken, broilerfryer cut up
Chicken, whole
Cornish hen
Turkey breast
1 piece
approx. 12
oz.
1 lb.
1 lb.
1-2 10 oz.
pkg.
1 lb.
1 lb.
1 lb.
2½-3 lbs.
2½-3 lbs.
4-6 lbs.
1
3-5
7-9
5-7 Place block in casserole. Turn over and break up after
half the time.
3-6
3-5
3-5
5-7
12-16 per lb.
6-8 per lb.
16-20
18-22
8-14 per lb.
6-10 per lb.
Place unopened package in oven. Let stand 5 minutes
after defrosting.
Place unopened package in oven. Microwave just until
franks can be separated. Let stand 5 minutes, if
necessary, to complete defrosting.
Turn meat over after half the time.
Use power level 1.
Place unwrapped meat in cookin
half the time and shield warm areas with foil. When
finished, separate pieces and let stand to complete
defrosting.
Place wrapped chicken in dish. Unwrap and turn over
after half the time. When finished, separate pieces and
microwave 2 to 4 minutes more, if necessary. Let
stand to finish defrosting.
Place wrapped chicken in dish. After half the time,
unwrap and turn chicken over. Shield warm areas with
foil. Finish defrosting. If necessary, run cold water in
the cavity until giblets can be removed.
Place unwrapped hen in the oven breast-side-up. Turn
over after half the time. Run cool water in the cavity
until giblets can be removed.
Place unwrapped breast in dish breast-side-down.
After half the time, turn over and shield warm areas
with foil. Finish defrosting. Let stand 1 to 2 hours in
refrigerator to complete defrosting.
dish. Turn over after
19
Page 20

Quick Reference Instructions
Vent Fan
Press
VENT F A N
pad to turn vent fan to
HI, LO,
and
OFF.
Surface Light
Press once for bright surface light, twice for dimmer
night light or press 3 times to turn off.
Display
Press and hold 0 pad for 3 seconds to turn display on or
off. Display cannot be turned off while oven is in
operation.
Scroll Speed
The display scroll speed can be changed. Press and
hold
Press number pad 1-5 to set scroll speed.
Clock
1. Press
2. Enter time of day.
3. Press AM/PM pad.
4. Press
Minute Timer
1. Press
2. Press desired time.
3. Press
ON/OFF
AM/PM
CLOCK.
CLOCK
TIMER
TIMER
pad of about 3 seconds to access display.
pad. Clock is set.
pad.
pad.
Program 2 Microwave Cooking
1. Place food in oven and close door.
2. Press
3. Press number pads to select first cook time.
4. If power level other than 100% is desired, press
5. Press
6. Press number pads to select second cook time.
7. If power level other than 100% is desired, press
8. Press
Changing Cookmatic® Power Level
1. Place food in oven and close door.
2. Select cook or defrost program.
3. Enter numbers for cooking or defrosting time.
4. Press
5. Press number for desired power level. Number
6. Press
One Step Cook (1-6)
1. Place food in oven and close door.
2. To select 1 to 6 minutes of cooking time, press
3. Oven stops, signals, and “FOOD IS READY”
PROGRAM 1 & 2
COOKMATIC LEVEL
PROGRAM 1 & 2
COOKMATIC LEVEL
STAR T
pad.
COOKMA TIC LEVEL
displays.
STAR T
desired number pad (1-6).
displays at end of cooking time. “READY” remains in
display until door is opened or
pressed.
.
pad.
pad and number pad.
pad.
pad and number pad.
pad.
STOP/RESET
pad is
Reminder
1. Press
2. Enter time of day you want the oven to signal.
3. Press
4. Press
Child Lock
TO lock or unlock control, press and hold STOP/RESET
pad for about 3 seconds.
Pause or Cancel Cycle
Open door or press
RESET
Complete Reminder
Complete Reminder is not adjustable.
Program 1 Microwave Cooking
1. Place food in oven. Close door.
2. Press
3. Press number pad to select desired cooking time.
4. If power level other than 100% is desired, press
5. Press
REMINDER
AM/PM
REMINDER
pad.
pad.
pad.
ST ART
pad to cancel cycle.
PROGRAM 1 & 2
COOKMATIC LEVEL
ST AR T
pad.
pad to pause. Press
pad.
pad and number pad.
STOP/
Auto Start
1. Place food in oven and close door.
2. Press
3. Enter desired start time.
4. Press
5. Enter desired cook or defrost program.
6. Press
Auto Accu-Thaw
1. Remove food from package, place in oven on
2. Press
3. Enter food weight.
4. Press
Accu-Thaw
1. Remove food from package, place in oven on
2. Press
3. Enter defrost time.
4. Press
AUTO ST A RT
AM/PM
STAR T
microwave-safe dish and close door.
pad.
ACCU-THAW®
STAR T
®
microwave-safe dish and close door.
ACCU-THAW®
STAR T
pad.
pad.
®
pad.
pad.
pad twice.
pad.
20
Page 21

Popcorn
1. Remove outer wrapper from microwave popcorn.
2. Open oven door, place package of popcorn in
center of oven floor, and close oven door.
3. Press
Cook
1. Place food in oven and close door.
2. Press
3. Press pad for desired food code.
4. Press number pads to enter food weight in ounces.
5. Press
Reheat
1. Place food in oven and close door.
2. Press
3. Press number pad from 1 to 6 to select desired food
4. Press
Add 30 Seconds
Each time
is added to cooking time. Press pad and oven will start
immediately .
POPCORN
COOK
STAR T
REHEA T
type.
START
ADD 30 SECOND
pad. Oven will start immediately .
pad.
pad. Oven will begin cooking.
pad.
pad.
pad is pressed 30 seconds
21
Page 22

22
Page 23

23
Page 24

Part No. C8940848
Printed in Korea
1997 Raytheon Appliances
Amana, Iowa 52204
 Loading...