

Amana MDB3601BWW, ADB1400A, DU810SWPQ, DU810SWPU, DU810SWPT Installation Instructions Manual
...Page 1
INSTALLATION INSTRUCTIONS
UNDERCOUNTER DISHWASHER
INSTRUCTIONS D'INSTALLATION
LAVE-VAISSELLE SOUS PLAN DE TRAVAIL
Table of Contents.......................2
Table des matières....................19
W10282559A
Page 2
TABLE OF CONTENTS
DISHWASHER SAFETY .................................................................2
INSTALLATION REQUIREMENTS................................................3
Tools and Parts ............................................................................3
Location Requirements................................................................ 3
Drain Requirements .....................................................................5
Water Supply Requirements........................................................5
Electrical Requirements ...............................................................5
DISHWASHER SAFETY
INSTALLATION INSTRUCTIONS ..................................................6
Prepare cabinet opening using existing utility hookups..............6
Prepare cabinet opening where there are
no existing utility hookups............................................................7
Prepare Dishwasher.....................................................................9
Make Electrical Connection .......................................................12
Connect to water supply............................................................13
Connect to drain.........................................................................13
Secure dishwasher in cabinet opening......................................14
You need to:
■ Slowly open dishwasher door while someone grasps the rear
of the dishwasher. Remove shipping materials, drain hose
and lower rack. Close dishwasher door until latched.
■ Observe all governing codes and ordinances.
■ Install this dishwasher as specified in these instructions.
■ Installation should be performed by a qualified service
technician. The dishwasher must be installed to meet all
electrical and plumbing national and local codes and
ordinances.
2
Page 3
INSTALLATION REQUIREMENTS
Tools and Parts
Gather the required tools and parts before starting installation.
All installations
Tools needed:
■ Pliers
■ Phillips screwdriver
■ ⁵⁄₁₆" y ¹⁄₄" nut drivers or hex
sockets
■ Measuring tape or ruler
■ 10" adjustable wrench that
opens to 1¹⁄₈" (2.9 cm)
■ Flat-blade screwdriver
■ Utility knife
■ 2 twist-on wire connectors
which are the proper size
to connect your household
wiring to 16-gauge wiring
in dishwasher
In addition, for new installations
Tools needed: Parts needed:
■ Cordless drill with ¹⁄₂", ³⁄₄"
y 1¹⁄₂" hole saw bits
■ Small tubing cutter
■ Wire stripper
■ 1¹⁄₂" to 2" screw-type
clamp is connecting to
waste-tee
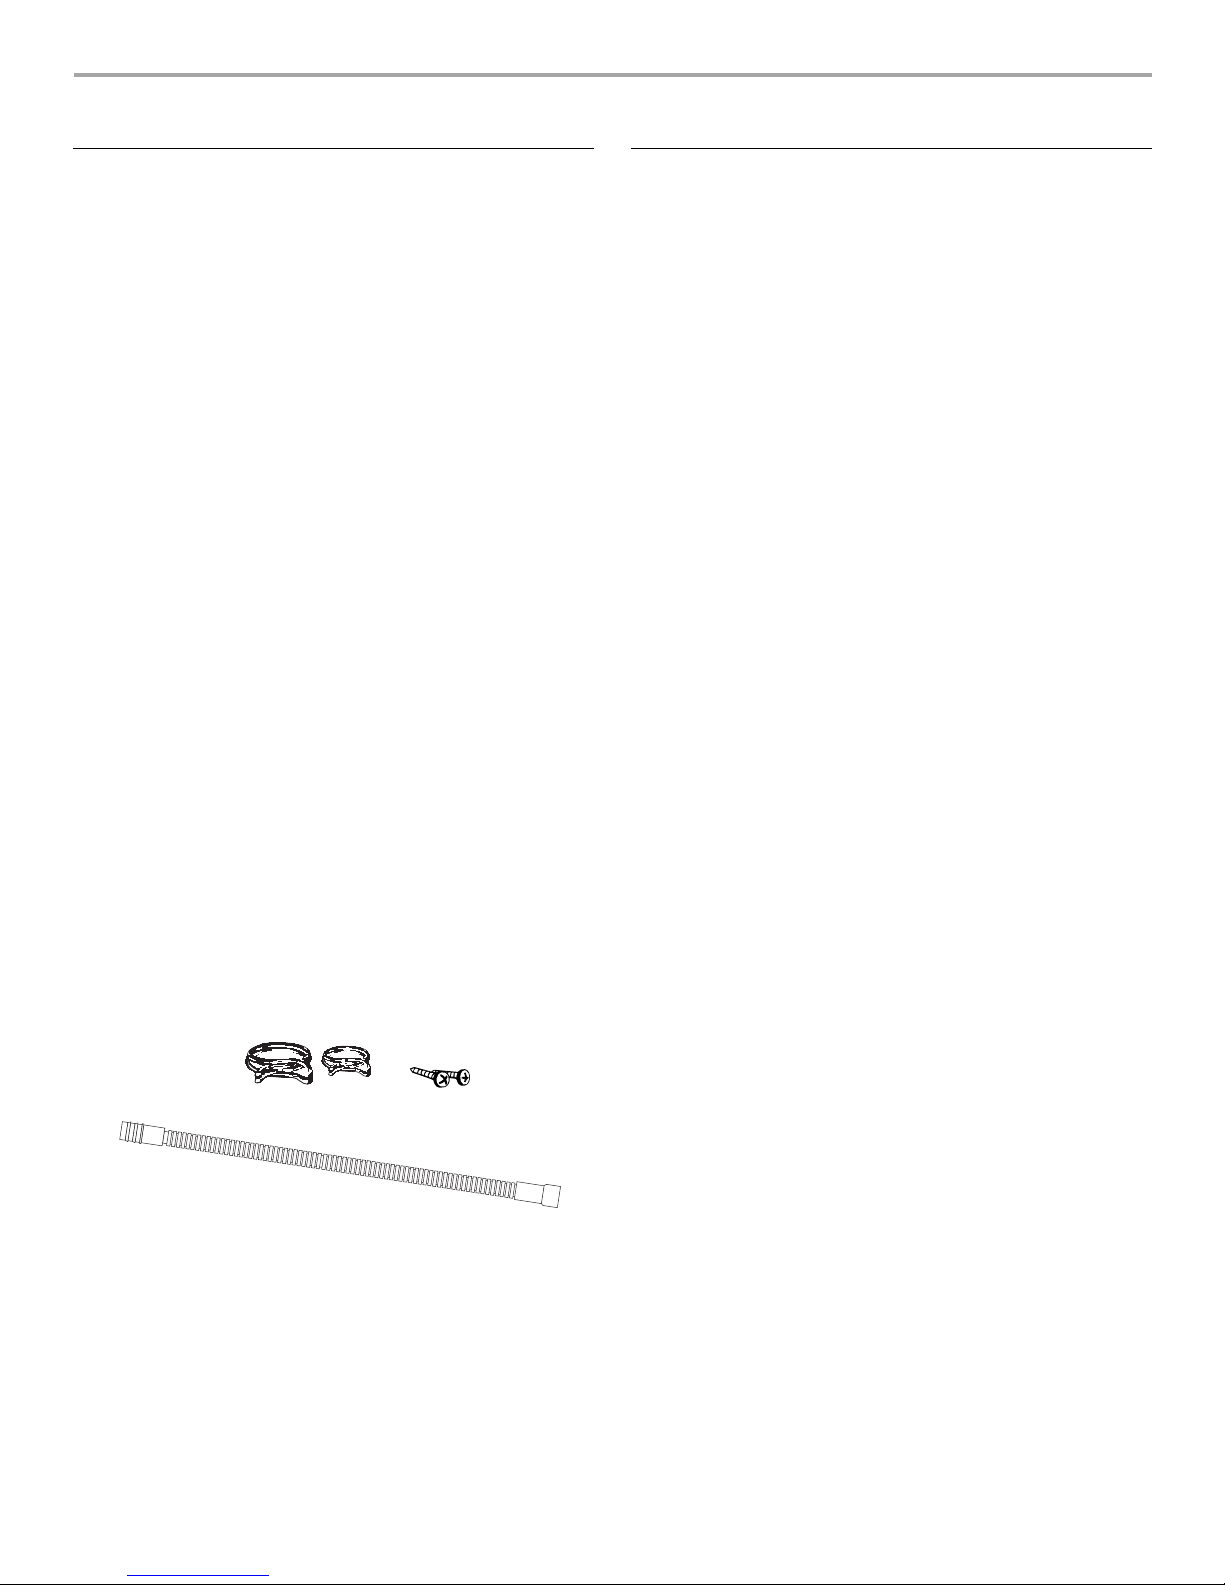
Parts supplied
A. 2 - drain hose clamps, 1 large and 1 small
B. 2 - # 10 x ¹⁄₂" Phillips-head screws
C. Drain hose
■ Small level
■ Flashlight
■ Shallow pan
■ ⁵⁄₈" open-end wrench
■ Bath towell
■ Wood block
Parts needed:
■ Shims (if installed with
built-up floor)
■ ³⁄₈" Compr x ³⁄₄" hose
fitting. (Part Number
W10273460A)
■ Copper tubing (³⁄₈"
recommended) or flexible
stainless steel braided fill
line
■ Clamp connector or
conduit connector to fit a
⁷⁄₈" (2.2 cm) diameter hole
Location Requirements
Do not run drain lines, water lines or electrical wiring where they
can interfere with or contact dishwasher motor or legs.
The location where the dishwasher will be installed must provide
clearance between motor and flooring. Motor should not touch
the floor.
Do not install dishwasher over carpeted flooring.
Shelter dishwasher and water lines leading to dishwasher against
freezing. Damage from freezing is not covered by the warranty.
A side panel kit is available from your dealer for installing your
dishwasher at the end of your cabinetry.
A moisture barrier accessory (Part Number 4396277) is available
from your dealer for installing underneath the countertop.
Check location where dishwasher will be installed. The location
must provide:
■ easy access to water, electricity and drain.
■ convenient access for loading and unloading dishes. Corner
locations require a 2" (5.1 cm) minimum clearance between
the side of the dishwasher door and the wall or cabinet.
■ square opening for proper operation and appearance.
■ cabinet front perpendicular to floor.
■ level floor. (If floor at front of opening is not level with floor at
rear of opening, shims may be needed to level dishwasher.)
NOTE: To avoid shifting during dishwasher operation, shims
must be securely attached to the floor.
If dishwasher will be left unused for a period of time or in a
location where it may be subject to freezing, have it winterized by
authorized service personnel.
Make sure pipes, wires and drain hose are within the shaded area
shown in the “Cutout dimensions” section.
Helpful Tip: If the floor in the dishwasher opening is uneven
(example: tile flooring only partway into opening), you will
need to be exact in measuring dimensions and in leveling
dishwasher.
A
C
For part or kit, see local retailer or call Whirlpool Parts:
1-800-442-8991.
B
3
Page 4

Product dimensions Cutout dimensions
24" (61 cm)*
20³⁄₄" (52.7 cm)
*To front of door frame
SIDE VIEW
REAR VIEW
Cut holes in shaded area of cabinet walls or floor as specified
below:
water line – ¹⁄₂" (1.3 cm)
drain line – 1¹⁄₂" (3.8 cm)
direct wire – ³⁄₄" (1.9 cm)
power supply cord – 1¹⁄₂" (3.8 cm)
*Measured from the lowest point on the underside of
countertop.
**Minimum, measured from narrowest point of opening.
4
Page 5

Drain Requirements
■ Use the new drain hose supplied with your dishwasher. If this
is not long enough, use a new drain hose with a maximum
length of 12 ft (3.7 m) that meets all current AHAM/IAPMO
test standards, is resistant to heat and detergent, and fits the
1"
■ Connect drain hose to waste tee or disposer inlet above drain
trap in house plumbing and 20" (50.8 cm) minimum above the
floor. It is recommended that the drain hose either be looped
up and securely fastened to the underside of the counter, or
be connected to an air gap.
Air gap
■ Use an air gap if the drain hose is connected to house
plumbing lower than 20" (50.8 cm) above subfloor or floor.
■ Use ¹⁄₂" minimum I.D. drain line fittings.
Water Supply Requirements
■ A hot water line with 20 to 120 psi (138 to 862 kPa) water
pressure.
■ 120°F (49°C) water at dishwasher.
■ ³⁄₈" O.D. copper tubing with compression fitting or flexible
braided fill line (¹⁄₂" minimum plastic tubing is not
recommended).
■ ³⁄₈" Compr x ³⁄₄" hose fitting.
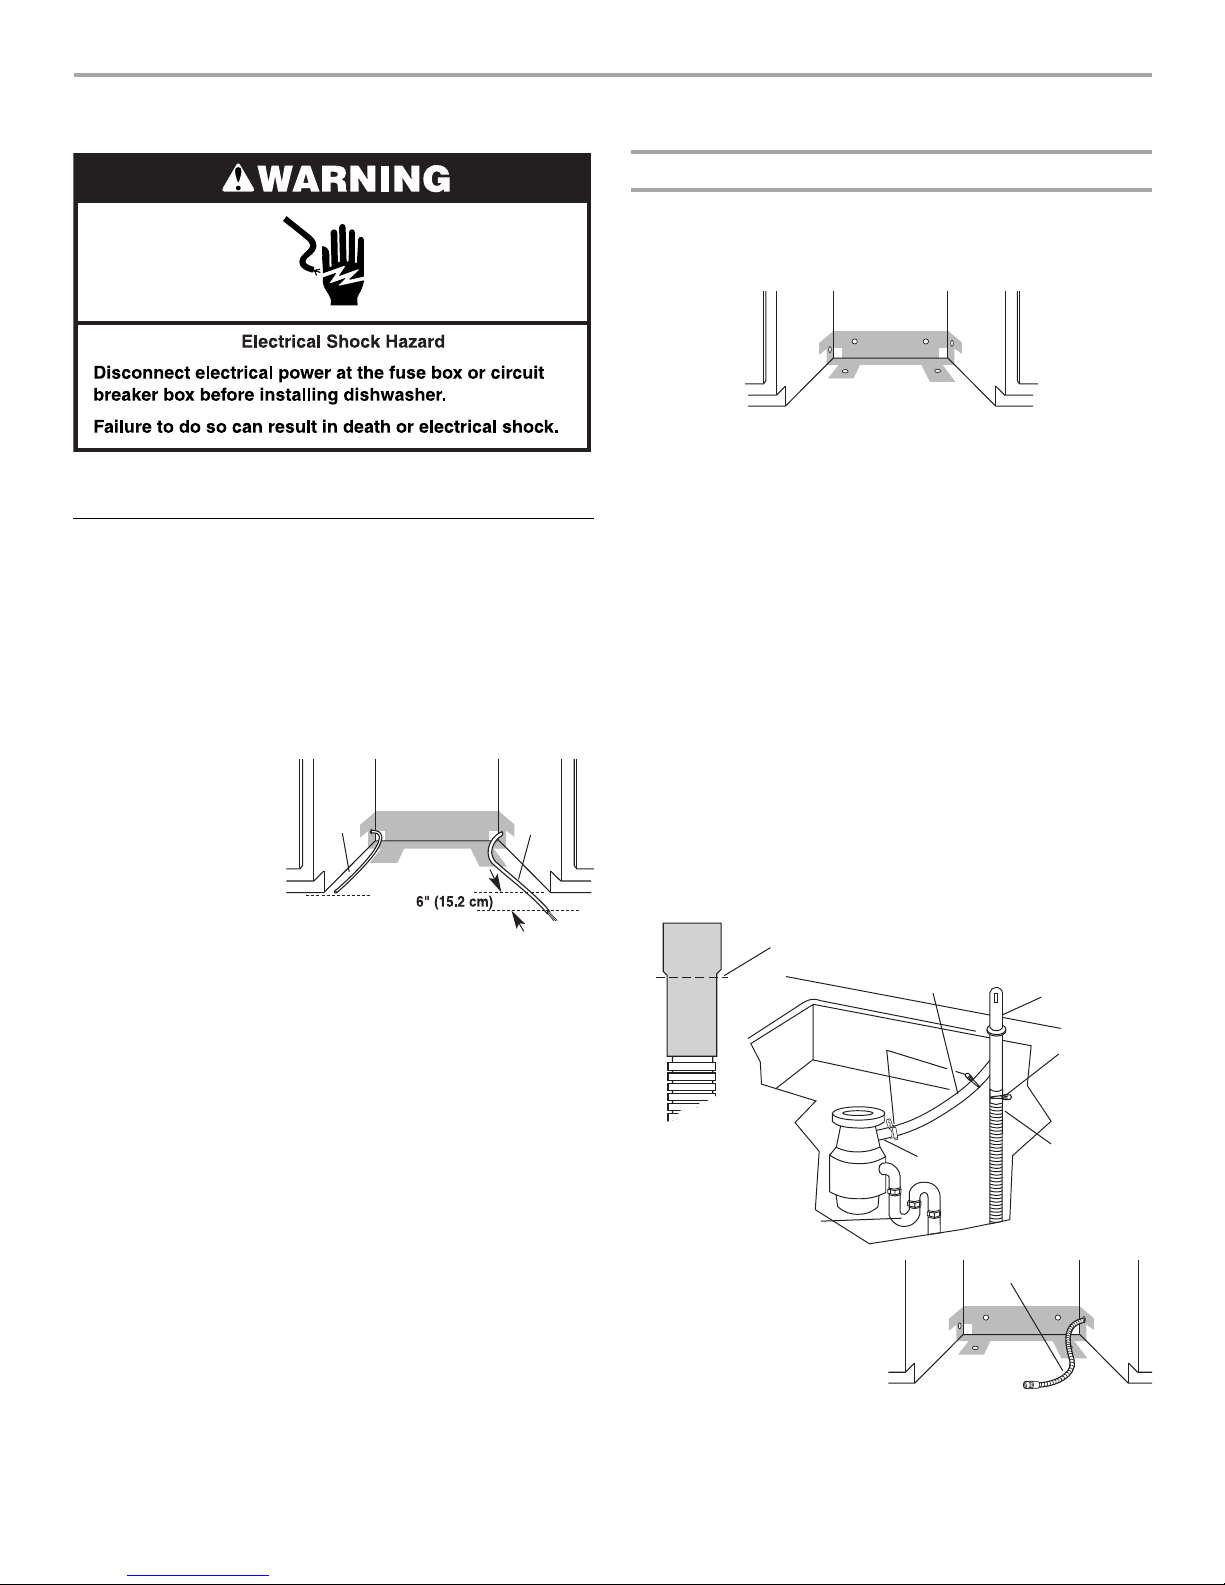
Do not solder within 6" (15.2 cm) of water inlet valve.
Electrical Requirements
Contact a qualified electrician.
Assure that the electrical installation is adequate and in
conformance with all national and local codes and ordinances.
You must have:
■ 120-volt, 60 Hz, AC-only, 15- or 20-amp, fused electrical
supply.
■ Copper wire only.
We recommend:
■ A time-delay fuse or circuit breaker.
■ A separate circuit.
If direct wiring dishwasher:
■ Use flexible, armored or nonmetallic sheathed, copper wire
with grounding wire that meets the wiring requirements for
your home and local codes and ordinances.
■ Use strain relief method provided with house wiring junction
box or install a UL Listed/CSA Approved clamp connector to
the house wiring junction box. If using conduit, use a UL
Listed/CSA Approved strain relief.
If connecting dishwasher with a power supply cord:
■ Use Power Supply Cord Kit (Part Number 4317824) marked
for use with dishwashers. Kit contents include:
– Volex, Inc., UL Listed 16 gauge 3 wire power supply cord
with 3 prong grounded plug.
– Neer C-500 ⁷⁄₈" strain relief.
– 3 wire connectors.
– Part Number 302797 grommet
Follow the kit instructions for installing the power supply
cord.
■ Power supply cord must plug into a mating 3 prong,
grounded outlet, located in the cabinet next to the
dishwasher opening. Outlet must meet all local codes and
ordinances.
5
Page 6
INSTALLATION INSTRUCTIONS
1. Disconnect power.
2. Turn off water supply.
Prepare cabinet opening using existing
utility hookups
■ Follow the steps in this section if you are installing the
dishwasher in an existing cabinet opening with utility
hookups.
■ If you are installing the dishwasher in a cabinet opening that
does not have hookups, follow the steps under “Prepare
cabinet opening where there are no existing utility hookups”
section.
1. Check that the water
line reaches to the
front left of opening
where the water
connection will be
made.
2. Check that the direct
wire reaches to the
front right of opening
where the electrical connection will be made.
If the water line and the direct wire reach far enough into the
opening, proceed to the next section “Install the drain hose.” If
they do not reach far enough, follow the steps under “Prepare
cabinet opening where there are no existing utility hookups.”
Water
line
Direct
wire
Install the drain hose
IMPORTANT: Always use a new drain hose when installing a new
replacement dishwasher.
1. Drill a 1¹⁄₂" (3.8 cm) diameter hole in cabinet wall or floor on
the side of the opening closest to the sink.
2. Connect drain hose to waste tee or waste disposer using one
of the following methods:
■ Option 1, Waste disposer – with air gap
■ Option 2, No waste disposer – with air gap
■ Option 3, Waste disposer – no air gap*
■ Option 4, No waste disposer – no air gap*
*An air gap is recommended.
Helpful Tip: To reduce the vibration of the hose, keep the
hose away from the floor and the edge of the hole where it
passes through the cabinet.
Option 1, Waste disposer - with air gap:
1. Remove the disposer knockout plug. Cut end of drain hose if
needed (do not cut ribbed section).
2. Attach drain hose to air gap with large spring-type clamp. If
the drain hose was cut, use a 1¹⁄₂" to 2" (3.8 to 5 cm) screwtype clamp*.
3. Use a rubber hose connector* with spring- or screw-type
clamps* to connect air gap to disposer inlet.
This connection must be before the drain trap and at least
20" (50.8 cm) above the floor where dishwasher will be
installed.
Drain hose cut here if needed
Rubber hose
Spring- or
screw-type
clamps
connector
Air gap
Large
spring-type
clamp
6
Drain trap
4. Insert drain hose through
hole cut in cabinet to the
front center of opening
where drain connection will
be made.
*Parts available from local
plumbing supply stores.
Disposer
inlet
Drain
hose
Drain hose
Page 7

Option 2, No waste disposer - with air gap:
e
1. Cut end of drain hose if needed (do not cut ribbed section).
2. Attach drain hose to air gap with large spring-type clamp. If
the drain hose was cut, use a 1¹⁄₂" to 2" (3.8 to 5 cm) screwtype clamp*.
3. Use a rubber hose connector* with spring- or screw-type
clamps* to connect air gap to waste tee.
This connection must be before the drain trap and at least
20" (50.8 cm) above the floor where dishwasher will be
installed.
Drain hose cut here if needed
Rubber hose
connector
Air gap
Option 4, No waste disposer - no air gap:
1. Cut end of drain hose if needed (do not cut ribbed section).
2. Attach drain hose to waste tee with 1¹⁄₂" to 2" (3.8 to 5 cm)
screw-type clamp*.
This connection must be before the drain trap and at least
20" (50.8 cm) above the floor where dishwasher will be
installed. It is recommended that the drain hose be looped up
and securely fastened to the underside of the counter.
Drain hose cut here if needed
Screw-type
clamp
Spring- or
Drain trap
4. Insert drain hose through
hole cut in cabinet to the
front center of opening
where drain connection
will be made.
*Parts available from local
plumbing supply stores.
screw-type
clamps
Waste
tee
Drain hose
Large
spring-typ
clamp
Drain
hose
Option 3, Waste disposer - no air gap:
1. Remove the disposer knockout plug. Do not cut end of drain
hose.
2. Attach drain hose to disposer inlet with large spring-type
clamp.
This connection must be before the drain trap and at least
20" (50.8 cm) above the floor where dishwasher will be
installed. It is recommended that the drain hose be looped up
and securely fastened to the underside of the counter.
Large spring-type
clamp
Drain hose
Disposer
inlet
Drain trap
3. Insert drain hose through
hole cut in cabinet to the
front center of opening
where drain connection will
be made.
Drain hose
Waste
tee
Drain
hose
Drain trap
3. Insert drain hose through hole
cut in cabinet to the front
center of opening where drain
connection will be made.
*Parts available from local
plumbing supply stores.
Drain hose
Prepare cabinet opening where there are
no existing utility hookups
Electrical connection
Option 1, Direct wire method:
Helpful Tip: Wiring the dishwasher will be easier if you route
wire into the cabinet opening from the right side.
1. Drill a ³⁄₄" (1.9 cm) hole in
right-hand cabinet side, rear
or floor. Preferred and
optional locations are shown.
2. Wood cabinet: Sand the hole
until smooth.
Metal cabinet: Cover hole
with grommet, (Part Number
302797 - not provided).
3. Run wire into house wiring junction box.
4. Install a UL Listed/CSA Approved clamp connector (strain
relief) for flexible-type wire. If installing conduit, attach a UL
Listed/CSA Approved strain relief to the junction box.
5. Run other end of wire
through cabinet hole. Cable
must extend to the right
front of cabinet opening.
Optional
locations
Preferred
locations
7
Page 8
Option 2, Power supply cord method:
NOTE: A mating, 3 prong, ground-type wall receptacle is required
in a cabinet next to the dishwasher opening.
1. Drill a 1¹⁄₂" (3.8 cm)
hole in the cabinet
Optional
locations
Preferred
locations
rear or side.
Preferred and
optional locations
are shown.
2. Wood cabinet:
Sand the hole until
smooth.
Metal cabinet: Cover hole with grommet (Part Number
302797) included with power supply cord kit.
Install the water line
Helpful Tip: Routing the water line through the left side of
cabinet opening will make water connection easier.
1. Drill a minimum ¹⁄₂" (1.3 cm) hole in the cabinet side, rear or
floor. Preferred and optional locations are shown.
Optional
locations
2. Measure overall
length of copper
tubing required.
3. Attach copper tubing
to the water line with
a manual shutoff
valve.
4. Slowly feed copper
tubing through hole in
cabinet. Copper tubing will bend and kink easily, so be
gentle. The copper tubing should be far enough into the
cabinet opening to connect it to dishwasher inlet on the front
left of the dishwasher.
5. Turn water shutoff valve to “ON” position. Flush water into a
shallow pan to get rid of particles that may clog the inlet
valve.
6. Turn shutoff valve to “OFF” position.
Preferred
locations
Copper
tubing
Install the drain hose
IMPORTANT: Always use a new drain hose.
1. Drill a 1¹⁄₂" (3.8 cm)
diameter hole in
cabinet wall or floor
on the side of the
opening closest to
the sink.
2. Connect drain hose to waste tee or waste disposer using one
of the following methods:
■ Option 1, Waste disposer – with air gap
■ Option 2, No waste disposer – with air gap
■ Option 3, Waste disposer – no air gap*
■ Option 4, No waste disposer – no air gap*
*An air gap is recommended.
Helpful Tip: To reduce the vibration of the hose, keep the
hose away from the floor and the edge of the hole where it
passes through the cabinet.
Option 1, Waste disposer - with air gap:
1. Remove the disposer knockout plug. Cut end of drain hose if
needed (do not cut ribbed section).
2. Attach drain hose to air gap with large spring-type clamp. If
the drain hose was cut, use a 1¹⁄₂" to 2" (3.8 to 5 cm) screwtype clamp*.
3. Use a rubber hose connector* with spring- or screw-type
clamps* to connect air gap to disposer inlet.
This connection must be before the drain trap and at least
20" (50.8 cm) above the floor where dishwasher will be
installed.
Drain hose cut here if needed
Rubber hose
Drain trap
Spring- or
screw-type
clamps
connector
Disposer
inlet
Air gap
Large
spring-type
clamp
Drain
hose
8
4. Insert drain hose through
hole cut in cabinet to the
front center of opening
where drain connection will
be made.
*Parts available from local
plumbing supply stores.
Drain hose
Page 9

Option 2, No waste disposer - with air gap:
e
1. Cut end of drain hose if needed (do not cut ribbed section).
2. Attach drain hose to air gap with large spring-type clamp. If
the drain hose was cut, use a 1¹⁄₂" to 2" (3.8 to 5 cm) screwtype clamp*.
3. Use a rubber hose connector* with spring- or screw-type
clamps* to connect air gap to waste tee.
This connection must be before the drain trap and at least
20" (50.8 cm) above the floor where dishwasher will be
installed.
Drain hose cut here if needed
Rubber hose
Spring- or
screw-type
clamps
connector
Air gap
Large
spring-typ
clamp
Option 4, No waste disposer - no air gap:
1. Cut end of drain hose if needed (do not cut ribbed section).
2. Attach drain hose to waste tee with 1¹⁄₂" to 2" (3.8 to 5 cm)
screw-type clamp*.
This connection must be before the drain trap and at least
20" (50.8 cm) above the floor where dishwasher will be
installed. It is recommended that the drain hose be looped up
and securely fastened to the underside of the counter.
Drain hose cut here if needed
Screw-type
clamp
Waste
tee
Drain
hose
Drain trap
4. Insert drain hose through
hole cut in cabinet to the
front center of opening
where drain connection will
be made.
*Parts available from local
plumbing supply stores.
Waste
tee
Drain hose
Drain
hose
Option 3, Waste disposer - no air gap:
1. Remove the disposer knockout plug. Do not cut end of drain
hose.
2. Attach drain hose to disposer inlet with large spring-type
clamp.
This connection must be before the drain trap and at least
20" (50.8 cm) above the floor where dishwasher will be
installed. It is recommended that the drain hose be looped up
and securely fastened to the underside of the counter.
Large spring-type
clamp
Drain hose
Disposer
inlet
Drain trap
3. Insert drain hose through
hole cut in cabinet to the
front center of opening
where drain connection will
be made.
*Parts available from local
plumbing supply stores.
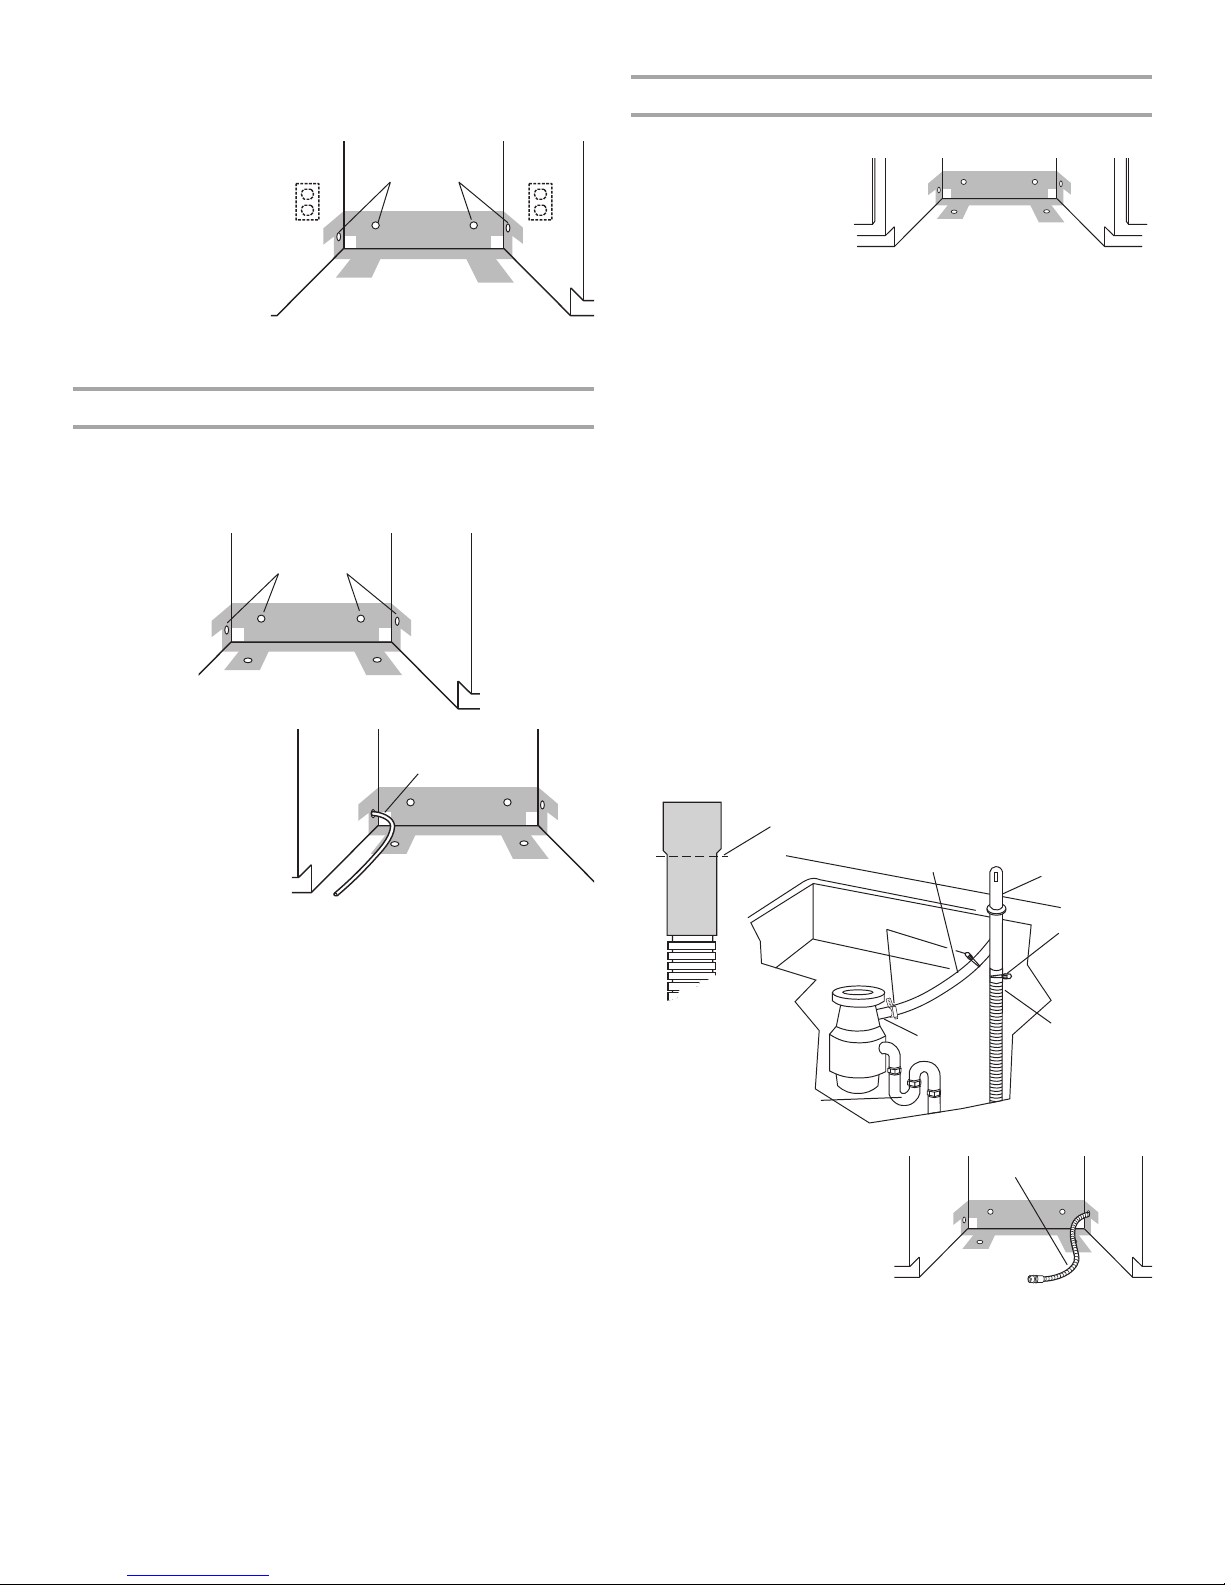
Prepare Dishwasher
Drain hose
Drain trap
3. Insert drain hose through
hole cut in cabinet to the
front center of opening
where drain connection will
be made.
Drain hose
Helpful Tip: Put cardboard under dishwasher until it is
installed in cabinet opening. The cardboard will help avoid
damage to floor covering during installation.
1. Using 2 or more people, grasp the sides of dishwasher door
frame and put the dishwasher on its back, resting on top of
the corner posts.
2. Remove the 2 top screws and the 2 bottom screws attaching
access panel and lower panel to dishwasher using a ¹⁄₄" hex
socket, nut driver or Phillips screwdriver.
3. Remove panels and set panels aside on a covered surface.
9
Page 10

4. Check that grounding clip is attached to the lower panel.
5. Slide nut and ferrule onto tubing.
Nut
Terminal
box cover
Cable clamp
connector
Dishwasher wires
8. Measure height of cabinet opening
from underside of countertop to
floor where dishwasher will be
installed (you need the lowest
point). Check chart for that height
opening. Put wheels in the
required position.
Ferrule
Copper tubing only: Slide nut, then ferrule, about 1" (2.5 cm)
onto copper tubing.
NOTE: To avoid vibration during operation, route the water
supply line so that it does not touch the dishwasher base,
frame or motor.
6. Add 90° elbow fitting to the water supply line.
Connect the ³⁄₈" compression fitting to the water supply line
prior to installing the unit into the cabinet opening. Attach
such that the ³⁄₄" connection is facing upward.
Copper tubing only: Put the tubing into the 90° elbow fitting
as far as it will go (the copper tubing bends and kinks easily).
Slide the nut and ferrule forward and start the nut onto the
elbow threads. Flexible braided connection: Secure nut to
elbow using ⁵⁄₈" open ended wrench or adjustable wrench.
®†
NOTE: Do not use Teflon
tape with compression fittings.
7. Remove terminal box cover.
– If you are direct wiring: Install a UL Listed/CSA Approved
clamp connector to the terminal box. If using conduit, use a
UL Listed/CSA Approved strain relief.
– If you are installing a power supply cord kit, do so now,
following kit instructions. The power supply cord kit must
be UL Listed and marked for use with dishwashers (that is,
Power Supply Cord Kit Part Number 4317824).
2
4
Wheel
Minimum
cutout height
34" (86.4 cm)
34¹⁄₈" (86.7 cm)
34⁵⁄₁₆" (87.2 cm)
34¹⁄₂" (87.6 cm)
Wheel
position
1
2
3
4
1
3
9. Turn both front leveler legs to the same
height.
If the minimum cutout height is less than
34" (86.4 cm), the rear wheels can be
removed for additional clearance. This will
allow the dishwasher to fit into a 33⁷⁄₈"
(86 cm) high cutout, but the dishwasher
will be more difficult to move into position.
Front leg
If the wheels are removed, cover the floor
when moving the dishwasher.
10. Using 2 or more people, stand the dishwasher up.
NOTE: Do not attach the dishwasher. This will be done later.
†®Teflon is a registered trademark of E.I. Du Pont de Nemours and Company.
10
Page 11

Check door spring tension
With another person holding the dishwasher to keep it from
tipping, open and close the door a few times. If the door closes
or falls open under its own weight, the door tension will need to
be adjusted.
■ If the door closes too quickly, decrease the spring tension
by moving the spring end toward the front of the
dishwasher.
■ If the door falls open, increase the spring tension by
moving the spring end toward the back of the dishwasher.
■ Springs should be in the same notches on left and right
sides.
7. Remove cardboard from under dishwasher.
8. Using the precut slots in the insulation, attach the insulation
to the sides of the tub using the molded hooks on each side
of the tub.
NOTE: It is all right if dishwasher fits tightly into cabinet opening.
Do not remove insulation blanket — the blanket reduces the
sound level.
Level the dishwasher
1. Align front of dishwasher door panel with cabinet doors. You
may need to adjust alignment to be even with your cabinets.
Helpful Tip: Prop up one side of frame to hold dishwasher up
off floor when adjusting front legs.
Spring
Move
spring end
Move dishwasher into cabinet opening
1. Using two or more people, stand the dishwasher up.
2. Grasp the sides of the dishwasher at the
edges of the door panel.
3. Tilt dishwasher backward on wheels
and move dishwasher close to cabinet
opening. Do not push on the front of the
panel or on the console — they may
dent.
4. If dishwasher has a power supply cord,
insert power supply cord into hole cut into cabinet.
If using direct wire, check that it is on the right front side of
opening.
5. Check that water line is on the left side of opening and drain
hose is near the center of the hole in the cabinet.
6. Slowly move dishwasher completely into cabinet opening. Do
not kink or pinch copper tubing, drain hose, power supply
cord or direct wire between dishwasher and cabinet.
Helpful Tip: Once the dishwasher is in position, you may
have to support the front of the dishwasher by raising,
lowering or shimming front feet.
With some installations, it may be easier to adjust the front
leg using the ³⁄₁₆" hex head.
2. Check that leveling legs are firmly against the floor.
3. Close and latch the door. Place the level against the front of
the dishwasher to check that it is vertically aligned. If needed,
adjust leveling leg or add shims under rear wheel until
dishwasher is even.
4. Repeat for other side of dishwasher.
NOTE: Shims must be securely attached to floor to prohibit their
movement when the dishwasher is operated.
5. Place level against top front
opening of tub. Check that
dishwasher is level from side to
side. If dishwasher is not level,
adjust front legs up or down
until dishwasher is level.
11
Page 12

Make Electrical Connection
Check “Electrical Requirements” section.
You need to:
■ have the correct electrical supply and recommended
grounding method.
If you are:
■ direct wiring, use Option 1
■ using a power supply cord, use Option 2
5. Securely tighten ground connector.
Ground wire
Washer
Ground
connector
Option 1, Direct wire method
1. Route direct wire so that it does not touch dishwasher motor
or lower part of dishwasher tub.
2. Pull direct wire through hole in terminal box.
Helpful Tip:
■ Select the proper size twist-on
connectors to connect your
household wiring to 16-gauge
dishwasher wiring.
■ Insert wire ends into twist-on
connector. Do not pre-twist bare wire.
■ Twist connector.
■ Gently tug on wires to be sure both are secured.
3. Connect the wires as follows using twist-on connectors sized
to connect direct wire to 16-gauge dishwasher wire:
Ground wire
6. Tighten clamp connector or
Screws
conduit connector screws.
7. Reinstall terminal box cover
with wires inside terminal box.
The cover must be outside the box
on the left side.
8. Make sure no wires are pinched by
cover.
Option 2, Power supply cord method
1. Route the power supply cord so that it does not touch
dishwasher motor or lower part of dishwasher tub.
2. Pull the direct wire through hole in terminal box.
Helpful Tip:
■ Select the proper size twist-on
connectors to connect your
household wiring to 16-gauge
dishwasher wiring.
■ Insert wire ends into UL Listed/CSA
Approved twist-on connector. Do not
pre-twist bare wire.
■ Twist connector.
■ Gently tug on wires to be sure both are secured.
4. Form bare ground wire into a U-shaped hook. Wrap ground
wire hook clockwise around ground connector and under the
washer.
12
Page 13

3. Connect the wires as follows using twist-on connectors sized
to connect power supply cord to 16-gauge dishwasher wire:
4. Form bare ground wire into a U-shaped hook. Wrap ground
wire hook clockwise around ground connector and under the
washer.
5. Securely tighten ground connector.
Ground wire
Washer
Ground
connector
Connect to water supply
1. Tighten 90° elbow fitting to valve.
Be sure rubber washer is properly seated in fitting. Slide the
³⁄₄" fitting up to the valve and hand tighten to avoid
unintentional cross-threading. Hand tighten until the coupling
is tight. Using pliers, check the tightness of the coupling. An
additional ¹⁄₄ to ¹⁄₂ turn may be required to seal the rubber
gasket.
NOTE: Do not overtighten. Damage to the coupling can
result.
2. Check for leaks.
Place paper towel under 90° elbow fitting. Turn on water
supply and check for leaks. If leak occurs, repeat previous
step.
Ground wire
6. Tighten clamp connector or
conduit connector screws.
7. Reinstall terminal box cover with
wires inside terminal box.
The cover must be outside the box
on the left side.
8. Make sure no wires are pinched by
cover.
9. Do not plug the dishwasher cord into the outlet until
instructed to do so.
10. Check that power supply cord does not touch dishwasher
motor or lower part of dishwasher tub.
Screws
Connect to drain
1. To help minimize vibration, route drain hose to avoid contact
with motor, door springs, water line, cabinet, flooring or the
edge of the hole where it passes through the cabinet.
2. Place shallow pan under end of drain hose connector. Pan
will collect any water in drain hose.
3. Remove the drain hose connector cap.
4. Put the drain hose clamp onto the drain hose connector.
Hose clamp
Drain hose
Located near back
Do not remove
Located near front
NOTE: Depending on the model, the drain connector may be
located near the back or front of the dishwasher. For either
location, connect the drain hose to the drain hose connector as
follows:
Hose clamp
Drain hose
13
Page 14

5. Put the spring-type drain hose clamp over the drain hose
Grounding
clip
connector.
6. Push the drain hose onto the drain hose connector.
7. Use pliers to open the clamp over the drain hose and drain
hose connector. Push the drain hose onto connector as far as
it will go.
Release the clamp. Check that the drain hose is secure.
NOTE: If a screw-type clamp is used instead of spring-type
clamp, use a ⁵⁄₁₆" nut driver to tighten the drain hose securely to
the drain hose connector.
Secure dishwasher in cabinet opening
3. Place the lower panel behind the access panel.
4. Slide the lower panel over and down onto the screws.
5. Hold the 2 panels together and place them against the
dishwasher leg.
6. Reattach the access panel to the dishwasher.
7. Reinstall the screws through the holes in the access panel
and the slots in the lower panel. Install the right side screw
first.
8. Check that the lower edge of the lower panel contacts the
floor.
9. Tighten the screws.
Direct wire method:
1. If you have not already done so, open dishwasher door and
place towel over pump assembly and spray arm of
dishwasher. This will keep screws from falling into pump area
if you unintentionally drop them when securing dishwasher to
countertop.
2. Check that dishwasher is still level and centered side to side
in the opening.
3. Secure dishwasher to countertop or sides of cabinet with
two, #10 x ¹⁄₂" Phillips-head screws. The dishwasher must be
secured to keep it from tipping when door is opened.
4. Open door about 3" (7.6 cm) and check that space between
inner door and tub is equal on both sides. If spacing is not
equal, loosen bracket screws and shift tub. Tighten bracket
screws.
5. Check that top of door does not contact screws, brackets, or
countertop. If it does, dishwasher must be lowered and releveled.
6. Remove towel from dishwasher.
7. Reinstall the lower dish rack.
Power supply cord method:
Complete installation
1. Check that grounding clip is attached to the access panel.
2. Start the screws in the lower panel holes on the dishwasher.
Do not tighten.
14
10. Reconnect power or plug in dishwasher.
Page 15

To change door panel color
(For models so equipped.)
NOTE: If your model has a plastic door color panel, both sides of
the panel are the same color.
1. Handle panels gently. Insert finger under one end of retainer
and pull toward you in a peeling action. Set retainer aside.
2. Lift door panel(s) at outer edges. Use one hand to bow
bottom of panel(s). Remove panel(s). Do not remove spacer.
4. Bow door panel(s) and insert other side of door panel(s) into
door frame.
5. Push in on door panel(s) near the top and slide panel(s) and
spacer up inside bottom of control console, allowing panel(s)
to rest on channel at bottom of door.
3. Insert one side of door panel(s), with desired color facing out,
into one side of door frame.
6. Snap one end of retainer into channel as shown. Push inward
while sliding thumb along full length of retainer.
15
Page 16

To change access panel color
1. Handle panels gently. Push up with thumbs on each end of
access panel top trim to unsnap trim. Remove top trim and
set it aside.
2. Slowly slide color access panel upward and remove. Do not
remove spacer.
3. With desired color facing out, bow access panel and insert it
into access panel frame. Slide panel down into groove along
bottom of access panel frame.
4. Line up edges of top trim with sides of access panel frame.
Tilt back of trim down and slide into place. Snap front of trim
down to cover top edge of access panel.
Custom door and access panels
IMPORTANT: Your door panel and access panel must have a
frame around the edges.
For custom door panels weighing less than 4 lbs (1.8 kg), use the
door springs that came with your dishwasher. For custom door
panels weighing more than 4 lbs (1.8 kg), you must use Heavy
Duty Spring Kit, Part Number 4318050. Maximum door panel
weight is 8 lbs (3.6 kg).
Dishwasher door panel and access panel (if model is so
equipped) can be customized to match wood cabinets. A
standard, ¹⁄₄" (6.4 mm) wood panel* can be used as is for
customizing the door and access panels. It is recommended that
a cabinetmaker cut the customized panel pieces because of the
precise dimensions needed.
■ Cut wood panels so that wood grain matches direction of
grain in cabinets.
■ File or sand edges of wood panels to avoid slivers.
■ Dishwasher is subject to some humidity. Apply moisture-
resistant sealer to both sides and edges of wood panels.
■ Cut door panel accurately for a snug fit between door side
frames.
* ⁷⁄₃₂" (5.6 mm) actual thickness.
16
Page 17

Custom panel dimensions
These panels fit only models with frames around the door and
access panels.
NOTE: Access panel is wider than door panel.
All edges routed to ⁷⁄₃₂" (5.6 mm) thickness.
Install customized wood panels in door and access
panel.
1. Cut wood door and access panels using specified
dimensions. Make sure wood grain direction matches cabinet
wood grain.
2. File or sand edges of wood panels to avoid slivers.
Dishwasher is subject to some humidity. Cover both sides
and edges of wood panels with moisture-resistant sealer.
3. Door Panel:
Handle panels gently. Insert finger under one end of retainer
and pull toward you in a peeling action. Set retainer aside.
4. Lift door panel(s) at outer edges. Use one hand to bow
bottom of panel(s). Remove panel(s) and spacer. Save
panel(s) and spacer for future use.
Routing custom panels
Cut door panel to clear access panel when door is in open
position.
Custom door panel more than ⁷⁄₃₂" (5.6 mm) thick: Route top and
bottom to ⁷⁄₃₂" (5.6 mm) thickness.
Custom access panel more than ⁷⁄₃₂" (5.6 mm) thick: Route all
four sides to ⁷⁄₃₂" (5.6 mm) thickness.
Custom panels less than ⁷⁄₃₂" (5.6 mm) thick: Install spacers
behind panels.
5. Insert top of wood door panel between sides of door frame
about 3" (7.5 cm) below console. Rotate wood door panel
down against dishwasher door. Slide top edge of wood door
panel under bottom edge of console. Press lower portion of
wood door panel in place between sides of door frame,
allowing wood door panel to rest on channel at bottom.
17
Page 18

6. Snap one end of retainer into channel as shown. Push inward
while sliding thumb along full length of retainer.
Retainer
Color panel
10. Insert wood access panel into access panel frame. Slide
panel down into groove along bottom of access panel frame.
It may be necessary to remove the two screws securing top
of access panel to dishwasher frame and tilt access panel
forward to install some wood panels.
11. Line up edges of top trim with sides of access panel frame.
Tilt back of trim down and slide into place. Snap front of trim
down to cover top edge of wood access panel.
Spacer
Channel
7. Check door for proper operation. Door should close easily
without slamming and open with its own weight. If necessary,
close door and adjust both door springs by moving spring
ends to different holes in base.
Spring
8. Access Panel:
Push up with thumbs on each end of access panel top trim to
unsnap trim. Remove top trim and set it aside.
Trim
9. Gently slide color access panel and spacer upward and
remove. Save color access panel and spacer for future use.
Check operation
1. Read the Use and Care Guide that came with your
dishwasher.
2. Check that all parts have been installed and no steps were
skipped.
3. Check that you have all the tools you used.
4. Start dishwasher and allow it to complete the shortest wash
cycle. After the first 2 minutes, unlatch door, wait 5 seconds,
then open door.
5. Check that there is water in the bottom of the dishwasher tub.
Check that dishwasher is working properly.
6. If the dishwasher is not working properly, disconnect power
or unplug dishwasher and see “If dishwasher does not
operate” section.
If dishwasher does not operate
First try the solutions suggested here to possibly avoid the cost
of a service call.
■ Has the circuit breaker tripped or the house fuse blown?
■ Is the door closed tightly and latched?
■ Has the cycle been set correctly to start the dishwasher?
■ Is the water turned on?
If none of these work, call 1-800-253-1301 or in Canada, call
1-800-807-6777.
18
Page 19

TABLE DES MATIÈRES
SÉCURITÉ DU LAVE-VAISSELLE...............................................19
EXIGENCES D’INSTALLATION...................................................20
Outillage et pièces......................................................................20
Emplacement d’installation........................................................20
Spécifications de la canalisation d’évacuation..........................22
Spécifications de l’alimentation en eau .....................................22
Spécifications électriques..........................................................22
SÉCURITÉ DU LAVE-VAISSELLE
INSTRUCTIONS D’INSTALLATION.............................................23
Préparation des ouvertures dans les placards –
utilisation des modes de raccordement existants pour
canalisations et câblage.............................................................23
Préparation de l’emplacement d’installation
entre les placards lorsque les canalisations et
câbles n’ont pas été installés.....................................................24
Préparation du lave-vaisselle .....................................................26
Raccordement électrique...........................................................29
Raccordement à la canalisation d’eau.......................................30
Raccordement à la canalisation d’évacuation...........................30
Immobilisation du lave-vaisselle dans l’espace d’installation ...31
Tenir compte de ceci :
■ Ouvrir lentement la porte du lave-vaisselle tandis qu’une
autre personne saisit l’arrière de l’appareil. Retirer les
matériaux d’emballage, le tuyau de décharge et le panier
inférieur. Fermer la porte du lave-vaisselle et verrouiller le
loquet.
■ Respecter les dispositions de tous les codes et règlements
en vigueur.
■ Installer le lave-vaisselle conformément aux prescriptions des
présentes instructions.
■ L’installation devrait être exécutée par un technicien qualifié.
Veiller à respecter les dispositions de tous les codes et
règlements locaux et nationaux régissant les installations de
plomberie et d’électricité.
19
Page 20

EXIGENCES D’INSTALLATION
Outillage et pièces
Rassembler tous les outils et pièces nécessaires avant de
commencer l’installation.
Pour toutes les configurations d’installation
Outillage nécessaire :
■ Pince
■ Tournevis Phillips
■ Tourne-écrou ou clé à
douille – douilles
hexagonales ⁵⁄₁₆" ou ¹⁄₄"
■ Mètre-ruban ou règle
■ Clé à molette de 10"
(ouverture jusqu’à 1¹⁄₈"
[2,9 cm])
■ Tournevis à lame plate
■ Couteau utilitaire
■ 2 connecteurs de fils de
taille appropriée pour le
raccordement des
conducteurs de l’appareil
(calibre 16) au câblage de
la maison
Outillage et pièces supplémentaires pour l’installation
dans un local neuf
Outillage nécessaire : Pièces nécessaires :
■ Perceuse sans fil avec
scies à trous de ¹⁄₂", ³⁄₄" et
1¹⁄₂"
■ Petit coupe-tube
■ Pince à dénuder
■ Bride de tuyau à vis 1¹⁄₂ à
2" pour raccordement sur
un raccord T
Pièces fournies
A. 2 brides pour tuyau de décharge - 1 grosse, 1 petite
B. 2 vis Phillips n° 10 x ¹⁄₂"
C. Tuyau de décharge
C
■ Petit niveau
■ Lampe torche
■ Plat peu profond
■ Clé plate ⁵⁄₈"
■ Serviette de bain
■ Cale de bois
Pièces nécessaires :
■ Cales (pour l’installation
sur un plancher à
rehaussement partiel)
■ Raccord de compression
de ³⁄₈" x ³⁄₄" pour tuyau.
(Pièce n° W10273460A)
■ Tube de cuivre (³⁄₈"
recommandé) ou conduit
de raccordement flexible
avec tresse d’acier
inoxydable
■ Serre-câble ou connecteur
de conduit utilisable sur un
trou de diamètre ⁷⁄₈"
(2,2 cm)
A
B
Emplacement d’installation
Ne pas placer canalisation d’évacuation, canalisation d’eau ou
câblage électrique à un endroit où cela susciterait interférence ou
contact avec les pieds ou le moteur du lave-vaisselle.
À l’emplacement d’installation du lave-vaisselle, on doit pouvoir
établir le dégagement approprié entre le moteur et le plancher. Le
moteur ne doit pas toucher le plancher.
Ne pas installer le lave-vaisselle par-dessus un tapis.
Protéger du gel le lave-vaisselle et les canalisations d’eau qui
l’alimentent; la garantie de l’appareil ne couvre pas les
dommages imputables au gel.
Un ensemble “panneau latéral” est disponible chez les
revendeurs pour l’installation du lave-vaisselle à l’extrémité d’une
rangée de placards.
Un accessoire pare-vapeur (pièce n° 4396277) est disponible
chez les revendeurs pour l’installation de l’appareil sous le plan
de travail.
Inspecter l’emplacement d’installation du lave-vaisselle; il doit
comporter les caractéristiques suivantes :
■ facilité d’accès aux canalisations d’eau et d’égout et à la
source d’électricité.
■ accès facile pour chargement et déchargement de la
vaisselle. Dans le cas de l’installation dans un angle, on doit
pouvoir établir un dégagement de 2" (5,1 cm) ou plus entre le
côté de la porte du lave-vaisselle et le mur ou le placard.
■ ouverture carrée offrant l’esthétique appropriée et permettant
un fonctionnement correct.
■ façade des placards perpendiculaire au plancher.
■ plancher horizontal et plat (s’il y a un écart de niveau entre
l’avant et l’arrière sur le plancher de l’emplacement
d’installation, il pourrait être nécessaire d’utiliser des cales
pour établir l’aplomb de l’appareil).
REMARQUE : Pour éviter tout déplacement des cales durant le
fonctionnement de l’appareil, il est nécessaire de fixer solidement
les cales au plancher.
Si le lave-vaisselle ne doit pas être utilisé pendant une période
prolongée ou s’il est laissé à un endroit qui pourrait être exposé
au gel, veiller à faire exécuter les opérations de pré-hivernage par
un technicien compétent.
Veiller à ce que les canalisations d’eau et d’évacuation et les
câbles électriques soient dans la zone marquée en gris dans la
section “Dimensions de l’emplacement d’installation”.
Conseil utile : Si le plancher de l’espace d’installation n’est
pas parfaitement horizontal et plat (exemple : garnissage de
carrelage sur une partie seulement), on devra accorder une
attention particulière aux détails lors du relevé des
dimensions et lors du réglage de l'aplomb du lave-vaisselle.
Pour commander des pièces ou un ensemble, consulter votre
marchand local ou Whirlpool Pièces : 1-800-442-8991.
20
Page 21

Dimensions du produit Dimensions de l’espace d’installation
*Jusqu'au devant du
cadre de la porte
Découper les trous dans la zone marquée en gris du plancher ou
des parois des placards, selon les spécifications ci-dessous :
Canalisation d’eau – ¹⁄₂" (1,3 cm)
Canalisation d’évacuation – 1¹⁄₂" (3,8 cm)
Câble pour câblage direct – ³⁄₄" (1,9 cm)
Cordon d’alimentation – 1¹⁄₂" (3,8 cm)
*Mesure depuis le point le plus bas de la face inférieure du plan
de travail.
**Dimension minimale mesurée au point le plus étroit de
l’ouverture.
21
Page 22

Spécifications de la canalisation
d’évacuation
■ Utiliser le tuyau d’évacuation neuf fourni avec le lave-
vaisselle. Si ce tuyau n’est pas suffisamment long, utiliser un
tuyau d’évacuation neuf de longueur maximale 12 pi (3,7 m)
qui satisfait les critères de la norme AHAM/IAPMO en vigueur,
résistant à la chaleur et aux détergents, et qui pourra être
connecté sur le raccord de sortie de 1" (2,5 cm) du lavevaisselle.
■ Connecter le conduit d’évacuation à la canalisation d’égout
par l’intermédiaire d’un raccord T ou du raccord d’un broyeur
à déchets situé plus haut que le siphon du circuit de
plomberie de la maison, et à au moins 20" (50,8 cm) audessus du sol. On recommande de lover le tuyau
d’évacuation et de le fixer solidement sur la face inférieure du
plan de travail, ou de le raccorder à un dispositif brise-siphon.
■ Utiliser un dispositif brise-siphon si le tuyau d’évacuation est
connecté à la canalisation d’égout de la maison à moins de
20" (50,8 cm) au-dessus du sous-plancher ou du plancher.
■ Utiliser un raccord de diamètre intérieur de ¹⁄₂" ou plus.
Spécifications de l’alimentation en eau
■ Canalisation d’eau chaude, sous pression de 20 à 120 lb/po
(138 à 862 kPa).
■ Température de 49°C (120°F) à l’entrée du lave-vaisselle.
■ Canalisation de cuivre de diamètre externe ³⁄₈" avec raccord à
compression, ou conduit de raccordement flexible à tresse
d’acier inoxydable (l’emploi d’un tube de plastique de ¹⁄₂"
minimum est déconseillé).
■ Raccord de compression de ³⁄₈" x ³⁄₄" pour tuyau. Contacter
votre magasin local Sears pour acheter l’ensemble n° 11000.
Ne pas exécuter de raccordement par soudure à moins de 6"
(15,2 cm) de l’électrovanne d’admission d’eau.
Spécifications électriques
Contacter un électricien qualifié.
Vérifier que l’installation électrique est adéquate et qu’elle
satisfait les exigences de tous les codes et règlements locaux et
nationaux en vigueur.
Caractéristiques exigées :
■ 120 volts CA, 60 Hz; protection par fusible 15 ou 20 A.
■ conducteurs de cuivre seulement
On recommande :
■ un fusible temporisé ou disjoncteur.
■ une alimentation par un circuit indépendant.
Pour le raccordement direct du lave-vaisselle :
■ Utiliser un câble flexible blindé ou à gaine non métallique, des
conducteurs de cuivre avec mise à la terre, satisfaisant les
exigences des codes et règlements locaux.
■ Arrimer le câble avec le dispositif fourni sur la boîte de
connexion de la maison, ou installer un raccord à collets
(homologation UL ou CSA) sur la boîte de connexion de la
maison. Dans le cas de l’emploi d’un conduit, utiliser un
serre-câble (homologation UL ou CSA).
Alimentation de l’appareil par un cordon d’alimentation :
■ Utiliser le cordon d’alimentation (pièce n° 4317824) identifié
pour l’utilisation avec un lave-vaisselle. L’ensemble
comprend :
- cordon d’alimentation Volex Inc., avec 3 conducteurs de
calibre 16 (homologation UL) et fiche de branchement à
3 broches pour liaison à la terre.
- serre-câble ⁷⁄₈" Neer C-500.
- 3 connecteurs de fils.
2
■ La fiche du cordon d’alimentation devra être branchée sur
- bague de protection - pièce n° 302797.
Pour l’installation du cordon d’alimentation, procéder
conformément aux instructions fournies avec l’ensemble.
une prise de courant à 3 alvéoles de configuration
correspondante, reliée à la terre, installée dans le placard à
côté de l’emplacement d’installation du lave-vaisselle. La
prise de courant doit satisfaire les exigences de tous les
codes et règlements locaux.
22
Page 23

INSTRUCTIONS D’INSTALLATION
1. Interrompre l’alimentation électrique.
2. Fermer l’arrivée d'eau.
Préparation des ouvertures dans les
placards – utilisation des modes de
raccordement existants pour canalisations
et câblage
■ Procéder conformément aux instructions de cette section
pour l’installation de l’appareil à un emplacement déjà doté
de moyens de raccordement.
■ Pour l’installation de
l’appareil à un
emplacement où les
canalisations et le
câblage n’ont pas
déjà été installés,
procéder
conformément aux
instructions
présentées à la
section “Préparation de l’emplacement d’installation entre les
placards lorsque les canalisations et câbles n’ont pas été
installés”.
1. Vérifier que la canalisation d’eau atteint le côté avant gauche
de l’espace d’installation (endroit où le raccordement à
l’appareil sera effectué).
2. Vérifier que le câble d’alimentation atteint l’angle avant droit
de l’espace d’installation (endroit où le raccordement à
l’appareil sera effectué).
Si la canalisation d’eau et le câble de raccordement électrique
direct sont suffisamment longs, passer à la section suivante
“Installation du tuyau d’évacuation”. Si la canalisation d’eau et le
câble électrique ne sont pas suffisamment longs, procéder
conformément aux instructions de la section “Préparation de
l’emplacement d’installation entre les placards lorsque les
canalisations et câbles n’ont pas été installés”.
Installation du tuyau d’évacuation
IMPORTANT : On doit toujours utiliser un tuyau d’évacuation
neuf, même pour l’installation d’un lave-vaisselle de
remplacement.
1. Percer un trou de diamètre 1¹⁄₂" (3,8 cm) dans la paroi du
placard ou dans le plancher sur le côté de l’espace
d’installation le plus proche de l’évier.
2. Employer l’une des méthodes suivantes pour raccorder le
tuyau d’évacuation sur un raccord T ou sur un broyeur à
déchets.
■ Option 1 - broyeur à déchets – avec brise-siphon
■ Option 2 - pas de broyeur à déchets – avec brise-siphon
■ Option 3 - broyeur à déchets – sans brise-siphon*
■ Option 4 - pas de broyeur à déchets – sans brise-siphon*
*On recommande qu’un brise-siphon soit disponible
Conseil utile : Pour réduire les effets de vibration du tuyau
durant le fonctionnement, maintenir une séparation entre le
tuyau et le plancher et entre le tuyau et la circonférence du
trou de passage à travers le placard.
Option 1 - broyeur à déchets – avec brise-siphon :
1. Ôter l’opercule arrachable sur le broyeur à déchets. Si
nécessaire, couper l’extrémité du tuyau d’évacuation (ne pas
couper dans la section ondulée).
2. Connecter le tuyau d’évacuation sur le dispositif brise-siphon
avec la grosse bride à ressort. Si le tuyau d’évacuation a été
coupé, utiliser une bride à vis* de 1¹⁄₂ à 2" (3,8 à 5 cm).
3. Utiliser un raccord en caoutchouc* avec une bride à ressort
ou à vis* pour raccorder le dispositif brise-siphon à l’entrée
du broyeur à déchets.
Ce raccordement doit être réalisé en amont du siphon du
circuit d’évacuation et à au moins 20" (50,8 cm) au-dessus du
plancher de l’espace d’installation du lave-vaisselle.
4. Insérer le tuyau d’évacuation à
travers le trou découpé dans le
placard et acheminer le tuyau
jusqu’à l'avant-centre de
l'ouverture, au point de
raccordement du tuyau
d'évacuation.
*Pièces disponibles dans un magasin local de fournitures de
plomberie
23
Page 24

Option 2 - pas de broyeur à déchets – avec brise-siphon :
1. Si nécessaire, couper l’extrémité du tuyau d’évacuation (ne
pas couper dans la section ondulée).
2. Connecter le tuyau d’évacuation sur le dispositif brise-siphon
avec la grosse bride à ressort. Si le tuyau d’évacuation a été
coupé, utiliser une bride à vis* de 1¹⁄₂ à 2" (3,8 à 5 cm).
3. Utiliser un raccord de caoutchouc* avec bride à ressort ou à
vis* pour le raccordement entre le dispositif brise-siphon et le
raccord T du circuit d’évacuation.
Ce raccordement doit être réalisé en amont du siphon du
circuit d’évacuation et à au moins 20" (50,8 cm) au-dessus du
plancher de l’espace d’installation du lave-vaisselle.
4. Insérer le tuyau d’évacuation à travers
le trou découpé dans le placard et
acheminer le tuyau jusqu’à l'avantcentre de l'ouverture, au point de
raccordement du tuyau d'évacuation.
*Pièces disponibles dans un magasin
local de fournitures de plomberie
Option 3 - broyeur à déchets – sans brise-siphon :
1. Ôter l’opercule arrachable du broyeur à déchets. Ne pas
couper l’extrémité du tuyau d’évacuation.
2. Connecter le tuyau d’évacuation sur le broyeur à déchets
avec la grosse bride à ressort.
Ce raccordement doit être réalisé en amont du siphon du
circuit d’évacuation et à au moins 20" (50,8 cm) au-dessus du
plancher de l’espace d’installation du lave-vaisselle. On
recommande de lover le tuyau d’évacuation et de le fixer
solidement sur la face inférieure du plan de travail.
3. Insérer le tuyau d’évacuation à
travers le trou découpé dans le
placard et acheminer le tuyau
jusqu’à l'avant-centre de
l'ouverture, au point de
raccordement du tuyau
d'évacuation.
Option 4 - pas de broyeur à déchets – sans brise-siphon :
1. Si nécessaire, couper l’extrémité du tuyau d’évacuation (ne
pas couper dans la section ondulée).
2. Connecter le tuyau d’évacuation sur le raccord T du circuit
d’évacuation avec une bride à vis de 1¹⁄₂ à 2" (3,8 à 5 cm)*.
Ce raccordement doit être réalisé en amont du siphon du
circuit d’évacuation et à au moins 20" (50,8 cm) au-dessus du
plancher de l’espace d’installation du lave-vaisselle. On
recommande de lover le tuyau d’évacuation et de le fixer
solidement sur la face inférieure du plan de travail.
3. Insérer le tuyau d’évacuation à
travers le trou découpé dans le
placard et acheminer le tuyau
jusqu’à l'avant-centre de
l'ouverture, au point de
raccordement du tuyau
d'évacuation.
*Pièces disponibles dans un magasin
local de fournitures de plomberie
Préparation de l’emplacement
d’installation entre les placards lorsque les
canalisations et câbles n’ont pas été
installés
Raccordement électrique
Option 1 - raccordement direct :
Conseil utile : Le
raccordement au lavevaisselle sera plus facile si on
achemine le câble par le côté
droit de l’espace
d’installation.
1. Percer un trou de ³⁄₄"
(1,9 cm) dans la paroi du
placard, le mur arrière ou
le plancher, sur le côté droit de l’espace d’installation. Les
emplacements préférentiels ainsi que les autres
emplacements possibles sont identifiés sur l’illustration.
2. Placard en bois : poncer la rive du trou percé pour produire
une surface lisse.
Placard métallique : garnir la circonférence du trou percé
avec une bague de protection (pièce n° 302797 - non
fournie).
3. Acheminer le câble jusqu’à la boîte de connexion (tableau de
distribution de la maison).
4. Pour un câble flexible, installer
un serre-câble (homologation UL
ou CSA). Dans le cas d’un
conduit, installer un connecteur
de conduit sur la boîte de
connexion (homologation UL ou
CSA).
24
Page 25

5. Faire passer l’autre extrémité du câble à travers le trou percé
dans le placard. L’extrémité du câble doit pouvoir parvenir
jusqu’à l’angle avant droit de l’espace d’installation.
Option 2 - raccordement par cordon d’alimentation :
REMARQUE : Une prise de courant murale à 3 alvéoles de
configuration correspondante, reliée à la terre, doit être installée
dans le placard, à côté de l’emplacement d’installation du lavevaisselle.
1. Percer un trou de 1¹⁄₂"
(3,8 cm) dans la paroi du
placard ou le mur
arrière. Les
emplacements
préférentiels ainsi que
les autres
emplacements
possibles sont identifiés
sur l’illustration.
2. Placard de bois : poncer la rive du trou percé pour produire
une surface lisse.
Placard métallique : garnir la circonférence du trou percé
avec la bague de protection (pièce n° 302797) fournie avec
l’ensemble du cordon d’alimentation.
Installation de la canalisation d’eau
Conseil utile : Le raccordement au lave-vaisselle sera plus
facile si on achemine la canalisation d’eau par le côté gauche
de l’espace d’installation.
1. Percer un trou de diamètre ¹⁄₂" (1,3 cm) ou plus dans la paroi
du placard, le mur arrière ou le plancher. Les emplacements
préférentiels ainsi que les autres emplacements possibles
sont identifiés sur l’illustration.
Installation du tuyau d’évacuation
IMPORTANT : Utiliser toujours un tuyau d’évacuation neuf.
1. Percer un trou de diamètre 1¹⁄₂" (3,8 cm) dans la paroi du
placard ou dans le plancher sur le côté de l’espace
d’installation le plus proche de l’évier.
2. Employer l’une des méthodes suivantes pour raccorder le
tuyau d’évacuation sur un raccord T ou sur un broyeur à
déchets.
■ Option 1 - broyeur à déchets – avec brise-siphon
■ Option 2 - pas de broyeur à déchets – avec brise-siphon
■ Option 3 - broyeur à déchets – sans brise-siphon*
■ Option 4 - pas de broyeur à déchets – sans brise-siphon*
*On recommande qu’un brise-siphon soit disponible
Conseil utile : Pour réduire les effets de vibration du tuyau
durant le fonctionnement, maintenir une séparation entre le
tuyau et le plancher et entre le tuyau et la circonférence du
trou de passage à travers le placard.
Option 1 - broyeur à déchets – avec brise-siphon :
1. Ôter l’opercule arrachable sur le broyeur à déchets. Si
nécessaire, couper l’extrémité du tuyau d’évacuation (ne pas
couper dans la section ondulée).
2. Connecter le tuyau d’évacuation sur le dispositif brise-siphon
avec la grosse bride à ressort. Si le tuyau d’évacuation a été
coupé, utiliser une bride à vis* de 1¹⁄₂ à 2" (3,8 à 5 cm).
3. Utiliser un raccord en caoutchouc* avec une bride à ressort
ou à vis* pour raccorder le dispositif brise-siphon à l’entrée
du broyeur à déchets.
Ce raccordement doit être réalisé en amont du siphon du
circuit d’évacuation et à au moins 20" (50,8 cm) au-dessus du
plancher de l’espace d’installation du lave-vaisselle.
2. Mesurer la longueur totale de
tube de cuivre nécessaire.
3. Connecter le tube de cuivre à
la canalisation d’eau par
l’intermédiaire d’un robinet
d’arrêt manuel.
4. Enfiler doucement le tube de
cuivre à travers le trou percé
dans le placard. On doit travailler prudemment; le tube de
cuivre est malléable et on peut facilement le déformer et
même l’écraser. Le tube de cuivre doit pénétrer suffisamment
dans le placard pour pouvoir être raccordé au point d'entrée
du lave-vaisselle, à l'avant-gauche de celui-ci.
5. Ouvrir le robinet d’arrêt à la position “ON” (marche) pour
éliminer les particules qui pourraient obstruer l’électrovanne
d’admission d’eau - récupérer l’eau qui s’écoule dans un plat
peu profond.
6. Tourner le robinet d'arrêt
à la position “OFF”
(arrêt).
4. Insérer le tuyau d’évacuation à
travers le trou découpé dans le
placard et acheminer le tuyau jusqu’à
l'avant-centre de l'ouverture, au point
de raccordement du tuyau
d'évacuation.
*Pièces disponibles dans un magasin
local de fournitures de plomberie
25
Page 26

Option 2 - pas de broyeur à déchets – avec brise-siphon :
1. Si nécessaire, couper l’extrémité du tuyau d’évacuation (ne
pas couper dans la section ondulée).
2. Connecter le tuyau d’évacuation sur le dispositif brise-siphon
avec la grosse bride à ressort. Si le tuyau d’évacuation a été
coupé, utiliser une bride à vis* de 1¹⁄₂ à 2" (3,8 à 5 cm).
3. Utiliser un raccord de caoutchouc* avec bride à ressort ou à
vis* pour le raccordement entre le dispositif brise-siphon et le
raccord T du circuit d’évacuation.
Ce raccordement doit être réalisé en amont du siphon du
circuit d’évacuation et à au moins 20" (50,8 cm) au-dessus du
plancher de l’espace d’installation du lave-vaisselle.
4. Insérer le tuyau d’évacuation à
travers le trou découpé dans le
placard et acheminer le tuyau
jusqu’à l'avant-centre de l'ouverture,
au point de raccordement du tuyau
d'évacuation.
*Pièces disponibles dans un magasin
local de fournitures de plomberie.
Option 4 - pas de broyeur à déchets – sans brise-siphon :
1. Si nécessaire, couper l’extrémité du tuyau d’évacuation (ne
pas couper dans la section ondulée).
2. Connecter le tuyau d’évacuation sur le raccord T du circuit
d’évacuation avec une bride à vis* de 1¹⁄₂ à 2" (3,8 à 5 cm)*.
Ce raccordement doit être réalisé en amont du siphon du
circuit d’évacuation et à au moins 20" (50,8 cm) au-dessus du
plancher de l’espace d’installation du lave-vaisselle. On
recommande de lover le tuyau d’évacuation et de le fixer
solidement sur la face inférieure du plan de travail.
3. Insérer le tuyau d’évacuation à
travers le trou découpé dans le
placard et acheminer le tuyau
jusqu’à l'avant-centre de
l'ouverture, au point de
raccordement du tuyau
d'évacuation.
*Pièces disponibles dans un magasin local de fournitures de
plomberie.
Préparation du lave-vaisselle
Option 3 - broyeur à déchets – sans brise-siphon :
1. Ôter l’opercule arrachable du broyeur à déchets. Ne pas
couper l’extrémité du tuyau d’évacuation.
2. Connecter le tuyau d’évacuation sur le broyeur à déchets
avec la grosse bride à ressort.
Ce raccordement doit être réalisé en amont du siphon du
circuit d’évacuation et à au moins 20" (50,8 cm) au-dessus du
plancher de l’espace d’installation du lavevaisselle. On
recommande de lover le tuyau d’évacuation et de le fixer
solidement sur la face inférieure du plan de travail.
3. Insérer le tuyau d’évacuation à
travers le trou découpé dans le
placard et acheminer le tuyau jusqu’à
l'avant-centre de l'ouverture, au point
de raccordement du tuyau
d'évacuation.
Conseil utile : Conserver une feuille de carton sous le lavevaisselle jusqu’à son installation dans l’espace d’installation
entre les placards. La feuille de carton protégera le plancher
durant l’installation.
26
Page 27

1. En utilisant 2 personnes ou plus, saisir l'aramature de porte
du lave-vaisselle par les côtés et mettre le lave-vaisselle sur
le dos en le faisant reposer sur les cornières.
2. Ôter les deux vis fixant le panneau de l’ouverture d’accès et
le panneau inférieur sur le lave-vaisselle – utiliser une clé à
douille de ¹⁄₄", un tourne-écrou ou un tournevis Phillips.
3. Placer les panneaux déposés à part, sur une surface
protégée.
4. Vérifier que l’agrafe de liaison à la terre est fixée sur le
panneau inférieur.
7. Ôter le couvercle de la boîte de connexion.
– Dans le cas du câblage direct, installer un raccord à collets
(homologation UL ou CSA) sur la boîte de connexion. Dans
le cas de l’utilisation d’un conduit, installer un serre-câble
(homologation UL ou CSA).
– Si l’appareil doit être alimenté par un cordon d’alimentation,
installer maintenant le cordon d’alimentation conformément
aux instructions fournies avec l’ensemble. La trousse du
cordon d’alimentation doit être homologuée UL et identifiée
pour utilisation avec les lave-vaisselle (trousse de cordon
d’alimentation, pièce n° 4317824).
5. Enfiler l’écrou et la virole sur la canalisation.
Canalisation en cuivre uniquement : Enfiler l’écrou puis la
virole sur la canalisation de cuivre, sur environ 1" (2,5 cm).
REMARQUE : Pour réduire les vibrations durant le
fonctionnement, acheminer la canalisation d’alimentation en
eau de telle manière qu’elle ne touche pas la base, le châssis
ou le moteur de l’appareil.
6. Raccorder le raccord coudé de 90° à la canalisation
d'alimentation en eau.
Raccorder le raccord de compression de ³⁄₈" à la canalisation
d'alimentation en eau avant d'installer l'appareil dans
l'ouverture découpée dans le placard. Le fixer de façon à ce
que le raccord de ³⁄₄" soit orienté vers le haut.
Canalisation en cuivre uniquement : insérer la canalisation
dans le raccord coudé de 90° aussi loin que possible (la
canalisation en cuivre se plie et s’écrase facilement). Faire
glisser l’écrou et la virole vers l’avant et engager l’écrou sur le
filetage du raccord coudé. Raccord flexible à tresse d'acier :
Fixer l’écrou sur le coude à l’aide d’une clé plate ou d’une clé
à molette de ⁵⁄₈".
REMARQUE : Ne pas utiliser de ruban adhésif Teflon
®†
avec
les raccords de compression.
†®Teflon est une marque déposée de E.I. Du Pont De Nemours et Compagnie.
8. Mesurer la hauteur libre de l’espace
d’installation, de la face inférieure du
plan de travail jusqu'au plancher, à
l'emplacement d'installation du lavevaisselle (au niveau du point le plus
bas). Consulter le tableau ci-dessous
pour obtenir la hauteur de l'ouverture.
Placer les roues de l’appareil à la
position appropriée.
9. Ajuster les pieds de réglage de l’aplomb
à l’avant (à la même hauteur).
Si la hauteur libre minimale de l'ouverture
est inférieure à 34" (86,4 cm), on peut
enlever les roues arrière pour obtenir un
dégagement supplémentaire. On pourra
ainsi installer le lave-vaisselle sous le plan
de travail si la hauteur libre est de 33⁷⁄₈"
(86 cm); il sera cependant plus difficile de
placer le lave-vaisselle à sa position de
service finale. Si on enlève les roues, on
devra veiller à protéger le plancher lors des déplacements du
lave-vaisselle.
10. À l’aide d'au moins deux personnes, mettre le lave-vaisselle
en position verticale.
REMARQUE : Ne pas fixer le lave-vaisselle. Ceci sera fait
ultérieurement.
27
Page 28

Contrôle de la tension des ressorts de la porte
Établissement de l’aplomb du lave-vaisselle
Alors qu’une autre personne retient le lave-vaisselle pour
l’empêcher de basculer, ouvrir et refermer la porte plusieurs fois.
Si la porte se ferme ou s’ouvre sous l’effet de son propre poids, il
sera nécessaire d’ajuster la tension des ressorts de la porte.
■ Si la porte se referme trop vite, diminuer la tension des
ressorts en déplaçant l’extrémité des ressorts vers l’avant
du lave-vaisselle.
■ Si la porte retombe et s'ouvre, augmenter la tension des
ressorts en déplaçant l’extrémité des ressorts vers
l’arrière du lave-vaisselle.
■ Les ressorts devraient être placés dans les mêmes
encoches à gauche et à droite.
Insertion du lave-vaisselle dans l'ouverture du placard
1. À l’aide d'au moins deux personnes,
mettre le lave-vaisselle en position
verticale.
2. Saisir les côtés du lave-vaisselle par les
rebords du panneau de porte.
3. Incliner le lave-vaisselle vers l’arrière sur
ses roulettes et approcher l’appareil de
l’ouverture dans le placard. Ne pas
pousser sur l’avant du panneau ou sur la console – ceci
pourrait faire subir des dommages à l’appareil.
4. Si le lave-vaisselle est alimenté par un cordon d’alimentation,
insérer le cordon d’alimentation dans le trou découpé dans le
placard.
Dans le cas d’un câblage direct, vérifier que le câble
d’alimentation est sur le côté avant droit de l’espace
d’installation.
5. Vérifier que la canalisation d’eau est sur le côté gauche de
l’espace d’installation, et que le tuyau d’évacuation est près
du centre du trou percé dans le placard.
6. Insérer lentement et complètement le lave-vaisselle dans
l’ouverture d’encastrement du placard. Veiller à ne pas
coincer le tube de cuivre, le tuyau d’évacuation, le cordon
d’alimentation ou le câble de raccordement direct entre le
lave-vaisselle et le placard.
Conseil utile : Lorsque le lave-vaisselle est à sa position de
service, il peut être nécessaire de soutenir l’avant – soulever/
abaisser ou caler les pieds avant.
7. Enlever la feuille de carton placée sous le lave-vaisselle.
8. À l’aide des encoches prédécoupées dans le garnissage
d’insonorisation/isolation, fixer le garnissage
d’insonorisation/isolation aux côtés de la cuve à l’aide des
crochets de chaque côté du tambour.
REMARQUE : Le fait qu’il n’y ait que peu d’espace entre le lavevaisselle et l’ouverture d’encastrement du placard ne pose pas
de problème. Ne pas enlever le garnissage d’insonorisation/
isolation – il réduit le niveau sonore.
1. Aligner l’avant du panneau de porte du lave-vaisselle avec les
portes des placards. Cela pourrait nécessiter un léger
déplacement du lave-vaisselle.
Conseil utile : Durant le réglage de la hauteur des pieds
avant, soulever un côté du châssis du lave-vaisselle pour
séparer le pied du plancher. Avec certaines installations, il
peut être plus facile de régler le pied avant à l’aide d’une clé à
tête hexagonale de ³⁄₁₆".
2. Vérifier que chaque pied de réglage de l’aplomb est
fermement en appui sur le sol.
3. Fermer la porte et la verrouiller. Placer le niveau contre l’avant
du lave-vaisselle pour voir s'il est aligné verticalement. Si
nécessaire, ajuster la hauteur des pieds de réglage de
l’aplomb ou ajouter des cales sous les roues arrière pour
établir l’aplomb correct du lave-vaisselle.
4. Répéter ces opérations pour l’autre côté du lavevaisselle.
REMARQUE : Pour éviter tout déplacement des cales durant le
fonctionnement du lave-vaisselle, il est nécessaire de fixer
fermement les cales au plancher.
5. Placer le niveau contre la partie
supérieure de la cuve, à l’avant;
vérifier l’aplomb transversal de
l’appareil. Si le lave-vaisselle
n’est pas d’aplomb, ajuster la
hauteur des pieds réglables
avant pour établir l’aplomb.
28
Page 29

Raccordement électrique
Voir la section “Spécifications électriques”.
On doit disposer :
■ d’une source d’électricité appropriée, et d’une liaison à la
terre selon la méthode recommandée.
Si vous êtes :
■ pour le câblage direct, utiliser l’option 1.
■ pour l’alimentation par un cordon d’alimentation, utiliser
l’option 2.
Option 1 - Câblage direct
1. Acheminer le câble d’alimentation de telle manière qu’il ne
touche pas le moteur du lave-vaisselle ni la partie inférieure
de la cuve du lave-vaisselle.
2. Insérer les conducteurs du câble dans la boîte de connexion,
à travers le trou.
Conseil utile :
■ Sélectionner des connecteurs de fils de
taille appropriée pour le raccordement des
conducteurs de l’appareil (calibre 16) au
câblage de la maison.
■ Insérer les extrémités des conducteurs dans
le connecteur. Ne pas pré-torsader les
conducteurs nus.
■ Visser le connecteur.
■ Tirer doucement sur les conducteurs pour vérifier la solidité
de la connexion.
3. Utiliser des connecteurs de fils de taille appropriée pour le
raccordement des conducteurs de l’appareil (calibre 16) au
câblage de la maison, et réaliser les raccordements comme
suit :
4. Former un crochet en U avec le conducteur nu de liaison à la
terre; placer le crochet du conducteur de liaison à la terre
(dans le sens horaire) autour du connecteur de liaison à la
terre et sous la rondelle.
5. Serrer fermement le connecteur de liaison à la terre.
6. Serrer les vis de bridage du
serre-câble ou du connecteur
de conduit.
7. Réinstaller le couvercle de la
boîte de connexion – enfermer les
conducteurs à l’intérieur de la boîte.
Le couvercle doit être placé à
l’extérieur de la boîte de connexion,
sur le côté gauche.
8. Veiller à ce qu’aucun conducteur ne soit coincé entre le
couvercle et la boîte.
Option 2, Raccordement par cordon d’alimentation
1. Acheminer le cordon d’alimentation de telle manière qu’il ne
touche pas le moteur du lave-vaisselle ni la partie inférieure
de la cuve du lave-vaisselle.
2. Insérer le câble de raccordement direct dans la boîte de
connexion, à travers le trou.
29
Page 30

Conseil utile :
■ Sélectionner des connecteurs de fils de
taille appropriée pour le raccordement des
conducteurs de l’appareil (calibre 16) au
câblage de la maison.
■ Insérer les extrémités des conducteurs
dans le connecteur homologué UL/CSA.
Ne pas pré-torsader les conducteurs nus.
■ Visser le connecteur.
■ Tirer doucement sur les conducteurs pour vérifier la solidité
de la connexion.
3. Utiliser des connecteurs de fils de taille appropriée pour le
raccordement des conducteurs de l’appareil (calibre 16) au
cordon d'alimentation électrique, et réaliser les
raccordements comme suit :
7. Réinstaller le couvercle de la boîte
de connexion – enfermer les
conducteurs à l’intérieur de la boîte.
Le couvercle doit être placé à
l’extérieur de la boîte de connexion,
sur le côté gauche.
8. Veiller à ce qu’aucun conducteur ne
soit coincé entre le couvercle et la boîte.
9. Ne pas brancher le cordon du lave-vaisselle dans une prise
avant que les instructions ne le précisent.
10. Vérifier l’absence de tout contact entre le cordon
d’alimentation et le moteur du lave-vaisselle ou la partie
inférieure de la cuve du lave-vaisselle.
Raccordement à la canalisation d’eau
1. Raccorder le raccord coudé de 90° à la valve.
S'assurer que la rondelle de caoutchouc est correctement
installée dans le raccord. Enfiler le raccord de ³⁄₄" vers le haut
jusqu'à la valve et serrer à la main afin d'éviter de fausser le
filetage. Serrer à la main jusqu'à ce que le raccord soit serré.
À l'aide d'une pince, vérifier l'étanchéité du raccord. ¹⁄₄ à ¹⁄₂
tour supplémentaire peut s’avérer nécessaire pour créer
l’étanchéité du joint de caoutchouc.
REMARQUE : Ne pas trop serrer. Le raccord risque d’être
endommagé.
2. Vérifier l'absence de fuites.
4. Former un crochet en U avec le conducteur nu de liaison à la
terre; placer le crochet du conducteur de liaison à la terre
(dans le sens horaire) autour du connecteur de liaison à la
terre et sous la rondelle.
5. Serrer fermement le connecteur de liaison à la terre.
6. Serrer les vis de bridage du
serre-câble ou du connecteur
de conduit.
30
Placer une serviette de papier sous le raccord coudé de 90°.
Ouvrir l’alimentation en eau et inspecter pour identifier toute
fuite. Si une fuite se produit, répéter l’étape précédente.
Raccordement à la canalisation
d’évacuation
1. Pour minimiser toute vibration, acheminer le conduit
d’évacuation de telle manière qu’il n’y ait aucun contact avec
le moteur, les ressorts de la porte, la canalisation d’eau, le
placard, le plancher ou la circonférence du trou de passage à
travers la paroi du placard.
2. Placer un plat peu profond sous l'extrémité du connecteur de
tuyau de vidange. Le plat récupérera l'eau accumulée dans le
tuyau de vidange.
3. Enlever le bouchon du tuyau de vidange.
Page 31

4. Placer la bride du tuyau de vidange sur le connecteur de
tuyau de vidange.
éè è
2. Contrôler le bon aplomb du lave-vaisselle, et le centrage
latéral de l’appareil dans l’ouverture.
3. Assujettir le lave-vaisselle au plan de travail ou aux côtés des
placards avec deux vis Phillips n° 10 x ¹⁄₂". Il faut que le lavevaisselle soit immobilisé pour qu’il ne bascule pas lors de
l’ouverture de la porte.
é
REMARQUE : Selon votre modèle, le raccord d’évacuation peut
se situer à l’arrière ou à l’avant du lave-vaisselle.
Quel que soit son emplacement, raccorder le tuyau de vidange
au connecteur du tuyau de vidange de la façon suivante :
5. Mettre la bride à ressort du tuyau de vidange sur le
connecteur du tuyau de vidange.
6. Insérer le tuyau de vidange sur le connecteur de tuyau de
vidange.
7. Utiliser une pince pour ouvrir la bride située sur le tuyau de
vidange et le connecteur du tuyau de vidange. Insérer le
tuyau de vidange sur le connecteur aussi loin que possible.
8. Dégager la bride. Vérifier que le tuyau de vidange est fixé
solidement.
REMARQUE : Si une bride à visser est utilisée au lieu d’une bride
à ressort, utiliser une tourne-écrou de ⁵⁄₁₆" pour bien fixer le
connecteur du tuyau de vidange au tuyau de vidange.
Immobilisation du lave-vaisselle dans
l’espace d’installation
4. Entrouvrir la porte d’environ 3" (7,6 cm); vérifier que l’espace
entre la doublure interne de la porte et la cuve est identique
des deux côtés. Si l’espace n’est pas identique des deux
côtés, desserrer les vis des brides d’arrimage et déplacer
légèrement la cuve. Resserrer les vis.
5. Vérifier que le sommet de la porter n'est pas en contact avec
les vis, les brides ou le plan de travail. S’il y a un contact, on
doit abaisser le lave-vaisselle puis établir de nouveau
l’aplomb de l’appareil.
6. Retirer la serviette du lave-vaisselle.
7. Réinstaller le panier à vaisselle inférieur.
Dernières opérations de l’installation
1. Vérifier que l’agrafe de liaison à la terre est fixée sur le
panneau inférieur.
2. Commencer à visser les vis dans les trous du panneau
inférieur du lave-vaisselle. Ne pas serrer.
3. Placer le panneau inférieur derrière le panneau d'accès.
1. Si ce n’est pas déjà fait, ouvrir la porte du lave-vaisselle et
placer une serviette au-dessus de l’ensemble pompe/bras
d’aspersion du lave-vaisselle. Ceci empêchera les vis de
tomber autour de la pompe si vous les faites glisser
involontairement lorsque vous fixez le lave-vaisselle au plan
de travail.
4. Faire glisser le panneau inférieur vers le bas, sur les vis.
5. Maintenir les 2 panneaux ensemble et les placer contre le
pied du lave-vaisselle.
6. Réinstaller le panneau d’accès sur le lave-vaisselle.
7. Réinstaller les vis dans les trous du panneau d’accès et les
fentes du panneau inférieur. Installer d’abord la vis du côté
droit.
8. Vérifier que le bord inférieur du panneau inférieur est en
contact avec le sol.
9. Serrer les vis.
31
Page 32

Alimentation de l’appareil par câblage direct :
Alimentation de l’appareil par cordon d’alimentation :
2. Soulever chaque extrémité du panneau de porte. À l’aide
d’une main, cintrer le panneau inférieur. Enlever le panneau.
Ne pas enlever la plaque d’espacement.
3. Insérer un côté du panneau de porte dans l’encadrement de
la porte, la couleur désirée étant orientée vers l’extérieur.
10. Rebrancher l’appareil ou reconnecter la source de courant
électrique.
Changement de la couleur du panneau de la porte
(Pour les modèles ainsi équipés.)
REMARQUE: Si votre modèle comporte des panneaux de porte
de couleur en plastique, les deux côtés du panneau sont de la
même couleur.
1. Manipuler les panneaux prudemment. Insérer le doigt sous
une extrémité de la moulure de retenue, puis tirer la moulure
de retenue vers soi et la mettre de côté.
4. Cintrer le panneau et insérer l’autre côté dans l’encadrement
de porte.
32
Page 33

5. Pousser le panneau vers le haut et insérer le panneau et la
plaque d’espacement dans la moulure inférieure du tableau
de commande, en faisant reposer le panneau dans le profilé
au bas de la porte.
6. Emboîter l’extrémité de la moulure de retenue dans le profilé,
tel qu’illustré. Pousser en faisant glisser le pouce sur toute la
longueur de la moulure de retenue.
3. La couleur désirée étant orientée vers l’extérieur, cintrer le
panneau et l’insérer dans l’encadrement du panneau. Faire
glisser le panneau vers le bas pour qu’il s’engage dans la
rainure en bas de l’encadrement du panneau d’accès.
4. Aligner les bords de la garniture supérieure avec les côtés de
l’encadrement du panneau d’accès. Incliner l’arrière de la
garniture vers le bas et la faire glisser jusqu’à sa position
finale. Emboîter l’avant de la garniture pour qu’elle recouvre
le bord supérieur du panneau de l’ouverture d’accès.
Panneaux de porte et d’accès personnalisés
Changement de la couleur du panneau d’accès
1. Manipuler le panneau prudemment. Pousser vers le haut
avec le pouce, de chaque côté de la garniture du panneau
d’accès pour déboîter la garniture. Retirer la garniture et la
mettre de côté.
2. Faire prudemment glisser le panneau coloré d’accès vers le
haut et le retirer. Ne pas enlever la plaque d’espacement.
IMPORTANT: Vos panneaux de porte et d’accès doivent
comporter un encadrement.
Pour les panneaux de porte personnalisés d’un poids inférieur à
1,8 kg (4 lb), utiliser les ressorts de porte fournis avec le lavevaisselle. Pour les panneaux de porte personnalisés d’un poids
supérieur à 1,8 kg (4 lb), vous doit utiliser l’ensemble de ressorts
de service rigoureux, Pièce N° 4318050. Le poids maximal du
panneau de porte est de 3,6 kg (8 lb).
Il est possible d’installer sur le lave-vaisselle un panneau de porte
et un panneau d’accès (pour les modèles ainsi équipés)
personnalisés assortis aux portes en bois des placards. On peut
utiliser sans modification un panneau en bois standard de 6 mm
(¹⁄₄")*, pour la porte et le panneau d’accès. Du fait de la précision
nécessaire des dimensions, on recommande que ces panneaux
soient découpés par un ébéniste.
33
Page 34

■ Découper les panneaux en bois, de telle manière que
l’orientation du grain du bois corresponde à celle du grain
des portes des placards.
■ Limer et poncer les bords des panneaux en bois pour éviter
les éclats.
■ Le lave-vaisselle est source d’humidité. Appliquer un bouche-
pores résistant à l’humidité sur les deux faces et sur les bords
des panneaux en bois.
■ Découper le panneau de porte avec précision pour qu’il soit
bien serré dans l’encadrement de la porte.
* Épaisseur réelle de ⁷⁄₃₂" (5,6 mm).
Dimensions du panneau personnalisé
Ces panneaux ne conviennent que pour les modèles comportant
un encadrement autour des panneaux de porte et d’accès.
Usinage des panneaux personnalisés
Découper le panneau de porte de manière à ce qu’il ne touche
pas le panneau d’accès lorsque la porte est en position ouverte.
Panneau de porte personnalisé d’épaisseur supérieure à ⁷⁄₃₂"
(5,6 mm) : Usiner les bords supérieur et inférieur pour obtenir une
épaisseur de 5,6 mm (⁷⁄₃₂").
Panneau d’accès personnalisé d’épaisseur supérieure à ⁷⁄₃₂"
(5,6 mm) : Usiner les quatre bords pour obtenir une épaisseur de
⁷⁄₃₂" (5,6 mm).
Panneaux personnalisés d’épaisseur inférieure à ⁷⁄₃₂" (5,6 mm) :
Installer une plaque d’espacement derrière les panneaux.
REMARQUE : Le panneau d’accès est plus large que le panneau
de porte
Épaisseur de 5,6 mm (⁷⁄₃₂") sur les bords, réalisée par usinage.
Installation des panneaux en bois personnalisés porte et ouverture d’accès
1. Découper les panneaux de bois de la porte de l’ouverture
d’accès selon les dimensions spécifiées, de telle manière que
l’orientation du grain du bois corresponde à celle du placard.
2. Limer ou poncer les bords des panneaux en bois pour éviter
les éclats.
Le lave-vaisselle est source d’humidité. Appliquer un bouche-
pores résistant à l’humidité sur les deux faces et sur les bords
des panneaux en bois.
3. Panneau de porte :
Manipuler les panneaux prudemment. Insérer le doigt sous
une extrémité de la moulure de retenue, puis tirer la moulure
de retenue vers soi et la mettre de côté.
34
Page 35

4. Soulever chaque extrémité du panneau de porte. À l’aide
d’une main, cintrer le panneau inférieur. Enlever le pannea et
la plaque d’espacement et les conserver pour usage futur.
5. Insérer le bord supérieur du panneau en bois entre les
éléments latéraux de l’encadrement de la porte, à environ
3" (7,5 cm) sous le tableau de commande. Faire pivoter le
panneau en bois vers le bas, pour l’amener en contact avec
la porte du lave-vaisselle. Faire glisser le bord supérieur du
panneau en bois sous le bord inférieur du tableau de
commande. Pousser le bas du panneau en bois pour l’insérer
entre les éléments latéraux de l’encadrement de la porte, en
faisant reposer le panneau de porte en bois dans le profilé U.
7. Vérifier le fonctionnement de la porte. Elle devrait se fermer
facilement, sans effort, et ne pas s’ouvrir sous l’effet de son
propre poids. S’il est nécessaire de régler les ressorts de la
porte, fermer la porte, et modifier la position d’ancrage de
l’extrémité des ressorts (dans les fentes prévues à cet effet à
la base du lave-vaisselle).
Spring
8. Panneau d’accès :
Pousser vers le haut avec les pouces de chaque côté de la
garniture supérieure du panneau d’accès pour déboîter la
garniture. Retirer la garniture et la mettre de côté.
9. Faire glisser prudemment le panneau coloré vers le haut pour
le retirer. Conserver le panneau coloré et la plaque
d’espacement pour utilisation ultérieure.
6. Emboîter l’extrémité de la moulure de retenue dans le profilé
U, tel qu’illustré. Pousser en faisant glisser le pouce sur toute
la longueur de la moulure de retenue.
10. Insérer le panneau en bois dans l’encadrement du panneau
d’accès. Faire glisser le panneau vers le bas pour qu’il
s’engage dans la rainure de l’élément inférieur de
l’encadrement. Pour l’installation de certains panneaux en
bois, il peut être nécessaire d’ôter les deux vis de montage
supérieur et d’incliner le panneau vers l’avant.
11. Aligner les bords de la garniture supérieure avec les côtés de
l’encadrement du panneau d’accès. Incliner l’arrière de la
garniture vers le bas et la faire glisser jusqu’à sa position
finale. Emboîter l’avant de la garniture pour qu’elle recouvre
le bord supérieur du panneau d’accès.
35
Page 36

Contrôle du fonctionnement
©
Si le lave-vaiselle ne fonctionne pas
1. Lire le manuel d’utilisation et d’entretien fourni avec
l’appareil.
2. Vérifier que toutes les pièces ont été installées et qu’aucune
étape n’a été omise.
3. Vérifier la présence de tous les outils utilisés.
4. Mettre le lave-vaisselle en marche et commander l’exécution
complète du programme de lavage le plus court. Après les
deux premières minutes, déverrouiller la porte; attendre cinq
secondes, puis ouvrir la porte.
5. Vérifier qu’il y a bien de l’eau au fond de la cuve du lavevaisselle. Vérifier que le lave-vaisselle fonctionne
correctement.
6. Si ce n’est pas le cas, déconnecter la source de courant
électrique ou débrancher le lave-vaisselle et voir la section
“Si le lave-vaisselle ne fonctionne pas”.
Essayer d’abord les solutions suggérées ici pour éviter le coût
d'une intervention de dépannage.
■ Disjoncteur ouvert ou fusible grillé?
■ Porte bien fermée et verrouillée?
■ Sélection correcte du programme sur l’appareil?
■ Arrivée d’eau ouverte?
Si ces contrôles ne permettent pas de résoudre l’anomalie,
téléphoner 1-800-253-1301 o Canada 1-800-807-6777.
W10282559A
2010.
All rights reserved.
Tous droits réservés.
Printed in U.S.A.
Imprimé aux É.-U.
12/10
 Loading...