

Page 1
PTAC HYDRONIC HEAT KIT
HVK03E
I
NSTALLATION
DESCRIPTION
The PTAC Hydronic Kit is an enclosure kit that provides
complete coverage of all PTAC plumbing and coils while still
allowing access to controls. The kit can only be installed
where there is a central boiler for heating the water. It does
not affect unit heating and cooling operations. The hydronic
kit chassis slides out for service without removing any
hydronic plumbing. The electrical connections are plug-in
type to assist in kit installation.
NOTE: Heat pump models will operate on heat pump
function down to the switchover temperature before operating on hydronic heat.
Freeze Protection
For PTAC Hydronic Coil freeze protection on hot water
systems, the hydronic system should use an antifreeze
AND
HWK03E
I
NSTRUCTIONS
solution. However, the addition of antifreeze will reduce the
capacity of the hydronic coil and affect system sizing. The
higher the antifreeze concentration, the greater the capacity
reduction. Therefore, for optimum unit performance, only use
an antifreeze concentration that will protect to the lowest
ambient temperature expected. A 20% solution will protect
to approximately 15°F. A 50% solution protect to -35°F.
Use an antifreeze that is formulated for hydronic use. DO
NOT USE AUTOMOTIVE OR PETROLEUM BASED PRODUCTS.
Tools Required
1/4 Inch Electric Drill
1/8 Inch Diameter Drill Bit
Center Punch and Hammer
6 Foot Rule
Combination Square
1/4 Inch Nut Driver or Socket
5/16 Inch Nut Driver or Socket
Torch, Solder, Flux, etc.
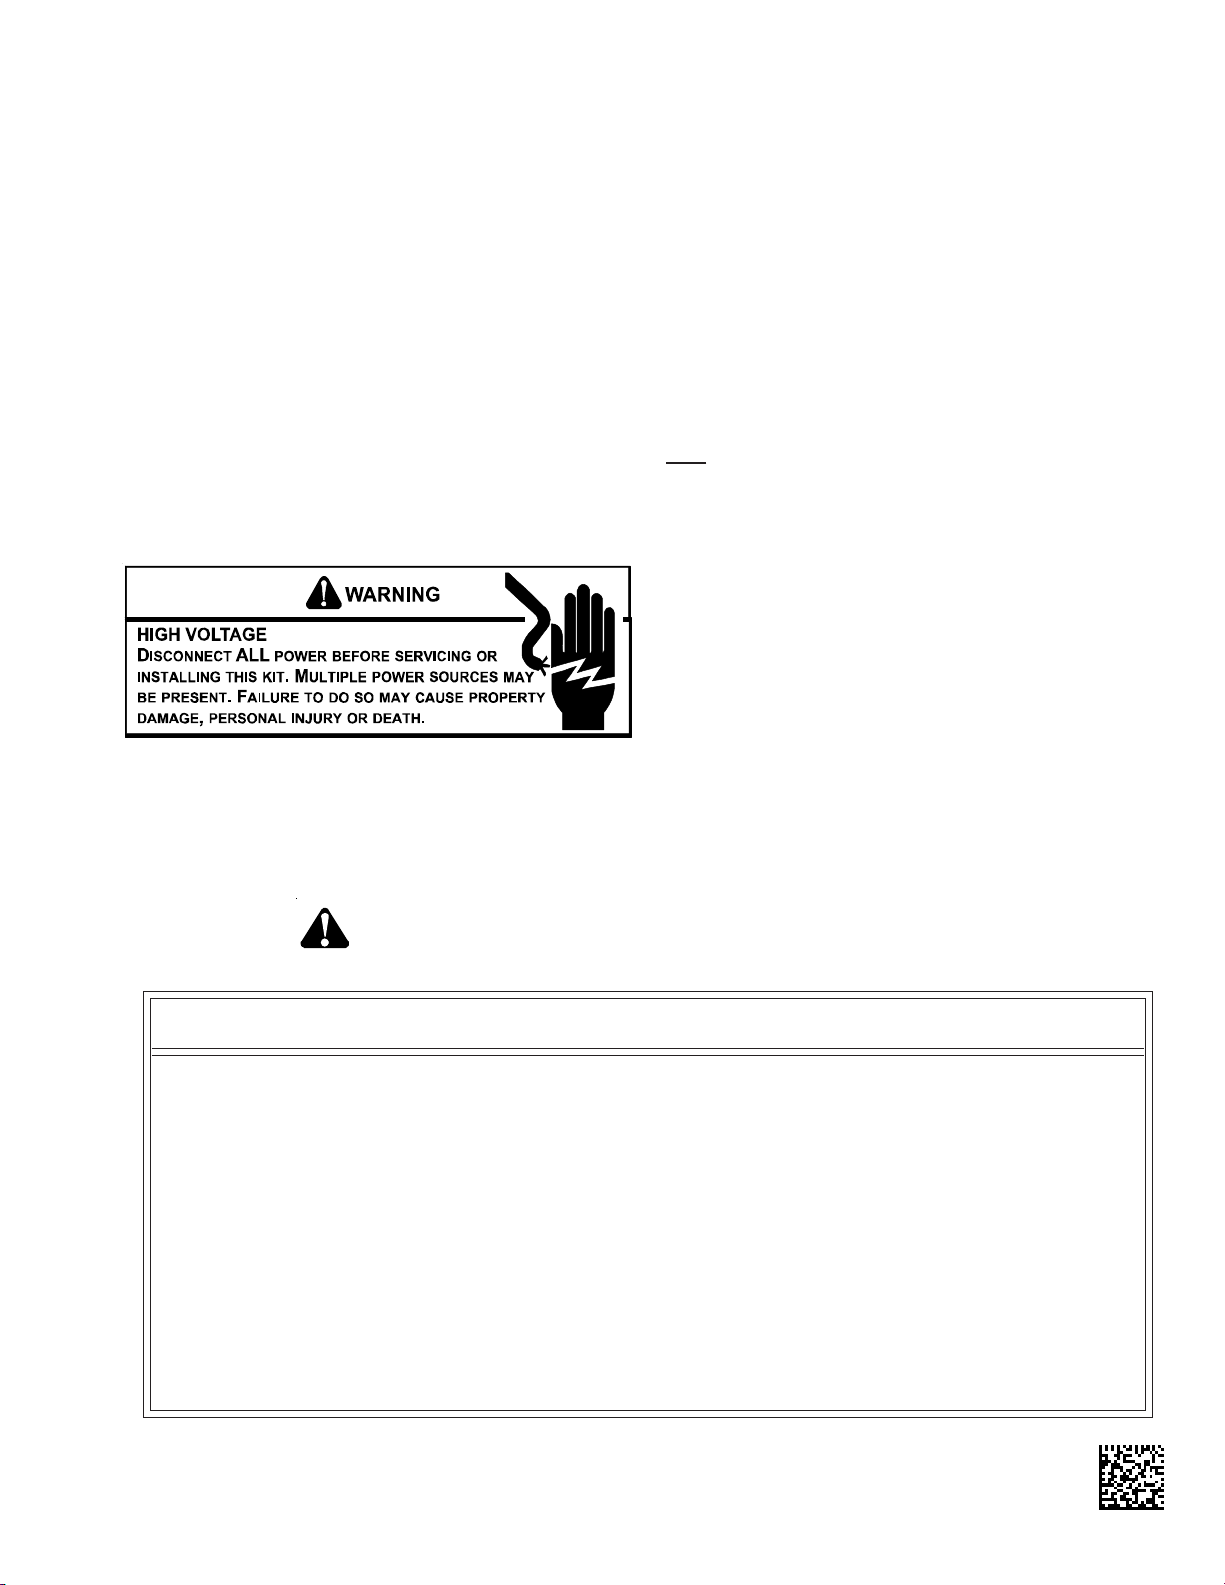
RECOGNIZE THIS SYMBOL AS A SAFETY PRECAUTION.
ATTENTION INSTALLING PERSONNEL
As a professional installer you have an obligation to know the product better than the customer. This
includes all safety precautions and related items.
Prior to actual installation, thoroughly familiarize yourself with this Instruction Manual. Pay special attention
to all safety warnings. Often during installation or repair it is possible to place yourself in a position which is
more hazardous than when the unit is in operation.
Remember, it is your responsibility to install the product safely and to know it well enough to be able to
instruct a customer in its safe use.
Safety is a matter of common sense...a matter of thinking before acting. Most dealers have a list of specific
good safety practices...follow them.
The precautions listed in this Installation Manual are intended as supplemental to existing practices.
However, if there is a direct conflict between existing practices and the content of this manual, the
precautions listed here take precedence.
Goodman Company, L.P.
IO-386B
February 2011
5151 San Felipe, Suite 500 • Houston, TX 77056
www.amana-ptac.com
© 2010 - 2011 Goodman Company, L.P.
Page 2

JOB PREPARATION
Before installing the hydronic kit, determine the following:
• Whether a 2-way or 3-way normally open or normally
closed valve is required.
• If an end switch is required to control the circulating
pump. (Information relating to U.L. approved valves
and current loads is shown on the kit label and is
repeated in the following figure).
NOTE: WHEN HYDRONIC HEAT IS USED, DISREGARD THE MINIMUM CIRCUIT AMPACITY AND MAXIMUM
FUSE SIZE SHOWN ON THE AUXILIARY NAMEPLATE FOR FIELD INSTALLED HEATERS. USE VALVES
SHOWN ON THE MASTER UNIT NAMEPLATE.
ERIE MANUFACTURING CO. 654C0507EA01 654C0407EA01 UNIT VOLTAGE RATING 230/208 265
CAUTION: VOLTAGE RATING OF VALVE IS 24VAC AND DOES NOT CORRESPOND TO
THIS KIT MAY BE USED WITH ONE OF THE
FOLLOWING ELECTRIC CONTROL VALVES:
VOLTAGE RATING ON THE UNIT NAMEPLATE.
HOT WATER
654C0527EA01 654C0427EA01 FAN MOTOR AMPS .6 .6
654C0509EA01 VS2212G14A02A MOTORIZED VALVE, WATTS 6.5 6.5
654C0529EA01 VS2212G24A02A
VT2212G14A02A
VT2212G24A02A
VT3213G14A02A
STEAM
NOTE: WHEN HYDRONIC HEAT KIT IS
EMPLOYED, THE FOLLOWING LOADS
OPERATE CONCURRENTLY:
E
F
A
C
BARBER-COLMAN VA-1403-201 VA-9224-201 MAX. WATER TEMPERATURE 200° F
HONEYWELL V8043A
VA-1403-301 VA-9214-201 MAX. WATER PRESSURE 200 PSIG
VA-3403-201 MAX. STEAM PRESSURE 5.0 PSIG
V8043B V8043J
V8044A
Also, ensure that the following steps are completed and a
hydronic model chassis is installed before installation.
NOTE: The hydronic chassis MUST have a model
number in which the 10th, 11th, 12th or 13th digit
is H.
1. Wall sleeve is installed and completely sealed.
It must extend at least 3” and no more than 3-1/8” past
the finished interior wall in order to properly install the
hydronic kit.
2. All plumbing stub-outs are completed.
3. Unit chassis is uncrated, uninstalled, and not yet
connected to an electrical source.
INSTALLATION
The installation and servicing of the equipment referred to in this booklet should be performed by qualified, experienced technicians.
Be sure to engage the services of a qualified water
treatment specialist to determine what water treatment, if any, is needed. The manufacturer will not
assume responsibility for equipment failures resulting
from untreated or improperly treated water.
B
D
This Installation kit includes:
Item Q ty Description
A 1 Transition
B 1 Hydronic Skirt
C 1 Hydronic Top Assy
D 1 Hydronic Front Assy
E 2 Support Brackets
F 1 Bag Assembly containing:
Installation Instructions,
Gasket foam,
8 - 3/8” #8 screws
2 - 1/2” #8 screws
4 - 1/2” #10 screws
1 #10 machine screw
1 snap bushing
1 valve harness
4 wire nuts
2
Page 3
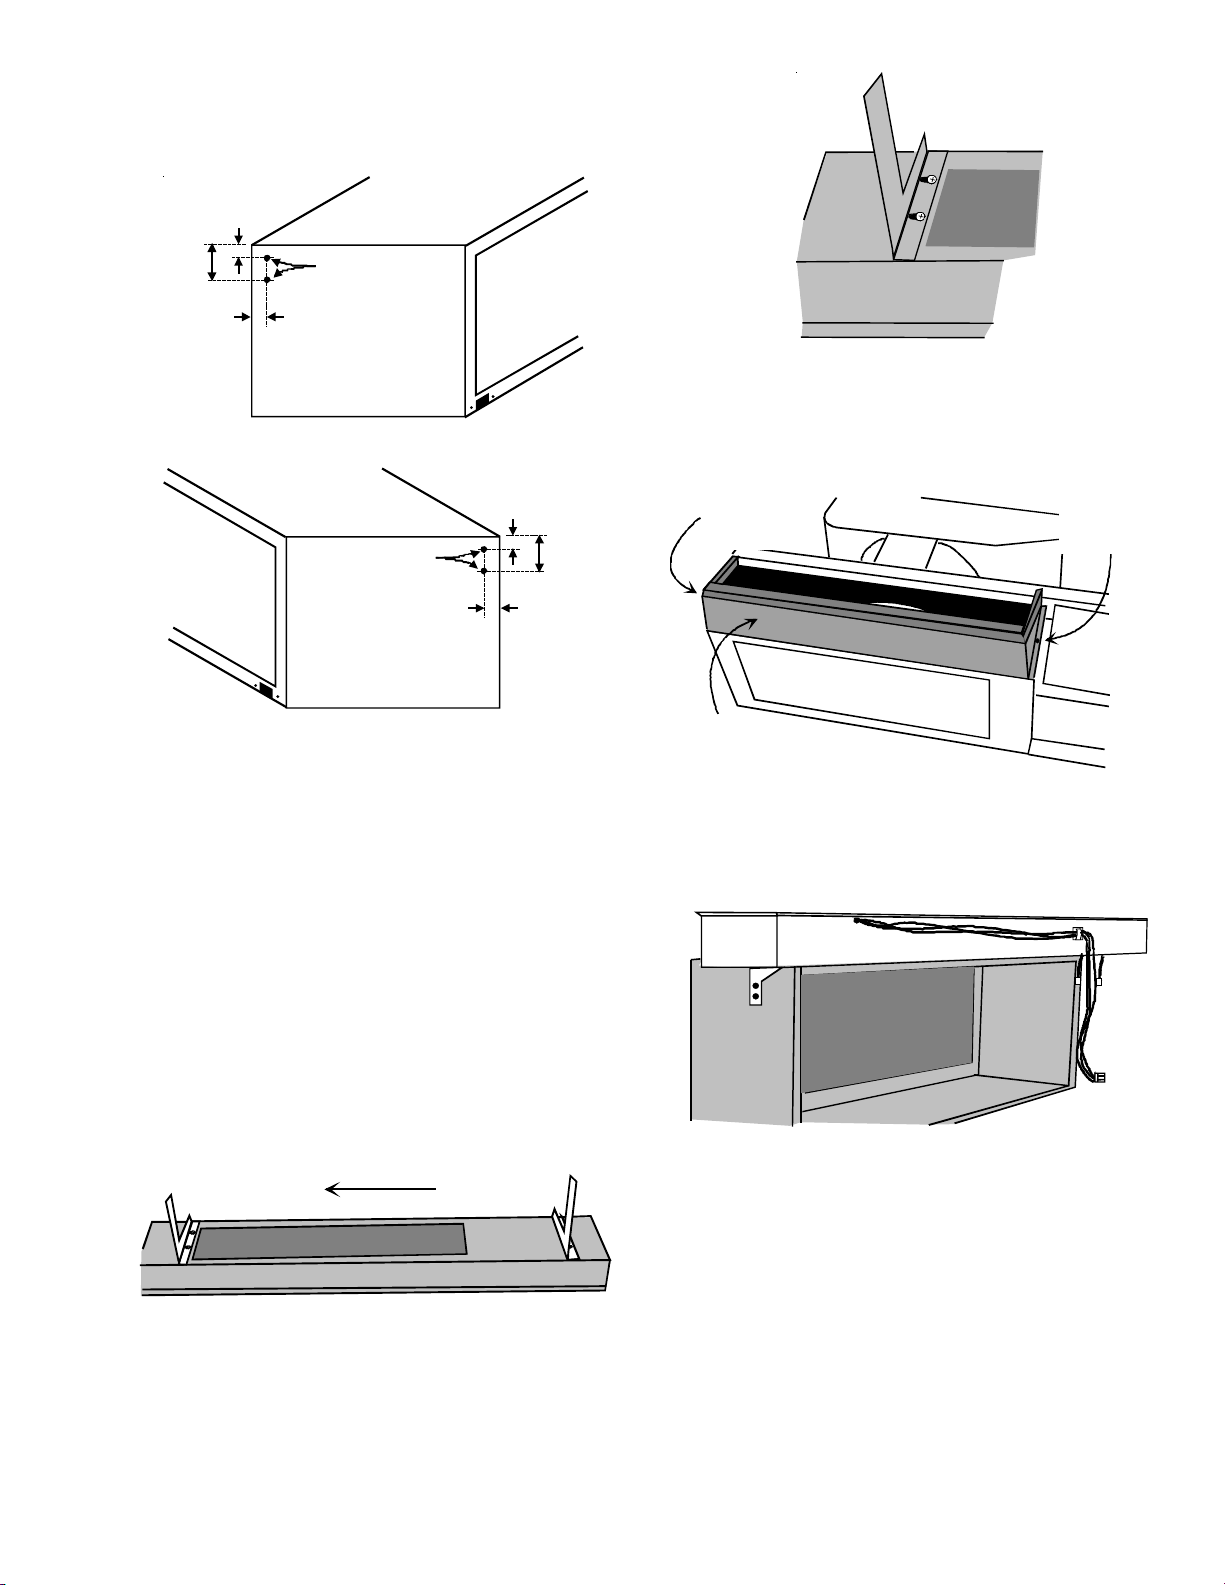
1. Drill two 1/8” diameter holes on both sides of wall sleeve
as shown (Figure 1).
NOTE: If there is not enough room to drill holes from the
side then drill holes from inside the wall sleeve.
Wall
3-1/4"
Sleeve
5"
2-1/4"
1/8" Holes
Indoor
Right
Side
Wall
Sleeve
1/8" Holes
3-1/4"
5"
2-1/4"
Indoor
Left
Figure 1
2. Remove the hydronic kit from its packaging. Recycle the
cardboard packaging material.
3. Mount the two support brackets to the bottom of the
hydronic top (Figure 2) with four (4) 3/8-inch #8 supplied
screws.
On HVK03E Hydronic Steam Kits, do not use 1/4 inch head,
3/8 inch long, #8 screws to attach the left support bracket
to the hydronic top. Use the provided two 5/16 inch painted
head, 1/4 inch long, #8 screws in place of these longer
screws. (Figure 3)
NOTE: Failure to use the 1/4 inch long screws instead
of the 3/8 inch long screws may result in leaks of the
hydronic steam coil.
Figure 3
4. Mount the transition to the chassis with two 1/2-inch #8
supplied screws (Figure 4).
1/2" #8 Screw
(May be covered
by gasket)
Transition
1/2" #8 Screw
(May be covered
by gasket)
Figure 4
5. Position the hydronic top with support brackets to the
wall sleeve and fasten the support brackets to the drilled
holes in the wall sleeve with four 1/2-inch #10 supplied
screws. (Figure 5)
Slide Brackets Before Tightening Screws
Figure 2
Move the brackets to the left so that screws are located
in right side of slot and tighten screws (Figure 3).
Figure 5
6. Place the chassis back into the wall sleeve and secure
chassis to wall sleeve.
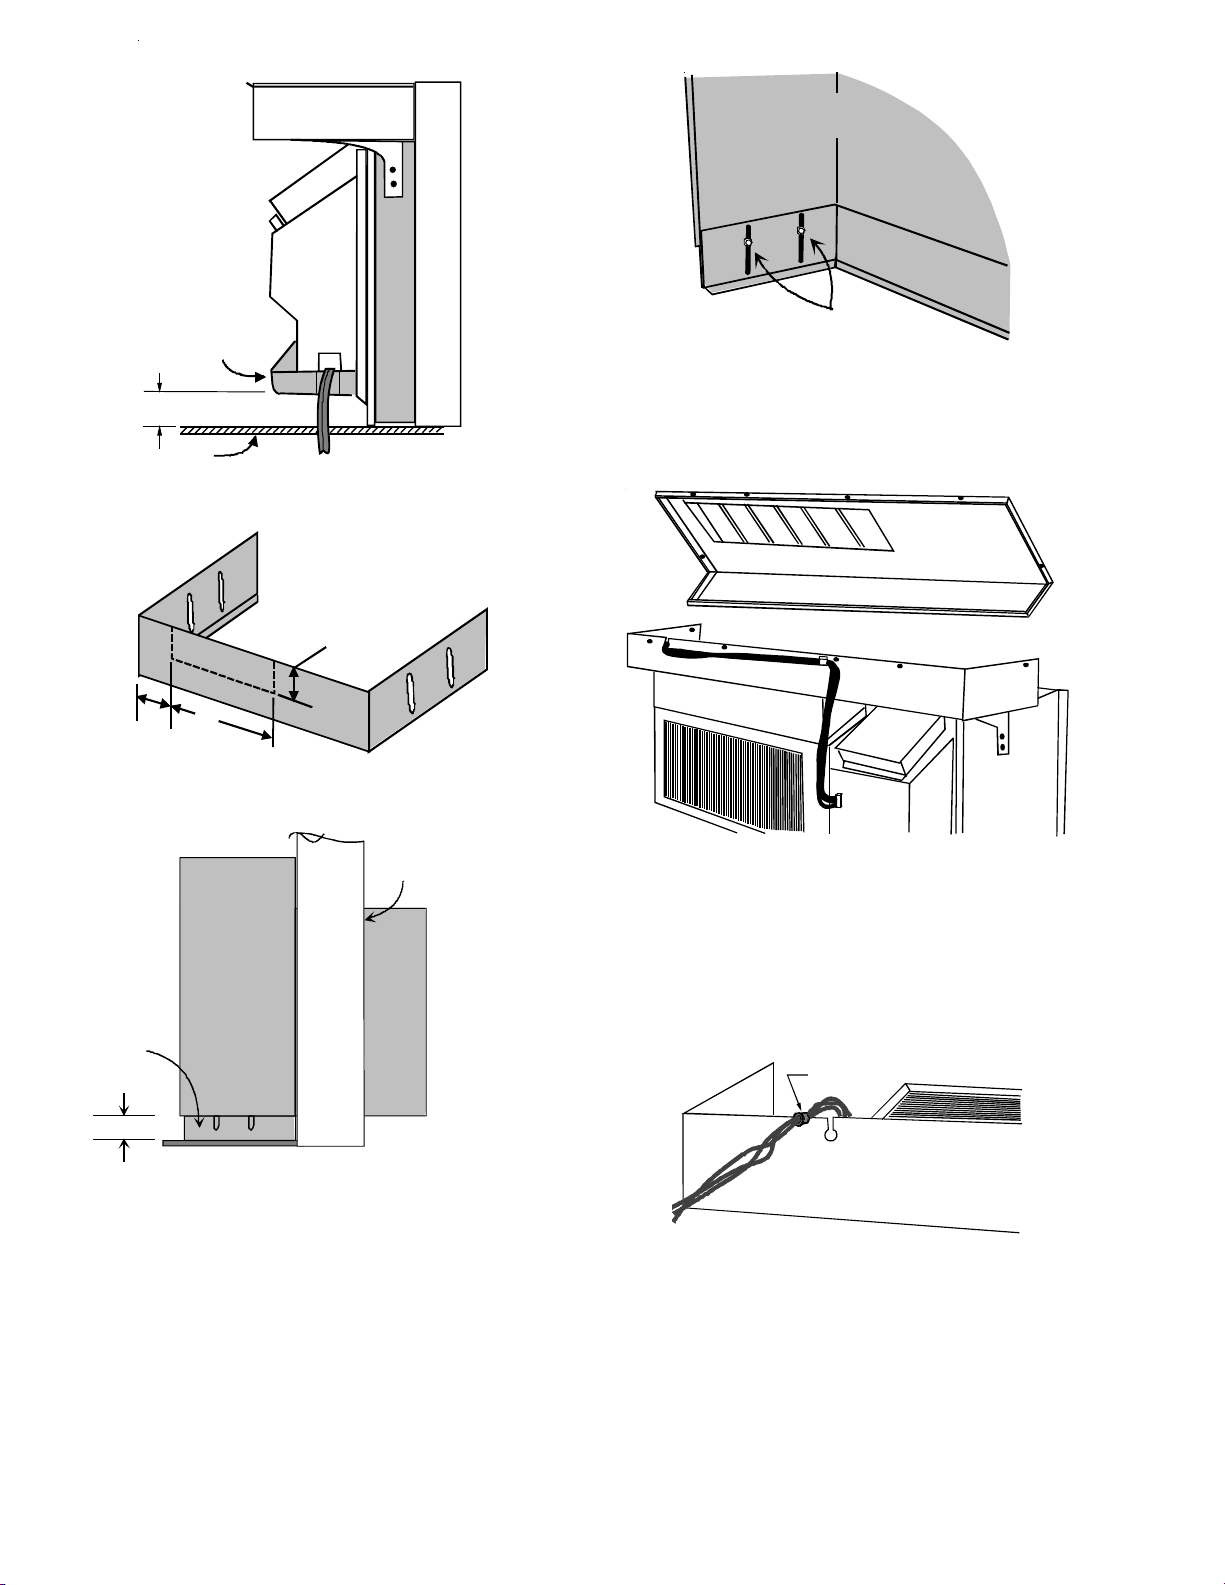
7. Measure the actual distance “D” (Figure 6) from the
bottom of the chassis basepan to the finished floor to
determine how far to extend the skirt below the metal
front. If the distance is less than two inches, trim the
skirt per Figure 7 so that it will not interfere with the
gasket or block the inlet air on the front. In Figure 7, “Y”
dimension equals 2” minus actual “D” dimension.
3
Page 4
Hydronic Front
(Inside Surface)
W
A
L
L
S
k
i
r
t
Basepan
D = 1/2" to 3-3/4"
Floor
6
2
-
3
/
4
"
8
"
Figure 6
Y
=
2
Figure 7
3/8" #8 Screws
(Two On Each Side)
Figure 9
9. Remove the six screws from the top of the hydronic top.
Lift the hydronic top straight up and set aside along with
the six screws (Figure 10).
"
-
D
Exterior
Wall
Figure 10
Skirt
Between 0" to 3"
Hydronic
Front
Finished
Floor
Wall
Sleeve
Figure 8
8. Mount the skirt to the metal front with the four remaining
3/8” #8 supplied screws (Figure 9).
NOTE: Skirt is attached to front of top piece during shipping.
10. Position the wires from the freeze thermostat found on
the left side of the hydronic top so the wires slide through
the slot opening in the hydronic top.
Place all wires into the supplied snap bushing (Figure
11.
SNAP BUSHING
Figure 11
11. Snap the grommet into the hydronic top and pull the
wires forward to take out the slack in the wires (Figure
12).
4
Page 5

Figure 12
R
12. Route the freeze thermostat wires through the U-clip on
the hydronic top assembly and down in front of the
control panel. Snap the plastic male pin connector into
the plastic female pin connector located on the outside
front surface of the control panel (Figure 13).
U-CLIP
VALVE
For normally closed valves, connect the BL chassis
harness wire to the second BK wire from the valve.
15. Cut either the YL or BL wire that is not being used at the
plastic male connector on the control panel.
TWO-WAY VALVE INSTALLATION
When installing two-way valves, the flow direction is from end
“B” as shown in Figure 15.
Prior to soldering the normally closed two-way valve, open
the ports by slowly moving the manual operating lever to the
retaining notch until lever is secured by valve spring. The
lever will reset to the automatic position the first time the
valve is energized.
THREE-WAY VALVE INSTALLATION
When installing three-way diverting valves, end “B” is the
supply to coil and end “A” is the bypass end. The inlet port
is unmarked. Port markings “A” and “B” are located on the
bottom of the valve body (Figure 15).
Motor
Control Cord/Plug
N.O. YL
N.C. BL
*
PLASTIC
CONNECTO
Figure 13
13. If the black valve motor leads are not accessible from the
valve housing, remove the valve cover. Connect the
supplied valve wire harness leads to the two valve motor
leads (not the end switch leads) using the supplied wire
nuts (Figure 14). The fiber washer and strain relief
supplied with the valve harness must be located in the
valve motor enclosure after assembly. Replace the valve
cover.
Control Cord/Plug
N.O. YL
N.C. BL
*
From
Heat
Coil
Motor
Return To
Water System
Wire Nuts
B
A
* Connect YL for Normally Open Valves.
Connect BL for Normally Closed Valves
Figure 14
14. Using the two remaining wire nuts, connect the wires
from the chassis wire harness to valve harness.
Connect one of the BK wires from the valve to BK wire
from the chassis.
For normally open valves, connect the YL chassis
harness wire to the second BK wire from the valve.
End "B"
To Coil
(Normally
Closed)
B
Coil Assembly
Wire Nuts
A
Return
* Connect YL for Normally Open Valves.
Connect BL for Normally Closed Valves
Figure 15
NOTE: For Erie Model VT32* (poptop), the three-way valve
is only configured as N.C. to “B” port. For N.O. configuration to the coil, simply turn the valve around.
Prior to soldering the normally closed 3-way valve, open both
ports by slowly moving manual operating lever to retaining
notch until lever is secured by valve spring.
Flow valve and tubing is to be installed so that it does not
restrict removal of the chassis from the sleeve for service.
SOLDERING THE VALVES
Solder the flow valve and other necessary components in line
with the plumbing rising from the floor or wall. Do not place
the components inside the hydronic top assembly (Figure
16).
5
Page 6

U-CLIP
VALVE
PLASTIC
CONNECTOR
Figure 16
STEAM AND WATER PLUMBING
1. The plumbing can enter from the left and/or right side of
the unit through the slots and holes that are supplied in
the hydronic top assembly. (See Steam and Water
Plumbing Dimensions figures.)
2. Hydronic water kits (HWK03E may have water entering
either the left or right side of the coil. Hydronic steam kits
(HVK03E) can only have entering steam on the right side
of the coil. (See Steam and Water Plumbing Dimensions figures.)
3. Make sure all piping is plumbed to the coil and system
has been bled of air. Using the existing six screws and
hydronic top from Step 13, place the top cover over the
coil deck assembly. Make sure the back flange of the
top cover fits inside the small vertical flange in the back
of the coil assembly. (Figure 17.)
Flange
3. To service the unit, remove the front. Remove the four
sheet metal screws that secure the unit to the wall
sleeve from each of the side seal mounting brackets. If
a subbase is used, remove the right side cover panel
from the subbase and disconnect the power cord. The
chassis may be removed for service.
NOTE: To prevent water hammering, the use of approved
motorized valves and good piping practices is strongly
recommended. Opening and closing motorized valves very
slowly will help prevent water hammering.
CONFIGURATION SETTINGS FOR R410A
E SERIES MODEL BOARDS
The control can be configured to operate a wide range of
options. The options listed below with the * are the factory
default settings. If these are acceptable, then the unit does
not require any additional configuration and is fully operable.
To configure the unit, first select the configuration feature
code setting and then an option code to change from the
factory default setting.
To enter configuration feature mode:
1. Press and hold the up and down arrow keys at the
same time and press the OFF key twice within
a two (2) second time frame. The display will indi-
Water
Piping
Hydronic
Coil
Figure 17
NOTE: A manual bleed valve is supplied with both the
Hydronic Water and Hydronic Steam Kits (HWK03E and
HVK03E). It is recommended that an automatic bleed valve
for Hydronic Steam Kits (HVK03E) be installed. This will
eliminate frequent access to the manual bleed valve for
purging air from the steam system.
FINAL KIT INSTALLATION STEPS
1. Place the hydronic front on the top assembly so the
flanges of the front fit tightly into the flanges of the top
assembly.
2. Ensure the inlet air filter is located inside of the inlet grille
and held in position with the four brackets (one on each
side and two on the bottom). The inlet grille can be
hinged open by unlatching the two top levers on the
grille.
cate - -., and then release the key and press the
key one time. The display will then alternate be-
tween C1 and 0.
To select a different configuration feature code, press
the HEAT key until the desired configuration
comes up. T o scroll to a previously viewed configuration codes press the COOL key.
Once you have scrolled to the correct feature, then to
select the option code for your desired configuration,
press either the up or down key to scroll through
the options of the selected feature code.
To exit configuration mode:
1. Press the OFF key . Configuration feature
mode will also exit if no keys are pressed for a period of two (2) minutes.
6
Page 7

CONFIGURATION SETTINGS
Configura tion Code Description Option Code Description
C1 I nterface 0 * Chas sis Me m brane*
rE Wireless Remote
L5 Wired Thermostat
C2 Fan Op erat io n bP Bu tt o n pr e s en t
bA* 7-Butt on , r evert s to C yclic
A A l wa y s run fan ( eve n in Off )
b C 7-B utton, rev ert s to Continuous
C3 Rever se Cyc le Ope r a tio n C Cooler O nly
H* Heat Pump*
0 Service No Operation "Eo"
C 4 Room I.D . Digit 1 & 2 0 0* - 99 00 * - 99
C 5 Room I.D . Digit 3 & 4 0 0* - 99 00 * - 99
C6 Wi re d or Wirele ss Occup an c y 0* Of f*
1On
1 8 18 Hour Au tomat ic Entry
C8 Te m p. Lim it ing C ool 60 * - 72 6 0* - 72
C9 Te m p. Limiti ng H eat 68 - 90 , 80* 68 - 90, 80*
Cd Englis h / Metr ic Temp F * Fa hren heit Sc ale*
CCelsius Scale
d6 Sen s or less Un-O c c . T ime 1 - 32, 18* 1 - 32 , 18*
d7 1s t Un -O c c . S et Ba c k Te mp. 1 - 16 , 2* 1 - 16, 2*
d8 1st Un-Occ. Set Back Time .1, .5*, 1 - 24 .1 ,.5 ,1 - 24, .5*
d9 2nd U n-Oc c . Set Back T em p. 1 - 16 , 3* 1 - 16, 3*
dA 2nd Un-Oc c. Se t Bac k T im e .1, .5, 1* - 24 (d8) - 24, 1*
db 3rd Un-Occ. Set Back Temp. 1 - 16, 6* 1 - 16, 6*
dC 3rd Un-Occ. Se t Back Time
.1, .5, 1 - 24, 3* (dA) - 24, 3*
dF Jace Group Code 00* - 99 00* - 99
r4 Room Pr efix 00* - 99 00* - 99
r5 Room Suf fix 00* - 99 0 0* - 99
*Indicates facto ry default
See manufacturer for additiona l configuration options.
7
Page 8

NOTE: If the unit will be controlled by a wireless thermostat
(Goodman DS01E using DT01A antenna on the
unit), the board may have to be configured to allow
the wireless thermostat to operate the unit.
Enter Configuration Mode, select feature code
(C1) by pressing the HEAT button and
option
NOTE: If the unit is being controlled by a wired wall thermo-
stat, the board will have to be configured to allow the
thermostat to operate the unit. To configure for a
wired wall thermostat,
Enter Configuration Mode, select Feature Code
(C1) by pressing the heat button and option (L5)
by pressing the (down)
(rE) by pressing the down arrow.
arrow.
TO SET THE PTAC CONTROL FOR A 4-DIGIT ROOM
NUMBER WIRED THERMOSTAT.
To select interface options, enter configuration mode, press
the HEAT
the up
four digit room number.
Press HEAT
the up
down arrows to select the first two digits of a
down arrows to select the last two digits.
key until (C4) appears, then press
again until (C5) appears then press
8
Page 9

Steam Plumbing Dimensions
(2 places)
3-1/2"
5-3/4"
1" x 1-1/2"
opening for piping
5-1/2"
1/2" I.D.
5/8" O.D.
5/8"
Steam Outlet
Connection
3-1/4"
1-7/8"
PTAC UNIT WALL SLEEVE
COIL
TOP VIEW OF COIL LOCATION
(with top grille and sheet metal removed)
1-1/2"
COIL
COIL
13-3/8"
1-1/2"
1-7/8"
3-1/4"
2-1/4"
(2 places)
1" diameter
opening for piping
1/2" I.D.
5/8" O.D.
5/8"
Steam Inlet
Connection
Steam Outlet Connection
16-7/8"
16-3/4"
20-3/16"
1-1/2"
SIDE VIEW SIDE VIEW
8-1/4"
Hydronic Air
Inlet
COIL
Steam Coil Position
Steam Inlet Connection
2-1/8"
53"
FRONT VIEW
(unit with Hydronic Kit installed)
COIL
1-1/2"
17-3/8"
Steam Trap (opti onal)
NOTE
(
: Steam Trap may be
installed on one or both
sides of Hyrdronic Unit)
Figure 18
9
Page 10

Hot Water Plumbing Dimensions
3-3/8"
3-3/8"
5-11/16"
5-1/2"
3-1/4"
1-13/16"
1"
1/2" I.D.
5/8" O.D.
1"
4-3/4"
2-3/4"
COIL
COIL
1-13/16"
1' 1-5/8"
1-1/16"
2-1/8"
3-1/4"
1/2" I.D.
5/8" O.D.
2-5/16"
4' 5"
1' 8-3/16"
1' 4-1/8"
0" to 3"
Finished Floor
Fini shed Floor
Figure 19
10
Page 11

PTAC HYDRONIC KIT
0
SPECIFICATIONS
Heating Capacity
Hydronic Heat Kit Application Data
Heating Capacity (Btuh)- Hot Water
Pressure
Gal. Drop
per (psig) 200° F. EWT 180° F. EWT 200° F. EWT 180° F. EWT
Min. 2-Way Fan Speed Fan Speed Fan Speed
CoilValveHiLoHiLoHiLoHiLo
1.00 0.93 0.16 18200 16500 14900 13600 20600 19000 16900 15600
1.13 1.03 0.20 18600 16900 15200 13900 21100 19500 17300 16000
1.25 1.14 0.25 19000 17300 15500 14200 21500 19900 17600 16300
1.38 1.26 0.30 19400 17600 15900 11500 21900 20300 18000 16600
1.50 1.40 0.36 19700 18000 16200 14700 22300 20700 18300 16900
1.63 1.55 0.43 20000 18200 16400 15000 22700 20900 18600 17200
1.75 1.71 0.49 20300 18400 16600 15100 22900 21200 18800 17400
7000 BTUH Units
9000, 12000 & 15000 BTUH Un it s
Fan Spe ed
1.88 1.89 0.57 20500 18600 16800 15300 23200 21500 19000 17600
2.00 2.10 0.64 20600 18800 16900 15400 23400 21600 19200 17700
2.13 2.32 0.73 20800 18900 17100 15600 23600 21800 19400 17900
2.25 2.57 0. 81 ** 21000 19100 17200 15700 23800 22000 19500 18000
2.38 2.84 0.91 21100 19200 17300 15800 23900 22100 19600 18100
2.50 3.14 1.00 21200 19200 17300 15800 24000 22200 19700 18200
2.63 3.48 1. 11 21200 19300 17300 15800 ** 24000 22200 19700 18200
2.75 3.85 1.21 21200 19300 17400 15900 24000 22200 19700 18200
** Based on AH RI Rating Conditions of 70° F Entering Air Temp., 200°F Entering Water Temp and 180°F
Leaving Water Temp. Max. Water Temp. 200°F. Max. W ater Pressure - 2 00 P sig.
Numbers above are based on systems without antifreeze.
Hydronic Heat Kit Application Data
Hea t in g C apacity (Btuh) - Steam
St eam 700 0 BTUH Units 9000 to 15 000 BTUH Units
(psig) Fan Speed Fan Speed
Hi Low Hi Low
2
3
4
Maxi mum steam pressure 5 ps ig
**Based on AHR I rating co nditions of 70° F entering ai r temp. and 2 psi g st eam pressur e
** 22,600 20,500 ** 25, 400 23,100
23,00
23,200 21,100 26,100 23,800
20,900 25,900 23,500
11
Page 12

Water V alve Pressure Drop
2-Way Valve
ERIE Models: 654C*
VT/S22*
Water Pressure Drop Water Press ur e Dro p Water P re ss u re Dr op Water Press ur e Drop
GPM (psig) GPM (psig) GPM (psig) GPM (psig)
1.00 0.16 1.00 0.11 1.00 0.04 1.00 0.06
1.13 0.20 1.13 0.14 1.13 0.05 1.13 0.08
1.25 0.25 1.25 0.17 1.25 0.06 1.25 0.10
1.38 0.30 1.38 0.21 1.38 0.08 1.38 0.12
1.50 0.36 1.50 0.25 1.50 0.09 1.50 0.14
1.63 0.43 1.63 0.30 1.63 0.11 1.63 0.17
1.75 0.49 1.75 0.34 1.75 0.12 1.75 0.19
1.88 0.57 1.88 0.39 1.88 0.14 1.88 0.22
2.00 0.64 2.00 0.44 2.00 0.16 2.00 0.25
2.13 0.73 2.13 0.50 2.13 0.18 2.13 0.28
2.25 0.81 2.25 0.56 2.25 0.20 2.25 0.32
2.38 0.91 2.38 0.63 2.38 0.23 2.38 0.35
2.50 1.00 2.50 0.69 2.50 0.25 2.50 0.39
2.63 1.11 2.63 0.77 2.63 0.28 2.63 0.43
2.75 1.21 2.75 0.84 2.75 0.30 2.75 0.47
CV=2.5 CV=3.0 CV=5.0 CV=4.0
3-Way Valve Bypass
ERIE Models: 654C*
Q = CV
Pd
3-Way Valve Service
ERIE Models: 654C*
3-Way Valve Bypass
and Service
ERIE Models: VT32*
Q = Flow in Gallons/Min
CV = Flow Coefficient of Valve
Pd = Pressure Drop (psig)
Dimensions of Complete Installation
9-7/8"
3"
Top of Wall Sleev e
16-1/16"
Bottom of Wall Sleeve
4-1/8"
e
v
e
e
l
S
l
l
a
W
Figure 20
Side View
is a registered trademark of Maytag Corporation or its related companies and is used under
license to Goodman Company, L.P., Houston, TX. All rights reserved.
Hydronic Front
Toe Plate
0" - 3.0" Long
5151 San Felipe, Suite 500 • Houston, TX 77056
© 2010 - 2011 Goodman Company, L.P.
5-1/2"
9-7/8"
Hydronic Air
Discharge
Goodman Company, L.P.
www.amana-ptac.com
12
42"
PTAC Unit Wall Sleeve
Figure 21
Top View
 Loading...