

Page 1

Attention:
Keep these instructions for future reference.
If microwave oven changes ownership, be sure
this manual accompanies microwave oven.
Microwave Oven
Owner’ s Manual &
Cooking Guide
F1361E / F1361W
F1961E / F1961W
F1961L / F1961SS
Page 2

Contents
TECHNICAL SPECIFICATIONS...................................................................................................................................2
PRECAUTIONS TO AVOID POSSIBLE EXPOSURE TO EXCESSIVE MICROWAVE ENERGY...............................3
IMPORTANT SAFETY INSTRUCTIONS ......................................................................................................................4
INSTALLATION.............................................................................................................................................................5
OTHER HELPFUL INFORMATION ..............................................................................................................................6
MODEL IDENTIFICATION.....................................................................................................................................6
GETTING THE BEST RESULTS FROM YOUR MICROWAVE OVEN .................................................................7
SPECIAL TECHNIQUES IN MICROWAVE COOKING .........................................................................................7
HOW FOOD CHARACTERISTICS AFFECT MICROWAVE COOKING................................................................8
COOKING UTENSILS..................................................................................................................................................8
FEATURE DIAGRAM ...................................................................................................................................................9
CONTROL PANEL ......................................................................................................................................................9
OPERATING INSTRUCTIONS....................................................................................................................................10
SETTING CLOCK ................................................................................................................................................10
EASY COOK .......................................................................................................................................................10
TIME COOK.........................................................................................................................................................10
MULTI-STAGE TIME COOK ...............................................................................................................................11
MICROWAVE POWER LEVELS..........................................................................................................................11
CHILD LOCK........................................................................................................................................................11
TIMER..................................................................................................................................................................11
CONTROL SET-UP..............................................................................................................................................12
MORE/LESS ........................................................................................................................................................13
SENSOR COOK OPERATION INSTRUCTION/SENSOR COOK.......................................................................13
SENSOR COOK CHART.....................................................................................................................................14
SENSOR POPCORN...........................................................................................................................................15
SENSOR REHEAT/SENSOR REHEAT CHART .................................................................................................15
HOLD WARM.......................................................................................................................................................15
AUTO COOK/AUTO COOK CHART....................................................................................................................16
AUTO DEFROST.................................................................................................................................................17
FRESH VEGETABLE CHART....................................................................................................................................18
COOK USING SENSOR COOK (VEGETABLE, RICE, CASSEROLE, FISH/SEAFOOD) ........................................19
COOK USING SENSOR COOK (FISH/SEAFOOD, EGGS).......................................................................................20
COOK USING SENSOR COOK (EGGS, CHICKEN, MEATLESS DISHES)..............................................................21
CLEANING..................................................................................................................................................................22
BEFORE CALLING FOR SERVICE............................................................................................................................23
WARRANTY................................................................................................................................................................24
Technical Specifications
MODEL
Power Supply
Rated Power Consumption
Microwave Output
Frequency
Rated Current
Overall Dimensions(WxHxD)
Oven Cavity Dimensions(WxHxD)
Effective Capacity of Oven Cavity
* IEC 705 RATING STANDARD
Specifications subject to change without prior notice.
237/8˝ x 139/16˝ x 1813/16˝21
171/16˝ x 103/8˝ x 185/16˝14
F1961E/W/L/SS F1361E/W
120 V AC, 60 Hz 120 V AC, 60 Hz
1500 W 1500 W
*1100 W *1100 W
2450 MHz 2450 MHz
13.3 A 13.3 A
7
/8˝ x 125/8˝ x 163/4˝
3
/4˝ x 9˝ x 16˝
1.9 Cu.ft. 1.3 Cu.ft.
2
Page 3

Important Safety Instructions
PRECAUTIONS TO AVOID POSSIBLE
EXPOSURE TO EXCESSIVE
MICROWAVE ENERGY
(a) Do not attempt to operate this oven with the door
open since open-door operation can result in
harmful exposure to microwave energy. It is
important not to defeat or tamper with the safety
interlocks.
(b) Do not place any object between the oven front face
and the door or allow soil or cleaner residue to
accumulate on sealing surfaces.
(c) Do not operate the oven if it is damaged.
It is particularly important that the oven door closes
properly and that there is no damage to the:
(1) Door (bent),
(2) Hinges and latches (broken or loosened),
(3) Door seals and sealing surfaces.
(d) The oven should not be adjusted or repaired by
anyone except properly qualified service personnel.
3
Page 4

Important Safety Instructions
WARNING
To reduce the risk of burns, electric shock, fire, injury to persons, or exposure to excessive microwave energy:
1. Read all instructions before using the appliance.
2. Read and follow the specific PRECAUTIONS TO AVOID POSSIBLE EXPOSURE TO EXCESSIVE
MICROWAVE ENERGY found on page 3 of this manual.
3. This appliance must be grounded. Connect only to properly grounded outlet. See GROUNDING
INSTRUCTIONS found on page 5 of this manual .
4. Install or locate this appliance only in accordance with the provided installation instructions.
5. Some products, such as whole eggs and sealed containers – for example, closed glass jars – may explode and
should not be heated in this oven.
6. Use this appliance only for its intended use as described in the manual. Do not use corrosive chemicals or
vapors in this appliance. This type of oven is specifically designed to heat, cook, or dry food. It is not designed
for industrial or laboratory use.
7. As with any appliance, close supervision is necessary when used by children.
8. Do not operate this appliance if it has a damaged cord or plug, if it is not working properly, or if it has been
damaged or dropped.
9. This appliance should be serviced only by qualified service personnel. Contact the nearest authorized service
facility for examination, repair, or adjustment.
10. Do not cover or block any openings on the appliance.
11. Do not store this appliance outdoors. Do not use this product near water - for example, near a kitchen sink,
in a wet basement, or near a swimming pool, and the like.
12. Do not immerse cord or plug in water.
13. Keep cord away from heated surfaces.
14. Do not let cord hang over the edge of a table or counter.
15. When cleaning surfaces of door and oven that comes together on closing the door, use only mild, non
abrasive soaps or detergents applied with a sponge or soft cloth.
16. To reduce the risk of fire in the oven cavity:
a. Do not overcook food. Carefully attend appliance if paper, plastic, or other combustible materials are placed
inside the oven to facilitate cooking.
b. Remove wire twist-ties from paper or plastic bags before placing bag in oven.
c. If materials inside the oven should ignite,
power cord or shut off power at the fuse or circuit breaker panel.
d. Do not use the cavity for storage purposes. Do not leave paper products, cooking utensils, or food in the
cavity when not in use.
17. Do not heat any type of baby bottles or baby food. Uneven heating may occur and could cause personal injury.
18. Avoid heating small-necked containers such as syrup bottles.
19. Avoid using corrosive and vapors, such as sulfide and chloride.
20. Liquids heated in certain shaped containers (especially cylindrical-shaped containers) may become
overheated. The liquid may splash out with a loud noise during or after heating or when adding ingredients
(instant coffee, etc.), resulting in harm to the oven and possible injury. In all containers, for best results, stir the
liquid several times before heating. Always stir liquid several times between reheatings.
KEEP OVEN DOOR CLOSED, turn oven off, and disconnect the
SAVE THESE INSTRUCTIONS
4
Page 5

Installation
Ensure proper ground
exists before use
(for F1361)
Ensure proper ground
exists before use
(for F1961)
GROUNDING INSTRUCTIONS
WARNING
This appliance must be grounded. In the event of an
electrical short circuit, grounding reduces the risk of electric
shock by providing an escape wire for the electric current.
This appliance is equipped with a cord having a grounding
wire with a grounding plug. The plug must be plugged into
an outlet that is properly installed and grounded.
EXTENSION CORD:
If it is necessary to use an extension cord, use only a
3-wire extension cord that has a 3-blade grounding plug, and
a 3-slot receptacle that will accept the plug on the appliance.
The marked rating of the extension cord shall be equal to or
greater than the electrical rating of the appliance.
Longer cord sets or extension cords are available and may
be used if care is exercised in their use.
Be careful not to drape the cord over the countertop or table
where it can be pulled on by children or tripped over accidentally.
Improper grounding can result in a risk of electric shock.
Consult a qualified electrician if the grounding instructions
are not completely understood, or if doubt exists as to
whether the appliance is properly grounded.
A short power-supply cord is provided to reduce the risks
resulting from becoming entangled in or tripping over a long cord.
PRECAUTIONS
*Be certain to place the front surface of the door three inches
away or more from the countertop edge to avoid accidental
tipping of the appliance in normal usage.
*For the most accurate programming of the electronic units,
touch the center of each pad securely. Do not touch several
pads at one time or touch between pads. A beep sound should
be heard with each touch when a pad is touched correctly.
*Do not hit or strike the control with objects such as silverware,
utensils, etc. Breakage may occur.
*Be careful when taking the cooking utensils out of the oven.
Some dishes absorb heat from the cooked food and may be
hot.
*Do not rinse cooking utensils by immediately placing them into
water just after cooking. This may cause breakage. Allow the
turntable to cool.
*Use only specific glass utensils. See cooking utensils section in
this manual.
*Do not operate the oven empty. Either food or water should
always be in the oven during operation to absorb microwave
energy.
*Do not use your microwave oven to dry newspapers or
clothes. They can catch fire.
*Use only thermometers approved for microwave oven cooking.
*Be certain the turntable is in place when you operate the oven.
*Pierce the skin of potatoes, whole squash, apples, or any fruit
or vegetable which has a skin covering before cooking.
*Never use your microwave oven to cook eggs in the shell.
Pressure can build up inside the shell, causing it to burst.
*Do not pop popcorn, except in a microwave-safe container or
commercial package designed especially for microwave ovens.
Never try to pop popcorn in a paper bag not designed for
microwave oven use. Overcooking may result in smoke and fire.
Do not repop unpopped kernels. Do not reuse popcorn bags.
CIRCUITS
For safety purposes this oven must be plugged into a 15 or 20
Amp circuit. No other electrical appliances or lighting circuits
should be on this line. If in doubt, consult a licensed electrician.
VOLTAGE
The voltage used at the wall receptacle must be the same as
specified on the oven name plate located inside oven door. Use
of a higher voltage is dangerous and may result in a fire or other
type of accident causing oven damage. Low voltage will cause
slow cooking. In case your microwave oven does not perform
normally in spite of proper voltage, remove and reinsert the plug.
PLACEMENT OF THE OVEN
Your microwave oven can be placed easily in your kitchen, family
room, or anywhere else in your home. Place the oven on a flat
surface such as a kitchen countertop or a specially designed
microwave oven cart. Do not place oven above a gas or electric
range except for the Built-In application of F1961 (see BUILT-IN
CAPABILITY). Free air flow around the oven is important.
DO NOT BLOCK AIR VENTS
All air vents should be kept clear during cooking. If air
vents are covered during oven operation the oven may
overheat. In this case, a sensitive thermal safety device
automatically turns the oven off. The oven will be inoperable
until it has cooled sufficiently.
RADIO INTERFERENCE
1. Microwave oven operation may interfere with TV or radio
reception.
2. When there is interference, it may be reduced or
eliminated by taking the following measures:
a. Clean the door and the sealing surfaces of the oven.
b. Reorient the receiving antenna of radio or television.
c. Relocate the microwave oven in relation to the TV or radio.
d. Move the microwave oven away from the receiver.
e. Plug the microwave oven into a different outlet so that
microwave oven and receiver are on different branch
circuits.
5
Page 6

Other Helpful Information
MODEL IDENTIFICATION
Complete enclosed registration card and promptly return. If registration card is missing,
call Consumer Affairs Department at 1-800-843-0304 inside U.S.A.
319-622-5511 outside U.S.A. When contacting Amana,
provide product information located on rating plate.
Record the following:
Model Number:
Manufacturing Number:
Serial or S/N Number:
Date of purchase:
Dealer’s name and address:
PARTS AND ACCESSORIES
Purchase replacement parts and additional accessories (e.g., refrigerator shelves, dryer racks,
or cooktop modules) over the phone.
To order accessories for your Amana product, call 1-800-843-0304 inside U.S.A.
or 319-622-5511 outside U.S.A.
BUILT-IN CAPABILITY (FOR F1961 MODELS ONLY)
To build -In, use only Amana FTK127 or FTK130 trim kits. The trim kit will specify
which Amana Wall Ovens the F1961 can be built above.
SERVICE
Keep a copy of sales receipt for future reference or in case warranty service is required.
Any questions or to locate an authorized servicer, call 1-800-NAT-LSVC (1-800-628-5782)
inside U.S.A. 319-622-5511 outside U.S.A.
Warranty service must be performed by an authorized servicer. Amana, also recommends
contacting an authorized servicer if service is required after warranty expires.
Asureª EXTENDED SERVICE PLAN
Amana offers long-term service protection for this new oven.
Asure™ Extended Service Plan is specially designed to supplement Amana’s strong warranty.
This plan covers parts, labor, and travel charges.
Call 1-800-528-2682 for information.
6
Page 7

Other Helpful Information
GETTING THE BEST RESULTS FROM YOUR
MICROWAVE OVEN
Keep an eye on things. The instructions in this book
have been formulated with great care, but your success
in preparing food depends, of course, on how much
attention you pay to the food as it cooks. Always watch your
food while it cooks. Your microwave oven is equipped with
a light that turns on automatically when the oven is in
operation so that you can see inside and check the
progress of your recipe. Directions given in recipes to
elevate, stir, and the like should be thought of as the
minimum steps recommended. If the food seems to be
cooking unevenly, simply make the necessary adjustments
you think appropriate to correct the problem.
Factors affecting cooking times. Many factors affect
cooking times. The temperature of ingredients used in a
recipe makes a big difference in cooking times. For
example, a cake made with ice-cold butter, milk, and eggs
will take considerably longer to bake than one made with
ingredients that are at room temperature. All of the recipes
in this book give a range of cooking times. In general, you
will find that the food remains under-cooked at the lower
end of the time range, and you may sometimes want to
cook your food beyond the maximum time given, according
to personal preference. The governing philosophy of this
book is that it is best for a recipe to be conservative in
giving cooking times. While undercooked food may always
be cooked a bit more, overcooked food is ruined for good.
Some of the recipes, particularly those for bread, cakes,
and custard, recommend that food be removed from the
oven when they are slightly undercooked. This is not a
mistake. When allowed to stand, usually covered, these
foods will continue to cook outside of the oven as the heat
trapped within the outer portions of the foods gradually
travels inward. If the foods are left in the oven until they are
cooked all the way through, the outer portions will become
overcooked or even burnt.
As you gain experience in using your microwave oven, you
will become increasingly skillful in estimating both cooking
and standing times for various foods.
SPECIAL TECHNIQUES IN MICROWAVE
COOKING
Browning: Meats and poultry that are cooked fifteen
minutes or longer will brown lightly in their own fat. Foods
that are cooked for a shorter period of time may be brushed
with a browning sauce to achieve an appetizing color. The
most commonly used browning sauces are Worcestershire
sauce, soy sauce, and barbecue sauce. Since relatively
small amounts of browning sauces are added to foods, the
original flavor of recipes is not altered.
Covering: A cover traps heat and steam and causes food
to cook more quickly. You may either use a lid or
microwave cling-film with a corner folded back to prevent
splitting.
Covering with waxed paper: Waxed paper effectively
prevents spattering and helps food retain some heat. Since
it makes a looser cover than a lid or cling-film, it allows the
food to dry out slightly.
Wrapping in waxed paper or paper towel: Sandwiches
and many other foods containing prebaked bread should be
wrapped prior to microwaving to prevent drying out.
Arranging and spacing: Individual foods such as baked
potatoes, small cakes, and hors d’oeuvres will heat more
evenly if placed in the oven and equal distance apart,
preferably in a circular pattern. Never stack foods on top of
one another.
Stirring: Stirring is one of the most important of all
microwaving techniques. In conventional cooking, foods are
stirred for the purpose of blending. Microwaved foods,
however, are stirred in order to spread and redistribute
heat. Always stir from the outside towards the center as the
outside food heats first.
Turning over: Large, tall foods such as roasts and whole
chickens should be turned so that the top and bottom will
cook evenly. It is also a good idea to turn cut-up chicken
and chops.
Placing thicker portions near the edge: Since
microwaves are attracted to the outside portion of foods, it
makes sense to place thicker portions of meat, poultry and
fish to the outer edge of the baking dish. This way, thicker
portions will receive the most microwave energy and the
foods will cook evenly.
Elevating: Thick or dense foods are often elevated so that
microwaves can be absorbed by the underside and center
of the foods.
Piercing: Foods enclosed in a shell, skin, or membrane are
likely to burst in the oven unless they are pierced prior to
cooking. Such foods include both yolks and whites of eggs,
clams and oysters, and many whole vegetables and fruits.
Testing if cooked: Because foods cook so quickly in a
microwave oven, it is necessary to test food frequently.
Some foods are left in the microwave until completely
cooked, but most foods, including meats and poultry, are
removed from the oven while still slightly undercooked and
allowed to finish cooking during standing time. The internal
temperature of foods will rise between 5°F (3°C) and 15°F
(8°C) during standing time.
Standing time: Foods are often allowed to stand for 3 to 10
minutes after being removed from the microwave oven.
Usually the foods are covered during standing time to retain
heat unless they are supposed to be dry in texture (some
cakes and biscuits, for example). Standing allows foods to
finish cooking and also helps flavors to blend and develop.
7
Page 8

Other Helpful Information
HOW FOOD CHARACTERISTICS AFFECT
MICROWAVE COOKING
Density of foods: Light, porous food like cakes and breads
cook more quickly than heavy, dense foods such as roasts
and casseroles. You must take care when microwaving
porous foods that the outer edges do not become dry and
brittle.
Height of foods: The upper portion of tall foods,
particularly roasts, will cook more quickly than the lower
portion. Therefore, it is wise to turn tall foods during
cooking, sometimes several times.
Moisture content of foods: Since the heat generated from
microwaves tends to evaporate moisture, relatively dry
foods such as roasts and some vegetables should either be
sprinkled with water prior to cooking or covered to retain
moisture.
Bone and fat content of foods: Bones conduct heat and
fat cooks more quickly than meat. Therefore, care must be
taken when cooking bony or fatty cuts of meat that the
meats do not cook unevenly and do not become
overcooked.
Cooking Utensils
NOTE: It is a common misconception that micro-waves
cook food from the inside out. This comes from heating
filled pastries with a high sugar content, like jelly doughnuts.
The pastry is cool but the filling is very hot! If you cook a
chicken or a roast, you’ll see the outside is cooked first.
Shape of foods: Microwaves penetrate only about 1 inch
(2.5cm) into foods; the interior portion of thick foods is
cooked as the heat generated on the outside travels inward.
In other words, only the outer edge of any food is actually
cooked by microwave energy; the rest is cooked by
convection.
It follows then that the worst possible shape for a food that
is to be microwaved is a thick cube. The corners will burn
long before the center is even warm. Round, thin, and ring
shaped foods cook most successfully in the microwave.
Quantity of foods: The number of microwaves in your
oven remains constant regardless of how much food is
being cooked. Therefore, the more food you place in the
oven, the longer the cooking time. Remember to decrease
cooking times by at least one-third when halving a recipe.
MICROWAVE-SAFE UTENSILS
CAUTION
SOME ITEMS ARE NOT INTENDED FOR MICROWAVE
COOKING, INCLUDING SOME STONEWARE AND
ITEMS WITH HIGH IRON OR LEAD CONTENTS.
Never use metal or metal-trimmed utensils in your
microwave oven: Microwaves cannot penetrate metal.
They will bounce off any metal object in the oven and cause
arcing, an alarming phenomenon that resembles lightning.
Most heat-resistant non-metallic cooking utensils are safe
for use in your microwave oven. However, some may
contain materials that render them unsuitable as microwave
cookware. If you have any doubts about a particular utensil,
there is a simple way to find out if it can be used in your
microwave oven.
Testing utensils for microwave use: Place the utensil in
question next to a glass bowl filled with water in the
microwave oven. Microwave at power HIGH for 1 minute. If
the water heats up but the utensil remains cool to the touch,
the utensil is microwave-safe. However, if the water does
not change temperature but the utensil becomes warm,
microwaves are being absorbed by the utensil and it is not
safe for use in the microwave oven. You probably have
many items on hand in your kitchen that can be used as
cooking equipment in your microwave oven. Just read
through the following checklist.
1. Dinner plates: Many kinds of dinner-ware are
microwave-safe. If in doubt, consult the manu-facturer's
literature or perform the microwave test, above.
2. Glassware: Glassware that is heat-resistant is
microwave-safe. This includes all brands of oven-tempered
glass cookware. However, do not use delicate glassware,
such as tumblers or wine glasses, as these might shatter as
the food warms.
3. Paper: Paper plates and containers are convenient
and safe to use in your microwave oven, provided the
cooking time is short and foods to be cooked are low in
fat and moisture. Paper towels are also very useful for
wrapping foods and for lining baking trays in which greasy
foods, such as bacon, are cooked. In general, avoid colored
paper products as the color may run.
4. Plastic storage containers: These can be used to hold
foods that are to be quickly reheated. However, they should
not be used to hold foods that will need considerable time in
the oven as hot foods will eventually warp or melt plastic
containers.
5. Plastic cooking bags: These are microwave-safe
provided they are specially made for cooking. However, be
sure to make a slit in the bag so that steam can escape.
Never use ordinary plastic bags for cooking in your
microwave oven, as they will melt and rupture.
6. Plastic microwave cookware: A variety of shapes and
sizes of microwave cookware is available. For the most
part, you can probably cook with items you already have on
hand rather than investing in new kitchen equipment.
7. Pottery, stoneware, and ceramic:
Containers made of these materials are usually fine for use
in your microwave oven, but they should be tested to be
sure.
8
Page 9
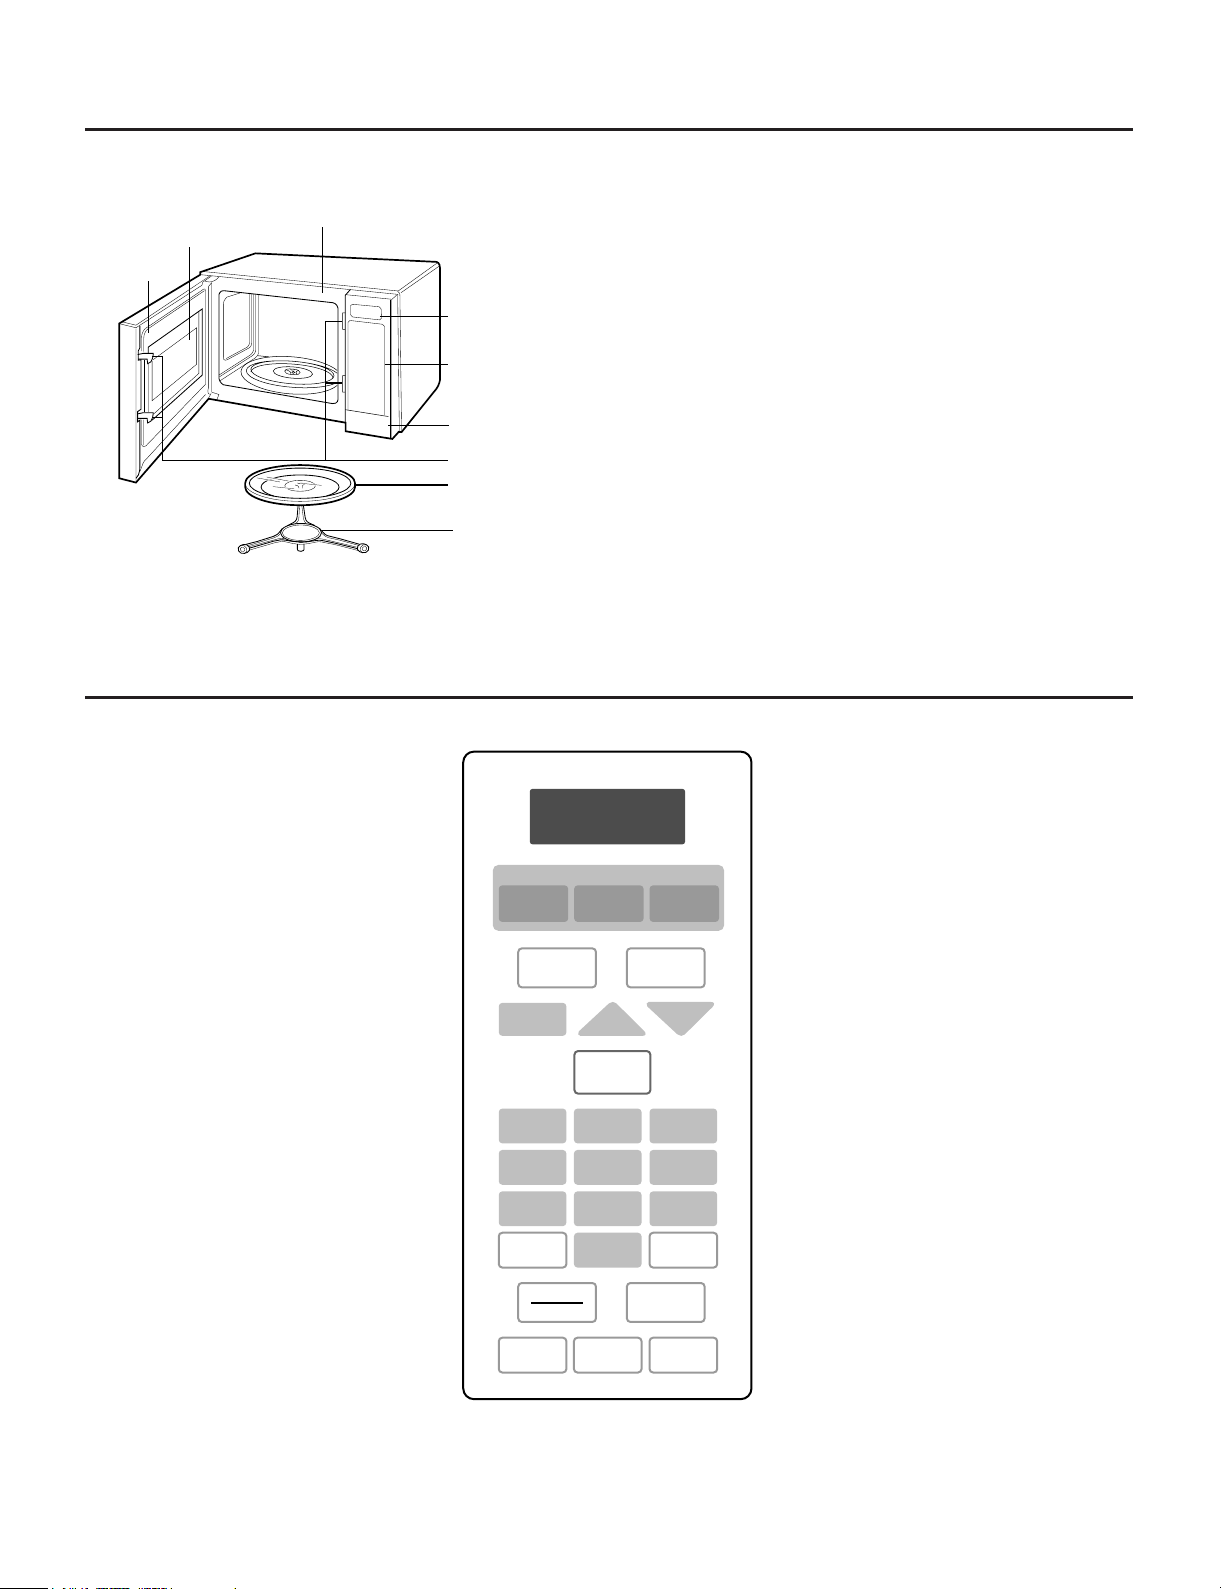
Feature Diagram
Oven Front Plate
Window Door Screen
Door Seal
Display Window
Control Panel
Door Open Button
Safety Door Lock System
Turntable
Rotating Ring
NOTE: A beep sounds when a pad on the
control panel is touched, to indicate
setting has been entered.
123
456
789
0
POWER
LEVEL
STOP
CLEAR
CONTROL
SET-UP
PROGRAM
SENSOR COOK
POPCORN
AUTO
COOK
AUTO
DEFROST
COOK
MORE
LESS
START
CLOCK TIMER
HOLD
WARM
EASY
COOK
REHEAT
Control Panel
Your oven will be packed with the following
materials:
Glass Turntable ...................................... 1 each
Owner's Manual &
Cooking Guide........................................ 1 each
Rotating Ring.......................................... 1 each
This microwave oven is designed for household
use only. It is not recommended for commercial
purposes and will void the warranty.
9
Page 10
Operating Instructions
START
1 1 1 1
CLOCK
POWER
LEVEL
5 380
START
EASY
COOK
SETTING CLOCK
When your oven is plugged in for the first time or when
power resumes after a power interruption, the words
PLEASE SET TIME OF DAY scrolls in the display five
times.
NOTE:
You can select AM or PM by touching CLOCK pad
alternately.
Example: To set 11:11 (PM)
1. Touch CLOCK pad twice.
➠
➠
Display scrolls the words
ENTER TIME OF DAY
the display.
2. Enter the time by using the
number key pads.
[1], [1], [1], and [1].
Display scrolls the words
11:11P TOUCH START.
3. Touch START.
The clock starts counting and
11:11P shows in the display.
PM
shows in
TIME COOK
This function allows you to cook food for a desired
amount of time. Because many foods need slower
cooking (at less than HI-POWER), there are 10 power
level settings in addition to HI-POWER.
When cooking is complete, beeps will sound. The word
END shows in the display window. Then the oven shuts
itself off.
NOTE :
If you do not select the power level, the oven will operate
at power HIGH. To set HI-POWER cooking, skip steps 2
& 3 above.
Example: To cook food on 80% Power (power8)
for 5 minutes 30 seconds
1. Enter 5 minutes 30 seconds by
➠
touching
Display scrolls the words 5:30
TOUCH START OR POWER.
2. Touch POWER LEVEL.
Display scrolls the words ENTER
POWER LEVEL 1 TO 10.
[5], [3], and [0].
➠
EASY COOK
A time-saving pad, this simplified control lets you quickly
set and start microwave cooking without the need to
touch START.
NOTE:
If you touch EASY COOK, it will add 30 seconds up to 3
minutes 30 seconds; after 3 minutes
30 seconds, every touch will add 1 minute up to 99 min
59 seconds.
Example: To set EASY COOK for 2 minutes.
Touch EASY COOK 4 times.
The oven begins cooking and
display shows time counting down.
➠
3. Touch 8.
To select power level 80%.
Display scrolls the words
TOUCH START.
4. Touch START.
P-80
10
Page 11

Operating Instructions
START
TIMER
3 0 0
STOP
CLEAR
0
0
MULTI-STAGE TIME COOK
For Multi-Stage cooking, touch PROGRAM and repeat
Time Cook steps 1-3 on previous page before touching
the START pad.
Auto Defrost can be programmed before the first stage
to defrost first and then cook.
MICROWAVE POWER LEVELS
Your microwave oven is equipped with eleven power
levels to give you maximum flexibility and control over
cooking. The table below will give you some idea of
which foods are prepared at each of the various power
levels.
MICROWAVE POWER LEVEL CHART
POWER
LEVEL
*Boiling water.
10 *Making candy.
(HIGH) *Cooking poultry pieces, fish, & vegetables.
*Cooking tender cuts of meat.
*Whole poultry.
9 *Reheating rice, pasta, & vegetables.
8
7 *Cooking cakes, breads.
*Reheating prepared foods quickly.
*Reheating sandwiches.
*Cooking egg, milk and cheese dishes.
*Melting chocolate.
USE
CHILD LOCK
This safety feature prevents unwanted oven operation.
Once the child lock is set, no cooking can take place. The
Child Lock feature is also useful when cleaning the control
panel. Child Lock prevents accidental programming when
wiping the control panel.
If the CHILD LOCK is set and you touch another cooking
pad, the word LOCKED shows in the display. Cancel the
child lock according to the procedure below.
To set the child lock
1. Touch STOP / CLEAR.
➠
2. Touch and hold 0 until
the word
display and two beeps are heard.
To cancel the child lock
Touch and hold 0 pad until the word
LOCKED disappears in the display.
After the CHILD LOCK is turned off, the time of day will
return to the display window. The oven will operate
normally.
TIMER
You can use the Timer of your oven for purposes other
than food cooking.
LOCKED appears in the
*Cooking veal.
6 *Cooking whole fish.
*Cooking puddings and custard.
5
4 *Thawing meat, poultry and seafood.
3
2
1
0
*Cooking ham, whole poultry, lamb.
*Cooking rib roast, sirloin tip.
*Cooking less tender cuts of meat.
*Cooking pork chops, roast.
*Taking chill out of fruit.
*Softening butter.
*Keeping casseroles and main dishes warm.
*Softening butter and cream cheese.
*Standing time.
*Independent.
Example: To set the TIMER
➠➠
11
1. Touch TIMER pad.
Display scrolls the words
TIME IN MIN AND SEC.
2. Touch 3, 0, 0.
Display scrolls the words 3:00
TOUCH START.
3. Touch START pad.
ENTER
Page 12

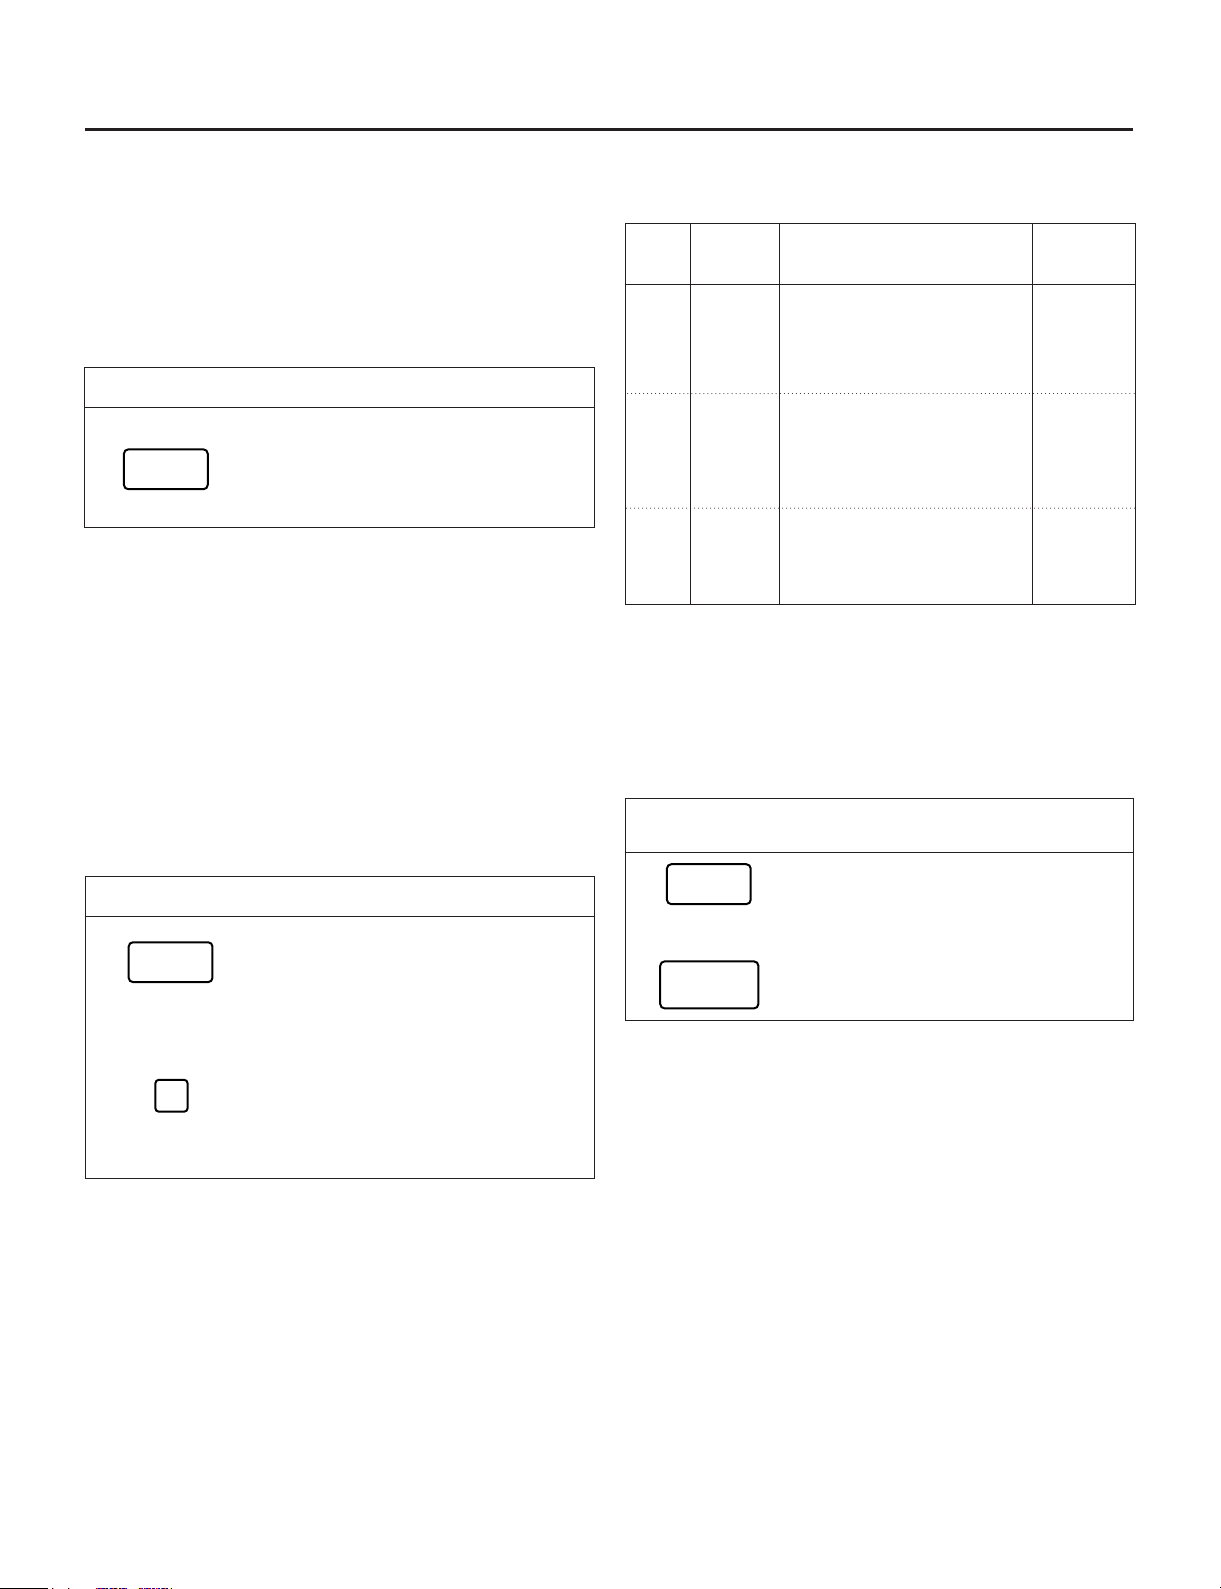
Operating Instructions
CONTROL
SET-UP
1
2
CONTROL
SET-UP
4
2
CONTROL SET-UP
CONTROL SET-UP provides five modes which make using your microwave oven quite handy.
You can select SOUND ON/OFF, CLOCK ON/OFF, SCROLL SPEED, LBS/KG, and DEMO MODE.
Example 1: To turn off Sound of beeper.
1. Touch CONTROL SET-UP.
Five modes show in the display
repeatedly. You can set them
➠➠
according to your intention.
2. Touch 1.
Display scrolls the words
SOUND ON TOUCH 1
OFF TOUCH 2.
3. Touch 2.
Display scrolls the words SOUND
OFF. The current time will be
displayed.
NOTE:
To turn beep sound back on, repeat
steps 1 - 2 then touch number 1.
Example 2: To select kg unit.
1. Touch CONTROL SET-UP.
Five modes show in the display
continuously.
➠➠
You can set them according to your
intention.
2. Touch 4.
Display scrolls the words
LBS TOUCH 1
KG TOUCH 2.
3. Touch 2.
Display scrolls the words KG.
The current time will be displayed.
NOTE:
To select LBS, repeat steps 1-2 then,
touch number 1.
CONTROL SET-UP FUNCTION CHART
NO
1
2
3
4
5
FUNCTION
SOUND ON / OFF
CLOCK ON / OFF
SCROLL SPEED
LBS / KG
DEMO ON / OFF
CHOICE REMARKS
Sound On or Sound Off
Clock On or Clock Off
Slow, Normal, or Fast
Lbs or Kg
Demo On or Demo Off
All of the key sound and EOC sound on or off.
When clock is off nothing displays when oven is not in use.
Scroll speed control speed of message that scroll across display.
Set control to LBS or KG for Auto Cook and Auto defrost features.
Demo mode allows oven to operate without oven heating.
NOTE: When the power cord is first plugged in, the default setting are Sound ON, Clock ON, Normal Speed,
LBS, and DEMO OFF.
12
Page 13

Operating Instructions
AUTO
COOK
4
2
COOK
4
MORE/LESS
By using the MORE or LESS keys, all of the AUTO
COOK, TIME COOK, EASY COOK, SENSOR COOK
programs can be adjusted to cook food for a longer or
shorter time. Pressing MORE will add 10 seconds to the
cooking time each time you press it. Pressing LESS will
subtract 10 seconds of cooking time each time you press it.
You must wait until heating begins to count down before
adding or subtracting time.
Example: To adjust the AUTO COOK(ex. beverage 2
cups) cooking time for a longer time, or for
a shorter time
1. Touch AUTO COOK.
Display scrolls the words SELECT
MENU 1 TO 6 -- SEE COOKING
GUIDE BEHIND DOOR.
➠➠
2. Touch 4.
Display scrolls the words
BEVERAGE TOUCH 1 TO 2 CUPS.
SENSOR COOK OPERATION INSTRUCTION
For most Sensor Cook programs, a chart with specific
food examples and cooking instructions is provided on
the next pages. The Sensor Cook system works by
detecting a build-up of vapor.
Hints
1. Make sure the door remains closed.
2. Once the vapor is detected, two beeps will sound.
3. Opening the door or touching the STOP/CLEAR pad
before the vapor is detected will abort the process.
The oven will stop.
4. Before using Sensor Cook, make sure the exterior of
the cooking container and the interior of the oven are
dry, to assure the best results.
5. Room temperature should not exceed 95˚ F.
6. Oven should be plugged in at least 5 minutes before
Sensor Cooking.
Categories: Sensor Popcorn
Sensor Cook
Sensor Reheat
SENSOR COOK
3. Touch 2.
NOTE:
Press the MORE or LESS pad during
time countdown.
SENSOR COOK allows you to cook most of your favorite
foods without having to select cooking times and power
levels. This oven automatically determines the cooking
time for each food item. This feature has 10 food
categories.
Example: To cook FROZEN ENTREE
1. Touch COOK.
Display scrolls the words SELECT
MENU 0 TO 9 -- SEE COOKING
GUIDE BEHIND DOOR.
➠
2. Touch 4.
The oven will cook food
automatically by sensor system.
13
Page 14

Operating Instructions
SENSOR COOK CHART
Code
1
2
3
4
5
6
Category
Potato
Fresh
Vegetable
Frozen
Vegetable
Frozen
Entree
Rice
Casserole
Direction
Pierce each potato with a fork and place on the
oven tray around the edge, at least one inch apart.
Prepare as desired, wash, and leave residual water
on the vegetables. Place in an appropriately-sized
microwave container, cover with plastic wrap and
vent.
Remove from package, rinse off frost under running
water. Place in an appropriately-sized microwave
container, cover with plastic wrap and vent.
Remove from outer display package. Slit cover. If
not in microwave safe container, place on plate,
cover with plastic wrap and vent.
Place rice and twice as much liquid (water or chicken
or vegetable stock) in a 2-quart microwavable dish.
Cover with plastic wrap. When cooking is complete,
allow 10 minutes standing time. Stir for fluffier rice.
Assemble the ingredients per the recipe in a 1-2
quart casserole. Cover with plastic wrap and vent.
After cooking is complete, allow 10 minutes standing
time. When using rice in a casserole recipe, use
MinuteTMRice and cook on RICE setting.
Amount
1 - 4 medium approx. 8
ounce each
1 - 6 cups
10 oz. - 1 lb.
Works best if entree is
less than an inch thick or
less than 3/4 pound.
1
/2 - 2 cups Use medium
or long grain rice. Cook
instant rice according to
directions on the package.
2 - 6 servings
See page 19 for recipes.
7
8
9
0
If you open the door or press STOP/CLEAR during sensing, the process will be canceled.
Ground
Meat
Fish,
Seafood
Scrambled
Eggs
Frozen
Pizza
Crumble into an appropriately sized microwavable
container and push gently to the sides, leaving a
void in the center. Season and cover with plastic
wrap. Vent cover for well-done meat, cover dish for
medium cooked, as in meat to be used in another
dish and cooked further.
Place the food around the sides of an appropriate
microwave container. Season and add 1/4-1/2 cup
liquid (wine, water, salsa, etc.) Cover with plastic
wrap, vented.
Break eggs into a 4-cup measuring cup or 1-quart
casserole. Cover with plastic wrap, vented. When
cooking is complete, remove from oven, stir, and
allow 1-2 minutes standing time.
Follow package directions. Use only frozen pizza
made for microwave use (the kind that comes with a
succeptor cooking tray). After cooking, remove from
oven and place on wire rack so crust will crisp
further.
1
/4 - 2 pounds
1
/4 - 2 pounds
See pages 19 - 20 for
recipes.
2 - 5 eggs
See pages 20 - 21 for
recipes.
1 - 2 slices
14
Page 15
Operating Instructions
POPCORN
SENSOR POPCORN
SENSOR POPCORN lets you pop commercially
packaged microwave popcorn (1.75-3.5 ounces). For
best results, use a fresh bag of popcorn.
Place only one bag of prepackaged microwave
popcorn on the center of turntable.
Example: To pop 3.5 oz.
Touch POPCORN.
Display scrolls the words POPCORN.
Then the oven will cook food
automatically by sensor system.
NOTE:
• Do not attempt to reheat or cook any unpopped
kernels.
• Do not use popcorn popping devices in microwave
oven with this feature.
SENSOR REHEAT
This feature allows you to reheat precooked roomtemperature or refrigerated foods without selecting
cooking times and power levels. This feature has 3
categories : dinner plate, soup/sauce, casserole.
Example: To reheat casserole
REHEAT
1. Touch REHEAT pad. Display scrolls
the words SELECT MENU 1 TO 3
-- SEE COOKING GUIDE BEHIND
DOOR.
➠
SENSOR REHEAT CHART
Code
Cate-
gory
1 Dinner Place foods to be heated Approx.
plate on dinner plate or similar
dish. pound
Cover with plastic wrap.
2 Soup/ Place food to be heated 1-4 cups
Sauce in an appropriate size
microwave container.
Cover with plastic wrap.
3 Casse- Cover dish containing 2-6
role the casserole with servings
plastic wrap.
Direction Amount
1
/2 - 1
HOLD WARM
You can safely keep hot, cooked food warm in your
microwave oven for up to 99 minutes, 99 seconds. You
can use HOLD WARM by itself, or to automatically follow
a cooking cycle.
Example: To hold warm hot or cooked food
HOLD
WARM
➠
START
1. Touch HOLD WARM.
Display scrolls the words HOLD
WARM TOUCH START.
2. Touch START.
The word WARM will come on while
the oven continue to run.
3
2. Touch number 3.
Then the oven will reheat food
automatically by sensor system.
NOTE:
• HOLD WARM operates for up to 99 minutes,
99 seconds.
• Opening the oven door cancels HOLD WARM. Close
the door and touch HOLD WARM, then touch START if
additional HOLD WARM time is desired.
• Food cooked should be covered during HOLD WARM.
• Pastry items (pies, turnovers, etc.) should be
uncovered during HOLD WARM.
• Complete meals kept warm on a dinner plate should be
covered during HOLD WARM.
• Do not use more than 1 complete HOLD WARM cycle
(about 1 hour, 40 minutes). The quality of some foods
will suffer with extended time.
15
Page 16

Operating Instructions
AUTO
COOK
1
4
AUTO COOK
This feature allows to cook foods that you select by touching AUTO COOK pad. It has 6 foods categories.
Example: To cook four slices of bacon
1. Touch AUTO COOK.
Display scrolls the words SELECT
MENU 1 TO 6 -- SEE COOKING
GUIDE BEHIND DOOR.
AUTO COOK CHART
• First, touch AUTO COOK pad, then select food and amount.
1
2
Category
Bacon
Frozen
Roll/ Muffin
Direction
Place bacon strips on microwave bacon rack for best results.
(Use diner plate lined with paper towels if none available).
Remove from display package and place on plate.
(If muffins are over 3 oz. each, count as two when entering quantity.)
Code
➠➠
2. Touch number 1.
Display scrolls the words BACON
TOUCH 2 TO 6 SLICES.
3. Touch number 4.
The oven will start automatically.
Amount
2-6 slices
1-6 pieces
(2-3 ounces each)
3
4
5
6
If you open the door or press STOP/CLEAR during cooking, the process will be canceled.
Fresh
Roll/ Muffin
Beverage
Chicken
Pieces
Hot Cereal
Remove from display package and place on plate.
(If muffins are over 3 oz. each, count as two when entering quantity.)
Remove from display package and place on plate.
(Be careful! The beverage will be very hot! Sometimes liquids
heated in cylindrical containers will splash out when the cup is moved.)
Place the chicken pieces in an appropriately sized microwaveable
container, cover with plastic wrap, and vent.
Prepare as directed on package and cook.
Stir and allow standing time before eating.
Use only instant hot cereal.
1-6 pieces
(2-3 ounces each)
1-2 cups
1
/2-2.0 lbs
1-6 servings
16
Page 17

Operating Instructions
AUTO
DEFROST
START
1 2
1
AUTO DEFROST
Three defrost sequences are preset in the oven. The
defrost feature provides you with the best defrosting
method for frozen foods. The cooking guide will show
you which defrost sequence is recommended for the
food you are defrosting.
With the Auto Defrost feature, the oven automatically
sets the defrosting time and power levels for you.
The oven automatically determines required defrosting
times for each food item according to the weight you
enter.
For added convenience, the Auto Defrost includes a
built-in beep mechanism that reminds you to check, turn
over, separate, or rearrange. Three different defrosting
levels are provided.
1 MEAT
2 POULTRY
3 FISH
•
You can select the category by touching the numeric
key 1 (MEAT), numeric key 2 (POULTRY), and numeric
key 3 (FISH) after touching the AUTO DEFROST pad.
•
Available weight is 0.1~6.0 lbs(0.1 ~ 4.0 kgs).
NOTE:
When you touch the START pad, the display changes to
defrost time count down. The oven will beep twice during
the DEFROST cycle. At each beep, open the door and
turn, separate, or rearrange the food.
Remove any portions that have thawed.
Return frozen portions to the oven and touch START to
resume the defrost cycle.
•
For best results, remove fish, shellfish, meat, and
poultry from its original closed paper or plastic package
(wrapper). Otherwise, the wrap will hold steam and
juice close to the foods, which can cause the outer
surface of the foods to cook.
•
For best results, shape your ground meat into the form
of a doughnut before freezing. When defrosting, scrape
off thawed meat when the beep sounds and continue
defrosting.
•
Place foods in a shallow container or on a microwave
roasting rack to catch drippings.
•
Food should still be somewhat icy in the center when
removed from the oven.
AUTO DEFROST SEQUENCE LIST
Example: To defrost 1.2 lbs of ground beef
1. Touch AUTO DEFROST.
Display scrolls the words
MEAT TOUCH 1
➠➠ ➠
POULTRY TOUCH 2
FISH TOUCH 3.
2. Touch 1.
Display scrolls the words
ENTER WEIGHT.
3. Enter the weight by touching
[1] and [2].
Display scrolls the words
1.2 LBS TOUCH START.
4. Touch START.
Defrosting starts.
Sequence Food
1
MEAT
2
POULTRY
3
FISH
BEEF
Ground beef, Round steak,
Cubes for stew, Tenderloin steak,
Pot roast, Rib roast, Rump roast,
Chuck roast, Hamburger patty.
LAMB
Chops (1 inch thick), Rolled roast
PORK
Chops (1/2 inch thick), Hot dogs,
Spareribs, Country-style ribs.
Rolled roast, Sausage.
VEAL
Cutlets (1 lb 1/2 inch thick)
POULTRY
Whole (under 4 lbs.), Cut-up,
Breasts (boneless)
CORNISH HENS
Whole
TURKEY
Breast
FISH
Fillets, Whole Steaks
SHELLFISH
Crab meat, Lobster tails, Shrimp,
Scallops
17
Page 18

Fresh Vegetable Chart
Cook time
Vegetable Amount at HIGH Instructions
(minutes)
Artichokes 2 medium 5-8 Trim. Add 2 tsp. water and 2 tsp. lemon juice. 2-3 minutes
(8 oz. each) 4 medium 10-12 Cover. Cook stem end up.
Asparagus, 1 Ib. 3-7 Wash and turn half of spears around. 2-3 minutes
Fresh, spears Add 1/2 cup water. Cover.
Beans, green & 1 lb. 7-10 Add 1/2 cup water in 11/2 qt. casserole. 2-3 minutes
wax Stir halfway through cooking.
Beets, Fresh 1 Ib. 12-16 Add 1/2 cup water in 11/2 qt. covered casserole. 2-3 minutes
Rearrange halfway through cooking.
Broccoli, Fresh, 1Ib. 5-9 Place broccoli in baking dish. 2-3 minutes
spears Add 1/2 cup water.
Cabbage, Fresh, 1 Ib. 5-7 Add 1/2 cup water in 11/2 qt. covered casserole. 2-3 minutes
chopped Stir halfway through cooking.
Carrots, Fresh, 2 cups 3-6 Add 1/4 cup water in 1 qt. covered casserole. 2-3 minutes
sliced Stir halfway through cooking.
Cauliflower, 1 lb. 6-10 Trim. Add 1/4 cup water in 1 qt. covered casserole. 2-3 minutes
Fresh, whole Stir halfway through cooking.
Celery, Fresh, 2 cups 3-5 Slice. Add 1/2 cup water in 11/2 qt. covered 2-3 minutes
sliced 4 cups 7-9 casserole.
Corn, Fresh 2 ears 5-8 Husk. Add 2 tsp water in 11/2 qt. baking dish. 2-3 minutes
Cover.
Mushrooms,
Fresh, sliced
Parsnips, Fresh, 1 Ib. 4-8 Add 1/2 cup water in 11/2 qt. covered casserole. 2-3 minutes
sliced
Peas, Green, 4 cups 6-9 Add 1/2 cup water in 11/2 qt. covered casserole. 2-3minutes
Fresh Stir halfway through cooking.
Sweet Potatoes 2 medium 5-7 Pierce potatoes several times with fork. 2-3 minutes
Whole Baking 4 medium 6-11 2-3 minutes
(6-8 oz. each)
White potatoes, 2 potatoes 5-7 Pierce potatoes several times with fork. 2-3 minutes
Whole Baking 4 potatoes 8-13 2-3 minutes
(6-8 oz. each)
Spinach, Fresh, 1 Ib. 5-7 Add 1/2 cup water in 2 qt. covered casserole. 2-3 minutes
leaf
Squash, Acorn or 1 medium 6-8 Cut squash in half. Remove seeds. 2-3 minutes
butternut, Fresh Place in 8x8-inch baking dish. Cover.
Zucchini, Fresh, 1 Ib. 5-8 Add 1/2 cup water in 11/2 qt. covered casserole. 2-3 minutes
sliced
Zucchini, Fresh, 1 Ib. 7-8 Pierce. Place on 2 paper towels. 2-3 minutes
whole Turn zucchini over and rearrange halfway through
1
/2 Ib. 2-31/2 Place mushrooms in 1
cooking.
1
/2 qt. covered casserole. 2-3 minutes
Standing
Time
18
Page 19

Cook using Sensor Cook
VEGETABLES
Vegetable Medley, serves 4 as a side dish or 2 as a meal
2 large carrots, cut into 1 inch pieces
1 large baking potato, diced
1 medium red onion, thinly sliced
4 cloves of garlic, peeled
2 stalks celery, cut into 1 inch pieces
2 tablespoons olive oil
salt and pepper to taste
Place everything in a 2 quart microwave dish, cover and cook
with sensor or microwave on high power for about 10 minutes
or until the carrots are tender.
Stewed Peppers, serves 4
1 large red bell pepper, cored and cut into 1 inch strips
1 large green bell pepper, cored and cut into 1 inch
strips
1 medium red onion, thinly sliced
2 cloves garlic, smashed
1 cup prepared salsa
2 tablespoons olive oil
salt and pepper to taste
Place everything in a 2 quart microwave dish, cover and cook
with sensor or microwave on high power for about 12 minutes
or until the peppers are very soft.
RICE
Spanish Rice, serves 4
1
/2
pound lean ground beef or smoke sausage
1 medium green bell pepper, cored and chopped
1 small yellow onion, chopped
1 cup instant rice
1 can (14 ounces) stewed tomatoes
1 teaspoon chili powder
Place the meat, pepper, onion in a 2 quart microwave dish
and microwave 2 minutes on high power. Drain off the fat. Stir
in the other ingredients, cover and cook on sensor.
Ground Beef and Noodle Casserole, serves 4
5 ounces egg noodles, cooked according to package
directions
1 pound lean ground beef, cooked and drained
2 cups cooked chopped broccoli, either fresh OR 10
ounces cooked peas
1 can (10 3/4ounces) cheddar cheese soup
salt and pepper to taste
2 ounces canned pimentos, optional
Mix everything in a 2 quart casserole, cover and cook on
sensor.
Shepherd’s Pie, serves 4
1 pound ground beef, lamb or turkey, cooked and drained
1 package frozen, cut green beans, defrosted or equal
amount of cooked green beans
1 can, (10 ounces) condensed cream of mushroom soup
2 cups instant mashed potatoes prepared as directed on
package or equal amount of leftover mashed potatoes
4 tablespoons butter melted
salt and pepper to taste
Spread the beans over the bottom of a 1 1/2quart microwave
dish. Mix the meat with the soup and season with salt and
pepper. Spread this mixture over the beans and spread the
potatoes over the meat. Drizzle the butter over the top of the
casserole and cook on sensor or microwave on medium
power for about 8 minutes or to an internal temperature of 180
degrees.
Chicken and Spaghetti Casserole, serves 2
2 boneless chicken breasts, cooked and diced
1 pound spaghetti or other noodles of choice, cooked as
directed on package
1 can (14 ounces) creamed corn
1 can (14 ounce) stewed tomatoes
1 cup frozen peas, defrosted
1 cup shredded mozzarella cheese
Mix the first 5 ingredients in a 2 quart microwave dish and
spread the cheese over the top. Cover and cook on sensor or
microwave on medium power for 10 minutes or to an internal
temperature of 180 degrees.
CASSEROLE
Macaroni and Cheese, serves 4
4 ounces macaroni noodles, cooked as directed on package
1 cup shredded cheddar cheese
1 large egg
2
/3cup milk
2 ounces canned, diced pimentos
salt, pepper to taste
cayenne pepper to taste, optional
Mix the egg with the milk and blend with the other ingredients
in a 2 quart microwave dish. Cover and cook on sensor.
FISH, SEAFOOD
Poached Salmon, serves 4
1
/2cup dry white wine
1
/2cup bottled clam juice
4 sprigs fresh dill weed or 1 tablespoon dried dill weed
6 pepper corns
4 small salmon steaks, about 4 ounces each lemon slices
In a shallow 2 quart microwave dish place the first 5
ingredients, cover and microwave on high power 3 minutes.
Add the salmon, recover and cook on sensor or microwave
on high power for 3-4 minutes or until the cooked and the
internal temperature is about 160 degrees.
19
Page 20

Cook using Sensor Cook
Peel and Eat Shrimp, serves 2
1
/2cup dry white wine
2 cloves garlic, minced
2 tablespoons lemon juice
4 tablespoons butter
1 pound large shrimp in shells
Place everything in a 2 quart microwave dish push to the
edge of the dish, cover and cook on sensor or
microwave on high power for about 5 minutes, stirring
once or until the shrimp are pink. Peel the shrimp and
serve with juices.
Rolled Fish Filets, serves 4
4 fish filets, sole, flounder, catfish or roughly about 4
ounces each
lemon pepper
2 tablespoons lemon juice
Season the fish with lemon pepper and roll up and
secure with a wooden pick. Place in a glass pie plate
and sprinkle with lemon juice. Cover with plastic wrap
and cook on sensor or microwave on medium power for
about 5 minutes or until the fish is opaque and flakes
easily. Mix the juices with 1/4th. / 4cups Italian salad
dressing and pour over the fish.
EGGS
Hard Cooked Eggs for Egg Salad -
If you’ve ever made an egg salad the traditional way you
know it’s quite a task. You have to boil the eggs, allow
them to cool and then peel them before you chop them
and add the other ingredients. When you cook the eggs
as directed here, the job is so much easier but the recipe
looks and tastes the same.
Put 1/4 cup hot water and carefully crack eggs in a
4-cup measuring cup or 1-quart casserole dish. Gently
pierce the yolks with a fork. Cover with vented plastic
wrap and cook on sensor.
ALLOW STANDING TIME OF 1 MINUTE OR UNTIL
THE EGGS HAVE SET.
Puff Omelet or Egg Cake -
This is one the easiest ways to cook eggs by microwave.
Though it doesn’t look like a conventional omelet, it
tastes great and is so much easier to make.
Beat eggs and milk (1 TS per 1 egg) until blended in a 4
cup measuring cup or 1-2 quart microwave casserole
dish. Cover with vented plastic wrap and cook on
sensor. ALLOW STANDING TIME OF 1 MINUTE.
Fish Filets Parmesan, serves 4
4 fish filets (about 4 ounces each) folded over
1 cup prepared spaghetti sauce
1
/2cup Parmesan cheese, grated
Place the sauce in a 2 quart microwave dish and lay the
fish over with the thicker part toward the side of the dish.
Sprinkle with cheese. Cover and cook on sensor.
Trout Almandine, serves 2
2 whole trout, about 8 ounces each
2 tablespoons slivered almonds
2 tablespoons lemon juice
4 slices bacon, crisp cooked and crumbled
4 tablespoons chopped parsley
Place the fish along side each other head to tail in a 10
inch glass pie plate. Add the lemon juice and butter, and
cover with plastic wrap and cook on sensor or
microwave on medium power for about 6 minutes or until
the fish is done. Place on a serving platter and pour
cooking juices over the fish and sprinkle with nuts, bacon
and parsley.
Scrambled Eggs -
Cook as puff omelet but scramble immediately after
cooking.
Ham and Egg for One -
This recipe is done before the toast pops out of the
toaster and no frying pan to wash.
Place a slice of boiled ham in an 8 ounce coffee cup and
crack a large egg into the ham cup. Gently pierce the
yolks with a folk. Cover with plastic wrap and cook on
sensor.
ALLOW STANDING TIME OF 1 MINUTE OR UNTIL
THE EGGS HAVE SET.
20
Page 21

Cook using Sensor Cook
EZ Eggs and Sausage for Two -
This is a great recipe for two busy people who have to
get off to work without a lot of breakfast preparation.
4 cooked breakfast sausage links
4 eggs, beaten
2 scallions, thinly sliced
salt and pepper to taste
Coat a 9-10 inch glass pie with vegetable oil spray and
place the sausages around the edge of the plate. Pour
the eggs into the plate and cover with plastic wrap and
cook on sensor. ALLOW STANDING TIME OF 1
MINUTE OR UNTIL THE EGG HAVE SET.
CHICKEN
Chicken in Yogurt, serves 2
2 large chicken breasts, cut-up and skinned
3 tablespoons butter or margarine
3 tablespoons gravy flour
1 cup chicken stock
1 cup yogurt
1
/2teaspoon dried thyme leaves
salt and pepper to taste
Mix everything in a 2 quart microwave dish, cover and
cook on microwave on high power for about 15 minutes
or until the chicken is 170 degrees.
MEATLESS DISHES
Potato Onion Bake, serves 2
2 medium baking potatoes, cubed
1 large yellow onion, diced
2 tablespoons olive oil
salt and pepper to taste
Place everything in a 2 quart microwave dish, cover and
cook on microwave on high power for 10 minutes or until
the potatoes are tender.
Beans and Rice, serves 4 as a side dish or 2 as a
meal
1
/2cup long grain rice
1 1/2cup tomato or V8 juice
1 can (14 ounce)pinto beans, drained
1 tablespoons dried onion flakes
salt and pepper to taste
Place everything in a 2 quart microwave dish, cover and
cook on microwave on high power for 15 minutes or until
the potatoes are tender.
Breast of Chicken Florentine, serves 2
1 10 ounce package frozen spinach, cooked and
squeezed of water
2 skinned and boned chicken breasts, cut in half
1
/2pound white mushrooms, sliced
1
/2cup grated Parmesan cheese
1
/4 cup bread crumbs
1 tablespoon lemon juice
chopped parsley
Lay the spinach on the bottom of a shallow casserole
dish or glass pie. Lay the chicken breasts over the
spinach and top with the mushrooms. Mix the cheese
and crumbs and sprinkle over the mushrooms. Drizzle
lemon juice over the top and cover with plastic wrap.
Cook using microwave on high power for 10 minutes or
until the chicken is 170 degrees. Sprinkle with parsley
and serve.
21
Page 22

Cleaning
123
456
789
0
POWER
LEVEL
STOP
CLEAR
CONTROL
SET-UP
PROGRAM
SENSOR COOK
POPCORN
AUTO
COOK
AUTO
DEFROST
COOK
MORE
LESS
START
CLOCK TIMER
HOLD
WARM
EASY
COOK
REHEAT
Before cleaning the oven, unplug the power supply cord of the oven.
If impossible, open the oven door to prevent an accidental oven start.
Part Description
INSIDE OF THE OVEN
GLASS TRAY
CONTROL PANEL
Use a damp cloth to wipe out crumbs and spillovers.
It is important to keep the area between door and cavity front clean to
assure a tight seal.
Remove greasy spatters with a sudsy cloth, then rinse and dry.
Do not use harsh detergent or abrasive cleaners.
The glass tray can be washed by hand or in the dishwasher.
Wipe with a damp cloth followed immediately by a dry cloth.
The Child Lock feature is also useful when cleaning the control panel.
Child Lock prevents accidental programming when wiping the control panel.
DOOR
If steam accumulates inside or around the outside of the oven door,
wipe the panel with a soft cloth.
This may occur when the microwave oven is operated under high humidity
conditions and in no way indicates a malfunction of the unit.
OUTSIDE OVEN SURFACE
Clean with damp cloth.
To prevent damage to the operating parts inside the oven, the water should
not be allowed to seep into the ventilation openings.
After cleaning the oven, be sure that the rotating ring and the glass tray are in the right position.
Press the STOP/CLEAR pad twice to reset any accidental key setting.
22
Page 23

Before Calling For Service
Please check your problem by using the guide below and try the solutions for each problem. If the microwave oven
still does not work properly, contact the nearest authorized service center.
Symptom Check
OVEN WILL NOT START AT ALL
ARCING OR SPARKING
UNEVEN COOKING OR POOR DEFROSTING
OVERCOOKED FOODS
* Electrical cord for oven is not plugged in.
-Plug into the outlet.
* Door is open.
-Close the door, and try again.
* Wrong operation is set.
-Check operation instructions.
* Materials to be avoided in microwave oven are used.
-Use microwave-safe cookware only.
* The oven is operated when empty.
-Do not operate with oven empty.
* Food refuse remains in the cavity or inside the cavity is uncleaned.
-Clean cavity with wet towel.
* Materials to be avoided in microwave oven are used.
-Use microwave-safe cookware only.
* Cooking time/Cooking power level is not suitable.
-Use correct time/Cooking power level.
* Food is not turned or stirred.
-Turn or stir food.
* Cooking time/Cooking power level is not suitable.
- Use correct time/cooking power level when you cook the same food.
* Use the LESS pad, and cook time will be decreased 10 seconds per one
touch.
UNDERCOOKED FOODS
* Materials to be avoided in microwave oven are used.
-Use microwave-safe cookware only.
* Food is not defrosted completely.
-Completely defrost food.
* Oven ventilation ports are restricted.
-Check to see that oven ventilation ports are not restricted.
* Cooking time/Cooking power level is not suitable.
-Use correct time/Cooking power level when you cook the same food.
* Use the MORE pad, and time will be increased 10 seconds per one touch.
ALL THESE THINGS ARE NORMAL
* Dull thumping sound during oven operation.
* Steam or vapor escaping from around the door.
* Light reflection around door or outer wrapper.
* Dimming oven light and change in blower sound during oven
operation at power levels other than high.
* Some radio and TV interference might occur during
operations. It is similar to the interference caused by other
small appliances such as mixers, blow dryer, etc.
23
Page 24

Warranty
MICROWAVE OVEN
ONE YEAR WARRANTY ON ALL PARTS
FIVE YEAR W ARRANTY ON MAGNETRON TUBE
FIRST YEAR
Amana Appliances will repair or replace, including related labor, any part (f.o.b. Amana, Iowa) which proves to be defective
as to workmanship or materials, when carried into an authorized Amana servicer.
SECOND THRU FIFTH YEAR
Amana Appliances will repair or replace, including related labor, a magnetron tube, (f.o.b. Amana, Iowa), which proves
defective as to workmanship or materials, when carried into an authorized Amana servicer.
OWNER'S RESPONSIBILITIES:
• Provide proof of purchase. (Sales Receipt)
• Provide normal care and maintenance, including
cleaning as instructed in owner's manual.
• Replace owner replaceable items where directions
appear in the Owner's Manual.
• Make product accessible for service.
• Pay for premium service costs for service outside
servicer's normal business hours.
• Pay for service calls related to product installation
and customer education
• Pay for service technician's travel expenses.
ITEMS NOT COVERED:
• Normal product maintenance and cleaning.
• Lost or broken air filters.
• Light bulbs.
• Damages which occur in shipment.
• General rebuilding or refurbishing that is not a
legitimate warranty repair.
• Failures caused by:
- Unauthorized service.
- Grease or other material buildup due to
improper cleaning or maintenance.
- Accidental or intentional damage.
- Connection to an improper power supply.
- Acts of God.
- Operating an empty oven.
- Use of improper pans, containers,
or accessories that causes damage
to the product.
WARRANTY LIMIT A TIONS:
• Begins at date of original purchase.
• Applies to product used for NORMAL food preparation.
• Applies to product used within the United States or in
Canada if product has appropriate agency listing when
shipped from the factory.
• Service must be performed by an authorized Amana
servicer.
WARRANTY IS VOID IF:
• Serial plate is defaced.
• Product has a defect or damage due to product alteration,
connection to an improper electrical supply, installation in a
corrosive environment accident, fire, flood, lighting, or other
condition beyond the control of Amana Appliances.
Product is improperly installed, used, or maintained.
• Product is used on a commercial, rental, or leased, basis.
IN NO EVENT SHALL AMANA APPLIANCES BE LIABLE
FOR INCIDENTAL OR CONSEQUENTIAL DAMAGES*
* This warranty gives you specific legal rights and you may
have others which vary from state to state. For example,
some states do not allow the exclusion or limitation of
incidental or consequential damages so this exclusion may
not apply to you.
For answers to questions regarding the above or to locate an
authorized Amana servicer, contact:
Amana Appliances
2800 220th Trail
Amana, Iowa 52204-0001
USA
1-800-843-0304 inside U.S.A.
1-319-622-5511 outside U.S.A.
24
Page 25

R
Four à Micro-Ondes
Manuel de
L’utilisateur et
Guide de Cuisson
F1361E / F1361W
F1961E / F1961W
F1961L / F1961SS
Conserver ces instructions pour consultation
ultérieure. En cas de changement de
propriétaire du four à micro-ondes, veiller à
laisser ce manual avec le four à micro-ondes.
Part No./Pièce n˚. 12401526
Printed in Korea
Imprimé en Corée
P/NO. 3828W5A1211
Page 26

Table Des Mati•res
SPÉCIFICATIONS TECHNIQUES..........................................................................................................................................2
PRECAUTIONS À PRENDRE POUR ÉVITER UNE EXPOSITON DANGEREUSE AUX MICRO-ONDES ..........................3
MESURES DE PRÉVENTION IMPORTANTES......................................................................................................................4
INSTALLATION.......................................................................................................................................................................5
AUTRES RENSEIGNEMENTS UTILES .................................................................................................................................6
DENTIFICATION DE MODÈLE........................................................................................................................................6
OBTENIR LES MEILLEURS RÉSULTATS DE VOTRE FOUR À MICRO-ONDES..........................................................7
TECHNIQUES SPÉCIALES DE CUISSON PAR MICRO-ONDES..................................................................................7
COMMENT LES PROPRIÉTÉS DES ALIMENTS AFFECTENT LA CUISSON PAR MICRO-ONDES...........................8
USTENSILES DE CUISSON...................................................................................................................................................8
NOMENCLATURE DES PIÈCES............................................................................................................................................9
PANNEAU DES COMMANDES..............................................................................................................................................9
INSTRUCTIONS DE FONCTIONNEMENT...........................................................................................................................10
RÉGLAGE DE L'HORLOGE .........................................................................................................................................10
CUISSON À MISE EN MARCHE SIMLIFIÉE................................................................................................................10
CUISSON CHRONOMÉTRIQUE..................................................................................................................................10
CUISSON EN PLUSIEURS ETAPES............................................................................................................................11
NIVEAUX DE PUISSANCE DU FOUR À MICRO-ONDES ...........................................................................................11
VERROUILLAGE À L'ÉPREUVE DES ENFANTS.........................................................................................................11
MINUTERIE...................................................................................................................................................................11
CONFIGURATION DU SYSTÈME DE COMMANDE....................................................................................................12
FONCTION PLUS/MOINS.............................................................................................................................................13
INSTRUCTIONS DE FONCTIONNEMENT DE LA CUISSON PAR CAPTEUR / CUISSON PAR CAPTEUR.............13
TABLEAU DE CUISSON PAR CAPTEUR.....................................................................................................................14
MAÏS À ÉCLATER PAR CAPTEUR...............................................................................................................................15
RÉCHAUFFAGE PAR CAPTEUR / TABLEAU DE RÉCHAUFFAGE PAR CAPTEUR..................................................15
MAINTIEN DE LA TEMPÉRATURE..............................................................................................................................15
CUISSON AUTOMATIQUE / TABLEAU DE CUISSON AUTOMATIQUE......................................................................16
DÉCONGELATION AUTOMATIQUE PAR LE POIDS...................................................................................................17
TABLEAU DES LÉGUMES FRAIS.......................................................................................................................................18
CUISINEZ EN UTILISANT LE SENSOR CUISINIER (LÉGUMES, RIZ, PLATS CUISINES)...............................................19
CUISINEZ EN UTILISANT LE SENSOR CUISINIER (POISSONS ET FRUITS DE MER, LES OEUFS)............................20
CUISINEZ EN UTILISANT LE SENSOR CUISINIER (LE POULET, REPAS SANS VIANDE)............................................21
NETTOYAGE.........................................................................................................................................................................22
AVANT DE PLACER UN APPEL DE SERVICE...................................................................................................................23
GARANTIE............................................................................................................................................................................24
SpŽcification Techniques
MODEL
Puissance d'entrée C.A 120 V, 60 Hz C.A 120 V, 60 Hz
Consommation de couran 1500 W 1500 W
Puissance de soutie *1100 W *1100 W
Fréquence des micro-ondes 2450 MHz 2450 MHz
Ampérage 13,3 A 13,3 A
Dimensions extérieures (WxHxP) 237/8˝ x 139/16˝ x 1813/16˝21
Dimensions imtérieurs (WxHxP) 171/16˝ x 103/8˝ x 185/16˝14
Capacité du four 1,9 pi cu 1,3 pi cu
* NORMES 705 STANDARD DE LA IEC
Les spécifications peuvent changer sans préavis.
F1961E/W/L/SS F1361E/W
7
/8˝ x 125/8˝ x 163/4˝
3
/4˝ x 9˝ x 16˝
2
Page 27

Mesures De ƒvention Importants
PRÉCAUTIONS À PRENDRE
POUR ÉVITER UNE EXPOSITION
DANGEREUSE AUX MICRO-ONDES:
(a) Ne pas tenter de faire fonctionner le four lorsque la
porte est ouverte car en procédant ainsi,
vous vous exposez aux micro-ondes.
Ne pas essayer non plus de forcer ou d'enlever les
loquets de sécurité du four.
(b) Rien ne doit obstruer la fermeture de la porte
du four. Voir aussi à ce qu'aucun reste d'aliments
ou de nettoyant ne s'accumule sur les joints
d'étanchéité de la porte.
(c) Ne pas faire fonctionner le four si celui-ci est
endommagé. Il est particulièrement impotant
de fermer la porte du four correctement.
Ne pas mettre le four en marche si:
(1) La porte est gauchie, déréglée ou déformée.
(2) Les charnières ou loquets de sûreté sont
desserrés ou cassés.
(3) Les joints d'étanchéité de la porte sont
endommagés.
(d) Le four ne doit être réglé ou réparé que par un
technicien spécialisé.
3
Page 28

Mesures De ƒvention Importants
AVERTISSEMENT
Afin de réduire les risques de brûlure, de choc électique, d'incendie, de blessure corporelle, ou d'exposition prolongée
aux micro-ondes, lisez ce que suit:
1. Veuillez lire toutes les instructions et mises en garde avant d'utiliser cet appareil.
2. Veuillez lire suivre les PRÉCAUTIONS À PRENDRE POUR ÉVITER UNE EXPOSITION DANGEREUSE AUX
MICRO-ONDES: que vous trouverez à la page 3 de ce guide.
3. Vous devez df fectuer la mise à la masse de cet appareil. Ne raccordez qu'à une prise avec mise à la masse adéquate.
Référez-vous aux INSTRUCTIONS DE MISE À LA MASSE que vous trouverez à la page 5 de ce manuel.
4. Installez ou placez cet appareil selon les instructions d'installation incluses avec ce guide.
5. Certains aliments, tels que les oeufs entiers ou les contenants scellés-les pots refermés-peuvent exploser:
vous ne devez pas les utiliser dans le four à micro-ondes.
6. N'utilisez cet appareil que pour l'usage auquel il est destiné, selon les indications de ce guide. N'utilisez pas de produits
chimiques corrosifs ni autres produits pouvant causer des vapeurs nocives. Ce type de four n'a été conçu que pour cuire,
réchauffer ou sécher les aliments. Il n’a pas été conçu à des fins industrielles ni de laboratoire.
7. Comme pour tout appareil électrique, les enfants qui utilisent ce four doivent être surveillés de prés.
8. Ne faites pas fonctionner cet appareil si le cordon d'alimentation a été endommagé, si l'appareil ne fonctionne pas
correctement ou s'il a été endommagé ou échappé.
9. Cet appareil ne devrait être réparé que par un technicien qualifié. Pour toute vérification, réparation ou ajustement,
communiquez avec le centre de service autorisé le plus près de chez vous.
10 Ne recouvrez pas et ne bloquez pas les ouvertures de cet appareil.
1 1. N'entreposez pas cet appareil à l'extérieur. Ne l'utilisez pas près de l'eau-près d'un évier de cuisine,
dans un sous-sol humide ni près d'une piscine, par exemple.
12. Ne mouillez pas le cordon d'alimentation.
13. Éloignez le cordon d'alimentation des sources de chaleur .
14. Ne laissez pas le cordon pendre sur les rebords d'une table ou d'un comptoir .
15. Lorsque vous nettoyez les surfaces du four et de la porte qui entrent en contact en se refermant, n'utilisez qu'un savon doux
et non abrasif, que vous appliquerez avec une éponge ou un linge doux.
16. Afin de réduire les risques d'incendie dans la cavité du four:
a. Ne cuisez pas trop les aliments. Supervisez la cuisson de très près lorsque vous utilisez du papier,
du plastique ou d'autres matériaux combustibles pour accélérer la cuisson.
b. Enlevez toutes les attaches des sacs de plastique ou de papier avant de placer ceux-ci dans le four.
c. Si les matériaux s'enflamment à l'intérieur du four , GARDEZ LA PORTE DU FOUR FERMÉE,
mettez le four hors tension et débranchez le cordon d'alimentation de la prise de courant ou coupez
le courant au niveau du disjoncteur ou du fusible.
d. Ne vous servez pas de la cavité du four pour ranger des objets. N'y laissez aucun papier, ustensiles
de cuisson ni nourriture lorsque vous n'utilisez pas le four à micro-ondes.
17. Ne réchauffez pas les biberons ni la nourriture pour bébés car la distribution inégale des ondes pourrait leur causer des
brûlures ou autres blessures.
18. Évtez de chauffer les bouteilles dont le goulot est petit, telles que les bouteilles de sirop.
19. Évitez de faire chauffer certains produits corrosifs tels que le sulfite ou le chore.
20. Les liquides réchauffés dans des contenants de forme particulière (tels que la forme cylindrique) peuvent surchauf fer dans le
four. Le liquide peut sortir de son contenant avec un grand bruit pendant ou après la cuisson ou lorsque vous ajoutez des
ingrédients tels que du café instantané, etc., ce qui pourrait vous blesser ou endommager le four.
En ce qui concerne tous les contenants, nous vous conseillons de bien brasser le liquide plusieurs fois avant le réchauf fage
et plusieure fois également entre les réchauffages.
SUAVEGARDEZ CES INSTRUCTIONS.
4
Page 29

Installation
Assurez-vous que votre prise
de courant soit bien mise à la masse
avant d'utiliser l'appareil(for F1361)
Assurez-vous que votre prise
de courant soit bien mise à la masse
avant d'utiliser l'appareil(for F1961)
INSTRUCTIONS DE MISE Ë LA MASSE
AVERTISSEMENT
Cet appareil doit être mis à la masse. S'il devait survenir
un court-circuit, la prise de terre réduirait les risques de
choc électrique en procurant au courant une trajectoire
d'échappement. Cet appareil est muni d'un fil de mise à
la masse dont la fiche possède une prise de terre. Cette
fiche doit être branchée dans une prise de courant bien
installée et adéquatement mise a la masse.
CORDON DÕEXTENSION
S'il est nécessaire d'utiliser un cordon d'extension, utilisez seulement le type à
trois conducteurs. muni de trois fiches dont une sert à la mise à la masse. De
plus, assurez-vous que votre prise de courant murale possède trois fentes
pouvant accepter la fiche de l'appareil. La capacité officielle du cordon
d'extension devra êgle ou supérieure à la capacité électrique de l'appareil.
Vous devez acheminer les cordons plus longs sur les comptoirs ou les
dessus de table de manière à ce que les enfants ne puissent pas tirer dessus
ou que l’on ne puisse pas trébucher.
Une mauvaise prise de terre peut être la cause d'un choc électrique.
Consultez un électricien certifié si vous ne comprenez pas parfaitement bien
les instructions de mise à la masse ou si vous n'êtes pas entièrement
certain(ne) que votre prise de courant soit mise à la masse.
Votre appareil possède un cordon court pour éviter qu’il ne s’emnêle ou que
l’on pile dessus s’il est trop long.
Cet appareil doit être mis à la masse. S'il devait survenir un court-circuit, la
prise de terre réduirait les risques de choc électrique en procurant au courant
une trajectoire d'échappement. Cet appareil est muni d'un fil de mise à la
masse dont la fiche possède une prise de terre. Cette fiche doit être branchée
dans une prise de courant bien installée et adéquatement mise a la masse.
PRƒCAUTIONS
* Assurez-vous de placer l'avant du four à trois pouces ou plus du
rebord des comptoirs de cuisine afin d'éviter d'échapper le four.
* Afin d'obtenir la programmation la plus précise des commandes
électroniques, touchez le milieu de chaque touche du clavier avec
fermeté.
Ne touchez pas plusieurs touches en même temps et n'appuyez pas
entre les touches. Un bip se fera entendre à chaque pression des
touches lorsque vous appuierez sur une touche valide.
* Ne frappez pas les commandes avec de l'argenterie ou autres
ustensiles de cuisson.
Vous pourriez les endommager .
* Sortez les plats de cuisson avec soin du four. Certains plats aborbent
les micro-ondes et peuvent être très chauds.
* Ne plongez pas les plats de cuisson dans l'eau immédiatement après
les avoir sortis du four.
Cela pourrait les briser. Laissez la table tournante refroidir .
* N'utiisez que des ustensiles en verre à l'épruve des micro-ondes.
Référez-vous à la section de ce guide se rapportant aux ustensiles de
cuisson pour fours à micro-ondes.
* Ne faites pas fonctionner ce four lorsqu'il est vide. De l'eau ou de la
nourriture doivent toujours se trouver dans le four afin que les microondes puissent être absorbées.
* N'utilisez pas votre four à micro-ondes pour sécher les journaux ni les
vêtements.
Ils peuvent prendre en feu.
* N'utilisez que les thermomètres certifiés pour la cuisson au four à
micro-ondes.
* Assurez-vous que la table tournante soit bien en place avant de faire
fonctionner le four.
* Avant la cuisson, percez la peau des pommes de terre, des courges
entières, des pommes ou tout fruit ou légume recouvert d'une peau.
* N'utilisez pas votre four à micro-ondes pour cuire les oeufs entiers
dans leurs coquilles. La pression à l'intérieur des oeufs peut les faire
éclater.
* Ne faites pas éclater du maïs, sauf dans des emballages
commerciaux conçus à cet effet. Ne tentez jamais de faire éclater du
maïs dans un sac en papier qui n'a pas été conçu pour les fours à
micro-ondes. Le sac peut surchauffer et prendre en feu. Ne faites pas
éclater les grains de maïs qui n'ont pas éclaté. Ne réutilisez pas les
sacs de maïs soufflédéjà utilisés.
N'OBSTRUEZ PAS LES FENTES
COURANT
Afin de répondre aux normes de sécurité, vous devez brancher ce four à
micro-ondes dans un circuit de 15 ou 20 ampères. V ous ne devriez pas
raccorder d'autres appareils électriques ou fixtures d'éclairage sur le même
circuit que ce four. Si vous avez quelque hésitation que ce soit, consultez un
électricien.
LA TENSION
La tension utilisée à la prise murale doit être la même que celle spécifiée sur
la plaque signalétique du four se trouvant à l’intérieur de la porte. L'utilisation
d'une tension plus élevée peut s'avérer dangereuse et être à l'origine d'un
incendie ou tout autre accident pouvant vous blesser ou endommager
l'appareil. Une tension trop faible ralentira la cuisson. Si, malgré une tension
adéquate, votre four ne fonctionne pas bien, retirez la prise et rebranchez-la.
EMPLACEMENT DU FOUR
Vous pouvez placer votre four à micro-ondes dans votre cuisine, salle familiale ou
n'importe où dans votre maison. Déposez le four sur une surface plate, telle qu'un
comptoir de cuisine ou un meuble spécialement conçu pour les fours à microondes. N'installez pas le four au-dessus d'une cuisinière conventionnelle ni au
gaz. Libérez l'espace autour du four de façon à ce que l'air circule librement.
D'AƒRATION
Libérez l'espace autour de toutes les fentes d'aération pendant
la cuisson. Si vous les obstruez, le four peut surchauffer. Si cela
se produit, un dispositif de sécurité thermo-sensible met
automatiquement le four hors circuit. V ous ne pourrez pas
utiliser le four jusqu'à ce qu'il se soit suffisamment refroidi.
INTERFƒRENCES RADIO
1. Il se peut que le fonctionnement du four à micro-ondes crée
des interférences à la réception de la radio ou du téléviseur .
2. En présence d'interférences. vous pouvez les réduire ou les
éliminer en prenant les mesures suivantes:
a. Nettoyez la porte et les surfaces scellantes du four .
b. Réorientez l'antenne de réception de la radio ou du
c. Déplacez le four à micro-ondes par rapport à la radio ou au
d. Éloignez le four de la radio ou du téléviseur .
e. Branchez le four à micro-ondes dans une prise différente
5
téléviseur.
téléviseur.
de façon à ce que le four et le récepteur soient sur des
circuits différents.
Page 30

Autres Renseignements Utiles
IDENTIFICATION DE MODƒLE
Veuillez remplir et retourner sans délai la carte d’enregistrement incluse.
Si la carte d’enregistrement manque, communiquer avec le service aux consommateurs
au 1-800-843-0304 aux É.-U. En dehors de É.-U., composez 319-622-5511.
Lors de communication avec Amana, veuillez fournir des renseignments concernant le produit,
situés sur la plaque signalétique.
Inscrivez ce qui suit:
Numéro de modèle:
Numéro de fabrication:
Numéro de série ou S/N:
Date de l’achat:
Nom et adresse du marchand:
PIéCES ET ACCESSOIRES
Achetez des pièces de remplacement et d’autres accessoires (ex.:étagères de réfrigérateur,
paniers de sécheuse, ou modules de table de cuisson) par téléphone.
Pour commander des accessoires pour votre produit Amana, composez 1-800-843-0304
aux É.-U., ou 319-622-5511 hors des É.-U.
LÕENSEMBLE PAR LE PLACARD (le NumŽro du Mod•le : F1961)
Si vous faisez le placard du four à micro-ondes, veuillez se servir des ornements de L’Amana
de FTK127 ou de FTK130 uniquement.
Les ornements du Four de Mur de L’Amana (F1961) peut être fait à la même marque.
SERVICE
Gradez une copie dú reçu de vente pour référence ultérieure ou dans les cas où le service sous garantie
est requis. Toutes les questions ou demande d’adresse d’un service autorisé, composez.
1-800-NAT-LSVC (1-800-628-5782) aux É.-U., ou 319-622-5511 hors des É.-U.
Le service sous garantie doit être exécuté par un service autorisé.
Amana recommande aussi de contacter un service autorisé même si le service est
requis après l’expiration de la garantie.
PROGRAMME DE SERVICE PROLONGƒ ASure
Amana offre une protection par l’entremise d’un service prolongé pour ce nouveau four.
Le programme de service prolongé AsureMCest spécialement conçu pour suppléer
à la garantie élaborée d’Amana.
Le programme couvre les pièces, la main-d’oeuvre et les frais de déplacement.
Composez 1-800-528-2682 pour des renseignements.
MC
6
Page 31

Autres Renseignements Utiles
OBTENIR LES MEILLEURS RƒSULTATS DE
VOTRE FOUR Ë MICRO-ONDES
Gardez un oeil sur la cuisson. La cuisson par micro-ondes ne
demande pas une supervision constante, c'est pourquoi vous
n’avez pas à vous soucier de brûler les aliments. TOUJORS
cuire les aliments moins longtemps que le demande la recette.
Vous pouvez toujours les cuire plus par la suite mais les
aliments trop cuits (brûlés) le demeureront toujours. Nous
avons élaboré les instructions de ce guide avec le plus grand
soin mais la plus grande part de votre succès dépendra
toujours de l'attention que vous porterez à la nourriture pendant
la cuisson. Surveillez toujours vos aliments pendant qu'ils
cuisent. Votre four est muni d'une lumière qui se met
automatiquement en fonction lorsqu'il est activé. Ceci vous
permet de regarder à l'intérieur et vérifier le progrès de votre
recette. Les directives données dans la recette (ex.: tourner ,
brasser, surélever, etc.) ne représentent que le minimum. Si la
nourriture ne semble pas cuire uniformément, faites simplement
les ajustements nécessaires afin de corriger la situation.
Facteurs affectant les durées de cuisson. De nombreux
facteurs ont des répercussions sur la durée de la cuisson. La
température des ingrédients utilisés dans la recette font une
grande différence. Par exemple, un gâteau fait avec du beurre
congelé, du lait et des oeufs froids prendra beaucoup plus de
temps que si ces ingrédients sont à la température de la pièce.
Toutes les recettes de ce livre vous donnent un choix de temps
de cuisson. En général, vous trouverez que la nourriture n'est
pas assez cuite aux temps de cuisson les moins longs et à
d'autres moments, vous voudrez dépasser le maximum
suggéré, selon vos goûts. La philosophie de ce guide veut qu'il
soit préféable de donner des estimations conservatrices du
temps de cuisson. On peut toujours reprendre les aliments qui
ne sont pas assez cuits mais les aliments brûlés sont ruinés à
jamais. Certaines recettes, particulièrement pour le pain, les
gâteaux et la crème anglaise, conseillent d'enlever les aliments
avant la fin de la recette. Ceci n'est pas une erreur . Lorsque
vous allouez un certain temps de repos aux aliments et les
recouvrez, ces aliments vont continuer à cuire à l'extérieur du
four car la chaleur prise dans la partie externe des aliments se
dirige habituellement vers l'intérieur . Si vous laissez la nourriture
dans le four jusqu'à ce qu'elle soit complètement cuite, les
parties externes seront trop cuites, voire même brûlées.
Après avoir pris de l'expérience avec la cuisson par microondes, vous deviendrez de plus en plus habile à estimer les
durées de cuisson et de repos pour la plupart des catégories de
nourriture.
TECHNIQUES SPƒCIALES DE CUISSON
PAR MICRO-ONDES
Brunissage: les viandes et les volailles qui sont cuites pendant
une quinzaine de minutes ou plus bruniront dans leur propre
graisse. Vous pouvez badigeonner de sauce brune les mets
que vous faites cuire moins longtemps afin de leur donner une
couleur appétissante. Les sauces les plus utilisées sont la
Worcestershire, la sauce soya et au barbecue. Étant donné que
vous ajoutez très peu de sauce à la recette, le goût original n'en
est pas altéré.
Recouvrir les aliments: recouvrir les aliments aide à
conserver la chaleur et la vapeur , ce qui les cuit plus
rapidement. Vous pouvez utiliser un couvercle ou une pellicule
de plastique, avec un coin replié pour l'empêcher de se fendre.
Recouvrir avce du papier ciré: le papier ciré prévient les
éclaboussures et aide les aliments à conserver une certaine
quantité de chaleur. Étant donné que le papier ciré ne scelle
pas autant que la pellicule plastique, les aliments ont tendance
à sécher un peu plus.
Emballer dans du papier ciré ou des essuie-tout: les
sandwiches et autres aliments contenant du pain précuit
devraient être emballés afin d'empêcher la cuisson au
micro-ondes de les assécher .
Disposer et espacer les aliments: les aliments cuits
individuellement tels que les pommes de terre au four , les petits
gâteaux et les hors-d'œuvres pourront être cuits plus
uniformément s'ils sont placés à équidistance dans le four ,
préférablement en rond. N'empilez jamais les aliments les uns
sur les autres.
Brasser les aliements: le brassage des préparations
représente la caractéristique la plus importante de la cuisson
par micro-ondes. En cuisson conventionnelle, on brasse les
aliments afin de bien mélanger la recette. Par contre, les
aliments cuits au four à micro-ondes sont brassés afin de mieux
distribuer la chaleur. Brassez toujours de l'extérieur vers
l'intérieur puisque les rebords cuisent en premier .
Rotourner les aliments: vous devez retourner les
aliments de grande dimension, tels que les rôtis et les poulets
entiers, afin de cuire le dessus et le dessous de façon uniforme.
C'est aussi une bonne idée de retourner le poulet en morceaux
et les côtelettes.
Placer les portions plus épaisses près des rebords: étant
donné que les micro-ondes agissent d'abord sur les parties
externes des aliments, il est logique de placer les parties plus
épaisses des viandes, volailles et poissons à l'extérieur du plat
de cuisson. De cette façon, les parties plus épaisses recevront
la plus grande quantité de micro-ondes et la nourriture cuira
plus uniformément.
Surélever les aliments: on surélève souvent les aliments
denses et épais de façon a ce que les micro-ondes puissent
agir sur le dessous et le centre de la nourriture.
Percer les aliments: les aliments enfermés dans une coquille,
une peau ou une membrane sont sujets à éclater dans le four , à
moins de les percer au préalable. V oici des exemples de tels
aliments: les jaunes et les blancs d'oeufs, les huîtres et les
palourdes, ainsi que de nombreux fruits et légumes.
Vérifier si la cuisson est complétée: étant donné que les
aliments cuisent plus rapidement dans un four à micro-ondes, il
est important de vérifier fréquemment la cuisson de la
nourriture. On peut laisser certains types d’aliments dans le four
jusqu’à ce qu’ils soient complètement cuits, tandis que d’autres
types d’aliments, tels que la volaille et les viandes, doivent être
retirés du four avant la fin de la cuisson afin de leur donner un
temps de repos. La nourriture finit sa cuisson pendant ce temps
de repos. La température interne des aliments monte de 5°F
(3°C) à 15°F (8°C) pendant le temps de repos.
T emps de repos:on laisse souvent un temps de repos de 3 à
10 minutes aux aliments après les avoir sortis du four .
Généralement, on recouvre les aliments pendant le temps de
repos afin de conserver la chaleur , à moins que l’on désire une
texture plus sèche (certains biscuits et gâteaux, par exemple).
Le temps de repos permet aux aliments de terminer leur
cuisson et aide également à fusionner les saveurs.
7
Page 32

Autres Renseignements Utiles
COMMENT LES PROPRIƒTƒS DES
ALIMENTS AFFECTENT LA CUISSON PAR
MICRO-ONDES
Densité des aliments: les aliments poreux et légers, tels que les
gâteaux et les pains, cuisent plus rapidement que ceux qui sont
denses et lourds, tels que les rôtis et les plats cuisinés. Vous devez
surveiller les aliments poreux pour que les parties extérieures ne
s’assèchent et ne s’effritent pas.
Hauteur des aliments: la partie supérieure des aliments,
particulièrement des rôtis, cuira plus rapidement que la partie
inférieure. C’est pourquoi il est importants de retourner les grands
aliments pendant la cuisson, plusieurs fois s’il le faut.
Humidité des aliments: étant donne que la chaleur générée par
les micro-ondes a tendance à faire évaporer l'humidité, les aliments
relativement secs tels que les rôtis et certains légumes devraient
être arrosés d’un peu d’eau avant la cuisson ou recouverts pour en
conserver l’humidité.
Les os et le gras: les os sont conducteurs de chaleur et le gras cuit
plus vite que la viande. C’est pourquoi vous devez faire attention,
lorsque vous cuisez des pièces de viande ou de volaille qui
contiennent beaucoup d’os et de gras, que la viande ne cuise pas
inégalement ni qu’elle ne cuise pas trop.
Ustensiles De Cuisson
REMARQUE: il est du domaine de la croyance populaire de penser
que les micro-ondes cuisent de l’intérieur vers l’extérieur. Le
réchauffage des pâtisseries fourrées est à l’origine de cette fausse
conception; la pâte demeurait froide alors que l’intérieur, composé
d’un grand pourcentage de sucre-comme dans le cas des beignes
fourrés à la confiture-était très chaud! Si vous cuisez un poulet ou un
rôti, vous verrez que l’extérieur cuit avant l’intérieur.
La forme des aliments: les micro-ondes ne pénètrent que d’un
pouce (2,5 cm) dans la nourriture; la portion intérieure des aliments
denses et épais est cuite parce que la chaleur générée à l’extérieur
voyage et se rend progressivement à l’intérieur.
En d’autres mots, seule est cuite la partie extérieure des aliments: le
reste est cuit par convection. Il est logique de dire que la pire forme
d’aliment à cuire au four à micro-ondes est un cube épais. Les coins
vont brûler bien avant que le centre ne soit cuit. Les aliments
minces, circulaires et en forme d’anneau réussissent le mieux au
four à micro-ondes.
La quantité de nourriture: la quantité de micro-ondes demeure
constante dans votre four, peu importe la quantité de nourriture qui
s’y trouve. Par conséquent, plus la quantité de nourriture est grande,
plus cela prendra de temps à cuire. Souvenez-vous de réduire d’au
moins un tier la durée de cuisson d’une recette coupée en deux.
MISE EN GARDE
CERT AINS USTENSILES DE CUISSON NE SONT PAS À L’ÉPREUVE
DES MICRO-ONDES, DONT CERTAINES POTTERIES ET AUTRES
ITEMS CONTENANT BEAUCOUP DE PLOMB OU DE FER.
USTENSILES Ë LÕƒPREUVE DES
MICRO-ONDES
N’utilisez jamais de métal ni d’assiettes à bordure de
métal dans votre four à micro-ondes: les micro-ondes ne
peuvent pas pénétrer le métal. Elles rebondiront de n’importe
quel objet de métal placé dans le four et causeront un
amorcage d’arc. L’amorçage d’arc est un phénomène étrange
qui ressemble aux éclairs. La plupart des plats non
métalliques à l’épreuve de la chaleur peuvent être utilisés
dans le four à micro-ondes. Toutefois, certains ustensiles
peuvent contenir des éléments les rendant inutilisables pour
la cuisson au four à micro-ondes. Si vous avez des doutes à
propos d’une assiette, tasse, verre, etc. en particulier, il existe
une méthode facile pour savoir si vous pouvez les utiliser
dans votre four à micro-ondes.
Vérifier les plats et ustensiles pour savoir s’ils peuvent
être utilisés dans le four à micro-ondes: placez l’ustensile
en question près d’un bol rempli d’eau dans le four. Cuisez à
la puissance maximale (HIGH) pendant environ une minute.
Lorsque l’eau bouille, vérifiez si l’ustensile est froid au toucher.
Si c’est le cas, vous pouvez l’utiliser dans votre four. Toutefois,
si l’eau ne bouille pas et que l’usteusile devient chaud, ceIa
signifie qu’il absorbe l’énergie des micro-ondes et qu’il n'est
pas prudent de l’utiliser dans votre four. Vous avez sûrement
à portée de la main un tas d’ustensiles qui peuvent aller au
four à micro-ondes, Prenez connaissance de la liste suivante:
1. Grandes assiettes: de nombreux types d’assiettes
peuvent être utilisés au four à micro-ondes. Si vous doutez de
la compatibilité, consultez la documentation du fabricant ou
faites le test mentionné ci-dessus.
2. Assiettes en verre: les assiettes en verre qui sont à
l’épreuve de la chaleur peuvent être utilisées au four à microondes. Ceci inclut tous les types d’assiettes en verre conçues
pour le four conventionnel. Toutefois, n’utilisez pas les
ustensiles de cuisson délicats, tels que les verres à vin car ils
pourraient éclater quand le contenu devient chaud.
3. Le papier: les assiettes et les contenants en papier sont
pratiques et sécuritaires au four à micro-ondes, pourvu que le
temps de cuisson soit court et que les aliments ne contiennent
pas trop de gras ni d’humidité. Les essuie-tout en papier sont
également très pratiques pour emballer la nourriture et garnir
les parois des assiettes contenant des aliments graisseux tels
que le bacon De façon générale, évitez les contenants faits de
papier de couleur car la couleur pourrait déteindre.
4. Contenants de plastique: on peut utiliser ces contenants
pour réchauffer rapidement certarns aliments. Par contre, ils
ne devraient pas être utilisés pour les aliments qui prennent
beaucoup de temps à se réchauffer ou à cuire car le plastique
se todra éventuellement et pourrait même fondre.
5. Sacs de cuisson en plastique: ces sacs sont à l’épreuve
des micro-ondes pourvu qu'ils soient spécifiquement conçus
pour la cuisson. Assurez-vous de fendre le sac afin de laisser
s’échapper la vapeur. N'utilisez jamais de sac de plastique
ordinaire pour cuire dans votre four à micro-ondes car ils
pourraient se rupturer ou fondre.
6. Assiettes de cuisson en plastique à I’épreuve des
micro-ondes: vous pouvez vous procurer toute une variété
de plats et contenants de diverses formes et dimensions pour
la cuisson au four à micro-ondes. En grande partie, vous
pourrez sûrement utiliser ce que vous avez déjà plutôt que
d’investir une fortune dans de nouveaux ustensiles de cuisson
à l’épreuve des micro-ondes.
7. Potteries, pots de grès et de céramique: les contenants faits
de ces matériaux peuvent être utilisés sans crainte mais vous
devriez les vérifier avant (faites le test mentionné ci-dessus).
8
Page 33

Nomenclature Des Pi•ces
REMARQUE: Une tonalité se fait entendre lorsque vous
appuyez sur une touche du tableau de commande,
vous indiquant qu’une commande a été entrée.
123
456
789
0
POWER
LEVEL
STOP
CLEAR
CONTROL
SET-UP
PROGRAM
SENSOR COOK
POPCORN
AUTO
COOK
AUTO
DEFROST
COOK
MORE
LESS
START
CLOCK TIMER
HOLD
WARM
EASY
COOK
REHEAT
Plaque frontale du four
Grillage du hublot de la porte
Sceau de
la porte
Fenêtre d'affichage
Panneau des commandes
Bouton d'ouverture de la porte
Verrouillage sécuritaire
de la porte
Table tournante
Bague de rotation
Panneau Des Commandes
Votre four à micro-ondes est expédié avec les
accessoires suivants:
Table tournante en verre...............................1
Manuel de l’utilisateur et
Guide de cuisson..........................................1
Bague rotative...............................................1
Ce four à micro-ondes est destiné à une
utilisation domestique seulement. II n’est pas
recommandé à des fins commerciales ni
industrielles.
9
Page 34

Instructions De Fonctionnement
START
1 1 1 1
CLOCK
POWER
LEVEL
5 380
START
EASY
COOK
RƒGLAGE DE L'HORLOGE
Lorsque vous branchez votre four à micro-ondes pour la
première fois ou si vous rétablissez le courant après une
interruption, les mots PLEASE SET TIME OF DAY (Veuillez
appuyer sur la touche de l'heure) défileront 5 fois à l'affichage.
REMARQUE:
vous pouvez passer de AM à PM en appuyant tour à tour
sur la touche CLOCK.
Exemple: si vous désirez ajuster l'heure à 11:11(PM):
1. Appuyez deux fois sur la touche de
l'heure CLOCK. L’expression
suivante défile sur l’afficheur
➠
➠
PM ENTER TIME OF DAY/PM
ENTRER L’HEURE.
2. Entrez l'heure en vous servant des
touches numériques: [1], [1], [1] et
[1]. L’expression suivante défile sur
l’afficheur 11:11P TOUCH START/
APPUYER SUR START.
3. Appuyez sur START.
L'horloge commence à compter son
heure et 11:11P apparaît à l'affichage.
CUISSON CHRONOMƒTRIQUE
Cette fonction vous permet de cuire les aliments pendant
une période de temps désirée. Pour obtenir de meilleurs
résultats, vous avez à votre disponibilité 10 niveaux de
puissance en plus du niveau maximum (HI) parce que de
nombreux types d'aliments nécessitent une cuisson plus
lente, à un niveau inférieur.
Lorsque la cuisson est terminée, vous entendrez deux bips
courts et un long. Le mot END (Fin) défilera à l'affichage.
Ensuite, le four s'éteindra.
REMARQUE:
si vous ne choisissez pas de niveau de puissance, le four
fonctionnera automatiquement à la puissance maximale
(HIGH). Pour régler le four à la cuisson au niveau
maximum, sautez les étapes 2 & 3 ci-dessus.
Exemple: si vous désirez cuire à 80% de la puissance
(niveau de puissance 8) pendant
5 minutes et 30 secondes.
1. Entrez la durée (5 minutes, 30
secondes) en appuyant sur [5], [3]
➠
et [0]. L’expression suivante défile
sur l’afficheur 5:30 TOUCH START
OR POWER/APPUYER SUR
START OU SUR POWER.
CUISSON Ë MISE EN MARCHE SIMPLIFIƒE
"EASY COOK"
Cette touche vous permet d'économiser du temps en
réglant et en mettant en marche rapidement votre four à
micro-ondes, sans avoir à appuyer sur la touche START.
REMARQUE:
Si vous appuyez sur EASY COOK, vous ajouterez
30 secondes-jusqu'à 3 minutes 30 seconds-de cuisson.
Après 3 minutes 30 secondes, chaque pression de la
touche ajoutera 1 minute-jusqu'à 99 minutes, 59 secondes.
Exemple: si vous désirez programmer une cuisson
simplifiée pendant deux minutes:
Appuyez quatre fois sur la touche de
mise en marche simplifiée EASY
COOK.
Le four débute sa cuisson et le compte
à rebours apparaît à
l'affichage.
2. Appuyez sur la touche des niveaux
de puissance POWER LEVEL.
➠➠
L’expression suivante défile sur
l’afficheur ENTER POWER LEVEL
1 TO 10/ENTRER LA PUISSANCE
DE CHAUFFAGE, DE 1 À 10.
3. Appuyez sur 8.
Les mots suivants défileront à
l'affichage: L’expression suivante
défile sur l’afficheur P-80 TOUCH
START/APPUYER SUR START.
4. Appuyez sur START.
10
Page 35

Instructions De Fonctionnement
START
TIMER
3 0 0
0
CUISSON EN PLUSIEURS ƒTAPES
Pour la cuisson en plusieurs étapes, appuyer sur
PROGRAM et répéter les étapes 1-3 de la cuisson minutée
à la page précédente avant d’appuyer sur la touche START
pour un temps supplémentaire et le programme puissance
que vous voulez ajouter.
Vous pouvez programmer la décongélation automatique
avant la première étape afin de décongeler d'abord et cuire
ensuite.
NIVEAUX DE PUISSANCE DU FOUR Ë
MICRO-ONDES
Pour plus de flexibilité et pour vous permettre de mieux
contrôler la cuisson, votre four à micro-ondes est muni de
onze niveaux de puissance. Le tableau ci-dessous vous
donne quelques idées des types de nourriture que l'on cuit
à différents niveaux.
TABLEAU DES NIVEAUX DE PUISSANCE DE
VOTRE FOUR À MICRO-ONDES
NIVEAU DE
PUISSANCE
• Bouillir de l'eau.
10 • Faire des bonbons.
(Maximum) • Cuire des morceaux de poulet, du poisson et des
légumes.
• Cuire des coupes de viande tendres.
• Poulet entier.
9 • Réchauffer le riz, les pâtes et les légumes.
8
7 • Cuire les gâteaux et les pains.
6 • Cuire les poissons entiers.
5
4 • Décongeler la viande, la volaille et les fruits de mer.
3
2
1
0
• Réchauffer rapidement les mets préparés.
• Réchauffer les sandwiches.
• Cuire les oeufs, le lait et les plats fromagés.
• Fondre le chocolat.
• Cuire le veau.
• Cuire les puddings et la créme anglaise.
• Cuire le jambon, le poulet entier et l'agneau.
• Cuire les rôtis de côte et les pointes de surlonge.
• Cuire les coupes de viande moins tendres.
• Cuire les côtelettes et les rôtis de porc.
• Tiédir les fruits.
• Amollir le beurre.
• Garder les plats cuisinés et les plats principaux au
chaud.
• Amollir le beurre et le fromage à la crème.
• Temps de repos
• Indépendant
UTILISATION
VERROUILLAGE Ë L'ƒPREUVE DES
ENFANTS
Cette caractéristique unique sert à verrouiller le clavier des
touches afin d'empêcher la mise en marche accidentelle du
four à micro-ondes. Une fois le verrouillage engagé, on ne
peut plus activer les touches du clavier.
La caractéristique du verrouillage de sécurité est également
utile lors du nettoyage du tableau de commande. Ce
verrouillage empêche la programmation accidentelle
lorsqu’on essuie le tableau de commande.
Si le verrouillage à l'épreuve des enfants a déjà été réglé et que
vous touchez une autre touche de cuisson, vous verrez les
lettres LOCKED (verrouillé) apparaître à l'affichage. V ous
pouvez annuler cette fonction en suivant les étapes ci-dessous.
Pour activer le verrouillage:
STOP
CLEAR
1. Appuyez sur la touche
d’arrêt/annulation STOP/CLEAR.
➠
2. Appuyez sur la touche "0" et tenez-la
enfoncée jusqu'à ce que les lettres
0
Pour annuler la fonction de verrouillage
Appuyez sur la touche "0" et tenez-la enfoncée
jusqu'à ce que les lettres LOCKED (verrouillé)
disparaissent de l'affichage.
Après avoir désactivé le verrouillage à l'épreuve des
enfants, l'heure normale reviendra à l'écran d'affichage. Le
four se remettra à fonctionner normalement.
MINUTERIE "TIMER"
Vous pouvez utiliser la minuterie de votre four à d'autres
fins que la cuisson de vos aliments.
Exemple: Pour régler la minuterie de votre four:
➠➠
LOCKED (verrouillé) apparaissent à
l'affichage et que vous entendiez deux
bips onores. Si l'heure a déjà été
réglée, elle reviendra à l'ècran
d'affichage. Lorsque ceci est fait, vous
ne pourrez activer les fonctions.
à l'épreuve des enfants:
1. Appuyez sur la touche de la minuterie
TIMER. L’expression suivante défile sur
l’afficheur ENTER TIME IN MIN AND
SEC./ENTRER LE TEMPS DE CUISSON
EN MIN. ET SEC.
2. Appuyez sur 3, 0, 0.
L’expression suivante défile sur l’afficheur
3:00 TOUCH START/APPUYER SUR
START.
3. Appuyez sur START.
11
Page 36

Instructions De Fonctionnement
CONTROL
SET-UP
1
2
CONTROL
SET-UP
4
2
CONFIGURATION DU SYSTéME DE COMMANDE ÒCONTROL SET-UPÓ
La fonction de configuration du système de commande comporte cinq modes qui facilitent l’utilisation du four à
micro-ondes. On peut sélectionner SIGNAL SONORE MARCHE/ARRÊT, HORLOGE MARCHE/ARRÊT, VITESSE
DE DÉFILEMENT, LB/KG, et LE MODE DÉMONSTRATION.
Exemple 1: si vous désirez désactiver le son des bips:
1. Appuyez sur la touche des réglages
sur mesure CONTROL SET-UP.
Les 5 modes apparaissent
➠
➠
répétitivement à l'écran. Vous pouvez
les régler selon vos goûts.
2. Appuyez sur le chiffre 1.
On voit apparaître
SOUND ON TOUCH 1 /
SONNERIE - APPUYER SUR 1
OFF TOUCH 2 /
ARRÊT - APPUYER SUR 2.
3. Appuyez sur le chiffre 2.
On voit apparaître SOUND OFF/
SONNERIE INACTIVE.
L’heure courante est affichée.
REMARQUE:
Si vous désirez remettre le son du bip
en fonction, répétez les étapes 1-2 puis
appuyez sur le 1.
Exemple 2: si vous désirez choisir l'option
des kg:
1. Appuyez sur la touche des réglages
sur mesure CONTROL SET-UP.
Les 5 modes apparaissent
➠➠
répétitivement à l'écran, Vous pouvez
les régler selon vos goûts.
2. Appuyez sur le chiffre 4.
On voit apparaître
LBS TOUCH 1/
LBS - APPUYER SUR 1
KG TOUCH 2/
KG - APPUYER SUR 2.
3. Appuyez sur le chiffre 2.
On voit apparaître KG.
L’heure courante est affichée.
REMARQUE:
Si vous désirez choisir les livres, répétez
les étapes 1-2 puis appuyez sur le 1.
TABLEAU DES FONCTIONS DES RÉGLAGES SUR MESURE
NO. FONCTION SELECTION ETC.
1
MISE EN MARCHE/ARRÉT
DU BIP
2
MISE EN MARCHE/ARRÉT
DE L'HORLOGE
3
VTTESSE DE DÉFILEMENT
4
LBS/KG
5
MISE EN MARCHE/ARRÉT
DE LA DÉMONSTRATION
REMARQUE: lorque vous branchez le cordon d'alimentation pour la première fois, les réglages sont les suivants;
mise en marche du son et de l'horloge, vitesse de défilement normale, Lbs et mise hors fonction de
la démonstration.
Le bip est activé ou non.
L'horloge est activée ou non.
Lente, normale ou rapide
Lbs ou Kg
Activation/désactivation du
mode de démonstration
Tous les sons de Key et ceux d’EOC peuvent
être choisis, c’est à dire, muets ou sonores.
Si la montre est arrêtée ou vous n’utilisez pas
le four, ne rien être marqué à l’écran du four.
La vitesse d’écran du four est réglée par le
scroll speed.
La chauffe-plats automatique et le dégel
automatique sont contrôlés par LBS ou KG.
Vous pouvez faire marcher le four à microondes sans rien faire chauffer par Demo Mode.
12
Page 37

Instructions De Fonctionnement
AUTO
COOK
4
2
COOK
4
FONCTION PLUS/MOINS "MORE/LESS"
Grâce aux touches MORE(PLUS) ou LESS(MOINS), il
est possible d’augmenter ou de diminuer le temps de
cuisson dans les programmes AUTO COOK(CUISSON
AUTOMATIQUE), TIME COOK(CUISSON DE DURÉE
DÉTERMINÉE), EASY COOK(CUISSON FACILE), et
SENSOR COOK(CUISSON PAR CAPTEUR). Si vous
appuyez sur MORE, vous augmenterez la durée de 10
secondes à chaque pression de la touche. Si vous
appuyez sur LESS, 10 secondes seront enlevées à
chaque pression de la touche.
Vous devez attendre jusqu’au compte à rebours de la
chaleur commence il y a le temps additif ou soustroctif.
Exemple: si vous désirez prolonger ou diminuer la durée
de la cuisson automatique "AUTO COOK" (par
exemple, deux tasses de breuvage).:
1. Appuyez sur la touche AUTO COOK.
Les mots suivants défilent sur l’afficheur
SELECT MENU 1 TO 6
--SEE COOKING GUIDE BEHIND
DOOR/SÉLECTIONNER MENU 1 À 6 -
➠➠
VOIR LE GUIDE DE CUISSON AU
VERSO DE LA PORTE.
2. Appuyez sur le numéro 4.
Les mots suivants défilent sur l’afficheur
BEVERAGE TOUCH 1 TO 2 CUPS/
APPUYER SUR BEVERAG 1 À 2
TASSES.
INSRTCTIONS DE
FONCTIONNEMENT DE LA CUISSON PAR
CAPTEUR "SENSOR"
Pour la plupart des programmes de cuisson par le
sensor, vous trouverez dans les pages suivantes un
tableau comprenant des exemples précis de cuisson
selon différentes catégories de nourriture. Le système
de cuisson par capteur fonctionne en détectant
l'accumulation de vapeur.
Indication
1. Assurez-vous de ne pas ouvrir la porte pendant la
détection.
2. Lorsque la vapeur aura été détectée, vous entendrez
deux bips sonores.
3. Vous annulerez le processus de détection si vous
ouvrez la porte ou appuyez sur la touche
d'arrêt/annulation "STOP/CLEAR" avant la fin de la
détection. Le four se mettra à l'arrêt.
4. Avant d'utiliser la fonction du capteur, assruez-vous
que la table tournante soit complètement sèche: ceci
vous donnera de meilleurs résultats.
5. La température ambiante de la pièce ne devrait pas
dépasser 95°F.
6. Le four devrait être branché au moins 5 minutes avant
la cuisson par détecteur.
Les catégories sont : Menu de cuisson par capteur
Menu de réchauffage par capteur
Maïs à éclater par capteur
3. Appuyez sur la touche 2.
REMARQUE:
Appuyez sur la touche PLUS (MORE) ou
MOINS (LESS) pendant le décompte du
four.
CUISSON PAR CAPTEUR
La CUISSON PAR CAPTEUR vous permet de cuire la
plupart de vos aliments préférés sans avoir à entrer la
durée de la cuisson ni les niveaux de puissance. Le four
à micro-ondes détermine automatiquement les durées
requises pour chaque item d'aliments. Cette fonction
comporte 10 catégories de nourriture.
Exemple: Si vous désirez cuire des METS
CONGELÉS (Frozen Entree):
1. Appuyez sur la touche de cuisson par
capteur COOK, les mots suivants
défilerront à l'écran:
SELECT MENU O TO 9 -- SEE
➠
COOKING GUIDE BEHIND
DOOR/SÉLECTIONNER MENU 0 À
9 - VOIR LE GUIDE DE CUISSON
AU VERSO DE LA PORTE.
2. Appuyez sur la touche 4.
Le four débutera sa cuisson
automatique par capteur.
13
Page 38

Instructions De Fonctionnement
TABLEAU DE CUISSON PAR CAPTEUR
CODE CATÉGORIE QUANTITÉ DIRECTIVES
1 Pomme de terre 1 - 4 moyennes de Percez chaque pomme de terre avec une
+/ - 8 onces ch. fourchette et disposez-les en cercle sur une assiette, à un pouce l'une
de l'autre.
2 Légumes frais 1 - 6 tasse Préparez tel que vous le désirez, lavez-les et laissez l'eau ruisseler sur
les légumes. Déposez-les dans un plat de grandeur appropriée, couvrez
de pellicule plastique tout en laissant un espace pour permettre à l'air de
s'échapper pendant la cuisson.
3 Légumes congelés 10 oz à 1 lb. Retirez de l'emballage, rincez les résidus de givre à l'eau courante.
Déposez-les dans un plat de grandeur appropriée, cluvrez de pellicule
plastique tout en lasissant un espace pour permettre à l'air de s'échapper
pendant la cuisson.
4 Entrée congelée Fonctionne mieux si l'entrée Retirez de l'emballage cartonné. Entaillez le couvercle.
est de moins d'un pouce Si les aliments ne sont pas dans un contenant à l'épreuve des
d'épaisseur ou moins de 3/4 lb. micro-ondes, déposez-le dans une assiette et couvrez d'une
pellicule plastique perforée.
5 Riz
6 Plats cuisinés 2 - 6 portions Assemblez les ingréients tels que spécifié dans la recette et
7 Viande hachée 1/4 - 2 lbs. Disposez dans un contenant à l'épreuve des micro-ondes de
8 Poissons et fruits 1/4 - 2 lbs. Disposez les aliments dans un contenant à l'épreuve des
de mer V oir pages 19 - 20 pour les micro-ondes de grandeur appropriée. Assaisonnez et ajoutez
9 Oeufs brouillés 2 - 5 oeufs Cassez les oeufs dans une tasse à mesurer de 4 tasses
1
/2 - 2 tasses Employez du riz Placez le riz et deux fois plus de liqide (eau, bouillon de poulet
à grains moyens ou longs. ou bouillon de légume) dans un contenant de 2 pintes à l'épreuve
Cuirs le riz instantané selon des micor-ondes. Couvrez de pellicule plastique. Lorsque la
les directives de l'emballage. cuisson est complétée, laissez reposer 10 minutes.
Brassez pour décoller les grains de riz.
Voir page 19 pour les déposez-les dans un contenant de 1-2 pintes.
recettes. Couvrez de pellicule plastique perforée. Lorsque la cuisson
10 minutes. Lorsque qu'on demande du riz dans une recette,
utilisez le riz Minute Rice tm que devez cuire avec le mode RICE.
grandeur appropriée en plaçant la viande sur le pourtour
de contenant et en prenant soin de laisser le centre libre.
Assaisonnez et coubrez de pellicule plastique.
Percez la pellicule pour une viande bien cuite, coubrez pour une
cuisson médium, dans le casd'une viande que l'on veut utiliser
dans une recette et qui néecssite une cuisson ultérieure.
1
/4 - 1/2
recettes. tasse de liquide (vin, eau, salsa, etc.) Couvrez de pellicule plastique
perforée.
Voir pages 20 - 21 pour les ou dans un contenant d'une pinte. Couvrez de pellicule plastique
recettes. perforée. Lorsque la cuisson est terminée, retirez du four, brassez et
laissez reposer 1 - 2 minutes.
0 Pizza congelée 1 - 2 tranches Suivez les indications de l'emballage. N'emplyez que de la pizza
congelée pour le micro-ondes (le type qui contient un plateau de
cuisson). Après la cuisson, retirez du four et déposez la pizza sur un
treillis pour permettre à la croûte de demeurer croustillante.
Si vous appuyez sur STOP/CLEAR pendant la détection ou si vous ouvrez la porte, le processus sera interrompu.
14
Page 39

Instructions De Fonctionnement
POPCORN
REHEAT
3
START
HOLD
WARM
MAìS Ë ƒCLATER PAR CAPTEUR
(SENSOR POPCORN)
Le maïs à éclater par capteur vous permet de faire
éclater du maïs dans les emballages commerciaux (de
1,75 à 3,5 oz). Pour obtenir de meileurs résultats, utilisez
un sac de maïs à éclater frais. Ne placez qu'un seul sac
de maïs (spécialement emballé pour fours à éclater frais.
Ne placez qu'un seul sac de maïs (spécialement emballé
pour fours à micro-ondes) au centre de la table tournate.
Exemple: Si vous désirez faire éclater un sac de maïs
de 3,5 oz.
Appuyez sur la touche de cuisson du
maïs par capteur POPCORN.
Le mot suivant défilera à l'écran:
POPCORN (maïs à éclater). Le four
cuira automatiquement la nourriture à
l'aide du capteur.
REMARQUES:
• Ne tentez pas de réchauffer ni cuire les grains de maïs
qui n'ont pas éclaté.
• N'utilisez pas de dispositifs spéciaux pour fair éclater le
maïs dans ce mode.
TABLEAU DE RÉCHAUFFAGE PAR CAPTEUR
CODE CATÉGORIE
1 Assiette 1/2-1 lbs. Placez les aliments à
d’aliments réchauffer sur une assiette.
2 Soupe/ 1-4 tasses Placez les aliments à
Sauce réchauffer dans un
3 Plat cuisiné 2-6 portions Couvrez le contenant de
QUANTIT
É
DIRECTIVES
Couvrez de pellicule plastique.
contenant à l’épreuve des
micro-ondes de grandeur
appropriée.
Couvrez de pellicule plastique.
pellicule plastique.
MAINTIEN DE LA TEMPƒRATURE
On peut conserver un mets cuit et chaud en sécurité
dans le four à micro-ondes pendant une période qui peut
atteindre 99 minutes, 99 secondes. On peut utiliser la
fonction HOLD WARM/MAINTIEN DE LA
TEMPÉRATURE par elle-même, ou automatiquement à
la fin d’un programme de cuisson.
RƒCHAUFFAGE PAR CAPTEUR
Cette fonction vous permet de réchauffer des aliments
précuits, à la température de la pièce, sans avoir à
entrer les durées de cuisson ni les niveaux de
puissance. Cette fonction possède trois catégories:
assiette de dîner (dinner plate), soupes/sauces
(soup/sauce) et plats cuisinés (casserole).
Exemple: Si vous désirez réchauffer un plat
cuisiné (casserole):
1. Appuyez sur la touche de réchauffage
par capteur REHEAT. Les mots
suivants défileront à l’écran: SELECT
MENU 1 TO 3 -- SEE COOKING
GUIDE BEHIND DOOR. (choisissez
le menu 1-3. Voir le guide de cuisson
derrière la porte).
2. Appuyez sur la touche 3.
Le four cuira automatiquement la
nourriture à l’aide du capteur.
➠
Exemple: Pour le maintien de la température d’un
mets chaud ou cuit.
1. Appuyer sur HOLD WARM/MAINTIEN
DE LA TEMPÉRATURE. On voit défiler
sur l’afficheur HOLD WARM TOUCH
➠
REMARQUE:
La fonction de MAINTIEN DE LA TEMPÉRATURE est
active pendant une période qui peut atteindre 99 minutes,
99 secondes. L’ouverture de la porte du four désactive la
fonction de MAINTIEN DE LA TEMPÉRATURE. Si une
période additionnelle de MAINTIEN DE LA
TEMPÉRA TURE est nécessaire, refermer la porte du four
et appuyer sur HOLD WARM puis sur START. Un mets
cuit sous couvercle devrait demeurer couvert pendant la
période de MAINTIEN DE LA TEMPÉRATURE. Ne pas
couvrir les produits de pâtisserie (tarte, vol-au-vent, etc.)
pendant une période de MAINTIEN DE LA
TEMPÉRA TURE. Recouvrir un repas complet dont on
maintient la température sur une assiette de service. Ne
pas maintenir la température d’un mets pendant plus de 1
heure, 40 minutes. Le maintien prolongé de la
température de certains aliments peut les dégrader.
START/MAINTIEN DE LA
TEMPÉRATURE - APPUYER SUR
START.
2. Appuyer sur START.
On voit apparaître WARM/CHAUD
tandis que le four continue à fonctionner.
15
Page 40

Instructions De Fonctionnement
AUTO
COOK
1
4
CUISSON AUTOMATIQUE
Cette caractéristique vous permet de cuire les aliments désirés à la simple pression de la touche de cuisson automatique
AUTO COOK. Cette fonction comporte 6 catégories d’aliments.
Exemple: Si vous désirez cuire 4 tranches de bacon:
1. Appuyez sur la touche AUTO COOK.
Les mots suivants défilent sur
l’afficheur SELECT MENU 1
TO 6 -- SEE COOKING GUIDE
BEHIND DOOR/SÉLECTIONNER
MENU 1 À 6 - VOIR LE GUIDE DE
CUISSON AU VERSO.
➠➠
TABLEAU DE CUISSON AUTOMATIQUE
• Premièrement, appuyez sur la touche AUTO COOK, puis sélectionnez la nourriture et la quantité
2. Appuyez sur le numéro 1.
Les mots suivants défilent sur
l’afficheur BACON TOUCH 2 TO 6
SLICES/BACON SÉLECTIONNER 2 À
6 TRANCHES.
3. Appuyez sur le numéro 4.
Le four débutera automatiquement la
cuissson.
CODE CATÉGORIE QUANTITÉ DIRECTIVES
1 Bacon 2-6 tranches Pour de meilleurs résultats, disposez les tranches de bacon dans un
treillis pour cuisson du bacon, (Employez une assiette bordée
d’essuie-tout si vous n’avez pas de treillis).
2 Brioches/ 1-6 unités Retirez de l’emballage et disposez dans une assiette.
Muffins congélés (2-3 oz chaque) (Si les muffins pèsent plus de 3 oz, calculez deux muffins lorsque vous
entrez la quantité).
3 Brioches/ 1-6 unités Retirez de l’emballage et disposez dans une assiette.
Muffins frais (2-3 oz chaque) (Si lemuffins pèsent plus de 3 oz, calculez deux muffins lorsque vous
entrez la quantité)
4 Breuvages 1-2 tasses Retirez de l’emballage et déposez sur le plateau du micro-ondes
(soyez prudents! Le breuvage sera très chaud! Parfois, les liquides
réchauffés dans des contenants cylindriques renversent lorsque l’on
déplace le contenant).
5 Morceaux
de poulet des micro-ondes de grandeur appropriée et couvrez de pellicule
6 Céréales 1-6 portions Préparez selon les directives de l’emballage.
chaudes Brassez et allouez une pause avant de consommer. Employez
1
/2-2,0 lbs Disposez les morceaux de poulet dans un contenant à l’épreuve
plastique perforée.
seulement des céréales chaudes instantanées.
NOTE: si vous ouvrez la porte ou appuyez sur STOP/CLEAR pendant la cuisson, le processus sera interrompu.
16
Page 41

Instructions De Fonctionnement
AUTO
DEFROST
START
1 2
1
DƒCONGƒLATION AUTOMATIQUE PAR LE
POIDS
Trois séquences de décongélation sont préréglées dans
le four. Cette caractéristique est la meilleure méthode de
décongélation des aliments. Le guide de cuisson vous
indiquera la séquence de décongélation la mieux
appropriée selon le type d’aliment que vous désirez
décongeler. Avec la fonction de décongélation
automatique, le four programme automatiquement pour
vous la durée de décongélation et les niveaux de
puissance.
Le four détermine automatiquement les durées de
décongélation nécessaires pour chaque catégorie
d’aliments, selon le poids que vous avez entré.
Pour plus de commodité, la fonction de décongélation
par le poids contient un mécanisme intégré qui vous
prévient de vérifier, retourner ou mieux disposer les
aliments. Il y a trois niveaux de décongélation différents:
1 VIANDES
2 VOLAILLES
3 POISSONS
• Vous pouvez choisir la catégorie en appuyant sur la
touche le numéro 1(viandes), le numéro 2(volailles), et
le numéro 3(poissons).
• La gamme des poids varie de 0,1 à 6,0 lbs
(0,1 à 4,0 kgs).
REMARQUES:
Lorsque vous appuyez sur la touche START, l’affichage
change au compte à rebours de la décongélation. Le
four sonnera deux fois pendant le cycle de
décongélation. À chaque bip, ouvrez la porte du four et
retournez, séparez ou réorganisez la nourriture. Enlevez
toute portion qui a dégelé. Retournez les portions
congelées dans le four et appuyez sur START afin de
terminer le cycle de décongélation.
• Pour de meilleurs résultats, enlevez les emballages
originaux des poissons, fruits de mer, viandes et
volailles sinon, l'emballage retiendra la vapeur et le
bouillon sera trop près de la viande, ce qui cuira la
surface extérieure des aliments.
• Pour décongeler la viande hachée plus efficacement,
tournez-la en forme de beigne avant de la congeler.
Lorsque vous décongelez, grattez la viande dégelée
au premier son du bip, puis continuez la décongélation.
• Placez les aliments dans un contenant peu profond ou
dans une grille à l'épreuve des micro-ondes afin de
recueillir tous les jus qui s'écoulent.
• La nourriture devrait être encore très froide dans le
centre lorsque vous l'enlevez du four.
LISTE SÉQUENTIELLE DE LA DÉCONGÉLATION
AUTOMATIQUE
Exemple: Si vous désirez décongeler 1,2 lbs de
boeuf haché:
1. Appuyez une fois sur la touche de
décongélation automatique par le
poids AUTO DEFROST. Les mots
suivants défileront à l’affichage:
➠➠➠
MEAT TOUCH 1
POULTRY TOUCH 2
FISH TOUCH 3 (Viandes appuyez
sur le 1, volailles, sur le 2 et
poissons, sur le 3).
2. Appuyez sur la touche1. Vous verrez
l’indication ENTER WEIGHT (Entrez
le poids) défiler à l’affichage.
3. Entrez le poids en appuyant sur le
[1] et le [2]. Les indications
suivantes défileront à l’affichage:
1.2 LBS TOUCH START
(Pour 1,2 lbs, appuyez sur START).
4. Appuyez sur la touche de départ
START.
La décongélation débute.
SÉQUENCE NOURRITURE
BŒUF
Bœuf haché, steak de ronde, cubes à ragoût,
filet mignon, bœuf à braiser, rôti de côte, rôti de
croupe. rôti de palette, boulettes de viande
hachée
1 AGNEAU
VIANDES Côtelettes (épaisseur de 1 po.), rôti ficelé
PORC
Côtelettes (épaisseur de 1 po.), hot dogs, côtes
levées, rôti ficelé, saucisses
VEAU
Escalopes (1 lbs, épaisseur de 1 po.)
VOLAILLES
Entière (moins de 4 lbs), en morceaux,
2
VOLAILLES
3
POISSONS
poitrines(désossées)
POULETS DE CORNOUAILLES
Entiers
DINDE
poitrine (moins de 6 lbs)
POISSON
Filets, darnes entières
FRUITS DE MER
Chair de crabe, queues de homard, crevettes,
pétoncles
17
Page 42

Tableau Des Legumess Frais
DURÉE DE
LÉGUMES QUANTITÉ
Artichauts(8 oz ch.) 2 moyens 5-8 Préparez. Ajoutez 2 c. à thé d'eau et 2 c. à table 2-3 min.
4 moyens 10-12 de jus de citron.
Asperges 1 lb 3-7 Nettoyez et retournez la moitié des pointes. 2-3 min.
fraîches en pointes Ajoutez 1/2 tasse d'eau. Recouvrez.
Fêves vertes et 1 lb 7-10 Ajoutez 1/2 tasse d'eau dans 1 casserole d'un 2-3 min.
jaunes litre et demi. Brassez à la mi-cuisson.
Betteraves fraîches 1 lb 12-16 Ajoutez 1/2 tasse d'eau dans 1 casserole d'un 2-3 min
Brocoli frais 1 lb 5-9 Placez le brocoli dans un plat de cuisson. 2-3 min
en bouquets Ajoutez 1/2 tasse d'eau.
Chou frais haché 1 lb 5-7 Ajoutez 1/2 tasse d'eau dans une casserole 2-3 min.
Carottes fraîches 2 tasses 3-6 Ajoutez 1/4 tasse d'eau dans une casserloe 2-3 min.
et tranchées couverte d'un litre.
Chou-fleur 1 lb 6-10 Préparez. 2-3 min.
frais et entier Ajoutez 1/4 tasse d'eau dans une casserole
Céleri frais 2 tasses 3-5 tranchez. Ajoutez 1/4 tasse d'eau dans une 2-3 min.
et tranché 4 tasses 7-9 casserole couverte d'un litre et demi.
Maïs frais 2 épis 5-8 Enlevez la pelure. 2-3 min.
Champignons
frais tranchés couverte d'un litre et demi.
Panais frais 1 lb 4-8 Ajoutez 1/2 tasse d'eau dans une casserole 2-3 min.
tranché couverte d'un litre et demi.
Pois verts frais 4 tasses 6-9 Ajoutez 1/2 tasse d'eau dans une casserole 2-3 min.
Patates douces, 2 moyennes 5-7 Percez les patates plusieurs fois avec une 2-3 min.
cuisson entière 4 moyennes 6-11 fourchette.
(6-8 oz ch.)
Patates blanches, 2 patates 5-7 Percez les patates plusieurs fois avec une 2-3 min.
cuisson entière 4 patates 8-13 fourchette.
(6-8 oz ch.)
Epinards frais en 1 lb 5-7 Ajoutez 1/2 tasse d'eau dans une casserole 2-3 min.
feuilles couverte de 2 litres.
Courge 1 moyenne 6-8 coupez la courge en deux. Enlevez les graines. 2-3 min.
(d'hiver ou Disposez dans un plat de cuisson de 8x8 po.
"butternut") fraîche Recouvrez.
Courgettes 1 lb 5-8 Ajoutez
fraîches tranchées couverte d'un litre et demi.
Courgettes 1 lb 7-8 Percez. Disposez sur un essuie-tout double. 2-3 min.
fraîches entières Retournez les courgettes et réarrangez à la
1
/2 lb 2-31/2 Placez les champignons dans une casserole 2-3 min.
CUISSON À LA
PUISSANCE D'ATTENTE
MAXIMALE
Recouvrez. Cuisez avec la tige vers le haut.
litre et demi. Réorganisez à la mi-cuisson.
couverte d'un litre et demi.
Brassez à la mi-cuisson.
Brassez à la mi-cuisson.
couverte d'un litre.
Brassez à la mi-cuisson.
Brassez à la mi-cuisson.
Ajoutez 2 c. à thé d'eau dans un plat de cuisson
de 1-1/2 litre. Recouvrez.
Brassez à la mi-cuisson.
Brassez à la mi-cuisson.
couverte d'un litre et demi.
Brassez à la mi-cuisson.
mi-cuisson.
INSTRUCTIONS
1
/2 tasse d'eau dans une casserloe 2-3 min.
TEMPS
18
Page 43

Cuisinez En Utilisant Le Sensor Cuisinier
LƒGUMES
Macédoine de légumes, 4 portions en
accompagnement ou 2 portions en repas principal
2 grosses carottes, coupées en morceaux d'un pouce
1 grosse pomme de terre, en cubes
1 oignon rouge moyen, tranché mince
4 gousses d'ail, pelées
2 branches de céleri, coupées en morceaux d'un pouce
sel et poivre au goût
Placez le tout dans un contenant à l'épreuve des microondes de 2 pintes; couvrez et cuisez à l'aide du capteur
ou à la puissance maximum pendant environ 10 min. ou
jusqu'à ce que les carottes soient cuites.
Poivrons à l'étuvé, 4 portions
1 gros poivron rouge, épépiné et coupé en morceaux
d'un pouce
1 gros poivron vert, épépiné et coupé en morceaux d'un
pouce
1 oignon rouge moyen, tranché mince
2 gousses d'ail, hachées
1 tasse de salsa commerciale sel et poivre au goût
Placez le tout dans un contenant à l'épreuve des microondes de 2 pintes; couvrez et cuisez à l'aide du capteur
ou au niveau de puissance maximum pendant environ
12 min. ou jusqu'à ce que les poivrons soient vraiment
tendres.
RIZ
Riz espagnol, 4 portions
1/2 lb de boeuf haché maigre ou de saucisses fumées
1 poivron vert moyen, épépiné et haché
1 petit oignon, haché
1 tasse de riz instantané
1 boîte (14 onces) de tomates à l'étuvé
1 c. à thé de poudre de chili
Placez la viande, poivron et oignon dans un contenant à
l'épreuve des micro-ondes de 2 pintes et cuisez pendant
2 minutes à la puissance maximale. Égouttez le gras.
Intégrez les autres ingrédients en brassant, couvrez et
cuisez à l'aide du capteur.
Casserole de bœuf haché et nouilles, 4 portions
5 onces de nouilles aux oeufs, cuites selon les indications
de l'emballage
1 lb de bœuf haché, cuit et égoutté
2 tasses de brocoli haché cuit ou 10 onces de pois verts
cuits
1 boîte (10-3/4 onces) de soupe au cheddar; sel et poivre
au goût
2 onces de poivrons rouges en conserve (optionnel)
Mélangez le tout dans un contenant de 2 pintes, couvrez et
cuisez à l'aide du capteur.
Hachis parmentier, 4 portions
1 lb de bœuf, agneau ou dinde, haché et égoutté
1 boîte de fêves vertes congelées ou une quantité égale de
fêves vertes cuites
1 boîte (10 onces) de crème de champignon non
reconstituée
2 tasses de pommes de terre instantanées préparées selon
les indications de l'emballage ou une quantité égale de
reste de purée de pommes de terre 4 c. à table de beurre
fondu
Sel et poivre au goût
Étendre les fêves dans un contenant d'une pinte et demie à
l'épreuve des micro-ondes. Mélangez la viande avec la
soupe, salez et poivrez. Étendre la préparation sur les fêves
et ajoutez la purée de pommes de terre sur le dessus.
Arrosez de beurre fondu et cuire à l'aide du capteur ou à
moyenne puissance pendant 8 minutes ou jusqu'à ce que la
température interne soit de 180 degrés.
Casserole de poulet au spaghetti, 2 portions
2 poitrines de poulet désossées et coupées en dés
1 lb de spaghetti ou autres nouilles, cuites selon les
directives de l'emballage
1 boîte (14 onces) de maïs en crème
1 boîte (14 onces) de tomates à l'étuvé
1 tasse de mozzarella haché
Mélangez les 5 premiers ingrédients dans un contenant
à l'épreuve des micro-ondes de 2 pintes et étendez le
fromage sur le dessus. Couvrez et cuisez avec ou sans
le capteur ou à moyenne puissance pendant 10 minutes
ou que la température interne soit de 180 degrés.
PLATS CUISINES
Macaroni au fromage, 4 portions
4 onces de nouilles de macaroni, cuites selon les
indications de l'emballage
1 tasse de fromage cheddar râpé
1 gros oeuf
2/3 tasses de lait
2 onces de poivrons rouges en conserve égouttés sel et
poivre au goût
Mélangez les oeufs, le lait et les autres ingrédients.
Placez le tout dans un contenant de 2 pintes, couvrez et
cuisez à l'aide du capteur.
POISSONS ET FRUITS DE MER
Saumon poché, 4 portions
1/2 tasse de vin blanc sec
1/2 tasse de jus de palourde en bouteille
4 brins d'aneth fraîche ou 1 c. à table de graines d'aneth
6 grains de poivre
4 petits steaks de saumon, 4 onces de tranches de citron
Dans un contenant peu profond de 2 pintes, placez les 5
premiers ingrédients, couvrez et cuisez pendant 3
minutes à lla puissance maximale. Ajoutez le saumon,
couvrez et cuisez avec ou sans le capteur ou à la
puissance maximale pendantt 3-4 minutes ou jusqu'à ce
que le saumon soit cuit ou que la température interne
soit de 160 degrés.
19
Page 44

Cuisinez En Utilisant Le Sensor Cuisinier
Crevettes à peler et à manger, 2 portions
1/2 tasse de vin blanc sec
2 gousses d'ail hachées
2 c. à table de jus de citron
4 c. à table de beurre
1 livre de grosses crevettes non décortiquées
Déposez le tout dans une assiette à l'épreuve des microondes de 2 pintes et disposez le mélange sur les côtés
de l'assiette. Recouvrez et cuisez à l'aide du capteur ou
au niveau maximum pendant environ 5 minutes, en
brassant une fois ou jusqu'à ce que les crevettes soient
roses. Décortiquez les crevettes et servez-les dans leur
jus.
Filets de poisson en roulades, 4 portions
4 filets de poisson (sole, morue, etc.) d'environ 4 onces
chacun
Poivre de citron
2 c. à table de jus de citron
Assaisonnez le poisson avec du poivre de citron,
enroulez-le et piquez-le avec un cure-ent. Déposez-le
dans une assiette à tarte en verre et arrosez de jus de
citron. Recouvrez de pellicule de plastique et cuisez à
l'aide du capteur ou à puissance moyenne pendant
environ 5 minutes, ou jusqu'à ce que le poisson soit
opaque et s'effrite facilement. Mélangez le jus de la
cuisson avec 1/4 tasse de vinaigrette italienne et versez
sur le poisson.
Filets de poisson au parmesan, 4 portions
4 filets de poisson (d'environ 4 onces chacun) repliés
1 tasse de sauce à spaghetti préparée
1/2 tasse de fromage parmesan râpé
Versez la sauce dans un plat à l'épreuve des microondes de 2 pintes et déposez le poisson par-dessus en
mettant la partie la plus épaisse sur le côté de l'assiette.
Saupoudrez de fromage. Recouvrez et cuisez à l'aide du
capteur.
Truite amandine, 2 portions
2 truites entières, d'environ 8 onces chacune
2 c. à table d'amandes effilées
2 c. à table de jus de citron
4 tranches de bacon cuites et émiettées
4 c. à table de persil haché
Disposez les poissons un à côté de l'autre, de la tête à la
queue, dans une assiette à tarte en verre de 10 pouces.
Ajoutez le jus de citron et le beurre, recouvrez de
pellicule plastique et cuisez à l'aide du capteur ou à
puissance moyenne pendant environ 6 minutes, ou
jusqu'à ce que le poisson soit cuit. Déposez sur une
assiette de service et versez les jus de cuisson sur le
poisson. Saupoudrez de noix, de bacon et de persil.
LES OEUFS
Oeufs cuits dur pour salade aux oeufs
Si vous avez déjà préparé une salade aux oeufs
traditionnelle, vous savez que c'est toute une tâche.
vous devez faire bouillir les oeufs, attendre qu'ils
refroidissent, puis enlever les coquilles avant de les
trancher pour les ajouter aux autres ingrédients. Lorsque
vous cuisez les oeufs en suivant la méthode décrite cidessous, le travail est beaucoup plus facile et la recette
goûte tout aussi bon.
Déposez 1/4 de tasse d'eau chaude et cassez
soigneusement les oeufs dans une tasse à mesurer de 4
tasses ou un plat de cuisson d'une pinte. Percez
doucement le jaune avec une fourchette. Recouverz de
pellicule plastique percée et cuisez à l'aide du capteur.
ALLOUEZ UN TEMPS DE REPOS D'UNE MINUTE OU
JUSQU'À CE QUE LES OEUFS SOIENT PRIS.
Omelette soufflée ou soufflés
Ceci est la façon la plus facile de cuire les oeufs au four
à micro-ondes. Même si cela ne ressemble pas à une
recette d'omelette conventionnelle, elle est délicieuse et
beaucoup plus facile à faire.
Fouettez les oeufs et le lait (1 c. à table par oeuf) jusqu'à
parfait mélange, dans une tasse à mesurer de 4 tasses
ou un plat de cuisson à l’épreuve des micro-ondes de 1
à 2 pintes. Recouvrez de pellicule plastique et cuisez à
l'aide du capteur. ALLOUEZ UN TEMPS DE REPOS
D'UNE MINUTE.
Oeufs brouillés
Cuisez de la même manière que pour l'omelette soufflée
mais brouillez les oeufs immédiatement après la
cuisson.
Oeuf et jambon pour une personne
Cette recette se fait avant même que votre rôti sorte du
grille-pain. De plus, vous n'avez pas de poêlon à laver.
Déposez une tranche de jambon bouilli dans une tasse à
café de 8 onces et cassez un gros oeuf dedans.
Recouvrez de pellicule plastique et cuisez à l'aide du
capteur. ALLOUEZ UN TEMPS DE REPOS D'UNE
MINUTE OU JUSQU'À CE QUE L'OEUF SOIT PRIS.
20
Page 45

Cuisinez En Utilisant Le Sensor Cuisinier
Oeufs faciles et saucisses pour deux
Cette recette est fantastique pour deux personnes
occupées qui doivent se précipiter au travail et qui n'ont
pas le temps de se faire à déjeûner.
4 saucisses à déjeûner cuites
4 oeufs fouettés
2 échalottes, finement tranchées
Salez et poivrez à votre goût.
Vaporisez de l'huile végétale dans une assiette à tarte de
9-10 po. et répartissez les saucisses sur les rebords de
l'assiette. Versez les oeufs dans le plat et recouvvrez de
pellicule plastique. Cuisez à l'aide du capteur. ALLOUEZ
UN TEMPS DE REPOS D'UNE MINUTE OU JUSQU'À
CE QUE L'OEUF SOIT PRIS.
LE POULET
Poulet au yogourt, 2 portions
2 grosses poitrines de poulet, découpées, sans la peau
3 c. à table de beurre ou margarine
3 c. à table de farine grillée
1 tasse de bouillon de poulet
1 tasse de yogourt
1/2 c. à thé de thym séché
Salez et poivrez à votre goût.
Mélangez le tout dans un plat à l'épreuve des microondes de 2 pintes, recouvrez et cuisez au four à microondes pendant 15 minutes à puissance maximale ou
jusqu'à ce que le poulet ait atteint 170 degrés.
REPAS SANS VIANDE
Plat de pommes de terre et oignons, 2 portions
2 pommes de terre au four de grosseur moyenne, en
cubes
1 gros oignon jaune en cubes
2 c. à table d'huile d'olive
Salez et poivrez à votre goût.
Disposez les ingrédients dans un plat à l'épreuve des
micro-ondes de 2 pintes. Recouvrez et cuisez au four à
micro-ondes pendant 10 minutes à puissance maximale
ou jusqu'à ce que les pommes de terre soient tendres.
Fêves et riz, fait 4 portions comme plat
d'accompagnement ou 2 comme met principal
1/2 tasse de riz à long grain
1-1/2 tasse de jus de tomate ou de V-8.
1 boîte (14 onces) de haricots égouttés
1 c. à table de flocons d'oignon séchés
Salez et poivrez à votre goût.
Déposez le tout dans un plat à l'épreuve des microondes de 2 pintes, recouvrez et cuisez au four à microondes à puissance maximale pendant 15 minutes ou
jusqu'à ce que les pommes de terre soient tendres.
Poitrine de poulet à la Florentine, 2 portions
1 paquet d’épinards congelés et essorés de 10 onces
2 poitrines de poulet désossées, sans peau et coupées
en deux
1/2 livre de champignons blancs, tranchés
1/2 tasse de fromage parmesan râpé
1/4 tassse de chapelure de pain
1 c. à table de jus de citron
Persil haché
Déposez les épinards au fond d'un plat ou d'une assiette
à tarte en verre peu profonds. Répartissez les poitrines
de poulet par-dessus les épinards et recouvrez de
champignont. Mélangez le fromage et la chapelure et
saupoudrez sur les champignons. Arrosez de jus de
citron et recouvrez de pellicule plastique. Cuisez au four
à micro-ondes pendant 10 minutes à puissance
maximale ou jusqu'à ce que le poulet ait atteint 170
degrés. Saupoudrez de persil et servez.
21
Page 46

Nettoyage
123
456
789
0
POWER
LEVEL
STOP
CLEAR
CONTROL
SET-UP
PROGRAM
SENSOR COOK
POPCORN
AUTO
COOK
AUTO
DEFROST
COOK
MORE
LESS
START
CLOCK TIMER
HOLD
WARM
EASY
COOK
REHEAT
Avant de nettoyer le four, débranchez le cordon d'alimentation de la prise de courant. Si cela vous est impossible, ouvrez la
porte du four afin d'empêcher qu'il ne parte accidentellement.
Part Description
À L'INTÉRIEUR DU FOUR
PLATEAU EN VERRE
PANNEAU DES COMMANDES
Servez-vous d'un linge humide pour enlever toutes les miettes et les
renversements de liquides. Il est important de garder l'endroit entre la porte
et la devanture de la cavité très propre afin que le sceau soit bien étanche.
À l'aide d'un linge mousseux, enlevez les éclaboussures de graisse, puis
rinsez et séchez.
N'utilisez pas de nettoyeurs abrasifs.
Vous pouvez laver le plateau en verre à la main ou dans le lave-vaisselle.
Essuyez le panneau des commandes à l'aide d'un linge humide et essuyezle immédiatement avec un linge sec.
La caractéristique du verrouillage de sécurité est également utile lors du
nettoyage du tableau de commande. Ce verrouillage empêche la
programmation accidentelle lorsqu’on essuie le tableau de commande.
PORTE
Si la vapeur s'accumule à l'intérieur ou autour de l'extérieur de la porte,
essuyez le panneau avec un linge doux. Ceci peut se produire lorsque le
four à micro-ondes fonctionne dans des conditions très humides; cela ne
signifie pas que le four est défectueux.
SURFACE EXTÉRIEURE DU FOUR
Nettoyez à l'aide d'un linge humide. Afin de prévenir tout dommage aux
composants internes du four, ne laissez pas d'eau s'inflitrer à travers les
fentes d'aération de l'appareil.
Après avoir nettoyé le four, assurez-vous que l'anneau de rotation et le plateau en verre soient bien installés.
Appuyez deux fois sur la touche d'arrêt/annulation "STOP/CLEAR" afin de réinitialiser tout réglage accidentel des
fonctions.
22
Page 47

Avant De Placer Un Appel De Service
Le guide ci-dessous vous donnera plusieurs solutions à différents problèmes;veuillez identifier la nature du problème
en le consultant. si, malgré tout, le four à micro-ondes ne fonctionne toujours pas bien, communiquez avec le centre
de service le plus près de chz vous.
Symptom Check
LE FOUR NE VEUT PAS
FONCTIONNER DU TOUT.
LE FOUR PRODUIT UN AMORÇAGE
D'ARC (OU DES ÉTINCELLES).
LA CUISSON N'EST PAS UNIFORME
OU LA DÉCONGÉLATION EST
MÉDIOCRE.
LES ALIMENTS SONT TROP CUITS.
• Le cordon électrique du four n'est pas branché.
- Branchez le cordon dans la prise de courant.
• La porte est ouverte. - Fermez la porte et essayez de nouveau.
• Vous avez réglé la mauvaise fonction.
- Vérifiez les indications du guide se rapportant à la fonction désirée.
• Vous vous servez d'ustensiles de cuisson qui ne doivent pas être utilisés dans
le four à micro-ondes.
- N'utilisez que des plats et ustensiles à l'épreuve des micro-ondes.
• Le four fonctionne lorsqu'il est vide.
- Ne faites pas fonctionner le four s'il est vide.
• Des déchets de nourriture sont restés dans le four ou la cavité intérieure du
four n'est pas propre.
- Nettoyez la cavité intérieure avec un linge mouillé.
• Vous utilisez des ustensiles de cuisson qui ne doivent pas être utilisés dans le
four à micro-ondes.
- N'utilisez que des plats et ustensiles à l'épreuve des micro-ondes.
• La durée de cuisson (ou de décongélation) et le niveau de puissance ne
conviennent pas.
- Choisissez la durée de cuisson et le niveau de puissance adéquats.
• Vous ne tournez ni ne brassez pas la nourriture.
- Tournez ou brassez les aliments.
• La durée de cuisson et le niveau de puissance ne conviennent pas.
- Choisissez la durée de cuisson et le niveau de puissance
adéquats lorsque vous cuisez les mêmes aliments.
- Utilisez la fonction "MOINS" (LESS), ce qui diminuera la durée
de la cuisson de 10 minutes à chaque pression de cette touche.
LES ALIMENTS NE SONT PAS ASSEZ
CUITS.
• Vous utilisez des ustensiles de cuisson qui ne doivent pas être utilisés dans le
four à micro-ondes.
- N'utilisez que des plats et ustensiles à l'épreuve des micro-ondes.
• Les aliments ne sont pas entièrement décongelés.
- Décongelez adéquatement la nourriture.
• Les ouvertures d'aération du four sont obstruées.
- Assurez-vous que les ouvertures d'aération du four ne soient pas bloquées.
• La durée de cuisson et le niveau de puissance ne conviennent pas.
- Choisissez la durée de cuisson et le niveau de puissance adéquats lorsque
vous cuisez les mêmes aliments.
- Utillisez la fonction "PLUS" (MORE), ce qui augmentera la durée de la
cuisson de 10 minutes à chaque pression de cette touche.
TOUTES CES CHOSES SONT NORMALES:
• Un bruit lourd et sourd pendant le fonctionnement du
four.
• De la vapeur qui fuit par les fentes autour de la porte.
• Des réflexions de lumière autour de la porte ou du
boîtier externe.
• La lumière du four qui s'atténue et le son de la
soufflerie du ventilateur qui change pendant le
fonctionnement à un niveau de puissance autre que le
maximurn (HIGH).
• Certaines interférences provenant de la radio ou du
téléviseur peuvent survenir pendant le fonctionnement.
Ceci est similaire aux interférences causées par les
petits appareils électriques tels que les mixettes,
séchoirs à cheveux, etc.
23
Page 48

Garantie
FOUR À MICRO-ONDES
GARANTIE DE UN AN SUR TOUTES LES PIÈCES
GARANTIE DE CINQ ANS SUR LE MAGNÉTRON
PREMIÈRE ANNÉE
Amana Appliances réparera ou remplacera, y compris la main d'oeuvre, toute pièce(f. à. b. Amana, Iowa) qui se révèle
défectueuse par suite d'un vice de matériau ou de fabrication, si elle est apportée chez un réparateur Amana autorisé.
DEUXIÈME ANNÉE JUSQU'À LA CINQUIÈME ANNÉE INCLUSIVEMENT
Amana Appliances réparera ou remplacera, y compris la main d'oeuvre, un magnétron(f. à. b. Amana, Iowa) qui se révèle
défectueux par suite d'un vice de matériau ou de fabrication, s'il est apporté chez un réparateur Amana autorisé.
RESPONSABILITÉS DU PROPRIÉTAIRE:
• Fournir une preuve d’achat. (Reçu de vente)
• Fournir un soin et un entretien normaux, y compris le
nettoyage tel qu’indiqué dans le manuel du
propriétaire.
• Remplacer les articles remplaçables par le
propriétaire, d’après les instructions données dans le
manuel du propriétaire.
• Rendre le produit accessible pour le service.
• Payer les coûts de service spécial plus élevés hors
des heures ouvrables normales du service.
• Payer les visites de service en relation à l’installation
du produit et à l’enseignement du fonctionnement au
client.
SITUATIONS NON COUVERTES
• Entretien et nettoyage normaux du produit.
• Filtres à air perdu ou brisé.
• Ampoule d’éclairage.
• Dommages survenus au cours de la livraison.
• Reconstruction générale ou remise à neuf qui n’est
pas une réparation légitime d’après la garantie.
• Pannes causées par:
- Service non autorisé.
- Accumulation de graisse ou autres matières par
suite du nettoyage ou de l’entretien inapproprié.
- Dommage accidentel ou intentionnel.
- Connexion à une source d’alimentation électrique
inappropriée.
- Actes naturels.
- Fonctionnement d’un four vide.
- Utilisation d’ustensiles, contenants ou
accessoires inappropriés qui causent
des dommages au produit.
LIMITATIONS DE LA GARANTIE:
• Comence à la date de l’achat original.
• S’applique au produit utilisé pour la préparation
NORMALE des aliments.
• S’applique au produit utilisé aux É.- U. ou au Canada
si le produit est fourni par une agence appropriée
homologuée, lorsque l’appareil est expédié de l’usine.
• Le service doit être exécuté par un service autorisé
Amana.
LA GARANTIE EST SANS VALEUR SI:
• La plaque signalétique est endommagée.
• Le produit a été modifié par l’utilisateur.
• Le produit n’est pas installé ou utilisé conformément
aux instructions du fabricant.
• Le produit est utilisé sur une base commerciale, loué
ou sur location-bail.
EN AUCUN CAS, AMANA APPLIANCES NE SERA
RESPONSABLE POUR LES DOMMAGES FORTUITS
OU CONSÉQUENTS*
* Cette garantie vous donne des droits légaux
spécifiques et vous pouvez avoir d’autres droits qui
varient d’un État ou d’une province à l’autre. Par
exemple, certains États ne permettent pas l’exclusion ou
la limitation de dommages fortuits ou conséquents de
sorte que cette exclusion peut ne pas s’appliquer dans
votre cas.
Pour des réponses aux questions qui concernent ce
qui précède, ou pour localiser un service autorisé Amana,
contacter:
Amana Appliances
2800 220th Trail
P.O. Box 8901
Amana, Iowa 52204-0001
USA
1-800-843-0304 aux É.-U
1-319-622-5511 hors dee É.-U
24
 Loading...