

Page 1

Top Freezer Refrigerator
Owner's Manual
Table of Contents
Important Safety Instructions......................................1
Installation ...............................................................2-4
Amana Appliances
403 West Fourth Street North
Newton, Iowa 50208
Ph# 1-800-843-0304 in U.S.A.
1-866-587-2002 in Canada
Internet: http://www.amana.com
Keep sales receipt as proof of original
purchase date.
Please read and keep this manual for future
reference.
TemperatureControls .................................................5
Looking Inside .........................................................6-7
Ice Service..................................................................8
Food StorageTips and Chart ................................9-10
Storing the Refrigerator ............................................11
Care and Cleaning ...................................................
Normal Operating Sounds .......................................13
BeforeYou Call .........................................................14
Warranty ...................................................................15
Manuel de I'utilisateur...............................................16
Manual del propietario ..............................................32
Have complete model and serial number
identification of your refrigerator.This is locat-
ed ona data plate inside the refrigerator com-
partment, on the upper left side. Record
these numbers below for easy access.
Model Number
Serial Number
Part No. 111537-1
Form C/09/03
In our continuing effort to improve the quality of
our appliances, it may be necessary to make
changes to the appliance without revising this guide.
Page 2

RECOGNIZE SAFETY
SYMBOLS, WORDS,
LABELS
To reduce risk of injury or death,
follow basic precautions, including
the following:
WarningandImportantSafetyInstruc-
tionsappearinginthismanualarenot
meantto coverall possibleconditions
andsituationsthatmayoccur.Common
sense,cautionandcaremustbeexer-
cisedwheninstalling,maintainingor
operatingthisappliance.
Alwayscontactyourdealer,distributor,
serviceagentor manufacturerabout
problemsorconditionsyoudonotunder-
stand.
When using your appliance, always
follow basic precautions.
Use the refrigerator only for its intend-
ed purpose.
Toprevent possibility of hazard due to
electrical shock, never plug the refrig-
erator into a receptacle which has not
been grounded adequately and in
accordance with the local and national
electrical codes. See A_.warning and
the grounding instructions that follow.
Unplug the refrigerator before clean-
ing or replacing a light bulb.
In case of power failure, minimize door
openings. If the power failure is of a
long duration, protectthe food byplac-
ing blocks of dry ice on top of the
packages or check with a local frozen
foods locker about temporary storage.
Frozenfoods which have thawed com-
pletely should not be refrozen.
DANGER . Immediate hazards
which WILL result in severe per,
sonal injury or death:
WARNING , Hazards or Unsafe
practices which COULD result in
severe personal injury or death:
CAUTION' Hazards or unsafe
practices which COULD result in
minor personal injury.
Any electrical service cord that
becomes frayed or damaged should
be immediately repaired or replaced.
Never unplug your appliance by
pulling on the power cord.
Yourrefrigerator should not beoperat-
ed in the presence of explosive fumes.
Children should not climb, hang or
standon the shelvesofthis refrigerator.
This appliance is designed to oper-
ateon a normal !15 volt, !5 ampi6 0
cycle line,There should be a sepa-
rate, grounded circuit serving this
appliance only. Do not use an
extension cord. Do not use any
device that will alter the electrical
performance of this appliance,
IMPORTANT: Child entrapment and
suffocation are not problems of the
past. Junked or abandoned refrigera-
tors are still dangerous - even if they
sit out for "just afew days."If you are
getting rid of your old refrigerator.
please follow the instructions below to
help prevent accidents.
Beforeyou throw away your old refrig-
erator or freezer:
Take off the doors.
Leave the shelves in
place so children
may not easily climb
inside.
This appliance is equipped with a three-
pronged grounding plug for your protec-
tion against possible electrical shockhaz-
ards. It must be plugged into a grounding
receptacle. Where a standard two-prong
wall receptacle is encountered, it is the
personal responsibility and obligation of
the customer to have it replaced with a
properly grounded three-prong wall
receptacle. Do not under any circum-
stances, cut or remove the third (ground)
prong from the power cord. Do not use an
adapter plug.
POWER SUPPLY CORD
WITH 3-PRONG
GROUNDING PLUG
GROUNDING TYPE
WALL RECEPTACLE
1
;0R;gTgR
Page 3

Yournew refrigeratorwas packed careful-
ly for shipment. Remove and discard
shelf packing clips (if used) located just
above each shelf where they hook onto
the frame. To remove plastic clips wiggle
the clips sideways and pull straight out.
IMPORTANT: Do not remove foam insu-
lationfrom the vents located in the ceiling
of the fresh food compartment.
Remove and retain levelers attached
to crate base.
Remove and discard crate base and
screws.
Using slip joint pliers, install levelers
all the way into holes located in the
front corners of the cabinet.
Some refrigerator models have
adjustable wheels and can be leveled
by removing the base grill* and adjust-
ing the wheels with a Y_"socket or
screwdriver.(See figure 2.)
TURN CLOCKWISE
TO RAISE CABINET
CORNER
TURN COUNTER-
CLOCKWISE TO
LOWER CABINET
Figure 2 CORNER
Allow for a free flow of air through the
front base grille.
Install the refrigerator where the room
temperature will not go below 55° E
With temperatures below 55° F, the
refrigerator will not run frequently
enough to maintain proper tempera-
ture in the freezer.
Allow a minimum X" clearance on the
sides, top and back for ease of instal-
lation. If refrigerator is placed with the
door hinge side against a wall, you
may want to allow additional space or
reversethe door swing(seepage 4)so
the door can be opened wider.
Use caution when installing the unit on
vinyl or hardwood floors so as not to
mark or otherwise damage the floor-
ing.A piece of plywood, a rug or other
material should be used to protect the
floor while positioning the unit.
Refrigerator should remain upright for
at least 30 minutes before plugging in.
Baser
Screw$_ _;_'_-
To enhance appearance and maintain
performance, the refrigerator should be
level. Depending on the model, the refrig-
erator can be leveled in one of two ways.
All refrigerator models have leveling
screws at the base of the cabinet
beneath each front corner. Levelers
can be adjusted byturning in or outas
required. If the floor is not level and it
is necessary to raise the rear of the
cabinet, use a piece of plywood or
other shim material. To lock the cabi-
net into place, turn down both leveling
screws.(See figure 1.)
*To remove the base grille, grasp both
ends and pull straight out. To replace,
align the spring clips with the round
openings in the cabinet and push each
end in until the grille locks into place.
For best results, after leveling the
cabinet, open and close the doors,
then relevel.
Figure 1
}
Page 4
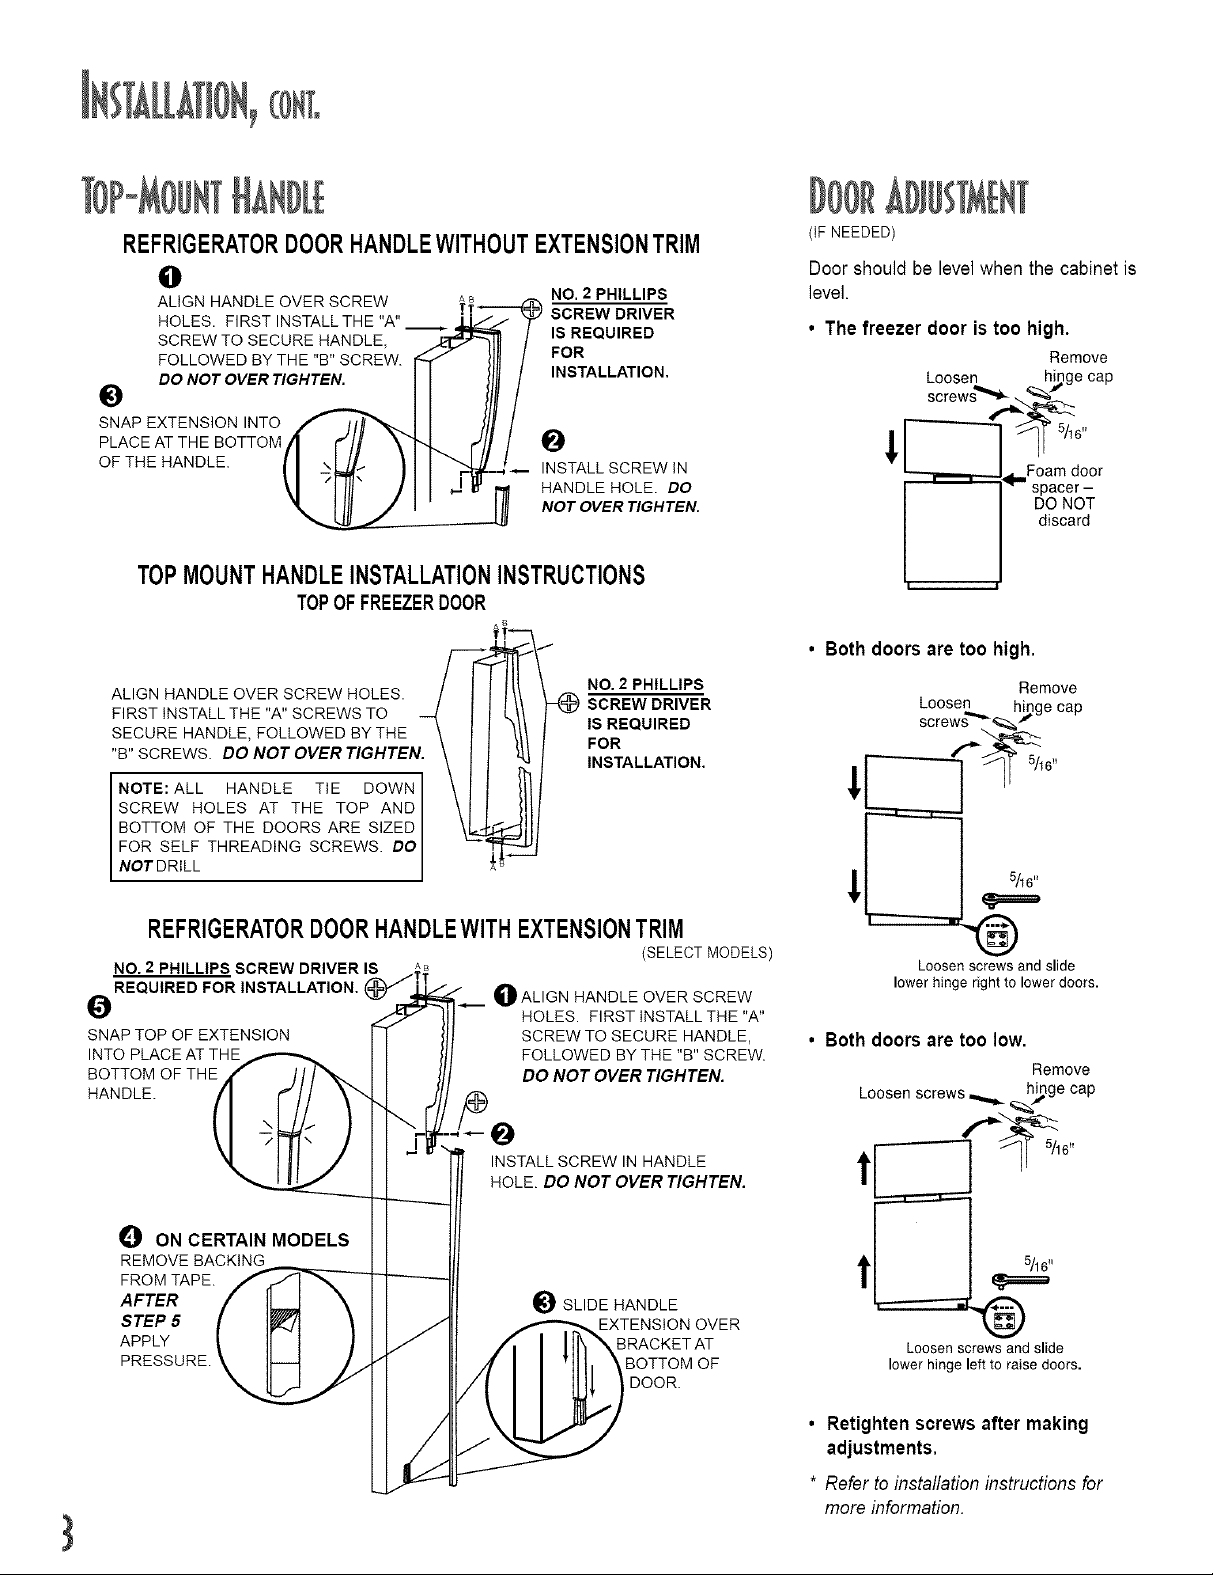
REFRIGERATORDOORHANDLEWITHOUTEXTENSIONTRIM
0
ALIGN HANDLE OVER SCREW
HOLES. FIRST INSTALLTHE "A"
SCREW TO SECURE HANDLE,
FOLLOWED BY THE "B" SCREW.
DO NOT OVER TIGHTEN.
NO. 2 PHILLIPS
SCREW DRIVER
IS REQUIRED
FOR
INSTALLATION.
O
SNAP EXTENSION INTO
PLACE AT THE BOTTOM
OF THE HANDLE.
INSTALL SCREW IN
HANDLE HOLE. DO
NOT OVER TIGHTEN.
(IF NEEDED)
Door should be level when the cabinet is
level.
• The freezer door is too high.
Remove
Loosen hinge cap
screws
I[ _; 5/16"
, , tl,.Foam door
-- spacer-
DO NOT
discard
TOPMOUNTHANDLEINSTALLATIONINSTRUCTIONS
TOPOFFREEZERDOOR
ALIGN HANDLE OVER SCREW HOLES. _"_r_ NO. 2 PHILLIPS
FIRST INSTALL THE "A" SCREWS TO , I1__( l I SCREW DRIVER
SECURE HANDLE, FOLLOWED BY THE \ I I IS REQUIRED
"B" SCREWS. DO NOT OVER TIGHTEN. \ I { FOR
SCREW HOLES AT THE TOP AND I \II
NOTE:ALLHANDLET,EDOWNI ill
BOTTOM OF THE DOORS ARE SIZED I \L_ ,1
FOR SELF THREAD NG SCREWS DO I "-_f
NOTDRILL I _A
INSTALLATION.
REFRIGERATORDOORHANDLEWITHEXTENSIONTRIM
NO. 2 PHILLIPS SCREW DRIVER IS
REQUIRED FOR INSTALLATION.
O
SNAP TOP OF EXTENSION
INTO PLACE AT THE ,,._"-'-_
BOTTOMOFTHEx" /ll'X',.
___ OALIGN HANDLE OVER SCREW
HOLES. FIRST INSTALL THE "A"
SCREW TO SECURE HANDLE,
FOLLOWED BY THE "B"SCREW.
DO NOT OVER TIGHTEN.
)o
HANDLE.
INSTALL SCREW IN HANDLE
HOLE. DO NOT OVER TIGHTEN.
(SELECT MODELS)
I
• Both doors are too high,
Remove
Loosen ,. hinge cap
screws
_ 4 6"
!
!
Loosen screws and slide
lower hinge right to lower doors.
• Both doors are too low.
Loosen screws_ h_ge cap
Remove
_) ON CERTAIN MODELS
REMOVE BACKING
FROM TAPE.
AFTER / II_
STEP 5 I IF/4
APPLY I II
PRESSURE. _
}
_ SLIDE HANDLE
TENSION OVER
RACKET AT
BOTTOM OF
DOOR.
t 5/16"
Loosen screws and slide
lower hinge left to raise doors.
• Retighten screws after making
adjustments.
* Refer to installation instructions for
more information.
Page 5

Tools Required: Phillips screwdriver,
_" socket and ratchet, putty knife or _,_"
end wrench.
1. Remove the hinge cap and set aside.
2. Remove screws and hinge with a %_"
socket wrench and set aside.
3. Carefully lift and removefreezer door.
10. Removethe plug buttons from tops of
freezer and refrigerator doors and
replace them on the opposite side.
11. Remove screw hole plugs from top of
cabinet and replace on the opposite
side.
12. Remove washers and stem from the
inside of the hinge plate and place
them on the outside of the hinge
plate.
(IF NEEDED)
5//16"
4. Remove screw and hinge arm from
top of the refrigerator door.
5. Carefully lift and remove refrigerator
door.
6. Remove grille cover and set aside.
7. Remove hinge plate from lower cor-
ner of refrigerator and secure iton the
opposite side.
8. Remove the plate from the underside
of the refrigerator door and secure it
on the opposite side.
9. Remove the plate from the underside
of the freezer door and secure it on
the opposite side.
13. Carefully replace refrigerator door on
the hinge plate in lower corner.
14. Slide the hinge arm into place and
secure with screw.
15. Carefully place freezer door on top of
hinge arm use foam door spacer to
set gap.*
16. Slide top hinge into place on freezer
door and secure screws with %0"
wrench.
17. Snap hinge cap securely in place.
18. Replace grille cover.
Remember to plug in your refrigerator
and reset the controls to the appropriate
setting(s).
Rest door on a non-scratching surface.
Too;
A. Remove left screw.
B. Open door and lift. Rest door on a
non-scratching surface.
J 4,
Remove hinge plate assembly. Rest door
on a non-scratching surface.
Do not discard the foam door spacer.
Doors may settle with use.
Page 6

Dependingonthemodel,thestyleofthecontrolswillvary.Thecontrolsarelocatedatthetopofthefreshfoodcompartment.
Allow 24 hours Initial setlng : 4
INITIAL SETTINGS
INITIAL SETTINGS
| Your refrigerator will run continu-
ously for several hours when you
first start it.This is normal.
| Let the refrigerator run at least8-12
hours before adding food.
Thefreezer control has settingsfrom 1 _ The fresh food control has settings
(warmest) to 7 (coldest). Initially set from 1 (warmest) to 7 (coldest).
this control on 4. Initially set this control on 4.
The refrigerator control has settings _ Thefreezer control has settingsfrom 1
from 1 (warmest) to 9 (coldest). (warmest) to 9 (coldest). Initially set
Initially set this control on 5. this control on 5.
III {llllI[;
24 hours after adding food, you may
decide that one or both compartments
should be colder or warmer. If so,
adjust the control(s) as indicated in the
table below.
Except when starting the refrigerator,
do not change either control more
than one number at a time.
At times, the front of the refrigerator cab-
inet may be warm to the touch. This is a
normal occurrence that helps prevent
moisturefrom condensing on the cabinet.
This condition will be more noticeable
when you first start the refrigerator, dur-
ing hot weather and after excessive or
lengthy door openings.
GIIII %111111
Allow 24 hours for temperatures to
stabilize before resetting.
Changing either control will have
some effect on the temperature of the
other compartment.
m
Fresh Food Compartment
tooWarm
Fresh Food Compartment
too Cold
Freezer too Warm
Freezer too Cold
Turn Refrigerator Off
(Dial Controls)
Turn Refrigerator Off
(Slide Controls)
NOTE: Turning the control to OFF or 0 stops cooling in BOTH compartments. It does
not shut off power to the refrigerator.
Adjust fresh food control to next higher setting.
Adjust fresh food control to next lower setting.
Adjust freezer control to next higher setting.
Adjust freezer control to next lower setting.
Set fresh food control to OFF or 0.
Slide the freezer control to OFE
f
Page 7

Your refrigerator is designed to defrost
automatically.
| During the automatic defrost cycle,
you may notice a red glow/reflec-
tion in the vents on the back wall of
the freezer compartment and you
may hear the sound of water
droplets coming into contact with
the defrost heater. This is normal !i
during the defrost cycle.
In order to ensure proper temperatures,
you need to permit air flow between the
refrigerator and freezer sections. As
shown in the illustration.
SHELVES
Adjustable 8helves: Cantilever shelves
may be availablewith your refrigerator.To
remove a shelf, slightly lift up the rear of
the shelf and pull straight out. Tolock the
shelf into another position, tilt up the front
edge of the shelf. Insert the hooks into
the desired frame openings and let the
shelf settle into place, making sure the
shelf is securely locked at the rear. On
certain models the outside edge of the
shelf rests on railsformed into the side of
the refrigerator cabinet.
shelf style may vary
DOORS
The Pick-Off Door Bins (select models)
are designed to accommodate gallon-
plus sized containers. They are
adjustable and easily removed. To
remove: Lift the bin up until it clears the
retainers on the door liner, then pull the
bin straight out. Reverse the above pro-
cedure to replace the bin.
Other models are constructed with
durable, Fixed Door 8helves with the
gallon-plus storage capacity.
Keepers (select models) fit in door
shelves or bins to secure bottles and
other containersin place when the door is
opened or closed. Keepers are adjusted
by sliding side to side.
DO NOT block any of these vents with
food packages. If the vents are blocked,
airflow will be prevented and temperature
and moisture problems may occur.
Full Width 8helves: Some models have
full width shelves that rest on linear sup-
port rails. To remove: pull the shelf for-
ward until it stops, lift the front and pull
the shelf straight out. Toreinstall, reverse
this procedure.
Never attempt to adjust a shelf that
is loaded with food,
6
Page 8
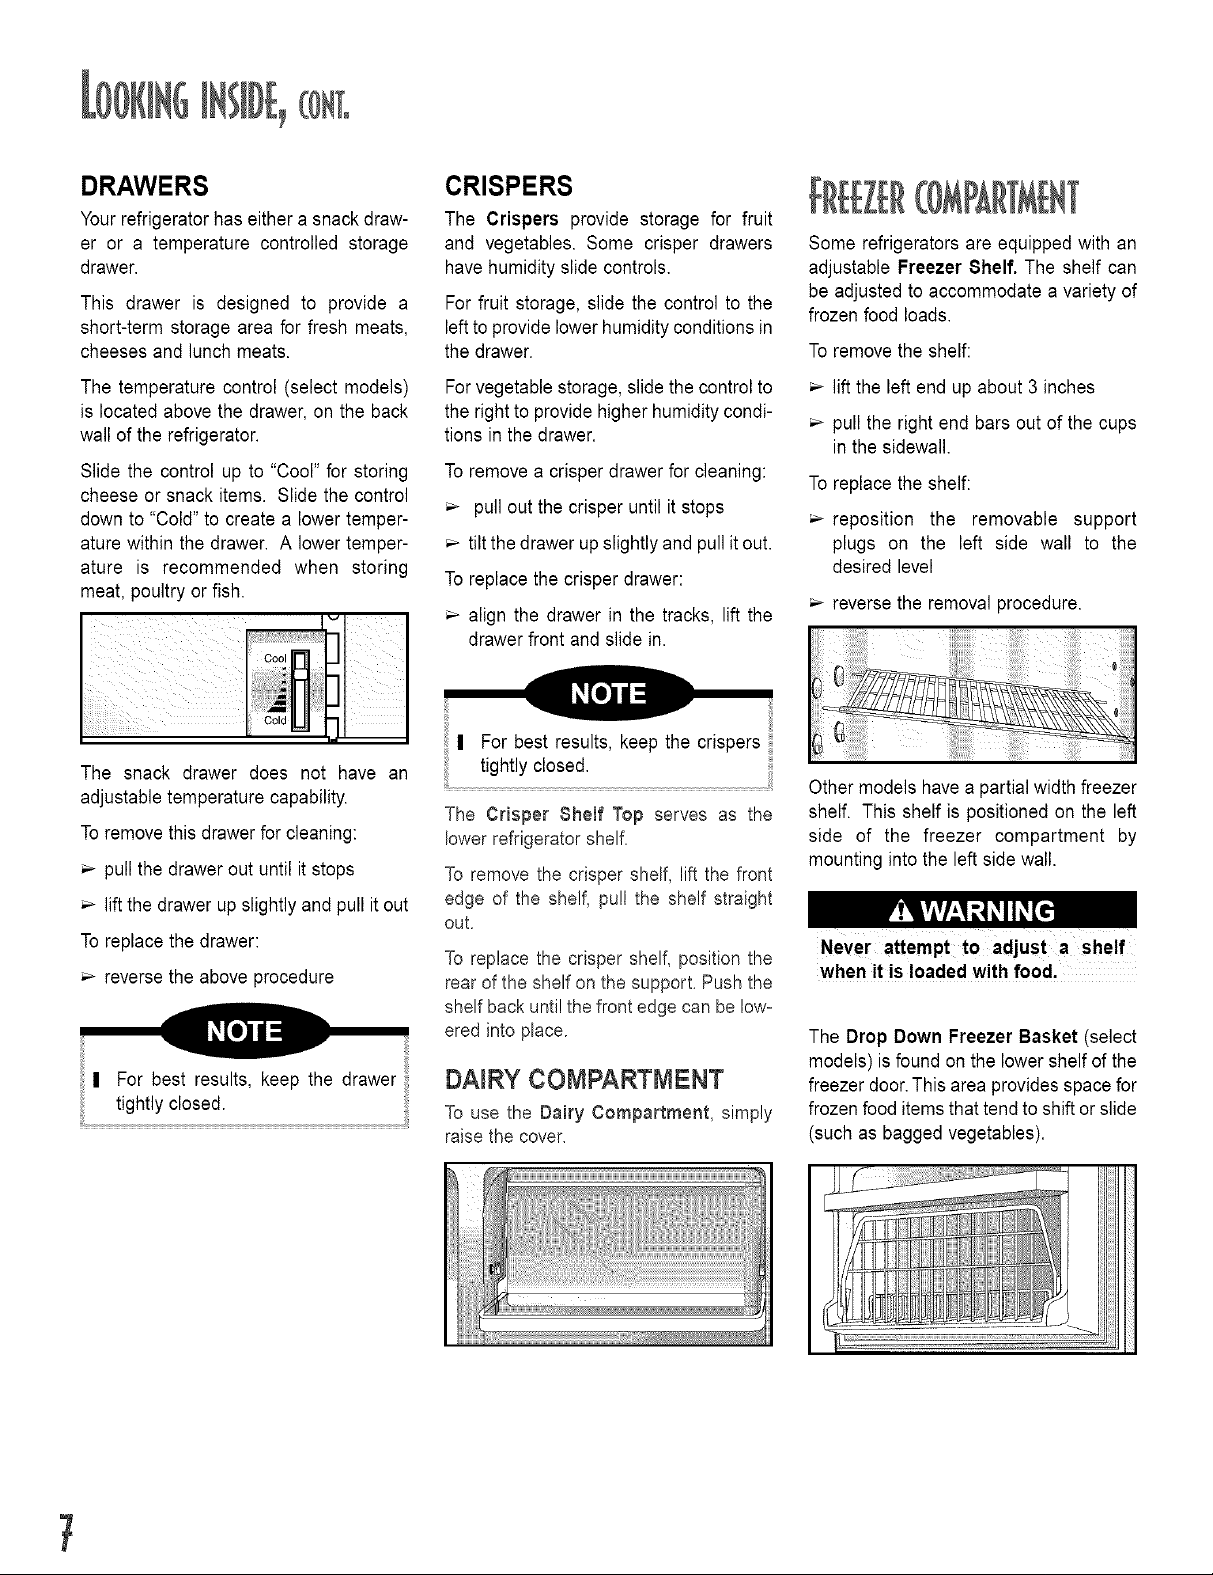
DRAWERS
Yourrefrigerator haseithera snack draw-
er or a temperature controlled storage
drawer.
This drawer is designed to provide a
short-term storage area for fresh meats,
cheeses and lunch meats.
CRISPERS
The Crispers provide storage for fruit
and vegetables. Some crisper drawers
have humidity slide controls.
For fruit storage, slide the control to the
left to provide lower humidity conditions in
the drawer.
Some refrigerators are equipped with an
adjustable Freezer Shelf. The shelf can
be adjusted to accommodate a variety of
frozen food loads.
Toremove the shelf:
The temperature control (select models)
is located above the drawer, on the back
wall of the refrigerator.
Slide the control up to "Cool" for storing
cheese or snack items. Slide the control
down to "Cold"to create a lower temper-
ature within the drawer. A lower temper-
ature is recommended when storing
meat, poultry or fish.
The snack drawer does not have an
adjustable temperature capability.
Toremove this drawer for cleaning:
pull the drawer out until it stops
lift the drawer up slightly and pull itout
Toreplace the drawer:
reverse the above procedure
| For best results, keep the drawer
tightly closed.
Forvegetable storage, slide the control to
the rightto providehigher humidity condi-
tions in the drawer.
Toremove a crisper drawer for cleaning:
pull out the crisper until it stops
tilt the drawer up slightly and pull it out.
Toreplace the crisper drawer:
align the drawer in the tracks, lift the
drawer front and slide in.
| For best results, keep the crispers
tightly closed.
The Crisper Shelf Top serves as the
lower refrigerator shelf.
To remove the crisper shelf, lift the front
edge of the shelf, pull the shelf straight
out.
To replace the crisper shelf, position the
rear of the shelf on the support. Push the
shelf back until the front edge can be low-
ered into place.
DAIRY COMPARTMENT
To use the Dairy Compartment, simply
raise the cover.
lift the left end up about 3 inches
pull the right end bars out of the cups
in the sidewall.
Toreplace the shelf:
reposition the removable support
plugs on the left side wall to the
desired level
reverse the removal procedure.
Other models have a partial width freezer
shelf. This shelf is positioned on the left
side of the freezer compartment by
mounting into the left side wall.
Never attempt to adjust a shelf
when it is loaded with food.
The Drop Down Freezer Basket (select
models) is found on the lower shelf of the
freezer door.This areaprovides spacefor
frozen food items that tendto shift or slide
(such as bagged vegetables).
7
Page 9

(UBETRAY;
Some models are equipped with icecube
trays.Torelease the icecubes from a tray,
hold the tray upside down over a bin and
twist both ends.
Some models are automatic ice maker
ready. The number of the appropriate ice
maker kit needed for installation into
these models appears on the data plate.
The kit contains installation instructions
and water connection instructions.
| Energy ratingguides that are post-
ed on the refrigerator at the time of
purchase do not include optional
ice maker energy usage.
Other models have a factory installed ice
maker. The water inlet tubing assembly
required to complete the water connec-
tion to the water valve is located in a bag
inside the refrigerator. Connect the ice
maker to the water supply as instructed in
the separate instructions furnished with
the refrigerator.
ADJUSTABLE ICE LEVEL
(SELECT MODELS)
Some ice makers are equipped with a
sensor arm to adjust the amount of ice in
your ice storage tray for times when less
ice isneeded.
After your refrigerator has been con-
nected to the water supply, move the
sensor arm into the down position.This
will start its operation.The ice maker
will fill with water when the freezer
reaches the proper temperature.
It may be 8 to 12 hours before the ice
maker furnishes any usable ice cubes.
The first one or two batches will prob-
ably contain undersized and irregular
cubes because of air in the supply
line.
The initial batch may also contain
impurities from the new water supply
piping. Therefore, all cubes from the
first two or three batches should be
discarded.
When the ice cubes are ejected it is
normal for several cubes to be joined
together at the ends. They can easily
be broken apart. The ice maker will
continue to make ice until the supply
of ice cubes raises the sensor arm,
shutting the ice maker off.
Certain sounds may accompany the
various cycles of the ice maker. The
motor may have a slight hum, the
cubes will rattle as they fall into an
empty storage pan and the water
valve may click or "buzz" occasionally.
If the ice is not used frequently,the ice
cubes will become cloudy,shrink, stick
together and taste stale.Emptythe ice
storage bin periodically and wash it in
lukewarmwater. Be sure to dry the bin
before replacing it.
To remove the ice bin, pull it forward,
away from the ice maker.Toavoid the
ice maker dumping ice while the bin is
removed, turn the ice maker off by lift-
ing the sensor arm.
To replace the ice bin, reverse the
above procedure. Turn the ice maker
on by lowering the wire lever arm.
Beverages and foods should not be
placed in the ice storage bin for quick
chilling. These items can block the
sensor arm, causing the ice maker to
malfunction.
Turnoff (arm up) the ice maker when
the water supply is to be shut off for
several hours.
FOR YOUR SAFETY
Do not place fingers or hands on the
automatic ice making mechanism while
the refrigerator is plugged in. This will
help protect you from possible injury. It
will also prevent interference with moving
parts of the ejector mechanism and the
heating element that releases the cubes.
Under certain rare circumstances, ice
cubes may be discolored, usually appear-
ing with a green-bluish hue.The cause of
this unusual discoloration can be a com-
bination of factors such as certain char-
acteristics of local waters, household
plumbing and the accumulation ofcopper
salts in an inactive water supply line
which feeds the ice maker.
Continued consumption of such discol-
ored ice cubes may be injurious to health.
If such discoloration is observed, discard
the ice cubes and contact your dealer to
purchase and install a water line filter.
To adjust the amount of ice produced:
Push the plastic sensor arm inward and
rotate the wire lever arm to the desired
capacity.
Wire Lever
Arm
100%
50% } 00 "* Sensor Arm
Page 10

IIII ;Illi£I
The fresh food compartment of a
refrigerator should be kept between
34° F and40° F with an optimum tem-
perature of 37° F.To check the tem-
perature, place an appliance ther-
mometer in a glass of water and place
in the center of the refrigerator. Check
after 24 hours. If the temperature is
above 40° F adjust the controls as
explained on page 5.
Avoid overcrowding the refrigerator
shelves.This reducesthe circulationof
air around the food and results in
uneven cooling.
FRUITS AND VEGETABLES
Storage in the crisper drawers traps
moisture to help preserve the fruit and
vegetable quality for longer time peri-
ods. (Refer to page 6).
Sort fruits and vegetables before stor-
age and use bruised or soft items first.
Discard those showing signs of decay.
Always wrap odorous foods such as
onions and cabbage so the odor does
not transfer to other foods.
While vegetables need a certain
amount of moisture to remain fresh,
too much moisture can shorten stor-
age times (especially leafy vegeta-
bles). Drain vegetables well before
storing.
MEAT AND CHEESE
Raw meat and poultry should be
wrapped securely so leakage and
contamination of other foods or sur-
faces does not occur.
Occasionally mold will develop on the
surface of hard cheeses (Swiss,
Cheddar, Parmesan). Cut off at least
an inch around and below the moldy
area. Keep your knife or instrument
out of the mold itself. The remaining
cheese will be safe and flavorfulto eat.
Do NOT try to save individual cheese
slices, soft cheese, cottage cheese,
cream, sour cream or yogurt when
mold appears.
DAIRY FOOD
Most dairy foods such as milk, yogurt,
sour cream and cottage cheese have
freshness dates on their cartons for
appropriate length of storage. Store
these foods in the original carton and
refrigerate immediately after purchas-
ing and after each use.
IOOl;TIIill
Thefreezer compartment of a refriger-
ator should be kept at approximately
0° F.To check the temperature, place
an appliance thermometer between
the frozen packages and check after
24 hours. If the temperature is above
0° E adjust the control as described on
page 5.
PACKAGING FOODS FOR
FREEZING
To minimize dehydration and quality
deterioration use aluminum foil, freez-
er wrap, freezer bags or airtight con-
tainers. Force as much air out of the
packages as possible and be sure
they are tightly sealed.Trappedair can
cause the food to dry out, change
color and develop an off-flavor (freez-
er burn).
Overwrap fresh meats and poultry
with suitable freezer wrap prior to
freezing.
Do not refreeze meat that has com-
pletely thawed.
LOADING THE FREEZER
Avoid adding too much warm food to
the freezer at one time.This overloads
the freezer, slows the rate of freezing
and can raise the temperature of
frozen foods.
Leavespace betweenthe packages so
cold air can circulate freely, allowing
food tofreeze as quickly as possible.
Avoid storing hard-to-freeze foods
such as ice cream and orangejuice on
the freezer door shelves. These foods
are best stored in the freezer interior
wherethe temperature varies less with
door openings.
Refer to the Food Storage Chart on
page 10 for approximate storage
times.
9
A freezer operates more efficiently
when it is at least two-thirds full.
Page 11

FOOD STORAGE CHART
(Storage times are approximate and may vary depending on type of packaging, storage temperature, and the quality of the food when
purchased.)
B7.'!I;i'd I'J.'{e]DllI_ _."]
Butter
Milk & cream
Cream cheese, cheese
spread & cheese food
Cottage cheese
Sour cream
Hard cheese (Swiss,
Cheddar & Parmesan)
1month
1week
1-2weeks
3-5 days
10days
1-2months
6-9 months
Not recommended
Not recommended
Not recommended
4-6 months
May become crumbly
Wrap tightiy or cover.
Check carton date. Close tightly. Don't return unused portions
to original container. Don't freeze cream unless whipped.
Wrap tightly.
Store in original carton. Check carton date.
Wrap tightly. Cut off any moid.
m-k-k-r
Eggs in the shell
Leftover yolks or whites
3 weeks
12-4 days
Not recommended
9-12 months
Refrigerate small ends down.
For each cup of yolks to be frozen, add ! tsp. sugar for use in
sweet, or 1 tsp. salt for non-sweet dishes.
miik'JiF
Apples
Bananas
Pears, plums, avocados
Berries, cherries, apricots
Grapes
Citrus fruits
Pineapples, cut
11 month
12-4 days
13-4 days
12-3 days
13-5 days
1-2 weeks
2-3 days
8 months (cooked)
6 months (wholelpeeled)
Not recommended
6 months
1 month (whole)
Not recommended
6-12 months
May also store unripe or hard apples at 60-70 ° E
Ripen at room temperature before refrigerating. Bananas and avo-
cados darken when refrigerated.
May also store at 60-70 ° E If refrigerated, store uncovered.
WiU not ripen after purchase. Use quickly.
Asparagus
Brussels sprouts, broccoli, cau-
iiflower, green peas, lima
beans, onions, peppers
Cabbage, celery
Carrots, parsnips, beets, &
turnips
Lettuce
".,(e]iJIIml,'i'i <£tid{-"111
Chicken and Turkey, whole
Chicken and Turkey, pieces
Fish
Bacon
Beef or lamb, ground
Beef or lamb, roast & steak
Ham, fuily cooked, whole
half
slices
Luncheon meat
Pork, roast
Pork, chops
Sausage, ground
Sausage, smoked
Veal
Frankfurters
i 1-2days
13-5 days
1-2 weeks
7-!0 days
17-!0 days
i 1-2 days
i 1-2 days
i 1-2 days
7 days
1-2 days
3-5 days
7 days
5 days
3 days
3-5 days
3-5 days
3-5 days
1-2 days
7 days
3-5 days
7 days
8-10 months
8-10 months
Not recommended
8-10 months
Not recommended
12 months
9 months
2-6 months
1 month
3-4 months
6-9 months
1-2 months
1-2 months
1-2 months
1-2 months
4-6 months
4 months
1-2 months
1-2 months
4-6 months
1 month
Do not wash before refrigerating. Store in crisper.
Wrap odorous foods. Leave peas in pods.
Wrap odorous foods & refrigerate in crisper.
Remove tops. Wrap odorous foods and refrigerate in the crisper.
Keep in original packaging for refrigeration. When freezing longer
than 2 weeks, overwrap with freezer wrap.
Fresh meats can be kept in original packaging for refrigeration.
When freezing ionger than 2 weeks, overwrap with freezer wrap.
Unopened, vacuum-packed luncheon meat may be kept up to 2
weeks in the Snack Drawer.
Processed meats should be tightly wrapped and stored in the
Snack Drawer.
Sources: United States Department of Agriculture; Food Marketing Institute; Cooperative Extension Service, Iowa State University
Page 12

3. Disconnect the refrigerator from the
electrical outlet.
If you will be gone for a month or less,
leavethe controls at the usual settings.
During longer absences:
1. Remove all food.
2. Shut off the ice maker (if installed) and
the valve where you tapped into the
water line to supply the refrigerator.
Referto thechart onthe followingpage for
specific refrigeratorcleaningguidelines.
Disconnect the power cord before
cleaning,
CLEANING UNDERTHE
REFRIGERATOR
Yourrefrigeratorcanbe rolledoutforclean-
ingthefloor underneath.Raisethe leveling
screws if engaged (see page 2). Pull the
refrigeratorstraightout fromthe wall.
4. Clean and dry the refrigerator
thoroughly.
5. Leave the doors open to prevent
odors.
REPLACING A
LIGHT BULB
Disconnect the power cord before
replacing light bulb(s),Wear gloves
as protection against broken glass.
Always use a standard 40 or 60 watt
appliance bulb.
Refrigerator
The light bulb(s) is/are located under the
top of the refrigerator compartment.
Toreplace:
When moving, follow steps 1-4 under
Vacations. In addition, remove and care-
fully pack any items that are easily
removable. Ship the refrigerator in an
upright position with the doors taped
shut.
Freezer
Some models are equipped with a freez-
er light. This light is located on the back
wall ofthe freezer compartment, near the
upper right corner.
Toremove the bulb cover:
Grasp the top and bottom of the bulb
cover.Press in the areas ofthe attach-
ment tabs, applying enough pressure
to unhook the tabs. At the same time,
pivot the cover down and remove.
Unscrew the light bulb and replace.
Replace the bulb cover by pivoting it
back into place and snapping the tabs
into the appropriate slots.
Unscrew the light bulb and replace.
Page 13

Disconnect the power cord before cleaning. Do not touch refrigerated surfaces with wet or damp hands, Damp objects
stick to co!d metal surfaces. Before cleaning the freezer, allow it to warm up. Allow glass shelves to warm up before
immersing in warm water.
Refrigerator Cleaning Chart
Base grille Mild detergent and warm
water
Mild liquid sprays
Vacuum cleaner
attachment
Condenser No need for cleaning unless environment is particularly greasy,dusty
Door handles
Painted metal surfaces:
Cabinet, doors
Door gasket
Glass shelves
Interior and door liner
Mild detergent and warm
water
Mild liquid sprays
Mild detergent and warm
water
Mild liquid sprays
Baking soda and warm
water
Mild detergent and warm
water
Mild detergent and warm
water
Glass cleaner
Mild liquid sprays
Mild detergent and warm
water
Baking soda and warm
water
Remove the base grille by grasping the ends and pulling straight out.
Toreplace, align the clips with the round openings in the cabinet and
push each end in until the base grille snaps into place.
or there is significant pet traffic in the home.
Dry with a clean, soft cloth.
Do notwipe the refrigerator with a soiled dishwashing cloth or wet
towel.These may leave residue that can scratch and weaken the
paint. Do not use scouring pads, powdered cleansers, bleach or
cleaners containing bleach. These products can scratch and erode
the paint finish.
Do notwax plastic or vinyl parts.
Use 1-2 tablespoons baking soda per quart of water. Be sure to
wring out excess water from sponge or cloth when cleaning
around controls, lights,or electrical parts.
Allow the glass to warm up to room temperature before
immersing in warm water. Never use hot water.
See above for baking soda solution.
DO NOT use abrasive cleaners, concentrated detergents, bleach-
es, cleaning waxes, solvents or polish cleaners to clean the refrig-
erator interior.
Drawers, bins,
egg cradle, etc.
Mild detergent and warm
water
Dry thoroughly. DO NOT wash in automatic dishwasher.
Page 14

Improvementsinrefrigerationdesignmayproducesoundsinyournewrefrigeratorthataredifferentorwerenotpresentinanolder
model.Theseimprovementsweremadetocreatearefrigeratorthatisbetteratpreservingfood,ismoreenergyefficient,andisquieter
overall.Becausenewunitsrunquieter,soundsmaybedetectedthatwerepresentinolderunits,butweremaskedbyhighersound
levels.Manyofthesesoundsarenormal.Pleasenotethatthesurfacesadjacenttoa refrigerator,suchashardwalls,floorsand
cabinetrymaymakethesesoundsseemevenlouder.Thefollowingaresomeofthenormalsoundsthatmaybenoticedinanewrefrig-
erator.
ICE MAKER: (if equipped) The ice maker will
occasionally generate a rattling sound when the
ice cubes are ready to drop down into the ice
bin. Also, the motor that ejects the ice from its
tray prior to dropping the ice may also be
detectable. These are normal sounds necessary
DEFROST TIMER: Frost-free
refrigerators have a defrost timer
that will generate a clicking
sound when it cycles the unit into
and out of defrost cyc e.
for making ice.
FREEZER COMPARTMENT
CONTRACTION AND EX-
PANSION: A popping sound
may occur in the freezer when
the unit starts up due to
contraction or expansion of
the materials in the freezer
area.
COMPRESSOR: In order for a new
refrigerator to run more efficiently, the
refrigeration system may run longer to
keep food at the desired temperatures
for freshness. That new, high
efficiency compressor may run longer
and generate sounds such as a higher
pitched hum or pulsation.
REFRIGERANT FLOW: The flow of the I
refrigerant in your refrigerator may cause a I
gurgling or rattling sound when the unit is
running or just after the unit cycles off. The
refr gerant s st f ow ng n the tub ng.
AIRFLOW SOUNDS: Both the freezer evaporator
fan and the condenser fan at the bottom of the
cabinet will create airflow sounds. The evaporator
fan is circulating the cold air throughout the
refrigerator and freezer compartments. The
condenser fan is removing the heat generated
when the unit is cooled.
WATER VALVE (if equipped): A buzzing
sound may be detected in the back of the
unit when the ice dispenser calls for the
water valve to open to fill the ice maker
tray. Following the ejection of the ice,
there may be some water dripping
sounds when the trays are being filled.
I
CABINET LEVELING: An unlevel I
cabinet may cause rattling or vibrating I
noises. This can be fixed by adjusting
the whee s or eve ers proper y.
Page 15

Review this chart of troubleshooting tips first...you may not need to call for service at all.
PROBLEM
Won't run
Runs too long,
too frequently
rl
.'1
II
,'t.
Light not working
rl
Visible glow in
freezer vents
Warm air from
cabinet bottom
Cabinet vibrates
Odor in cabinet
Noise, sounds and
2
vibrations
I
Freezer, refrigerator
too warm (soft ice cream)
nl
,3
Freezer, refrigerator
too cold (food freezing)
Automatic icemaker
not working
Ice cubes have
odor/taste
Ice cubes stickingin tray
Ice cubes evaporating
Moisture on cabinet
surface between doors
Moisture on inside cabinet
walls or in crisper
I
Foods dry out
Excessive moisture in
crisper
POSSIBLE CAUSES
Power cord not plugged in.
No power to outlet.
Freezer control set to OFF position.
Refrigerator is in automatic defrost.
Room temperature iess than 55° E
Today's refrigerators start and stop more
often to maintain even temperatures.
Normal at startup for new or recently
installed units.
Prolonged or frequent door openings.
Door not sealing.
Base grille blocked.
Bulb burned out.
No power to unit.
Appearance of a red glow or reflection is
normal during the defrost cycle.
This is normal air flow for condenser
circulation.
Cabinet not ievei. Weak floor.
Odor producing foods not covered.
Normal noise.
Cabinet not level.
Control set too warm.
Prolonged door openings.
Room temperature Iess than 55° E
Products with high sugar content may
not harden completely when frozen.
Controi set too cold.
Sensor arm in up position. Adjust sensor arm down to ON position.
Cabinet not level.
Water supply not connected or restricted.
Freezer too warm.
Old cubes.
Bad water quality.
Food transmits odor/taste to ice.
Residue from minerals in the water.
Limited use of ice.
Not unusual during periods of high humidity.
Hot humid weather. Normal.
Frequent or prolonged door openings.
Door not closed properly.
Food not wrapped properly.
Crisper not tightly ciosed.
Temperature controls set too cold.
Packages not wrapped or sealed properly.
Food not wrapped properly.
Hot, humid weather.
WHAT TO DO
Push plug into outlet.
Replace fuse, reset circuit breaker.
Set freezer control (see page 5).
Wait 25 minutes for defrost cycle to end.
Relocate unit to proper climate (see installation on page 2).
Wait 24 hours to completely cool down
(see temperature controls on page 5).
This is normal. Minimize door openings.
Check to see if something is preventing door from closing.
Unblock to allow warm air to exit unit.
Unplug refrigerator and change bulb (see page 11).
Check to see if power cord is completely plugged in.
Level cabinet (see page 2.)
Cover or wrap odorous foods tightly. Clean cabinet.
See Normal Operating Sounds page 13.
Level cabinet (see page 2).
Adjust temperature control (see page 5).
Minimize door openings.
Unit wilI not run often enough to maintain proper temperatures.
Adjust temperature controi (see page 5).
Level unit (see page 2).
Connect water supply, or clear obstructions.
Adjust freezer temperature control (see page 5).
Discard; ice cubes may absorb odors which affect taste.
Contact local water treatment company.
Wrap foods tightly.
Wipe trays with vinegar-soaked cloth until clean.
Dump old ice cubes.
Minimize door openings.
Check to see if something is preventing door from closing.
Wrap or cover aiI foods tightly.
Close crisper all the way.
Adjust temperature controls (see page 5).
Wrap or cover aiI foods tightly.
Wrap or cover aiI foods tightly.
Minimize door openings.
Page 16

i;NOT(OWR #BY WARRANTJ ;
[¥
Full One YearWarranty
Limited FiveYearWarranty on Sealed
System Components and Food
Compartment Liner
FirstYear
Amana Appliances will repair or replace.
including related labor and travel, any part
(f,o.b.Amana Iowa) which proves defectiveas
to workmansh p or materials.
Second through Fifth Year
Amana Appliances will repair or replace.
including related labor and travel, any sealed
system component (compressor. condenser.
evaporator, and interconnecting tubing) and
repair any food compartment liner (exclusiveof
door liner) which is defective due to workman-
ship or materials.
IN NO EVENT SHALL AMANA BE LIABLE
FOR INCIDENTAL OR CONSEQUENTIAL
DAMAGES INCLUDING FOOD LOSS.
Replacement of household fuses, resetting of circuit breakers, or correc-
tion to household wiring or plumbing.
Normal product maintenance and cleaning, including light bulbs.
Products with original serial numbers removed, altered, or not readily
determined.
Products purchased for commercial, industrial, rental, or leased use.
Products located outside of the United States or Canada.
Premium service charges, if the servicer is requested to perform service
in addition to normal service or outside normal service hours or area.
Adjustments after the first year.
Repairs resulting from the following:
• Improper installation, exhaust system, or maintenance.
• Any modification, alteration, or adjustment not authorized by Amana.
• Accident, misuse, abuse, fire, flood, or acts of nature.
• Connectionsto improperelectricalcurrent,voltage supply, or gas supply.
• Use of improper pans, containers, or accessories that cause damage
to the product.
This warranty gives you specific legal rights,
and you may haveothers which vary from state
to state.For example,some statesdo notallow
the exclusion or limitation of incidental or con-
sequential damages, so this exclusion may not
apply to you.
Service must be performed by an authorized Amana service representative.
Product must be reasonably accessible for service.Toschedule service,con-
tact the Amana dealer where you purchased your appliance or contact:
Maytag Services sM
1-800-628-5782 inside U.S.A.
For more information,
Maytag Appliances
Attn: Amana CAIR_Center
403 West Fourth Street North
Newton, Iowa 50208
1-800-843-0304 in U.S.A.
1-866-587-2002 in Canada
When contacting us please include the following information:
Your name, address, and telephone number.
Model number and serial number of your appliance.
The nameand address of your dealer and the date of purchase.
A clear description of the problem.
Proof of purchase (sales receipt).
Page 17

R6frig6rateur sup6rieur de cong61ateur
Manuel de I'utilisateur
Table des Matieres
Instructionsde SecuriteImportantes...................................17
Amana Appliances
403 West Fourth Street North
Newton, Iowa 50208
Telephone : 1-800-843-0304 en dehors
des Etats-Unis
1-866-587-2002 au Canada
Internet: http://www.amana.com
Conserverun documentattestantde la date de
I'achatinitial.Conserverlafacture.Unepreuvede
Iadatede I'achatinitialest necessairepour Fob-
tentiondu servicesousgarantie.
Conserver ces instructions pour consultation
ult@ieure.
Installation......................................................................!8-20
ReglagesdeslesTemp@atures..........................................2!
InterieurduRefrigerateur...............................................22-23
Productionde Glace............................................................24
ConseilsPourIa ConservationdesAliments.................25-26
Remisagedu Refrigerateur.................................................27
Entretienet Nettoyage....................................................27-28
BruitsNormaux....................................................................29
Avantde ContacterunDepanneur......................................30
Garantie...............................................................................31
Manualdel Propietario........................................................32
II estutiled'avoirtoujourssousla mainle num@o
demodeleetIenumerodes@iedeI'appareil.Ces
numerossontinscritssur uneplaquesignaletique
dans Ie compartiment de refrig@ation,c6te
gauche/enhaut.Notercesnum@osci-dessous.
Numero de mode]e
Numerodesede
Danslecadredenoseffortsconstantsd'ameliorationdela
qualitedenosproduits,certainesmodificationspeuvent_tre
introduitessur les appareilssansqueceladonnelieu
unerevisionde ceguide.
Page 18

RECONNAISSEZ LES
I TIQUETTES, PHRASES
OU SYMBOLES sun LA
SI CURITI
Pourevitertout risquede blessureou
dedeces,prendrelesprecautionssuiv-
antes:
Lesinstructionsdes4curiteimportantesetles
avertissementsparaissantdansceguidene
sontpasdestinesacouvrirtouteslessitua-
tionsetconditionseventuellesquipeuventse
presenter.IIfautfairepreuvedebonsensetde
prudenceIorsderinstallation,deI'entretienou
derutilisationderappareil.
Preneztoujourscontactavecvotrerevendeur,
distributeur,agentdeserviceoufabricant,au
sujetdeproblemesouconditionsquevousne
comprenezpas.
8uivretoujourslesprecautionsde base
Iors de I utilisationdecetappareil.
UtiliserIe r4frigerateuruniquementpour
sonapplicationprevue.
Poureviterunrisquedechocelectrique,ne
jamais brancherle refrigerateursur une
prisedecourantqui n'apas4teadequate-
mentrelieea laterre,conformementaux
prescriptionsdes codesnationalet local
des installationselectriques.Voir _ ci-
dessousravertissementetlesinstructions
deliaisonalaterre.
Debrancherlerefrigerateuravantdelenet-
toyeroude remptaceruneampoule.
En casde panned'electricit&eviterd'ou-
vrirlesportes.Sirinterruptionderalimen-
tation se prolonge,placerdes blocs de
glacecarboniquepar-dessuslespaquets
pourprotegerlesalimentsplusIongtemps,
ou contacterun entrep6tfrigorifiquelocal
DANGER' indiqueun dangerimmediat
qui RESULTERAen une blessureou un
deces.
AVERTI88EMENT'Indiqueundanger0U
une manceuvre non securitairequi
RISQUE de causer uneblessure ou un
deces.
ATTENTION, Indiqueun danger0uune
manceuwenons6curitai[equiRISQUEde
causer une blessuremineure.
pourorganiserunstockagetemporaire.Ne
pasrecongelerdesalimentssurgelesqui
ontete completementd4congeles.
Reparerou remplacertout cordon d'ali-
mentationelectriquequia eteendommage
ou d4terior&Nejamaistirersurle cordon
pourdebrancherrappareil.
NepasfairefonctionnerIerefrigerateuren
presencedefumeeexplosive.
Nejamais laisserun enfantse tenir sur,
grimper sur, ou se suspendre a une
clayettedece refrigerateur.
Cet apparei! est congu pour _tre
alimente_ partirdu reseaunormalde
115Y/60Hz,! 5A.L'appareildevrait6tre
aliment6paruncircuitindependant:Ne
pas ut!!iserun €_ble de ral!onge.Ne
jamaisutiliserun d!spositifSusceptible
de degraderlaperformanceelectrique
de ¢et appareil,
IMPORTANT: Les risques d'emprison-
nementetde suffocationchezles enfants
ne sont pas ph6nomenesdu pass& Les
vieux refrig4rateurs abandonnes sont
encoredangereux,m_)mes'ils sontentre-
pos_,spour{{quelquesjours seulement>>.
Poursed6faired'unvieuxrefrigerateur,lire
les_nstructionsci-dessousafind'eviterles
accidents
Avantde jeter un vieux refrigerateurou
congelateur:
Demonterles portes.
Lasser lestablettesen
place pour que les
enfantsnepu_ssentpas
facilemententrera rin-
terieur.
Cetappareilestdoted'unefichede branche-
menta 3 broches(pourliaisona la terre),ce
quiassureuneprotectionadequatecontreles
risquesdechocselectriques.Ondolt brancher
I'appareiluniquementsuruneprisedecourant
reIiee a la terre. Si la prise de courant
disponiblene comporteque deux alveoles,
c'estau clientqu'incombentla responsabilite
etrobligationpersonnelledelafaireremplacer
par une prisede couranta 3 alveotescon-
venablementreliee a la terre. On ne dolt
jamais,quellesque soientles circonstances,
couperouarracherlatroisiemebroche(liaison
la terre) de la fiche de branchement.Ne
jamaisutiliserunefiched'adaptation.
CORDOND=ALIMENTATION
AVEC FICHEDE BRANCHEMENT
_,3 BROCHES
PRISEDE C(_URANT
MURALE RELIEE
,_LATERRE
(6;IH;TRg(HOH;POgR
Page 19

Ce refrigerateura fait I'objetd'un emballage
soigne.Enleveretjeter lesagrafeseventueIle-
ment utilisees pour I'immobilisation des
ciayettes (juste au-dessus de chaque
clayette-- accrochagesur le ch&ssis).Pour
enleverlesagrafesde plastique,faire bouger
lesagrafesIateralementettirerenlignedroite.
IMPORTANT: Ne pas enleverI'isolanten
moussedeseventssituesdansle ptafonddu
compartimentd'alimentsfrais.
Veillerace que I'air puissecirculerlibre-
menta traversla grilledeplintheavant.
Installerlerefrigerateura un endroito_ la
temperatureambiantenebaisserapasau-
dessousde 13 °C (55 °F). Lorsquela
temperatureambiante est inferieure
13°C(55°F),lerefrigerateurnefonctionne
pasassezfrequemmentpour le maintien
de [a temperatureadequatedansle com-
partimentdecongelation.
PrevoirunespaceIibred'aumoins1,5cm
(Y_po) sur les c6tes,au sommetet
I'arrierepourfaciliterI'installation.Sile c6te
comportantles charnieresde porte est
contreunmur,i[est desirablequ'ily aitun
espacelibreplusimportantdecec6tepour
pouvoirouvrir completementles portesou
inverserleursensd'ouverture(page20).
Dartslecasd'unplancherenvinyleou en
bois,travaillerprudemmentIorsde I'instal-
Iationpoureviterde laisserdes marques
sur le plancher ou de I'endommager.
Utiliseruneplaquede contreplaqueou un
morceaude tapisou d'un autremateriau
pourprotegerle solIorsdu positionnement
deI'appareil.
Retireret conserverlesdispositifsde mise
niveaufixesa labasededemenagement.
Retireretjeterla basede demenagement
etlesvis.
A I'aide d'une pince a joint coulissant,
installerles dispositifsde mise a niveau
dansles troussituesaux anglesavantde
Iacaisse.
Dispositifs-_
de raise fl _ _F{%_
nlveau _:#Su_/_t.
demenagemem _._,,_,,_ "'''_''-
Vis
PouroptimiserI'esthetiqueet la performance
du refrigerateur,il faut le placer d'aplomb.
Selonle modele,le refrigerateurpeut6tre mis
d'aptombdedeuxfa£ons.
Touslesmodelesde refrigerateurontdes
visde miseaniveauala basedeIacaisse,
souschacundes coins avant.Ces pieds
peuvent6treajustesen les tournantdarts
unsensouI'autre,aubesoin.Sileplancher
n'estpasde niveauetqu'il soitnecessaire
de releverI'arrierede la caisse,utiliserun
morceaudecontreplaqueou autremateri-
audecalage.Pourimmobiliserlacaisseen
place,fairedescendreIesdeuxvisdemise
niveau(voirfig. !).
Les modeles de refrigerateurqui com-
portent des roulettes reglables peuvent
6tre mis a niveauen retirantla grillede
plinthe*et enreglantces rouiettesa I'aide
d'untournevisou d'unedouilledeY_pouce
(voirfig.2).
ROTATIONHORAIRE
POURSOULEVERLE
COINDE LACAISSE
DE LACAISSE
Figure2
* Pour retirerla grillede plinthe,saisir Ies
deuxextremitesettirer enlignedroite.Pour
la reinstaller,alignerles attachesavec les
ouverturesrondesdansla caisseet pous-
ser sur chaqueextremitepour I'embofte-
ment.
Pourde meilleursresultats,apresavoirmis
Ia caissea niveau,ouvrir et fermer Ies
portesetremettrea niveau.
Lerefrigerateurdoltresterverticalpendant
aumoins30 minutesavantd'6trebranche.
Figure1
Page 20

POIGNEEDEPORTEDEREFRIGERATEURSANSGARNITURE
(AUBESOIN)
0
ALIGNER LA POIGN E SUR LES TOURNEVIS PHILLIPS
TROUS DE VIS INSTALLER N° 2 NECESSAIRE
D ABORD LA VIS "A POUR POUR L'INSTALLATION,
FIXER LA POIGN E, PUIS LAVIS
B " NE PAS TROP LES SERRER. Desserrer couvre-charniere
O
ENCLENCHER -- 4 _._-=-7_
LEXTRMIT CACHE- e ! :_l _/16po
VIS EN PLACE. LA INSTALLER LAVIS DANS
PARTIE INF RIEURE
DE LA POIGN E.
LE TROU DE LA POIGN E
NE PAS TROP LA SERRER.
La portedoit_tredeniveauIorsquela caisse
I'est.
• La porteducongelateuresttrophaute.
Retirer le
les vis'_'_. ,._p,.,_,,_....
, , _ Ne pas jeter la
cale d'espacement
en mousse de la porte.
INSTRUCTIONSD'INSTALLATIONDELAPOIGNI_E
SEMONTANTSURLEDESSUSDELAPORTEDUCONGI_LATEUR
ALIGNER LA POIGN E SUR LES TROUS /----=':/_']I_,_11111f TOURNEVI$ PHILLIPS
A POUR FIXER LA POIGN E, PUIS \ I I POUR L'INSTALLATION,
DE VlS. INSTALLER O ABORD LES VIS --( I It_ -_ N°._2NI=CESSAIRE
LESv,sB. \ It
REMARQUE : TOUS LES TROUS X I I _II
DE VIS POUR LE MONTAGE DE LA \ I I
POIGN E EN HAUT ET EN BAS \!._.__
DES PORTES SONT PR VUS _"
POUR DES VIS TARAUDEUSES.
l'h
I !
• Lesdeuxportessont trophautes.
Retirer le
Desserrer couvre-charni_re
les vis''_ _"
INEPASAGRANDIRCESTROUS.I
POIGNEEDEPORTEDE REFRIGERATEURAVECGARNITURE
TOURNEVISPHILLIPSN° 2
NECESSAIREPOUR
L'INSTALLATION.
ENCLENCHERLEHAUTDE LAGARNITURE
ENPLACE LEXTRMIT
INFRtEUREDELA ,/if Jj
A
I1_ ALIGNERLAPOIGNESUR
LESTROUSDEVtS. INSTALLER
DABORDLAVtSA POURFIXER
LAPOtGNE,PUISLAVIS B '.
NEPASTROPLESSERRER.
fl ¢/
INSTALLERLAVIS DANS
LETROU DELAPOtGNE.
NEPASTROPLASERRER.
_)SUR CERTAINSMODI_LES,
RETIRERL ENDOSDU
RUBAN APRES
L't:TAPE5, /1
APPUYER SUR / II
LE RUBAN. _
COULISSERLAGARNITUREDE
IGNE PAR-DESSUSLE
(CERTAINSMODELES)
UPPORT LAPARTIE
INFRIEUREDELA
PORTE.
Desserrer les vis et coulisser la charni_re
inferieure a droite pour baisser les portes.
• Lesdeuxportessont tropbasses,
Retirer le
Desserrer couvre-charni_re
les vis _._
/ 0po
5/16 po
Desserrer les vis et coulisser la charne
inferieure a gauche pour relever les portes.
• Resserrerlesvis apresavoir fini les
reglages.
* Sereporterauxinstructionsd'installation
pourobtenirplusd'informations.
Page 21

Outils necessaires: tournevisPhillips,cle
rochetetdouillede_ po, couteaua masticou
cleouvertede-_0po,
1.Retirerle couvre-charniereetIemettrede
c6t&
2. Retirerlesviset lacharniereavecunecle
douillede _6poet lesmettredec6t&
3. Souleverdoucementla portedu congela-
teuret la retirer.
4. Enleverlavis et le brasde charnieredu
dessusdeIa portedurefrigerateur,
5. Souleverdoucementlaportedurefrigera-
teuret la retirer.
6. Retirerle protecteurde grilleet Iemettre
dec6t&
7. Retirer la plaquede charnieredu coin
inferieurdu refrigerateuret I'installerde
I'autrec6t&
8. Retirerla plaquedu dessousdela porte
du refrigerateuret I'installerde I'autre
c6t&
9. RetirerIa plaquedu dessousde la porte
ducongelateuretI'installerdeI'autrec6t&
10.Retirer les boutons sur le dessus des
portesde refrigerateuret de congelateur
etIesreinstallerde I'autrec6t&
11.Retirerlesbouchonsdestrousde vis du
dessusde Ia caisseet les reinstallerde
I'autrec6t&
12.Retirerlesrondelleset I'axede I'interieur
dela plaquedecharniereetIesinstaller
I'exterieurdela plaquedecharniere.
13.ReinstallersoigneusementIa porte du
refrigerateursurlaplaquedecharniereau
coininferieur.
14.Coulisserlebrasdecharniereen placeet
lefixeravecunevis.
15.Installersoigneusementla portedu con-
gelateur sur le dessus du bras de
charniere en se servant de la cale
d'espacementpourmaintenirI'intervalle.*
16.Coulisserla charnieresuperieureenplace
surIaporteducongelateuretfixerlesvis
I'aided'uneclede76po.
17.Bien enclencher en place Ie couvre-
charniere,
18.Remettrele protecteurdegrille.
Nepasoublierderebrancherlerefrigerateuret
de reenclencherles commandesau reglage
voulu.
(AUBESOIN)
5/16 po
PoserIaportesurunesurfacenonrugueuse.
Outi_
A. Retirerla visgauche.
B. Ouvrirlaporteet la soulever.Poserla
portesur unesurfacenonrugueuse.
J 4,
Retirer I'ensembtede plaquede charniere.
PoserIaportesurunesurfacenonrugueuse.
Ne pasjeter la cale d'espacement en mousse
de la porte, Les portes peuventse stabiliser
I'usage.
Page 22

Lestyledescommandesvarientselonlemodele.Les commandessontemptacera curseura lapartiesuperieuredu compartimentrefrigerateur.
INITIAL DES COMMANDES
DE;A(UR;WR
INITIAL DES COMMANDES
I Lorsdelamiseenmarcheinitiale,lecom-
presseurdurefrigerateurfonctionnerapen-
dantplusieursheures.Ceciestnormal.
I Laisserlerefrigerateurfonctionnerpen-
dantau moins8 a 12 heuresavantd'y
placerdesaliments.
P
GiNDE;
Lacommandequiagitsur lecompartiment
de congelationcomporteune graduation
de1(temperaturemaximale)a 7(tempera-
tureminimale).SelectionnerinitialementIa
valeur4pourcettecommande.
Lacommandequiagitsur lecompartiment
de refrig(_rationcomporteune graduation
de1(temp(_raturemaximale)a 9(tempera-
tureminimale).SelectionnerinitialementIa
valeur5pourcettecommande.
Laisserlestemperaturessestabiliserpen-
dant 24 heures avant de modifier les
reglages.
Une modificationdu reglagede I'un ou
I'autredesboutonsdecommandeentrafne
une modificationde la temperaturedarts
I'autrecompartiment.
> Lacommandequiagitsurlecompartiment
de refrigerationcomporteune graduation
de1 (temperaturemaximale)a 7(tempera-
tureminimale).SelectionnerinitialementIa
valeur4pourcettecommande.
Lacommandequiagitsur lecompartiment
de congelationcomporteune graduation
de1 (temp(_raturemaximale)a 9(tempera-
tureminimale).SelectionnerinitialementIa
valeur5pourcettecommande.
D;LA(41;;;
Occasionnellement,lafaceavantde lacaisse
dur(_frigerateurpeut6trechaudeautoucher.II
s'agitd'un effetnormalqui emp_)chela con-
densationd'humiditesur la caisse.Ceci se
remarqueparticulierementIorsde la miseen
marche initiale du refrigerateur,par temps
chaudou apres une periode prolongeeou
excessivedes portes.
24heuresapresI'additiond'aliments,il est
possiblededeciders'il convientd'ajusterIa
temperaturedartsI'un ou I'autre ou les
deuxcompartiments.Dartsce cas,modifier
Ia positiondu ou des boutonsde com-
mande,selon les indicationsdu tableau
ci-dessous.
SaufIorsde la miseen marcheinitialedu
refrigerateur,nepaschangerlapositiondu
boutondecommandedeplusd'uneunite
Iafois.
2]
Compartiment((refrigeratiom>
tropchaud
Compartiment((refrigeratiom>
tropfroid
Compartiment(<congelatiom_
tropchaud
Compartiment(<congelatiom_
tropfroid
Mettrele refrigerateura I'arr_t
(Commandesrotatives)
Mettrele refrigerateura I'arr_t
(Commandesa curseur)
REMARQUE: Lorsqu'onplace le boutonde commande_rdrigerateur_a la positiond'arr_t
{_OFF>_,le refroidissementcessedanslesDEUXcompartiments.L'alimentationdeI'appareiln'est
pasinterrompue.
Fairetournerle bouton<<refrigerateur>>jusqu'auchiffre
sup(_rieur(1unite)
Fairetournerle bouton<<refrigerateur>>jusqu'auchiffre
inferieur(! unite).
Fairetournerle bouton<<congelateur>>jusqu'auchiffre
superieur(1unite).
Fairetournerle bouton<<congelateur>>jusqu'auchiffre
inferieur(! unite)
Placerlacommande<<refrigerateur>>aIaposition
d'arr_t((OFF>>.
Mettrelecurseursur((OFF>>(ARRET)
Page 23

p
D{D{GIVR {
Ce r6frigerateurcomporte une fonction de
degivrageautomatique.
I Lors du cycle de degivrageautoma-
tique, I'on peut remarquerun reflet
rougeoyantdartslesevents,surlaparoi
arriere du compartimentde congela-
tion,etI'onpeutentendreaussiIe bruit
de gouttes d'eau venant en contact
avec1'61ementchauffantdusystemede
degivrage.Ceci est normal Iors du
degivrage.
D{LA
(WR(ULAglOND{
Pour assurer le maintiendes temperatures
appropriees,iIest necessaireque la circula-
tion de I'air se fassecorrectemententre les
compartimentsde r6frigerationet decongela-
tion,commeI'indiqueI'illustration.
CLAYETTES
Clayettes reglables: Des clayettes en
porte-a-fauxpeuvent6tre obtenuespour le
r6frigerateur.Enlevement:releverlegerement
I'arrierede Ia clayetteetla tirertout droitvers
I'exterieur.Pour verrouillerla clayettea une
autre position,releverIe bord avant de la
clayette. Inserer les crochets dans les
ouvertures choisies et laisser la clayette
retomberen place en s'assurantqu'ellese
retrouve bien verrouillee a I'arriere. Sur
certains modeles,le bord exterieur de la
cIayettereposesur lesrailsquifont partiede
la paroilateralede lacaissedurefrig6rateur.
Iemodelepeutvarier
LA PORTE DU
RC:FRIGC:RATEUR
Les balconnets amovibles (certains
modeles) sont con_us pour recevoir des
contenants d'un gallon minimum.IIs sont
reglables et s'enlevent facilement.
Enlevement:souleverle balconnetjusqu'ace
qu'ilsorte de ses retenuessurla paroide la
porte, puis le tirer tout droit vers I'exterieur.
Rep6terlesoperationsci-dessusdansI'ordre
inversepourremettreIebalconnet.
D'autresmodelesder6frigerateursontdotes
de balconnets fixes durables d'une
contenancesuperieurea ungallon.
Des retenues(certainsmodeles)s'adaptent
darts les balconnetsdu refrig6rateurpour
retenirdesbouteillesouautrescontenantsIors
deI'ouvertureou lafermeturede Iaporte.Les
retenues s'ajustent en les coulissant
Iateralement.
NEbloqueraucundeceseventsavecdes
aliments.S'ils etaientbloques,la circulation
deI'airseraitentravee,cequientraTneraitdes
problemesdetemperatureet d'humidite.
! t
Clayettespie!helargeur: Certainsmodeles
comportentdes clayettespleine largeurqui
reposentsurdesrailsdesupport.Enlevement:
tirerla clayetteversI'avantjusqu'ace qu'elle
s'arr6te,releverI'avantettirerla clayettetout
droitversI'exterieur.Remontage:rep6terces
operationsdansI'ordreinverse.
Nejamais essayerd'ajusteruneclayette
sielleestchargee.
11
Page 24

TIROIRS
Le refrigerateurcomporteuntiroirpourcolla-
tion ou un tiroir a temperaturereglable. Le
tiroir est un espace de rangementa court
termepourlesviandesfraTches,lesfromages
etIescharcuteries.
La commandede la temperature(certains
modeles)estsitueeau-dessusdu tiroirsurla
paroiarrieredurefrigerateur.Relevezla com-
mandesur <<Cool>>(frais)pourlesfromagesou
les collations.Abaissezla commandesur
<{Cold>>(froid)ce qui donneune temperature
plusbassedartsletiroir.Unetemperatureplus
basse est recommandeepour la viande,Ia
volailleou le poisson.
Latemperaturen'estpasreglabledansIetiroir
pourcollation.
BAGS A LI GUMES
Les baes a legumes frais permettent la
conservationdes fruitset legumes.Certains
modelesde refrigerateurcomporte 1 ou 2
boutonsde commandede I'hygrometrie-- sur
I'etagereau-dessusdesbacsa legumesfrais.
Pouroptimiserla conservationdesfruits,faire
coulisserla commandedubacversla gauche
pourminimiserI'humiditedartsIe bac.
Pouroptimiserla conservationdes legumes,
fairecoulisserlacommandeversladroitepour
augmenterleniveaud'hygrometriedanslebac.
Deposedubac aIegumespourlenettoyage:
tirerle bacjusqu'aIabutee.
souleverI'avantettirerpourextraireie bac.
Reinstallationdu baca Iegumes:
aligner le bac avec les rails de
coulissement.SouleverI'avantdu bac et
faireglisserlebac.
Certains refrigerateurs comportent une
clayette de CongelateurReglable,Cette
clayettes'ajustepourrecevoirunevarietede
produitscongeles.
PourenleverI'etagere:
souleverI'extremited'environ3 pouces
retirerdessupportsdelaparoilateraleI'ex-
tremitededroitedesbarresdesupport
PourreinstallerI'etagere:
reinstallerles douillesd'appuiamovibles
surlaparoidegauche,a lahauteurdesiree
executerdartsI'ordreinverseIesoperations
d'extraction
Pourretirercetiroirafinde Ienettoyer:
tirez-lejusqu'ala butee
soulevez-lelegerementet sortez-le
PourremettreIetiroir:
procedezinversement
I Pourdemeilleursresultats,ce tiroirdolti
6trebienferme.
i PourI'obtentiondesmeilleursresultats,
veillerace que les bacs a Iegumes
soienttoujoursfermes.
Laclayetteinferieuredu refrigerateurtientlieu
duP_afondduBa¢a Legumes.
Deposede la clayetteinferieuredu refrigera-
teur:souleverlebordavantde laclayette.Tirer
laclayetteen lignedroite.
Reinstatlationde la clayette inferieure du
refrigerateur:placer tes barresarri_resur le
support. Pousserta clayette vers I'arriere,
jusqu'acequ'itsoitpossibted'effectuerlaraise
enplacecorrectedu bordavant.
COMPART]M NT A
PRODUiTS LAITiER$
Pour utiliser le grand Cempartiment
ProduitsLaitiers, il suffitdesoulevertecou-
vercte.
D'autresmodelesontuneetagerepartiellede
congelateurde largeur. Cette etagere est
placeedu c6te gauchedu compartimentde
congeIateurpar le montagedansla paroide
gauche.
Nejamaisessayerd ajusterlebal¢0nnet
Iorsqu!ilestremplL
Le Panier Amovible de Congelateur
(certainsmodeIes)se trouvesur la clayette
inferieurede la porte du congelateur.Cette
zone prevoit un espace pour les articles
congeIesqui ont tendancea glisser(comme
parexempledessachetsde legumes).
Page 25

1f AG{A(ON;
Certainsmodelessont dotes de moules
glagons.Pourextrairelesglagonsd'unmoule,
tenirlemouleaI'enversau-dessusdu casier,
et provoquerune torsion du moule par les
extremites.
Certainsmodelessont prStsa recevoirun
generateur de glagons automatique. Le
numerodeproduitdu generateurde glagons
approprie est inscrit sur la plaque signa-
letique. L'ensemblenecessairecontient les
instructionsd'installationetde raccordement
lacanalisationd'eau.
I Les indices d'efficacite energetique
;: inscrits sur le refrigerateurneuf ne
tiennentpascomptede rutilisationdu
generateurdegla_onsfacultatif.
Sur d'autres modeles, un generateur de
glagonsa eteinstallea I'usine.Letube d'ar-
riveed'eaunecessairepour leraccordement
entrelepointdeconnexionet lerobinetd'arrSt
de la canalisationse trouvedansun sachet,
dans le refrigerateur.Effectuerle raccorde-
mentde lamachineaglagonsa lacanalisation
d'arriveed'eau,selonles instructionspresen-
tees dans un autredocumentfourni avec Ie
refrigerateur.
NIVEAU DE GLACE
REGLABLE
(CERTAIN8 MODC:LE8)
Lesapparelsa glace insta/esen usinesont
equipes d'un bras detecteur de regler le
niveaude glacedanslebaca glaceIorsqueIa
consommationdiminue.
marche.Lamachinea glagonsse remplit
d'eaudesquelatemperatureadequateest
etabliedartslecongelateur.
Ondolt attendre8 a 12 heuresavantque
I'appareilproduisedesglagonsutilisables.
Les deux premierslots serontprobable-
mentconstituesde glagonsde petitetaille
et irreguliers,du fait de Ia presenced'air
danslacanalisation.
Lepremierlotpeutegalementcontenirdes
impuretespresentesdanslanouvellecanal-
isationd'eau.Parconsequent,jetertousles
glagonsdesdeuxoutroispremierslots.
LorsdeI'ejectiondesglagons,ilestnormal
que plusieurs glagonscubiques soient
connectesensemble.On peutfacilement
Ies separer. La machine a glagons
continueraa produiredesglagonsjusqu'a
cequeleuraccumulationdartsle recepta-
cle provoquele soulevementdu bras de
detection,ce qui provoqueI'arrStde Ia
machinea glagons.
Certainssonspeuvent8treaudiblesdurant
Ies diversesphasesde la productionde
glagons:legerbourdonnementdumoteur,
chutedeglagonsdartslereceptaclevideet
manoeuvresd'ouvertureet fermeturede
I'electrovanned'arriveed'eau.
Si la consommationde glagonsest faible,
Iesglagonsaccumulespeuventprendreun
aspect trouble, se contracter et colIer
ensemble, et prendre un goOt. Vider
periodiquement le receptacle
d'accumulationpourle lavera I'eautiede.
VeillerabiensecherIereceptacleavantde
Iereinstaller.
Pour retirer Ie bac £ glagons,tirer vers
I'avant,en I'ecartantdu generateurde
glagons.Pour eviter que Ia machine
glagonsproduisedesglagonsalors queIe
receptaclea eteretire,souleverlebrasde
detection- ceci provoqueI'arrSt de Ia
machinea glagons.
Pourreinstallerle baca glagons,executer
ces operationsdartsI'ordreinverse.Pour
remettrela machinea glagonsen marche,
abaisserlebrasde detection.
NeplaceraucunalimentouIiquidedartsle
receptaclea glagons,parexemplepourun
refroidissement rapide. Ces articles
entraveraientIesmouvementsdu brasde
detection, ce qui susciterait un
fonctionnementerratiquede Ia machine
glagons.
Lorsque I'arrivee d'eau dolt £tre
interrompue pendant plusieurs heures,
souleverlebrasdedetectionpourarrSterIa
machinea glagons.
MESURES DE SI CURITI
Nejamaisplacerles doigtsou la main sur le
mecanismedela machineaglagonsIorsquele
refrigerateurestbranche,pourevitertoutrisque
de blessure.Cela evi-teratoute interference
aveclespiecesmobilesdumecanismed'ejec-
tionet avecI'elementchauffantquiprovoquela
Iiberationdesglagons.
Danscertainescirconstancesrares,lesglagons
peuvent presenterune colorationvert-bleu.
Ceci est dOa une combinaisonde facteurs
commecaracteristiquesdeI'eaulocale,circuits
de plomberiede la residence,et accumulation
desels decuivredansIacanalisationinactive
quialimenteIamachineaglagons.
La consommationrepetitivedeglagonsainsi
colorespeut8tre nefastepour la sante.Jeter
tous les glagons manifestant une telle
coloration,et contacter Ie concessionnaire
pour I'achatd'un filtre qui devra8tre insta/e
surlacanalisationd'eau.
Bras-levier Metallique
Pour reglerle niveaude glace produite:
Pousserle bras detecteuren plastiquevers
I'interieuret le placerala capacitedesiree.
Apresleraccordementdurefrigerateura la
canalisationd'arriveed'eau, abaisserle
bras de detection des glagons (tringle
metallique);cecideclenchela miseen
50%
Bras Detecteur
Page 26

PRODUH;
Ondevraitmaintenirlatemperaturedansle
compartimentde refrigerationentre 1 °C
(34 °F)et 4 °C (40 °F)(la valeuroptimale
eat 3 °C (37 °F)). Pour oontr61erla
temperature,placerunthermometredarts
unverred'eau,aucentreducompartiment
de refrigeration. Noter I'indication du
thermometre apres 24 heures. Si la
temperatureestsuperieurea 4 °C (40°F),
ajusterles boutonsde commande,selon
Iesinstructionsdela page21.
Eviterde placertrop de produitssur les
clayettesdurefrigerateur.Ceci entravela
circulationde I'air autour des alimentset
susciteun refroidissementnonuniforme.
FRUITS ET LI GUMES
I'humiditedesproduitsconservesdans le
baca legumesestretenue,cequi permet
de maximiserIa qualite et la duree de
conservationdes fruits et legumes(voir
page22).
Effectueruntri desfruitsetlegumesavant
delesplacerdansle refrigerateur;veiller
consommerd'abordIesarticlesamollisou
qui ont subi des chocs.Jeter les articles
manifestantundebutdedegradation.
Veillera toujoursenvelopperles aliments
tresodorants- oignons,choux,etc.- afin
que I'odeur ne soit pas transferee
d'autresaliments.
Tandisqu'unecertainedosed'humiditeest
necessaire a la conservation de la
frafcheurdes legumes,un excesd'humid-
ite peutreduirela dureede conservation
(particulierementpour la laitue).Veiller
bien drainer les legumesavant de les
placerdansIerefrigerateur.
VIANDES ET FROMAGES
Ondevraitparfaitementenvelopperlespro-
duitsde viandeou volaillenon cuitepour
qu'il ne puisse y avoir aucune
contaminationd'autres alimentsou des
surfacesdu refrigerateur.
Occasionnellement,une moisissurepeut
se developpera la surface de certains
fromages durs (gruyere, cheddar,
parmesan). Couper dans le fromage,
jusqu'aun pouceautouret au-dessousde
Iazonemoisie.Veillerace quecouteauou
autre instrumentne touchepas la zone
moisie.Le restedufromageconserverasa
saveur et pourra 6tre consommesans
danger.NE PA8tenterde recupererapres
I'apparition de moisissuretranches de
fromage individuelles, fromage mou,
fromagecottage,creme,creme sure ou
yaourt.
PRODUITS LAITIERS
Unedatede peremptionindiquantlalimite
deconservationapparaftgeneralementsur
I'emballagede la plupart des produits
Iaitierscommelait, yaourt,cremesureet
fromage cottage. On dolt veiller
conserver ces aliments dans leur
emballaged'origine eta les refrigerer
immediatementapres I'achat et apres
chaqueprelevement.
AUA NT;
La temperaturedarts lecompartimentde
congelationd'un refrigerateur dolt 6tre
maintenuea environs-18 °C (0 °F) ou
moins. Pour contr61erla temperature,
placer un thermometre pour appareils
menagersentre les paquets d'aliments
surgeles.NoterI'indicationduthermometre
apres 24 heures.Si la temperatureest
superieurea -!8 °C (0 °F), ajuster Ies
boutons de commande, selon Ies
instructionsdela page21.
PRI PARATION DES
ALIMENTS POUR LA
CONGI LATION
Pour minimiser la deshydration et la
deterioration qualitative, utiliser feuille
d'aluminium,pelliculeplastique,etsachets
ou contenantsetanchespourcongelateur.
Expulser autant d'air possible de
I'emballage,veillerace quechaquepaquet
soit parfaitementferm& L'airretenupeut
provoquerI'assechementdesaliments,un
changementde couleur,ou le developpe-
mentd'unesaveurnon naturelle(brOlures
decongelation).
Avant de les congeler, envelopperles
paquetsde viandefrafcheet de volaille
avecun produitadequatd'emballagepour
congelation.
Nepascongelerde nouveauune piece
deviandecompletementdecongelee.
CHARGEMENT DU
CONGI LATEUR
Eviterdeplacertropd'alimentstiedesdarts
Ie congelateuren une seule fois. Ceci
soumetle congelateura unesurcharge,ce
qui ralentit le refroidissement et peut
provoquer une augmentation de la
temperaturedesalimentsdejacongeles.
Laisserun espaceentrelespaquetspour
queI'airfroidpuissecirculerIibrement,ce
quisusciteraunecongeIationplusrapide.
Eviter de placer sur les balconnetsdu
congeIateurdes produits a congelation
difficile comme creme glacee ou jus
d'orange;il est preferablede placerces
produitsa I'interieurdu congelateuro0 la
temperaturevariemoinsIorsde I'ouverture
desportes.
8e reporterautableaudeconservationdes
alimentsa la page 26 pour connaitreles
dureesapproximativesdeconservation.
Lefonctionnementducongelateurestplus
efficaceIorsquiIest remplia66Yoou plus.
0
Page 27

TABLEAU DE CONSERVATION DES ALIMENTS
(Ladureedeconservationestapproximativeetpeutvariersetonletyped'embatlage,la temperaturede conservationetlaquatitedu produittorsde
sonachat.)
d;{o]_luJi_."]mr;fill_;_.']
Beurre
Lait et creme
Fromage a la creme, tartinade de
fromage et produits au fromage
Fromage cottage
Creme sure
Fromage dur (gruyere, cheddar
et parmesan)
1mois
1semaine
1-2semaines
3-5jours
10jours
1-2mois
6-9 mois
Non recommande
Non recommande
Non recommande
4-6 mois
Peut s'emietter
Bien empaqueter ou couvrir
Verifierladate sur I'embaUage.8ienfermer.Nepas remettretapattienon utiliseedanale
contenantd'origine.Ne pascongeierla creme&moinsqu'eUene soitfouettee.
Bien envelopper.
Conserver dans le contenant d'origine. Wrifier la date sur le cartonnage.
Bien envelopper. Decouper toute pattie moisie.
m'll'|mi"
Oeufs en coquiile,
Jaunes ou blancs
)3 semaines
)2-4jours
Non recommande
9-12 mois
Refrig6rer, pointe vers le bas.
Pour chaque tasse de jaunes d'oeuf, ajouter 1 c. & the de sucre pour les
p_tisseries ou 1 c. a the de se( pour les mets non sucres.
mli:,Jif
Pommes
Bananes
Poires, prunes, avocats
Bales, cerises, abricots
Raisins
Agrumes
Ananas, d6coupe
)1 mois
)2-4 jours
(3-4 jours
)2-3 jours
(3-5 jours
1-2 semaines
2-3 jours
8 mois (cuites)
6mois (entieres/pelees)
Non recommande
6mois
1 mois (entiers)
Non recommande
6-12 mois
Egalement,conservationde potatoesa chairfermeounonmeresa 15-21°C(60-70° F).
Faire merit a la temperature ambiante avant de mettre au r6frigerateur. Les
bananes et les avocats noircissent Iorsqu'ils sont mis au r6frigerateur.
Seconserventaussia 15-21° C (60-70° F).Aur6frigerateur,conserversanslesrecouvrir.
Ne merit pas apres t'achat. Utiliser rapidement.
Asperges
Choux de Bruxeiles,brocoli,
chou-fleur,petitspois, haricots
de lima,oignons, poivrons
Chou, celeri
Carottes, panais, betteraves
et navets
Laitue
&vLo]mF±!i!!:_l qmm".[o]D%'_o]L_D"
Poulet et dinde, entiers
Poulet et dinde, morceaux
Poisson
ITI mr_imL1lil_.
Bacon
Boeufou agneau, hache
Boeuf ou agneau, r6tiet steak
Jambon, entier,
entierement cult, moiti&
en tranches
Viandes froides
R6ti de porc
C6telettes de porc
Saucissesa basede viandehachee
Saucisses fumees
Veau
Saucisses de Francfort
Sources: Ministere deI'agriculture desEtats-Unis; Institut De Vente De Nourriture:Service De Prolongation Coop_ratif, Universitede I'Etat De I')owa
1-2jours
(3-5jours
1-2semaines
(7-10jours
)7-10jours
1-2jours
)1-2jours
)1-2jours
7jours
1-2 jours
3-5 jours
7jours
5jours
3jours
3-5 jours
3-5 jours
3-5 jours
1-2 jours
7jours
3-5 jours
7jours
8-10mois
8-10mois
Nonrecommande
8-10mois
Non recommande
12mois
9mois
2-6mois
1 mois
3-4 mois
6-9 mois
1-2 mois
1-2 mois
1-2 mois
1-2 mois
4-6 mois
4 mois
1-2 mois
1-2 mois
4-6 mois
1 mois
Ne pas laver avant de r6frigerer. Ranger clans le bac & legumes.
EnvelopperIesalimentsdegageantuneodeur.Laisserlespetitspoisen gousse.
Envelopper(esalimentsdegageantune odeuret lesrefrigererdans)ebac &legumes.
Enlever (esfeuiiles. Enveiopper )esaliments degageant une odeur et ies refriger-
er dans le bac &legumes.
Conserver dans I'emballage d'origine pour la refrigeration. Si la congelation est
de plus de 2 semaines, reenvelopper avec un embaUagepour congelation.
Les viandes frafches peuvent 6tre conservees dans )eurembaiiage d'origine pour
la refrigeration. Si la congelation est de plus de 2 semaines, reenvelopper avec
un embaUagepour congelation.
La charcuterie non ouverte, emballee sous vide, peut 6tre conservee jusqu'a
2 semaines dans le Tiroir Pour Collation.
Bien envelopper les viandes transformees et les ranger clans le Tiroir Pour
Collation.
)6
Page 28

3. DebrancherIerefrigerateurde la prisede
courant.
Pour une absence de un mois ou moins,
laisser les boutons de commande aux
positionsdereglagehabitueIles.
Pouruneabsencede plusIongueduree:
1. Retirertousles aliments.
2. Arr6terla machinea gla£ons(si elle est
installee)et fermerIe robinetd'arr6tde Ia
canalisationd'eau.
Le tableaude la pagesuivantepresentedes
directivesspecifiquespou Ie nettoyagedu
refrigerateur.
Debrancher Is cordon d'alimentation
avanttouteoperationde nettoyage.
NETTOYAGE SOUS LE
RI FRIGI RATEUR
II est possiblede faire roulerle refrigerateur
sur le sol pour pouvoirnettoyerle plancher
sous le refrigerateur.Faired'abordremonter
lesvisde misea niveausi ellessontabaissees
(page18).Tirerle refrigerateurenlignedroite
pourI'ecarterdu tour.
4. Nettoyer et secher parfaitement le
refrigerateur.
5. Laisserles portesouvertespoureviterIe
developpementd'odeurs.
REMPLACEMENT D'UNE
AMPOULE
Debrancherle cordon d,alimentation
avantderemplace[uneampoulelPorter
des gantsatitredeprotectioncontreun
eventuelbrisduverre.
Utilisertoujoursuneampoulestandardde
40ou60W,pourappareilsmenagers.
Refrigerateur
[:ampoule(lesampoules)est (sont)situee(s)
sousle hautducompartimentrefrigerateur.
Devisser/remptacerIaIampe.
Pourundemenagement,executerlesetapes!
4 decritesauparagrapheVacances.Deplus,
enleveret emballersoigneusementtoutarticle
facilement amovibte. Faire transporter le
refrigerateurverticalement;les portesdoivent
6trefermeeset immobiliseesavec du ruban
adhesif.
Congelateur
Certainsmodelescomportentunelampedarts
Ie compartimentde congelation,sur la paroi
arriere,dartsI'anglesuperieur/droit.
Pourenleverlecabochon:
Saisir le cabochonen haut et en bas.
Appuyerdanslazonedes pattesdefixa-
tion, en exerQantune pressionsuffisante
pour les degager. Simultanement,faire
pivoterle cabochonpourI'enlever.
Devisser/remplacerI'ampoule.
Reinstallerlecabochonen le faisantpivo-
ter dartsle sensinversepour la raiseen
position,puisenemboftantlespattesdarts
Iesouverturesappropriees.
Page 29

Debrancherle cordond'alimentationavantd'entreprendrelenettoyage;Nepastoucherlessurfacesrefrigereesavecunemainhumide
ou mouillee.Un objetmouil!eadheresurunesurfacemetalliquetresfroide.Avantde nettoyerlecompartimentcongelateur,ondoltle
laisserserechauffer.Laisserles_tageresenverreserechaufferavantdelesimmergerdartsde I'eautilde.
Tableaude nettoyage du refrigerateur
[lilo]iililo}._l il,7
Grilledeplinthe
;l"i';'l;Illll_ll Ill !, ii Ii_-iI1,1i
Eautiedeet detergentdoux
Liquidepulverisabledoux
Aspirateur
If o]it."I:t I_lr:.] ,11i]1:t€1! ti [o]it.:
Pourenleverla grillede plinthe,saisirlesextremitesettirerenIignedroite.
Pourla reinstaller,alignerlesattachesavecIesouverturesrondesdansIa
caisseetpoussersurchaqueextremite.
Condenseur Aucunbesoindenettoyage,saufsiI'environnementestparticulierement
graisseuxou poussiereux,ou s'ily a plusieursanimauxdecompagniedansla
maison.
Poigneesde porte
Eautiedeet detergentdoux
Liquidepulverisabtedoux
Surfacesmetalliques peintes:
caisse,portes
Eautiedeet detergentdoux
Liquidepulverisabledoux
Secheravecunlingedouxpropre.
Nepasessuyerlerefrigerateuravecuneserviettehumideouuntorchonavais-
sellesale;ilpourraityavoirsurcesarticlesdesresidussusceptiblesdedegra-
derou eraflerlapeinture.Nepasutilisernonplustamponde recurage,produit
denettoyageenpoudre,ouproduitdenettoyagecontenantunagentde
blanchiment.Cesproduitspeuventerafleret degraderIa peinturedefinition.
N'apptiqueraucuneciresurlescomposantsenplastiqueou vinyle.
Jointsdeporte
Etageresenverre
ri't(-4i 1:t!iil o[:t.11,,io]iil ip.1i iii.
Bicarbonatede sodiumet
eautiede
Eautiedeet detergentdoux
Eautiedeet detergentdoux
Produitde nettoyagedu
_liil.li[--lii i;i;t _i (_l!lil_tl,!,]i[_ I:1_'1I;li I
Utiliser1-2cull.a soupedebicarbonatedesodiumparlitred'eau.Veiller
bienessorerI'excesd'eaude I'epongeouduchiffonavantde nettoyer
autourdescommandes,desIampesou descomposantselectriques.
Laisserleverre se rechauffera la temperatureambianteavantdeI'im-
mergerdartsde I'eautiede.NejamaisutiliserdeI'eauchaude.
verre
Liquidepulverisabtedoux
Doubluresinternes- porteet
interieur
Eautiedeet detergentdoux
Bicarbonatede sodiumet
eautiede
Voirci-dessuspourla solutiondebicarbonatedesodium.
NEPA8utiliserdeproduitde nettoyageabrasif,detergentconcentre,agent
de blanchiment,solvantoucire nettoyantepournettoyerI'interieurdu
refrigerateur.
Tiroirs,bacs,oeufrier,
Eautiedeetdetergentdoux
Secherparfaitement.NE PA8laverdansun Iave-vaisselleautomatique.
balconnets,etc,
Page 30

DesameliorationsdartslaconceptiondusystemederUrigerationpeuventproduiredesbruitsdanslenouveaurUrigerateurquisontdifferentsouqui
n'etaientpaspresentsdansunancienmodele.CesameliorationsonteterealiseespourproduireunrUrigerateurmeilleurpourlapreservationdesali-
ments,plusefficaceenenergieetplussilencieux.Parcequecesnouveauxappareilsfonctionnentdefa£onplussilencieuse,I'ondetectedessonsqui
etaientpresentsdansIesanciensappareils,maisquietaientmasquespardesniveauxdebruitpluseleves.Nombredecesbruitssontnormaux.II
fautnoterquelessurfacesadjacentesaunrUrigerateur,commelesmurs,lessolsetlesarmoires,peuventamplifiercesbruits.Voicilesbruitsnor-
mauxquipeuvent6treremarquesdartsunrUrigerateurneuf.
MACHINE,_ GLA?ONS (le cas echeant) : La machine
gla£ons fait entendre de temps en temps un bruit de
crepitementIorsquelesgla?onssont pr_ts a tomberdarts le
bac. Aussi, le moteurqui permetI'ejection des gla?onsdu
moule avant la chute des gla?ons, peut aussi 6tre
decelable. Ce sont des bruits normaux, necessaires & la
MINUTERIEDE Dt_GIVRAGE: Les]
r6frig6rateurs sans givre ont une/
minuteriede degivrage qui emet un/
declic Iorsqu'elle fait fonctionner le/
cyce dedegvrage par ntermttence. J
fabricationdes gla?ons.
DILATATIONET CONTRACTIONDU
COMPARTIMENTDECONGt_LATION:
Un bruitsec peutse produiredansle
congelateurIorsquerappareilsemeten
marcheparsuitede la dilatationou de
la contractiondes materiauxdans la
zoneducompartimentdecongelation.
COMPRESSEUR: Pour qu'un refrig6rateur
fonctionnedefagonplus efficace,le systeme
de refrigerationpeutavoir _.fonctionner plus
Iongtempspour maintenir les aliments aux
temperatures souhaitees. Ce nouveau
compresseur,tres efficace,peut fonctionner
plusIongtempset produiredes bruitscomme
un ronronnementaiguoudes vibrations.
CIRCULATIONDUREFRIG_:RANT:Lacirculation
du refrigerantdartsle refrigerateurpeutfaire un
bruit de gargouillisou de crepitementIorsque
I'appareilfonctionneoujusteapr_slaphased'arr_t
derappareil.Ler_frigerantcirculeen permanence
danslatubulure.
BRUITS DE CIRCULATIOND'AIR : Le ventilateur de
I'evaporateur du congelateur et le ventilateur de
condenseura la partie inf_rieurede la caisseentrainent
des bruits d'air. Le ventilateur de I'evaporateur fait
circulerrair froid dans les compartimentsde refrigeration
et de congelation.Le ventilateurde condenseurretirela
chaleurproduiteIorsqueI'appareilest refroidi.
ELECTROVANNE(le cas echeant) : Un
bourdonnementpeut s'entendrea.I'arrierede
rappareilIorsquele distributeurdegla?onsfait
ouvrirI'electrovannepourremplirle mouledela
machinea glagons.Apr_sr_jectiondesgla?ons,
peuty avoirquelquesbruitsd'eauquigoutte
le remplissagedesmoulesalieu.
MISEA NIVEAUDELACAISSE:Unecaissepresentant
undefautdemise& niveaupeutentrafnerdesbruitsde
vibrationou metalliques.Cecipeuts'arrangerenr_glant
lesroulettesoulesvisdemise&niveau.
Page 31

EssayerIessolutionssuivantessilesanomaliesindiqueessemanifestent...
PROBLEMES
Lerefrig_rateur ne
fonctionne pas
Lecompresseur fonctionne
rl
trop frequemment outrop
Iongtemps
II
m
I1
I1
Lumiere ne
m
fonctionnant pas
|
Luminescencevisibledans
lesevents ducongelateur
r,
Airtiede sortant du bas
dela caisse
Vibrationde la caisse
Odeur darts lescompartiments
Bruits, sons et vibrations
m
Compartiments congelateur
et refrigerateur -
temperaturetrop etevee
(cremeglacee molle)
I1
Compartiments congelateuret
refrigerateur - temperature
basse(congelation des
aliments)
Machinea gla£ons ne
fonctionne pas
Les gla_:onsont un go_t/
uneodeur
Gta_onseolles dane le moule
Evaporationdes glac;ons
Humiditesur la surfacede la
caisseentre les portes
Humiditesur lee parois
internes ou darts les bacs
E
Assechementdes aliments
iim
Humiditeexcessivedansle bac
;_legumes
CAUSESPOSSIBLES SOLUTIONS
Cordond'alimentationnonbranche BrancherIafiche dansla prise
Prisesanscourant Remplacerlefusible Reenclencherledisjoncteur.
Commandedecongelateura la positiond'ARRET(OFF) RegIerla commandeducongelateur(page21).
Refrigerateuren coursdedegivrageautomatique. Attendre25minutesquele degivragesetermine.
Temperatureambianteinferieure_ 13°C (55°F). Reinstallerfappareildansunenvironnementconvenable(voirinstallationpage18).
Lesrefrigerateursd'aujourd'huise mettenten
marcheets'arretentplussouventafinde maintenir
destemperaturesuniformes
Normala tamiseen marcheinitialepourlesappareils
neufsou installesrecemment.
Ouverturesdes portesprolongeesoufrequentes.
Etancheitedeficientedes portes.
Grilledeplintheobstruee
Ampoulegrillee.
Aucuneelectficiten'arrivea I'appareil.
Uneluminescencerougeatreou un refletest normal
lotsdu degivrage
Ceciest normal I1s'agitde Fairqui acirculeau contact
ducondenseur.
Aplombdeficientde la caisse.Plancherinsuffisamment
ferme.
Desalimentsgenerateursd'odeurne sontpas couverts.
Ceciest normal
Aplombdeficientde la caisse.
Commanderegteea une temperaturetropelevee.
Ouverturesprolongeesdesportes.
Temperatureambianteinferieurea 13°C (55°F).
Lesproduitsateneur eleveeensucrepeuventne pas
durcircompletementmemecongeles.
Commanderegleea une temperaturetrop basse.
Lebrasdedetectionest enpositionrelevee.
Aplombdeficientde la caisse.
Arriveed'eaugeneeou fermee.
Temperaturetropeleveedartsle congelateur.
Gla£onsanciens.
MauvaisequalitedeI'eau
Lanourrituretransmetles odeurs/legoatauxglacons.
ResidusdeminerauxdansI'eau.
Utilisationlimiteedegta_ons.
Pasinhabituelpartempstreshumide.
Tempschaudethumide
Ouverturesprolongeesoufraquentesdes portes.
Fermetureincorrected'uneporte.
Alimentsincorrectementenveloppes
Bacalegumespas parfaitementferme.
Commandesde temperaturetrop basses.
Paquetsnon parfaitementscellesouenveloppes.
AlimentsincorrectementenveIoppes
Tempschaudethumide
Attendre24heurespourun refroidissementcomplet(voircommandesde
temperaturepage21)
Ceciest normal.Minimiserlesouverturesde portes
Verifiersiquelquechosen'empechepaslesportesde sefermen
Degagerpour permettrea FairtiededequitterI'appareiL
Debrancherte refrigerateuret changerI'ampoule(page27).
Verifiersitecordonest bienbranch&
Mettrela caissea niveau(page18).
Lescouvrirou bienIesenvelopperNettoyerla caisse
VoirBruitsNormauxpage29
Mettrela caissea niveau(page18).
Reglerla commandedetemperature(page21).
MinimiserFouverturedesportes.
L'appareilnefonctionnepasassezpourmaintenirlesbonnestemperatures
RegIerla commandede temperature(page21).
BaisserIebrasde detectiona la positionde MARCHE(ON).
Mettrela caissea niveau(page18).
RaccorderI'alimentationd'eauou enlevertesobstructions
Regterla commandede temperaturedu congelateur(page21).
Lesjeter Lesgla£onspeuventabsorberlesodeurs,cequi modifieleurgoat.
Prendrecontactavecla compagnielocalede traitementd'eau.
Bienenvelopperlesailments.
Essuyerlesmoulesavecun lingetrempedansle vinaigrejusqu'acequ'ils
soientpropres.
Jeterles vieuxgla%ns.
Ceciest normal.
Minimiserlesouverturesdes portes.
VerifiersiqueIquechosen'empechepasla portede se fermer
Bienenvelopperourecouvrirtousles aliments.
Bienlefermer.
Ajusterlescommandesde temperature(page21).
Bienenvelopperourecouvrirtousles aliments.
Bienenvelopperourecouvrirtouslesaliments.
Minimiserlesouverturesdes portes.
Page 32

P
DUR GIRATIUR
QUIN%TB;(OUV RTBR LAGARANTI
Remplacementdesfusibles,reenclenchementdesdisioncteursoucorrectiondu
cAblagedomestiqueoude Iaplomberie.
Garantiecompleted'unan
Garantielimiteede cinqanssur lescomposants
dusystemescelleet lerev_tementinterieurdu
refrigerateur
Premiereannee
Amana Appliances reparera ou remplacera
gratuitement(y compns la main d'ceuvreet le
transport),toutepiece(f.o.b.Amana.Iowa)venant
6tredefectueuseenraisondevicesdefabricationou
ded6fautsde mat6riaux.
Deuxiemea cinquiemeannee
Amana Appliances reparera ou remplacera
gratuitement(y compris la main d'ceuvreet le
transport), tout composant du systeme scelle
(compresseur.condensateur_,vaporateuret tuyau
d'interconnexion)et epareralerev£tementinterieur
du refrigerateur(a I'exceptiondu rev6tementde la
porte)venant&6tred6fectueuxenraisondevicesde
fabricationoudedefautsdemateriaux.
ENAUCUNCA8AMANAAPPLIANCE8NE8ERA
TENURE8PON8ABLEDE8 DOMMAGE8
INDIRECT80UACCE8SOIRE8,NOTAMMENT
LAPERTEDE NOURRITURE.
Cettegarantievous donnedes droitsspecifiques
auxquelspeuvents'ajouterd'autresdroitsquivanent
d'une provincea I'autre.Par exemple,certaines
provinces ne permettent aucune exclusion
concemantlesdommagesaccessoiresou indirects.
Cetteexclusionne s'appliquedoncpeut-6trepas
VOUS.
Entretiennormalde I'appareil,commeleremplacementdesampoules.
Apparelsdontlenumerodeseriea eteenlev&modifieou illisible.
Apparelsachetesa desfinscommerciales,industrieIlesoulocatives.
Apparelsachetesa I'exterieurduCanadaoudes Etats-Unis.
Fraisdeservicesupplementaires,sile prestatairede serviceapres-venteoffreun
serviceaI'exterieurdela zonedesservieou endehorsdesheuresouvrabtes.
Reglagesapreslapremiereannee.
Reparationsresultantde ce quisuit:
• Miseenservice,systemed'evacuationouentretienimpropre.
• Toutemodification,alterationou reglagenonautoriseparAmana.
• Accident,utilisationimpropre,abus,incendie,inondationou catastrophes
natureles.
• Mauvaisraccordelectrique,tensioninapproprieeoualimentationengazinappro-
priee.
• Utilisationimproprede plats,derecipientsoud'accessoiresayantendommage
I'appareiI.
IITIIIIIII PIIITITIOl;II GiIilTII
Lesprestationsde garantiedoiventitre offertesparun technicienagrii parAmana.
I'accesa I'appareildolt8trefacile.Pourprendrerendez-vous,communiqueravecle
detaillantAmanaoQI'appareila eteacheteouavecun centrede serviceapres-vente:
MaytagServicess=
1-800-628-5782des Etats-Unis
Pourdeplusamplesrenseignements
MaytagAppliances
Attn: AmanaCAIR° Center
403WestFourthStreetNorth
Newton,Iowa50208
1-800-843-0304des Etats-Unis
1-866-587-2002au Canada
LotsdetoutecommunicationavecAmanaAppliances,mentionnerIesrenseignements
suivants:
Nom,adresseet numerodetelephone.
Numerode modeleetdeseriede I'appareil.
Nometadressedu detaillantoQI'appareiIa eteacheteetladate d'achat.
Descriptionclaireduprobleme.
Preuved'achat(recepissedevente).
Page 33

Refrigerador superior del congelador
Manual del propietario
AmanaAppliances
403WestFourthStreetNorth
Newton,Iowa 50208EE.UU.
Tel.1-800-843-0304US.A.
1-866-587-2002auCanada
Internet:http://www.amana.com
Conserveel recibodecompraoriginal.Paraobten-
erserviciobajoIagarantiasenecesitaverificacion
dela fechadecompraoriginal.
Conserveestasinstruccionesparareferenciafutura.
TengaalamanoelnQmerodemodeloynQmerode
seriede su refrigerador.Estaubicadoenla placa
de datos dentrodel compartimientodel refriger-
ador,enel ladosuperiorizquierdo.Parafacilacce-
so,escribaestos nt3merosen losespaciosprovis-
tosa continuacion.
InstruccionesImportantesdeSeguridad.............................33
Instalacion......................................................................34-36
Controlesde lasTemperaturas............................................37
VistadeIInterior.............................................................38-39
Fabricaci6ndeHieIo............................................................40
SugerenciasParaConservarIosAlimentos...................41-42
AlmacenamientodeIRefrigerador.......................................43
Cuidadoy Limpieza........................................................43-44
SonidosNormalesde Funcionamientos.............................45
AntesdeSolicitarServicio..................................................46
Garantia...............................................................................47
Numerodemodelo
NOmerode serie
Ennuestroafande mejorarIacalidaddenuestros
electrodomesticos,puedequeseanecesariomodificar
el electrodomesticosinactualizarestaguia.
Page 34

Lasadvertenciaseinstruccionesimportantes
sobreseguridadqueaparecenenestemanual
noestandestinadasacubrirtodaslasposibles
circunstanciasy situacionesquepuedan
ocurrir.Sedebeejercersentidocomt3n,pre-
cauciony cuidadocuandoinstale,realice
mantenimientoohagafuncionarelartefacto.
Siemprep6ngaseencontactoconsudis-
tribuidor,agentedeservicioofabricantesisur-
genproblemaso situacionesqueustedno
comprenda.
RECONOZCA LOS
SIMBOLOS DE
SEGURIDAD,
ADVERTENCIAS,
ETIQUETAS
PELIGROZ Riesg0s inminentes que
CAUSARANlesi0nespers0nalesgraveso
la muerte.
ADVERTENCIA. Riesgos o practicas
insegurasque PODRIANcausarlesiones
personalesgraveso lamuerte.
Parareducirel riesgode lesioneso la
muerte,siga las precaucionesbasicas,
incluyendolassiguientes:
IMPORTANTE:LosniSos atrapados y
asfixiadosenrefrigeradoresnoescosadel
pasado.Losrefrigeradoresquese arrum-
ban o abandonan:aun cuandosea "s61o
por unos cuantosalias",contin_anrepre-
sentandoun peligro.Si desechaunrefrig-
eradorviejo,sirvaseseguirlassiguientes
instruccionespara ayudara prevenirun
accidente.
Ariesdetirarsu refrigeradoro congelador
vlejo:
Quitelelaspuertas
Cuando utilice el electrodomestico
siempresiga las precaucionesbasicas.
Use el refrigeradorQnicamentepara el
propOsitoquehasidediseSado.
Para prevenir la posibilidadde peligro
debido a choques electricos, nunca
enchufe el refrigerador en un toma-
corrienteque no hayasido debidamente
puesto a tierra segQnlos c6digoselec-
triceslocalesy nacionales.Verlaadverten-
cia,_iL,y lasinstruccionesdepuestaa tier-
raqueseindicancontinuacion.
Desenchufe el refrigerador antes de
Iimpiarloo de reemplazarelfoco.
Encasede uncortedecorrienteebctrica,
tratedeabrirlapuertaIomenosposible.Si
Ia falla electricase prolongademasiado,
protejalos alimentoscolocandobloquesde
hielo seco encima de los paquetes o
averigQesipuedealmacenarlosenuncon-
PRECAUCION' Riesgos0 practicasinse=
gurasque PODRIANcausarlesionesper-
sonabsmenores.
geladorprovisionallocal. Los alimentos
que se hayan descongeladocompteta-
mentenodebencongelarsede nuevo.
Si el cordonelectricose deshilachao se
da5a se debe reparar o reemptazarde
inmediato. Nunca desenchufesu elec-
trodomesticotirandodelcordonelectrico.
Surefrigeradornodebehacersefuncionar
cercadevaporesexplosivos.
No permitaque los niSosse suban,se
cuelgueno se parenen las parrillasdel
refrigerador.
diseSadoparafuncionarconunafuente
de energiae!ectrica de 1!5 voltios,!5
amperios,60 Hz. 8e recomiendausar
un circuito separadoy puestoa tierra,
exclusivamenteparaelrefrigerador.No
use un cablede extension.Noutilice
ningundisPositivocluepuedaalterare!
rendimientoelectrico de este
electrodomestico.
De,ele las repisas
puestaspara que los
niSos no puedan
meterseconfacilidad.
Esteelectrodomesticoest&equipadocon un
enchufede tres ctavijascon puestaa tierra
comoprotecci6ncontrael posiblepeligrode
choquesebctricos. Se debeenchufaren un
tomacorrientepuesto a tbrra. Si s61ose
disponede un tomacorrienteestandarpara
enchufede dos clavijas,el ctientetiene la
responsabiIidady obligaci6nde reemplazarlo
pot un tomacorrienteparaenchufede tres
clavijas debidamentepuesto a tierra. Por
ningOnmotivecarteo retirela terceraclavija
(puestaatierra)delcableelectrico.Nouseun
adaptador.
CORDONELECTRICOCON
ENCHUFEDETRES CLAVIJAS
CONPUESTA A TIERRA
TOMACOR_IENTE
DEL TIPOCON
PUESTAA TIERRA
Page 35

Su refrigeradornuevofue empacadocuida-
dosamente para el embarque. Retire y
descartelos sujetadoresde empaque(si se
usaron)de las parrillas que se encuentran
inmediatamentearribade cadaparriiladonde
se enganchanen eI marco. Paraquitarlos
sujetadores plasticos muevalos hacia los
ladosy levantelosdirectamentehaciaafuera.
IMPORTANTE:No retire el aislamientode
espumade los respiraderosubicadosen el
techodelcompartimientodealimentosfrescos.
)6
Retire y conserve los tornillos niveladores
que se encuentran en Ia base de la jaula
de embalaje.
Retirey descartelabasede Iajaula y los
tornillos.
Usandopinzasajustablesinstaleloshive-
(adoreshastaelfondoenlosagujerosubi-
cadosenla esquinadelanteradelgabinete
de(refrigerador.
Los modelosde refrigeradorque tienen
ruedasajustablespuedenser nivelados
retirandolarejillainferior*y ajustandolas
ruedascon undestornilladoro casquillode
_". (Verfigura2.)
GIREA LADERECHA
PARASUBIRLA
iSQUlNADELGABINETE
GIREA LA
LIIERDAPARABAJAR
LAESQUINADEL
Figura2
GABINETE
Dejequeel airecirculelibrementeatraves
dela rejillainferiordelantera.
Instaieelrefrigeradoren unlugardondela
temperaturaambienteno descenderaa
menosde55oF(13oC). Contemperaturas
inferioresa 55°F(13°C),elrefrigeradorno
funcionaracon la suficientefrecuencia
paramantener(atemperaturacorrectaen
elcongelador.
DejeunespaciominimodeY_"(1,5cm)en
amboslados,arribay detrasdel refrige-
rador para facilitar (a instalacion.Si el
refrigeradores co(ocadocon el ladode la
bisagradela puertacontraunapared,es
necesariodejarespacioadicionalo invertir
(apuerta(verpagina36)paraque(apuerta
puedaabrirsemas.
Tengacuidado al instalarel refrigerador
sobrepisosde viniloo maderade modo
quenoserayeno daSen.Sepuedeutilizar
unpedazodemaderacontrachapada,una
alfombrau otromaterialparaprotegerel
pisomientrasseinstalael refrigerador.
El refrigeradordebe permanecervertical
duranteporIo menos30minutosantesde
serenchufado.
Tornillos
Paramejorarla aparienciay mantenerbuen
rendimiento,elrefrigeradordebeestarnivela-
do. Dependiendodel modelo,el refrigerador
puedeserniveladodedos maneras.
Todoslos modelosde refrigeradortienen
torniliosniveladoresen la basedel gabi-
nete debajode cada esquinadelantera.
Los niveladorespueden ser ajustados
girandoloshacia adentroo haciaafuera
seg_nsea requerido. Si el piso no esta
niveladoyes necesarioelevar la parte
traseradel refrigerador,useun pedazode
maderacontrachapadauotromaterialsim-
ilar. Parabloquearelgabineteensulugar,
gire hacia abajo ambos tornillos nive-
ladores.(Verfigura !.)
* Parasacar la rejillainferior,sujeteambos
extremosy tirede la rejilIaderechohacia
afuera. Paravolvera colocarla,aiineelos
clipsa resorteconlas aberturasredondas
del gabinetey empujecadaextremode la
rejillainferiorhastaque entreensulugar.
Paraobtenermejoresresultados,despues
de nivelar el gabinete,abra y cierre (as
puertasy luegovuelvaa nivelar.
Figura1
Page 36

IUAIN;TAB#AB BRT ;UP RIOR
MANIJADELAPUERTADELREFRIGERADOR
SINLAMOLDURADEEXTENSION
O ALINEE LA MANIJA SOBRE LOS a _
AGUJEROS DE LOS TORNILLOS, tt.--_.¢ SE REQUIERE UN
INSTALE PRIMERO ELTORNILLO _ / DESTORNILLADOR
"A" PARA ASEGURAR LA MANIJA _/ Illl / LAPHILLIPSlNsTALACIoN.NO"2 PARA
Y DESPUES ELTORNILLO"B". I i /l# /
INSERTEAPRESION/ I . I II \ I ["'-..I II 1 0
LAEXTENSIONENLA_I -;_( Ill [-_-_-- INSTALEELTORNILLOEN
PARTE INFERIOR DE _ IIll / I t _ _ [1 ELAGUJERODELAMANIJA.
LA MANIJA, _ ' L_ NO APRIETE DEMASIADO
J;T [APU RB
(SI ES NECESARIO)
Lapuertadeberiaestarniveladasi elgabinete
estanivelado.
• La puertadelcongeladorestademasia-
doalta.
Afloje los de la bisagra
tornillos '_. ,,_ _J
, , _ Espaciador de
Retirela tapa
espuma de la
puerta - NO Io
descarte
INSTRUCCIONESDEINSTALACIONDELAMANIJASUPERIOR
PARTESUPERIORDELAPUERTADELCONGELADOR
ALINEE LA MANIJA SOBRE LOS /_"..._
AGUJEROS DE LOS TORNILLOS. / I ]
INSTALE PRIMERO ELTORNILLO"A" / I I
PARA AsEGURAR LA MANIJAY _/ ! I
DESPUES LOS TORNILLOS "B". \ I I
NO APRIETE DEMASIADO. \ l l
NOTA: TODOS LOS AGUJEROS DE \ I I
LOS TORNILLOS DE LA MANIJA EN LA \ I I
PARTE SUPERIOR E INFERIOR DE LAS \_,D__
PUERTAS ESTAN DIMENSIONADOS
PARA TORNILLOS AUTORROSCANTES.
NO AGRANDE LOS AGUJEROS CON
UN TALADRO.
DESTORNILLADOR
PHILLIPS NO. 2 PARA
LA INSTALACION.
SE REQUIERE UN
MANIJADELAPUERTADELREFRIGERADORCONMOLDURADEEXTENSION
SE REQUIEREUN DESTORNILLADOR
PHILLIPSNO. 2 PARA LA INSTALAClON.
O
COLOQUEA PRESIONLA
PARTESUPERIORDE
LAEXTENSIONEN
LAPARTE
INFERIORDE
LAMANIJA.
A
U ALINEE LAMANIJASOBRE LOS AGUJEROSDE
LOSTORNILLOS INSTALEPRIMEROEL
TORNILLO"A" PARAASEGURARLAMAN{JA.
SEGUIDODELTORNILLO"B". NOAPRIETE
DEMASlADO.
0
INSTALEELTORNILLO ENELAGUJERO
DELAMANIJA NOAPRIETEDEMASIADO.
(MODELOSSELECTOS)
I
• Ambas puertas estan demasiado altas.
Retire latapa
Afloje los de la bisagra
Afloje los tomillos y deslice la bisagra inferior
a la derecha para bajar las puertas.
• Ambas puertasestandemasiadobajas.
Retire la tapa
Afloje los de la bisagra
tornillos _ _
16''
ENClERTOS MODELOS
RETIREELFORRO
ADHESIVODE LA
CINTA DESPUES
DEL PASO 5
APLIQUE
PRESION
tNSERTELAEXTENSIONDELA
NtJAEN ELSOPORTE
ITUADOEN LAPARTE
INFERIORDE LA
PUERTA
Afloje los torniflos y deslice la bisagra inferior
a la izquierda para elevar las puertas.
• Vuelvaa apretarlos tornillosdespues
dehacerlos ajustes.
* Paramayorinformaci6nconsultelas
instruccionesdeinstalaci6n.
Page 37

[A;PU RTA;
HerramientasNecesarias: Destornillador
Phillips, Ilave de tubo y trinquete de _",
cuchilloparaenmasiIlaro Ilavede una soIa
bocade_0".
1.RetireIatapade Iabisagray cot6quelaa
unIado.
2. Retirelos tornillosy la bisagracon una
Ilavedetubo de_" ydejea unlado.
3. LevantecuidadosamenteyretireIapuerta
delcongelador.
4, Retireeltornilloyelbrazodelabisagrade
la parte superiorde la puertadeI refrige-
rador.
5. Levantecuidadosamenteyretirelapuerta
delrefrigerador.
6. Retire la cubiertade la rejilla inferiory
col6quelaa unlado.
10.
Retirelos taponessituadosen la parte
superiordelas puertasdel congeladory
del refrigeradory col6quelosen el Iado
opuesto.
11.Retirelostaponesde losagujerosde los
tornillosde lapartesuperiordeIgabinete
ycoI6quelosenel ladoopuesto.
12.Retirelasarandelasy virgulitasdel interi-
ordela paladelabisagraycol6quelasen
elexteriordela paladeIabisagra.
13.Vuelvaa colocarcuidadosamentelapuer-
tadelrefrigeradorenla paladela bisagra
enla esquinainferior.
14.Inserteelbrazode la bisagraen suIugar
yasegQreloconuntornillo.
15.
Coloquecuidadosamentela puerta del
congeladorarribadelbrazodela bisagra.
Useelespaciadordeespumadelapuerta
para determinar el espacio entre Ias
puertas,*
5/16"
Depositelapuertasobreunasuperficiequeno
Iaraye.
Herramien_
7. Retirela palade la bisagrade laesquina
inferiordel refrigeradore instalelaen el
ladoopuesto.
8. Retirela pala dela bisagradeI ladoinfe-
rior de la puerta del refrigerador y
col6quelaenel ladoopuesto.
9. RetirelapaladelIadoinferiorde lapuerta
del congeladory col6quelaen el lado
opuesto.
16.Insertelabisagrasuperiorensu lugaren
la puerta del congeladory apriete los
tornilIoscon laIlavede-%".
17.Instalea presion Ia tapa de Ia bisagra
firmementeen su lugar.
18.Vuelvaa colocarIa rejillainferior,
Recuerdeenchufarsu refrigeradory volvera
programarlos controlesen el (los)ajuste(s)
apropiado(s).
A. Retireeltornilloizquierdo
B. Abrala puertay levantela.Depositela
puertasobreunasuperficiequeno la
raye.
Retireel conjuntode la palade la bisagra.
Depositelapuertasobreunasuperficiequeno
Iaralle.
No descarteel espaciadorde espumade la
puerta. Laspuertasse asientanconel uso.
}6
Page 38

Elestiloy de loscontrolespuedevariardependiendodelmodelo.LoscontrolesestasubicarenIapartesuperiordelcompartimientodelosalimen-
tosfrescos.Otrosmodelostienencontrolesseparados,unoen IapartesuperiordeIcompartimientodelosalimentosfrescosyotrocontrolsencillo
alfondodelcompartimientodelcongelador.
AJUSTES INICIALES
El controldelcongeladorsepuedeajustar _ El controlde los alimentosfrescos se
de ! (mas caliente) a 7 (mas frio), puedeajustarde1(mascaliente)a 7(mas
Inicialmenteajusteestecontrolen4. frio). Inicialmenteajusteestecontrolen4.
AJUSTES INICIALES
I Elrefrigeradorfuncionaraininterrumpdo
por vaias horas al cuando en
funcionamientopor primeravez. Esto
esnormal.
I Deje funcionarel refrigeradorpor Io
menosde 8 a 12horasantesde colo-
carlosalimentos.
;T; [0;(0N[R0[[;
Si24horasdespuesdecolocarlosalimen-
tos observaque uno o ambos compar-
timientosdeberianestar masfrios o mas
calientes,ajusteel (los)control(es)segOn
seindicaenIa tablasiguiente.
Conla excepci6nde cuandose poneen
funcionamientoel refrigeradorporprimera
vez,no cambieningunode los controles
masde unnOmeroa Iavez.
Espere24 horasparaque Ia temperatura
seestabiliceantesdereajustar.
Cualquiercambioen unode loscontroles
afectarala temperaturadel otro compar-
timiento.
El control para los alimentosfrescosse
puedeajustardesde1(mascaliente)hasta
9 (mas frio). Inicialmente,ajuste este
controlen 5.
A veces, la parte delanteradel refrigerador
puedesentirsecalientealtacto. Estaes una
situacionnormalqueayudaaprevenirIacon-
CompartimientodeAlimentos
FrescosdemasiadoCaliente
CompartimientodeAlimentos Gireelcontrolde alimentosfrescosal proximo
FrescosdemasiadoFrio ajustemasbajo.
CongeladordemasiadoCaliente Gireel controldelcongeladoralproximoajuste
CongeladordemasiadoFrio Gireel controldelcongeladoralproximoajuste
Apagueel Refrigerador Gireel controlde alimentosfrescosa'OFF'
(Controlesde DiscosRotatorios) (APAGADO)
Apagueel Refrigerador DesliceelcontroldeIcongeladora laposici6n
NOTA:AI apagarel controlde alimentosfrescossedetienee!enfriamientoen AMBOScompar-
timientosperonose cortala electricidadal refrigerador.
El control del congeladortiene ajustes
desde1 (mascaliente)hasta9 (masfrio).
Inicialmente,ajusteestecontrolen5.
densacionenel gabinete.Estacondici6nsera
mas notoria cuandoel refrigeradorfunciona
por primeravez, durantetiempocalurosoy
despuesdeabrirla puertade maneraexcesi-
vao prolongada.
Gireel controIde alimentosfrescosal proximo
ajustemasalto.
masalto.
masbajo.
37
Page 39

El refrigeradorha sidodiseSadoparadescon-
geIarseautomaticamente.
| Duranteelcicloautomaticodedescon-
gelacion,puedeobservarseunresplan-
dor/reflejorojoen losorificiosdeventi-
Iaci6nenlaparedposteriordeIcompar-
timiento del congelador y oirse el
sonidodegotasdeaguacuandoentran
en contacto con el calentador de
descongeIaci6n. Esto es normal
duranteel ciclode descongelacion.
Paraasegurartemperaturasapropiadas,usted
debedejarqueel airecirculeentreel refriger-
adory el congeladorcomose muestraen Ia
ilustracion.
NObloqueeningunodeestosrespiraderos
con paquetesde alimentos. Si los respi-
raderosestanbloqueados,seobstruiraelflujo
detairey ocurriranprobtemasdetemperatura
yhumedad.
• iii
PARRILLAS
ParrillasAjustables: 3u refrigeradorpuede
tenerparrillastipo consola. Parasacar una
parrillalevantelevementelapartetraseradela
parrillay saqueladerechohaciaafuera. Para
colocarla parrillaenotra posici6n,levanteel
hordedelanterode laparrilla.Insertelosgan-
chosen la aberturadeseadadel soportey
deje que Ia parrillaentreen su lugar,ase-
gurandosedequeestefirmementebloqueada
en la partetrasera. Enalgunosmodelos,el
hordeexteriorde la parrilladescansaen los
rielesmoldeadosenlosIadosdelgabinetedel
refrigerador.
elestilodelas parrillaspuedevariar
ParrillasatodoelAncho:Algunosmodelos
tienenparrillasatodoelanchoquedescansan
enlosrielesdesoportederechos.Parasacar:
tirede la parrillahaciaadelantehastaquese
detenga,levantela partedelanteraysaquela
parrilladerechohacia afuera. Paravolvera
instalarinviertaesteprocedimiento.
PUERTA
Los CompartimientosRemoviblesde la
Puerta (modelosselectos)estan dise_ados
para colocarenvasesde mayorcapacidad.
Sonajustablesyfacilesdesacar.Parasacar:
Levanteel compartimientohastaquese salga
delosretenesdelforrodela puerta,luegotire
deI compartimientoderecho hacia afuera.
Inviertael procedimientoanteriorparavotvera
colocarel compartimiento.
Otros modelos estan equipados con
CompartimientosFijos de la Puerta con
capacidadparaenvasesdemasdeun galon.
Lasdivisiones(modelosselectos)seajustan
en los estantesde la puertadel refrigerador
para mantenerfirmes Ias botellasy otros
envasesensulugarcuandolapuertaseabra
osecierre.Lasdivisionesseajustandeslizan-
dotasde unIadoaotro.
Nunca intente ajustar una pardllaque
tengaalimentossobreella.
}8
Page 40

CAJONES
Su refrigeradortieneya sea unagavetapara
bocadilloso uncaj6nde almacenamientocon
controlde temperaturapara guardarcarnes
frescas,quesosy fiambresduranteperiodos
cortes.
El controlde la temperatura(modelosselec-
tos)seencuentraarribadelcaj6n,enIa pared
traseradelrefrigerador.
Desliceel controlhaciaarriba a la posicion
"Cool" para guardar queso o bocadillos.
Desliceel control hacia abajo a la posicion
"Cold",paracrear unatemperaturamasbaja
dentrodelcaj6n.
Latemperaturamasbajaserecomiendacuan-
do se guardacame de res, camede aveo
pescado.
Lagavetaparabocadillosnotienetemperatu-
raadjustable.
Pararetirarestecaj6nparasu limpieza:
tiredelcajonhaciaafuerahastaeltope
Ievanteligeramenteel cajonparasacarlo
Parareinstalarel cajon:
inviertael procedimientoanterior
Paraun6ptimoalmacenamientodelasverduras,
desliceetcontroldelagavetaaladerechapara
aumentarlahumedadenlagaveta.
Para retirar la gavetade Iasverduraspara
limpiarla:
tire de Ia gavetade Ias verdurashacia
afuerahastaeItope
inclinehaciaarribala partedelanterade Ia
gavetaytiredeellahaciaafuera
Para volver a colocar la gaveta de Ias
verduras:
alineelagavetaen losrieles
Ievantela partedelanterade la gavetay
deslicelahastasulugar.
I Para obtener mejores resultados,
mantengalasgavetasde lasverduras
hermeticamentecerradas.
La Parte Superior de la Gaveta de las
verduras sirve come parritla inferior del
refrigerador.
Pararetirarla parritlasobreIa gavetade las
verduras,levanteel borde detanterode la
parrilla,tire de la parriltadirectamentehacia
afuera
Paravotvera cotocarlaparrittasobrelagaveta
delasverduras,coloquelasbarrasposteriores
enelsoporte,empujelaparriltahaciaelfondo
hastequeel hordedelanteropuedaset baja=
doa suposici6ncorrect&
El congeladorde algunosrefrigeradoresesta
equipadocon una ParrillaAjustable, La
parrillapuedeserajustadaparaacomodaruna
variedaddealimentoscongelados.
Pararetirarlaparrilla:
Ievantehacia arriba el extreme aproxi-
madamente3pulgadas
saque las barras del extreme derecho
fueradelascavidadesdela paredlateral
Paravolvera colocarIaparrilla:
coloquelostaponesdesoporteremovibles
en la pared lateral izquierdaa Ia altura
deseada
invierta el procedimientopara sacar Ia
parrilla
Otrosmodelostienenun estante parcialdel
congeladorde la anchura. Esteestantees
colocadoen el lade izquierdodel compar-
timientodelcongeladormontandoen la pared
deIIadoizquierdo.
I Paramejoresresultados,mantengala
gavetabiencerrada.
GAVETAS DE LAS
VERDURAS
En las Gavetasdelas Verdurasseguardan
las frutasy las verduras.Algunosrefrige-
radorestiene ya sea 1 o 2 controlesde
humedad situados en la parrilla del
compartimientode las verduras,sobre las
gavetasdelasverduras.
Paraun6ptimoalmacenamientodelasfrutas,
desliceel controla laizquierdaparareducirIa
humedadenIagaveta.
}9
COMPARTIMIENTO DE
PRODUCTOS LACTI=OS
Parausar el espaciosoCompartimiento de
ProduetosL_cteos,simpJementeJevanteta
tapa.
Nuncaintente ajustarla parrilla¢uando
tengaalimentossobreella.
La Canasta Para AlimentosCongelados
(modelosselectos)se encuentraen la parte
inferiorde la puerta deI congelador. En la
canasta se ofrece espacio para guardar
alimentoscongeladosquetiendena moverse
o deslizarse (tales como Ias verduras en
bolsas).
Page 41

iDIA;Df(UBO;Df
Algunos modelos estan equipados con
bandejasde cubosde hieIo.Parasacar los
cubos de la bandeja,coloque la bandeja
invertidasobreel recipientey tuerzaambos
extremosdela bandeja.
Aigunosmodelosfabrican hielo automatica-
mente.El ntimerodeIjuegoparafabricarhielo
apropiado para ser instalado en estos
modelos,se encuentraenlaplacadedatos.El
juegocontieneIasinstruccionesdeinstalacion
ylasinstruccionesparalaconexiondeIagua.
I Las guiasdeconsumodeenergiaque
estan indicadasen el refrigeradoral
momentode la compra,no incluyenel
usodeenergiadela maquinadehacer
hielo.
Otrosmodelostienenuna maquinade hacer
hieloinstaladaen lafabrica.Elconjuntode la
tuberiade entradadel aguarequeridapara
completarla conexiona la lave del agua,se
encuentraenunabolsaenel interiordelrefri-
gerador.Conectela maquinadehacerhieloal
suministrode aguasegtin las instrucciones
provistasporseparadoconsurefrigerador.
NIVEL DE HIELO
AJUSTABLE
(MODEL08 8ELECT08)
Algunas m£quinas de hacer hielo estan
equipadascon unbrazosensorqueajustala
cantidadde hieloquehayen el depositodel
hieloparaaquellasoportunidadesen quese
necesitamenoshielo.
Despuesde haber conectadoel refrige-
rador al suministrode agua, muevaIa
manecilladealambrehaciaabajo.Estoini-
clarael funcionamiento. La maquinade
hacerhielose Ilenaraconaguacuandoel
congelador alcance Ia temperatura
correcta.
Puedentranscurrirde8 a 12horasantes
de que la maquina de hacer hielo
comience a producir cubos de hielo
utilizables. Los primeros dos Iotes
probablementecontendran cubos muy
pequeios o de forma irregulardebidoal
aireen Ia Iineadesuministrodeagua.
El Iote inicial tambien puede contener
impurezas provenientesde la tuberia
nuevadelsuministrode agua.PorIotanto,
espreferibledescartartodosloscubosde
losprimerosdoso tresIotes.
Cuandolos cubosdehieloson expulsados
esnormalquevarioscubossalganunidos.
Sepodransepararfacilmente.Lamaquina
de hacer hielo continuara produciendo
hielo hastaque la cantidadde cubosde
hielo sea suficiente para levantar la
manecillade alambrey la maquinase
apague.
Se puedenoir ciertos ruidos cuandose
esta fabricandoel hielo.El motor puede
hacerunIevezumbido,los cubossonaran
alcaersobrela bandejavaciay la lave de
aguapuedeemitirunchasquidoozumbido
devezencuando.
Si el hielono se usacon frecuencia,los
cubos se opacaran, disminuiran de
tamaio,se pegarany adquiriranmaIsabor.
Vacieel depositode hieloperiodicamente
y limpielocon agua tibia. Cerci0resede
secar bienel dep6sitoantes de votvera
colocarloen su posici0n.
Parasacarel recipientedel hielo,tire de el
haciaadelante,alejandolodeIamaquinade
hacerhielo.Paraevitarque sigasaliendo
hieloalretirareldep0sito,apaguelamaquina
Ievantandolamanecilladealambre.
Paravolvera colocarel recipientedelhielo,
inviertael procedimientoanterior.Baje la
manecilladealambresideseaencenderIa
maquinade hacerhielo.
Nosedebencolocarbebidasnialimentos
en el dep0sitodel hielo para enfriarlos
rapidamente. Estos articulos pueden
bloquearla manecillade alambrey daiar
Iam£quina.
Cuandoelsuministrodeaguavayaaserinte-
rrumpidoporvariashoras,apaguelamaquina
dehacerhietolevantandoIamanecilla.
PARA SU SEGURIDAD
No introduzcalos dedos o Ia mano en el
mecanismo automatico de hacer hielo
mientrasel refrigeradoresteconectado.Esto
Ie protegera contra posibles Iesiones y
tambienevitarainterferenciacon las piezas
moviles del mecanismo eyector y del
calentadorqueexpulsalos cubos.
Enrarasocasiones,loscubosde hielopueden
salir descoloridos,mostrandogeneralmente
uncolorazulverdoso.Lacausade estarara
decoloraci6nes unacombinaci0ndefactores
tales como ciertascaracteristicasdel agua
local,la plomeriadela casayla acumulacion
de salesde cobre en la tuberia inactivade
suministrodeaguaqueabasteceaIamaquina
dehielo.
El consumo continuo de los cubos
descoloridospuedesernocivoparala salud.
Si observa la mencionadadescoloracion,
descartelos cubos de hielo y pongaseen
contactoconsu Distribuidorparacomprare
instalarunfiltroenIatuberiadelagua.
Manectla
de Alambre
Paraajustarla oantidaddehielopreducida:
Oprima el brazo sensor de pt£stico hacia
adentroy gire la palancade alambrea Ia
capacidaddeseada.
50%
Page 42

i[li[illl [111(II
La temperatura del compartimientode
alimentosfrescosdel refrigeradorse debe
mantenerentre1oC(34oF)y4°C (40°F).
La temperaturaideales de 3° C (37oF).
ParaverificarIa temperatura,coloqueun
termometroparaelectrodomesticosen un
vasodeaguaenel centrodelrefrigerador.
Espere 24 horas antes de verificar la
temperatura.Si latemperaturasobrepasa
4oC (40° F) ajusteloscontrotessegin se
expticaen lap£gina37.
Evitesobrecargarlas parrillasdel refrige-
radorpues esto reducela circulaci6nde
airealrededorde losalimentosy ocasiona
enfriamientoirregular.
FRUTAS Y VERDURAS
La gaveta de las verduras retiene la
humedad para ayudar a preservar la
frescura de las frutas y verduras por
periodosmas protongados.(ConsulteIa
pagina38.)
Clasifiquelas frutas y verdurasantesde
guardarlasy consumaprimerolasquese
encuentren maduras o ma!lugadas.
Descarteaquellasque muestrensefiales
dedescomposici6n.
Siempre envuelva los alimentos que
despidenolortales comola cebolla y el
repollodemodoqueelolornose transfiera
a otrosalimentos.
Aunque las verduras necesitan cierta
cantidad de humedad para retener la
frescura, demasiada humedad puede
acortar el tiempo de conservaci6n
(especialmentela lechuga). Seque bien
Iasverdurasantesdeguardarlas.
QUESOS Y CARNES
La camecruday de avedebeenvolverse
muybienparaquenoocurranderramesy
contaminacion de otros alimentos o
superficies.
A vecesse puedeformarun mohoen la
superficiede los quesos duros (Suizo,
Cheddary Parmesano). Corte por Io
menosunapulgadaalrededory debajodel
area afectada. Mantenga el cortador
alejado del moho. El queso restante
retendrasu sabor y se puedecomersin
preocupacion.NOtrate deconservarlas
rodajas individuales de queso, queso
suave,requeson,crema,nata cortadao
yogurcuandotengansefialesdemoho.
PRODUCTOS LACTEOS
LamayoriadelosproductosIacteoscomo
Ia leche,yogur,natacortaday requeson
muestranIafechade vencimientoen sus
envases para asegurar su correcta
duraci6n.Guardeestosalimentosen los
envasesoriginalesy refrigerelosIo mas
prontoposibley despuesdecadauso.
i[li[lll; (llG[[ilO;
El compartimientodel congeladorsedebe
mantenera unatemperaturaapproximada-
mente-18oC(0° F)o inferior.Paraverificar
Ia temperatura,coIoque un termometro
paraelectrodomesticosentrelos paquetes
congeladosy espere24 horasantes de
verificarla.Si la temperaturaesta sobre-
18°C(0° F),ajusteelcontrolcomoseindi-
caenla pagina37.
ElcongeIadorfuncionaramaseficazmente
si se ocupa por Io menos dos terceras
partesdesucapacidad.
ENVOLTURA DE
ALIMENTOS PARA SU
CONGELAClON
Para reducir la deshidrataci6n y el
deterioro de Ia calidad, use papel de
aluminio, envoltura para alimentos
congelados, bolsas especiales para
alimentos congelados o envases
hermeticamentecerrados. Extraiga la
mayorcantidadposiblede airedelpaquete
y asegirese de queeste biensellado,el
aire atrapadopuede resecar,cambiarde
color o dar mal sabor (quemadurade
congelacion)a losalimentos.
Envuelvabienlascarnesfrescasy deave
con envoltura especial para alimentos
congeladosantesdeguardarlas.
No congelenuevamentela came que
haya sido descongelada completa-
mente.
COMO CARGAR EL
CONGELADOR
Evite guardar demasiados alimentos
calientesen el refrigeradorde una sola
vez. Esto sobrecarga el congelador,
reduce Ia velocidad de congelaci6n y
puede elevar la temperatura de los
alimentoscongelados.
Deje un espacioentre los paquetesde
manera que el aire pueda circular
Iibremente para que los atimentos se
congelenIomasrapidoposible.
Evite guardar alimentos dificiles de
congelartales como helado y jugo de
naranjaconcentradoen lasparrillasde la
puerta del congelador. Es preferible
guardarestosalimentosen el interiordel
congeladordondeIa temperaturafluctia
menosal abrirlapuerta.
Consulte laTablade Conservaciondelos
Alimentosen lapagina42paralostiempos
dealmacenamientoaproximados.
Page 43

TABLA DE CONSERVACNONDE LOS AMMENTOS
(Lostiemposde conservaci6nsonaproximadosy puedenvariardependiendodeJtipodeempaque,temperaturadealmacenamientoyla calidaddeJ
atimentocuandofue comprado.)
_;{o]_lUi_lEO1,.11J_'To_/:[o_-1
Mantequilla
Leche y Crema
Queso en crema, pasta de queso
y atimentos de queso
Requeson
Crema Acida
Queso duro (Suizo,
Cheddar y Parmesano)
Ili'|li'i"
Huevosenteros
Qaraso yemasrestantes
1 mes
1 semana
1 a 2 semanas
3 a 5 dias
10 dias
1 a 2 meses
3 semanas
2 a 4 dias
6 a 9 meses
No se reoomienda
No se reoomienda
No se reoomienda
4 a 6 meses
Puede quedar migajoso
No se reoomienda
9 a 12 meses
Envolver bien o cubrir.
Verifiquelafecha del envase.Cierrefirmemente.Novuelvaa colocarlas porciones
nousadasenel envaseoriginal.No congelela cremaa menosque seabatida.
Envolver bien.
Guardar en el envase original. Verificar lafecha del envase.
Envolver bien. Cortar cuatquier moho.
Refrigerar colocando el extremo peque_o hacia abajo.
For cadataza de yemasque se desee congelar,agregueI cucharaditade aztJcar
si sevan a usar endulces ouna cucharaditadesal si es paraplatos no dulces.
liil,irl}
Manzanas
Ptatanos
Peras, ciruelas, aguacate
F_sas, cerezas, damascos
Uvas
Frutas acidas
PiSa,cortada
1 rues
2 a 4 dias
3 a 4 dias
2 a 3 dias
3a5dias
1 a 2 semanas
2 a 3 dias
8 meses (cocinadas)
6 meses
(enteros/pelados)
No se reoomienda
6 meses
1 rues (enteras)
No se reoomienda
6 a 12 meses
Puede tambien guardarse verdes o manzanas duras a una temperatura de
60 a 70° F (15 a 21° C).
Madurar a temperatura ambiente antes de ser refrigeradas. Los platanos y
los aguacates seobscurecen cuando son refrigerados.
Tambien se puede guardar a 60 a 70° F (15 a 21° C). Si se refrigeran,
guardelas sin oubrirlas.
No maduraran despues de la compra. Use rapidamente.
I'l= il,i'Jif;
Esparragos
Repollitos de Bruselas, br6coli,
coliflor, chicharos, frijoles,
cebollas, pimientos
Repollo, apio
Zanahorias,pastinaca,betarraga
y nabos
Lechuga
1 a 2 dias
3a5dias
1 a 2 semanas
7 a 10dias
7 a 10dias
8 a10meses
8 a10meses
No se recomienda
8 a 10 meses
No se recomienda
No lave antes de refrigerar. Guarde en la gaveta de las verduras.
Envueiva tos alimentos que producen olor. Deje los chicharos en las
vainas.
Envuelva los alimentos que producen olor y refdgere en la gaveta de las
verduras.
Retire las hojas. Envuelva los aiimentos que producen olor y refrigere en la
gaveta de las verduras.
III
Polioy pave, entero
Polioy pave, presas
Pescado
Tocino
Res o cordero, molida 1
Res o ternera, asada y bistec 3
Jam6n, completamente cocido,
Fiambres
Cerdo, asado
Cerdo, chutetas
Saichichas, molidas
Salohiohas, ahumadas
Ternera
Satchiohas
entero
mitad
rebanadas
Fuentes: Ministerio de Agriculturade los Estados Unidos; Instituto de Mercadotecnia de Alimentos;Servicio de Extensi6n Cooperativa, Universidad Estatal de Iowa.
1 a2alias
1 a2alias
1 a2alias
7 dias
a 2 dias
a 5 dias
dias
i7
i5
dias
i3
dias
a 5 dias
i3
a 5 dias
i3
i3
a 5 dias
il
a 2 dias
l
i7
dias
l
i3
a 5 dias
l
i7
dias
i
12 meses
9 meses
2 a 6 meses
1mes
3 a 4 meses
6 a 9 meses
1a 2 meses
1a 2 meses
1a 2 meses
1 a 2 meses
4 a 6 meses
4 meses
1 a 2 meses
1a 2 meses
4 a 6 meses
1 rues
Mantener en el envase original para refrigeracion. Cuando congele pot mas
de 2 semanas, envuelva nuevamente con envoltura para congelador.
Las carnes fresoas pueden ser guardadas en el envase original para su
refrigeracion. Cuando congele por mas de 2 semanas, envuelva nueva-
mente con papel para congelador.
Los fiambres sin abrir envasados al vacio pueden ser guardados durante 2
semanas en la gaveta de la came y queso.
Las carnes procesadas deben ser bien envueltas y guardadas en la gaveta
para bocadillos.
42
Page 44

Si estaraausentemenosdeun mes,dejelos
controlesenIaposicionnormal.
Duranteausenciasmasprolongadas:
1. Retiretodoslosalimentos,
2. Apaguela maquinade hacerhielo(si esta
instalada)y cierrelaIlavedelsuministrode
aguaal refrigerador,
Y
3. Desenchufeel refrigerador,
4. Limpiey sequeel refrigeradormeticulosa-
mente,
5. Dejelaspuertasabiertasparaevitarmalos
olores.
Para la mudanza,siga los pasos desde 1
hasta4 bajoVacaciones. Ademas,retirey
empaqueconcuidadotodasIaspiezasquese
puedendesmontarfacilmente. Transporteel
refrigerador en posicion vertical con Ias
puertas cerradas y aseguradascon cinta
adhesiva.
Consultelatablaen la siguientepaginapara
las instruccionesespecificasde limpiezadel
refrigerador.
Desenchufeel cableelectricoantesde
la limpieza.
LIMPIEZA DEBAJO DEL
REFRIGERADOR
El refrigeradorpuede rodarse hacia afuera
para limpiarel pisodebajode el. Elevelos
tornilIosniveladoressi estanbloqueados(Ver
pagina34). Tiredel refrigeradordirectamente
haciaafuerade lapared.
REEMPLAZO DE UNA
BOMBILLA
Desenchufeel cable electricoantesde
reemplazarla(s)bombilla(s). Pongase
guantescomoproteccioncontra posi.
blesvidriosrotos.
8iempre use una bombillaestandarpara
electrodomesticode 40o 60watts.
Refrigerador
La(s)bombilla(s)seencuentra(n)debajode la
partesuperiordel compartimientodeIrefrige-
rador.
Destornillelabombillay reemplacela.
Conge/ador
AlgunosmodelosestanequipadosconunaIuz
enel congelador.EstaIuzestacolocadaen Ia
pared trasera deI compartimiento del
congelador,cerca de la esquina superior
derecha.
Parasacarla bombilla:
Sujetela parte superiore inferiorde la
cubiertade la bombilla.OprimaIasareas
de Ias leng0etasde sujecion,aplicando
suficientepresi6ncomo para desengan-
charIasleng0etas.AImismotiempo,gireIa
cubiertahaciaabajoysaquela.
Destornillela bombillay reemplacela.
Vuelvaa colocarla cubiertadela bombilla
girandoladenuevoasulugare insertando
IasIengQetasenIasranurasapropiadas.
4}
Page 45

DesenchufeelcordonelectricoantesdelaIimpieza,NOtoquelassuperficiesrefrigeradasconlasmanoshumedas0 mojadas,Losobje,
tos mojadosse adhierena lassuperficiesmetalicaslAntesdelimpiarelcongelador,esperequesedesoongeleyentibie. Dejequelas
parrillasdevidrioseentibienantesdesumergirlasenaguatibia.
TabladeLimpiezadelRefrigerador
Rejillainferior
Condensador NonecesitaIimpiarloa menosqueesteubicadoen unlugargrasoso,
Manijasde la puerta Detergentesuavey aguatibia
Superficiesmetalicaspintadas:
gabinetes,puertas
Juntadela puerta
Parrillasdevidrio
Detergentesuavey aguatibia
DetergentesIiquidossuaves
enaerosol
Accesoriode laaspiradora
DetergentesIiquidossuaves
enaerosol
Detergentesuavey aguatibia
DetergentesIiquidossuaves
enaerosol
Bicarbonatodesodayagua
tibia
Detergentesuavey aguatibia
Detergentesuavey aguatibia
Limpiavidrios
Detergentesliquidossuaves
enaerosol
Retirela rejillainferiorsujetandolosextremosy tirandoladerechohacia
afuera.Paravolveracolocar,alineelosclipsconlasaberturasredondasdeI
gabinetey empujecadaextremohaciaadentrohastaqueIa rejillainferior
entreensulugara presion.
polvorientoo muytransitadoporanimalesdomesticos.
Sequeconunpasosuaveylimpio.
Nuncalimpieelrefrigeradorconunpasosucioo unatoallamojada.Estos
puedendejarresiduosquepuedenrayaro debilitarIapintura.No useespon-
jasde alambre,productosdelimpiezaen polvo,blanqueadoro productosque
contenganblanqueador.Estosproductospuedenrayary corroerel acabado
dela pintura.
Nouseceraenlaspiezasdeptasticoo devinilo.
Use1o 2 cucharadasde bicarbonatodesodaporcadacuartodegaIon
deagua.Aseg0resedeexprimirbienel pasoo laesponjaantesdelimpiar
alrededorde loscontroles,Iuceso piezaselectricas.
Elvidriodebeestara la temperaturaambienteantesdesumergirloen
aguatibia. Nuncauseaguacaliente.
ParedInterior y
revestimientodela puerta
Gavetas,depositos,bandeja
paraloshuevos,etc.
Detergentesuavey aguatibia
Bicarbonatodesoday agua
tibia
Detergentesuavey aguatibia
Vealasindicacionesanterioresparalasoluci6nde bicarbonatodesoda.
NOuseproductosdelimpiezaabrasivos,detergentesconcentrados,blan-
queadores,cerasde limpieza,solventesy abrillantadoresparaIimpiarel
interiordeIrefrigerador.
Sequeesmeradamente.NOloslaveenel IavavajiIlasautomatico.
Page 46

Lasmejoraseneldisefiodelarefrigeraci6npuedenproducirsonidosensunuevorefrigeradorquesondiferentesoquenoexistianenelmodelo
antiguo.Estasmejorasfueronhechasparacrearunrefrigeradorqueseamejorparaconservarlosalimentos,queahorreenergiayqueengeneral
seamassilencioso.Debidoaquelosnuevosmodelosfuncionanmassilenciosamente,ahoraesposibledetectarsonidosqueestabanpresentesen
losmodelosmasantiguosperoquepasabaninadvertidosdebidoalosnivelesderuidomasaltos.Muchosdeestossonidossonnormales.Porfavor
tomenotadequelassuperficiesadyacentesaunrefrigerador,talescomolasparedes,lospisosylaestanteriapuedenavecesaumentarelnivelde
estossonidos.Acontinuaci6nseindicanalgunosdelossonidosnormalesquepuedenestarpresentesenunrefrigeradornuevo.
MAQUINADEHACERHIELO:(Si la tiene)La m_quinade
hacerhieloocasionalmentegeneraraunsonidodegolpeteo
cuandolos cubesde hielo caen en el dep6sitodel hielo.
CONTADOR DEL TIEMPO DE
DESCONGELACION:Losrefrigeradores
que no se descongelan tienen un
contadordel tiempo de descongelaci6n
que produce un chasquido cuando el
refrigeradorcomienzao termina un ciclo
de descongelaci6n.
Ademastambiense puedeoir el ruidoel motorqueempuja
el hielo desde su bandeja antes de que caiga en el
dep6sito.Estosson sonidos normalesnecesariospara la
fabricaci6ndelhielo.
CONTRACCION Y EXPANSION DEL
COMPARTIMIENTODELCONGELADOR:
Puedeocurrirun sonidocomoun estallido
en el congeladorcuando el refrigerador
comienza a funcionar debido a la
contracci6no expansi6nde los materiales
enel_,readelcongelador.
COMPRESOR:Paraqueun refrigeradornuevo
funcione mas eficientemente,el sistema de
refrigeraci6npuede funcionar por un tiempo
masprolongadoparaconservarlosalimentosa
la temperaturadeseadaparasufrescura. Este
nueve compresor de alta eficiencia puede
funcionarpor periodos mas largos y generar
sonidostales como un zumbidoagudo o un
sonidopulsante.
FLUJODELREFRIGERANTE:Elflujo delrefrigerante[
en su refrigeradorpuede causar un sonido comeI
borboteo o golpeteo cuando el refrigerador esteI
funcionandoo juste despu6sde que el refrigerador
terminael ciclo. Elrefrigerantetodavfaestacirculando
en as tuberas.
SONIDOS DE LA CIRCULACIONDEL AIRE: Tanto el
ventiladordel evaporadordel congeladorcomoel ventilador
del condensadoren la parte inferiordel gabinete creara.n
sonidosdecirculaci6ndel aire. El ventiladordel evaporador
esta circulandoel aire fifo a travesdel compartimientodel
refrigeradory congelador.Elventiladordelcondensadoresta
extrayendoelcalorgeneradocuandoel gabinetees enfriado.
VALVULADELAGUA (Sila tiene): Se puededetectar[
unzumbidoenla parletraseradel refrigeradorcuando[
el distribuiderdel hielorequierequela valvuladeagua I
se abra para Ilenar la bandeja de la m_tquinade I
fabricarhielo. Despuesde que el hielo sale, puede
oirseel ruidode aguaquegoteacuandolas bandejas
est_nsendo enadas.
NIVELADODELGABINETE: Un gabineteque no [
este niveladopuede causar sonidosvibratorioso
golpeteo. Esto puede solucionarseajustandolos
tomillosoruedecillasniveladorasenformacorrecta.
Page 47

ConsulteprimeroestatabladesugerenciasparaIa solucionde averias...posiblementenoesnecesariosolicitarservicio.
PROBLEMA
Nofunciona
Funcionadurante muchotiempo,
condemasiadafreeuencia
ii
II
rl
I
Laluz no trabaja
Resplandorvisibleen los
respiraderosdel congelador
Aire tibio provenientede la
parte inferior del gabinete.
El gabinetevibra
Olor en el gabinete
Ruidos,sonidosy vibraeiones
m
ii
El eongelador,refrigerador
demasiadotibios (el helado
heladoqueda blando)
lid
II
rl
,1
Congelador,refrigerador esta
demasiadofrios (congelacion
congelaci6n de los alimentos)
Lamaquina dehaeer hielo
automatieano funeiona
ii
rl
Los cubos dehielo tienen
i
olor/sabor
Los cubos dehielo se pegan
enla bandeja
Los cubos dehielo se evaporan
Humedaden la superficie del
gabineteentre las puertas
Humedaden las paredes
interiores delrefrigerador o
enla gavetadelas verduras
rl
Los alimentos se secan
lid
IIII
Humedadexcesivaen la Envuelvao cubrabientodostosalimentos.
gavetade lasverduras Reduzcalasaperturasdela puerta.
CAUSASPOSIBLES
El cord6nelectriconoestaenchufado.
Eltomacorrienteno tienealimentaci6nelectric&
Controldetcongeladorcotocadoen la posici6n"OFF"
(Apagado).
El refrigeradorestaendescongelaci6nautomatica.
Temperaturaambienteinferiora 550F(130C).
Losciclosde losrefrigeradoresmodernossonmas
m_sfrecuentesparamantenertemperaturasuniformes.
Estoes normalcuandoel refrigeradores nuevoo ha
sidorecientementeinstalado
Lapuertase abreduranteperiodosprolongadoso con
muchafrecuencia.
Lapuertano quedabiencerrada
Larejitlainferiorestabioqueada.
EIfocose quem6
Nollegaenergiael6ctricaal refrigerador.
Laaparici6ndeun briltooreflejorojoes normal
duranteel ciclo dedescongelaci6n
Estees flujode aire normalparala cJrculaci6ndel
condensadon
EIgabineteno estanivelado Elsued esdebil
Losalimentosque producenoloresnoestancubiertos.
Ruidonormal.
EIgabineteno estanivelado
Controlajustadoa unatemperaturademasiadotibia
Aperturasprolongadasde la puerta.
LatemperaturaambJentees inferiora 550F (13° C).
Losproductosconalto contenidode azt_carpuedenque
queno se endurezcancompletamentecuandoestan
congelados.
EIcontrolestaen un ajustedemasiadofrio.
El brazosensorestaen posici6nhaciaardba.
EIgabineteno estanivelado
Elsuministrodeaguano estaconectadooest_obstruido.
Etcongeladorestademasiadotibio.
Cubesdehieloafiejos.
Malacalidaddelagua
Losaiimentostransmitenold/saberadeI hielo.
Residuodemineralesenel agua.
Usolimitadodel hielo
EscomtJnduranteperiodosde altahumedad.
TiempohQmedocaliente
Aperturasprolongadaso muyfrecuentesde la puerta.
Lapuertano estacerradaen formacorrect&
Losalimentosno envueltosen formacorrecta.
Lagavetade lasverdurasno esta biencerrada.
Loscontrolesdela temperaturaestanen unajuste
muyfrio
Lospaquetesno estanenvueltoso selladosenforma
correct&
Losalimentosno estanenvuettosenforma correct&
TiempohQmedo,caliente.
SOLUCION
Enchufeel refrigeradorenel tomacorriente
Reemplaceel fusible,vuelvaa reportereldisyuntor
AjusteelcontroldeI congelador(verpagina37).
Espere25minutosparaqueelciclode descongelaci6ntermine.
Vuelvaa ubicarelrefrigeradorenunclimaapropiado(verinstalacbnenlapagina34).
Espere24horashastaquese enfriecompletamente(vet controlesdeta
temperaturaen la pagina37).
Estoesnormal. Disminuyalasaperturasdela puerta.
Verifiqueparavetsialgoesta evitandoquela puerta secierre
Desbloqueeparaqueel airetibiosalgadel refrigerador.
Desenchufeel refrigeradory cambieelfoco(verpagJna43).
Verifiquesi el corddnel6ctricoestabienenchufado.
Niveleelgabinete(verpagina34).
Cubrao envuelvalosalimentosqueproduzcanolor. Limpieelgabinete.
VerSonidosNormalesdeFuncionamientoen lapagina45.
Niveleelgabinete(verpagina34).
Ajusteelcontrolde la temperatura(vet pagina37).
Reduzcalafrecuenciade aperturade lapuerta.
RefrigeradornofuncionaraIo suficientecomopara mantenertatemperatura
apropiada
Ajusteelcontrolde tatemperatura(vetpagina37).
Bajeel brazosensora la posicidn"ON"(Encendido)
Niveleelrefrigerador(vetpagina34)
Conecteelsuministrode aguaoretirelas obstrucciones.
Ajusteelcontrolde la temperaturadelcongetador(verpagJna37).
Desc_rtelos;loscubosdehielopuedenabsorberoloresqueafectantambi6nelsabor
P6ngaseencontactoconla compafiiadetratamientodeagua
EnvuelvabJenlosalimentos.
Limpielasbandejascon untrapohumedecidoen vinagrehastaquequeden
limpias
Descartetoscubesdehieloa_ejos.
Normal.
Reduzcaiasaperturasdeia puerta.
Verifiquesi existealgo queevlte quela puerta secierre
Envuelvao cubrabientodos tosalimentos.
Cierrebienlagavetadelasverduras
Ajustelos controlesdelatemperatura(verpagina37).
Envuelvao cubrabientodos losalimentos.
Page 48

if{ il 11£fi4101
Garantiacompletade unafio
Garantialimitadadecincoafiosde los
componentesdelsistemaselladoy del
recubrimientodelcompartimientodealmentos
Primerafio
Amana Appliances reparara o reemplazara.
induyendola manode obra y el transportecorre-
spondiente(I.a.b.Amana.Iowalcualquierpiezaque
secompruebedefectuosadebidoa lamanodeobra
o losmateriales.
8egundoal quintoafio
Amana Appliances reparara o reemplazara.
incluyendolamanodeobrayeltransporte,cualquier
componentedel sistemaselado [compresor,con-
densador,evaporadory tuberiadeconexi6ninterna)
y reparara cualquier recubrimientodel compar-
timientode almentos(excluyendoel recubrimiento
delapuerta)quesecompruebedefectuosadebidoa
la manodeobrao losmateriales.
ENNINGONCASOAMANAAPPLIANCE88E
HARARESPONSABLEDEBAI_O8
EMERGENTE8NI INCIDENTALE8INCLUSOLA
PI_RDIDADEALIMENTOS.
Estagarantiale otorgaderechoslegalesespecificos
yustedpodriatenerotrosquevariandeunestadoa
otto.Porelemplo,algunosestadosno permitenla
exclusi6no la limitaci6ndelos dahosemergentesnl
incidentales,de modoque estaexclusidnpodria no
correspondera sucaso.
f;T4(UBfR[0B4J0;;T4£4R4N14
Reemplazodefusiblesdomesticos,reajustedeIcortacircuitosni Ia correcci6ndel
cabteadoo plomeriadomesticos.
MantenimientoyIimpiezanormalesdel producto,inclusolosfocos.
Productosquenotenganlosnimerosoriginalesde serie,o quelostenganalter-
adosoque nosepuedandeterminarconfacilidad.
Productoscompradosconfinesdeusocomercial,industrial,paraalquilerorenta.
Productosqueseencuentrenfuerade losEstadosUnidoso Canada.
Cargosporserviciopostal,sial tecnicosele pidequerealiceserviciosadi-
cionalesalservicionormalofueradehorashabileso delarea.
Ajustesdespuesdelprimeraio.
Lasreparacionescausadaspor:
• Lainstalacion,elsistemadeescapeoel mantenimientoincorrectos.
• Lasmodificaciones,alteracioneso ajustesnoautorizadosporAmana.
• Accidentes,realuso,maltrato,incendios,inundacioneso actosdeIa
naturaleza.
• Lasconexionesala corrienteelectrica,elsuministrodevoltajeo elsuministrode
gasrealizadosincorrectamente.
• El usodelasbandejas,losrecipientesolosaccesoriosincorrectosquehaya
causadodaios al producto.
p
I111111;IIVI{II1410{414141114
El serviciodeberealizarlounrepresentantede servicioautorizadode Amana.Para
programaralgin servicio,comuniqueseconel distribuidorde Amanaen dondecorn-
proel aparatoo comuniquese:
MaytagServicess=
1-800-628-5782dentrode EE.UU.
Paraobtenermas information, comuniquesecon:
MaytagAppliances
Attn: AmanaCAIR_Center
403WestFourthStreetNorth
Newton,Iowa50208
1-800-843-0304dentrode EE.UU.
1-866-587-2002au Canada
Cuandose comuniqueconAmanaAppliancesincluyaIasiguienteinformaci6n:
Suhombre,direcci6nynQmerotelefonico.
NQmerode modeloyde seriedelaparato.
ElnombreyIadirecci6ndel distribuidory Iafechadecompra.
Unadescripcionclaradelproblema.
Pruebadecompra(recibodeventa).
PartNo.111537-1 ©2003MaytagAppliancesSalesCo.
FormC/09/03
 Loading...