

Amana ABB1924DEB, ABB1924DES, ABB2524DEQ, ABB2524DEW, ABC2037DES Owner’s Manual
...
m Bottom Freezer
Form}}No: B/O!i/04 Part No: 12828101
What You Need to Know About
Safety instructions
Warning and Important Safety hstructions appearing in
this guide are not meant to cover all possible
conditions and situations that may occur. Common
sense, caution and care must be exercised when
installing, maintaining or operating appliance.
Always contact the manufacturer about problems or
conditions you do not understand.
Recognize Safety Symbols, Words,
Labels
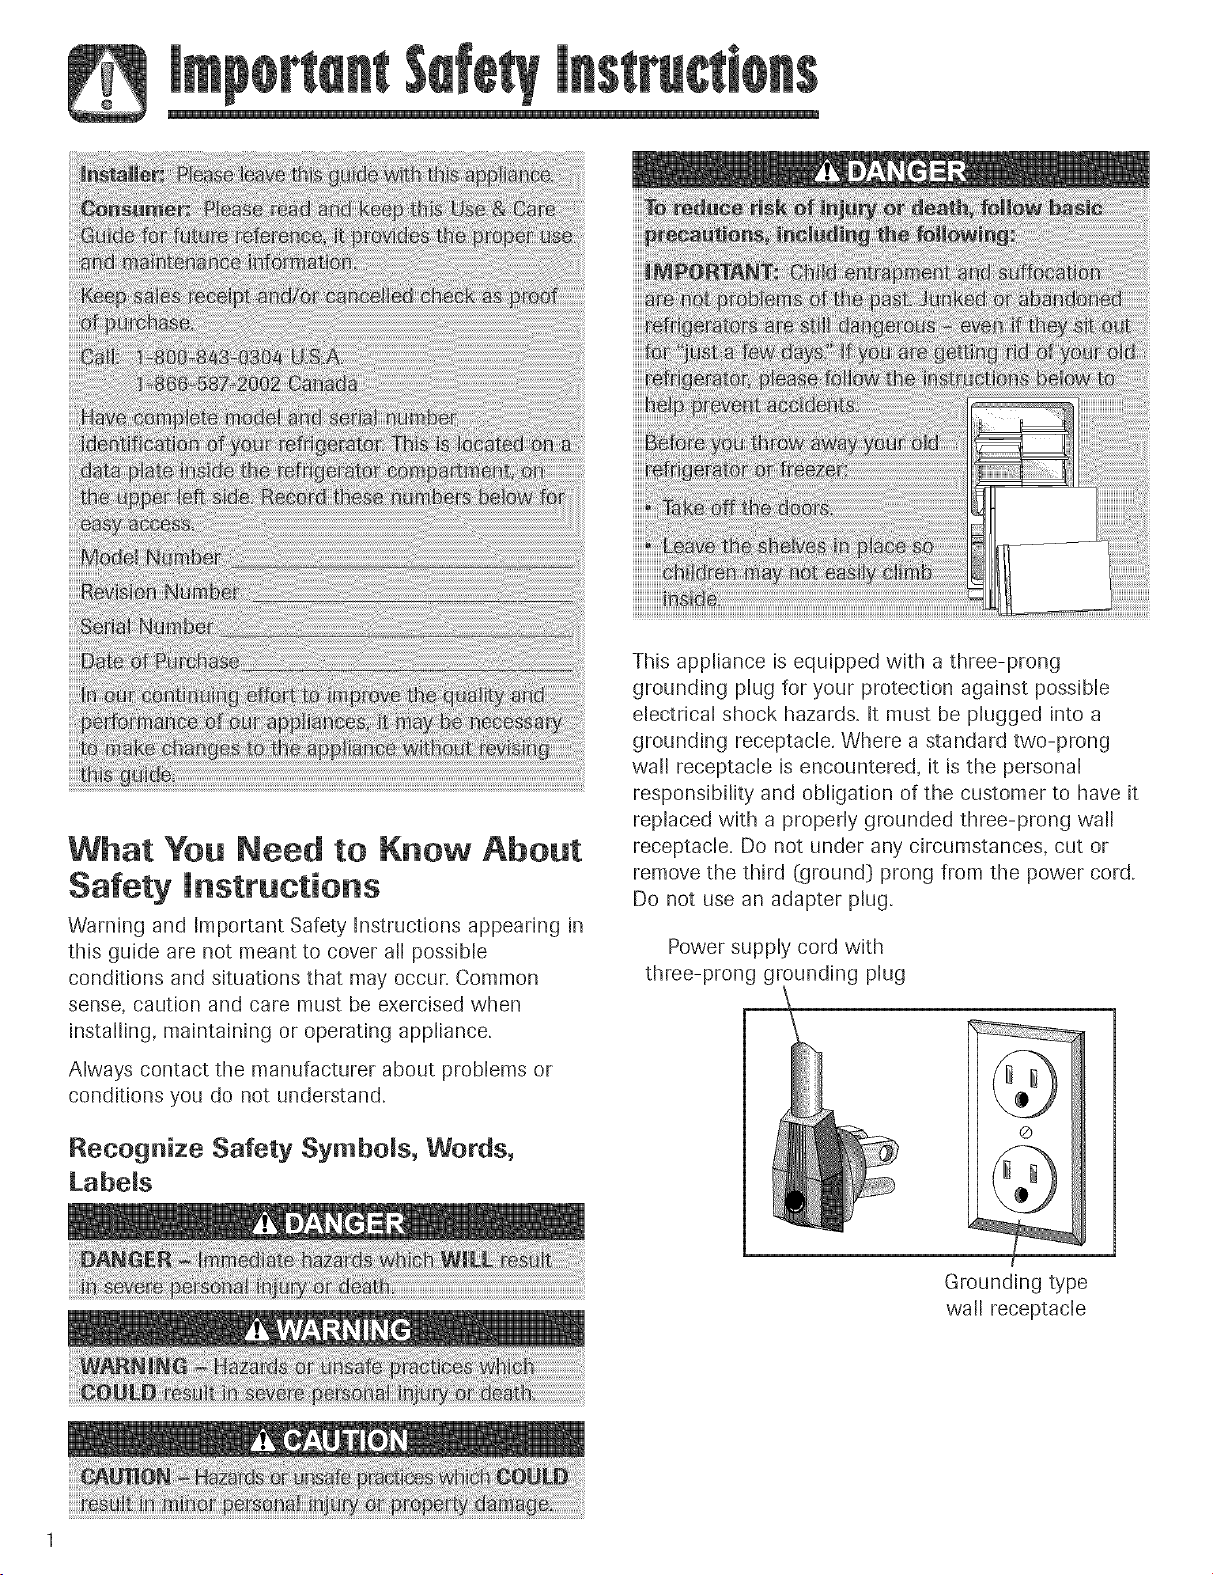
This appliance is equipped with a three-prong
grounding plug for your protection against possible
electrical shock hazards. It must be plugged into a
grounding receptacle. Where a standard two-prong
wall receptacle is encountered, it is the personal
responsibility and obligation of the customer to have it
replaced with a properly grounded three-prong wall
receptacle. Do not under any circumstances, cut or
remove the third (ground} prong from the power cord.
Do not use an adapter plug.
Power supply cord with
three-prong grounding plug
Grounding type
wall receptacle
SAVE THESE l NSTRUCTIONS
Your refrigerator was packed carefully for shipment.
Remove and discard shelf packaging and tape. Do not
remove the serial plate.
. Do not install refrigerator near oven, radiator or other
heat source. If not possible, shield refrigerator with
cabinet material.
Do not install where temperature falls below 55° F
(13° C} or rises above 110° F (43° C}. Malfunction
may occur at this temperature.
Refrigerator is designed for indoor househomd
appmication onmyo
To enhance the appearance and maintain performance,
the refrigerator should be level
Measuring the Opening
When installing your refrigerator, measure carefully,
Allow Y}' space at top and Y}' space behind the
machine compartment cover (located in the tea0 for
proper air circulation,
Subflooring or floor coverings (Le. carpet, tile, wood
floors, rugs} may make your opening smaller than
anticipated.
Some clearance may be gained by using the leveling
procedure under Leveling.
UMPORTANT: If refrigerator is to be installed into a
recess where the top of the refrigerator is completely
covered, use dimensions from floor to top of hinge cap
to verify proper clearance.
Transporting Your Refrigerator
. NEVER transport refrigerator on its side. If an
upright position is not possible, lay refrigerator on its
back. Allow refrigerator to sit upright for
approximately 30 minutes before plugging it in to
assure oil returns to the compresson Plugging the
refrigerator in immediately may cause damage to
internal parts.
Use an appliance dolly when moving refrigerator.
ALWAYS truck refrigerator from its side or
back-NEVER from its front.
, Complete any required door reversal, panel
installation and/or a water supply connection,
before leveling.
Materials Needed
, -Y_"hex head driver
, Carpenter's level
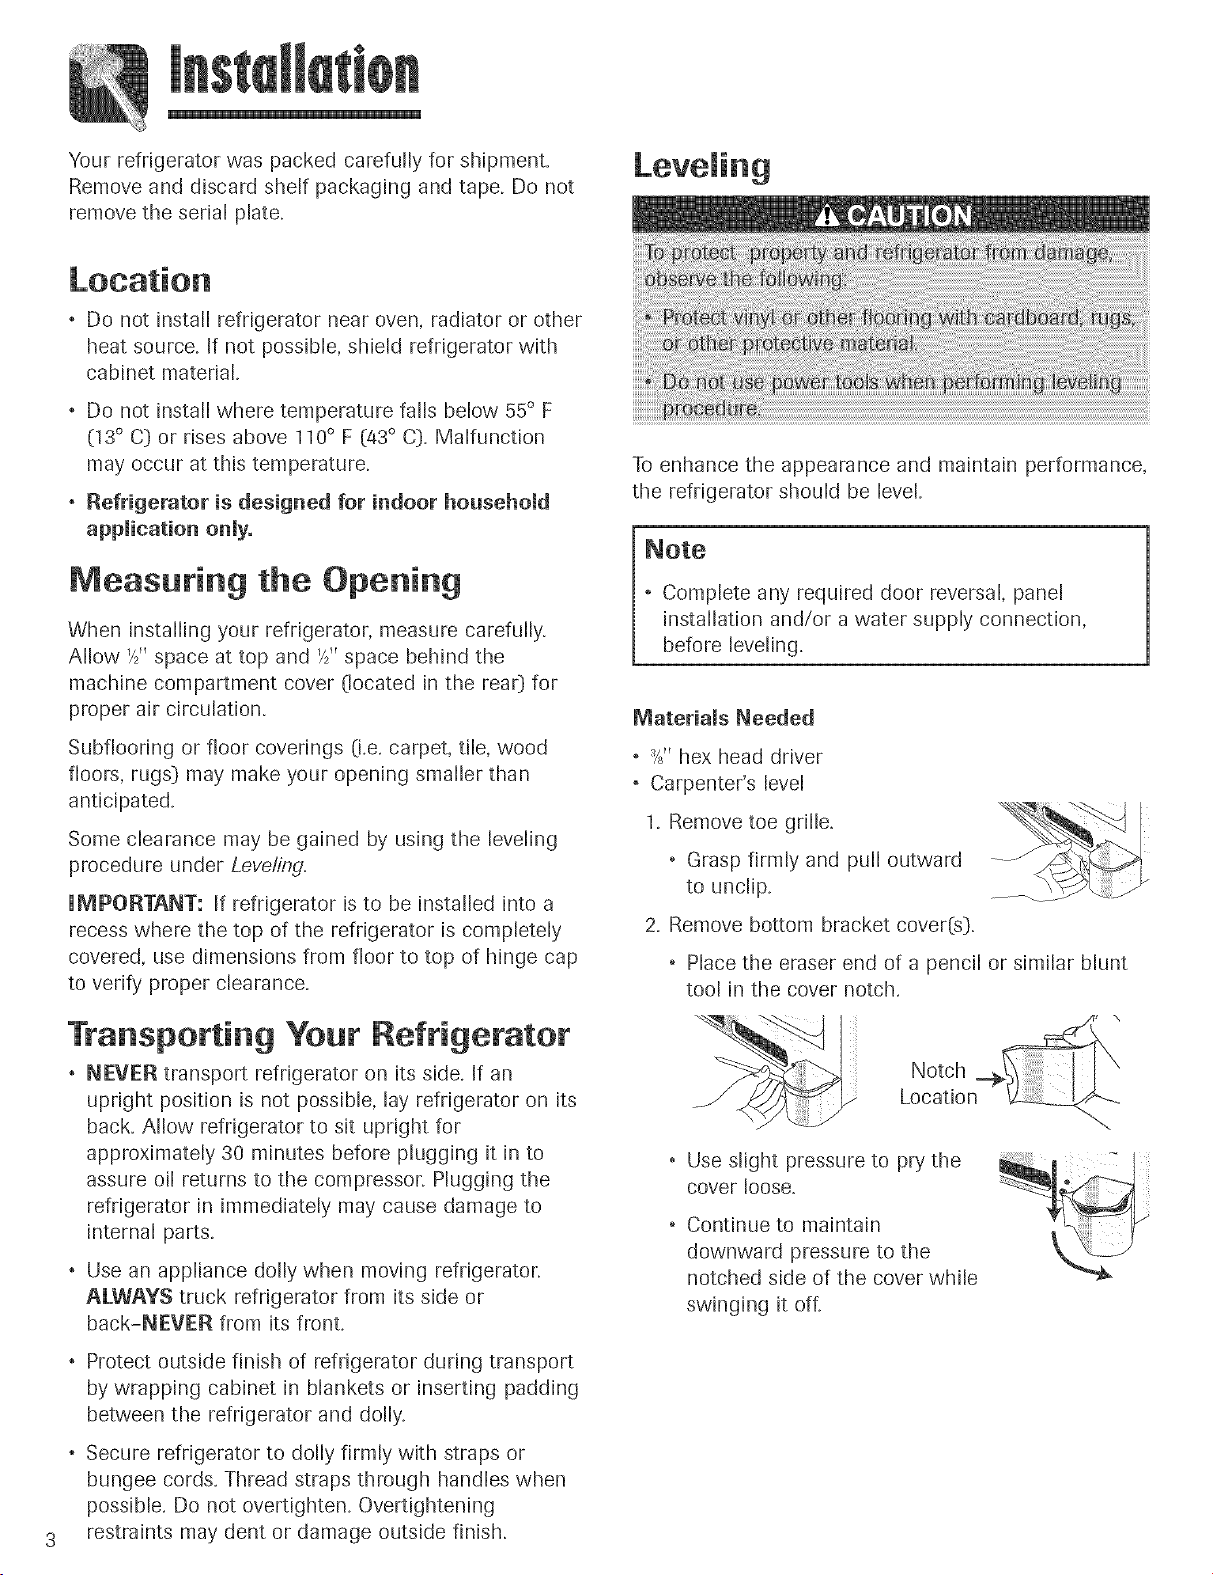
1. Remove toe grille.
Grasp firmly and pull outward
to unclip.
2. Remove bottom bracket cover(s}.
Place the eraser end of a pencil or similar blunt
tool in the cover notch.
Notch
Location
, Use slight pressure to pry the
cover loose,
Continue to maintain
downward pressure to the
notched side of the cover while
swinging it oft
, Protect outside finish of refrigerator during transport
by wrapping cabinet in blankets or inserting padding
between the refrigerator and dolly.
. Secure refrigerator to dolly firmly with straps or
bungee cords. Thread straps through handles when
possible. Do not overtighten. Overtightening
restraints may dent or damage outside finish.
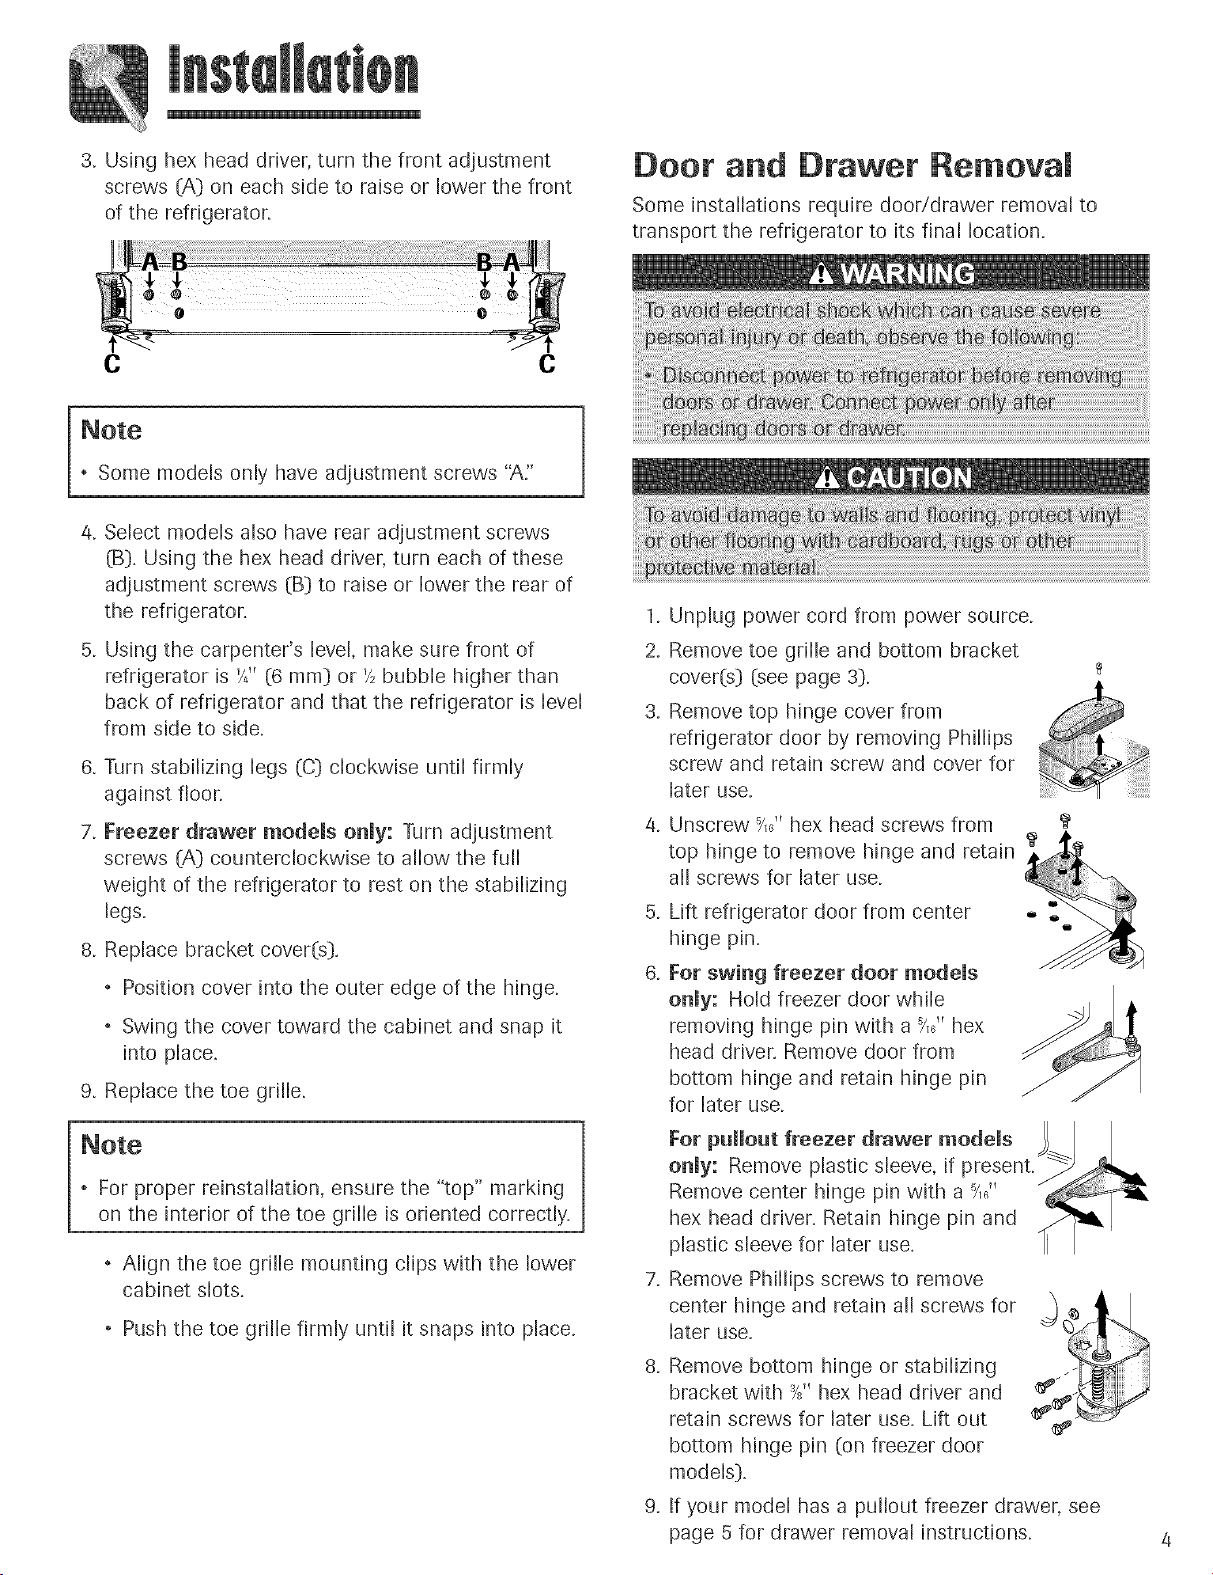
3.Usinghexheaddriver,turnthe frontadjustment
screws(A]oneachsidetoraiseorlowerthefront
oftherefrigerator.
C C
, Some models only have adjustment screws "A:'
4. Select models also have rear adjustment screws
(B]. Using the hex head driver, turn each of these
adjustment screws (B] to raise or lower the rear of
the refrigerator.
5. Using the carpenter's level, make sure front of
refrigerator is K" (6 mini or K bubble higher than
back of refrigerator and that the refrigerator is level
from side to side.
6. Turn stabilizing legs (C] clockwise until firmly
against floor.
7, Freezer drawer models onmy: Turn adjustment
screws (A] counterclockwise to allow the full
weight of the refrigerator to rest on the stabilizing
legs.
8,Replace bracket cover(s].
, Position cover into the outer edge of the hinge.
, Swing the cover toward the cabinet and snap it
into place.
9. Replace the toe grille.
Door and [}rawer Removam
Some installations require door/drawer removal to
transport the refrigerator to its final location.
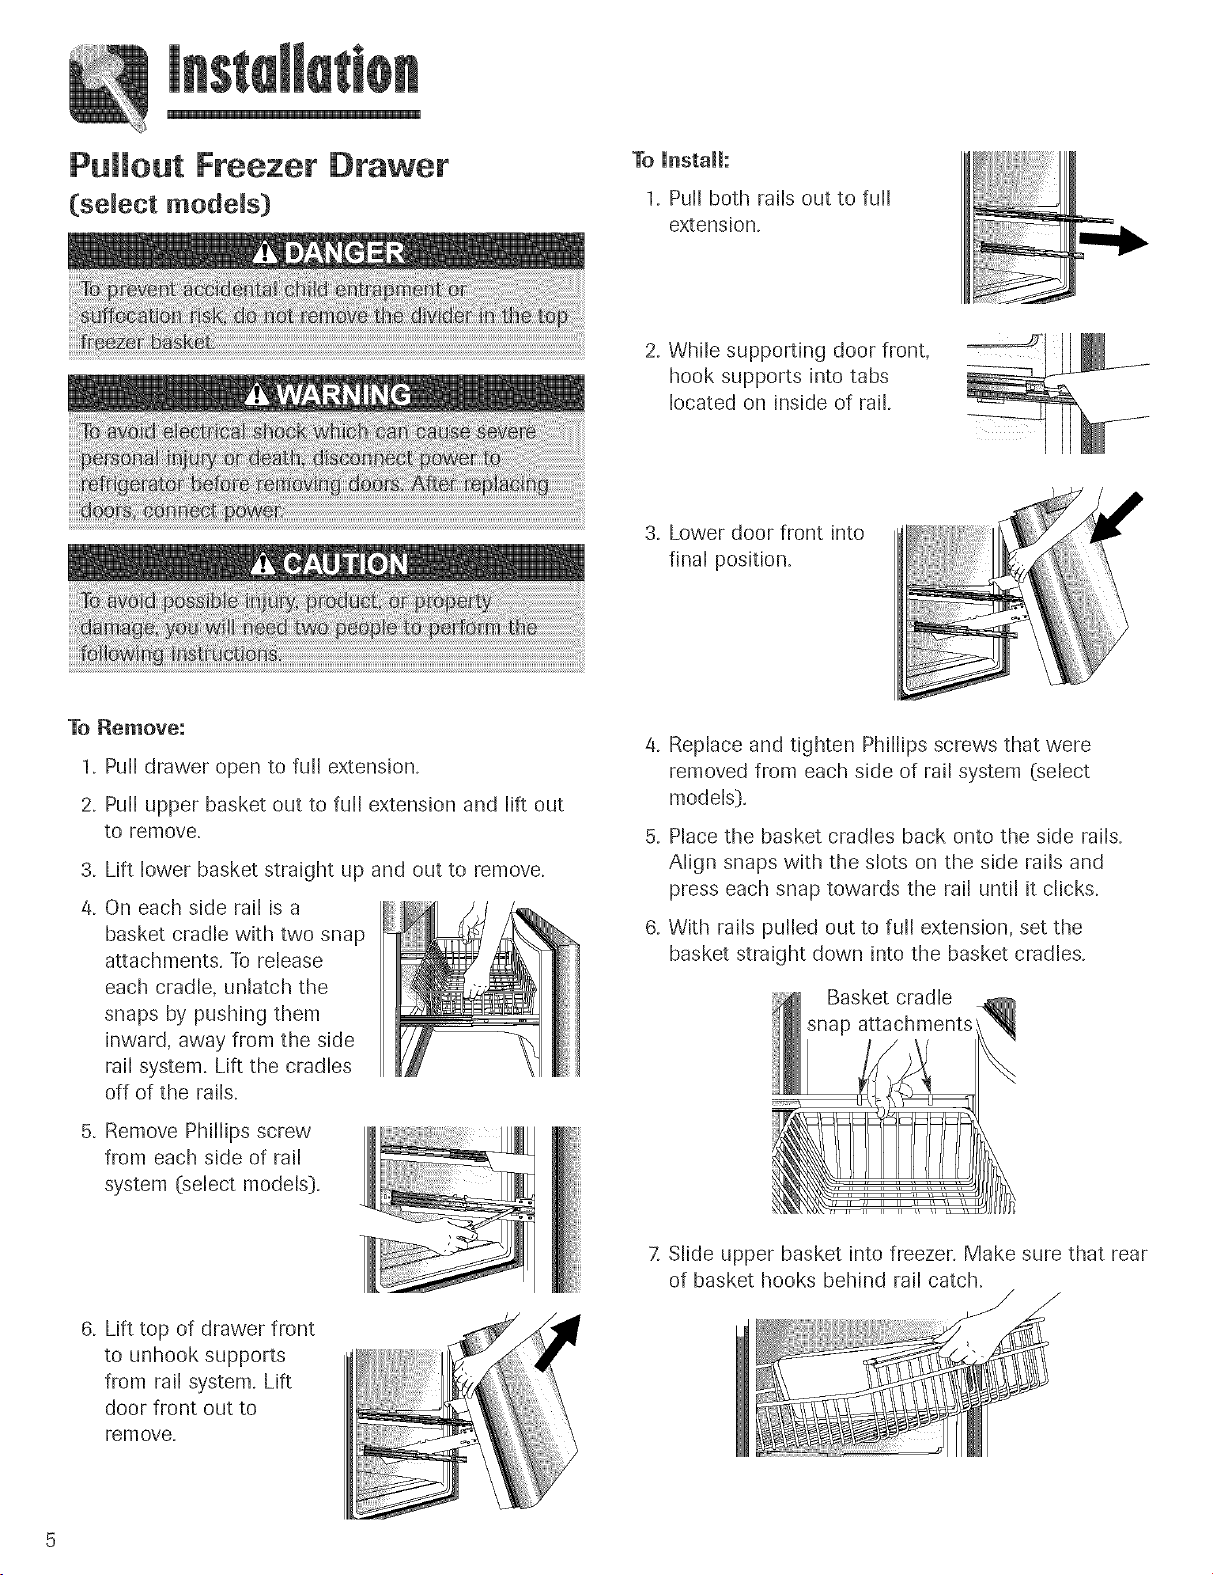
1. Unplug power cord from power source.
2. Remove toe grille and bottom bracket
cover(s] (see page 3].
3. Remove top hinge cover from
refrigerator door by removing Phillips
screw and retain screw and cover for
later use,
4. Unscrew _,_" hex head screws from
top hinge to remove hinge and retain _,_r_
all screws for later use.
5. Lift refrigerator door from center
hinge pin.
6, For swing freezer door models
onmy: Hold freezer door while
removing hinge pin with a _,_" hex
head driver, Remove door from
bottom hinge and retain hinge pin
for later use,
, For proper reinstallation, ensure the "top" marking
on the interior of the toe grille is oriented correctly.
, Align the toe grille mounting clips with the lower
cabinet slots.
, Push the toe grille firmly until it snaps into place.
For pullout freezer drawer models
only: Remove plastic sleeve, if F
Remove center hinge pin with a _"
hex head driver. Retain hinge pin and
plastic sleeve for later use.
Remove Phillips screws to remove
center hinge and retain all screws for
later use.
8. Remove bottom hinge or stabilizing
bracket with -_/8"hex head driver and
retain screws for later use. Lift out ¢_
bottom hinge pin (on freezer door
models].
9. If your model has a pullout freezer drawer, see
page 5 for drawer removal instructions.
Pullout Freezer Drawer
(sdect motds)
To Remove:
1. Pull drawer open to full extension.
2. Pull upper basket out to full extension and lift out
to remove.
.
Lift lower basket straight up and out to remove.
4.
On each side rail [s a
basket cradle with two snap
attachments. To release
each cradle, unlatch the
snaps by pushing them
inward, away from the side
rail system. Lift the cradles
off of the rails.
To Install:
1. Pull both rails out to full
extension.
2. While supporting door front,
hook supports into tabs
located on inside of rail.
3, Lower door front into
final position.
Replace and tighten Phillips screws that were
removed from each side of rail system (select
models}.
Place the basket cradles back onto the side rails.
Align snaps with the slots on the side rails and
press each snap towards the rail until it dicks.
With rails pulled out to full extension, set the
basket straight down into the basket cradles.
Basket cradJe
5. Remove Phillips screw
from each side of rail
system (select models}.
6,Lift top of drawer front
to unhook supports
from rail system. Lift
door front out to
remove.
7 Slide upper basket into freezer. Make sure that rear
of basket hooks behind rail catch,
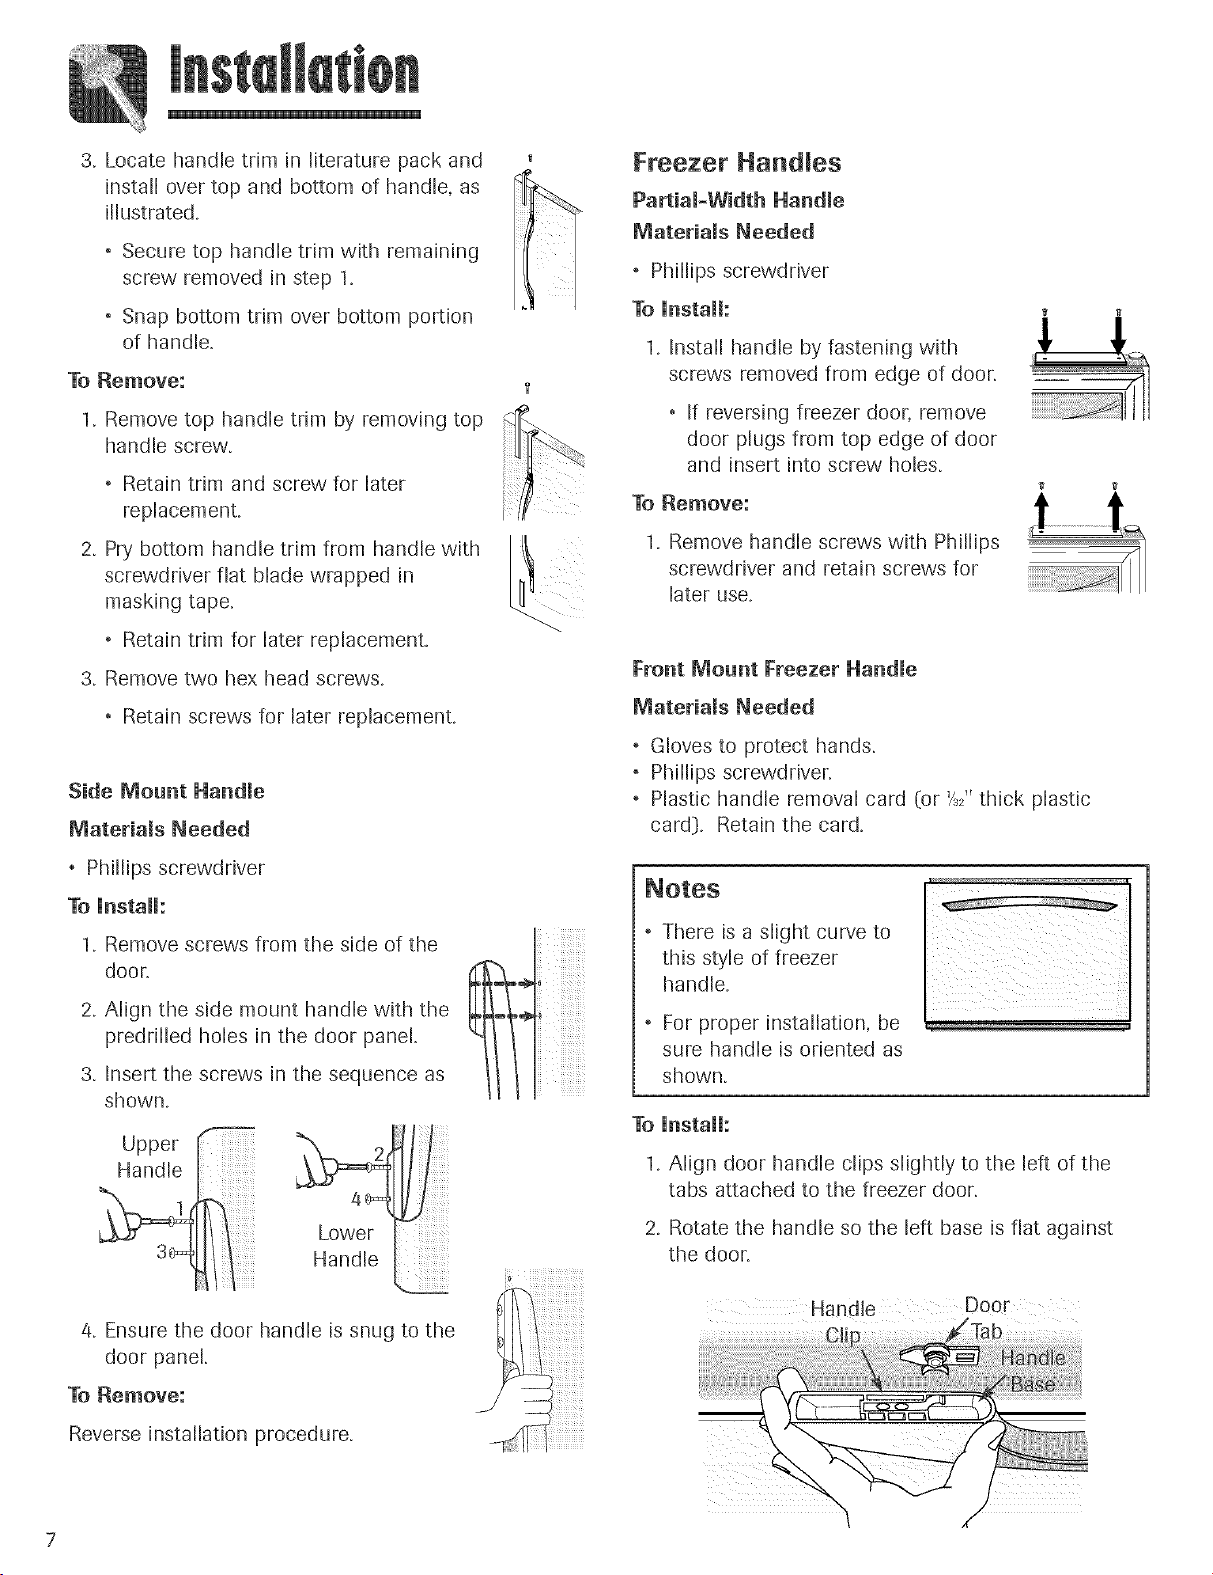
ReinstaHation of the Doors
1, Install hinge assemblies:
. Install top hinge loosely with %/' hex head
screws.
Install center hinge with Phillips screws.
Freezer door models: Install bottom hinge with
Ys"hex head screws.
2. Freezer door modeJs: Insert bottom
hinge pin.
Locate bottom hinge hole closest to
outside edge of cabinet, and insert
bottom hinge pin. Replace any door
shims, if present.
3, Freezer door models: Place hinge
side of freezer door on bottom hinge
pin and hold freezer door upright
while installing center hinge pin with
-?#' hex head driver.
Replace plastic sleeve.
Replace any applicable door shims.
, Make sure the hinge pin is installed tightly.
4. Place hinge side of refrigerator
door on center hinge pin.
5. While holding refrigerator door
upright, tighten down top hinge
with -Y#' hex head driver and
replace hinge cover.
Door ReversaJ
3. Transfer door stops from bottom edge of fresh food
door and freezer door, if applicable, to opposite
side of door edge.
Use a Phillips screwdriver
for removal and installation.
4, Install handles (see pages 6,
7 or 8},
5. Reinstall the door(s}.
If not installed, the handle is located in the interior of
the fresh food section or attached to the back of your
refrigerator.
Remove and discard handle packaging and tape.
Handle design varies from refrigerator to refrigerator.
Please reference the appropriate instructions for your
model below.
Fresh Food HandJes
Standard Front Mount NandJe
Materials Needed
. Phillips screwdriver
" %/hex head driver r
In some installations, reversing the door swing allows
for more convenient access to stored items. Both
doors can be reversed on freezer door models and the
fresh food door is reversible on freezer drawer models.
1, Remove door(s} (see page/4},
2. Transfer cabinet plugs and cabinet
screws to opposite side of cabinet.
, Remove cabinet plugs with flat
blade of screwdriver tip wrapped
in masking tape.
, Remove center mullion screws
with _/,?'hex head screwdriver.
, Freezer door models: Remove
bottom mullion screws with s%,hex head driver.
1. Remove K" hex head screws from .
door face with hex head driver, and
Phillips screw from top of door.
To Unstalh
If reversing door, remove door
plugs from opposite side of door
and insert in screw holes.
2. Align handle holes with screw holes on ! Jl
door face and secure with two door face
screws from step 1.
i ,,
.
Locate handle trim in literature pack and
install over top and bottom of handle, as
illustrated.
, Secure top handle trim with remaining
screw removed in step 1.
Snap bottom trim over bottom portion
of handle.
To Remove:
Remove top handle trim by removing top
handle screw.
Retain trim and screw for later
replacement.
2. Pry bottom handle trim from handle with
screwdriver flat blade wrapped in
masking tape.
Retain trim for later replacement.
3. Remove two hex head screws.
Retain screws for later replacement.
Side Mount Handle
IVtateriams Needed
Freezer Handles
Partiam_Width Handle
Materiams Needed
, Phillips screwdriver
To UnstaH:
1. Install handle by fastening with
screws removed from edge of door.
, If reversing freezer door, remove
door plugs from top edge of door
and insert into screw holes.
To Remove:
1. Remove handle screws with Phillips
screwdriver and retain screws for
later use.
Front Moent Freezer Handme
Materiams Needed
Gloves to protect hands.
Phillips screwdriver.
Plastic handle removal card (or '//' thick plastic
card}. Retain the card.
Phillips screwdriver
To UnstaH:
Remove screws from the side of the
door.
.
Align the side mount handle with the
predrilled holes in the door panel.
.
Insert the screws in the sequence as
shown.
Upper _ /
_ /4_ ....
Handle i
3e= Handle
Lower
4. Ensure the door handle is snug to the [1/_
door panel.
To Remove:
Reverse installation procedure.
I ii!i!_i_!ii!ilil
, There is a slight curve to
this style of freezer
handle.
, For proper installation, be
sure handle is oriented as
shown.
To install:
1. Align door handle clips slightly to the left of the
tabs attached to the freezer door.
2. Rotate the handle so the left base is flat against
the door.
Handle Door
7
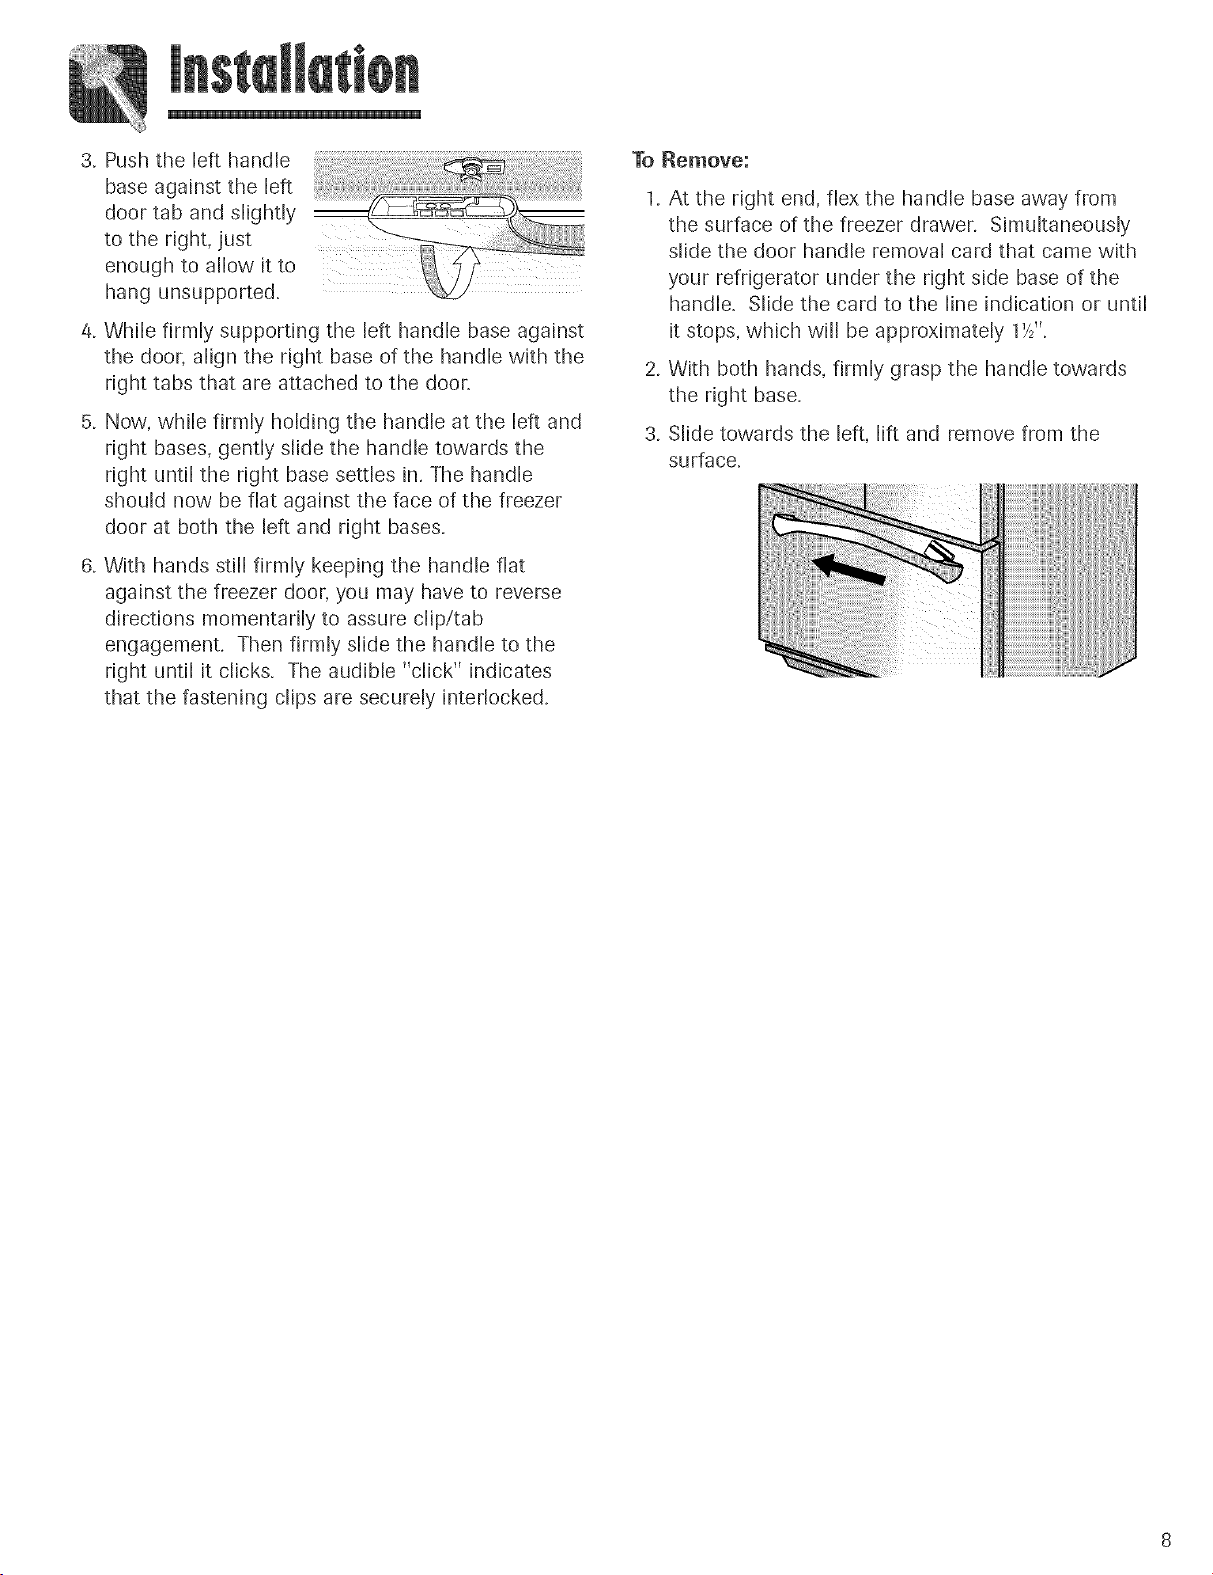
3.Pushthelefthandle
baseagainstthe left
doortabandslightly
totheright,just
enoughto allowitto
hangunsupported.
4.Whilefirmlysupportingtheleft handlebaseagainst
thedoor,aligntherightbaseofthe handlewiththe
righttabsthatareattachedtothedoor.
5.Now,whilefirmlyholdingthehandleatthe leftand
rightbases,gentlyslidethehandletowardsthe
rightuntiltherightbasesettlesin.Thehandle
shouldnowbefiatagainstthefaceofthefreezer
doorat boththeleftandrightbases.
6,With hands still firmly keeping the handle flat
against the freezer door, you may have to reverse
directions momentarily to assure clip/tab
engagement. Then firmly slide the handle to the
right until it clicks. The audible "click" indicates
that the fastening clips are securely interlocked.
To Remove:
1. At the right end, flex the handle base away from
the surface of the freezer drawer. Simultaneously
slide the door handle removal card that came with
your refrigerator under the right side base of the
handle. Slide the card to the line indication or until
it stops, which will be approximately 1K'.
2. With both hands, firmly grasp the handle towards
the right base.
3. Slide towards the left, lift and remove from the
surface.
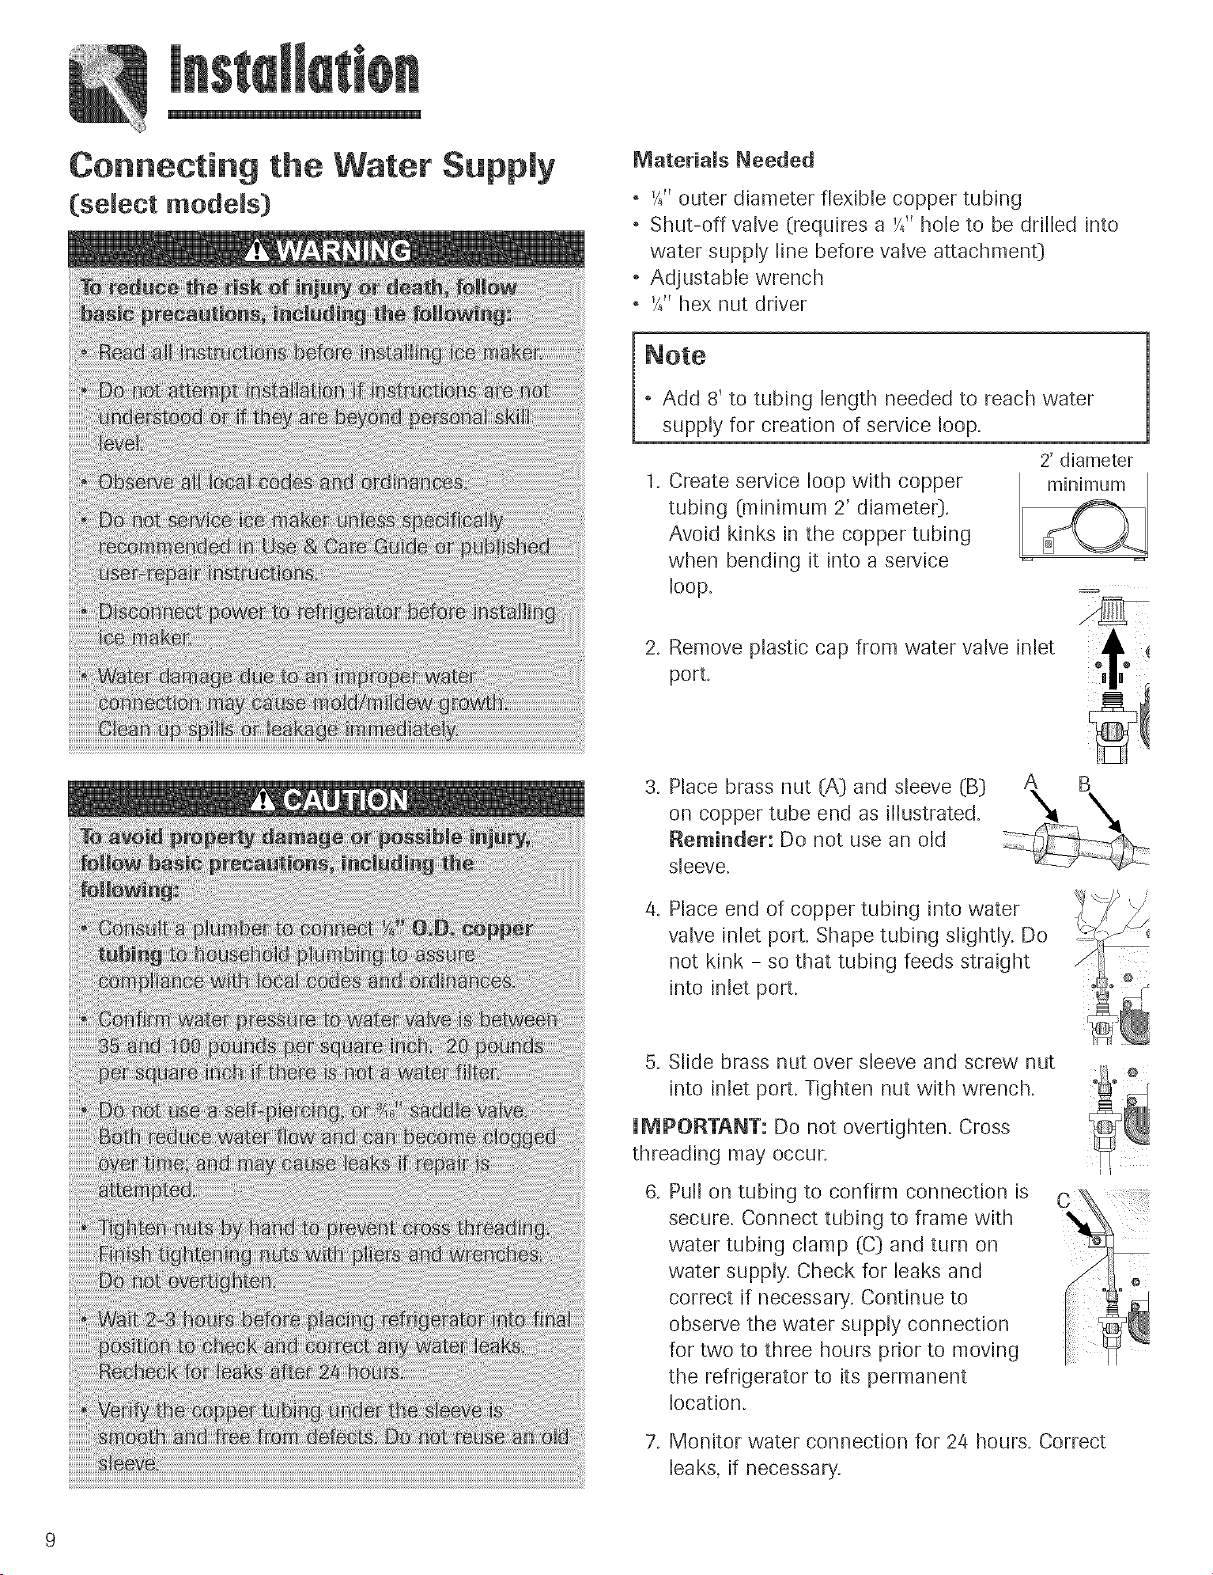
Connecting the Water Supply
(select models)
Materials Needed
'/_"outer diameter flexible copper tubing
Shut-off valve (requires a X" hole to be drilled into
water supply line before valve attachmenO
Adjustable wrench
Y_"hex nut driver
Add 8'
supply
2. Remove plastic cap from water valve inlet
to tubing length needed to reach water
for creation of service loop,
Create service loop with copper
tubing {minimum 2' diamete0.
Avoid kinks in the copper tubing
when bending it into a service
bop,
port.
Place brass nut (A) and sleeve (B)
on copper tube end as illustrated.
Reminder: Do not use an old
sleeve.
Place end of copper tubing into water
valve inlet port. Shape tubing slightly. Do
not kink - so that tubing feeds straight
into inlet port.
2' diameter
5. Slide brass nut over sleeve and screw nut
into inlet port. Tighten nut with wrench.
UMPORTANT: Do not overtighten. Cross
threading may occur.
Pull on tubing to confirm connection is
secure. Connect tubing to frame with
water tubing clamp (C) and turn on
water supply. Check for leaks and
correct if necessary. Continue to
observe the water supply connection
for two to three hours prior to moving
the refrigerator to its permanent
location.
7. Monitor water connection for 24 hours, Correct
leaks, if necessary,
 Loading...