

Page 1
Package Contents
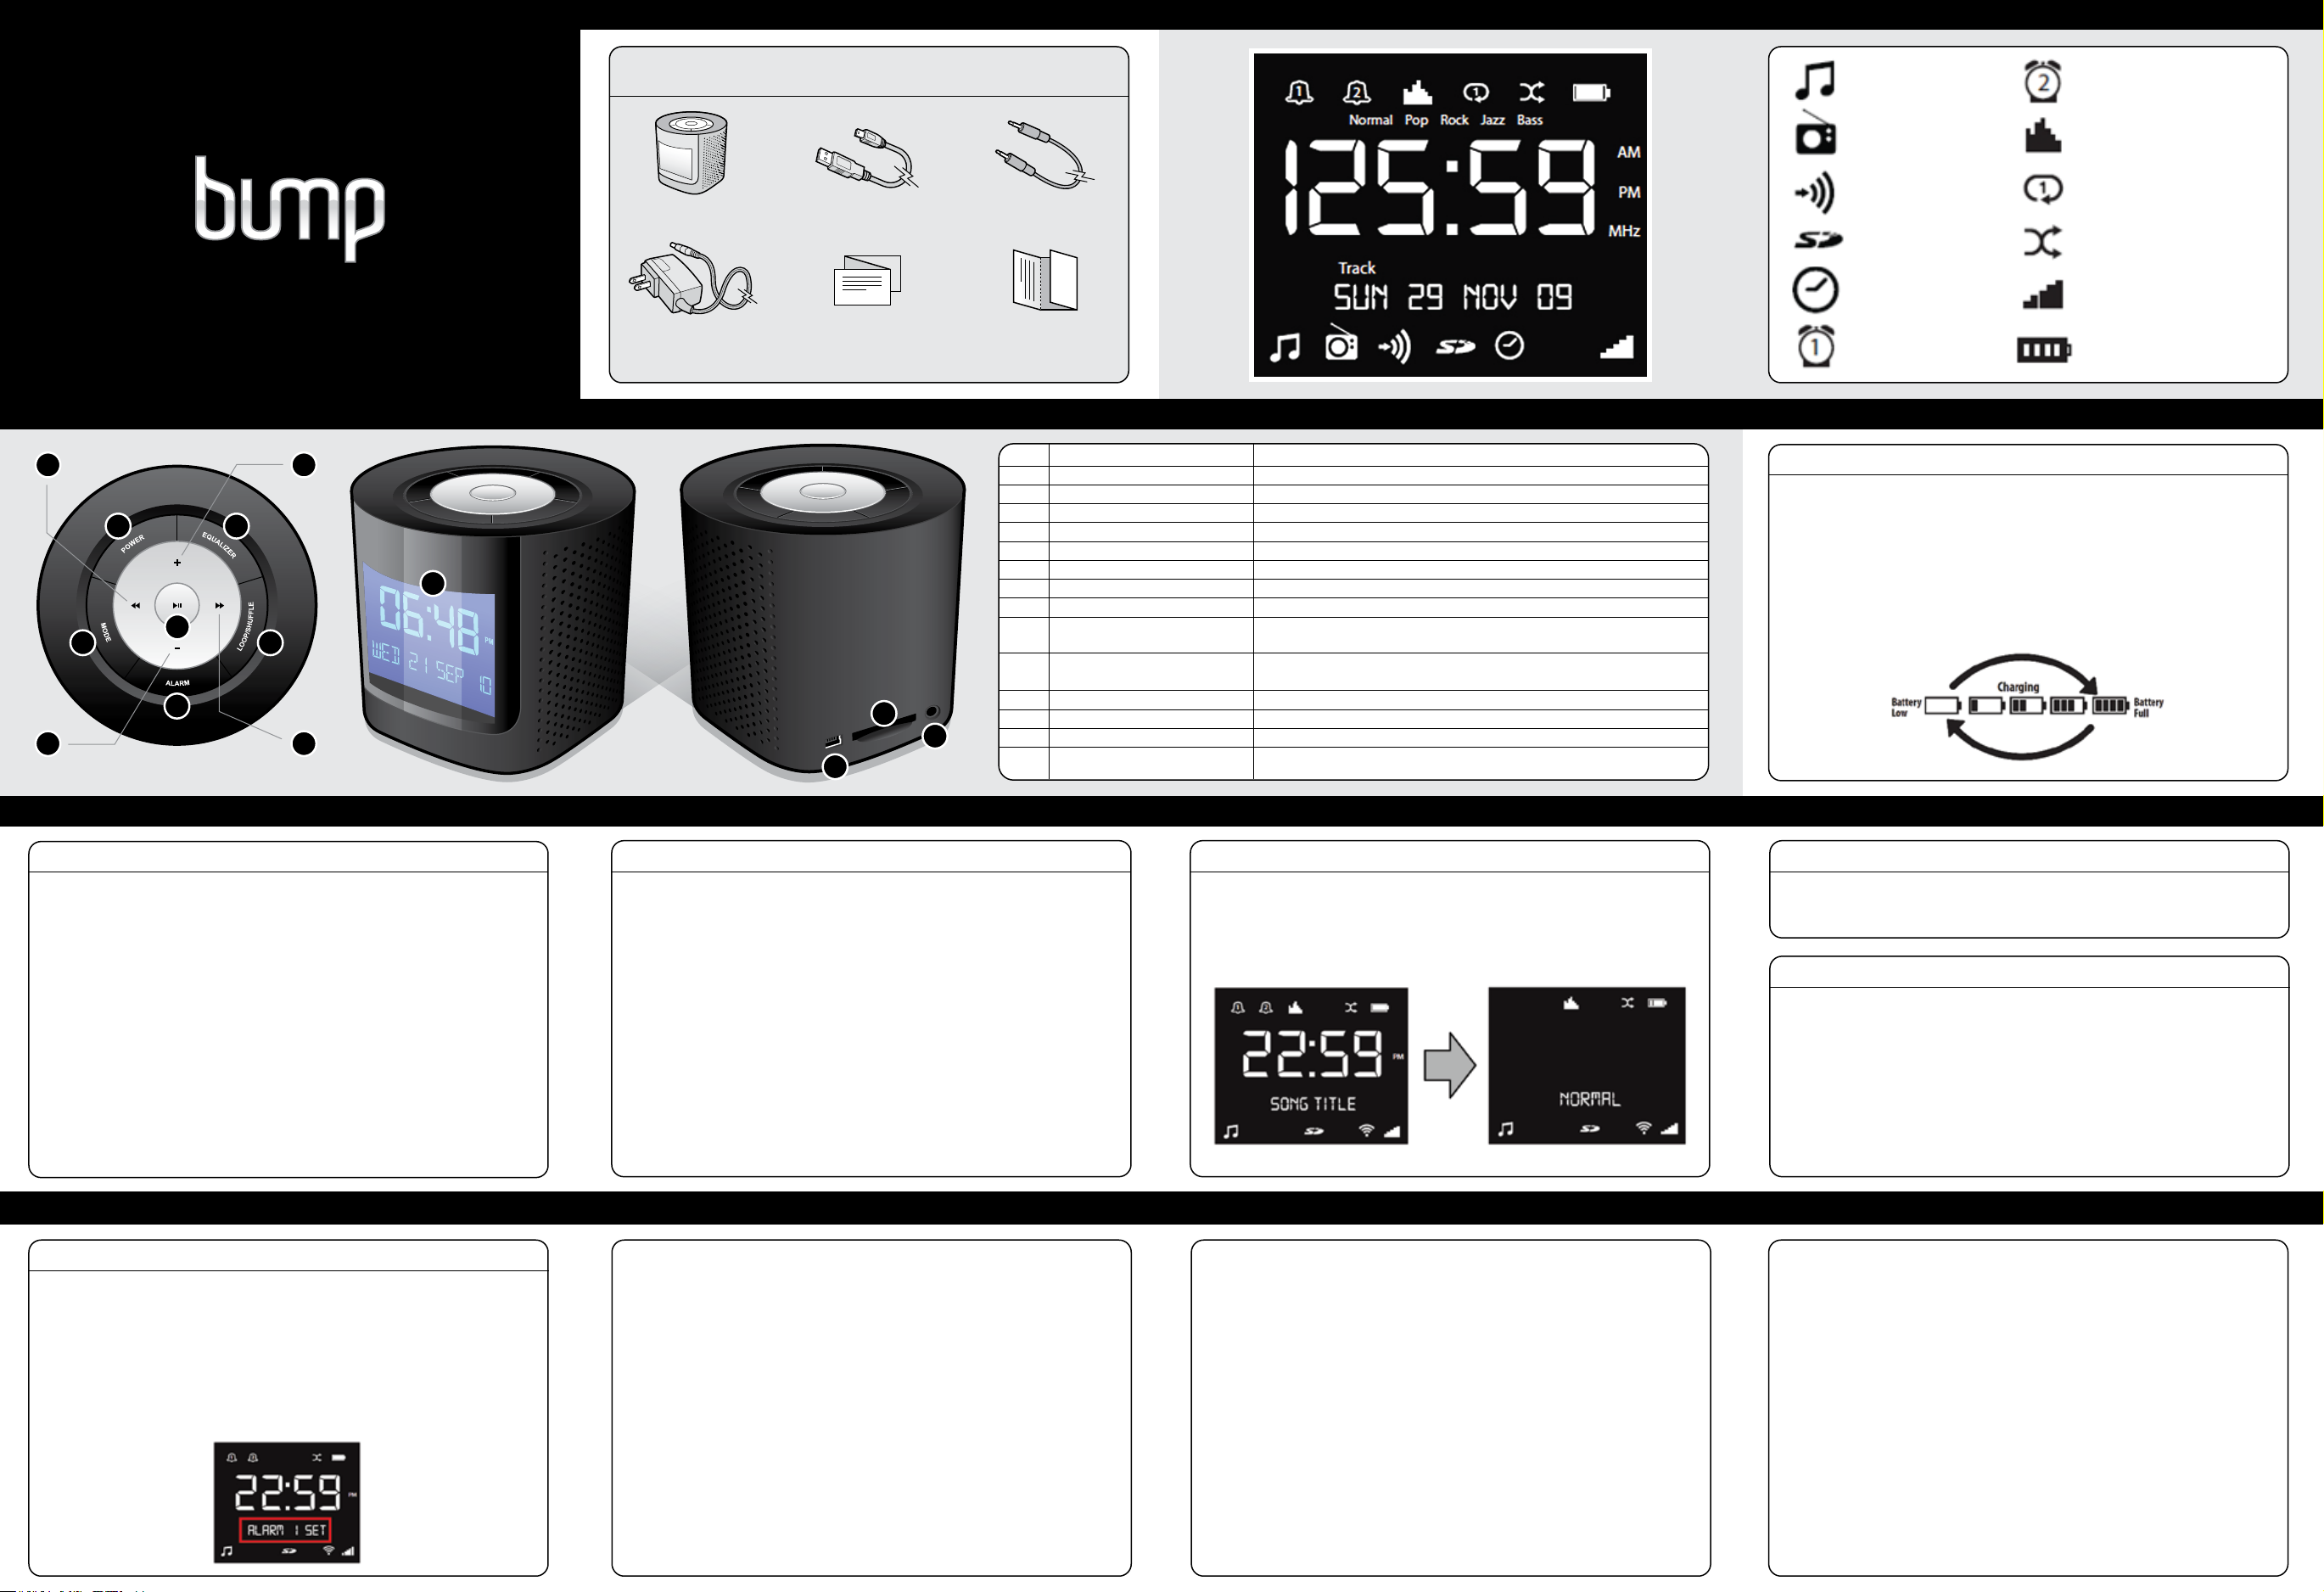
Display Icon Detail
Portable MP3 / FM Radio Boombox
Quick Start Guide
by Aluratek by Aluratek
aluratek.com
Product Detail
9
1
6
5
4
8
qsg Q10177 Copyright © 2010 Aluratek, Inc. All Rights Reserved.
7
2
14
3
10
AMS01F
Your order has been carefully packaged and inspected. The following should be included in your package.
Please inspect the contents of the package to ensure that you have received all items and that nothing has
been damaged. If you discover a problem, please contact us immediately for assistance.
Portable MP3 / FM
Radio Boombox
Power Adapter
USB 2.0 Cable
Quick Start Guide
12
13
11
Auxillary Cable
Warranty / Registration
Card
ITEM
Power
1
Equalizer button
2
Audio play mode button
3
Alarm button
4
Mode button
5
Play button
6
Volume +
7
Volume -
8
Left button
9
Right button
10
USB port
11
SD card slot
12
Audio Line-in port
13
Display
14
DESCRIPTION
To turn on/off speaker
To change equalizer setting
To change between shuffle and loop mode
To turn on/off alarm, To set alarm
To change operation mode: SD / Line in / Radio / Clock
Press once to play/pause audio playback
To increase the volume
To lower the volume
To move cursor left, press once for previous song, press and
hold to fast rewind
To move cursor right, press once for next song, press and hold
to fast forward
Connect to PC for data transfer, to power speaker using USB cable
Insert SD card for music playback
Line in for other audio source
Display
Audio Player mode
FM Radio mode
Audio Line In mode
SD card indicator
Clock mode
Alarm 1
Alarm 2
Equalizer Settings
Audio Play mode - Loop
Audio Play mode - Shuffle
Volume Level
Battery Indicator
Product Operation
Step 1: Charging the Speaker
The Built-in Li-Ion Polymer battery is not fully charged and must be fully charged
before first use. It is recommended to charge the battery for a minimum of 3 hrs.
You can charge either thru the USB cable or the power adapter.
1. Connect the mini-B end of the provided USB cable or power adapter to the
USB port on AMS01F
2. Connect the type-A end of the same cable to a computer or the power adapter
to the wall outlet
3. The LED indicator will shown Red during charging and will go off when the
battery is fully charged
Step 2: Connect the speaker to an audio source:
From a SD card:
1. Press the power button on the speaker until the blue color LED indicator is on
2. Insert the SD card into SD card slot
3. Press the “Mode” button to switch to the SD mode
4. Press the “Play” button to play/pause music
5. You can adjust the volume by pressing the volume buttons on top of the speakers
6. Press the “Right” or “Left” buttons to play the next or previous song
From a MP3 player:
1. Press the power button on the speaker until the blue color LED indicator is on.
2. Connect the music player Line out/headset out to the Line In port of the
speaker using included audio cable
3. You can now stream music from the MP3 player.
4. You can adjust the volume by pressing the volume buttons on top of the speaker
5. To turn of the speaker, press and release the “Power” button, LED indicator
will fade off
Step 6: How to set an alarm
1. In clock mode, press the “left” or “right” button to switch between Alarm 1,
Alarm 2 and current time
2. In Alarm 1 or Alarm 2, press and hold the “Mode” button until the “Hour” is blinking.
3. Press “left”, “right” buttons to select hour or minute
4. Press “up”, “down” buttons to selected the desired value
5. Press the “Play” button to confirm
6. In SD card music mode, select the desired audio file and start playing. During
playback, press and hold the “Alarm” button until you see the below screen.
In Radio mode, select the desired FM frequency, then press and hold the
“Alarm” button until you see the below screen.
Step 2: Continued
To Listen to the Radio:
1. Press the power button on the speaker until the blue color LED indicator is on
2. Press the “Mode” button to switch to the Radio mode
3. Connect the provided Audio Line in cable into the Audio Line in port as an antenna
4. Press the “right” and “left” button to search for stations manually
5. Press and hold the “right” or “left” buttons to search for station automatically
Stations will save as preset stations automatically. It can store up to 20
preset stations
6. Press the “Play” button to access the Preset stations
If you need further assistance, please contact the Aluratek support department
for troubleshooting prior to returning this device.
E-mail: support@aluratek.com
Web: www.aluratek.com/support
Local (Tustin, CA): 714-586-8730
Toll free: 1-866-580-1978
Step 3: EQ Settings
1. While in music playback mode, press the “Equalizer” button until the equalizer
icon appears.
2. Press the “Play” button to enter EQ setting.
3. Press the “left” or “right” buttons to change the EQ setting and press “play” to confirm
Step 4: Playback option
While in music playback mode, press the “Loop/Shuffle” button to switch between
Shuffle and Loop mode.
Step 5: How to set the clock
1. Press the power button on the speaker until the blue color LED indicator is on
2. Press the “Mode” button to switch to the Clock mode
3. Press and hold the “Mode” button to enter clock setting
4. Press “left”, “right” buttons to select among hour, min, day, month, and year
5. Press “up”, “down” buttons to selected the desired value
6. Press the “Play” button to confirm
Radio and TV Interference StatementTechnical Support Warranty
WARNING!!! This equipment has been tested and found to comply with the limits
of a Class B digital device, pursuant to part 15 of the FCC rules. These limits are
designed to provide reasonable protection against harmful interference in a
residential installation.
This equipment generates, uses and can radiate radio frequency energy and, if
not installed and used in accordance with the instruction, may cause harmful
interference to radio communications. However, there is no guarantee that
interference will not occur in a particular installation. If this equipment does cause
harmful interference to radio or television reception, which can be determined by
turning the equipment off and on, the user is encouraged to try to correct the
interference by whatever measures may be required to correct the interference.
Aluratek warrants this product against defect in material or workmanship for 1 Year
from the date of purchase.
This warranty becomes invalid if the factory-supplied serial number or "warranty void" sticker
has been removed or altered on the product.
This warranty does not cover:
A) Cosmetic damage or damage due to acts of God
B) Accident, misuse, abuse, negligence or modification of any part of the product.
C) Damage due to improper operation or maintenance, connection to improper equipment,
or attempted repair by anyone other than Aluratek.
D) Products sold AS IS or WITH FAULTS.
IN NO EVENT SHALL ALURATEK'S LIABILITY EXCEED THE PRICE PAID FOR THE
PRODUCT FROM DIRECT, INDIRECT, SPECIAL, INCIDENTAL, OR CONSEQUENTIAL
DAMAGES RESULTING FROM THE USE OF THE PRODUCT, IT'S ACCOMPANYING
SOFTWARE, OR IT'S DOCUMENTATION.
Aluratek makes no warranty or representation, expressed, implied, or statutory, with respect
to it's products, contents or use of this documentation and all accompanying software, and
specifically disclaims it's quality, performance, merchantability, or fitness for any particular
purpose. Aluratek reserves the right to revise or update it's product, software or documentation
without obligation to notify any individual or entity.
 Loading...