


Internet Radio Alarm Clock <with Built-in WiFi>
Instructional Manual AIRMM01F
mnl M10086 Copyright © 2009 Aluratek, Inc. All Rights Reserved. |
aluratek.com |

Table of Contents
Chapter 1: Introduction...................................................................... |
04 |
|
1.1 |
Overview.................................................................................... |
05 |
1.2 |
Features .................................................................................... |
05 |
1.3 |
Requirements ............................................................................ |
05 |
1.4 |
Package Contents ..................................................................... |
05 |
1.5 |
Product Application ................................................................... |
06 |
1.6 |
Keypad Functions ..................................................................... |
07 |
Chapter 2: Getting Started ................................................................ |
10 |
||
2.1 |
Hardware Installation................................................................. |
10 |
|
2.2 |
Software Installation .................................................................. |
10 |
|
Chapter 3: Configuration................................................................... |
11 |
||
3.1 |
Configure as an Wireless Client ............................................... |
11 |
|
3.2 |
Configure as a Wired Client ...................................................... |
15 |
|
3.3 |
Configure as a Wireless Access Point (AP Mode) .................... |
17 |
|
Chapter 4: Listen to Various Music .................................................. |
19 |
||
4.1 |
Listen to Internet Radio ............................................................. |
19 |
|
4.2 |
Listen to FM Radio .................................................................... |
23 |
|
4.3 |
Listen to Music in Your Computer.............................................. |
25 |
|
4.4 |
Listen to the Music in Your USB Drive....................................... |
28 |
|
4.5 |
The Playback Screen ................................................................ |
29 |
|
4.6 |
How to Add Stations Thru the Web Portal................................. |
30 |
|
Chapter 5: Advanced Tools ............................................................... |
32 |
||
5.1 |
Network Setting ......................................................................... |
32 |
|
5.2 |
Configure Network..................................................................... |
32 |
|
5.3 |
Reset to Default ........................................................................ |
32 |
|
5.4 |
Clear Favorites .......................................................................... |
33 |
|
5.5 |
Device MAC Address ................................................................ |
33 |
|
5.6 |
Firmware Version ...................................................................... |
33 |
|
5.7 |
Firmware Upgrade..................................................................... |
33 |
|
Chapter 6: Misc................................................................................... |
35 |
||
6.1 |
Clock Setting ............................................................................. |
35 |
|
6.1.1 |
Time Setup - Manually............................................................ |
36 |
|
6.1.2 |
Time Setup - Auto-Sync (NTP)............................................... |
37 |
|
6.1.3 |
Time Display Format .............................................................. |
37 |
|
6.2 Alarm Setting ............................................................................. |
38 |
||
6.3 |
Backlight Setting ....................................................................... |
40 |
|
6.4 |
Equalizer Setting ....................................................................... |
40 |
|
Appendix A: Listen to Music via WMP 11......................................... |
41 |
||
Appendix B: Listen to Music via WMC 2.0 ....................................... |
49 |
||
Technical Support .............................................................................. |
53 |
||
Radio and TV Interference Statement............................................... |
54 |
||
Warranty.............................................................................................. |
55 |
||

Chapter 1: Introduction
1.1 Overview
Thank you for choosing Aluratek’s® Internet Radio Alarm Clock with Built-in WiFi. Once I’m connected to the internet you will have access to 11,000+ live streaming internet radio stations from around the globe at your fingertips.
This includes any music genre you can think of including talk, sports and local news from over 150 countries.
That’s pretty much free music for life playing from any room in your home or office.
Just use your exisitng WiFi and internet connection. If you have internet you are all set!
In addition to making sure only quality materials are used for manufacturing, Aluratek® is also dedicated to provide the best customer satisfaction and support.
The goal of Aluratek is to embody “Simple Elegance” in every product it designs, manufactures and sells.
The product focus of Aluratek is to bring simple yet elegant connectivity solutions to the consumers to enhance their consumer electronics, communications and computing experience. Each product is carefully designed with the consumer in mind. Each product is solution-driven to address the need of the consumers and deliberately planned to provide the ultimate user experience.
Read this guide thoroughly and follow the installation and operation procedures carefully to prevent any damage to the unit and / or any of the devices it connects to.
4

Chapter 1: Introduction
1.2 Features
•Choose between more than 11,000+ radio stations worldwide via built-in vTuner with no monthly cost
•Search music by genre, i.e. classic, pop, talk, news, sports etc. and geographically over 150 countries
•Compatible with universal Plug-n-Play audio servers such as: Microsoft Media Player 11 (WMP11), Microsoft Media Connect and MusicMatch Jukebox
•Wireless access WIFI 802.11 b/g, Ethernet and USB 2.0 (host only) connectivity
•Built-in FM radio tuner for local FM broadcast service
•Access music files stored on a USB 2.0 flash drive, MP3 player or Hard drive through the unit’s USB port
•Alarm clock function with 2 programmable alarms wakes you up to internet radio, FM radio, digital music, or choice of several alarm tones
•Integrated amplifier: 2x2W stereo
•External plug for headsets (3.5mm)
•2 RCA plugs (Stereo Lineout) for external speakers
•No PC is required
•1 Year limited warranty
1.3 Requirements
•Wired / wireless router
•Internet connection
1.4 Package Contents
Your order has been carefully packaged and inspected. The following should be included in your package. Please inspect the contents of the package to ensure that you have received all items and that nothing has been damaged. If you discover a problem, please contact us immediately for assistance.
•WiFi Internet Radio
•Remote Control
•FM Antenna
•Power Adaptor
•Instructional Manual / CD
•Quick Start Guide
•Warranty / Registration Card
5
Chapter 1: Introduction
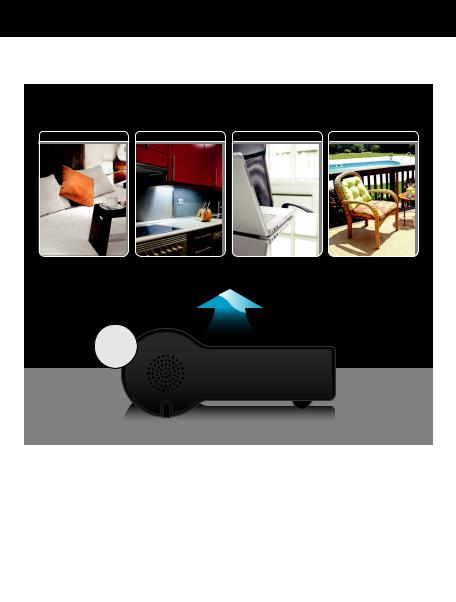
1.5 Product Application
1 PLACE IN ANY ROOM IN YOUR HOME
Bedroom Kitchen Home Office Backyard / Patio
Integrate the AIRMM01F |
Built-in WiFi |
into your home theater |
|
system via the RCA jacks |
|
C |
|
|
B |
2 LISTEN
A |
OR |
B |
OR |
C |
|
|
|
Stream Internet Radio from your WiFi / wireless
802.11 B / G router.
Connect your local CAT5 Ethernet cable to stream Internet Radio.
Plug in any USB Drive and listen to your music files. (USB port at front)
6

Chapter 1: Introduction
1.6 Keypad Functions
The following tables shows the keypad function definition at various situations when you operate AIRMM01F.
(A) When you are browsing the menu list, or when the device is idle
|
|
|
Screen with Menu List |
Clock Screen |
|
|
|
|
|
(Standby Screen) |
|
SNOOZE |
|
No function |
No function |
||
|
|
|
|
|
|
STOP |
|
1. Stop music |
Enter the alarm menu |
||
|
2. Go back to main menu |
||||
|
|
|
|
||
|
|
|
|
|
|
|
|
|
Short press=Light ON/OFF |
Short press=Light ON/OFF |
|
|
|
|
|||
|
|
|
|||
|
|
|
Long press=standby mode |
Long press=standby mode |
|
|
|
|
|
||
OK |
|
Select the function |
Enter main menu |
||
|
|
|
|
||
UP |
|
Move to previous item |
Enter main menu |
||
|
|
|
|
||
DOWN |
|
Move to next item |
Enter main menu |
||
|
|
|
|
|
|
|
|
Int. Radio |
|
|
|
LEFT |
FM Radio |
Back to upper layer of lists |
Enter main menu |
||
Media Serv. |
|||||
|
|
|
|
||
|
|
MP3 Player |
|
|
|
|
|
|
|
|
|
|
|
Int. Radio |
|
|
|
RIGHT |
FM Radio |
Enter next layer of lists |
Enter main menu |
||
Media Serv. |
|||||
|
|
|
|
||
|
|
MP3 Player |
|
|
|
|
|
|
|
|
|
7

Chapter 1: Introduction
(B) When you are playing music
|
|
|
Screen with |
Clock screen & |
Clock Screen & |
|
|
|
|
name of |
Music Playing |
Alarm Music |
|
|
|
|
Station / Song |
|
|
|
|
|
|
Enable or disable |
Enable or disable |
STOP the music. |
|
|
|
|
sleep function. |
sleep function. |
Go back to clock |
|
SNOOZE |
Start the timer for |
Start the timer for |
screen & restart the |
|||
15/30/45/60 min. |
15/30/45/60 min. |
alarm in 10 min. |
||||
|
|
|
(stop current mu- |
(stop current mu- |
|
|
|
|
|
sic source after |
sic source after |
|
|
|
|
|
time is up) |
time is up) |
|
|
|
|
|
|
|
|
|
STOP |
1. Stop music |
1. Stop music |
1. STOP alarm |
|||
2. Go back to |
2. Go back to |
2. Go back to |
||||
|
|
|
main menu |
main menu |
clock screen |
|
|
|
|
|
|
|
|
|
|
|
Short press = |
Short press = |
Short press = |
|
|
|
|
Light ON / OFF |
Light ON / OFF |
Light ON /OFF |
|
|
|
|
||||
|
|
|
||||
|
|
|
Long press = |
Long press = |
Long press = |
|
|
|
|
Standby mode |
Standby mode |
Standby mode |
|
|
|
|
|
|
|
|
OK |
Go to option menu |
Show the playback |
Show the playback |
|||
screen |
screen |
|||||
|
|
|
|
|
||
UP |
Volume up |
Volume up |
Volume up |
|||
|
|
|
|
|
||
DOWN |
Volume down |
Volume down |
Volume down |
|||
|
|
|
|
|
|
|
|
|
Int. Radio |
Go back to radio list |
|
|
|
|
|
|
|
|
|
|
LEFT |
FM Radio |
Go back to radio list |
Show the playback |
Show the playback |
||
Media Serv. |
Go back to song list |
screen |
screen |
|||
|
|
|||||
|
|
|
|
|
|
|
|
|
MP3 Player |
Go back to song list |
|
|
|
|
|
|
|
|
|
|
8

Chapter 1: Introduction
(B) When you are playing music (cont.)
|
|
Screen with |
Clock screen & |
Clock Screen & |
|
|
|
name of |
Music Playing |
Alarm Music |
|
|
|
Station / Song |
|
|
|
|
Int. Radio |
Go back to radio list |
|
|
|
|
|
|
|
|
|
RIGHT |
FM Radio |
Go back to radio list |
Show the playback |
Show the playback |
|
Media Serv. |
Go back to song list |
screen |
screen |
||
|
|||||
|
|
|
|
|
|
|
MP3 Player |
Go back to song list |
|
|
|
|
|
|
|
|
9

Chapter 2: Getting Started
2.1 Hardware Installation
Please fasten the wireless antenna and the FM antenna to appropriate antenna connectors at the rear panel of the device. If you prefer to use Ethernet for wired network connection, please plug in your Ethernet cable to the LAN (RJ45) port.
Please plug in the DC power adapter to the outlet and the DC power jack carefully.
To operate the device, you can use both the supplied remote control and also the keypad buttons.
2.2 Software Installation
AIRMM01F can work as a stand-alone device or as a media streamer of a media server. As a stand-alone unit, you can use it to listen to
Internet radio, FM radio, and external USB storage/MP3 players. No computer is needed.
For digital music files that are stored in your computer, you need to install streaming server software in the computer so that AIRMM01F can request the streaming service from that server.
AIRMM01F is compliant to UPnP protocol. It works with media server software such as Microsoft Windows Media Player 11 (WMP11), Microsoft Media Connect 2.0 (WMC2.0), and Musicmatch Jukebox.
Once you have the software installed on the computer, you can stream your music collection to AIRMM01F.
Please find Appendix A and B for instructions on how to connect AIRMM01F to your computer via WMP11, and WMC2.0.
10
Chapter 3: Configuration
There are three modes of network configuration for AIRMM01F. It can be a wireless client, a wired client, or even a wireless access point (Wireless AP).
3.1 Configure as an Wireless Client
The factory default mode is the wireless client code. According to the availability of an Ethernet cable, the device will automatically select a suitable client mode to operate. User can also manually change the setting of network configuration through the Setup menu “Setup/Advanced Setup/Configure Network”.
AIRMM01F will connect wirelessly if it detects an 802.11b/g wireless network. With no Ethernet cable attached, you just need to power on the device and AIRMM01F will automatically enter the wireless client mode.
To connect AIRMM01F to the wireless network for the first time, you will need to set the encryption key for a secured network. Once the setting is finished, the device will remember the related settings and try to connect to the designated AP when it is power on next time. However, if there
is something trouble in connecting to the designated AP, the device will show the AP list screen for you to configure again
First time using device without an Ethernet cable plugged in:
|
Instructions |
Screenshot |
Go to next |
Notes |
|
|
|
screen |
|
1. |
POWER ON |
|
|
|
|
|
|
|
|
2. |
|
|
|
Device is running |
|
|
|
|
as a Wireless |
|
|
|
|
Client. |
|
|
|
|
|
3. |
|
|
|
Scanning for |
|
|
|
|
available APs. |
|
|
|
|
|
11
Chapter 3: Configuration
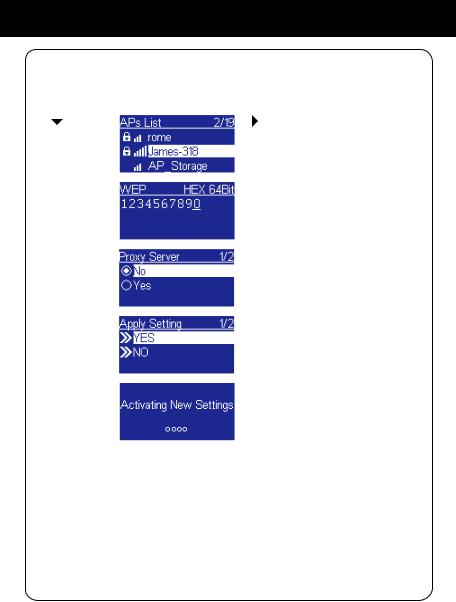
First time using device without an Ethernet cable plugged in (cont.):
|
Instructions |
Screenshot |
Go to next |
Notes |
|
|
|
screen |
|
4. |
“ ” button |
|
“ ” button or |
Select the desired |
|
|
|
“OK” button |
AP to connect |
|
|
|
|
|
5. |
Numeric key |
|
“OK” button |
Type in the |
|
pads |
|
|
encryption key |
|
|
|
|
if the AP is |
|
|
|
|
encrypted. |
|
|
|
|
|
6. |
|
|
“OK” button |
Set a proxy |
|
|
|
|
server if any. |
|
|
|
|
|
7. |
|
|
“OK” button |
Confirm to the |
|
|
|
|
settings. |
|
|
|
|
|
8. |
|
|
|
Apply new settings. |
|
|
|
|
|
12 |
12 |
Chapter 3: Configuration
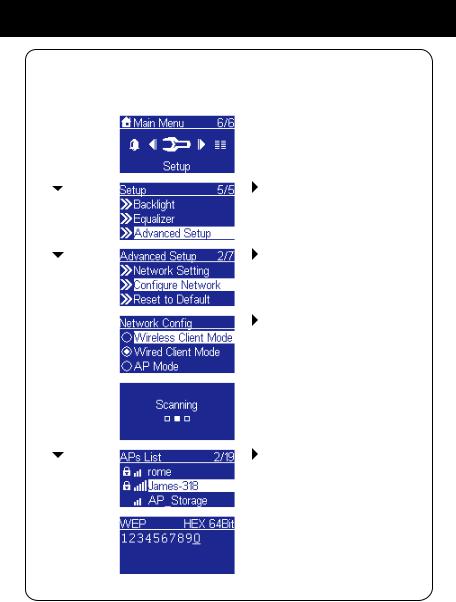
Manually configured as the Wireless Client Mode:
|
Instructions |
Screenshot |
Go to next |
Notes |
||
|
|
|
|
screen |
|
|
1. |
|
|
|
“OK” button |
Select “Setup” |
|
|
|
|
|
|
|
menu |
|
|
|
|
|
|
|
2. |
“ |
” button |
|
“ |
” button or |
Enter “Advanced |
|
(4 times) |
|
“OK” button |
Setup” menu |
||
|
|
|
|
|
|
|
3. |
“ |
” button |
|
“ |
” button or |
|
|
(1 time) |
|
“OK” button |
|
||
|
|
|
|
|
|
|
4. |
|
|
|
“ |
” button or |
Manually select |
|
|
|
|
“OK” button |
the wireless |
|
|
|
|
|
|
|
client mode. |
|
|
|
|
|
|
|
5. |
|
|
|
|
|
Scanning for |
|
|
|
|
|
|
available APs. |
|
|
|
|
|
|
|
6. |
“ |
” button |
|
“ |
” button or |
Select the |
|
|
|
|
“OK” button |
desired AP to |
|
|
|
|
|
|
|
connect |
|
|
|
|
|
||
7. |
Numeric key |
|
“OK” button |
Type in the |
||
|
pads |
|
|
|
encryption key |
|
|
|
|
|
|
|
if the AP is |
|
|
|
|
|
|
encrypted. |
|
|
|
|
|
|
|
13
Chapter 3: Configuration
Manually configured as the Wireless Client Mode (cont.):
|
Instructions |
Screenshot |
Go to next |
Notes |
|
|
|
screen |
|
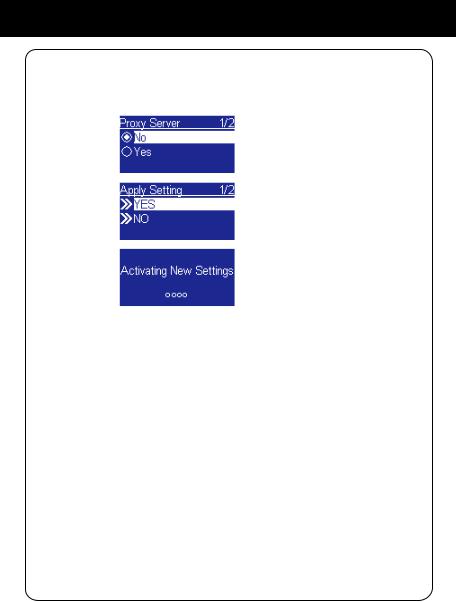
8. |
|
|
“OK” button |
Set a proxy |
|
|
|
|
server if any. |
|
|
|
|
|
9. |
|
|
“OK” button |
Confirm to the |
|
|
|
|
settings above. |
|
|
|
|
|
10. |
|
|
|
Apply new |
|
|
|
|
settings. |
|
|
|
|
|
14
Chapter 3: Configuration
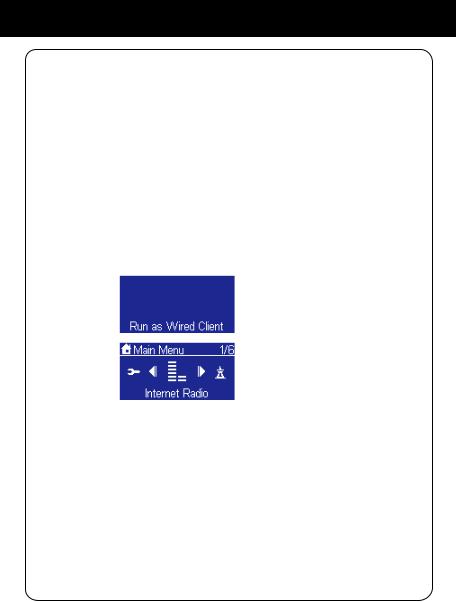
3.2 Configure as a Wired Client
If there is no 802.11b/g wireless network, AIRMM01F can also connect to the wired network through an Ethernet cable.
For this case, prior to power on the device, you have to plug in the Ethernet cable into the LAN (RJ45) connector on the back of the unit. After you power on the device, it will automatically go into the wired client mode when it detects a link status through the Ethernet connection.
First time using device with an Ethernet cable plugged in:
|
Instructions |
Screenshot |
Go to next |
Notes |
|
|
|
screen |
|
1. |
POWER ON |
|
|
|
|
|
|
|
|
2. |
|
|
|
Device is running |
|
|
|
|
as a Wireless |
|
|
|
|
Client. |
|
|
|
|
|
3. |
|
|
|
The device is in |
|
|
|
|
wired client mode |
|
|
|
|
now. It already |
|
|
|
|
connected to your |
|
|
|
|
network. |
|
|
|
|
|
15

Chapter 3: Configuration
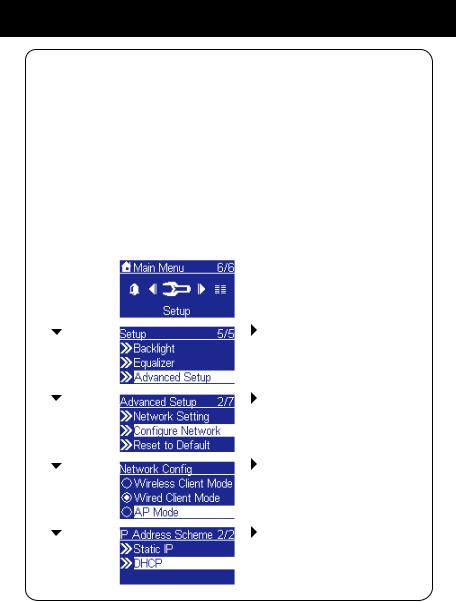
Manually configured as the Wired Client Mode:
|
Instructions |
Screenshot |
Go to next |
Notes |
||
|
|
|
|
screen |
|
|
1. |
|
|
|
“OK” button |
Select “Setup” |
|
|
|
|
|
|
|
menu |
|
|
|
|
|
|
|
2. |
“ |
” button |
|
“ |
” button or |
Enter “Advanced |
|
(4 times) |
|
“OK” button |
Setup” menu |
||
|
|
|
|
|
|
|
3. |
“ |
” button |
|
“ |
” button or |
|
|
(1 time) |
|
“OK” button |
|
||
|
|
|
|
|
|
|
4. |
“ |
” button |
|
“ |
” button or |
Manually select |
|
(1 time) |
|
“OK” button |
the wired client |
||
|
|
|
|
|
|
mode. |
|
|
|
|
|
|
|
5. |
“ |
” button |
|
“ |
” button or |
Select the DHCP |
|
(1 time) |
|
“OK” button |
for auto configured |
||
|
|
|
|
|
|
IP address. |
|
|
|
|
|
|
|
6. |
|
|
|
“OK” button |
Confirm to the |
|
|
|
|
|
|
|
settings above. |
|
|
|
|
|
|
|
7. |
|
|
|
|
|
Apply new |
|
|
|
|
|
|
settings. |
|
|
|
|
|
|
|
16
Chapter 3: Configuration
3.3 Configure as a WirelessAccess Point (AP Mode)
AIRMM01F can also be configured as a wirelessAP. With such feature, you can easily extend the wireless coverage without purchasing another AP.
To configure theAIRMM01F as an wirelessAP, you have to manually setup the device through selecting the setup menu “Setup /Advanced Setup / Configure Network/AP mode”.And then further setup the IP address scheme, SSID, channel number and the encryption key of theAP. Once the setting is finished, the device will reboot automatically and function as anAP.
Manually configured as a WirelessAccess Point (AP Mode):
|
Instructions |
Screenshot |
Go to next |
Notes |
||
|
|
|
|
screen |
|
|
1. |
|
|
|
“OK” button |
Select “Setup” |
|
|
|
|
|
|
|
menu |
|
|
|
|
|
|
|
2. |
“ |
” button |
|
“ |
” button or |
Enter “Advanced |
|
(4 times) |
|
“OK” button |
Setup” menu |
||
|
|
|
|
|
|
|
3. |
“ |
” button |
|
“ |
” button or |
|
|
(1 time) |
|
“OK” button |
|
||
|
|
|
|
|
|
|
4. |
“ |
” button |
|
“ |
” button or |
Manually select |
|
(2 times) |
|
“OK” button |
the AP mode. |
||
|
|
|
|
|
|
|
5. |
“ |
” button |
|
“ |
” button or |
Select the DHCP |
|
(1 time) |
|
“OK” button |
for auto configured |
||
|
|
|
|
|
|
IP address. |
|
|
|
|
|
|
|
17
 Loading...