


Combo Graphic Console Module
KA9233
User Manual
www.aten.com
KA9233 User Manual
FCC Information
This is an FCC Class A product. In a domestic environment this product may
cause radio interference in which case the user may be required to take
adequate measures.
This equipment has been tested and found to comply with the limits for a Class
A digital device, pursuant to Part 15 of the FCC Rules. These limits are
designed to provide reasonable protection against harmful interference when
the equipment is operated in a commercial environment. This equipment
generates, uses and can radiate radio frequency energy and, if not installed and
used in accordance with the instruction manual, may cause harmful
interference to radio communications. Operation of this equipment in a
residential area is likely to cause harmful interference in which case the user
will be required to correct the interference at his own expense.
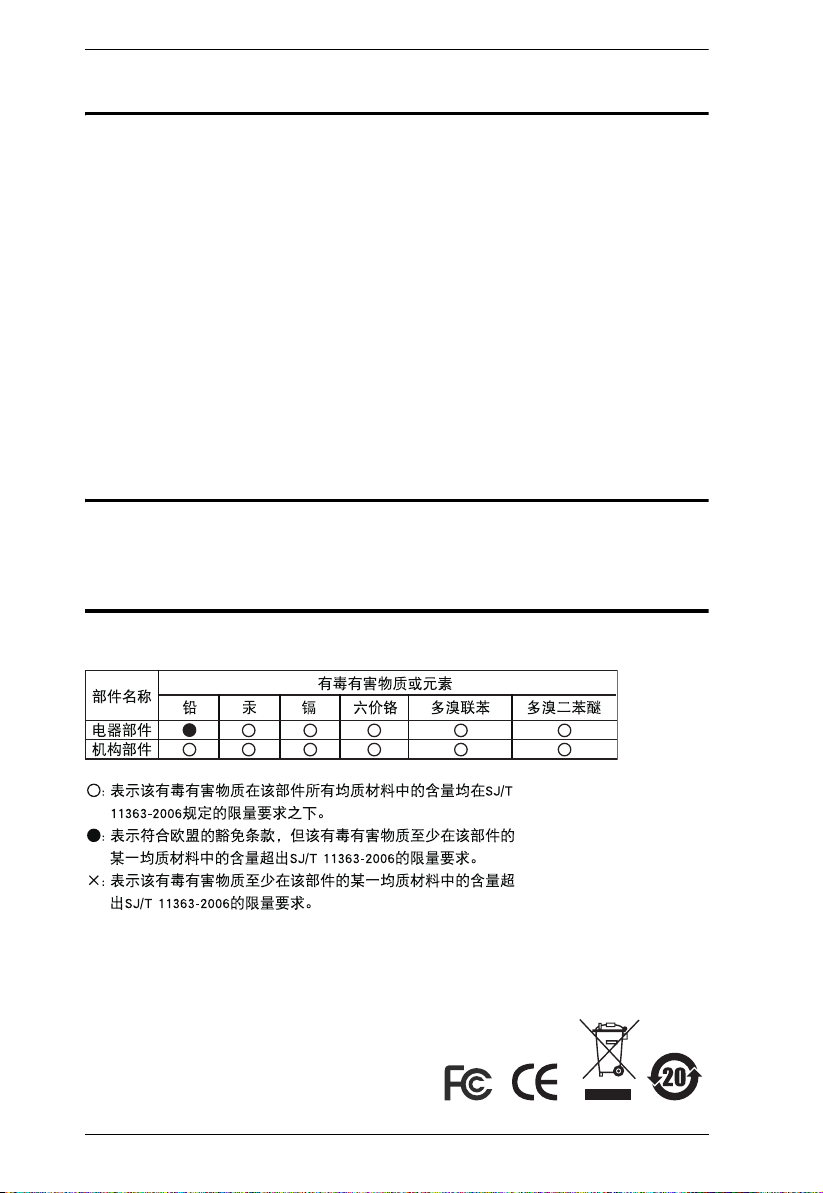
RoHS
This product is RoHS compliant.
SJ/T 11364-2006
The following contains information that relates to China:
ii

KA9233 User Manual
User Notice
All information, documentation, and specifications contained in this manual
are subject to change without prior notification by the manufacturer. The
manufacturer makes no representations or warranties, either expressed or
implied, with respect to the contents hereof and specifically disclaims any
warranties as to merchantability or fitness for any particular purpose. Any of
the manufacturer's software described in this manual is sold or licensed “as is.”
Should the programs prove defective following their purchase, the buyer (and
not the manufacturer, its distributor, or its dealer), assumes the entire cost of all
necessary servicing, repair and any incidental or consequential damages
resulting from any defect in the software.
The manufacturer of this system is not responsible for any radio and/or TV
interference caused by unauthorized modifications to this device. It is the
responsibility of the user to correct such interference.
The manufacturer is not responsible for any damage incurred in the operation
of this system if the correct operational voltage setting was not selected prior
to operation. PLEASE VERIFY THAT THE VOLTAGE SETTING IS
CORRECT BEFORE USE.
Online Registration
Be sure to register your product at our online support center:
International – http://support.aten.com
North America – http://www.aten-usa.com/product_registration
Online Support
Online technical support is available to ATEN customers through our support
center. See Technical Support, page xiii, for details.
iii

KA9233 User Manual
Safety Instructions
General
Read all of these instructions. Save them for future reference.
Follow all warnings and instructions marked on the device.
Do not place the device on any unstable surface (cart, stand, table, etc.). If
the device falls, serious damage will result.
Do not use the device near water.
Do not place the device near, or over, radiators or heat registers.
The device cabinet is provided with slots and openings to allow for
adequate ventilation. To ensure reliable operation, and to protect against
overheating, these openings must never be blocked or covered.
The device should never be placed on a soft surface (bed, sofa, rug, etc.) as
this will block its ventilation openings. Likewise, the device should not be
placed in a built in enclosure unless adequate ventilation has been
provided.
Never spill liquid of any kind on the device.
Unplug the device from the wall outlet before cleaning. Do not use liquid
or aerosol cleaners. Use a damp cloth for cleaning.
The device should be operated from the type of power source indicated on
the marking label. If you are not sure of the type of power available,
consult your dealer or local power company.
The device is equipped with a 3-wire grounding type plug. This is a safety
feature. If you are unable to insert the plug into the outlet, contact your
electrician to replace your obsolete outlet. Do not attempt to defeat the
purpose of the grounding-type plug. Always follow your local/national
wiring codes.
Do not allow anything to rest on the power cord or cables. Route the
power cord and cables so that they cannot be stepped on or tripped over.
If an extension cord is used with this device make sure that the total of the
ampere ratings of all products used on this cord does not exceed the
extension cord ampere rating. Make sure that the total of all products
plugged into the wall outlet does not exceed 15 amperes.
To help protect your system from sudden, transient increases and
decreases in electrical power, use a surge suppressor, line conditioner, or
uninterruptible power supply (UPS).
iv

KA9233 User Manual
When connecting or disconnecting power to hot pluggable power supplies,
observe the following guidelines:
Install the power supply before connecting the power cable to the power
supply.
Unplug the power cable before removing the power supply.
If the system has multiple sources of power, disconnect power from the
system by unplugging all power cables from the power supplies.
Never push objects of any kind into or through cabinet slots. They may
touch dangerous voltage points or short out parts resulting in a risk of fire
or electrical shock.
Do not attempt to service the device yourself. Refer all servicing to
qualified service personnel.
If the following conditions occur, unplug the device from the wall outlet
and bring it to qualified service personnel for repair.
The power cord or plug has become damaged or frayed.
Liquid has been spilled into the device.
The device has been exposed to rain or water.
The device has been dropped, or the cabinet has been damaged.
The device exhibits a distinct change in performance, indicating a need
for service.
The device does not operate normally when the operating instructions
are followed.
Only adjust those controls that are covered in the operating instructions.
Improper adjustment of other controls may result in damage that will
require extensive work by a qualified technician to repair.
v

KA9233 User Manual
Rack Mounting
Before working on the rack, make sure that the stabilizers are secured to
the rack, extended to the floor, and that the full weight of the rack rests on
the floor. Install front and side stabilizers on a single rack or front
stabilizers for joined multiple racks before working on the rack.
Always load the rack from the bottom up, and load the heaviest item in the
rack first.
Make sure that the rack is level and stable before extending a device from
the rack.
Do not overload the AC supply branch circuit that provides power to the
rack. The total rack load should not exceed 80 percent of the branch circuit
rating.
Ensure that proper airflow is provided to devices in the rack.
Do not step on or stand on any device when servicing other devices in a
rack.
vi

KA9233 User Manual
Package Contents
The KA9233 package consists of:
1 Combo Graphic Console Module with Stacking Brackets
1 KVM Cable
1 Power Adapter
1 Rack Mount Kit
1 Firmware Upgrade Cable
1 User Manual*
1 Quick Start Guide
Check to make sure that all of the components are present and in good order.
If anything is missing, or was damaged in shipping, contact your dealer.
Read this manual thoroughly and follow the installation and operation
procedures carefully to prevent any damage to the switch or to any other
devices on the KA9233 installation.
* Changes may have been made to the manual since it was printed. Please visit
our Website to check for the most up-to-date version.
Copyright © 2007 ATEN® International Co., Ltd.
Manual Part No. PAPE-0273-1AXG
Printing Date: 04/2007
Altusen and the Altusen logo are registered trademarks of ATEN International Co., Ltd. All rights reserved.
All other brand names and trademarks are the registered property of their respective owners.
vii

KA9233 User Manual
Contents
FCC Information . . . . . . . . . . . . . . . . . . . . . . . . . . . . . . . . . . . . . . . . . . . . . ii
RoHS . . . . . . . . . . . . . . . . . . . . . . . . . . . . . . . . . . . . . . . . . . . . . . . . . . . . . ii
SJ/T 11364-2006 . . . . . . . . . . . . . . . . . . . . . . . . . . . . . . . . . . . . . . . . . . . . ii
User Notice . . . . . . . . . . . . . . . . . . . . . . . . . . . . . . . . . . . . . . . . . . . . . . . . .iii
Online Registration . . . . . . . . . . . . . . . . . . . . . . . . . . . . . . . . . . . . . . . .iii
Online Support . . . . . . . . . . . . . . . . . . . . . . . . . . . . . . . . . . . . . . . . . . .iii
Safety Instructions . . . . . . . . . . . . . . . . . . . . . . . . . . . . . . . . . . . . . . . . . . .iv
General . . . . . . . . . . . . . . . . . . . . . . . . . . . . . . . . . . . . . . . . . . . . . . . . .iv
Rack Mounting . . . . . . . . . . . . . . . . . . . . . . . . . . . . . . . . . . . . . . . . . . .vi
Package Contents . . . . . . . . . . . . . . . . . . . . . . . . . . . . . . . . . . . . . . . . . . vii
About This Manual . . . . . . . . . . . . . . . . . . . . . . . . . . . . . . . . . . . . . . . . . . .xi
Overview . . . . . . . . . . . . . . . . . . . . . . . . . . . . . . . . . . . . . . . . . . . . . . . .xi
Conventions . . . . . . . . . . . . . . . . . . . . . . . . . . . . . . . . . . . . . . . . . . . . xii
Technical Support. . . . . . . . . . . . . . . . . . . . . . . . . . . . . . . . . . . . . . . . . . . xiii
International . . . . . . . . . . . . . . . . . . . . . . . . . . . . . . . . . . . . . . . . . . . . xiii
North America . . . . . . . . . . . . . . . . . . . . . . . . . . . . . . . . . . . . . . . . . . .xiii
Product Information . . . . . . . . . . . . . . . . . . . . . . . . . . . . . . . . . . . . . . . . .xiv
Chapter 1.
Introduction
Overview. . . . . . . . . . . . . . . . . . . . . . . . . . . . . . . . . . . . . . . . . . . . . . . . . . . 1
Features . . . . . . . . . . . . . . . . . . . . . . . . . . . . . . . . . . . . . . . . . . . . . . . . . . . 2
Requirements . . . . . . . . . . . . . . . . . . . . . . . . . . . . . . . . . . . . . . . . . . . . . . . 3
Consoles . . . . . . . . . . . . . . . . . . . . . . . . . . . . . . . . . . . . . . . . . . . . . . . . 3
Computers. . . . . . . . . . . . . . . . . . . . . . . . . . . . . . . . . . . . . . . . . . . . . . . 3
Cables . . . . . . . . . . . . . . . . . . . . . . . . . . . . . . . . . . . . . . . . . . . . . . . . . . 3
Operating Systems . . . . . . . . . . . . . . . . . . . . . . . . . . . . . . . . . . . . . . . . 3
KA9233 Front View. . . . . . . . . . . . . . . . . . . . . . . . . . . . . . . . . . . . . . . . . . . 4
KA9233 Rear View . . . . . . . . . . . . . . . . . . . . . . . . . . . . . . . . . . . . . . . . . . . 5
Chapter 2.
Installation
Before you Begin . . . . . . . . . . . . . . . . . . . . . . . . . . . . . . . . . . . . . . . . . . . . 7
Stacking and Rack Mounting . . . . . . . . . . . . . . . . . . . . . . . . . . . . . . . . . . . 7
Stacking . . . . . . . . . . . . . . . . . . . . . . . . . . . . . . . . . . . . . . . . . . . . . . . . 7
Rack Mounting . . . . . . . . . . . . . . . . . . . . . . . . . . . . . . . . . . . . . . . . . . . 8
Installation. . . . . . . . . . . . . . . . . . . . . . . . . . . . . . . . . . . . . . . . . . . . . . . . . 10
Verifying the Connection to the Matrix KVM Switch . . . . . . . . . . . . . . . . . 11
Topology Considerations . . . . . . . . . . . . . . . . . . . . . . . . . . . . . . . . . . . . . 11
Basic Operation . . . . . . . . . . . . . . . . . . . . . . . . . . . . . . . . . . . . . . . . . . . . 11
Hot Plugging . . . . . . . . . . . . . . . . . . . . . . . . . . . . . . . . . . . . . . . . . . . . 11
Hot Plugging User Ports . . . . . . . . . . . . . . . . . . . . . . . . . . . . . . . . 11
viii

KA9233 User Manual
Chapter 3.
Operation
Overview . . . . . . . . . . . . . . . . . . . . . . . . . . . . . . . . . . . . . . . . . . . . . . . . . .13
Switching Between the Local Computer and the Matrix KVM Switch . . . .13
Adjusting the Picture Quality. . . . . . . . . . . . . . . . . . . . . . . . . . . . . . . . . . .14
Logging in to the Graphical OSD . . . . . . . . . . . . . . . . . . . . . . . . . . . . . . . 15
The Graphical OSD. . . . . . . . . . . . . . . . . . . . . . . . . . . . . . . . . . . . . . . . . .16
Menus . . . . . . . . . . . . . . . . . . . . . . . . . . . . . . . . . . . . . . . . . . . . . . . . .16
Icons . . . . . . . . . . . . . . . . . . . . . . . . . . . . . . . . . . . . . . . . . . . . . . . . . .16
Tree View Icons. . . . . . . . . . . . . . . . . . . . . . . . . . . . . . . . . . . . . . . . . .17
Navigating the Graphical OSD . . . . . . . . . . . . . . . . . . . . . . . . . . . . . . . . .17
Shortcut Keys . . . . . . . . . . . . . . . . . . . . . . . . . . . . . . . . . . . . . . . . . . .17
Port ID Numbering . . . . . . . . . . . . . . . . . . . . . . . . . . . . . . . . . . . . . . . . . .19
Cascaded Installations . . . . . . . . . . . . . . . . . . . . . . . . . . . . . . . . . . . . 19
Matrix Plus KVM Adapter Cable Installations . . . . . . . . . . . . . . . . . . . 19
Daisy-Chained Installations. . . . . . . . . . . . . . . . . . . . . . . . . . . . . . . . .19
Port Status . . . . . . . . . . . . . . . . . . . . . . . . . . . . . . . . . . . . . . . . . . . . . . . .21
Accessing Devices Attached to the Matrix KVM Switch . . . . . . . . . . . . . .22
Skipping and Scanning Attached Computers . . . . . . . . . . . . . . . . . . . . . .23
Setting the OSD View . . . . . . . . . . . . . . . . . . . . . . . . . . . . . . . . . . . . . . . . 24
View Mode. . . . . . . . . . . . . . . . . . . . . . . . . . . . . . . . . . . . . . . . . . . . . .25
Set Port ID. . . . . . . . . . . . . . . . . . . . . . . . . . . . . . . . . . . . . . . . . . . . . .25
Display Duration . . . . . . . . . . . . . . . . . . . . . . . . . . . . . . . . . . . . . . . . .26
Set Scan . . . . . . . . . . . . . . . . . . . . . . . . . . . . . . . . . . . . . . . . . . . . . . .26
Configuring OSD User Settings . . . . . . . . . . . . . . . . . . . . . . . . . . . . . . . .27
Viewing Help . . . . . . . . . . . . . . . . . . . . . . . . . . . . . . . . . . . . . . . . . . . . . . . 29
Logging Out. . . . . . . . . . . . . . . . . . . . . . . . . . . . . . . . . . . . . . . . . . . . . . . .29
Chapter 4.
Hotkey Mode
Hotkey Port Control. . . . . . . . . . . . . . . . . . . . . . . . . . . . . . . . . . . . . . . . . .31
Invoking Hotkey Mode. . . . . . . . . . . . . . . . . . . . . . . . . . . . . . . . . . . . . 31
Port Switching . . . . . . . . . . . . . . . . . . . . . . . . . . . . . . . . . . . . . . . . . . .32
Switching to Ports . . . . . . . . . . . . . . . . . . . . . . . . . . . . . . . . . . . . .32
Auto Scanning . . . . . . . . . . . . . . . . . . . . . . . . . . . . . . . . . . . . . . . . . . .33
Setting the Scan Interval . . . . . . . . . . . . . . . . . . . . . . . . . . . . . . . . 33
Invoking Auto Scan . . . . . . . . . . . . . . . . . . . . . . . . . . . . . . . . . . . . 34
Hotkey Beeper Control . . . . . . . . . . . . . . . . . . . . . . . . . . . . . . . . . . . . . . . 35
Hotkey Summary Table. . . . . . . . . . . . . . . . . . . . . . . . . . . . . . . . . . . . . . . 36
Chapter 5.
Administration
Overview . . . . . . . . . . . . . . . . . . . . . . . . . . . . . . . . . . . . . . . . . . . . . . . . . .37
Naming Stations . . . . . . . . . . . . . . . . . . . . . . . . . . . . . . . . . . . . . . . . . . . .37
Setting the Webpage Session Timeout. . . . . . . . . . . . . . . . . . . . . . . . . . . 38
Network Configuration. . . . . . . . . . . . . . . . . . . . . . . . . . . . . . . . . . . . . . . . 39
ix

KA9233 User Manual
IP Installer Setting. . . . . . . . . . . . . . . . . . . . . . . . . . . . . . . . . . . . . . . . 39
IP Address. . . . . . . . . . . . . . . . . . . . . . . . . . . . . . . . . . . . . . . . . . . . . . 40
Port Settings . . . . . . . . . . . . . . . . . . . . . . . . . . . . . . . . . . . . . . . . . . . . 40
System Event Reports . . . . . . . . . . . . . . . . . . . . . . . . . . . . . . . . . . . . 41
Setting the Date and Time . . . . . . . . . . . . . . . . . . . . . . . . . . . . . . . . . . . . 42
Group Management . . . . . . . . . . . . . . . . . . . . . . . . . . . . . . . . . . . . . . . . . 44
Adding Groups . . . . . . . . . . . . . . . . . . . . . . . . . . . . . . . . . . . . . . . . . . 45
Modifying Groups . . . . . . . . . . . . . . . . . . . . . . . . . . . . . . . . . . . . . . . . 46
Deleting Groups . . . . . . . . . . . . . . . . . . . . . . . . . . . . . . . . . . . . . . . . . 46
Managing Port Access Rights for Groups. . . . . . . . . . . . . . . . . . . . . . 47
User Management . . . . . . . . . . . . . . . . . . . . . . . . . . . . . . . . . . . . . . . . . . 49
Adding Users. . . . . . . . . . . . . . . . . . . . . . . . . . . . . . . . . . . . . . . . . . . . 51
Modifying Users . . . . . . . . . . . . . . . . . . . . . . . . . . . . . . . . . . . . . . . . . 53
Deleting Users. . . . . . . . . . . . . . . . . . . . . . . . . . . . . . . . . . . . . . . . . . . 53
Managing Port Access Rights for Users . . . . . . . . . . . . . . . . . . . . . . . 53
Port Management . . . . . . . . . . . . . . . . . . . . . . . . . . . . . . . . . . . . . . . . . . . 56
Accessing Ports . . . . . . . . . . . . . . . . . . . . . . . . . . . . . . . . . . . . . . . . . 57
Managing Port Access . . . . . . . . . . . . . . . . . . . . . . . . . . . . . . . . . . . . 58
Cascaded Installations . . . . . . . . . . . . . . . . . . . . . . . . . . . . . . . . . . . . 61
Configuring Port Settings . . . . . . . . . . . . . . . . . . . . . . . . . . . . . . . . . . 62
Restoring Port Defaults. . . . . . . . . . . . . . . . . . . . . . . . . . . . . . . . . . . . 63
Searching for Ports and Stations . . . . . . . . . . . . . . . . . . . . . . . . . . . . . . . 64
Upgrading Firmware . . . . . . . . . . . . . . . . . . . . . . . . . . . . . . . . . . . . . . . . . 65
Preparing to Upgrade the Firmware . . . . . . . . . . . . . . . . . . . . . . . . . . 65
Downloading the Firmware Upgrade Package . . . . . . . . . . . . . . . . . . 66
Upgrading the Firmware . . . . . . . . . . . . . . . . . . . . . . . . . . . . . . . . . . . 66
Upgrade Failed . . . . . . . . . . . . . . . . . . . . . . . . . . . . . . . . . . . . . . . . . . 70
Viewing and Clearing the Log File . . . . . . . . . . . . . . . . . . . . . . . . . . . . . . 71
Broadcasting Commands . . . . . . . . . . . . . . . . . . . . . . . . . . . . . . . . . . . . . 73
Viewing System Information . . . . . . . . . . . . . . . . . . . . . . . . . . . . . . . . . . . 74
Chapter 6.
Keyboard Emulation
Apple Keyboard . . . . . . . . . . . . . . . . . . . . . . . . . . . . . . . . . . . . . . . . . . . . 75
Sun Keyboard . . . . . . . . . . . . . . . . . . . . . . . . . . . . . . . . . . . . . . . . . . . . . . 76
Appendix
Specifications . . . . . . . . . . . . . . . . . . . . . . . . . . . . . . . . . . . . . . . . . . . . . . 77
Factory Default Settings . . . . . . . . . . . . . . . . . . . . . . . . . . . . . . . . . . . . . . 78
Entering the ok Prompt (Sun Solaris) . . . . . . . . . . . . . . . . . . . . . . . . . . . . 78
Troubleshooting . . . . . . . . . . . . . . . . . . . . . . . . . . . . . . . . . . . . . . . . . . . . 79
General . . . . . . . . . . . . . . . . . . . . . . . . . . . . . . . . . . . . . . . . . . . . . . . . 79
Sun Systems. . . . . . . . . . . . . . . . . . . . . . . . . . . . . . . . . . . . . . . . . . . . 80
Limited Warranty. . . . . . . . . . . . . . . . . . . . . . . . . . . . . . . . . . . . . . . . . . . . 81
Index
x

KA9233 User Manual
About This Manual
This User Manual is provided to help you get the most from your KA9233
system. It covers all aspects of installation, configuration, and operation. An
overview of the information found in the manual is provided below.
Overview
Chapter 1, Introduction, introduces you to the KA9233 system. Its
purpose, features, and benefits are presented, and its front and back panel
components are described.
Chapter 2, Installation, provides step-by-step instructions for setting up
your installation, and explains some basic operating procedures.
Chapter 3, Operation, describes how to log into the KA9233 and provides
detailed information for configuring and controlling your installation using the
KA9233’s intuitive, Graphical OSD (On Screen Display).
Chapter 4, Hotkey Mode, explains the concepts and procedures used to
control the KA9233 from the keyboard.
Chapter 5, Administration, explains the administrative procedures that are
employed to configure the matrix KVM switch’s working environment using
the Graphical OSD.
Chapter 6, Keyboard Emulation, lists the keys for a PC keyboard to
emulate the functions of the Apple and Sun keyboards.
An Appendix at the end of the manual provides technical and troubleshooting information.
xi

KA9233 User Manual
Conventions
This manual uses the following conventions:
Monospaced Indicates text that you should key in.
[ ]
1.
♦
→
Indicates keys you should press. For example, [Enter] means
to press the Enter key. If keys need to be chorded, they
appear together in the same bracket with a plus sign
between them: [Ctrl+Alt].
Numbered lists represent procedures with sequential steps.
Bullet lists provide information, but do not involve sequential
steps.
Indicates selecting the option (on a menu or dialog box, for
example), that comes next. For example, Start
means to open the Start menu, and then select Run.
Indicates critical information.
→ Run
xii

Technical Support
International
KA9233 User Manual
Technical Phone Support 1. Contact your local dealer.
Email Support Email your questions and concerns to:
Online Support
Technical Support
Troubleshooting
Documentation
Software Updates
2. Call the ALTUSEN Technical Support Center:
886-2-8692-6959
support@aten.com
1. Online technical support is available to ALTUSEN customers through our e-Support Center:
http://support.aten.com
2. Online troubleshooting that describes the most
commonly encountered problems and offers possible
solutions to them; online documentation (including
electronically available manuals); and the latest drivers
and firmware for your product are available at our
Website: http://www.aten.com
North America
Technical Phone Support Registered ALTUSEN product owners are entitled to
Email Support Email your questions and concerns to:
Online Support
Technical Support
Troubleshooting
Documentation
Software Updates
telephone technical support. Call the ALTUSEN Technical
Support Center: 1-888-999-ATEN
support@aten-usa.com
1. Online technical support is available to ALTUSEN customers through our e-Support Center:
http://www.aten-usa.com/support
2. Online troubleshooting that describes the most
commonly encountered problems and offers possible
solutions to them; online documentation (including
electronically available manuals); and the latest drivers
and firmware for your product are available at our
Website: http://www.aten-usa.com
When you contact us, please have the following information ready beforehand:
Product model number, serial number, and date of purchase
Your computer configuration, including operating system, revision level,
expansion cards, and software
Any error messages displayed at the time the error occurred
The sequence of operations that led up to the error
Any other information you feel may be of help
xiii

KA9233 User Manual
Product Information
For information about all ALTUSEN products and how they can help you
connect without limits, visit ATEN on the Web or contact an ALTUSEN
Authorized Reseller. Visit ATEN on the Web for a list of locations and
telephone numbers:
International – http://www.aten.com
North America – http://www.aten-usa.com
xiv

Chapter 1
Introduction
Overview
The Altusen KA9233 Combo Graphic Console Module offers secure access to
the servers in a matrix KVM switch from a keyboard, monitor, mouse (KVM)
console or a computer workstation. It provides user-friendly server
management, flexible console interface support, and superior video graphics.
The KA9233 has console ports for both PS/2 and USB keyboards and mice and
an SPHD port for integration with a computer workstation. It enables network
administrators to seamlessly switch between a workstation computer and
servers in the matrix KVM switch. This eliminates the constant need to move
from one workstation to another to manage servers. Moreover, because the
KA9233 can be placed up to 300 meters (980') away from the servers, network
administrators can respond to problems as they arise, not only when they have
time to visit the data center.
An intuitive graphical user interface, the Graphical OSD, features easy-to-use
menus, icons, and shortcut keys to access servers, manage users and groups,
control port access, upgrade firmware versions, and perform many other
administrative functions. Login password protection and three-level user
access control ensure that unauthorized users cannot gain control of the servers
in your matrix KVM switch. The Graphical OSD is platform independent and
does not require you to install any software.
Superior video display resolutions are supported up to 2048 x 1536 for the local
computer and 1024 x 768 for the matrix KVM switch for crisp, clear graphics.
Support for Display Data Channel (DDC) emulation eliminates complex power
on procedures and ensures the highest possible video resolution.
As server densities increase, so does cable bulk. To combat this effect, the
KA9233 uses a single, economical Cat 5 cable to connect to the matrix KVM
switch, greatly reducing cable volume and the overall cost of the installation.
Other useful features include Auto Scan mode to continuously monitor servers,
a log file, free lifetime firmware upgrades, and a 1U rack mount kit.
1

KA9233 User Manual
Features
One Combo Graphic Console Module can control a workstation computer
and a remote matrix KVM switch installation
Supports PS/2 and USB keyboards and mice
New Graphical OSD—intuitive, easy-to-use graphical user interface to
manage the matrix KVM switch and port switching
Supports login password authentication
Supports three-level user access control (Super Administrator,
Administrator, and User)
Configure port access rights via user or group account settings, or on a
port-by-port basis
Automatically scan attached computers at regular intervals
Connects to matrix KVM switch via economical Cat 5 (or higher) cable
Superior video quality—2048 x 1536 @ 60Hz for up to 10m for local
computer; 1024 x 768 @ 60Hz for up to 300 meters from Combo Graphic
Console Module to KVM adapter cable (CPU module)
Full-screen Graphical OSD (800 x 600, 16-bit color)
Automatic video gain control
Manual video gain control to fine tune the video signal
Extensive sets of hotkeys and shortcut keys enable you to quickly switch
between the workstation computer, Graphical OSD, and ports on the
matrix KVM switch, operate the Graphical OSD entirely from the
keyboard, invoke Auto Scan mode, and more
OSD hotkey is customizable to avoid conflict with programs running on
computers
Supports Logitech and Microsoft wireless mice
LCD, VGA, SVGA, XGA, and MultiSync support; DDC2B (local
computer)
Built in ASIC for greater reliability and compatibility
No software to install
Free lifetime flash firmware upgrades
Rack mounts in 1U of rack space
2

Chapter 1. Introduction
Requirements
Consoles
The following equipment is required for the console:
A VGA, SVGA, XGA, or MultiSync monitor capable of displaying the
highest resolution provided by any computer in the installation
Keyboard and mouse (PS/2 or USB)
Computers
The following equipment is required for the local computer:
A VGA, SVGA, XGA, or MultiSync video graphics card with an HDB-15
port
PS/2 mouse and keyboard ports (6-pin mini-DIN), or one USB port
Cables
One or more of the following cables are required for use with the KA9233:
Typ e Description
Cat 5 Cable Connects the KA9233 to a matrix KVM switch
KVM Cable Connects a local computer to the KA9233:
Computers with PS/2 ports use Part No. 2L-5202P
Computers with a USB port use Part No. 2L-5202U
Operating Systems
Microsoft® Windows® 2000 and higher
Mac OS
RED HAT
Mandriva Linux 9.0 and higher
SUSE 8.2 and higher
Free BSD 3.5.1, 4.2, 4.3, 4.5 and higher
Sun Solaris™ 8 and higher
Netware 5.0, 6.0 and higher
OS/2 Ver 2.0
AIX 4.3 and higher
DOS 6.22
®
9.0 and higher
®
Linux® 6.0, 7.1, 7.2, 7.3, 8.0 and higher
3
KA9233 User Manual
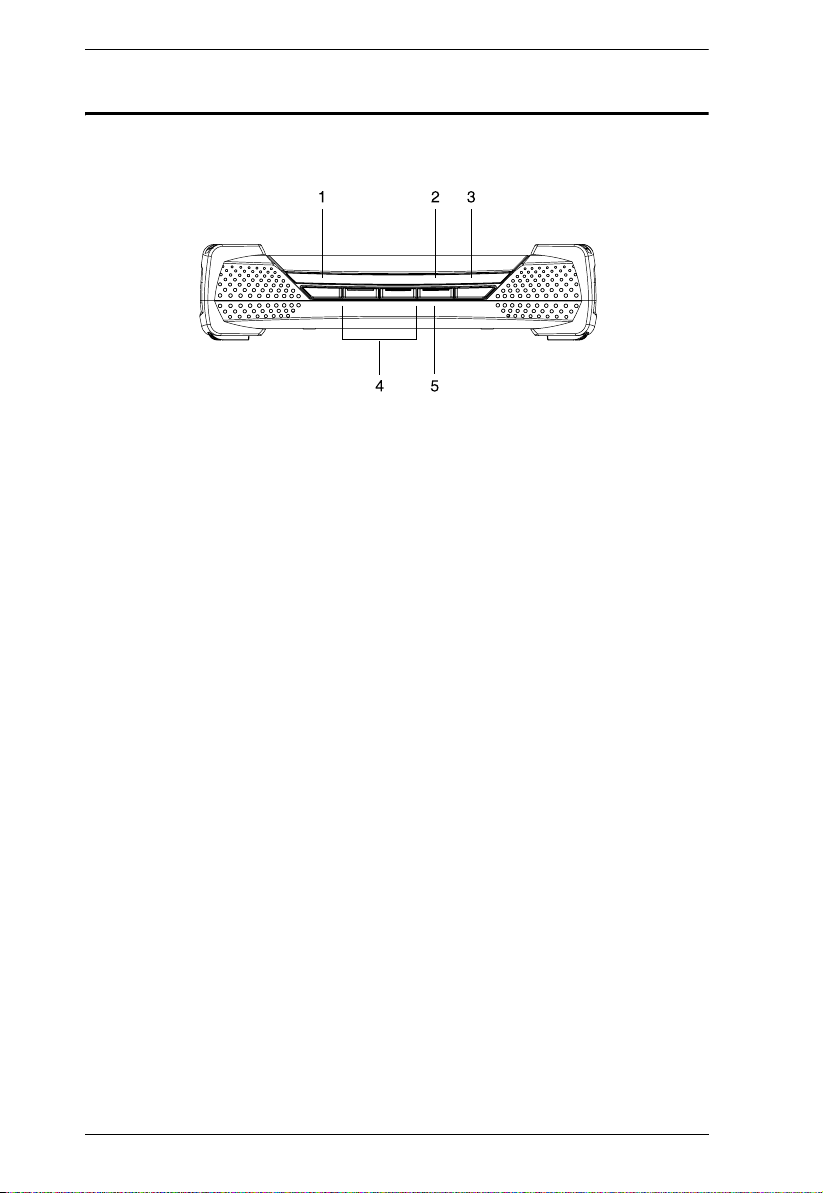
KA9233 Front View
1. LINK LED
2. LOCAL LED
3. REMOTE LED
4. Video Gain Buttons
5. LOCAL/REMOTE Button
4

KA9233 Rear View
1. Power Jack
2. LOCAL PC Port
3. LINK Port
Chapter 1. Introduction
4. F/W UPGRADE Port
5. CONSOLE Section
5

KA9233 User Manual
This Page Intentionally Left Blank
6

Chapter 2
Installation
Before you Begin
1. Important safety information regarding the placement of this
device is provided on page iv. Please review it before proceeding.
2. If you will connect a local computer, ensure it is powered off.
3. Make sure that all devices you will be connecting up are
properly grounded.
Stacking and Rack Mounting
The KA9233 can be stacked on the desktop or rack mounted in 1U of rack
space.
Stacking
The KA9233 can be placed on any level surface that can safely support its
weight and the weight of the attached cables. Ensure that the surface is clean
and free of materials that can interfere with the normal operation of the device.
The stacking brackets provide an easy method to securely stack multiple
KA9233 together.
7
KA9233 User Manual
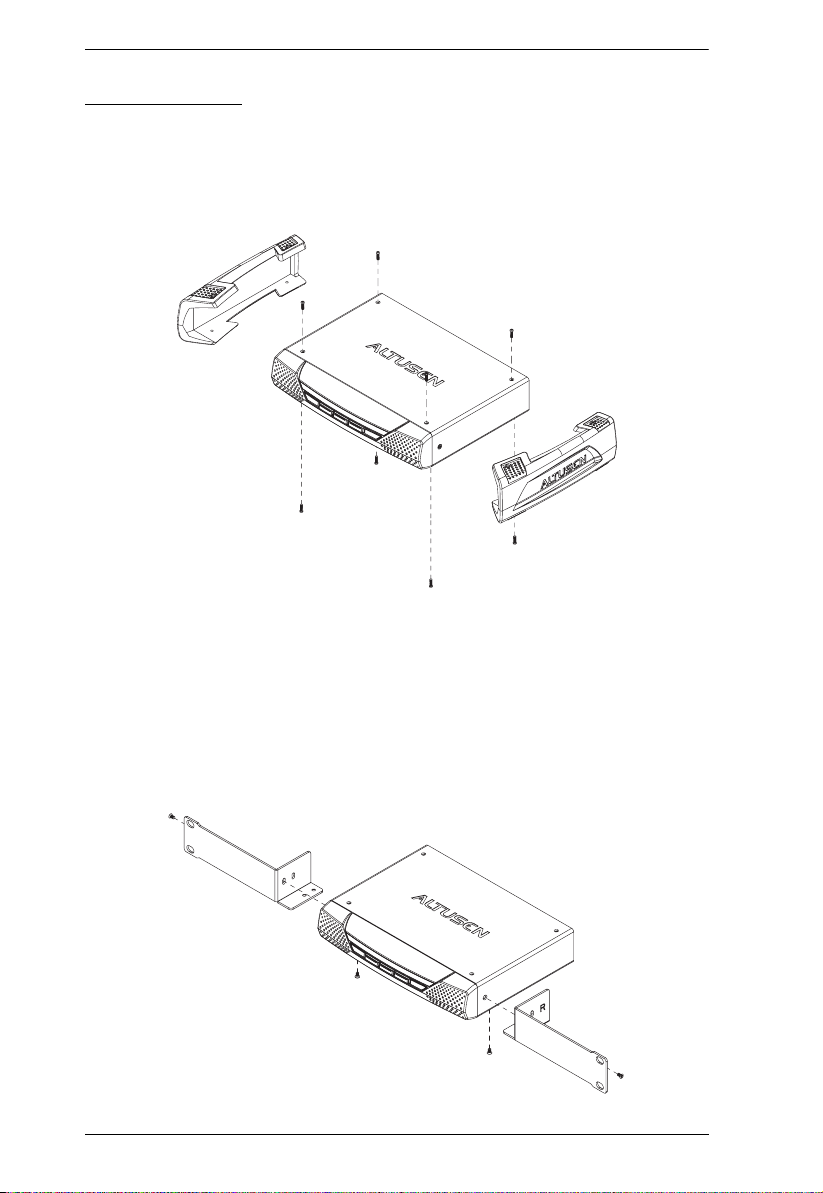
Rack Mounting
1. Remove the 2 stacking brackets from the sides of the unit. This requires
using a Phillips head hex screwdriver to remove the 8 screws that attach
the stacking brackets to the unit.
2. Remove the 4 screws from the sides and bottom at the front of the unit.
Using the screws provided with the rack mount kit, attach the rack mount
brackets to the sides of the unit (as shown in the figure below). There are
two sets of screw holes on the rack mount brackets so that the KA9233 can
be rack mounted either flush with the rack or with the front panel
protruding.
8
Chapter 2. Installation
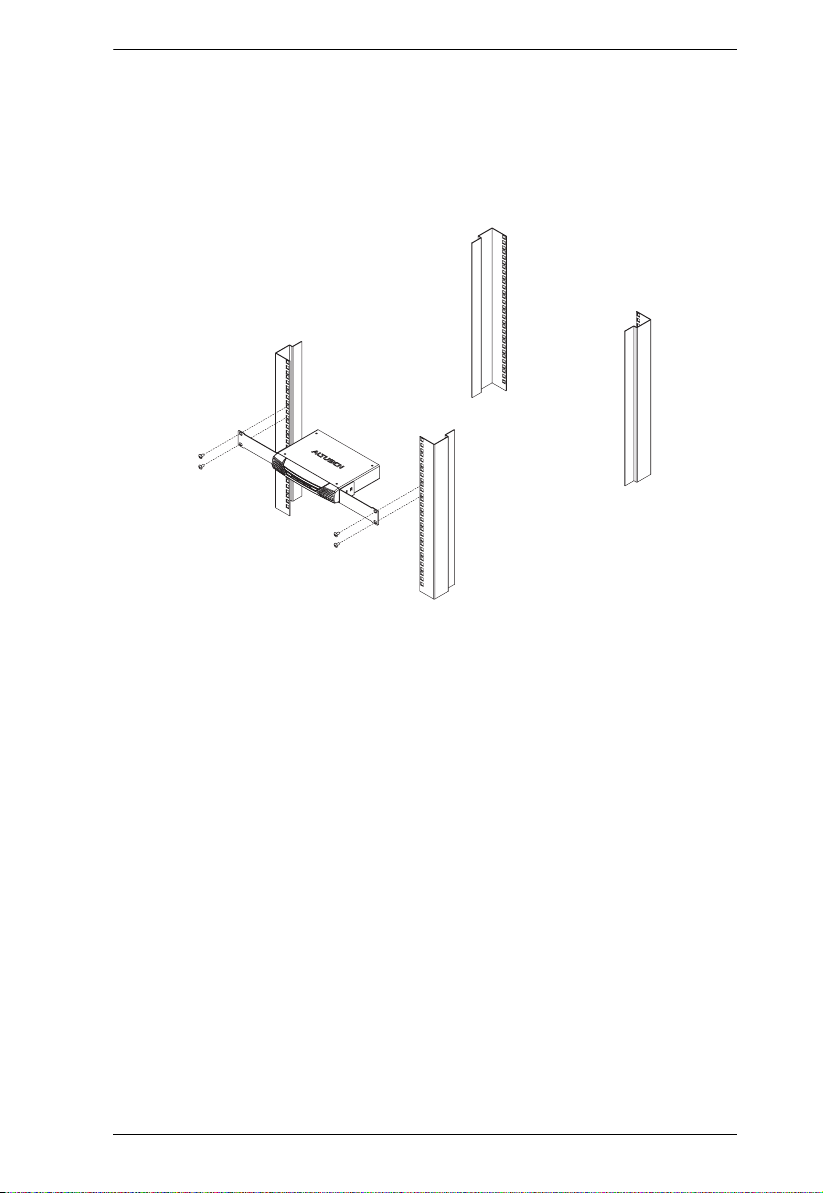
3. Attach the unit to the front of the rack. Position it so that the holes in the
mounting brackets line up with those in the rack. Secure the mounting
brackets to the rack. Cage nuts are provided for racks that are not
prethreaded.
9

KA9233 User Manual
Installation
Follow these steps to install your new KA9233 Combo Graphic Console
Module:
1. Connect your monitor and PS/2 or USB keyboard and mouse to the CONSOLE ports on the KA9233. Each port is marked with an identifying icon.
2. (Optional) Use the provided KVM cable to connect a computer to the
LOCAL PC port.
3. Use Cat 5 cable to connect the LINK port on the KA9233 to a user port on
the rear panel of the matrix KVM switch.
4. Connect the power adapter to an AC mains power source appropriate for
your model, and then connect the power adapter cable to the KA9233. You
will hear a long beep and the LED indicators on the front panel will
illuminate for a moment.
5. If you connected a computer to the LOCAL PC port, you may turn it on
now.
10

Chapter 2. Installation
Verifying the Connection to the Matrix KVM Switch
The LINK LED indicator on the front panel of the KA9233 illuminates when
the KA9233 establishes a valid connection to a matrix KVM switch that is
powered on. It flashes when the KA9233 transmits and receives data.
Topology Considerations
The KA9233 operates with the matrix KVM switch at distances up to 300
meters between the Combo Graphic Console Module and KVM adapter cables,
while still maintaining reliability and high video resolution. This allows the
matrix KVM switch installation to take advantage of the internal Cat 5e and
Cat 6 wiring built-in to most modern commercial buildings.
Since the data signals are not transmitted in packets, the transmission cannot
go through network hubs or switches. Passive components such as patch
panels, keystone jacks, patch cables, etc. can be used to channel the traffic,
instead.
Basic Operation
Hot Plugging
The KA9233 supports hot plugging—components can be removed and added
back into the KA9233 by unplugging their cables from the ports without the
need to shut the console module down. In order for hot plugging to work
properly, however, the procedure described below must be followed:
Hot Plugging User Ports
The keyboard, monitor, and mouse all can be hot plugged. If you experience a
problem after you plug in a new mouse, unplug the power adapter cable from
the KA9233 and plug it in again.
11

KA9233 User Manual
This Page Intentionally Left Blank
12

Chapter 3
Operation
Overview
In this chapter we explain how to use the Graphical OSD to access target
devices attached to the matrix KVM switch installation. Users also can
automatically monitor target devices in Auto Scan mode and manually skip
forward and backward through them. We also show users how to make changes
to their profiles and set up their personal working environments.
Switching Between the Local Computer and the Matrix KVM Switch
Press the LOCAL/REMOTE button located on the front panel of the KA9233
to switch between the matrix KVM switch and the computer attached to the
LOCAL PC port. (The LOCAL LED indicator illuminates when accessing the
local computer, and the REMOTE LED indicator illuminates when accessing
the matrix KVM switch.) Or, follow this procedure to use a hotkey
combination to perform this function:
1. Press and hold down the [Num Lock] key.
2. Press and release the minus (-) key or the asterisk (*) key two times.
3. Release the [Num Lock] key.
[Num Lock] + [-] + [-]
-or-
[Num Lock] + [*] + [*]
4. Repeat this procedure to return to the previous screen.
13

KA9233 User Manual
Adjusting the Picture Quality
The length and quality of Cat 5 cable used to connect the KA9233 to the matrix
KVM switch can affect picture quality when viewing computers attached to the
matrix KVM switch. (The picture quality of the local computer is not affected
by the Cat 5 cable.) Use the video gain buttons on the front panel of the
KA9233 to adjust the picture quality. If the picture quality appears poor, press
VIDEO GAIN + to improve it. If the picture appears too bright, press VIDEO
GAIN - to normalize the picture.
14

Chapter 3. Operation
Logging in to the Graphical OSD
To log in to the Graphical OSD:
1. After powering on the KA9233, the Login screen appears.
Note: If the Login screen does not appear, press the LOCAL/REMOTE
button on the front panel of the KA9233.
2. Enter your username and password, and then click Login. (Usernames and
passwords are not case-sensitive.) Upon successfully logging in, the
Graphical OSD main screen appears.
15

KA9233 User Manual
The Graphical OSD
Menus
The menus at the top of the Graphical OSD are described in the table below:
Menu Description
View Clicking the View menu opens the View screen, which allows the
user to set screen viewing options. (See Setting the OSD View,
page 24.)
Settings Clicking the Settings menu opens the Settings screen. Users can
Administration Clicking the Administration menu opens a pop-up menu. From this
Skip/Scan Clicking the Skip/Scan menu starts Auto Scan mode.
Search Clicking the Search menu opens the Search screen. The user can
change their account passwords; they also can set the OSD
activation keys, time to logout, and screen blanker, as well as turn
on and off both the hotkey commands and the beeper, and set the
idle timeout. (See Configuring OSD User Settings, page 27.)
menu, administrators and super administrators can manage
users, ports, and stations. In addition, super administrators can
manage groups, configure the network settings, set the date and
time, broadcast, and view the system information for the matrix
KVM switch. (Administration is discussed in Chapter 5.)
(See Skipping and Scanning Attached Computers, page 23.)
search for computers and stations on the matrix KVM switch
installation. (See Searching for Ports and Stations, page 64.)
Icons
The icons at the top of the Graphical OSD are described in the table below:
Icon Description
UPGRADE The Super Administrator can click this icon to upgrade the
LOG Clicking the Log icon opens the Event Log screen, which allows
LOGOUT Clicking the Logout icon closes the user's session.
HELP Clicking the Help icon opens the KA9233 help file.
16
firmware version of the KA9233. (See Upgrading Firmware,
page 65.)
administrators to view all of the events that took place on the
matrix KVM switch system. (See Viewing and Clearing the Log
File, page 71.)

Chapter 3. Operation
Tree View Icons
A tree at the left side of the main screen displays the stations and ports. The
matrix KVM switch root station icon (at the top of the tree) represents the root
node. Under the root station icon are computer icons and station icons, which
represent the child nodes—one for each KVM port and arranged in ascending
order. (If you cannot see all 32 computer icons, refer to View Mode, page 25,
to change the view settings.) Clicking on a station icon opens the Port Status
screen for the cascaded station connected to the KVM port. Clicking the plus
sign (+) next to a station icon expands the KVM ports on that station. Clicking
on a computer icon opens the Port Management screen for that KVM port. The
port ID is displayed in brackets. (See Port ID Numbering, page 19, for an
explanation of the port ID.)
Navigating the Graphical OSD
You can navigate the Graphical OSD and perform operations using the
intuitive menus and icons. Or, you can perform all the same functions using
shortcut keys.
Shortcut Keys
The KA9233 has numerous shortcut keys that allow you to move through the
Graphical OSD screens and perform operations.
Press To
F1 Open Help.
F2 Open the View screen.
F3 Open the Settings screen.
F4 Open the System Information screen.
F5 Open the Search screen.
F6 Open the Log screen.
F7 Start Auto Scan mode.
F8 Log out of the KA9233.
F9 Select the tree view.
F10 Start Firmware Upgrade mode.
Ctrl+U Open the User Management screen.
(continues on next page)
17

KA9233 User Manual
(continued from previous page)
Press To
Ctrl+G Open the Group Management screen.
Ctrl+P Open the Port Select screen for the root station, or whatever station is
Ctrl+S Open the Station Management screen for the root station, or whatever
Ctrl+N Open the Network Settings screen.
Ctrl+D Open the Date & Time screen.
Ctrl+B Open the Broadcast screen.
Ctrl Select multiple non-adjacent entries in the Port Management screen by
Shift (Port Management screen) Select multiple adjacent entries by clicking
Tab Move forward through the options.
Shift+Tab Move backward through the options.
Spacebar Select the radio button if the active option is a radio button. Select or
Arrow keys Move forward and backward through the tree view, port lists, user and
U (User and Group Information screens) Set the access right as Not
N (User Information screen) Set the access right as No Access for the
V (User and Group Information screens) Set the access right as View Only
F (User and Group Information screens) Set the access right as Full
currently selected.
station is currently selected.
clicking the entries while pressing and holding down Ctrl.
the top and bottom entries of the range while pressing and holding down
Shift.
(User and Group Information screens) Set the access rights for a group
or user for all ports on a KVM switch by clicking the type of access right
you want to assign while pressing and holding down Shift.
clear the check box if the active option is a check box.
group lists, and Date box. Select options in drop-down combo boxes.
Assigned for the highlighted station/port in the Computer/Station box.
highlighted station/port in the Computer/Station box.
for the highlighted station/port in the Computer/Station box.
Access for the highlighted station/port in the Computer/Station box.
18

Chapter 3. Operation
Port ID Numbering
Each port in the KVM installation has a unique port ID. The port ID is
composed of up to 4 port numbers separated by hyphens. These port numbers
describe a path from the first-level KVM switch through the KVM installation
to the target device.
The port numbers that compose the port ID are displayed in the following order
from left to right:
Cascaded Installations
1. The port number on the first-level matrix KVM switch
2. The port number on the second-level KVM switch (if applicable)
3. The port number on the third-level KVM switch (if applicable)
4. The port number on the fourth-level KVM switch (if applicable)
For example, a computer attached to Port 3 of a fourth-level KVM switch,
which is cascaded from Port 6 of a third-level KVM switch, which is cascaded
from Port 15 of a second-level KVM switch, which in turn is cascaded from
Port 8 of the first-level matrix KVM switch, would have a port ID of: 8-15-6-3.
Matrix Plus KVM Adapter Cable Installations
1. The port number on the first-level matrix KVM switch
2. The port number on the second-level KVM switch (if applicable)
3. The port number on the third-level KVM switch (if applicable)
4. The station ID displayed on the Matrix Plus KVM adapter cable
For example, a computer attached to a Matrix Plus KVM adapter cable with
Station ID 3, which is cascaded from Port 6 of a third-level matrix KVM
switch, which is cascaded from Port 15 of a second-level matrix KVM switch,
which in turn is cascaded from Port 8 of the first-level matrix KVM switch,
would have a port ID of: 8-15-6-3.
Daisy-Chained Installations
1. The port ID for daisy-chained KVM switches begins with “1”.
2. The position of the KM0432 Matrix KVM Switch in the daisy chain. You
can determine the position of the KM0432 in the daisy chain by
subtracting 1 from its station ID.
19

KA9233 User Manual
For example, the station ID of the first KM0432 in the daisy chain is 2.
2 - 1 = 1
The KM0432’s position in the daisy chain is 1.
The table below lists the KM0432’s station ID and its position in the daisy
chain.
Station ID
21
32
43
54
65
76
87
Position in the Daisy
Chain
3. The port number on the KM0432
For example, a computer attached to Port 18 of a KM0432, which is in
Position 7 in the daisy chain (Station ID 8), which in turn is daisy-chained from
the first-level matrix KVM switch, would have a port ID of: 1-7-18.
20

Port Status
Chapter 3. Operation
When you log in to the Graphical OSD, the Port Status screen displays by
default. (You can display the Port Status screen at any time by clicking on the
root station icon in the tree view. You can view the Port Status screen for
cascaded stations by clicking the station icon for the cascaded KVM switch.)
Users see only those KVM ports for which they have full access and view only
privileges. Clicking on a column heading sorts information in the column by
ascending or descending order.
Column Description
Port ID Lists the port number. (See Port ID Numbering, page 19.)
Port Note Displays the Port Note that was assigned to the port (if
any). For information about Port Notes see Configuring
Port Settings, page 62.
Online Indicates whether the device attached to the port is
powered on.
Computer / Station Type Displays information about the cascaded matrix KVM
switch or KVM adapter cable (CPU module) connected to
the port.
21

KA9233 User Manual
Accessing Devices Attached to the Matrix KVM Switch
You can access target devices for which you have been granted port access
rights. Use one of the following methods to access a target device attached to
the matrix KVM switch:
From the Port Status screen, double-click on a port entry. (See Port Status,
page 21.)
Click on a computer icon in the tree. After the Port Management screen
appears, double-click the computer icon again to access the attached target
device.
Invoke Hotkey mode, enter the port ID of the target device, and then press
[Enter]. (Chapter 4 discusses Hotkey mode in detail.)
Press the OSD hotkey twice (see OSD Activation, page 28) to return to the
Graphical OSD.
To set which ports appear on the Port Status screen and in the tree, see View
Mode, page 25.
22

Chapter 3. Operation
Skipping and Scanning Attached Computers
You can automatically scan target devices by clicking the Skip/Scan icon. In
Auto Scan mode, video from each target device is displayed for a length of time
set with the Scan Timer. After the interval elapses, Auto Scan mode switches
to the next port.
To change which ports are displayed in Auto Scan mode and the scan interval,
see Set Scan, page 26. (The ports that are available in Auto Scan mode may
also depend upon the user’s port access rights.)
The following controls are available in Auto Scan mode:
This Keystroke Does This
[←] Skips to the previous port in the OSD list.
[→] Skips to the next port in the OSD list.
[↑] Skips to the first port in the OSD list.
[↓] Skips to the last port in the OSD list.
P
Single-click
Spacebar
Right-click
Pauses Auto Scan mode.
Press any key or single-click again to resume Auto Scan mode.
Exits Auto Scan mode.Escape
All other keyboard and mouse input is disabled in Auto Scan mode. To restore
normal KVM console operation, you must exit Auto Scan mode.
To scan target devices, do one of the following:
Click Scan/Skip. Auto Scan mode begins and video displays from the first
available target device. After the predetermined amount of time, the next
available target device displays.
Invoke Hotkey mode, and then type [A]. (Chapter 4 discusses Hotkey
mode in detail.)
23

KA9233 User Manual
Setting the OSD View
Users can log in to the Graphical OSD to set the On Screen Display (OSD)
view settings for their accounts. This includes selecting the ports that will
appear on the Port Status screen; the type, position and duration of the Port ID
display; and the scan mode and scan duration.
To open the View screen:
Click the View menu. The View screen appears. (The View settings are
explained in the tables on the following pages.)
24

Chapter 3. Operation
View Mode
Use this function to broaden or narrow the scope of ports that are listed on the
Port Status screen and in the tree. The submenu choices and their meanings are
given in the table below:
Choice Meaning
Personal Some console modules have the option to set the OSD list to
display only those ports that the user has set as Personal. The
KA9233 does not support this feature. If you set the view as
Personal, the KA9233 will instead display all accessible ports.
However, when using a console module that supports this feature,
only ports that have been set as Personal will be displayed. (See
SET PERSONAL VIEW in the matrix KVM switch
Accessible The OSD lists only those ports that the user is permitted to access.
Accessible +
Powered
See Managing Port Access, page 58.
The OSD lists only those ports that the user is permitted to access
and that have their attached computers powered on.
user manual.)
Set Port ID
When a user switches ports from the OSD, a port ID is shown. The table below
explains the choices:
Choice Meaning
Tag Mode Selects how the Port ID is displayed: the Port Number alone (ID);
ID Position Defines where the Port ID appears on the monitor. The options are
the Port Note alone (Port Name); or the Port Number plus the Port
Note (ID + Port Name). The default is ID + Port Name.
Upper left, Upper right, Lower left, Lower right, and Other. If
you select Other, enter horizontal and vertical coordinates in the X
and Y fields. The default is Upper left.
25

KA9233 User Manual
Display Duration
Display Duration determines the length of time that the Port ID displays on the
screen after a port change. The table below explains the choices:
Choice Meaning
Always On Displays the Port ID at all times.
User Defined Enter a display duration of 1–240 seconds. Enter 0 (zero) to
disable the Port ID display function. The default is 3 seconds.
Set Scan
Select the ports that are viewed under Auto Scan mode and the duration of time
that they receive the KVM focus.
Setting Function
Scan Timer Determines how long the KVM focus dwells on each port as it
cycles through the selected ports in Auto Scan mode (see F7
SCAN in the matrix KVM switch user manual). Enter a value from
0–240 seconds. The default is 5 seconds. Entering 0 will cause the
KA9233 to automatically enter Skip mode when Auto Scan mode
is invoked.
Scan Mode Selects which computers will be accessed under Auto Scan mode
(see Skipping and Scanning Attached Computers, page 23).
Choices are:
Personal—Some console modules have the option to scan only
those ports that the user has set as Personal. The KA9233 does
not support this feature. If you set the Scan Mode as Personal, the
KA9233 will instead scan all accessible ports. However, when
using a console module that supports this feature, only ports that
have been set as Personal will be scanned. (See SET PERSONAL
VIEW in the matrix KVM switch
Accessible—Only those ports that the user is permitted to access.
See Managing Port Access, page 58.
Accessible + Powered—Only those ports that the user is
permitted to access and that have their attached computers
powered on.
The default is Accessible + Powered.
user manual.)
1. Choose the settings you wish, and then click Save.
2. To exit without saving changes, click any other menu or icon.
26

Chapter 3. Operation
Configuring OSD User Settings
Users can change account passwords and set up unique working environments.
A separate profile for each user is stored by the matrix KVM switch and is
activated according to the username that is provided during login.
To open the Settings screen:
Click the Settings menu. The Settings screen appears. (The OSD settings are
explained in the table on the following page.)
27

KA9233 User Manual
(continued from previous page)
Setting Function
Change
Password
OSD Activation Selects which hotkey combination is used to return to the Graphical
Set Logout
Timeout
Screen Blanker If there is no input from the console for the amount of time set with
Hotkey
Command
Set Beeper When set to On, the KA9233 beeps when switching ports, when
Set Idle Timeout If there is no input from the console accessing a particular port for
Restore User
Default
Enter the old account password. Enter a new password, and then
reenter the password to confirm it. Or, do not enter anything to
leave the password unchanged.
OSD from within the matrix KVM switch ports:
[Scroll Lock] [Scroll Lock] or [Ctrl] [Ctrl].
Since the Ctrl key combination may conflict with programs running
on the computers, the default is the Scroll Lock combination.
This function allows you to specify the number of minutes to elapse
before an inactive user is timed out of the OSD. If there is no input
from the user for the specified amount of time, the user will be
logged out automatically. The valid range is from 1–180 minutes.
Enter 0 (zero) to disable the Logout Timeout function. This function
is disabled by default.
this function, the screen is blanked. Key in a value from 1–30
minutes, and then press [Enter]. Enter 0 (zero) to disable the
Screen Blanker. This function is disabled by default.
Enables or disables Hotkey mode in case a conflict with programs
running on the computers occurs. Hotkey mode is On by default.
(See Hotkey Mode, page 31.)
activating Auto Scan mode (see page 23), when switching ports in
Auto Scan mode, when exiting Auto Scan mode, or when an invalid
entry is made on an OSD menu. The beeper is On by default.
the amount of time set with this function, the port is released,
allowing it to be accessed by the other consoles. The valid range is
from 1–240 seconds. Enter 0 (zero) to disable the Idle Timeout
function. The default is 5 seconds.
Restores the original factory default settings for View Mode (OSD),
Set Port ID, Display Duration, Set Scan, OSD Activation, Set
Logout Timeout, Screen Blanker, Hotkey Command, Set
Beeper, and Set Idle Timeout.
1. Choose the settings you wish, and then click Save.
2. To exit without saving changes, click any other menu or icon.
28

Chapter 3. Operation
Viewing Help
Most Graphical OSD functions are described in Help.
To open the help file:
Click the Help icon. The Altusen KA9233 Help screen appears.
Logging Out
Click the Logout icon to end sessions in the Graphical OSD.
29

KA9233 User Manual
This Page Intentionally Left Blank
30

Chapter 4
Hotkey Mode
Hotkey Port Control
Hotkey port control allows you to provide KVM focus to a particular port
directly from the keyboard.
Note: Hotkeys work best in single level and basic cascaded or daisy-chained
installations. For installations that combine daisy chaining and
cascading, it is simpler, more convenient, and more efficient to use the
OSD.
The KA9233 provides the following hotkey port control features:
Port switching
Auto scanning
Skip mode switching
Invoking Hotkey Mode
All hotkey operations begin by invoking Hotkey mode. You must be viewing
a port in the matrix KVM switch to invoke Hotkey mode.
To invoke Hotkey mode:
1. Press and hold down the [Num Lock] key.
2. Press and release the minus (-) key or the asterisk (*) key.
3. Release the [Num Lock] key.
[Num Lock] + [-]
-or-
[Num Lock] + [*]
31

KA9233 User Manual
When Hotkey mode is active:
The Caps Lock and Scroll Lock LED indicators flash in succession. They
stop flashing and revert to normal status when you exit Hotkey mode.
An on-screen command line appears. The command line prompt is the
word HOTKEY: in white text on a blue background. Text that you key in
while in Hotkey mode displays here.
Ordinary keyboard and mouse functions are suspended
—only hotkey
compliant keystrokes and mouse clicks (described in the sections that
follow) can be input.
Pressing [Esc] or [Spacebar] exits Hotkey mode.
Port Switching
Each port is assigned a port ID based on its position in the KVM installation
(see Port ID Numbering, page 19). After invoking Hotkey mode, you can type
a port ID to switch directly to any port in the installation. Depending on the
position of the port in the installation, the port ID is composed of up to 4 port
numbers separated by hyphens.
Switching to Ports
To switch to a port:
1. Invoke Hotkey mode (see page 31).
2. At the command prompt, type the port ID. (see Port ID Numbering,
page 19, for a description of the port ID.)
The port ID numbers display on the command line as you type them. If
you make a mistake, use [Backspace] to erase the wrong number.
3. Press [Enter].
After you press [Enter], the KVM focus switches to the designated port,
the port ID is displayed, and you automatically exit Hotkey mode.
32

Chapter 4. Hotkey Mode
Auto Scanning
Auto Scan mode switches among all the ports that are accessible to the current
operator at regular intervals (see Scan Mode, page 26, for information
regarding accessible ports). This function is convenient for automatically
monitoring the activity of the computers on the installation.
Setting the Scan Interval
The amount of time Auto Scan mode focuses on each port is set with the Scan
Timer (see Set Scan on page 26). You can change the scan interval before
activating Auto Scan mode, if you wish, with the following hotkey
combination:
1. Invoke Hotkey mode (see page 31).
2. Key in [T] [n]
Where [T] is the letter T, and [n] is a number from 0–240 that represents
the number of seconds for the dwell time.
The letter T and the numbers display on the command line as you key
them in. If you make a mistake, use [Backspace] to erase the wrong
number.
3. Press [Enter]
After you press [Enter], you automatically exit Hotkey mode, and are
ready to invoke Auto Scanning.
33

KA9233 User Manual
Invoking Auto Scan
To start Auto Scanning, key in the following hotkey combination:
1. Invoke Hotkey mode (see page 31).
2. Press [A].
After you press A, you automatically exit Hotkey mode, and enter Auto
Scan mode, and Auto Scanning begins.
While you are in Auto Scan mode, you can pause the scanning in order
to keep the focus on a particular port either by pressing P or with a leftclick of the mouse. During the time that Auto Scanning is paused, the
command line displays: AUTOSCAN PAUSED
Pausing and exiting are the two ways to stop scanning and keep the
focus on a particular port. If you intend to continue scanning after a
brief stop, pausing is more convenient than exiting Auto Scan mode
completely.
This is because when you resume scanning after pausing, you start
from where you left off. On the other hand, if you exit and then restart
Auto Scan mode, you start over from the very first port on the
installation.
To resume Auto Scanning after you pause, press any key or left-click.
Scanning continues from where it left off.
While you are in Auto Scan mode, you can press the arrow keys to skip
through the OSD list:
←
→
↑
↓
Switches to the previous port in the OSD list.
Switches to the next port in the OSD list.
Switches to the first port in the OSD list.
Switches to the last port in the OSD list.
After the amount of time set with the Scan Timer elapses, Auto Scan
mode will switch to the next port.
While Auto Scan mode is in effect, ordinary keyboard and mouse
functions are suspended
—only Auto Scan mode compliant keystrokes
and mouse clicks can be input. You must exit Auto Scan mode in order
to regain normal control of the KVM console.
34

Chapter 4. Hotkey Mode
3. To exit Auto Scan mode press [Esc] or [Spacebar]. Auto Scanning stops
when you exit Auto Scan mode.
Hotkey Beeper Control
The beeper (see Set Beeper, page 28) can be toggled on and off by means of a
hotkey. To toggle the beeper, enter the following hotkey combination:
1. Invoke Hotkey mode (see page 31).
2. Press [B]
After you press B, the beeper toggles on or off. The command line displays
BEEPER ON or BEEPER OFF for one second; then the message disappears
and you automatically exit Hotkey mode.
35

KA9233 User Manual
Hotkey Summary Table
[Num Lock] + [-]
-or-
[Num Lock] + [*]
[port ID] [Enter] Switches to the port that corresponds to
that port ID.
[T] [n] [Enter] Sets the Auto Scan mode interval to n
seconds—where n is a number from 1–
240.
[A] Invokes Auto Scan mode.
When Auto Scan mode is in effect, press
[P] or left-click to pause Auto Scan mode.
When Auto Scan mode is paused, press
any key or left-click to resume Auto Scan
mode.
Press [Esc] or [Spacebar] to exit Auto
Scan mode.
[←] In Auto Scan mode, skips to the previous
port in the OSD list.*
[→] In Auto Scan mode, skips to the next port
in the OSD list.*
[↑] In Auto Scan mode, skips to the first port
in the OSD list.*
[↓] In Auto Scan mode, skips to the last port
in the OSD list.*
[B] Toggles the beeper on or off.
* The user’s Scan Mode settings and port access rights determine which ports
are available in Auto Scan mode. To change Scan Mode settings, see Set
Scan, page 26.
36

Chapter 5
Administration
Overview
Administrators can quickly and efficiently access servers, manage users and
groups, control port access, upgrade firmware versions, and perform many
other administrative functions. Login password protection and three-tier user
access ensure that unauthorized users cannot gain control of the servers in your
matrix KVM switch.
Naming Stations
To help distinguish one KVM switch from another in cascaded installations,
Super Administrators and Administrators can assign unique names to each
KVM switch.
To assign a station name to the KVM switch:
1. Click on the target station in the tree view to select it.
2. From the Administration menu, choose Station Management. The
Station Management screen appears.
3. Type a name in the Station Na me field. Station names may be up to 15
characters long. Legal characters include: a–z, A–Z, 0–9, space, and
hyphen. Enter a unique name that will distinguish the KVM switch from
all other KVM switches in the installation.
4. Click Save.
5. To exit without saving changes, click any other menu or icon.
37

KA9233 User Manual
Setting the Webpage Session Timeout
If the length of time that a user is idle in the KM0832 Administrator Utility
exceeds the Webpage Session Timeout setting, the user’s session is ended. The
valid range for the Webpage Session Timeout is 1–240 minutes. The default is
3 minutes.
To set the Web Page Session Timeout for the KM0832 Administrator Utility:
1. From the Administration menu, choose Station Management. The Sta-
tion Management screen appears.
2. In the Web Page Session Timeout field, specify the number of minutes to
elapse before an inactive user is timed out of the KM0832 Administrator
Utility.
3. Click Save.
4. To exit without saving changes, click any other menu or icon.
38

Chapter 5. Administration
Network Configuration
Network configuration is a Super Administrator function. Network settings are
configured through the Network Settings screen.
To open the Network Settings screen:
1. From the Administration menu, choose Super Adm Configuration >
Set Network. The Network Settings screen appears. (The Network Settings page is described on the following pages.)
2. Choose the settings you wish, and then click Save.
3. To exit without saving changes, click any other menu or icon.
IP Installer Setting
You can use the IP Installer to view and change network settings for the matrix
KVM switch. Download the IP Installer from the KM0832 Driver Download
section of our Website.
Click Enabled to allow the IP Installer to be used to change the IP
address, subnet mask, and gateway for the matrix KVM switch.
39

KA9233 User Manual
Click View Only to allow the IP Installer to be used to view the IP
address, subnet mask, and gateway for the matrix KVM switch.
Click Disabled to restrict the IP Installer from being used to view or
change the network settings for the matrix KVM switch.
IP Address
You can manually enter a static IP address or use a DHCP server to
dynamically assign an IP address.
To use a DHCP server to assign an IP address:
1. Under DHCP Enabled, click Ye s to use a DHCP server.
To manually assign an IP address:
1. Under DHCP Enabled, click No.
2. In the fields under Manual IP Address, enter the IP address, subnet mask,
default gateway, and primary DNS server. You also can enter an alternate
DNS server; however, it is not required.
Note: If you use a DHCP server to assign an IP address to the matrix KVM
switch, you should also enable Mail Notification so that you will be
notified whenever the IP address changes.
Port Settings
Enter the network ports that the matrix KVM switch will use to transfer
Webpages and communicate with clients that access the KM0832
Administrator Utility. Typically, Port 80 is used for Hyper Text Transfer
Protocol (HTTP) communications, while Port 443 is used for HTTPS (HTTP
over Secure Socket Layer).
Note: You must assign a port number for each field. Otherwise, the KM0832
Administrator Utility will not function correctly.
40

Chapter 5. Administration
System Event Reports
The matrix KVM switch can be configured to send an e-mail notification
whenever the DHCP server assigns a new IP address to the matrix KVM
switch. Enable the Mail Notification feature and specify the Simple Mail
Transfer Protocol (SMTP) server address, information for a valid e-mail
account on the server, and the e-mail address of the person to whom the
message should be sent. When you finish filling in the information, click Save.
Field Description
Mail Notification Click Yes to enable Mail Notification; click No to disable it.
SMTP Server
Address
SMTP Authentication If the SMTP server requires authentication, click Yes.
Account Name Enter the username for a valid e-mail account on the SMTP
Password Enter the password for the e-mail account.
From Enter the e-mail address for the e-mail account.
To Enter the e-mail address of the person to whom the notification
If you enabled Mail Notification, enter the address of the SMTP
server.
server.
message should be sent.
41

KA9233 User Manual
Setting the Date and Time
Super administrators can set the date and time of the matrix KVM switch,
which enables the System Log, Active Sessions, and System Information
Webpages to maintain accurate time-sensitive data.
To set the date:
1. From the Administration menu, choose Super Adm Configuration >
Date & Time. The Date & Time screen appears.
2. Under Date, click << or >> to move backward or forward by one year
increments to set the year.
3. Under Date, click < or > to move backward or forward by one month
increments to set the month.
4. Under Date, click on the day of the month in the calendar.
5. Click Save. Your settings are saved and the date is updated.
42

Chapter 5. Administration
To set the time:
1. Under Time, use 24-hour notation to type the time as hours:minutes:sec-
onds. For example, three o'clock in the afternoon would be written
15:00:00.
2. Under Time Zone, select the time zone in which the matrix KVM switch
is located.
3. Select Daylight Saving Time (Summer Time) if it is used in the region in
which the matrix KVM switch is located.
4. Click Save. Your settings are saved and the time is updated.
43

KA9233 User Manual
Group Management
Super administrators can create up to 256 groups on the matrix KVM switch,
as well as modify and delete those groups. Super administrators also can grant
port access rights to groups. Grouping users together simplifies port
management by enabling actions to be performed that affect a whole group of
users, rather than only one. (You can still use the User Management screen to
change individual user account settings. See User Management, page 49.)
All group management operations start from the Group Management screen. It
shows all groups that have been created on the matrix KVM switch and
provides options for creating new groups and modifying or deleting existing
groups.
To access the Group Management screen:
From the Administration menu, choose Account Management > Group
Management. The Group Management screen appears.
44

Chapter 5. Administration
Adding Groups
To add a new group:
1. In the Group Management screen, click Add. The Group Information
screen appears.
2. Type a name in the Group Name field. Group names may be up to 15
characters long. Legal characters include: A–Z, 0–9, space, hyphen, square
brackets, parentheses, and period.
3. If you want to assign port access rights for the group, see Managing Port
Access Rights for Groups, page 47.
4. Click Save to add the new group to the matrix KVM switch.
5. To exit without saving changes, click any other menu or icon.
45

KA9233 User Manual
Modifying Groups
To edit a group name:
1. In the Group Management screen, select a group name from the list, and
then click Modify. The Group Information screen appears.
2. Edit the group information, and then click Save.
3. To exit without saving changes, click any other menu or icon.
Deleting Groups
When you delete a group all users that are members of the group are also
deleted. If you do not want to delete certain users in the group, first change the
group membership of those users, and then delete the group.
To delete a group:
1. In the Group Management screen, select a group name from the list, and
then click Delete. The group is removed from the list. All users who are
members of the group also are deleted from the matrix KVM switch.
2. To exit without saving changes, click any other menu or icon.
46

Chapter 5. Administration
Managing Port Access Rights for Groups
Super administrators can manage port access rights for groups from the Group
Information screen.
Please note that you do not need to assign access rights for a group to KVM
ports that cascade matrix KVM switches. However, if a KVM port cascades a
non-matrix KVM switch, you must assign access rights for a group to both that
KVM port and those on the cascaded KVM switch. When you assign access
rights for a group to a KVM port that cascades a Matrix Plus KVM adapter
cable, the access rights apply to all KVM adapter cables in the chain.
To manage port access rights for a group:
1. In the Group Management screen, select a group name from the list, and
then click Modify. The Group Information screen appears. (If you have
already completed this step, skip to Step 2.)
2. In the Computer/Station box, click the plus sign or double-click the root
station icon to expand the ports. The tree expands to reveal the ports of the
root station.
47

KA9233 User Manual
3. Click to apply the type of access rights you wish to assign for the group to
each port. The station/port icon changes according to the type of access
right assigned.
4. If there are cascaded stations, expand those as well and apply access rights
to the cascaded ports.
5. Click Save to store your changes.
6. To exit without saving changes, click any other menu or icon.
48

Chapter 5. Administration
User Management
Super Administrators and Administrators can add, modify, and delete users.
Super Administrators can manage all user account types, while Administrators
can manage other Administrators and Users. Up to 1024 unique user accounts
can be created on the matrix KVM switch with no restriction on the number of
any particular user type. In order for users to access the matrix KVM switch
through the local console OSD or through the KM0832 Administrator Utility
each user must have a user account. For each user account you must assign a
username, password, user type, and group membership. Each user requires a
valid username and password or the user will not be allowed to access the
matrix KVM switch either through the KM0832 Administrator Utility or
through the local console OSD.
When creating user accounts you must add each user to a group. Therefore, we
suggest that you create groups before users. If you do not wish to create groups
you may add users to the default group account. However, the default group
account cannot be used to grant port access to group members. In this case, you
must individually add users to the port(s).
The User Management screen is similar to the Group Management screen. It
shows all users that have been created on the matrix KVM switch and their
individual group memberships. It also provides options for creating new users
and modifying or deleting existing users.
49

KA9233 User Manual
To access the User Management screen:
From the Administration menu, choose Account Management > User
Management. The User Management screen appears.
50

Chapter 5. Administration
Adding Users
To add a user account:
1. In the User Management screen, click Add. The User Information
screen appears.
2. Type a name in the User name field. Usernames may be up to 15
characters long. Legal characters include: A–Z, 0–9, space, hyphen, square
brackets, parentheses, and period.
3. Enter a password and then reenter the password to confirm it. Passwords
may be up to 15 characters long. Legal characters include: A–Z, 0–9,
space, hyphen, square brackets, parentheses, and period. This field may
not be left blank.
51

KA9233 User Manual
4. Select an account type for the user.
Permission User Administrator
Access ports*
Configure personal
profile settings
Search
View online Help
Manage user/
administrator accounts
Manage super
administrator accounts
Manage stations
Manage ports
View/clear log file
Manage group accounts
Configure network
settings
View system information
Upgrade firmware
•••
•••
•••
•••
Super
Administrator
••
•
••
••
••
•
•
•
•
Invoke Broadcast mode
•
* Super administrators and administrators have full access to all ports;
however, users must be granted permission to access each port.
5. Select a group membership for the user. If you do not wish to create a
group membership for the user, select the default GROUP account.
6. If you want to assign port access rights for the user, see Managing Port
Access Rights for Groups, page 47.
7. Click Save to add the new user to the matrix KVM switch.
8. To exit without saving changes, click any other menu or icon.
52

Chapter 5. Administration
Modifying Users
To edit a user account:
1. In the User Management screen, select a username from the list, and then
click Modify. The User Information screen appears.
2. Edit the user information, and then click Save. (Leave the password fields
blank to keep the same password.)
3. To exit without saving changes, click any other menu or icon.
Deleting Users
To delete a user account:
1. In the User Management screen, select a username from the list, and then
click Delete. The user is removed from the list.
2. To exit without saving changes, click any other menu or icon.
Managing Port Access Rights for Users
Super Administrators and Administrators can manage port access rights for
Users from the User Information screen. (You do not need to assign port access
rights for Super Administrators and Administrators. They have access to all
KVM ports in the matrix KVM switch installation, including those in cascaded
KVM switches.)
Please note that you do not need to assign access rights for a user to KVM ports
that cascade matrix KVM switches. However, if a KVM port cascades a nonmatrix KVM switch, you must assign access rights for a user to both that KVM
port and those on the cascaded KVM switch. When you assign access rights for
a user to a KVM port that cascades a Matrix Plus KVM adapter cable, the
access rights apply to all KVM adapter cables in the chain.
53

KA9233 User Manual
To manage port access rights for a user:
1. In the User Management screen, select a username from the list, and then
click Modify. The User Information screen appears.
2. In the Computer/Station box, click the plus sign or double-click the root
station icon to expand the ports. The tree expands to reveal the ports of the
root station.
54

Chapter 5. Administration
3. Click to apply the type of access rights you wish to assign for the user to
each port. The station/port icon changes according to the type of access
right assigned.
4. If there are cascaded stations, expand those as well and apply access rights
to the cascaded ports.
5. Click Save to store your changes.
6. To exit without saving changes, click any other menu or icon.
55

KA9233 User Manual
Port Management
The matrix KVM switch port access rights for Users and groups are set on a
port-by-port basis, giving administrators a high degree of control over which
ports users can access and how they access the ports. To enable Users to access
ports, you must first configure the user access rights for each port. By default,
all Super Administrators and Administrators have full access to all ports.
Note: Adding users to groups streamlines port configuration by allowing you
to assign port access to entire groups at one time.
In this section we will discuss how to:
Set port access rights for users and groups
Configure port settings and assign names to ports
Restore port defaults
56

Chapter 5. Administration
Accessing Ports
All ports in the station are listed on the Port Select screen.
To open the Port Select screen:
1. In the tree view, click on a station to select it.
2. From the Administration menu, choose Port Management. The Port
Select screen appears.
The Port Select screen is divided into two columns. Port IDs, or port numbers,
are listed in the column on the left in ascending order. If a port has been named,
the name appears to the right of the Port ID in the Port Note column. Click on
a port entry to access the Port Management screen for that port.
57

KA9233 User Manual
Managing Port Access
Each port has an individual Port Management screen that is used to set port
access rights, assign port names and configure other port settings. This also is
true for cascaded child stations.
To open the Port Management screen for a port:
1. In the matrix KVM switch tree (on the left side of the main screen), click
on a computer icon. Each computer icon corresponds to a port. The Port
Management screen for that port appears. (See Tree View Icons, page 17,
for more information about using the computer icons.)
-or-
Open the Port Select screen. Go to Step 2.
2. Click on a port entry to open the Port Management screen for that port.
The Port Management screen appears.
58

Chapter 5. Administration
The Port Access area of the Port Management screen is used to manage port
access rights for users and groups. The boxes on the left side of the screen show
all users and groups that have been created. The boxes on the right side of the
screen govern port access rights. These boxes are discussed in the table below.
In the middle of the screen are five sets of arrows. Each set contains two
arrows: one facing leftward (<) and the other facing rightward (>), which
correspond to the boxes immediately to the left and right, respectively. Arrows
are used to move users and groups from the boxes on the left into the boxes on
the right and vice versa.
Box Name Description
Available Users Lists users who have not been assigned access rights for the
Available Groups Lists groups that have not been assigned access rights for the
No Access Users Lists users who are restricted from access to the KVM port. If a
View Only Users Lists users who are permitted to view video from the KVM port.
Full Access Users Lists users who are permitted both to view video from the KVM
View Only Groups Lists groups that are permitted to view video from the KVM port.
Full Access Groups Lists groups that are permitted both to view video from the KVM
KVM port.
KVM port.
user listed in this box is a member of a group that has
permission to access the KVM port, placing the user in this box
restricts the user from accessing the KVM port.
port and to control it. If the KVM port cascades a KVM switch,
the user will not be able to access KVM ports on that station until
granted access rights to the individual KVM ports.
port and to control it. If the KVM port cascades a KVM switch,
the group will not be able to access the KVM ports of that station
until granted access rights to the individual KVM ports.
Note: 1. You cannot add more than 32 users and 32 groups to a port. If you
need to add more than 32 users to a port, first add the users to groups
and then add those groups to the port.
2. If a user is granted both user and group access rights to the same port,
the user access rights will be applied and not those of the group.
59

KA9233 User Manual
To grant port access rights to users or groups:
1. Open the Port Management screen for the port where you wish to grant
access rights.
2. In the Available Users box, click on a username to highlight it.
-or-
In the Available Groups box, click on a group name to highlight it.
Click the appropriate rightward facing arrow (>) to move the selected user
(or group) to the box on the right that corresponds to the access rights that
you wish to grant to the user (or group). The user (or group) appears in the
access rights box.
3. Repeat this procedure until you have assigned port access rights (or
restrictions) for all users and groups.
If you make a mistake by adding a user or group to the wrong access rights
box, simply highlight the username (or group name) again and then click
60

Chapter 5. Administration
the corresponding leftward facing arrow. The selected user (or group) is
removed from the box and put back into its former position.
4. Click Save. The selected users (or groups) are given the permissions that
were assigned in the last step.
5. To exit without saving changes, click any other menu or icon.
Cascaded Installations
Super administrators and administrators have full access to all KVM ports in
the installation. You must assign access rights to KVM ports for all other users
and groups. You do not need to assign access rights for users and groups to
KVM ports that cascade other matrix KVM switch. However, if a KVM port
cascades a non-matrix KVM switch, you must assign access rights for users
and groups to both that KVM port and those on the cascaded KVM switch.
When you assign access rights for users and groups to a KVM port that
cascades a Matrix Plus KVM adapter cable, the access rights apply to all KVM
adapter cables in the chain.
61

KA9233 User Manual
Configuring Port Settings
Before you configure port settings, first verify that the KVM adapter cable for
the KVM port you wish to configure is connected to the correct KVM port on
the back panel of the matrix KVM switch. The other fields on the Port
Management screen are described in the table below. (These fields do not
appear if a cascaded KVM switch is connected to the port.)
Field Description
Port Note Type a name in the Port Note field. Port notes may be up to 15
characters long. Legal characters include: a–z, A–Z, 0–9, space,
and hyphen. Enter a unique note for the port that will differentiate it
from all other ports in the KVM installation. The port note will appear
on the Port Status and Port Select screens, and in the KA9233 tree
next to the computer icon.
If the KVM port cascades a matrix KVM switch, the port note is
replaced by the station name of the cascaded matrix KVM switch.
To modify station names, see Naming Stations, page 37.
If a non-matrix KVM switch or a computer is connected to the
KVM port by a KVM adapter cable, the port note can be changed.
If the position of the KVM switch or the computer in the KVM
installation ever changes, the port note for the new KVM port will
automatically change to the port note stored in the KVM adapter
cable. However, the port note for the old KVM port must be
erased manually.
If nothing is connected to the KVM port, the port note can be
changed. However, if a cascaded KVM switch or KVM adapter
cable is attached to the port later, the port note will change to the
port note stored in the KVM adapter cable.
62
(continues on next page)

Chapter 5. Administration
(continued from previous page)
Field Description
Keyboard
Layout (OS
Language)
Keyboard (Port
OS)
Set the layout of the keyboard(s) that will be used to access the
computer attached to this port. The matrix KVM switch supports 3
keyboard layouts: U.S. English, Japanese, and French. Configuring
this setting correctly will ensure that characters are entered correctly
and that the special keys on Japanese keyboards work correctly (if
applicable).
Set the model of the keyboard(s) that will be used to access the
computer attached to this port. The matrix KVM switch supports 3
keyboard models: IBM PC (101/104 keys), Apple, and Sun.
Configuring this setting correctly will ensure that the special keys on
Apple and Sun keyboards work correctly (if applicable).
Restoring Port Defaults
Clicking the Restore Defaults button at the bottom of the Port Select screen
restores KVM port defaults. When restoring port defaults, port access rights are
revoked for users and groups, port notes are removed, and the Port Operating
System and Port Language settings are restored to the original factory default
settings. (See Factory Default Settings, page 78.)
In cascaded installations, you can restore port defaults for up to 2 levels of
KVM switches at a time. If you want to restore port defaults for more than two
levels of KVM switches, repeat this procedure for each third-level KVM
switch for which you wish to restore port defaults. Port defaults will be restored
for any fourth-level KVM switches at the same time.
Note: You cannot restore port defaults for daisy-chained KM0432.
To restore port defaults for up to two levels of KVM switches:
1. In the tree view, click on the station for which you want to restore port
defaults to select it.
2. From the Administration menu, choose Port Management. The Port
Select screen for that station appears.
3. Click Restore Defaults. The port defaults are restored for the selected
station and one additional level of cascaded KVM switches (if applicable).
63

KA9233 User Manual
Searching for Ports and Stations
The Search function provides a convenient method to easily locate ports and
cascaded stations by Port Note or Station Name.
To search for a port:
1. Click the Search menu. The Search screen opens.
2. In the field, enter the Port Note of the port for which you are searching; or,
enter the Station Name of a cascaded station. All entries that match or
contain the search term(s) appear in a list.
Note: You do not need to enter the entire Port Note; a partial Port Note is
acceptable. For example, if you want to search for a port with Port
Note WIN 2K AS, you only need enter a portion of the Port Note,
i.e. WIN. The same applies when searching for stations.
3. Click Search.
4. To exit without searching, click any other menu or icon.
64

Chapter 5. Administration
Upgrading Firmware
Super Administrators can upgrade firmware for the KA9233. As new versions
of the KA9233 firmware become available, they can be downloaded from our
Website. Check the Website regularly to find the latest information and
firmware upgrade packages.
Preparing to Upgrade the Firmware
To prepare to upgrade the firmware:
Connect the firmware upgrade cable to a COM port on the computer you used
to download the upgrade package and to the F/W UPGRADE port on the
KA9233.
65

KA9233 User Manual
Downloading the Firmware Upgrade Package
To download the firmware upgrade package:
1. From a computer that is not part of your KVM installation go to our Website and choose the model name that relates to your device. A list of available firmware upgrade packages appears.
2. Choose the firmware upgrade package that you wish to install (usually the
most recent) and download it to your computer.
Upgrading the Firmware
To upgrade the firmware:
1. Log in to the Graphical OSD (see Logging in to the Graphical OSD,
page 15).
2. Click the Upgrade icon. The following dialog box appears:
66

Chapter 5. Administration
3. Double-click the KA9233 Firmware Upgrade Utility icon. The
Firmware Upgrade Utility welcome screen appears.
4. Read the license agreement, and then click I Agree.
5. Click Next to continue. The Firmware Upgrade Utility main screen
appears.
The Utility inspects your installation. All devices capable of being
upgraded by the package are listed in the Device List box.
67

KA9233 User Manual
6. Select a device in the Device List box to display information about it in
the Device Description panel.
7. Select the Check Firmware Version check box if you wish to compare
the current firmware version level of the KA9233 to that of the Firmware
Upgrade Utility installation files. Click Next to begin upgrading the
firmware. If the KA9233's firmware version level is equal to or higher
than that of the installation files, the following dialog box appears to give
you the option to abort the operation:
8. Click Yes to begin upgrading the firmware; or, click No to abort the
operation.
If you chose not to check the firmware version, the Firmware Upgrade
Utility installs the upgrade files without comparing the firmware version
levels.
68

Chapter 5. Administration
9. As the Upgrade proceeds, status messages appear in the Status Messages
box, and the progress toward completion is shown on the Progress bar.
10. After the upgrade is finished, a message appears at the top of the screen to
inform you that the firmware was successful upgraded:
69

KA9233 User Manual
11. Click Finish to close the Firmware Upgrade Utility. The following dialog
box appears in the KA9233 Graphical OSD:
12. Click OK. The KA9233 will reset automatically.
Upgrade Failed
If the firmware upgrade fails to complete successfully, then follow this
procedure to restart the upgrade:
1. Click Finish to quit upgrading the firmware.
2. Start the firmware upgrade procedure again (see Upgrading the Firmware,
page 66).
70

Chapter 5. Administration
Viewing and Clearing the Log File
The log file is a record of events that happen in the Graphical OSD. It records
events such as logins and logouts. Each entry is recorded with the date and time
at which the event happened. Only Super Administrators and Administrators
can view and clear the log file.
To view the log file:
1. Click the Log icon. The Event Log screen appears.
2. Select one of the following three ways to view log file events:
Today: Select this option to view only events that happened today.
All: Select this option to view all events in the log file.
Range: Select this option to view events that happened over a period of
one or more days. Enter the beginning date in the From field and the
ending date in the To field. Enter the date in Arabic numerals, year
first, then the month, followed by the day. The year must carry four
digit places, while the month and day each must carry two digit places.
The year, month, and day each must be separated by a hyphen. For
example, December 5th, 2005, should be written 2005-12-05.
71

KA9233 User Manual
3. Click OK. The System Log screen appears.
Each line in the log file is a record of an event that occurred in the KA9233
during the time specified on the Event Log screen.
4. Click Back to return to the Event Log screen.
To clear the contents of the log file:
If you delete the contents of the log file you cannot recover them;
however, this will not affect future log events.
1. Follow Steps 1–3 for viewing the log file.
2. At the bottom of the System Log screen, click Clear All Log. All events
in the log file are deleted.
3. To exit without clearing the log file, click any other menu or icon.
72

Chapter 5. Administration
Broadcasting Commands
In Broadcast mode, super administrators can broadcast commands from the
KVM console keyboard to all available computers in the installation.
Broadcast mode is particularly useful for operations that need to be performed
on multiple computers, such as performing a system wide shutdown, installing
or upgrading software, etc.
While Broadcast mode is in effect:
A speaker symbol appears before the port ID display of the KVM port that
currently has the KVM console focus.
Other KVM consoles will not be able to control the computers; however,
they will be able to access the KVM ports to view the computers.
Mouse commands will not be broadcast.
A message displays across the bottom of the super administrator’s screen
that Broadcast mode is in effect.
If the super administrator that invoked Broadcast mode is idle for longer
than the period of time set with the Idle Timeout function, Broadcast mode
is canceled. (See Set Idle Timeout, page 28, for details.)
If the super administrator that invoked Broadcast mode invokes the OSD
for more than 30 seconds, Broadcast mode is canceled.
To enable Broadcast mode:
1. From the Administration menu, choose Super Adm Configuration >
Broadcast. The Broadcast screen appears.
2. Select Enable, and then click Save. Broadcast mode is enabled.
73

KA9233 User Manual
To exit Broadcast mode:
1. Open the Graphical OSD.
2. From the Administration menu, choose Super Adm Configuration >
Broadcast. The Broadcast screen appears.
3. Select Disable, and then click Save. Broadcast mode is disabled.
Viewing System Information
Super Administrators can view information about the KA9233 system through
the System Information screen. It shows device model number and the
firmware version.
To view system information:
1. From the Administration menu, choose Super Adm Configuration >
System Information. The System Information screen appears.
74

Chapter 6
Keyboard Emulation
Apple Keyboard
The IBM PC keyboard (101/104 keys) can emulate the functions of the Apple
keyboard. The emulation mappings are listed in the table below.
PC Keyboard Apple Keyboard
[Shift] Shift
[Ctrl] Ctrl
[Ctrl] [1]
[Ctrl] [2]
[Ctrl] [3]
[Ctrl] [4]
[Alt] Alt
[Print Screen] F13
[Scroll Lock] F14
=
[Enter] Return
[Backspace] Delete
[Insert] Help
[Ctrl]
F15
Note: When using key combinations, press and release the first key (Ctrl),
then press and release the activation key.
75

KA9233 User Manual
Sun Keyboard
The IBM PC keyboard (101/104 keys) can emulate the functions of the Sun
keyboard. The emulation mappings are listed in the table below.
PC Keyboard Sun Keyboard
[Ctrl] [T] Stop
[Ctrl] [F2] Again
[Ctrl] [F3] Props
[Ctrl] [F4] Undo
[Ctrl] [F5] Front
[Ctrl] [F6] Copy
[Ctrl] [F7] Open
[Ctrl] [F8] Paste
[Ctrl] [F9] Find
[Ctrl] [F10] Cut
[Ctrl] [1]
[Ctrl] [2]
[Ctrl] [3]
[Ctrl] [4]
[Ctrl] [H] Help
-
+
Compose
Note: 1. When using key combinations, press and release the first key [Ctrl],
then press and release the activation key.
2. If you are using a PC keyboard and want to use Stop-A keys to enter
the ok prompt, see Entering the ok Prompt (Sun Solaris), page 78.
76

Appendix
Specifications
Function KA9233
Computer Connections 1
Console Connections 1
Port Selection Graphical OSD, Hotkey
Connectors Console Port Keyboard 1 x USB Type A Female (White)
1 x 6-pin Mini-DIN Female (Purple)
Video 1 x HDB-15 Female (Blue)
Mouse 1 x USB Type A Female (White)
1 x 6-pin Mini-DIN Female (Green)
KVM Port 1 x SPHD-15 Female (Yellow)
F/W Upgrade 1 x 4-conductor 3.5mm Jack
Power 1 x DC Jack (Black)
Link 1 x RJ-45 Female (Black)
Switches Local/Remote 1 x Pushbutton
Video Gain Adjustment 2 x Pushbutton
LEDs Link 1 (Green)
Local 1 (Orange)
Remote 1 (Orange)
Emulation Keyboard/Mouse PS/2; USB (PC, Sun, Apple)
Video 1024 x 768 @ 60Hz (300m max.)
Scan Interval 1–240 Seconds
Power Consumption DC 5.3V, 6W
Environment Operating Temp.
Storage Temp.
Humidity 0–80% RH, Non-condensing
Physical
Properties
Housing Metal
Weight 1.20 kg
Dimensions (L x W x H) 16.60 x 21.50 x 4.50 cm (19"/1U)
0–50
-20–60
o
C
o
C
77

KA9233 User Manual
Factory Default Settings
The factory default settings are as follows:
Setting Default
View mode Accessible + Powered
Port ID Tag mode ID + Port Name
Port ID Position Upper left
Display Duration User Defined (3 seconds)
Scan Timer 5 seconds
Scan mode Accessible + Powered
OSD Activation [Scroll Lock] [Scroll Lock]
Logout Timeout 0 (Disabled)
Screen Blanker 0 (Disabled)
Hotkey Command On
Beeper On
Idle Timeout 5 seconds
Port Access None (Super Administrators and Administrators have
full access)
Port Note None
Port OS Language English
Port Operating System Windows (PC compatible)
Webpage Session Timeout 3 minutes
DHCP Enabled No (Disabled)
SMTP Server Mail Notification No (Disabled)
Broadcast mode Disabled
Entering the ok Prompt (Sun Solaris)
If you are using a PC keyboard to control a Sun Solaris server and want to use
Stop-A keys to enter the ok prompt, do the following:
Note: Before entering the ok prompt, consult the server’s documentation for
any precautionary steps that you should take.
Press and release [Ctrl], press and hold down [T], and then press [A].
78

Troubleshooting
General
Problem Solution
I cannot use an Ethernet
hub to connect the KA9233
to the matrix KVM switch.
I can’t login to the matrix
KVM switch.
Appendix
Although Cat 5 cable is used to connect the KA9233
Console Module to the matrix KVM switch, it does not
support the Ethernet protocol; thus, you cannot use an
Ethernet hub to connect them.
1. Make sure that the power adapter cable is plugged
into the KA9233 and connected to an AC mains power
source.
2. Make sure that the keyboard is connected and functioning properly.
1. Make sure that the Cat 5 cable is connected to the
LINK port on the KA9233 and to a user port on the
matrix KVM switch.
2. Verify that the KM0832 firmware is version 1.2.114 or
higher. If not, upgrade the KM0832 firmware to version 1.2.114 or higher.
79

KA9233 User Manual
Sun Systems
Problem Solution
Video display problems
with HDB-15 interface
systems (e.g. Sun Blade
1000 servers).
Video display problems
with 13W3 interface
systems (e.g. Sun Ultra
servers).*
The display resolution should be set to 1024 x 768 @
60Hz.
Under Text Mode:
1. Enter the ok prompt (see page 78) and issue the following firmware commands:
setenv output-device screen:r1024x768x60
reset-all
Under XWindow:
1. Open a console and issue the following command:
m64config -res 1024x768x60
2. Log out.
3. Log in.
The display resolution should be set to 1024 x 768 @
60Hz.
Under Text Mode:
1. Enter the ok prompt (see page 78) and issue the following firmware commands:
setenv output-device screen:r1024x768x60
reset-all
Under XWindow:
1. Open a console and issue the following command:
ffbconfig -res 1024x768x60
2. Log out.
3. Log in.
* These solutions work for most common Sun VGA cards. If these procedures
fail to resolve the problem, consult the manual for the Sun VGA card.
80

Appendix
Limited Warranty
ATEN warrants this product against defects in material or workmanship for a period of one (1) year
from the date of purchase. If this product proves to be defective, contact ATEN's support
department for repair or replacement of your unit. ATEN will not issue a refund. Return requests
can not be processed without the original proof of purchase.
When returning the product, you must ship the product in its original packaging or packaging that
gives an equal degree of protection. Include your proof of purchase in the packaging and the RMA
number clearly marked on the outside of the package.
This warranty becomes invalid if the factory-supplied serial number has been removed or altered
on the product.
This warranty does not cover cosmetic damage or damage due to acts of God, accident, misuse,
abuse, negligence or modification of any part of the product. This warranty does not cover damage
due to improper operation or maintenance, connection to improper equipment, or attempted repair
by anyone other than ATEN. This warranty does not cover products sold AS IS or WITH FAULTS.
IN NO EVENT SHALL ATEN'S LIABILITY EXCEED THE PRICE PAID FOR THE
PRODUCT. FURTHER, ATEN SHALL NOT BE RESPONSIBLE FOR DIRECT, INDIRECT,
SPECIAL, INCIDENTAL OR CONSEQUENTIAL DAMAGES RESULTING FROM THE USE
OF THE PRODUCT, ITS ACCOMPANYING SOFTWARE, OR ITS DOCUMENTATION.
ATEN SHALL NOT IN ANY WAY BE RESPONSIBLE FOR, WITHOUT LIMITATION, LOSS
OF DATA, LOSS OF PROFITS, DOWNTIME, GOODWILL, DAMAGE OR REPLACEMENT
OF EQUIPMENT OR PROPERTY, AND ANY EXPENSES FROM RECOVERY,
PROGRAMMING, AND REPRODUCTION OF ANY PROGRAM OR DATA.
ATEN makes no warranty or representation, expressed, implied, or statutory with respect to its
products, contents or use of this documentation and all accompanying software, and specifically
disclaims its quality, performance, merchantability, or fitness for any particular purpose.
ATEN reserves the right to revise or update its product, software or documentation without
obligation to notify any individual or entity of such revisions, or update.
For details about extended warranties, please contact one of our dedicated value added resellers.
81

KA9233 User Manual
This Page Intentionally Left Blank
82

Index
A
accessing target devices, 22
accounts, managing, 44, 49
activating the Graphical OSD, 28
adjusting picture quality, 14
Apple
keyboard emulation, 75
keyboards, 63
Auto Scan mode
invoking, 23, 34
pausing, 23, 34
setting port access, 26
setting scan interval, 26, 33
skipping ports, 23
stopping, 23, 35
B
basic operation, 11
beeper, 28, 35
Broadcast mode, 73
C
cables, 3
change password, 28
computer, local, 13
CPU module. See KVM adapter ca-
ble
D
date, setting, 42
default settings, factory, 78
desktop mounting, 7
E
e-mail notification, 41
emulation, keyboard
Apple, 75
Sun, 76
English keyboard layout, 63
Event Log, 71
F
F/W UPGRADE port, 5
factory default settings, 78
FCC Information, ii
firmware, upgrading, 65
French keyboard layout, 63
G
Graphical OSD, 16
OSD hotkey, 22, 28
shortcut keys, 17
Group Management, 44
H
Help, 29
hot plugging, 11
Hotkey mode, 28
beeper control, 35
invoking, 31
port control, 31
port selection, 32
summary table, 36
hotkey, OSD, 22, 28
I
icons, 16
Idle Timeout, 28
installing the KA9233, 10
invoking Hotkey mode, 31
IP address, assigning
in IP Installer, 39
in the Graphical OSD, 40
83

KA9233 User Manual
IP Installer, 39
J
Japanese keyboard layout, 63
K
KA9233
front view, 4
rack mounting, 7
rear view, 5
stacking, 7
keyboard emulation
Apple, 75
Sun, 76
keyboard layout, 63
keyboards, 63
KVM adapter cable, 62
L
LINK LED, 4, 11
LINK port, 5
local computer switching, 13
LOCAL LED, 4, 13
LOCAL PC port, 5, 13
LOCAL/REMOTE button, 4, 13
Log File, 71
logging in, 15
logging out, 29
Logout Timeout, 28
M
Macintosh. See Apple
menus, 16
O
Online
Registration, iii
Support, iii
OSD hotkey, 22, 28
OSD. See Graphical OSD
Overview, 1
P
password, changing, 28
picture quality, adjusting, 14
port access, managing, 47, 53, 58
port ID, 21
numbering, 19
Port Management, 56
port management, 56
port note, 21, 62
port settings, 62
Port Status, 21
port switching, 22
ports
F/W UPGRADE, 5
keyboard layout, 63
keyboards, 63
LINK, 5
LOCAL PC, 5, 13
R
rack mounting, 7
safety instructions, vi
REMOTE LED, 4, 13
restoring port defaults, 63
RoHS, ii
N
naming stations, 37
Network Settings, 39
notification messages, 41
84
S
safety instructions
general, iv
rack mounting, vi
Screen Blanker, 28

Index
Search, 64
setting
Auto Scan mode interval, 33
shortcut keys, 17
SJ/T 11364-2006, ii
Skip mode, 26, 34
SMTP server settings, 41
specifications, technical, 77
stacking, 7
stations, naming, 37
Sun Microsystems
keyboard emulation, 76
keyboards, 63
ok prompt, 78
troubleshooting, 80
switching ports, 22, 32
system event report, 41
System Information, 74
system requirements
cables, 3
computers, 3
consoles, 3
operating systems, 3
T
target devices, accessing, 22
technical specifications, 77
technical support, xiii
time, setting, 42
troubleshooting, 79
Sun Microsystems, 80
U
upgrading firmware, 65
user management, 49
user notice, iii
user settings, OSD, 27
V
video gain buttons, 4, 14
video quality, adjusting, 14
View, 24
W
Web Page Session Timeout, 38
85
 Loading...