

Page 1

ALTINA A600
User’s Manual
Page 2

English Version
R01
Nov. 2005
Trademarks
All brand and product names are trademarks or registered trademarks of their
respective companies.
Note
The information in this manual is subject to change without notice.
Page 3

Before You Begin
※ Precautions and Notices
※ For your own safety, do not operate the controls of the product while
driving.
※ Use this product prudently. The product is intended to be used only as a
navigation aid. It is not for precise measurement of direction, distance,
location or topography.
※ The calculated route is for reference only. It is the user’s responsibility to
follow the traffic signs and local regulations along the roads.
※ When you get off the car, do not leave your device on the dashboard that
is subject to direct sunlight. The overheating of the battery can cause
malfunction and/or danger.
※ GPS is operated by the United States government, which is solely
responsible for the performance of GPS. Any change to the GPS system
can affect the accuracy of all GPS equipments.
※ GPS satellite signals cannot pass through solid materials (except glass).
When you are inside a tunnel or building, GPS positioning is not
available.
※ A minimum of 4 GPS satellite signals is needed to determine current
GPS position. Signal reception can be affected by situations such as bad
weather or dense overhead obstacles (e.g. trees and tall buildings).
※ The wireless devices might interfere the reception of satellite signals and
cause the reception of the signal to be unstable. For better signal
reception, it is recommended that you use a car antenna (option).
※ A car holder is needed when using the device in a car. It is
recommended that you place the device in an appropriate place, so as
not to obstruct the driver’s view, or deployment of airbags.
※ Overview
GPS Navigation Features
※ Electronic maps with roads, freeways, highways, railways, rivers, lakes,
points of interest, etc.
※ GPS positioning
※ Optimal route calculation and trip plan
※ Friendly and efficient navigation with turn-by-turn, voice, and visual
guidance
※ Various ways for searching a location on the map
- Using a known address
- Using a POI (point of interest)
Page 4

- Using Favorites (personal stored locations)
- Using History (previous destinations)
※ Recording and playback of journeys
※ Viewing modes for different needs and situations:
- 2D or 3D
- Daytime or nighttime view
- Turn-by-turn view of the route
- Driving direction of the route
Other Features
※ MP3 Player: playing MP3 music.
※ Photo Viewer
※ Mpeg 4 Player: playing Mpeg 4
※ Calculator
About this Manual
This manual is divided into four major parts:
※ Part I “Basic Operations” tells you how to get your device running and
customize system settings.
※ Part II “GPS Navigation” tells you how to use the GSP navigation
functions.
※ Part III “More Tools” introduces MP3 Player and data transfer tools.
※ Part IV “References” gives guidelines on troubleshooting and
maintenance and provides the regulatory information.
Page 5

Part I. Basic Operations
Part I guides you through the process of getting your device running, familiarizes
you with the external components, and tells you how to customize system settings
Page 6
1. Getting Started
This chapter tells you step by step how to perform the initial startup and
introduces you to the external components of your device.
1.1 Setting the ON/OFF Switch
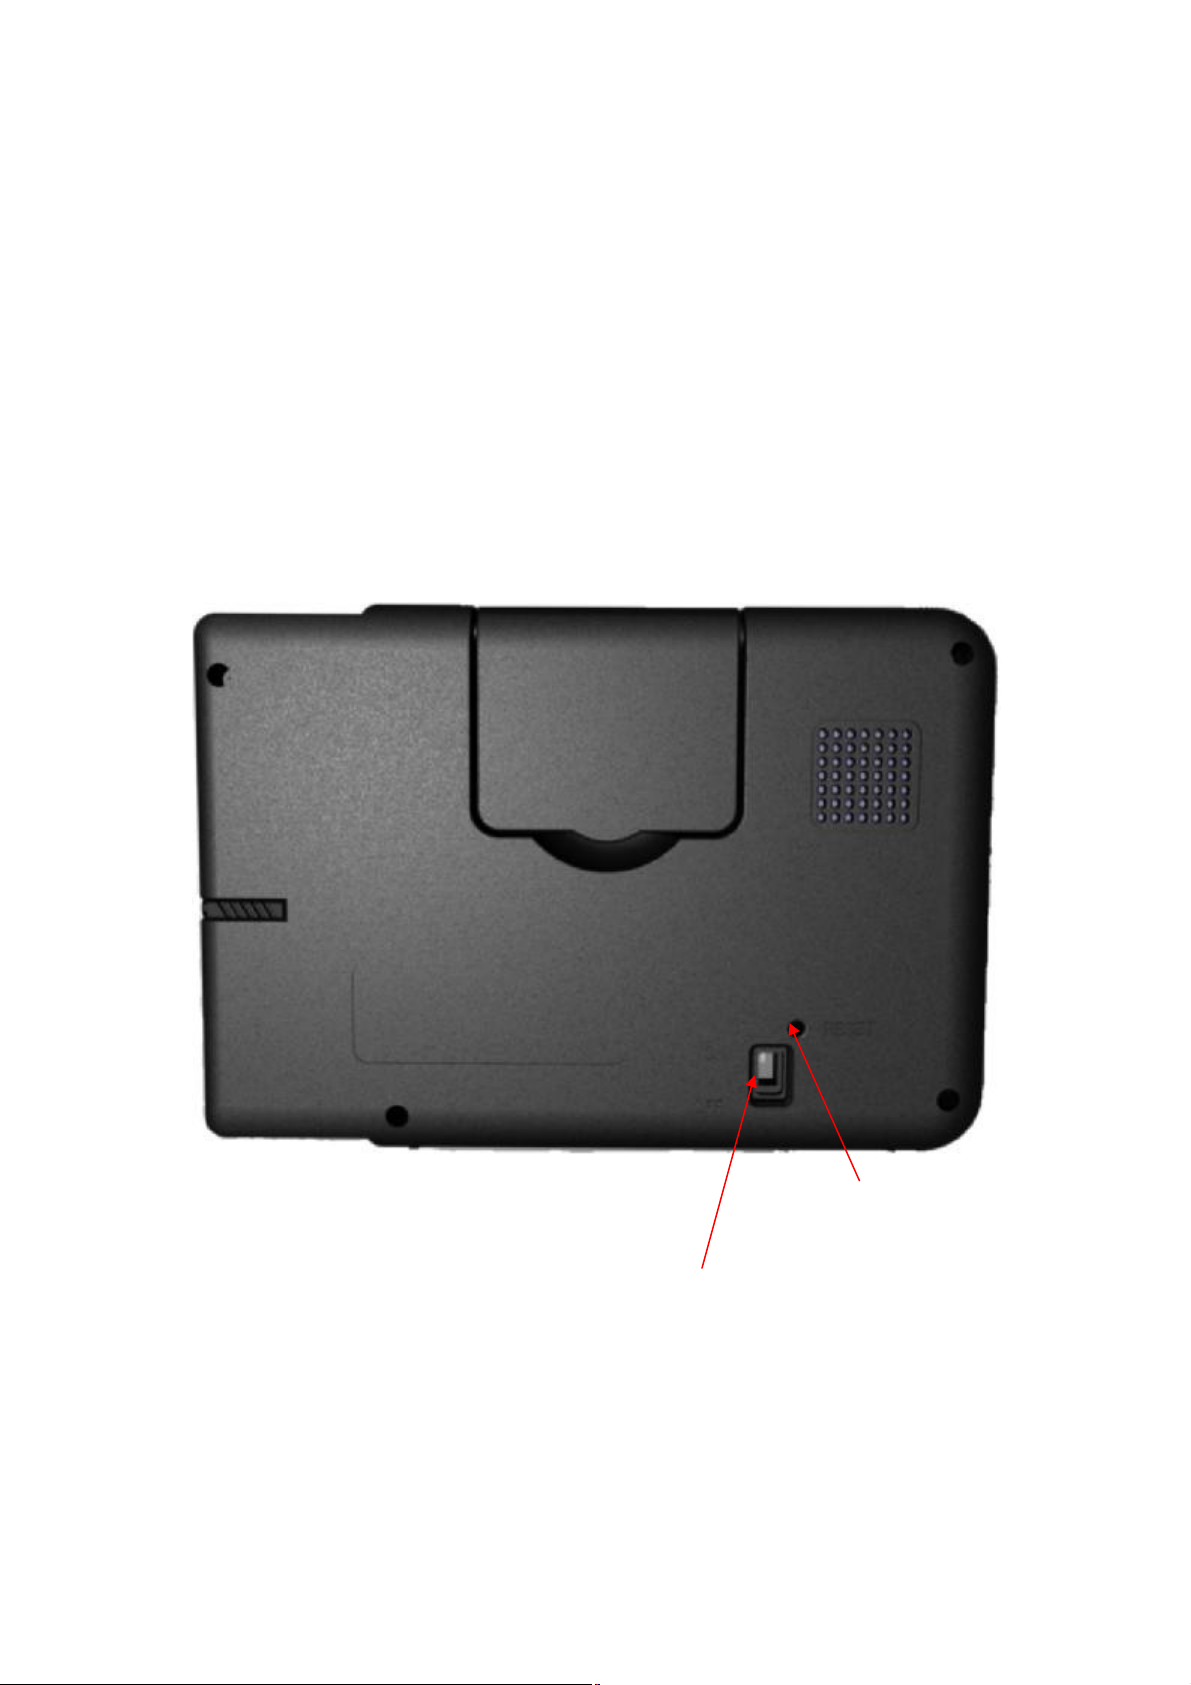
The ON/OFF switch should be set to the ON position for normal operation. Pull
out the stylus pen and use it to slide the ON/OFF switch to the ON (left) position.
CAUTION: Always leave the ON/OFF switch in the ON position for normal
operation.
Reset
On/Off Switch
1.2 Connecting to AC Power and Charging the Battery
Fully charge the battery before using your device for the first time.
1. Slide and click the connector converter onto the AC adapter.
2. Connect the adapter cable to the bottom of your device.
3. Plug the AC adapter into a wall outlet.
Page 7

※ The charge indicator glows amber when charging is in progress. Do not
disconnect your device from AC power until the battery is fully charged, when
the charge indicator turns green. This will take a couple of hours.
1.3 Using Your Device in a Vehicle
A car holder and a car charger are supplied with your device.
Using the Car Holder
※CAUTION:
1.Select an appropriate location for the car holder. Never place the holder
where the driver’s field of vision is blocked.
2.If the car’s windshield is tinted with a reflective coating, an external antenna
(optional) may be needed to route the antenna to the top of the car through
a window. When closing the car window, be careful not to pinch the antenna
cable. (Cars with an anti-jam window design may automatically leave
adequate space as needed.)
The car holder consists of a bracket and a dashboard stand. Use the car holder to
mount your device in a vehicle.
Connecting the Car Charger
The car charger supplies power to your device when you are using the device in a
car.
※CAUTION : To protect your device against sudden surges in current,
connect the car charger only after the car engine has been
started.
1.Connect one end of the car charger to the power connector of your device.
2.Connect the other end to the cigarette lighter in the car to power and charge
your device.
1.4 Understanding Hardware Features
NOTE: Depending upon the specific model purchased, the color of your device
may not exactly match the device shown in this manual.
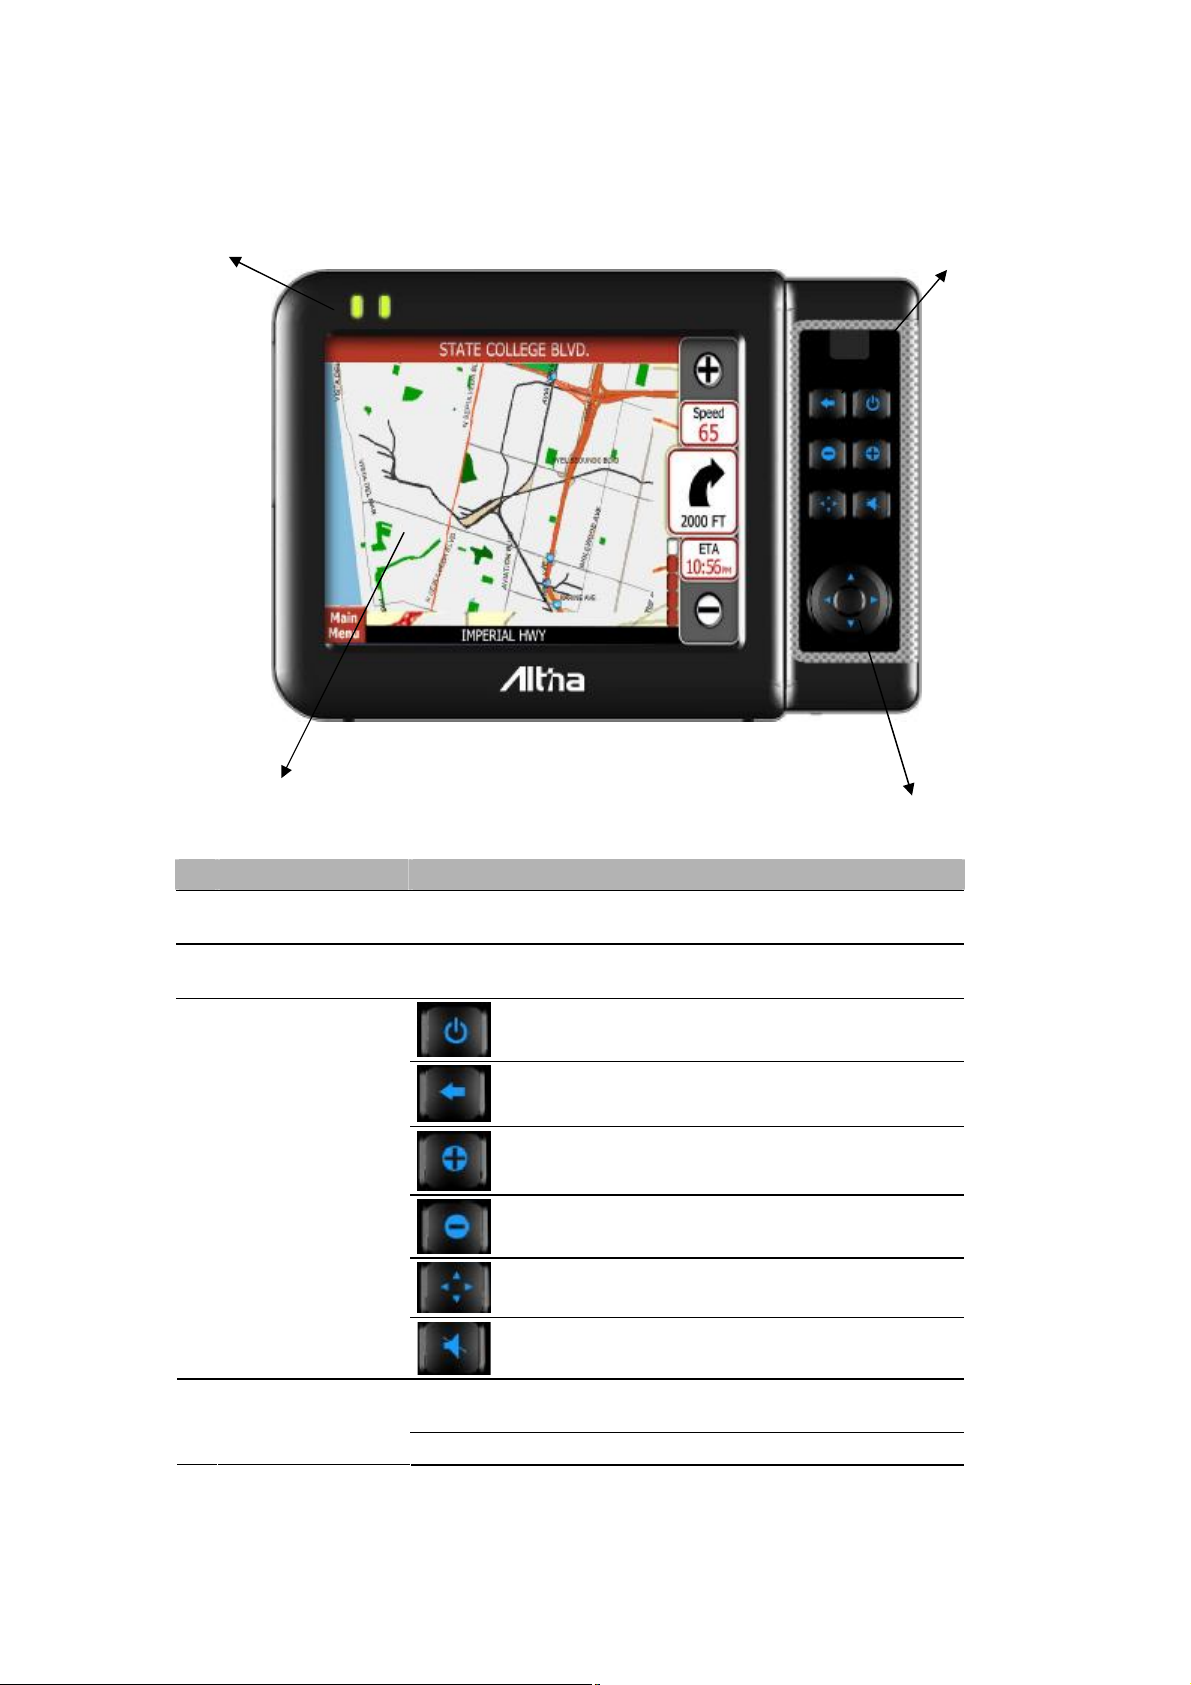
Front Components
Page 8
Œ Ž
• •
Ref
Œ
•
Ž
Component Description
Charge Indicator Glows bright amber to indicate that the battery is charging, and
turns green when the battery is fully charged.
Touch Screen Displays the output of your device. Tap the screen with the
stylus pen to select menu commands or enter information.
Hardware Buttons
Power On/Off
Back
Zoom In
Zoom Out
Navigation Settings
Stop Voice
Navigation Pad
•
Moves up, down, left or right by pressing the corresponding
area of the pad.
Selects highlighted item by pressing in the center.
Page 9
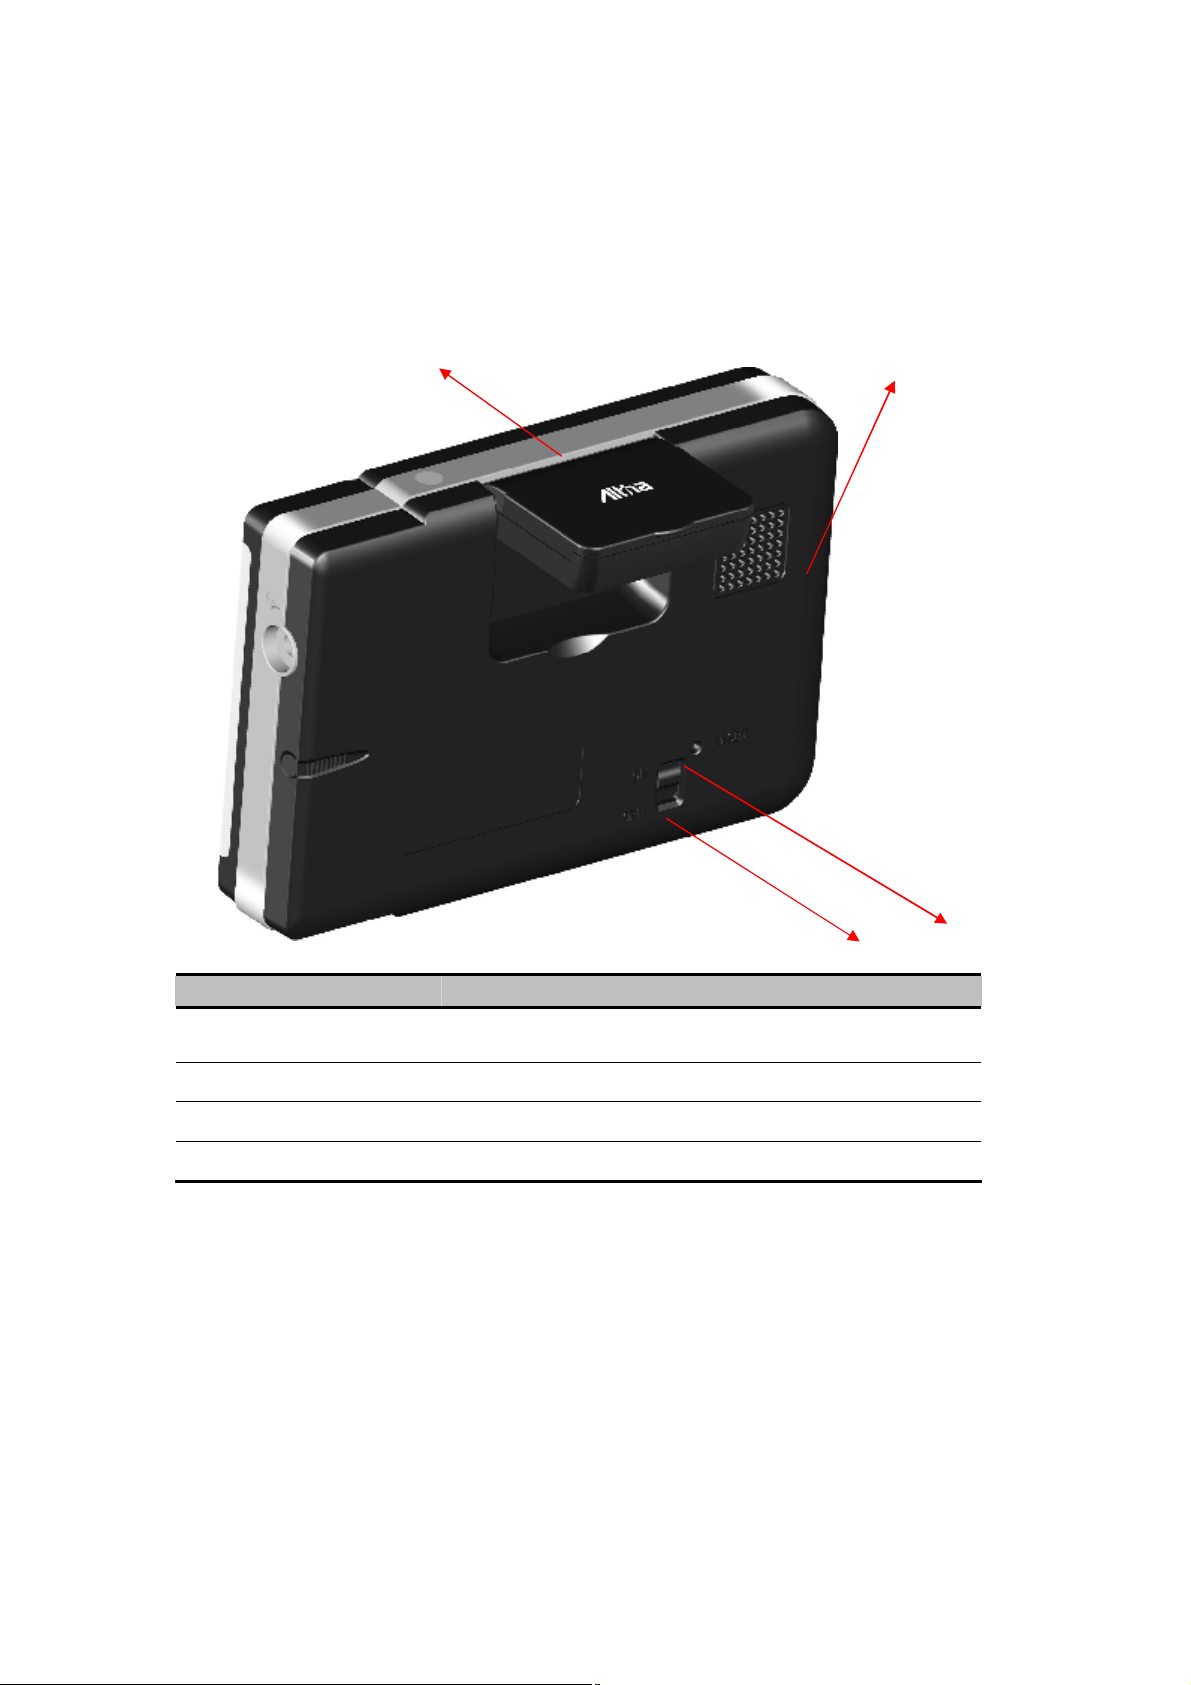
Back Components
Œ •
Ref
Œ
•
Ž
•
Component Description
GPS Antenna Receives signals from the GPS satellites overhead. It should
be lifted up to the horizontal position for normal operation.
Speaker Sends out music, sounds and voice.
ON/OFF Switch The main power/battery cutoff switch.
Reset Button Restarts your device (soft reset).
Left-Side Components
Ž •
Page 10
Œ
• Ž
Ref
Œ
•
Ž
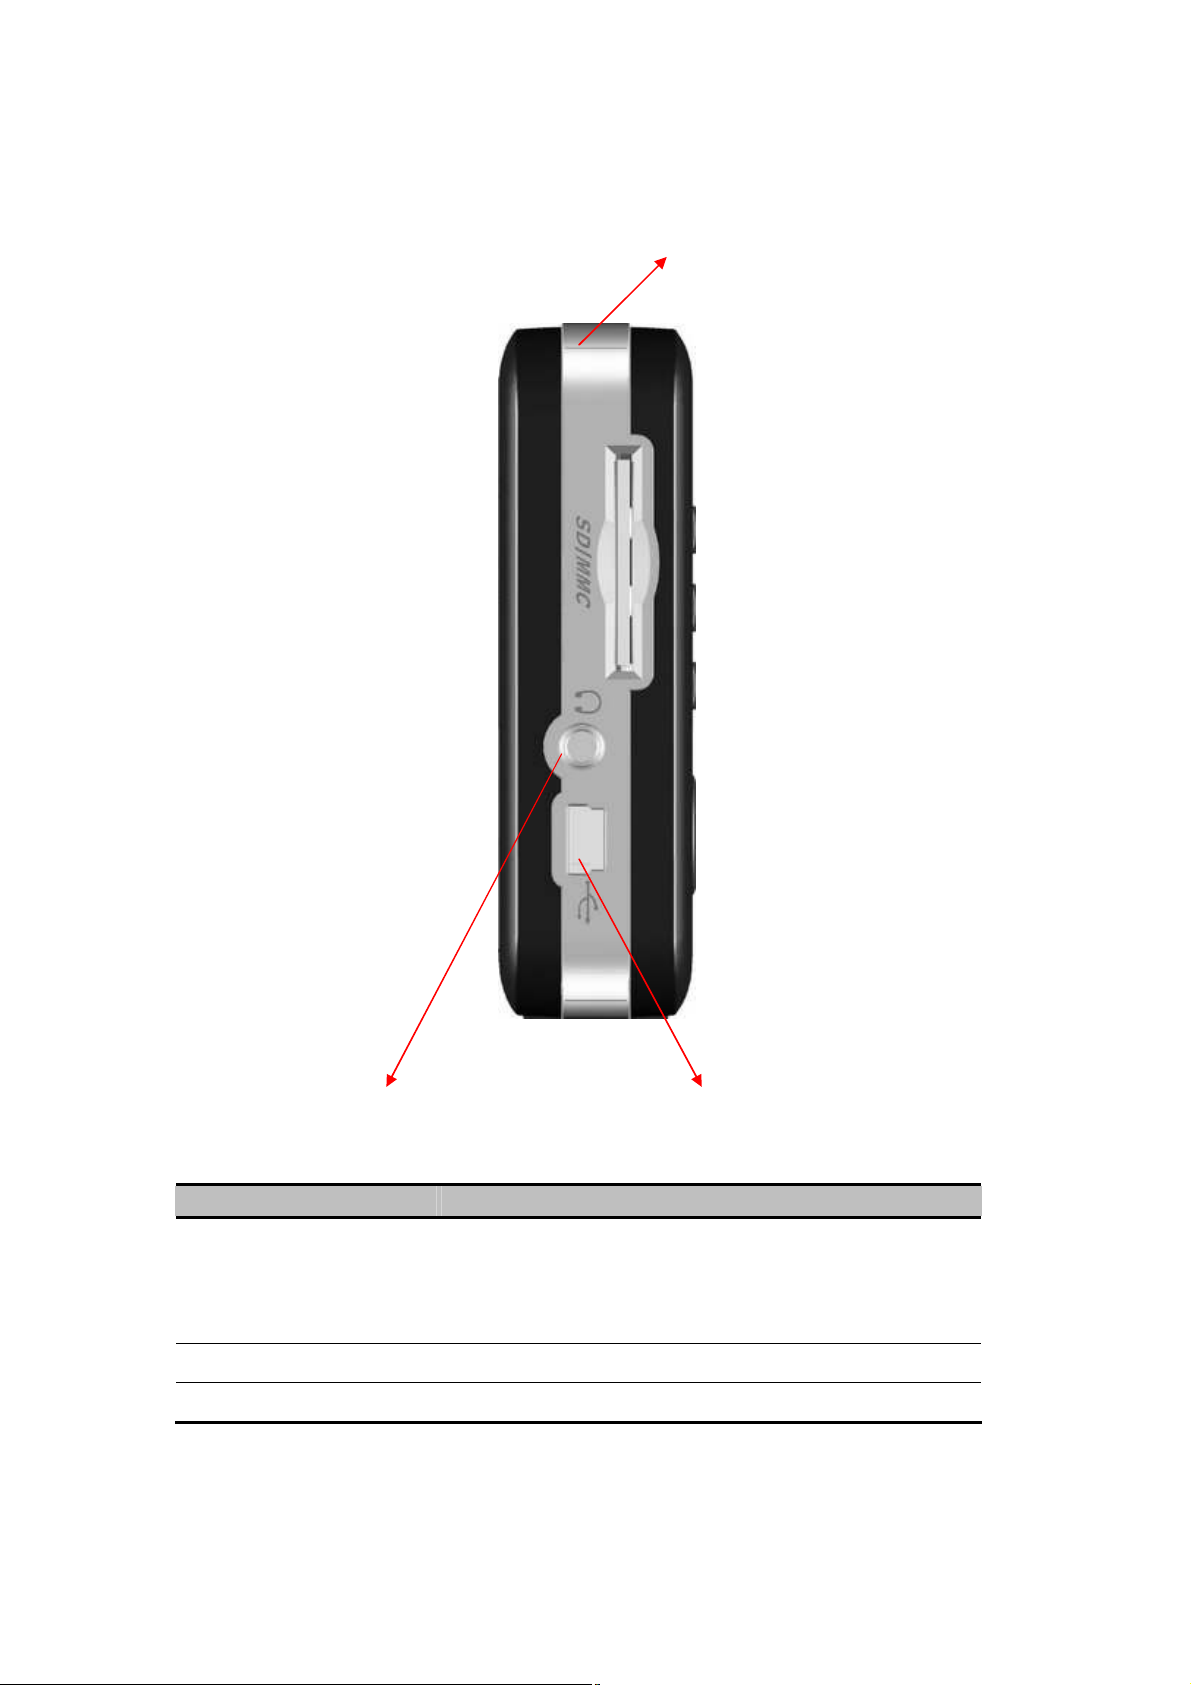
Component Description
SD/MMC Slot Accepts a SD (Secure Digital) or MMC (MultiMediaCard) card
for accessing data such as maps and MP3 music.
NOTE: Before using GPS navigation software and maps, you
need to insert the storage card included with your device. Do
not remove the card during GPS operation.
Headphone Connector
Mini USB Connector Connects to the computer for data transfer.
Connects to stereo headphones.
Page 11
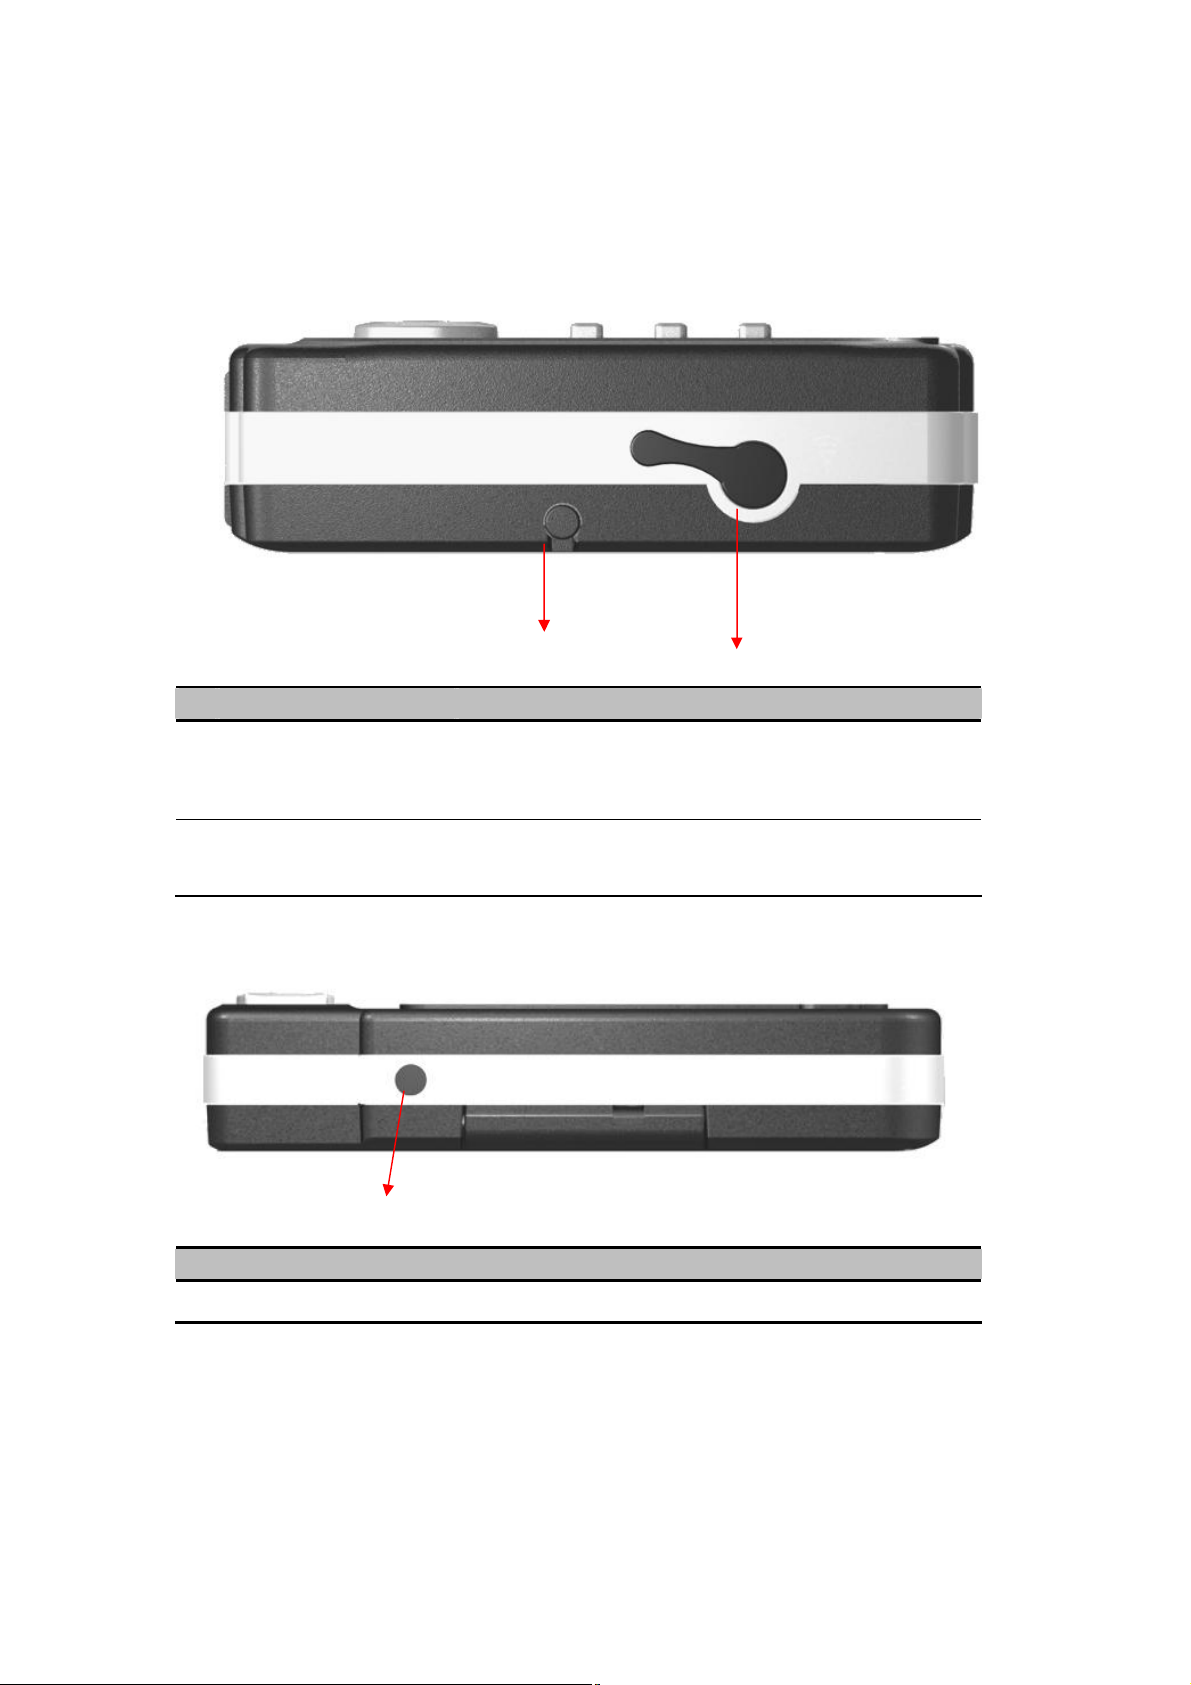
Right-Side Components
• Œ
Ref
Œ
•
Component Description
External Antenna
Connector
Stylus Pen Tap on the touch screen to make selections and enter
This connector (under rubber dust cover) allows use of an
optional external antenna with magnetic mount, which may
be positioned on top of the car for better signal reception in
areas with poor reception.
information. Pull the stylus pen out of its slot to use it, and
store it in the slot when not in use.
Top Components
Œ
Ref Component Description
Light Sensor Automatically detect the strength of lighting
Œ
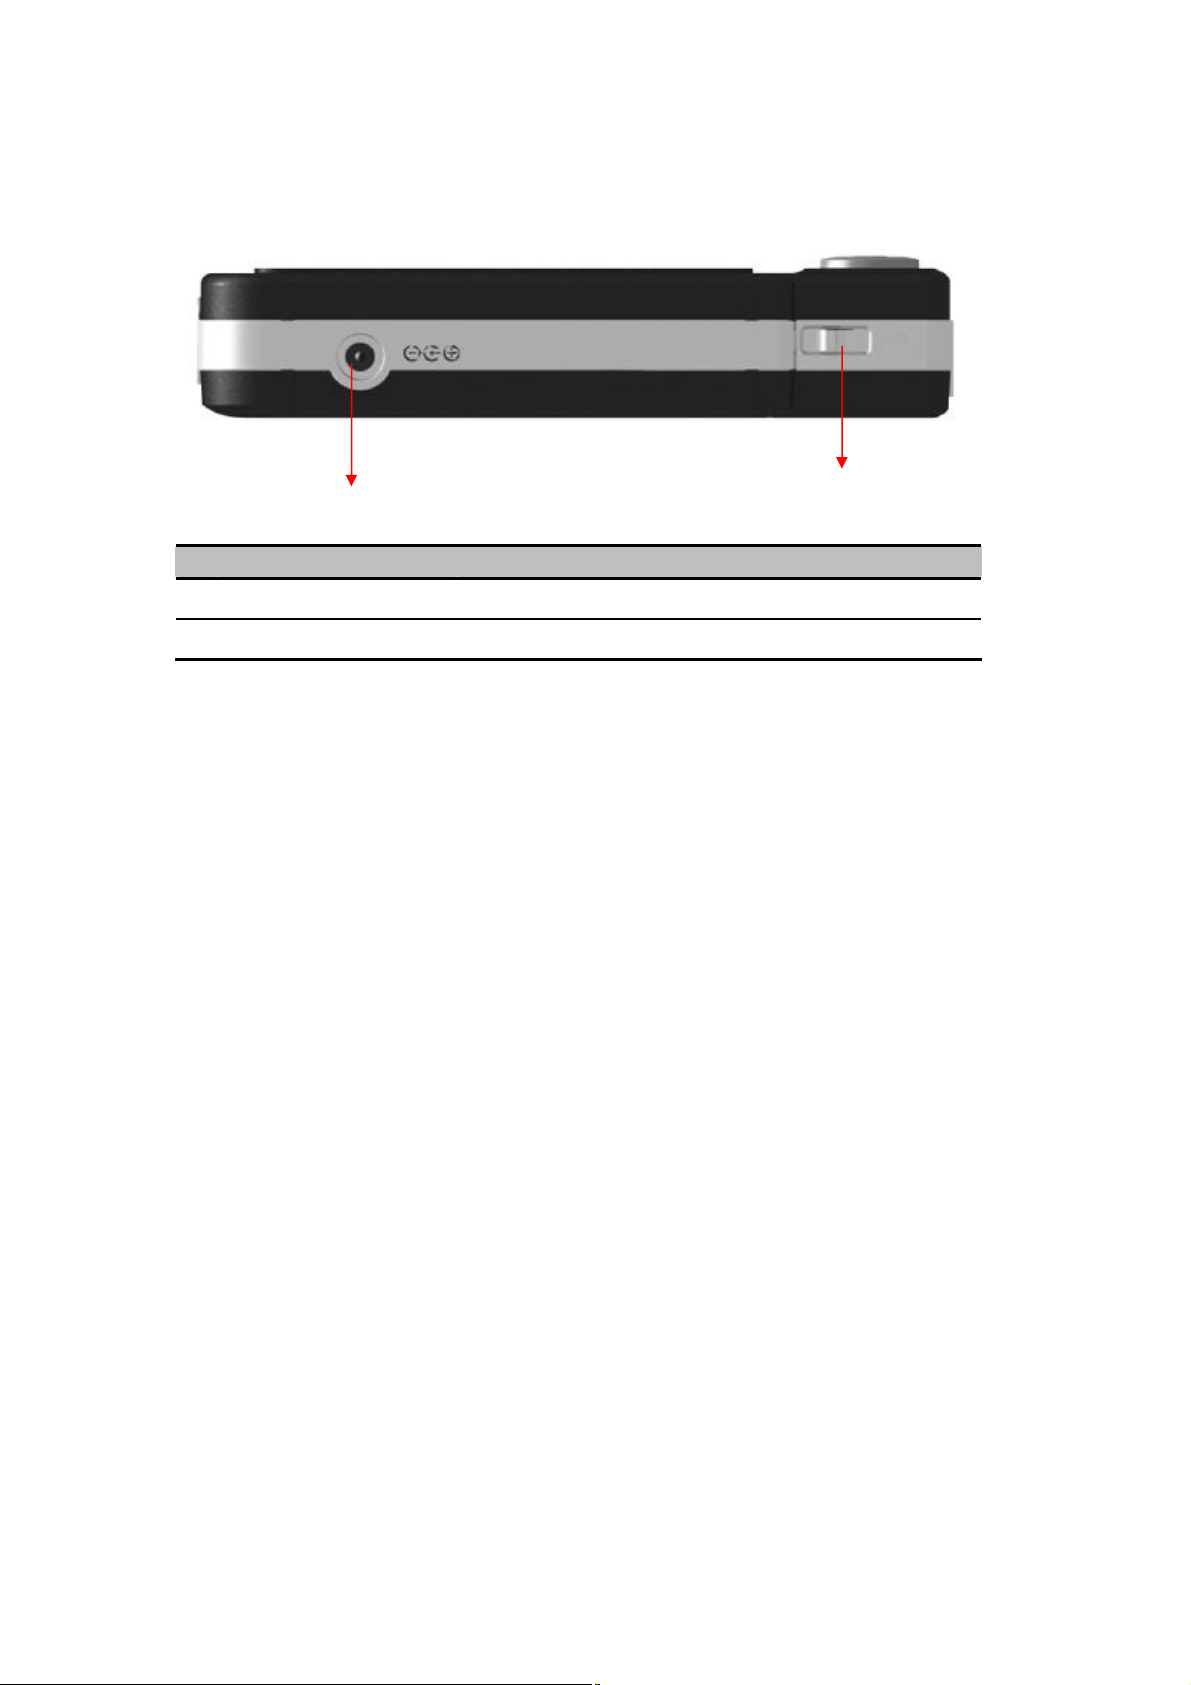
Bottom Components
Page 12
Œ •
Ref
Œ
•
Component Description
Power Connector Connects to the AC adapter.
Hold Button When hold on the button, it will freeze the operation.
Page 13
2. Basic Skills
This chapter guides you through the process of using your device and familiarizes
you with the basic operations such as using the stylus pen and navigation pad..
2.1 Turning On and Off Your Device
Use the power button on the front of your device to turn on and off your
device.
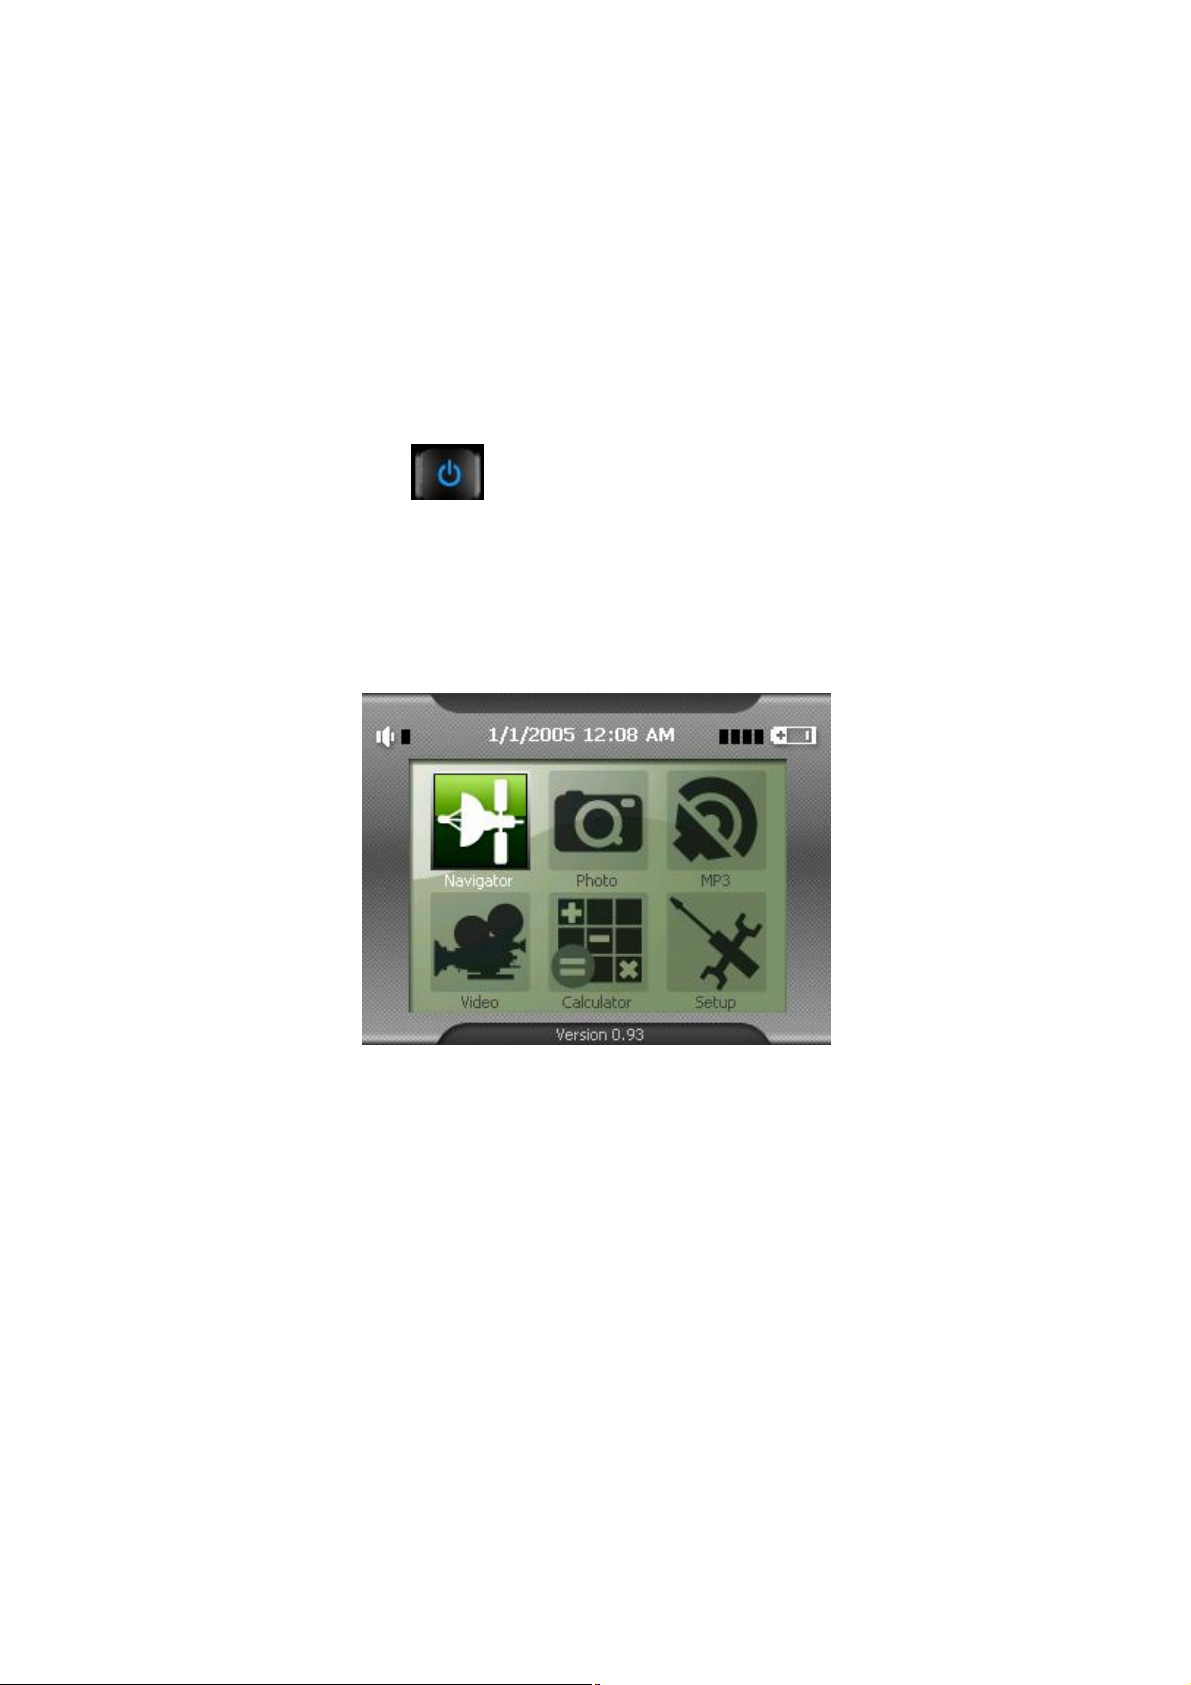
When you turn on the device for the first time, the Main screen appears as shown
below. There are six buttons on the Main screen: Navigation, Photo, MP3, Video,
Calculator and Setup. Each button represents a function or feature. To use a
function, just tap the corresponding button. (For more information, refer to the
following chapters.)
When you press the power button to turn off the unit, your device actually enters a
suspend state and the system stops operating. Once you turn on the system
again, it resumes.
2.2 Operating Your Device
To operate your device, use the hardware buttons and/or the stylus pen.
Using Hardware Buttons
Page 14
Button
center of
Up Down Right Left
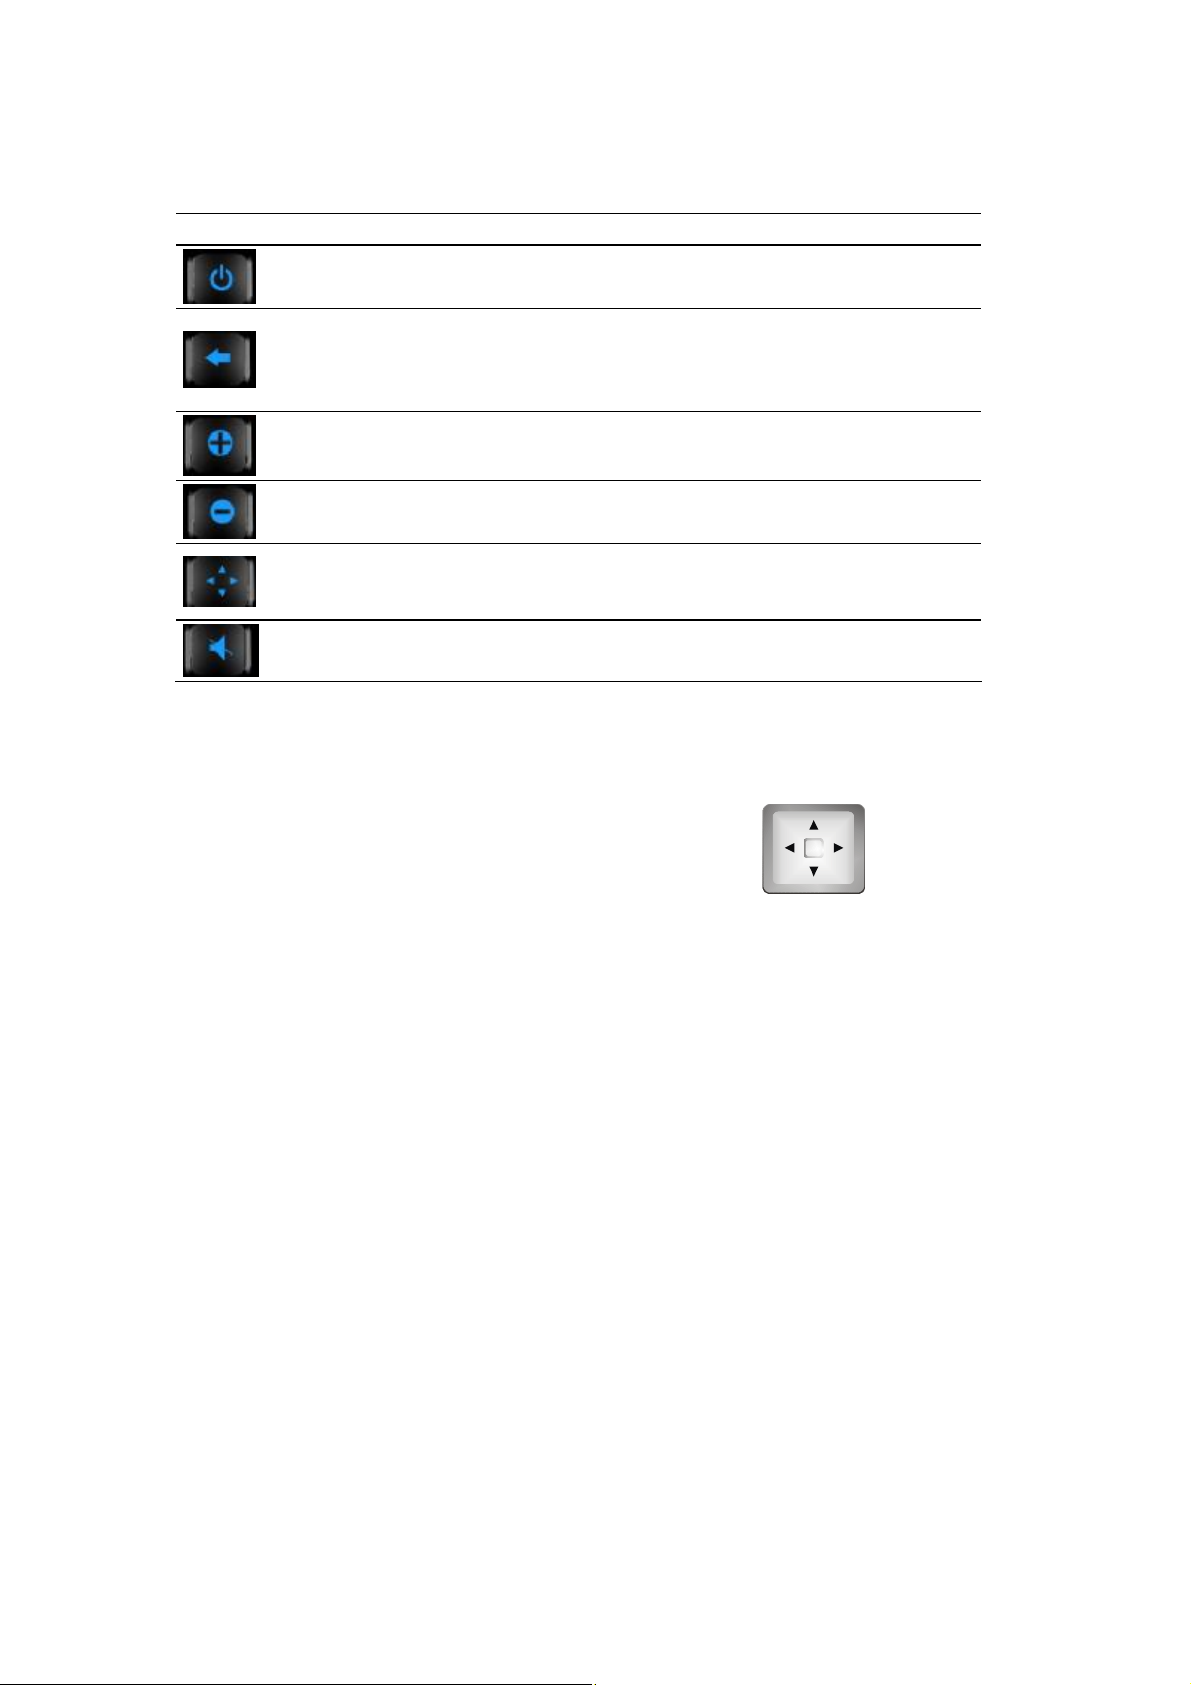
Name Description
Power On/Off Turns on and off the device.
※Goes back to the previous screen.
Back
Zoom In Increases the map scale
Zoom Out Decreases the map scale.
Navigation Settings
Stop Voice Mute the voice.
※Goes to the map screen while in a Navigation Settings
screen.
Access to different navigation related tools categorized
under Destinate, View and Options menu screens.Press
button repeatedly to cycle through the available menus.
Using the Navigation Pad
With the navigation pad, you can move up,
down, left and right within a menu.
To move in a direction, simply press the
corresponding arrow on the button. To
activate the selected item, press the
the button.
Stylus Pen
The stylus pen is your input device. You use it to select objects such as command
and option on the screen.
Pull the stylus pen out of the slot and extend it for ease of use. Store it in the slot
when not in use.
You can use the stylus pen to do the following actions:
®Tap
Touch the screen once with the stylus pen to open items or select options.
®Drag
Hold the stylus pen on the screen and drag up/down/left/right or across the
screen.
®Tap and hold
Tap and hold the stylus until an action is complete, or a result or menu is shown.
Page 15
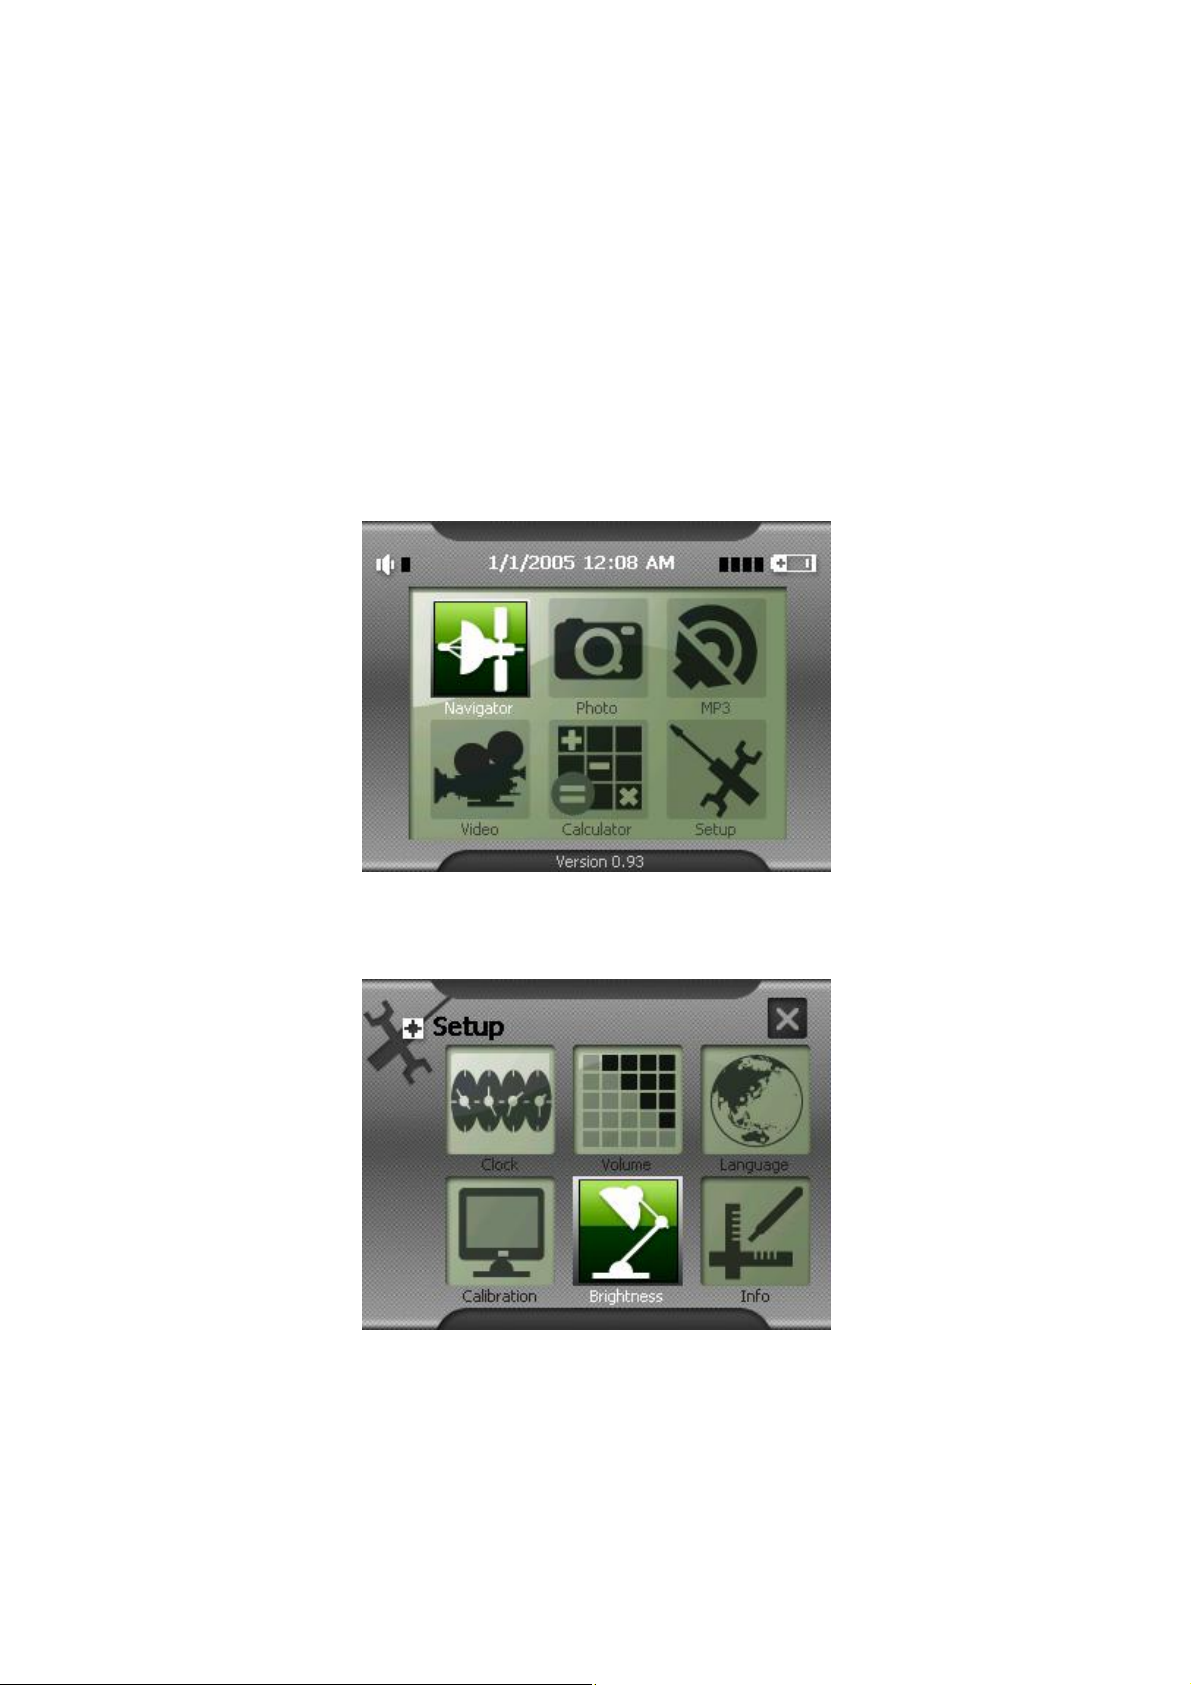
3. System Settings
Your device is supplied with default settings. You may also customize the settings
to suit your personal needs. Once you change settings, your new settings will
remain until either you change them again, or until battery cutoff switch is turned
off and then back on again, which resets the unit to factory defaults.
3.1 Using System Settings
Tap the Setup button on the Main screen.
The Setup screen contains six buttons as shown below. The following sections
describe these six buttons and their functions.
3.2 Brightness
1. Tap Setup on the Main screen.
2. Tap the Brightness button on the Setup screen.
Page 16
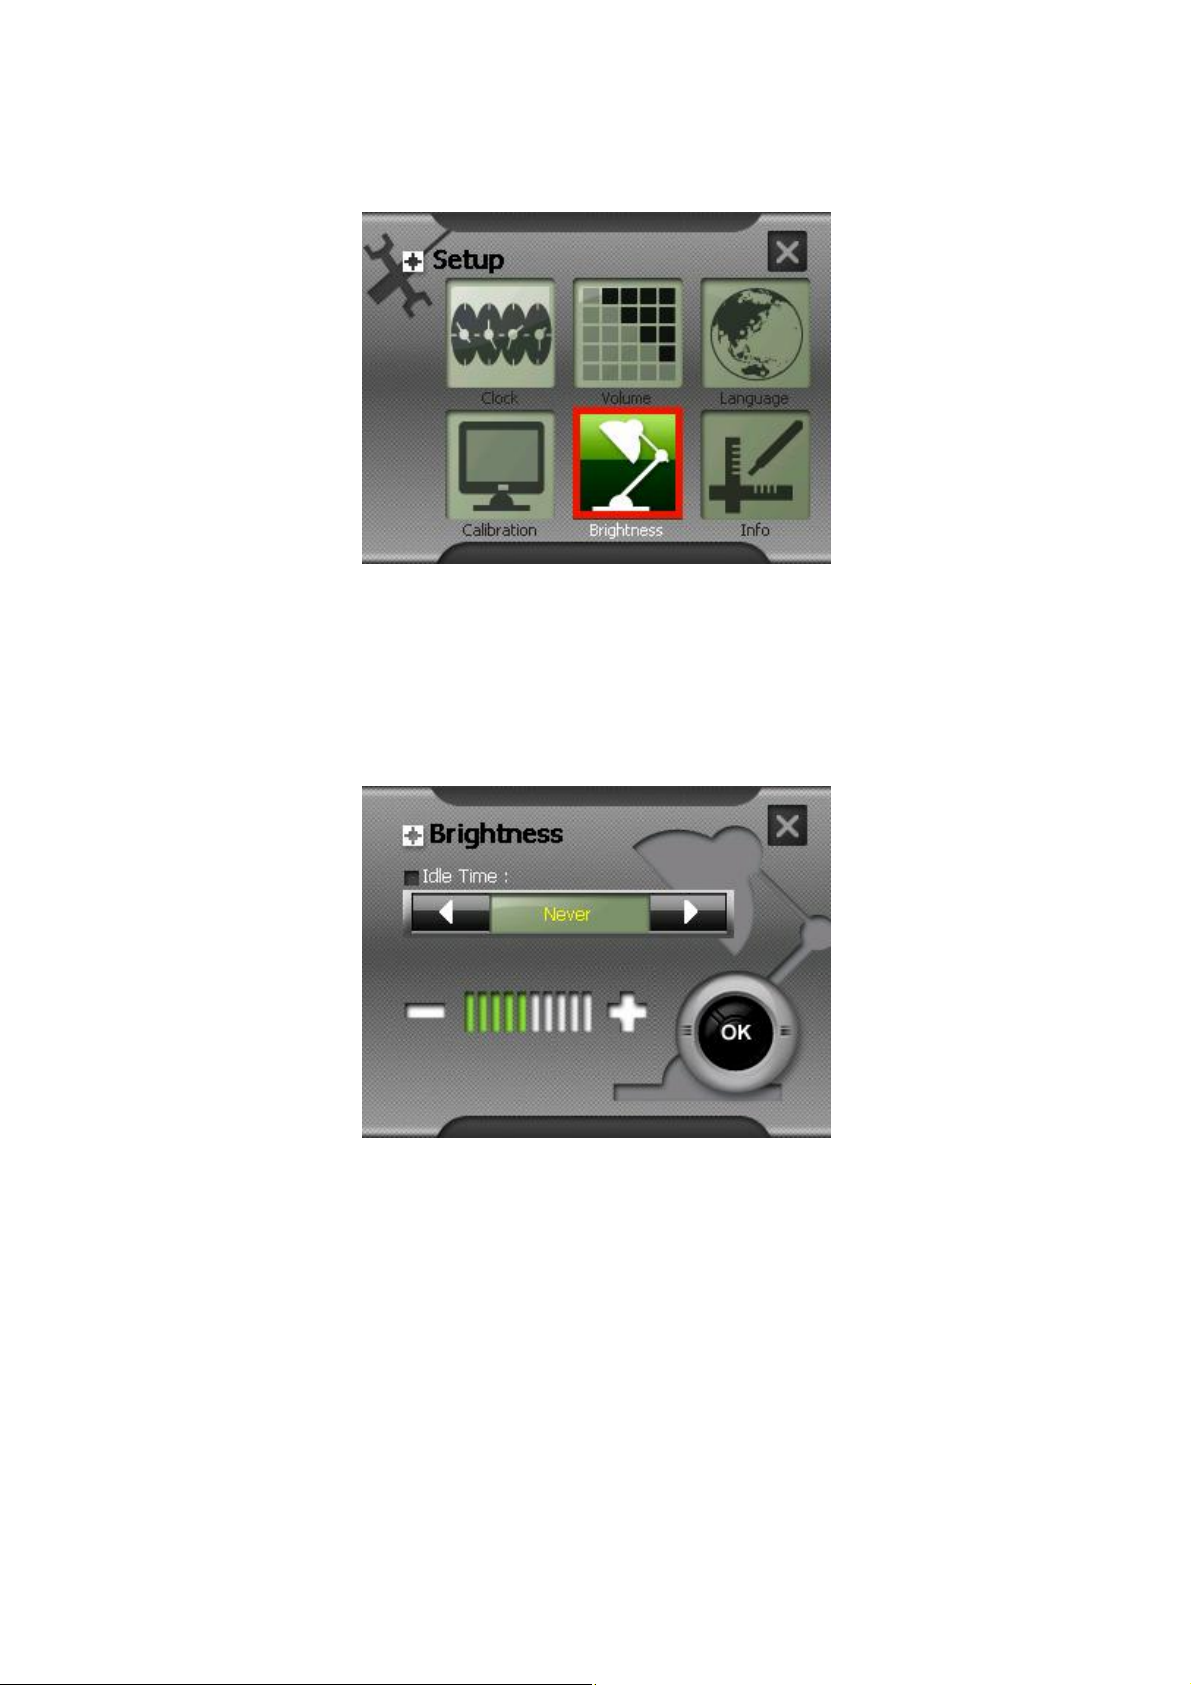
3. After you have made changes, press the mark button to save the changes
and exit the screen.
Adjusting the Brightness
Tap the bulb button to adjust.
※To darken the screen, tap the left bulb button.
※To lighten the screen, tap the right bulb button.
Setting the Idle Time
You can set a timer when it is idle for a set period of time.
Page 17
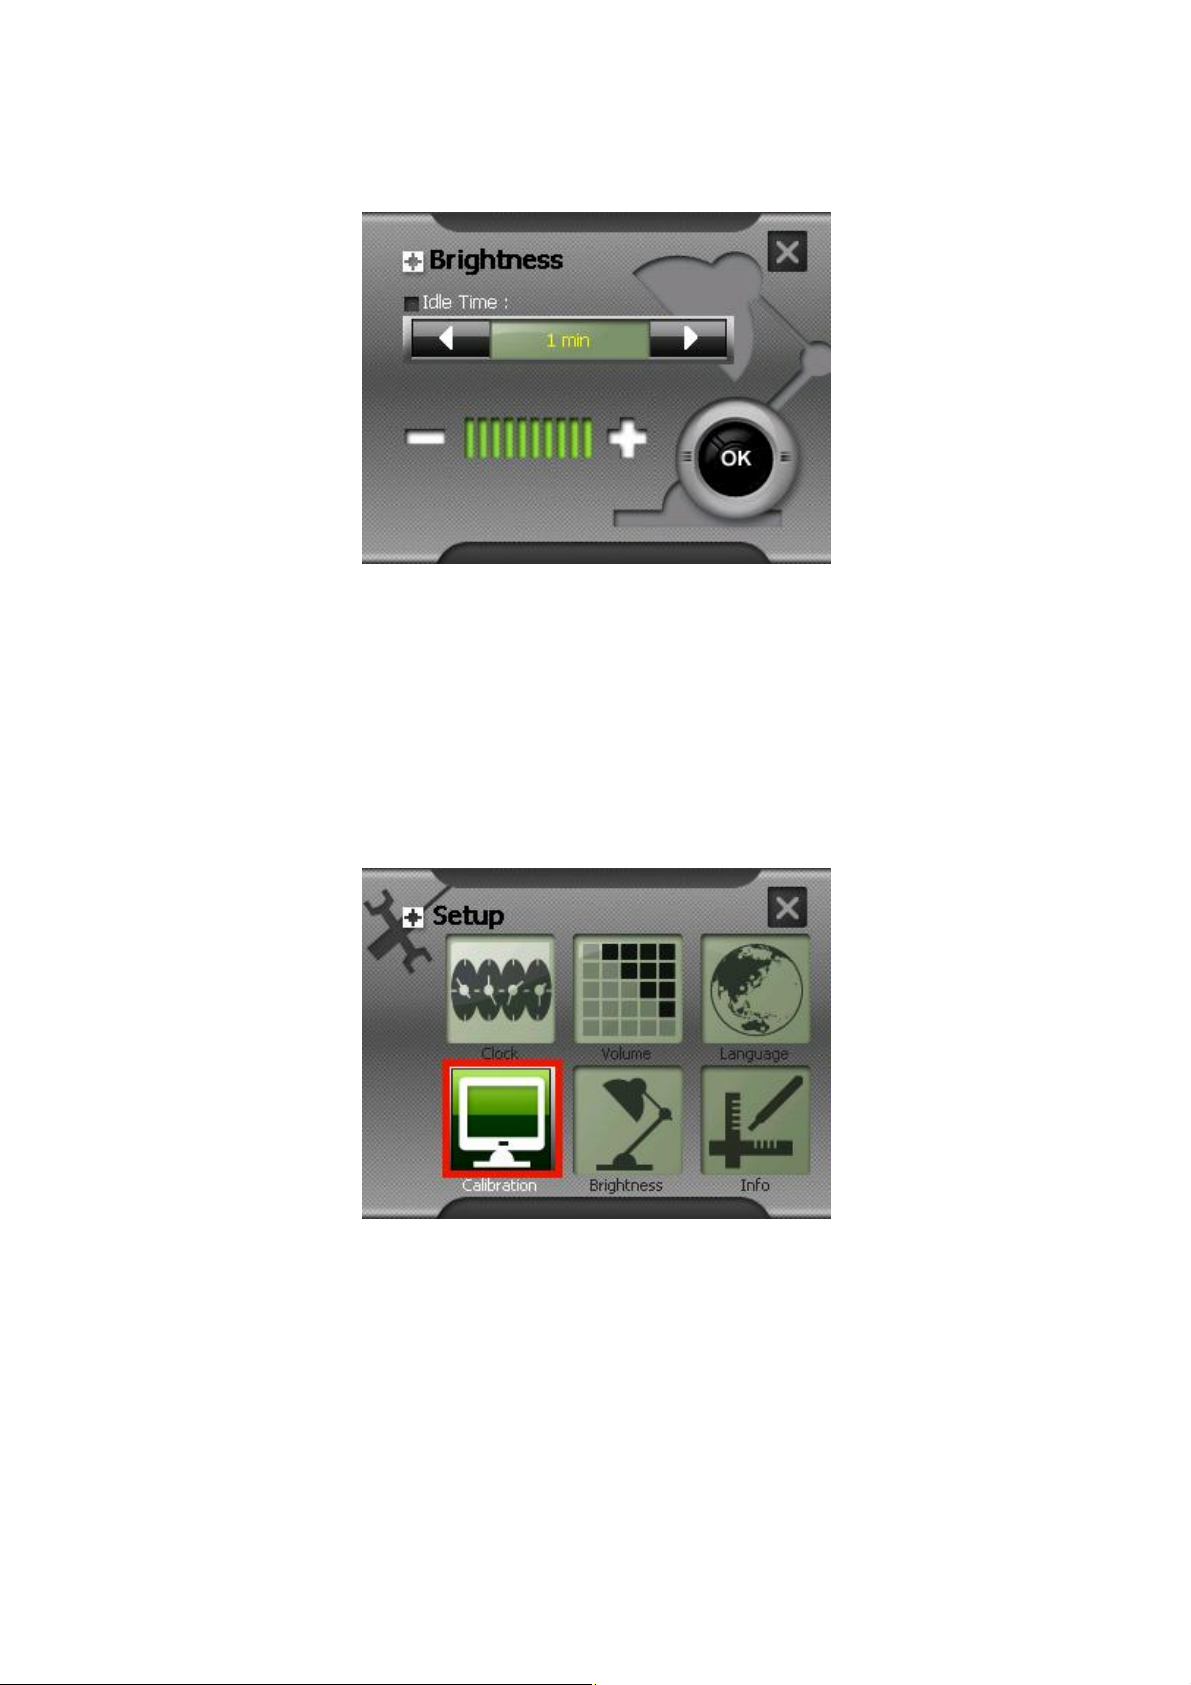
Tap the Idle Time box and select the time. The options are 1 minute, 2 minutes, 5
minutes, never.
3.3 Calibration
You can calibrate the touch screen if it is not responding accurately to your stylus
pen taps.
1. Tap Setup on the Main screen.
2. Tap the Calibration button on the Settings screen.
3. Tap and hold the center of the target.
Page 18
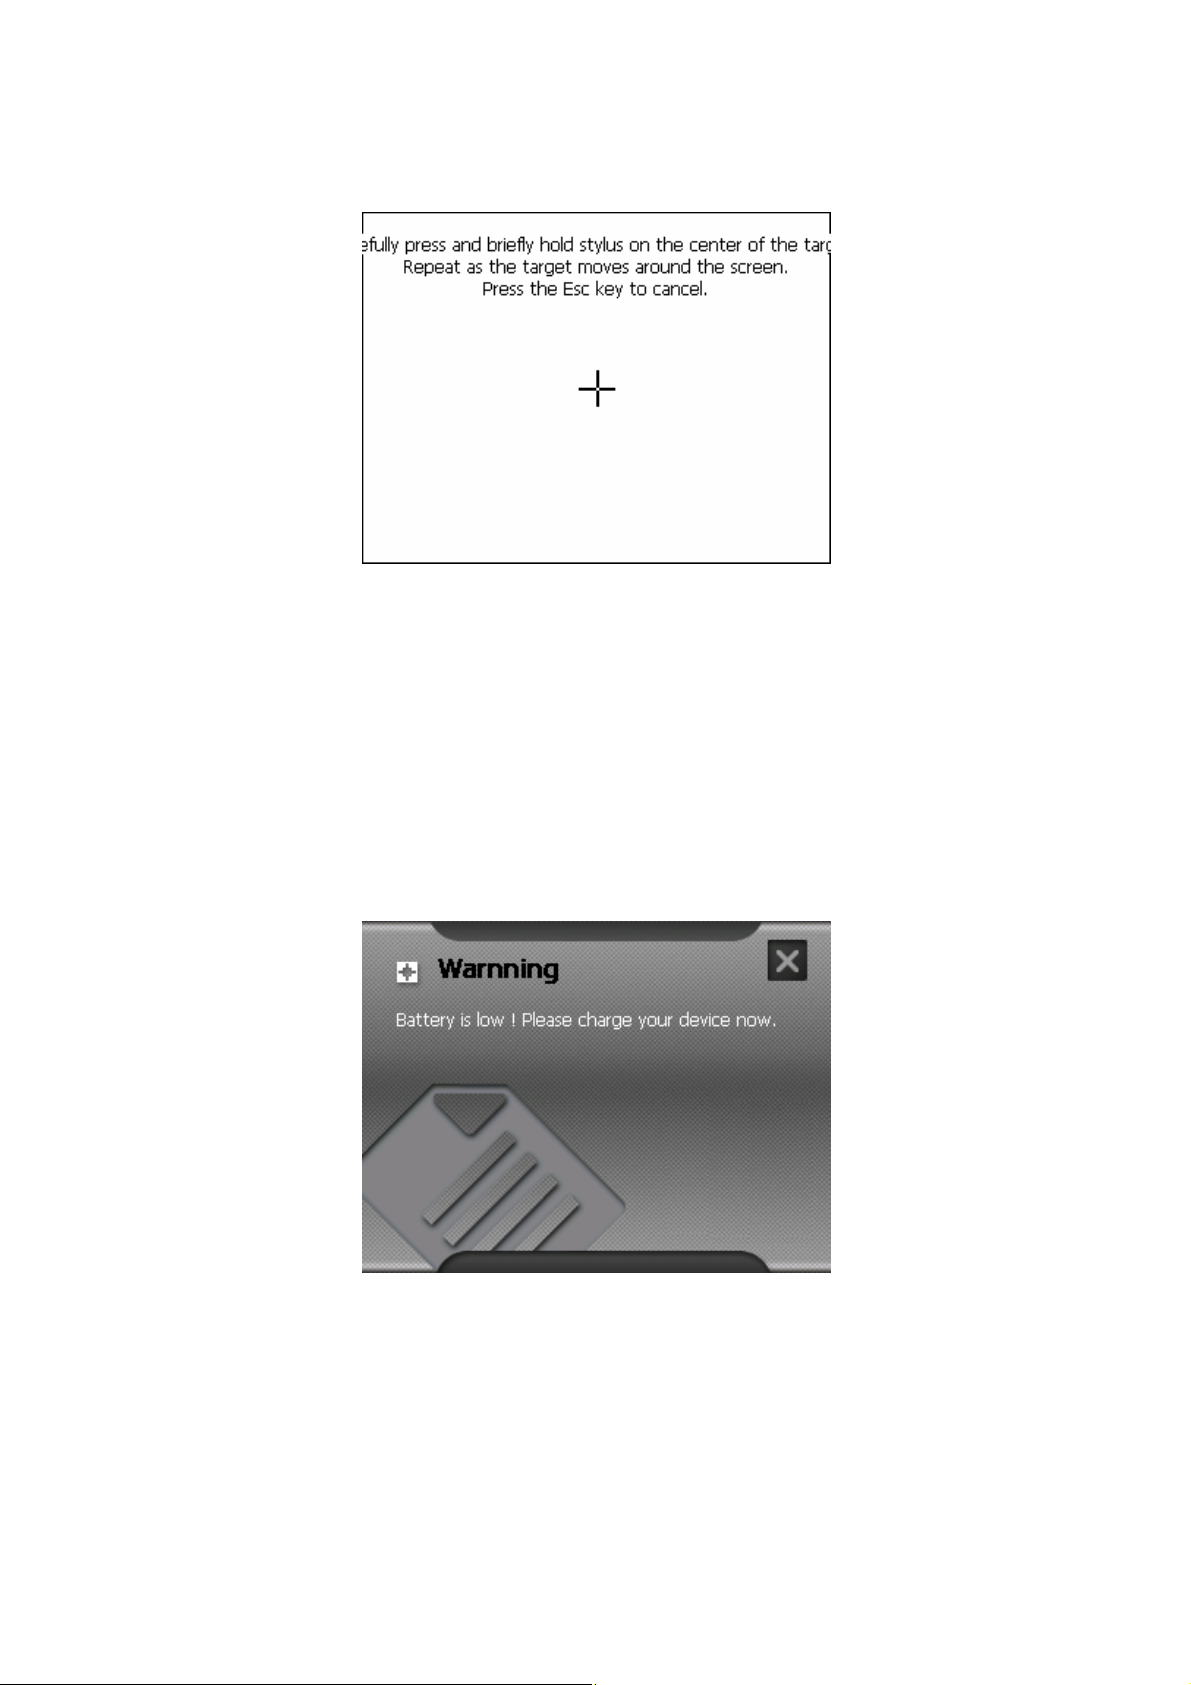
4. When the target moves to another position, tap and hold at the center of the
new target. Repeat each time to complete the calibration process.
5. When completed, tap anywhere on the screen.
3.4 Power
To check the remaining power level of your battery:
1. Press the Settings button on your device or tap Settings on the Main screen.
2.Tap the Power Status button on the Settings screen.
3.The Power Status screen will appear showing the remaining power of your
battery.
NOTE: If the level of power is too low, be sure to charge the battery with the AC
adapter or the car charger.
3.5 Clock
To set the clock:
Page 19
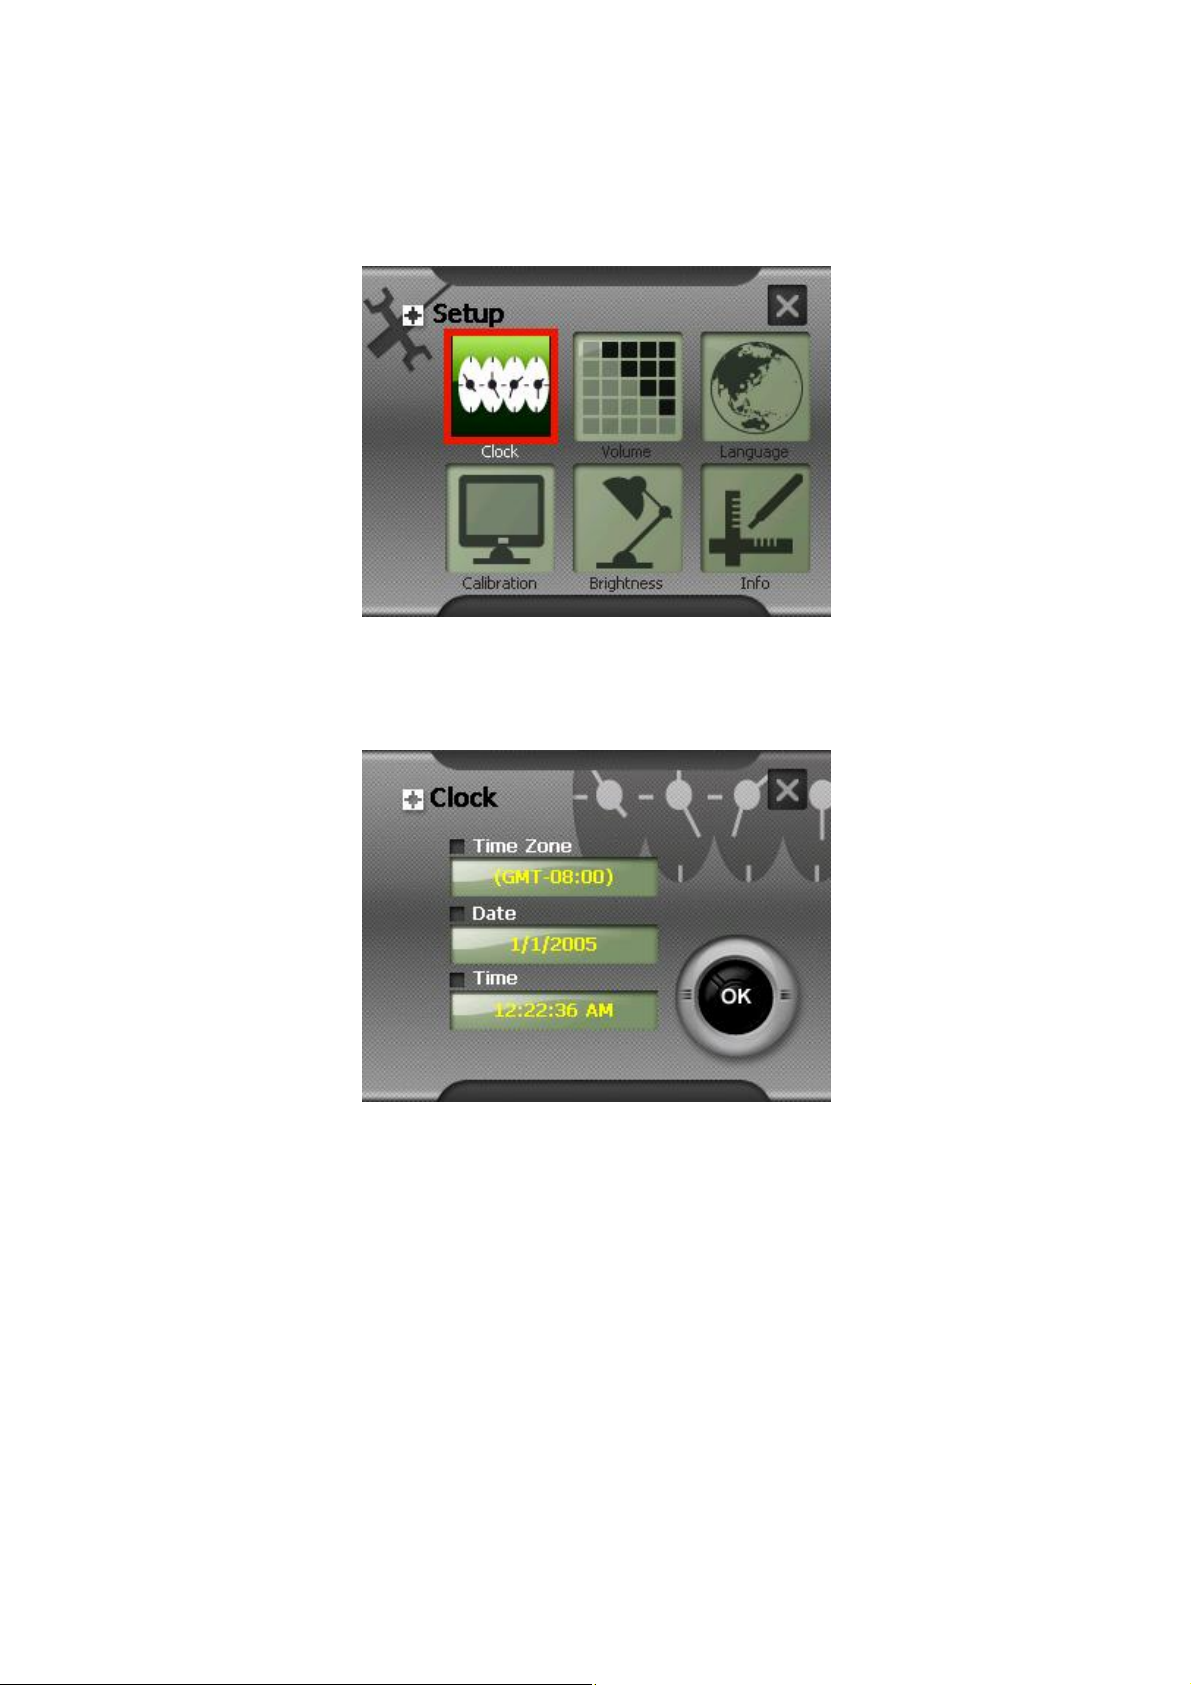
1. Tap Settings on the Main screen.
2. Tap the Clock button on the Setup screen.
3. Tap the Time Zone box to select your time zone.
4. Tap the Date box to set the date.
A calendar will pop up showing day, month and year. Tap the left arrow to go
to the earlier month and year or tap the right arrow to select the later month
and year.
Page 20
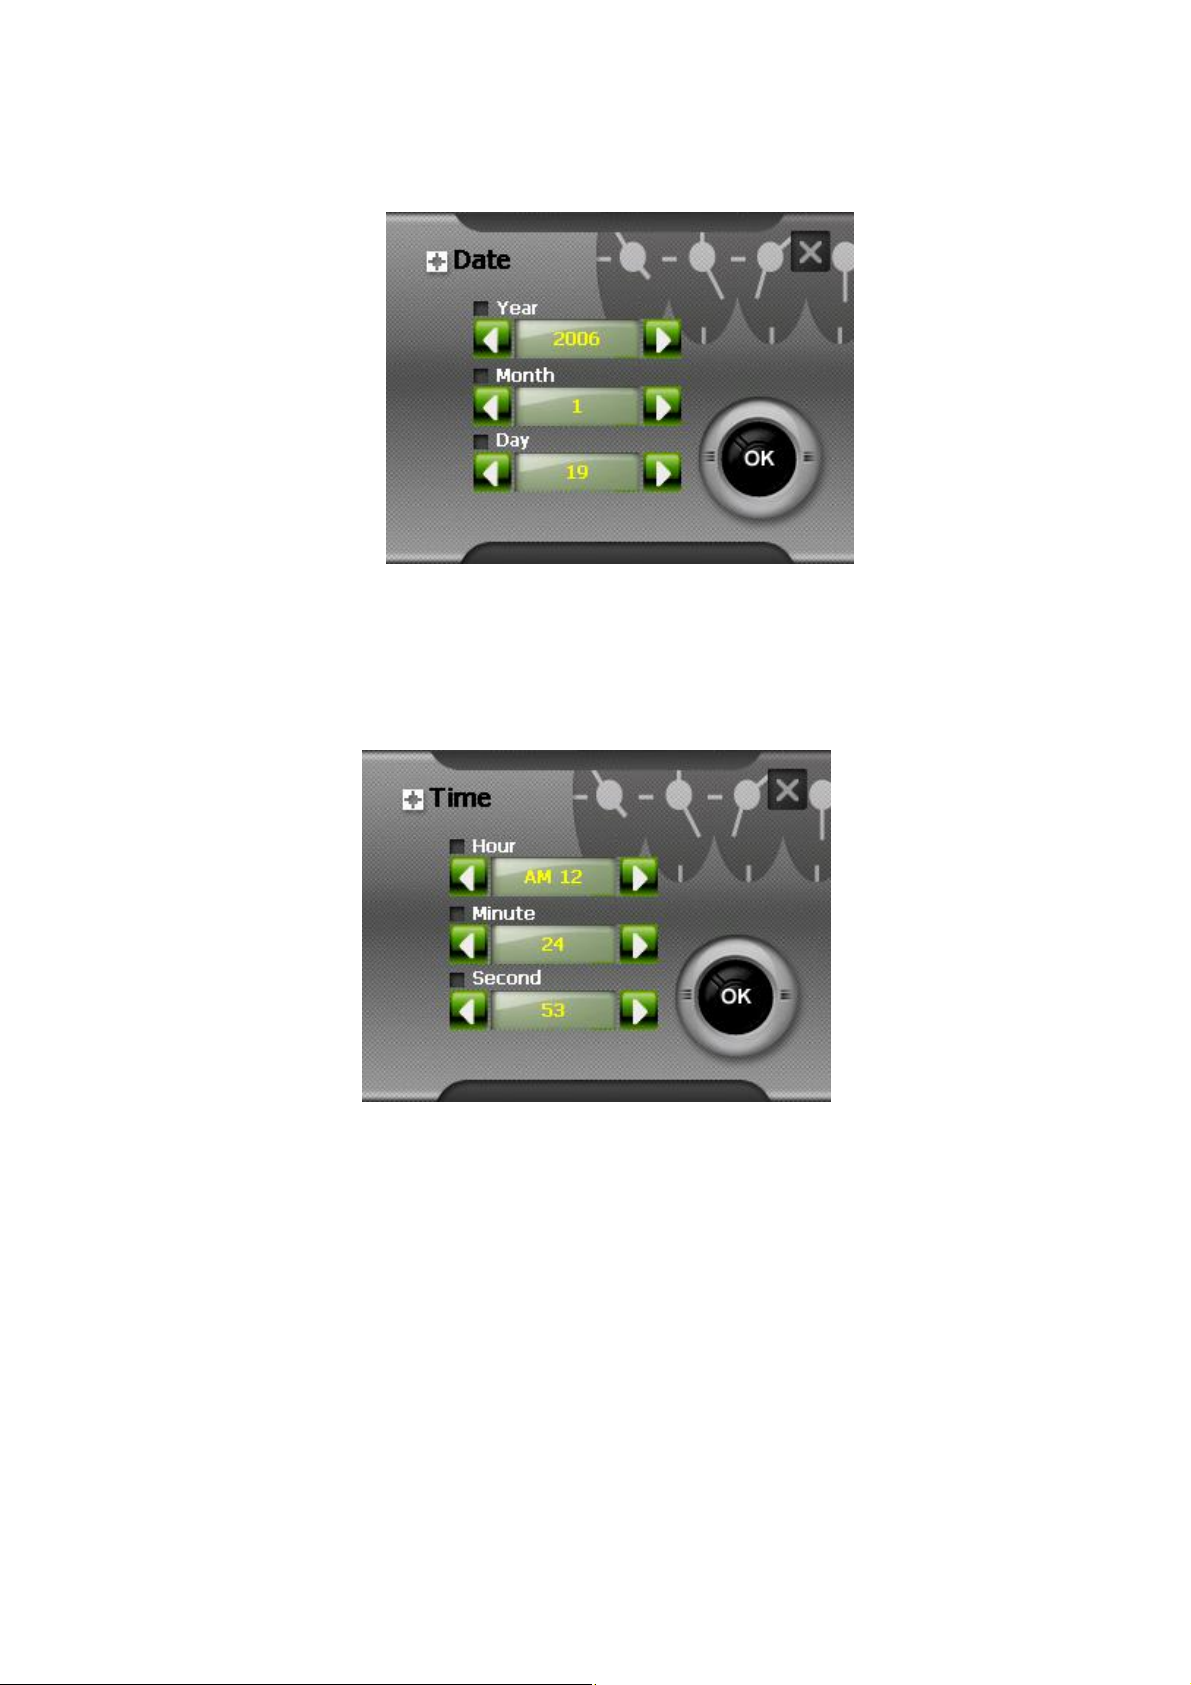
You can also tap the month and year on top of the calendar to change the
month and year. Then tap the date on the calendar.
.
5. Before setting the time, you can tick the 24-hour format box to use 24-hour
format. Then tap the item (Hour/Minute/Second) you want to set..
3.5 Language
To set the Language:
1. Tap Settings on the Main screen.
2. Tap the Language button on the Setup screen.
Page 21
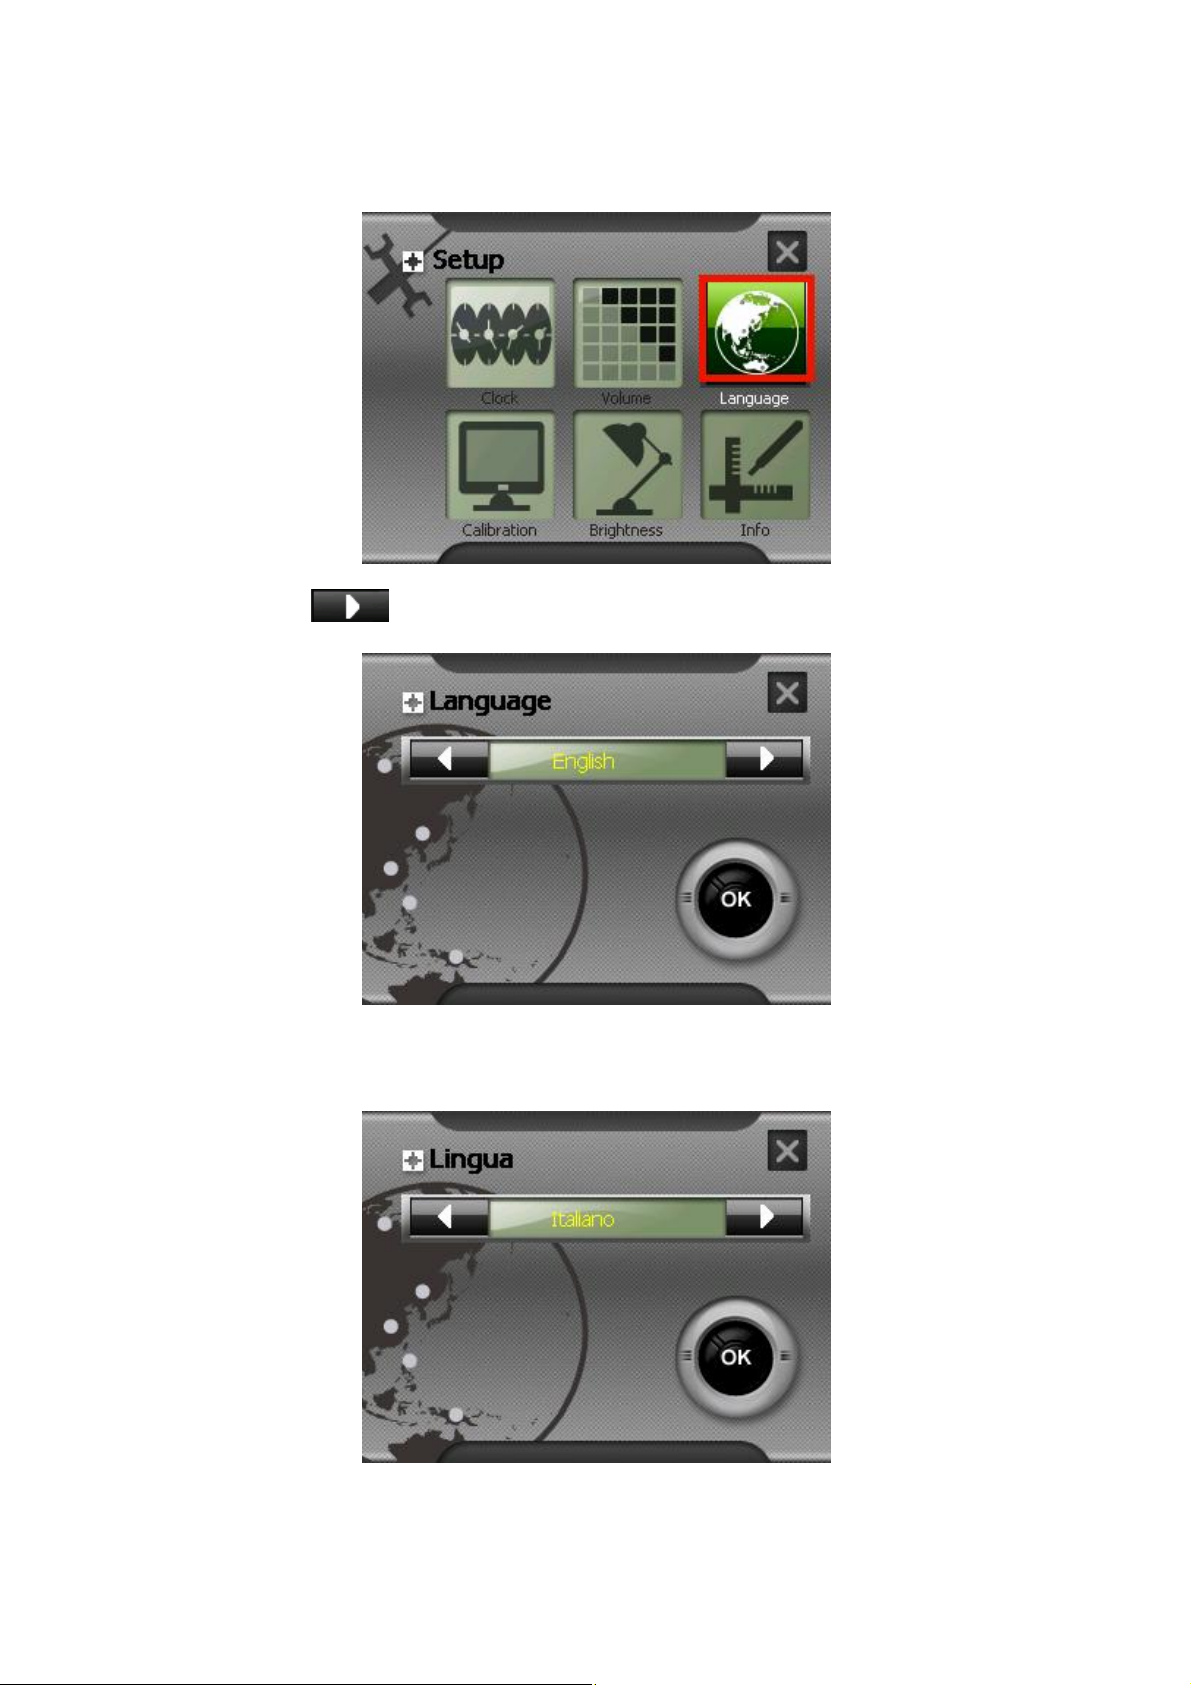
3. Tap the button to select your language.
3. There are English, France, Germany, Italy, Spain, Dutch languages
available.
Page 22
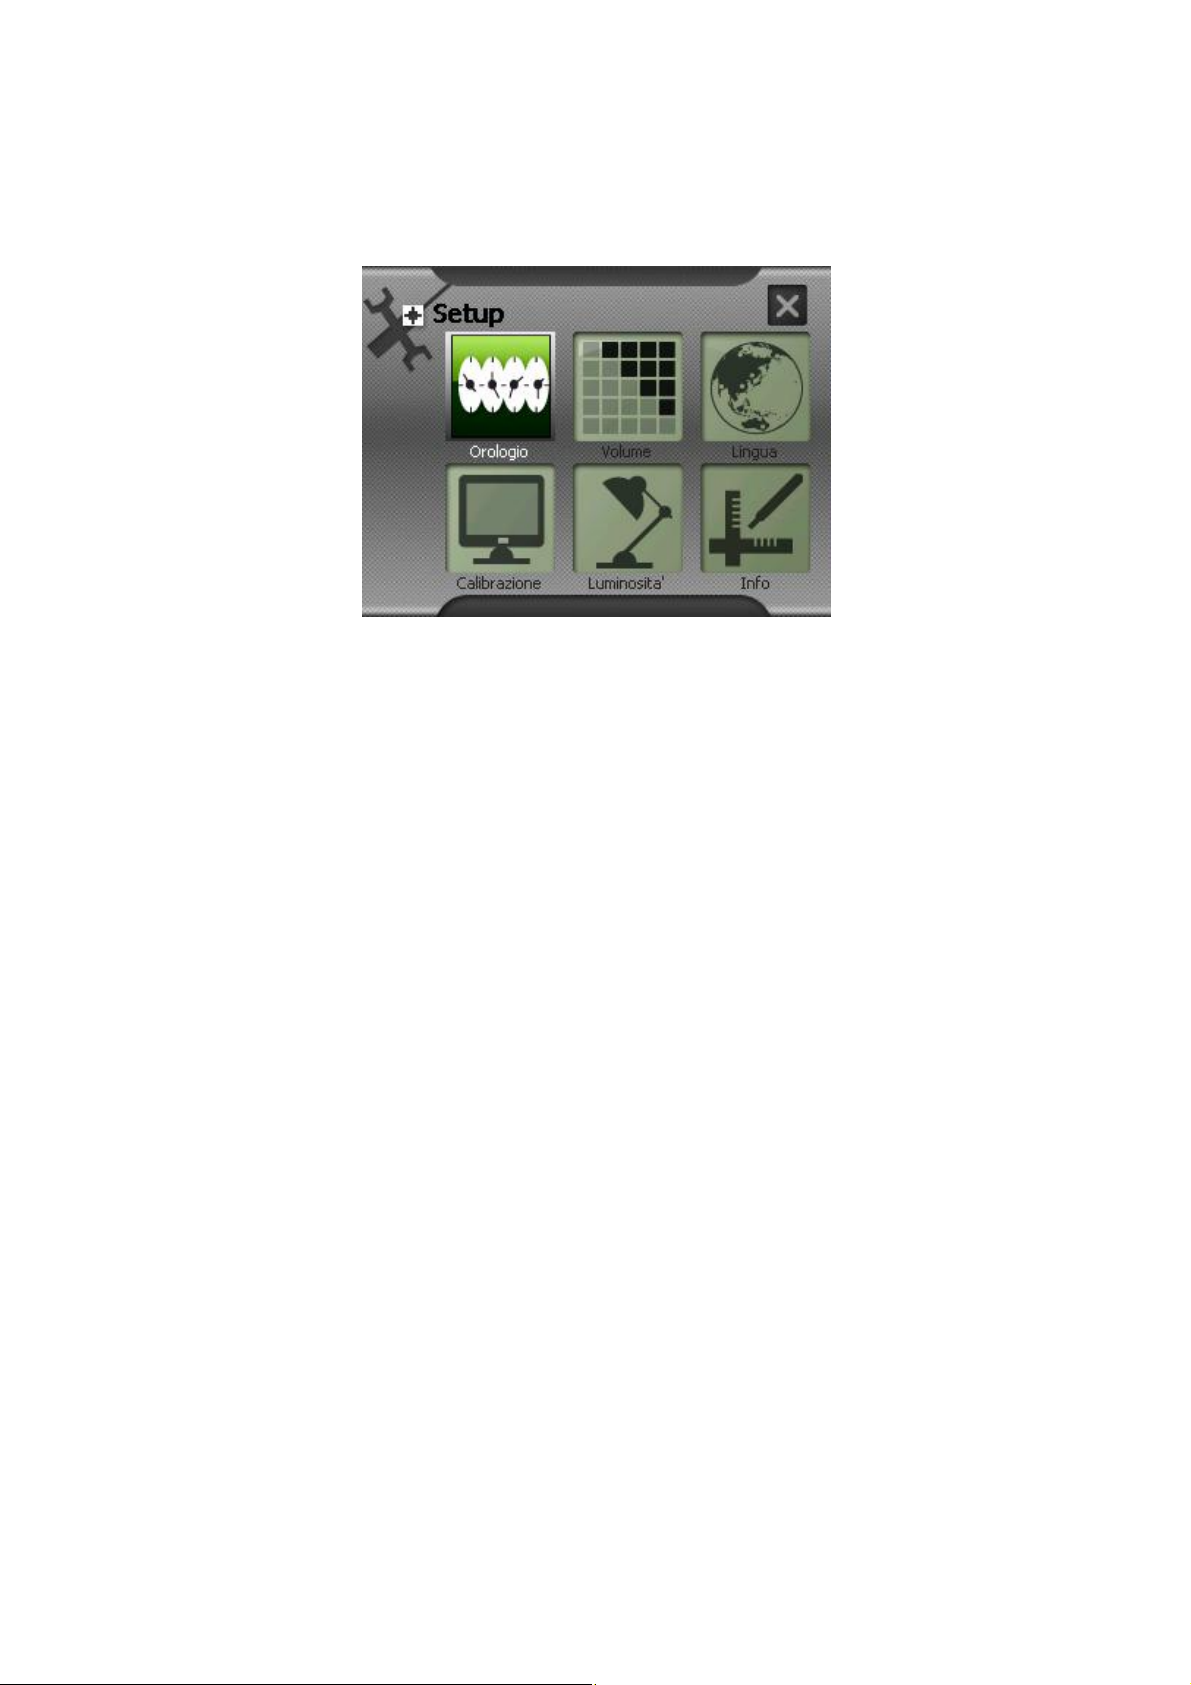
4. After setting, the screen will show your setting language.
Page 23

Part II. GPS Navigation
Part II tells you how to use the GPS navigation function
.
Page 24
4. Navigation Basics
In this chapter you will learn how to start GPS positioning, select origin (starting
point) and destination (end point). Then, you can begin your journey with the
navigation program to guide you down the road.
4.1 Before You Start
Before you begin navigation, you must have the right map preinstalled in your
flash card.
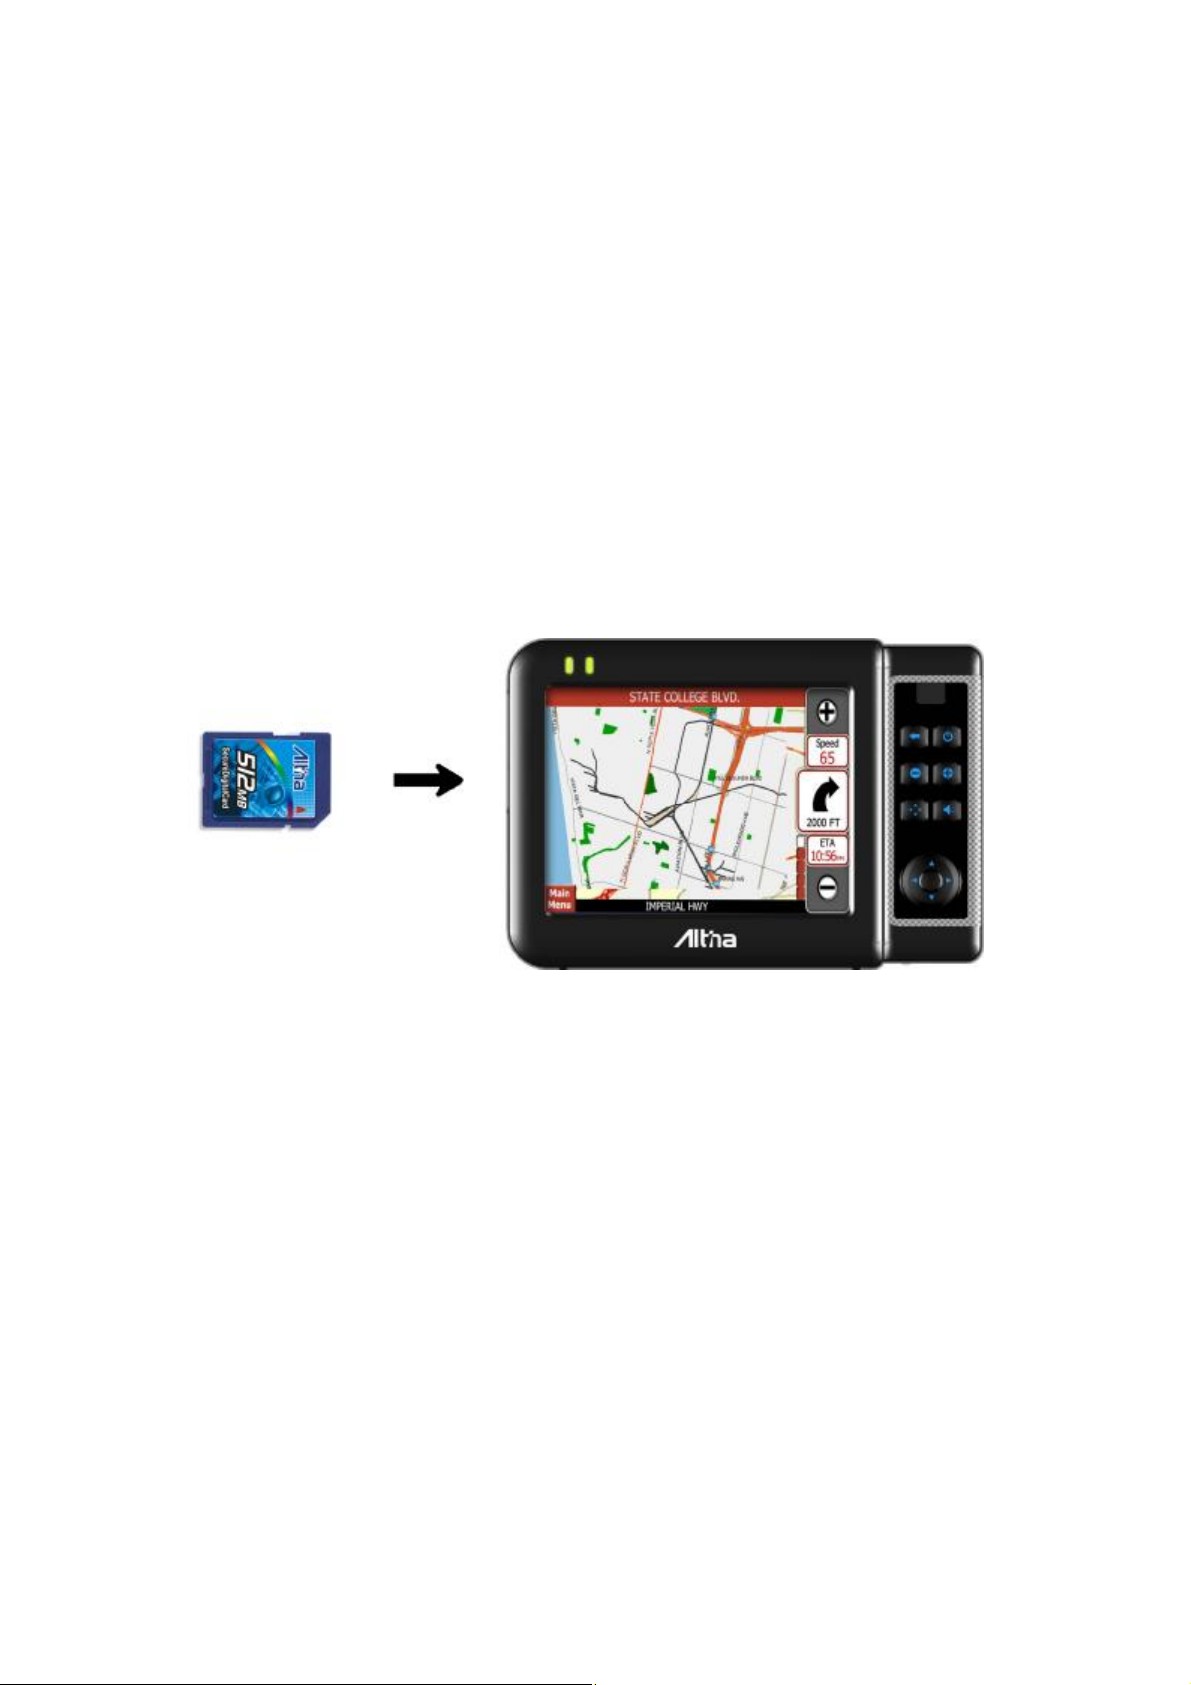
Inserting the Flash Card
Insert the SD/MMC card into the slot, with the connector pointing to the slot and its
label facing the front of the device.
Checking the Map Data
You can check the map data using Switch Map function. If your SD/MMC card
includes the map you need, use Switch Map function to switch to the correct map.
4.2 Starting GPS Navigation Software
1. Make sure that an SD/MMC card with map data is inserted and that either
external power is available or the battery has power.
2. Rotate the GPS antenna of your device to the horizontal position. This
allows the receiver to receive signals from the GPS satellites overhead.
NOTE: When in poor reception areas, for better signal reception, you may
choose to use an optional external antenna.
3. Press the power button on the device to start the system. If you see another
program rather than the Main screen (such as Settings, or the MP3 player),
you will need to exit that program and go back to the Main screen.
Page 25
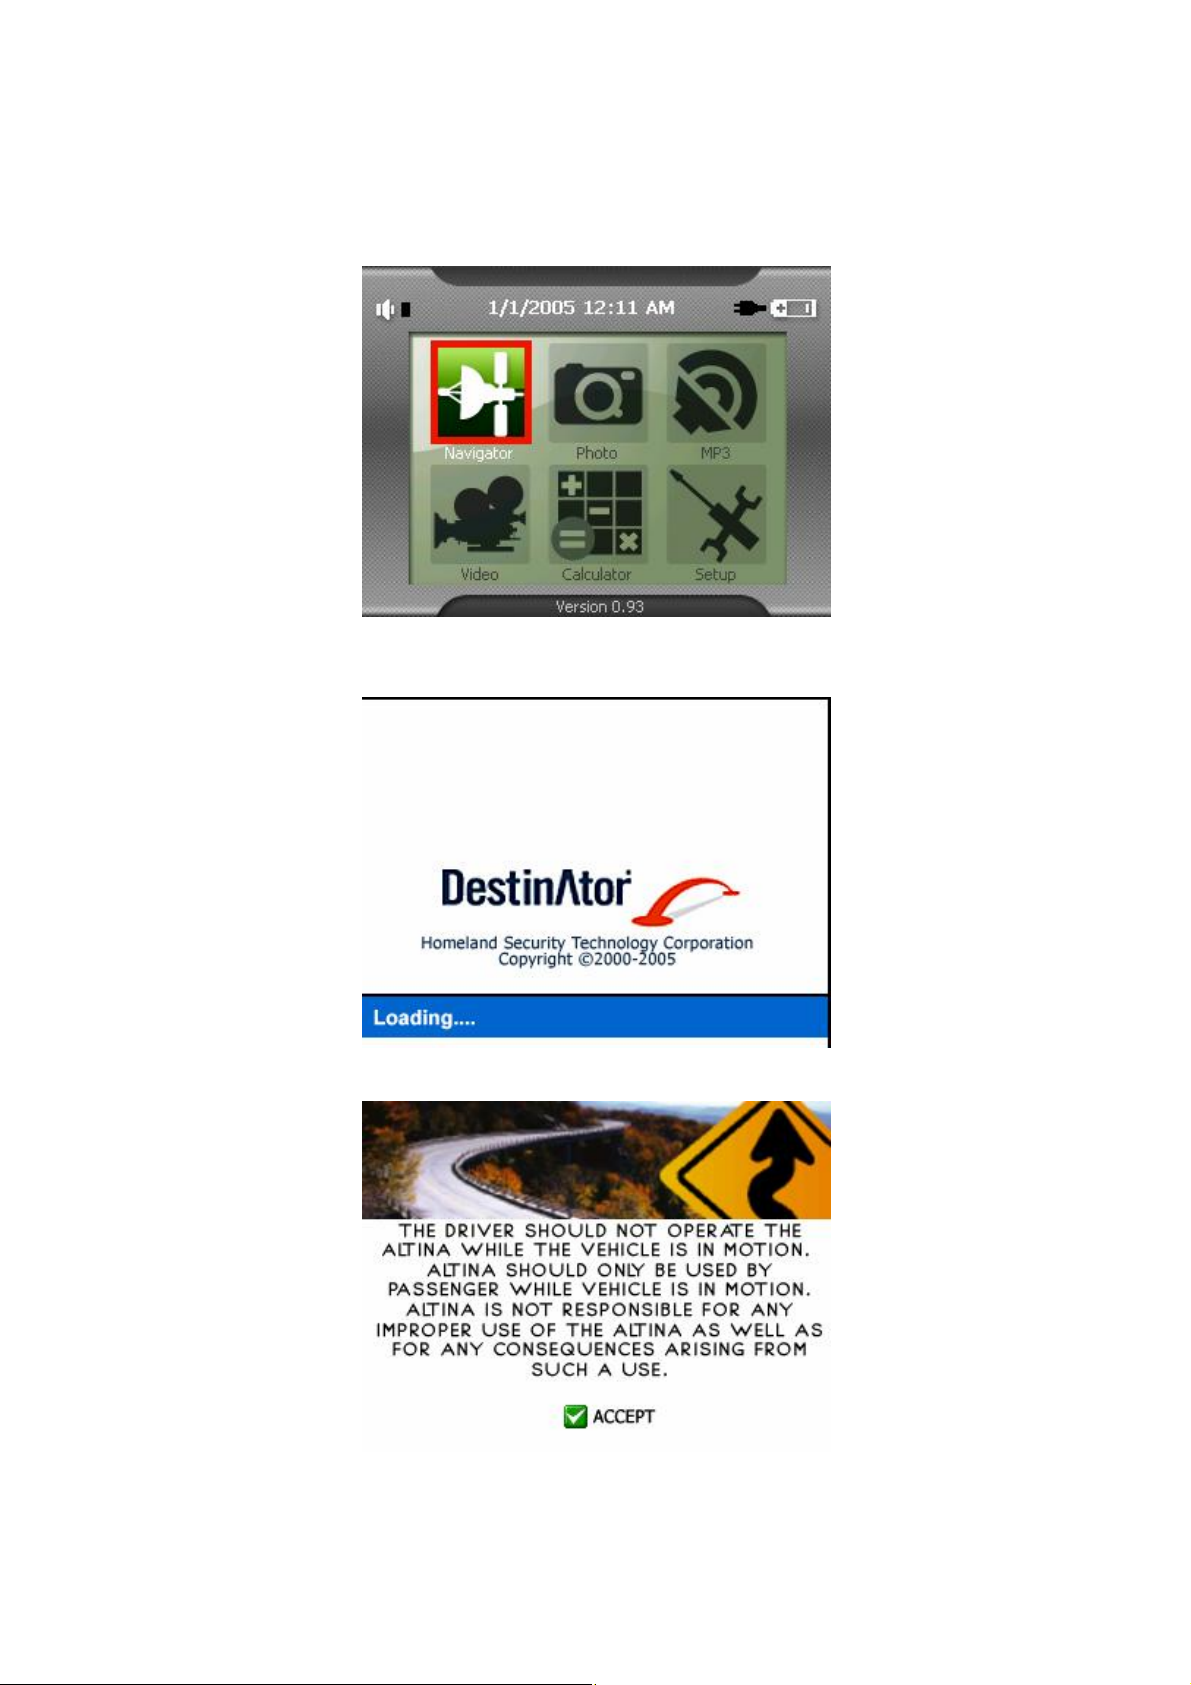
4. Tap the Navigator button to start the navigation program
5. It will be loaded the Destinator map..
6. Tap the “Accept” button
Page 26
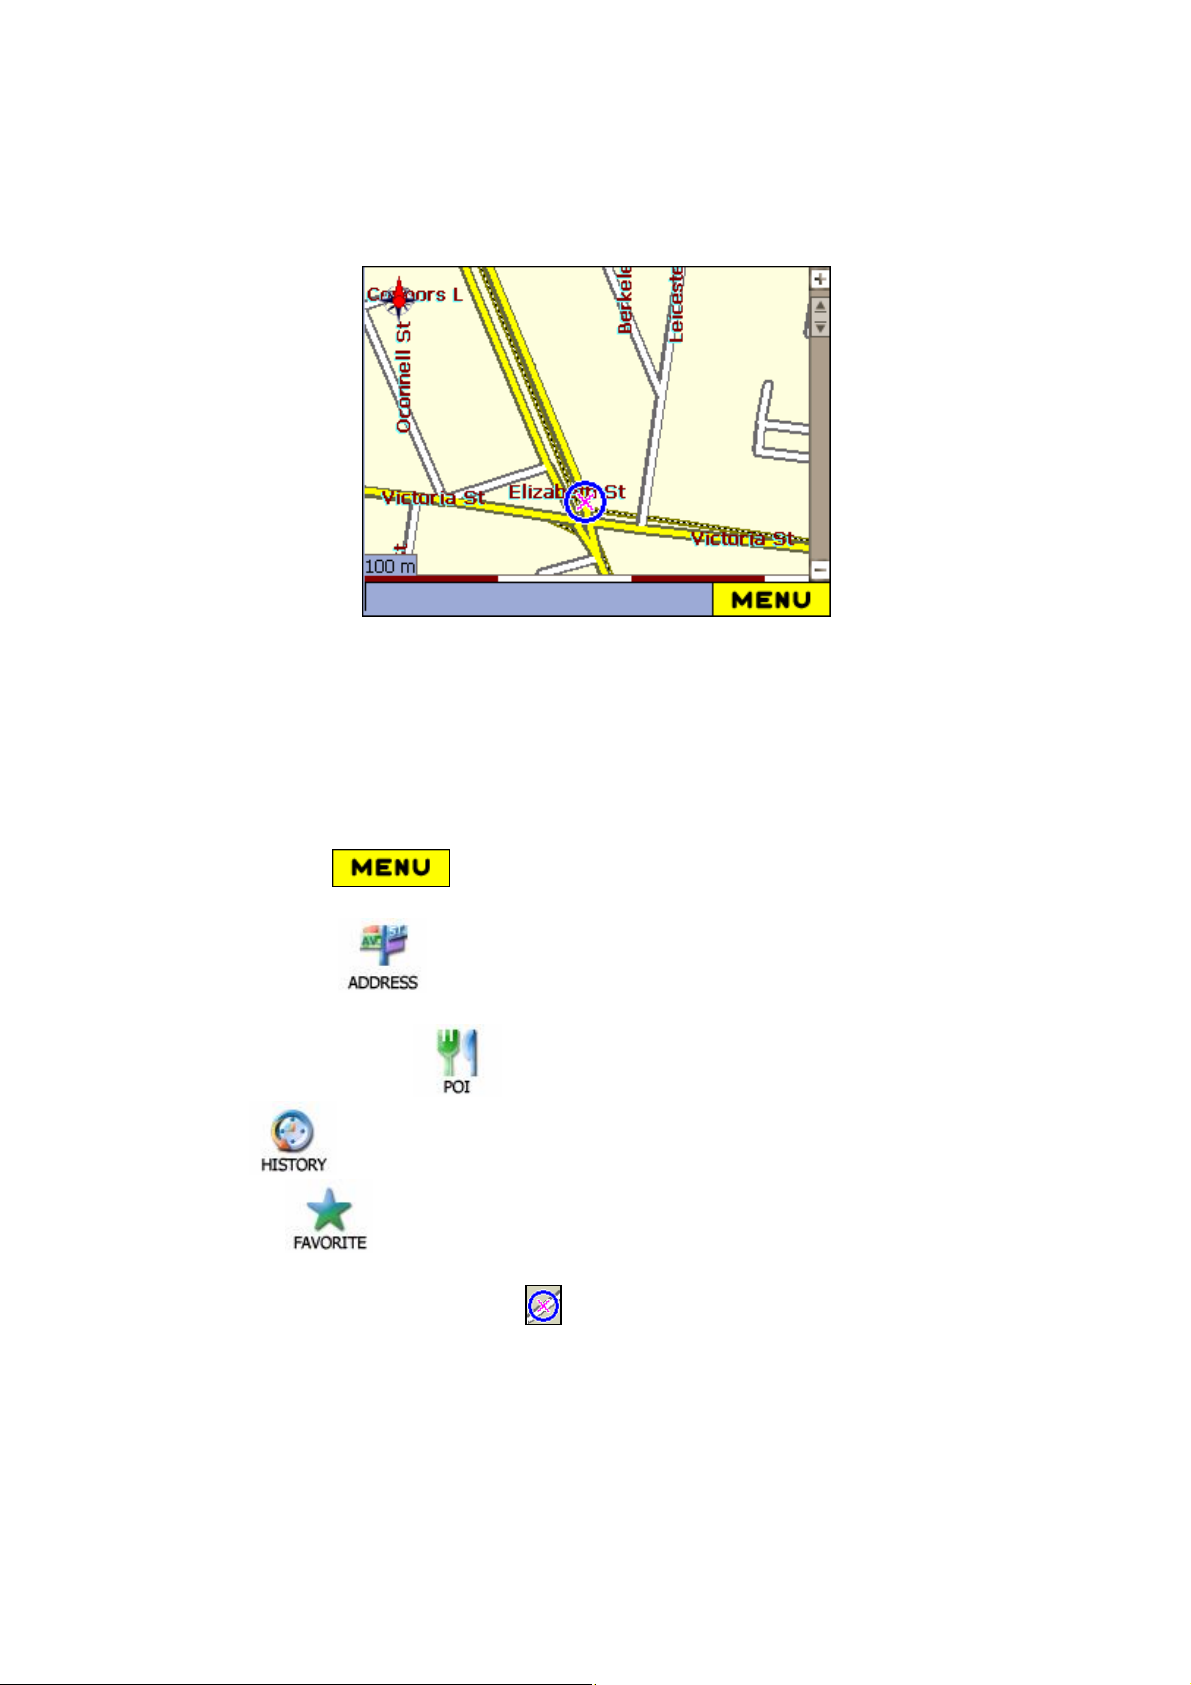
7. The main menu will be as following:.
3
N
44..3
You can access many functions of your Navigation device from the Main Menu. To
access the Main Menu, press the Menu button located at the bottom left of the
Map Screen after starting your device.
AAVVIIGGAATTEE
N
T
T
OO AA
K
NNOOWWNN
K
A
DDDDRREESSS
A
S
1. Click Manu button, which opens the Address.
2.Select the Known Address:
Address menu
From Map Cursor (Pop-up screen)
Point of Interest (POI)
History
Favourites
From your current position, the route (blue) is calculated and displayed. The
Circle (blue - with a cross inside) represents your Origin (departure point).
Page 27
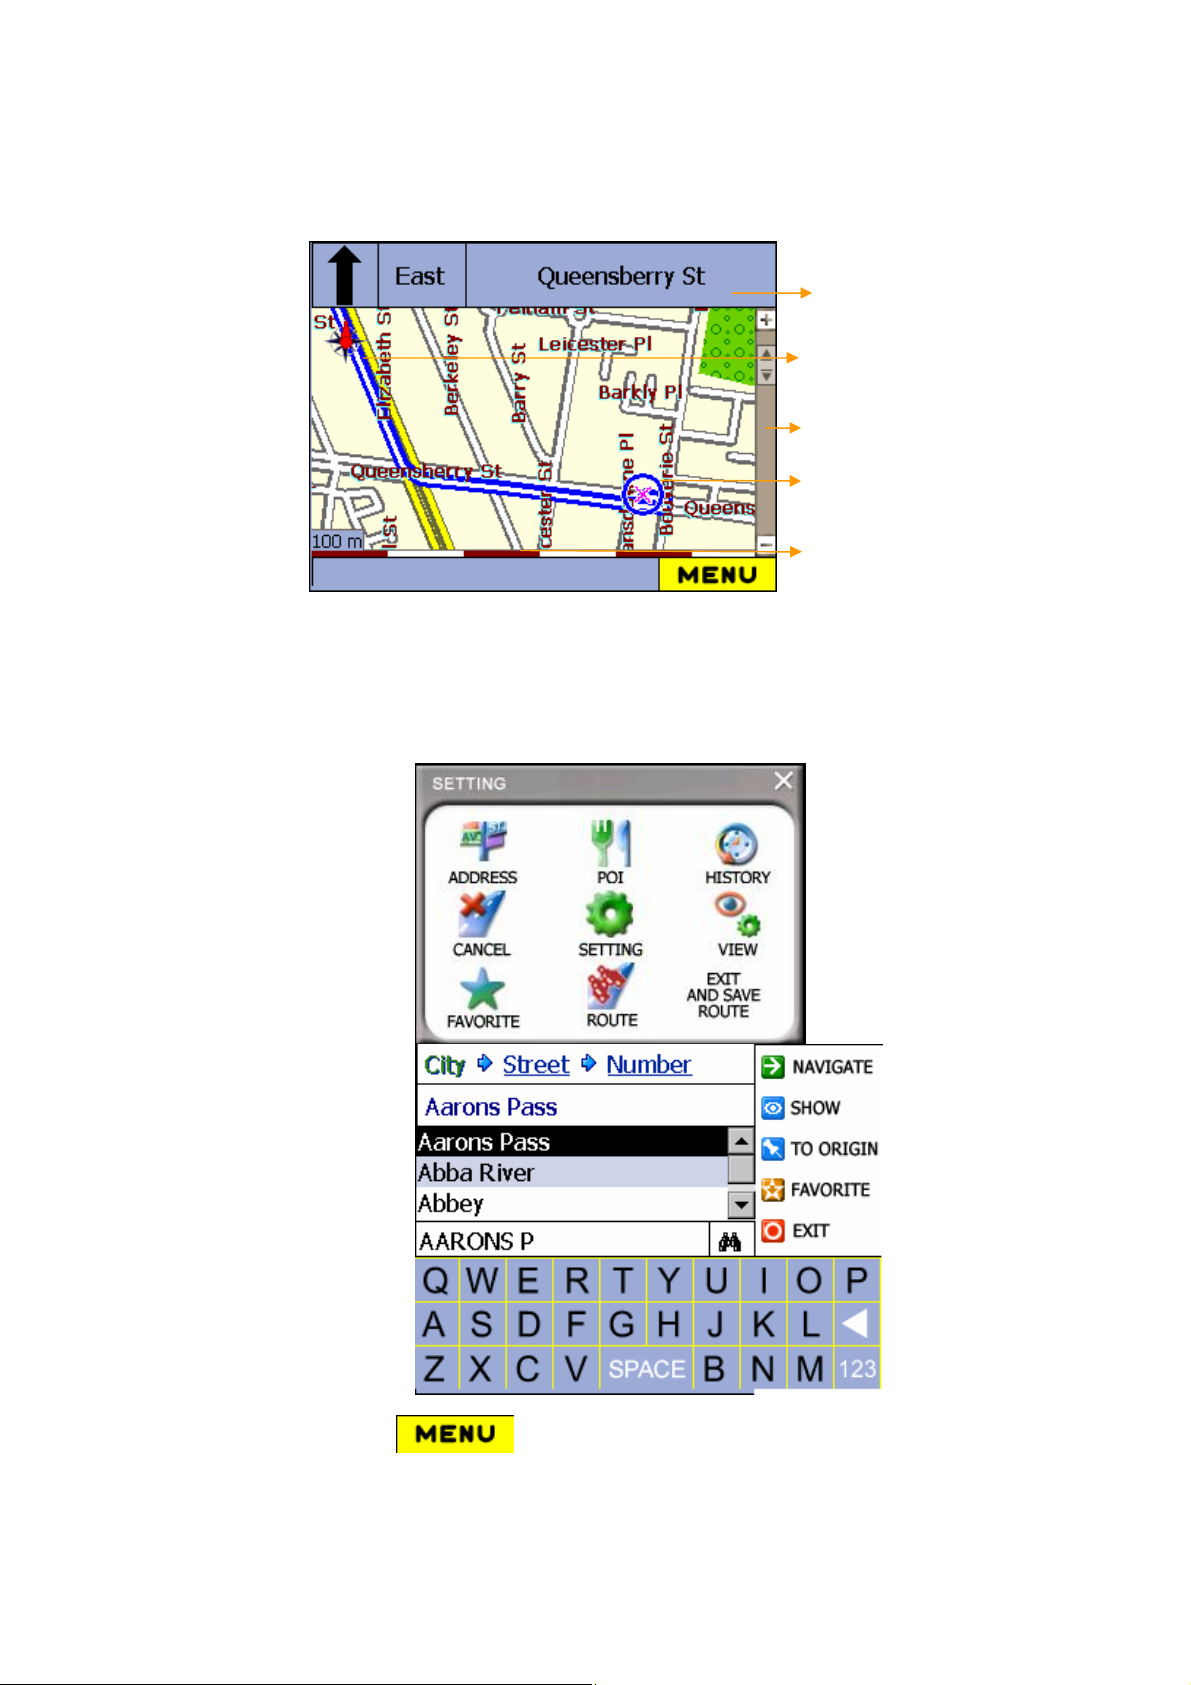
Driving direction and
street name
Compass rose
Zoom scroll bar
Origin - Departure
Normal 2D view
4.4 NAVIGATE TO AN ADDRESS
To navigate to an address, you will need to tell Destinator the City, Street, and
Street Number of your destination.
1.Click Menu button (bottom toolbar), to open Address menu.
Page 28
2.Click the Address button
3.Use the Soft Keyboard to enter the first few characters in the City name.
The scroll list will update accordingly. Select the City eg: AARONS PASS.
4.Click Street (top of the screen) to display a list of street names for the
selected city. Select the street name.
Not all cities/towns are mapped to the street level. In such cases, the
software will display Street data not found. You can still navigate to the
city as selected.
5.Click Number (top of the screen) and enter the number using the soft
keyboard.
6.To calculate the route click Navigate . The route is shown as a
highlighted blue line from your current GPS position
As you drive, Destinator provides you with turn-by-turn voice and visual
directions, letting you know when your next maneuver is coming up until you
arrive at your destination.
Press the SHF to change alphabet to number with Keyboard.
Know only a part of the name? Try the keyboard Smart Search button
- Type in part of the name and press Smart Search.
For more Information on a City, Street or Number click the City, Street
name or a complete address and it will display the locations details.
Use the Navigate (Jog) button to assist in looking for street name. Up
and Down motion to scroll thought the alphabet.
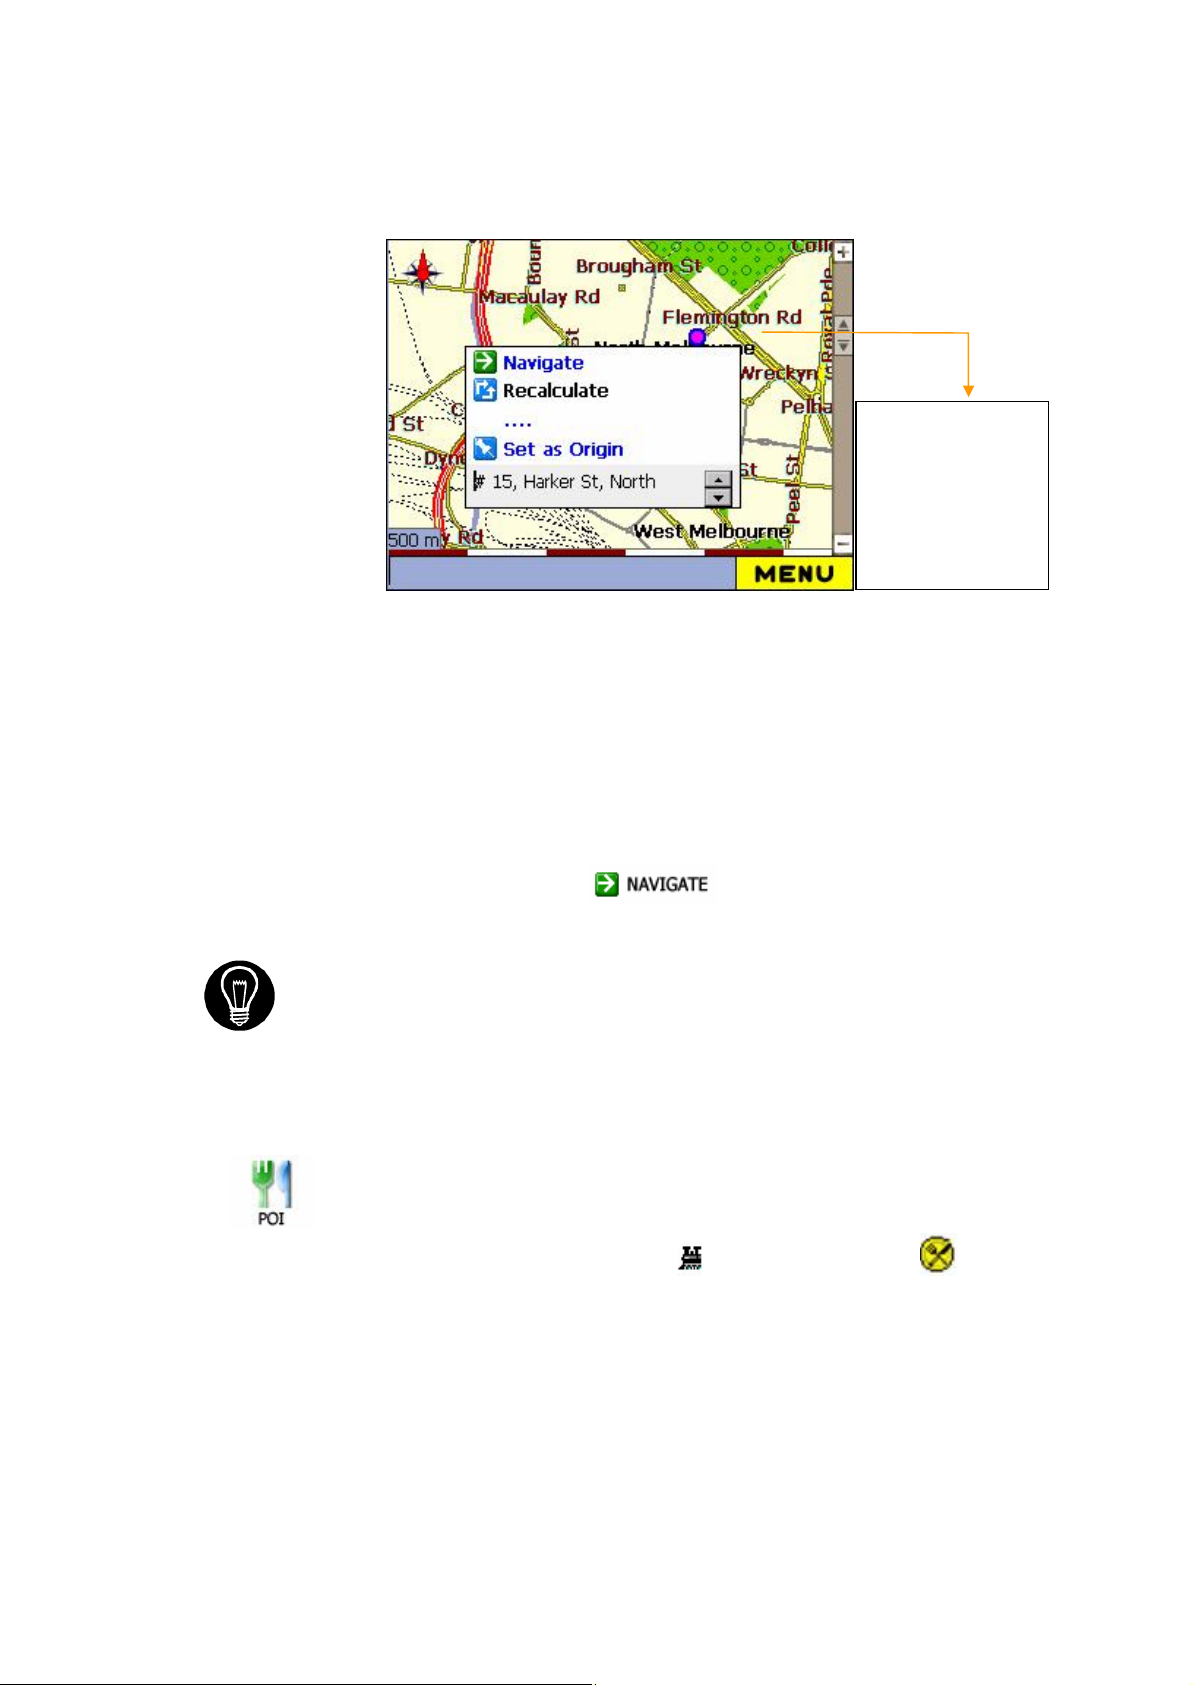
4.5 NN
Use Navigate to Map Cursor, you can view details, set as origin or initiate
navigation
1.You may select any point on the map with the cursor, navigate, recalculate,
set as origin or create a route to it.
2.Navigate to Cursor is especially handy when you want to navigate to a
physical location, facility, or attraction rather than by its street address.
AAVVIIGGAATTEE
T
T
OO
M
M
AAPP
C
UURRSSOORR
C
Page 29
New Origin,
save to favorite
or point to
navigate (new
destination)
3.Use the stylus to scroll or drag the map to a specific point – tap the desired
location. The Cursor Dialog opens.
4.There are several choices at this point, setting this location as the Origin, to
Navigate (create a route) or just general Information of this location – as a
name, if it has one. Click Recalculate if the route changes.
5.To clear the cursor dialog, just tap the screen again.
To calculate the route click Navigate . The route is shown as a
highlighted blue line from your current GPS position.
If you need to reset the point of Origin, pinpoint the location with
the cursor (tap with the stylus) to open the Cursor Dialog.
Click Set As Origin. Now all new route calculations will use
this as the Start Point.
4.6 NAVIGATE TO A POINT OF INTEREST (POI)
POI on a map represents local places of interest or importance. POI’s
are identified on the maps by various icons (eg: Transportation or
Restaurants). POI navigation is especially handy when you need to find a
facility, attraction or amenity by the type or sort.
Destinator allows you to choose your destination from our vast database of POIs.
For example, you can ask Destinator to guide you to the closest bank, mall, hotel,
restaurant, gas station, etc.
Page 30
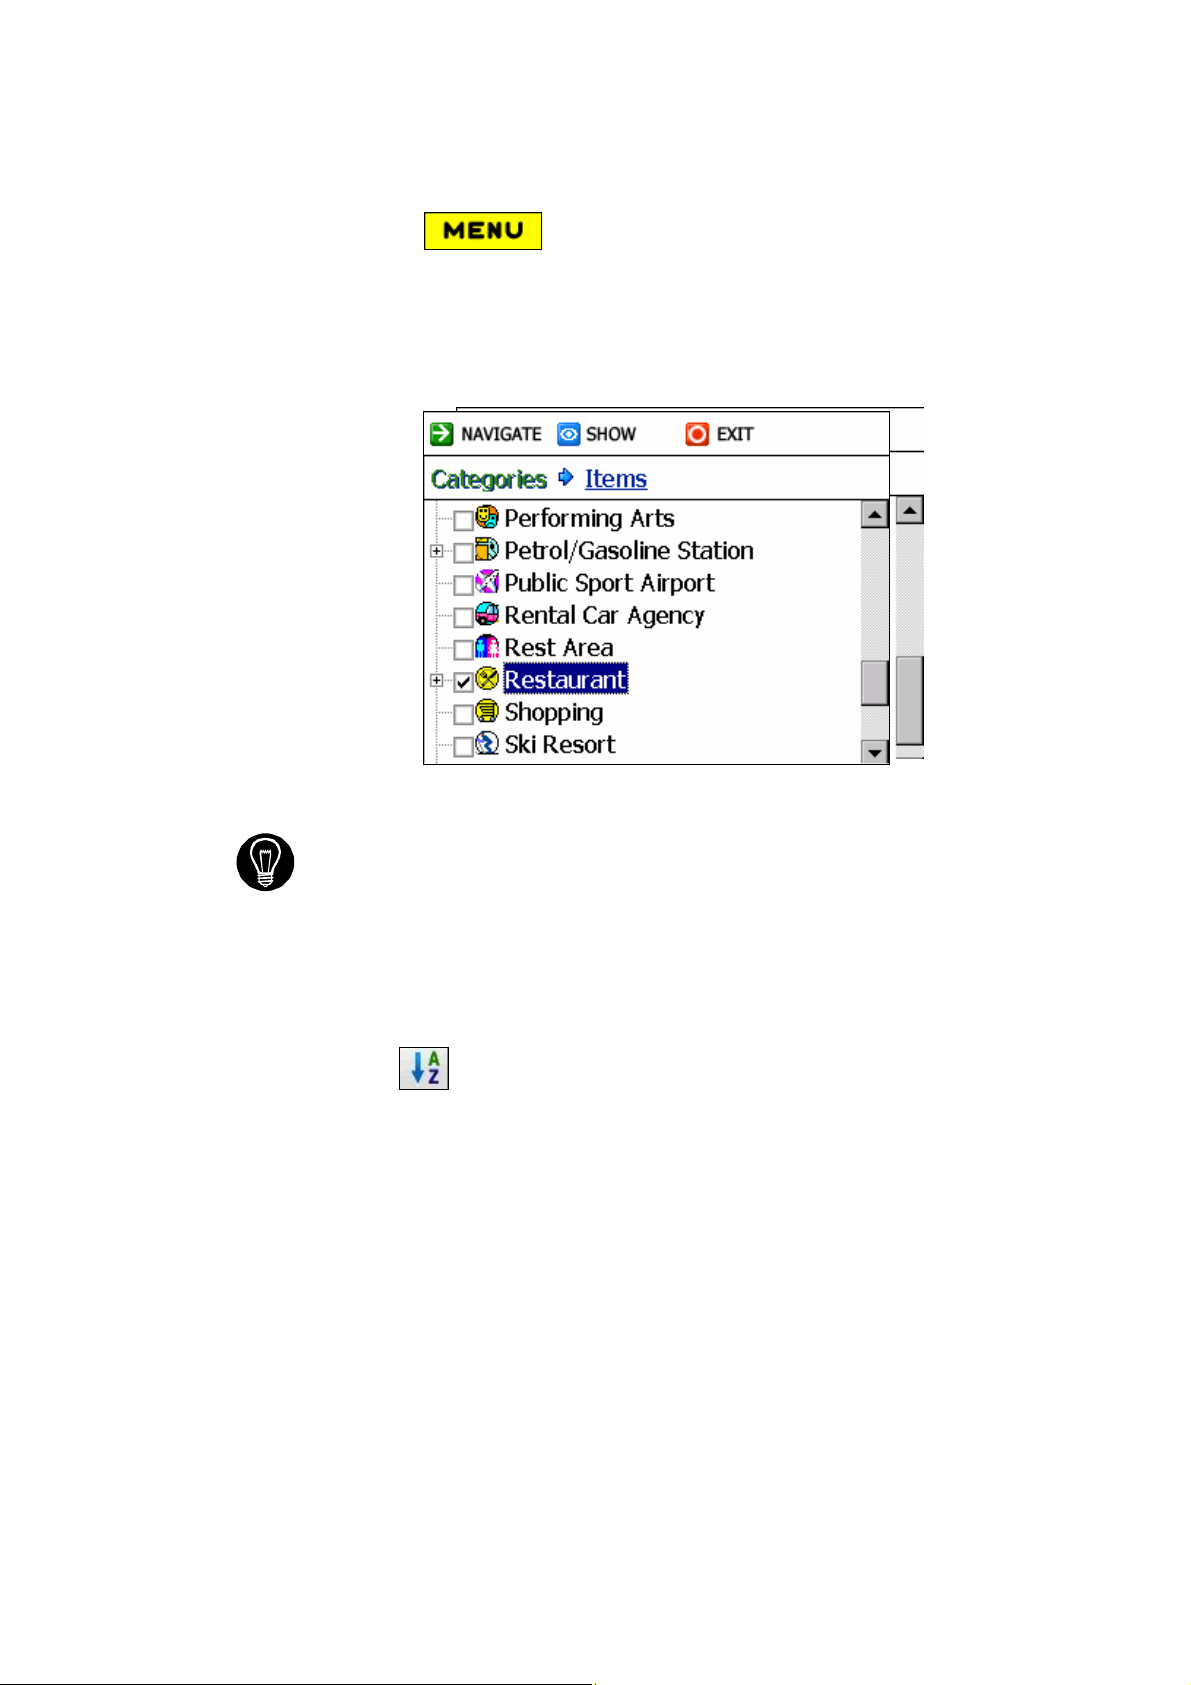
1 Click Menu button (bottom toolbar), to open POI menu.
2 Locate and select the POI button Scroll down the list of POI categories
and highlight your desired category. In this example, we are going to
highlight Restaurant.
The “+” Sign located to the left indicates that the main category
contains at least one sub-category eg: (Restaurants - Italian, Indian,
Barbecue or Cajun).
Check (√) any of the categories to display them on the map as you
drive.
The POIs are listed in order of distance. To sort them alphabetically,
tap the button.
3 With Restaurants highlighted, tap Items (top of the screen) and you will
see the Restaurants in your area (from Charlie’s Fast Foods to Zin’s
Diner). The POIs are listed in order of distance.
Page 31
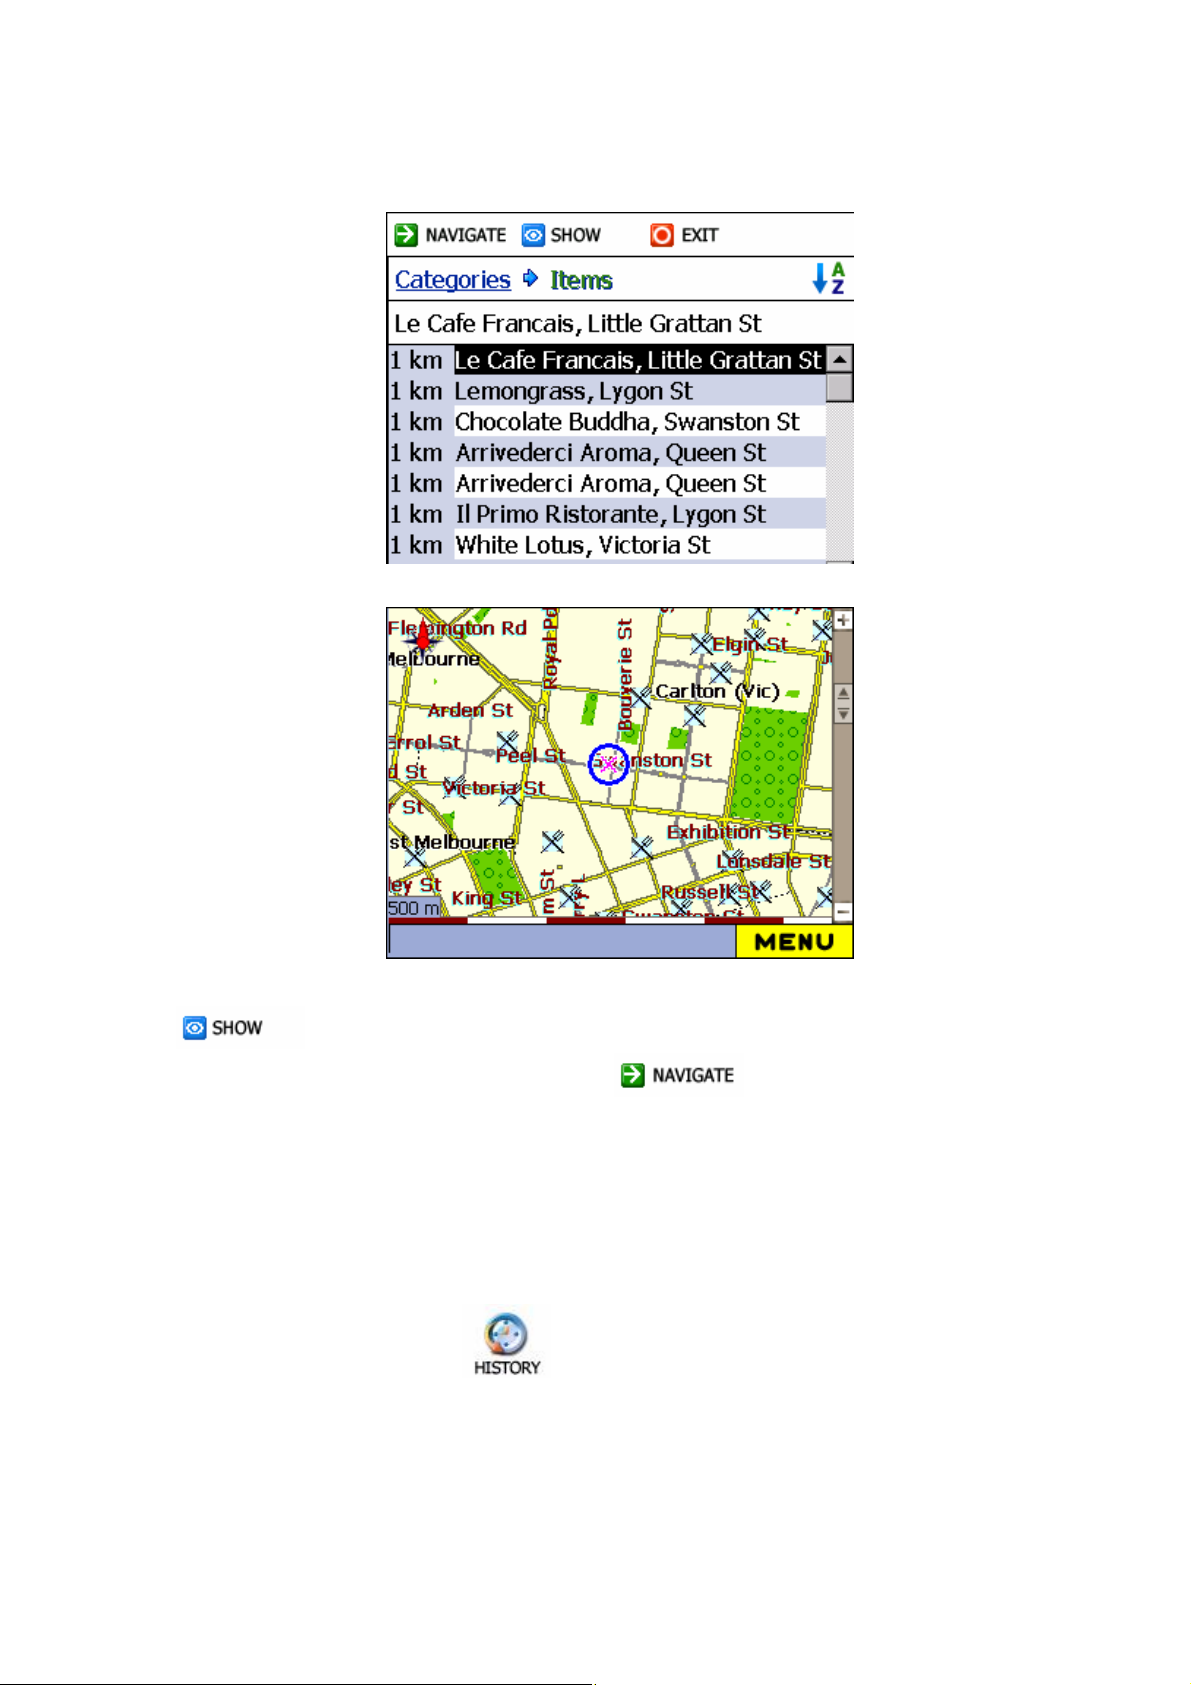
4 To preview your destination on the main map click Show button
.
5 To calculate the route click Navigate . The route is shown
as a highlighted blue line from your current GPS position.
As you drive, Destinator provides you with turn-by-turn voice and visual
directions, letting you know when your next maneuver is due.
4.7 NAVIGATE FROM HISTORY
Uses navigate from History , to select an existing destination from a list of
previously traveled destinations. The software automatically stores the last few
destinations in memory.
Page 32
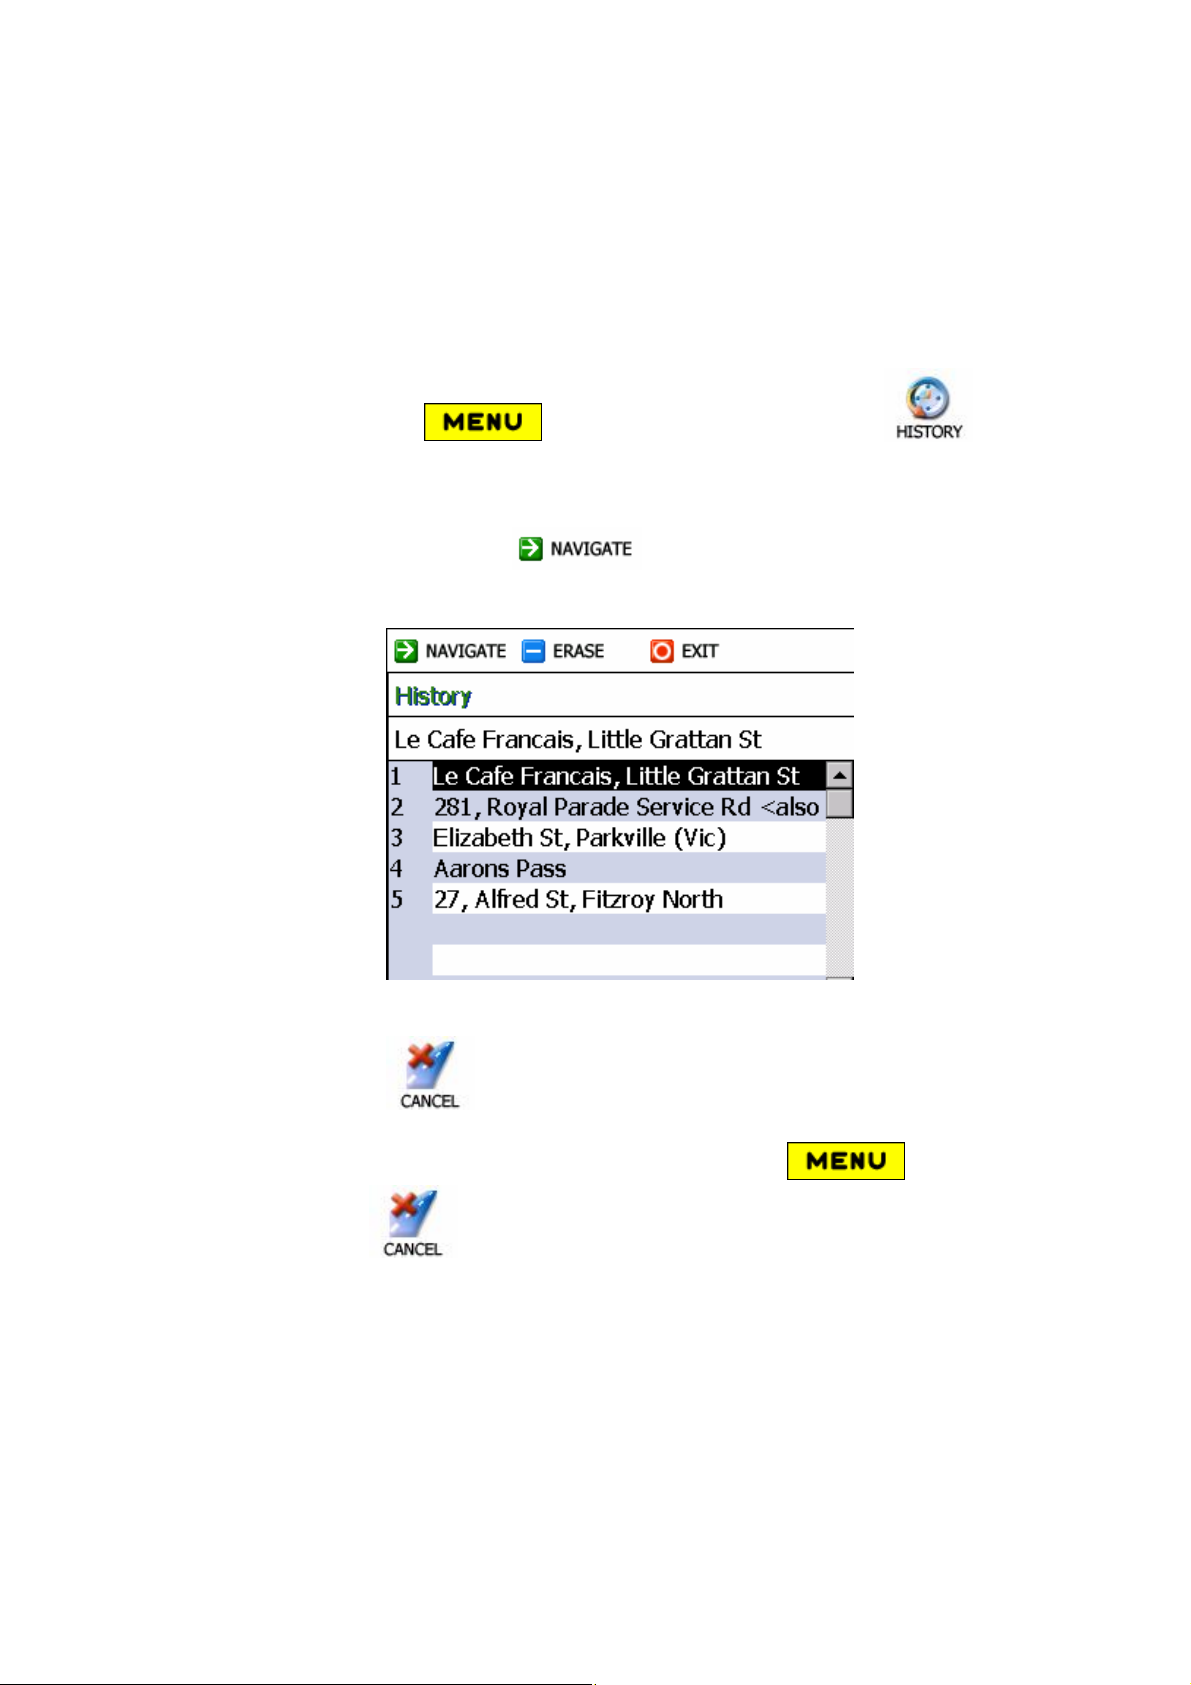
As newer destinations, are written, to the top of the stack, the older destinations at
the bottom of the stack are erased.
After entering the destination, you can initiate navigation from History, or view
details of the destination first and then initiate navigation.
1 Click Menu button (bottom toolbar), to open History .
2 Locate and select the History button from the Destinate menu.
3 Highlight the History item.
4 Tap or click Navigate button . Your route is calculated and is
displayed on the main map view.
4.8 CANCEL ROUTE
Use Cancel Routes to terminate navigation to a destination at any time.
Click Menu button (bottom toolbar), to open Cancel menu .
Then Click Cancel .
The route is cleared and you and your Destinator are ready for your next journey.
9
N
44..9
You can select a destination from the list of stored Favorites.
AAVVIIGGAATTIIOONN
N
T
T
F
OO
AAVVOORRIITTE
F
E
Page 33
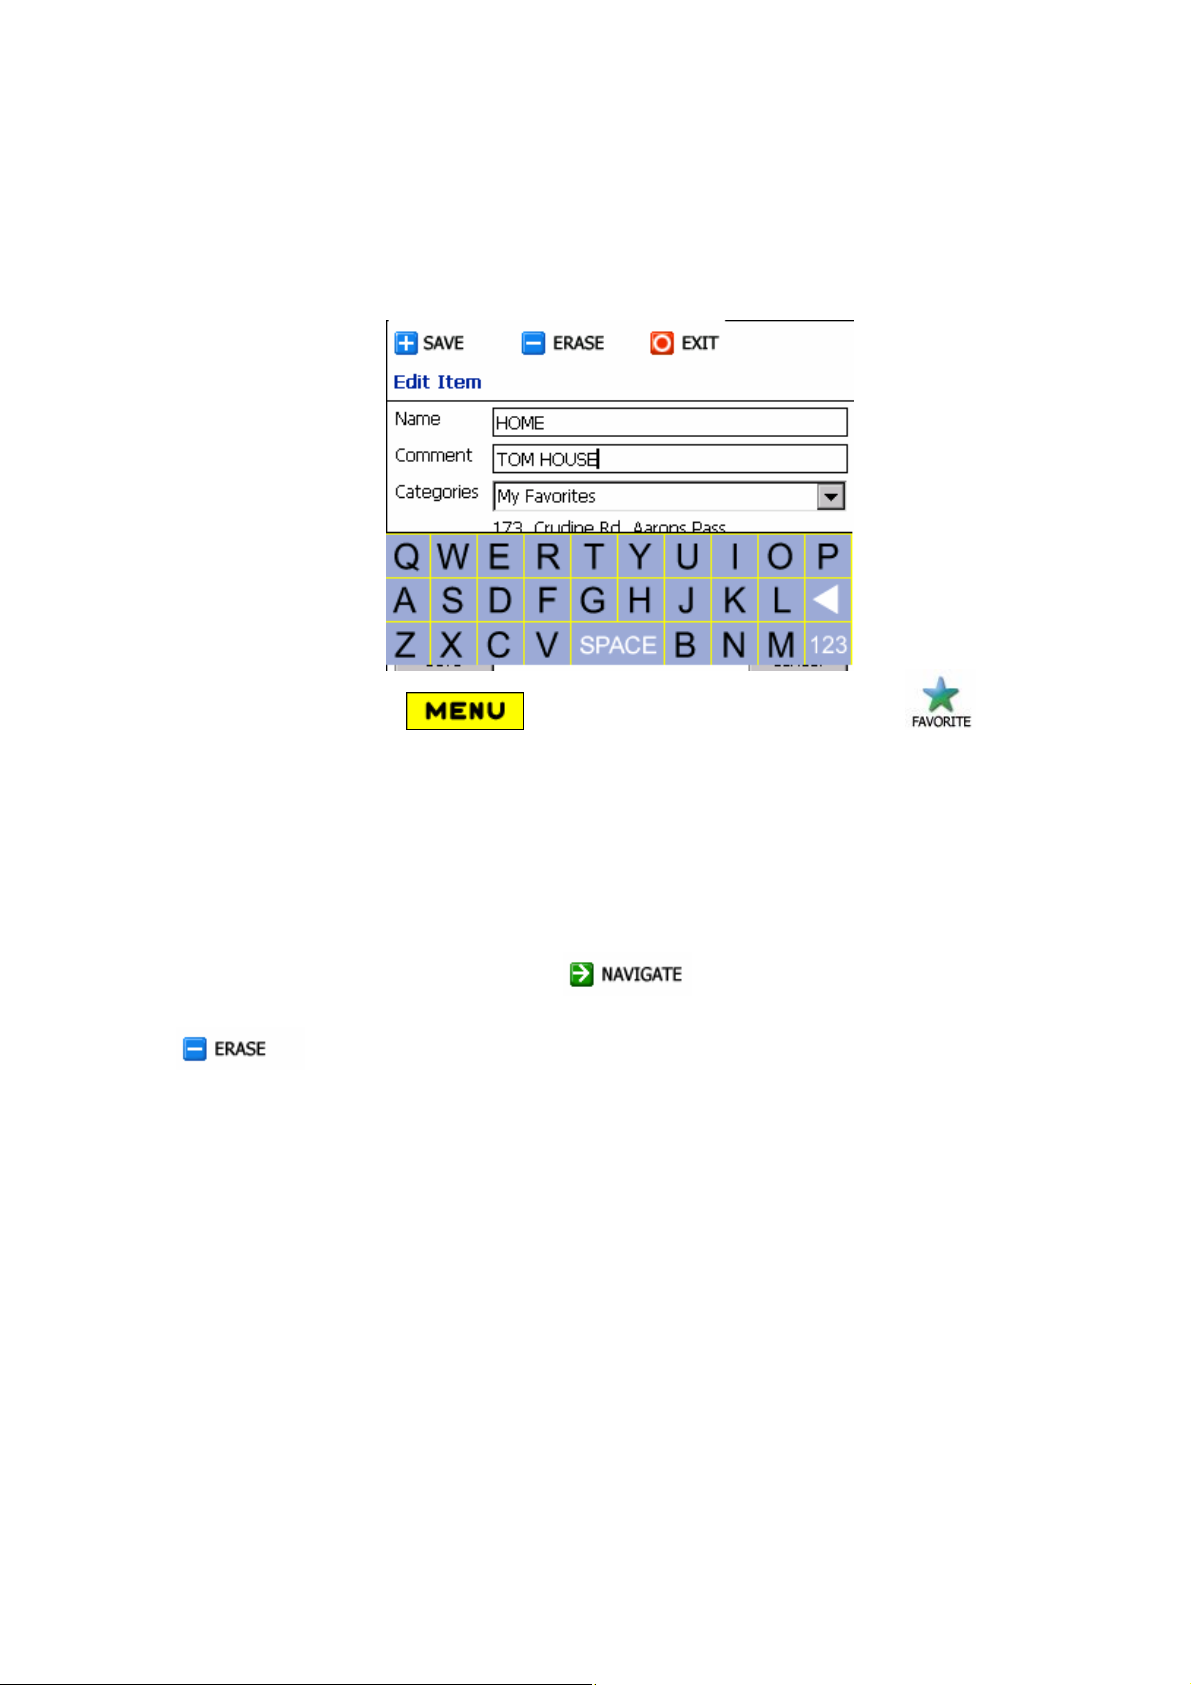
A Favorite place is an address or a point on Destinator previously stored by you
for future use. You can also save, edit or delete destinations from this folder.
1. Click Menu button (bottom toolbar), to open Favorites
button.
2. Select it – (Check the box to highlighted My Favorites).
3. Then tap Items – lists of stored items are displayed.
4. Select the Favorite Item, ensure that it is highlighted.
To see your destination info taps My Favorites: after destination selected.
To calculate the route click Navigate (top toolbar). The route is
shown as a highlighted blue line from your current GPS position. Press Erase
to delete the record.
4.10 Route
This feature is used to display the entire route, plus details as name, time and
distances, of the route.
Page 34
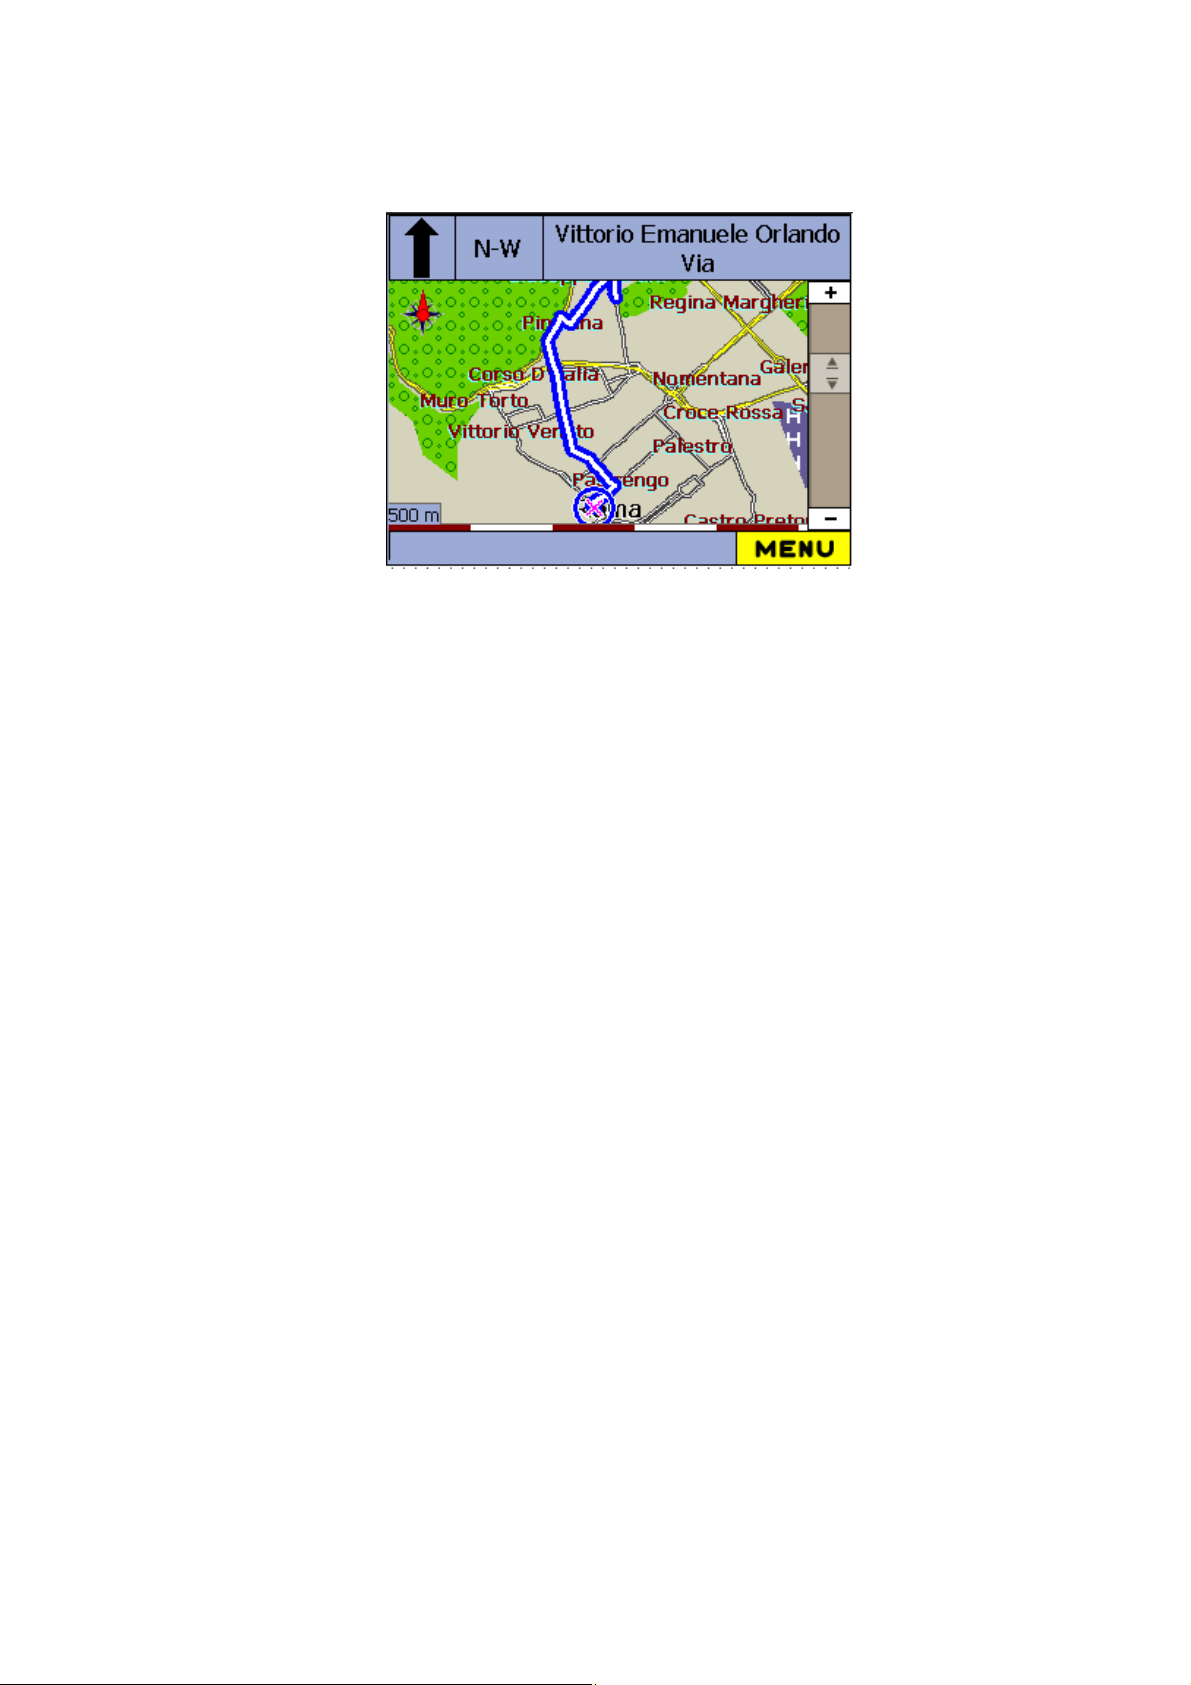
The departure point is indicated with a Blue flag, and the destination with an
Orange flag. The calculated route is always displayed in blue.
The screen also displays the details of the destination:
Destination – Address
Distance - Total length of journey
ETR - Estimated Time Remaining
You can also use the Arrow button to zoom in or out (Up to Zoom In, and Down
to Zoom Out.)
Page 35
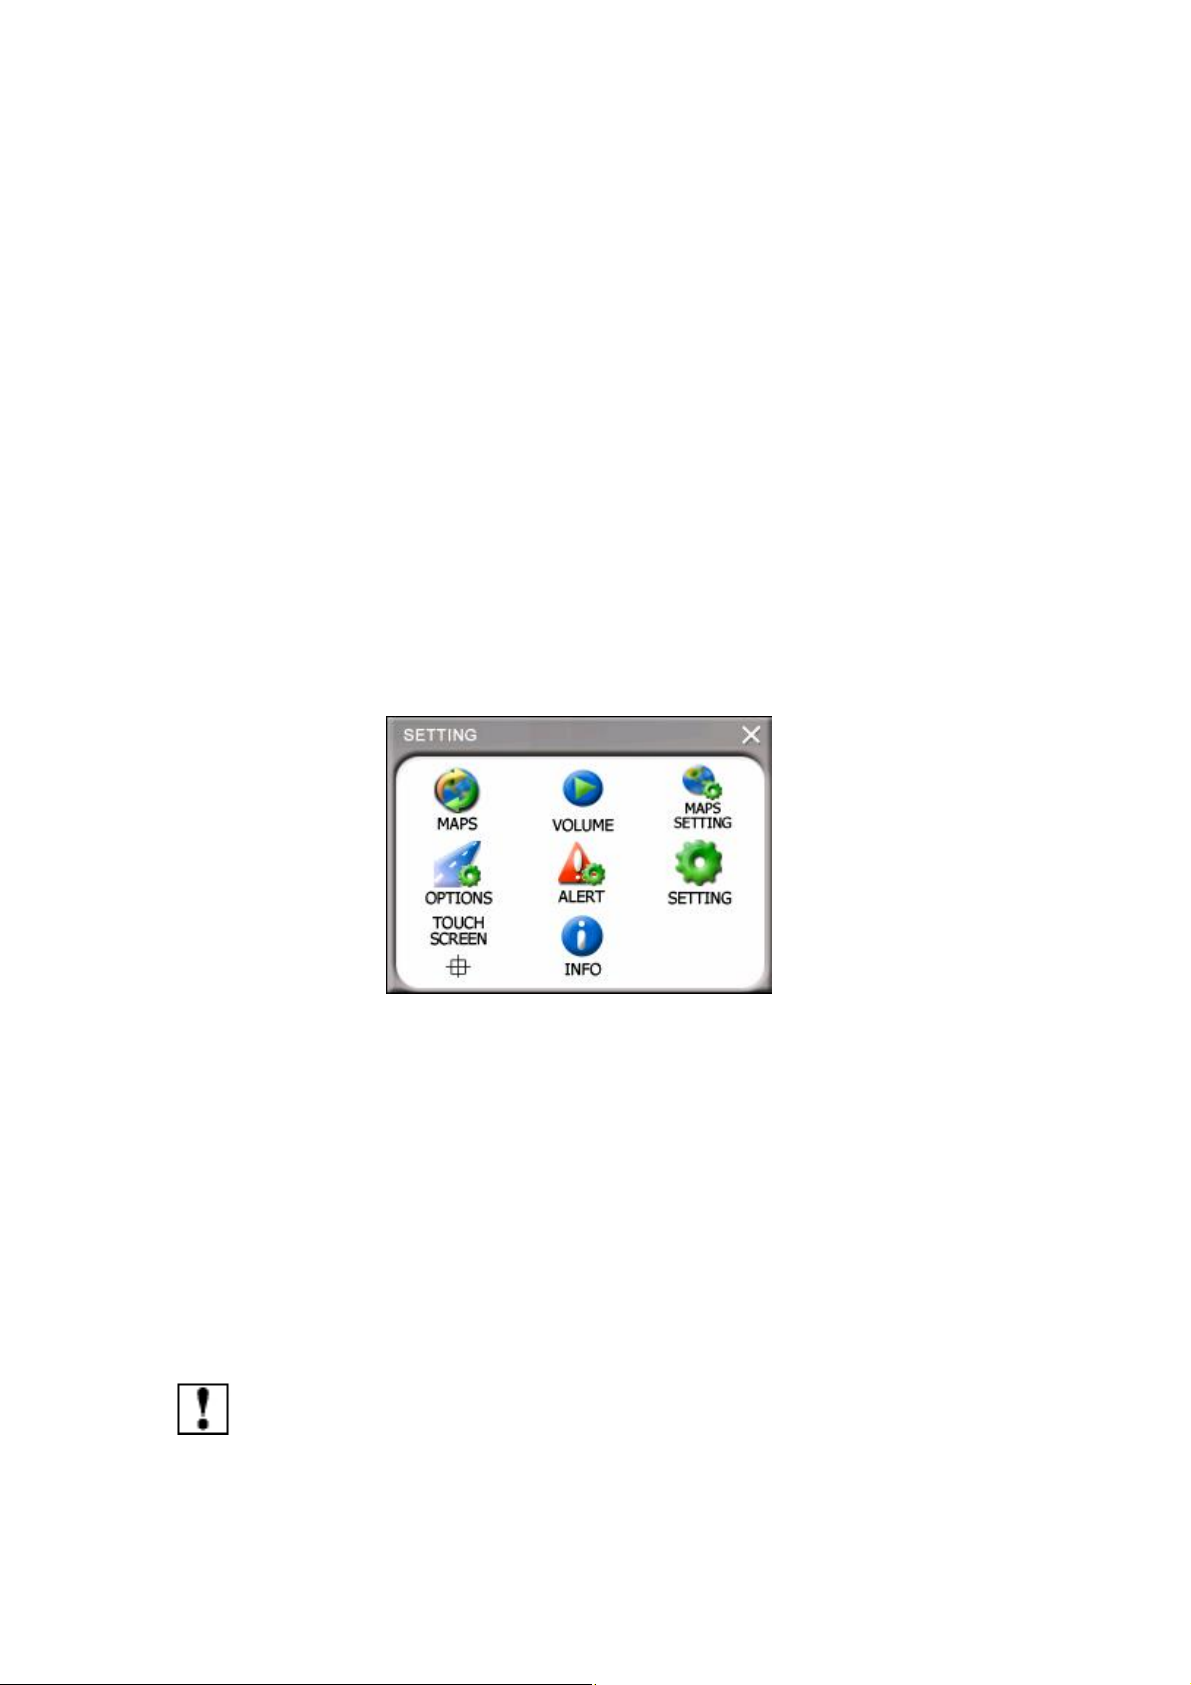
5. SETTING
5.1 Introduction
Want to know how to change the default setting of maps, views and route
management? Want to change the commonly used options and preferences
settings?
Well this chapter will let you change the settings according to your personal
preferences and tastes.
5.2 Overview
This chapter contains the following topics:
1 MAPS
2 VOLUME
3 MAPS SETTING
4 OPTIONS
5 ALERT
6 SETTING
7 TOUCH SCREEN
8. INFO
Note: Please remember, if you are using Destinator Lite, many of the
Page 36
functions and features listed will not work or be available
The various options, preferences and setting are all available from these menu
and sub-menus. Each setting has a check box which when selected enables
that particular function or feature.
Defaults
Destinator initially has certain defaults set when it is installed. However, why
leave them as is? Configure Destinator to your personal likes and tastes.
The following sections will describe how to do this.
Maps
Click the MAPS to switch Map
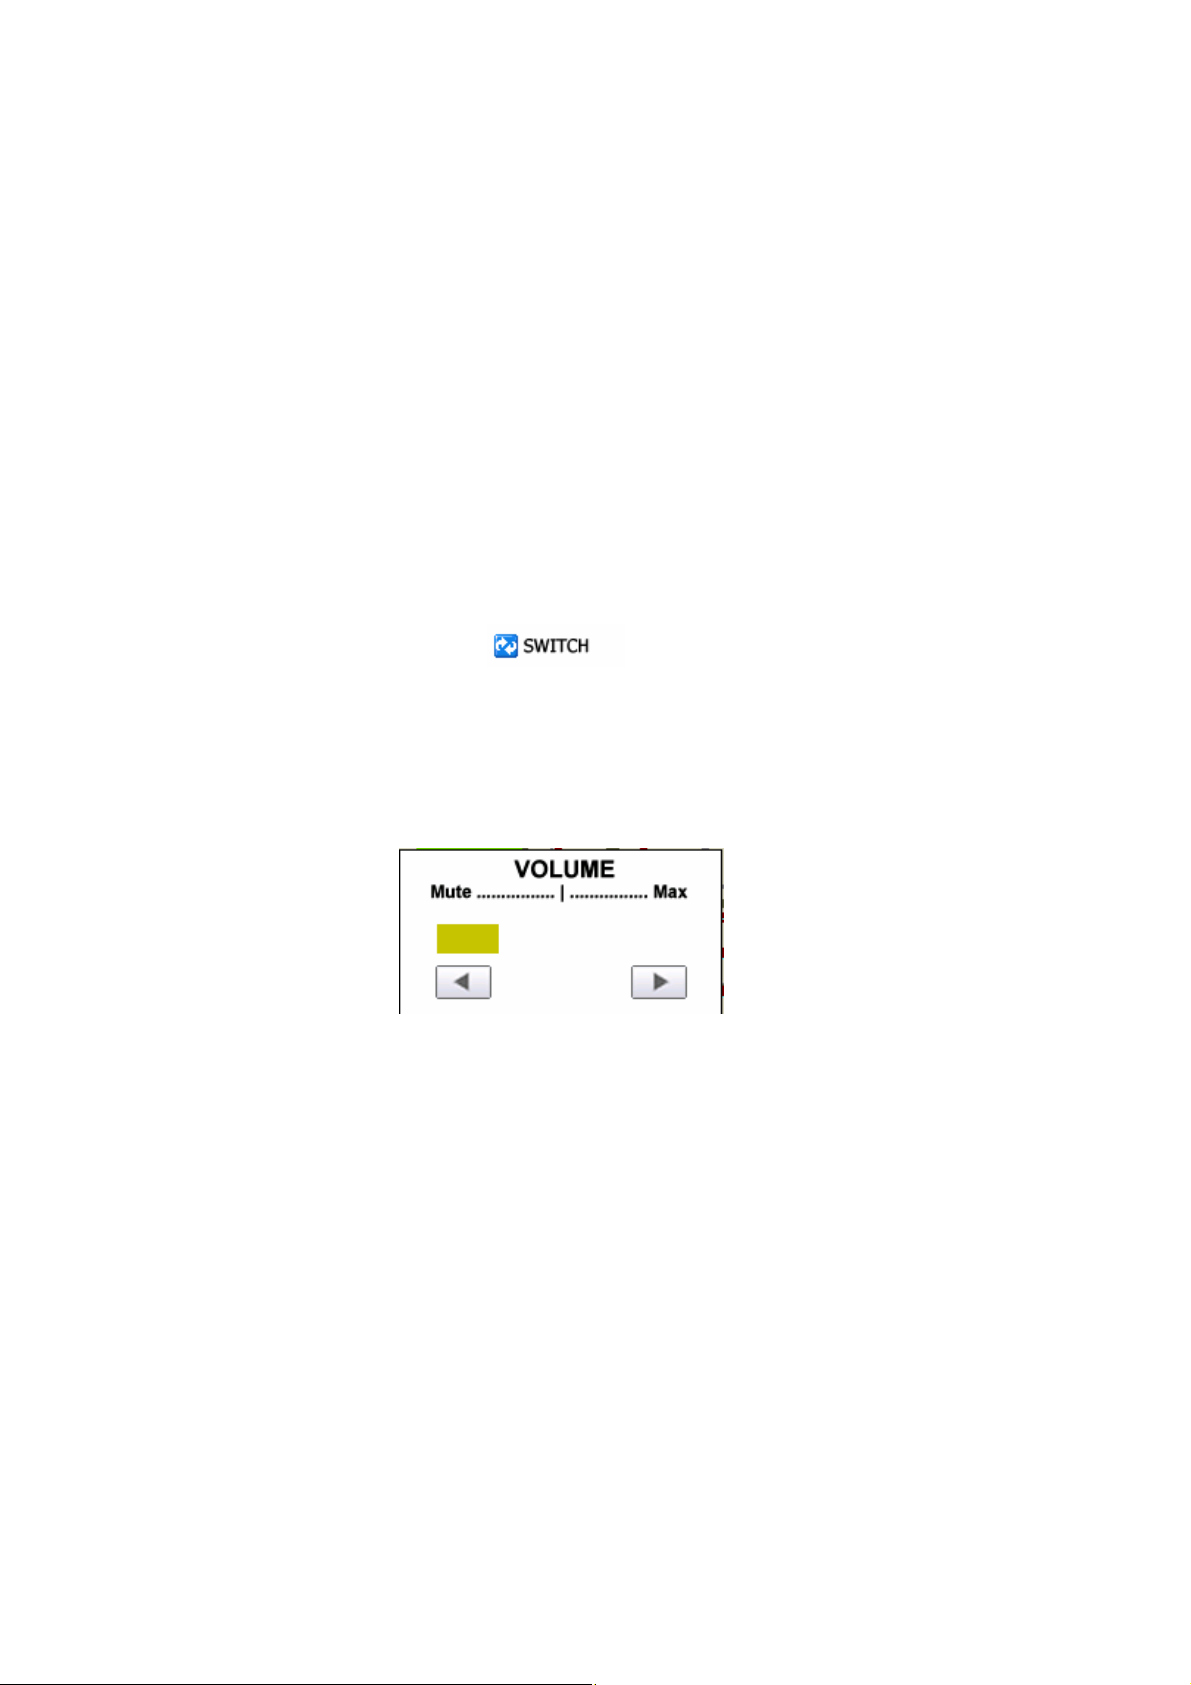
Volume
Select Volume from Setting to Left Arrow to Mute,
Right Arrow for the Max volume
5.3 Map Settings
Page 37
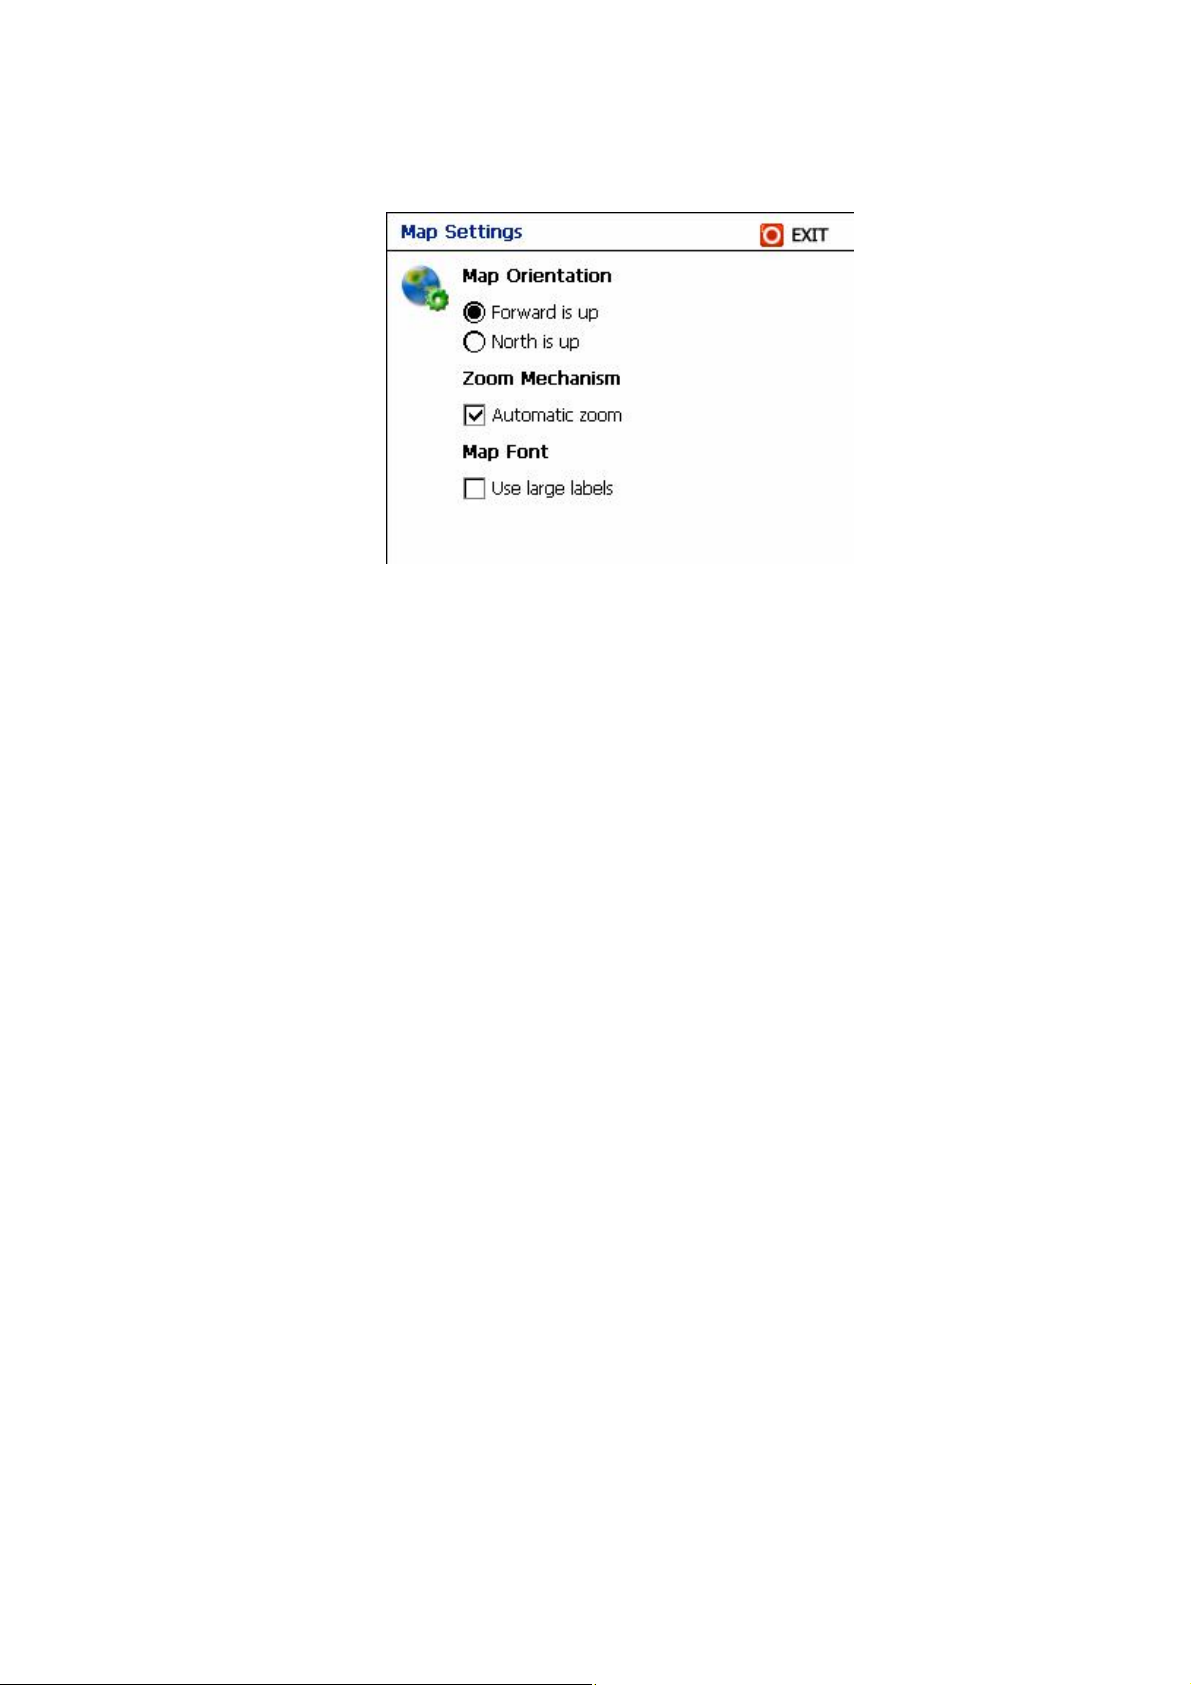
Map Orientation
1. Forward is Up - Dynamic Map Notation – the map will rotate as the vehicle
turns. Destinator will also update the compass to show the North-South
direction as the vehicle turns.
2. North is Up - North map notation – Destinator will keep the map static in a
North or UP - always at top orientation.
Zoom Mechanism
Automatic Zoom - the software automatically scales the map according to the
current speed of the vehicle.
Map Font
Use Large labels - easier to read under adverse lighting conditions, as inside a
vehicle.
5.4 Options – Route Settings
Page 38
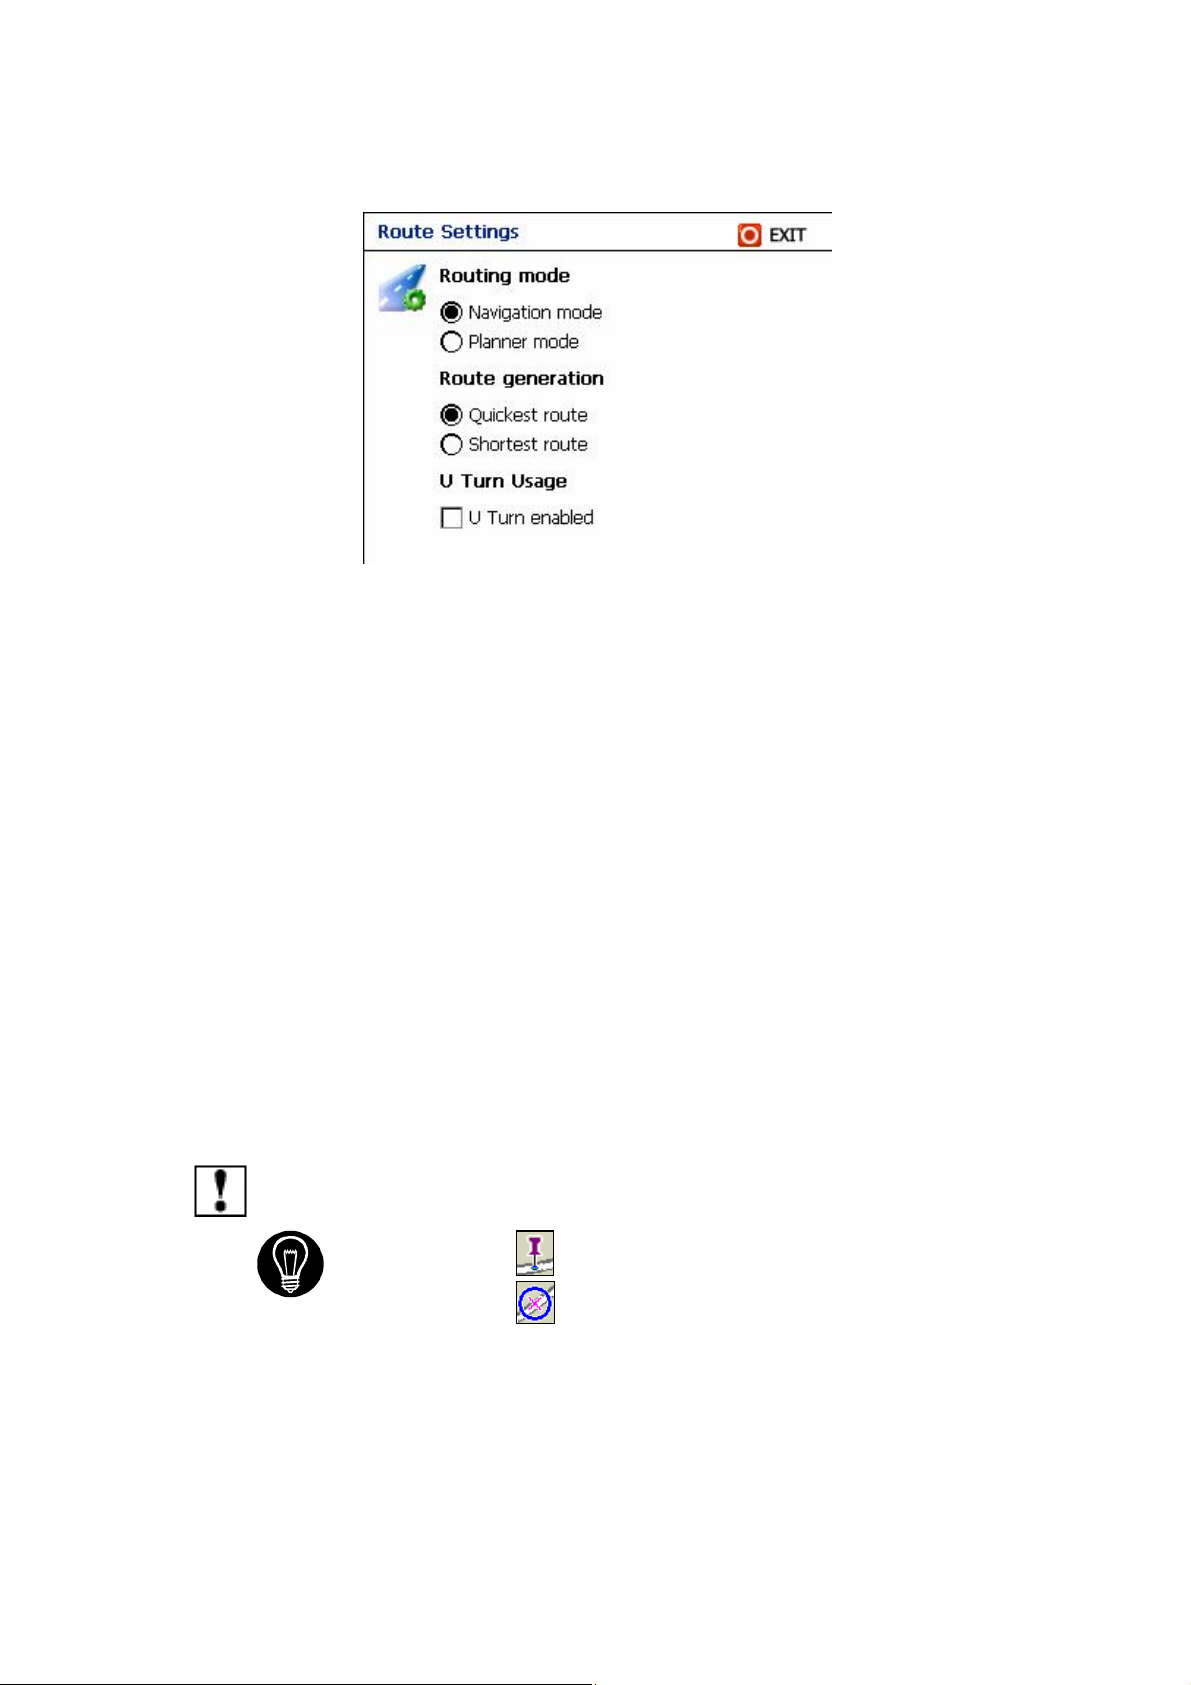
Routing Mode
1. Navigation mode – Normal driving – Set as default view.
2. Planner Mode – display, planned routes, but does not show your progress,
as you travel.
Route generation
1. Quickest route – Destinator calculates the route by picking the shortest
distance and highest speed limits.
2. Shortest route – Destinator calculates the route by picking the shortest
distance.
U Turn Usage
1. U Turn enabled - If you select this option, the route will be calculated by
including any U Turns that are needed. If you clear this option, the route will
be calculated without any U Turns. (This feature is included because some
drivers prefer not to make U Turns.)
Note: Route generation excludes any detours, stops or delays along the
route.
If you see this icon Origin - you know that you are in Planner mode.
If you see this icon Origin - you know that you are in Navigation mode.
5.5 Alert Settings
Contains warning and alerts, which if selected, can enhance your Destinator
experience.
3
Page 39
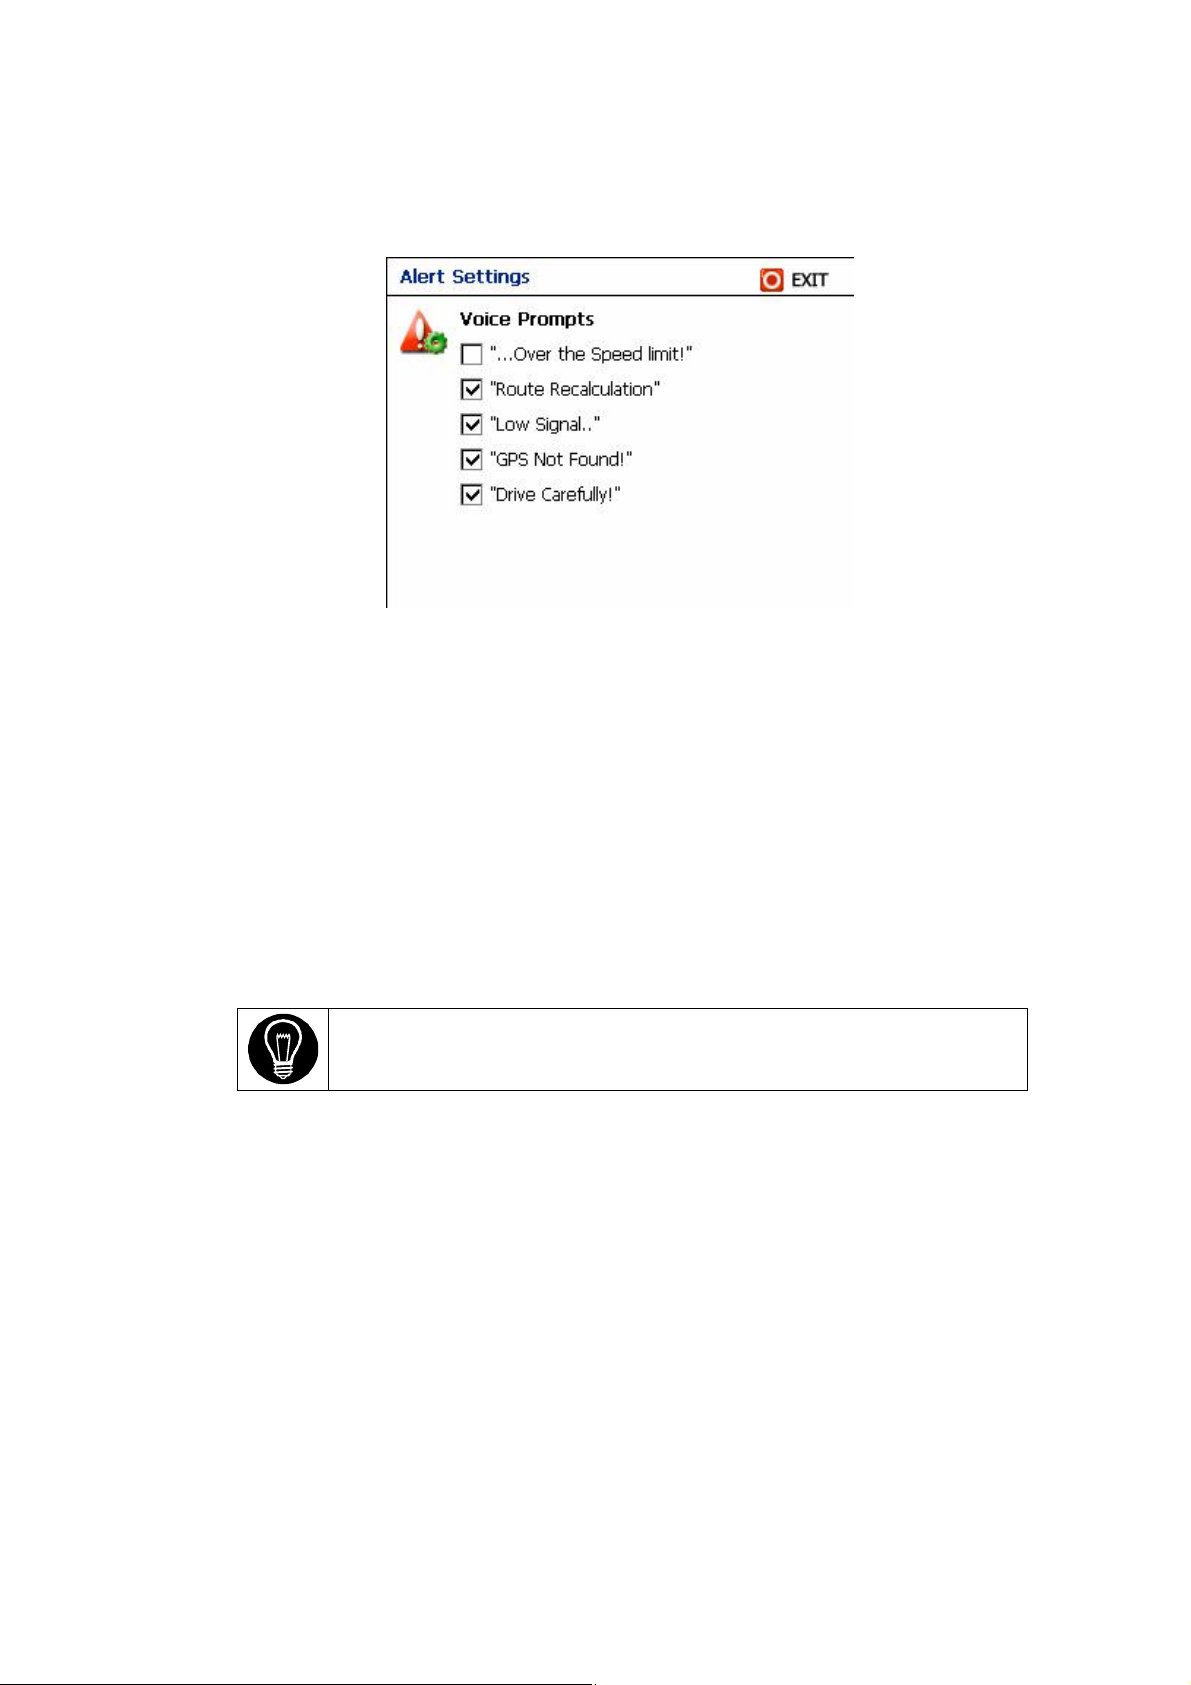
Voice Prompts
1. Speed Setting - gives you a voice prompt, when your car exceeds the
speed limit on this section of the road.
2. Route recalculation - If deviated from original route, Destinator
automatically recalculated new route and update ETA and distances.
3. Low / Bad GPS signal - Warning that you are in an area of low signal.
4. GPS Not Found - No GPs signal, normally due to No power to GPS
receiver antenna or not connected to the Pocket PC.
5. Drive Safely - Friendly reminder at the start of each journey.
Select GPS Not found - Alerts you if GPS signal is lost, or the
power is removed from the GPS Receiver.
5.6 Setting – General Settings
Page 40
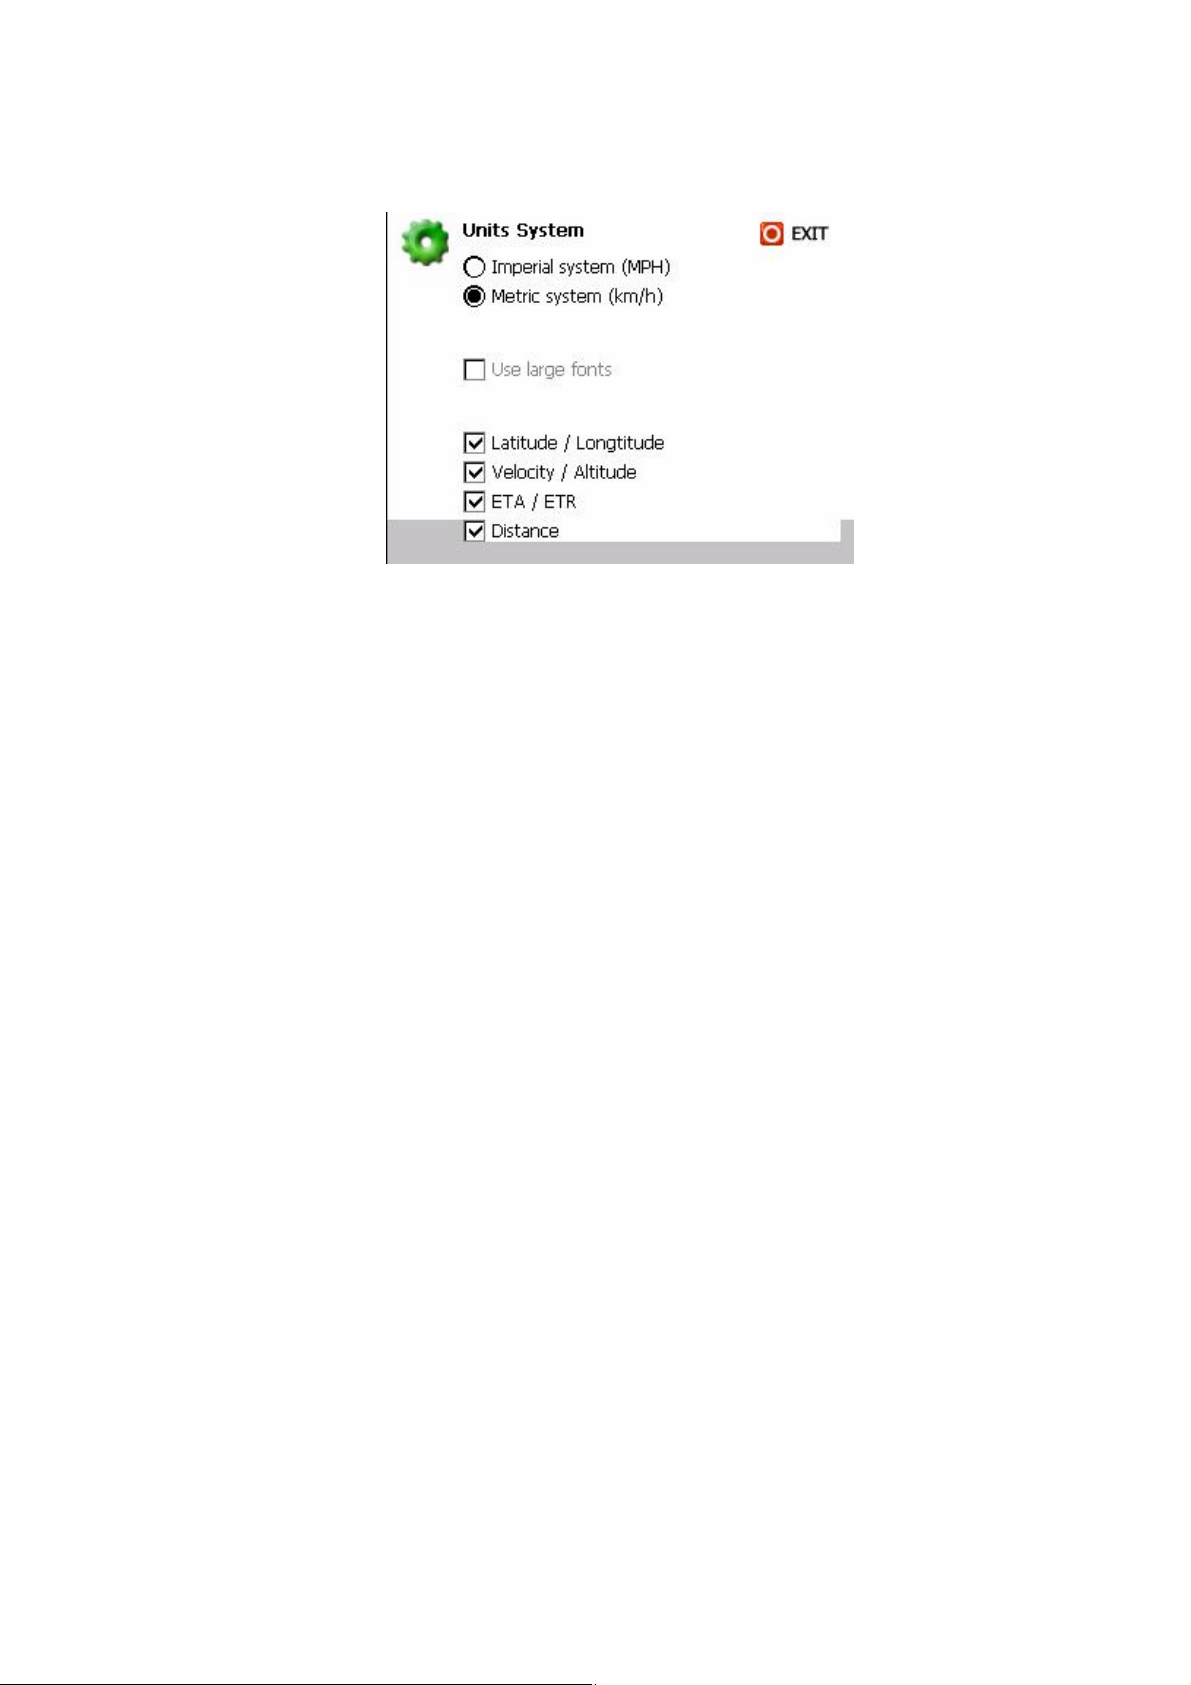
Unit Selections
All distances are displayed in imperial or metric units.
1 Imperial (Miles and yards) for USA and the UK.
2 Metric (Kilometers and meters) for Germany and Canada.
Application Font select
Use Large fonts - makes the display easier to read especially in bad lighting.
On Map Information
To display - select any, none or all of the following.
1. Latitude / Longitude.
2. Velocity / Altitude.
Page 41
.
66.
V
V
IIEEWW
6.1 Introduction
Destinator contains many improvements and enhancement, eg: increased
viewing area, clearer driving direction, brighter colors for increased viewing,
less cluttered screen as well as additional map views like Bird’s-eye
(enhanced 3D) view.
6.2 Overview
This chapter contains a description on the following topics:
1.How to Zoom
2.Types of View
3.3D Enhanced – Bird’s-Eye View
4.Improved visual driving direction
5.Improved Maneuvering indicators (Turn by turn)
6.Day Mode
7.Night Mode
8.Show Route
Note: Please remember, if you are using Destinator Lite, many of the
functions and features listed will not work or be available.
Page 42
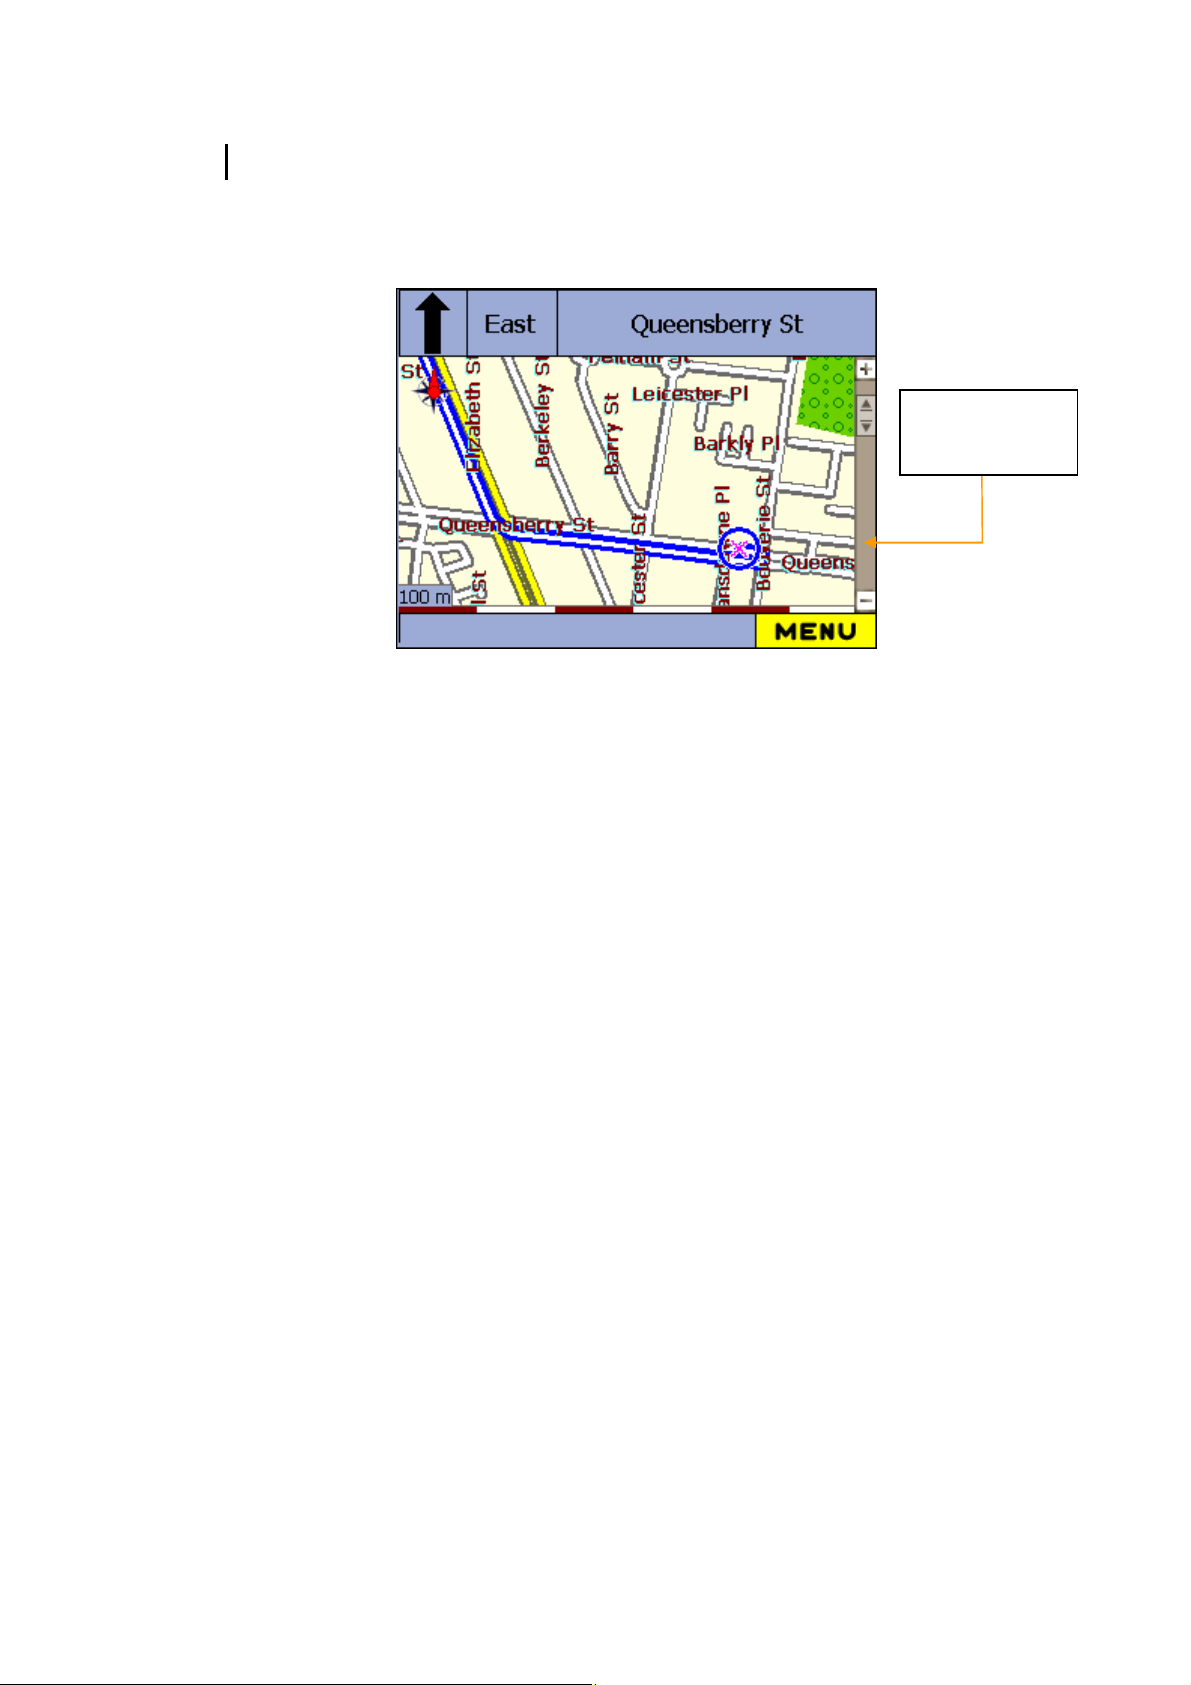
Scroll Bar
6.3 How to Zoom
Zoom
The Zoom scroll bar can be used to Zoom In (+ Magnify) or to Zoom Out (-
Expand) on the displayed map.
You can zoom from 100 m (meters) to 400 Km (Kilometers - metric system) or
Imperial system from 60 y (yards) to 200 mi (Miles).
On the main map screen - Press the top of the scroll bar to zoom in, and the
bottom of the scroll bar to zoom out.
After a few seconds, the zoom level automatically returns to the default setting
for the current speed of the vehicle.
You can use the Arrow button on Device to Zoom.
(Arrow button is also referred to, as the Joystick, Action or Jog button
depending on manufacture).
Up to Zoom In
Down to Zoom Out
Right to Counterclockwise (CCW)
Left to Clockwise (CW)
Page 43
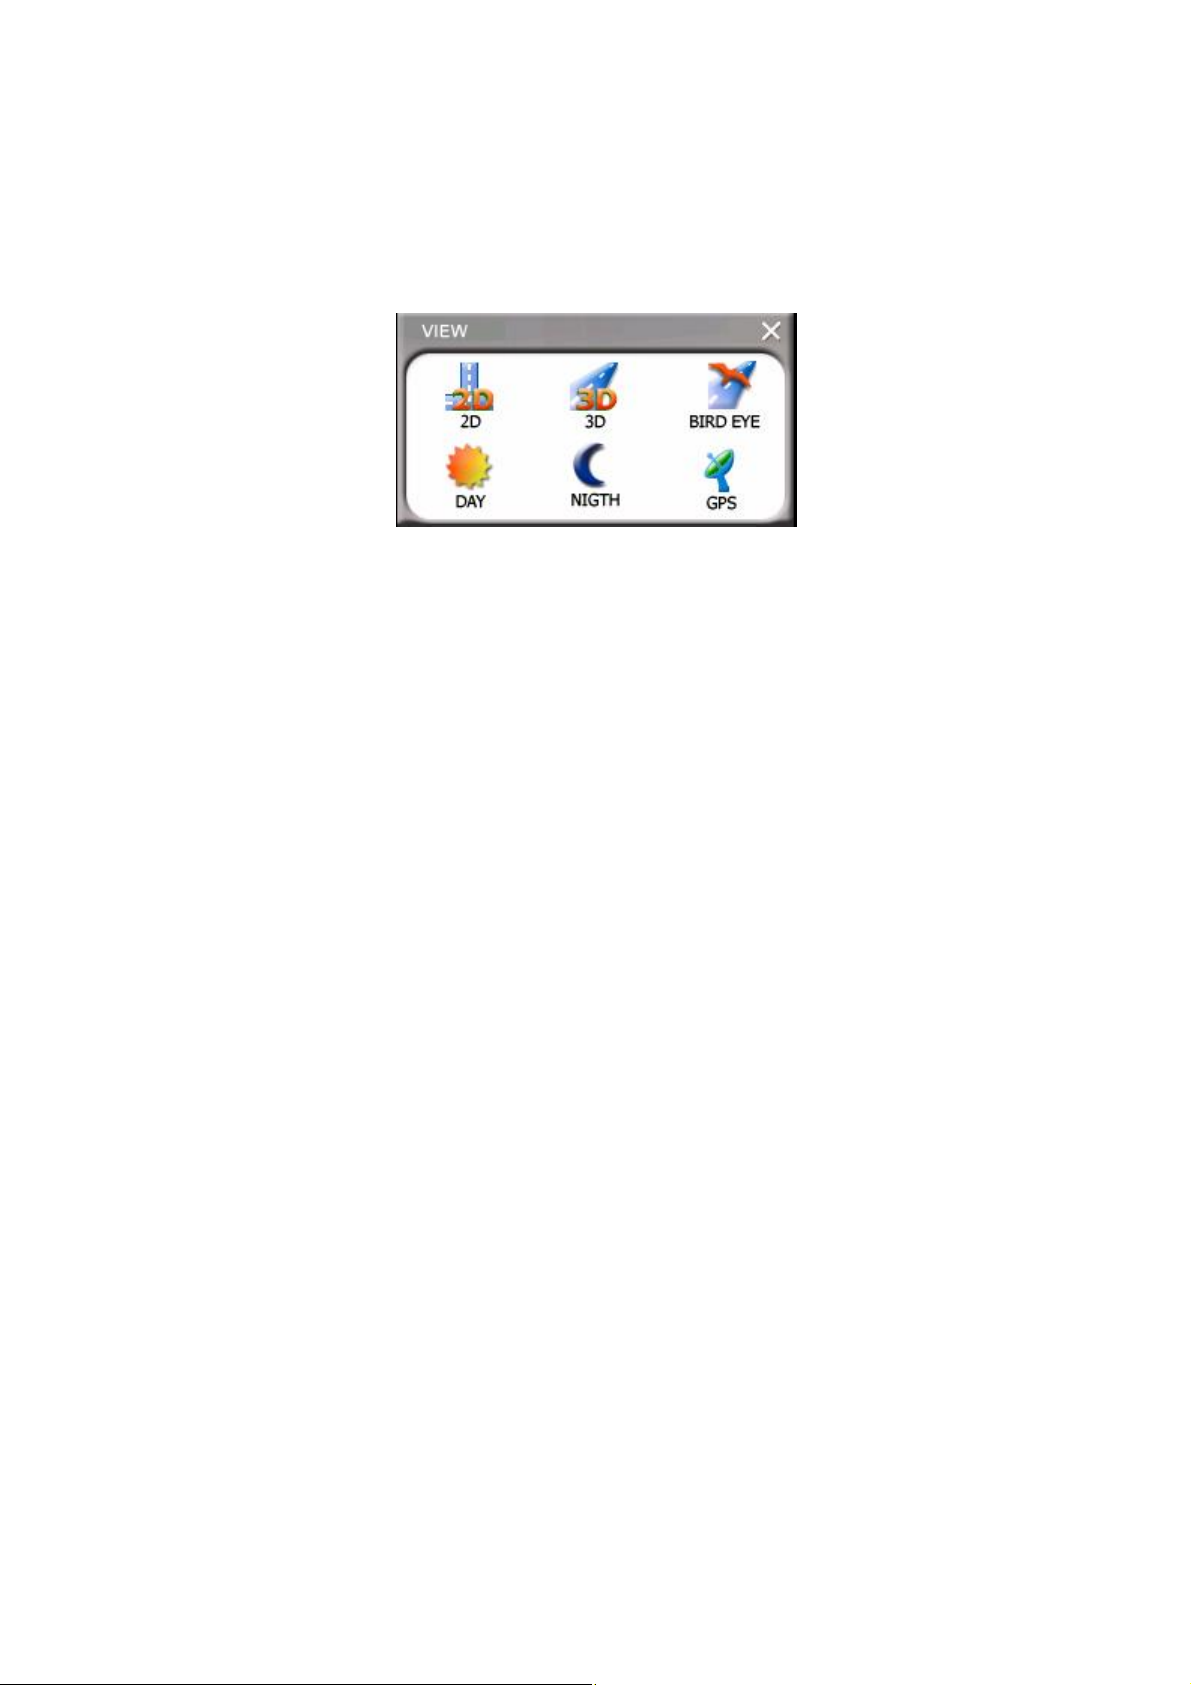
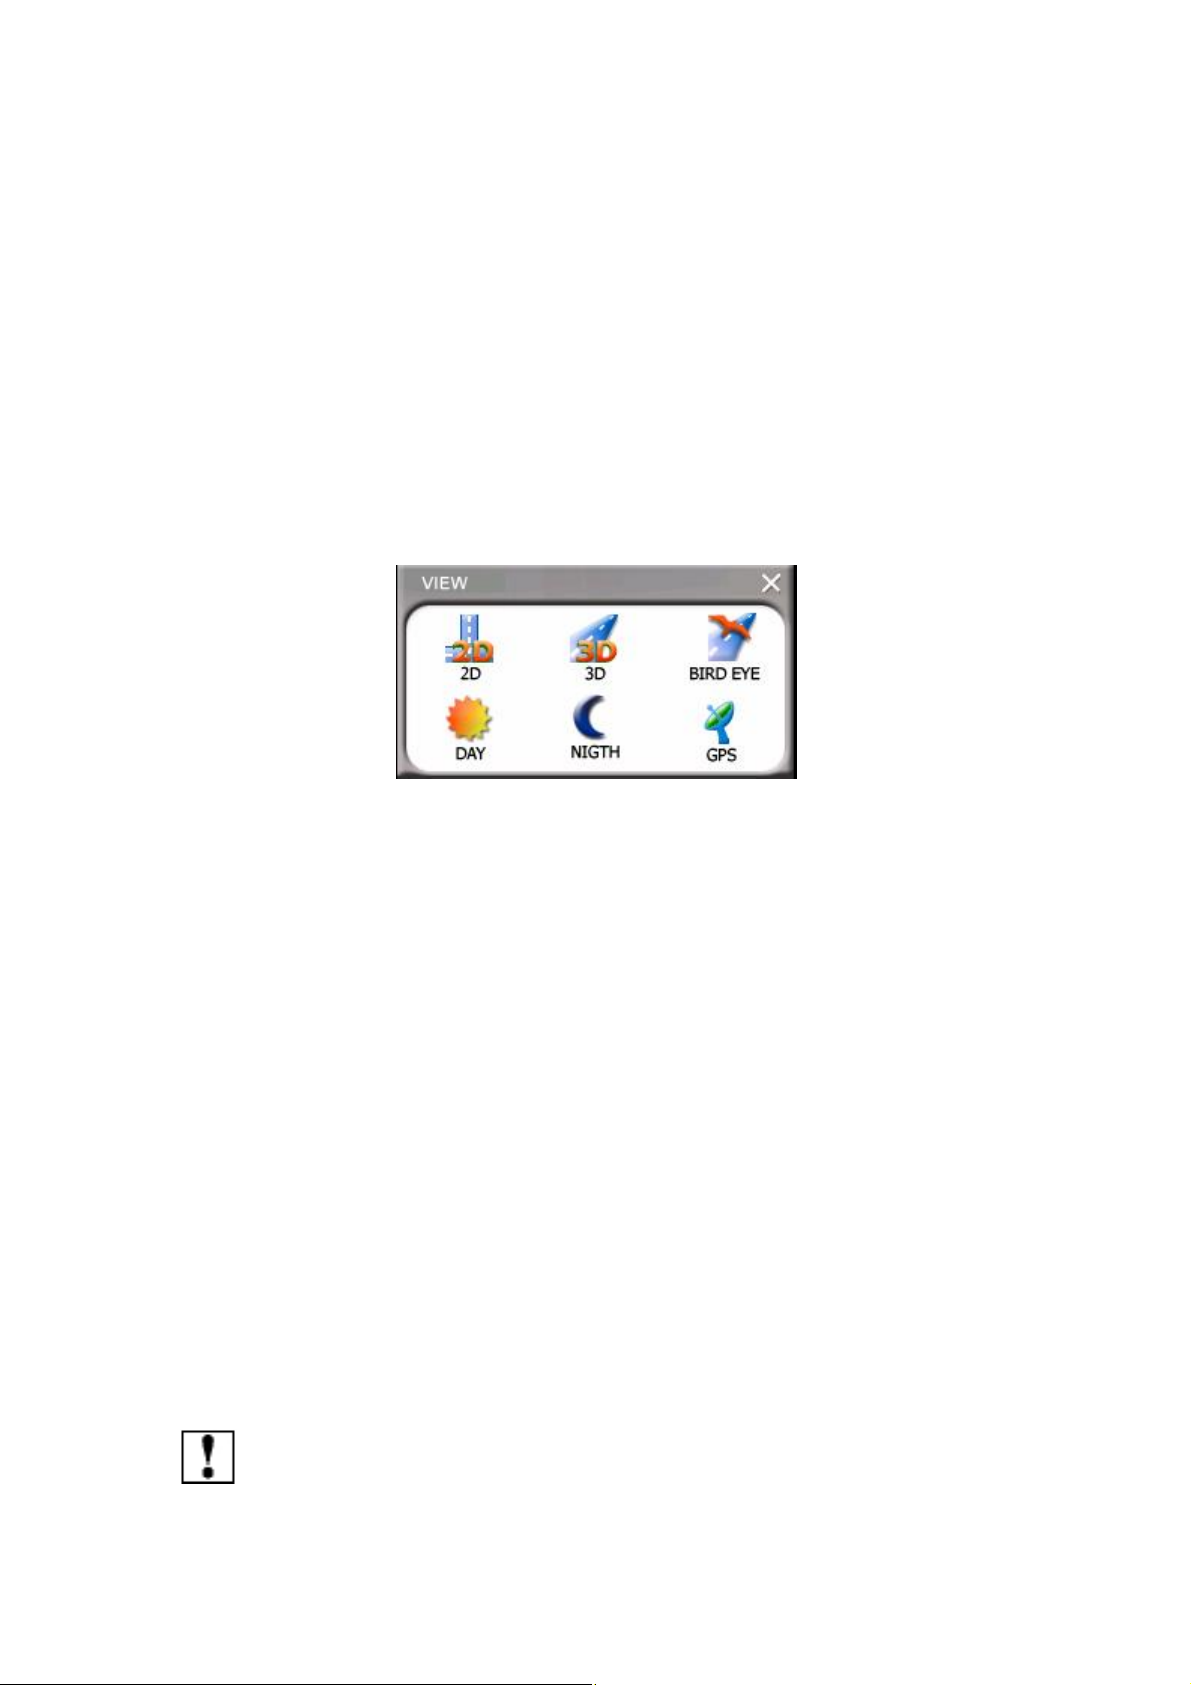
6.4 Types of View
Destinator comes with several different general viewpoints: From 2D, 3D and
Enhanced 3D or Bird’s–eye View.
2D View
The 2D view is the straight forward 2 (two) Dimensional normal view. The
normal main map view.
The map is dynamically updated. It’s easy to read features and clearly
defined route enable you, with a single glance, to visually, find where you are
and where you are going.
3D View
A simplified general 3D (three Dimensional) viewpoint showing the map in a
basic 3 D relief.
Page 44
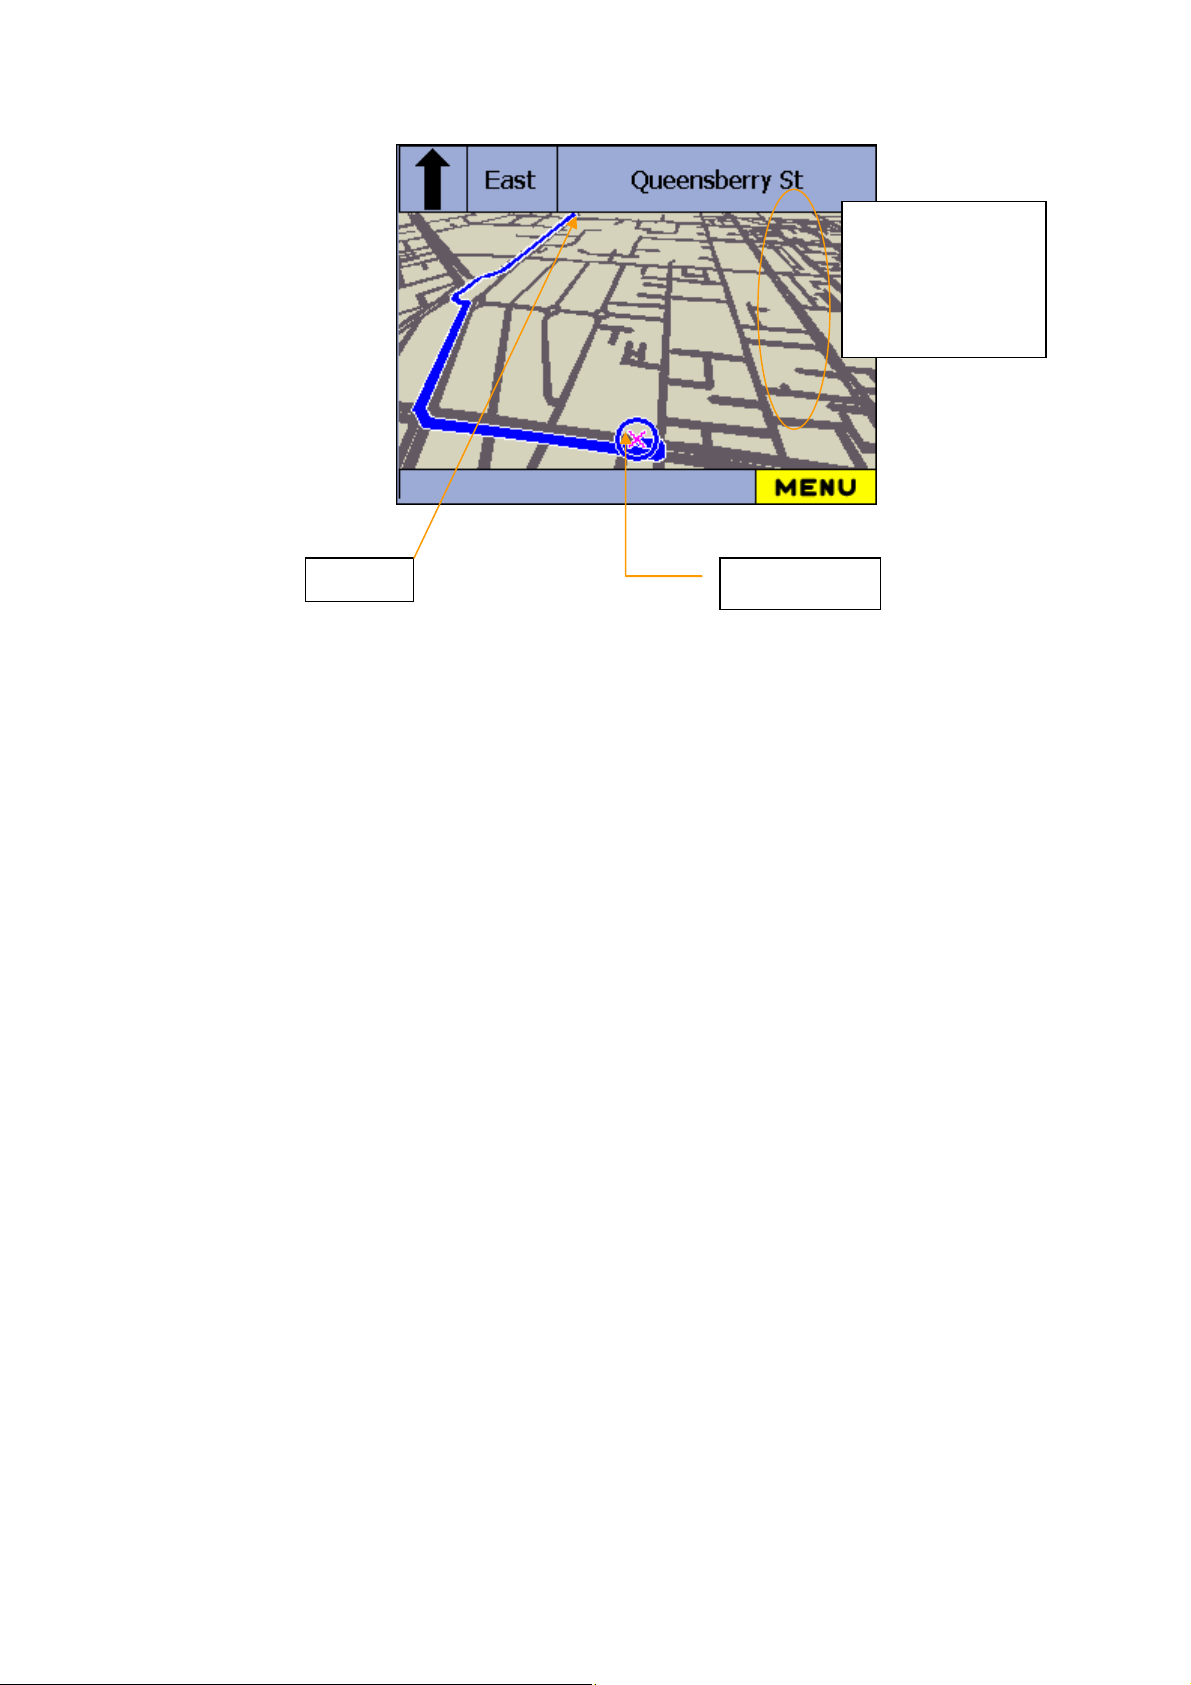
Origin
With 3D and
Bird View will
not show the
street name and
Destination
It shows the basic relief (outline) and details of the surrounding roads and
general area Your current position is clearly shown (blue circle) as well as your
destination (red arrow).
Bird’s-eye View
Extensive screen design of the main screen has allowed clearer; more detailed
and improved map rending. With more of the map displayed and clearer map
Destinator makes it easier for you to view the map, even under a variety of
adverse weather, bad light and driving conditions.
Instead of a normal 2D view, this view gives a Birds-eyes view of the
proposed route. The map is display in a unique 3D angle with horizon fill to
enhance the viewing and navigational experience.
It allows you, in a single glance, to see your route, origin and destination, so
that you can plan any addition stops or avoid any known detours or obstacles.
Besides being more user-friendlier, it gives a better modeling of your
immediate area and proposed route.
Day Color Skin
Page 45
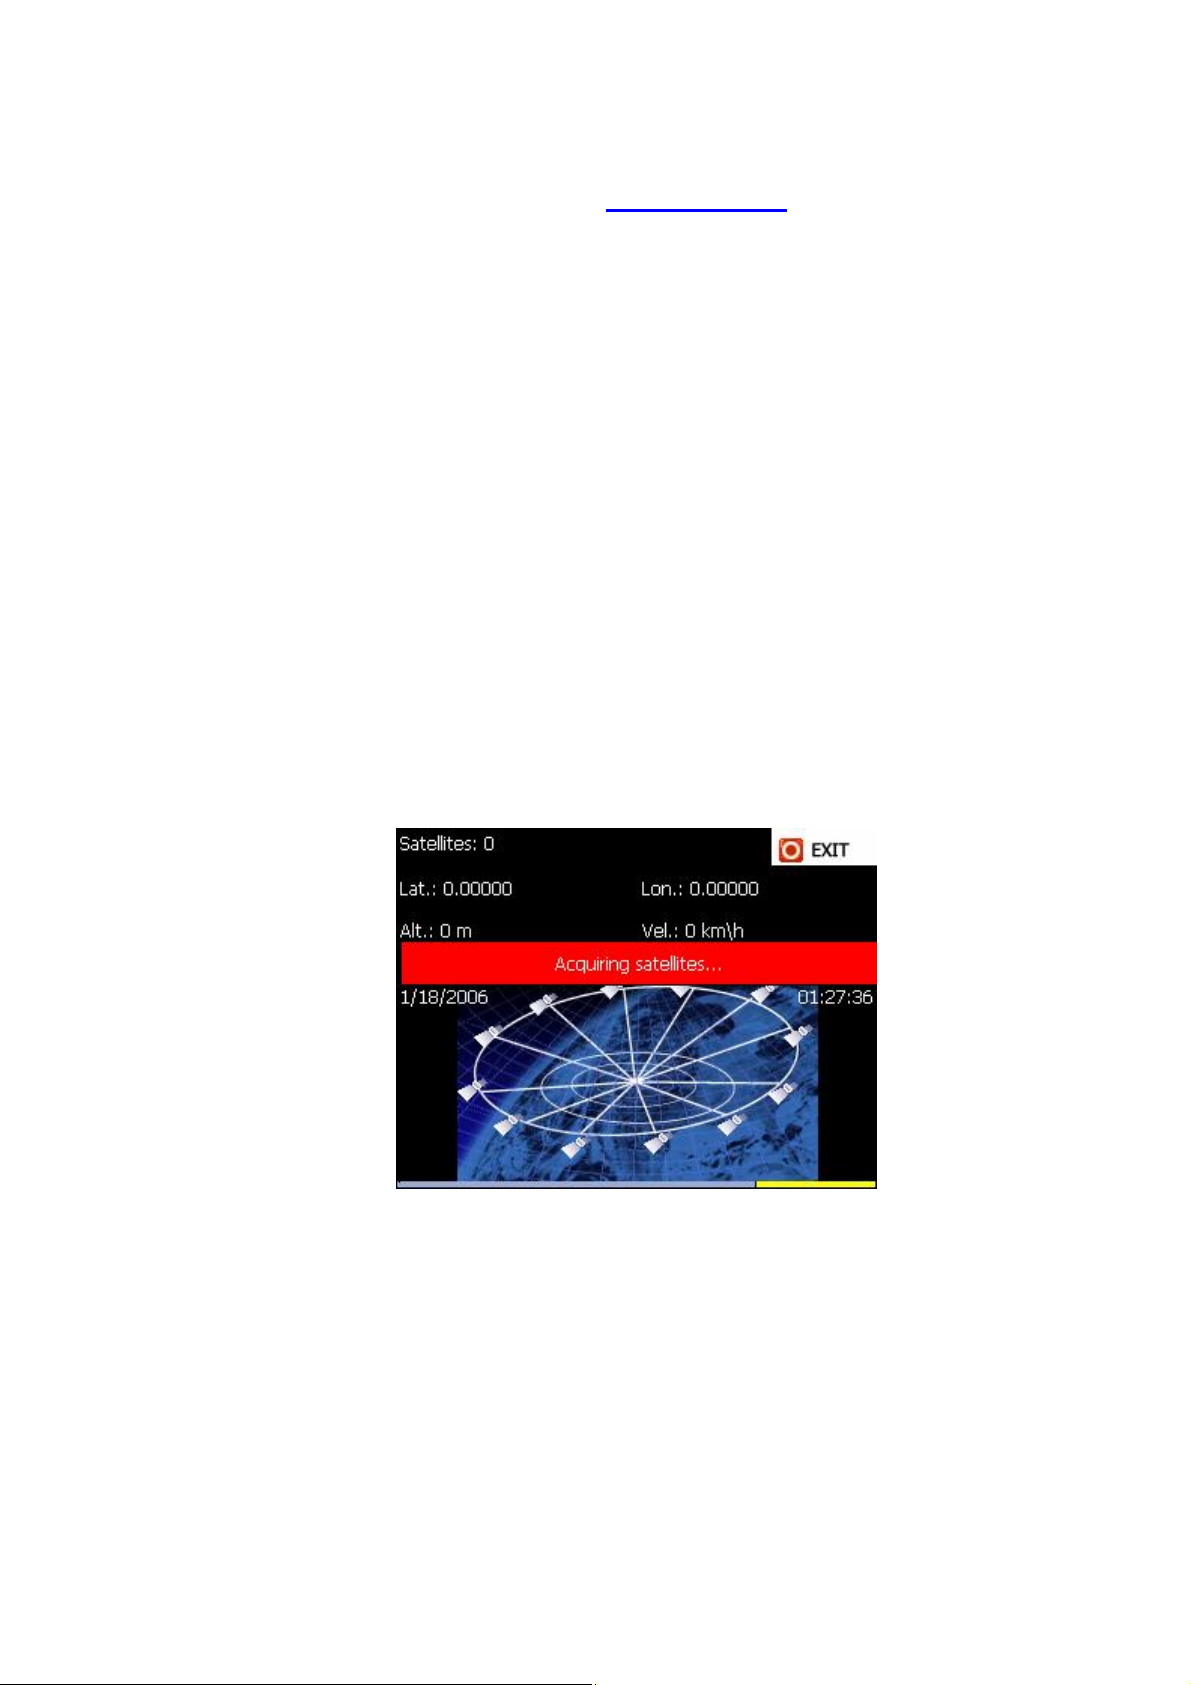
This is the default mode. (View > Day color skin). You can use this setting
to change the level of backlighting (from Night color skin) on the screen of the
Pocket PC device for daylight driving conditions. Colors are bright and easy
to view under most daytime conditions.
The route and present location is (marked in blue) is clearly seen and visible
under a variety of weather and driving conditions. Not lost in the background,
but clearly visible.
Night Color Skin
You can use this setting to change the level of backlighting on the screen of
the Pocket PC device for night time or adverse weather conditions. Colors
and background are muted to assist night time driving making the route and
current position more visible.
GPS
To see the status of GPS and its details.
Viewing the Route By:
The route, start point and destination (outlined in blue) are clearly seen and
visible under a variety of weather and driving conditions. Detail is not lost in
the background and general clutter on the screen. Turn by Turn
Page 46
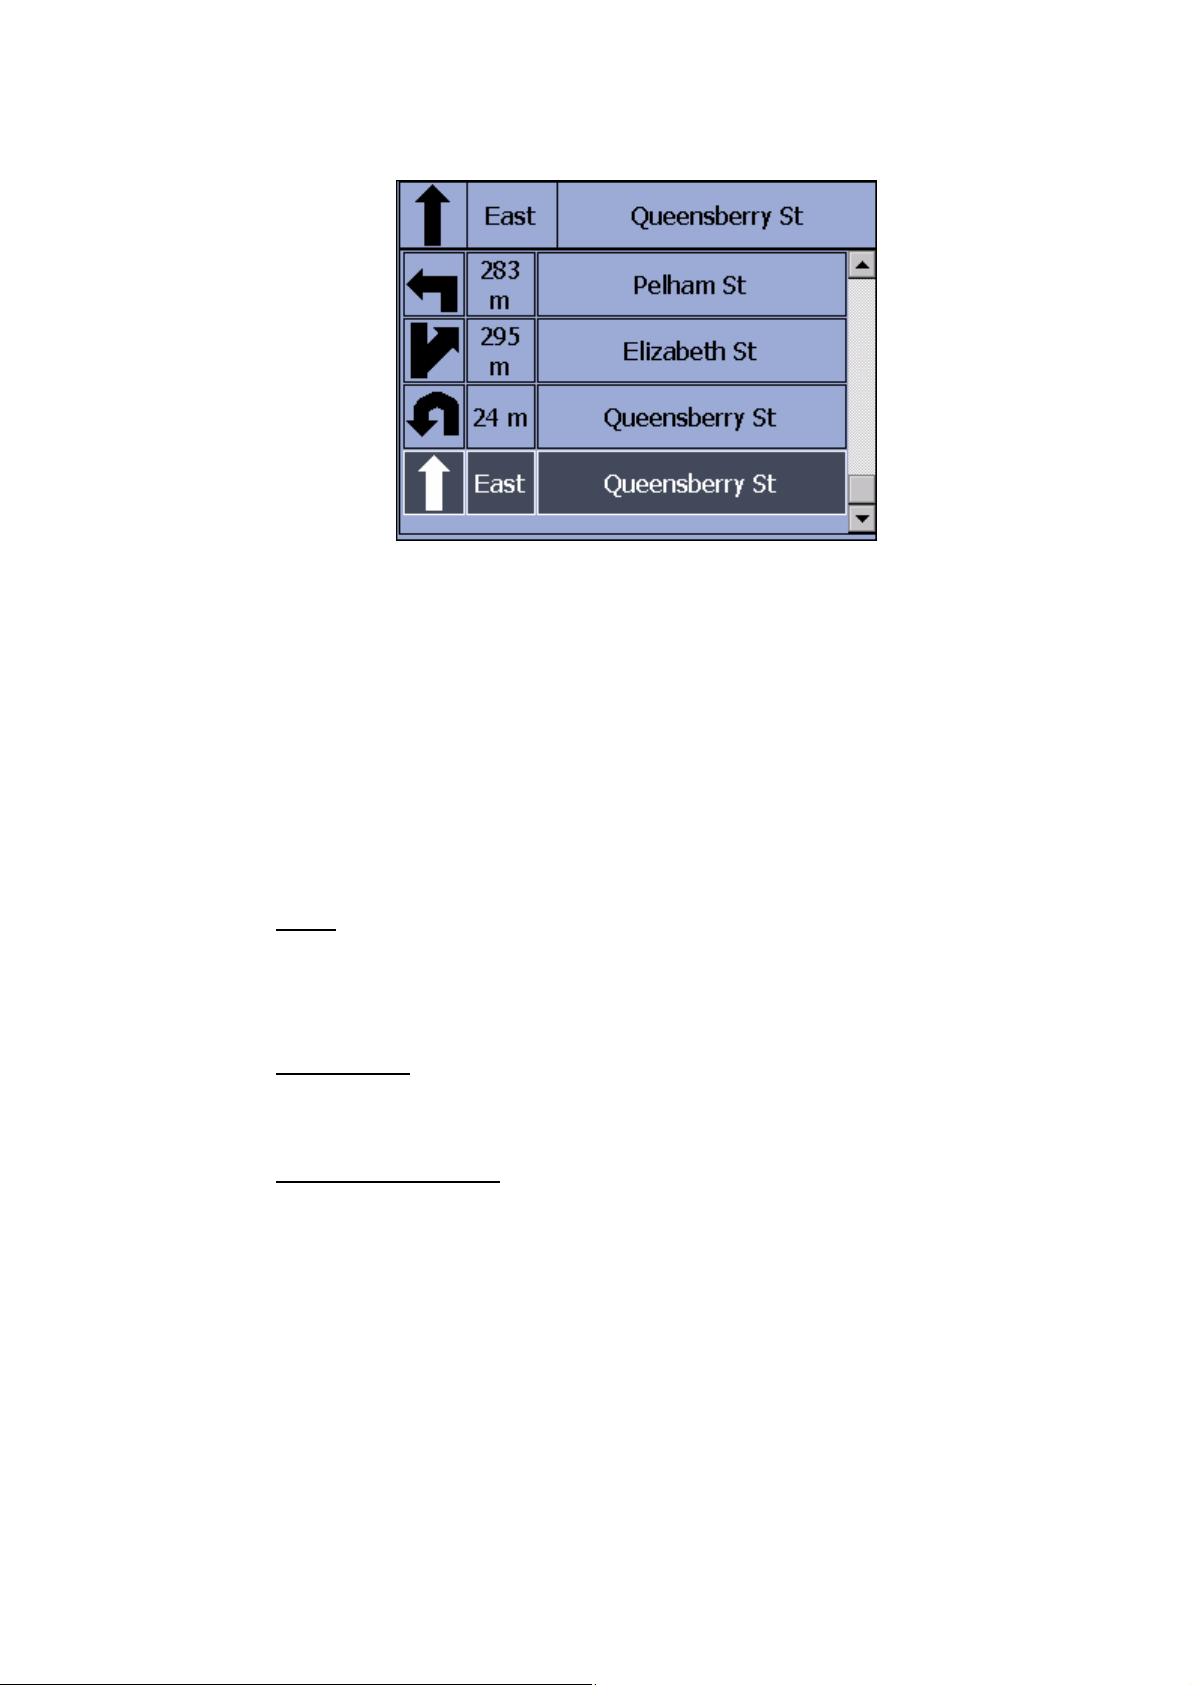
This view indicates the route Turn By Turn. It will show the next turn
immediately after completing the previous turn. The two arrows Previous
and Next allow scrolling to the next turn or previous turn.
It will also provide a Voice and Visual Prompt at intervals of 3 Km, 500m,
200m and 50m of the next turn, or change of direction.
The Map Screen contains the following functions/information:
l Menu
This button will load the Main Menu. Refer to the Menu Section for
more information.
l Zoom In/Out
Changes the current map scale.
l Journey Information
This box will show your current speed, estimated distance to next
turn , remaining distance from your destination .
Note: These features are only available when your device is in
navigation mode. If your device is not in navigation mode, only your
current speed will be displayed.
Page 47

Part III. More Tools
Part III introduces MP3 Player, Photo Viewer, Mpeg 4 Video Play, Calculator,
etc
Page 48
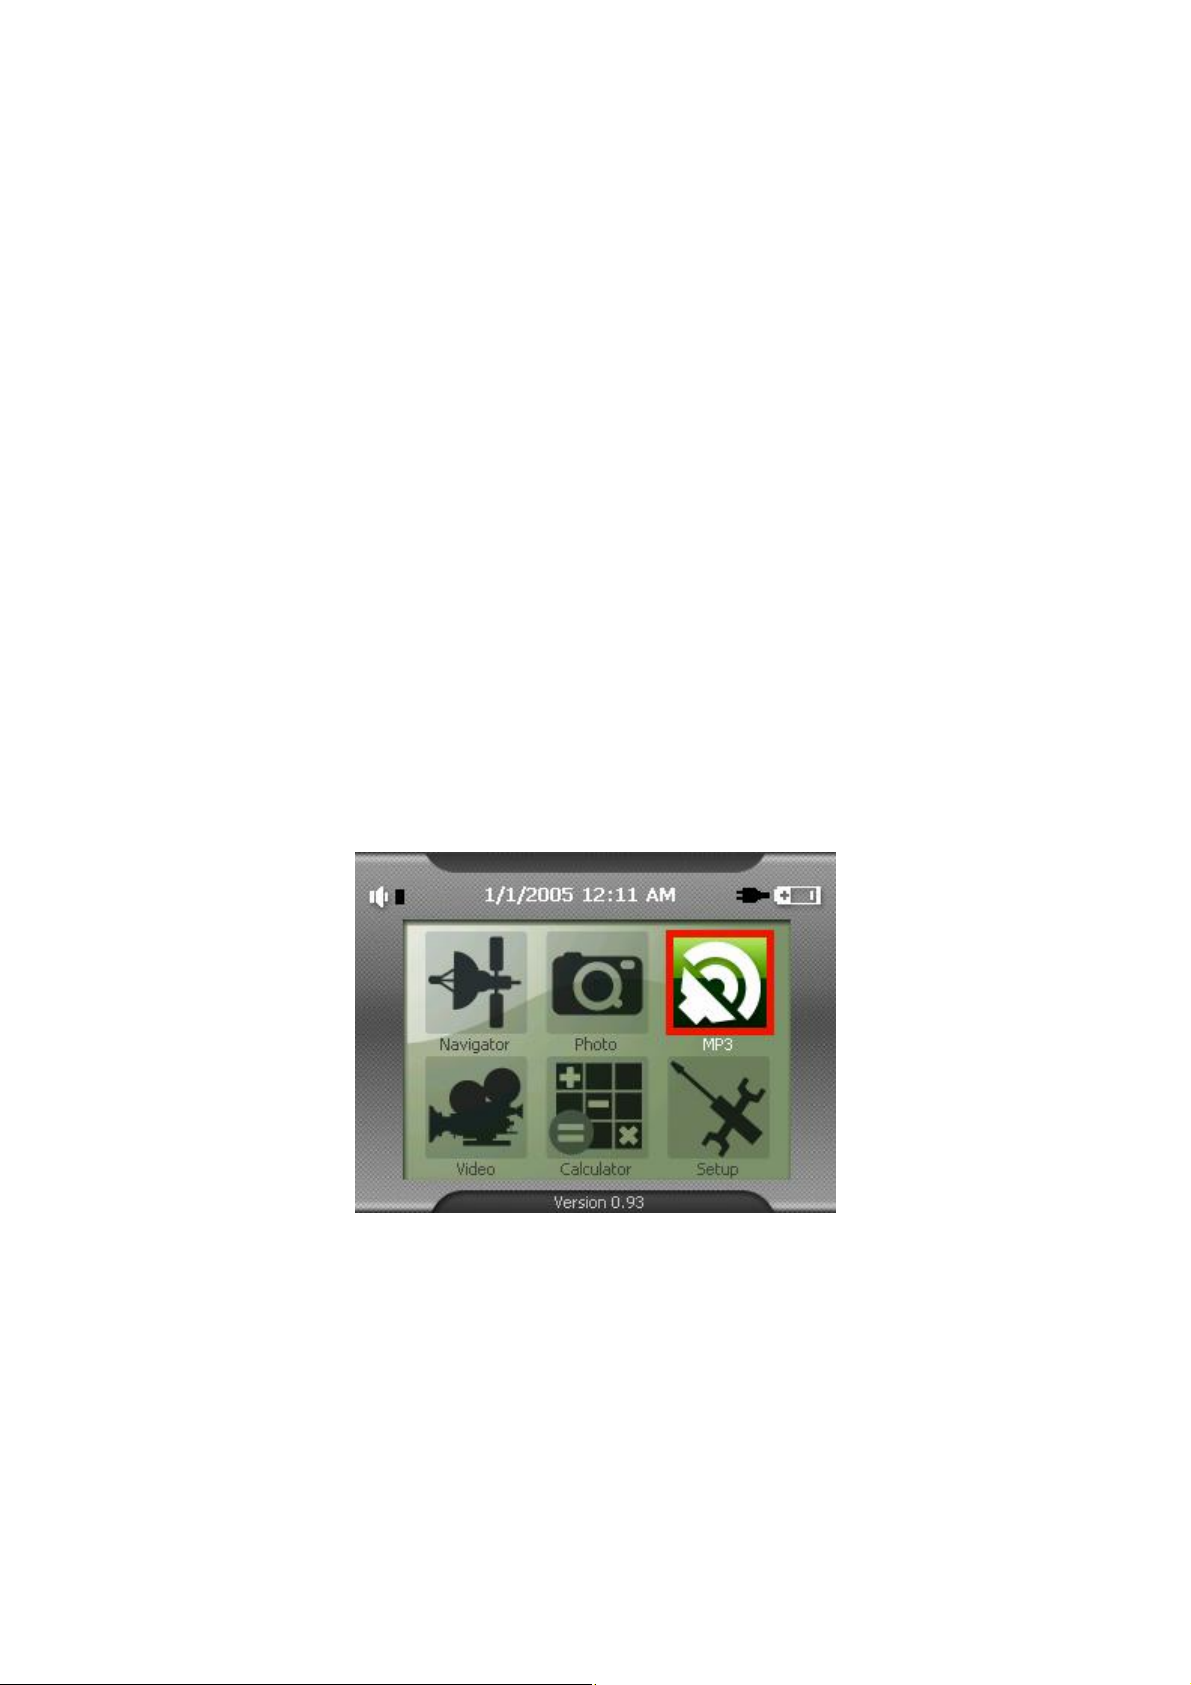
7. Using MP3 Player
This chapter tells you how to play MP3 files using your device
The MP3 Player program turns your device into an MP3 player. It features:
※ Playback of MP3 and WAV files
※ Basic playback controls such as play, pause, stop, next and previous
※ Graphic equalizer settings with 17 presets
※ Playback includes single selection playback, repeat, single repeat,
sampling playback, normal sequence and random sequence.
※ Play list support
7.1 Starting and Exiting MP3 Player
Tap MP3 Player on the Main screen to switch to the program.
The control panel will appear on the screen. You can now easily control the
MP3 player by tapping the control buttons.
Page 49
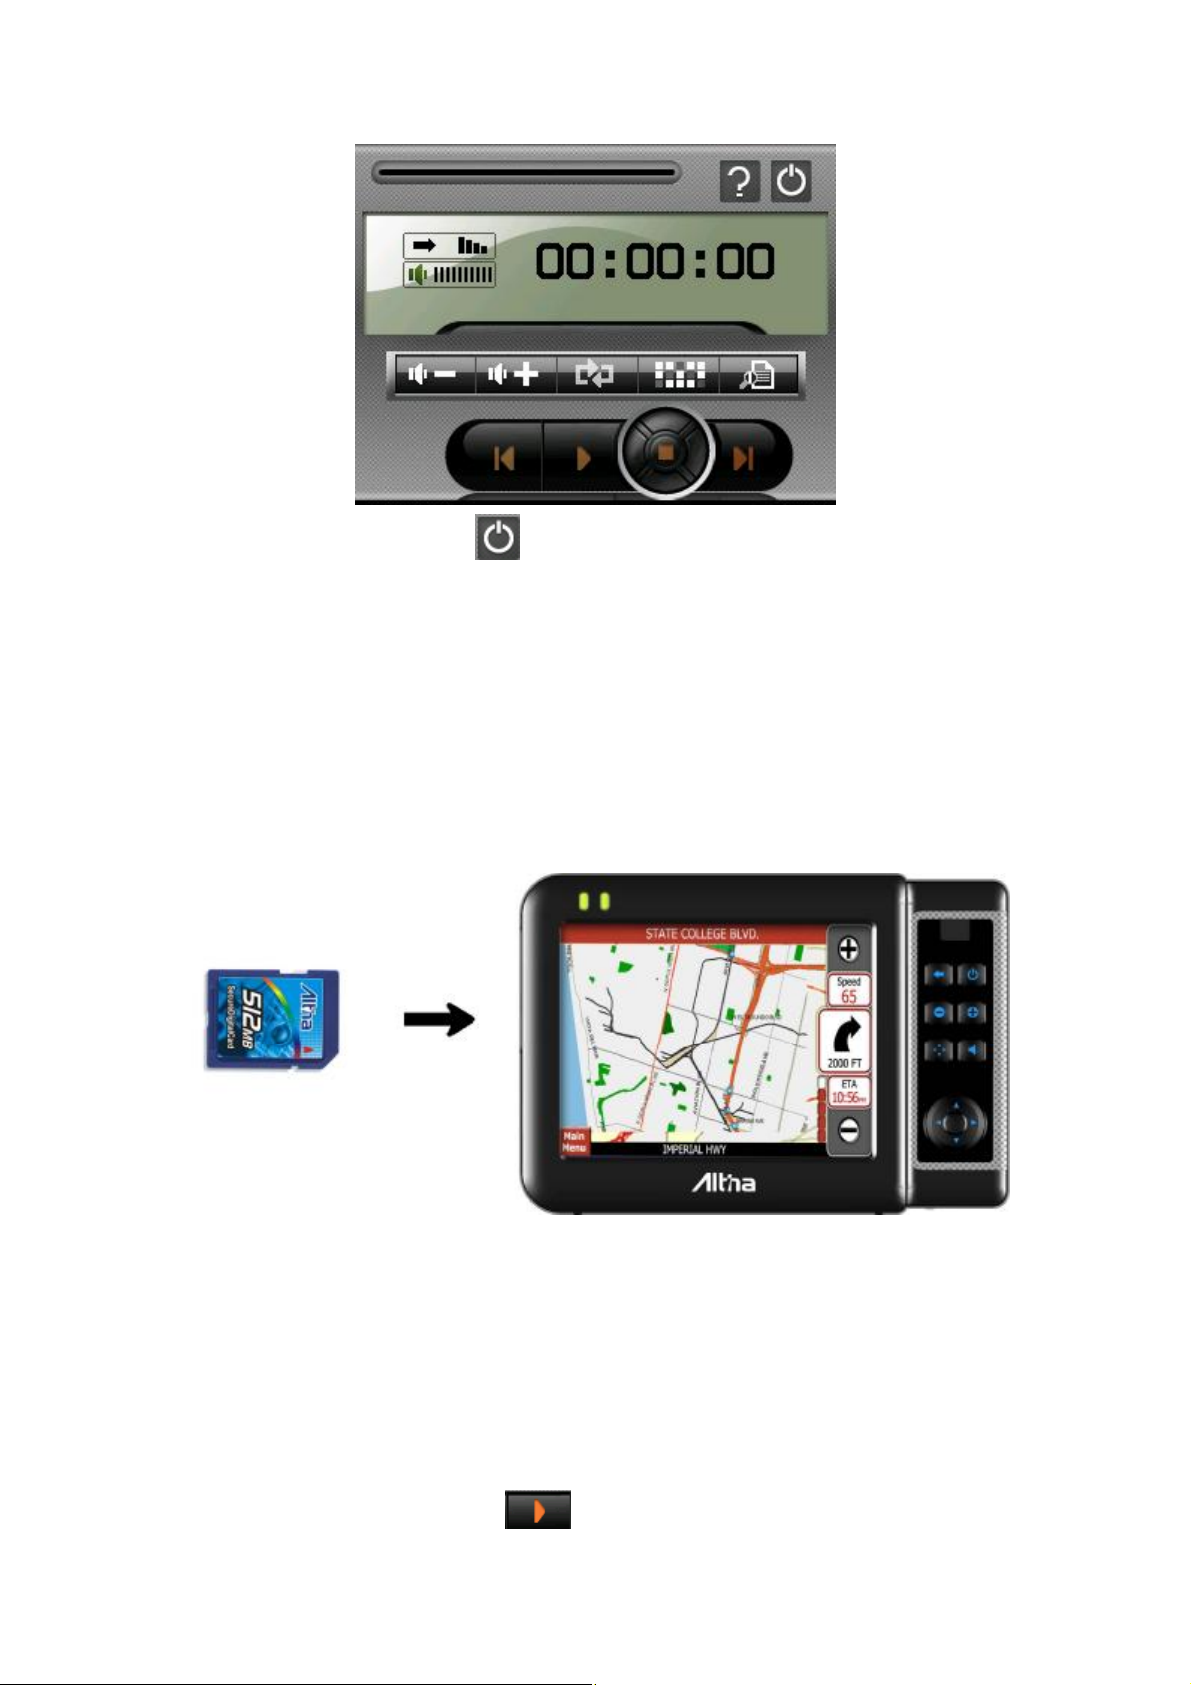
To exit the program, just tap in the lower right of the screen.
7.2 Preparing MP3 Files for Your Device
With the card reader, you can easily copy MP3 files from your computer to a
storage card. The MP3 Player can detect MP3 files in all folders of a storage
card.
7.3 Playing MP3 Files
1. Tap the MP3 Player button on the Main screen to switch to the program
2. To start the playback, tap To control the playback, use the control
Page 50
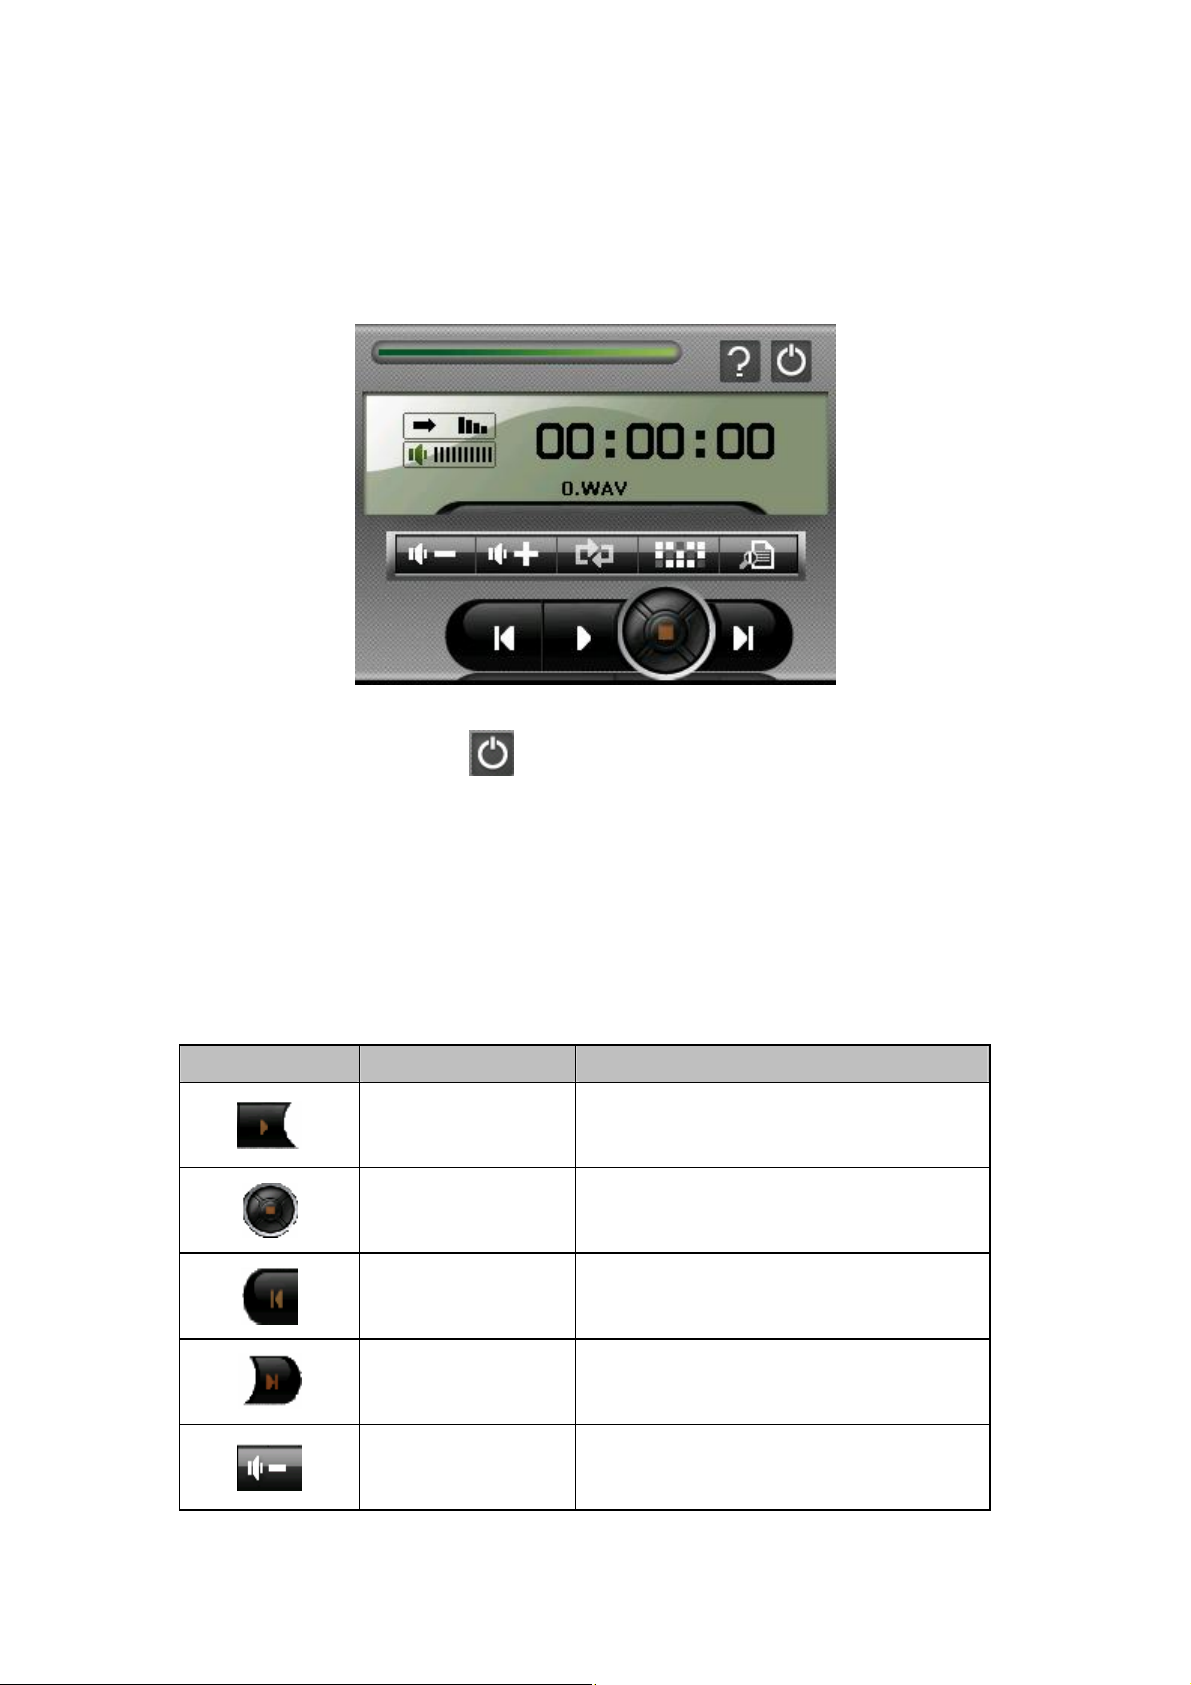
buttons as described later.
※NOTE: When files are added to the play list, the play list is automatically
saved when you exit MP3 Player.
3. To exit the program, tap at the top of the toolbar. You will return to the
Main menu.
7.4 MP3 Playback Control
You can control the MP3 Player via control buttons. See the table below for
details:
Control Button
Name Description
Play Play the playback.
Stop Stop the playback.
Previous Move to the previous file.
Next Move to the next file.
Decrease the volume.
Volume
The indicator on the upper right corner of the
Page 51
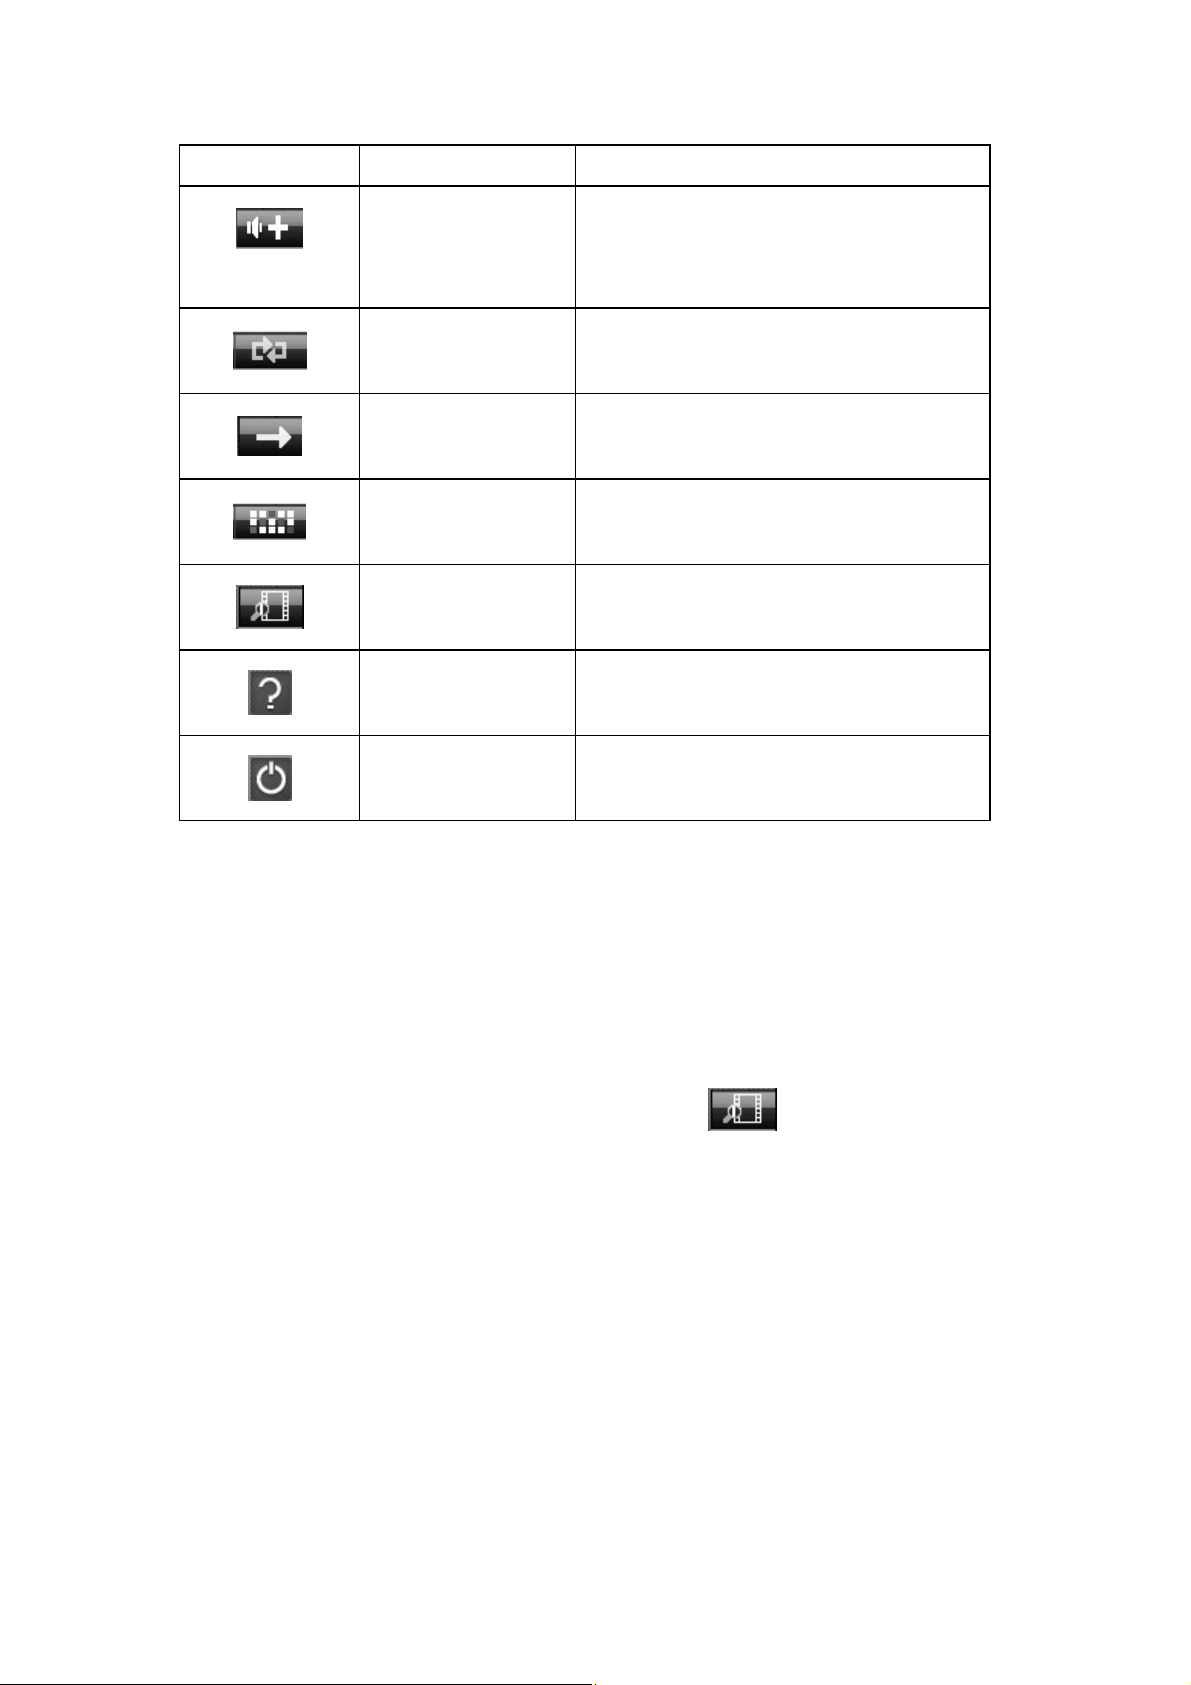
panel will show the current volume level.
Increase the volume.
Volume
The indicator on the upper right corner of the
panel will show the current volume level.
Repeat all Repeat all
Single playback Single playback
Random Random sequence
Play List Open play list.
Info Check version
Exit Exit MP3 Player
7.5 Using Play List
Once the MP3 player is open, by default the system will automatically load all
MP3 files in the play list. If you wish to create your own play list, follow the
instructions below:
1. To create your own play list in MP3 Player, tap on the right toolbar.
Page 52
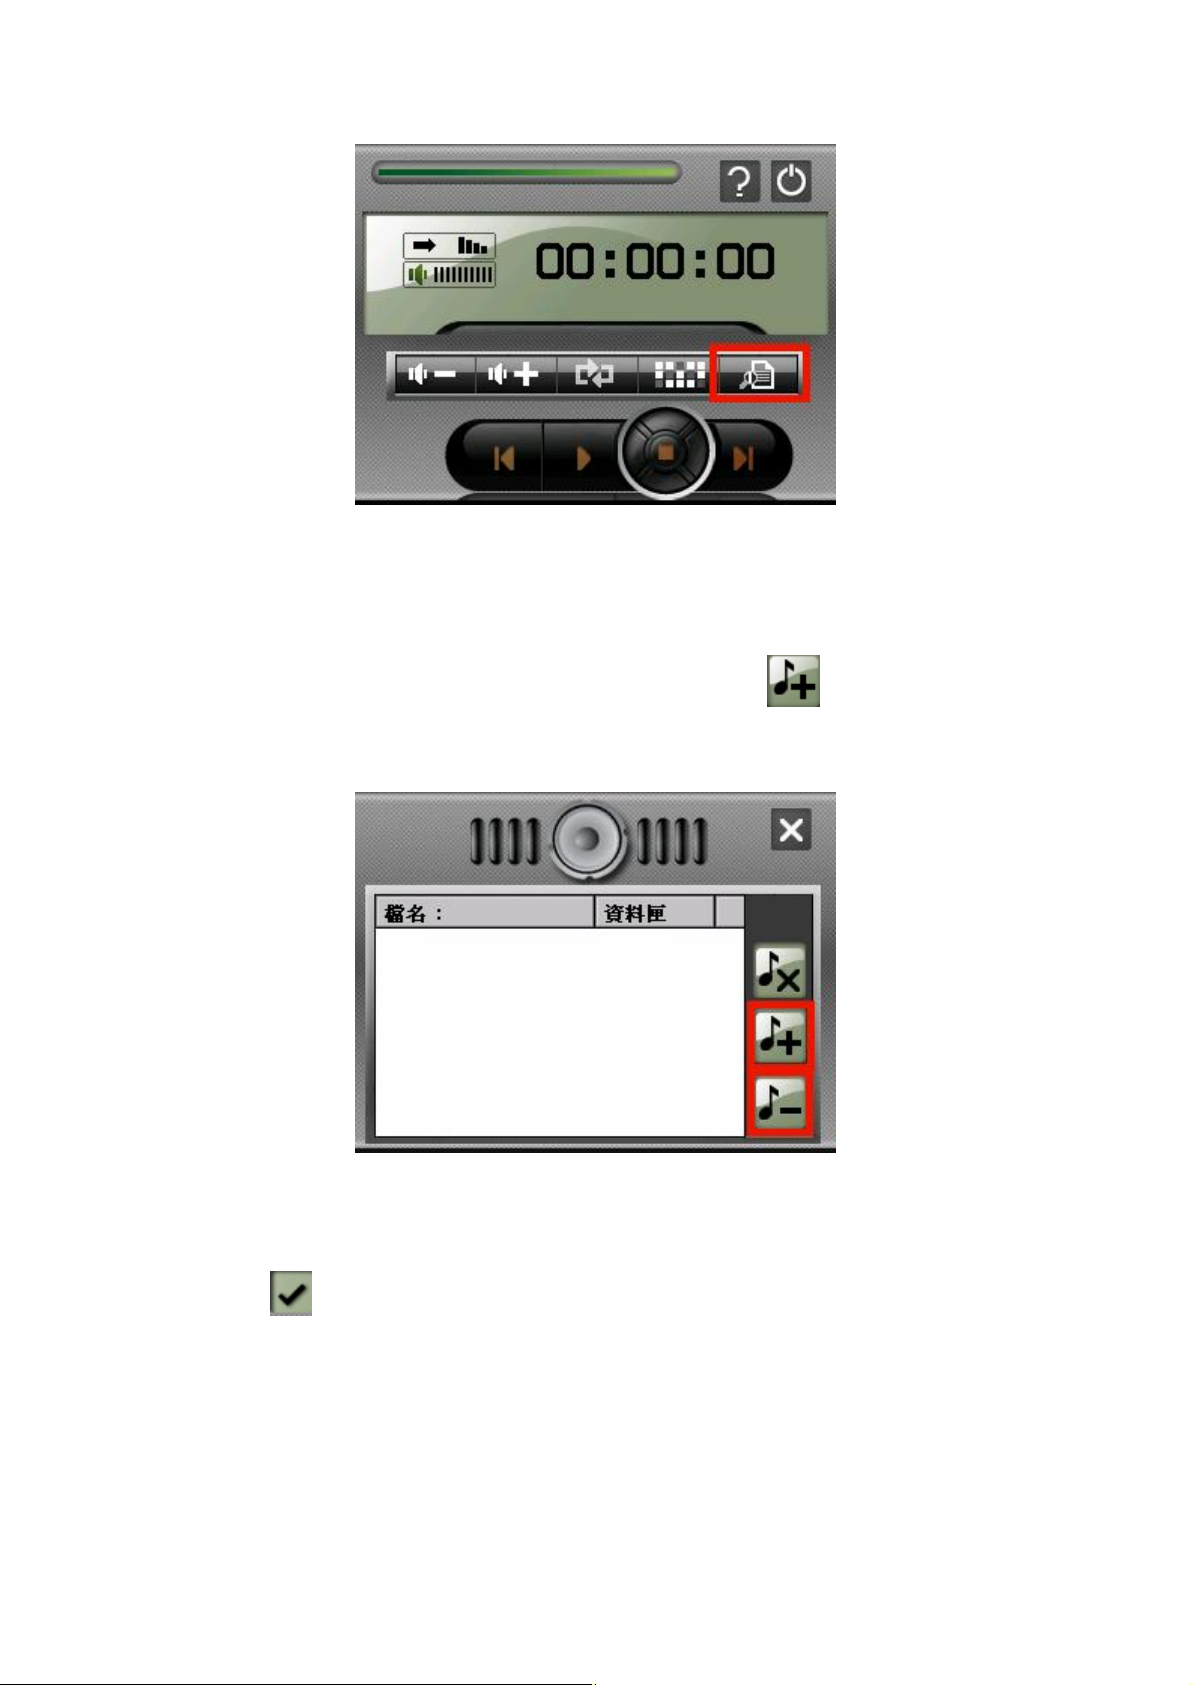
2. You can use the following buttons to add or delete songs in your play list:
※Add Song
Add a new song to your play list. Tap Add Song icon .
3. Choose a song that you wish to add to your play list . Tap Add Song
button at the bottom of the screen. The new song will appear in your
play list.
Page 53
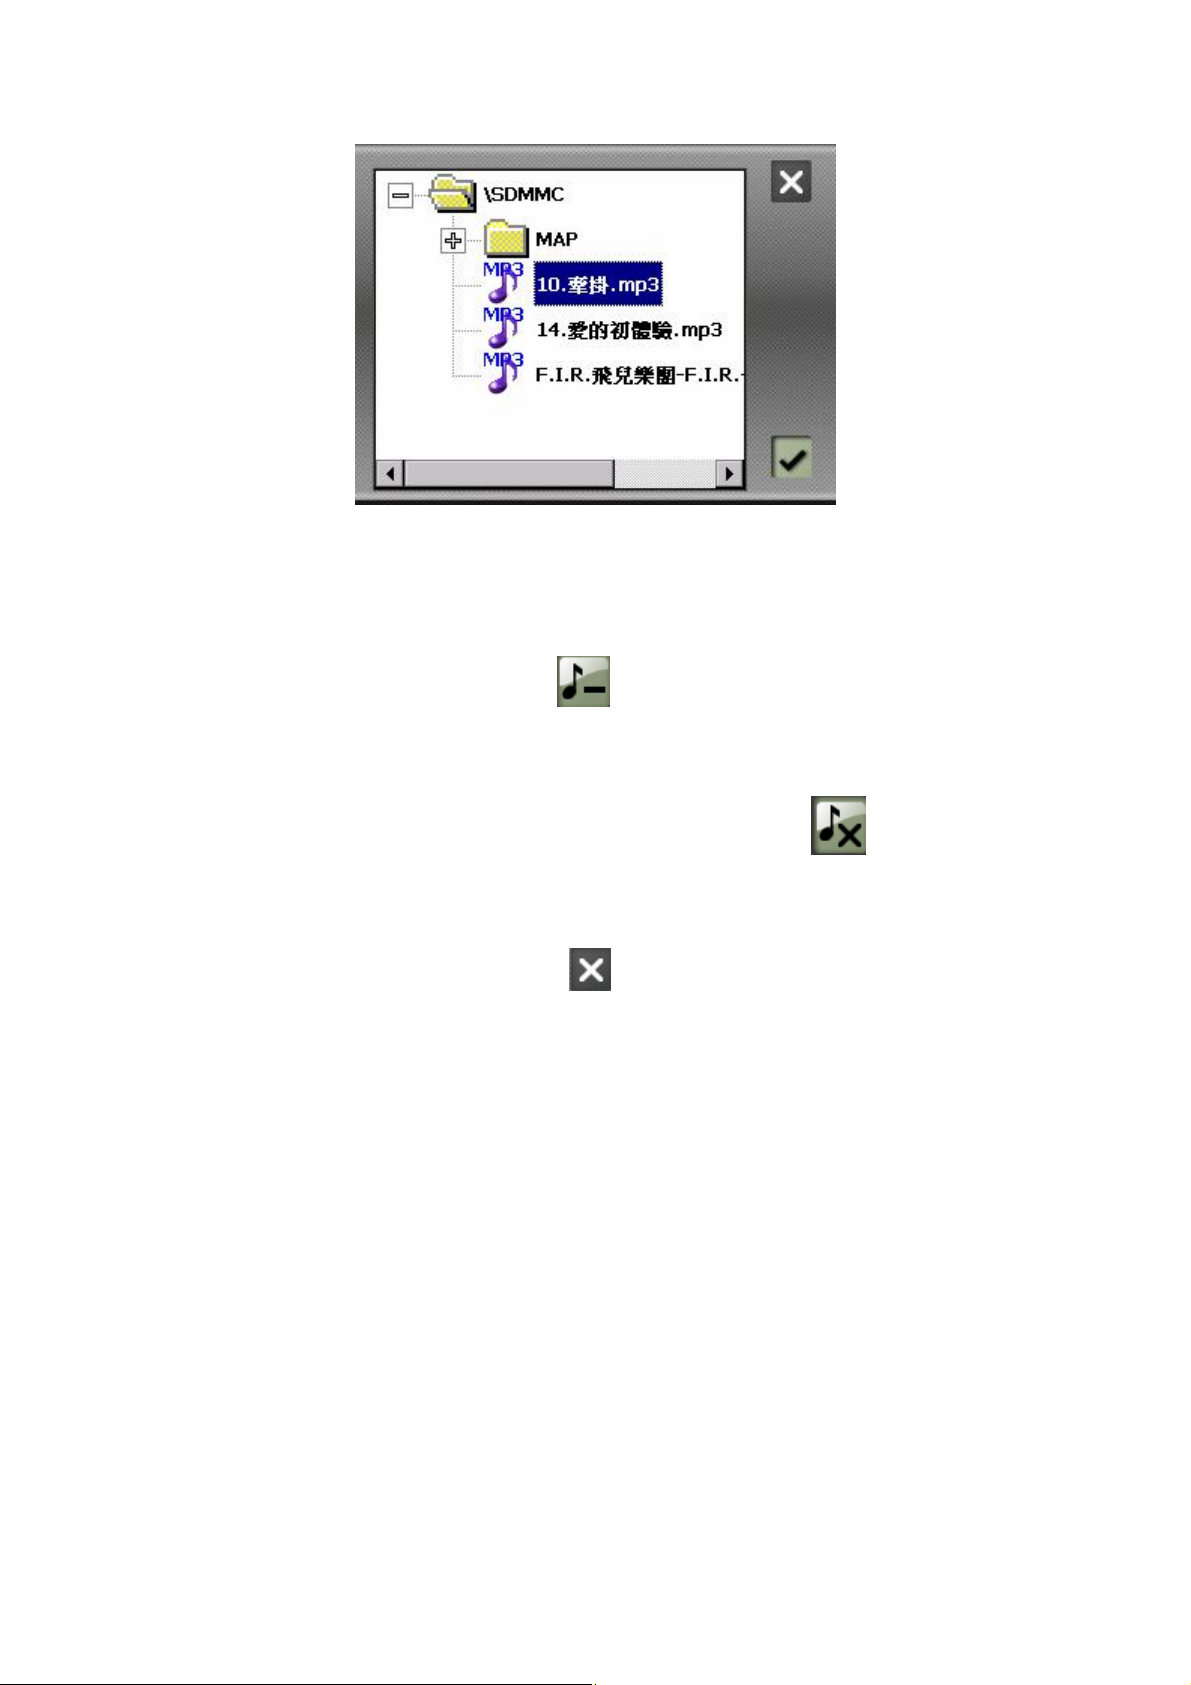
3. Delete Song
Remove one song from your play list. Choose a song that you wish to
delete and tap Delete Song icon .
4. Delete All
Remove all songs from your play list. Tap Delete All icon on the right
toolbar. All songs in your play list will be removed.
5. To return to the control panel, tap on the right toolbar.
Page 54
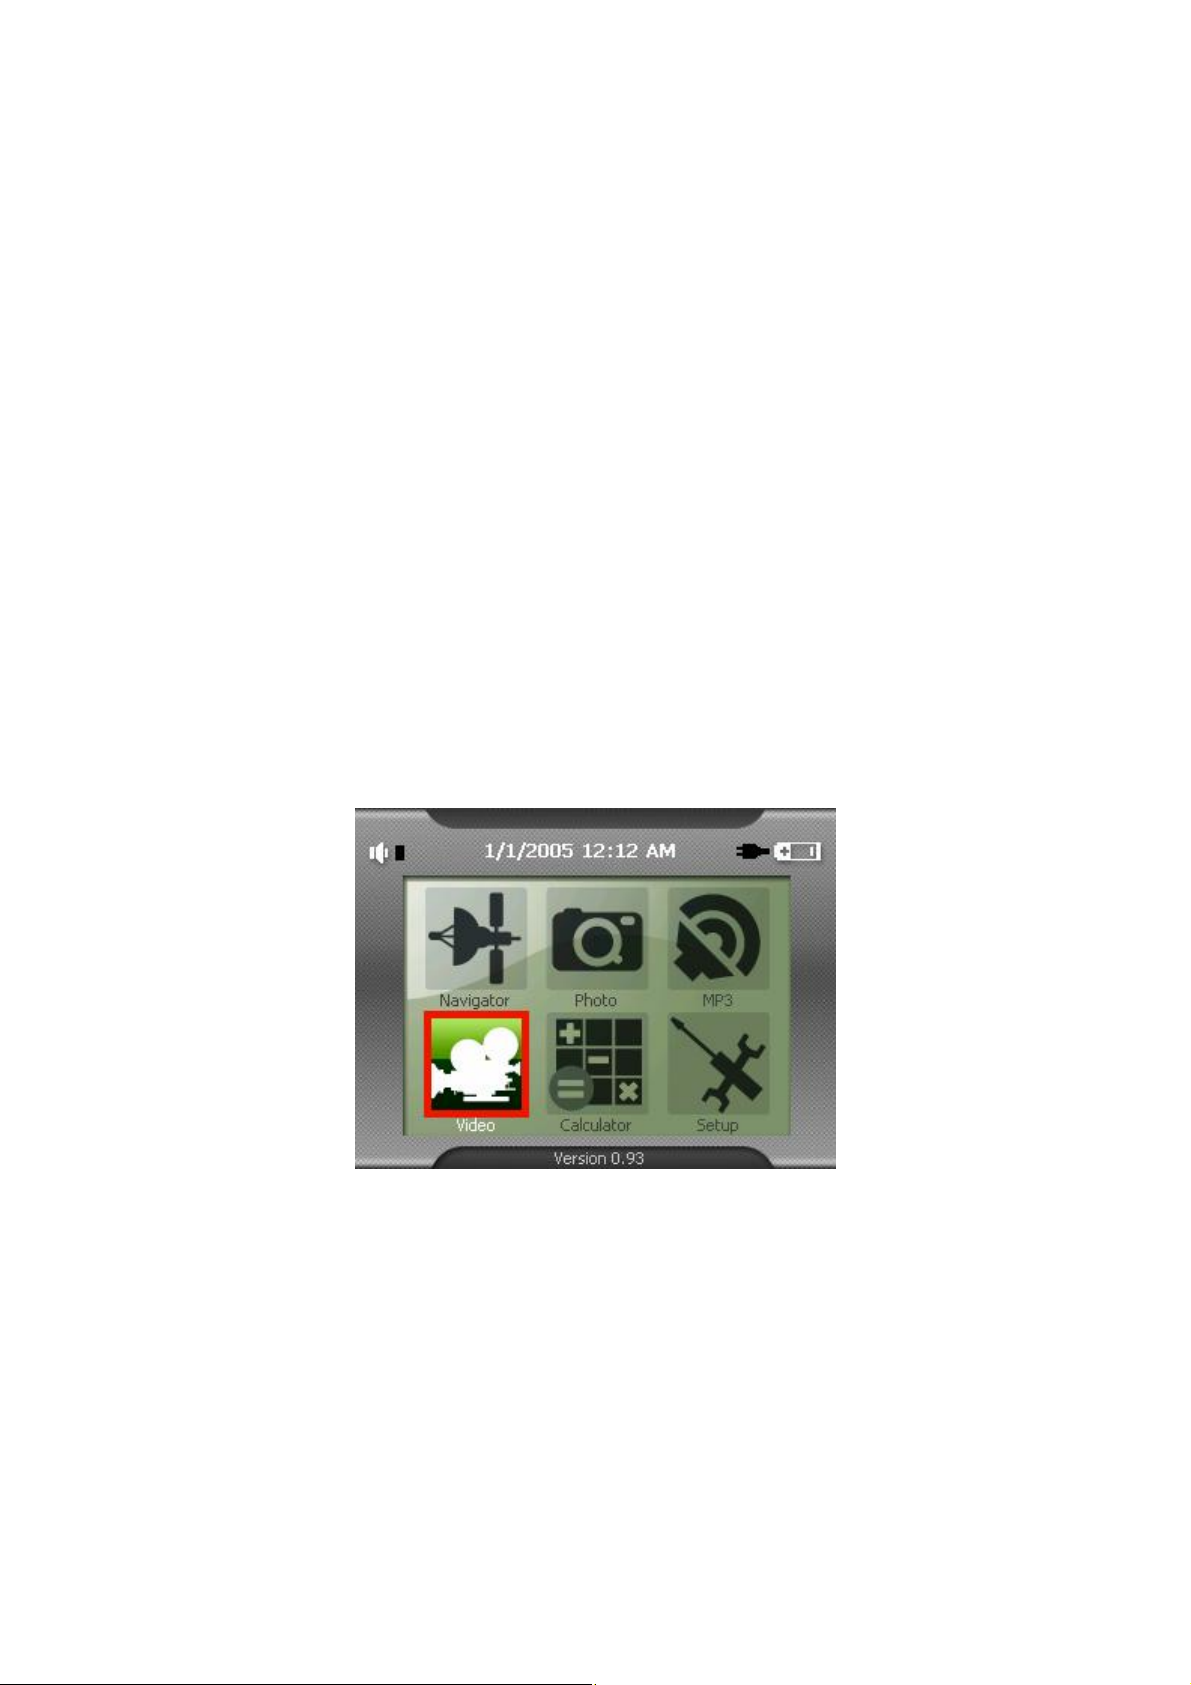
8. Using Video Player
This chapter tells you how to play Video files using your device
The Video Player program turns your device into an Video player. It features:
※ Playback of WMV, ASF and AVI(Microsoft format) files
※ Basic playback controls such as play, pause, stop, next and previous
※ Playback includes single selection playback, repeat, single repeat,
sampling playback, normal sequence and random sequence.
※ Play list support
8.1 Starting and Exiting Video Player
Tap Video Player on the Main screen to switch to the program.
The control panel will appear on the screen. You can now easily control the
Video player by tapping the control buttons.
Page 55
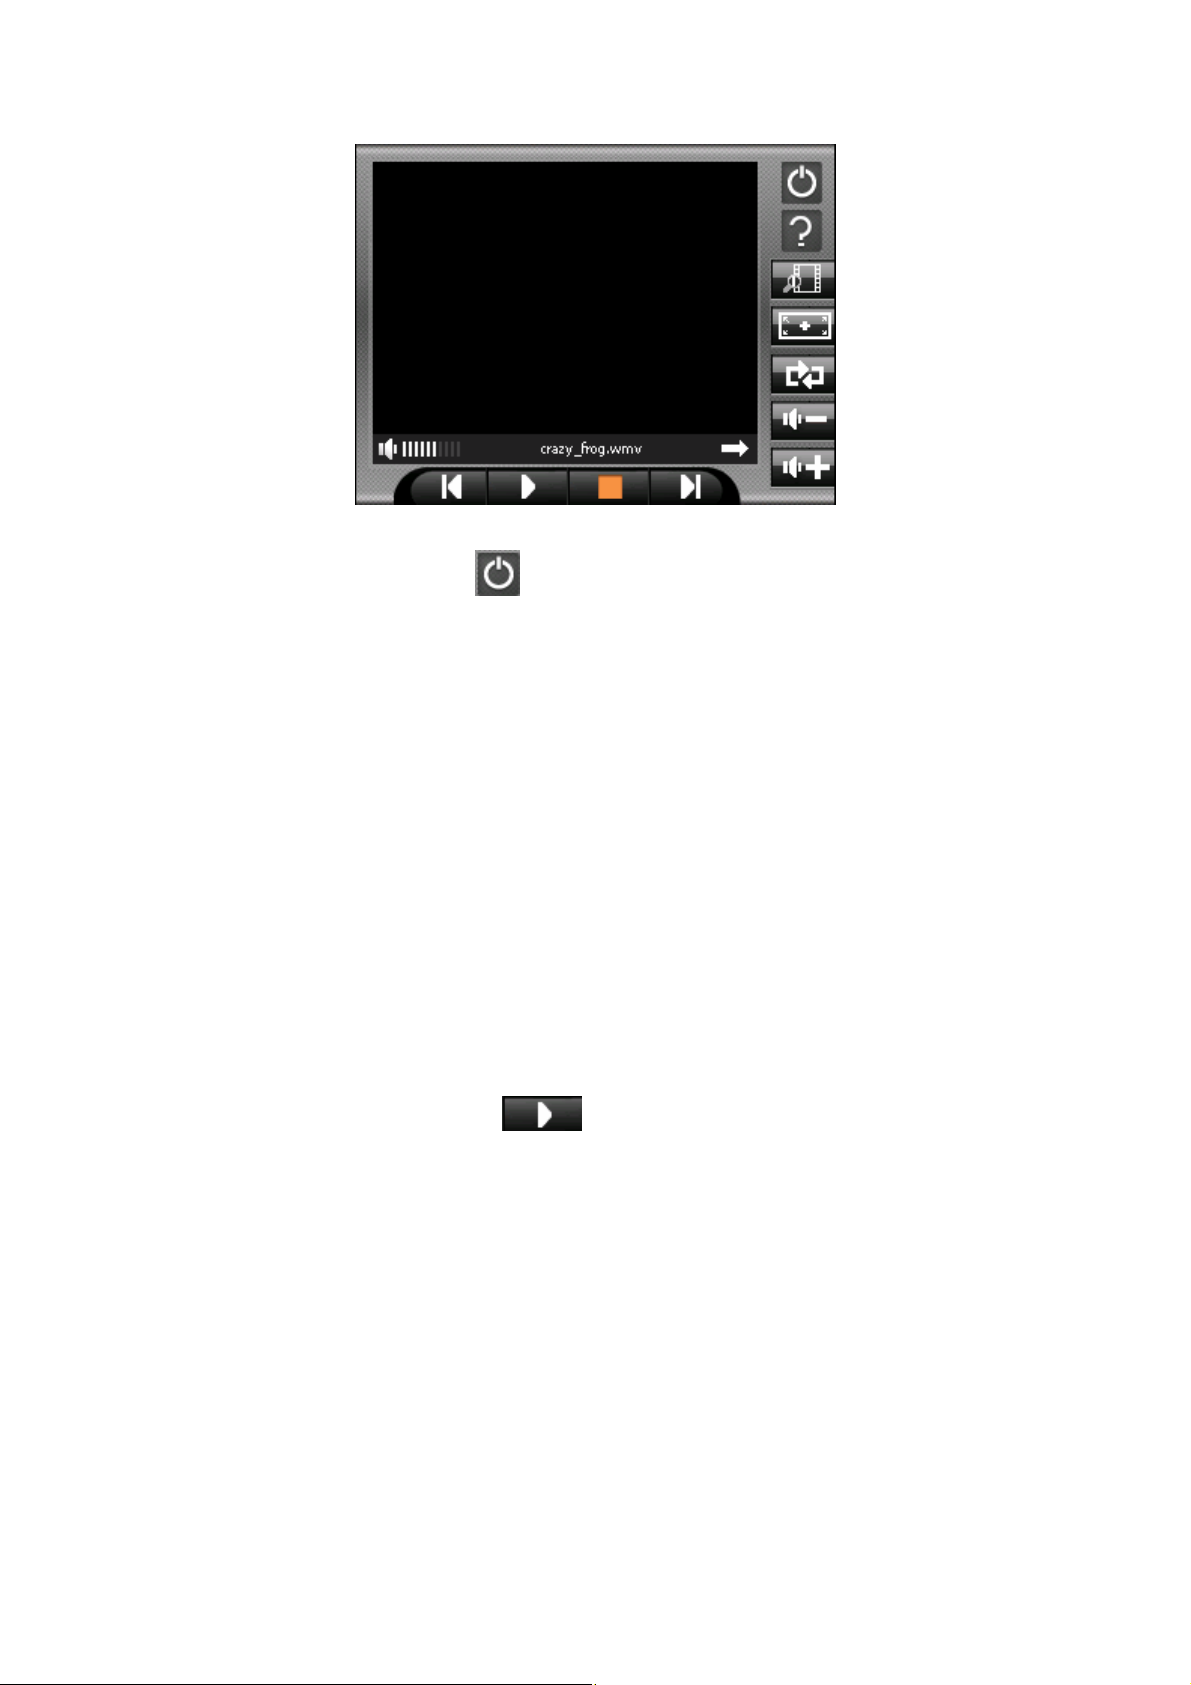
To exit the program, just tap in the lower right of the screen.
8.2 Preparing Video Files for Your Device
With the card reader, you can easily copy Video files from your computer to a
storage card. The Video Player can detect Video files in all folders of a storage
card.
8.3 Playing Video Files
1. Tap the Video Player button on the Main screen to switch to the program
2. To start the playback, tap To control the playback, use the control
buttons as described later.
※NOTE: When files are added to the play list, the play list is automatically
saved when you exit MP3 Player.
Page 56
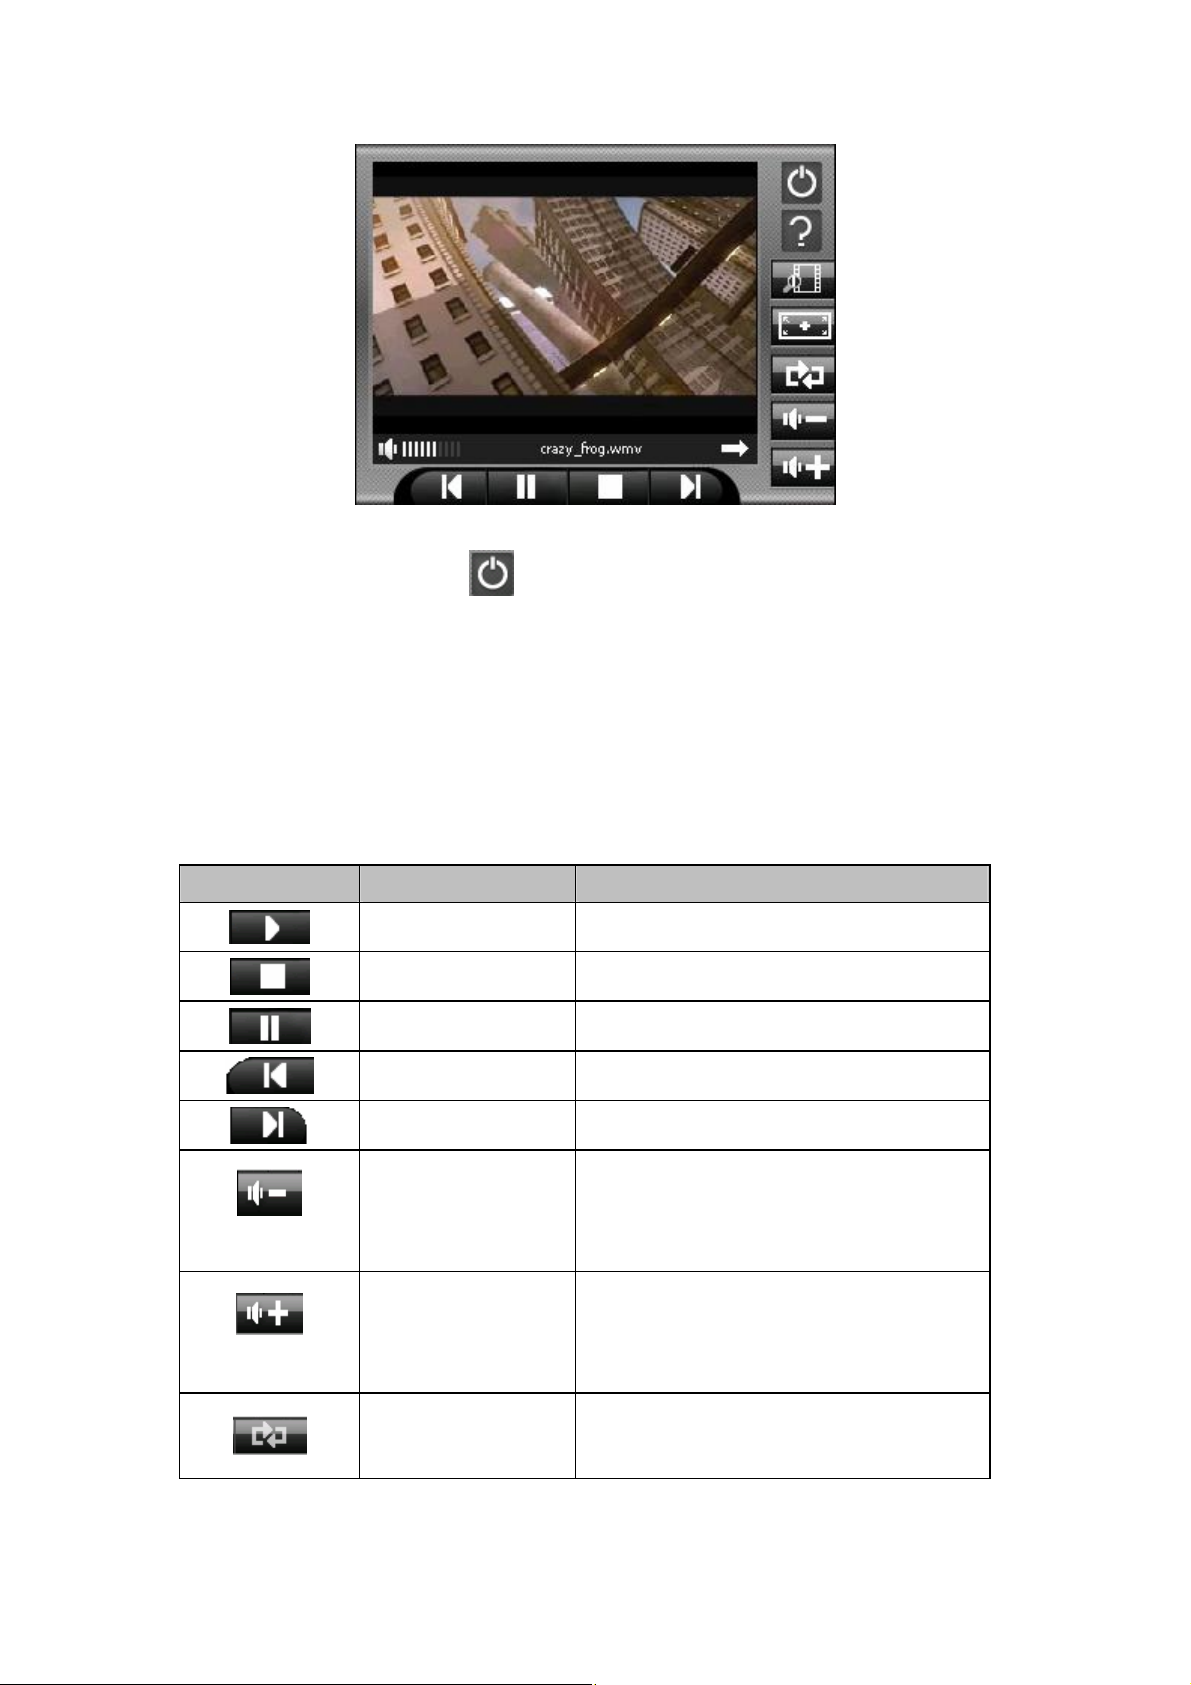
3. To exit the program, tap at the top of the toolbar. You will return to the
Main menu.
8.4 MP3 Playback Control
You can control the MP3 Player via control buttons. See the table below for
details:
Control Button
Name Description
Play Play the playback.
Stop Stop the playback.
Pause Pause the playback
Previous Move to the previous file.
Next Move to the next file.
Decrease the volume.
Volume
The indicator on the upper right corner of the
panel will show the current volume level.
Increase the volume.
Volume
The indicator on the upper right corner of the
panel will show the current volume level.
Repeat all Repeat all
Page 57
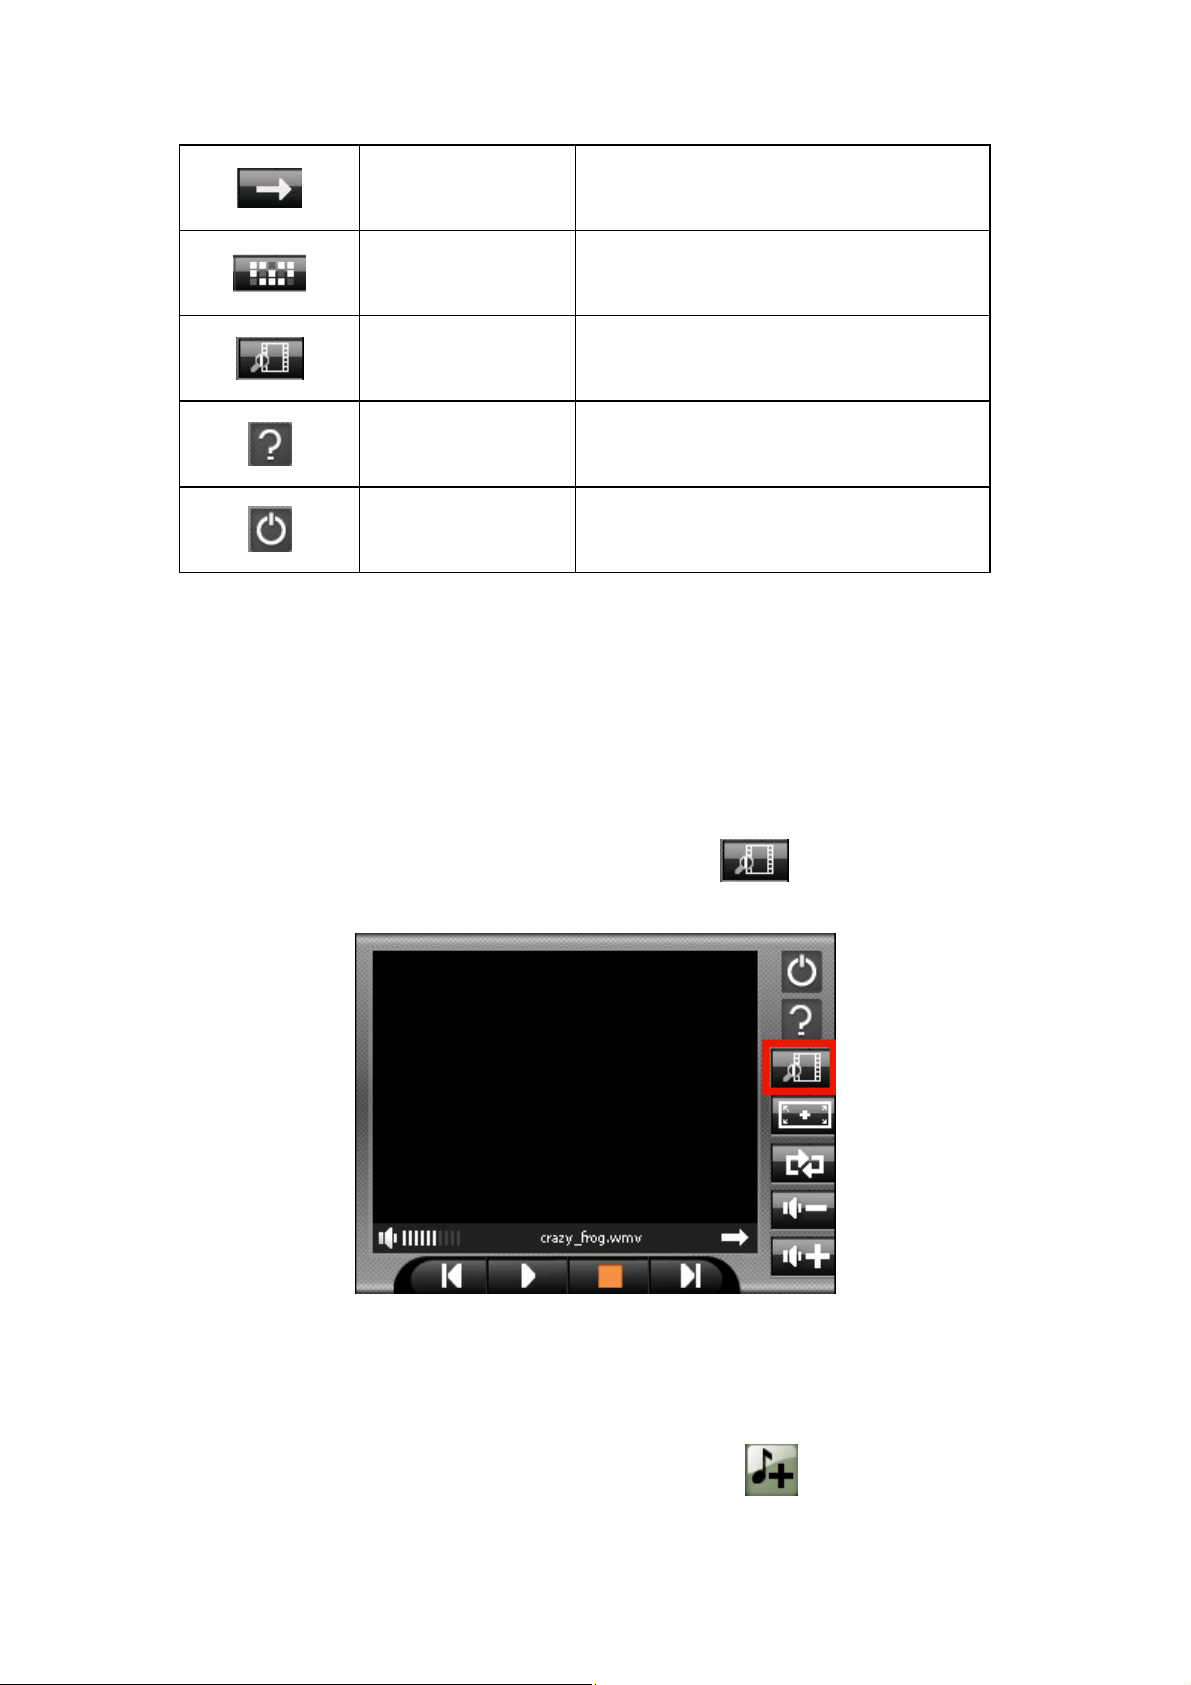
Single playback Single playback
Random Random sequence
Play List Open play list.
Info Check version
Exit Exit MP3 Player
8.5 Using Play List
Once the Video player is open, by default the system will automatically load all
Video files in the play list. If you wish to create your own play list, follow the
instructions below:
1. To create your own play list in Video Player, tap 圖示。
2. You can use the following buttons to add or delete songs in your play list:
※Add file
Add a new file to your play list. Tap Add file icon
Page 58
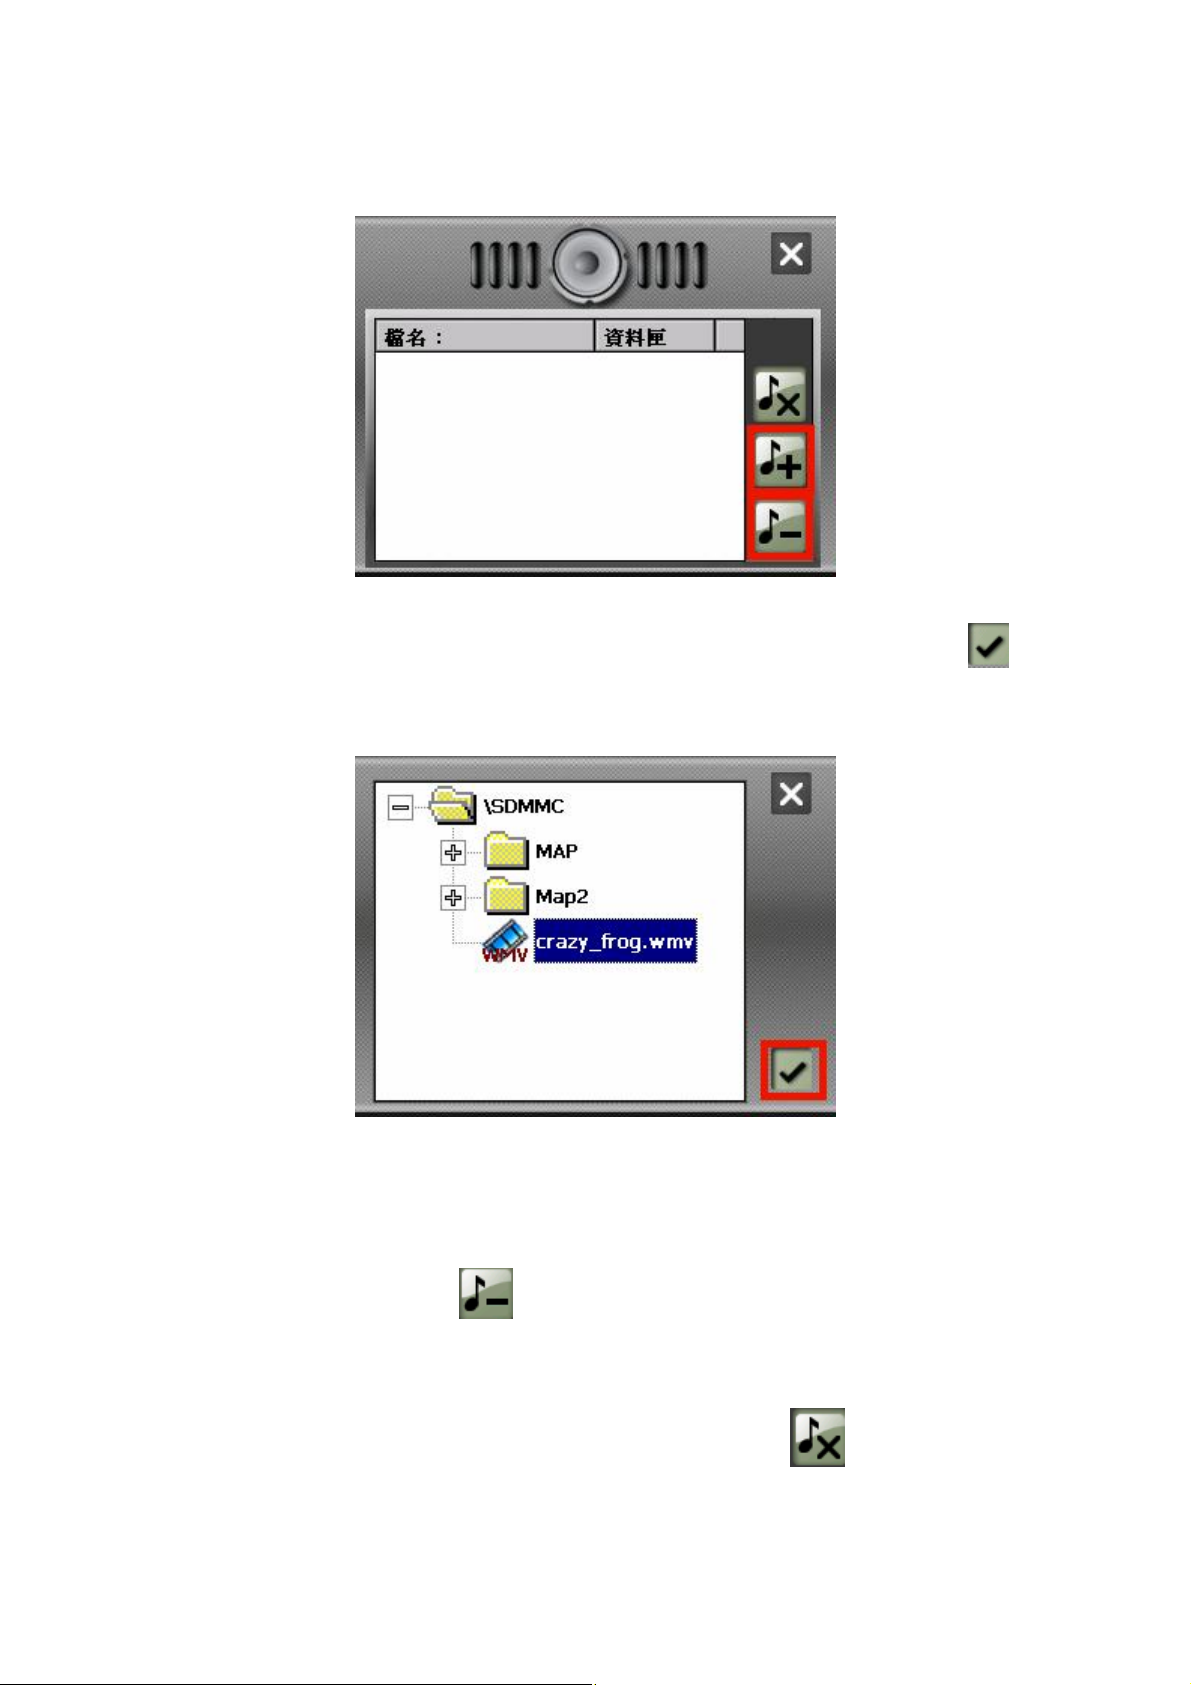
on the right toolbar.
3. Choose a file that you wish to add to your play list . Tap Add file button
at the bottom of the screen. The new video file will appear in your play list.
4. Delete file
Remove one file from your play list. Choose a file that you wish to delete
and tap Delete file icon .
5. Delete All
Remove all files from your play list. Tap Delete All icon on the right
toolbar. All files in your play list will be removed.
Page 59

6. To return to the control panel, tap on the right toolbar.
Page 60
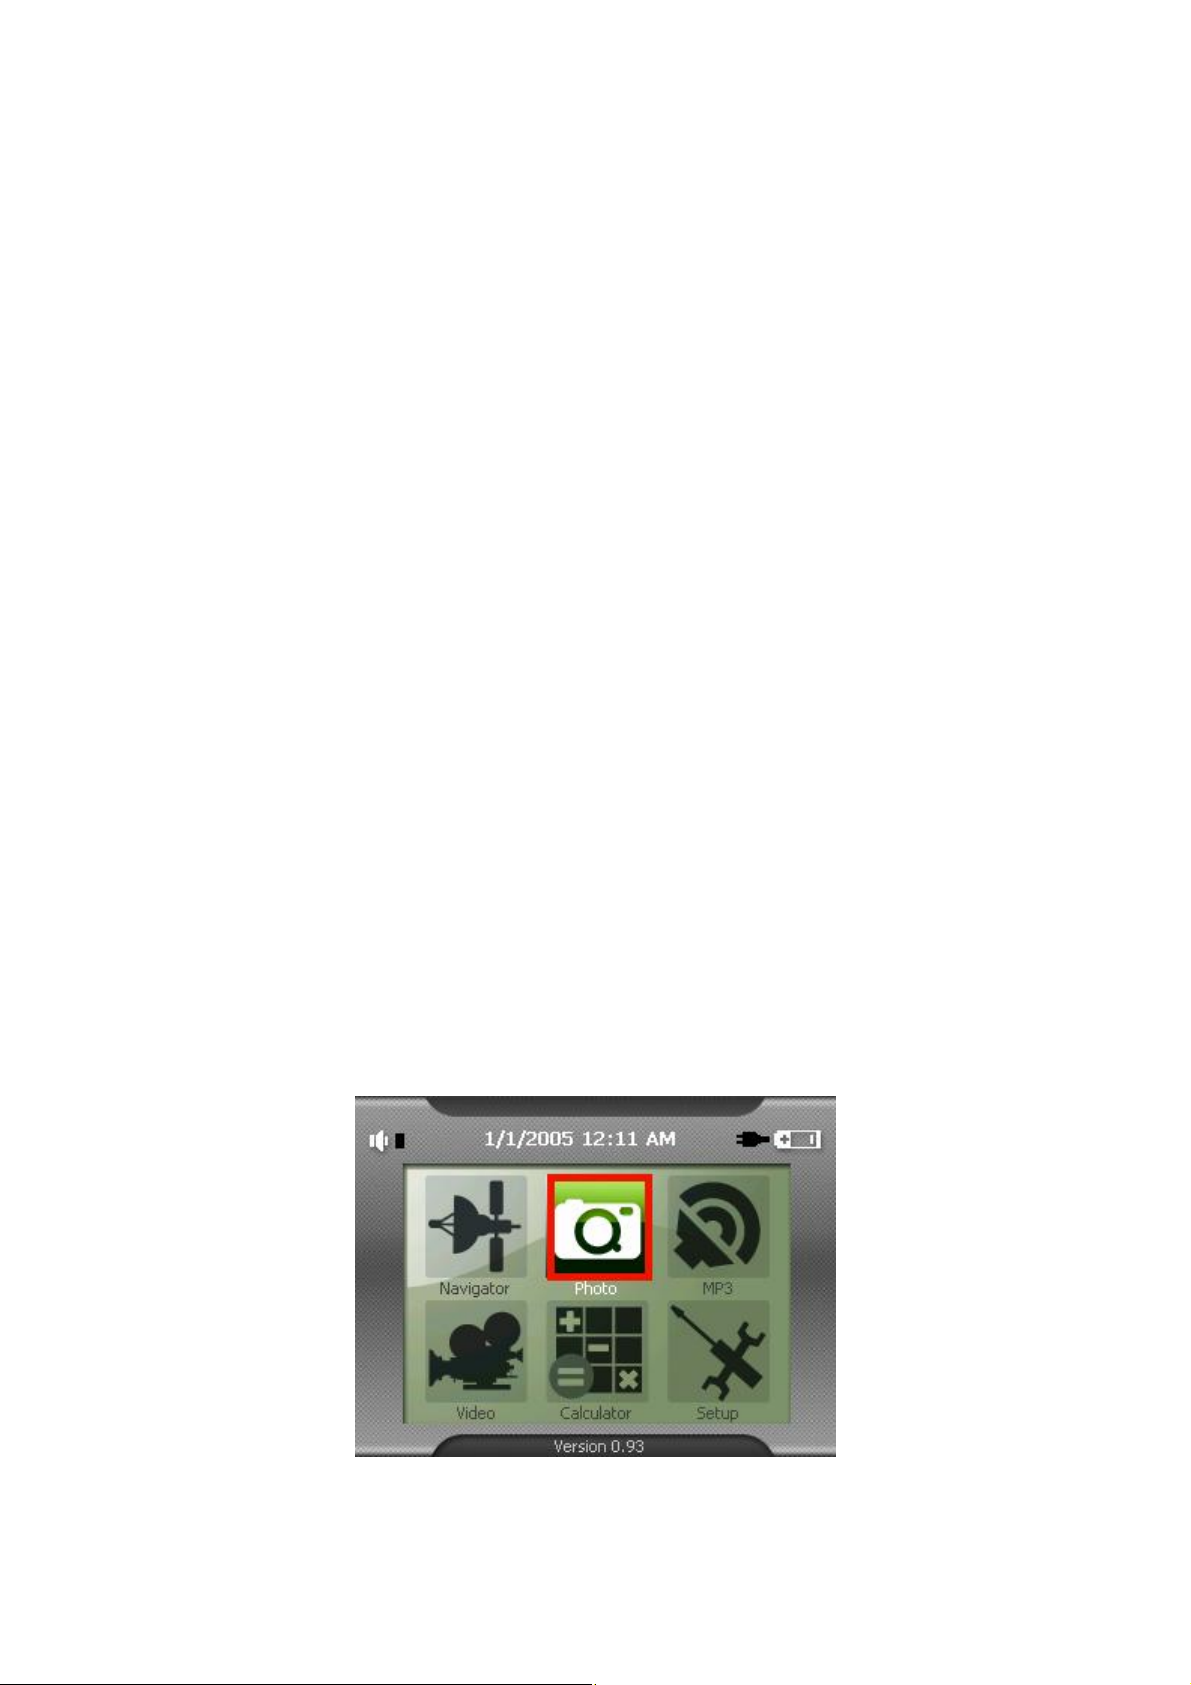
9. Using Photo Player
This chapter tells you how to play Photo files using your device
The Photo Player program turns your device into an Photo player. It features:
※ Playback of JPEG files
※ Basic playback controls such as the picture with zoom in/out, rotation in full
screen.
※ Playback includes single selection playback, repeat, single repeat,
sampling playback, normal sequence and random sequence.
※ You may browse through the pictures in different modes, file explore mode,
thumbnail mode, full screen mode and slide show mode.
9.1 Starting and Exiting Photo Player
Tap Video Player on the Main screen to switch to the program.
9.2 Photo View Program
The control panel will appear on the screen. You can now easily control the
Photo player by tapping the control buttons.
Page 61
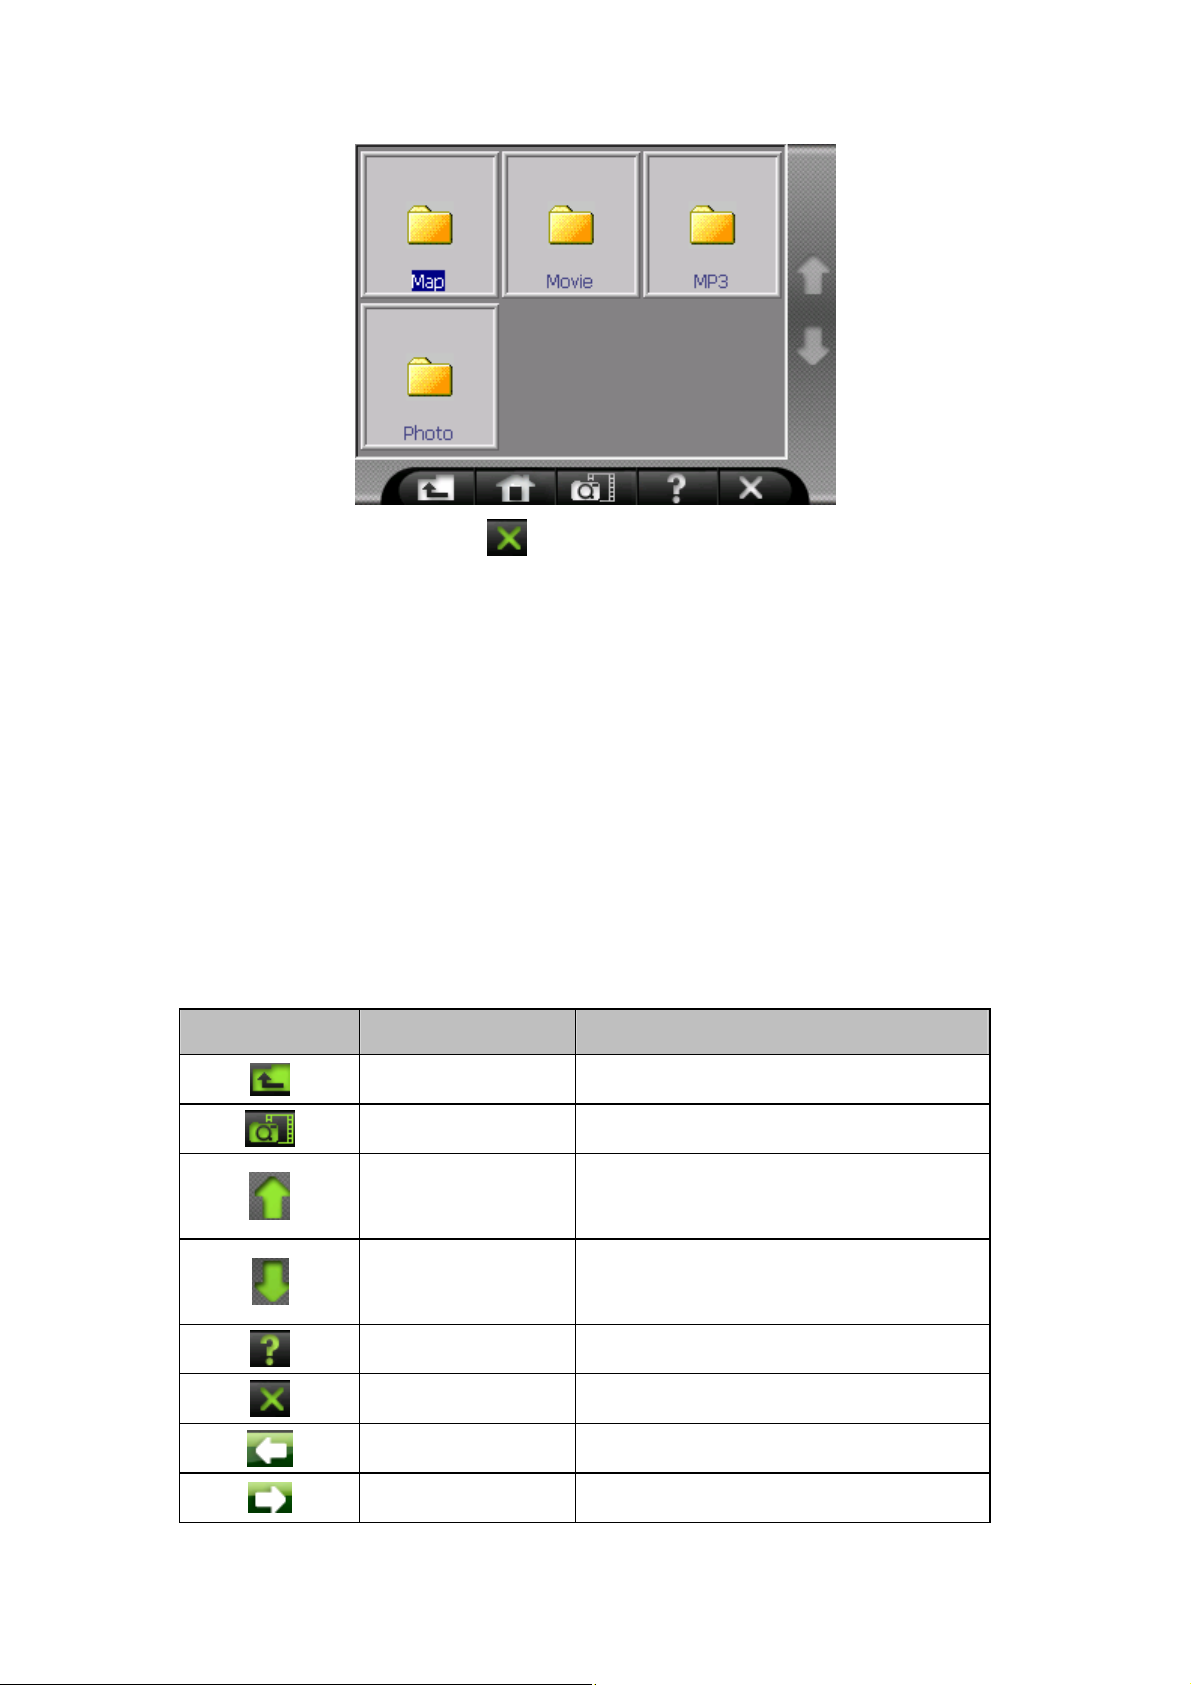
To exit the program, just tap in the lower right of the screen.
9.3 Preparing Photo Files for Your Device
With the card reader, you can easily copy Photo files from your computer to a
storage card. The Photo Player can detect Photo files in all folders of a storage
card.
9.4 Photo Playback Control
You can control the Photo Player via control buttons. See the table below for
details:
控制鈕 名稱 說明
Back Back to previous layer
Play Play slide show
Previous Back to previous page
Next Forward to next page
Info Check version
Exit Exit the program
previous Play the previous file
next Play the next file
Page 62
Zoon in Zoom in the photo
Zoom out Zoom out the photo
Display Normal Display
Right Rotate Play file in Right Rotation
Left Rotate Play file in Left Rotation
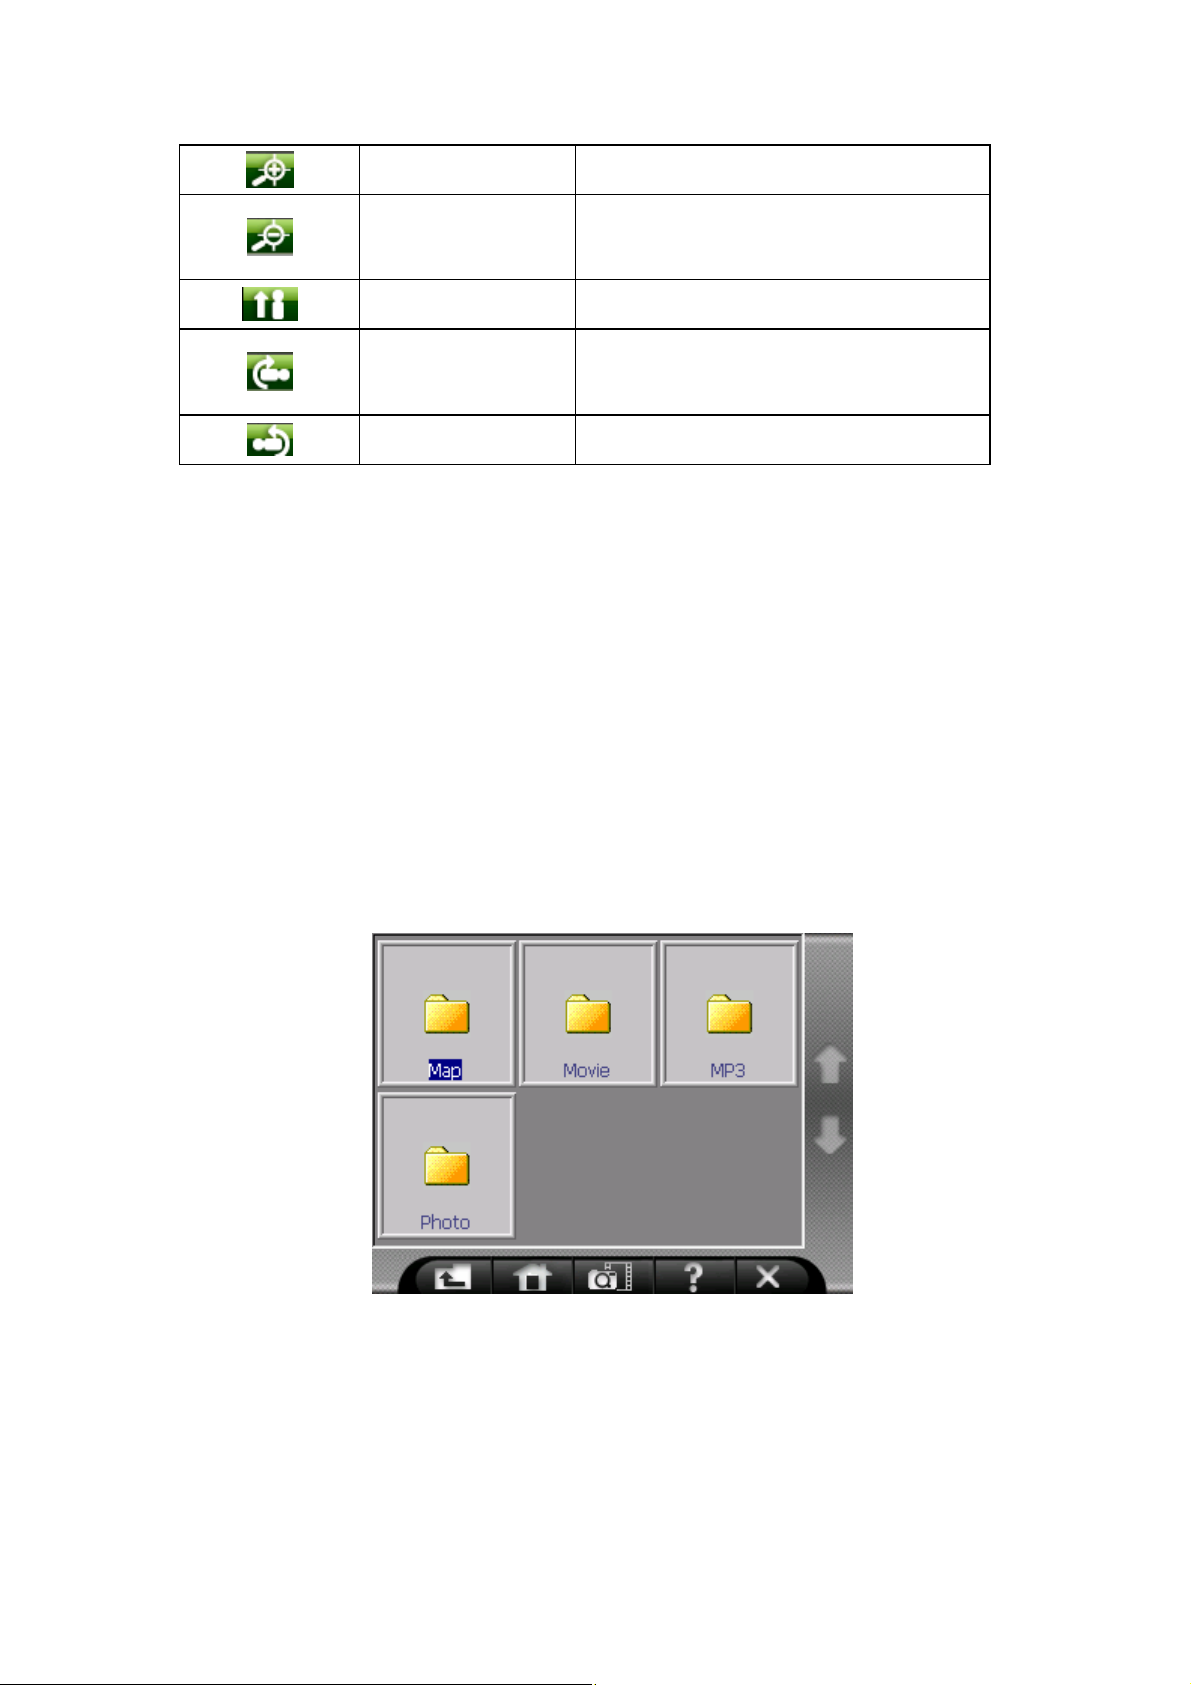
9.5 Display Mode
You may browse through the pictures in four different modes, file explore mode,
thumbnail mode, full screen mode and slide show mode.
j File explore mode
1. Tap Photo Player on the Main screen to switch to the program.
2. The default screen will show the explore mode of data structure and include
all folders and files in the SD/MMC card.
k Thumbnail Mode
1. Tap Photo Player on the Main screen to switch to the program.
2. When you browse the files of the folder, the relative photo files will be shown
in thumbnail mode of the windoow.
Page 63
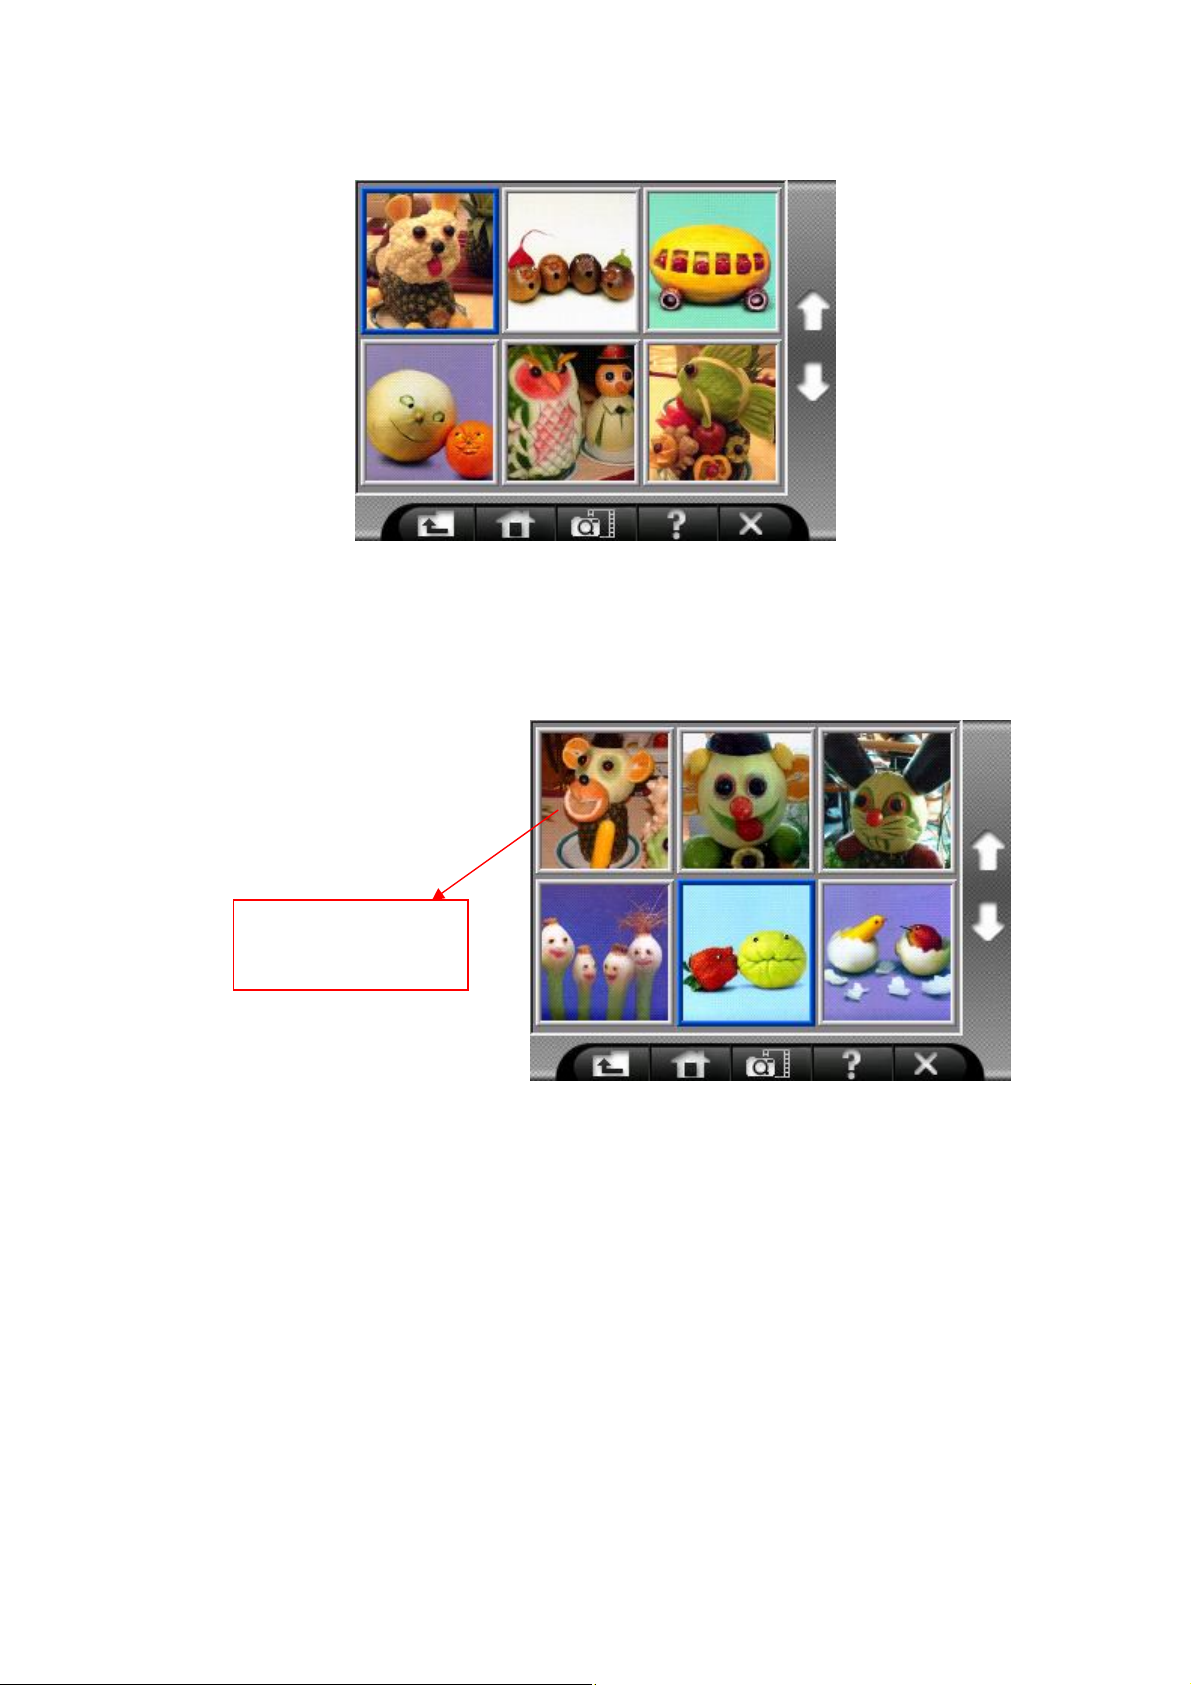
l Full screen mode
1. Tap Photo Player on the Main screen to switch to the program.
2. Tap the photo file in the window and double click.
1. Select the file
2. Double Click
2. The selected file will be shown in full screen mode.
Page 64
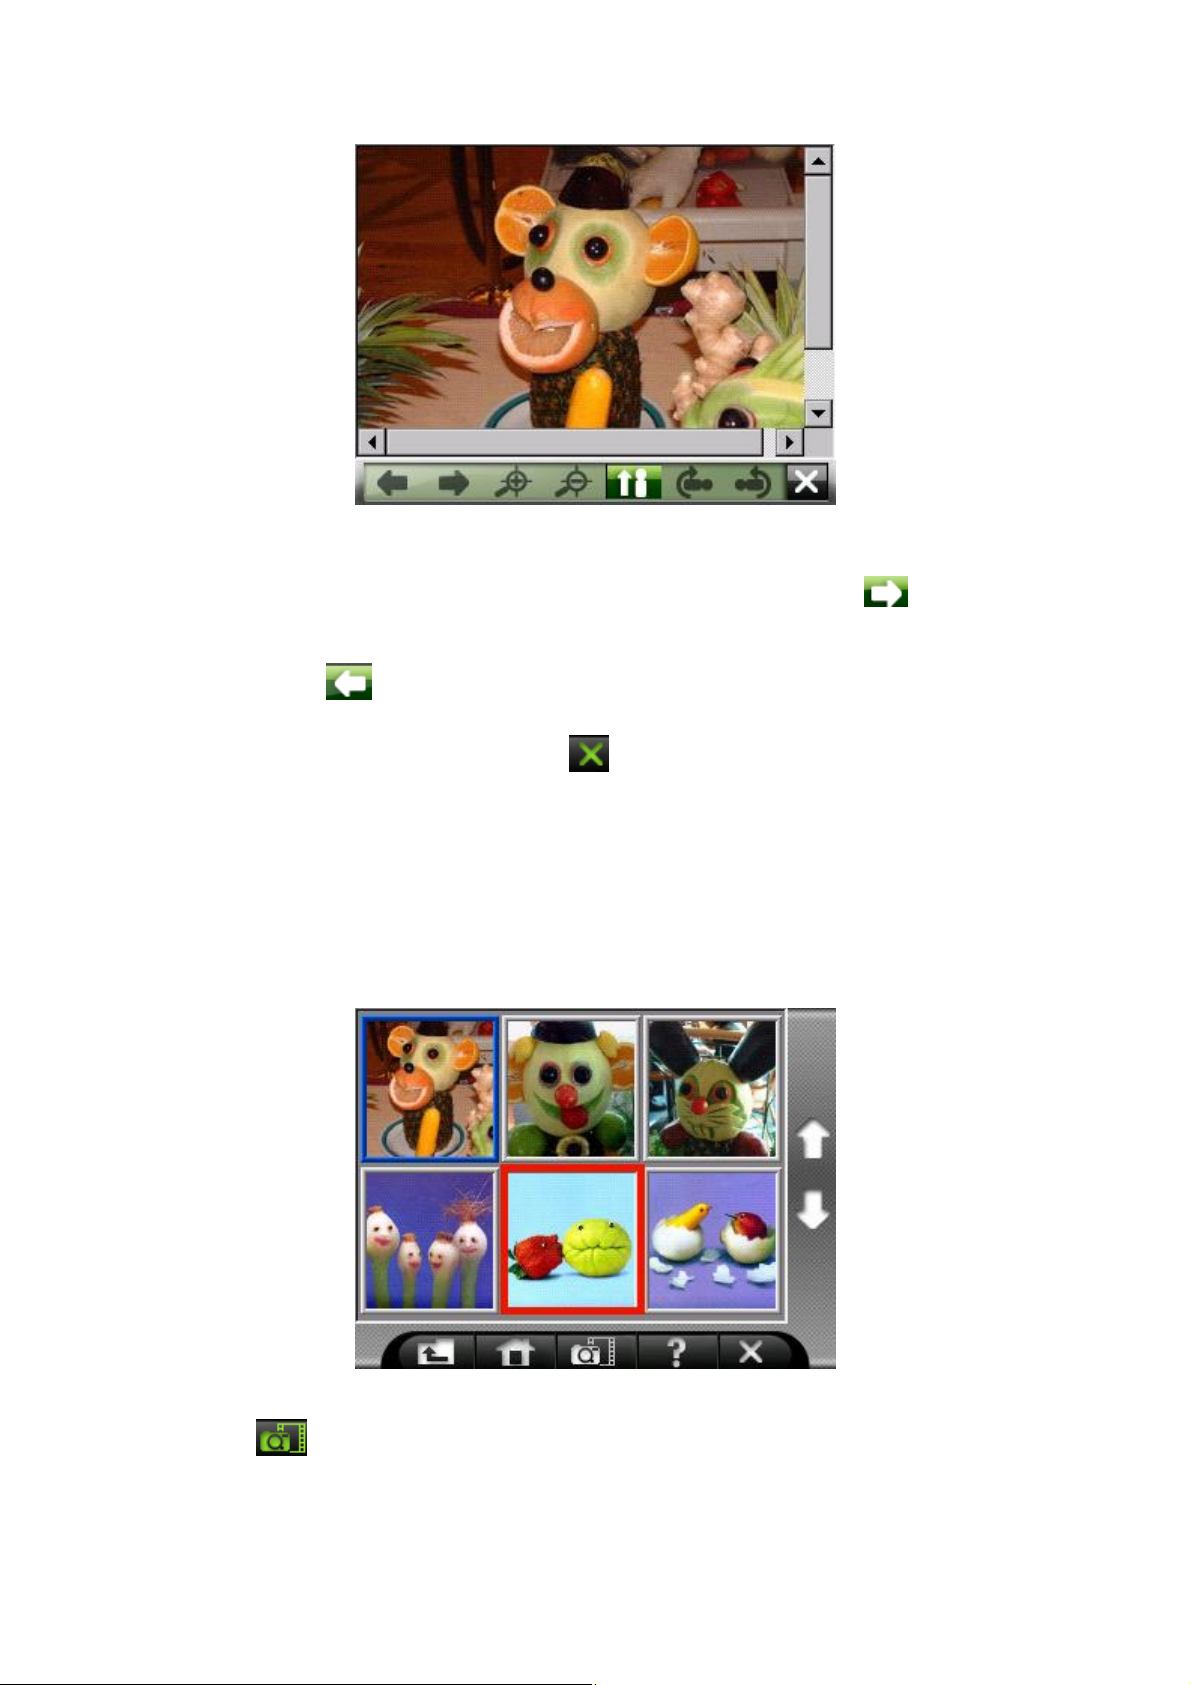
4. The photo program will automatically detect the photo files of your flash
cards. If you are going to browse the next photo, please tap icon and
it will show the next image. If you are going to browse the previous photo,
please tap icon and it will show the previous image.
5. To return to the control panel, tap on the right toolbar.
m Slide Show Mode
1. Tap Photo Player on the Main screen to switch to the program.
2. Tap the photo file in the window and double click.
3. Tap icon and it will show the photos in slide show.
4. The photo program will play the photos in full screen.
Page 65
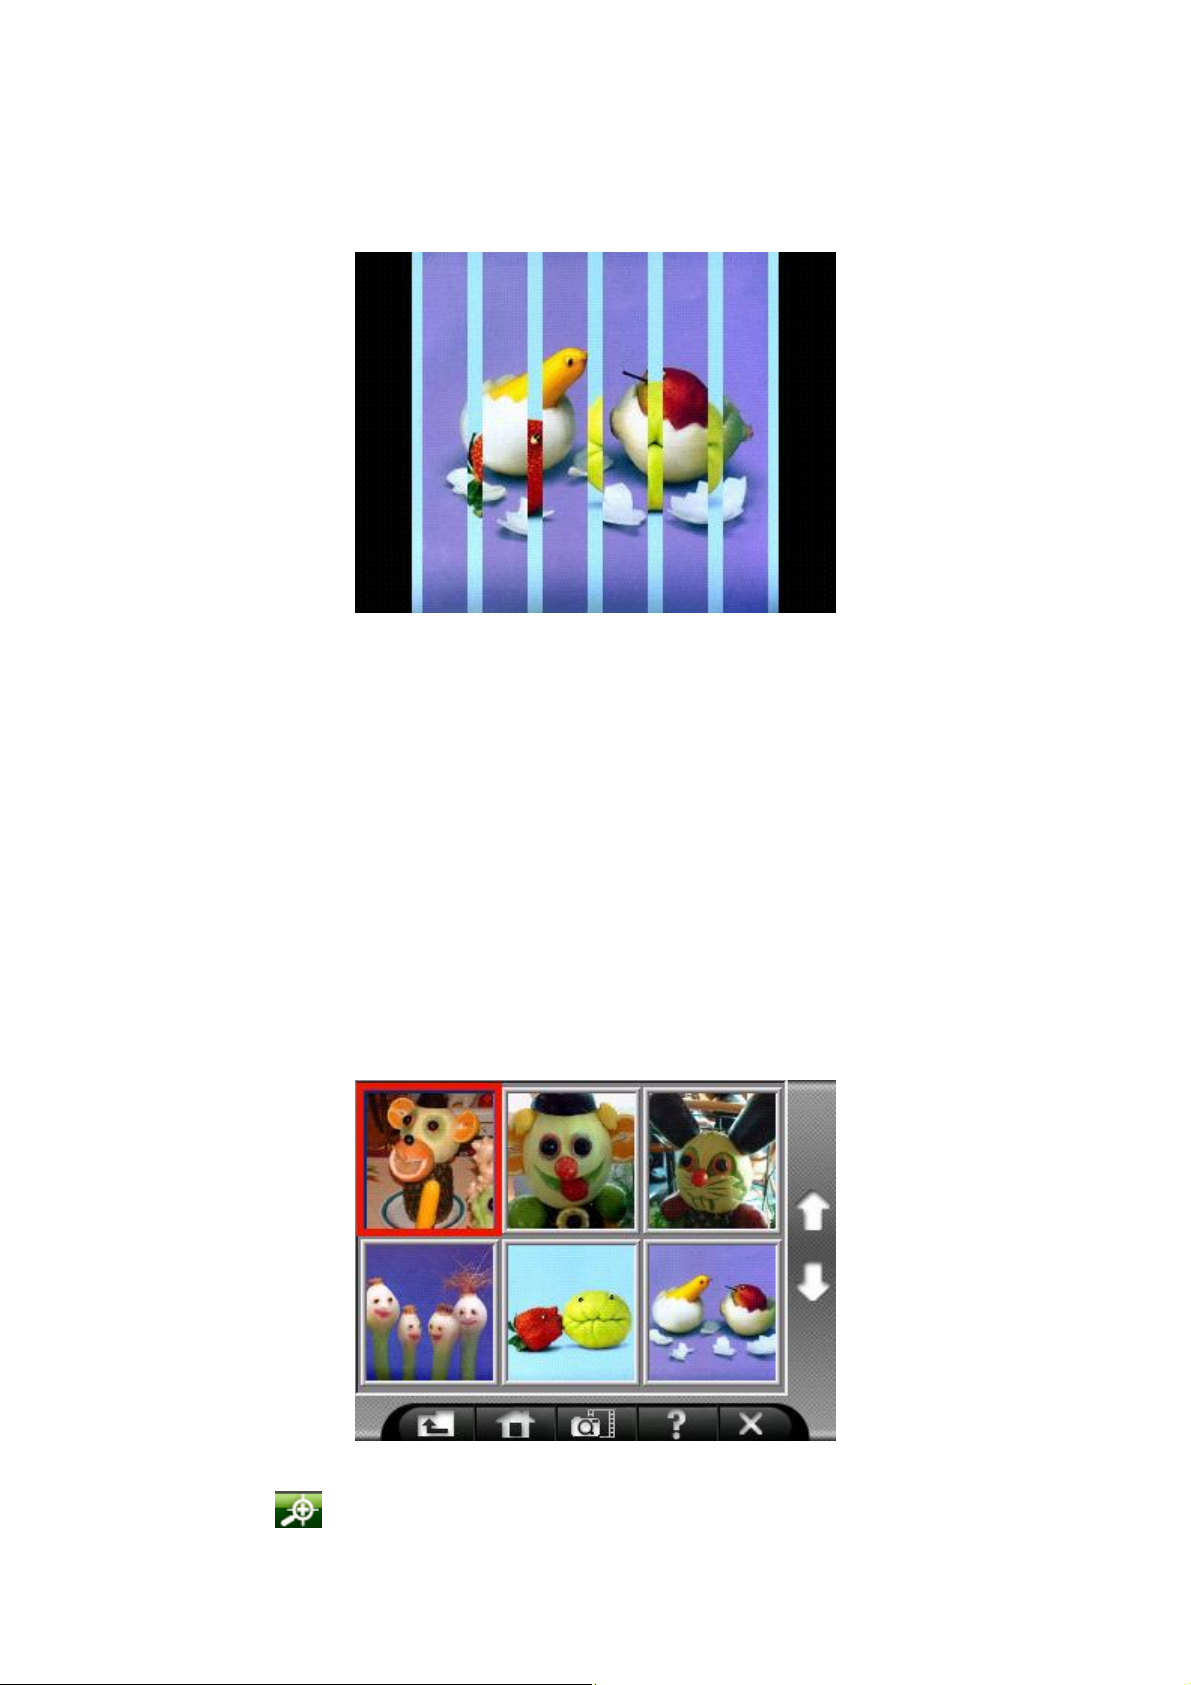
5. The slide show mode will afford more than 10 different transition effects and
will make your slide show more outstanding.
9.6 Browse Photo
It supports 24 -bit true color images. You can browse the picture with zoom
in/out, rotation in full screen
jFull screen
kZoom in/out
1. Tap Photo Player on the Main screen to switch to the program.
2. Tap the photo file in the window and double click it.
3. Tap icon and you may browse the photo in zoom in mode.
Page 66
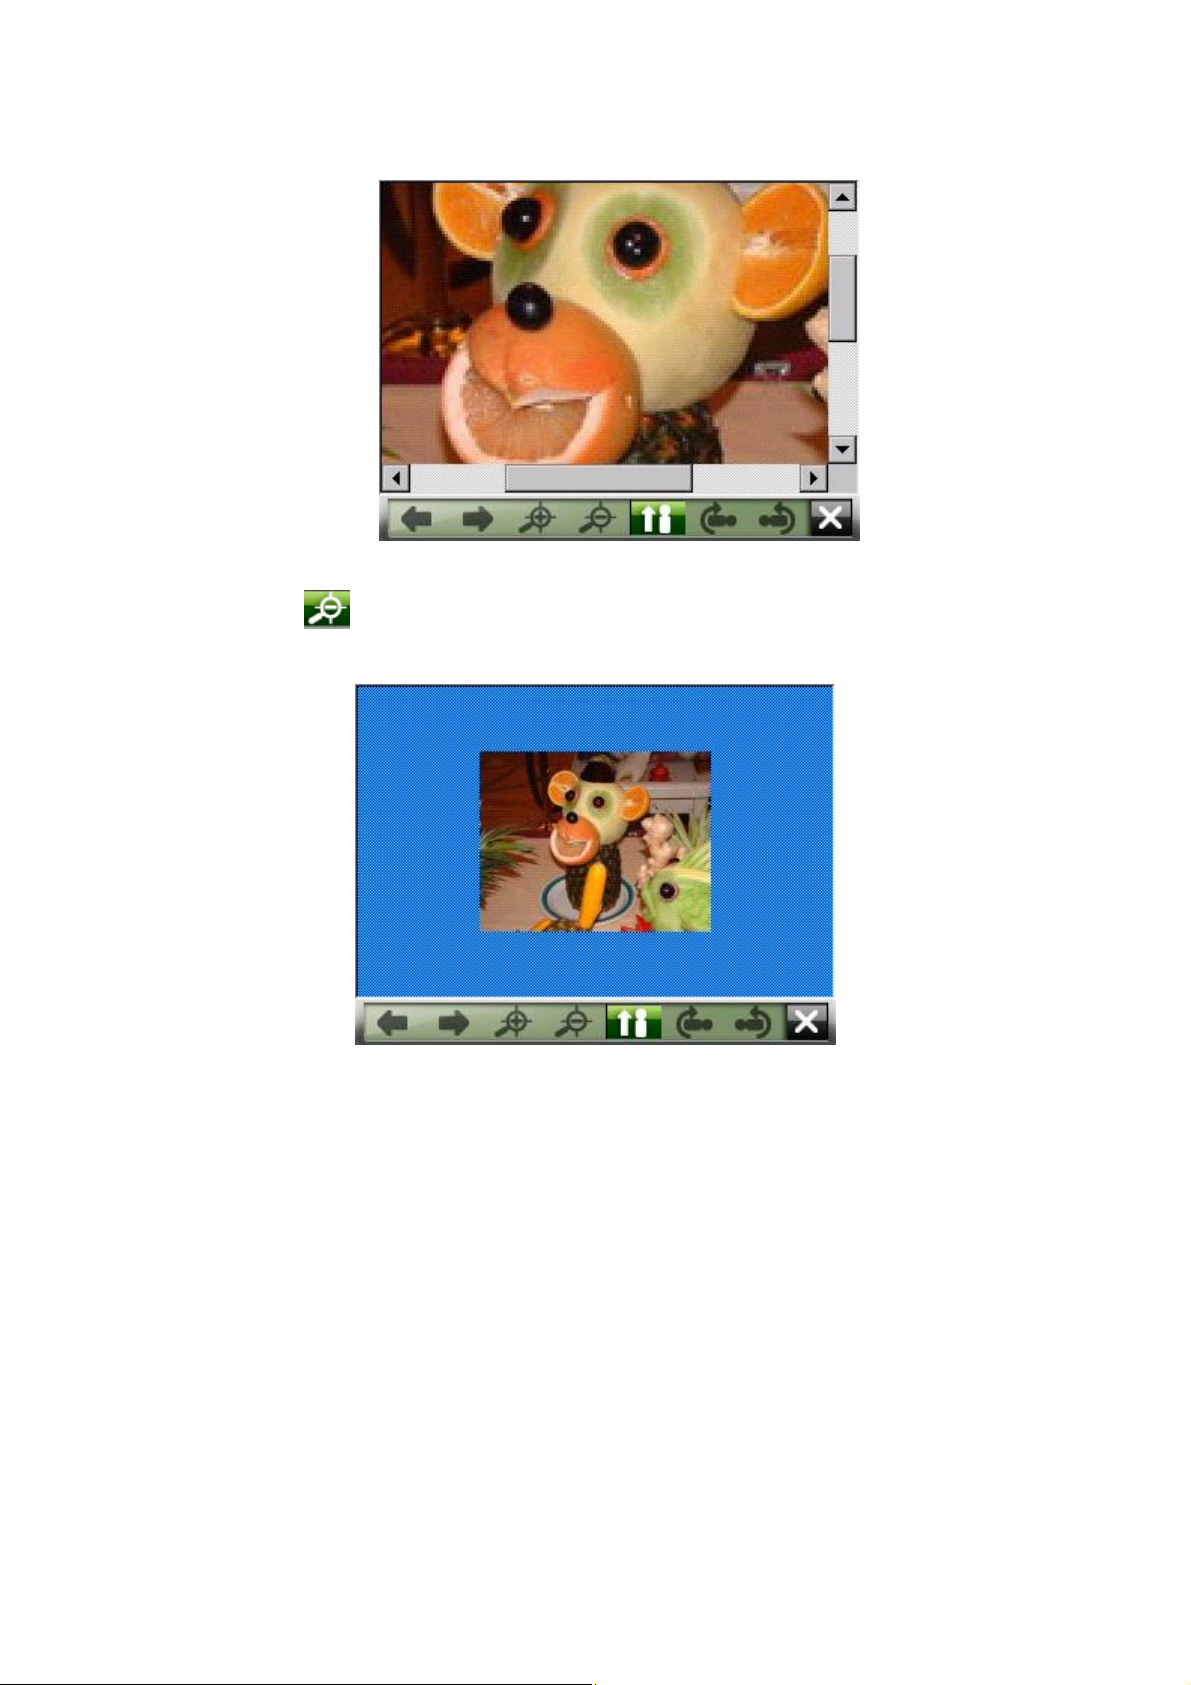
4. Tap icon and you may browse the photo in zoom out mode.
lPhoto browse in Rotation
1. Tap Photo Player on the Main screen to switch to the program.
2. Tap the photo file in the window and double click it.
Add 2 Landscape mode (rotate left & right) in image view
Page 67
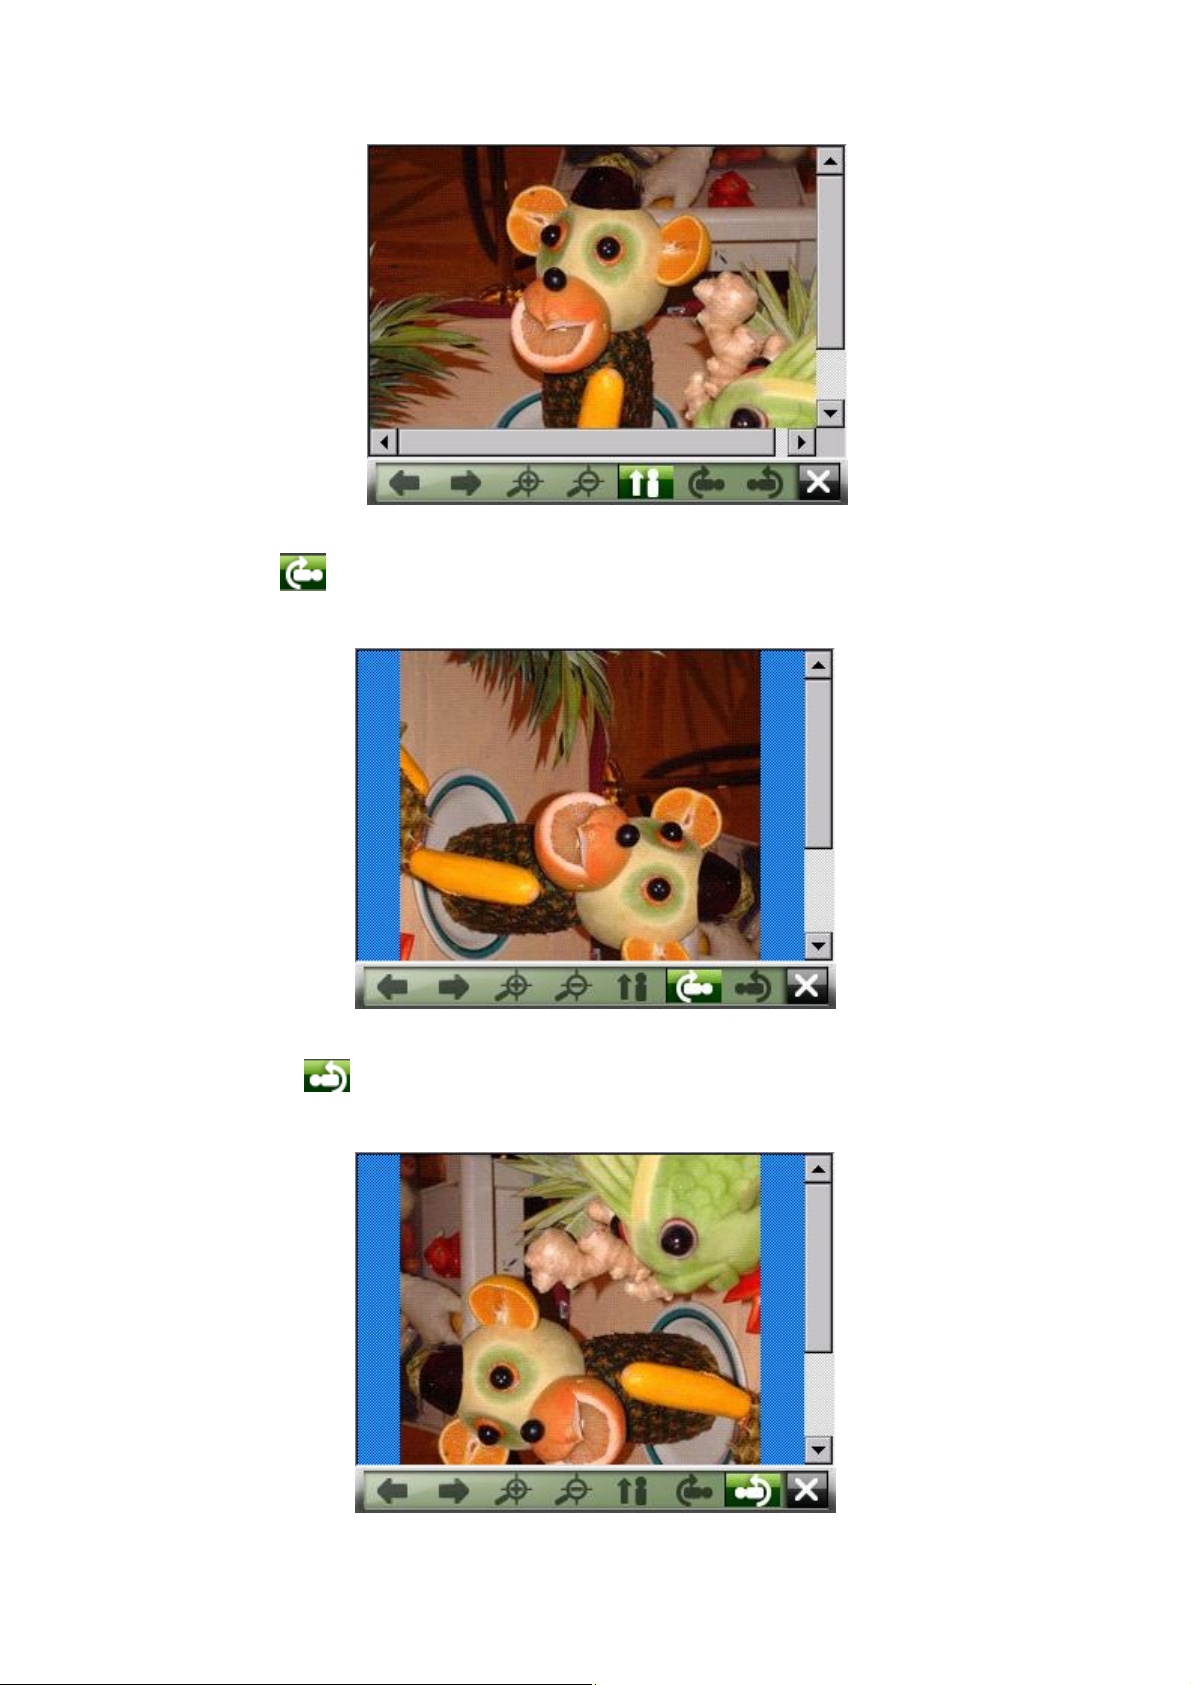
3. Tap icon,it will show the rotated image turn-in right.
4. Tap icon,it will show the rotated image turned-in left.
 Loading...