

Page 1

Altera SDK for OpenCL
Cyclone V SoC Getting Started Guide
Subscribe
Send Feedback
OCL006-15.0.0
2015.05.04
101 Innovation Drive
San Jose, CA 95134
www.altera.com
Page 2

TOC-2
Altera SDK for OpenCL Cyclone V SoC Getting Started Guide
Contents
Altera SDK for OpenCL Cyclone V SoC Getting Started Guide........................1-1
Setting Up the Altera SDK for OpenCL, SoC EDS, and the Cyclone V SoC
Development Kit for Windows....................................................................... 2-1
Prerequisites..................................................................................................................................................1-2
Contents of the Altera SDK for OpenCL..................................................................................................1-2
Overview of the AOCL and Cyclone V SoC Development Kit Setup Processes.................................1-4
Cyclone V SoC Development Kit Reference Platform Board Variants................................................1-5
Design Considerations................................................................................................................................1-6
Upgrading to Current Version of AOCL for Cyclone V SoC................................................................2-2
Downloading the Altera SDK for OpenCL.............................................................................................. 2-2
Downloading the SoC EDS.........................................................................................................................2-3
Installing the Altera SDK for OpenCL......................................................................................................2-3
Setting the Environment Variables for Windows................................................................................... 2-4
Installing the SoC EDS ...............................................................................................................................2-5
Licensing the Software.................................................................................................................................2-5
Installing the Cyclone V SoC Development Kit...................................................................................... 2-6
Writing an SD Card Image onto the Micro SD Flash Card on Windows................................2-6
Configuring the SW3 Switches.......................................................................................................2-7
Setting Up Terminal Connection in Windows............................................................................2-8
Setting Environment Variables and Loading OpenCL Linux Kernel Driver..........................2-8
Connecting the Board to Network via Ethernet..........................................................................2-9
Creating the Hardware Configuration File of an OpenCL Kernel for SoC.......................................2-10
Executing an OpenCL Kernel on an SoC............................................................................................... 2-12
Building the Host Application..................................................................................................... 2-13
Running the Host Application.....................................................................................................2-13
Output from Successful Kernel Execution on the Cyclone V SoC Development Kit..........2-13
Uninstalling the Software......................................................................................................................... 2-14
Setting Up the Altera SDK for OpenCL, SoC EDS, and the Cyclone V SoC
Altera Corporation
Development Kit for Linux............................................................................. 3-1
Upgrading to Current Version of AOCL for Cyclone V SoC................................................................3-2
Downloading the Altera SDK for OpenCL.............................................................................................. 3-2
Downloading the SoC EDS.........................................................................................................................3-3
Installing the Altera SDK for OpenCL......................................................................................................3-3
Setting the Environment Variables for Linux..........................................................................................3-4
Installing the SoC EDS................................................................................................................................3-5
Licensing the Software.................................................................................................................................3-5
Installing the Cyclone V SoC Development Kit...................................................................................... 3-6
Writing an SD Card Image onto the Micro SD Flash Card on Linux......................................3-7
Page 3

Altera SDK for OpenCL Cyclone V SoC Getting Started Guide
TOC-3
Configuring the SW3 Switches.......................................................................................................3-7
Setting Up Terminal Connection in Linux...................................................................................3-8
Setting Environment Variables and Loading OpenCL Linux Kernel Driver..........................3-9
Connecting the Board to Network via Ethernet..........................................................................3-9
Creating the Hardware Configuration File of an OpenCL Kernel for SoC.......................................3-11
Executing an OpenCL Kernel on an SoC............................................................................................... 3-13
Building the Host Application..................................................................................................... 3-14
Running the Host Application.....................................................................................................3-14
Output from Successful Kernel Execution on the Cyclone V SoC Development Kit..........3-14
Uninstalling the Software......................................................................................................................... 3-15
Document Revision History...............................................................................A-1
Altera Corporation
Page 4

Altera SDK for OpenCL Cyclone V SoC Getting
www.altera.com
101 Innovation Drive, San Jose, CA 95134
Started Guide
2015.05.04
OCL006-15.0.0
Subscribe
The Altera SDK for OpenCL Cyclone V SoC Getting Started Guide describes the procedures you follow to set up and use the Altera® Software Development Kit (SDK) for OpenCL application on the Altera Cyclone® V SoC Development Kit.
OpenCL is a C-based open standard for the programming of heterogeneous parallel devices. The AOCL
provides a compiler and tools for you to build and run OpenCL applications that target Altera FPGAs.
The AOCL supports the embedded profile of the OpenCL Specification version 1.0. For more information
on the OpenCL Specification version 1.0, refer to the OpenCL Reference Pages. The OpenCL Specification
version 1.0 includes detailed information on the OpenCL application programming interface (API) and
programming language.
This document assumes the following:
1. You are knowledgeable in OpenCL concepts and application programming interfaces (APIs), as
described in the OpenCL Specification version 1.0 by the Khronos Group.
2. You have experience in creating OpenCL applications, and are familiar with the contents of the
OpenCL Specification.
3. You are familiar with the information available in the following AOCL documentation:
Send Feedback
™
(1)
(AOCL)
(2)
to run an OpenCL
1
• Altera SDK for OpenCL Getting Started Guide.
• Altera SDK for OpenCL Programming Guide.
• Altera SDK for OpenCL Best Practices Guide.
Related Information
• OpenCL Reference Pages
• OpenCL Specification version 1.0
• Altera RTE for OpenCL Getting Started Guide
• Altera SDK for OpenCL Getting Started Guide
• Altera SDK for OpenCL Programming Guide
• Altera SDK for OpenCL Best Practices Guide
(1)
OpenCL and the OpenCL logo are trademarks of Apple Inc. used by permission of the Khronos Group™.
(2)
The Altera SDK for OpenCL is based on a published Khronos Specification, and has passed the Khronos
Conformance Testing Process. Current conformance status can be found at www.khronos.org/
conformance.
©
2015 Altera Corporation. All rights reserved. ALTERA, ARRIA, CYCLONE, ENPIRION, MAX, MEGACORE, NIOS, QUARTUS and STRATIX words and logos are
trademarks of Altera Corporation and registered in the U.S. Patent and Trademark Office and in other countries. All other words and logos identified as
trademarks or service marks are the property of their respective holders as described at www.altera.com/common/legal.html. Altera warrants performance
of its semiconductor products to current specifications in accordance with Altera's standard warranty, but reserves the right to make changes to any
products and services at any time without notice. Altera assumes no responsibility or liability arising out of the application or use of any information,
product, or service described herein except as expressly agreed to in writing by Altera. Altera customers are advised to obtain the latest version of device
specifications before relying on any published information and before placing orders for products or services.
ISO
9001:2008
Registered
Page 5

1-2
Prerequisites
Prerequisites
To install the Altera SDK for OpenCL (AOCL) and create an OpenCL application for the Cyclone V SoC
Development Kit, your system must meet certain hardware, target platform, and software requirements.
Hardware Requirements
Ensure that your system meets the following minimum hardware and operating system (OS) require‐
ments:
1. The accelerator board is the Altera Cyclone V SoC Development Kit.
2. Development system requirements:
• You must have administrator privileges on the development system to install the necessary
packages and drivers.
• The development system has at least 8 gigabytes (GB) of RAM.
• The development system must be running on one of the following supported target platforms:
• Microsoft 64-bit Windows 7 on the x86-64 architecture.
• Red Hat Enterprise 64-bit Linux (RHEL) versions 6 on the x86-64 architecture.
You will use the development system to perform the following tasks:
OCL006-15.0.0
2015.05.04
• Compile OpenCL kernel source files to create hardware configuration files.
• Cross-compile the host executables to the ARM® processor.
• Connect your system to the SoC board so that they can communicate with each other using
UART over USB connection.
Software Prerequisites
• Linux systems require the Perl command version 5 or later. Ensure that your PATH environment
variable setting includes the path to the Perl command.
Contents of the Altera SDK for OpenCL
The AOCL provides logic components, drivers, and AOCL-specific libraries and files.
Logic Components
• The Altera Offline Compiler (AOC) translates your OpenCL device code into a hardware configuration
file that the system loads onto an Altera FPGA.
• The AOCL utility includes a set of commands you can invoke to perform high-level tasks such as
running diagnostic tests.
• The host runtime provides the OpenCL host platform application programming interface (API) and
runtime API for your OpenCL host application.
Drivers, Libraries and Files
The software installation process installs the software into a directory that you own. The
ALTERAOCLSDKROOT environment variable references the path to the software installation directory.
Altera Corporation
The host runtime consists of libraries that provide OpenCL APIs, hardware abstractions, and helper
libraries.
Altera SDK for OpenCL Cyclone V SoC Getting Started Guide
Send Feedback
Page 6
OCL006-15.0.0
2015.05.04
Table 1-1: Select Contents of the AOCL Installation Directory
Windows Folder Linux Directory Description
bin bin User commands in the AOCL. Include this directory in your PATH
environment variable setting.
board board The AOCL Custom Platform Toolkit and Reference Platforms available
with the software.
• The path to the Custom Platform Toolkit is
ALTERAOCLSDKROOT/board/custom_platform_toolkit
• The path to the Cyclone V SoC Development Kit Reference
Platform, is
ALTERAOCLSDKROOT/board/c5soc
ip ip Intellectual property (IP) cores used to compile device kernels.
host host Files necessary for compiling and running your host application.
host\include host/include OpenCL Specification version 1.0 header files and software interface
files necessary for compiling and linking your host application.
The host/include/CL subdirectory also includes the C++ header file
cl.hpp. The file contains an OpenCL version 1.1 C++ wrapper API.
These C++ bindings enable a C++ host program to access the OpenCL
runtime APIs using native C++ classes and methods.
Contents of the Altera SDK for OpenCL
1-3
Important: The OpenCL version 1.1 C++ bindings are compatible
with OpenCL Specification versions 1.0 and 1.1.
Add this path to the include file search path in your development
environment.
host\
windows64\lib
host/linux64/lib OpenCL host runtime libraries that provide the OpenCL platform and
runtime APIs. These libraries are necessary for linking your host
application.
To run an OpenCL application on Linux, include this directory in the
LD_LIBRARY_PATH environment variable setting.
host\
windows64\bin
host/linux64/bin Runtime commands and libraries necessary for running your host
application, wherever applicable. For 64-bit Windows system, include
this directory in your PATH environment variable setting.
For Windows system, this folder only contains runtime libraries.
For Linux system, this directory contains platform-specific binary for
the aocl utility command.
share share Architecture-independent support files.
Example OpenCL Applications
You can download example OpenCL applications from the OpenCL Design Examples page on the Altera
website.
Altera SDK for OpenCL Cyclone V SoC Getting Started Guide
Send Feedback
Altera Corporation
Page 7
1-4
Overview of the AOCL and Cyclone V SoC Development Kit Setup Processes
Related Information
OpenCL Design Examples page on the Altera website
Overview of the AOCL and Cyclone V SoC Development Kit Setup
Processes
The Altera SDK for OpenCL Cyclone V SoCs Getting Started Guide outlines the procedures for installing
the Altera SDK for OpenCL (AOCL) and all related software. It also outlines the setup process for the
Cyclone V SoC Development Kit.
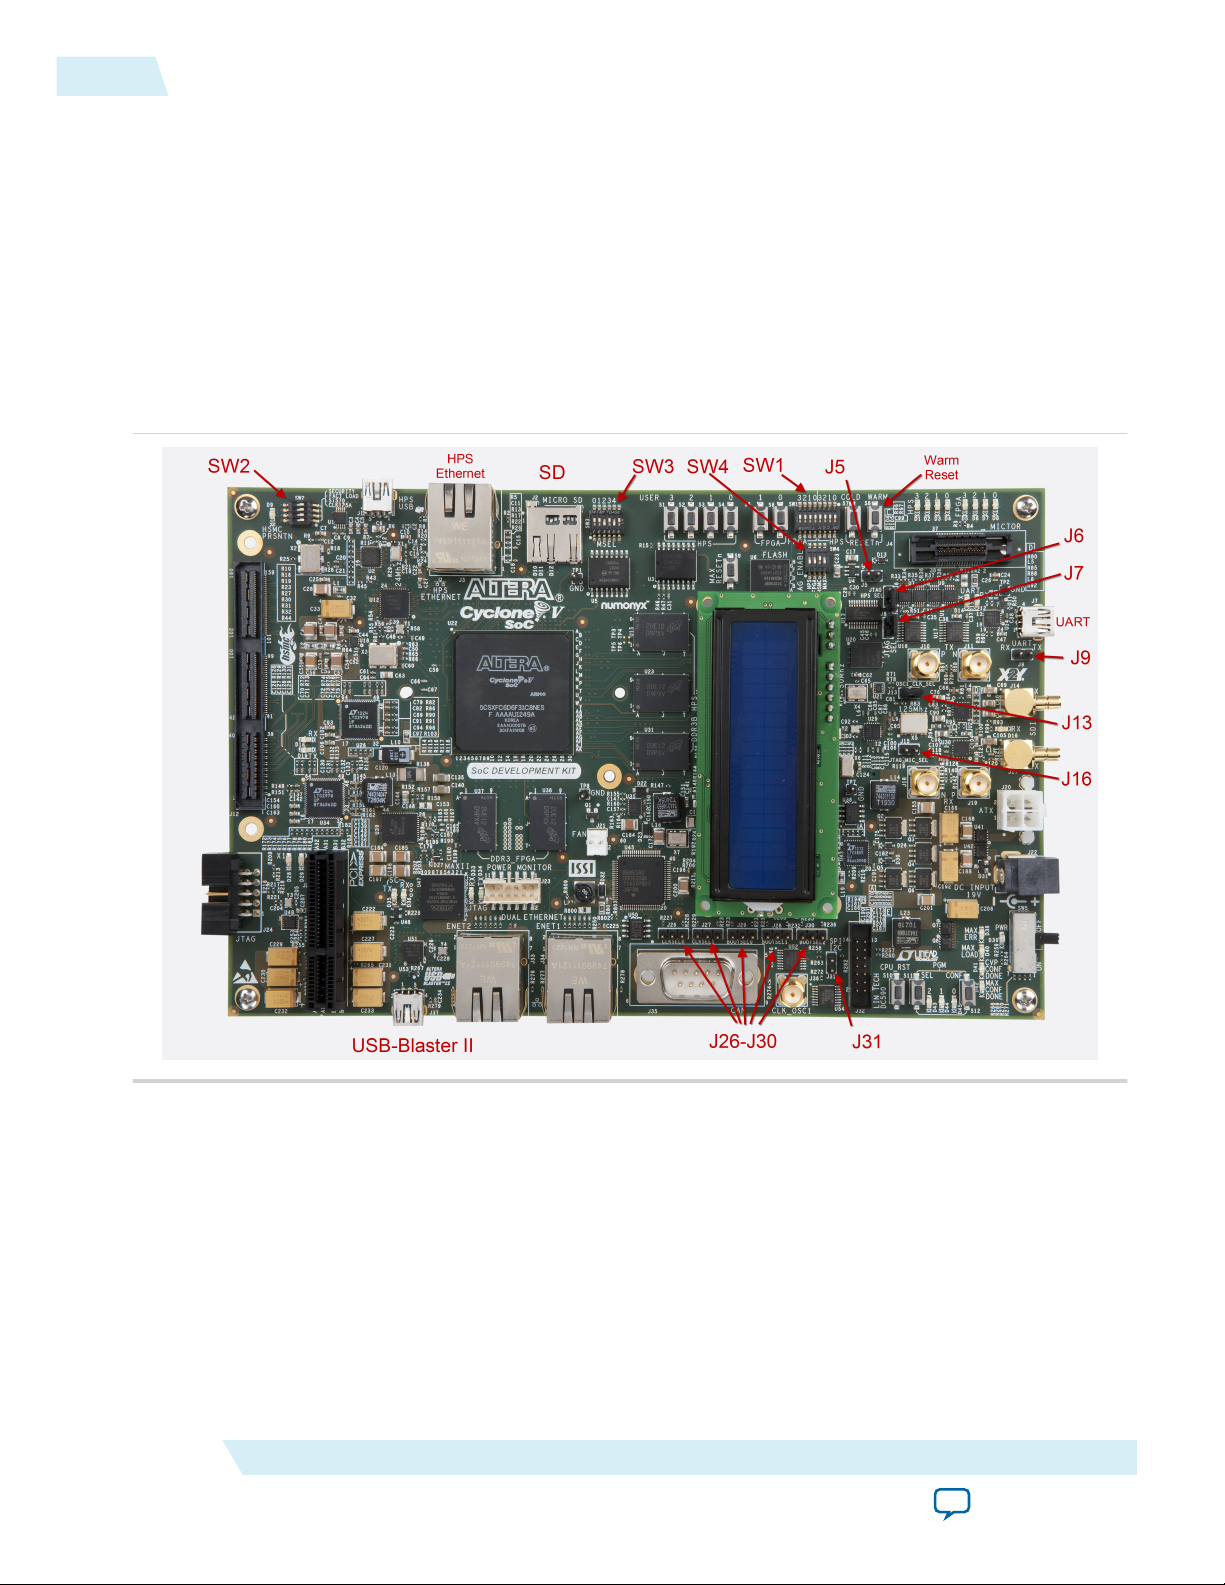
Figure 1-1: Key Components of the Cyclone V SoC Development Kit
OCL006-15.0.0
2015.05.04
The figure below summarizes the steps for setting up the necessary software and installing the Cyclone V
SoC Development Kit.
Altera Corporation
Altera SDK for OpenCL Cyclone V SoC Getting Started Guide
Send Feedback
Page 8
Review prerequisites
Download installers from altera.com
(Quartus II software, Cyclone V + Stratix V
device support, AOCL, SoC EDS)
Install Quartus II software,
Cyclone V + Stratix V device support,
AOCL, SoC EDS
HW, SW,
OS prereq
satisfied?
Acquire prerequisite
HW, SW, OS
aoc executable
runs?
NO
YES
NO
YES
Legend
Action
Decision
Install Cyclone V SoC
Development Kit
Run hello_world
on FPGA
aocl
diagnose
<device_name>
= PASSED?
YES
NO
Set up Cyclone V Development Kit
1. Write SD card image onto flash card
2. Set DIP switches
3. Terminal Connection
4. Set env. variables and load Linux kernel driver
Connect board to
network
OCL006-15.0.0
2015.05.04
Cyclone V SoC Development Kit Reference Platform Board Variants
Figure 1-2: Overview of AOCL and Board Setup
1-5
Cyclone V SoC Development Kit Reference Platform Board Variants
The Cyclone V SoC Development Kit Reference Platform (c5soc) includes two board variants.
Altera SDK for OpenCL Cyclone V SoC Getting Started Guide
Send Feedback
Altera Corporation
Page 9

1-6
Design Considerations
OCL006-15.0.0
• c5soc board
This default board provides access to two DDR memory banks. The hard processor system (HPS)
DDR is accessible by both the FPGA and the CPU. The FPGA DDR is only accessible by the FPGA.
• c5soc_sharedonly board
This board variant contains only HPS DDR connectivity. The FPGA DDR is not accessible. This board
variant is more area efficient because less hardware is necessary to support one DDR memory bank.
The c5soc_sharedonly board is also a good prototyping platform for a final production board with a
single DDR memory bank.
To target this board variant when compiling your OpenCL kernel, include the --board
c5soc_sharedonly option in your aoc command.
For more information on the -- board <board_name> option of the aoc command, refer to the
Compiling a Kernel for a Specific FPGA Board (--board <board_name>) section of the Altera SDK for
OpenCL Programming Guide.
Related Information
Compiling a Kernel for a Specific FPGA Board (--board <board_name>)
2015.05.04
Design Considerations
When designing your OpenCL kernel and host program for execution on the Cyclone V SoC
Development Kit, factor in design considerations such as shared memory usage and FPGA area
optimization.
Shared memory is the preferred memory for FPGA kernels. For information on how to allocate and use
shared memory, refer to the Allocating Shared Memory for OpenCL Kernels Running on SoCs section of
the Altera SDK for OpenCL Programming Guide.
The Cyclone V SoC FPGA on the Cyclone V SoC Development Kit is not considered a large FPGA.
However, if you structure your kernel code in a way that optimizes hardware usage, it can provide
sufficient hardware resources to implement complex computations. Altera recommends that you consult
the Altera SDK for OpenCL Best Practices Guide to get a good understanding of the Altera Offline
Compiler (AOC). In addition, refer to the Strategies for Optimizing FPGA Area Usage section of the Altera
SDK for OpenCL Best Practices Guide for tips on area optimization.
Related Information
• Allocating Shared Memory for OpenCL Kernels Targeting SoCs
• Strategies for Optimizing FPGA Area Usage
• Altera SDK for OpenCL Best Practices Guide
Altera Corporation
Altera SDK for OpenCL Cyclone V SoC Getting Started Guide
Send Feedback
Page 10

Setting Up the Altera SDK for OpenCL, SoC EDS,
www.altera.com
101 Innovation Drive, San Jose, CA 95134
and the Cyclone V SoC Development Kit for
Windows
2015.05.04
OCL006-15.0.0
Subscribe
The Altera SDK for OpenCL (AOCL) setup process includes downloading and installing the software,
installing the Cyclone V SoC Development Kit, and then executing an OpenCL kernel on the SoC.
1. Upgrading to Current Version of AOCL for Cyclone V SoC on page 2-2
If you have been using a previous version of the Altera SDK for OpenCL (AOCL) to program your
Cyclone V SoC Development Kit, you must upgrade the software programs and files to the current
version.
2. Downloading the Altera SDK for OpenCL on page 2-2
Download the AOCL and all related software for Windows from the Download Center on the Altera
website.
3. Downloading the SoC EDS on page 2-3
Download the SoC Embedded Design Suite (EDS) for Windows from the Download Center on the
Altera website.
4. Installing the Altera SDK for OpenCL on page 2-3
Install the AOCL in a folder that you own.
5. Setting the Environment Variables for Windows on page 2-4
Set the PATH user environment variable to point to Altera SDK for OpenCL (AOCL) libraries.
6. Installing the SoC EDS on page 2-5
To use the Altera SDK for OpenCL to create OpenCL kernel programs that target a Cyclone V SoC,
install the Altera SoC Embdded Design Suite (EDS) on your host system to develop the corresponding
embedded software.
7. Licensing the Software on page 2-5
Obtain the AOCL license from the Altera Self Service Licensing Center.
8. Installing the Cyclone V SoC Development Kit on page 2-6
To execute an OpenCL kernel on a Cyclone V SoC, first install the Cyclone V SoC Development Kit
and configure it as described in the Altera SDK for OpenCL (AOCL) documentation.
9. Creating the Hardware Configuration File of an OpenCL Kernel for SoC on page 2-10
To create the .aocx file for the hello_world example OpenCL application, you must download the
example design from the OpenCL Design Examples page on the Altera website. Extract the
downloaded source files, and then compile the kernel using the Altera Offline Compiler (AOC).
10.Executing an OpenCL Kernel on an SoC on page 2-12
Build your host application using the GNU Compiler Collection (GCC) cross-compiler available with
the SoC Embedded Design Suite (EDS).
Send Feedback
2
©
2015 Altera Corporation. All rights reserved. ALTERA, ARRIA, CYCLONE, ENPIRION, MAX, MEGACORE, NIOS, QUARTUS and STRATIX words and logos are
trademarks of Altera Corporation and registered in the U.S. Patent and Trademark Office and in other countries. All other words and logos identified as
trademarks or service marks are the property of their respective holders as described at www.altera.com/common/legal.html. Altera warrants performance
of its semiconductor products to current specifications in accordance with Altera's standard warranty, but reserves the right to make changes to any
products and services at any time without notice. Altera assumes no responsibility or liability arising out of the application or use of any information,
product, or service described herein except as expressly agreed to in writing by Altera. Altera customers are advised to obtain the latest version of device
specifications before relying on any published information and before placing orders for products or services.
ISO
9001:2008
Registered
Page 11

2-2
Upgrading to Current Version of AOCL for Cyclone V SoC
11.Uninstalling the Software on page 2-14
To uninstall the AOCL for Windows, run the uninstaller, and restore all modified environment
variables to their previous settings.
Upgrading to Current Version of AOCL for Cyclone V SoC
If you have been using a previous version of the Altera SDK for OpenCL (AOCL) to program your
Cyclone V SoC Development Kit, you must upgrade the software programs and files to the current
version.
The AOCL is incompatible with previous versions of the Quartus® II software.
1. Upgrade the following software to the current version:
a. Quartus II software
b. AOCL
c. SoC Embedded Design Suite (EDS)
2. Reprogram the Cyclone V SoC Development Kit micro SD flash card with an image created using the
current version of the AOCL.
For instructions on programming the micro SD flash card, refer to the Writing an SD Card Image File
onto the Micro SD Flash Card section.
3. Recompile your host application using the current version of the AOCL.
OCL006-15.0.0
2015.05.04
Related Information
Writing an SD Card Image onto the Micro SD Flash Card on Windows on page 2-6
Downloading the Altera SDK for OpenCL
Download the AOCL and all related software for Windows from the Download Center on the Altera
website. Download the AOCL and all related software into a single installation package. Alternatively, if
you already have the current version of the Quartus II software in your system, download the AOCL as a
stand-alone software.
Download the following software and files:
• Quartus II software
• Cyclone V and Stratix® V device support files
• AOCL
• Altera SoC Embedded Design Suite (EDS)
1. In the main page of the Altera website, click MYALTERA and log into your account.
If you do not have a myAltera account, register for a new account.
2. Click DOWNLOADS to enter the Download Center.
3. Click Altera SDK for OpenCL to enter the download page for the subscription edition of the AOCL.
4. Select the software version. The default selection is the current version.
5. Select the Akamai DLM3 Download Manager or Direct Download as the download method.
Altera Corporation
By default, when you select Akamai DLM3 Download Manager, all the available software and device
support will be selected for download. Choose this download method if you need to install all the files.
Setting Up the Altera SDK for OpenCL, SoC EDS, and the Cyclone V SoC Development Kit for Windows
Send Feedback
Page 12

OCL006-15.0.0
2015.05.04
If you do not require all the files, select Direct Download and download only the files that you need.
Choose this download method if you already have the current version of the Quartus II software and
device support installed on your machine.
6. Click the Windows SDK tab and then click More beside Download and install instructions to view
the download and installation procedure.
7. Perform the steps outlined in the download and installation instructions on the download page.
Related Information
Altera website
Downloading the SoC EDS
Download the SoC Embedded Design Suite (EDS) for Windows from the Download Center on the Altera
website.
1. In the main page of the Altera website, click MYALTERA and log into your account.
If you do not have a myAltera account, register for a new account.
2. Click DOWNLOADS to enter the Download Center.
3. Click SoC EDS to enter the download page for the subscription edition of the SoC EDS.
4. Select the software version.
5. Select Windows as the operating system.
6. Select Akamai DLM3 Download Manager or Direct Download as the download method.
7. If you select Akamai DLM3 Download Manager as the download method, click Download.
8. If you select Direct Download as the download method, click SoC Embedded Design Suite (EDS).
9. Perform the steps outlined in the download and installation instructions on the download page.
Downloading the SoC EDS
2-3
Related Information
Altera website
Installing the Altera SDK for OpenCL
If you download the AOCL, the Quartus II software, and the device support into a single installation
package, run the Quartus II software installer for Windows to install all the software and files. If you
download the AOCL as a stand-alone software, run the AOCL installer. Install the AOCL in a folder that
you own.
Before you begin
You must have administrator privileges.
Setting Up the Altera SDK for OpenCL, SoC EDS, and the Cyclone V SoC Development Kit for Windows
Send Feedback
Altera Corporation
Page 13

2-4
Setting the Environment Variables for Windows
OCL006-15.0.0
• To install the AOCL, Quartus II software, and device support files simultaneously, perform the
following tasks:
1. Run the QuartusSetup-<version>-windows.exe file to launch the installation wizard. Perform the tasks
outlined in the wizard.
2. The installer sets the user environment variable ALTERAOCLSDKROOT to point to the path of the
software installation. To verify the ALTERAOCLSDKROOT setting, from the Windows main menu,
click Control Panel > System and Security > System > Advanced system settings. In the System
Properties pop-up window, click the Environment Variables button to open the Environment
Variables pop-up window. The ALTERAOCLSDKROOT environment variable and its setting
appears under User variables for <user_name>. Edit the value if the path does not point to the
AOCL installation.
3. In the Environment Variables pop-up window, verify that the PATH environment variable setting
includes the bin folder in the Quartus II system folder (for example, <home_directory>\altera\
<version>\quartus\bin). Edit the value as needed.
• To install the AOCL as a stand-alone software, perform the following tasks:
1. Ensure that your system already has the current version of the Quartus II software and applicable
device support files.
2. Ensure that the PATH environment variable includes the bin folder in the Quartus II system folder
(for example, <home_directory>\altera\<version>\quartus\bin).
3. Run the AOCLSetup-<version>-windows.exe installer. Direct the installer to extract the software to an
empty folder that you own (that is, not a system folder).
The installation path must not contain any spaces (for example, <home_directory>\altera\<version>\
hld).
4. The installer sets the environment variable ALTERAOCLSDKROOT. Ensure that
ALTERAOCLSDKROOT points to the current version of the software.
2015.05.04
Setting the Environment Variables for Windows
Set the PATH user environment variable to point to Altera SDK for OpenCL (AOCL) libraries.
1. In the Windows Start menu, click Control Panel > System and Security > System.
2. In the System window, click Advanced system settings. In the Advanced tab of the System Properties
dialog box, click Environment Variables.
3. In the Environment Variables dialog box, include the following paths in the corresponding environ‐
ment variable settings:
Environment Variable Path to Include
PATH
Altera Corporation
Setting Up the Altera SDK for OpenCL, SoC EDS, and the Cyclone V SoC Development Kit for Windows
1. %ALTERAOCLSDKROOT%\bin
2. %ALTERAOCLSDKROOT%\host\windows64\bin
where ALTERAOCLSDKROOT points to the path of the software installa‐
tion
Send Feedback
Page 14

OCL006-15.0.0
2015.05.04
Installing the SoC EDS
To use the Altera SDK for OpenCL to create OpenCL kernel programs that target a Cyclone V SoC, install
the Altera SoC Embdded Design Suite (EDS) on your host system to develop the corresponding
embedded software.
1. Run the SoCEDSSetup-<version>-windows.exe installer. Follow the installation instructions in the
Installing the SoC EDS section of the Altera SoC Embedded Design Suite User Guide.
2. Perform the tasks outlined in the Installing the ARM DS-5 Altera Edition Toolkit section of the Altera
SoC Embedded Design Suite User Guide to install the ARM Development Studio (DS-5) Altera Edition
Toolkit for your operating system (OS).
For more information on the ARM DS-5 Altera Edition Toolkit, refer to the ARM DS-5 Altera Edition
page of the ARM website.
3. Consult the Licensing section of the Altera SoC Embedded Design Suite User Guide for licensing
instructions for the SoC EDS and the ARM DS-5 Altera Edition Toolkit.
Related Information
• Installing the SoC EDS
• Installing the ARM DS-5 Altera Edition Toolkit
• ARM DS-5 Altera Edition page on the ARM website
• SoC EDS Licensing
Installing the SoC EDS
2-5
Licensing the Software
Obtain the AOCL license from the Altera Self Service Licensing Center. The AOCL license allows the
software to access relevant Quartus II software functionalities and device support without an additional
Quartus II software license.
Before you begin
For information on the licensing options and requirements, refer to the Licensing Altera Software section
of the Altera Software Installation and Licensing manual, the LICENSE.txt file that accompanies each
software, and the Altera Licensing page within the Altera website.
1. In the main page within the Altera website, click MYALTERA and log into your account.
2. Click the link to the Self-Service Licensing Center.
3. Perform the steps outlined in the Requesting a License from the Self-Service Licensing Center section of
the Altera Software Installation and Licensing manual to obtain and activate the license.
You must obtain a separate license for the SoC Embedded Design Suite (EDS).
4. If you have a fixed license, append the <path_to_license_file>/<license_filename> file to the
LM_LICENSE_FILE environment variable in the following manner:
Setting Up the Altera SDK for OpenCL, SoC EDS, and the Cyclone V SoC Development Kit for Windows
Send Feedback
Altera Corporation
Page 15

2-6
Installing the Cyclone V SoC Development Kit
a. Create a backup copy of the provided license file.
b. Save the new license file on your local hard drive.
c. Append the <path_to_license_file>/<license_filename> file to the LM_LICENSE_FILE environment
variable.
5. If you have a floating licence, append the <path_to_license_file>/<license_filename> file to the
LM_LICENSE_FILE environment variable in the following manner:
a. Obtain the port number and host name from the network or system administrator. Alternatively,
the information is in the license file line SERVER <hostname> <8 to 12 character host or NIC
ID> <port>.
The license location for the user is <port>@<hostname>. If a port is not listed in the license file,
specify @<hostname>.
b. Modify the license file to update the port number and host name.
c. Append the <path_to_license_file>/<license_filename> file to the LM_LICENSE_FILE environment
variable.
Related Information
• Altera Licensing page on the Altera website
• Altera Software Installation and Licensing
• Altera website
OCL006-15.0.0
2015.05.04
Installing the Cyclone V SoC Development Kit
To execute an OpenCL kernel on a Cyclone V SoC, first install the Cyclone V SoC Development Kit and
configure it as described in the Altera SDK for OpenCL (AOCL) documentation.
1. Writing an SD Card Image onto the Micro SD Flash Card on Windows on page 2-6
To write an SD card image onto the micro SD flash card on Windows, download and install the Win32
Disk Imager, and then write the SD card image onto the micro SD flash card.
2. Configuring the SW3 Switches on page 2-7
Configure the SW3 dual in-line package (DIP) switches on the Cyclone V SoC Development Kit.
3. Setting Up Terminal Connection in Windows on page 2-8
To set up the terminal connection for the Cyclone V SoC Development Kit in Windows, specify the
USB virtual COM port settings.
4. Setting Environment Variables and Loading OpenCL Linux Kernel Driver on page 2-8
After you turn on the board and establish terminal connection, log into the Cyclone V SoC
Development Kit as user root with no password. Then, before you run your host application, set the
environment variables and load the OpenCL Linux kernel driver.
5. Connecting the Board to Network via Ethernet on page 2-9
Connecting the Cyclone V SoC Development Kit to the host network allows you to transfer files to and
from your SoC.
Writing an SD Card Image onto the Micro SD Flash Card on Windows
The Altera SDK for OpenCL (AOCL) includes a Cyclone V SoC Development Kit Reference Platform. To
write an SD card image onto the micro SD flash card on Windows, download and install the Win32 Disk
Altera Corporation
Setting Up the Altera SDK for OpenCL, SoC EDS, and the Cyclone V SoC Development Kit for Windows
Send Feedback
Page 16

OCL006-15.0.0
2015.05.04
Configuring the SW3 Switches
Imager, and then write the SD card image onto the micro SD flash card. The SD card image contains
everything you need to start using OpenCL on the board.
Before you begin
The SD card image linux_sd_card_image.tgz is available in the Cyclone V SoC Development Kit Reference
Platform. Ensure that the environment variable AOCL_BOARD_PACKAGE_ROOT points to the location
of the board_env.xml file in the Reference Platform.
You must have administrator privileges.
1. Extract the files from the %ALTERAOCLSDKROOT%\board\c5soc\linux_sd_card_image.tgz archive.
You can use tools such as 7zip or WinZip to extract the SD card image file from the .tgz archive.
2. Download the Win32 Disk Imager from the SourceForge website.
3. Unzip the Win32 Disk Imager and the SD card image to a directory that you own.
4. Insert the micro SD card into the card reader and connect it to your PC.
5. Launch the Win32 Disk Imager. In the dialog box, under Image File, browse to the SD card image file.
6. From the Device pull-down menu, select the destination drive of the micro SD card.
Warning: Specifying the wrong device name might cause the SD card image to overwrite all existing
data.
7. Click Write.
8. After you write the image onto the micro SD flash card, insert the card into the micro SD card slot on
the Cyclone V SoC Development Kit.
9. Power up the board.
If the LEDs on the FPGA flash in a counter pattern, the image is written onto the micro SD card
successfully. A section of OpenCL logic on the FPGA drives these LEDs.
2-7
Related Information
Altera Cyclone V SoC Development Kit Reference Platform Porting Guide
Configuring the SW3 Switches
Configure the SW3 dual in-line package (DIP) switches on the Cyclone V SoC Development Kit. The
switch bank is located next to the SD card slot.
1. Set the SW3 DIP switches to the following positions:
Switch Configuration
1 ON
2 OFF
3 ON
4 OFF
5 ON
6 ON
The figure below illustrates the physical configuration of the SW switches on the Cyclone V SoC
Development Kit:
Setting Up the Altera SDK for OpenCL, SoC EDS, and the Cyclone V SoC Development Kit for Windows
Send Feedback
Altera Corporation
Page 17

2-8
Setting Up Terminal Connection in Windows
Setting Up Terminal Connection in Windows
To set up the terminal connection for the Cyclone V SoC Development Kit in Windows, specify the USB
virtual COM port settings.
OCL006-15.0.0
2015.05.04
1. Connect the board to your development machine via the micro-USB port that is closest to the power
supply connector on the board.
2. Connect the board to the power supply and power it up.
3. Download the Virtual COM port (VCP) driver from the VCP driver download page on the Future
Technology Devices International (FTDI) Ltd. website.
4. Determine the COM port in use.
a. From the Windows Start menu, click Control Panel > Hardware and Sound.
b. Under Devices and Printers, click Device Manager.
c. In the Device Manager window, under Ports, click USB Serial Port (COM<X>).
5. Connect either the Tera Term or PuTTY open-source terminal emulator to the COM port that the
FDTI driver creates.
6. Set the port settings to 115200, 8N1, with parity and control flow set to none.
7. For Tera Term, select Setup > Terminal, and then change Code Page to 1250.
8. Without powering down, restart the board.
Setting Environment Variables and Loading OpenCL Linux Kernel Driver
After you turn on the board and establish terminal connection, log into the Cyclone V SoC Development
Kit as user root with no password. Then, before you run your host application, set the environment
variables and load the OpenCL Linux kernel driver.
1.
After logging into the SoC board, run the source ./init_opencl.sh command, which
performs the following tasks:
a. Set the PATH, LD_LIBRARY_PATH, and AOCL_BOARD_PACKAGE_ROOT environment
variables.
b. Load the OpenCL Linux kernel driver.
Altera Corporation
Setting Up the Altera SDK for OpenCL, SoC EDS, and the Cyclone V SoC Development Kit for Windows
Send Feedback
Page 18

OCL006-15.0.0
2015.05.04
The init_opencl.sh file is available in the SD card image that you write onto the micro SD flash card. It
contains the commands shown below:
export ALTERAOCLSDKROOT=<aocl_destination_directory>
export AOCL_BOARD_PACKAGE_ROOT=$ALTERAOCLSDKROOT/board/c5soc
export PATH=$ALTERAOCLSDKROOT/bin:$PATH
export LD_LIBRARY_PATH=$ALTERAOCLSDKROOT/host/arm32/lib:$LD_LIBRARY_PATH
insmod $AOCL_BOARD_PACKAGE_ROOT/driver/aclsoc_drv.ko
Connecting the Board to Network via Ethernet
Connecting the Cyclone V SoC Development Kit to the host network allows you to transfer files to and
from your SoC.
1. Connect the hard processor system (HPS) Ethernet port of the board to your network.
2. Reboot the board.
The boards acquires an IP address, allowing you to initiate a Secure Shell (SSH) connection and runs a
Secure Copy (SCP) program to login and transfer files.
Alternatively, you can mount a network drive to your board and access the files directly.
Ensuring IP Address Acquisition
After you connect the hard processor system (HPS) Ethernet port on the Cyclone V SoC Development Kit
to your network and reboot the board, ensure that the board acquires an IP address successfully.
Connecting the Board to Network via Ethernet
2-9
Before you begin
After you connect the HPS Ethernet port to your network and power up your board, you should see a
solid orange light and a blinking green light. If not, check the connection of the Ethernet cable to the
Ethernet port on your network.
1. To check if your board has an IP address, search for the IP address in boot messages such as the one
shown below:
Sending discover...
libphy: stmmac-0:04 - Link is Up - 1000/Full
Sending discover...
Sending select for 137.57.175.148...
Lease of 137.57.175.148 obtained, lease time 86400
/etc/udhcpc.d/50default: Adding DNS 137.57.142.218
/etc/udhcpc.d/50default: Adding DNS 137.57.109.10
/etc/udhcpc.d/50default: Adding DNS 137.57.64.1
done.
The message Lease of <board_IP_address> obtained, lease time 86400
identifies the IP address of the board.
2. If you receive the following output, perform a warm reboot of the board by pressing the WARM
button next to the LED lights.
Sending discover...
libphy: stmmac-0:04 - Link is Up - 1000/Full
Sending discover...
Sending discover...
No lease, failing
The board uses the dynamic host configuration protocol (DHCP) to acquire an IP address. If the
session times out waiting for an IP assignment, reboot the CPU to restart the IP acquisition process.
Setting Up the Altera SDK for OpenCL, SoC EDS, and the Cyclone V SoC Development Kit for Windows
Send Feedback
Altera Corporation
Page 19

2-10
Using SSH and SCP
To reboot the CPU, press the Warm reset button next to the four hard processor system (HPS) LEDs
on the board.
3. If you are unable to acquire the IP address, ensure that the Ethernet cable is in good working condition
and the Ethernet port on your network is enabled.
Using SSH and SCP
Instead of connecting the Cyclone V SoC Development Kit to the host system using UART over USB and
transferring files using a network drive, you can initiate a Secure Shell (SSH) connection and transfer files
using a Secure Copy (SCP) program.
1. To establish a connection between the Cyclone V SoC Development Kit and the host system via SSH,
invoke the ssh root@<board_ip_address> command from your development machine.
For instructions on how to identify <board_ip_address>, refer to the Ensuring IP Address Acquisition
section.
2.
To transfer files, one at a time, from the host system to the board via SCP, invoke the scp
<source_filename> root@<board_ip_address>:<target_filename> command
from your development machine.
Related Information
Ensuring IP Address Acquisition on page 2-9
OCL006-15.0.0
2015.05.04
Creating the Hardware Configuration File of an OpenCL Kernel for SoC
The hardware configuration file of an OpenCL kernel is called an Altera Offline Compiler Executable file
(.aocx). To create the .aocx file for the hello_world example OpenCL application, you must download the
example design from the OpenCL Design Examples page on the Altera website. Extract the downloaded
source files, and then compile the kernel using the Altera Offline Compiler (AOC).
After you successfully install your FPGA board, you can create a .aocx file that executes on the device. The
steps below describe the process of creating a .aocx file from the hello_world example design. For more
information on the OpenCL design examples, refer to the OpenCL Design Examples page on the Altera
website.
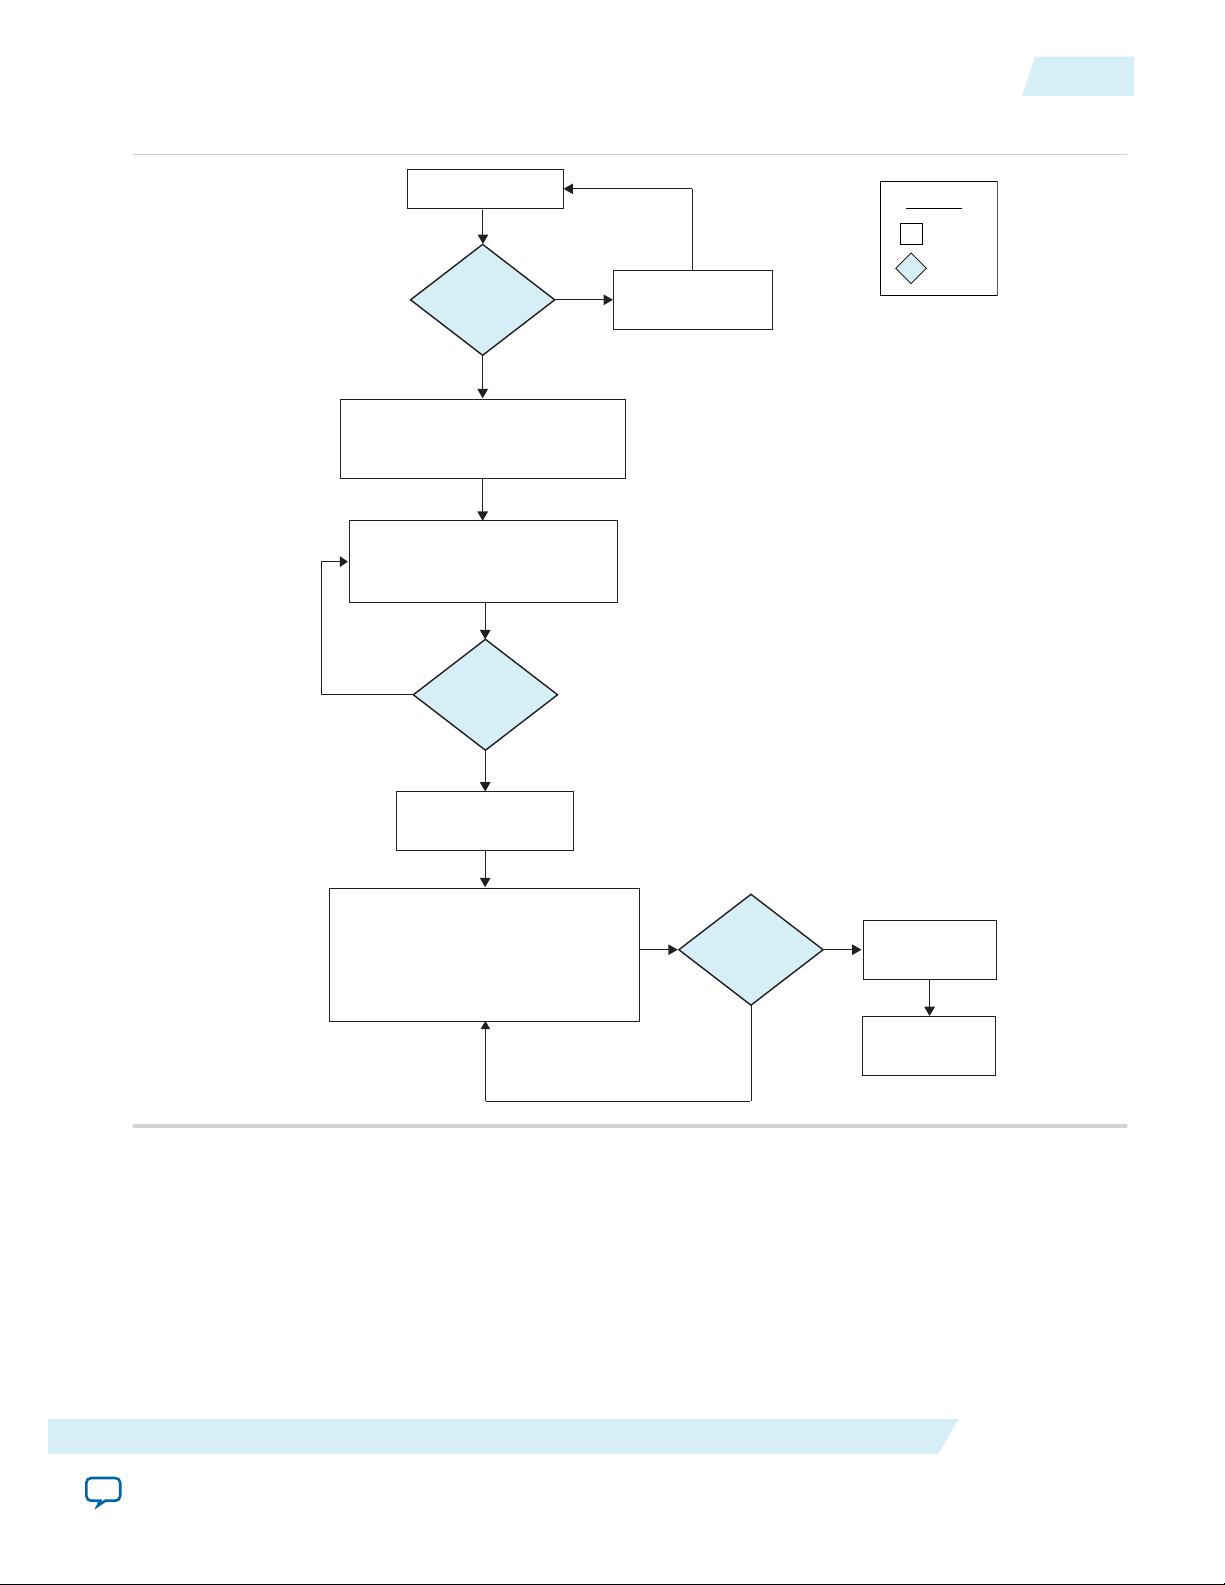
Important:
The figure below summarizes the steps you perform to program your Cyclone V SoC.
Before you program your Cyclone V SoC with the hardware image, ensure that your SoC
contains an image created using the current version of the AOCL.
Altera Corporation
Setting Up the Altera SDK for OpenCL, SoC EDS, and the Cyclone V SoC Development Kit for Windows
Send Feedback
Page 20

Extract hello_world
OpenCL example
Build
host application
Run hello_world
host executable
Check setting of
AOCL_BOARD_PACKAGE_ROOT
Select target FPGA board
(aoc --list-boards)
Compile kernel for target board
(
aoc -v --board c5soc device/hello_world.cl -o bin/hello_world.aocx
)
hello_world.aoco
hello_world.aocx
Build successful?
NO
YES
Legend
Action
Decision
File
Attention: Adding the -c option in your aoc
command ( aoc -c -v --board c5soc
device/hello_world.cl
) instructs the
AOC to generate hello_world.aoco only.
-o bin/hello_world.aoco
OCL006-15.0.0
2015.05.04
Creating the Hardware Configuration File of an OpenCL Kernel for SoC
Figure 2-1: Cyclone V SoC Development Kit Programming Overview
2-11
1. Download the SoC-specific hello_world example OpenCL application from the OpenCL Design
Examples page on the Altera website.
2. Extract the hello_world example (exm_opencl_hello_world_x32_linux_<version>) to a location to which
you have write access.
3. Ensure that you set the environment variable AOCL_BOARD_PACKAGE_ROOT to point to the
Cyclone V SoC Development Kit Reference Platform (that is, ALTERAOCLSDKROOT/board/c5soc).
4. At a command prompt, navigate to the hello_world design.
5. To list the SoC boards available in the Cyclone V SoC Development Kit Reference Platform, invoke the
aoc --list-boards command.
Setting Up the Altera SDK for OpenCL, SoC EDS, and the Cyclone V SoC Development Kit for Windows
Send Feedback
Altera Corporation
Page 21

2-12
Executing an OpenCL Kernel on an SoC
OCL006-15.0.0
You should see an output similar to the one below:
Board list:
c5soc
c5soc_sharedonly
6. To compile the kernel for your Cyclone V SoC Development Kit, invoke the following command:
aoc --board c5soc device/hello_world.cl -o bin/hello_world.aocx
This command performs the following tasks:
• Generates the Quartus II design project files from the OpenCL source code.
• Checks for initial syntax errors.
• Performs basic optimizations.
• Creates a hello_world subfolder or subdirectory containing necessary intermediate files.
• Creates the Altera Offline Compiler Object file (.aoco).
• Creates the .aocx hardware configuration file and saves it in the bin subfolder or subdirectory.
Attention: The .aocx file might take hours to build, depending on the complexity of the kernel. To
view the progress of the compilation on-screen, include the -v flag in your aoc command
(that is, aoc -v <your_kernel_filename>.cl).
The AOC displays the line aoc: Hardware generation completed
successfully. to signify the completion of the compilation process.
2015.05.04
For more information on the --list-boards option of the aoc command, refer to the Listing the
Available FPGA Boards in Your Custom Platform (--list-boards) section of the Altera SDK for OpenCL
Programming Guide.
For more information on the --board <board_name> option of the aoc command, refer to the
Compiling a Kernel for a Specific FPGA Board (--board <board_name>) section of the Altera SDK for
OpenCL Programming Guide.
For more information on the -v option of the aoc command, refer to the Generating Compilation
Progress Report (-v) section of the Altera SDK for OpenCL Programming Guide.
For more information on the -o <filename> option of the aoc command, refer to the Specifying the
Name of an AOC Output File (-o <filename>) section of the Altera SDK for OpenCL Programming Guide.
Related Information
• OpenCL Design Examples page on the Altera website
• Listing the Available FPGA Boards in Your Custom Platform (--list-boards)
• Compiling a Kernel for a Specific FPGA Board (--board <board_name>)
• Generating Compilation Progress Report (-v)
• Specifying the Name of an AOC Output File (-o <filename>)
Executing an OpenCL Kernel on an SoC
Build your host application using the GNU Compiler Collection (GCC) cross-compiler available with the
SoC Embedded Design Suite (EDS).
Related Information
Creating the Hardware Configuration File of an OpenCL Kernel for SoC on page 2-10
Altera Corporation
Setting Up the Altera SDK for OpenCL, SoC EDS, and the Cyclone V SoC Development Kit for Windows
Send Feedback
Page 22

OCL006-15.0.0
2015.05.04
Building the Host Application
Build your SoC-specific OpenCL host application using the GNU Compiler Collection (GCC) crosscompiler available with the SoC Embedded Design Suite (EDS).
1. Perform the following tasks to download the hello_world design example.
a. Download the SoC-specific hello_world design example (<version> Arm32 Linux package (.tgz))
from the Hello World Design Example page within the Altera website.
b. Extract exm_opencl_hello_world_arm32_linux_<version>.tar to a location to which you have write
access.
c. Ensure that you set the environment variable AOCL_BOARD_PACKAGE_ROOT to point to the
Cyclone V SoC Development Kit Reference Platform (that is, %ALTERAOCLSDKROOT%\board\c5soc).
2. At a command prompt, invoke the following command to set the PATH environment variable:
SET PATH=%PATH%;<path_to_SoCEDS_installation_dir>\ds-5\sw\gcc\bin
3. Navigate to the <path_to_exm_opencl_hello_world_arm32_linux_<version>>\hello_world directory.
4.
Invoke the make -f Makefile command. Alternatively, you can simply invoke the make
command.
The hello_world executable will be in the <path_to_exm_opencl_hello_world_arm32_linux_<version>>\hello_
world\bin directory.
Related Information
Hello World Design Example page on the Altera website
Building the Host Application
2-13
Running the Host Application
To execute the hello_world.aocx Altera Offline Compiler Executable file on the SoC, run the host
application you built from the ARM-specific Makefile.
1. Log into your SoC board.
2. Copy the hello_world.aocx hardware configuration file and the hello_world host executable from the
<exm_opencl_hello_world_arm32_linux_<version>>\hello_world\bin to the board.
3. Ensure that the LD_LIBRARY_PATH environment variable includes the $%ALTERAOCLSDKROOT%\host\
arm32\lib.
4. To execute the kernel on the SoC, at a command prompt, navigate to the host executable directory and
run the hello_world host executable.
Output from Successful Kernel Execution on the Cyclone V SoC Development Kit
When you run the host application to execute your OpenCL kernel on the Cyclone V SoC Development
Kit, the software notifies you of a successful kernel execution.
Example output:
Found 1 OpenCL platforms.
Querying platform for info:
==========================
CL_PLATFORM_NAME = Altera SDK for OpenCL
CL_PLATFORM_VENDOR = Altera Corporation
CL_PLATFORM_VERSION = OpenCL 1.0 Altera SDK for OpenCL, Version <version>
Querying device for info:
========================
CL_DEVICE_NAME = c5soc : Cyclone V SoC Development Kit
Setting Up the Altera SDK for OpenCL, SoC EDS, and the Cyclone V SoC Development Kit for Windows
Send Feedback
Altera Corporation
Page 23

2-14
Uninstalling the Software
CL_DEVICE_VENDOR = Altera
CL_DEVICE_VENDOR_ID = 4466
CL_DEVICE_VERSION = OpenCL 1.0 Altera SDK for OpenCL, Version <version>
CL_DRIVER_VERSION = <version>
CL_DEVICE_ADDRESS_BITS = 64
CL_DEVICE_AVAILABLE = true
CL_DEVICE_ENDIAN_LITTLE = true
CL_DEVICE_GLOBAL_MEM_CACHE_SIZE = 32768
CL_DEVICE_GLOBAL_MEM_CACHELINE_SIZE = 0
CL_DEVICE_GLOBAL_MEM_SIZE = 2147483648
CL_DEVICE_IMAGE_SUPPORT = false
CL_DEVICE_LOCAL_MEM_SIZE = 16384
CL_DEVICE_MAX_CLOCK_FREQUENCY = 1000
CL_DEVICE_MAX_COMPUTE_UNITS = 1
CL_DEVICE_MAX_CONSTANT_ARGS = 8
CL_DEVICE_MAX_CONSTANT_BUFFER_SIZE = 3758096384
CL_DEVICE_MAX_WORK_ITEM_DIMENSIONS = 3
CL_DEVICE_MAX_WORK_ITEM_DIMENSIONS = 1024
CL_DEVICE_MIN_DATA_TYPE_ALIGN_SIZE = 128
CL_DEVICE_PREFERRED_VECTOR_WIDTH_CHAR = 4
CL_DEVICE_PREFERRED_VECTOR_WIDTH_SHORT = 2
CL_DEVICE_PREFERRED_VECTOR_WIDTH_INT = 1
CL_DEVICE_PREFERRED_VECTOR_WIDTH_LONG = 1
CL_DEVICE_PREFERRED_VECTOR_WIDTH_FLOAT = 1
CL_DEVICE_PREFERRED_VECTOR_WIDTH_DOUBLE = 0
Command queue out of order? = false
Command queue profiling enabled? = true
OCL006-15.0.0
2015.05.04
Kernel initialization is complete.
Launching the kernel...
Thread #2: Hello from Altera's OpenCL Compiler!
Kernel execution is complete.
Uninstalling the Software
To uninstall the AOCL for Windows, run the uninstaller, and restore all modified environment variables
to their previous settings.
1. From the Windows Start Menu shortcut, navigate to the Altera <version>\Altera SDK for OpenCL <version>
(64-bit) folder.
2. Run Uninstall Altera SDK for OpenCL <version>.
3. Remove the following paths from the PATH environment variable:
a. %ALTERAOCLSDKROOT%\bin
b. %ALTERAOCLSDKROOT%\host\windows64\bin
4. Remove the ALTERAOCLSDKROOT environment variable.
Altera Corporation
Setting Up the Altera SDK for OpenCL, SoC EDS, and the Cyclone V SoC Development Kit for Windows
Send Feedback
Page 24

Setting Up the Altera SDK for OpenCL, SoC EDS,
www.altera.com
101 Innovation Drive, San Jose, CA 95134
and the Cyclone V SoC Development Kit for
Linux
2015.05.04
OCL006-15.0.0
Subscribe
The Altera SDK for OpenCL (AOCL) setup process includes downloading and installing the software,
installing the Cyclone V SoC Development Kit, and then executing an OpenCL kernel on the SoC.
1. Upgrading to Current Version of AOCL for Cyclone V SoC on page 3-2
If you have been using a previous version of the Altera SDK for OpenCL (AOCL) to program your
Cyclone V SoC Development Kit, you must upgrade the software programs and files to the current
version.
2. Downloading the Altera SDK for OpenCL on page 3-2
Download the AOCL and all related software for Linux from the Download Center on the Altera
website.
3. Downloading the SoC EDS on page 3-3
Download the SoC Embedded Design Suite (EDS) for Linux from the Download Center on the Altera
website.
4. Installing the Altera SDK for OpenCL on page 3-3
Install the AOCL in a directory that you own.
5. Setting the Environment Variables for Linux on page 3-4
Set the PATH and LD_LIBRARY_PATH user environment variables to point to the Altera SDK for
OpenCL (AOCL) and board libraries.
6. Installing the SoC EDS on page 3-5
To use the Altera Software Development Kit (SDK) for OpenCL to create OpenCL kernel programs
that target a Cyclone V SoC, you must install the Altera SoC Embdded Design Suite (EDS) on your
host system to develop the corresponding embedded software.
7. Licensing the Software on page 3-5
Obtain the AOCL license from the Altera Self Service Licensing Center.
8. Installing the Cyclone V SoC Development Kit on page 3-6
To execute an OpenCL kernel on a Cyclone V SoC, first install the Cyclone V SoC Development Kit
and configure it as described in the Altera SDK for OpenCL (AOCL) documentation.
9. Creating the Hardware Configuration File of an OpenCL Kernel for SoC on page 3-11
To create the .aocx file for the hello_world example OpenCL application, you must download the
example design from the OpenCL Design Examples page on the Altera website. Extract the
downloaded source files, and then compile the kernel using the Altera Offline Compiler (AOC).
10.Executing an OpenCL Kernel on an SoC on page 3-13
Build your host application using the GNU Compiler Collection (GCC) cross-compiler available with
the SoC Embedded Design Suite (EDS).
Send Feedback
3
©
2015 Altera Corporation. All rights reserved. ALTERA, ARRIA, CYCLONE, ENPIRION, MAX, MEGACORE, NIOS, QUARTUS and STRATIX words and logos are
trademarks of Altera Corporation and registered in the U.S. Patent and Trademark Office and in other countries. All other words and logos identified as
trademarks or service marks are the property of their respective holders as described at www.altera.com/common/legal.html. Altera warrants performance
of its semiconductor products to current specifications in accordance with Altera's standard warranty, but reserves the right to make changes to any
products and services at any time without notice. Altera assumes no responsibility or liability arising out of the application or use of any information,
product, or service described herein except as expressly agreed to in writing by Altera. Altera customers are advised to obtain the latest version of device
specifications before relying on any published information and before placing orders for products or services.
ISO
9001:2008
Registered
Page 25

3-2
Upgrading to Current Version of AOCL for Cyclone V SoC
11.Uninstalling the Software on page 3-15
To uninstall the AOCL for Linux, remove the software package via the Red Hat Package Manager
(RPM) or GUI uninstaller, then delete the software directory and restore all modified environment
variables to their previous settings.
Upgrading to Current Version of AOCL for Cyclone V SoC
If you have been using a previous version of the Altera SDK for OpenCL (AOCL) to program your
Cyclone V SoC Development Kit, you must upgrade the software programs and files to the current
version.
The AOCL is incompatible with previous versions of the Quartus II software.
1. Upgrade the following software to the current version:
a. Quartus II software
b. AOCL
c. SoC Embedded Design Suite (EDS)
2. Reprogram the Cyclone V SoC Development Kit micro SD flash card with an image created using the
current version of the AOCL.
For instructions on programming the micro SD flash card, refer to the Writing an SD Card Image File
onto the Micro SD Flash Card section.
3. Recompile your host application using the current version of the AOCL.
OCL006-15.0.0
2015.05.04
Related Information
Writing an SD Card Image onto the Micro SD Flash Card on Linux on page 3-7
Downloading the Altera SDK for OpenCL
Download the AOCL and all related software for Linux from the Download Center on the Altera website.
Download the AOCL and all related software into a single installation package. Alternatively, if you
already have the current version of the Quartus II software in your system, download the AOCL as a
stand-alone software.
Download the following software and files:
• Quartus II software
• Cyclone V and Stratix V device support files
• AOCL
• Altera SoC Embedded Design Suite (EDS)
1. In the main page of the Altera website, click MYALTERA and log into your account.
If you do not have a myAltera account, register for a new account.
2. Click DOWNLOADS to enter the Download Center.
3. Click Altera SDK for OpenCL to enter the download page for the subscription edition of the AOCL.
4. Select the software version. The default selection is the current version.
Altera Corporation
Setting Up the Altera SDK for OpenCL, SoC EDS, and the Cyclone V SoC Development Kit for Linux
Send Feedback
Page 26

OCL006-15.0.0
2015.05.04
5. Select Direct Download as the download method.
6. Click the Linux SDK tab and then click More beside Download and install instructions to view the
download and installation procedure.
7. Perform the steps outlined in the download and installation instructions on the download page.
Related Information
Altera website
Downloading the SoC EDS
Download the SoC Embedded Design Suite (EDS) for Linux from the Download Center on the Altera
website.
1. In the main page of the Altera website, click MYALTERA and log into your account.
If you do not have a myAltera account, register for a new account.
2. Click DOWNLOADS to enter the Download Center.
3. Click SoC EDS to enter the download page for the subscription edition of the SoC EDS.
4. Select the software version.
5. Select Linux as the operating system.
6. Select Direct Download as the download method.
7. Click SoC Embedded Design Suite (EDS).
Download will begin immediately.
8. Perform the steps outlined in the download and installation instructions on the download page.
Downloading the SoC EDS
3-3
Related Information
Altera website
Installing the Altera SDK for OpenCL
If you download the AOCL, the Quartus II software, and the device support into a single installation
package, run the Quartus II software installer for Linux to install all the software and files. If you
download the AOCL as a stand-alone software, run the AOCL installer. Install the AOCL in a directory
that you own.
Before you begin
1. You must have sudo or root privileges.
2. You must install the Linux OS kernel source and headers (for example, kernel-devel.x86_64 and kernel-
headers.x86_64), and the GNU Compiler Collection (GCC) (gcc.x86_64).
Attention:
If you install the software on a system that does not contain any C Shell Run Commands file
(.cshrc) or Bash Run Commands file (.bashrc) in your directory, you must set the environment
variables ALTERAOCLSDKROOT and PATH manually. Alternatively, you may create
the .cshrc and .bashrc files, and then append the environment variables to them. To ensure that
the updates take effect, restart your terminal after you set the environment variables.
Setting Up the Altera SDK for OpenCL, SoC EDS, and the Cyclone V SoC Development Kit for Linux
Send Feedback
Altera Corporation
Page 27

3-4
Setting the Environment Variables for Linux
OCL006-15.0.0
• To install the AOCL, Quartus II software, and device support files simultaneously, perform the
following tasks:
1. Run the QuartusSetup-<version>-linux.run installer, and follow the installation instructions in the
Altera Software Installation and Licensing manual.
2. The installer sets the environment variable ALTERAOCLSDKROOT to point to the path of the
software installation. Ensure that ALTERAOCLSDKROOT points to the current version of the
software.
3. Ensure that the PATH environment variable includes the bin directory in the Quartus II system
directory (for example, <home_directory>/altera/<version>/quartus/bin).
• To install the AOCL as a stand-alone software, perform the following tasks:
1. Ensure that your system already has the current version of the Quartus II software and applicable
device support files.
2. Ensure that the PATH environment variable includes the bin directory in the Quartus II system
folder (for example, <home_directory>/altera/<version>/quartus/bin).
3. To install the software using the Red Hat Package Manager (RPM), at the command prompt,
invoke one of the following commands:
•
At a command prompt, type rpm -i aocl-sdk-<version>.x86_64.rpm to install the
software in the default location (for example, opt/altera/aocl-sdk).
•
To install the software in the default location with verbose progress reporting, type rpm -ivh
aocl-sdk-<version>.x86_64.rpm
• To install the software in an alternate directory that you own (that is, not a system directory),
type the rpm -i --prefix <aocl_destination_directory> aocl-sdk-
<version>.x86_64.rpm command.
4. To install the software using the GUI installer, run the AOCLSetup-<version>-linux.run installer. Direct
the installer to extract the software to an empty folder that you own (that is, not a system directory).
The installation path must not contain any spaces (for example, usr/altera/<version>/hld).
5. The installer sets the environment variable ALTERAOCLSDKROOT to the path of the software
installation. Ensure that ALTERAOCLSDKROOT points to the current version of the software.
2015.05.04
Related Information
Altera Software Installation and Licensing
Setting the Environment Variables for Linux
Set the PATH and LD_LIBRARY_PATH user environment variables to point to the Altera SDK for
OpenCL (AOCL) and board libraries.
Before you begin
Attention:
Altera Corporation
If you install the software on a system that does not contain any C Shell Run Commands file
(.cshrc) or Bash Run Commands file (.bashrc) in your directory, you must set the environment
variables ALTERAOCLSDKROOT and PATH manually. Alternatively, you may create
the .cshrc and .bashrc files, and then append the environment variables to them. To ensure that
the updates take effect, restart your terminal after you set the environment variables.
Setting Up the Altera SDK for OpenCL, SoC EDS, and the Cyclone V SoC Development Kit for Linux
Send Feedback
Page 28

OCL006-15.0.0
2015.05.04
1.
At a command prompt, type export PATH=$ALTERAOCLSDKROOT/bin:$PATH to add the
path to the AOCL bin directory to PATH, where ALTERAOCLSDKROOT points to the path to the
software installation.
2. At a command prompt, specify the following environment variable settings:
a.
Invoke the export LD_LIBRARY_PATH=$ALTERAOCLSDKROOT/host/linux64/lib:
$LD_LIBRARY_PATH command to add the path to the AOCL host runtime libraries to
LD_LIBRARY_PATH.
b.
Invoke the export LD_LIBRARY_PATH=$AOCL_BOARD_PACKAGE_ROOT/linux64/
lib:$LD_LIBRARY_PATH command to add the path to the board libraries to
LD_LIBRARY_PATH, where AOCL_BOARD_PACKAGE_ROOT points to the path to the Custom
or Reference Platform.
Installing the SoC EDS
To use the Altera Software Development Kit (SDK) for OpenCL to create OpenCL kernel programs that
target a Cyclone V SoC, you must install the Altera SoC Embdded Design Suite (EDS) on your host
system to develop the corresponding embedded software.
The GNU Compiler Collection (GCC) tool chain is part of the SoC EDS installation package.
Installing the SoC EDS
3-5
1. Run the SoCEDSSetup-<version>-linux.run installer. Follow the installation instructions in the Installing
the SoC EDS section of the Altera SoC Embedded Design Suite User Guide.
2. Perform the tasks outlined in the Installing the ARM DS-5 Altera Edition Toolkit section of the Altera
SoC Embedded Design Suite User Guide to install the ARM Development Studio (DS-5) Altera Edition
Toolkit for your operating system (OS).
For more information on the ARM DS-5 Altera Edition Toolkit, refer to the ARM DS-5 Altera Edition
page of the ARM website.
3. Consult the Licensing section of the Altera SoC Embedded Design Suite User Guide for licensing
instructions for the SoC EDS and the ARM DS-5 Altera Edition Toolkit.
Related Information
• Installing the SoC EDS
• Installing the ARM DS-5 Altera Edition Toolkit
• ARM DS-5 Altera Edition page on the ARM website
• SoC EDS Licensing
Licensing the Software
Obtain the AOCL license from the Altera Self Service Licensing Center. The AOCL license allows the
software to access relevant Quartus II software functionalities and device support without an additional
Quartus II software license.
Before you begin
For information on the licensing options and requirements, refer to the Licensing Altera Software section
of the Altera Software Installation and Licensing manual, the LICENSE.txt file that accompanies each
software, and the Altera Licensing page within the Altera website.
Setting Up the Altera SDK for OpenCL, SoC EDS, and the Cyclone V SoC Development Kit for Linux
Send Feedback
Altera Corporation
Page 29

3-6
Installing the Cyclone V SoC Development Kit
OCL006-15.0.0
2015.05.04
1. In the main page within the Altera website, click MYALTERA and log into your account.
2. Click the link to the Self-Service Licensing Center.
3. Perform the steps outlined in the Requesting a License from the Self-Service Licensing Center section of
the Altera Software Installation and Licensing manual to obtain and activate the license.
You must obtain a separate license for the SoC Embedded Design Suite (EDS).
4. If you have a fixed license, append the <path_to_license_file>/<license_filename> file to the
LM_LICENSE_FILE environment variable in the following manner:
a. Create a backup copy of the provided license file.
b. Save the new license file on your local hard drive.
c. Append the <path_to_license_file>/<license_filename> file to the LM_LICENSE_FILE environment
variable.
5. If you have a floating licence, append the <path_to_license_file>/<license_filename> file to the
LM_LICENSE_FILE environment variable in the following manner:
a. Obtain the port number and host name from the network or system administrator. Alternatively,
the information is in the license file line SERVER <hostname> <8 to 12 character host or NIC
ID> <port>.
The license location for the user is <port>@<hostname>. If a port is not listed in the license file,
specify @<hostname>.
b. Modify the license file to update the port number and host name.
c. Append the <path_to_license_file>/<license_filename> file to the LM_LICENSE_FILE environment
variable.
Related Information
• Altera Licensing page on the Altera website
• Altera Software Installation and Licensing
• Altera website
Installing the Cyclone V SoC Development Kit
To execute an OpenCL kernel on a Cyclone V SoC, first install the Cyclone V SoC Development Kit and
configure it as described in the Altera SDK for OpenCL (AOCL) documentation.
1. Writing an SD Card Image onto the Micro SD Flash Card on Linux on page 3-7
To write an SD card image onto the micro SD flash card on Linux, extract the SD card image from the
Cyclone V SoC Development Kit Reference Platform, and then write the image onto the micro SD
flash card.
2. Configuring the SW3 Switches on page 3-7
Configure the SW3 dual in-line package (DIP) switches on the Cyclone V SoC Development Kit.
3. Setting Up Terminal Connection in Linux on page 3-8
To set up the terminal connection for the Cyclone V SoC Development Kit in Linux, specify the USB
virtual COM port settings.
4. Setting Environment Variables and Loading OpenCL Linux Kernel Driver on page 3-9
After you turn on the board and establish terminal connection, log into the Cyclone V SoC
Development Kit as user root with no password. Then, before you run your host application, set the
environment variables and load the OpenCL Linux kernel driver.
Altera Corporation
Setting Up the Altera SDK for OpenCL, SoC EDS, and the Cyclone V SoC Development Kit for Linux
Send Feedback
Page 30

OCL006-15.0.0
2015.05.04
Writing an SD Card Image onto the Micro SD Flash Card on Linux
5. Connecting the Board to Network via Ethernet on page 3-9
Connecting the Cyclone V SoC Development Kit to the host network allows you to transfer files to and
from your SoC.
Writing an SD Card Image onto the Micro SD Flash Card on Linux
The Altera SDK for OpenCL (AOCL) includes a Cyclone V SoC Development Kit Reference Platform. To
write an SD card image onto the micro SD flash card on Linux, extract the SD card image from the
Cyclone V SoC Development Kit Reference Platform, and then write the image onto the micro SD flash
card. The SD card image contains everything you need to start using OpenCL on the board.
Before you begin
The SD card image linux_sd_card_image.tgz is available in the Cyclone V SoC Development Kit Reference
Platform. Ensure that the environment variable AOCL_BOARD_PACKAGE_ROOT points to the location
of the board_env.xml file in the Reference Platform.
You must have sudo or root privileges.
1.
To decompress the $ALTERAOCLSDKROOT/board/c5soc/linux_sd_card_image.tgz file, run the tar xvfz
linux_sd_card_image.tgz command.
2. Insert the micro SD flash card into a card reader, and connect the reader to your PC.
a. If the flash card already contains an image, partitions will exist automatically in the micro SD card.
Unmount or eject all these partitions.
3.
Run the dmesg | tail command to verify the device name of the flash card (for example, /dev/
sde).
4. Write the SD card image onto the micro SD flash card by running the following commands:
sudo dd if=linux_sd_card_image of=/dev/sde bs=1M
3-7
sync
Attention:
If the device name of your micro SD flash card is not /dev/sde, replace /dev/sde in the
above command with the device name you obtain from Step 3.
Warning: Specifying the wrong device name might cause the SD card image to overwrite all existing
data.
5. After you write the image onto the micro SD flash card, insert the card into the micro SD card slot on
the Cyclone V SoC Development Kit.
Related Information
Altera Cyclone V SoC Development Kit Reference Platform Porting Guide
Configuring the SW3 Switches
Configure the SW3 dual in-line package (DIP) switches on the Cyclone V SoC Development Kit. The
switch bank is located next to the SD card slot.
1. Set the SW3 DIP switches to the following positions:
Switch Configuration
1 ON
2 OFF
Setting Up the Altera SDK for OpenCL, SoC EDS, and the Cyclone V SoC Development Kit for Linux
Send Feedback
Altera Corporation
Page 31
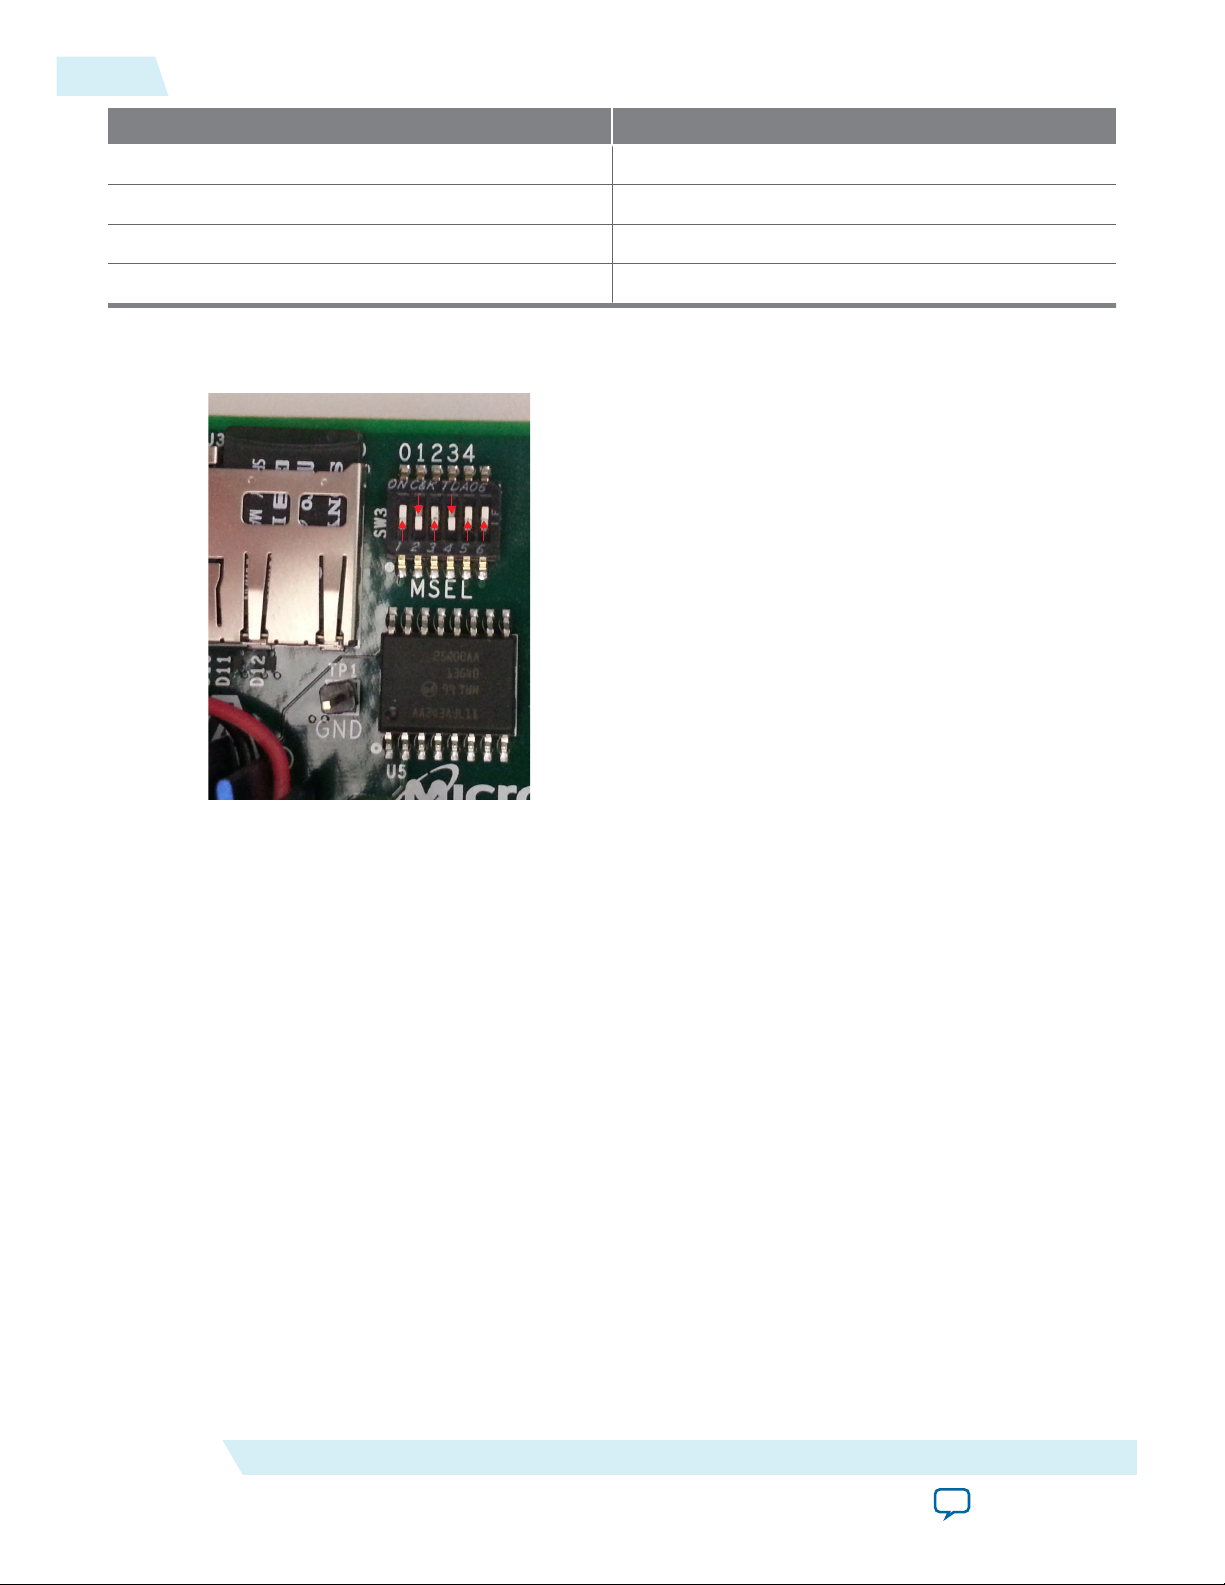
3-8
Setting Up Terminal Connection in Linux
Switch Configuration
3 ON
4 OFF
5 ON
6 ON
The figure below illustrates the physical configuration of the SW switches on the Cyclone V SoC
Development Kit:
OCL006-15.0.0
2015.05.04
Setting Up Terminal Connection in Linux
To set up the terminal connection for the Cyclone V SoC Development Kit in Linux, specify the USB
virtual COM port settings.
1. Connect the board to your development machine via the micro-USB port that is closest to the power
supply connector on the board.
2. Connect the board to the power supply and power it up.
3.
Run the command dmesg | tail to determine which device the Future Technology Devices
International (FTDI) driver assigns for the connection (e.g. /dev/ttyUSB0).
4. Setup the minicom as follows:
a.
Ensure that minicom is installed on your system. If not, invoke the yum install minicom
command.
b.
Run minicom -s as root to enter the minicom setup mode.
c. Select Serial port setup and then press Enter.
d.
Press A to change Serial Device to /dev/ttyUSB0 and then press Enter.
e. Press E to change the port settings. Press E again to select 115200 for Speed, and then press Q to set
Data/Parity/Stopbits to 8-N-1 configuration.
Altera Corporation
Setting Up the Altera SDK for OpenCL, SoC EDS, and the Cyclone V SoC Development Kit for Linux
Send Feedback
Page 32

OCL006-15.0.0
2015.05.04
Setting Environment Variables and Loading OpenCL Linux Kernel Driver
f. Press Enter twice to return to the main minicom setup menu.
g. Select Save setup as dfl and then press Enter to save the minicom settings as defaults.
h. Select Exit.
5. Without powering down, restart the board.
You should see Linux boot messages appear on the terminal command of your choice.
Setting Environment Variables and Loading OpenCL Linux Kernel Driver
After you turn on the board and establish terminal connection, log into the Cyclone V SoC Development
Kit as user root with no password. Then, before you run your host application, set the environment
variables and load the OpenCL Linux kernel driver.
1.
After logging into the SoC board, run the source ./init_opencl.sh command, which
performs the following tasks:
a. Set the PATH, LD_LIBRARY_PATH, and AOCL_BOARD_PACKAGE_ROOT environment
variables.
b. Load the OpenCL Linux kernel driver.
The init_opencl.sh file is available in the SD card image that you write onto the micro SD flash card. It
contains the commands shown below:
export ALTERAOCLSDKROOT=<aocl_destination_directory>
export AOCL_BOARD_PACKAGE_ROOT=$ALTERAOCLSDKROOT/board/c5soc
export PATH=$ALTERAOCLSDKROOT/bin:$PATH
export LD_LIBRARY_PATH=$ALTERAOCLSDKROOT/host/arm32/lib:$LD_LIBRARY_PATH
insmod $AOCL_BOARD_PACKAGE_ROOT/driver/aclsoc_drv.ko
3-9
Connecting the Board to Network via Ethernet
Connecting the Cyclone V SoC Development Kit to the host network allows you to transfer files to and
from your SoC.
1. Connect the hard processor system (HPS) Ethernet port of the board to your network.
2. Reboot the board.
The boards acquires an IP address, allowing you to initiate a Secure Shell (SSH) connection and runs a
Secure Copy (SCP) program to login and transfer files.
Alternatively, you can mount a network drive to your board and access the files directly.
Ensuring IP Address Acquisition
After you connect the hard processor system (HPS) Ethernet port on the Cyclone V SoC Development Kit
to your network and reboot the board, ensure that the board acquires an IP address successfully.
Before you begin
After you connect the HPS Ethernet port to your network and power up your board, you should see a
solid orange light and a blinking green light. If not, check the connection of the Ethernet cable to the
Ethernet port on your network.
1. To check if your board has an IP address, search for the IP address in boot messages such as the one
shown below:
Sending discover...
libphy: stmmac-0:04 - Link is Up - 1000/Full
Sending discover...
Setting Up the Altera SDK for OpenCL, SoC EDS, and the Cyclone V SoC Development Kit for Linux
Send Feedback
Altera Corporation
Page 33

3-10
Mounting a Shared Drive
Sending select for 137.57.175.148...
Lease of 137.57.175.148 obtained, lease time 86400
/etc/udhcpc.d/50default: Adding DNS 137.57.142.218
/etc/udhcpc.d/50default: Adding DNS 137.57.109.10
/etc/udhcpc.d/50default: Adding DNS 137.57.64.1
done.
OCL006-15.0.0
2015.05.04
The message Lease of <board_IP_address> obtained, lease time 86400
identifies the IP address of the board.
2. If you receive the following output, perform a warm reboot of the board by pressing the WARM
button next to the LED lights.
Sending discover...
libphy: stmmac-0:04 - Link is Up - 1000/Full
Sending discover...
Sending discover...
No lease, failing
The board uses the dynamic host configuration protocol (DHCP) to acquire an IP address. If the
session times out waiting for an IP assignment, reboot the CPU to restart the IP acquisition process.
To reboot the CPU, press the Warm reset button next to the four hard processor system (HPS) LEDs
on the board.
3. If you are unable to acquire the IP address, ensure that the Ethernet cable is in good working condition
and the Ethernet port on your network is enabled.
Mounting a Shared Drive
The most convenient way to share files between a development PC and the Cyclone V SoC development
board is to mount a network drive.
1. Check the /etc/fstab file systems table file on your development PC for the line that describes the
mounting of the drive you want to use on the board.
The following example /etc/fstab entry indicates that the /data folder on the my_nas server is mounted
to the /data folder on the development PC:
my_nas:/data /data nfs
exec,dev,suid,rw,tcp,hard,intr,vers=3,rsize=32768,wsize=32768,timeo=600,retrans=200
2. Add the /etc/fstab entry described above to the /etc/fstab file on the Cyclone V SoC development board.
3.
Run the sync command to save the /etc/fstab file to the SD flash card.
4. Create an empty folder on the board that serves as the mounting point for the network drive.
For example: type mkdir /data, where /data is the name of the folder.
5.
Invoke the busybox mount -a command.
If the mounting operation fails, rerun the command.
Using SSH and SCP
Instead of connecting the Cyclone V SoC Development Kit to the host system using UART over USB and
transferring files using a network drive, you can initiate a Secure Shell (SSH) connection and transfer files
using a Secure Copy (SCP) program.
1. To establish a connection between the Cyclone V SoC Development Kit and the host system via SSH,
Altera Corporation
invoke the ssh root@<board_ip_address> command from your development machine.
Setting Up the Altera SDK for OpenCL, SoC EDS, and the Cyclone V SoC Development Kit for Linux
Send Feedback
Page 34

OCL006-15.0.0
2015.05.04
Creating the Hardware Configuration File of an OpenCL Kernel for SoC
For instructions on how to identify <board_ip_address>, refer to the Ensuring IP Address Acquisition
section.
2.
To transfer files, one at a time, from the host system to the board via SCP, invoke the scp
<source_filename> root@<board_ip_address>:<target_filename> command
from your development machine.
Related Information
Ensuring IP Address Acquisition on page 3-9
Creating the Hardware Configuration File of an OpenCL Kernel for SoC
The hardware configuration file of an OpenCL kernel is called an Altera Offline Compiler Executable file
(.aocx). To create the .aocx file for the hello_world example OpenCL application, you must download the
example design from the OpenCL Design Examples page on the Altera website. Extract the downloaded
source files, and then compile the kernel using the Altera Offline Compiler (AOC).
After you successfully install your FPGA board, you can create a .aocx file that executes on the device. The
steps below describe the process of creating a .aocx file from the hello_world example design. For more
information on the OpenCL design examples, refer to the OpenCL Design Examples page on the Altera
website.
3-11
Important:
Before you program your Cyclone V SoC with the hardware image, ensure that your SoC
contains an image created using the current version of the AOCL.
The figure below summarizes the steps you perform to program your Cyclone V SoC.
Setting Up the Altera SDK for OpenCL, SoC EDS, and the Cyclone V SoC Development Kit for Linux
Send Feedback
Altera Corporation
Page 35

Extract hello_world
OpenCL example
Build
host application
Run hello_world
host executable
Check setting of
AOCL_BOARD_PACKAGE_ROOT
Select target FPGA board
(aoc --list-boards)
Compile kernel for target board
(
aoc -v --board c5soc device/hello_world.cl -o bin/hello_world.aocx
)
hello_world.aoco
hello_world.aocx
Build successful?
NO
YES
Legend
Action
Decision
File
Attention: Adding the -c option in your aoc
command ( aoc -c -v --board c5soc
device/hello_world.cl
) instructs the
AOC to generate hello_world.aoco only.
-o bin/hello_world.aoco
3-12
Creating the Hardware Configuration File of an OpenCL Kernel for SoC
Figure 3-1: Cyclone V SoC Development Kit Programming Overview
OCL006-15.0.0
2015.05.04
1. Download the SoC-specific hello_world example OpenCL application from the OpenCL Design
Examples page on the Altera website.
2. Extract the hello_world example (exm_opencl_hello_world_x32_linux_<version>) to a location to which
you have write access.
3. Ensure that you set the environment variable AOCL_BOARD_PACKAGE_ROOT to point to the
Cyclone V SoC Development Kit Reference Platform (that is, ALTERAOCLSDKROOT/board/c5soc).
4. At a command prompt, navigate to the hello_world design.
5. To list the SoC boards available in the Cyclone V SoC Development Kit Reference Platform, invoke the
aoc --list-boards command.
Altera Corporation
Setting Up the Altera SDK for OpenCL, SoC EDS, and the Cyclone V SoC Development Kit for Linux
Send Feedback
Page 36

OCL006-15.0.0
2015.05.04
Executing an OpenCL Kernel on an SoC
You should see an output similar to the one below:
Board list:
c5soc
c5soc_sharedonly
6. To compile the kernel for your Cyclone V SoC Development Kit, invoke the following command:
aoc --board c5soc device/hello_world.cl -o bin/hello_world.aocx
This command performs the following tasks:
• Generates the Quartus II design project files from the OpenCL source code.
• Checks for initial syntax errors.
• Performs basic optimizations.
• Creates a hello_world subfolder or subdirectory containing necessary intermediate files.
• Creates the Altera Offline Compiler Object file (.aoco).
• Creates the .aocx hardware configuration file and saves it in the bin subfolder or subdirectory.
Attention: The .aocx file might take hours to build, depending on the complexity of the kernel. To
view the progress of the compilation on-screen, include the -v flag in your aoc command
(that is, aoc -v <your_kernel_filename>.cl).
The AOC displays the line aoc: Hardware generation completed
successfully. to signify the completion of the compilation process.
3-13
For more information on the --list-boards option of the aoc command, refer to the Listing the
Available FPGA Boards in Your Custom Platform (--list-boards) section of the Altera SDK for OpenCL
Programming Guide.
For more information on the --board <board_name> option of the aoc command, refer to the
Compiling a Kernel for a Specific FPGA Board (--board <board_name>) section of the Altera SDK for
OpenCL Programming Guide.
For more information on the -v option of the aoc command, refer to the Generating Compilation
Progress Report (-v) section of the Altera SDK for OpenCL Programming Guide.
For more information on the -o <filename> option of the aoc command, refer to the Specifying the
Name of an AOC Output File (-o <filename>) section of the Altera SDK for OpenCL Programming Guide.
Related Information
• OpenCL Design Examples page on the Altera website
• Listing the Available FPGA Boards in Your Custom Platform (--list-boards)
• Compiling a Kernel for a Specific FPGA Board (--board <board_name>)
• Generating Compilation Progress Report (-v)
• Specifying the Name of an AOC Output File (-o <filename>)
Executing an OpenCL Kernel on an SoC
Build your host application using the GNU Compiler Collection (GCC) cross-compiler available with the
SoC Embedded Design Suite (EDS).
Related Information
Creating the Hardware Configuration File of an OpenCL Kernel for SoC on page 3-11
Setting Up the Altera SDK for OpenCL, SoC EDS, and the Cyclone V SoC Development Kit for Linux
Send Feedback
Altera Corporation
Page 37

3-14
Building the Host Application
Building the Host Application
Build your SoC-specific OpenCL host application using the GNU Compiler Collection (GCC) crosscompiler available with the SoC Embedded Design Suite (EDS).
1. Perform the following tasks to download the hello_world design example.
a. Download the SoC-specific hello_world design example (<version> Arm32 Linux package (.tgz))
from the Hello World Design Example page within the Altera website.
b. Extract exm_opencl_hello_world_arm32_linux_<version>.tar to a location to which you have write
access.
c. Ensure that you set the environment variable AOCL_BOARD_PACKAGE_ROOT to point to the
Cyclone V SoC Development Kit Reference Platform (that is, $ALTERAOCLSDKROOT/board/c5soc).
2. At a command prompt, invoke the following command to set the PATH environment variable:
export PATH=<path_to_SoCEDS_installation_dir>/ds-5/sw/gcc/bin:$PATH
3. Navigate to the <path_to_exm_opencl_hello_world_arm32_linux_<version>>/hello_world directory.
4.
Invoke the make -f Makefile command. Alternatively, you can simply invoke the make
command.
The hello_world executable will be in the <path_to_exm_opencl_hello_world_arm32_linux_<version>>/hello_
world/bin directory.
OCL006-15.0.0
2015.05.04
Related Information
Hello World Design Example page on the Altera website
Running the Host Application
To execute the hello_world.aocx Altera Offline Compiler Executable file on the SoC, run the host
application you built from the ARM-specific Makefile.
1. Log into your SoC board.
2. Copy the hello_world.aocx hardware configuration file and the hello_world host executable from the
<exm_opencl_hello_world_arm32_linux_<version>>/hello_world/bin to the board.
3. Ensure that the LD_LIBRARY_PATH environment variable includes the $ALTERAOCLSDKROOT/host/
arm32/lib.
4. To execute the kernel on the SoC, at a command prompt, navigate to the host executable directory and
run the hello_world host executable.
Output from Successful Kernel Execution on the Cyclone V SoC Development Kit
When you run the host application to execute your OpenCL kernel on the Cyclone V SoC Development
Kit, the software notifies you of a successful kernel execution.
Example output:
Found 1 OpenCL platforms.
Altera Corporation
Querying platform for info:
==========================
CL_PLATFORM_NAME = Altera SDK for OpenCL
CL_PLATFORM_VENDOR = Altera Corporation
CL_PLATFORM_VERSION = OpenCL 1.0 Altera SDK for OpenCL, Version <version>
Querying device for info:
========================
CL_DEVICE_NAME = c5soc : Cyclone V SoC Development Kit
Setting Up the Altera SDK for OpenCL, SoC EDS, and the Cyclone V SoC Development Kit for Linux
Send Feedback
Page 38

OCL006-15.0.0
2015.05.04
Uninstalling the Software
CL_DEVICE_VENDOR = Altera
CL_DEVICE_VENDOR_ID = 4466
CL_DEVICE_VERSION = OpenCL 1.0 Altera SDK for OpenCL, Version <version>
CL_DRIVER_VERSION = <version>
CL_DEVICE_ADDRESS_BITS = 64
CL_DEVICE_AVAILABLE = true
CL_DEVICE_ENDIAN_LITTLE = true
CL_DEVICE_GLOBAL_MEM_CACHE_SIZE = 32768
CL_DEVICE_GLOBAL_MEM_CACHELINE_SIZE = 0
CL_DEVICE_GLOBAL_MEM_SIZE = 2147483648
CL_DEVICE_IMAGE_SUPPORT = false
CL_DEVICE_LOCAL_MEM_SIZE = 16384
CL_DEVICE_MAX_CLOCK_FREQUENCY = 1000
CL_DEVICE_MAX_COMPUTE_UNITS = 1
CL_DEVICE_MAX_CONSTANT_ARGS = 8
CL_DEVICE_MAX_CONSTANT_BUFFER_SIZE = 3758096384
CL_DEVICE_MAX_WORK_ITEM_DIMENSIONS = 3
CL_DEVICE_MAX_WORK_ITEM_DIMENSIONS = 1024
CL_DEVICE_MIN_DATA_TYPE_ALIGN_SIZE = 128
CL_DEVICE_PREFERRED_VECTOR_WIDTH_CHAR = 4
CL_DEVICE_PREFERRED_VECTOR_WIDTH_SHORT = 2
CL_DEVICE_PREFERRED_VECTOR_WIDTH_INT = 1
CL_DEVICE_PREFERRED_VECTOR_WIDTH_LONG = 1
CL_DEVICE_PREFERRED_VECTOR_WIDTH_FLOAT = 1
CL_DEVICE_PREFERRED_VECTOR_WIDTH_DOUBLE = 0
Command queue out of order? = false
Command queue profiling enabled? = true
3-15
Kernel initialization is complete.
Launching the kernel...
Thread #2: Hello from Altera's OpenCL Compiler!
Kernel execution is complete.
Uninstalling the Software
To uninstall the AOCL for Linux, remove the software package via the Red Hat Package Manager (RPM)
or GUI uninstaller, then delete the software directory and restore all modified environment variables to
their previous settings.
1. Remove the software package by performing one of the following tasks:
a.
To uninstall the AOCL via RPM at the command line, type the rpm -e aocl-sdk command.
b. To uninstall the AOCL via the GUI uninstaller, run the aocl-<version>-uninstall.run program located
in the <install directory>/uninstall directory.
2. Remove $ALTERAOCLSDKROOT/bin from the PATH environment variable.
3. Remove $ALTERAOCLSDKROOT/host/linux64/lib from the LD_LIBRARY_PATH environment variable.
4. Remove the ALTERAOCLSDKROOT environment variable.
Setting Up the Altera SDK for OpenCL, SoC EDS, and the Cyclone V SoC Development Kit for Linux
Send Feedback
Altera Corporation
Page 39

2015.05.04
www.altera.com
101 Innovation Drive, San Jose, CA 95134
Document Revision History
A
OCL006-15.0.0
Subscribe
Send Feedback
Table A-1: Document Revision History of the Altera SDK for OpenCL Cyclone V SoC Getting Started Guide
Date Version Changes
May 2015 15.0.0
• Organized instructions into the following sections:
• Setting Up the Altera SDK for OpenCL on SoC for Windows
• Setting Up the Altera SDK for OpenCL on SoC for Linux
December 2014 14.1.0
• Reorganized information flow.
• Updated Red Hat Enterprise Linux (RHEL) version support.
• Included information on the ALTERAOCLSDKROOT/init_opencl script
for setting environment variables.
• Added the Contents of the AOCL section.
• Consolidated software uninstallation instructions and moved them
to the end of the document.
• Updated the kernel compilation command in the figure Cyclone V
SoC Development Kit Programming Overview.
• Updated licensing instructions for the new Altera Software
Development Kit (SDK) for OpenCL (AOCL) license.
• Updated instructions for building and running the host application
for SoC.
June 2014 14.0.0
©
2015 Altera Corporation. All rights reserved. ALTERA, ARRIA, CYCLONE, ENPIRION, MAX, MEGACORE, NIOS, QUARTUS and STRATIX words and logos are
trademarks of Altera Corporation and registered in the U.S. Patent and Trademark Office and in other countries. All other words and logos identified as
trademarks or service marks are the property of their respective holders as described at www.altera.com/common/legal.html. Altera warrants performance
of its semiconductor products to current specifications in accordance with Altera's standard warranty, but reserves the right to make changes to any
products and services at any time without notice. Altera assumes no responsibility or liability arising out of the application or use of any information,
product, or service described herein except as expressly agreed to in writing by Altera. Altera customers are advised to obtain the latest version of device
specifications before relying on any published information and before placing orders for products or services.
• Initial Release.
ISO
9001:2008
Registered
 Loading...