

Page 1

TWIN TUNER HIGH DEFINITION DIGITAL RECORDER
PVR 6600
Page 2

CONTENTS
CONTENTS ................................................................................................... 2
SAFETY INSTRUCTION ............................................................................. 3
FRONT PANEL ............................................................................................. 4
REAR PANEL ............................................................................................... 4
REMOTE ....................................................................................................... 5
PRECAUTIONS ABOUT BATTERIES ....................................................... 5
PREPARATION OF REMOTE CONTROL ................................................. 8
OPERATION DISTANCE AND ANGLE OF THE REMOTE CONTROL 8
RECORDING TIPS AND KEY FEATURES ............................................... 8
SYSTEM CONNECTION ........................................................................... 11
1. SET UP- YPBPR ............................................................................. 11
2. SET UP-HDMI ................................................................................ 12
3. SET UP- CVBS ................................................................................ 13
4. SET UP- AMPLIFIER ..................................................................... 14
POWER ON ................................................................................................. 16
SCANNING CHANNELS .......................................................................... 17
SETTINGS (INSTALLATION SET UP) .................................................... 18
SOFTWARE UPGRADE ............................................................................ 20
PVR FUNCTIONALLITY .......................................................................... 22
FILE PLAYBACK ....................................................................................... 26
MEDIA SERVICE ....................................................................................... 27
TV/ RADIO CHANNEL ............................................................................. 28
SPECIFICATION ........................................................................................ 29
WARRANTY CERTIFICATE ..................................................................... 30
PLEASE NOTE ALTECH UEC WILL CONTINUE TO
ENHANCE PERFORMANCE OF THIS PRODUCT AND
PROVIDE SOFTWARE UPDATES. PLEASE VISIT
WWW.UEC.COM.AU FOR MORE INFORMATION.
2
Page 3
SAFETY INSTRUCTION
IMPORTANT SAFETY INSTRUCTIONS
1. Read these instructions.
2. Keep these instructions.
3. Heed all warnings.
4. Follow all instructions.
5. Do not use this apparatus near water.
6. Clean only with dry cloth.
7. Do not block any ventilation openings. Install in accordance with the manufacturer’s instructions.
8. Do not install near any heat sources such as radiators, heat registers, stoves, or other apparatus
(including amplifiers) that produce heat.
9. The parameter of the using power source should be accordance with which indicating on the rear
panel; otherwise the machine will work improperly and even be ruined.
10. Protect the power cord from being walked on or pinched particularly at plugs, convenience
receptacles, and the point where they exit from the apparatus.
11. Only use attachments/accessories specified by the manufacturer.
12. To prolong the useful life of this machine, the interval of the continuous switch action must be
above one minute.
13. Unplug this device during lightning storms or when unused for long periods of time.
14. Refer all servicing to qualified service personnel. Servicing is required when the device has been
damaged in any way, such as power-supply cord or plug is damaged, liquid has been spilled or objects
have fallen into the apparatus, the device has been exposed to rain or moisture, does not operate
normally, or has been dropped.
15. Warning: This unit should only be serviced by an authorized and properly trained technician.
Opening the cover or other attempts by the user to service this unit may result in serious injury or death
from electrical shock.
16. No naked flame sources, such as lighted candles, should be placed on the apparatus.
Note: All the OSD and illustrations in this manual may be somewhat different from the actual situation.
Please take the actual RECEIVER as the standard.
WARNING: To reduce the risk of fire or electric shock, do not expose this product to rain or moisture.
Apparatus shall not be exposed to dripping or splashing and no objects filled with liquids, such as vases,
shall be placed on the apparatus. Refer to the identification/rating label located on the back panel of
your product for its proper operating voltage.
3
Page 4
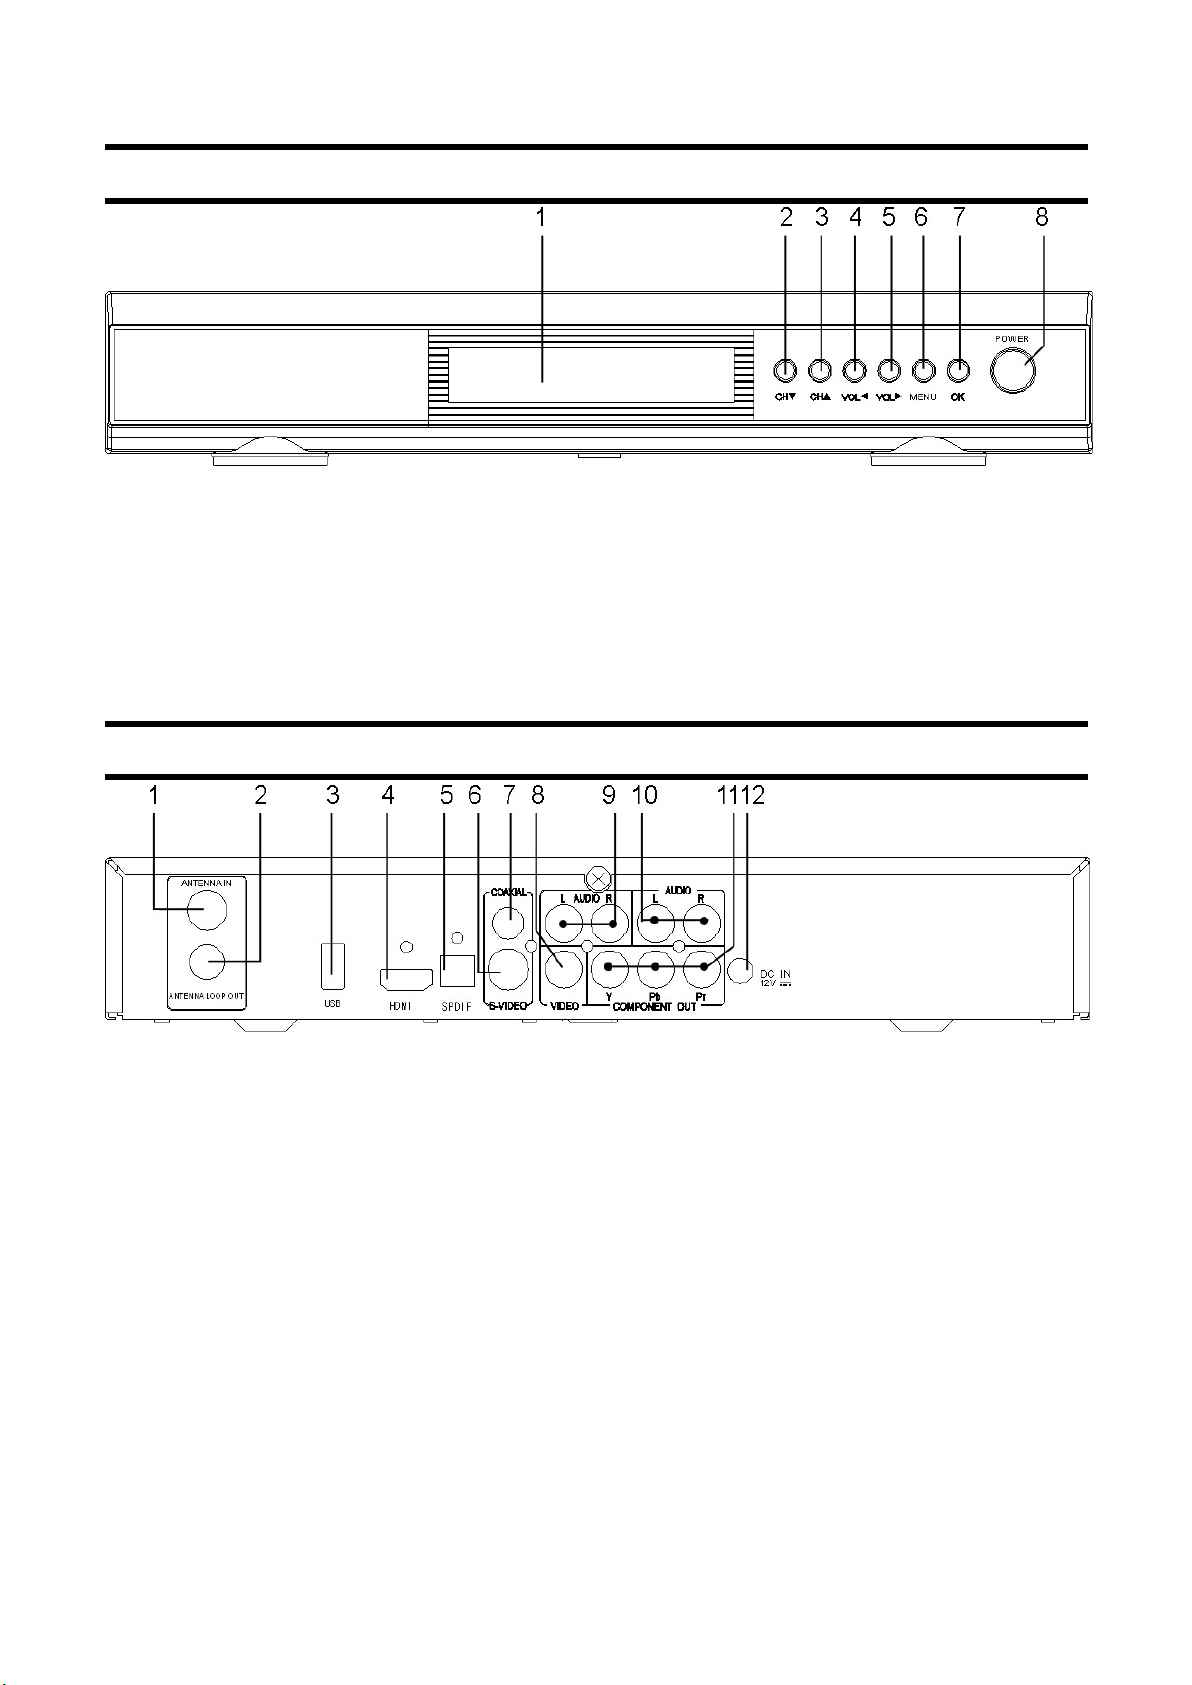
FRONT PANEL
1. Status indicator/ displaying board/ remote sensor
2. 3. Channel up or down/ cursor movement
4. 5. Volume adjustment
6. MENU. Menu entry
7. OK. Operation confirmation
8. STANDBY button
REAR PANEL
1. Terminal, ANTENNA IN connection with antenna signal
2. Terminal, ANTENNA LOOP OUT. Antenna signal loop through ( TO TV )
3. Interface, USB. Used to insert an external USB device. We do recommend adopting
a memory device that supports interface 2.0 (size limit applies)
4. Interface, HDMI. An interface that carries both the audio and the video signal in
digital format the same time.
5. Interface, SPDIF. Digital optical audio signal output. You can link it with either an
amplifier or a TV set with a SPDIF interface as well
6. Interface, S-VIDEO. An interface provides clearer video signal than VIDEO
7. Terminal, COAXIAL. Digital coaxial audio signal output
8. Terminal, video signal output
9. Terminals, audio signal output L/R. Link with the corresponding terminals on a TV
10. Terminals, audio signal output L/R. Link with the corresponding terminals on a TV
11. Terminals, (YPbPr )component video outputs
12. DC POWER IN
4
Page 5
REMOTE
Improper use of batteries may cause corrosion or fluid leakage. Please observe the
following instructions for the safe use of batteries.
1. Be aware of polarities of batteries
2. Never leave dead batteries in the remote control
3. Remove batteries from the remote controller if it is not going to be used for a
prolonged period
4. Do not attempt to disassemble, short-circuit, heat, recharge or throw the
batteries into the fire source
5. Do not use new batteries and old one together, or which is different type
6. Wipe away any electrolyte fluid inside the remote controller, and insert new
batteries
PRECAUTIONS ABOUT BATTERIES
Page 6

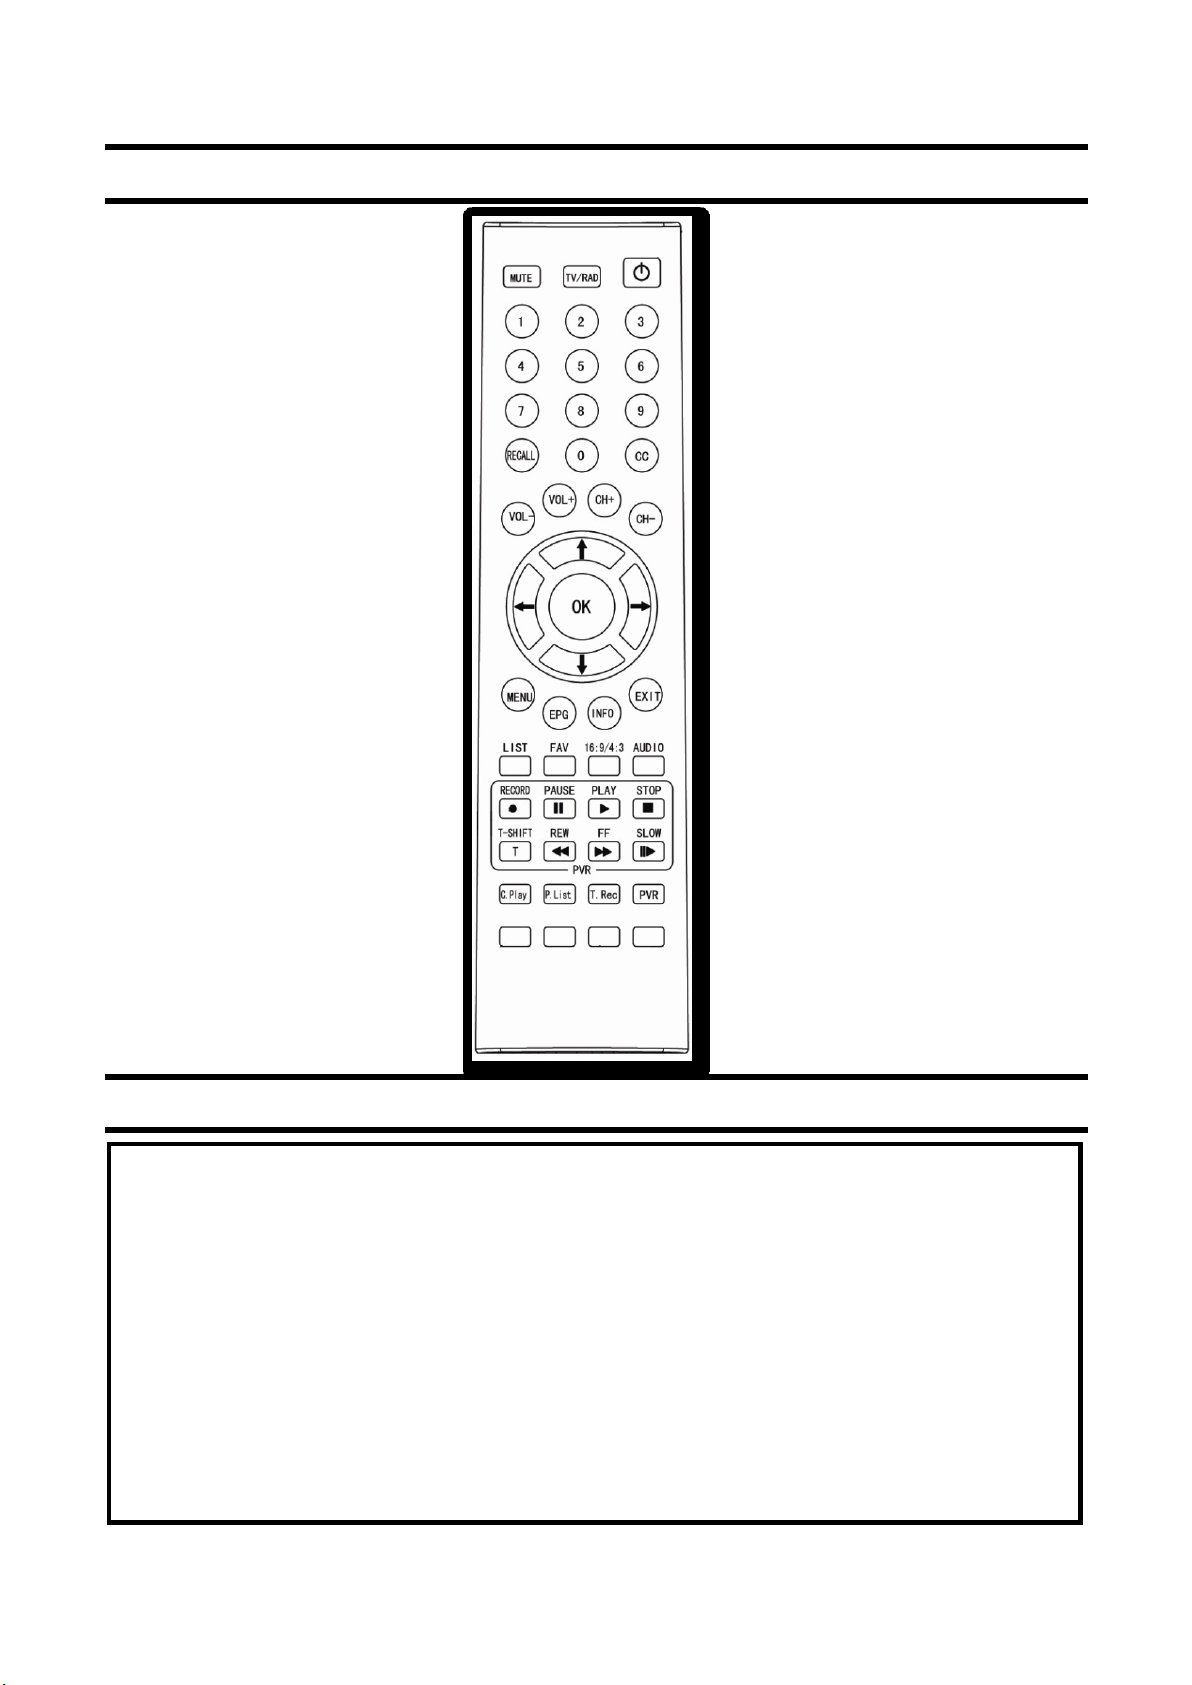
MUTE. Mutes the audio
STANDBY. Enters Standby mode
FAV. Displays Your Favorites List
TV/RAD. To switch program mode between TV and radio
LEFT/RIGHT. Menu mode: select or adjust settings
( Also controls volume up/down in viewing/playback mode )
UP/DOWN. Menu mode: move the cursor upwards/ downwards
( Also controls channel up/down in viewing mode )
EXIT. Return to the previous menu
MENU. Displays the Main Menu
0-9. Menu: input the parameter value; non-menu : Select Channel
INFO: displays information bar, press the key once more to show next
program information, press the OK key to display extended program
details
EPG. Activates the broadcasters 8 day EPG ( electronic program
guide ) – Please allow time for information to load.
RECALL. recalls the previous channel
AUDIO. displays the Audio sub-menu
OK. Operation confirmation
VOL+/-. Volume adjustment
CH+/-. Channel changing
LIST. TV or radio channel listing
RECORD. get into program-recording state ( 1 hr preset )
SLOW. In playing recorded program. Press the key to slow down
program [X1/2-X1/4-X1/8-X1/16-X1/32-normal play]
FF. In playing recorded program. Press the key to speed up program
[X2-X4-X8-X16-X32-normal play]
REW. In playing recorded program. Press the key to get back
program [X2-X4-X8-X16-X32]
PAUSE. Used to pause while playing recorded program or
while recording
STOP. Used to stop program playback, recording program: cease
action
PLAY. Used to play recorded program to play normally
6
Page 7

16:9/4:3. Alternate video output format between 16:9, 4:3 pan&scan
and 4:3 letter box
CC. closed caption on/ off
C.Play. Access currently recording programs ( Chase Play )
P.List. lists recorded programs from hard drive
T.Rec. Access recording list
PVR. Displays PVR menu to access recording set up options
7
Page 8
PREPARATION OF REMOTE CONTROL
Load the batteries into the remote control and then operate the PVR.
1. Open the lid.
2. Load the batteries and attend whether the + terminal and - terminal of
battery are corresponding to the polarity indicated on the remote
controller.
3. Close the lid.
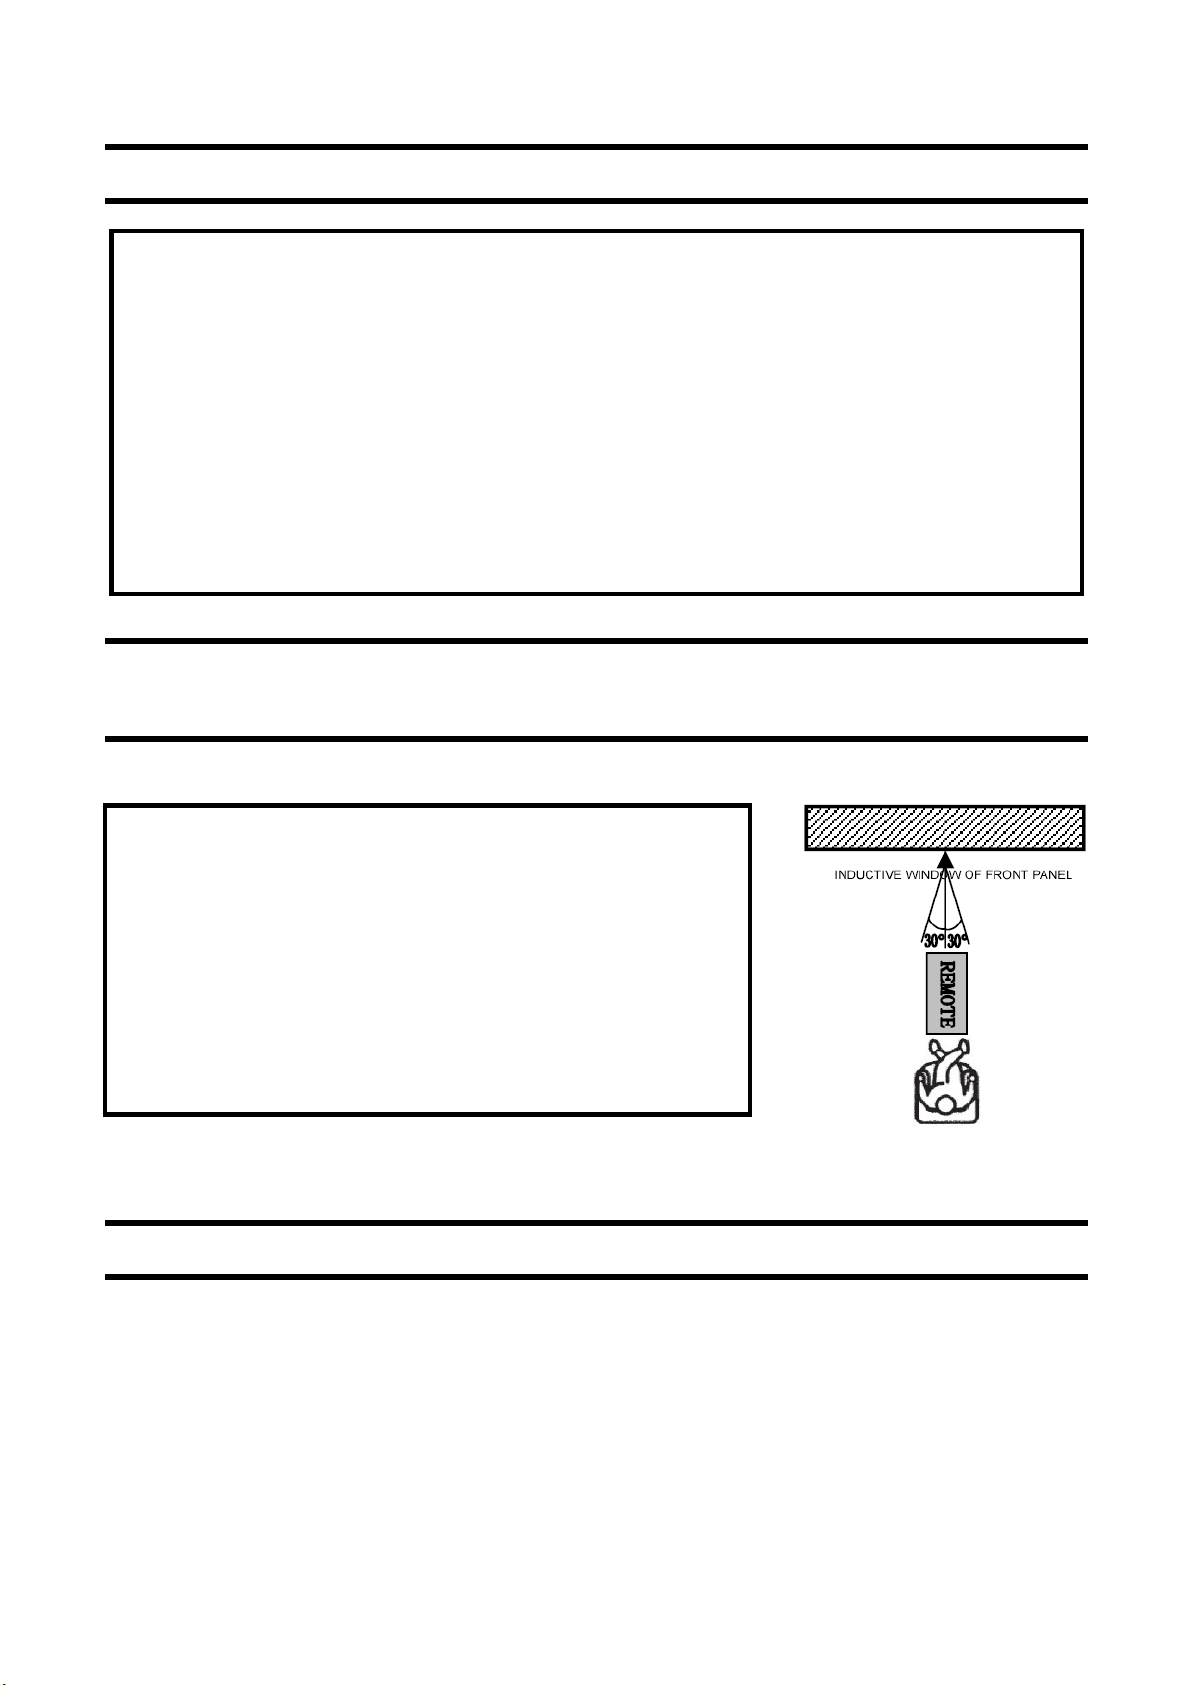
POINT the control toward the window of PVR
and then press the keys
1. Distance: about SIX meters in front of the
window.
2. Angle: about 30 degree right or left. Refer to
image on the right.
OPERATION DISTANCE AND ANGLE OF THE REMOTE
CONTROL
RECORDING TIPS AND KEY FEATURES
The PVR6600 allows you to record 2 channels simultaneously while watching a
third from within a recording channel. i.e record SBS and ABC and watch ABC2.
The PVR6600 can also allow you to record 2 channels and watch a prerecorded
program from the hard drive.
8
Page 9

Other keys point
1. Booking a recording – There are 2 methods of booking a recording,
one via the broadcasters EPG (electronic program guide) or the manual
timer
EPG – 8 days of program guide is available from each broadcaster and
this information can be used to schedule recording i.e ABC news or
Manual timer – press the T.Rec on the remote and access the recording
list and follows instructions on bottom of page to book event for
recording using time. i.e 7.00 a.m – 9.00 a.m
2. Chase Play – A function where you can access a recording program and
watch from the beginning. This function can be accessed via a hot key on
the remote called C.PLAY.
3. Manual recording – By pressing REC (one touch recording) while
watching live you record TV. Here the preset is 1 hour but can be
adjusted in the PVR section of the main menu.
4. INFO button – The most important button on the remote as it
provides feedback on what function the PVR is performing i.e Live
TV, Playback, Recording etc etc
5. Channel lockout - access during 2 channel recording is limited to one
channel only as the PVR is locked onto the last channel that was
activated for recording. Chase play can allow you access to the other
channel for viewing from the beginning.
6. Playback function – During playback the skip function can be used and
this is shown when the info button is pressed during a playback.
9
Page 10

7. Play list – the P.LIST button on the remote launches list of your
recorded files and play them in a window. Use the up/down arrow key to
scroll through recordings and OK to play full screen. Pressing P.LIST
will again launch the list and you can play files from the list by pressing
OK.
8. If the unit locks up with no functions it will require a full power
reset to reboot machine.
9. It is important you set your time according to your time Zone and
also set daylight off/on. This is accessible in the setting menu ( Pg
19 )
10
Page 11
SYSTEM CONNECTION
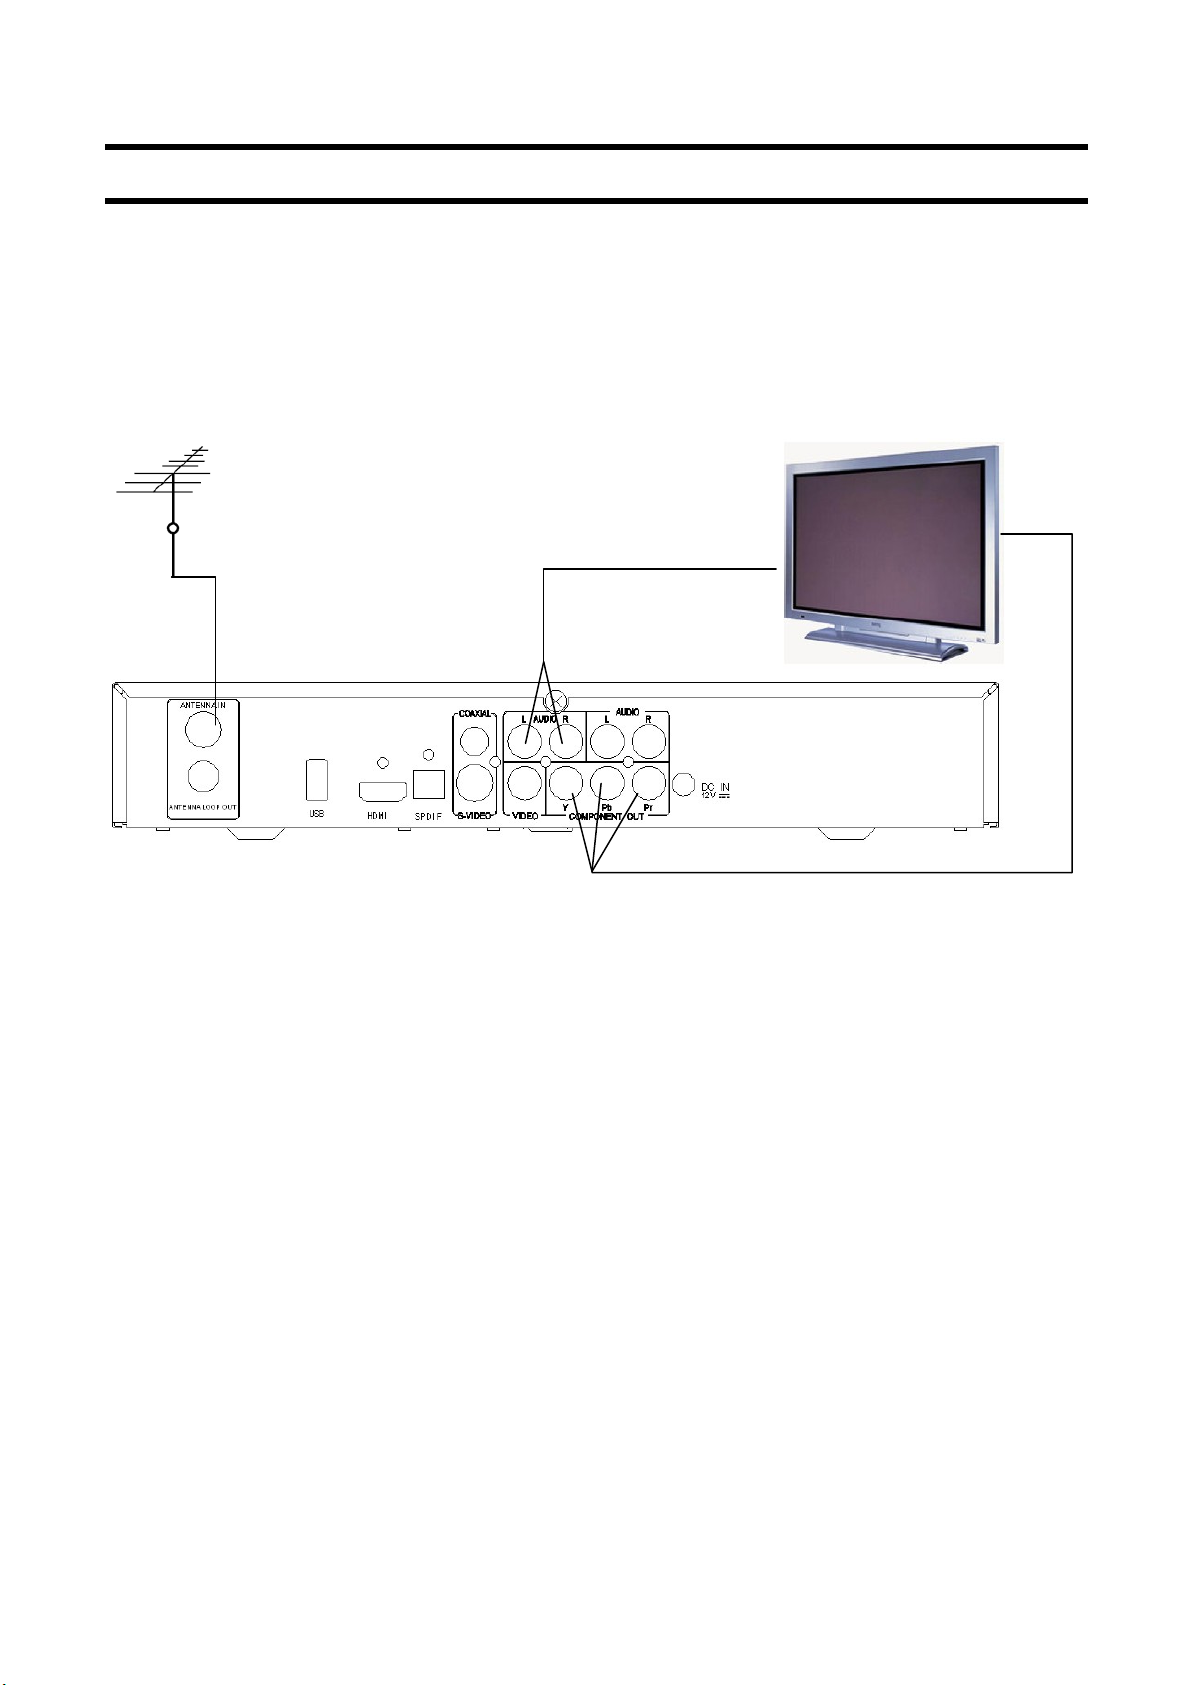
1. SET UP- YPbPr
For this Set Up use an YPbPr lead (Red, Blue and Green coloured) for the
video connection and either the red and white connectors of the RCA leads
that came with this Set Top Box or an optical cable for the audio connection.
All of video output modes are active simultaneously.
1.1 Prepare your equipment
Make sure that your TV has YPbPr input.
Make sure that you have an adaptor.
Ensure that the power leads to both the TV monitor and the Set Top Box are
unplugged before you commence the set up procedure.
1.2. Connecting Video and Audio
Video
Connect the YPbPr terminals colored red, blue and green from
COMPONENT VIDEO on the receiver to the input on the TV monitor.
Audio
a) Connect the red and white connectors of the RCA lead to the
corresponding colored audio output connectors on the rear of the Set Top
Box.
b) Connect the other end of the cable to the corresponding colored
11
Page 12
connectors on your television monitor.
Video and audio signal share one cord
c) Connect the SPDIF/COAXIAL for a better audio quality
1.3. Connect the antenna
Connect the antenna lead to the “ANTENNA IN” connection on the rear of
the Set Top Box.
1.4. Connect the power
a) Plug the connector of the power line of the receiver into the socket.
b) Connect the power to your monitor and turn it on, you are now ready to
get started.
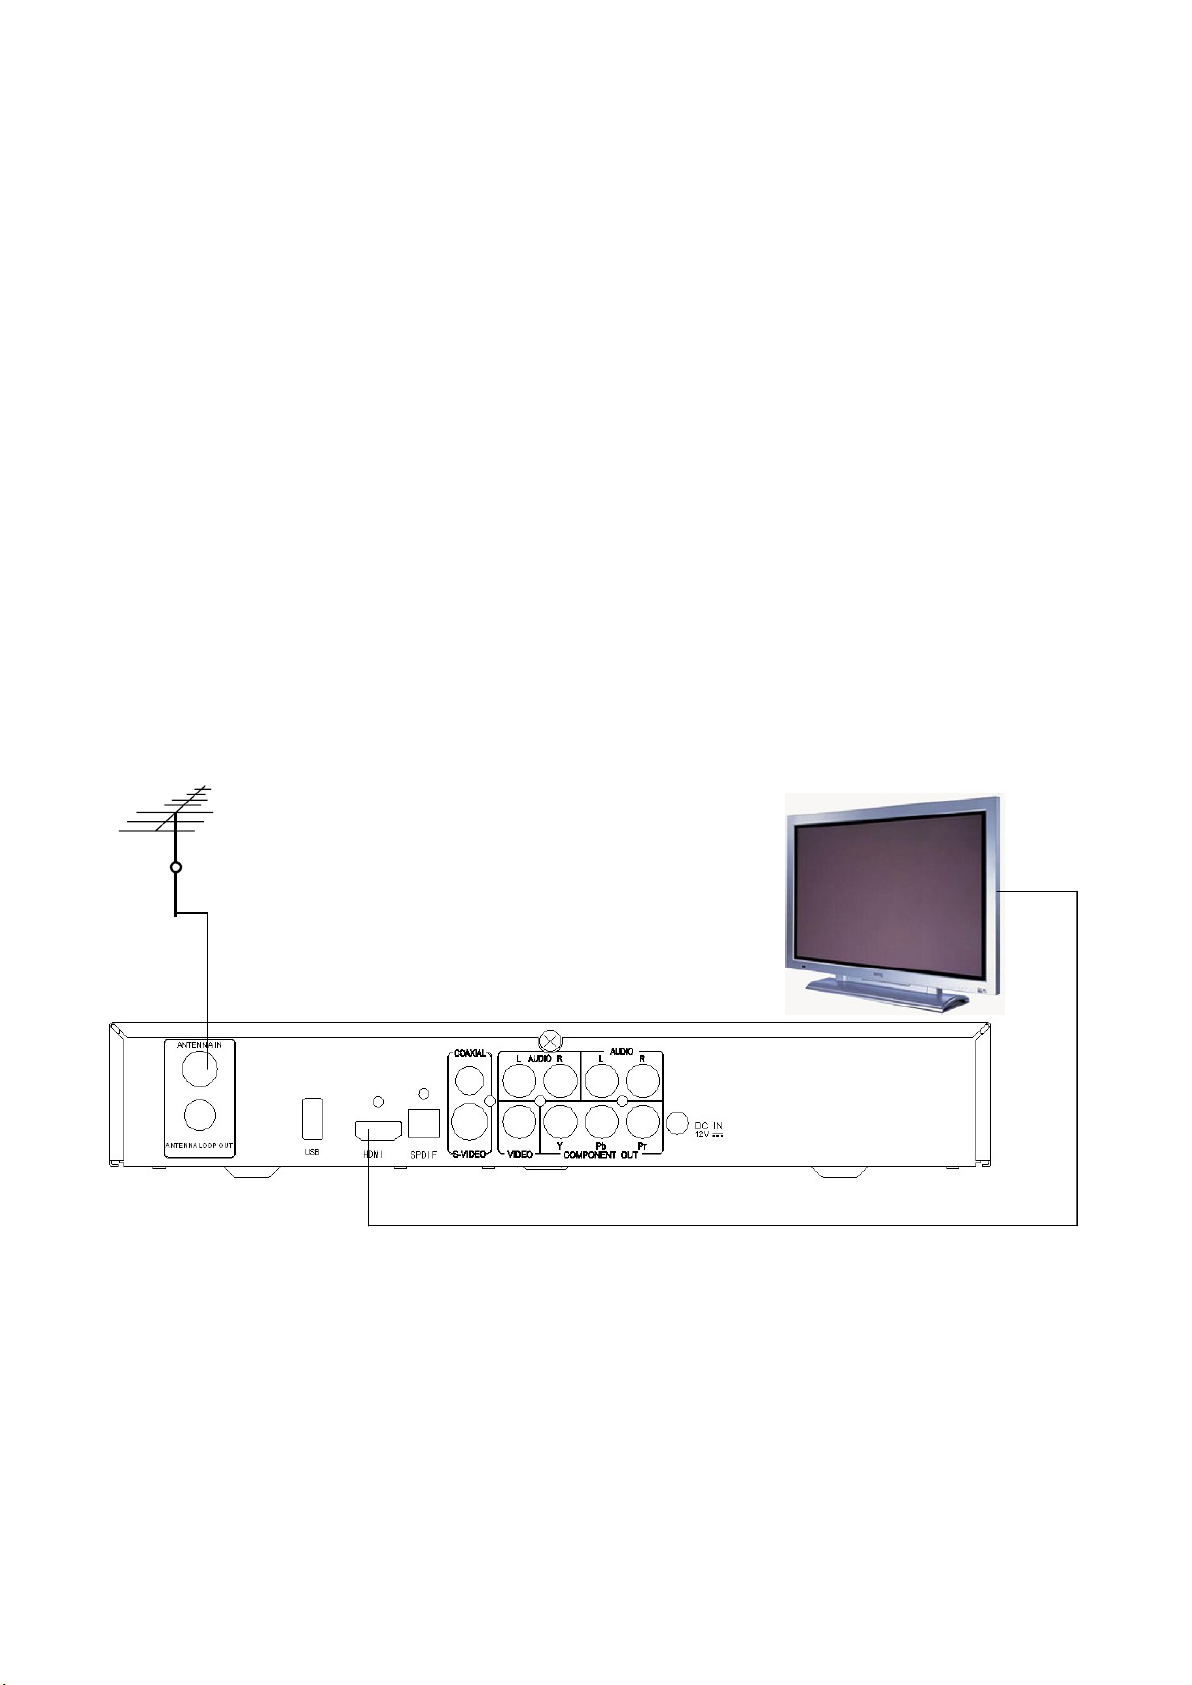
2. SET UP-HDMI
For this Set Up just use a HDMI interface for both the video and audio
connection.
All of video output modes are active simultaneously.
2.1. Prepare your equipment
Make sure that your monitor has HDMI input.
Make sure that you have an adaptor.
Ensure that the power leads to both the TV monitor and the Set Top Box are
unplugged before you commence the set up procedure.
2.2. Connecting Video and Audio
12
Page 13
Connect the HDMI cable from the HDMI interface output of the Set Top
Box to the HDMI interface input of the TV monitor.
2.3. Connect the antenna
Connect the antenna lead to the “ANTENNA IN” connection on the rear of
the Set Top Box.
2.4. Connect the power
a) Plug the connector of the power line of the receiver into the socket.
b) Connect the power to your monitor and turn it on, you are now ready to
get started.
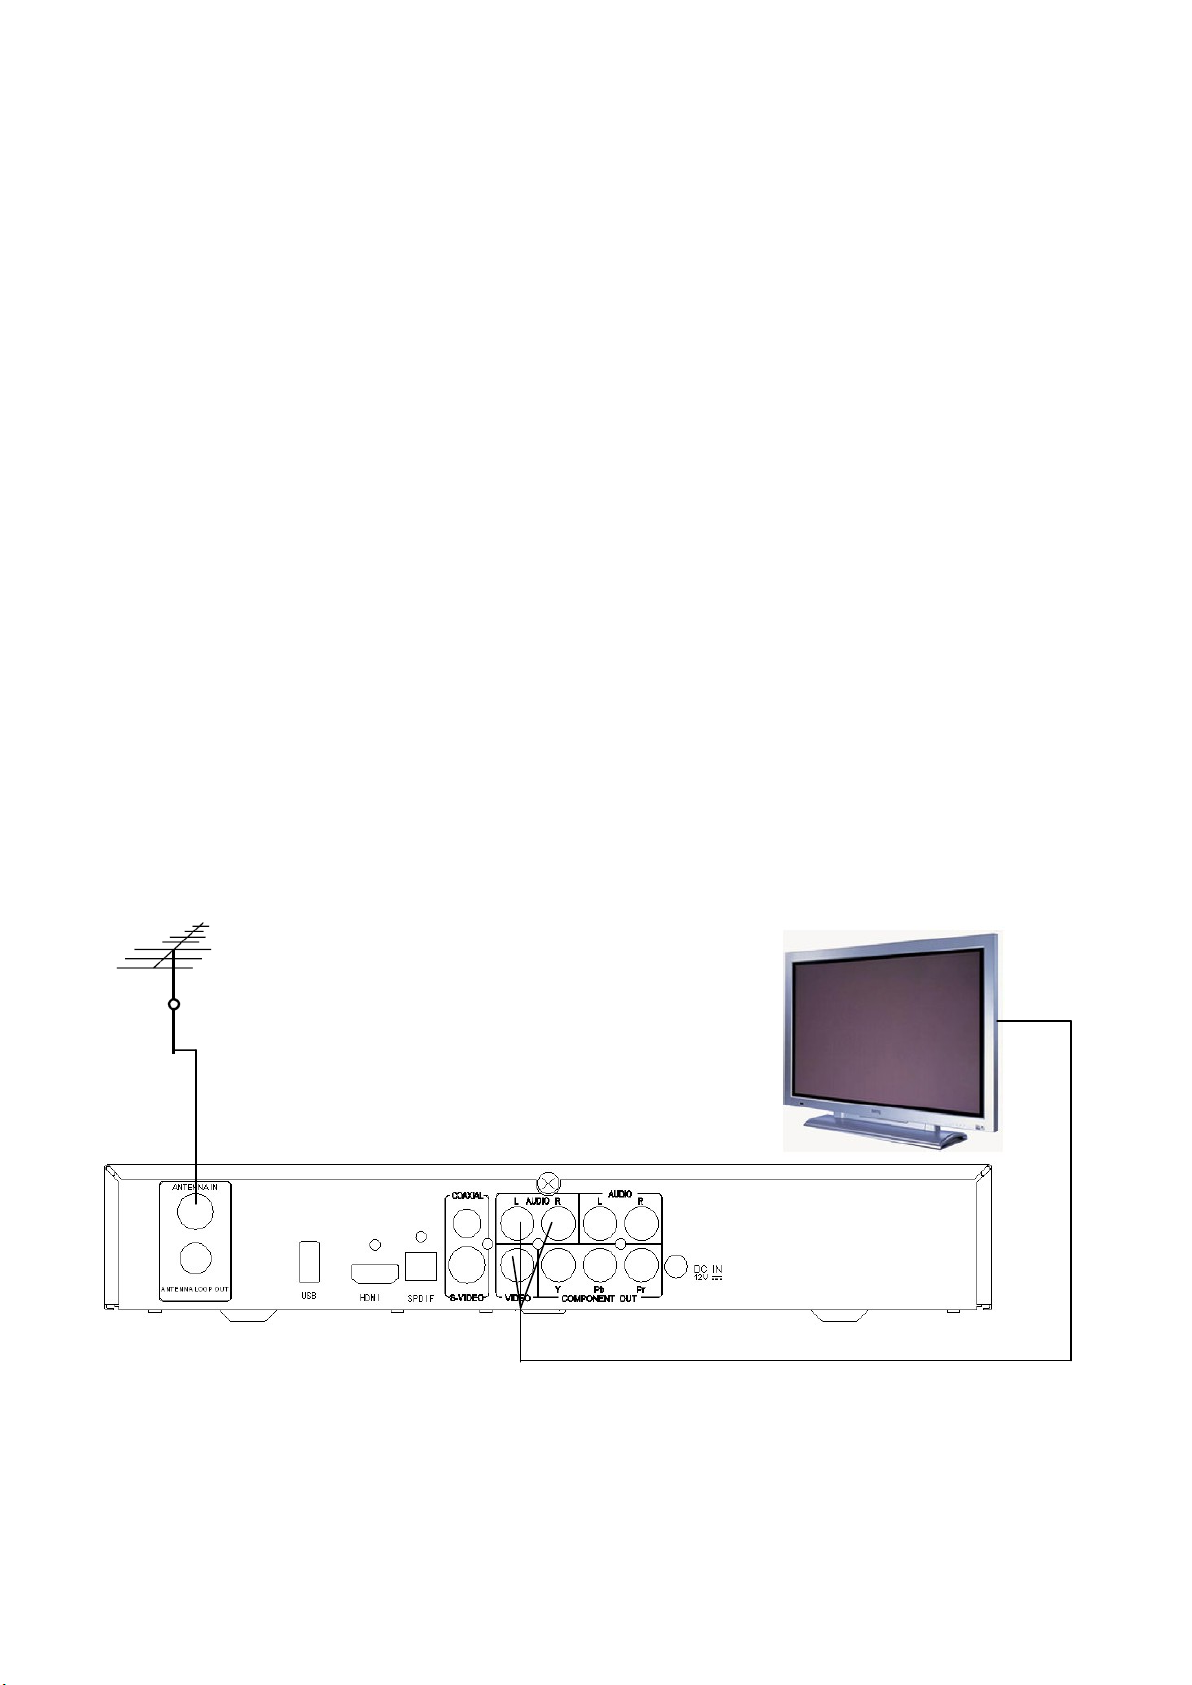
3. SET UP- CVBS
For this Basic Set Up use a CVBS lead for the video connection and either
the red and white of RCA leads that came with this Set Top Box or an
optical cable for the audio connection.
All of video output modes are active simultaneously
3.1. Prepare your equipment
Make sure that your monitor has CVBS (VIDEO, AUDIO R, AUDIO L)
input.
13
Page 14

Make sure that you have an adaptor.
Ensure that the power leads to both the TV monitor and the Set Top Box are
unplugged before you commence the set up procedure.
3.2. Connecting Video and Audio
Video
Connect the yellow RCA cable from the VIDEO output of the Set Top Box
to the VIDEO input of the TV monitor.
Audio
a) Connect the red and white connectors of the RCA lead to the
corresponding colored audio output connectors on the rear of the Set Top
Box.
b) Connect the other end of the cable to the corresponding colored
connectors on your television monitor.
c) Can use SPDIF /COAXIAL audio connection as well if available
3.3. Connect the antenna
Connect the antenna lead to the “ANTENNA IN” connection on the rear of
the Set Top Box.
3.4. Connect the power
a) Plug the connector of the power line of the receiver into the socket.
b) Connect the power to your monitor and turn it on, you are now ready to
get started.
4. SET UP- Amplifier
For this Set Up, use your preferred video connection, the example below
shows video connection via YPbPr (component), you can use other methods
from the previous examples. You will also need an Optical cable for the
audio set up.
14
Page 15

4.1 Prepare your equipment
Make sure that your television monitor has a component input; it may be
labeled “YPbPr”, COMPONENT VIDEO. In any case it will be
characterized by the red, green and blue connectors and grouped together.
Ensure that the power leads to both the TV monitor and the Set Top Box are
unplugged before you commence the set up procedure.
4.2 Connecting Video and Audio
Video
Follow the instructions for one of the previous video set up examples to suit
your system. YPbPr, for example.
Audio
a) Connect the optical cable to the SPDIF/COAXIAL connector on the rear
of the set top box.
b) Connect the other end of the optical cable to the Amplifier.
4.3 Connect the antenna
Connect the antenna lead to the ANTENNA IN connection on the rear of
the Set Top Box.
4.4 Connect the power
a) Plug the connector of the power line of the receiver into the socket.
b) Connect the power to your monitor and turn it on, you are now ready to
get started.
15
Page 16

c) Connect the power to your monitor and amplifier and turn them on, you
are now ready to get started.
POWER ON
1. Connect the power-input connector of your adaptor to your mains power
point
2. Insert the power-output connector of the adaptor to the plughole of DC
IN
3. Connect the power to your monitor and turn it on, you are now ready to
get started.
16
Page 17
SCANNING CHANNELS
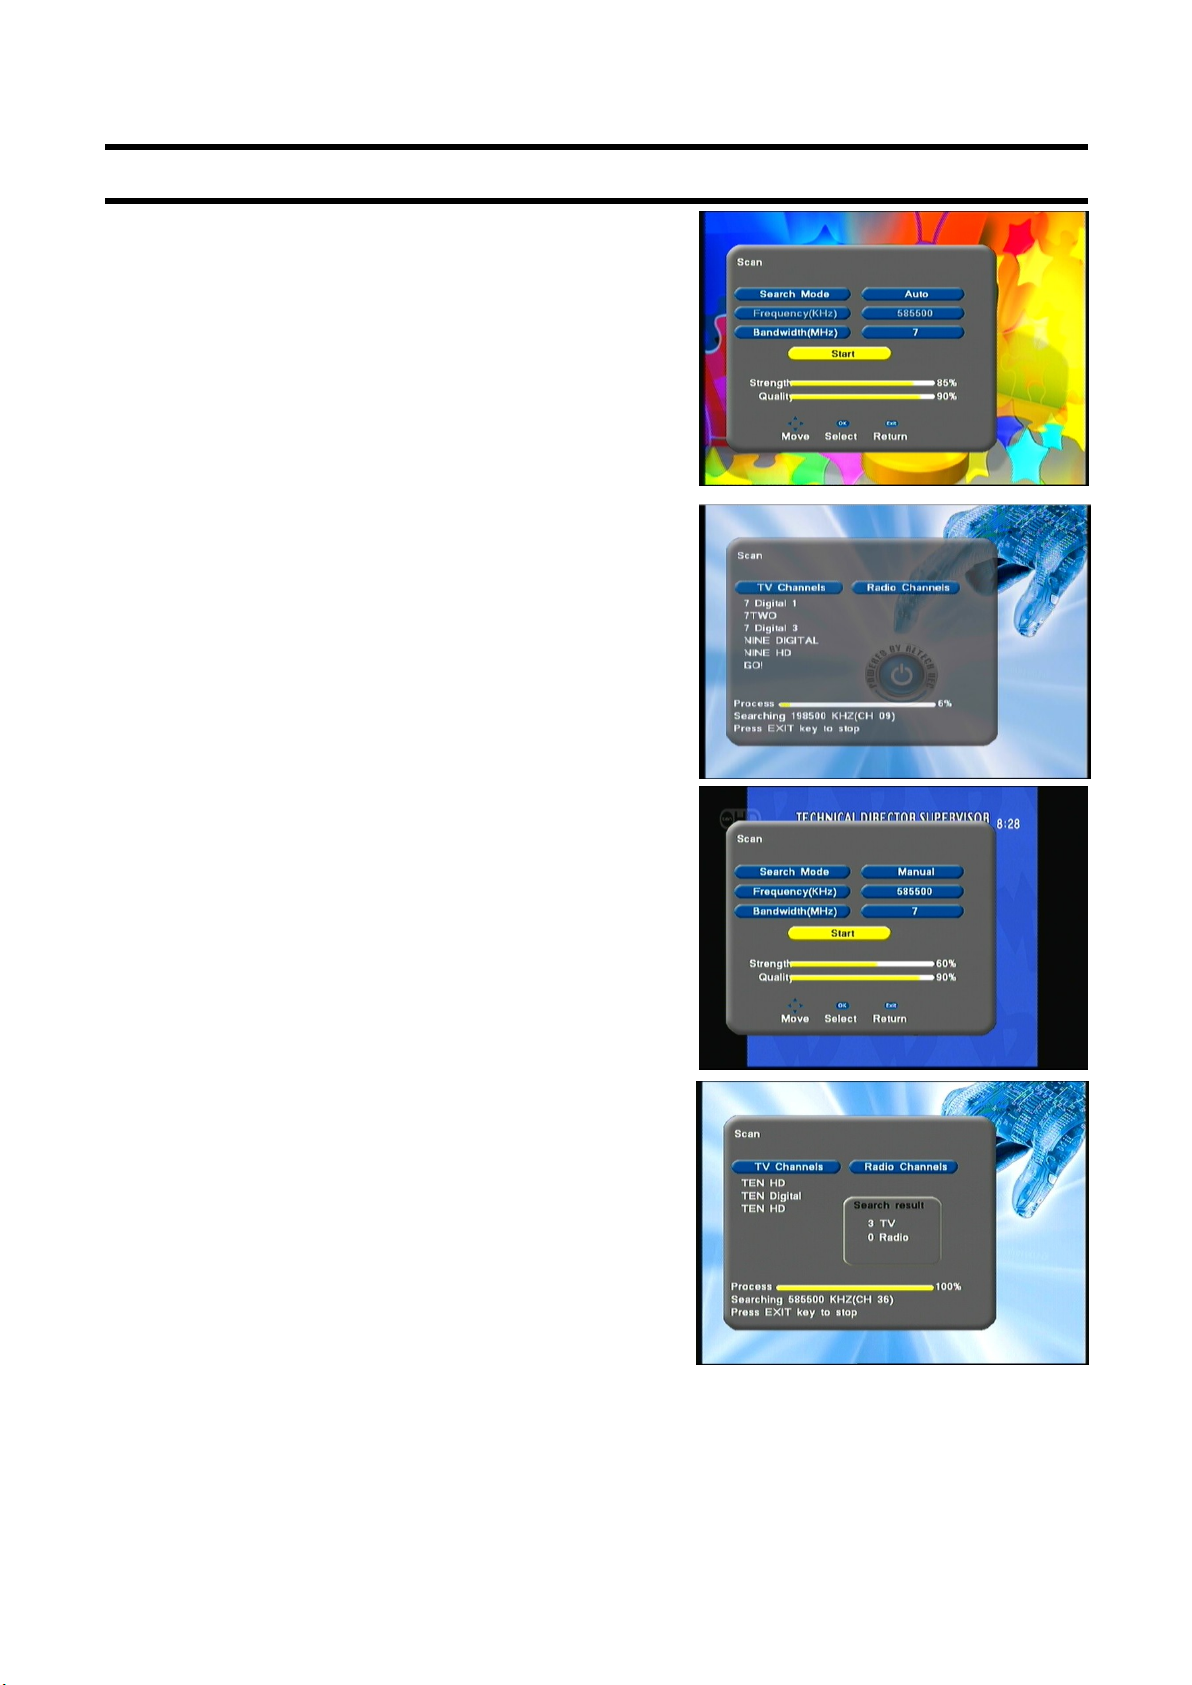
Press UP/DOWN the key to highlight the
instruction [Scan], press [OK] to enter.
Auto: highlight [Search Mode], press the
key LEFT/RIGHT to switch type between
Auto and Manual.
Highlight [Start], press [OK] to commence
scanning.
Image of scanning process, right side.
Manual: highlight [Search Mode], press the
key LEFT/RIGHT to switch type between
Auto and Manual.
Highlight [Frequency (KHz)], press the
[digit keys] to input value; press the LEFT
key to remove digits.
Highlight [Start], press [OK] to commence
scanning.Image of scanning process, right
side.
After scanning, press the [EXIT] key to go
into the program.
17
Page 18
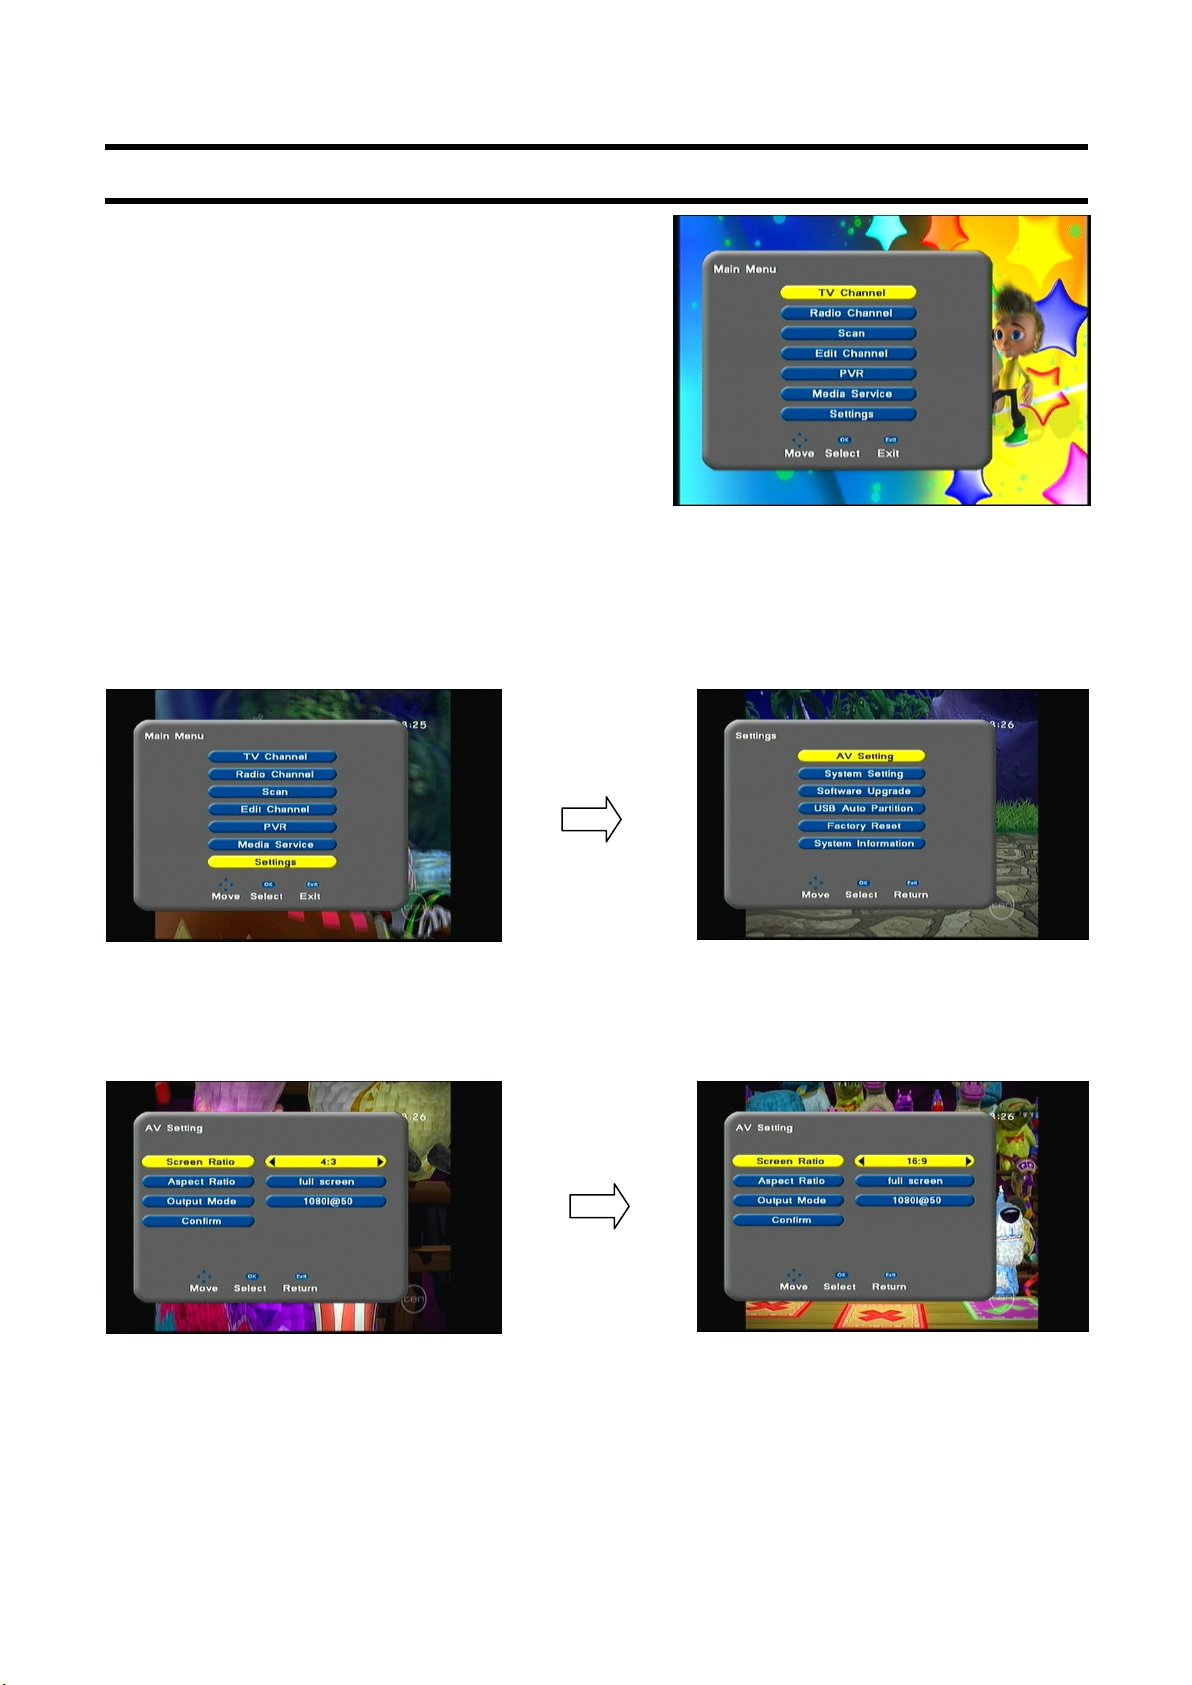
SETTINGS (INSTALLATION SET UP)
Press the key MENU to display [MAIN
MENU].
Press the UP/DOWN key to highlight the [Settings], press [OK] then input
code ( 0000) to enter.
TV display aspect can be set up here ( also available on Hot Key
( 16:9/4:3 ). Three modes are available 16:9, 4:3 full and 4:3 letterbox
Make your setting selection and press confirm to accept these settings.
18
Page 19
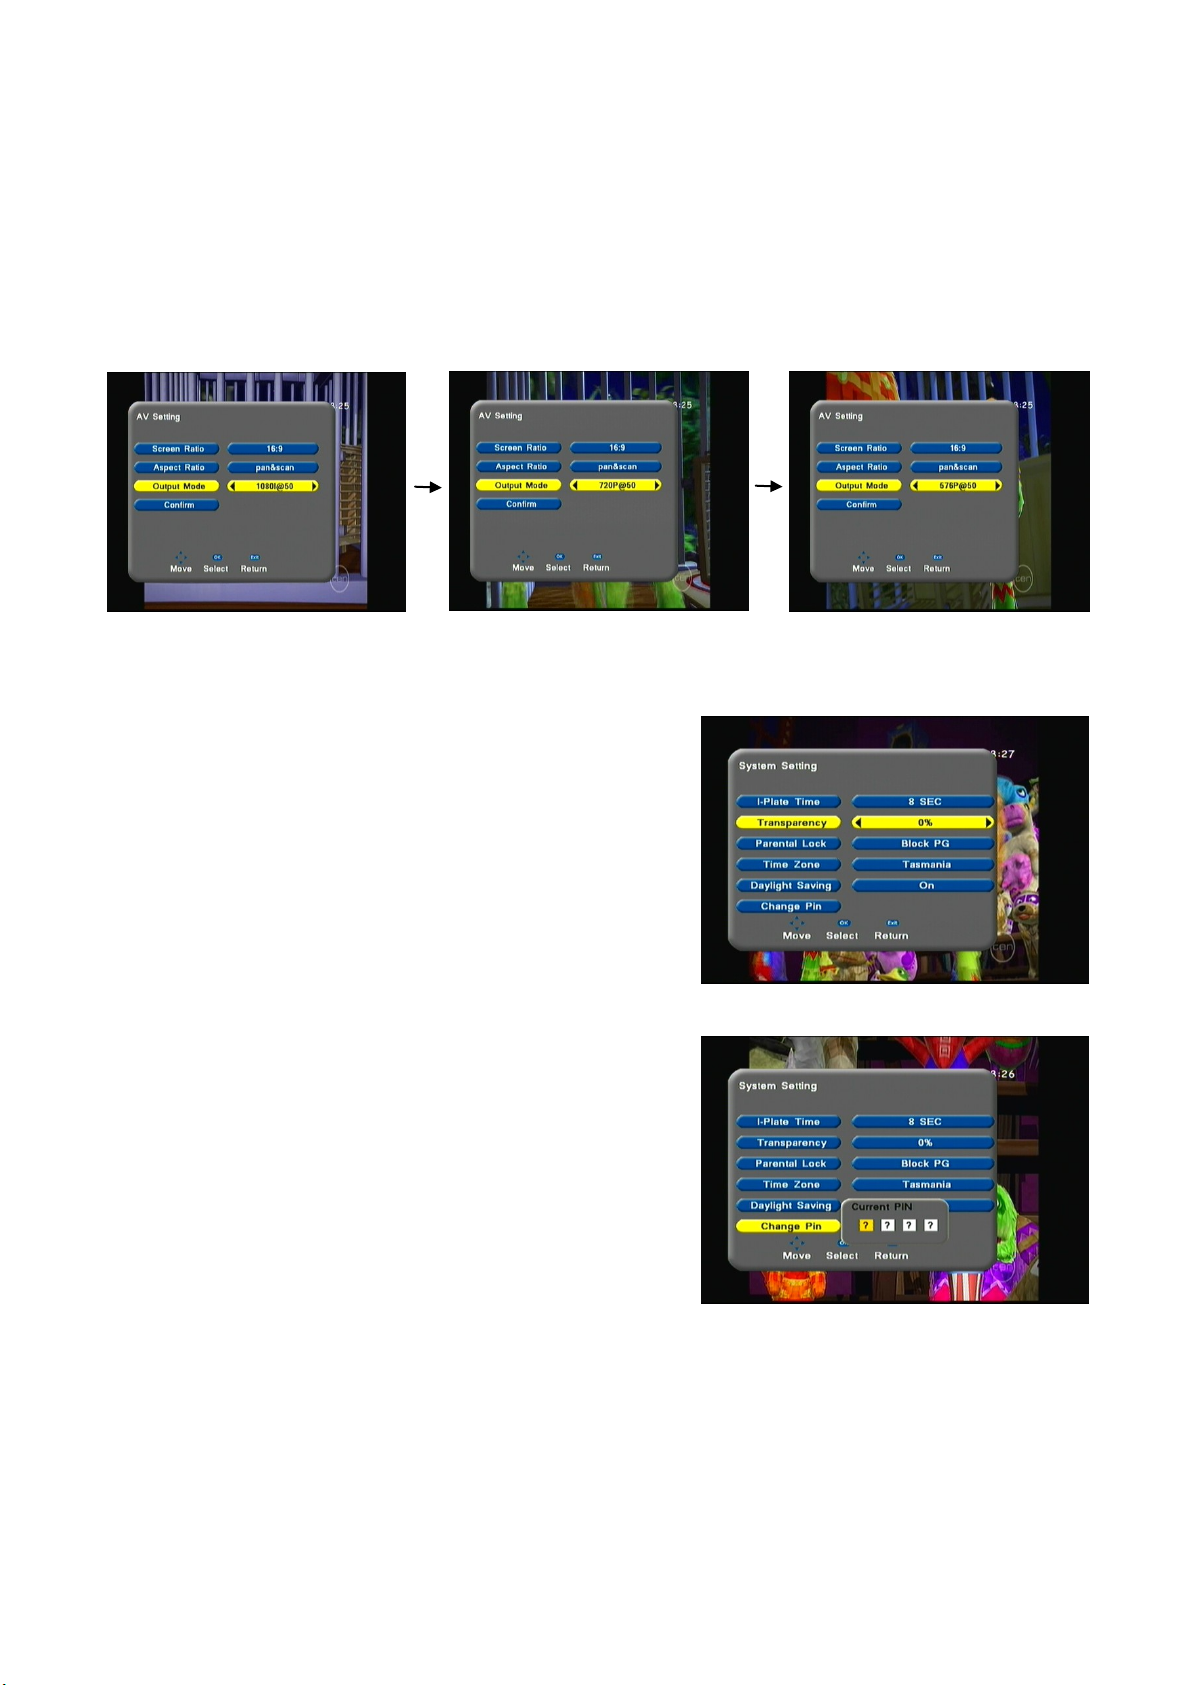
If you have an old CRT or Flat panel you may only be able use component
video ( red,blue and green ) by setting output to 576p.
In [Output Mode], press the LEFT/RIGHT key to alternate output mode
[1080I@50], [720P@50], [576P@50], and select 576p and confirm to
activate.
SYSTEM SETTING: to highlight the
instruction [SystemSetting], press [OK] to
enter.
Information-Plate Time: to set the
duration of the information bar on the
screen when switching channels
Transparency of the menu: after
highlighting it, press the LEFT/RIGHT
key to alternate, larger the value, more
transparent.
Change PIN, input current then new and
then verify.
Time zone and Daylight saving time setting.
Time Zone: Set a Time Zone for the state you live in
Daylight Saving: Set Daylight Saving Time on or off
19
Page 20

SOFTWARE UPGRADE
PLEASE NOTE ALTECH UEC WILL CONTINUE TO ENHANCE
PERFORMANCE OF THIS PRODUCT AND PROVIDE SOFTWARE
UPDATES. PLEASE VISIT WWW.UEC.COM.AU FOR MORE
INFORMATION.
Software upgrade function is under the setting menu.
Copy updating file directly onto a USB device and insert into front USB
port of PVR. Select software upgrade function from the menu and press [ok]
to enter.
During the updating process, the system of receiver will go under the order
of [Checking USB device, Searching update software, Reading & Verifying
update software, Updating and will restart automatically after 5 seconds]
The USB device has to be in non-locked state.
Don’t shut off the power when updating,
all of the updating steps will be completed automatically.
20
Page 21
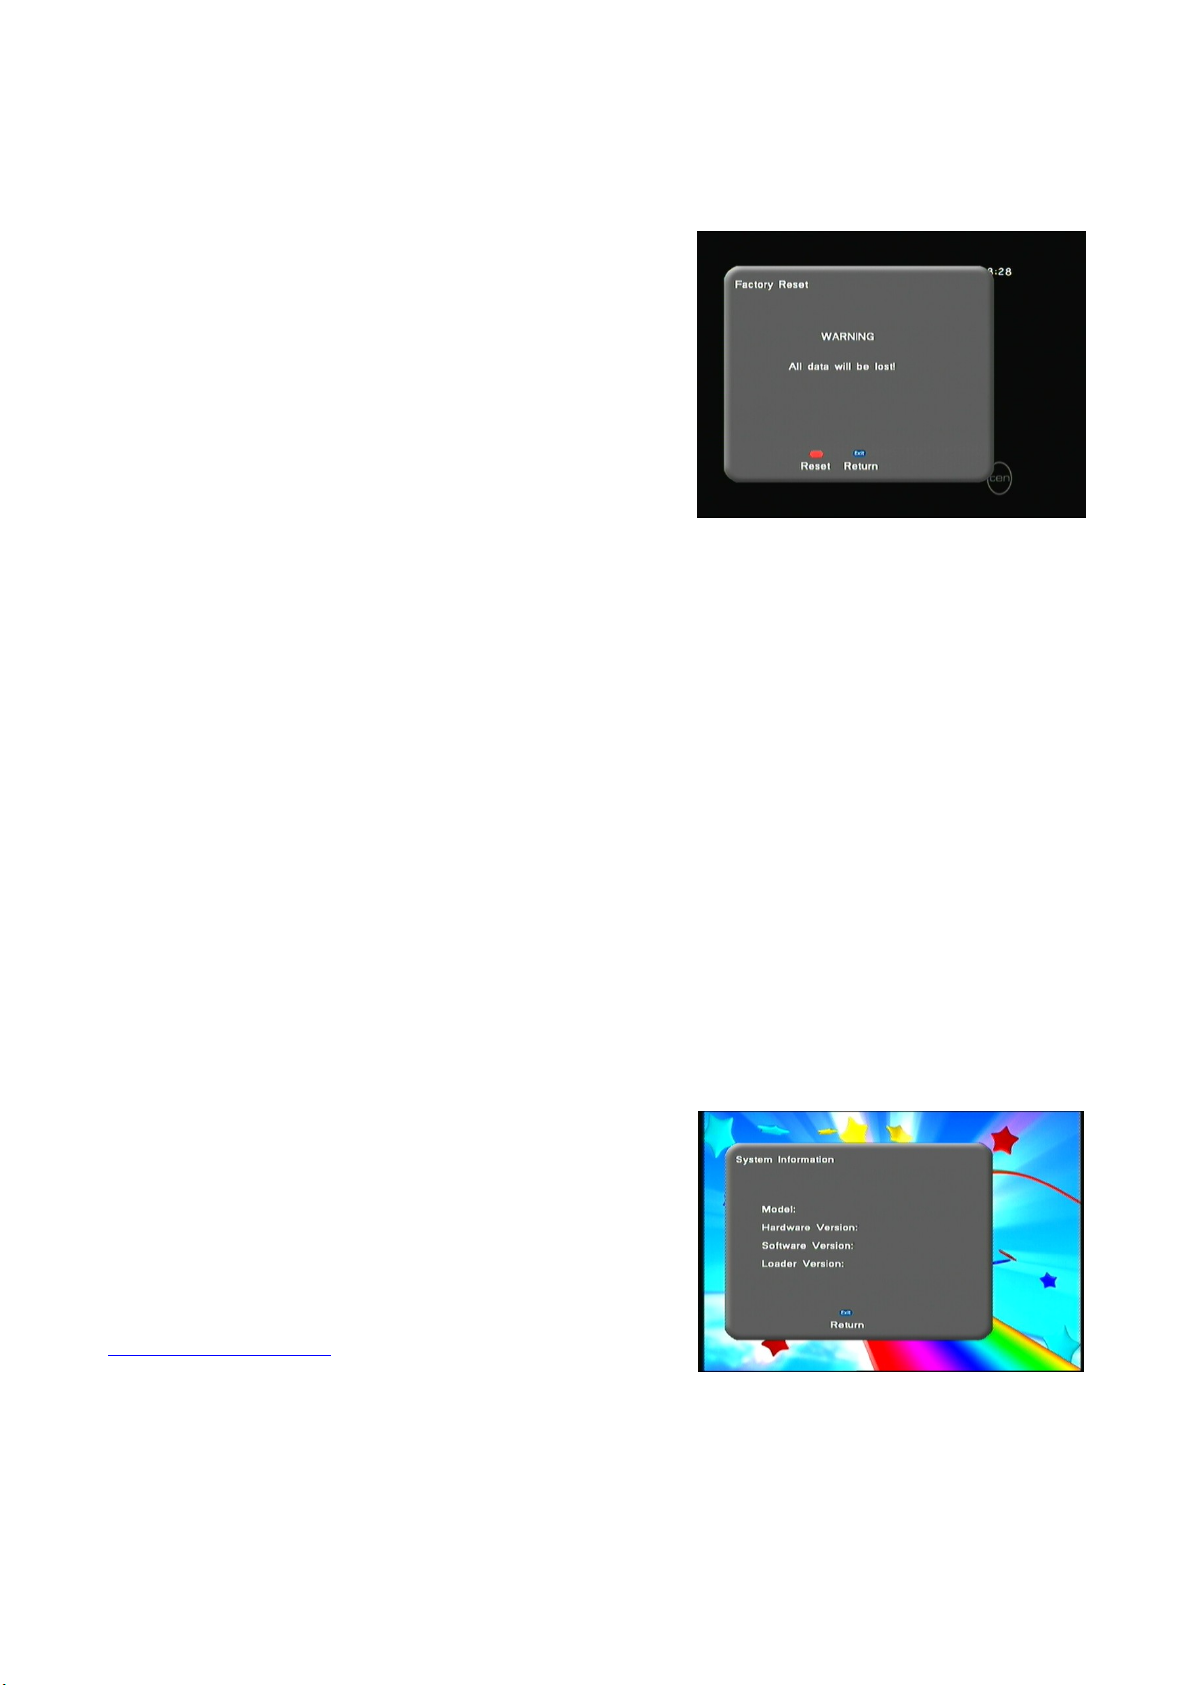
FACTORY RESET:
After updating the new software , the PVR
will need to be reset to factory defaults.
This function is available under the settings
menu and can be accessed by entering pin
code 0000
Select [Factory Reset], press [OK] to enter,
Press the red key to activate.
Please note all channel information will be lost and the unit will need a
rescan.
STORED PROGRAMS ON THE HARD DRIVE WILL NOT BE
ERASED.
The factory reset function can also be used to unlock the PVR. If you are
finding that the PVR is not functioning adequately and also locking up. A
reset to factory defaults can help and the PVR may function correctly.
SYSTEM INFORMATION
Here details of the software version can be
retrieved. It is accessed via the settings
menu.
Please check for software updates at
www.uec.com.au or email
21
Page 22

PVR FUNCTIONALLITY
This HD PVR has 3 modes of recording, manual, timer and via EPG and all
these are explained below.
1. Manual – while watching a program you can start recording by pressing
the record button (one touch recording ). Here the preset recording time
is 1 hr but can be varied in 1 hr steps up to 10 hrs or have no limit. This
setting can be changed by accessing the
PVR menu and is under the RECORD
SETTINGS option.
The info bar on the right shows
recording remaining time and record
status
2. Timer record – Here you can preset recording schedules by selecting a
program and setting a start time and a duration. This application can be
launched by pressing the T.Rec button on the remote.
3. EPG recording – Recording programs is also possible via the
broadcasters 8 day Electronic Program guide. This function is launced
via the EPG button on the remote.
22
Page 23
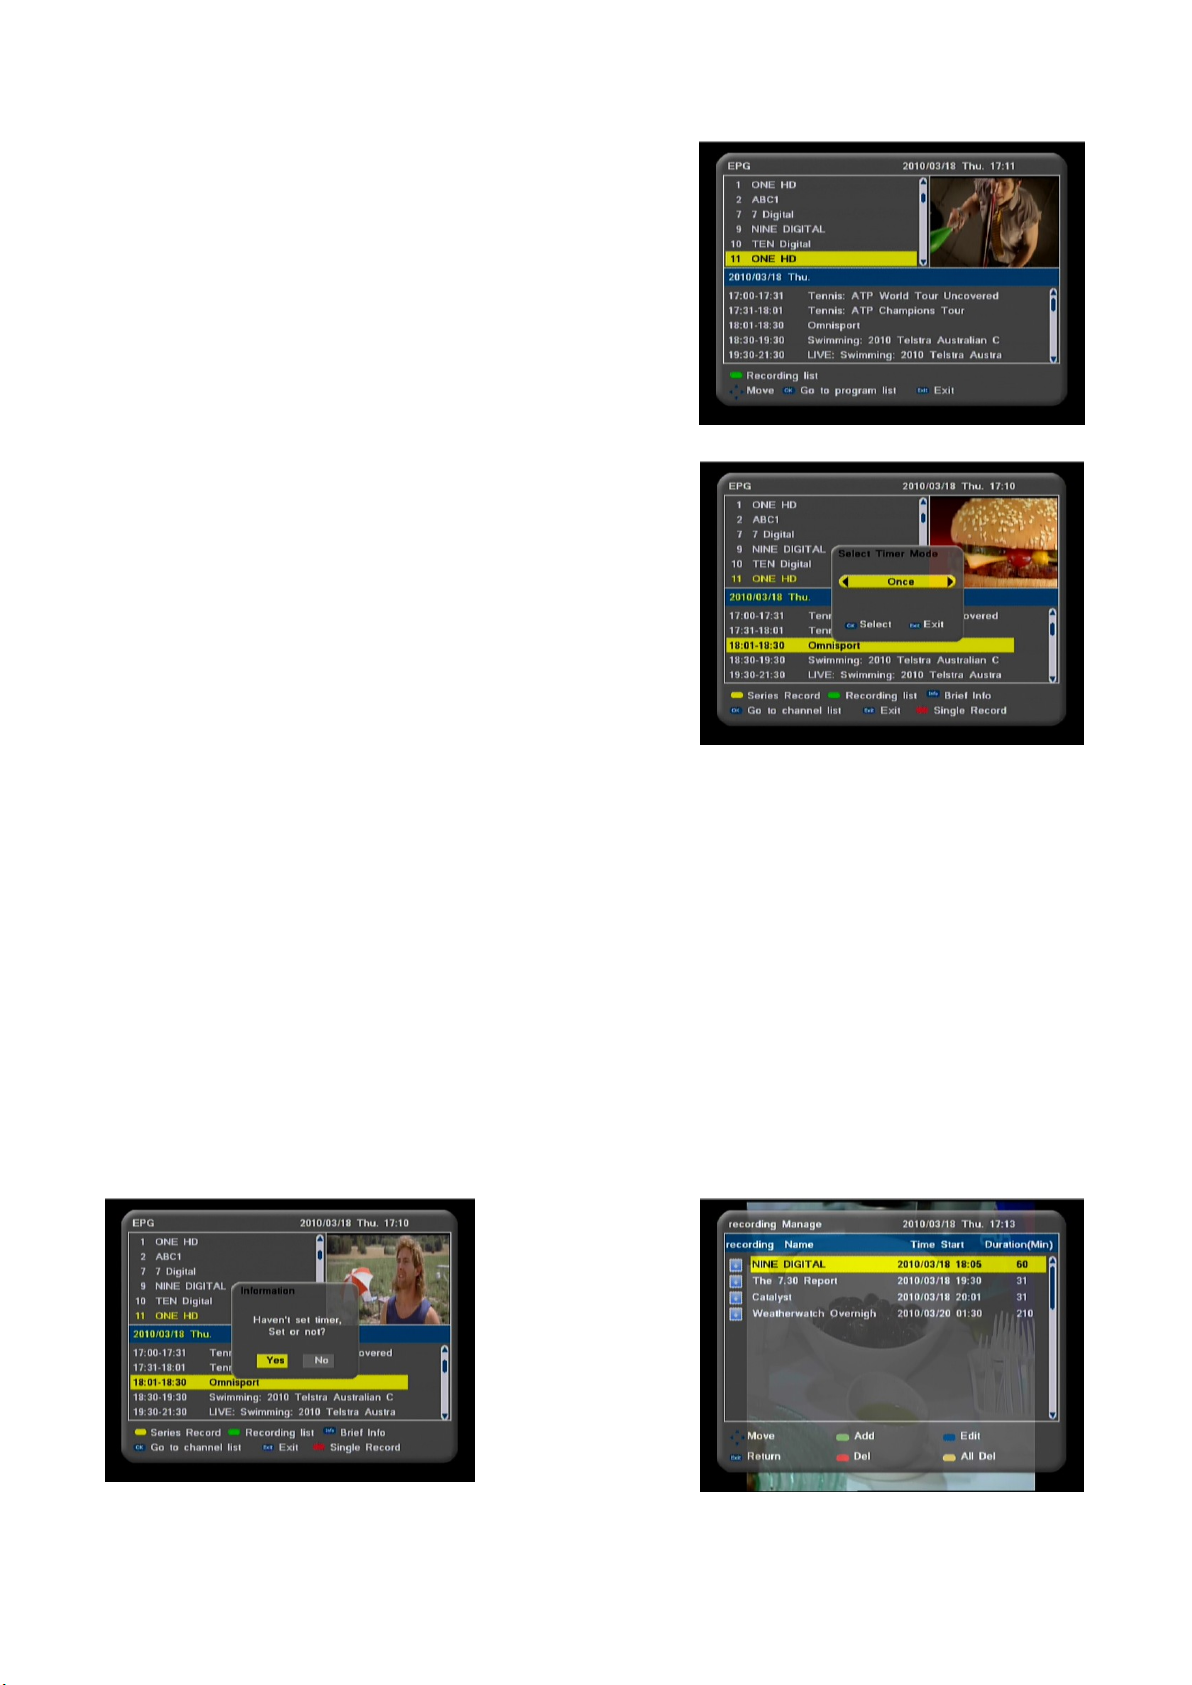
Pressing the EPG button will show screen
on the right.
If the unit has been switched off for sometime
the EPG will take a few second to populate
so please be patient.
Select channel that you want to schedule
a recording for and press OK on the remote.
The program name is now highlighted.
Here the coloured buttons on the remote is
used to book recordings.
If you want to record to record program once press the RED button on the
remote control.
If you want the same program recorded as a series or on specific days press
the Yellow button to access the following selections (Every day, Every
week, Mon-Fri, Every Sat, Every Sun)
Once you have made your selection the PVR will request you to confirm
your booking. Here you can also Press the Green button to check all your
scheduled recording
23
Page 24
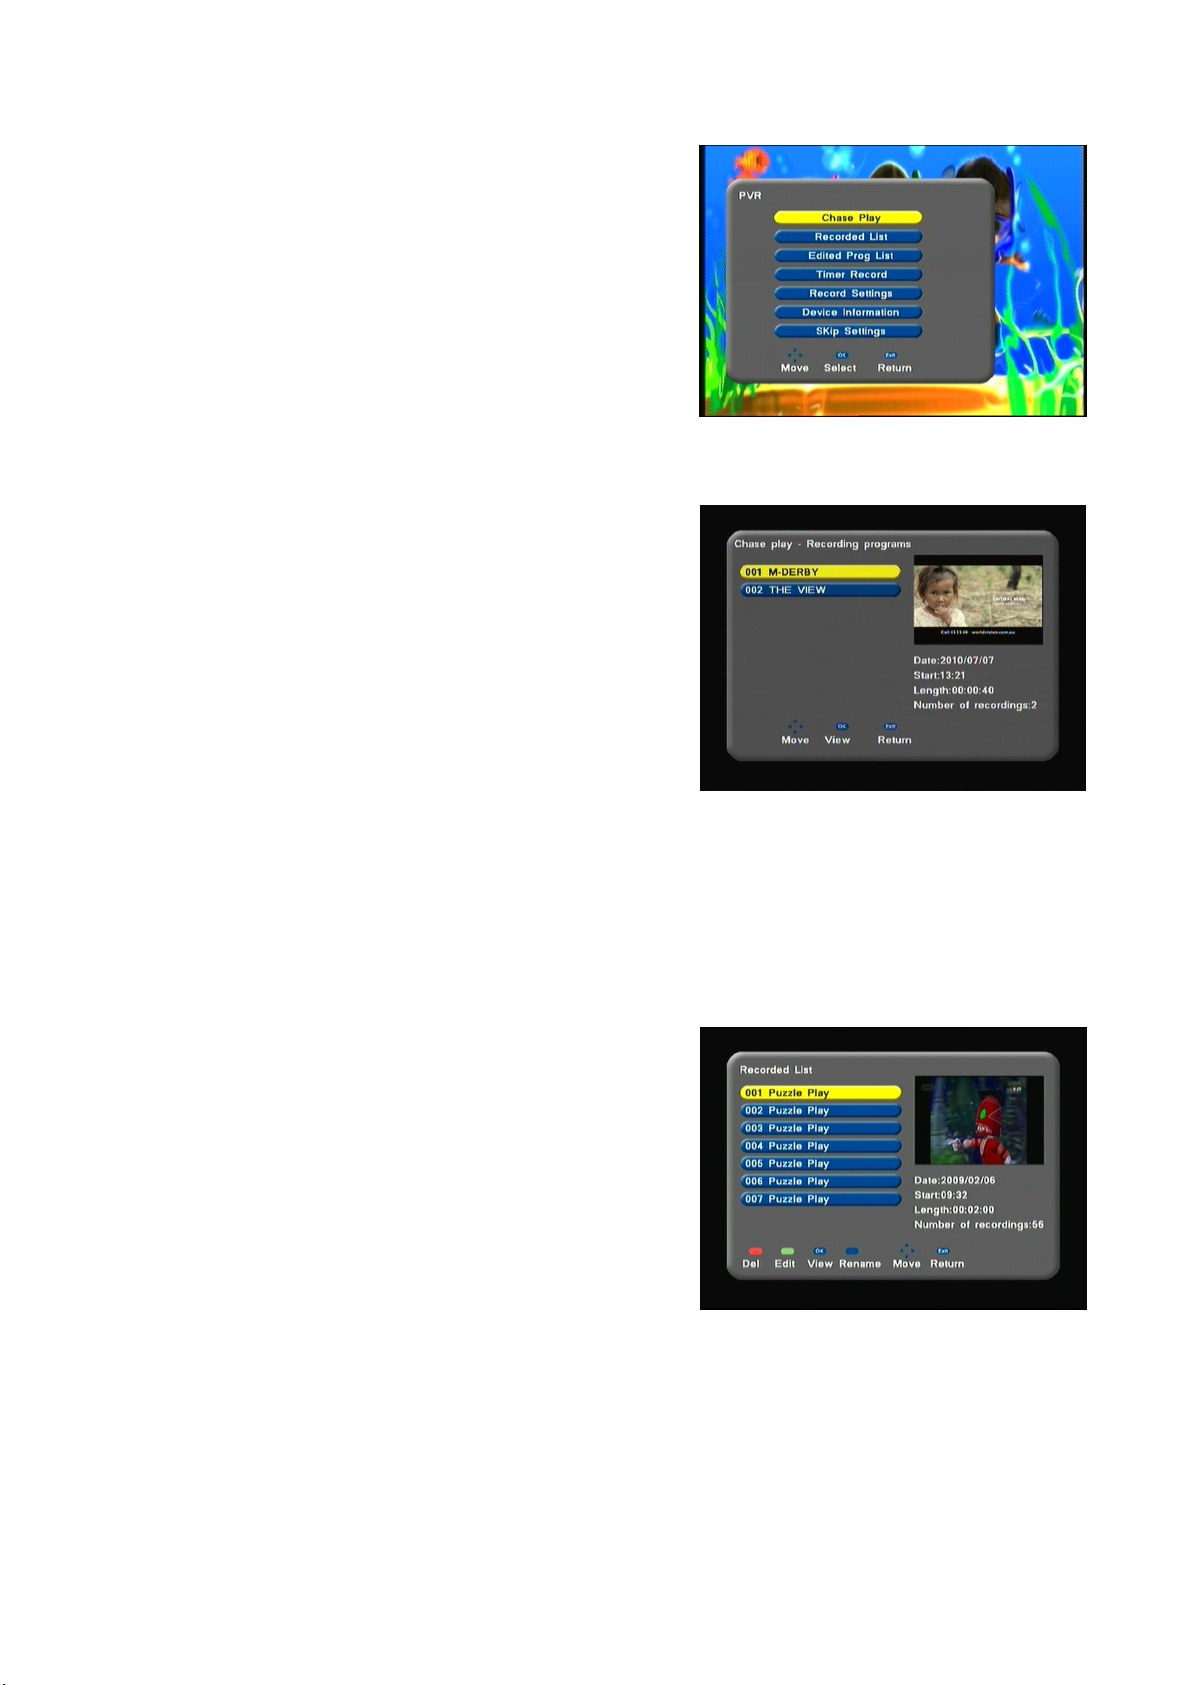
4. Operation about [PVR] instruction.
Under [Main Menu], select [PVR], press the
[OK] key to get into. Here this menu can
also be launched by pressing the PVR hot
key on the remote
5. Chase Play. Used to pursue the recording
item. Pressing the [C.Play] hotkey can
provide access to this section as well.
Here you can select to play a recording
while still in record mode. You can select
either of the 2 programs to play from the
beginning.
6. Recorded list
Access your recorded program by pressing the P.LIST button on your
remote. Here the program will start playing in the window as shown on the
right. Details such as Date/Length of
recording and start time are shown in this
section.
You can scroll down the page and by
pressing OK on your remote you can play
the file as a full screen.
Using this menu you can also
1. Delete files
2. Edit your files
3. Rename file
24
Page 25
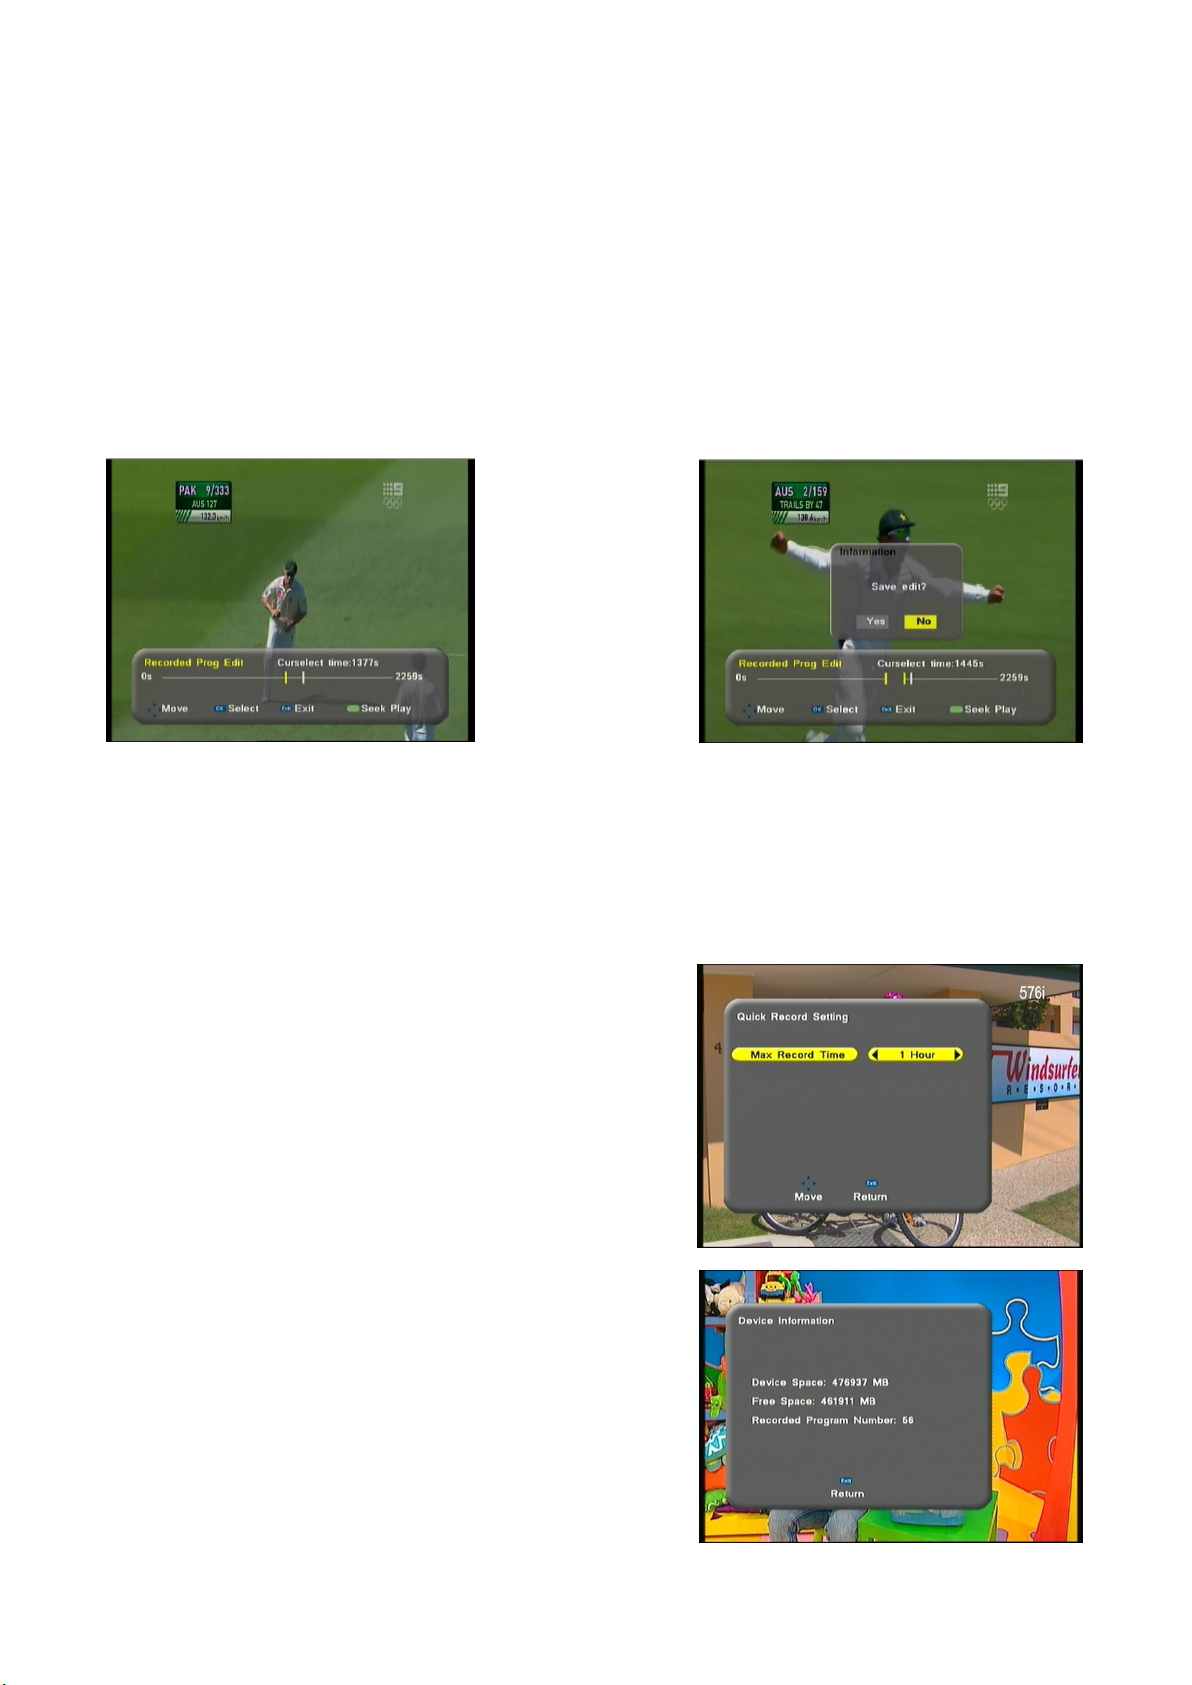
7. Edited Program list – Here all your edited files are stored and these are
steps to follow to edit a file.
How to Edit
Play a file that you want to edit. Mark points by pressing OK on the points
in the file that you want to remove.
Press exit and the PVR will prompt you select yes/no to save edited file.
8. Timer Record – Shows list of recordings that have been scheduled. Can
be active via a hot key on remote. ( T.Rec )
9. Record Settings
Here you can increase or decrease your
manual recording duration.
1-10Hour or limitless.
10. Device Information
Here the Hard drive capacity and remaining
space is shown.
25
Page 26
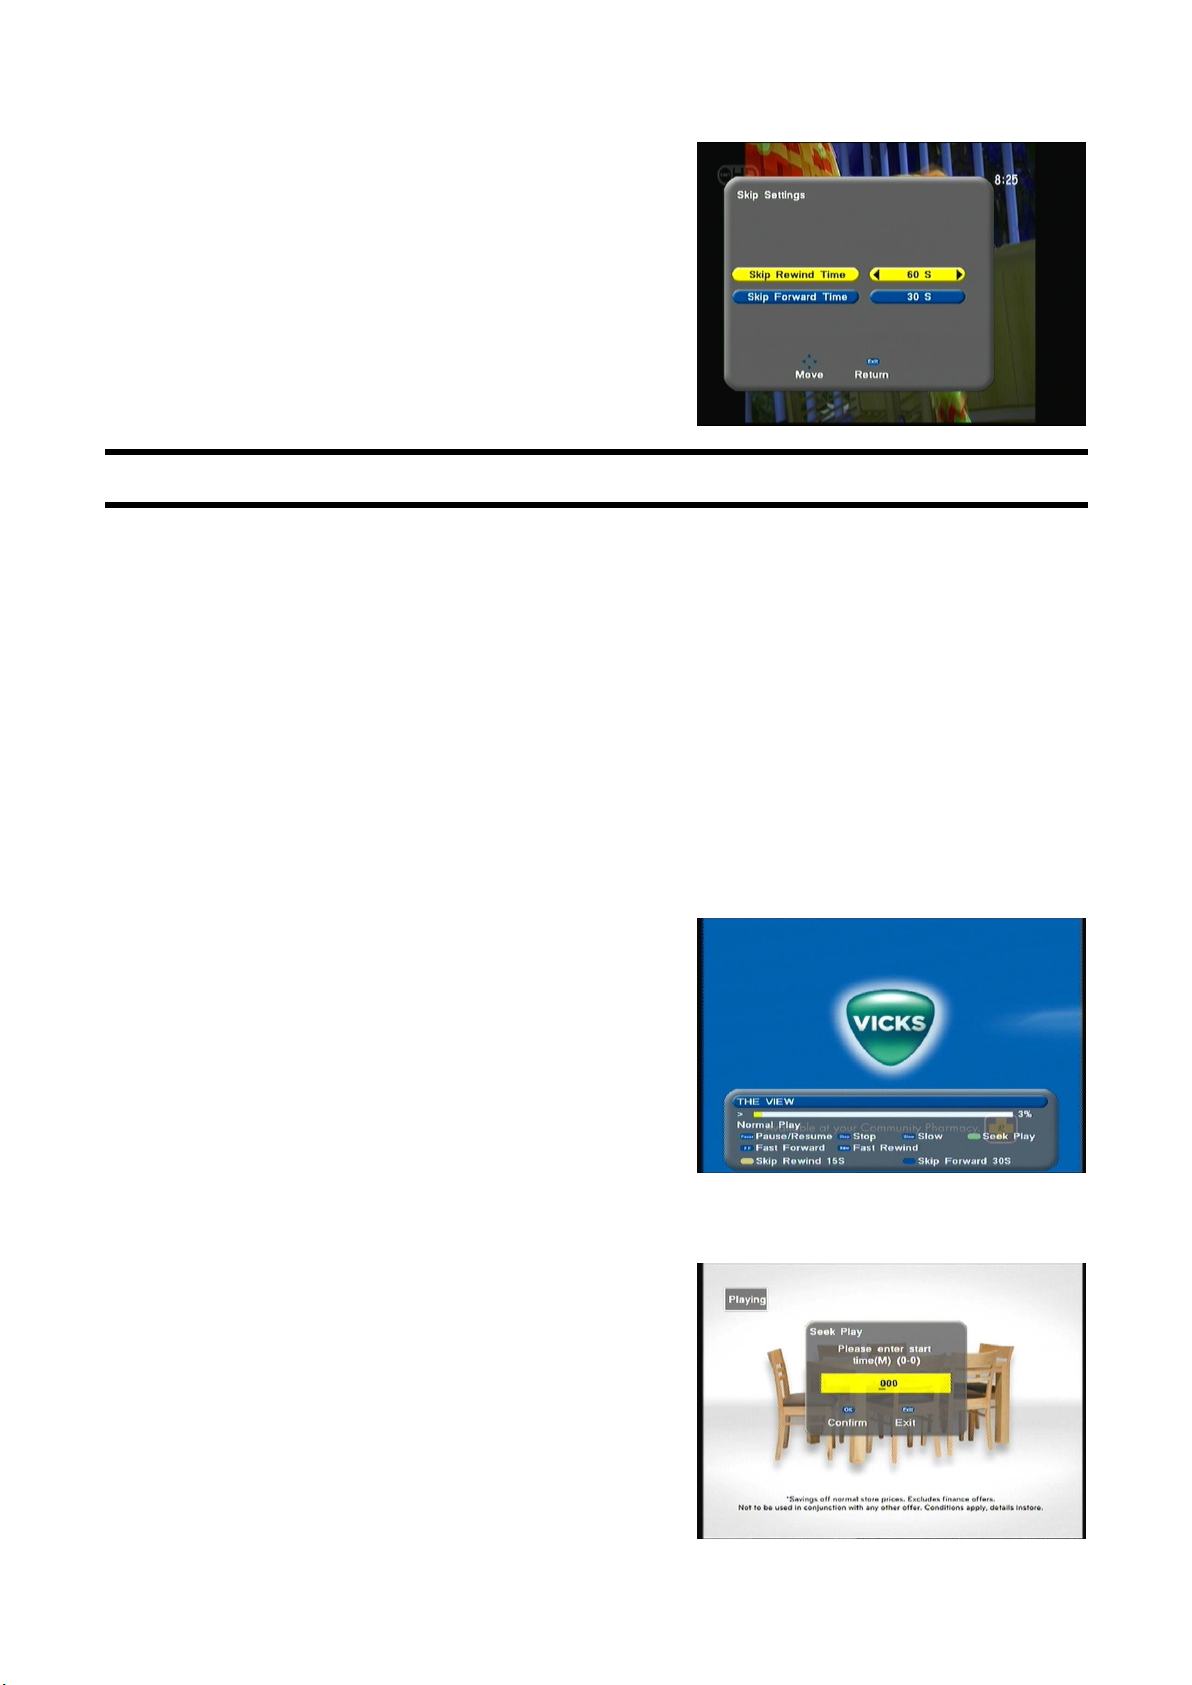
11. Skip Setting. Used to set skip time for
forward/ backward movement during
playback.
FILE PLAYBACK
During recorded program playback pressing the INFO button will pop a bar
on the bottom of your screen.
Here the functions during file playback is shown. This includes FFW, REW,
Skip backward, Skip forward and seek play.
During playback of a file the yellow button is used to skip backwards and
the blue button is used to skip forward. These buttons are on the remote
control.
You can also jump to a point on a large file by pressing the green button on
the remote during playback and bring up the
screen as shown below.
Here by simply keying in the time in
minutes you can jump to that point on the
file
26
Page 27
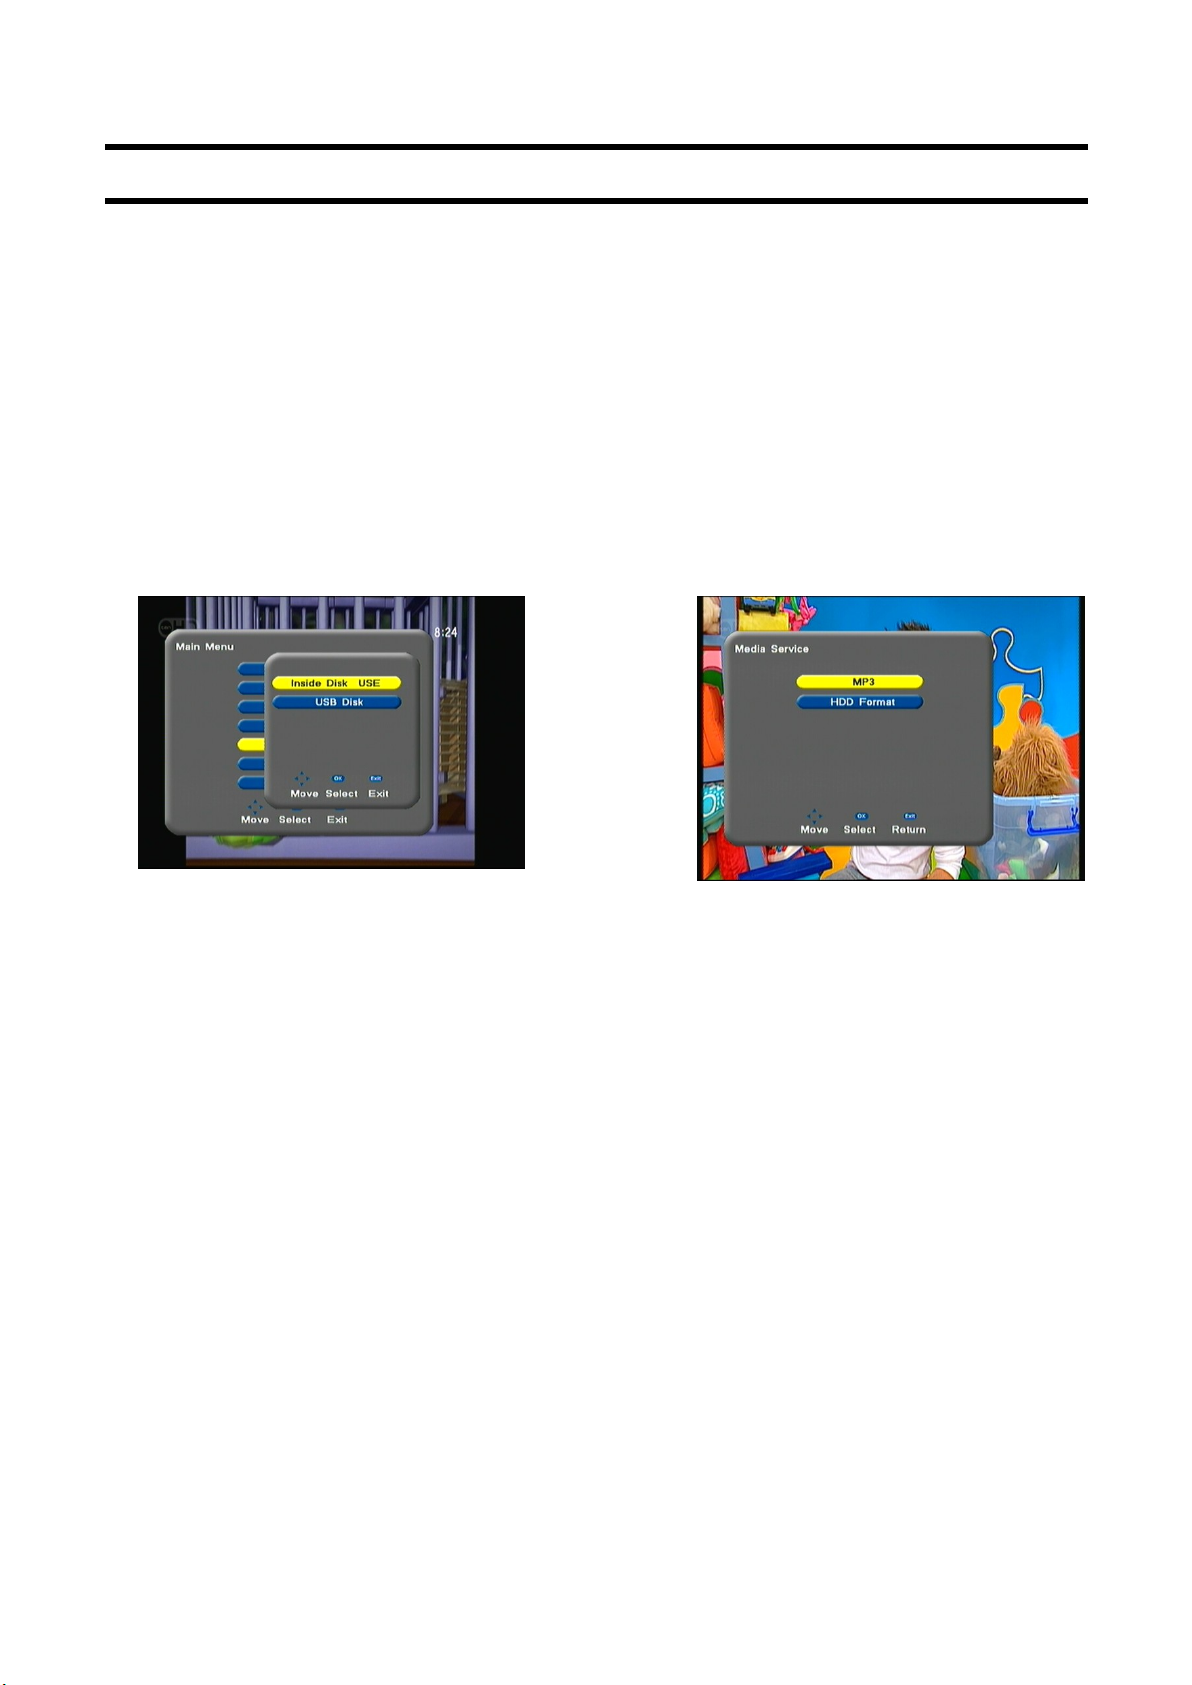
MEDIA SERVICE
The PVR6600 allows the following functions via the USB port.
1. Software upgrade
2. Playback MP3
On [Main Menu], select [Media Service]; press the [OK] key to get into its
submenu. Here you can access your internal or external hard drive. The
PVR will ask you to select hard drive source.
Once you have accessed the external hard drive you can select to play your
MP3 music.
3. Hard drive Format – It is advisable to occasionally format your internal
hard drive. This task should be performed once all recordings have been
viewed.
Be aware all content on the hard drive will be lost if you perform
this function
27
Page 28
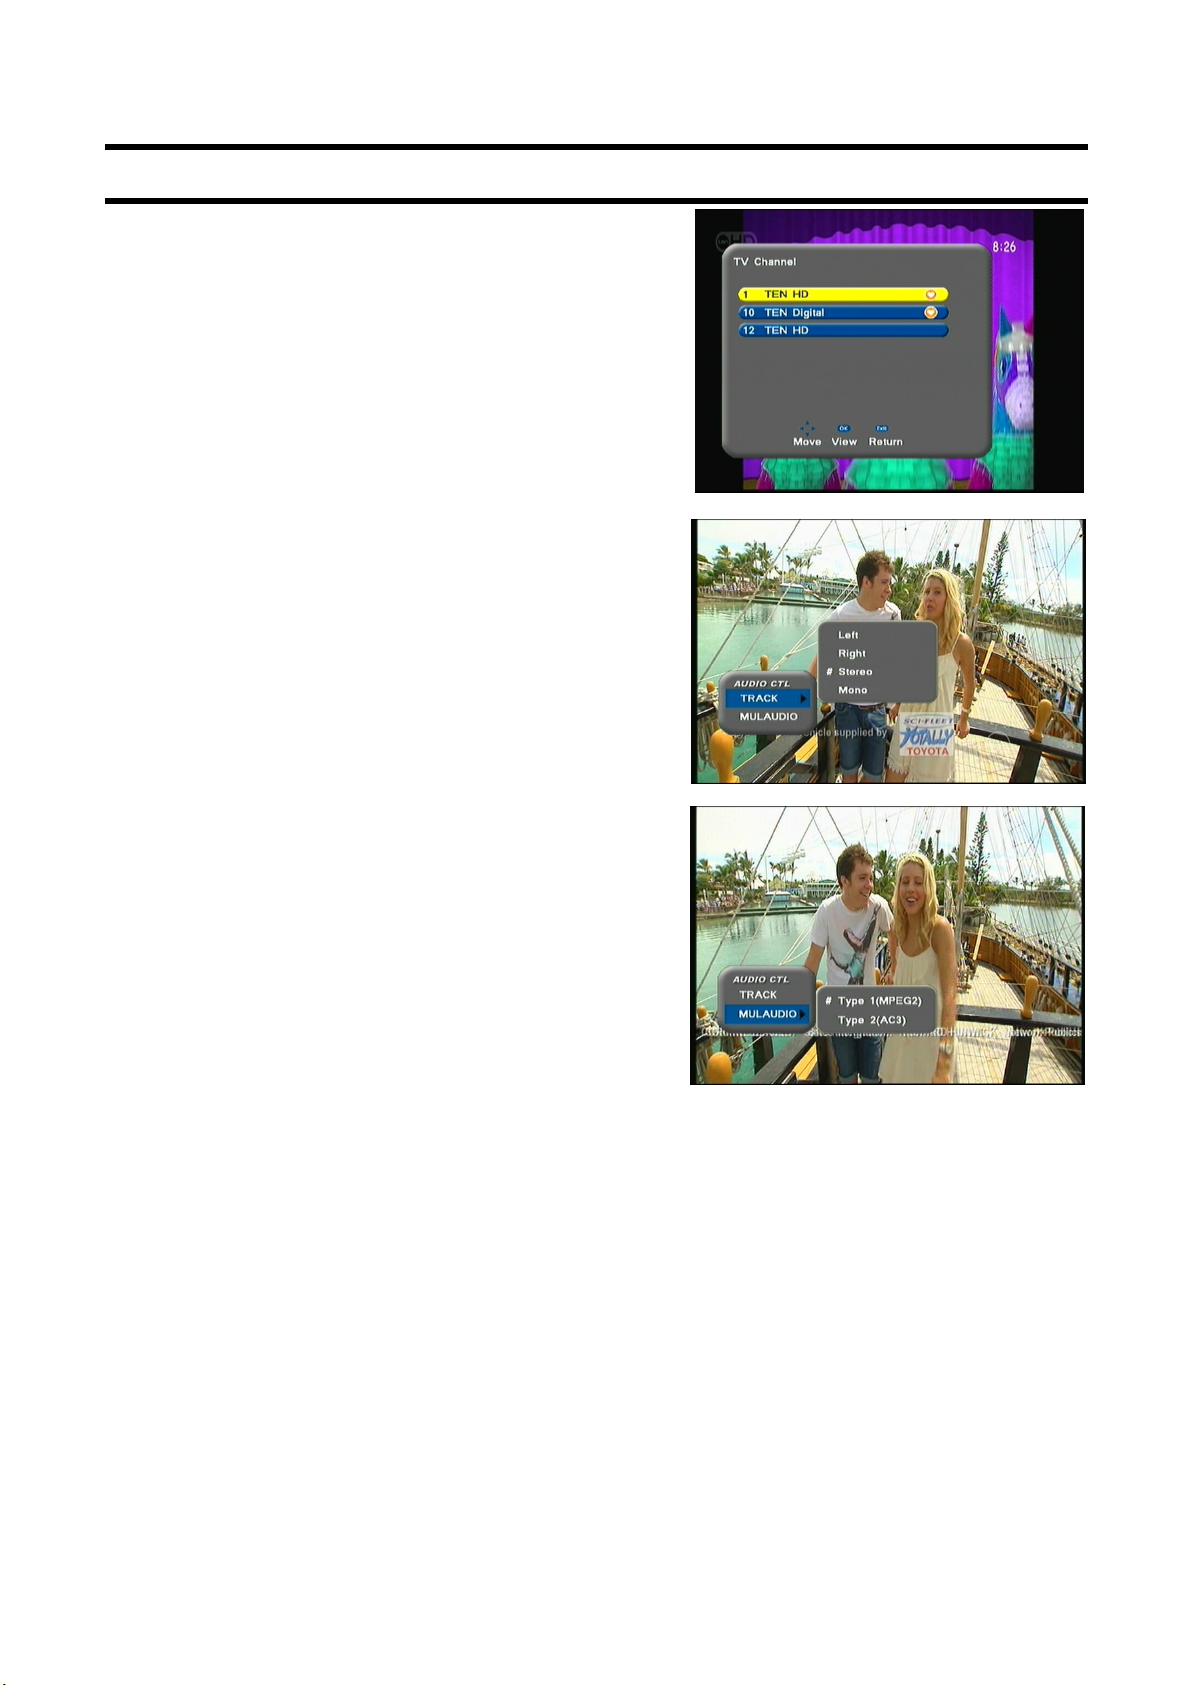
TV/ RADIO CHANNEL
Press the [OK] or [LIST] key to list channel
Press the UP/DOWN key to highlight
[TV/Radio Channel], press the key [OK] to
change.
The Up/down arrow key also changes the
channel.
4. Audio Control
When watching a program, press the
[AUDIO] key to display a dialog box
[Audio CTL]. Here you can select to
mix stereo audio to mono so you can
connect your audio output to one RCA
connnector
MULTI AUDIO,
While watching a program you can
select between MPEG2 and (AC3) audio, press the key [OK] to confirm.
28
Page 29

SPECIFICATION
Input impedance
Video Profile level
Video Output System
Video Output Terminal
Video Output Level
Audio Decoding
Audio Sampling Frequency
Audio Freq response
Audio Output Level
Audio Output Terminal
Power supply voltage
Power consumption
Temperature
Weight
75 ohm
MPEG-II /H.264 MP@HL
PAL
CVBS, YPbPr, HDMI, S-VIDEO
1V
P-P
(75ohm)
MPEG-II layer I&II
32/44.1/48KHz
20Hz-20KHz
Adjustable
RCA(R/L), SPDIF, COAXIAL
DC 12V
20W
0-50℃
About 2.2 kg
29
Page 30

WARRANTY CERTIFICATE
WARRANTY CERTIFICATE FOR PVR 6600
Complete the details on this form and retain in the event of warranty service being required (purchase receipt
attached)
PURCHASER’S NAME: ___________________________________
ADDRESS: CITY STATE POST CODE
DATE OF PURCHASE INVOICE/SALES DOCKET NO__________
TERMS OF WARRANTY
Altech UEC provides 12 month manufacturer’s warranty for FAULTY MATERIAL or WORKMANSHIP for the
PVR6600 from the original date of purchase. Such defect will be rectified, without cost to you for either labour or
material, at the premises of Altech UEC or their Authorized Service Centre.
This warranty is subject to the following terms and conditions:
1. Proof of purchase must be produced when a warranty claim is made. Particulars of the model and serial number,
the date of original purchase and invoice/sales docket number being provided to the authorized service centre when
a claim under warranty is made.
2. All (a) damage resulting from incorrect installation or use other than in accordance with the operating
instructions issued by the Company (b) incidental or consequential damage, being excluded from this Warranty.
3. If the product is misused, any unauthorized alteration, modification, substitution of any part of the product be
made or the serial number of the product is defaced or altered than the warranty will be rendered invalid.
4. Cost of transportation both ways to and from the authorized service centre being met by the owner if it is
necessary to return the product or any part to an authorized service centre. Altech UEC accepts no responsibility for
damage in transit to and from his premises
5. This Warranty is only applicable in Australia.
6. In home warranty is not covered by ALTECH UEC.
7. The hours for service are during normal business hours, Monday to Friday not including public holidays.
8. If the product or any parts returned to an authorized service centre for any cause is not covered by this warranty,
all costs involved, including a charge for inspection and handling must be paid to the authorized service centre
9. Terms of above warranty cannot be varied without consultation with ALTECH UEC.
10. This product must be solely used for domestic purposes.
11. The warranty shall not apply to remote control batteries or any other part with limited life.
If any legislation whether Federal or State applies to this transaction, certain non-excludable conditions and may be
implied and certain non-excludable rights may arise but except for such conditions and warranties which might
otherwise be implied in this transaction are hereby excluded and negated.
FOR WARRANTY SERVICE, PLEASE CONTACT THE RETAILER FROM WHOM YOU PURCHASED
YOUR UNIT OR CONTACT Service on 02 9425 5777
Altech UEC Pty Limited
27 Sirius Road
Lane Cove West 2066
NSW
www.uec.com.au
Page 31

 Loading...