

Page 1

Limited Warranty
TERK Technologies Corp. (TERK) warrants this product against defects
in materials or workmanship for one (1) year from the date of purchase.
During this warranty period, this product will be replaced without charge.
This warranty does not cover any damage due to acts of nature, commercial
use, accident, misuse, abuse or negligence. This warranty is only valid in the
USA. Replacement as provided under this warranty is the exclusive remedy
of the consumer. TERK shall not be liable for any incidental or consequential
damages for breach of any express or implied warranty on this product,
except to the extent that limitations of this sort are prohibited by applicable
law. THERE ARE NO IMPLIED WARRANTIES OF MERCHANTABILITY OR
FITNESS FOR A PARTICULAR PURCHASE EXCEPT TO THE EXTENT THAT
IMPLIED WARRANTIES OF EITHER SORT ARE REQUIRED BY APPLICABLE
LAW, AND IN SUCH CASE, EACH WARRANTY IS LIMITED IN DURATION TO
ONE YEAR.
For additional information: call 1.800.942.TERK (8375)
or visit www.terk.com.
For more information about XM Satellite Radio service, visit www.xmradio.com or call
1-800-852-9636.
The XM name and related logos are trademarks of XM Satellite Radio Inc.
TERK is a registered trademark. The TERK logo is a trademark of the TERK Technologies Corp
405P006
Page 2

SMART DIGITAL ADAPTER
Installation Guide
XMDALP100
Smart Digital Adapt
or Alpine Car St
er f
ereos
Page 3
Smart Digital Adapter
Smart Digital Adapter
Universal Tuner
XMDALP100
XMD1000
Pass through to head unit
for other Alpine products
Adapter
Tuner
Antenna
Head Unit
Introduction
Thank you for purchasing the TERK Smart Digital Adapter for XM
ready Alpine car stereo head units. This product must be used in
conjunction with the XM Universal Tuner Box (part # XMD1000)
sold seperately. The Smart Digital Adapter for Alpine allows you
to adapt a satellite radio ready car stereo to receive XM Satellite
Radio service.
Important Note::
The TERK Smart Digital Adapter for Alpine car stereo head
units is compatible with most Alpine head units displaying
the logo. For a complete compatibility list go online
to TERK.com/XMDirect
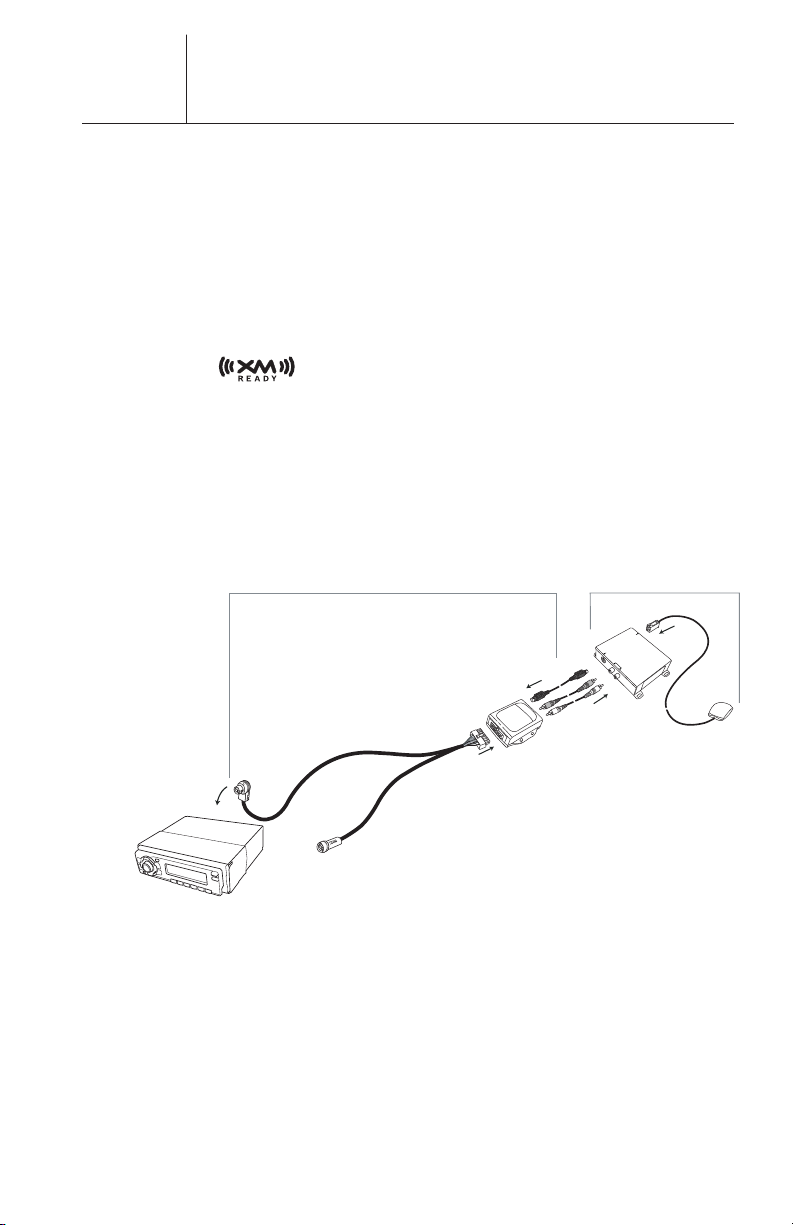
The XMDALP100 is easy to install plugging directly into the
XMD1000 and the Alpine car stereo head unit*. No splicing or
cutting of existing wiring within the vehicle is required. The
illustration below shows the complete installation of the XM Direct
system, including the XMDALP100 and the XMD1000 into your
Alpine car stereo head unit.
1
Fig. 1
*IT IS RECOMMENDED THAT A PROFESSIONAL INSTALLER
ALLS THE XM DIRECT SYSTEM (XMDALP100 AND XMD1000).
INST
Page 4

Installation Overview
Smart Digital Adapter
Installation Basics::
When choosing a location to mount the components, care must be
taken not to interfere with any of the vehicles existing systems.
Good installation practices should be observed when mounting
components to avoid any vibration, movement or rattling after
installation. When routing the cables avoid blocked passages and
any obstructions that could kink, crimp, twist, or chafe the cables.
Components should be secured in place with methods such as
Velcro, double stick foam tape, screws and nuts, cable ties etc. All
mounting hardware and methods are at the discretion of the installer.
Cables should also be secured in place to avoid movement. Care
should be taken not to crimp any of the cables when installing them.
And special care should be taken not to route cables on or near sharp
edges that could eventually cut into the jacket of the cable.
Installation Planning::
The XMDALP100 should be located within 2-3 feet of the XMD1000
due to the cable lengths. The antenna should be located in an area
to insure the cable will reach the tuner location. Check this prior
to installation. The installation guide supplied with your XM
Universal Tuner and bundled antenna has additional information
on antenna location and installation.
2
Page 5

Installation
Smart Digital Adapter
Prior to installation, locate the area where the XM Universal Tuner
Box is installed. Make sure you have followed the location
requirements for the XM Universal Tuner prior to installing the
Alpine Smart Digital Adapter.
Step 1
Remove the Alpine car stereo head unit from your dash board.
Important: Depending on how your Alpine head unit was installed
you may have to remove part or all of your dash board to remove
the head unit before the Alpine head unit can be pulled out. You
may also have to remove screws to complete this step.
Step 2
Connect the red and white audio cables into the red and white
connectors on the XM tuner box (XMD1000) as well as the black
cable with straight connector. Plug the other end of these
three cables into the top of the Alpine smart digital adapter
as shown in Fig 2.
Fig 2
3
Note: Make sure all cables are connected securely.
Step 3
Connect the remaining cable with the white rectangle connector
into the bottom of the XMDALP100 as shown in Fig 2.
Page 6

Smart Digital Adapter
Step 4
Take the end of the cable with the right angle connector and plug
it into the back of the Alpine head unit as shown in Fig 3. The
other end of the cable coming from the white rectangle connector
is a pass through cable that can be used to connect other Alpine
products to your Alpine head unit, i.e. CD changer.
Fig 3
4
Note: The location of the connections on the Alpine head unit may
vary depending on the Alpine model.
Step 5
Start your car and turn on your Alpine head unit to confirm that
the XM Direct system is properly connected. When you tune to
XM channel 1, you should see “XM Preview” on your Alpine head
unit LCD, and hear that channel through your car speakers.
If not, check to make sure all connections are correct or refer to
the trouble shooting section of this installation guide.
Step 6
Mount and secur
will not interfere with the radio and will not vibrate or rattle
after installation.
e the XMDALP100 in a suitable location that
Page 7

Installation (continued)
Smart Digital Adapter
Step 7
Return the Alpine car stereo head unit back to its original location
in the dash board, be careful with cables that you just installed so
that they do not unplug or get kinked by the head unit.
Note: If you had removed screws to pull the Alpine car stereo
head unit out please screw those back in.
Step 8
If you had removed the dash board during installation please
return it back to its original location.
5
Completing Activation::
Now that your XM Direct system has been installed your XM
Universal Tuner will need to be activated. Tune your Alpine
car stereo head unit to the XM Preview Channel, channel 1
and follow instructions for activation. You can also go on-line
at XMradio.com or call the toll free XM activation number at
1-800-852-9696.
XM SATELLITE RADIO OPERATION
Please refer to the XM Radio Operation section of your Alpine
owners manual.
Page 8

Troubleshooting
Smart Digital Adapter
ANTENNA
The XM antenna is not connected to the XM tuner.
• Check whether the XM antenna cable is attached securely.
UPDATING
Radio is being updated with latest encryption code.
• Wait until encryption code has updated. Channels 0 and 1
should function normally.
NO SIGNAL
XM signal is too weak or blocked at the current location.
• Wait until the car reaches a location with a stronger signal
or
• Wait until the car is in an area that has a clear view of the
open sky.
LOADING
Radio is acquiring audio or program information.
• Wait until the radio has recieved the information.
OFF AIR
The channel currently selected has stopped broadcasting.
• Select another channel.
“––––” or “––––––”
The user has selected a Channel Number that does not exist or is
not subscribed to.
• The unit will revert back to the previously selected channel.
or
There is no artist name/feature, song/program title, or additional
information associated with the channel at that time.
• No action needed.
6
 Loading...