

Page 1
R
R
XMA-T200RF
XMTM Radio/Changer System
EN
FR
•OWNER'S MANUAL
Please read before using this equipment.
•MODE D'EMPLOI
Veuillez lire avant d'utiliser cet appareil.
•MANUAL DE OPERACIÓN
Léalo antes de utilizar este equipo.
ALPINE ELECTRONICS, INC.
Tokyo office: 1-1-8 Nishi Gotanda,
Shinagawa-ku,
Tokyo 141-8501, Japan
Tel.: (03) 3494-1101
ALPINE ELECTRONICS OF AMERICA, INC.
19145 Gramercy Place, Torrance,
California 90501, U.S.A.
Tel.: 1-800-ALPINE-1 (1-800-257-4631)
ALPINE ELECTRONICS OF CANADA, INC.
7300 Warden Ave., Suite 203, Markham,
Ontario L3R 9Z6, Canada
Tel.: 1-800-ALPINE-1 (1-800-257-4631)
ALPINE ELECTRONICS OF AUSTRALIA PTY. LTD.
6-8 Fiveways Boulevarde Keysborough,
Victoria 3173, Australia
Tel.: (03) 9769-0000
ALPINE ELECTRONICS GmbH
Kreuzerkamp 7, 40878 Ratingen, Germany
Viale C. Colombo 8, 20090 Trezzano Sul
Tel.: 02102-45 50
ALPINE ITALIA S.p.A.
Naviglio (MI), Italy
Tel.: 02-48 47 81
ALPINE ELECTRONICS FRANCE S.A.R.L.
(RCS PONTOISE B 338 101 280)
98, Rue de la Belle Etoile, Z.I. Paris Nord Il,
B.P. 50016, 95945 Roissy Charles de Gaulle
13 Tanners Drive, Blakelands, Milton Keynes
ALPINE ELECTRONICS DE ESPAÑA, S.A.
01013 Vitoria (Alava)-APDO 133, Spain
Cedex, France
Tel.: 01-48 63 89 89
ALPINE ELECTRONICS OF U.K., LTD.
MK14 5BU, U.K.
Tel.: 01908-61 15 56
Portal de Gamarra 36, Pabellón, 32
Tel.: 945-283588
ES
ES
IT
SE
Yamagata Printing Co., Ltd.
2-6-34, Takashima, Nishi-ku, Yokohama,
Kanagawa, Japan
Designed by ALPINE Japan
Printed in Japan (Y)
68P50520Y58-O
Page 2

CHA-S634
•
CD changer for XMA-T200RF.
•
Changeur CD pour XMA-T200RF.
•
Cambiador de CD para XMA-T200RF.
•
CD changer for XMA-T200RF.
•
Changeur CD pour XMA-T200RF.
•
Cambiador de CD para XMA-T200RF.
CHM-S630CHA-1214
Alpine CD Changers Give You More!
More musical selections, more versatility, more convenience.
The CHA-S634 is a high-performance 6-disc changer with a new M DAC, CD-R/RW PLAY BACK, MP3
PLAY BACK and CD TEXT. The CHA-1214 Ai-NET model holds 12 discs, and the CHM-S630 M-Bus
model is a super-compact 6-disc changer with a CD-R/RW PLAY BACK.
Changeurs de CD Alpine : vous avez le choix!
Plus de sélections musicales, plus de souplesse, plus de confort.
Le modèle CHA-S634 est un changeur 6 disques ultra performant équipé des nouvelles fonctions M DAC,
CD-R/RW PLAY BACK, MP3 PLAY BACK et CD TEXT. Le modèle CHA-1214 Ai-NET contient 12
disques. Le modèle CHM-S630 M-Bus est un changeur 6 disques super compact disposant de la fonction
CD-R/RW PLAY BACK.
¡Los cambiadores Alpine de CD le ofrecen más!
Más selecciones musicales, más versatilidad y más ventajas.
CHA-S634 es un cambiador de seis discos de alto rendimiento con nuevos M DAC, CD-R/RW PLAY
BACK, MP3 PLAY BACK y CD TEXT. El modelo CHA-1214 Ai-NET alberga 12 discos y el modelo CHMS630 M-Bus es un cambiador de 6 discos de tamaño reducido con un CD-R/RW PLAY BACK.
Page 3

Contents
Operating Instructions
WARNING
WARNING.................................................. 2
CAUTION................................................... 2
PRECAUTIONS ......................................... 2
Basic Operation
Initial System Start-Up ...................................... 3
Turning Power On and Off ................................3
Modulator Frequency Setting ............................ 3
Listen to the Radio .............................................3
ENGLISH
MP3 Changer Operation (Optional)
Playing MP3 Files ............................................ 12
Music Sensor (Skip)......................................... 12
Fast Forward and Backward ............................ 12
Selecting Folders.............................................. 12
File Search ....................................................... 12
Repeat Play ...................................................... 13
M.I.X. (Random Play) ..................................... 13
Scanning Programs .......................................... 13
Setting the Range of MP3 File Selection ......... 13
Playing MP3 Data ............................................13
Remote Control
Battery Replacement ........................................ 14
XM Radio Operation
Receiving XM Channels with the XM Receiver ..... 4
Checking the XM Radio ID Number .................4
Storing XM Channel Presets.............................. 5
Receiving Stored XM Channels.........................5
Category Search .................................................5
Changing the Display......................................... 5
SETUP Operation
Scroll Setting...................................................... 6
Setting the AUX Mode (V-Link) ........................ 6
Demonstration .................................................... 7
Volume Level Setting of External Input
(AUX LEVEL)...............................................7
Changer Volume Level Setting (CHG LEVEL) ...
XM Level Setting (XM LEVEL) ....................... 7
Title/Text Operation
Displaying the Title/Text .................................... 8
Titling Discs ....................................................... 9
Erasing Disc Title............................................... 9
CD Changer Operation (Optional)
Controlling CD Changer ..................................10
Music Sensor (Skip) ......................................... 10
Fast Forward and Backward ............................ 10
Repeat Play ...................................................... 10
M.I.X. (Random Play) ..................................... 11
Scanning Programs .......................................... 11
Multi-Changer Selection .................................. 11
Information
In Case of Difficulty ........................................ 15
Specifications ................................................... 17
Installation and Connections
Warning ............................................................ 18
Caution ............................................................. 18
Precautions ....................................................... 18
Installation .......................................................19
Connections .....................................................20
LIMITED WARRANTY
7
1-EN
Page 4

WARNING
WARNING
This symbol means important instructions. Failure
to heed them can result in serious injury or death.
DO NOT OPERATE ANY FUNCTION THAT TAKES YOUR
ATTENTION AWAY FROM SAFELY DRIVING YOUR
VEHICLE.
Any function that requires your prolonged attention should only
be performed after coming to a complete stop. Always stop the
vehicle in a safe location before performing these functions.
Failure to do so may result in an accident.
KEEP THE VOLUME AT A LEVEL WHERE YOU CAN STILL
HEAR OUTSIDE NOISE WHILE DRIVING.
Failure to do so may result in an accident.
MINIMIZE DISPLAY VIEWING WHILE DRIVING.
Viewing the display may distract the driver from looking ahead of
the vehicle and cause an accident.
DO NOT DISASSEMBLE OR ALTER.
Doing so may result in an accident, fire or electric shock.
USE ONLY IN CARS WITH A 12 VOLT NEGATIVE GROUND.
(Check with your dealer if you are not sure.) Failure to do so may
result in fire, etc.
KEEP SMALL OBJECTS SUCH AS BATTERIES OUT OF THE
REACH OF CHILDREN.
Swallowing them may result in serious injury. If swallowed,
consult a physician immediately.
CAUTION
This symbol means important instructions. Failure
to heed them can result in injury or material
property damage.
HALT USE IMMEDIATELY IF A PROBLEM APPEARS.
Failure to do so may cause personal injury or damage to the
product. Return it to your authorized Alpine dealer or the nearest
Alpine Service Center for repairing.
DO NOT MIX NEW BATTERIES WITH OLD BATTERIES.
INSERT WITH THE CORRECT BATTERY POLARITY.
When inserting the batteries, be sure to observe proper polarity (+
and –) as instructed. Rupture or chemical leakage from the
battery may cause fire or personal injury.
PRECAUTIONS
Temperature
Be sure the temperature inside the vehicle is between +60°C
(+140°F) and –10°C (+14°F) before turning your unit on.
Maintenance
If you have problems, do not attempt to repair the unit yourself.
Return it to your Alpine dealer or the nearest Alpine Service
Station for servicing.
USE THE CORRECT AMPERE RATING WHEN REPLACING
FUSES.
Failure to do so may result in fire or electric shock.
USE THIS PRODUCT FOR MOBILE 12V APPLICATIONS.
Use for other than its designed application may result in fire,
electric shock or other injury.
2-EN
Page 5
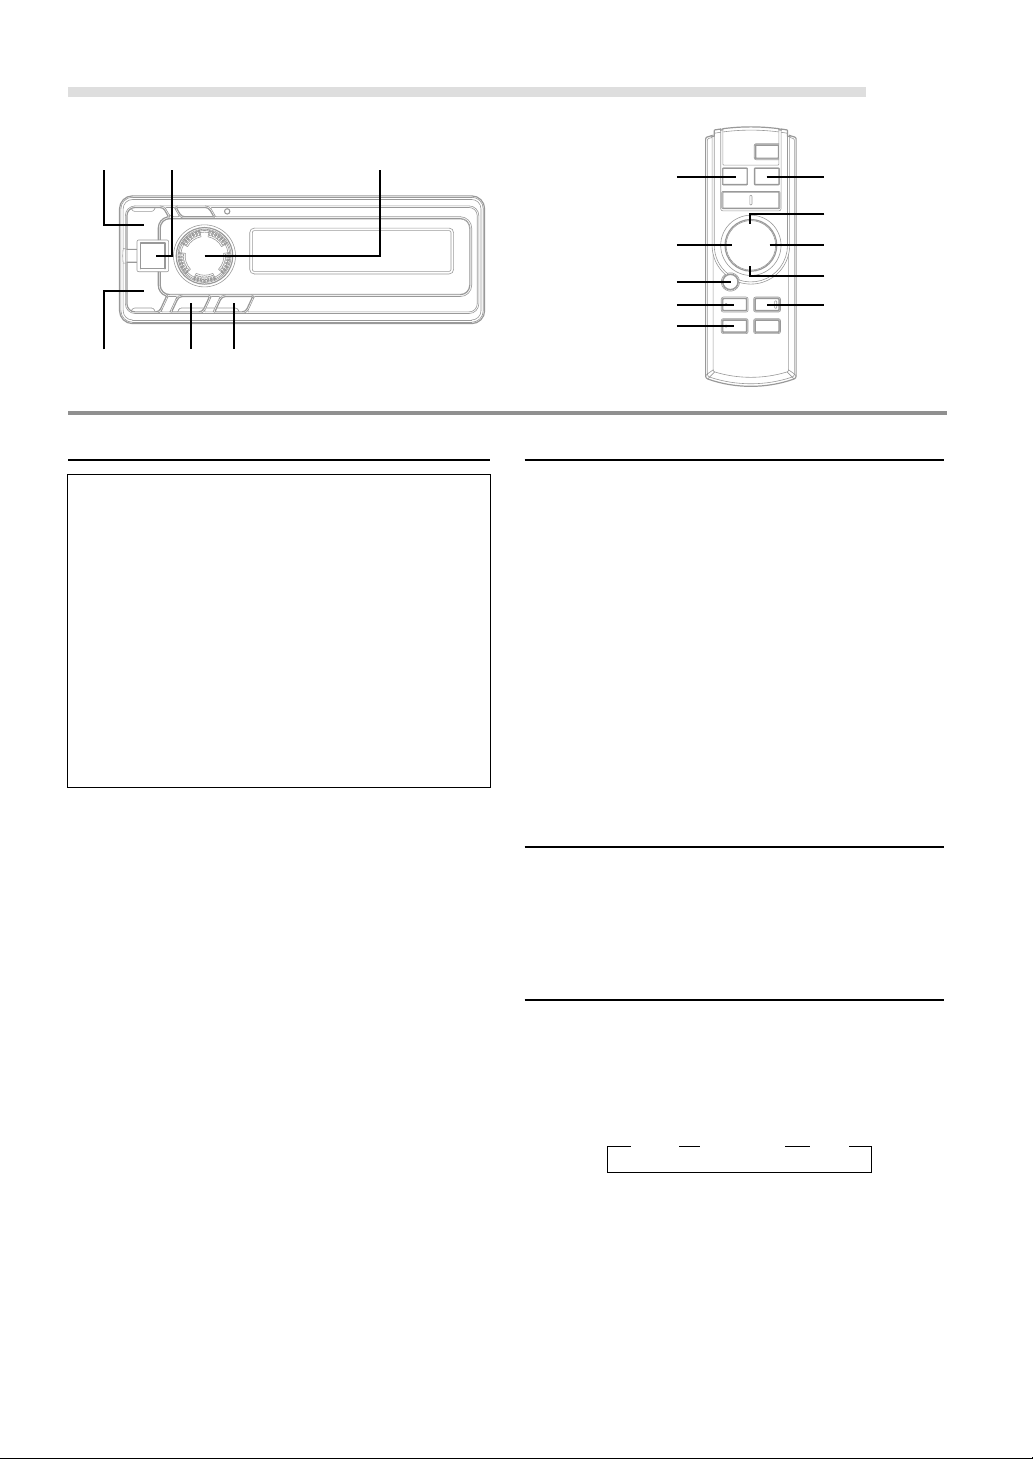
Basic Operation
POWER SETUP
)
(
RESET
<Remote Display>
Rotary encoder
Initial System Start-Up
Be sure to press the RESET switch when using the unit for
the first time, after installing the CD changer, etc., or after
changing the car battery.
1 Make sure that the power of the unit is off.
If the power is on, press the POWER button to turn off
the unit. (On the Remote Control, press and hold the
POWER button for at least 2 seconds.)
2 Press the RESET switch with a ballpoint pen, or any
other pointed object.
POWER
8
g
<Remote Control>
f
9
SETUP
Modulator Frequency Setting
1 Press and hold the SETUP button of the Remote
Display or the Remote Control for at least 2 seconds.
2 Turn the rotary encoder of the Remote Display, or
press the 8 or 9 button of the Remote Control to enter
the Frequency Setting mode (displays the frequency).
3 Press the ( or ) button of the Remote Display, or
the g or f button of the Remote Control to set
the frequency.
The Frequency is varied by 200 kHz (0.2 MHz) steps
from 87.7 to 89.9 MHz.
Turning Power On and Off
1 Press the POWER button of the Remote Display or the
Remote Control to turn on the unit.
NOTE
The unit can be turned on by pressing any button of the Remote
Display.
The volume level gradually increases to the previous
level you were listening to before the unit was turned
off. Press the POWER button on the Remote Control or
press and hold the POWER button of the Remote
Display for at least 2 seconds to turn off the unit.
NOTES
• When turning the unit On or Off with the POWER button, be
sure to lower the volume level of the factory-installed radio.
This will prevent any electrical pop noises from entering the
system.
• Once you are sure all connections are proper, you may turn
the unit on.
• When the frequencies of this unit and the specified head unit
are the same, the pop noise occurs when turning the unit on.
This is not a malfunction.
4 Press the SETUP button of the Remote Display or the
Remote Control to return to the Normal mode.
NOTES
• Select a frequency that is not used by a strong, local FM
station. This will prevent interference while listening to CD.
• To listen to an FM broadcast, turn down the volume of the
radio then turn power off to the XMA-T200RF. Tune the radio
to your desired station and adjust the volume to your
preference.
• The initial setting at the factory is 88.7 MHz.
Tips
When you connect the unit to the optional DHA-S680, set AiNET SETUP on the DHA-S680 to “CD-CHG.” For further
information about this operation, see the Owner’s Manual of the
DHA-S680.
Listen to the Radio
1 To listen to your factory-installed radio, turn off the
Remote Display Unit or Remote Control by pressing
the POWER button.
NOTES
• When you set the Modulator Unit to a frequency which has no
FM broadcast, your audio system may produce some harsh,
interstation noises when CD playback is stopped.
• With the FM Modulator connected, there will be a slight loss
in signal strength to the radio.
3-EN
Page 6

XM Radio Operation
)
SOURCE
DISP/SETUP
SOURCE
gf
-/J
BAND
8
9
<Remote Display>
34
Rotary encoder(
Receiving XM Channels with the XM
Receiver
XM Satellite Radio* is the next generation of audio
entertainment, with up to 100 brand-new digital
channels. For a small monthly fee, subscribers can hear
crystal-clear music, sports, news and talk, coast-tocoast via satellite. For more information, visit XM’s
website at www.xmradio.com or call 1-800-852-9696.
* XM and its corresponding logos are trademarks of XM
Satellite Radio Inc.
NOTES
• The controls on the XMA-T200RF for XM Receiver
operation are operative only when an XM Receiver is
connected.
• The XM1 or XM2 band illuminates when in XM mode.
1 First, refer to "Modulator Frequency Setting" (page 3 ),
and set the frequency.
2 Press the SOURCE button of the Remote Display or
the Remote Control to select RADIO Mode.
3 Press the BAND button on the Remote Control to
select XM1 or XM2.
4 Turn the rotary encoder of the Remote Display, or
press the g or f button of the Remote Control to
select the desired channel. Holding the ( or )
button of the Remote Display, or holding the g or
f button of the Remote Control will change
channels continuously.
NOTE
You can press the ( or ) button of the Remote Display to
select the desired channel.
DISP/
SETUP
<Remote Control>
Checking the XM Radio ID Number
You need to provide XM with the unique XM Radio ID
number for your XM Radio Receiver in order to
subscribe to XM's programming.
This number is an 8 character alphanumeric number
that is printed on a label directly on the XM Receiver.
It can also be displayed on the screen of the XMAT200RF in the following way.
It is displayed only when an XM Satellite Radio Receiver
(TUA-T020XM) is connected.
1 While receiving XM1/XM2, turn the rotary encoder of
the Remote Display or press the g or f button of
the Remote Control to select channel “0”.
NOTE
You can also press the ( or ) button of the Remote
Display to switch the channel.
2 The unit alternately displays “RADIO ID” for 2 seconds,
then the ID number for 10 seconds.
3 To cancel the ID number display, set the channel to
other than “0.”
TIPS
There is another way to display your ID number.
1. Press and hold the SETUP button of the Remote Display or
the Remote Control for at least 2 seconds.
2. Turn the rotary encoder of the Remote Display, or press the
8 or 9 button of the Remote Control to select “RADIO ID”.
3. Press the ( or ) button of the Remote Display, or the
g or f button of the Remote Control to display your ID
number.
4. After checking your ID number, press the SETUP button of
the Remote Display or the Remote Control to return to the
normal display.
NOTES
• You cannot use “O,” ”S,”” I,” or ”F” for the ID Number.
• You can check your ID number printed on the label on the
package of your XMA-T200RF.
4-EN
Page 7

Storing XM Channel Presets
1 Press the BAND button on the Remote Control to
select the desired band (XM1 or XM2) you want to
store.
2 After tuning in the desired channel, press and hold the
rotary encoder of the Remote Display for at least 2
seconds until the channel name on the display blinks.
3 Turn the rotary encoder of the Remote Display to
select the preset No. you want to use.
4 Press the rotary encoder of the Remote Display to
store the channel while the channel name display is still
blinking (within 5 seconds).
The display stops blinking once the channel has been
memorized. The display shows the band, preset No.
and channel name memorized.
5 Repeat the procedure to store up to 5 other channels
onto the same band.
To use this procedure for other bands, simply select the
band desired and repeat the procedure.
A total of 12 channels can be stored in the preset
memory (6 channels for each band; XM1 and XM2).
NOTE
If you store a channel in a preset memory which already has a
station, the current channel will be cleared and replaced with the
new one.
Receiving Stored XM Channels
1 Press the BAND button on the Remote Control to
select the desired band (XM1 or XM2).
2 Press the 4 or 3 button of the Remote Display, or the
8 or 9 button of the Remote Control to find the desired
preset.
Category Search
Channels are divided into categories. Category Search
allows you to search for a specific channel by its
category. You can also do searches of all channels within
a particular category.
3 Within 13 seconds of selecting the category, press the
rotary encoder of the Remote Display or the -/J
button of the Remote Control again to select the next
channel within that category. Repeatedly press the
rotary encoder of the Remote Display or the -/J
button of the Remote Control within 13 seconds to
select additional channels within that category.
When tuned in, the category is displayed for 13
seconds, then the display returns to normal mode.
NOTES
•
If you cannot find your desired category, the display shows “--
--” for 2 seconds automatically.
• To exit the category search mode, press and hold the rotary
encoder of the Remote Display or the -/J button of Remote
Control for at least 2 seconds. Alternatively, wait for 13
seconds until the receiver returns to the normal channel
search mode.
Changing the Display
Text information, such as the channel name, artist
name/feature, and song/program title, is available with
most XM channels. The unit can display this text
information as explained below.
1 In XM mode, press the DISP button of the Remote
Display or the Remote Control.
Each time you press this button, the display changes
as shown below.
Channel Name
display
NOTES
• Depending on the model, the display may differ from the one
shown above.
• Press and hold the TITLE button of the Remote Control for at
least 2 seconds in the "SCR OFF" setting so that the display
scrolls one time only when a title exceeds 8 characters.
• When the "Scroll Setting" (refer to page 6) is set to "SCR
ON", the display scrolls only when entering a title of more
than 8 characters.
The display scrolls one time in the "SCR OFF" setting when a
title exceeds 8 characters, and when performing the operation
(Power On, Disc change, etc.).
Artist Name
→→→
display
Song Title
display
1 In XM mode, press the rotary encoder of the Remote
Display or the -/J button of the Remote Control to
display the category of the channel that is currently
selected for 13 seconds.
2 While the category is displayed, turn the rotary
encoder of the Remote Display, or press the g or
f button of the Remote Control to select a different
category (or leave it to stay with the same category.)
NOTE
You can also press the ( or ) button of the Remote Display
to select a category.
5-EN
Page 8
SETUP Operation
)
(
SOURCE
34
SETUP Rotary encoder
<Remote Display>
SOURCE
g
8
f
9
SETUP
<Remote Control>
Scroll Setting
If connected to an XM tuner, this unit can scroll the
channel name, category, artist, and song title.
If connected with a CD changer, this unit can scroll the
disc and track names recorded on CD-TEXT discs, as
well as the text information of MP3 files, folder names,
and ID3 tags.
1 Press and hold the SETUP button of the Remote
Display or the Remote Control for at least 2 seconds.
2 Turn the rotary encoder of the Remote Display to the
left or the right, or press the 8 or 9 button of the
Remote Control to select “SCR.”
3 Press the ( or ) button of the Remote Display or
g or f button of the Remote Control to select
“SCR OFF” or “SCR ON.”
• SCR ON: channel name, category, artist and song
title (XM tuner), and CD text information, text
information of folder and file names, and ID3 tags
are scrolled automatically.
• SCR OFF: the display is scrolled once when a disc is
loaded or when a track is changed, etc.
(However, the display is scrolled only when a name
exceeds 8 characters).
4 When the setting is completed, press the SETUP
button of the Remote Display or the Remote Control to
return to the normal mode.
NOTE
Channel name, category, artist and song title (XM tuner), CD
text names, folder names, file names or ID3 tag displays
exceeding 8 characters will be scrolled. The disc titles input
manually (refer to page 9) cannot be scrolled.
Setting the AUX Mode (V-Link)
You can input TV/video sound by connecting an optional
Versatile Link Terminal (KCA-410C) to this component.
1 Press and hold the SETUP button of the Remote
Display or the Remote Control for at least 2 seconds.
2 Turn the rotary encoder of the Remote Display, or
press the 8 or 9 button of the Remote Control to
select “AUX.”
3 Press the ( or ) button of the Remote Display, or
the g or f button of the Remote Control to select
“AUX ON.”
OFF:
You cannot select an external input sound source.
ON:
You can select an external input sound source. You can
also select an AUX for external input∗.
∗ Turn the rotary encoder of the Remote Display, or
press the 8 or 9 button of the Remote Control to
select your preferred name from AUX, MP3, TV,
VCR, and GAME.
AUX
You can select and set a name of external input when
Versatile Link Terminal (KCA-410C) is not connected.
A1 AUX / A2 AUX
You can select an AUX NAME when Versatile Link
Terminal (KCA-410C) is connected.
NOTE
When connecting the Versatile Link Terminal (KCA-410C), you
can set two AUX mode displays.
4 When the setting is completed, press the SETUP
button of the Remote Display or the Remote Control to
return to the normal mode.
6-EN
5 To adjust the volume, etc., first press the SOURCE
button of the Remote Display or the Remote Control
and select the AUX mode, then make the necessary
adjustment.
NOTE
When using the Versatile Link Terminal (KCA-410C), you can
connect two external inputs. To select the mode, press the BAND
button on the Remote Control.
Page 9

Demonstration
This unit has a Demonstration feature which simulates the
display functions.
1 Press and hold the SETUP button of the Remote
Display or the Remote Control for at least 2 seconds.
2 Turn the rotary encoder of the Remote Display to the
left or the right, or press the 8 or 9 button of the
Remote Control to select “DEMO.”
3 Press the ( or ) button of the Remote Display or
the g or f button of the Remote Control to turn
on or off the DEMO mode.
If no button is pressed for 30 seconds, the DEMO
mode activates.
NOTES
• The initial setting at the factory is “DEMO OFF.”
• To quit DEMO mode, set to “DEMO OFF.”
4 Press the SETUP button of the Remote Display or the
Remote Control again to return to normal operation.
Changer Volume Level Setting
(CHG LEVEL)
Select a level between CHG LEVEL 1 to 4 to match the
changer's output to the head unit's internal sources.
1 Press and hold the SETUP button of the Remote
Display or the Remote Control for at least 2 seconds.
2 Turn the rotary encoder of the Remote Display, or
press the 8 or 9 button of the Remote Control to
select “CHG LEV.”
NOTE
The level is displayed only when a changer is connected.
3 Press the ( or ) button of the Remote Display, or
the g or f button of the Remote Control to set
the desired volume level.
4 Press the SETUP button of the Remote Display or the
Remote Control to return to the Normal mode.
NOTE
If you hear distortion, reduce the volume level setting.
Volume Level Setting of External
Input (AUX LEVEL)
Select a level between AUX LEVEL 1 to 4 to match the
output of an external source with the head unit's internal
sources.
1 Press the 4 or 3 button of the Remote Display or the
8 or 9 button of the Remote Control to set the desired
volume level (AUX LEV 1 to 4).
NOTES
• You can select AUX LEVEL only when AUX is on in “Setting
the AUX Mode (V-Link),” on page 6.
• If you hear distortion, reduce the volume level setting.
TIPS
You can set the volume level also from the SETUP mode.
1. Press and hold the SETUP button of the Remote Display or
the Remote Control for at least 2 seconds.
2. Turn the rotary encoder of the Remote Display, or press the
8 or 9 button of the Remote Control to select “AUX LEV”.
The level is displayed only when the AUX mode is “AUX
ON”. (See the section of “Setting the AUX Mode” on Page 6.)
3. Press the ( or ) button of the Remote Display, or the
g or f button of the Remote Control to set the desired
volume level.
4. Press the SETUP button of the Remote Display or the
Remote Control to return to the Normal mode.
XM Level Setting (XM LEVEL)
Select a level between XM LEVEL 1 to 4 to match the
output of the XM receiver with the head unit's internal
sources.
1 Press and hold the SETUP button of the Remote
Display or the Remote Control for at least 2 seconds.
2 Turn the rotary encoder of the Remote Display, or
press the 8 or 9 button of the Remote Control to
select “XM LEV.”
NOTE
The level is displayed only when an XM receiver is connected.
3 Press the ( or ) button of the Remote Display, or
the g or f button of the Remote Control to set
the desired volume level.
4 Press the SETUP button of the Remote Display or the
Remote Control to return to the Normal mode.
NOTE
If you hear distortion, reduce the volume level setting.
7-EN
Page 10
Title/Text Operation
POWER
)
(
DISP/SETUP Rotary encoder
<Remote Display>
Displaying the Title/Text
It is possible to display the CD title if the title has been
previously inputted. For details, see “Titling Disc” (page
9). Text information, such as the disc name and the track
name, will be displayed if playing a CD text compatible
disc. It is also possible to display the folder name, the
file name, and the ID3 tag, etc. while playing MP3 files.
1 Press the DISP button of the Remote Display or the
Remote Control.
The mode will change every time the button is
pressed.
About “Title” and “Text”
Title: With this device, it is possible to input the CD name
(refer to page 9). This inputted name is referred to
as a “title.”
Text: Text compatible CDs contain text information such
as the disc name and track name. Such text
information is referred to as “text.”
CD Changer mode:
↓
ELAPSED TIME DISPLAY
TEXT DISPLAY (DISC NAME)
TEXT DISPLAY (TRACK NAME)
↓
↓
↓
TITLE DISPLAY
∗1
∗1
POWER
TITLE
8
gf
-/J
<Remote Control>
∗1
Displayed during playback of a disc with CD Text.
“NO TEXT” will be displayed when the CD contains
no Text data.
∗2
If an MP3 file contains ID3 tag information, all the
ID3 tag information is displayed (e.g., track name,
artist name, and album name). No other information
is displayed.
“NO TAG” will be displayed when an MP3 file
contains no ID3 tag information.
∗3
The recording sampling rate and bit rate of the MP3
file are displayed.
9
DISP/
SETUP
NOTES
• Some characters may not be displayed correctly with this
device, depending on the character type.
• The CD changer must also be CD Text compatible for the Text
information to be displayed.
• When the Scroll Setting (refer to page 6) is set to “SCR
OFF”, press and hold the TITLE button on the Remote
Control for at least 2 seconds to scroll the Text information
only once (TEXT DISPLAY, FOLDER NAME DISPLAY, FILE
NAME DISPLAY or ID3 TAG DISPLAY mode).
• “NO SUPPORT” is displayed when the desired text
information cannot be displayed on this unit.
• If the title was not previously input, “NO TITLE” is
displayed.
MP3 CD Changer mode:
ELAPSED TIME DISPLAY
FOLDER NAME DISPLAY
FILE NAME DISPLAY
8-EN
↓
↓
↓
↓
ID3 TAG DISPLAY
FRAME DISPLAY
↓
↓
TITLE DISPLAY
∗2
∗3
Page 11

Titling Discs
It is possible to title your favorite CD's.
1 Press the DISP button of the Remote Display or the
Remote Control and select the title display mode.
For details, see “Displaying the Title/Text” (page 8).
2 Press and hold the TITLE button on the Remote
Control for at least 2 seconds. The first character will
blink.
3 Turn the rotary encoder of the Remote Display to the
left or the right, or press the g or f button of the
Remote Control to select the desired letter/numeral/
symbol available for naming.
NOTE
You can also press the ( or ) button of the Remote Display
to select the desired letter / numeral / symbol.
4 Press the rotary encoder of the Remote Display, or
press the -/J button of the Remote Control to store
the first character. The first character will stop blinking
and the display will automatically advance to the next
character. When that character begins to blink, you
may choose the next letter or symbol of your title.
5 Repeat the steps 3 to 4 above to complete the titling.
Turning the rotary encoder of the Remote Display, or
pressing the -/J button of the Remote Control after
entering the 8th character, automatically stores the title
into memory.
After entering a title, the input number of the title is
shown on the display for about 2 seconds.
1 / 150
Entered number Maximum number of
titles available∗
NOTE
∗ The maximum of titles available will vary, depending upon the
CD Changer being used.
When entering a title of less than 8 characters (for
example, 3 character title):
After entering 3 characters to complete your title, the
4th character space will be blinking. Go to step 6 to
complete the title.
6 Press and hold the TITLE button of the Remote Control
for at least 2 seconds to record the title.
NOTES
• If you try to store beyond the limit, the display will show
“FULL DATA.” At this point, no more titles can be stored.
• The CD Changer title length or memory capacity varies
depending upon the model being used.
• To input a new title, one of the previously inputted titles must
first be deleted.
• When you want to erase a title, enter the “
all spaces.
• The operations described in steps 3 to 5 must be made within
10 seconds. The input mode will be cancelled if no action is
taken for over 10 seconds.
• Removing power from the unit may delete these titles. Use
caution when manipulating the power cord.
• You cannot enter titles for your DVD disc when the unit is
connected to the DHA-S680.
” symbol into
Erasing Disc Title
1 Press and hold the SETUP button of the Remote
Display or the Remote Control for at least 2 seconds.
2 Turn the rotary encoder of the Remote Display, or
press the 8 or 9 button of the Remote Control to
select “TTL DEL”.
3 Press the ( or ) button of the Remote Display, or
press the g or f button of the Remote Control
repeatedly until the title you want to erase is displayed.
The title first memorized on the changer side blinks on
the display.
4 Press the rotary encoder of the Remote Display, or
press the -/J button of the Remote Control.
“DEL OK?” message is displayed. Press the rotary
encoder of the Remote Display, or press the -/J
button of the Remote Control, and the title is erased.
Repeat steps 3 and 4 to erase more titles.
5 Press the SETUP button of the Remote Display or the
Remote Control to return to the normal mode.
NOTES
• You cannot erase CD-TEXT.
• In the Changer Mode, "TTL DEL" can be selected.
9-EN
Page 12
CD Changer Operation (Optional)
)
(
SOURCE
34
Rotary encoder
<Remote Display>
Controlling CD Changer
An optional CD Changer may be connected to the XMAT200RF if it is Ai-NET compatible. With a CD Changer
connected to the Ai-NET input of the XMA-T200RF, the
CD Changer will be controllable from the XMA-T200RF.
Using the KCA-400C (Multi-Changer Switching device) or
the KCA-410C (Versatile Link Terminal) multiple
changers can be controlled by the XMA-T200RF.
See the Multi-Changer Selection section on page 11 for
selecting the CD Changers.
NOTES
• The controls on the XMA-T200RF for CD Changer operation
are operative only when a CD Changer is connected.
• The DVD changer (optional) is controllable from the XMA-
T200RF as well as the CD changer.
SOURCE
g
-/J
M.I.X.
SCAN
<Remote Control>
BAND
8
f
9
REPEAT
Music Sensor (Skip)
1 Turn the rotary encoder of the Remote Display to the
left, or press the g button of the Remote Control
once during CD play to return to the beginning of the
current track. If you wish to access the beginning of a
track further back, repeatedly press until you reach the
desired track.
Turn the rotary encoder of the Remote Display to the
right, or press the f button of the Remote Control
once to advance to the beginning of the next track. If
you wish to access the beginning of a track further
ahead, press repeatedly until the desired track is
reached.
NOTE
The music sensor feature is functional in the play or pause
mode.
1 Press the SOURCE button of the Remote Display or
the Remote Control to activate the CHANGER mode.
Select the FM band.
Tune to the same frequency you selected on the
Modulator Unit and adjust for the desired volume level.
The display shows the disc number and track number.
2 Press the 4 or 3 button of the Remote Display, or
press the 8 or 9 button of the Remote Control until
your desired disc number appears in the display. The
track number will also appear in the display.
To pause playback, press the -/J button on the
Remote Control.
Pressing the -/J button again will resume playback.
Fast Forward and Backward
1 Press the ( or ) button of the Remote Display, or
press and hold the g or f button of the Remote
Control to quickly move backward or forward until you
reach the desired section of the track.
Repeat Play
1 Press the REPEAT button of the Remote Control to
play back repeatedly the track being played.
The track will be played repeatedly.
The RPT ALL mode is selected, the unit repeatedly
plays back all tracks on the disc selected.
→ RPT → RPT ALL → (off)
Press the REPEAT button and select OFF to
deactivate the repeat play.
10-EN
Page 13
M.I.X. (Random Play)
1 Press the M.I.X. button on the Remote Control in the
play or pause mode.
The tracks on the disc will be played back in a random
sequence. After all the tracks on a disc have finished
playing back, the tracks of the next disc will be played
back.
If a CD Changer equipped with the ALL M.I.X. function
is connected, ALL M.I.X. will also be selectable.
In this mode, the tracks on all the CDs in the current
magazine will be included in the random playback
sequence.
→ M.I.X. → ALL M.I.X. → (off)
To cancel M.I.X. play, press the M.I.X. button to turn off
the M.I.X.
Scanning Programs
1 Press the SCAN button on the Remote Control to
activate the Scan mode.
The first 10 seconds of each track will be played back
in succession.
To stop scanning, press the SCAN button and
deactivate the Scan mode.
Multi-Changer Selection
Alpine's Ai-NET system will support up to 6 CD
Changers. When operating two or more changers, the
KCA-400C (Multi-Changer Switching device) must be
used. If you use 1 Switching device, you can connect up
to 4 CD Changers. If you use 2 Switching devices, you
can connect up to 6 CD Changers. When using KCA410C (Versatile Link Terminal), you can connect two
changers and two external sources (AUX).
1 Press the SOURCE button of the Remote Display or
the Remote Control to activate the CD Changer mode.
2 Press the BAND button on the Remote Control to
activate the CD Changer Selection mode.
3 Press the BAND button on the Remote Control until
the desired changer indicator appears on the display.
NOTE
If the selected CD Changer is not connected, the display will
show “NO CHG.”
4 To operate the selected changer.
NOTE
For further details about the external input (AUX) when using
KCA-410C, see “Setting the AUX Mode (V-Link)” on page 6.
11-EN
Page 14

MP3 Changer Operation (Optional)
)
(
SOURCE
34
SETUP
Rotary encoder
<Remote Display>
Playing MP3 Files
With an MP3 compatible changer connected, you can
play CD-ROMs, CD-Rs, and CD-RWs containing MP3
files with this unit.
1 Press the SOURCE button of the Remote Display or
the Remote Control to switch to the MP3 Changer
mode.
The mode will change every time the button is pressed.
2 Press the 4 or 3 button of the Remote Display, or
press the 8 or 9 button of the Remote Control until
your desired disc number appears in the display.
To pause playback, press the -/J button on the
Remote Control.
Pressing the -/J button again will resume playback.
NOTES
• The unit can play discs containing both audio data and MP3
data.
• The MP3 indicator is lit during MP3 playback.
Music Sensor (Skip)
SOURCE
FOLDER 4FOLDER 3
8
gf
-/J
M.I.X.
SCAN
<Remote Control>
9
REPEAT
SETUP
Fast Forward and Backward
1 Press the ( or ) button of the Remote Display, or
press and hold the g or f button of the Remote
Control to quickly move backward or forward until you
reach the desired section of the file.
Note
There is no audio output during fast forward/backward for MP3
files.
Selecting Folders
1 Press the FOLDER 4 or FOLDER 3 button on the
Remote Control to select the folder.
File Search
You can locate all the files on a disc and play them.
1 Press and hold the rotary encoder for at least 2
seconds, or press and hold the -/J button of the
Remote Control for at least 2 seconds during playback.
The unit switches to File Search Mode.
1 Turn the rotary encoder to the left, or press the g
button of the Remote Control once during CD play to
return to the beginning of the current file. If you wish to
access the beginning of a track further back,
repeatedly press until you reach the desired file.
Turn the rotary encoder to the right, or press the f
button of the Remote Control once to advance to the
beginning of the next file. If you wish to access the
beginning of a track further ahead, press repeatedly
until the desired file is reached.
NOTES
• The music sensor feature is functional in the play or pause
mode.
• Files are played back in their pathname order which was used
when they were written to the CD.
12-EN
2 Turn the rotary encoder, or press the g or f
button of the Remote Control to select the desired file.
Then, if you press the rotary encoder, or press the
-/J button of the Remote Control, the selected file
starts to play.
NOTE
File Search Mode is automatically canceled if no buttons are
pressed within 5 seconds.
Page 15

Repeat Play
1 Press the REPEAT button of the Remote Control to
play back repeatedly the file being played.
The file will be played repeatedly.
The RPT ALL mode is selected, the unit repeatedly
plays back all files on the disc selected.
→ RPT → RPT ALL → (off)
Press the REPEAT button of the Remote Control and
select OFF to deactivate the repeat play.
NOTE
When MP3 FLDR and RPT ALL are in “Setting the Range of
MP3 File Selection,” files in a folder will be played repeatedly.
M.I.X. (Random Play)
1 Press the M.I.X. button on the Remote Control in the
play or pause mode.
The files on the disc will be played back in a random
sequence.
To cancel M.I.X. play, press the M.I.X. button on the
Remote Control to turn off the M.I.X.
NOTE
When MP3 FLDR and M.I.X. are set in “Setting the Range of
MP3 File Selection,” files in a folder will be played in random
order. After all the tracks have been played back, play does not
shift to the next Folder.
Setting the Range of MP3 File
Selection
You can set the range of MP3 file selection to “entire
disc contents” or “folder contents only.”
1 In the MP3 Changer mode, press the rotary encoder
of the Remote Display to switch to MP3 DISC or MP3
FLDR.
TIPS
You can also set the range in the SETUP mode.
1. Press and hold the SETUP button of the Remote Display or
the Remote Control for at least 2 seconds.
2. Turn the rotary encoder of the Remote Display, or press the
8 or 9 button on the Remote Control to select MP3 DISC or
MP3 FLDR.
3. Press the ( or ) button of the Remote Display, or press
the g or f button of the Remote Control to toggle the
mode between MP3 DISC and MP3 FLDR.
• MP3 DISC : plays all the files on one disc.
• MP3 FLDR : plays files in the selected folder only.
4. Press the SETUP button of the Remote Display or the
Remote Control to set the selected mode.
NOTES
If a changer compatible with MP3 is used, the range of MP3 file
selection applies to REPEAT, M.I.X. and SCAN modes only. In
normal mode, the unit plays all files on a disc even when you set
the range of MP3 selection to "folder contents only."
Scanning Programs
1 Press the SCAN button on the Remote Control to
activate the Scan mode.
The first 10 seconds of each file will be played back in
succession.
To stop scanning, press the SCAN button on the
Remote Control and deactivate the Scan mode.
NOTE
When MP3 FLDR is set in “Setting the Range of MP3 File
Selection,” the first 10 seconds of each file in a folder will be
played back in succession.
Playing MP3 Data
You can select either playback only of CD data, or
playback of formatted CD data and MP3 files.
When a disc contains CD or the MP3 file data, playback
starts from the CD data portion of the disc.
1 Press and hold the SETUP button of the Remote
Display or the Remote Control for at least 2 seconds.
2 Turn the rotary encoder of the Remote Display to the
left or the right, or press the 8 or 9 button of the
Remote Control to select “CD-DA.”
3 Press the ( or ) button of the Remote Display or
g or f button of the Remote Control to select
“CD-DA” or “CD/MP3.”
• CD-DA: Only CD data can be played back.
• CD/MP3: Both CD data and MP3 file tracks can be
played back.
4 When the setting is completed, press the SETUP
button of the Remote Display or the Remote Control to
return to the normal mode.
13-EN
Page 16

Remote Control
Battery Replacement
Applicable battery: Use two “AAA” sized dry batteries or
equivalent.
1 Opening the battery cover
Slide out the battery cover while firmly pressing the
direction of arrow.
2 Replacing the battery
Put the batteries in the case observing the polarities
as illustrated.
Remote sensor
• Point the Remote Control transmitter toward the
remote sensor on the Remote Display Unit.
3 Closing the cover
Push the cover as illustrated until a click is heard.
14-EN
Page 17

Information
In Case of Difficulty
If you encounter a problem, please turn the power off, then on
again. If the unit is still not functioning normally, please
review the items in the following checklist. This guide will
help you isolate the problem if the unit is at fault. Otherwise,
make sure the rest of your system is properly connected or
consult your authorized Alpine dealer.
Basic
No function or display.
• Vehicle's ignition is off.
- If connected following instructions, the unit will not
operate with the vehicle's ignition off.
• Blown fuse.
- Check the fuse on the battery lead of the unit; replace
with the proper value if necessary.
• Internal micro-computer malfunctioned due to interference
noise etc.
- Press the RESET switch with a ballpoint pen or other
pointed article.
• No connection of Battery lead.
- Make sure Battery lead is connected properly.
• No connection of ACC Power lead and Ground lead.
- Make sure ACC Power lead and Ground lead are connected
properly.
No Sound.
• Volume level too low.
- Turn Volume Control clockwise to desired level.
• No tuning of FM frequency.
- Tune to the correct frequency.
• No connection of FM modulator and antenna.
- Make sure the FM modulator is connected to the antenna.
• When the interference with broadcasting stations occurs.
- Change the oscillator frequency of the FM modulator.
Music skips excessively.
• The CD changer has not been mounted securely.
- Follow the installation instructions for proper installation.
CD
Changer not functioning.
• Out of operating temperature range +50˚C (+120˚F) for CD.
- Allow the vehicle's interior (or trunk) temperature to
cool.
CD playback sound is wavering.
• Moisture condensation in the CD Module.
- Allow enough time for the condensation to evaporate
(about 1 hour).
Unable to fast forward or backward the CD.
• The CD has been damaged.
- Eject the CD and discard it; using a damaged CD in
your unit can cause damage to the mechanism.
CD playback sound skips due to vibration.
• Improper mounting of the changer.
- Securely re-mount the changer.
• Disc is very dirty.
- Clean the disc.
• Disc has scratches.
- Change the disc.
• The pick-up lens is dirty.
- Do not use a commercial available lens cleaner disc.
Consult your nearest ALPINE dealer.
CD playback sound skips without vibration.
• Dirty or scratched disc.
- Clean the disc; damaged disc should be replaced.
MP3
MP3 is not played back.
• There was an error in writing the disc.
- Make sure the format used to write the disc is compatible.
15-EN
Page 18

Information
Indication for XM Radio Mode
ANTENNA
• The XM antenna is not connected to the XM radio module.
- Check whether the XM antenna cable is attached securely to
the XM radio module.
UPDATING
• Radio is being updated with latest encryption code.
- Wait until encryption code is being updated. Channels 0 and
1 should function normally.
NO SIGNL
• XM signal is too weak at the current location.
- Wait until the car reaches a location with a stronger signal.
LOADING
• Radio is acquiring audio or program information.
- Wait until the radio has received the information.
OFF AIR
• The channel currently selected has stopped broadcasting.
- Select another channel.
Indication for CD Changer (Optional)
HI TEMP
• Protective circuit is activated due to high temperature.
- The indicator will disappear when the temperature returns to
within operation range.
ERROR - 01
• Malfunction in the CD Changer.
- Consult your Alpine dealer. Press the magazine eject
button and pull out the magazine.
Check the indication. Insert the magazine again.
If the magazine cannot be pulled out, consult your Alpine
dealer.
• Magazine ejection not possible.
- Press the magazine eject button. If the magazine does
not eject, consult your Alpine dealer.
ERROR - 02
• A disc is left inside the CD Changer.
- Press the Eject button to activate the eject function. When the
CD Changer finishes the eject function, insert an empty CD
magazine into the CD Changer to receive the disc left inside
the CD Changer.
NO MAGZN
– – – –
• The user has selected a Channel Number that does not exist or
is not subscribed to.
- The unit will revert back to the previously selected channel.
• There is no artist name/feature, song/program title, or
additional information associated with the channel at that time.
- No action needed.
• No magazine is loaded into the CD Changer.
- Insert a magazine.
NO DISC
• No indicated disc.
- Choose another disc.
16-EN
Page 19

Specifications
RF MODULATOR SECTION
RF Output Frequency (Selectable)
RF Output Voltage 70 dBµV
RF Modulator Input Sensitivity/Impedance
REMOTE CONTROL
Battery Type AAA batteries (2 pcs.)
Width 42 mm (1-21/32")
Height 121 mm (4-25/32")
Depth 23 mm (29/32")
Weight 50 g (1.8 oz)
REMOTE DISPLAY UNIT
Width 113 mm (4-7/16")
Height 39.5 mm (1-9/16")
Depth 19 mm (25/32")
Weight 200 g (7 oz)
FM MODULATOR UNIT
Width 130 mm (5-1/8")
Height 35 mm (1-3/8")
Depth 74 mm (2-15/16")
Weight 380 g (13.4 oz)
XM TUNER UNIT
Width 180 mm (7-1/8")
Height 35 mm (1-3/8")
Depth 160 mm (6-1/4")
Weight 812 g (28 oz)
87.7 – 89.9 MHz
500 mV/10 k Ohms
Due to continuous product improvement, specifications and design
are subject to change without notice.
17-EN
Page 20

Installation and Connections
Before installing or connecting the unit, please read the
following and pages 2 of this manual thoroughly for
proper use.
Warning
MAKE THE CORRECT CONNECTIONS.
Failure to make the proper connections may result in fire or
product damage.
USE ONLY IN CARS WITH A 12 VOLT NEGATIVE GROUND.
(Check with your dealer if you are not sure.) Failure to do so may
result in fire, etc.
BEFORE WIRING, DISCONNECT THE CABLE FROM THE
NEGATIVE BATTERY TERMINAL.
Failure to do so may result in electric shock or injury due to
electrical shorts.
DO NOT ALLOW CABLES TO BECOME ENTANGLED IN
SURROUNDING OBJECTS.
Arrange wiring and cables in compliance with the manual to
prevent obstructions when driving. Cables or wiring that obstruct
or hang up on places such as the steering wheel, gear lever, brake
pedals, etc. can be extremely hazardous.
DO NOT SPLICE INTO ELECTRICAL CABLES.
Never cut away cable insulation to supply power to other
equipment. Doing so will exceed the current carrying capacity of
the wire and result in fire or electric shock.
DO NOT DAMAGE PIPE OR WIRING WHEN DRILLING
HOLES.
When drilling holes in the chassis for installation, take
precautions so as not to contact, damage or obstruct pipes, fuel
lines, tanks or electrical wiring. Failure to take such precautions
may result in fire.
DO NOT USE BOLTS OR NUTS IN THE BRAKE OR
STEERING SYSTEMS TO MAKE GROUND CONNECTIONS.
Bolts or nuts used for the brake or steering systems (or any other
safety-related system), or tanks should NEVER be used for
installations or ground connections. Using such parts could
disable control of the vehicle and cause fire etc.
KEEP SMALL OBJECTS SUCH AS BATTERIES OUT OF THE
REACH OF CHILDREN.
Swallowing them may result in serious injury.
If swallowed, consult a physician immediately.
DO NOT INSTALL IN LOCATIONS WHICH MIGHT HINDER
VEHICLE OPERATION, SUCH AS THE STEERING WHEEL
OR GEARSHIFT.
Doing so may obstruct forward vision or hamper movement etc.
and results in serious accident.
DO NOT INSTALL THE REMOTE DISPLAY UNIT NEAR THE
PASSENGER SEAT AIR BAG.
If the unit is not installed correctly the air bag may not function
correctly and when triggered the air bag may cause the Remote
display unit to spring upwards causing an accident and injuries.
DO NOT BLOCK VENTS OR RADIATOR PANELS.
Doing so may cause heat to build up inside and may result in fire.
Caution
HAVE THE WIRING AND INSTALLATION DONE BY
EXPERTS.
The wiring and installation of this unit requires special technical
skill and experience. To ensure safety, always contact the dealer
where you purchased this product to have the work done.
USE SPECIFIED ACCESSORY PARTS AND INSTALL THEM
SECURELY.
Be sure to use only the specified accessory parts. Use of other than
designated parts may damage this unit internally or may not securely
install the unit in place. This may cause parts to become loose
resulting in hazards or product failure.
ARRANGE THE WIRING SO IT IS NOT CRIMPED OR
PINCHED BY A SHARP METAL EDGE.
Route the cables and wiring away from moving parts (like the
seat rails) or sharp or pointed edges. This will prevent crimping and
damage to the wiring. If wiring passes through a hole in metal, use a
rubber grommet to prevent the wire’s insulation from being cut by
the metal edge of the hole.
DO NOT INSTALL IN LOCATIONS WITH HIGH MOISTURE
OR DUST.
Avoid installing the unit in locations with high incidence of
moisture or dust. Moisture or dust that penetrates into this unit
may result in product failure.
Precautions
• Be sure to disconnect the cable from the (–) battery post before
installing your XMA-T200RF. This will reduce any chance of
damage to the unit in case of a short-circuit.
• Be sure to connect the color coded leads according to the
diagram. Incorrect connections may cause the unit to
malfunction or damage to the vehicle's electrical system.
• When making connections to the vehicle's electrical system, be
aware of the factory installed components (e.g. on-board
computer). Do not tap into these leads to provide power for this
unit. When connecting the XMA-T200RF to the fuse box, make
sure the fuse for the intended circuit of the XMA-T200RF has the
appropriate amperage. Failure to do so may result in damage to
the unit and/or the vehicle. When in doubt, consult your ALPINE
dealer.
IMPORTANT
Please record the serial number of your unit in the space
provided below and keep it as a permanent record. The serial
number plate is located on the bottom of the unit.
SERIAL NUMBER:
INSTALLATION DATE:
INSTALLATION TECHNICIAN:
PLACE OF PURCHASE:
18-EN
Page 21

Installation
Installing the Remote Display Unit
CAUTION:
Do not install the remote display unit near the air-bag of
the front passenger's seat.
• Check the installing location.
• Determine the installing location on the dashboard
(in the center, and flat position).
• Installation using Velcro tape
• In case of installing the remote display unit with the
VelcroTM tape attached, cut the tape into two pieces.
1. Without separating the two pieces of Velcro tape,
peel off the paper backing on one side and place on
the back of the remote display unit.
NOTE
Take care not to cover the caution label on the remote display
unit with the tape.
2. Make sure the location selected is free from
moisture or dirt. Peel off the backing paper from the
other side of the Velcro tape on the Remote Display.
•Installation using flush mount and
bracket mount
1. Make a hole to match the external dimensions of
bracket mount on the installation location of the
dashboard.
2. Insert the remote display unit into the flush mount to
lock securely.
3. Insert the remote display unit and flush mount
combined into the bracket mount and fix them.
4. Insert the remote display unit, flush mount and
bracket mount combined into the hole made at step
1 and fix them.
Bracket Mount (Included)
Flush Mount (Included)
Dashboard
3. Place the remote display unit on the installing
location and push the unit to fix securely.
Velcro Tape
• Installation using flush mount
1. After determining the installing location, install the
flush mount with screws (M2.9 x 20).
2. Insert the remote display unit into the flush mount to
lock securely.
NOTE
To remove the remote display from flush mount, please use thin
plate such as a plastic card to insert to either side of the remote
display carefully. Then the remote display will be released.
Flush Mount (included)
Dashboard
Tapping Screws (M2.9 × 20)
(Included)
Installing the FM Modulator Box
The FM Modulator Box can be mounted to any flat
surface using the Velcro tape.
Velcro Tape (Included)
Installing the XM Tuner Box
•Install the unit
1. Using the unit as a template, hold it at its mounting
location and mark the holes to be drilled. Before
drilling, make sure that there are no objects that
could be damaged behind the mounting surface.
2. Drill holes and secure the unit with self-tapping
screws (M4 x 14) supplied.
NOTE
An antenna is required for the proper operation of this
receiver. This antenna must be purchased separately. The
TUA-T020XM receiver can use any antenna that is designed
specifically for the XM receiver. Please follow the installation
instructions supplied with the antenna.
Screws
(M4 × 14)
(Included)
19-EN
Page 22

Installation and Connections
Connections
Remote Display Unit
1
Antenna
FM Modulator Box
65 4
(Yellow) (Green)
(L-ch) (R-ch)
#
OUTPUT INPUT
%$
XM Tuner Box
(
&
9
7
8
!
"
8
!
)
32
Ignition Key
VCR or GAME, etc.
(Sold Separately)
CD Changer
(Sold Separately)
Factory Head
Unit, etc.
Battery
1 Antenna Receptacle
2 FM Modulator Antenna Cable
3 Head Unit's Antenna Receptacle
4 AUX Input Terminals
5 Ai-NET Connector
6 Remote Display Connector
7 Switched Power Lead (Ignition) (Red)
Connect this lead to an open terminal on the vehicle's fuse
box or another unused power source which provides (+)12V
only when the ignition is turned on or in the accessory
position.
8 Battery Lead (Yellow)
Connect this lead to the positive (+) post of the vehicle's
battery.
9 Fuse Holder (5A)
To prevent external noise from entering the audio system.
• Locate the unit and route the leads at least 10 cm away from the car harness.
• Keep the battery power leads as far away from other leads as possible.
• Connect the ground lead securely to a bare metal spot (remove any paint, dirt or grease if necessary) of the car chassis.
• If you add an optional noise suppressor, connect it as far away from the unit as possible. Your Alpine dealer carries various noise suppressors, contact
them for further information.
• Your Alpine dealer knows best about noise prevention measures so consult your dealer for further information.
! Ground Lead (Black)
Connect this lead to a good chassis ground on the vehicle.
Make sure the connection is made to bare metal and is
securely fastened using the sheet metal screw provided.
" RCA Extension Cable (Sold Separately)
# Ai-NET Cable (Included)
$ Ai-NET (OUTPUT) Connector
% Ai-NET (INPUT) Connector
Connect this to the output or input connector of other
product (CD Changer, Versatile Link Terminal) equipped
with Ai-NET.
& Ai-NET Cable (Included with CD Changer)
( Fuse Holder (7.5A)
) Antenna (Sold Separately)
20-EN
Page 23

LIMITED WARRANTY
ALPINE ELECTRONICS OF AMERICA, INC. AND ALPINE OF CANADA INC. ("Alpine"), are dedicated to quality
craftsmanship and are pleased to offer this Warranty. We suggest that you read it thoroughly. Should you have any
questions, please contact your Dealer or Alpine at one of the telephone numbers listed below.
[[
[PRODUCTS COVERED:
[[
This Warranty covers Car Audio/Visual Products and
Related Accessories ("the product"). Products purchased in
the Canada are covered only in the Canada. Products
purchased in the U.S.A. are covered only in the U.S.A.
[[
[LENGTH OF WARRANTY:
[[
This Warranty is in effect for one year from the date of the
first consumer purchase.
[[
[LIFETIME TAPE HEAD WARRANTY:
[[
All Alpine Car Audio analog tape heads excluding Video
tape heads are warranted for life against manufacturing
defects causing failure.
[[
[WHO IS COVERED:
[[
This Warranty only covers the original purchaser of the
product, who must reside in the United States, Puerto Rico
or Canada.
[[
[WHAT IS COVERED:
[[
This Warranty covers defects in materials or workmanship
(parts and labor) in the product.
[[
[WHAT IS NOT COVERED:
[[
This Warranty does not cover the following:
1 Damage occurring during shipment of the product to
Alpine for repair (claims must be presented to the
carrier).
2 Damage caused by accident, abuse, negligence,
misuse, improper connections, improper operation or
failure to follow instructions contained in the Owner's
manual.
3 Damage caused by act of God, including without
limitation, earthquake, fire, flood, storms or other acts of
nature.
4 Any cost or expense related to the removal or
reinstallation of the product.
5 Service performed by an unauthorized person, company
or association.
6 Any product which has the serial number defaced,
altered or removed.
7 Any product which has been adjusted, altered or
modified without Alpine's consent.
8 Any product not distributed by Alpine within the United
States, Puerto Rico or Canada.
9 Any product not purchased from an Authorized Alpine
Dealer.
! Any product that has been determined to contain an
excessive amount of dust or dirt and any product that
contains other contaminants including liquid or foreign
objects.
[[
[HOW TO OBTAIN WARRANTY SERVICE:
[[
1 You are responsible for delivery of the product to an
Authorized Alpine Service Center or Alpine for repair
and for payment of any initial shipping charges. Alpine
will, at its option, repair or replace the product with a
new or reconditioned product without charge. If the
repairs are covered by the warranty, and if the product
was shipped to an Authorized Alpine Service Center or
Alpine, Alpine will pay the return shipping charges.
2 You should provide a detailed description of the
problem(s) for which service is required.
3 You must supply proof of your purchase of the product.
4 You must package the product securely to avoid
damage during shipment.
[[
[HOW WE LIMIT IMPLIED WARRANTIES:
[[
ANY IMPLIED WARRANTIES INCLUDING FITNESS FOR
USE AND MERCHANTABILITY ARE LIMITED IN
DURATION TO THE PERIOD OF THE EXPRESS
WARRANTY SET FORTH ABOVE AND NO PERSON IS
AUTHORIZED TO ASSUME FOR ALPINE ANY OTHER
LIABILITY IN CONNECTION WITH THE SALE OF THE
PRODUCT.
[[
[HOW WE EXCLUDE CERTAIN DAMAGES:
[[
ALPINE EXPRESSLY DISCLAIMS LIABILITY FOR
INCIDENTAL AND CONSEQUENTIAL DAMAGES
CAUSED BY THE PRODUCT. THE TERM "INCIDENTAL
DAMAGES" REFERS TO EXPENSES OF
TRANSPORTING THE PRODUCT TO THE ALPINE
SERVICE CENTER, LOSS OF THE ORIGINAL
PURCHASER'S TIME, LOSS OF THE USE OF THE
PRODUCT, BUS FARES, CAR RENTALS OR OTHERS
COSTS RELATING TO THE CARE AND CUSTODY OF
THE PRODUCT. THE TERM "CONSEQUENTIAL
DAMAGES" REFERS TO THE COST OF REPAIRING OR
REPLACING OTHER PROPERTY WHICH IS DAMAGED
WHEN THIS PRODUCT DOES NOT WORK PROPERLY.
THE REMEDIES PROVIDED UNDER THIS WARRANTY
ARE EXCLUSIVE AND IN LIEU OF ALL OTHERS.
[[
[HOW STATE/PROVINCIAL LAW RELATES TO THE
[[
WARRANTY:
This Warranty gives you specific legal rights, and you may
also have other rights which vary form state to state and
province to province. In addition, some states/provinces do
not allow limitations on how long an implied warranty lasts,
and some do not allow the exclusion or limitation of
incidental or consequential damages. Accordingly,
limitations as to these matters contained herein may not
apply to you.
[[
[IN CANADA ONLY:
[[
This Warranty is not valid unless your Alpine car audio
product has been installed in your vehicle by an Authorized
Installation Center, and this warranty stamped upon
installation by the installation center.
[[
[HOW TO CONTACT CUSTOMER SERVICE:
[[
Should the product require service, please call the following
number for your nearest Authorized Alpine Service Center.
U.S.A. 1-800-ALPINE-1 (1-800-257-4631)
CANADA 1-800-ALPINE-1 (1-800-257-4631)
Alpine Electronics of America, Inc., 19145 Gramercy Place, Torrance, California 90501, U.S.A.
Alpine Electronics of Canada, Inc., Suite 203, 7300 Warden Ave. Markham, Ontario, L3R 9Z6, Canada
Page 24

Índice
ESPAÑOL
Manual de instrucciones
ADVERTENCIA
ADVERTENCIA ......................................... 2
PRUDENCIA.............................................. 2
PRECAUCIONES ...................................... 2
Operación básica
Puesta en funcionamiento inicial del sistema .... 3
Conexión y desconexión de la alimentación...... 3
Ajuste de la frecuencia del modulador ..............3
Escuchar la radio ................................................ 3
Operación de la radio XM
Recepción de los canales XM con
el receptor XM ..............................................4
Comprobación del número ID de radio XM ......4
Memorización de canales de XM ...................... 5
Recepción de canales de XM almacenadas ....... 5
Búsqueda por categoría ...................................... 5
Cambio de la indicación .................................... 5
Operación del SETUP
Ajuste de desplazamiento .................................. 6
Ajuste del modo AUX (V-Link) ......................... 6
Demostración .....................................................7
Ajuste del nivel de volumen de la
entrada externa (AUX LEVEL) .................... 7
Ajuste del nivel de volumen del cambiador
(CHG LEVEL) .............................................. 7
Ajuste del nivel XM (XM LEVEL) ...................7
Operación del cambiador de discos
compactos (Opcional)
Control de un cambiador de
discos compactos ........................................ 10
Sensor de música (Salto).................................. 10
Avance rápido o retroceso ................................ 10
Reproducción con repetición ........................... 10
M.I.X. (Reproducción aleatoria) ...................... 11
Escaneo de programas .....................................11
Selección de cambiador múltiple .....................11
Utilización de cambiador de MP3
(Opcional)
Reproducción de archivos MP3 .......................12
Sensor de música (Salto).................................. 12
Avance rápido o retroceso ................................ 12
Selección de carpetas .......................................12
Búsqueda de archivos....................................... 12
Reproducción con repetición ........................... 13
M.I.X. (Reproducción aleatoria) ...................... 13
Escaneo de programas .....................................13
Ajuste del margen de selección
de archivos MP3.......................................... 13
Reproducción de datos MP3 ............................13
Operaciones con el control remoto
Reemplazo de las pilas ..................................... 14
Información
En caso de dificultad ........................................ 15
Especificaciones............................................... 17
Operación del título/texto
Visualización del título/texto ............................. 8
Asignación de nombre a discos .........................9
Borrado de títulos del disco ............................... 9
Ubicación y conexiones
Advertencia ......................................................18
Prudencia ......................................................... 18
Precauciones .................................................... 18
Instalación ........................................................19
Conexiones ....................................................... 20
1-ES
Page 25

ADVERTENCIA
ADVERTENCIA
Este símbolo indica que las instrucciones son
importantes. De no tenerse en cuenta, podría
ocasionarse heridas graves o muerte.
NO REALICE NINGUNA OPERACIÓN QUE PUEDA
DISTRAER SU ATENCIÓN Y COMPROMETER LA
SEGURIDAD DURANTE LA CONDUCCIÓN DEL VEHÍCULO.
Las operaciones que requieren su atención durante más tiempo
sólo deben realizarse después de detener completamente el
vehículo. Estacione el vehículo en un lugar seguro antes de
realizar dichas operaciones. De lo contrario, podría ocasionar un
accidente.
MANTENGA EL VOLUMEN A UN NIVEL QUE NO LE IMPIDA
ESCUCHAR LOS SONIDOS DEL EXTERIOR MIENTRAS
CONDUCE.
De no ser así, podría ocasionar un accidente.
REDUZCA AL MÁXIMO LA VISUALIZACIÓN DE LA
PANTALLA MIENTRAS CONDUCE.
El conductor puede distraer su atención de la carretera mientras
mira la pantalla y ocasionar un accidente.
NO DESMONTE NI ALTERE LA UNIDAD.
Si lo hace, podrá ocasionar un accidente, un incendio o una
descarga eléctrica.
PRUDENCIA
Este símbolo indica que las instrucciones son
importantes. De no tenerse en cuenta, podría
ocasionarse heridas graves o daños materiales.
DEJE DE USAR LA UNIDAD INMEDIATAMENTE SI
APARECE ALGÚN PROBLEMA.
Su uso en estas condiciones podría ocasionar lesiones personales
o daños al producto. Lleve la unidad a un distribuidor Alpine
autorizado o al Centro de servicio Alpine más próximo para
repararla.
NO MEZCLE PILAS NUEVAS CON VIEJAS. INSERTELAS
CON LAS POLARIDADES CORRECTAMENTE ORIENTADAS.
Cuando las inserte en su compartimento, cerciórese de colocarlas
con las polaridades (+ y –) como se indica. La rotura o la fuga de
sustancias químicas de la batería podrá ocasionar un incendio o
heridas personales.
PRECAUCIONES
Temperatura
Cerciórese de que la temperatura del interior de vehículo esté
entre +60°C (+140°F) y –10°C (+14°F) antes de conectar la
alimentación de la unidad.
UTILICE LA UNIDAD SOLAMENTE EN VEHÍCULOS QUE
TENGAN 12 VOLTIOS CON NEGATIVO A MASA.
(Consulte a su distribuidor en caso de duda.) De no ser así, podría
ocasionar un incendio, etc.
MANTENGA LOS OBJETOS PEQUEÑOS, COMO LAS
PILAS, FUERA DEL ALCANCE DE LOS NIÑOS.
La ingestión de estos objetos puede provocar lesiones graves. Si esto
ocurre, consulte con un médico inmediatamente.
UTILICE EL AMPERAJE CORRECTO CUANDO CAMBIE
FUSIBLES.
De lo contrario, puede producirse un incendio o una descarga
eléctrica.
UTILICE ESTE PRODUCTO CON APLICACIONES MÓVILES
DE 12 V.
Si se emplea para otra aplicación distinta de la prevista, podría
producirse un incendio, una descarga eléctrica u otras lesiones.
Mantenimiento
Si tiene problemas, no intente reparar la unidad por sí mismo.
Devuélvala a su proveedor Alpine o a la estación de servicio
Alpine para que se la reparen.
2-ES
Page 26

Operación básica
POWER SETUP
)
(
RESET
<Pantalla remota>
Codificador rotatorio
Puesta en funcionamiento inicial
del sistema
Asegúrese de pulsar el interruptor RESET cuando utilice la
unidad por primera vez, después de instalar el cambiador
de CD, etc. o después de cambiar la batería del coche.
1 Asegúrese de que la alimentación de la unidad está
desactivada.
Si la alimentación está activada, pulse el botón
POWER para apagar la unidad. (En el mando a
distancia, pulse y mantenga pulsado el botón POWER
durante al menos 2 segundos.)
2 Presione el interruptor RESET utilizando un bolígrafo o
cualquier otro objeto puntiagudo.
Conexión y desconexión de la
alimentación
1 Presione el botón POWER de la pantalla remota o del
mando a distancia para encender la unidad.
NOTA
La unidad se puede encender pulsando cualquier botón de la
pantalla remota.
El nivel del volumen aumenta de forma gradual hasta
llegar al nivel previo a la desconexión de la unidad.
Presione el botón POWER del mando a distancia o
mantenga pulsado el botón POWER de la pantalla
remota durante aproximadamente 2 segundos para
apagar la unidad.
NOTAS
• Al conectar y desconectar la unidad mediante el botón
POWER, asegúrese de bajar el nivel del volumen de la radio
de serie. Esto evitará la presencia de ruidos eléctricos en el
sistema.
• Cuando se haya asegurado de que todas las conexiones son
correctas, puede encender la unidad.
• Si las frecuencias de esta unidad y las de la unidad principal
especificada son las mismas, al conectar la unidad se
producirá un sonido de notificación. No se trata de un mal
funcionamiento.
POWER
8
gf
9
SETUP
<Mando a distancia>
Ajuste de la frecuencia del modulador
1 Presione el botón SETUP de la pantalla remota o del
mando a distancia durante un tiempo mínimo de 2
segundos.
2 Gire el codificador rotatorio de la pantalla remota o
pulse el botón 8 ó 9 del mando a distancia para
introducir el modo de ajuste de frecuencia (muestra la
frecuencia).
3 Presione el botón ( ó ) de la pantalla remota o
el botón g ó f del controlador remoto para
ajustar la frecuencia.
La frecuencia varía en 200 kHz (0,2 MHz) pasos de
87,7 a 89,9 MHz.
4 Presione el botón SETUP de la pantalla remota o del
controlador remoto para volver al modo normal.
NOTAS
• Seleccione una frecuencia que ninguna emisora local y
potente de FM utilice. Evitará interferencias mientras
escuche un CD.
• Par escuchar una emisión de FM, baje el volumen de la radio
y desconecte la unidad XMA-T200RF. Sintonice la emisora de
radio deseada y ajuste el volumen según sus preferencias.
• La unidad sale de fábrica con este ajuste en 88,7 MHz.
SUGERENCIAS
Si conecta la unidad al dispositivo opcional DHA-S680, ajuste
Ai-NET SETUP del DHA-S680 en la posición “CD-CHG”. Para
obtener más información sobre su funcionamiento, consulte el
manual de operación del DHA-S680.
Escuchar la radio
1 Para escuchar la radio de serie, desconecte la unidad
de pantalla remota o el controlador remoto pulsando el
botón POWER.
NOTAS
• Cuando ajuste la unidad de modulación en una frecuencia
que no tenga emisiones FM, el sistema de audio puede
producir algunos ruidos desagradables cuando se detiene la
reproducción del CD.
• Con el modulador de FM conectado se producirá una ligera
pérdida en la fuerza de la señal de radio.
3-ES
Page 27

Operación de la radio XM
)
SOURCE
DISP/SETUP
SOURCE
g
-/J
BAND
8
f
9
<Pantalla remota>
34
Codificador rotatorio(
Recepción de los canales XM con el
receptor XM
La radio XM vía satélite∗ constituye la próxima
generación de entretenimiento de audio, con un máximo
de 100 canales completamente nuevos de calidad
digital. A cambio de una pequeña cuota mensual, los
abonados podrán disfrutar de música, deportes, noticias
y tertulias vía satélite con un sonido muy nítido, estén
donde estén. Si desea obtener más información, visite
el sitio Web de XM en www.xmradio.com o llame al 1800-852-9696.
* XM y los logotipos correspondientes son marcas
registradas de XM Satellite Radio Inc.
NOTAS
• Los controles de XMA-T200RF para el funcionamiento
del receptor XM sólo están operativos cuando hay un
receptor XM conectado.
• La banda XM1 o XM2 se ilumina cuando está activado
el modo XM.
1 Primero, consulte “Ajuste de la frecuencia del
modulador” (página 3) y ajuste la frecuencia.
2 Presione el botón SOURCE de la pantalla remota o del
controlador remoto para seleccionar el modo RADIO.
3 Presione el botón BAND de la controlador remoto para
seleccionar XM1 o XM2.
4 Gire el codificador rotatorio de la pantalla remota o
presione el botón g o f del controlador remoto
para seleccionar el canal deseado. Si pulsa el botón
( o ) de la pantalla remota o el botón g o
f del controlador remoto se cambiarán los canales
continuamente.
NOTA
Puede pulsar el botón ( o ) de la pantalla remota para
seleccionar el canal deseado.
DISP/
SETUP
<Mando a distancia>
Comprobación del número ID de radio XM
Es necesario proporcionar a XM el número ID de radio
XM exclusivo de su receptor de radio XM para
suscribirse al programa de XM.
Se trata de un número alfanumérico de 8 caracteres
que aparece impreso en una etiqueta directamente
sobre el receptor XM.
También puede mostrarse en la pantalla de XMAT200RF de la siguiente forma.
Se muestra solamente cuando se ha conectado un XM
Satellite Radio Receiver (TUA-T020XM).
1 Mientras se recibe XM1/XM2, gire el codificador
rotatorio de la pantalla remota o presione el botón
g o f del controlador remoto para seleccionar el
canal "0".
NOTA
También puede pulsar el botón ( ó ) de la pantalla
remota para cambiar el canal.
2 La unidad muestra alternativamente "RADIO ID"
durante 2 segundos y el número de ID durante 10
segundos.
3 Para cancelar la presentación del número de ID, ajuste
el canal en un número que no sea "0".
SUGERENCIAS
Hay otra manera de visualizar el número de ID.
1. Presione y mantenga presionado el botón SETUP de la
pantalla remota o del controlador remoto durante al menos 2
segundos.
2. Gire el codificador rotatorio de la pantalla remota o
presione el botón 8 ó 9 del controlador remoto para
seleccionar "RADIO ID".
3. Presione el botón ( o ) de la pantalla remota o el
botón g o f del controlador remoto para mostrar el
número de ID.
4. Después de comprobar el número de ID, presione el botón
SETUP de la pantalla remota o del controlador remoto para
volver a la indicación normal.
NOTAS
• No puede utilizar "O", "S", " I" o "F" para el número de ID.
• Puede comprobar el número de ID impreso en la etiqueta en el
paquete de XMA-T200RF.
4-ES
Page 28

Memorización de canales de XM
1 Presione el botón BAND de la controlador remoto para
seleccionar la banda (XM1 o XM2) que desee
almacenar.
2 Después de sintonizar el canal deseado, pulse y
mantenga pulsado el codificador rotatorio de la
pantalla remota durante al menos 2 segundos hasta
que el nombre del canal de la pantalla parpadee.
3 Gire el codificador rotatorio de la pantalla remota
para seleccionar el número preseleccionado que
desea utilizar.
4 Presione el codificador rotatorio de la pantalla
remota para almacenar el canal mientras la pantalla
del nombre del canal parpadee (antes de 5 segundos).
La pantalla deja de parpadear en cuanto se ha
memorizado el canal. La pantalla muestra
memorizados la banda, el número de preselección y el
nombre del canal.
5 Repita el procedimiento para almacenar hasta 5
canales más en la misma banda.
Para utilizar este procedimiento para otras bandas,
simplemente seleccione la banda que desee y repita el
procedimiento.
Es posible almacenar un total de 12 canales en la
memoria (6 canales para cada banda, XM1 y XM2).
NOTA
Si almacena una emisora en una posición de memoria que ya
contiene un canal, el canal actual se borra y se sustituye por el
nuevo.
Recepción de canales de XM
almacenadas
1 Presione el botón BAND de la controlador remoto para
seleccionar la banda que desee (XM1 o XM2).
2 Presione el botón 4 o 3 de la pantalla remota, o el
botón 8 o 9 del mando a distancia para buscar el
canal predefinido deseado.
Búsqueda por categoría
2 Mientras se muestra la categoría, gire el codificador
rotatorio de la pantalla remota, o presione el botón
g o f del controlador remoto para seleccionar
una categoría distinta (o deje de pulsar el botón para
permanecer en la misma categoría).
NOTA
También puede pulsar el botón ( o ) de la pantalla
remota para seleccionar una categoría.
3 Antes de que transcurran los 13 segundos de la
selección de la categoría, presione el codificador
rotatorio de la pantalla remota o el botón -/J del
controlador remoto nuevamente para seleccionar el
siguiente canal dentro de la categoría. Presione
repetidamente el codificador rotatorio de la pantalla
remota o el botón -/J del controlador remoto en
menos de 13 segundos para seleccionar canales
adicionales dentro de dicha categoría.
Cuando se sintoniza, la categoría se muestra durante
13 segundos y, a continuación, el visualizador vuelve
al modo normal.
NOTAS
• Si no encuentra la categoría que desea, el visualizador
muestra "
----
• Para salir del modo de búsqueda por categoría, mantenga
pulsado el codificador rotatorio de la pantalla remota o el
botón -/J del mando a distancia durante 2 segundos como
mínimo. También puede esperar 13 segundos hasta que el
receptor vuelva al modo de búsqueda de canal normal.
" automáticamente durante 2 segundos.
Cambio de la indicación
La información de texto, como por ejemplo el nombre
del canal, la característica o nombre del artista y el título
del programa o canción, está disponible en la mayoría
de canales XM. La unidad puede mostrar esta
información de texto como se explica a continuación.
1 En el modo XM, presione el botón DISP de la pantalla
remota o del controlador remoto.
Cada vez que se pulsa este botón, el visualizador
cambia de la siguiente forma.
Indicación
de nombre
de canal
→→→
Indicación
de nombre
de artista
Indicación
de título de
canción
Los canales se dividen en categorías. Búsqueda por
categoría permite buscar un canal específico según su
categoría. También es posible realizar búsquedas de
todos los canales de una categoría en particular.
1 En el modo XM, presione el codificador rotatorio de
la pantalla remota o el botón -/J del controlador
remoto para mostrar la categoría del canal
seleccionado actualmente durante 13 segundos.
NOTAS
• En función del modelo, la pantalla puede ser distinta a la que
aparece anteriormente.
• Mantenga presionado el botón TITLE (en el ajuste “SCR
OFF”) del mando a distancia durante 2 segundos como
mínimo para que la pantalla se desplace sólo una vez cuando
un título exceda los 8 caracteres.
• Cuando el ajuste de desplazamiento (consulte la página 6) se
ajusta en “SCR ON”, la pantalla se desplaza sólo cuando se
introduce un título de más de 8 caracteres.
La pantalla se desplaza una vez en el ajuste “SCR OFF”
cuando un título excede los 8 caracteres y cuando se realiza
la operación (encendido, cambio de disco, etc.).
5-ES
Page 29

Operación del SETUP
)
(
SOURCE
34
SETUP Codificador rotatorio
<Pantalla remota>
Ajuste de desplazamiento
Si la unidad está conectada a un sintonizador XM,
podrá desplazar el nombre del canal, la categoría, el
artista y el título de la canción. Si esta unidad está
conectada a un cambiador de CD, puede desplazarse por
el disco y buscar nombre grabados en discos CD-TEXT,
así como información de texto de archivos MP3, nombres
de carpetas y fichas ID3.
1 Presione y mantenga pulsado el botón SETUP de la
pantalla remota o del controlador remoto durante al
menos 2 segundos.
2 Gire el codificador rotatorio de la pantalla remota hacia
la izquierda o hacia la derecha o bien presione el botón
8 ó 9 del controlador remoto para seleccionar "SCR".
3 Presione el botón ( ó ) de la pantalla remota o
el botón g ó f del controlador remoto para
seleccionar "SCR OFF" o "SCR ON".
• SCR ON: se desplazan automáticamente el nombre
del canal, la categoría, el artista y el título de la
canción (sintonizador XM), la información de texto
de CD, la información de texto de los nombres de
archivo y de carpeta y los indicadores ID3.
• SCR OFF: la pantalla se desplaza una vez cuando
se carga un disco o se cambia una pista, etc.
(Sin embargo, la pantalla se desplaza sólo cuando
un nombre excede los 8 caracteres.)
4 Cuando se haya completado el ajuste, presione el
botón SETUP de la pantalla remota o del controlador
remoto para volver al modo normal.
NOTA
Se desplazarán el nombre del canal, la categoría, el artista y el
título de la canción (sintonizador XM), los nombres de texto de
CD, los nombres de carpeta o los indicadores ID3 que
sobrepasen los 8 caracteres. Los títulos de discos introducidos
manualmente (consulte la página 9) no pueden desplazarse.
Ajuste del modo AUX (V-Link)
Es posible introducir sonido de un televisor/vídeo
conectando un Versatile Link Terminal (KCA-410C)
opcional a este componente.
SOURCE
8
g
<Mando a distancia>
f
9
SETUP
1 Presione y mantenga pulsado el botón SETUP de la
pantalla remota o del controlador remoto durante al
menos 2 segundos.
2 Gire el codificador rotatorio de la pantalla remota o
presione el botón 8 ó 9 del controlador remoto para
seleccionar "AUX".
3 Presione el botón ( ó ) de la pantalla remota o
el botón g ó f del controlador remoto para
seleccionar "AUX ON".
OFF:
No es posible seleccionar una fuente de sonido externa.
ON:
Es posible seleccionar una fuente de sonido externa.
Asimismo, es posible elegir un AUX para la entrada
externa∗:
∗ Gire el codificador rotatorio de la pantalla remota o
presione el botón 8 ó 9 del controlador remoto para
seleccionar su nombre preferido entre AUX, MP3,
TV, VCR, y GAME.
AUX
Puede seleccionar y fijar un nombre para la entrada
externa cuando el Versatile Link Terminal (KCA-410C)
no está conectado.
A1 AUX / A2 AUX
Puede seleccionar un AUX NAME cuando el Versatile
Link Terminal (KCA-410C) está conectado.
NOTA
Al conectar el Versatile Link Terminal (KCA-410C), es posible
ajustar dos indicaciones del modo AUX.
4 Cuando se haya completado el ajuste, presione el
botón SETUP de la pantalla remota o del controlador
remoto para volver al modo normal.
5 Para ajustar el volumen, etc., primero presione el
botón SOURCE de la pantalla remota o del controlador
remoto, seleccione el modo AUX y realice los ajustes
necesarios.
NOTA
Si utiliza el Versatile Link Terminal (KCA-410C), podrá conectar
dos entradas externas. Para seleccionar el modo, presione el
botón BAND del controlador remoto.
6-ES
Page 30

Demostración
Esta unidad dispone de la característica de
demostración que simula las funciones de indicación.
1 Mantenga presionado el botón SETUP de la pantalla
remota o del controlador remoto durante 2 segundos
por lo menos.
2 Gire el codificador rotatorio de la pantalla remota
hacia la izquierda o hacia la derecha o presione el
botón 8 ó 9 del controlador remoto para seleccionar
"DEMO".
3 Presione el botón ( ó )de la pantalla remota o el
botón g ó f del controlador remoto para
conectar y desconectar el modo DEMO.
Si no presiona ningún botón durante 30 segundos, se
activa el modo DEMO.
NOTAS
•
La unidad sale de fábrica con este ajuste en "DEMO OFF".
• Para salir del modo DEMO, ajústelo en "DEMO OFF".
4 Presione de nuevo el botón SETUP de la pantalla
remota o del controlador remoto para recuperar el
funcionamiento normal.
Ajuste del nivel de volumen del
cambiador (CHG LEVEL)
Seleccione un nivel entre CHG LEVEL 1 y 4 para hacer
coincidir la salida del cambiador con las fuentes
internas de la unidad principal.
1 Mantenga presionado el botón SETUP de la pantalla
remota o del controlador remoto durante al menos 2
segundos.
2 Gire el codificador rotatorio de la pantalla remota o
presione el botón 8 ó 9 del controlador remoto para
seleccionar "CHG LEV".
NOTA
El nivel se muestra solamente si se ha conectado un cambiador.
3 Presione el botón ( ó ) de la pantalla remota o
el botón g ó f del controlador remoto para
ajustar el nivel de volumen deseado.
4 Presione el botón SETUP de la pantalla remota o del
controlador remoto para volver al modo normal.
NOTA
Si el sonido se distorsiona, reduzca el ajuste del volumen.
Ajuste del nivel de volumen de la
entrada externa (AUX LEVEL)
Seleccione un nivel entre AUX LEVEL 1 y 4 para hacer
coincidir la salida de una fuente exterior con las fuentes
internas de la unidad principal.
1 Presione el botón 4 ó 3 de la pantalla remota o el
botón 8 ó 9del controlador remoto para ajustar el
nivel de volumen deseado (AUX LEV 1 a 4).
NOTAS
• Puede seleccionar AUX LEVEL sólo cuando AUX esté
encendido en "Ajuste del modo AUX (V-Link)", en la página
6.
• Si el sonido se distorsiona, reduzca el ajuste del volumen.
SUGERENCIAS
También puede ajustar el nivel del volumen desde el modo
SETUP.
1. Mantenga presionado el botón SETUP de la pantalla remota
o del controlador remoto durante al menos 2 segundos.
2.
Gire el codificador rotatorio de la pantalla remota o
presione el botón 8 ó 9 del controlador remoto para
seleccionar "AUX LEV".
El nivel se muestra solamente cuando el modo AUX está en la
posición "AUX ON". (Consulte el apartado "Ajuste del modo
AUX " en la página 6.)
3. Presione el botón ( ó ) de la pantalla remota o el
botón g ó f del controlador remoto para ajustar el
nivel de volumen deseado.
4. Presione el botón SETUP de la pantalla remota o del
controlador remoto para volver al modo normal.
Ajuste del nivel XM (XM LEVEL)
Seleccione un nivel entre XM LEVEL 1 y 4 para hacer
coincidir la salida del receptor XM con las fuentes
internas de la unidad principal.
1 Mantenga presionado el botón SETUP de la pantalla
remota o del controlador remoto durante al menos 2
segundos.
2 Gire el codificador rotatorio de la pantalla remota o
presione el botón 8 ó 9 del controlador remoto para
seleccionar "XM LEV".
NOTA
El nivel se muestra solamente si se ha conectado un receptor
XM.
3 Presione el botón ( ó ) de la pantalla remota o
el botón g ó f del controlador remoto para
ajustar el nivel de volumen deseado.
4 Presione el botón SETUP de la pantalla remota o del
controlador remoto para volver al modo normal.
NOTA
Si el sonido se distorsiona, reduzca el ajuste del volumen.
7-ES
Page 31

Operación del título/texto
POWER
)
(
Codificador rotatorioDISP/SETUP
<Pantalla remota>
Visualización del título/texto
Es posible visualizar el título del disco compacto si el
título se ha introducido previamente. Para obtener
información detallada, consulte "Asignación de nombre
a discos" (página 9). La información de texto, como el
título de discos y canciones, aparecerá al reproducir
discos compactos compatibles con texto. También es
posible mostrar el nombre de la carpeta, del archivo y la
etiqueta ID3, etc. mientras se reproducen archivos MP3.
1 Presione el botón DISP de la pantalla remota o del
controlador remoto.
Cada vez que presione el botón cambiará el modo.
Acerca de "Título" y "Texto"
Título: Con este aparato se puede introducir el nombre del
Texto: Los CDs compatibles con texto contienen texto
compacto (consulte la página 9). Este nombre
introducido se denomina "título".
informativo tal como el nombre del disco y nombre
de las canciones. Este texto informativo se
denomina "texto".
Modo de discos compactos cambiador:
↓
VISUALIZACIÓN DEL TIEMPO TRANSCURRIDO
VISUALIZACIÓN DE TEXTO (NOMBRE DEL DISCO)
VISUALIZACIÓN DE TEXTO (NOMBRE DE LA CANCIÓN)
VISUALIZACIÓN DEL TÍTULO
↓
↓
↓
∗1
∗1
POWER
TITLE
8
gf
-/J
<Mando a distancia>
∗1
Se muestra durante la reproducción de un disco
con texto CD. Aparecerá "NO TEXT" cuando el CD
contenga datos no de texto.
∗2
Si un archivo MP3 contiene información de etiqueta
ID3, se mostrará toda la información de etiqueta
ID3 (p.ej., nombre de la canción, del artista y del
álbum). No se muestra otro tipo de información.
Aparece "NO TAG" cuando un archivo MP3 no
contiene información de etiqueta ID3.
∗3
Se muestra el índice de muestreo y velocidad de
bits de grabación del archivo MP3.
9
DISP/
SETUP
NOTAS
• Dependiendo del tipo de caracteres, algunos caracteres
podrán no visualizarse correctamente con este aparato.
• Para que la información de texto se visualice, el cambiador
de discos compactos debe ser también compatible con discos
compactos con texto.
• Cuando el ajuste de desplazamiento (consulte la página 6) se
encuentre en "SCR OFF", mantenga presionado el botón
TITLE del controlador remoto durante 2 segundos por lo
menos para desplazar la información de texto sólo una vez
(TEXT DISPLAY, FOLDER NAME DISPLAY, FILE NAME
DISPLAY o modo ID3 TAG DISPLAY).
• Aparece "NO SUPPORT" cuando la información de texto
deseada no puede mostrarse en esta unidad.
• Si el título no se ha introducido previamente, aparecerá
"NO TITLE".
Modo de cambiador de CD MP3:
↓
VISUALIZACIÓN DEL TIEMPO TRANSCURRIDO
INDICACIÓN DE NOMBRE DE CARPETA
INDICACIÓN DE NOMBRE DE ARCHIVO
INDICACIÓN DE ETIQUETA ID3
INDICACIÓN DE FOTOGRAMA
INDICACIÓN DE TÍTULO
↓
↓
↓
↓
↓
8-ES
∗2
∗3
Page 32

Asignación de nombre a discos
Es posible asignar nombre a los discos compactos que
desee.
1 Presione el botón DISP de la pantalla remota o el
controlador remoto y seleccione el modo de
visualización del título.
Para obtener más información, consulte "Visualización
del título/texto" (página 8).
2 Presione y mantenga pulsado el botón TITLE en el
controlador remoto durante al menos 2 segundos. El
primer carácter parpadeará.
3 Gire el codificador rotatorio de la pantalla remota
hacia la izquierda o hacia la derecha o bien presione el
botón g ó f del controlador remoto para
seleccionar la letra/el número/el símbolo disponible
para escribir el título.
NOTA
También puede pulsar el botón ( ó ) de la pantalla
remota para seleccionar la letra/el número/el símbolo deseado.
4 Presione el codificador rotatorio de la pantalla
remota o pulse el botón -/J del mando a distancia
para guardar el primer carácter. El primer carácter
dejará de parpadear y el indicador avanzará
automáticamente hasta el carácter siguiente. Cuando
este carácter empiece a parpadear, puede elegir la
siguiente letra o símbolo para el título.
5 Repita los anteriores pasos 3 a 4 para completar el
nombre del título. Girando el codificador rotatorio de
la pantalla remota o pulsando el botón -/J del
controlador remoto después de escribir el 8 carácter,
se guardará automáticamente el título en la memoria.
Después de escribir el título, el número de entrada del
título se muestra en la pantalla durante
aproximadamente 2 segundos.
1 / 150
Número escrito Número máximo de
títulos disponibles∗
NOTA
∗ El número máximo de títulos variará en función del
cambiador de CD utilizado.
Si desea almacenar un título de menos de 8 caracteres
(por ejemplo, el título de 3 caracteres):
Una vez que ha metido 3 caracteres para completar el
título, el 4 carácter empieza a parpadear. Realice el
paso 6 para completar el título.
6 Presione y mantenga pulsado el botón TITLE en el
controlador remoto durante al menos 2 segundos para
grabar el título.
NOTAS
• Si intenta sobrepasar este límite el visualizador mostrara
"FULL DATA". A partir de ese mensaje no podrá memorizar
más título.
• La longitud de los títulos y la capacidad de memoria del
cambiador de CD varía según el modelo utilizado.
• Para introducir un nuevo título deberá borrar previamente
uno de los ya introducidos.
• Cuando desee borrar un título, introduzca el símbolo "
en todos los espacios.
• Las operaciones descritas en los pasos 3 a 5 deben realizarse
en 10 segundos. El modo introducido se cancelará si no se
realiza ninguna operación durante más de 10 segundos.
• Si desactiva la alimentación de la unidad, estos títulos pueden
borrarse. Tenga cuidado cuando maneje el cable de
alimentación.
• No puede introducir títulos para el disco DVD cuando la
unidad esté conectada a DHA-S680.
Borrado de títulos del disco
1 Presione y mantenga pulsado el botón SETUP de la
pantalla remota o del controlador remoto durante al
menos 2 segundos.
2 Gire el codificador rotatorio de la pantalla remota o
presione el botón 8 ó 9 del controlador remoto para
seleccionar "TTL DEL".
3 Presione el botón ( ó ) de la pantalla remota o el
botón g ó f del controlador remoto repetidamente
hasta que se muestre el título que desea borrar.
El título memorizado en primer lugar en el lado del
cambiador parpadea en la pantalla.
4 Presione el codificador rotatorio de la pantalla
remota o pulse el botón -/J del mando a distancia.
Se mostrará el mensaje "DEL OK?". Pulse el
codificador rotatorio de la pantalla remota o pulse el
botón -/J del mando a distancia y se borrará el título.
Repita los pasos 3 y 4 para borrar más títulos.
5 Presione el botón SETUP de la pantalla remota o del
mando a distancia para volver al modo normal.
NOTAS
• No es posible borrar CD-TEXT.
• En el modo de cambiardor, se puede seleccionar "TTL DEL".
"
9-ES
Page 33

Operación del cambiador de discos compactos (Opcional)
)
(
SOURCE
34
Codificador rotatorio
<Pantalla remota>
Control de un cambiador de discos
compactos
Es posible conectar un cambiador opcional al XMAT200RF si es compatible con Ai-NET. Con un cambiador
de discos compactos conectado a la entrada Ai-NET del
XMA-T200RF, podrá controlar dicho cambiador
mediante el XMA-T200RF.
Mediante el uso del KCA-400C (dispositivo de
conmutación de varios cambiadores) o KCA-410C
(Versatile Link Terminal), podrá controlar varios
cambiadores con el XMA-T200RF.
Consulte la sección correspondiente a la selección de
varios cambiadores de la página 11 para seleccionar los
cambiadores de discos compactos.
NOTAS
• Los controles del XMA-T200RF para operaciones de cambiador
de discos compactos sólo pueden utilizarse cuando hay un
cambiador conectado.
• El cambiador DVD (opcional), al igual que el cambiador de
discos compactos, se controla desde XMA-T200RF.
1 Presione el botón SOURCE de la pantalla remota o del
controlador remoto para activar el modo CHANGER.
Seleccione la banda de FM.
Sintonice la misma frecuencia que seleccionó con la
unidad de modulación y ajuste el nivel de volumen
deseado. La pantalla muestra el número del disco y el
número de la pista.
2 Presione el botón 4 ó 3 de la pantalla remota o el
botón 8 ó 9 del controlador remoto hasta que
aparezca en la pantalla el número del disco deseado.
El número de la pista también aparecerá en pantalla.
Para detener la reproducción, presione el botón -/J
del controlador remoto.
Si vuelve a pulsar el botón -/J reanudará la
reproducción.
SOURCE
g
-/J
M.I.X.
SCAN
<Mando a distancia>
BAND
8
f
9
REPEAT
Sensor de música (Salto)
1 Gire el codificador rotatorio de la pantalla remota
hacia la izquierda o presione el botón g del
controlador remoto durante la reproducción del CD
para volver al inicio de la pista actual. Si desea
acceder al principio de una pista anterior, presione
repetidamente hasta llegar a la pista deseada.
Gire el codificador rotatorio de la pantalla remota
hacia la derecha o presione el botón f del
controlador remoto una vez para ir al principio de la
siguiente pista. Si desea acceder al principio de una
pista posterior, presione repetidamente hasta llegar a
la pista deseada.
NOTA
La función del sensor de música puede utilizarse en el modo de
reproducción o pausa.
Avance rápido o retroceso
1 Presione el botón ( ó ) de la pantalla remota o
presione y mantenga pulsado el botón g ó f del
controlador remoto para desplazarse con rapidez
hacia delante o hacia atrás hasta alcanzar la parte
deseada de la pista.
Reproducción con repetición
1 Presione el botón REPEAT del controlador remoto
para reproducir repetidamente la pista que está
escuchando.
La pista se reproducirá repetidamente.
Se ha seleccionado el modo RPT ALL y la unidad
reproducirá repetidamente todas las pistas del disco
seleccionado.
→ RPT → RPT ALL → (off)
10-ES
Pulse el botón REPEAT y seleccione OFF para
desactivar la reproducción repetida.
Page 34

M.I.X. (Reproducción aleatoria)
Selección de cambiador múltiple
1 Presione el botón M.I.X. de la controlador remoto en el
modo de reproducción o pausa.
Las canciones del disco se reproducirán en secuencia
aleatoria. Una vez reproducidas todas las pistas de un
disco, se iniciará la reproducción de las pistas del
siguiente disco.
Si hay conectado un cambiador de discos compactos
equipado con la función ALL M.I.X., también podrá
seleccionar ALL M.I.X.
En este modo, las pistas de todos los CD del cargador
actual se incluirán en la secuencia aleatoria de
reproducción.
→ M.I.X. → ALL M.I.X. → (off)
Para cancelar la reproducción M.I.X., presione el botón
M.I.X. para desactivarla.
Escaneo de programas
1 Presione el botón SCAN de la controlador remoto para
activar el modo escáner.
Se reproducirán los primeros 10 segundos de cada
canción en sucesión.
Para detener el escáner, presione el botón SCAN y
desactive el modo escáner.
El sistema Ai-NET podrá manejar hasta 6 cambiadores
de discos compactos Alpine. Cuando quiera operar dos
o más cambiadores, deberá usar el KCA-400C
(dispositivo de conmutación de cambiadores múltiples).
Si utiliza un dispositivo de conmutación, podrá conectar
hasta 4 cambiadores de discos compactos. Si utiliza 2
dispositivos de conmutación, podrá conectar hasta 6
cambiadores de discos compactos.
Al utilizar KCA-410C (Versatile Link Terminal), es
posible conectar dos cambiadores y dos fuentes
externas (AUX).
1 Presione el botón SOURCE para activar el modo de
cambiador de discos compactos.
2 Mantenga presionado el botón BAND del
controlador remoto para activar el modo de selección
de cambiador de discos compactos.
3 Presione el botón BAND del controlador remoto hasta
que el indicador del cambiador deseado aparezca en
la pantalla.
NOTA
Si el cambiador de discos compactos seleccionado no está
conectado, el visualizador mostrará "NO CHG".
4 Para utilizar el cambiador seleccionado.
NOTA
Para obtener más detalles sobre la entrada externa (AUX)
durante el uso de KCA-410C, consulte "Ajuste del modo AUX
(V-Link)" en la página 6.
11-ES
Page 35

Utilización de cambiador de MP3 (Opcional)
)
(
SOURCE
34
SETUP
Codificador rotatorio
<Pantalla remota>
SOURCE
g
-/J
M.I.X.
SCAN
<Mando a distancia>
FOLDER 4FOLDER 3
8
f
9
REPEAT
SETUP
Reproducción de archivos MP3
Si conecta un cambiador compatible con MP3, podrá
reproducir con esta unidad discos CD-ROM, CD-R y
CD-RW que contengan archivos MP3.
1 Presione el botón SOURCE de la pantalla remota o del
controlador remoto para cambiar al modo de
cambiador MP3.
El modo cambiará cada vez que presione el botón.
2 Presione el botón 4 ó 3 de la pantalla remota o el
botón 8 ó 9 del controlador remoto hasta que
aparezca en la pantalla el número del disco deseado.
Para hacer una pausa en la reproducción, presione el
botón -/J de la controlador remoto.
La reproducción se reanudará cuando vuelva a
presionar el botón -/J .
NOTAS
• La unidad puede reproducir discos que contengan tanto datos
de audio como datos MP3.
• El indicador MP3 se ilumina durante la reproducción MP3.
Sensor de música (Salto)
1 Gire el codificador rotatorio hacia la izquierda o
pulse el botón g del mando a distancia una vez
mientras se reproduce el CD para volver al principio
del archivo actual. Si desea acceder al principio de una
pista situada más hacia atrás, pulse repetidamente
hasta que alcance el archivo deseado.
Gire el codificador rotatorio hacia la derecha o pulse el
botón f del mando a distancia una vez para avanzar
al principio del siguiente archivo. Si desea acceder al
principio de una pista situada más hacia adelante, pulse
repetidamente hasta que alcance el archivo deseado.
NOTAS
• La función del sensor de música puede utilizarse en el modo
de reproducción o pausa.
• Los archivos se reproducen según el orden de ruta de acceso
que se utilizó cuando se registraron en el CD.
Avance rápido o retroceso
1 Mantenga presionado el botón ( o ) de la
pantalla remota o el botón g o f del controlador
remoto para retroceder o avanzar rápidamente hasta
alcanzar la parte deseada del archivo.
NOTA
No se oye el sonido durante el avance/retroceso rápido de
archivos MP3.
Selección de carpetas
1 Presione el botón FOLDER 4 o FOLDER 3 de la
controlador remoto para seleccionar la carpeta.
Búsqueda de archivos
Es posible localizar todos los archivos de un disco y
reproducirlos.
1 Mantenga presionado el codificador rotatorio durante
al menos 2 segundos o presione el botón -/J del
controlador remoto durante al menos 2 segundos
durante la reproducción.
La unidad cambia al modo de búsqueda de archivos.
2 Gire el codificador rotatorio, o presione el botón g
o f del controlador remoto para seleccionar el
archivo deseado.
A continuación, si pulsa el codificador rotatorio o el
botón -/J del controlador remoto, se inicia la
reproducción del archivo seleccionado.
NOTA
El modo de búsqueda de archivos se cancelará automáticamente
si durante 5 segundos no se pulsa ningún botón.
12-ES
Page 36

Reproducción con repetición
1 Pulse el botón REPEAT del mando a distancia para
reproducir repetidamente el archivo que está
escuchando.
El archivo se reproducirá repetidamente.
Se selecciona el modo RPT ALL y la unidad reproducirá
repetidamente todos los archivos del disco seleccionado.
→ RPT → RPT ALL → (off)
Pulse el botón REPEAT del mando a distancia y
seleccione OFF para desactivar la reproducción
repetida.
NOTA
Si MP3 FLDR y RPT ALL se encuentran en "Ajuste del margen
de selección de archivos MP3", los archivos de una carpeta se
reproducirán repetidamente.
M.I.X. (Reproducción aleatoria)
1 Presione el botón M.I.X. de la controlador remoto en el
modo de reproducción o pausa.
Los archivos del disco se reproducirán en una
secuencia aleatoria.
Para cancelar la reproducción M.I.X., pulse el botón
M.I.X. del mando a distancia para desactivarla.
NOTA
Si MP3 FLDR y M.I.X. están ajustados en "Ajuste del margen de
selección de archivos MP3", los archivos de una carpeta se
reproducirán en orden aleatorio. Cuando se hayan reproducido
todas las pistas, no se pasará a la siguiente carpeta.
Escaneo de programas
1 Presione el botón SCAN de la controlador remoto para
activar el modo escáner.
Los primeros 10 segundos de cada archivo se
reproducirán sucesivamente.
Para detener el escáner, presione el botón SCAN de la
controlador remoto y desactive el modo escáner.
NOTA
Si MP3 FLDR está ajustado en "Ajuste del margen de selección
de archivos MP3", los primeros 10 segundos de cada archivo de
una carpeta se reproducirán sucesivamente.
Ajuste del margen de selección de
archivos MP3
Puede establecer el margen de selección de archivos
MP3 en "contenido completo del disco" o "sólo
contenido de la carpeta".
1 En el modo de cambiador MP3, presione el
codificador rotatorio de la pantalla remota para
cambiar a MP3 DISC o MP3 FLDR.
SUGERENCIAS
También puede ajustar el margenen el modo SETUP.
1. Presione y mantenga pulsado el botón SETUP de la pantalla
remota o del controlador remoto durante al menos 2
segundos.
2. Gire el codificador rotatorio de la pantalla remota o
presione el botón 8 ó 9 del controlador remoto para
seleccionar MP3 DISC o MP3 FLDR.
3. Presione el botón ( o ) de la pantalla remota o el
botón g o f del controlador remoto para alternar los
modos MP3 DISC y MP3 FLDR.
• MP3 DISC : reproduce todos los archivos de un disco.
• MP3 FLDR : reproduce únicamente losarchivos de la
carpeta seleccionada.
4. Presione el botón SETUP de la pantalla remota o del
controlador remoto para ajustar el modo seleccionado.
NOTA
Si el cambiador de CD compatible con MP3 está conectado, el
rango de selección de archivos MP3 sólo se aplica a los modos
REPEAT, M.I.X y SCAN.
En modo normal, la unidad reproduce todos los archivos en un
disco incluso cuando se establece el rango de selección de
archivos MP3 en "sólo el contenido de la carpeta."
Reproducción de datos MP3
Puede seleccionar entre reproducir sólo datos de CD o
reproducir datos de CD formateados y archivos MP3.
Si un disco contiene datos de CD o de archivos de MP3,
la reproducción se inicia a partir de la porción de datos
de CD del disco.
1
Presione y mantenga pulsado el botón SETUP de la
pantalla remota o del controlador remoto durante al
menos 2 segundos.
2 Gire el codificador rotatorio de la pantalla remota hacia
la izquierda o hacia la derecha o bien presione el botón
8 ó 9 del controlador remoto para seleccionar "CD-DA".
3 Presione el botón ( ó ) de la pantalla remota o
el botón g ó f del controlador remoto para
seleccionar "CD-DA" o "CD/MP3".
• CD-DA: Sólo se pueden reproducir datos.
• CD/MP3: Se pueden reproducir datos de CD y
pistas del archivo de MP3.
4 Cuando se haya completado el ajuste, presione el
botón SETUP de la pantalla remota o del controlador
remoto para volver al modo normal.
13-ES
Page 37

Operaciones con el control remoto
Reemplazo de las pilas
Pilas a usar: Utilice dos pilas secas de tamaño "AAA" o
equivalentes.
1 Abertura de la tapa de las pilas
Presione la tapa y deslicela en la dirección indicada
por la flecha para quitarla.
Sensor remoto
• Apunte el transmisor del controlador remoto hacia el
sensor remoto de la unidad de pantalla remota.
2 Reemplazo de las pilas
Coloque las pilas en el compartimiento orientando las
polaridades como se indica.
3 Cierre de la tapa
Empuje la tapa como se indica hasta que produzca un
chasquido.
14-ES
Page 38

Información
En caso de dificultad
Si surge algún problema, apague la unidad y vuélvala a encender.
Si el problema persiste, compruebe los distintos elementos de la
siguiente lista de comprobación. Esta lista le ayudará a resolver
los problemas de su unidad. Si el problema persiste, compruebe
si el resto de su sistema está adecuadamente conectado o
consulte a un proveedor autorizado por Alpine.
Básica
La unidad no funciona ni hay visualización.
• La llave de encendido del automóvil está en OFF.
- Si ha realizado las conexiones de acuerdo con las
instrucciones, la unidad no funcionará con la llave de
encendido en OFF.
• Fusible quemado.
- Compruebe el fusible de cable de la unidad a la
batería. Si fuera necesario cámbielo por otro del
valor apropiado.
• El microordenador interno funciona mal a causa de
interferencias, ruido, etc.
- Presione el interruptor RESET con un bolígrafo u
otro objeto puntiagudo.
• Cable de batería sin conexión.
- Asegúrese de que el cable de la batería está conectado
adecuadamente.
• Ccable de alimentación de CCA y cable de puesta a masa sin
conexión.
- Asegúrese de que el cable de alimentación de CCA y
el cable de puesta a masa están conectados correctamente.
No se oye el sonido.
• El volumen es demasiado bajo.
- Gire el control del volumen en el sentido de las agujas del
reloj hasta el nivel deseado.
• No se sintoniza la frecuencia de FM.
- Sintonice la frecuencia adecuada.
• No hay conexión entre el modulador de FM y la antena.
- Asegúrese de que el modulador de FM está conectado a la
antena.
• Si se producen interferencias con las emisoras de radio.
- Cambie el oscilador de frecuencia del modulador de FM.
La música salta de forma excesiva.
• El cambiador de CD no se ha montado firmemente.
- Siga las instrucciones de instalación para una instalación
adecuada.
Discos compactos
El cambiador no funciona.
• Se encuentra a más de +50°C (+120°F) de temperatura.
- Deje que se enfríe la temperatura en el interior
(o en el portaequipajes) del vehículo.
El sonido de reproducción de un disco
compacto oscila.
• Se ha condensado humedad en el módulo de discos compactos.
- Espere el tiempo necesario para que se evapore la
humedad (aproximadamente 1 hora).
El disco no avanza ni retrocede.
• El disco compacto está dañado.
- Extraiga el disco compacto y tírelo. La utilización de un
disco compacto dañado en su unidad podría averiar el
mecanismo.
El sonido salta debido a las vibraciones.
• Montaje inadecuado de la cambiador.
- Vuelva a montar la cambiador firmemente.
• El disco está muy sucio.
- Límpie el disco.
• El disco posee rayaduras.
- Cambie el disco.
• La lente de recogida está sucia.
- No utilice discos limpiadores de lentes disponibles en
el mercado. Consulte con el proveedor ALPINE más
próximo.
El sonido salta sin haber vibraciones.
• El disco está sucio o rayado.
- Límpie el disco. Los discos dañados deberán
reemplazarse.
MP3
El MP3 no se reproduce.
• Se ha producido un error al grabar en el disco.
- Asegúrese de que el formato utilizado para grabar en el disco
sea compatible.
15-ES
Page 39

Información
Indicación para el modo de radio XM
ANTENNA
• La antena XM no está conectada al módulo de radio XM.
- Compruebe que el cable de antena XM esté firmemente
conectado al módulo de radio XM.
UPDATING
• La radio se actualiza con el código de encriptación más
reciente.
- Espere hasta que el código de encriptación se actualice. Las
emisoras 0 y 1 deben funcionar normalmente.
NO SIGNL
• La señal XM es demasiado débil en la ubicación actual.
- Espere hasta que el automóvil llegue a un lugar donde se
pueda recibir una señal más intensa.
LOADING
• La radio está recibiendo información de audio o programas.
- Espere hasta que la radio haya recibido la información.
OFF AIR
• La emisora actualmente seleccionada ha dejado de emitir.
- Seleccione otra emisora.
– – – –
• El usuario ha seleccionado un número de emisora que no
existe o para el que no se dispone de suscripción.
- La unidad volverá a la emisora previamente seleccionada.
• No existe nombre/característica de artista, título de canción/
programa ni información adicional asociados a la emisora en
ese momento.
- No es preciso realizar ninguna acción.
Indicaciones para el reproductor de discos
compactos (Opcional)
HI TEMP
• Se ha activado el circuito protector debido a la alta
temperatura.
- El indicador desaparecerá cuando la temperatura
vuelva a la gama de operación.
ERROR - 01
• Mal funcionamiento del cambiador de discos compactos.
- Consulte a su proveedor Alpine. Presione el botón de
expulsión del cargador y extraiga éste.
Compruebe la indicación. Vuelva a insertar el
cargador.
Si no puede extraer el cargador, consulte a su
proveedor Alpine.
• No es posible extraer el cargador.
- Presione el botón de extracción del cargador. Si no
puede extraer el cargador, consulte a su proveedor
Alpine.
ERROR - 02
• En el interior del cambiador de CD ha quedado un disco.
- Presione el botón Eject para activar la función de expulsión.
Cuando el cambiador de discos compactos finalice la función
de expulsión, inserte un cargador de discos compactos vacío
en el cambiador de discos compactos para recibir el disco
que ha quedado en el interior del cambiador de discos
compactos.
NO MAGZN
• No hay cargador insertado en el cambiador de discos
compactos.
- Inserte un cargador.
NO DISC
16-ES
• El disco indicado no existe.
- Elija otro disco.
Page 40

Especificaciones
SECCIÓN DEL MODULADOR DE RF
Frecuencia de salida de RF (seleccionable)
Voltaje de salida de RF 70 dBµV
Sensibilidad/impedancia de entrada del modulador de RF
CONTROLADOR REMOTO
Tipo de pila Pilas AAA (2)
Anchura 42 mm
Altura 121 mm
Fondo 23 mm
Peso 50 g
UNIDAD DE PANTALLA REMOTA
Ancho 113 mm
Alto 39,5 mm
Profundo 19 mm
Peso 200 g
UNIDAD DE MODULADOR DE FM
Ancho 130 mm
Alto 35 mm
Profundo 74 mm
Peso 380 g
UNIDAD DEL SINTONIZADOR DE XM
Ancho 180 mm
Alto 35 mm
Profundo 160 mm
Peso 812 g
87,7 - 89,9 MHz
500 mV/10 k ohmios
Debido a la mejora continua del producto, las especificaciones y el
diseño están sujetos a cambio sin previo aviso.
17-ES
Page 41

Ubicación y conexiones
Antes de instalar o conectar la unidad, lea atentamente
lo siguiente y las páginas 2 de este manual para
emplearla adecuadamente.
Advertencia
REALICE LAS CONEXIONES CORRECTAMENTE.
Una conexión incorrecta puede producir un incendio o dañar el
equipo.
UTILICE LA UNIDAD SOLAMENTE EN VEHÍCULOS QUE
TENGAN 12 VOLTIOS CON NEGATIVO A MASA.
(Consulte a su distribuidor en caso de duda.) De no ser así, podría
ocasionar un incendio, etc.
ANTES DE EFECTUAR EL CABLEADO, DESCONECTE EL
CABLE DEL TERMINAL NEGATIVO DE LA BATERÍA.
De no hacerlo así, podría ocasionar una descarga eléctrica o
heridas debido a cortocircuitos eléctricos.
IMPIDA QUE LOS CABLES SE ENREDEN CON LOS
OBJETOS SITUADOS ALREDEDOR.
Disponga la instalación eléctrica y los cables conforme a lo
descrito en el manual para evitar obstáculos durante la
conducción. Los cables que obstaculizan la conducción o que
cuelgan de partes del vehículo como el volante de dirección, la
palanca de cambios, los pedales de freno, etc., se consideran
extremadamente peligrosos.
NO EMPALME CABLES ELÉCTRICOS.
Nunca corte el aislamiento de un cable para suministrar energía a
otro equipo. Esto hace que la capacidad portadora del cable se
supere y puede ser la causa de incendios o descargas eléctricas.
EVITE DAÑAR LOS TUBOS Y EL CABLEADO CUANDO
TALADRE AGUJEROS.
Si taladra agujeros en el chasis durante la instalación, tome las
precauciones necesarias para no rozar, dañar u obstruir los tubos,
las tuberías de combustible, los depósitos o el cableado eléctrico.
De lo contrario, podría provocar un incendio.
NO UTILICE TUERCAS O PERNOS EN EL SISTEMA DE
FRENOS O DE DIRECCIÓN PARA REALIZAR LAS
CONEXIONES A MASA.
Los pernos o tuercas empleados en los sistemas de freno o de
dirección (o en cualquier otro sistema relacionado con la
seguridad del vehículo), o los depósitos, NUNCA deben
utilizarse para instalaciones de cableado o conexión a masa. Si
utiliza tales partes podrá incapacitar el control del vehículo y
provocar un incendio, etc.
MANTENGA LOS OBJETOS PEQUEÑOS, COMO LAS
PILAS, FUERA DEL ALCANCE DE LOS NIÑOS.
La ingestión de estos objetos puede provocar lesiones graves. Si
esto ocurre, consulte con un médico inmediatamente.
NO INSTALE EL EQUIPO EN LUGARES QUE PUEDAN
INTERFERIR CON LA OPERACIÓN DEL VEHÍCULO, COMO
EL VOLANTE DE DIRECCIÓN O LA CAJA DE CAMBIOS DE
VELOCIDAD.
Esto podría obstaculizar la visibilidad y dificultar el movimiento,
etc. y provocar accidentes graves.
NO INSTALE EL UNIDAD DE PANTALLA REMOTA CERCA
DEL AIRBAG DEL ASIENTO DEL PASAJERO.
Si el aparato no está bien instalado, el airbag podrá no funcionar
correctamente y, cuando se despliegue el airbag, podrá hacer que
el unidad de pantalla remota salga despedido hacia arriba y
ocasionar un accidente y heridas.
NO OBSTRUYA LOS ORIFICIOS DE VENTILACIÓN O LOS
PANELES DEL RADIADOR.
Si los bloquea, el calor podría acumularse en el interior y
producir un incendio.
Prudencia
CONFÍE EL CABLEADO Y LA INSTALACIÓN A
PROFESIONALES.
El cableado y la instalación de este equipo requieren una
competencia y experiencia técnica confirmada. Para garantizar la
seguridad, póngase siempre en contacto con el distribuidor al que
ha comprado el equipo para confiarle estas tareas.
UTILICE LOS ACCESORIOS ESPECIFICADOS E
INSTÁLELOS CORRECTAMENTE.
Asegúrese de utilizar los accesorios especificados solamente. La
utilización de otras piezas no designadas puede ser la causa de
daños en el interior de la unidad o de una instalación incorrecta.
Las piezas pueden aflojarse, lo que, además de ser peligroso,
puede provocar averías.
DISPONGA EL CABLEADO DE FORMA QUE LOS CABLES
NO SE DOBLEN, NO SE CONTRAIGAN NI ROCEN UN
BORDE METÁLICO AFILADO.
Aleje los cables y el cableado de piezas móviles (como los raíles de
los asientos) o de bordes puntiagudos o afilados. De esta forma
evitará dobleces y daños en el cableado. Si los cables se introducen
por un orificio de metal, utilice una arandela de goma para evitar
que el borde metálico del orificio corte el aislamiento del cable.
NO INSTALE LA UNIDAD EN LUGARES MUY HÚMEDOS O
LLENOS DE POLVO.
Evite instalar la unidad en lugares con altos índices de humedad o
polvo. Si entra polvo o humedad, el equipo puede averiarse.
Precauciones
• Asegúrese de desconectar el cable del polo (–) de la batería
antes de instalar su XMA-T200RF. Esto reducirá las
posibilidades de averiar la unidad en caso de cortocircuito.
• Asegúrese de conectar los conductores con clave de colores
según el diagrama. Unas conexiones incorrectas pueden
ocasionar un mal funcionamiento de la unidad o pueden dañar
el sistema eléctrico del vehículo.
• Cuando haga las conexiones al sistema eléctrico del vehículo,
tenga en cuenta los componentes que vienen instalados de
fábrica (como un computador incorporado, por ejemplo). No
conecte a estos conductores para proporcionar alimentación a
esta unidad. Al conectar el XMA-T200RF a la caja de fusibles,
asegúrese de que el fusible designado para el circuito del
XMA-T200RF sea del amperaje adecuado. De lo contrario, Ia
unidad y/o el vehículo podrán sufrir daños. Cuando tenga
dudas, consulte a su distribuidor ALPINE.
IMPORTANTE
Anote el número de serie de la unidad en el espacio
proporcionado a continuación y consérvelo como registro
permanente. La placa del número de serie se encuentra en la
base de la unidad.
NÚMERO DE SERIE:
FECHA DE INSTALACIÓN:
INSTALADOR:
LUGAR DE ADQUISICIÓN:
18-ES
Page 42

Instalación
Instalación de la unidad de visualización
de control remoto
PRECAUCIONES:
No instale la unidad de visualización de control remoto
cerca del cojín de aire del asiento del pasajero delantero.
• Verifique el lugar de la instalación.
• Determine el lugar de la instalación en el tablero de
instrumentos (en un lugar central y plano).
• Instalación utilizando cinta de Velcro
• Si instala la unidad de pantalla remota con cinta de
VelcroTM suministrada, corte la cinta en dos partes.
1. Sin separar las dos piezas de la cinta Velcro, pele el
papel de un lado y ponga la cinta en el lado trasero
de la unidad de visualización de control remoto.
NOTA
Tenga cuidado de no cubrir la etiqueta de precaución de la
unidad de visualización de control remoto con la cinta.
2. Asegúrese de que el lugar elegido esté libre de
humedad y de suciedad. Pele el papel del otro lado de
la cinta Velcro en el visualizador de control remoto.
3. Ponga la unidad de visualización de control remoto
en el lugar de instalación y empuje la unidad para
fijarla con seguridad.
Cinta Velcro
•Instalación utilizando montura de
alineación y montura de abrazadera
1. Haga un orificio para unir las dimensiones externas
de la montura de abrazadera a la parte del tablero
donde desea instalar la unidad.
2. Inserte la unidad de pantalla remota en la montura
de alineación para fijarla con firmeza.
3. Inserte la unidad de pantalla remota y la montura de
alineación conjuntamente en la montura de
abrazadera y fíjelas.
4. Inserte la unidad de pantalla remota, la montura de
alineación y la montura de abrazadera conjuntamente
en el orificio realizado en el paso 1 y fíjelas.
Montura de abrazadera
(incluida)
Montura de alineación
(incluida)
Tablero de
instrumentos
Instalación de la caja del modulador de FM
La caja del modulador de FM podrá ser instalada en
cualquier lugar plano utilizando la cinta Velcro.
•Instalación utilizando una montura de
alineación
1. Después de determinar la ubicación para la
instalación, fije la montura de alineación con los
tornillos (M2,9 x 20).
2. Inserte la unidad de pantalla remota en la montura
de alineación para fijarla con seguridad.
NOTA
Para retirar la pantalla remota de la montura de alineación,
utilice una placa fina como una tarjeta de plástico e insértela
con cuidado en cualquier lado de la pantalla remota. Se
liberará la pantalla remota.
Montura de alineación
(incluida)
Tableau de
instrumentos
Tornillos de ajuste
(M2,9 x 20) (incluidos)
Cinta Velcro
(incluida)
Instalación de la caja del sinonizador de XM
•Instale la unidad
1. Utilice la unidad como plantilla, sujétela en su
ubicación de montaje y marque los orificios que
deban perforarse. Antes de perforar, asegúrese de
que no hay objetos que puedan dañarse detrás de
la superficie de montaje.
2. Perfore los orificios y asegure la unidad conlos
tornillos autoenroscables (M4 x 14) suministrados.
NOTA
Para un buen funcionamiento del receptor es necesaria una
antena. Esta antena se debe comprar por separado. El
receptor TUA-T020XM puede utilizar cualquier antena
específicamente diseñada para el receptor XM. Siga las
instrucciones de instalación que se proporcionan con la
antena.
Tornillos
(M4 × 14)
(incluidos)
19-ES
Page 43

Ubicación y conexiones
Conexiones
Unidad de pantalla remota
Antena
1
(Amarillo)
Caja de modulador
de FM
65 4
(L-ch) (R-ch)
#
(Verde)
OUTPUT INPUT
%$
Caja del sintonizador de XM
(
&
9
7
8
!
"
8
!
32
Llave de encendido
VCR o GAME etc.
(Vendido por
separado)
Cambiador de CD
(Vendido separadamente)
)
Unidad principal de
fábrica etc.
Batería
1 Compartimento de antena
2 Cable de la antena del modulador de FM
3 Compartimento de la antena de la unidad principal
4 Terminales de entrada AUX
5 Conector Ai-NET
6 Conector de pantalla remota
7 Cable de alimentación de encendido (rojo)
Conecte este cable a un terminal abierto de la caja de
fusibles del vehículo o a otra fuente de alimentación no
utilizada que proporcione (+)12 V solamente cuando el
encendido esté conectado o en posición de accesorio.
8 Cable de la batería (amarillo)
Conecte este cable al polo positivo (+) de la batería del
vehículo.
9 Soporte del fusible (5A)
Para evitar que ruidos externos entren en el sistema de audio.
• Sitúe la unidad y pase los cables a una distancia mínima de 10 cm de los controles del vehículo.
• Mantenga los cables de alimentación de la batería lo más alejados posible de los demás cables.
• Conecte el cable de puesta a masa con firmeza a un punto metálico desnudo (si es necesario, elimine la pintura, suciedad o grasa) del chasis del
automóvil.
• Si añade un supresor de ruido opcional, conéctelo lo más lejos posible de la unidad. Su proveedor Alpine dispone de varios supresores del ruido,
póngase en con él para obtener más información.
• Su proveedor Alpine es experto en medidas de prevención del ruido, consúltele para obtener más información.
! Cable de puesta a masa (negro)
Conecte este cable a una puesta a masa del chasis del
vehículo. Asegúrese de que la conexión se hace sobre metal
desnudo y que se asegura firmemente con el tornillo
metálico suministrado.
" Cable prolongador RCA (se vende por separado)
# Cable Ai-NET (incluido)
$ Conector Ai-NET (SALIDA)
% Conector Ai-NET (ENTRADA)
Conéctelo al conector de entrada o salida de otro producto
equipado con Ai-NET (cambiador de CD, Versatile Link
Terminal).
& Cable Ai-NET (incluido con el cambiador de CD)
( Soporte del fusible (7,5A)
) Antena (Vendido separadamente)
20-ES
 Loading...