

Page 1

FOR CAR USE ONLY/NUR FÜR AUTOMOBIL GEBRAUCH/POUR APPLICATION AUTOMOBILE
UNIQUEMENT/SOLO PER L’UTILIZZO IN AUTOMOBILE/PARA USO EN AUTOMÓVILES/ALLEEN VOOR
GEBRUIK IN DE WAGEN/ENDAST FÖR BILBRUK/KUN TIL BRUG I BILEN
R
SMART MAP PRO
EN
EN
DE
For NVE-N099P Series
Prog. Ver. Z3.00
DVD NAVIGATION MAP
NAVIGATIONSKARTEN-DVD
CARTE DE NAVIGATION DVD
DVD MAPPE PER LA NAVIGAZIONE
MAPA DE NAVEGACIÓN DEL DVD
DVD NAVIGATIEKAART
DVD NAVIGERINGSKARTA
DVD-NAVIGATIONSKORT
OWNER'S MANUAL
Please read before using this disc.
BEDIENUNGSANLEITUNG
Lesen Sie diese Bedienungsanleitung bitte vor
Gebrauch der Disc.
MODE D'EMPLOI
Veuillez lire avant d'utiliser ce disque.
ISTRUZIONI PER L'USO
Si prega di leggere prima di utilizzare il disco.
MANUAL DE OPERACIÓN
Lea este manual antes de utilizar este disco.
GEBRUIKSAANWIJZING
Lees de gebruiksaanwijzing zorgvuldig door
alvorens u de disk in gebruik neemt.
ANVÄNDARHANDLEDNING
Läs igenom handledningen innan du
använder den här skivan.
BRUGERVEJLEDNING
Læs venligst denne vejledning, for du tager
denne DVD i brug.
FR
IT
ES
NL
SE
FR
ES
SE
DK
Page 2

ALPINE ELECTRONICS MARKETING, INC.
1-1-8 Nishi Gotanda,
Shinagawa-ku, Tokyo 141-0031, Japan
Phone 03-5496-8231
ALPINE ELECTRONICS OF AMERICA, INC.
19145 Gramercy Place, Torrance,
California 90501, U.S.A.
Phone 1-800-ALPINE-1 (1-800-257-4631)
1-888-NAV-HELP (1-888-628-4357)
ALPINE ELECTRONICS OF CANADA, INC.
777 Supertest Road, Toronto,
Ontario M3J 2M9, Canada
Phone 1-800-ALPINE-1 (1-800-257-4631)
1-888-NAV-HELP (1-888-628-4357)
ALPINE ELECTRONICS OF AUSTRALIA PTY. LTD.
161-165 Princes Highway,
Hallam Victoria 3803, Australia
Phone 03-8787-1200
ALPINE ELECTRONICS GmbH
Frankfurter Ring 117,
80807 München, Germany
Phone 089-32 42 640
R
YAMAGATA
Corporation
2-6-34, Takashima,
Nishi-ku, Yokohama,
Kanagawa, Japan
ALPINE ELECTRONICS OF U.K. LTD.
Alpine House
Fletchamstead Highway,
Coventry CV4 9TW, U.K.
Phone 0870-33 33 763
ALPINE ELECTRONICS FRANCE S.A.R.L.
(RCS PONTOISE B 338 101 280)
98, Rue de la Belle Etoile, Z.I. Paris Nord Il,
B.P. 50016, 95945 Roissy Charles de Gaulle
Cedex, France
Phone 01-48638989
ALPINE ITALIA S.p.A.
Viale C. Colombo 8, 20090 Trezzano
Sul Naviglio (MI), Italy
Phone 02-484781
ALPINE ELECTRONICS DE ESPAÑA, S.A.
Portal de Gamarra 36, Pabellón, 32
01013 Vitoria (Alava)-APDO 133, Spain
Phone 945-283588
ALPINE ELECTRONICS (BENELUX) GmbH
Leuvensesteenweg 510-B6,
1930 Zaventem, Belgium
Phone 02-725 13 15
© 2005 NAVTEQ. All Rights Reserved.
© 2006 Zenrin Europe B.V., All Rights Reserved.
Designed by ALPINE Japan
Printed in Japan (Y)
68-06194Z28-A
Page 3

PRECAUTIONS
IMPORTANT INFORMATION, PLEASE READ CAREFULLY BEFORE USING
THIS PRODUCT.
This product is intended to safely provide turn
by turn instruction to get you to a desired
destination. Please read the following
precautions to ensure that you use your
navigation system correctly.
L This product is not a substitute for your
personal judgment. Any route suggestions
made by the navigation system may never
supersede any local traffic regulations or
your personal judgment and/or knowledge
of safe driving practices. Do not follow
route suggestions if the navigation system
instructs you to perform an unsafe or illegal
maneuver, places you in an unsafe situation,
or routes you into an area which you
consider unsafe.
L Glance at the monitor screen only when
necessary and safe to do so. If prolonged
viewing of the screen is necessary, stop the
vehicle in a safe and legal manner and
location.
L Do not input destinations, change settings,
or access any functions requiring a
prolonged view of the monitor and/or
remote control while you are driving. Stop
the vehicle in a safe and legal manner and
location before attempting to access the
system.
L Do not use the navigation system to route
you to emergency services. Not all locations
of emergency service providers such as
police and fire stations, hospitals, and
clinics are contained in the database. Please
use your own judgment and your ability to
ask for directions in these situations.
L The map database contained within the
media (DVD ROM) in which it is stored is
the most recent map data available at the
time of production. Because of changes in
streets and neighbourhoods, there may be
situations where the navigation system may
not be able to route you to your desired
destination. In these cases, use your own
personal judgment.
2
L The map database is designed to provide
you with route suggestions, it does not take
account of the relative safety of a suggested
route, or of factors which may affect the
time required to reach your destination. The
database does not reflect road closures or
construction, road characteristics (i.e. type
of road surface, slope or grade, weight or
height restrictions, etc.), traffic congestion,
weather conditions, or any other factors
which may affect the safety or timing of
your driving experience. Use your personal
judgment if the navigation system is unable
to provide you with an alternate route.
L There may be situations where the
navigation system may display the vehicle’s
location erroneously. Use your own driving
judgment in this situation, taking into
account current driving conditions. Please
be aware that in this situation, the
navigation system should correct the
vehicle’s position automatically; however,
there may be times where you may have to
correct the position yourself. If this is the
case, stop the vehicle in a safe and legal
manner and location before attempting
operation.
L Make certain that the volume level of the
monitor is set to a level which still allows
you to hear outside traffic and emergency
vehicles. Driving while unable to hear
outside sounds could cause an accident.
L Please make certain that any other person
who intends on using the navigation system
reads these precautions and the following
instructions carefully.
L If there is anything in the manual which you
do not understand, or are uncertain about the
operation of the navigation system, please
contact an authorized Alpine representative
before using the navigation system.
Page 4
Points to Observe for Safe Usage
a Read the manuals for this disc and the system
components carefully before using your navigation
system. They contain instructions on how to use
the system in a safe and effective manner. Alpine
cannot be responsible for problems resulting from
failure to observe the instructions in these
manuals.
aMeaning of displays
This symbol means important instructions. Failure to heed them can
Warning
Caution
result in serious injury or death.
This symbol means important instructions. Failure to heed them can
result in injury or material property damage.
Warning
DO NOT OPERATE ANY FUNCTION THAT TAKES
YOUR ATTENTION AWAY FROM SAFELY
DRIVING YOUR VEHICLE.
Any function that requires your prolonged
attention should only be performed after coming
to a complete stop. Always stop the vehicle in a
safe location before performing these functions.
Failure to do so may result in an accident.
DO NOT DISASSEMBLE OR ALTER.
Doing so may result in an accident, fire or electric
shock.
KEEP SMALL OBJECTS SUCH AS BATTERIES
OUT OF THE REACH OF CHILDREN.
Swallowing them may result in serious injury. If
swallowed, consult a physician immediately.
USE THIS PRODUCT FOR MOBILE 12V
APPLICATIONS.
Use for other than its designed application may
result in fire, electric shock or other injury.
a This manual uses various pictorial displays to
show you how to use this product safely and to
alert you to potential dangers resulting from
improper connections and operation. Following
are the meanings of these pictorial displays. It is
important to fully understand the meanings of
these pictorial displays in order to use this manual
and the system properly.
MINIMIZE DISPLAY VIEWING WHILE DRIVING.
Viewing the display may distract the driver from
looking ahead of the vehicle and cause an
accident.
DO NOT FOLLOW ROUTE SUGGESTIONS IF THE
NAVIGATION SYSTEM INSTRUCTS YOU TO
PERFORM AN UNSAFE OR ILLEGAL
MANEUVER, OR PLACES YOU IN AN UNSAFE
SITUATION OR AREA.
This product is not a substitute for your personal
judgment. Any route suggestions by this system
should never supersede any local traffic
regulations or your personal judgment or
knowledge of safe driving practice.
Caution
HALT USE IMMEDIATELY IF A PROBLEM
APPEARS.
Failure to do so may cause personal injury or
damage to the product. Return it to your
authorized Alpine dealer or the nearest Alpine
Service Centre for repairing.
DO NOT PLACE HANDS, FINGERS OR FOREIGN
OBJECTS IN INSERTION SLOTS OR GAPS.
Doing so may result in personal injury or damage
to the product.
Tips
This indicates supplementary explanation of operation of the system.
KEEP FINGERS AWAY WHILE THE MOTORIZED
FRONT PANEL OR MOVING MONITOR IS IN
MOTION.
Failure to do so may result in personal injury or
damage to the product.
3
Page 5

Precautions
END-USER TERMS
The data (“Data”) is provided for your personal, internal use only and not for resale. It is protected by copyright, and is
subject to the following terms and conditions which are agreed to by you, on the one hand, and ALPINE Electronics, Inc.
(“ALPINE”) and its licensors (including their licensors and suppliers) on the other hand. ©
The Data for areas of Canada includes information taken with permission from Canadian authorities, including: © Her
Majesty the Queen in Right of Canada, © Queen’s Printer for Ontario. GeoBase
®
TERMS AND CONDITIONS
Personal Use Only. You agree to use this Data together with [insert name of ALPINE authorized Application] for the solely
personal, non-commercial purposes for which you were licensed, and not for service bureau, time-sharing or other similar
purposes. Accordingly, but subject to the restrictions set forth in the following paragraphs, you may copy this Data only
as necessary for your personal use to (i) view it, and (ii) save it, provided that you do not remove any copyright notices
that appear and do not modify the Data in any way. You agree not to otherwise reproduce, copy, modify, decompile,
disassemble or reverse engineer any portion of this Data, and may not transfer or distribute it in any form, for any
purpose, except to the extent permitted by mandatory laws.
Restrictions. Except where you have been specifically licensed to do so by ALPINE, and without limiting the preceding
paragraph, you may not (a) use this Data with any products, systems, or applications installed or otherwise connected to
or in communication with vehicles, capable of vehicle navigation, positioning, dispatch, real time route guidance, fleet
management or similar applications; or (b) with or in communication with any positioning devices or any mobile or
wireless-connected electronic or computer devices, including without limitation cellular phones, palmtop and handheld
computers, pagers, and personal digital assistants or PDAs.
No Warranty. This Data is provided to you “as is,” and you agree to use it at your own risk. ALPINE and its licensors (and
their licensors and suppliers) make no guarantees, representations or warranties of any kind, express or implied, arising
by law or otherwise, including but not limited to, content, quality, accuracy, completeness, effectiveness, reliability, fitness
for a particular purpose, usefulness, use or results to be obtained from this Data, or that the Data or server will be
uninterrupted or error-free.
Disclaimer of Warranty: ALPINE AND ITS LICENSORS (INCLUDING THEIR LICENSORS AND SUPPLIERS) DISCLAIM
ANY WARRANTIES, EXPRESS OR IMPLIED, OF QUALITY, PERFORMANCE, MERCHANTABILITY, FITNESS FOR A
PARTICULAR PURPOSE OR NON-INFRINGEMENT. Some States, Territories and Countries do not allow certain
warranty exclusions, so to that extent the above exclusion may not apply to you.
Disclaimer of Liability: ALPINE AND ITS LICENSORS (INCLUDING THEIR LICENSORS AND SUPPLIERS) SHALL NOT
BE LIABLE TO YOU: IN RESPECT OF ANY CLAIM, DEMAND OR ACTION, IRRESPECTIVE OF THE NATURE OF
THE CAUSE OF THE CLAIM, DEMAND OR ACTION ALLEGING ANY LOSS, INJURY OR DAMAGES, DIRECT OR
INDIRECT, WHICH MAY RESULT FROM THE USE OR POSSESSION OF THE INFORMATION; OR FOR ANY LOSS
OF PROFIT, REVENUE, CONTRACTS OR SAVINGS, OR ANY OTHER DIRECT, INDIRECT, INCIDENTAL, SPECIAL
OR CONSEQUENTIAL DAMAGES ARISING OUT OF YOUR USE OF OR INABILITY TO USE THIS INFORMATION,
ANY DEFECT IN THE INFORMATION, OR THE BREACH OF THESE TERMS OR CONDITIONS, WHETHER IN AN
ACTION IN CONTRACT OR TORT OR BASED ON A WARRANTY, EVEN IF ALPINE OR ITS LICENSORS HAVE BEEN
ADVISED OF THE POSSIBILITY OF SUCH DAMAGES. Some States, Territories and Countries do not allow certain
liability exclusions or damages limitations, so to that extent the above may not apply to you.
Export Control. You agree not to export from anywhere any part of the Data provided to you or any direct product thereof
except in compliance with, and with all licenses and approvals required under, applicable export laws, rules and
regulations.
Entire Agreement. These terms and conditions constitute the entire agreement between ALPINE (and its licensors,
including their licensors and suppliers) and you pertaining to the subject matter hereof, and supersedes in their entirety
any and all written or oral agreements previously existing between us with respect to such subject matter.
Governing Law. The above terms and conditions shall be governed by the laws of the Illinois [insert “Netherlands” where
European NAVTEQ Data is used], without giving effect to (i) its conflict of laws provisions, or (ii) the United Nations
Convention for Contracts for the International Sale of Goods, which is explicitly excluded. You agree to submit to the
jurisdiction of Illinois [insert “The Netherlands” where European NAVTEQ Data is used] for any and all disputes, claims
and actions arising from or in connection with the Data provided to you hereunder.
2005 NAVTEQ All rights reserved.
4
Page 6
Government End Users. If the NAVTEQ Data is being acquired by or on behalf of the United States government or any
other entity seeking or applying rights similar to those customarily claimed by the United States government, (i) for
acquisitions conducted by the Department of Defense, the NAVTEQ Data is licensed with “Limited Rights” in accordance
with the rights set forth at DFARS 252.227-7013(b)(3), TECHNICAL DATA-NONCOMMERCIAL ITEMS, and NAVTEQ Data delivered
or otherwise furnished with “Limited Rights” shall be marked with the following “Limited Rights Notice” set forth at DFARS
252.227-7013(f)(3), and shall be treated in accordance with such Notice:
LIMITED RIGHTS
CONTRACT NO.: __________________________________________________
C
ONTRACTOR
The Government’s rights to use, modify, reproduce, release, perform, display, or disclose these technical data are
restricted by paragraph (b)(3) of the Rights in Technical Data-Noncommercial Items clause contained in the above
identified contract. Any reproduction of technical data or portions thereof marked with this legend must also reproduce
the markings. Any person, other than the Government, who has been provided access to such data must promptly notify
the above named Contractor.
and; (ii) for civilian agency acquisitions, the NAVTEQ Data is licensed in accordance with the rights set forth at FAR
52.227-14(g)(1), RIGHTS IN DATA-GENERAL (
Contracting Officer requires the delivery of limited rights NAVTEQ Data that has been withheld or would otherwise be
withholdable in accordance with FAR 52.227-14(g)(1), the NAVTEQ Data is licensed with “Limited Rights” as set forth in
the following “Limited Rights Notice” at FAR 52.227-14(g)(2) (Alternate II), which shall be affixed to the NAVTEQ Data
and the NAVTEQ Data shall be treated in accordance with such Notice (which shall be marked on any reproduction of
these data, in whole or in part):
(M
ANUFACTURER/SUPPLIER
CONTRACTOR (MANUFACTURER/ SUPPLIER) NAME: NAVTEQ
) A
DDRESS
: 222 Merchandise Mart Plaza, Suite 900, Chicago, Illinois 60654
Protection of limited rights data and computer software
). In the event that the
LIMITED RIGHTS NOTICE (JUN 1987)
These data are submitted with limited rights under Government Contract No. _____ (and subcontract ______, if
appropriate). These data may be reproduced and used by the Government with the express limitation that they will not,
without written permission of the Contractor, be used for purposes of manufacture nor disclosed outside the Government;
except that the Government may disclose these data outside the Government for the following purposes, if any, provided
that the Government makes such disclosure subject to prohibition against further use and disclosure:
additional purposes permitting disclosure of such Data.
The manufacturer/supplier of the Data is NAVTEQ, 222 Merchandise Mart Plaza, Suite 900, Chicago, Illinois 60654.
If the Contracting Officer refuses to use either of the licenses provided in (i) or (ii), herein, the Contracting Officer must notify
NAVTEQ prior to seeking additional or alternative rights in the NAVTEQ Data.
There are no
Traffic Information in the UK provided by RAC Trafficmaster
Telematics Ltd.
V-Trafic informations in France are provided by Mediamobile company.
The product includes Seven-digit post code DB data in United kingdom
licensed by Ordnance Survey.
License Number 100041629
Note:
German traffic information is available on this model only if the traffic information service
(T-traffic), provided by T-Mobile, is used.
WARNING
• Operation of the system while driving is dangerous. Users should stop vehicle before operating the
software.
• Road conditions and regulations take precedence over information contained on the map display:
observe actual traffic restrictions and circumstances while driving.
• This software is designed for use exclusively in the NVE-N099P series. It cannot and may not be used in
conjunction with other hardware.
5
Page 7

Table of Contents
PRECAUTIONS
IMPORTANT INFORMATION, PLEASE
READ CAREFULLY BEFORE USING
THIS PRODUCT. ....................................... 2
Points to Observe for Safe Usage ................. 3
END-USER TERMS .................................... 4
Preface
Navigation terminology ................................ 8
Features......................................................... 9
How to Use the Disc ................................... 11
Before Using The System
Rewriting operating system programme..... 12
Switching the display on or off................... 12
Touch operation .......................................... 13
How to switch the map displays ................. 15
Main menu and sub-menu .......................... 18
Point setting menu ...................................... 19
Change the map scale ................................. 20
Changing the orientation of the map .......... 20
About congestion area ................................ 21
About active route search ........................... 22
Basic Operation
Deciding the route ...................................... 23
Selecting from the route menu
(three routes searching) ............................ 25
Suspending or resuming the route
guidance .................................................... 26
Erasing the route ......................................... 26
Registering your home................................ 27
Searching For Destinations
Searching for a destination from
its address ................................................. 29
Searching for a point of interest (POI) ....... 30
Searching from postcode ............................ 31
Setting the local point icon display ............ 32
Searching for the local POIs using
the their icons .................................................
Searching from telephone number.............. 33
Searching from memory points .................. 34
Searching by quick access points ............... 34
Searching for home..................................... 34
Searching from previous destinations
searched .................................................... 35
Searching from intersection ........................ 35
Searching from motorway entrance/exit..... 36
Searching from start point .......................... 36
Searching from coordinates ........................ 37
Searching by scrolling displayed map ........ 37
32
Route Checking
Overviewing the searched route ................. 38
Previewing the searched route .................... 38
Guidance Screen Configuration
Guidance map display ................................ 39
Dual-screen display .................................... 40
Route Editing
Adding destinations .................................... 41
Reordering destinations .............................. 41
Deleting destinations .................................. 42
Searching for a detour ................................ 42
Changing the conditions for the
route searching..............................................
Setting the route options ............................. 43
43
Memory Points
Storing locations in memory ...................... 44
Deleting the memory points ....................... 44
Editing the memory points ......................... 45
Deleting the stored previous destinations ... 47
6
Page 8

TMC Operation
Setting the RDS-TMC ................................ 48
Displaying the traffic event information
on route ...........................................................
49
Displaying all receiving traffic event
information ............................................... 50
Displaying the TMC event list .................... 50
Detailed display of traffic event.................. 50
Customizing Setups
How to change the setups ........................... 51
Screen position adjustment ......................... 53
Others
Vehicle position/direction correction .......... 54
Resetting after tyre replacement ................. 54
Adjusting the volume level for the
navigation system ..................................... 55
Drive simulation ......................................... 55
Displaying system information................... 56
Automatic dial operation ............................ 56
Automatic dialling from a point
of interest item ...............................................
56
Automatic dialling from a memory point ... 57
Reference
Buttons and functions of remote controls... 58
Remote control button and touch button .... 59
In case of difficulty ..................................... 60
If this message appears ............................... 61
• This manual explains operations using remote
control RUE-4141.
If the navigation system is connected to Alpine
touch panel-compatible monitor IVA-D310R, IVAD310RB, IVA-D100R, IVA-D100RB, IVA-W200Ri,
TME-M770S or TME-M860, etc., the touch
operation is possible. For details, refer to “Touch
operation” on page 13.
7
Page 9
Preface
Navigation terminology
Navigation
The navigation system displays and tracks the
vehicle’s position and movement on a moving
map display. When a destination is input, the
navigation system quickly calculates a route and
guides you along the route with pictorial displays
and voice prompts.
Current vehicle position
The navigation system integrates the GPS (Global
Positioning Satellite) signals received and the map
information stored on the DVD ROM to display the
position and direction of the vehicle. The system
also includes a gyroscope and a speed sensor
that enable it to display the present position even
in locations where the GPS signals may be
blocked.
Current vehicle
position
Map matching
Since GPS navigation has an error of 100 – 655
feet (30 m – 200 m), the position of your vehicle
may be displayed off the road. Map matching
automatically corrects this error so that the
position of your vehicle is displayed on the road.
Memory points
Locations you go to
frequently can be stored
into memory and marked
on the map. The system
can store up to 200 points.
You can add icons at the
memory points so that the
system also displays the
icons on the map.
Memory point mark
Motorway-preference selection
When searching for routes with the navigation
system, you can switch between searching for
routes that give priority to motorways and those
that give priority to ordinary roads. When you
specify motorway preference, the navigation
system automatically searches for a route that
gives priority to motorways and guides you along
that route.
Destination
The point on the map that
is your destination is
specified and displayed
with the destination icon.
You can set up to 5
destinations for the same
journey.
Route
When a destination is
input, the navigation
system automatically
calculates a route and
displays it in blue on the
map.
8
Destination icon
Route
(Blue)
Page 10

Features
• Detour of Congestion Area
Areas in London, for example, where a
congestion tax has been introduced, are shown
in pink on the map (scale less than 1.6km). You
can also search for a detour of a congested
area.
• Active Route Search Function
While following the route you have set, this
function continuously searches for alternative
routes to optimize travel time. In addition, if a
TMC traffic event occurs, an alternative route
will be searched. You will be immediately
informed of any new route that becomes
available.
• 3-Dimensional Map Display
A bird's eye view, 3-dimensional map can also
be displayed.
• Ordinary Road Lane Information
Display
If lane information is given at an ordinary
crossroads, you can safely follow the lane
information as displayed.
• Automatic Route Calculation
Just select the destination and your navigation
system does the rest, automatically searching
for the route you need.
• Real Time Voice Guide
A voice guide informs you of the distance and
direction until your course changes, giving
advice timed to match road conditions.
The VOICE button lets you repeat the last voice
guide when needed by just pushing the button.
The voice guidance may not be given if the
vehicle’s present position is too near the
destination.
• Dual-screen Display
Two different maps or guidance screens can be
displayed simultaneously. For example, the map
screen and the arrow-guide screen, or the map
screen and the motorway screen.
• Voice Guidance and 3-D Junction
View Display at an Exit or
Junction on Motorways
When you approach an exit or junction on the
motorway, the system gives you voice guidance
using the same name as shown on the road
signboards. An exit or junction is shown on the
display in real appearance.
• Map Zooming
You can change the map display in 14
magnification scales (50,100, 200, 400, 800,
1.6K, 3K, 7K, 13K, 26K, 50K, 100K, 200K and
400K metres) to show more detailed or wider
views by pressing the 3 or 4 button on the
remote control.
• Direct Input of Name of Place of
Interest
Input only the name of a place of interest
(without inputting the city name) to search for
the route to the place of interest.
• Twelve Languages Selectable for
the Voice Guidance
You can choose one of the twelve languages
(English, German, French, Italian, Dutch,
Spanish, Swedish, Danish, Polish, Hungarian,
Czech or Slovak) for the voice route guidance.
• Multiple-Destination Setting
You can set up to 5 destinations in any order
you like for the same journey.
• Intersection Zoom
As you near intersections and cross points, the
map display automatically zooms in to show a
more detailed view that you will need. This
means there is no need to press the zoom
buttons.
(To be continued)
• Direct Inputting of Phone
Number
By inputting the phone number of a memory
point you have stored, the system can search
for it as the destination.
9
Page 11

Preface
• Built-in Gyroscope and Speed
Sensors
The gyroscope for sensing direction and the
speed pulse sensor for detecting distance
provide data which allows the vehicle position
and direction to be displayed even in locations
where the GPS signals cannot be received such
as between high buildings or in tunnels.
• Motorway Information Display
When you travel on motorways, the basic
guidance display (with an arrow) automatically
shows the distances to the next fuel station/
restaurant/parking/junction (except exit).
• Built-in RDS-TMC Receiver
Real time traffic information from the Traffic
Message Channel (TMC) will be automatically
received. In the event of a traffic jam or traffic
restriction, etc., you will be informed by voice
and visual guidance.
TMC traffic information is already broadcast in
Germany, UK, France, Italy, Belgium, Denmark,
the Netherlands, Spain, Sweden, Switzerland,
Austria, Norway and Finland.
•RDS-TMC information may not be received
depending on FM radio reception and TMC
service conditions.
• Two Types of Operation
The operation for the navigation system can be
performed with both the supplied remote control
(RUE-4141) or touch button.*
Touch button operation can be performed only when you
*
connect to Alpine Touch panel-compatible monitor IVAD310R, IVA-D310RB, IVA-D100R, IVA-D100RB, IVAW200Ri, TME-M770S or TME-M860, etc. For details,
refer to “Touch operation” on page 13. See also the
Owner’s Manual of the touch panel-compatible monitor.
10
Page 12

How to Use the Disc
There are two discs: the EAST version, and the WEST version. Information other than Coordinates and
Memory points contained in the EAST version disc cannot be searched by the WEST version disc, and
vice versa. Places in the EAST version disc area, for example, can only be found on the EAST version
disc.
The EAST and WEST version discs cover the areas as shown in grey below. There are some overlap
countries* which are stored in both discs.
* Overlap countries: Switzerland, Austria, Czech Republic, Germany, and Denmark
EAST version disc area WEST version disc area
Notes:
• You can set a destination outside of the disc area by Coordinates (latitude and longitude) or Memory
point search, but neither the route search nor guidance is performed. (Use the directional arrow
and straight-line distance information to proceed to your destination.) For details, refer to
“Searching from memory points” (page 34) and “Searching from coordinates” (page 37).
• If you insert the disc not corresponding to your current position, the map screen is not displayed,
but the compass screen (current vehicle position information display) is.
Tips:
Displaying the route to a destination outside of the disc area:
To display the route to a destination outside of the disc area, add a mid-stage destination in an
overlapping country that is between your current car position and your final destination. Proceed on
the highlighted route to the mid-stage destination, then switch discs, and proceed to the final
destination. Refer to “Adding destinations” on page 41.
11
Page 13
Before Using The System
Rewriting operating system
programme
If a different version of the map disc is used with
your navigation system, the operating system
programme installed will be rewritten automatically
to read this SMART MAP PRO disc.
Insert this SMART MAP PRO disc
into the NVE-N099P. (For removing
1
and inserting procedures, refer to
the Owner’s Manual of the system.)
The system starts rewriting of the operation
system programme. While the programme
is being rewritten, do not turn the power off
and on to the system, or do not eject the
disc.
The opening screen appears in the
display.
2
The important information changes
to the selected language.
Be sure to read the important
information.
Language selection menu
After you have read this important
information, select “I agree” and
2
press the ENTER button.
The map screen is displayed.
Note:
For the locations and functions of the remote
control’s buttons, see pages 58 and 59.
Switching the display on or off
With the Alpine navigation system, when the
ignition key is turned to ACC or ON and the
display monitor is set in navigation display mode
or external input display mode, the opening
screen will be automatically displayed.
For operation of the remote control, see pages 58
and 59 and the Owner’s Manual for your system.
After the opening screen is
displayed, important information
1
saying “CAUTION” and the language
selection menu are automatically
displayed.
There are twelve languages to
choose from. Select (highlight) your
desired language for the picture/
voice guidance and texts by tilting
the joystick on the remote control,
then press the ENTER button on the
12
top of the joystick to execute the
selection.
To turn off the navigation, press the
ON/OFF button on the remote
3
control.
When you press the ON/OFF button again,
the display monitor is turned on and the
opening screen is displayed.
Tips:
•If there is no disc in the navigation system,
“No DVD. Please insert map DVD.” is
displayed. For details on how to load or
remove the disc, refer to the “Inserting the
DVD-ROM” and “Removing the DVD-ROM”
sections in the manual for the navigation
system.
•If the inserted disc cannot be read, the
“Unable to read data. Check if map DVD is
correct.” message is displayed. Load the
correct disc.
•If the monitor is kept on with the engine off
for an extended period of time, the battery
may discharge.
•If Polish (PL), Hungarian (H), Czech (CZ), or
Slovak (SL) is selected in the language
selection menu, the on-screen display
language is English.
Page 14
Touch operation
If the navigation system is connected to Alpine touch panel-compatible monitor IVA-D310R,
IVA-D310RB, IVA-D100R, IVA-D100RB, IVA-W200Ri, TME-M770S or TME-M860, etc., touch operation
can be performed by directly touching the monitor.
Touch Button Operation
Notes:
•Be sure to touch the button lightly with the pad of your finger on the display to protect the display.
•If you touch a button and there is no reaction, remove your finger from the display once, and try again.
•Touch buttons that cannot be operated appear dull in colour.
L Remote Control and Touch Button Operation
This manual explains operation using the remote control. Operate the touch panel as you would the
joystick or ENTER button on the remote control. In addition, the touch buttons that are displayed on the
lower part of the screen are provided only for touch panel use. These buttons function the same as the
shortcut buttons on the remote control. For details, refer to the comparison table of the remote control
buttons and the touch buttons, on page 59.
Remote Control Operation
Ex.1
Press the MENU button on the
remote control to display the main
menu.
Touch Button Operation
Touch “ ” to display the main
menu.
(To be continued)
13
Page 15

Before Using The System
Ex.2
Select (highlight) “Destination” from
the main menu by tilting the joystick
on the remote control and press the
ENTER button on the top of the
joystick.
Ex.3
Search for a desired destination by
scrolling the map with the joystick.
The map scrolls in the direction in
which the joystick is tilted. Bring the
destination point on the map under
the reticule icon and press ENTER.
The point setting menu appears.
Touch “Destination” from the main
menu.
Touch on the display and scroll the
map. Align a desired point in the
centre of the map by touching
“
”. The point setting menu
appears.
Note:
Touch operation is described as “Touch.”
14
Page 16
How to switch the map displays
Once the route setting has been performed and
travelling started, the navigation system provides
the driver all of the major route information with
real time voice directions and guidance displays.
You can manually select the desired guidance
displays for your convenience.
L Current Vehicle Position Display
a
b
c
d
e
f
g
a Map orientation
Shows the map orientation for up on the current
map.
: North up (2 Dimension map)
: Heading up (2 Dimension map)
: 3-D (3 Dimension map)
(The arrowhead shows the direction of north. To
change the map orientation, see page 20.)
b Scale
400 m
←→
c GPS signal state
No icon:
No satellite information being received or satellite
signals are being calculated.
Icon is displayed:
Receiving GPS signals
(in 2-dimensional or 3-dimensional).
d TMC indicator
For details, see page 48.
e Distance to the destination
f Estimated required time
1 25
h min
9:30
g Point Setting Menu button
Point setting menu on or off.
For details, see page 19.
The distance between the arrows on the
screen is 400 metres ( mile).
1
4
: Estimated remaining time before arrival
: Anticipated arrival time
The Current Vehicle Position Display is
automatically displayed when travelling starts.
Pressing the 4 or 3 button on the remote control
while the map is being displayed the map will be
zoom in or out. To return to the current vehicle
position screen display from other screen
displays, press the POS. button.
h
i
j
k
l
m
n
o
h Lane guidance
Approximately 150m before an intersection you
are to go straight over, the guidance lane will
appear highlighted.
i Information on the next intersection
j Guidance Point
Crossroads and junctions are displayed as you
approach them.
k Route
l Current vehicle position icon
m Street name
The name of the current street.
n Current time display
The current displayed time is derived from GPS
signals and cannot be changed.
o Touch buttons are used only for touch
operation.
(These buttons are lit when you press the
corresponding button on the remote control.)
(To be continued)
15
Page 17
Before Using The System
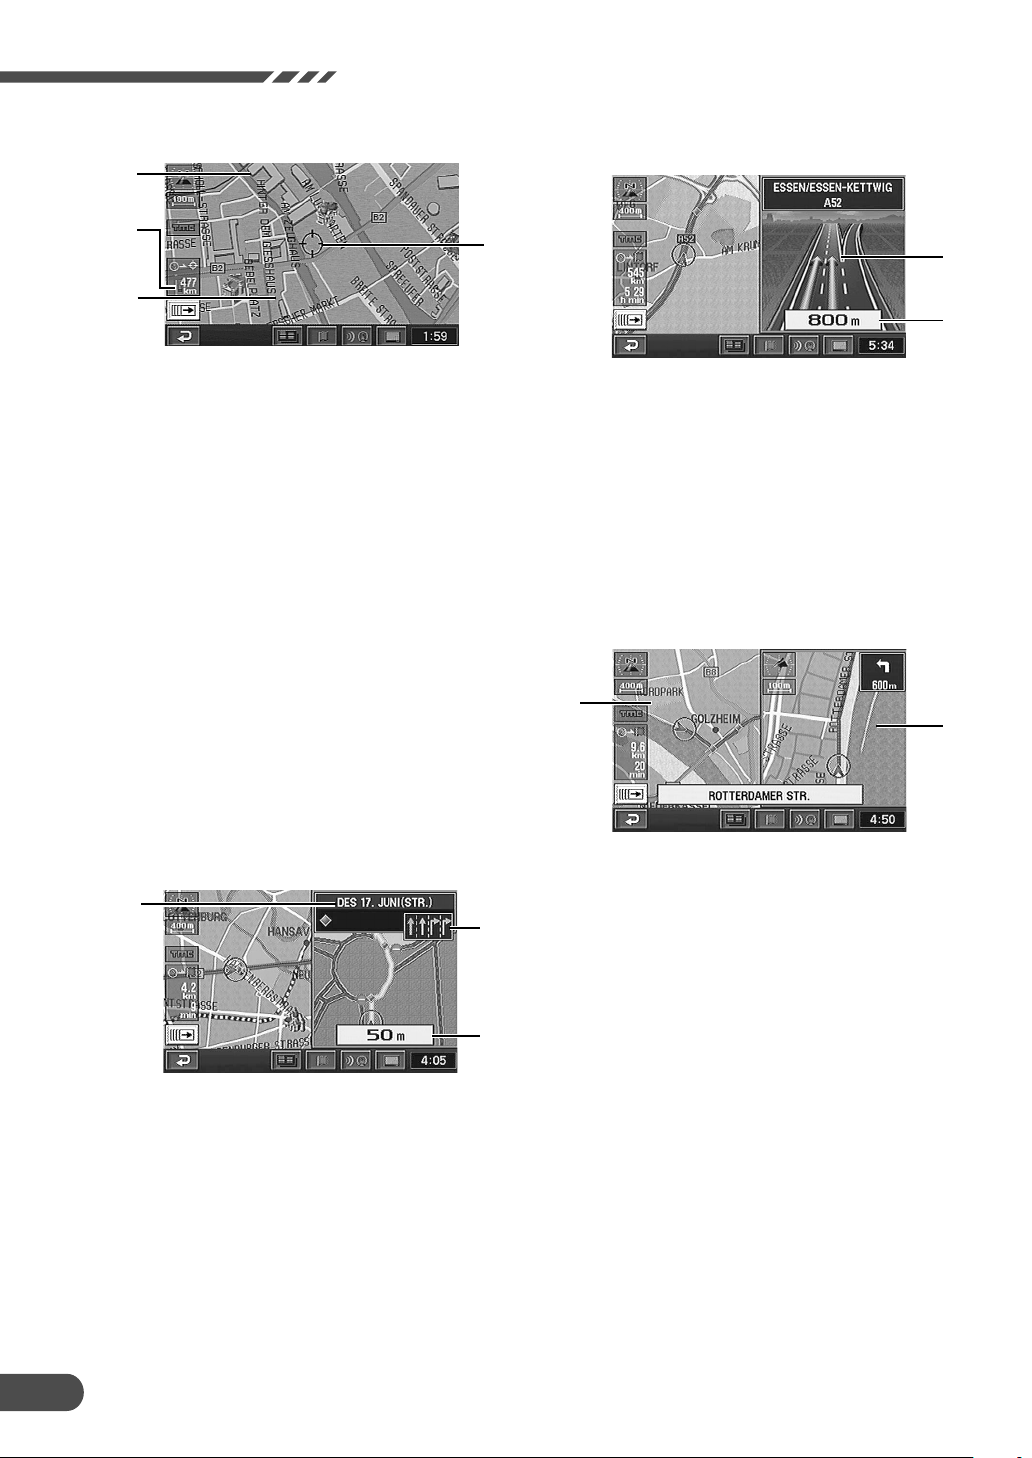
L Point Display
d
L
3-D Display for Motorway Junction
b
c
a Reticule icon
The reticule icon is displayed on the screen after
you have searched for a local point or scrolled the
map.
b Distance from the current vehicle position
Distance in a straight line from the current vehicle
position.
c 3-D landmark icon
For details, see page 20.
d Building Outlines
For details, see page 20.
L
Zoomed Intersection Map Display
a
During navigation, when your vehicle approaches
an intersection, the Zoomed Intersection Map of
that intersection is displayed. This enlarged
Intersection Map gives you further information via
voice guidance.
(Sometimes, the enlarged crossroads map is
displayed even when you are going to go straight.)
a
b
a
b
a Motorway junction
b Distance to the intersection
(Red point on the route)
Note:
Applicable to some areas in Germany, UK, France,
Belgium, The Netherlands, Luxembourg, Italy, Spain,
Portugal, Switzerland and Austria.
L Dual - Screen Display
a
b
a Left screen
b Right screen
a Next road name/Junction name
Ordinary Road: Name of next road ahead.
Motorway: Name of next junction ahead.
b Lane guidance
If there is lane guidance at an intersection, it will
appear with the guidance lane highlighted.
c Distance to the intersection
(Red point on the route)
Note:
Any petrol station near the intersection will appear as
an icon in the intersection zoomed screen.
16
c
Page 18
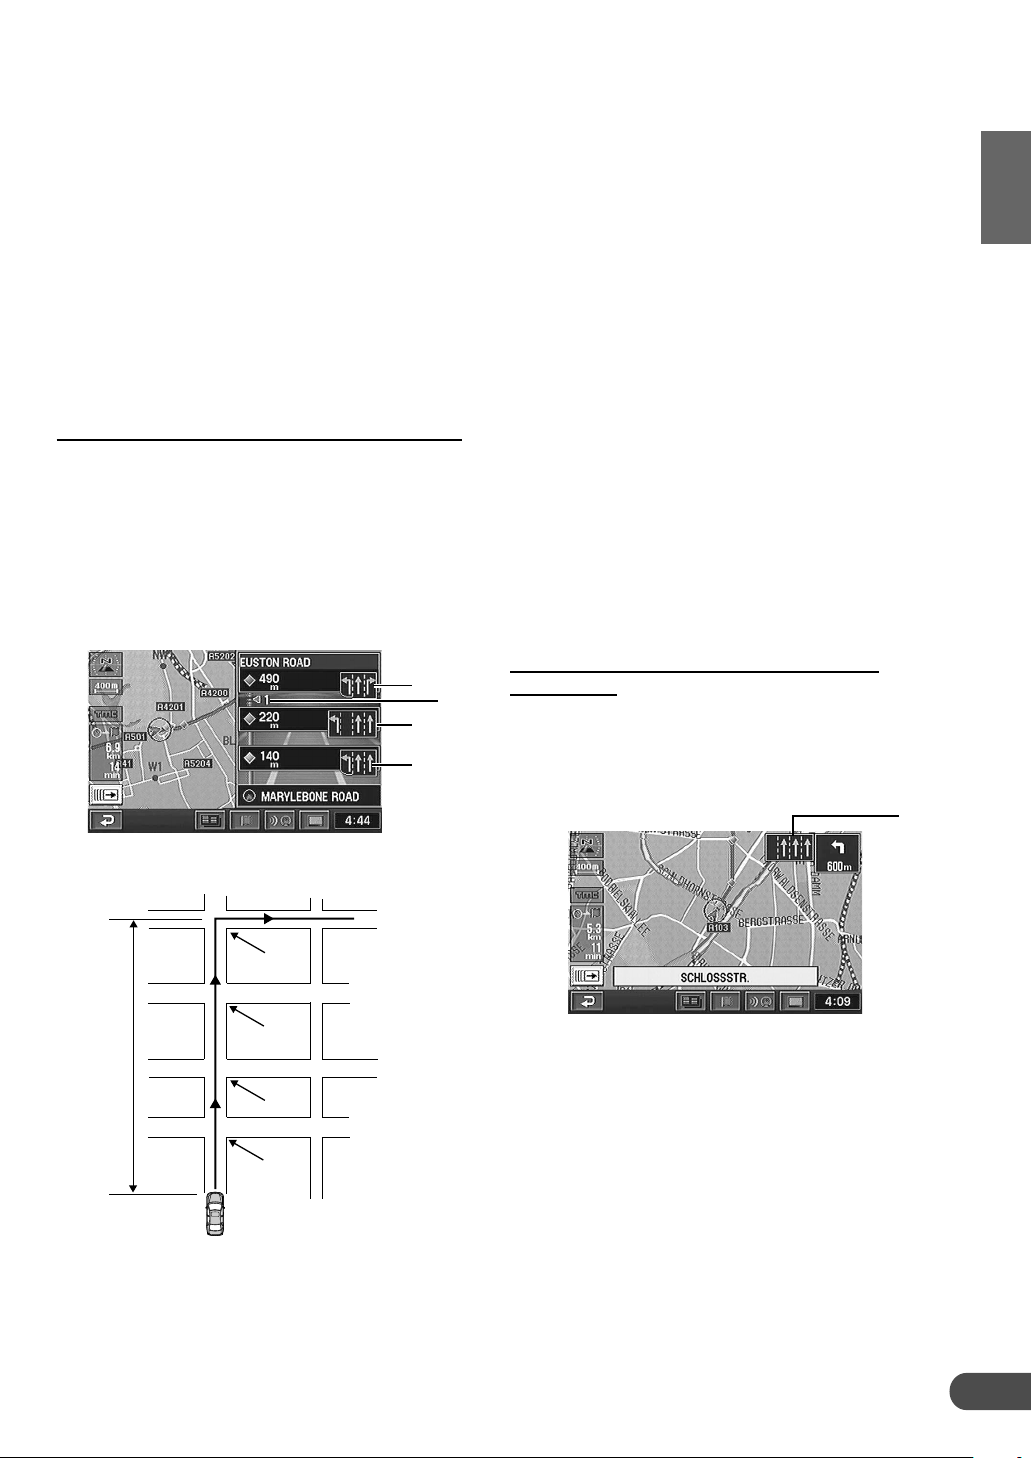
L Lane Guidance
During navigation, when your vehicle approaches
an intersection, if lane information is available,
lane information is displayed on the screen, along
with voice guidance.
Lane information appears in the following
situation:
• approx. 800m before an intersection to turn left or
right
• approx. 150m before an intersection to go straight
over
• Zoomed Intersection Map Display
Approaching an intersection to turn left or right
When your vehicle approaches an intersection
with lane information provided ahead of approx.
800m before turning left or right, the guidance
screen appears and lane information is displayed.
If there is an intersection you are to go straight
over between the vehicle's present position and
turning left or right, the lane guidance is also
displayed.
a
b
c
d
a Lane information for turning left or right at an
intersection
The distance between the vehicle's present
position and the intersection and lane information
are displayed in the zoomed intersection map
display.
b Number of other intersections to be driven
straight over
The total number of intersections to be driven
straight over before turning left or right is
displayed.
c Lane information for intersections to be driven
straight over
The distance and lane information are displayed
from the vehicle's present position to the last two
intersections to be driven straight over.
d Lane information for intersections to be driven
straight over
The distance between the vehicle's present
position and the last intersection before turning left
or right (and its lane information) is displayed.
Lane information for going straight over an
intersection
Lane information on the map is displayed approx.
150m ahead of an intersection for going straight
over where lane information is provided.
800m
a
a
b
c
d
a Lane information for going straight over an
intersection
Notes:
• Lane information is not displayed at intersections
with no lane information registered.
• The guidance lane in the route display is
highlighted.
• You can switch the lane information display ON or
OFF. For details, see pages 51 and 53.
• Lane guidance may not always follow actual traffic
conditions and should be followed accordingly.
• The direction arrow for a lane may not always be
displayed.
17
Page 19
Before Using The System
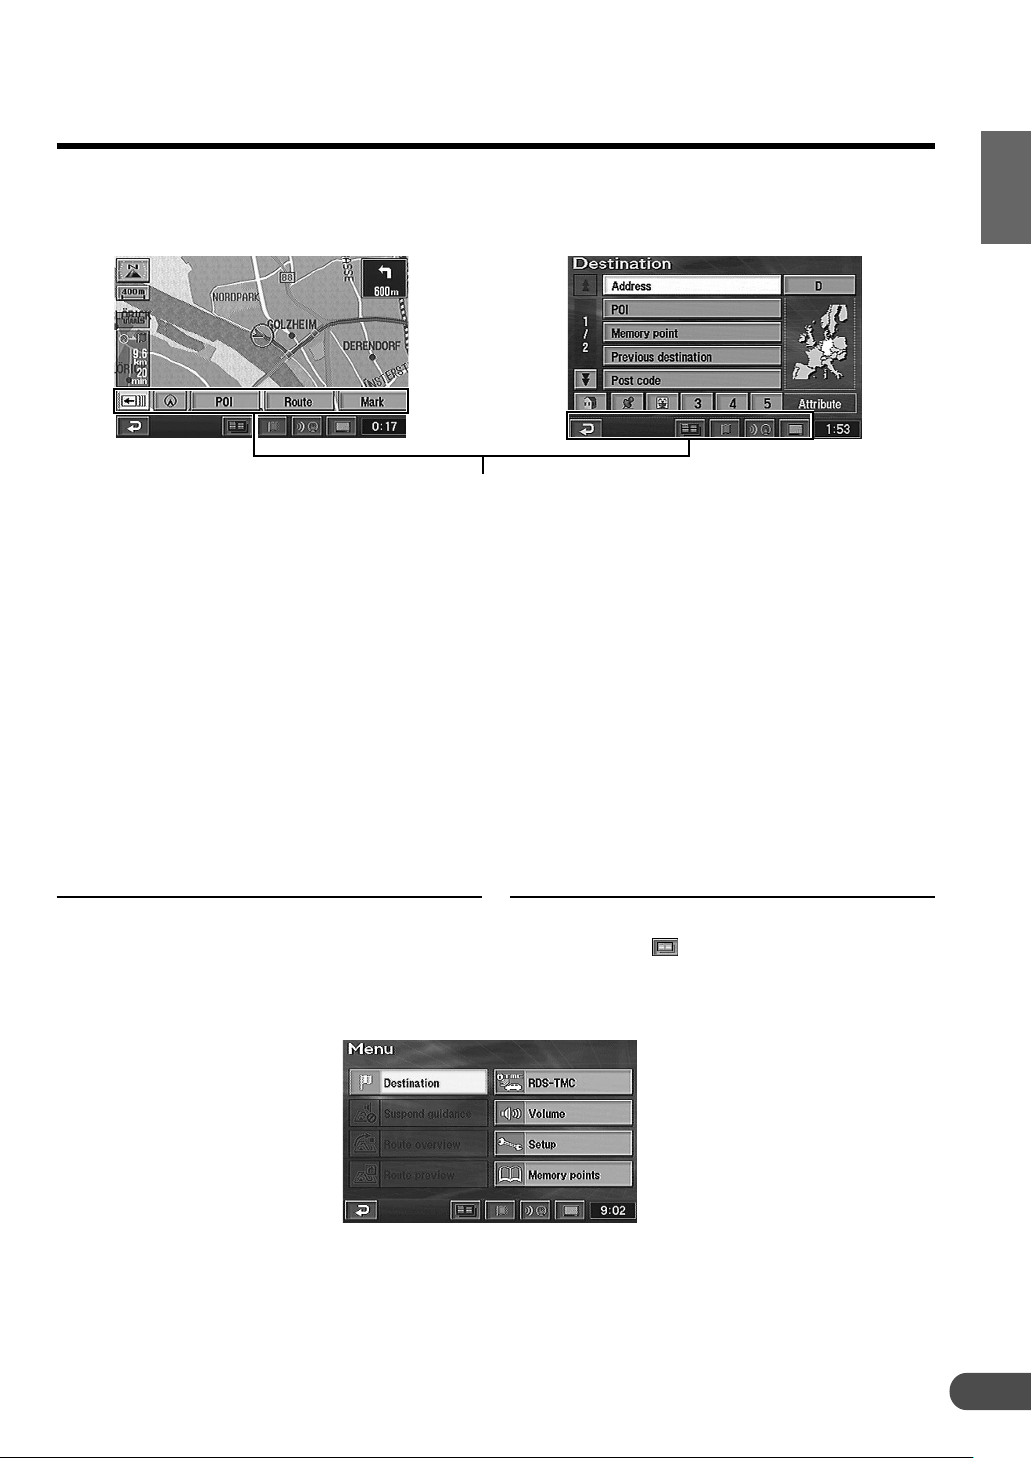
Main menu and sub-menu
Use the main menu to select a variety of the
system’s functions. Select (highlight) a desired
main menu item and press the ENTER button.
The sub-menu for the selected main menu item
automatically appears in the display.
Press the MENU button on the
remote control to display the main
1
menu when the navigation system is
on.
For the locations of the buttons on the
remote control, see pages 58 and 59.
The main menu appears on the
display.
2
Tilt the joystick to select (highlight)
a desired main menu item.
Make sure that the desired main
menu item is highlighted, then press
3
the ENTER button on the top of the
joystick to execute the selection of
the menu item.
The display shows the sub-menu for
the selected main menu item.
4
Highlight (select) a desired submenu item by tilting the joystick and
press the ENTER button.
The screen example shows when
“Destination” is selected.
c
a
b
d
a These arrows indicate that the list contains further
pages. The number indicates the page. To scroll the
page of the list, select “ ” or “ ” by tilting the joystick
and press ENTER.
b Register your home for easy selection of a single button
to set your destination. (For details, see page 34.)
c Searching country
(For details, see page 23.)
d Register frequently used memory points in Quick access
points (1 through 5) for easy selection of a single button
to set your destination. (For details, see page 34.)
Note:
Press the POS. button to return to the current vehicle
position screen.
If the name of a submenu item cannot be fully
displayed
Any characters that cannot fit in the submenu
screen can be viewed by scrolling the display.
18
a
b
a-
Characters not displayed can be displayed by
pressing -.
b/
Press / to return to the first character.
Page 20

Point setting menu
When a desired point is searched for using the Destination or Memory points menu etc. and the map
for the point area is displayed, the point setting menu is displayed. This menu is very useful when you
set the searched point as a destination or memory point. After selecting a menu item, press ENTER.
When the point map is displayed
using the Destination menu
a
b
cd
e
When the point map is displayed
using the Memory points menu
a
d
e
f
When the ENTER button is pressed
while a map screen without the
point setting menu is displayed
g
a
h
a SCALE: The scale screen is displayed by selecting this
menu. You can change the map scale by selecting
(zoom in) or (zoom out) and pressing ENTER within
2 seconds. For details, see page 20.
b Change: Select this menu when you want to change the
conditions in searching for a route, such as motorway
preference. For details, see page 43.
c Enter: Use this menu when you set the point as a
destination or an additional destination, and calculate
the route.
To set the selected point as an additional destination,
select “Enter” from the point setting menu and press
ENTER. The Add destination menu appears, select
“Add” and press ENTER.
Select “Replace” and press ENTER to replace the
current destination with a new one.
d : Select to turn the point setting menu display off.
You can scroll the map manually with the joystick.
: Select to display the point setting menu.
e Info.: Choose this menu when you want to get some
information about the point such as address, phone
number, etc. when the point is searched.
f Enter: Use this menu when you set the point as a
memory point.
g Map orient.: Select this menu when you want to change
the map orientation for the current map display.
h : This menu appears only when multiple
destinations are set. Use it when you specify the desired
destination.
i Screen configuration: The screen configuration
selection menu is displayed by selecting this menu. You
can select from various map displays. (For details, see
page 39.)
j POI: Use this menu when you want to display the POI
icons on the map or to display the “Local POI list” for the
displayed POIs.
k Route: Choose this menu when you want to change to
another route (this menu is displayed only when the
route has already been set).
l Mark: You can store the point as a memory point.
d
i
j
l
k
19
Page 21

Before Using The System
Change the map scale
Change the map magnification ratio upwards or
downwards (in 14 steps).
L Remote control operation
Press the 4 or 3 button while
displaying the map screen.
1
Each press of the button changes
the map scale. This changes rapidly
by pressing and holding either
button.
L Touch operation
Touch “ (SCALE).” Change the
map magnification ratio by touching
1
“
(zoom in)” or “ (zoom out)”
within 3 seconds. This changes
rapidly by pressing and holding
either button.
Changing the orientation of
the map
The map orientation can be set for either northern
heading up, or your current direction heading up,
the latter also featuring an optional, 3-dimensional
display feature. The icon in the upper left of the
screen indicates the current orientation.
While a map screen is being
displayed, press ENTER.
1
Touch:
In the case of touch operation, touch “ ”.
The point setting menu appears.
Select “Map orient ( / /
2
)” by tilting the joystick and
press ENTER.
If you want to change map orient
automatically, perform steps 1 and 2
repeatedly.
• 2-D North up
20
Notes:
•The 3D landmark icon cannot be displayed
on the map when map scale is more than
400m.
If you select the 3D landmark icon on the
map by tilting the joystick and press ENTER,
the point setting menu appears.
For details of the point setting menu, see
page 19.
Touch: In the case of touch operation, touch
the 3D landmark icon.
•The local POI icon cannot be displayed
when map scale is more than 800m. For
details, see page 32.
•When the map scale is 50m or 100m, the
display shows building outlines, including
capital landmarks.
•When the map scale is more than 1.6km,
the congestion area is not displayed. For
details, see page 21.
• 2-D Heading up
Page 22

• 3-D Heading up Map
About congestion area
Areas in London, for example, where a congestion
tax has been introduced, are shown in pink on the
map (scale less than 1.6km). You can also search
for a detour of a congested area.
To automatically find a congestion area detour
during a search, set “Allow congestion charging
zone” to detour in the road preference setting.
For details, see page 43.
Notes:
• The angle of the 3-D map cannot be
changed.
• If the map scale is more than 800m, the sky
background is displayed. The sky pattern is
fixed, but colour changes depending on the
map colour.
• When the 3-D map is scrolled, it changes
automatically to 2-D map (heading up).
• When dual-screen is displayed, 3-D map
cannot be selected on the right screen.
• When the Drive simulation function is on, the
3-D heading screen cannot be displayed.
L If “Allow congestion charging zone” is set to
Detour
If the destination is set in a congestion area and
a route is searched, a confirmation message is
shown. Select “Yes” or “No.”
a Yes
The navigation searches for a route through
the congestion area.
b No
The message shows the destination which is
set outside of the congestion area. Search for a
route when you have set the destination outside
of the congestion area.
L If “Allow congestion charging zone” is set to
Allow
Even if the destination is set in a congestion
area, the route is searched as usual.
Notes:
• When the current vehicle position is in a
congestion area, a route is searched, regardless of
the congestion area setting.
• If “Allow congestion charging zone” is set to Detour
after the destination has been set for a congested
area, an alternate route through the congested
area will be searched. If you want to avoid the
congested area, do another search, setting the
destination outside the congested area.
• When you search for a route through a congestion
area, “Allow congestion charging zone” is
automatically set to Allow.
•A route through a congestion area is indicated by a
beep and voice guidance.
Caution
If “Allow congestion charging zone” is set to detour,
in searching for a route through a congestion area,
decide your own detour route.
21
Page 23

Before Using The System
About active route search
The active route search updates traffic changes
from moment to moment, providing you with a
more accurate anticipated arrival time.
The active route search is performed based on
TMC restriction event (no entry, traffic jams, etc.).
When an optimal route is found, the message is
shown in the display and automatically changes
the route (when the active route search is set to
AUTO). For details, refer to pages 51 and 53.
L If the active route search is set to MANUAL
If an optimal route is found using the active
route search function, a confirmation message
is shown. Select “Yes” or “No.”
a Yes
Changes to a new route.
b No
Continues to guide you with the current route.
L If the active route search is set to AUTO
If an optimal route is found using the active
route search function, a message is shown and
the route will be automatically changed to a new
route.
Notes:
• If a newly searched route offers no difference in
anticipated arrival time, the navigation system may
continue to guide you via the current route.
• The distance for a newly searched route may be
longer than the current one.
c TMC event icon
The TMC event icon is displayed during active
route search. The distance is shown from the
current vehicle position to the TMC event. The
distance is displayed in km or miles, depending
on the distance setting (see page 51).
22
Page 24

Basic Operation
Deciding the route
There are three procedures to decide an
appropriate route to your desired destination;
searching for the location, searching for the route,
and deciding the route.
This section describes the operational procedures
when a destination is searched for using its
address as an example.
Press the MENU button on the
remote control to display the main
1
menu.
Select (highlight) “Destination” from
the main menu by tilting the joystick
2
on the remote control and press the
ENTER button on the top of the
joystick.
Note:
When you search for a location in another
country (area), you should change the search
country (area). In this case, select “Country
initial (D, GB, etc.)” by tilting the joystick, and
press ENTER. The Search area menu
appears, select the desired area (country) by
tilting the joystick and press ENTER. (Select
” or “ ” indicator on the display and
the “
press ENTER to scroll the area list.) When
you have selected the desired area, choose
“OK” by tilting the joystick and press ENTER.
The street or city name input
alphabet table automatically
4
appears. Tilt the joystick to select
the desired character for the first
position of the street name and
press ENTER. The input character
appears at the first position of the
text window. Repeat this procedure
to input the entire street name.
The Destination search menu
automatically appears. Select
3
“Address” from the Destination
search menu by tilting the joystick
and press the ENTER button.
Searching country
(This example shows when Germany is selected.)
Tips:
•When 1 character is input, the candidates
for the next character are narrowed down.
•Selecting “/” returns to the previous
numeral and erases it.
When the street name inputtings
have been completed, the list of the
5
input street names appears. Select
the desired street name by tilting the
joystick and press ENTER.
(To be continued)
23
Page 25

Basic Operation
Note:
If there are other streets with the same name
in other cities when the desired street name is
searched for in “All cities” mode, the list of the
city names will be displayed. Select the
desired city name and press ENTER.
The house number input table
appears automatically. Input the
6
house number in the same manner
as step 4 above. When the house
number inputtings have been
completed, select “OK” by tilting the
joystick and press ENTER.
The map showing the area of the
input address with the point setting
7
menu appears. Select “Enter” by
tilting the joystick and press ENTER.
The system starts calculation of the
8
route. When the calculation is
completed, the whole route and
route menu are displayed. Select
“Guide” by tilting the joystick and
press ENTER.
When you start driving this route,
the system displays the map with
9
the current vehicle position and
begins guidance.
24
Notes:
• If “Change” is selected, and ENTER is
pressed, you can change to set the Route
preference. For details, see page 43.
• If “Info.” is selected, and ENTER is pressed,
information around the destination can be
displayed. For details, see page 19.
Current vehicle position
Tips:
You can search for a location from various
items as shown below.
Searching from Page No.
Address P29
POI P30, 31
Postcode P31
Local POI P32
Telephone number P33
Memory point P34
Quick access point P34
Home P34
Previous destination P35
Intersection P35
Motorway entrance/exit P36
Previous starting point P36
Coordinates P37
Map P37
Page 26

Selecting from the route menu (three routes searching)
The system calculates up to three routes
simultaneously including the recommended route.
You can choose any one of the routes.
When you have selected a desired
destination, the navigation system
1
calculates up to 3 routes and the
system automatically displays the
“All-route” screen and route menu.
Select the desired route menu item
and press ENTER.
2
The route menu items:
a Guide: Starts the route guidance.
Note:
If you want to view the drive simulation to
check the details of the route, select “Guide”
then press and hold the ENTER button for at
least 5 seconds while the whole route screen
is displayed. (For more information, see page
55.)
a 3 routes: Displays the 3 Routes screen.
Select a desired route by tilting the joystick
and press ENTER.
The list showing information about the distance and
required time to the destination is displayed.
• Quick1 (recommended route 1):
Route consists mainly of wide country/main roads.
• Quick2 (recommended route 2):
Recommended alternative route to Quick1.
• Short (distance preference route):
Route is the shortest possible distance.
Tips:
• Quick1 is normally the route that requires
the shortest time. However, Quick2 or Short
may be even shorter, depending on the
search condition or a destination.
• For the search condition, refer to “Setting
the route options” on page 43.
• The “Short” route distance may not always
be less than “Quick1” or “Quick2.”
a Route: Displays the Change route screen.
For details, see page 41.
25
Page 27

Basic Operation
Suspending or resuming the
route guidance
You can very easily suspend the route guidance
temporarily and resume it.
Note:
The route information remains in memory even if the
route is cancelled. To erase the route information
delete the destination, see “Erasing the route” (next
section).
Press the MENU button to display
the main menu.
1
To temporarily suspend the route
guidance, select “Suspend
2
guidance” in the main menu by
tilting the joystick and press ENTER.
Erasing the route
Press the MENU button to display
the main menu.
1
Select “Route overview” from the
main menu by tilting the joystick
2
and press ENTER.
The “Route overview” screen
appears. Select “Route” by tilting
3
the joystick and press ENTER.
26
1-02-2
Note:
When the guidance is suspended, the main
menu automatically changes to show
“Resume guidance.”
To resume the route guidance,
select “Resume guidance” in the
3
main menu by tilting the joystick
and press ENTER.
Page 28

The “Change route” screen appears.
Select “Delete” and press ENTER.
4
Note:
If multiple destinations are set, the “Delete
destination” screen showing the list of the
destinations appears. Select the destination to
be deleted (or “Delete all” to delete all
destinations) by tilting the joystick and press
ENTER.
The confirmation dialogue message
appears. Select “Yes” by tilting the
5
joystick and press ENTER if you
want to delete the destination(s) and
route.
Registering your home
Register your home first. When your home is
registered, you can recall it very quickly and
setting the route for returning home is simple.
Press the MENU button to display
the main menu.
1
Select “Memory points” from the
main menu by tilting the joystick
2
and press ENTER.
The sub-menu appears. Select
“Register” by tilting the joystick and
3
press ENTER.
(To be continued)
27
Page 29

Basic Operation
To search for your home location,
select the searching method
4
described in the Searching for a
Destination section on page 29.
When the map showing the area of
your home is displayed, Select
5
“Enter” by tilting the joystick and
press ENTER.
The “Change attribute” screen
appears.
7
Select “
and press ENTER.
Note:
You can register only one home.
Select “OK” by tilting the joystick
and press ENTER.
8
” by tilting the joystick
The “Memory point” screen appears.
Select “Attribute” by tilting the
6
joystick and press ENTER.
Note:
You can change icons or names displayed on
the map.
For details, see page 45.
Press the POS. button to return to
the current vehicle position map.
9
28
Page 30

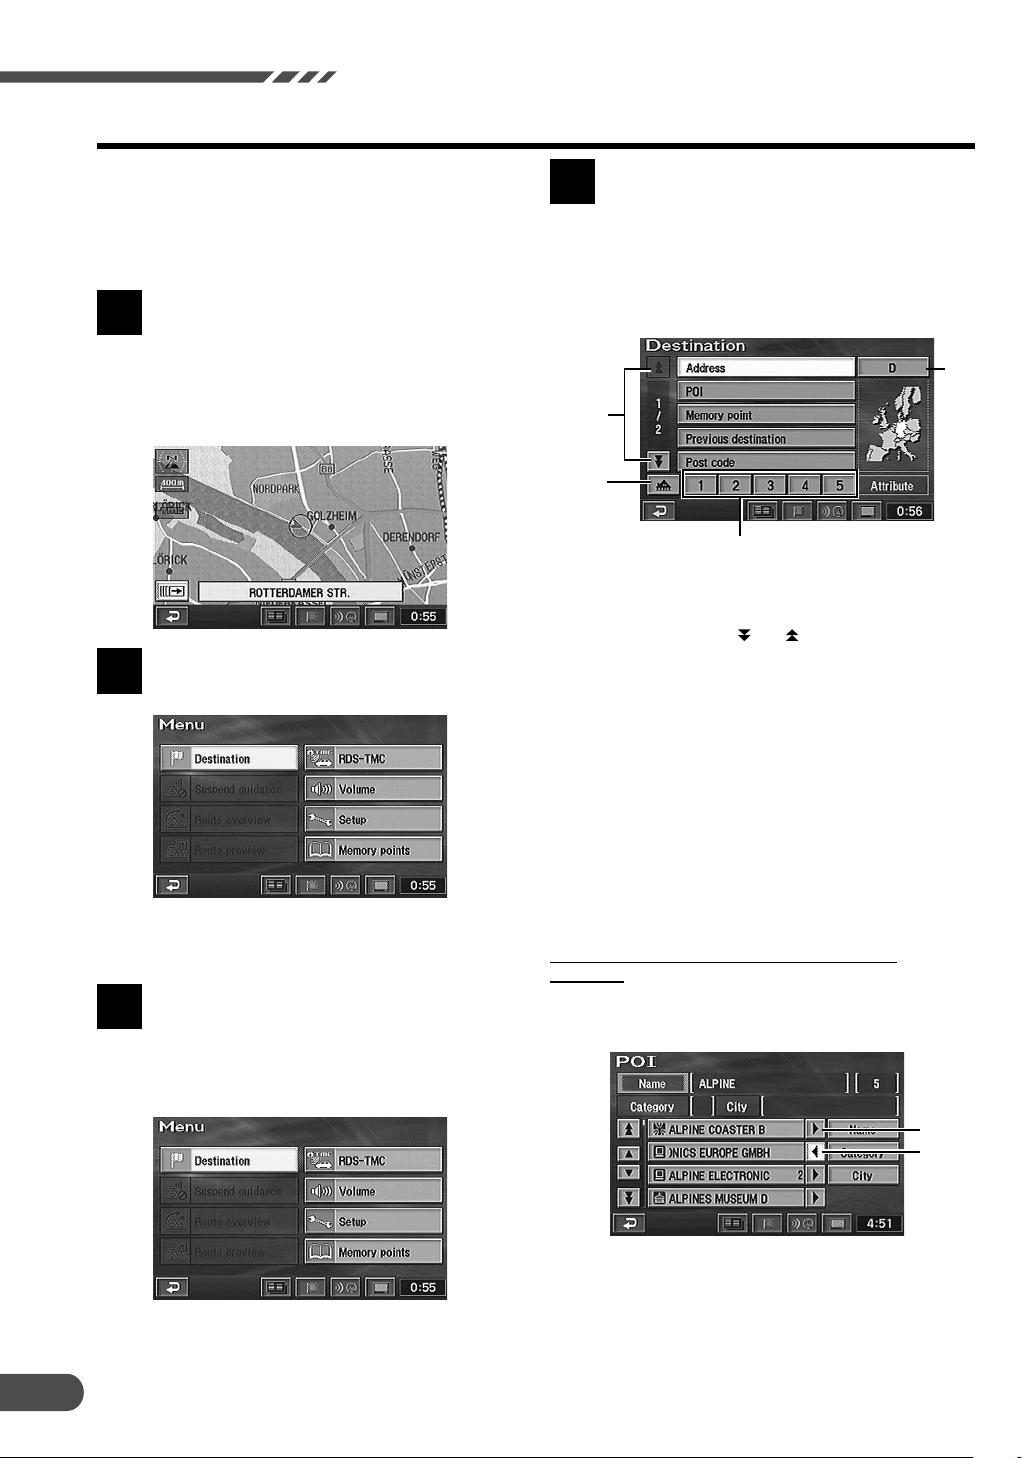
Searching For Destinations
Searching for a destination from its address
If you know the address of the desired destination,
you can easily display that point on the map by
just inputting the address.
Press the MENU button to display
the main menu. Select “Destination”
1
from the main menu by tilting the
joystick and press ENTER.
The sub-menu for Destination
screen appears. Select “Address”
2
by tilting the joystick and press
ENTER.
Notes:
•If your destination is located in other country
than that currently selected one, be sure to
change the searching country.
•To change the searching country, choose
“Country initial (D, GB, etc.).” The menu
appears, select the desired searching
country.
The street name input table for the
destination appears. Select the
3
character for the first position of the
street name by tilting the joystick
and press ENTER. The entered
character appears at the first
position of the text window. Repeat
this procedure to complete the
character inputtings of the street
name.
a
e
c
b
a Text windows
Display the selected characters/numerals.
b List
Displays a list of the candidate names for
the selected characters/numerals.
c /
Returns to the previous character/numeral
and erases it.
d Character with diacritical mark/numeric
pallet
Select the desired pallet.
e Number of candidates
Tips:
•When 1 character/numeral is input, the
candidates for the next character/numeral
are narrowed down (and the others are
shaded).
•You can also search for a location by
inputting just the start of its name and
selecting “List” and pressing ENTER.
•If the number of candidate locations is
narrowed down, the list of the candidate
locations will be displayed automatically.
Select the desired location from the list and
press ENTER.
•If you want to display the list of candidate
street names, select “List” and press
ENTER.
When “City” is selected and ENTER
is pressed, the city selection menu
appears. Select the desired menu
item.
•When “Input city name” is selected, input
the city name and press ENTER.
•When “5 near cities” is selected, the names
of 5 near cities appears in the display.
Select the desired city name and press
ENTER.
•When a city name is directly selected from
the list displayed, press ENTER.
•When “All cities” is selected, the character
input pallet will be displayed. Input the city
name.
•When “Input post code” is selected, the
postcode input pallet will be displayed.
Input the postcode.
d
(To be continued)
29
Page 31

Searching For Destinations
The list of street names will be
displayed. Select the desired street
4
name and press ENTER.
Notes:
•If there are other streets with the same
name in other cities when the desired street
name is searched for in “All cities” mode,
the list of the city names will be displayed.
Select the desired city name and press
ENTER.
•If there is no location with the input spelling,
locations with similar spelling are displayed.
The house number input table
appears. Input the house number in
5
the same manner as for inputting the
street name (step 3 above). When the
house number inputtings have been
completed, select “OK” by tilting the
joystick and press ENTER.
Searching for a point of
interest (POI)
If you know the name of the desired point of
interest (POI), you can easily display that point of
interest on the map by just inputting its name.
Press the MENU button to display
the main menu. Select “Destination”
1
by tilting the joystick and press
ENTER.
The sub-menu appears. Select “POI”
by tilting the joystick and press
2
ENTER.
There are three ways in searching
for your desired POI. The Input POI
3
name screen with the character
input table appears.
• By inputting the name:
1. Input the name of a POI you want to search
for by tilting the joystick and pressing ENTER
in the same manner as inputting the street
name (see page 29).
30
2-00-3
Notes:
•Your desired destination can be searched
for more precisely by inputting the house
number.
•The house number can also be input using
the numeric keypad on the remote control.
For operation, see the Remote Control
Reference Guide page 58.
•If there is no house number or no data in the
disc, the system displays the map showing
the area of the input street name.
The map screen showing the
selected area with the point setting
6
menu appears.
Note:
For details of the point setting menu, see
page 19.
• From the category
1. Select “Category” by tilting the joystick and
press ENTER.
2. The category selection menu appears. Select
the desired category by tilting the joystick and
press ENTER.
• When “List all categories” is selected, all
categories are displayed in the list. Select the
desired category and press ENTER.
• If the category is not selected, any or all
categories can be set.
Page 32

• From the city name
1. Select “City” by tilting the joystick and press
ENTER. The city selection menu appears,
select the desired menu item.
• When “Input city name” is selected, input the
city name.
• When “5 near cities” is selected, the names of 5
near cities appears in the display. Select the
desired city name and press ENTER.
• When a city name is directly selected from the
list displayed, press the ENTER button.
• When “All cities” is selected, the character input
pallet will be displayed. Input the POI.
• When “Input post code” is selected, the post
code input pallet will be displayed. Input the
postcode.
Searching from postcode
You can search for a destination by inputting the
postcode. (This function may not be used in some
regions.)
Press the MENU button to display
the main menu. Select “Destination”
1
by tilting the joystick and press
ENTER.
The sub-menu appears.
Select “Post code” by tilting the
2
joystick and press ENTER.
The postcode input screen appears.
Input the desired postcode by tilting
3
the joystick.
Select “List” by tilting the joystick
and press ENTER. The list of the
4
candidate POIs and the number of
the POIs appear. Select the desired
POI by tilting the joystick and press
ENTER.
Note:
If you select “Name,” “Category” or “City,” you
can narrow down the number of the
candidates.
The map screen showing the area of
the selected POI and the point
5
setting menu appears.
Note:
For details of the point setting menu, see
page 19.
Tips:
•When 1 character/numeral is input, the
candidates for the next character/numeral
are narrowed down (and the others are
shaded).
•Selecting “/” returns to the previous
character/numeral and erases it.
•If you want to display the list of candidate
postcode, select “List” and press ENTER.
The inputted postcode list is
displayed. Select a desired postcode
4
and press ENTER.
The map screen showing the
selected area with the point setting
5
menu appears.
Note:
For details of the point setting menu, see
page 19.
31
Page 33

Searching For Destinations
Setting the local point icon
display
The system can display on the map the icons for
the points of interest such as petrol stations,
restaurants, parking lots, etc.
While a map screen is being
displayed, press ENTER.
1
Touch:
In the case of touch operation, touch “ ”.
The point setting menu appears.
Select “POI” from the point setting
2
menu by tilting the joystick and
press ENTER.
The Show POI icons screen is
displayed. Select a desired POI icon
3
by tilting the joystick and press
ENTER.
•You can set up to 5 POI icons.
•If you select “POI off,” the POI icons do not
appear on the map.
•POI icons cannot be displayed if the map
scale is more than 800m.
•If you select the POI icon on the map by
tilting the joystick and press ENTER, the
point setting menu appears.
The “Info.” menu of the point setting menu is
displayed only for 5 seconds.
For details of the point setting menu, see
page 19.
Touch: In the case of touch operation, touch
the POI icon.
Searching for the local POIs
using the their icons
The system can search for the POIs in a range of
30 km (19 miles) around the reticule icon and
when POI icons are set you can display their icons
with the distance to the POIs. The system can
also display only the POIs along the set route.
Press the MENU button to display
the main menu. Select “Destination”
1
by tilting the joystick and press
ENTER.
The sub-menu appears. Select
“Local POI” by tilting the joystick
2
and press ENTER.
Brand icon
(Displayed only for certain hotels and petrol companies.)
Notes:
•If you want to display multiple icons, select
“More” by tilting the joystick and press
ENTER. Then, select the desired icons one
by one. When all selections have been
32
completed, select “OK” and press ENTER.
POI icon
The Local POI icons screen appears.
Select a desired POI icon by tilting
3
the joystick and press ENTER.
The list of the desired Local POI
icons screen appears. Select the POI
4
icon by tilting the joystick and press
ENTER.
Page 34

Select “List” by tilting the joystick
and press ENTER.
5
Note:
If you want to add a local POI, select “OK”
and press ENTER, then repeat step 3 to 4.
The list of the Local POIs appears.
6
When this menu is selected, the system
can list the POIs along the set route.
You can sort the list by distance, icons or names.
Searching from telephone
number
If you have input phone number in your memory
points, you can easily display a desired memory
point as your destination by just inputting the
phone number. For inputting phone numbers for
the memory points, see page 46.
Press the MENU button to display
the main menu. Select “Destination”
1
from the main menu by tilting the
joystick and press ENTER.
The sub-menu appears. Select
“Telephone number” by tilting the
2
joystick and press ENTER. The
numeric input table appears.
Input the phone number including
the area code by tilting the joystick
3
and pressing ENTER. (For details of
inputting number, see step 5 on
page 30.)
When the desired phone number
has been input, select “OK” and
press ENTER.
Notes:
•You can sort the list by distance, icons or
names.
•You can list up to 200 places to display.
Select the desired local POI by
tilting the joystick and press ENTER.
7
The map showing the area of the
selected POI with the point setting
menu appears.
Note:
For details of the point setting menu, see
page 19.
Tips:
•The phone number can also be input using
the numeric keypad on the remote control.
For operation, see the Remote Control
Reference Guide page 58.
•When 1 numeral is input, the candidates for
the next numeral are narrowed down (and
the others are shaded).
•Selecting “/” returns to the previous
numeral and erases it.
The area map of the location with
the input phone number is displayed
4
with the point setting menu.
Note:
For details of the point setting menu, see
page 19.
33
Page 35

Searching For Destinations
Searching from memory
points
If memory points have already been registered,
you can call them out with a simple operation and
choose a desired location as the destination. For
details on the registration method, see page 44.
Press the MENU button to display
the main menu. Select “Destination”
1
from the main menu by tilting the
joystick and press ENTER. Select
“Memory point” from the sub-menu
by tilting the joystick and press
ENTER.
The list of the memory points is
displayed. Select the memory point
2
you wish to display by tilting the
joystick and press ENTER.
The sub-menu appears. Select the
desired quick access point icon by
2
tilting the joystick and press ENTER.
Quick access point icons
The reticule icon appears at the
selected quick access point on the
3
map with the point setting menu.
Note:
For details of the point setting menu, see
page 19.
Searching for home
If your home has already been registered, you can
call it out with a simple operation. For details
about the registration method, see page 27.
The reticule icon appears at the
selected memory point on the map
3
with the point setting menu.
Note:
For details of the point setting menu, see
page 19.
Searching by quick access
points
If quick access points have already been
registered, you can call them out with a simple
operation and choose a desired location as the
destination. For details on the registration method,
see page 46.
Press the MENU button to display
the main menu. Select “Destination”
1
from the main menu by tilting the
joystick and press ENTER.
Press the MENU button to display
the main menu. Select “Destination”
1
from the main menu by tilting the
joystick and press ENTER.
The sub-menu appears. Select
“Home icon” by tilting the joystick
2
and press ENTER.
Home icon
The reticule icon appears at the
selected home point on the map
3
with the point setting menu.
Note:
For details of the point setting menu, see
page 19.
34
Page 36

Searching from previous
destinations searched
The system automatically stores up to 99
locations the system have searched for as
destinations.
Searching from intersection
If you know an intersection near where you want
to go, you can input two cross streets as your
destination. This section describes how to locate a
destination by entering two cross street names.
Press the MENU button to display
the main menu. Select “Destination”
1
from the main menu by tilting the
joystick and press ENTER.
The sub-menu appears. Select
“Previous destination” by tilting the
2
joystick and press ENTER.
The list showing the destinations
stored in memory is displayed.
3
Select the desired destination from
the list by tilting the joystick and
press ENTER.
a
This bar indicates that there is a continuation of the
a
list. To scroll the list, select “Arrow” by tilting the
joystick and press ENTER.
“ ” or “ ”: Scrolls the list page.
“8” or “9”: Scrolls the list one by one.
If you select this area of the screen
b
and press ENTER, you can easily
call out the start point when you
want to return to the start point. For
details, see page 36.
b
Press MENU button to display the
main menu. Select “Destination”
1
from the main menu by tilting the
joystick and press ENTER.
The sub-menu appears. Select
“Intersection” by tilting the joystick
2
and press ENTER.
The intersection input table for the
1st street name and 2nd street name
3
appears. Input the 1st street name
by tilting the joystick and pressing
ENTER in the same manner as for
inputting the address for Searching
For Destinations (step 3 on page 29).
The 2nd street name input table
appears. Input the 2nd street name.
4
Note:
When the 1st street name is input, the
candidate for the 2nd street name is narrowed
down.
When two street names have been
input, the map screen showing the
5
area of the selected intersection
with the point setting menu appears.
The map of the selected destination
appears with the point setting menu.
4
Notes:
•For details of the point setting menu, see
page 19.
•The stored location in memory can be
erased. For details, see page 47.
•If the destination was searched from Home
or a Quick access point, the point is not
recorded in the previous point list.
Note:
For details of the point setting menu, see
page 19.
35
Page 37

Searching For Destinations
Searching from motorway
entrance/exit
You can search for a location from the motorway
entrance or exit.
Press the MENU button to display
the main menu. Select “Destination”
1
from the main menu by tilting the
joystick and press ENTER.
The sub-menu appears. Select
“Motorway entrance/exit” by tilting
2
the joystick and press ENTER. The
Motorway Ent./Exit input pallet
appears.
Input the desired motorway name by
tilting the joystick and press ENTER.
3
When the inputtings of the
motorway name have been
4
completed, the list of the input
motorways appears. Select the
correct motorway by tilting the
joystick and press ENTER.
Note:
When the number of candidates narrows
down, the list of candidates is displayed
automatically.
The map showing the area of the
selected entrance or exit of the
7
motorway with the point setting
menu is displayed.
Note:
For details of the point setting menu, see
page 19.
Searching from start point
When a route has been set, the start point of the
route is stored in memory. You can easily call out
the start point when you want to return to the start
point.
Press the MENU button to display
the main menu. Select “Destination”
1
from the main menu by tilting the
joystick and press ENTER.
The sub-menu appears. Select
“Previous destination” by tilting the
2
joystick and press ENTER.
The previous points screen appears.
Select “Previous starting point” by
3
tilting the joystick and press ENTER.
36
The “Motorway Ent./Exit” screen
appears. Select “Entrance” or “Exit”
5
as desired by tilting the joystick and
press ENTER.
The list of the entrances or exits of
the selected motorway appears.
6
Select the desired entrance or exit
by tilting the joystick and press
ENTER.
a You can sort the list.
Dist. sort: sort in order of nearest
entrance or exit of a motorway.
Name sort: sort in order of name.
b The screen appears to input the
entrance/exit name.
a
b
The map showing the previous start
point and the point setting menu
4
appears.
Note:
For details of the point setting menu, see
page 19.
Page 38

Searching from coordinates
If you know the latitude and longitude of the
desired location, you can display that location by
just inputting those numbers.
Press the MENU button to display
the main menu. Select “Destination”
1
from the main menu by tilting the
joystick and press ENTER.
The sub-menu appears. Select
“Coordinates” by tilting the joystick
2
and press ENTER. The Latitude and
Longitude input pallet appears.
Select “N” (North) from the Lat.
(Latitude) by tilting the joystick and
3
press ENTER. Input the North
Latitude by tilting the joystick and
pressing ENTER.
Select “W” (West) or “E” (East) from
the Long. (Longitude) by tilting the
4
joystick and press ENTER. Input the
Longitude by tilting the joystick and
pressing ENTER. When the desired
Latitude and Longitude has been
input, select “OK” and press
ENTER.
The map screen showing the area of
the selected coordinate with the
5
point setting menu appears.
Searching by scrolling
displayed map
The displayed map can be freely scrolled with the
joystick in eight directions to search for a desired
destination.
The best way to find a location is first to display
the wide range map and specify the approx.
location. You can find the desired location
efficiently by specifying more and more detailed
maps. (Press the 4 or 3 button to change the
map magnification.)
Search for a desired destination by
scrolling the map with the joystick.
1
The map scrolls in the direction in
which the joystick is tilted. Bring the
destination point on the map under
the reticule icon and press ENTER.
The point setting menu appears.
Notes:
•For details of the point setting menu, see
page 19.
•There are three map scrolling speeds,
depending on how long the joystick is tilted.
•To return to the current vehicle position,
press the POS. button.
•You cannot scroll the map by the joystick
while displaying the point setting menu.
Note:
For details of the point setting menu, see
page 19.
37
Page 39

Route Checking
Overviewing the searched
route
We recommend that before you begin driving the
route, you look at the entire route in the overview
display.
Press the MENU button to display
the main menu. Select “Route
1
overview” from the main menu by
tilting the joystick and press ENTER.
The entire route is displayed on a
map with a large enough view that
2
you can view the entire route.
a
bc
Previewing the searched route
When this mode is selected, the reticule icon for
the current vehicle position moves along the
searched route so that you can preview the route.
You can also search for the POIs along the route.
Press the MENU button to display
the main menu. Select “Route
1
preview” from the main menu by
tilting the joystick and press ENTER.
The route preview screen with
operation menu is displayed.
2
a
b
c
a Displays the turn list (see the example below).
b Goes to route editing mode.
c Activates route guidance mode.
Example of turn list
d
d This bar indicates that there is a
continuation of the list.
To scroll the list, select “Arrow” by tilting
the joystick and press ENTER.
“ ” or “ ”: Scrolls the list page.
“8” or “9”: Scrolls the list one by one.
e Displays the map with your starting point or
destination(s). To register a point as a memory
point, tilt the joystick to select “Mark” then press
ENTER.
When you press the POS. button,
the system return to the current
3
vehicle position map screen.
e
a Select this menu to scroll the map using the joystick.
b Select the desired menu to move the reticule icon
along the route to go to the destination/POI selected or
to return to the current vehicle position.
c Select this menu to display the Edit route preview
menu as shown below.
d
d Previews for a destination.
e Searches for POIs along the route. Select a POI first.
Note:
“Info.” menu appears for 5 seconds only when there
are POI icons along the route.
You can display the POI information.
Press the POS. button to return to
the current vehicle position screen.
3
e
38
Page 40

Guidance Screen Configuration
Guidance map display
Your desired guidance map display modes can be
selected for your convenience as follows.
While a map screen is being
displayed, press ENTER.
1
Touch:
In the case of touch operation, touch “ ”.
The point setting menu appears.
Select “Screen configuration (
2
by tilting the joystick and press
ENTER.
The Screen configuration selection
menu is displayed. Select a desired
3
menu item by tilting the joystick and
press ENTER.
Note:
The screen configuration selection menu is
displayed also by pressing the
the remote control.
Screen configuration menu
button on
)”
b Dual-screen display
c Current vehicle position information
display
d Turn list display (Displayed only when
driving on the route.)
abcdef
a Single screen display
e Arrow screen display (Displayed only
when driving on the route.)
f Motorway information display
(Displayed only when driving on a
motorway.)
39
Page 41

Guidance Screen Configuration
Dual-screen display
The system can display two different screens
simultaneously for your convenience. For
example, a detailed map and a wide range map
can be displayed at the same time so that you can
view a detailed map around the present vehicle
position and a wide range map along the route.
While a map screen is being
displayed, press ENTER.
1
Touch:
In the case of touch operation, touch “
The point setting menu appears.
Select “Screen configuration (
2
by tilting the joystick and press
ENTER.
The Screen configuration selection
menu appears (see page 39). Select
3
“
” by tilting the joystick and
press ENTER.
Note:
The screen configuration selection menu is
displayed also by pressing the
the remote control.
The System changes to dual-screen
mode and displays two screens
4
simultaneously.
To change display mode of the right
screen, press RIGHT MAP button.
5
Touch:
In the case of touch operation, touch the right
screen.
button on
”.
)”
The Edit right screen menu appears.
6
Notes:
•To change the map orientation, select “Map
orient.” menu by tilting the joystick and
press ENTER. Each pressing of ENTER
toggles between north-up and heading-up
modes.
•To display the set local POI icons, select
“Show POI icons” by tilting the joystick and
press ENTER. If a local POI icon(s) is not
displayed, this menu cannot be selected. To
display a local POI icon(s), refer to page 32.
•To display the set RDS-TMC icons, select
“Show RDS-TMC info.” by tilting the joystick
and press ENTER. When “Show RDS-TMC
info.” in Setting the RDS-TMC (see page 48)
is set to OFF, this menu cannot be selected.
•To change the map magnification range,
press the 4 or 3 button.
Touch: In the case of touch operation, touch
(zoom in)” or “ (zoom out)”.
“
•If a map that is bigger than 800m scale is
being displayed, the POI icons cannot be
displayed. In this case, change to a detailed
map by pressing the 3 button.
When the settings have been
completed, select “OK” by tilting the
7
joystick and press ENTER to return
to the current vehicle position map.
Now, the system displays two
different screens.
40
Note:
A map edited in the dual-screen display is
only viewable in the dual-screen display.
Page 42

Route Editing
Adding destinations
This operation is for setting multiple destinations
for the same journey (up to 5).
Press MENU button to display the
main menu. Select “Route overview”
1
from the main menu by tilting the
joystick and press ENTER.
The “Route overview” screen
appears. Select “Route” by tilting
2
the joystick and press ENTER.
The “Change route” screen appears.
Select “Add” under “Destination” by
3
tilting the joystick and press ENTER.
The “Destination” screen is
displayed. For details of searching
4
for the desired destinations, see
pages 29 to 37.
When the map showing the area of
the selected destination with the
5
point setting menu is displayed,
select “Enter” by tilting the joystick
and press ENTER.
The “Add destination” screen
showing the sequence of the
6
destinations is displayed. Select
“Add” at the place where the new
destination should be added by
tilting the joystick and press ENTER.
The “Route on search condition”
screen appears. Select “Guide” by
7
tilting the joystick and press ENTER.
Note:
To add more destinations (up to 5 in all),
select “Route” then press ENTER, and repeat
steps 3 to 6. When you have set all the
destinations, select “Guide” and press
ENTER.
Reordering destinations
The sequence of the destinations to go can be
changed in any order you like.
Press the MENU button to display
the main menu. Select “Route
1
overview” from the main menu by
tilting the joystick and press ENTER.
The “Route overview” screen
appears. Select “Route” by tilting
2
the joystick and press ENTER.
The “Change route” screen appears.
Select “Re-order” under
3
“Destination” by tilting the joystick
and press ENTER.
The list of the Input destinations
appears. Select the destinations one
4
by one in the desired sequence of
arrival by tilting the joystick and
pressing ENTER.
When the sequence of the
destinations has been changed,
5
select “OK” by tilting the joystick
and press ENTER.
When the settings have been
completed, select “Guide” by tilting
6
the joystick and press ENTER.
41
Page 43

Route Editing
Deleting destinations
This section describes how to delete an input
destination or all of the input destinations at the
same time.
Press the MENU button to display
the main menu. Select “Route
1
overview” from the main menu by
tilting the joystick and press ENTER.
The “Route overview” screen
appears. Select “Route” by tilting
2
the joystick and press ENTER.
The “Change route” screen appears.
Select “Delete” under “Destination”
3
by tilting the joystick and press
ENTER.
The list of the Input destinations
appears. Select the destination you
4
want to delete by tilting the joystick
and press ENTER.
(If you want to delete all of the
destinations at the same time, select
“Delete all” by tilting the joystick
and press ENTER.)
Searching for a detour
You can search for a detour around your current
position on the route. If there is a construction site
ahead, for example, search for a detour by
selecting the distance difference from your current
position.
Press the MENU button to display
the main menu. Select “Route
1
overview” from the main menu by
tilting the joystick and press ENTER.
The “Route overview” screen
appears. Select “Route” by tilting
2
the joystick and press ENTER.
The “Change route” screen appears.
Select “Detour” by tilting the
3
joystick and press ENTER.
42
Note:
If only one destination is set, the list will not
appear.
The confirmation dialog screen
appears. Select “Yes” by tilting the
5
joystick and press ENTER. The
selected destination (or all of the
destinations) will be deleted.
Note:
If all the destinations are deleted, the screen
returns to the current vehicle position.
When the sequence of the
destinations has been changed,
6
select “OK” by tilting the joystick
and press ENTER.
Select “Guide” by tilting the joystick
and press ENTER.
7
Select the distance difference of the
detour. Tilt the joystick to select
4
“1km,” “3km,” “5km” or “Whole
route” and press ENTER. A detour
will be searched for.
Notes:
•You can search for a detour only when your
are on a route.
•“Around traffic” is displayed only when the
RDS-TMC information is received. Search
for a congestion evasion route is
automatically started when “Dynamic nav.”
is activated in the RDS-TMC setting. To
manually start search for a congestion
evasion route, select “Around traffic” and
press ENTER.
Page 44

the route searching
You can change the conditions for the route
searching between the current vehicle position to
a destination or only a portion of the route.
Press the MENU button to display
the main menu. Select “Route
1
overview” from the main menu by
tilting the joystick and press ENTER.
The “Route overview” screen
appears. Select “Route” by tilting
2
the joystick and press ENTER.
The “Change route” screen appears.
Select “Search condition” by tilting
3
the joystick and press ENTER.
The search condition list screen
appears. Select the route between
4
the points to be edited and choose
the desired condition (Quick, Short,
etc.) by tilting the joystick and press
ENTER. You can specify the
searching condition for other
portions of the route as well.
Setting the route optionsChanging the conditions for
The navigation system can search for 7 different
types of routes: using motorway, toll road, ferry,
car train, congestion area, restricted road and
season restricted road.
Press the MENU button to display
the main menu. Select “Route
1
overview” from the main menu by
tilting the joystick and press ENTER.
The “Route overview” screen
appears. Select “Route” by tilting
2
the joystick and press ENTER.
The “Change route” menu appears.
Select “Road preference” by tilting
3
the joystick and press ENTER.
The “Road preference” menu
4
appears. Select the item to be edited
by tilting the joystick and press
ENTER.
When the searching conditions have
been specified, select “OK” by
5
tilting the joystick and press ENTER.
Select “Guide” by tilting the joystick
and press ENTER.
6
Tips:
For the route search conditions, refer to
“Selecting from the route menu (three routes
searching)” on page 25.
The selected item will be ticked.
Ticked: Allow
Unticked: Detour
When the editing for the route
option has been completed, select
5
“OK” by tilting the joystick and
press ENTER.
Select “Guide” by tilting the joystick
6
and press ENTER.
Tips:
Depending on traffic conditions, the system
may set a route search that is not included in
your search conditions. For example, even if
Detour is set, the system will search for a toll
road if it judges it to be the better route.
43
Page 45

Memory Points
Storing locations in memory
You can store up to 200 special points on the map
in memory, such as locations you go to frequently
or scenic locations. The locations stored in
memory can be recalled quickly.
Press the MENU button to display
the main menu. Select “Memory
1
points” from the main menu by
tilting the joystick and press ENTER.
The “Memory point” menu appears.
Select “Register” by tilting the
2
joystick and press ENTER.
The “Register memory points” with
the searching menu appears. Search
3
for a desired point. To search for a
point, see pages 29 to 37.
When the point searched for and the
point setting menu is displayed,
4
select “Enter” by tilting the joystick
and press ENTER.
The “Memory point” screen is
displayed. Select “OK” by tilting the
5
joystick and press ENTER.
Deleting the memory points
Press the MENU button to display
the main menu. Select “Memory
1
points” from the main menu by
tilting the joystick and press ENTER.
The “Memory point” menu appears.
Select “Delete” by tilting the joystick
2
and press ENTER.
The list of the “Delete memory
points” appears. Select the memory
3
point to be deleted by tilting the
joystick and press ENTER.
(To delete all of the memory points
at the same time, select “Delete all”
by tilting the joystick and press
ENTER.)
The confirmation dialogue message
is displayed. Select “Yes” by tilting
4
the joystick and press ENTER to
execute the deletion.
44
Press the POS. button to return to
the present vehicle position screen.
6
Press the POS. button to return to
the current vehicle position screen.
5
Note:
If a memory point that is registered in Attribute
(as Home or a Quick access point) is deleted,
the point will be automatically deleted from
Attribute as well.
Page 46

Editing the memory points
You can change the point marks, names, phone
numbers, etc. of the memory points. You can also
register a memory point as a Quick access point
(up to 5), or as Home.
Press the MENU button to display
the main menu. Select “Memory
1
points” from the main menu by
tilting the joystick and press ENTER.
The “Memory point” menu appears.
Select “Edit” by tilting the joystick
2
and press ENTER.
cDel. (Displayed only when
something is registered in attribute)
You can delete a registered point from attribute.
The point will not be deleted from memory point.
H Go to c1 Attribute Delete.
dName
You can give a name to a registered point and set
to show it or not.
H Go to d1 Name change.
eLocation
The location of a memory point can be moved.
H Go to e1 Location Change.
fPhone no.
Phone number can be added to a registered point.
H See f1 Phone Number Change.
The list of the memory points
appears. Select the memory point to
3
be edited by tilting the joystick and
press ENTER.
You can sort by the date, icons, names or attributes.
The “Memory point” screen appears.
Select the item to be edited by tilting
4
the joystick and press ENTER.
a
d
e
f
b
c
Icon Change
Select “Icon” and press ENTER.
a1
The icon list appears. Select the
desired icon and press ENTER.
a2
Note:
When you select “With sound” and press
ENTER, the sound menu appears. Select
your desired sound to be produced when you
come near the memory point. If the voice
guidance and the memory point sound
happened to come at the same time, the
voice guidance has priority.
(To be continued)
aIcon
You can select an icon for the registered point
from a number of icons.
H Go to a1 Icon change.
bAttribute
You can register a registered point as Home or as
a Quick access point (up to 5). It enables you to
easily select these points as a destination.
H Go to b1 Attribute Register and Change
45
Page 47

Memory Points
Attribute Register and Change
Select “Attribute” and press ENTER.
b1
The attribute menu appears. Select
the desired number and press
b2
ENTER.
Attribute Delete
Select “Del.” and press ENTER.
c1
The confirmation dialogue message
is displayed. Select “Yes” and press
c2
ENTER.
Name Change
Select “Name” and press ENTER.
d1
The character input pallet is
displayed.
d2
Select the desired characters one by
one and press ENTER each time you
select a character.
Location Change
Select “Location” and press ENTER.
e1
The location to be corrected is
indicated by the reticule icon. Tilt
e2
the joystick and move the map to
the correct location, press ENTER.
The point setting menu appears.
Select “Enter” by tilting the joystick
e3
and press ENTER.
Phone Number Change
Select “Phone no.” and press
ENTER.
f1
The numeric input pallet is
displayed. Select the desired
f2
numeral and press ENTER. Repeat
this procedure to complete the
editing.
46
Backspace Erases the previous character
When character inputtings have
been completed, select “OK” and
d3
press ENTER.
Note:
To show the name, select “On” and press
ENTER. If you do not want to show the name,
select “Off” and press ENTER.
Backspace Erases the previous numeral
When the new phone number has
been input, select “OK” and press
f3
ENTER.
Tips:
Phone Number Editing:
You can search for a desired destination or
point of interest using the phone number that
is input or edited here. (See page 33.)
When the editing has been
completed, select “OK” by tilting the
5
joystick and press ENTER.
Press the POS. button to return to
the current vehicle position screen.
6
Page 48

Deleting the stored previous destinations
Press the MENU button to display
the main menu. Select “Setup” from
1
the main menu by tilting the joystick
and press ENTER.
The “Setup” screen appears. Tilt the
joystick to select “
2
press ENTER, to scroll pages and
display “Previous point”.
Tilt the joystick to select “Delete”
under “Previous point” and press
3
ENTER.
The “Delete previous point” screen
showing the list of the previous
4
destinations appears. Select the
previous destination to be deleted
by tilting the joystick and press
ENTER.
(If you want to delete all of the
previous destinations, select “Delete
all” by tilting the joystick and press
ENTER.)
” or “ ” and
The confirmation dialogue message
appears, select “Yes” by tilting the
5
joystick and press ENTER.
Press the POS. button to return to
the current vehicle position screen.
6
You can sort by the date or names.
Note:
If the destination was searched from Home or
a Quick access point, the point is not
recorded in the previous point list.
47
Page 49

TMC Operation
About the TMC indicator
This indicator displays the reception status.
TMC
There is traffic
information on the
route.
(Receiving
information of
“Stationary Traffic,”
“Traffic Jam,”
“Accidents,”
“Closed Road,”
“Road Works” or
“Danger” within
30km ahead on the
route.)
There is other
information on the
route.
(Receiving
information of
“Road Conditions,”
“Weather” or
“Delays” within
30km ahead on the
route.)
There is information
outside of the route.
No information
(No traffic snarl)
While TMC
data available
Red
Yellow
Blue
No TMC data
available
Red/Grey
Yellow/Grey
Grey
Country
Use this to set the country.
3a
“Auto”:
The country is automatically set.
“Manual”:
You can select a country from the country list.
Station
You can select the station from which you
3b
receive information.
“Auto”:
You can receive the information automatically
from a station.
“Manual”:
Select a desired broadcasting station (A list of
stations from which you can receive
information is displayed.)
48
Setting the RDS-TMC
Press the MENU button to display
the main menu. Select “RDS-TMC”
1
from the main menu by tilting the
joystick and press ENTER.
RDS-TMC setting screen is
displayed. Select each item with the
2
joystick, and press ENTER to
execute the setting.
Page 50

Show RDS-TMC info.
This sets if you display the RDS-TMC icon
3c
on the map or not.
Symbol Symbol
Legend
Stationary
traffic
Tr affic jam
Accidents
Closed road
Legend
Road
Conditions
Weather
Delays
Parking
Displaying the traffic event
information on route
Press the MENU button to display
the main menu. Select “RDS-TMC”
1
from the main menu by tilting the
joystick and press ENTER.
RDS-TMC setting screen is
displayed. Select “Traffic on route”
2
by tilting the joystick and press
ENTER.
Road works
Danger
Notes:
•Thick arrows blink the distance between
traffic events. These appear in red, orange
or yellow, depending on the kind of traffic
event.
•The applicable section is between the
marks shown on the road.
•There may be displayed a pale mark, which
means an estimated information instead of
confirmed information.
•RDS-TMC icon can be displayed when the
map contraction is between 50m and 13km.
Information
If there is any traffic event on the
route, the status information will be
3
displayed in order of distance from
the current position.
Notes:
•Select “Map” and press ENTER to display
the map with the traffic event status
information.
•Select “Detail” and press ENTER to display
traffic event status information details.
•Depending on the capital you are in (Paris,
etc.) street name may be displayed as
“Others.”
Press the POS. button to return to
the current vehicle position screen.
4
Voice guidance
The 10km and 800m in advance traffic
3d
event information on the route is given by
voice guidance.
When each item is set the screen
returns to the current vehicle
4
position.
49
Page 51

TMC Operation
50
Displaying all receiving traffic
event information
Press the MENU button to display
the main menu. Select “RDS-TMC”
1
from the main menu by tilting the
joystick and press ENTER.
RDS-TMC setting screen is
displayed. Select “All traffic
2
conditions” by tilting the joystick
and press ENTER.
The street name list for all traffic
events is displayed. Tilt the joystick
3
to select the desired street name
and press ENTER.
Notes:
•Select “Current Road” and press ENTER. If
there is any traffic event on the route, the
status information in order of distance from
the current position is displayed.
•Depending on the capital you are in (Paris,
etc.) street name may be displayed as
“Others.”
The status information of a traffic
event on the selected street is
4
displayed in order of distance from
the current position.
Notes:
•Select “Map” and press ENTER to display
the map with the traffic event status
information.
•Select “Details” and press ENTER to display
traffic event status information details.
Press the POS. button to return to
the current vehicle position screen.
5
Displaying the TMC event list
Press the TMC button to display the
TMC event list.
1
Touch:
In the case of touch operation, touch “TMC”.
Tilt the joystick to select the desired
street name and press ENTER. The
2
status information of a traffic event
on the selected street is displayed in
order of distance from the current
position.
Notes:
•Select “Map” and press ENTER to display
the map with the traffic event status
information.
•Select “Details” and press ENTER to display
traffic event status information details.
Press the POS. button to return to
the current vehicle position screen.
3
Detailed display of traffic
event
You can display the detailed information of RDSTMC icon displayed on the map.
Put the Reticule icon on the RDSTMC icon displayed on the map with
1
the joystick and press ENTER.
Touch:
In the case of touch operation, touch the
desired RDS-TMC icon.
The point setting menu is displayed.
Select the “Info.” and press ENTER.
2
The Status information of a traffic
event is displayed on the screen.
3
Note:
Select “Details” and press ENTER to display
traffic event status information details.
Press the POS. button to return to
the current vehicle position screen.
4
Page 52

Customizing Setups
How to change the setups
Press the MENU button to display
the main menu. Select “Setup” from
1
the main menu by tilting the joystick
and press ENTER.
The “Setup” screen appears. Select
the desired item to be customized
2
by tilting the joystick and press
ENTER.
To scroll the page of the list, select “ ” or
“
” by tilting the joystick and press
ENTER.
“Calibration”
Use after adjusting the current
3a
position or changing tyres. For
details, see page 54.
“Distance”
Selects km or miles.
3b
Note:
For English, you can select the distance
indications in either miles or km.
For other languages, only kilometres are used
for the distance indications.
“Estimated travel time”
When “Change speed” is selected,
3c
the graphic screen appears in the
display. Select “;” or “:” of the
desired menu item and press ENTER
to increase or decrease the average
speed. When settings have been
finished, select “OK” by tilting the
joystick and press ENTER to end the
setting procedure.
Note:
To go back to the original settings, select
“Default”.
“Auto reroute”
Turns on or off the automatic
3d
rerouting function when the vehicle
deviated from the original route.
“Time zone”
When “Change” is selected, the
3e
“Time zone” screen appears. Select
the desired time zone and press
ENTER. Also select “On” or “Off” for
daylight saving time depending on
your situation. When setting is
finished, select “OK” by tilting the
joystick and press ENTER to end the
setting procedure.
“Auto voice guidance”
Turns the voice guidance on the
3f
route on or off.
(To be continued)
51
Page 53

Customizing Setups
“Voice guidance in all modes”
g
When the search screen, etc., is
3
displayed during driving on the
route, you can turn the voice
guidance or guidance screen
interruption on or off.
“Border guidance”
Displays the national flag of the
3h
country you have entered for about
10 seconds when you cross the
border. Turn it on or off.
“Intersection guidance”
Turns the display of the intersection
3i
guidance on or off.
“Guidance screen on M-way”
j
Turns the display of the 3-D junction
3
view at an exit or junction on
motorways on or off.
“Street name on scroll map”
Tilt the joystick to set “On” or “Off”
3k
to show the street name of where
the reticule icon is when the map is
scrolled.
“Screen adjust”
Use when you adjust the screen
3n
position. For details, see next
section.
“Previous point”
Use to delete the previous
3o
destination point. See page 47 for
details.
“Map colour (day), (night)”
p
Selects normal colour (1) or special
3
colour (2 to 4).
Note:
“day” means when the head lamps are off and
“night” means the head lamps are on.
“GPS info.”
q
GPS satellite information being
3
received is displayed on the screen.
For details, see page 56.
52
“Notify traffic restriction”
Turns the display of the traffic
3l
restrictions on or off.
“Est. Time to Destination”
Selects “
3
m
time before arrival)” or “
(Anticipated arrival time)” of the
Estimated required time display. See
page 15 for details.
(Estimated remaining
Page 54

“Street lane guidance”
Determines before the crossroad
3r
whether the lane information display
turns on or off. For details, see page
17.
“Active route”
Sets if you use the active route
3s
search. For details, see page 22.
Auto : If an optimal route is found using
the active route search function,
the message is shown, and the
system is automatically changed
to a new route.
Off : Active route search is not used.
Manual : If an optimal route is found using
the active route search function,
a confirmation message is
shown. Select “Yes” or “No.”
When the settings have been
completed, select “OK” by tilting the
4
joystick and press ENTER.
Note:
To return to the initial settings, select “Default”
by tilting the joystick and press ENTER.
Screen position adjustment
For some TV monitors that can be connected to
the navigation system, the screen display will be
out of place. Adjust the display position to match
the TV monitor you connect to the system.
Press the MENU button to display
the main menu. Select “Setup” from
1
the main menu by tilting the joystick
and press ENTER.
The “Setup” screen appears. Select
“Adjust” under “Screen adjust” by
2
tilting the joystick and press ENTER.
The screen position adjustment
screen is displayed.
3
Adjust the display position by tilting
the joystick.
The display screen moves the way you tilt
the joystick.
Touch:
In the case of touch operation, touch “;”, “:”,
“8” or “9” on the screen.
When the adjustment has been
completed, press ENTER.
Touch:
In the case of touch operation, touch “OK”.
The screen is displayed at the adjusted
position.
53
Page 55

Others
Vehicle position/direction
correction
If the actual position/direction of your vehicle and
the position/direction of the current vehicle
position icon on the map differ (for example, when
you moved on a ferry boat), you can manually
correct the position/direction of the current vehicle
position icon with the following method.
The system’s map matching feature automatically
corrects the error when you drive the vehicle
several miles in good GPS signal reception area.
Press the MENU button to display
the main menu. Select “Setup” from
1
the main menu by tilting the joystick
and press ENTER.
The “Setup” screen appears. Select
“Adjust” under “Calibration” by
2
tilting the joystick and press ENTER.
The “Calibration” screen is
displayed. Select “Pos./Direction”
3
by tilting the joystick and press
ENTER.
Select “Enter” by tilting the joystick
and press ENTER.
5
The Direction calibration screen
appears. Tilt the joystick to select
6
“
ENTER to correct the direction.
When the correction has been
completed, Select “Enter” by tilting
7
the joystick and press ENTER.
” or “ ” and press
Resetting after tyre
replacement
Resetting is required when the vehicle’s tyres are
replaced. Be sure to perform the following
resetting procedure when the vehicle’s tyres are
replaced.
54
Tilt the joystick in 8 directions to
correct the position. When the
4
correction has been completed,
press ENTER.
Touch:
In the case of touch operation, touch “Arrow”
in 8 directions.
Press the MENU button to display
the main menu. Select “Setup” from
1
the main menu by tilting the joystick
and press ENTER.
The “Setup” screen appears. Select
“Adjust” under “Calibration” by
2
tilting the joystick and press ENTER.
The “Calibration” screen appears.
Select “Tyre change” by tilting the
3
joystick and press ENTER.
Page 56

Adjusting the volume level for
the navigation system
You can adjust the volume level of the beep
sound that is produced when the remote control is
operated and the volume level of the voice guide.
Press the MENU button to display
the main menu. Select “Volume”
1
from the main menu by tilting the
joystick and press ENTER.
The volume adjustment screen
appears. You can adjust the volume
2
level in seven steps from 1 to 7.
Select the desired level by tilting the
joystick and press ENTER.
Drive simulation
To check the searched route, you can carry out a
drive simulation. The icon for the current vehicle
position moves along the searched route
indicating the contents of guidance that will be
provided.
When the calculation of the route
has been completed, the display
1
shows the entire route on the map
and the point setting menu. For
details, see the searching for a route
on page 23.
Select “Guide” from the point
setting menu by tilting the joystick,
2
then press and hold ENTER for at
least 5 seconds.
Notes:
•When you want to turn off the sound of the
navigation system, select “Off” and press
ENTER.
•You can temporarily turn up the volume for
voice guidance while driving on a motorway
by activating (ticking) “Automatic volume
level control”. Tilt the joystick to select
“Automatic volume level control” and press
ENTER.
When the settings have been
completed, select “OK” by tilting the
3
joystick and press ENTER.
The drive simulation starts.
To stop the drive simulation, press
3
the RETURN button. The display
returns to the current vehicle
position screen.
55
Page 57

Others
Displaying system information
GPS satellite information being received is
displayed on the screen. If the error for the
vehicle’s current position is too large, check how
many GPS satellites you are receiving.
Furthermore, you can confirm the status of the
Speed Pulse, ACC Power, Parking brake,
illumination (status of the vehicle lights) etc.
Press the MENU button to display
the main menu. Select “Setup” from
1
the main menu by tilting the joystick
and press ENTER.
The “Setup” screen appears.
Select “GPS info.” under “Info.” by
2
tilting the joystick and press ENTER.
Automatic dial operation
If your navigation system is connected to the
Nokia 6090 (GSM 900 Car Phone), you
can automatically dial to the “Point of Interest”
(POI) and “Memory Points” that you have already
placed in memory.
Note:
To connect the navigation system, you need a NaviNokia 6090 cable (KCE-6090P).
Please be aware that the telephone numbers of
items registered on the disc may change day by day,
and they are not always correct.
Automatic dialling from a
point of interest item
Press the MENU button to display
the main menu. Select “Destination”
1
from the main menu by tilting the
joystick and press ENTER. Select
“POI” from the sub-menu by tilting
the joystick and press ENTER.
The system information screen is
displayed.
3
Confirm the setting of each item.
a Lights in blue when satellite signals for
3D GPS are being calculated.
b Blinks when the Speed Pulse signal is
being input.
Tip:
The number of satellites that are highlighted
indicates the number of GPS satellites being
received.
Press the POS. button to return to
the current vehicle position screen.
4
a
b
Refer to “Searching for a point of
interest (POI)” (page 30) and search
2
for a desired POI item. Then display
the screen map.
Select “Info.” by tilting the joystick
and press ENTER.
3
The information screen appears.
Select “
4
joystick and press ENTER.
Notes:
•You cannot call if a telephone number is not
registered to the point of interest (POI).
•The “ ” menu is not displayed if the
Nokia 6090 (GSM 900 Car phone) is not
connected.
(Call)” by tilting the
56
Page 58

The number is automatically dialled,
and the telephone is connected.
To disconnect the telephone, press
6
button.
Note:
If the telephone is not connected due to busy
line or some other cause, a message will be
displayed.
To delete the message, press the RETURN
button.
The information screen appears.
Select “
45
joystick and press ENTER.
(Call)” by tilting the
Touch:
In the case of touch operation, the “
button is displayed in the touch button area
only during a call. Touch this button to finish
the call.
Automatic dialling from a
memory point
Press the MENU button to display
the main menu. Select “Destination”
1
from the main menu by tilting the
joystick and press ENTER. Select
“Memory point” from the sub-menu
by tilting the joystick and press
ENTER.
Refer to “Searching from memory
points” (page 34) and search for a
2
desired Memory Point. Then display
the screen map.
Select “Info.” by tilting the joystick
and press ENTER.
3
”
Notes:
•You cannot call when the telephone number
is not registered to Memory Points.
•The “
Nokia 6090 (GSM 900 Car phone) is not
connected.
The number is automatically dialled,
and the telephone is connected.
5
To disconnect the telephone, press
the
6
Touch:
In the case of touch operation, the “
button is displayed in the touch button area
only during a call. Touch this button to finish
the call.
Note:
If the telephone is not connected due to busy
line or some other cause, a message will be
displayed.
To delete the message, press the RETURN
button.
” menu is not displayed if the
button.
”
57
Page 59

Reference
Buttons and functions of remote controls
RUE-4141
Joystick/ENTER button
Selects highlighted items in menus and
moves map displays and vehicle position
icon. Tilt and hold this to scroll at a higher
speed. Press the ENTER button to select
any highlighted function, screen icon or
street segment.
Zoom/Scroll buttons
Change map magnification ratio upward or
downward in 14 steps. When the button is
pressed momentarily, the map
magnification ratio changes one step.
When the button is pressed and held, the
map magnification ratio changes
continuously. The page scrolls if the list is
more than 2 pages.
AUDIO/NAV. switch
Switches between Audio and
Navigation operations.
Pressing this button illuminates the
highlighted portion of the display.
button
Displays the “TMC event list” screen.
LO.PT. (Local Point) button
Press to display the information of the
set POI.
The “Show POI icons” screen is
displayed.
ROUTE button
Press to change the set route. “Change
route” screen is displayed.
DEL. DEST. button
Deletes current destination.
(Deletes only the next destination to go to.)
DEST. (Destination) button
Displays the destination menu.
ON/OFF button
Tu rns the pictorial display on or off.
button
Finishes a call.
TEL. button
Displays the telephone number inputting screen.
Remote Control transmitter
Tr ansmits the remote control signals.
Aim toward the display monitor for
operation.
Status indicator
Illuminates when the remote is
transmitting.
MENU button
Displays the main menu.
MODE button
Press this button to input numerals
using the numeric keypad. The
numerals can be input while the
status indicator is blinking.
RETURN button
Returns the navigation system to
the previous searching.
button
Displays the screen configuration
selection menu.
Numeric Keypad
Use these buttons after pressing
the MODE button to enter phone
numbers, address numbers or
street names containing numbers
(i.e., 42nd St.).
BS key : Deletes the character
previously input.
OK key : Executes numeral
inputting.
POS. (Position) button
Returns to the current position of
your vehicle.
When this button is pressed while
the current vehicle position map is
displayed, information about places
around the current vehicle position
is displayed.
VOICE button
Initiates vocal instruction for next
route maneuver or repeats last
instruction.
RIGHT MAP button
Displays the Edit right screen
menu when the dual-screen is
displayed.
M.PT. (Memory Point) button
Displays the memory point list.
You can set the desired memory
point as a destination.
Tips:
After pressing the MODE button, press the following buttons while the status indicator is blinking : numerals
(0 to 9), BS. and OK.
Note: Due to continuous product improvement, specifications are subject to change.
58
Page 60

Remote control button and touch button
The table below shows the various functions and their respective remote control (RUE-4141) and touch
buttons.
Remote Control RUE-4141 Touch Button
1
6
2
5
9
No.
Remote Control RUE-4141
1
2
3
4
5
6
7
8
9
!
"
#
34
LO.P.T.
ROUTE
RETURN
MENU
DEST.
POS./VOICE
—
RIGHT MAP
8
3
!
4
#
7
Touch Button
POI
Route
Right side map
1
#
2
4
5
637 9!"8
Feature
Changes the map magnification ratio upward or downward.
Displays the “TMC event list” screen.
Displays the screen configuration selection menu.
Press or touch to display the information of the set POI.
The “Show POI icons” screen displayed.
Press or touch to change the set route. “Change route”
screen is displayed.
Returns the navigation system to the previous searching.
Finishes a call. Displayed only during a call.
Displays the main menu screen.
Displays the destination menu.
Returns to the current position of your vehicle.
When this button is pressed or touched while the current
vehicle position map is displayed, information about places
around the current vehicle position is displayed.
Initiates vocal instruction for next route maneuver or repeats
last instruction.
Displays the buttons for the touch operation compatible
monitor.
Displays the Edit right screen menu when the dual-screen is
displayed.
59
Page 61

Reference
In case of difficulty
If you encounter a problem, please review the items in the following checklist. This guide will help you
isolate the problem if the system is at fault. Otherwise, make sure the system is properly connected or
consult your authorized Alpine dealer.
Symptom
No operation
The present vehicle
position cannot be
measured correctly.
The measurement
error is too large.
Screen not displayed
Cannot read disc is
displayed for a certain
operation.
Unstable operation
Cannot operate menu
No auto reroute
Cause
Blown fuse
Ambient temperature over 50°C
Moisture condensation
The vehicle position changed after
the ignition was switched off.
• Movement on a ferry boat
• Rotation of a parking lot turntable
• Movement by tow truck
Poor satellite configuration
Measurement is 2
dimensional
The navigation screen is off.
The disc is dirty.
The pickup lens is dirty.
The remote control batteries are
wearing out.
While driving on the route, some
menu operations cannot be carried
out.
Auto reroute mode is not set.
Solution
Replace with a fuse of the prescribed rating.
Lower the temperature in the vehicle below 50°C, for
example by running for a while with the window open
or by using the air conditioner.
Allow enough time for the condensation to evaporate
(about 1 hour).
Drive for a while with GPS signal reception.
Move to a location where GPS satellite reception is
easy.
Press the ON (ON/OFF) button on the remote control.
Clean the disc.
Consult your Alpine dealer. (Do not use a lens cleaner
disc sold in the market.)
Replace the remote control batteries.
Move the vehicle to a safe location, stop, and engage
the parking brake, then carry out this operation.
Select “Setup” from the main menu, then select ON
for Auto reroute. (See page 51.)
60
Page 62

If this message appears
Various messages are displayed on the monitor screen during operation. In addition to the messages
telling you the current status or providing guidance for the next operation, there are also the following
error messages. If one of these error messages is displayed, carefully follow the instructions in the
solution column.
Message
No DVD.
Please insert map DVD.
Unable to read data.
Check if map DVD is correct.
Home is not registered.
Register in menu Memory
points.
No memory point registered.
Register in menu Memory
points.
Unable to set additional points.
Perform operation again after
deleting unnecessary points.
No roads possible for guidance
near destination. Please refer to
map.
Route could not be found.
Cause
• The disc has been removed.
• There was no disc in the system when
the power was switched on.
•A disc that the system cannot read has
been loaded.
• The disc is dirty or upside down.
• The disc cannot be read because of
condensation.
• An attempt was made to search the
map from home with no home
registered.
• An attempt was made to search the
map from a memory point with no
memory point registered.
• An attempt was made to register more
than 200 points in memory.
• An attempt was made to set more than
5 destinations.
• When the destination or waypoint was
specified, there was no road in the
area, so no route could be found.
• Route could not be found for some
reason.
Solution
Insert the disc.
Insert the map disc.
Take out the disc, check if it was upside
down, clean it if necessary, then
re-insert it.
Take out the disc, allow enough time for
condensation to evaporate (about 1
hour), then re-insert the disc.
Register your home, then search the
map.
Register a memory point, then search
the map.
Erase unnecessary points, then register.
Focus on a nearby major road, then
specify the destination or waypoint
again.
Try to search for route again, or set
another location as destination.
61
 Loading...