

Page 1

R R
R
ALPINE ELECTRONICS MARKETING, INC.
1-1-8 Nishi Gotanda,
Shinagawa-ku, Tokyo 141-0031, Japan
Phone 03-5496-8231
ALPINE ELECTRONICS OF AMERICA, INC.
19145 Gramercy Place, Torrance,
California 90501, U.S.A.
Phone 1-800-ALPINE-1 (1-800-257-4631)
1-888-NAV-HELP (1-888-628-4357)
ALPINE ELECTRONICS OF CANADA, INC.
7300 Warden Ave., Suite 203, Markham,
Ontario L3R 9Z6, Canada
Phone 1-800-ALPINE-1 (1-800-257-4631)
1-888-NAV-HELP (1-888-628-4357)
ALPINE ELECTRONICS OF AUSTRALIA PTY. LTD.
6-8 Fiveways Boulevarde Keysborough,
Victoria 3173, Australia
Phone 03-9769-0000
ALPINE ELECTRONICS GmbH
Kreuzerkamp 7,
40878 Ratingen, Germany
Phone 02102-4550
ALPINE ELECTRONICS OF U.K. LTD.
Alpine House
Fletchamstead Highway,
Coventry CV4 9TW, U.K.
Phone 0870-33 33 763
ALPINE ELECTRONICS FRANCE S.A.R.L.
(RCS PONTOISE B 338 101 280)
98, Rue de la Belle Etoile, Z.I. Paris Nord Il,
B.P. 50016, 95945 Roissy Charles de Gaulle Cedex,
France
Phone 01-48638989
ALPINE ITALIA S.p.A.
Viale C. Colombo 8, 20090 Trezzano
Sul Naviglio (MI), Italy
Phone 02-484781
ALPINE ELECTRONICS DE ESPAÑA, S.A.
Portal de Gamarra 36, Pabellón, 32
01013 Vitoria (Alava)-APDO 133, Spain
Phone 945-283588
NVD-A211
SMART MAP PRO
Prog. Ver. 2.00
OWNER'S MANUAL
Please read before using this DVD-ROM.
Yamagata Printing Co.,
Ltd.
2-6-34, Takashima,
Nishi-ku, Y okohama,
Kanagawa, Japan
© 2002 Navigation Technologies. All Rights Reserved.
Interstate Exit and Service Data provided by
ZENRIN CO.,LTD.
Copyright © 2002, All Rights Reserved.
Certain business data provided by infoUSA, Inc.,
Omaha, Nebraska, Copyright © 2002, All Rights Reserved.
Designed by ALPINE Japan
Printed in Japan (Y)
68P70033Y02-O
Page 2

iiiii
Page 3

Page 4

USER AGREEMENT
Important information.
Please read carefully before using this product.
In using this DVD-ROM "SMART MAP PRO" (hereinafter referred to as "Disk"), as part
of the Alpine Electronics, Inc. ("Alpine"), Aisin AW Co., Ltd. ("Aisin AW") and Navigation Technologies Corporation ("NavTech") Database (hereinafter referred to as "Database"), you are bound by the terms and conditions set forth below. By breaking the
seal on this package, and using your copy of the Database and Disk, you have demonstrated your agreement to the terms and conditions of this Agreement. You should
therefore, make sure that you read and understand the following provisions.
• The Disk and Database may not be copied, duplicated, processed, or otherwise
modified, in whole or in part, without the express written permission of Aisin AW,
NavTech and Alpine.
• Neither the Disk nor the Database may be transferred or sublicenced to any third
party for profit, rent or loan, or licensed for reuse in any manners.
• The Disk and/or Database may not be decompiled, reverse engineered or otherwise
disassembled, in whole or in part.
• The Disk and Database may not be used in a network or by any other manner of
simultaneous use in multiple systems.
• The Disk and Database are intended solely for personal use (or internal use where
the end-user business), or the consumer. The Disk and Database are not to be used
for commercial purposes.
• Neither Aisin AW, Alpine nor NavTech guarantees to the customer that the functions
included in the Disk and Database meet a specific objective of user.
• Neither Aisin AW, Alpine nor NavTech shall be responsible for any damages caused
by the use of the Disk and/or Database to the actual user and to any third party.
• The Warranty on the Disk and Database shall not extend to an exchange or refund
due to misspelling, omission of letters, or any other cosmetic discrepancy in layout
found in Disk and/or Database.
• The right to use the Disk and Database shall expire either when the user destroys
this software, or when any of the terms for use is violated and Aisin AW, Alpine and/
or NavTech exercises the option to revoke the license to use this software.
• The terms and conditions hereof apply to all subsequent users and owners as well
as to the actual purchaser.
The NavTech Database may include or reflect data of licensors, including Her Majesty
The Queen in right of CANADA. Such data is licensed on an "AS IS" basis. The licensors, including Her Majesty The Queen, make no guarantees, representations or warranties respecting such data, either express or implied, arising by law or otherwise, accuracy or fitness for a particular purpose.
The licensors, including Her Majesty The Queen, shall not be liable in respect of any
claim, demand or action, irrespective of the nature of the cause of the claim, demand or
action alleging any loss, injury or damages, direct or indirect, which may result from the
use or possession of the data or the NavTech database. The licensors, including Her
Majesty The Queen, shall not be liable in any way for loss of revenues or contracts, or
any other consequential loss of any kind resulting from any defect in the data or the
NavTech database.
End User shall indemnify and save harmless the licensors, including Her Majesty The
Queen and the minister, and their officers , employees and agents from and against any
claim, demand or action, irrespective of the nature of the cause of the claim, demand or
action, alleging loss, costs, expenses , damages or injuries (including injuries resulting in
death) arising out of the use or possession of the data or the NavTech database.
Page 5

PRECAUTIONS
Important information.
Please read carefully before using this pr oduct.
This product is intended to safely provide turn by turn instructions to get you to a desired destination. Please
make certain that all persons using this navigation system carefully read these precautions and the following
instructions fully.
1) This product is not a substitute for your personal judgment. Any route suggestions
made by this navigation system may never supersede any local traffic regulations or your
personal judgment and/or knowledge of safe driving practices.
suggestions if the navigation system instructs you to perform an unsafe or illegal
maneuver, places you in an unsafe situation, or routes you into an area which you
consider unsafe.
2) Glance at the screen only when necessary and safe to do so. If prolonged viewing of
the screen is necessary, pull over in a safe and legal manner and location.
3) Do not input destinations, change settings, or access any functions requiring a
prolonged view of the monitor and/or remote control while you are driving. Pull over in a
safe and legal manner and location before attempting to access the system.
4) Do not use the navigation system to route you to emergency services. Not all locations
of emergency services such as police and fire stations, hospitals and clinics are contained
in the database. Please use your own judgment and ask for directions in these situations.
Do not follow route
5) The map database used in the DVD-ROM is the most recent map data available at the
time of production. Because of changes in streets and neighborhoods, there may be
situations where the navigation system is not able to route you to your desired destination.
In these cases, use your own judgment.
6) The map database is designed to provide you with route suggestions and does not take
into account the relative safety of a suggested route or of factors which may affect the time
required to reach your destination. The system does not reflect road closures or
construction, road characteristics (i.e. type of road surface, slope or grade, weight or
height restrictions, etc.), traffic congestion, weather conditions, or any other factors which
may affect the safety or timing of your driving experience. Use your personal own
judgment if the navigation system is unable to provide you with an alternate route.
7) There may be situations where the navigation system displays the vehicle's location
erroneously. Use your own driving judgment in this situation, taking into account current
driving conditions. Please be aware that in this situation the navigation system should
correct the vehicle's position automatically. However, there may be times where you may
have to correct the position yourself. If this is the case, pull over in a safe and legal manner
and location before attempting operation.
8) Make certain that the volume level of the monitor, CVA-1003/CVA-1004/CVA-1005/CVA1006/IVA-C800/IVA-C801/IVA-D900 or other audio type unit is set to a level which still
allows you to hear outside traffic and emergency vehicles.
If there is anything in the manual about the operation of the navigation system
which you are uncertain about, please contact your local Alpine authorized
navigation dealer or Alpine at 1-888-NAV-HELP (1-888-628-4357) before using the
navigation system.
iii
Page 6
Points to Observe for Safe Usage
• Read this manual carefully before using this DVD-ROM. It contains instructions on how
to use this product in a safe and effective manner. Alpine cannot be responsible for
problems resulting from failure to observe the instructions in this manual.
• This manual uses various pictorial displays to show you how to use this product safely
and to alert you to potential dangers resulting from improper connections and operation.
Following are explanations of these pictorial displays. It is important to fully understand the
meanings of these pictorial displays in order to use this manual and the system properly.
MEANING OF DISPLAYS:
This symbol will precede important instructions.
Warning
Caution
Failure to heed them can result in serious injury
or death.
This symbol precedes important instructions.
Failure to heed them can result in injury or
property damages.
iv
This indicates supplementary
explanation or helpful suggestions for
a specific feature in this system.
WARNING
• Operation of the system while driving is dangerous. Users should stop vehicle
before operating the software.
• Road conditions and regulations take precedence over information contained
on the map display: observe actual traffic restrictions and circumstances while
driving.
• This software is designed for use exclusively in the NVE-N851A/NVE-N852A
series. It cannot and may not be used in conjunction with other hardware.
Page 7

Warning
DO NOT OPERATE ANY FUNCTION THAT TAKES YOUR
ATTENTION AWAY FROM SAFELY DRIVING YOUR VEHICLE.
Any function that requires your prolonged attention should only be performed after
coming to a complete stop. Always stop the vehicle in a safe location before
performing these functions. Failure to do so may result in an accident.
MINIMIZE MONITOR VIEWING WHILE DRIVING
Viewing the monitor may distract the driver from looking ahead of the vehicle and
cause an accident.
DO NOT FOLLOW ROUTE SUGGESTIONS IF THE NAVIGATION
SYSTEM INSTRUCTS YOU TO PERFORM AN UNSAFE OR
ILLEGAL MANEUVER, OR PLACES YOU IN AN UNSAVE
SITUATION OR AREA
This product is not a substitute for your personal judgement. Any route suggestions
by this system should never supersede any local traffic regulations or your
personal judgement or knowledge of safe driving practice.
KEEP SMALL OBJECTS SUCH AS BATTERIES OUT OF THE
REACH OF CHILDREN
Swallowing them may result in serious injury. If swallowed, consult a physician
immediately.
USE THIS PRODUCT FOR MOBILE 12V APPLICATIONS
Other uses may result in electric shock or injury.
DO NOT PLACE FINGERS OR FOREIGN OBJECTS IN CD/DVDROM INSERTION SLOTS OR GAPS
Doing so may result in injury or damage to the product.
Caution
HALT USE IMMEDIATELY IF A PROBLEM APPEARS
Failure to do so may cause injury or damages to the product. Return it to your
authorized Alpine dealer or the nearest Alpine Service Station for repairing.
v
Page 8

TABLE OF CONTENTS
Precautions .................................................................................................... ii - V
Preface
System Features, System Enhancements, Navigation Terminology
and Remote Control Reference Guide......................................................................
Before Using the System
Installing New Navigation System Software ................................................................6
How to use the Disc ....................................................................................................7
Operation
Basic Operation................................................................................................... 8 - 12
Switching the display on/off.......................................................................................13
Switching between Split Screen Display and Detailed Map Display ................. 14 - 15
Manual backup.................................................................................................. 16 - 17
Destination Menu
Entering a destination by Address .................................................................... 18 - 20
Entering a destination using a Major Intersection ............................................. 21 - 23
Entering a Point of Interest by Place Name ...................................................... 24 - 25
Entering a Point of Interest by Place Type......................................................... 26 - 28
Entering a Point of Interest by Phone Number.................................................. 29 - 30
Entering a Point of Interest by Latitude and Longitude .............................................31
Entering a destination by Recent Destination ...........................................................32
Entering a destination using the Address Book ........................................................33
Entering a destination directly from the Map Display ................................................34
Entering a destination by Origin of the Route ...........................................................35
Saving a destination into the Address Book..............................................................36
Adding a destination into Today's Plan......................................................................37
Using the Today's Plan Function ....................................................................... 38 - 39
Setting Wa ypoints......................................................................................................40
Searching for local places ................................................................................. 41 - 42
Searching for Exit Information places........................................................................43
Setup/Editing Menu
Address Book editing ................................................................................................44
Address Book editing (Name Editing) .......................................................................45
Address Book editing (Phone Number Editing).........................................................46
Address Book editing (Special Settings) ........................................................... 47 - 48
Recent Route editing.................................................................................................49
Today's Plan editing...................................................................................................50
Route editing ..................................................................................................... 51 - 52
Changing order of waypoints.....................................................................................53
Setting as Current Position........................................................................................54
Displaying the entire route.........................................................................................55
Changing the off-route recalculation option ..............................................................56
Changing the route calculation method.....................................................................57
Setting the Today's Plan Calculation Method ............................................................58
Recalling the Street List during guidance .................................................................59
Setting the map color ................................................................................................60
Setting Point of Interest icon options................................................................. 61 - 63
Setting the map screen orientation ...........................................................................64
Setting the Split Screen.............................................................................................65
Setting the voice guide type/frequency .....................................................................66
Setting Est. (Estimated) Time display........................................................................67
Setting assumed speed.............................................................................................68
vi
Setting audio interrupt ...............................................................................................69
2 - 5
Page 9

Setting the GPS clock ....................................................................................... 70 - 71
Recalibration for new vehicle or tires.........................................................................72
Direction adjustment .................................................................................................73
Screen position adjustment.......................................................................................74
Information/Guidance Menu
Connection check for peripherals..............................................................................75
Navigation Simulation................................................................................................76
Viewing GPS Information ..........................................................................................77
Viewing Trip Information ............................................................................................78
Viewing Software Information....................................................................................79
Using the Detour function..........................................................................................80
Using the Plan function .............................................................................................81
Reference
In case of difficulty/Error Messages .................................................................. 82 - 83
Buttons and functions of remote controls.......................................................... 84 - 85
Remote Control Reference Guide for Head Unit.......................................................86
Remote Control Reference Guide for AV Head Unit .................................................87
vii
Page 10

PREFACE
System Features
Automatic Route Calculation
The navigation system displays and tracks your vehicle's position and movement
via a moving map display. When you input a destination, the navigation system
quickly calculates a route and guides you with pictorial displays and voice prompts.
When determining the route, the system can be programmed to minimize the use
of toll roads and freeways.
This system combines GPS signals received with map information stored on DVDROM to display the position and direction of the vehicle. This navigation system
also includes an electronic gyro-sensor and a speed sensor that enable it to
display the present vehicle position even in locations where GPS signals may be
blocked.
Multiple Mode Destination Selection
Desired destinations can be selected among these 10 categories:
• an address
• an major intersection
• a point of interest (POI)
• a recent destination
• your personal address book
• a special feature called Today's Plan
• a location selected directly from the map display
• a phone number
• an origin of the current route
• a latitude and longitude
Street Name Input
Allows you to input your destination's street name (via Address or Intersection
search) if you don't know your destination's city name.
Next T urn Guide
When an upcoming turn is approaching, the system will give maneuver instructions
via arrow guides and simple voice prompts.
Real Time Voice Guidance
Using voice prompts, the system will notify you of upcoming turns and highways to
enter. The VOICE button on the remote control allows you to access this voice
guidance feature at any time with a single press.
Map Zoom
You can change the map display in nine magnification scales to get more detail or
more general views (1/32, 1/16, 1/8, 1/4, 1/2, 2, 8, 32, 128 mile zoom scales). A
special 256 mile zoom scale is available when you view a very long route.
2
Page 11

System Enhancements
Overall Improved System Response Time
Faster screen transitions and route calculations.
Faster Input Using Smart Key Filtering
By displaying only the characters necessary to complete your destination input,
jumping over unnecessary letters is kept to a minimum.
Input Destination by Phone Number
By entering a POI by phone number, routing or calling and routing.
Expanded Points of Interest Database
The POI database contains hundreds of thousands of business locations. The
database is constantly expanding and changing. Regular updates are made to
keep up with this constant change.
GPS Clock
This time will automatically adjust according to GPS time.
This time can also be displayed directly on the map along with your estimated time
of arrival (ETA) or estimated drive time remaining (TO GO).
3
Page 12
Navigation Terminology
Present Vehicle Position Indicator
The present vehicle position is indicated by an
arrowhead within a circle.
Map Matching
Since GPS has an error window of about 100 - 650 feet
(30 m - 200 m), the position of the vehicle may be calculated
in such a way that it is displayed incorrectly off the road.
Map matching automatically corrects this error so that the
vehicle is displayed on the road.
Destination
The destination point is represented by a checkered flag.
Present vehicle
position
➡
Uncorrected
Corrected
Destination
icon
Address Book
Up to 99 personal locations and phone numbers can be
stored in the system's memory.
Popular Points of Interest
Eight different POI icons can be programmed to appear on
the map. These icons indicate the locations and names of
the nearest ATMs, banks, gas station, restaurants, hotels,
supermarkets, parking garages and highway exit with IA
data. All eight icons can be displayed on the screen at one
time.
Note: The brand icons (thirteen petrol companies) of the gas
stations appear on the map. For details, see page 62 of this
Manual.
4
Route
Page 13
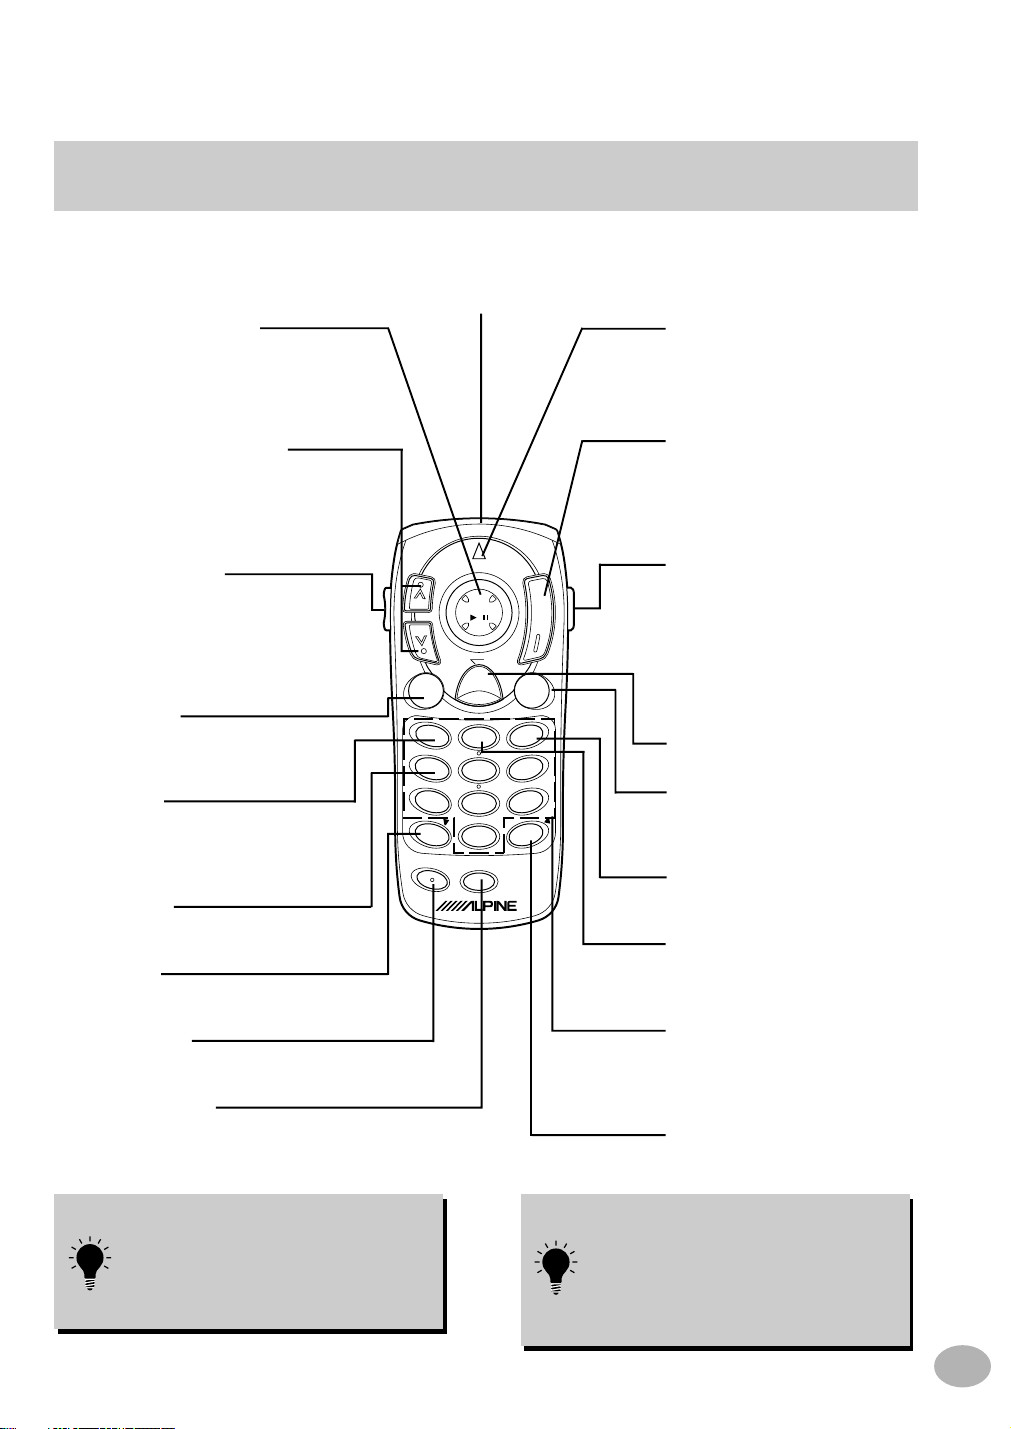
Remote Control Reference Guide
Remote Control transmitter
Transmits the remote control signals.
Aim toward the display monitor for
operation.
Joystick/ENTER button
Selects highlighted items within menus
and moves map displa ys and v ehicle
position icon. Press the ENTER b utton
to select any highlighted function,
screen icon or street segment.
Zoom/Quick Scroll buttons
Changes map magnification ratio
upward or downward in 9 steps.
Scroll through street, city or
place type listings a page at a
time.
AUDIO/NAV.button
Switches between Audio and
Navigation operations.
Pressing this button illuminates
the highlighted portion of the
display.
VOICE button
Initiates vocal instruction for next
route maneuver or repeats last
instruction.
LIST button
Displays list of the streets
currently set for the route. To
return to the guidance mode,
press the MP/RG button.
PLAN button
Allows you to advance to the next
destination in Today's Plan list.
DEL button
Deletes the character previously
input.
ON/OFF button
Turns the pictorial display on or
off.
DEL DEST. button
Deletes current destination.
.
L
O
V
ENTER
/
E
T
U
M
LIST N/H
PLAN
DEL.
ON/OFF
A PROC.
MENU
DTR
23
1
5
4
F
U
7809
O
P
DEL. DEST
N
/
C
V SEL.
S
O
U
R
S
E
MP
/RG
B
A
N
D
CANC.VOICE
6
C
.
L
OK
Status indicator
Illuminates when remote is
transmitting. Blinks for 5 seconds
when the MODE button is
pressed.
MP/RG button
Toggles between Detailed Map
Display and Basic Guide Display
during guidance. Switches
directly to Map when not in
guidance.
MODE button
Press this button to input
numerals using the numeric
keypad, DEL. and OK buttons.
After pressing the MODE button,
the following buttons will be
pressed while the status
indicator is blinking: numerals
(0-9), DEL.,and OK.
MENU button
Displays the main menu bar.
CANC. button
Cancels current display screen
and switches back to previous
screen with menus.
N/H button
Toggles between North Up and
Heading Up orientation.
DTR (DETOUR) button
Automatically recalculates route
if a road block or traffic
congestion is encountered.
Numeric Keypad
Use these buttons to enter Phone
numbers, address numbers or
street names containing numbers
(i.e., 42nd St.).
OK button
Executes numeral inputtings and
starts searching.
a If an operation is not accepted, the
navigation system beeps.
a After pressing the MODE button, the
following buttons will be pressed
while the status indicator is blinking:
numerals (0-9), DEL.,and OK.
a Hold down CANC. button for 3
seconds to toggle between Heading
Up and North Up orientation. (See
page 64.)
a The Alpine Head Unit can be
operated with the remote control.
For details, refer to pages 86 and 87.
Note: Due to continuous product improvement, specifications are subject to change.
5
Page 14
BEFORE USING THE SYSTEM
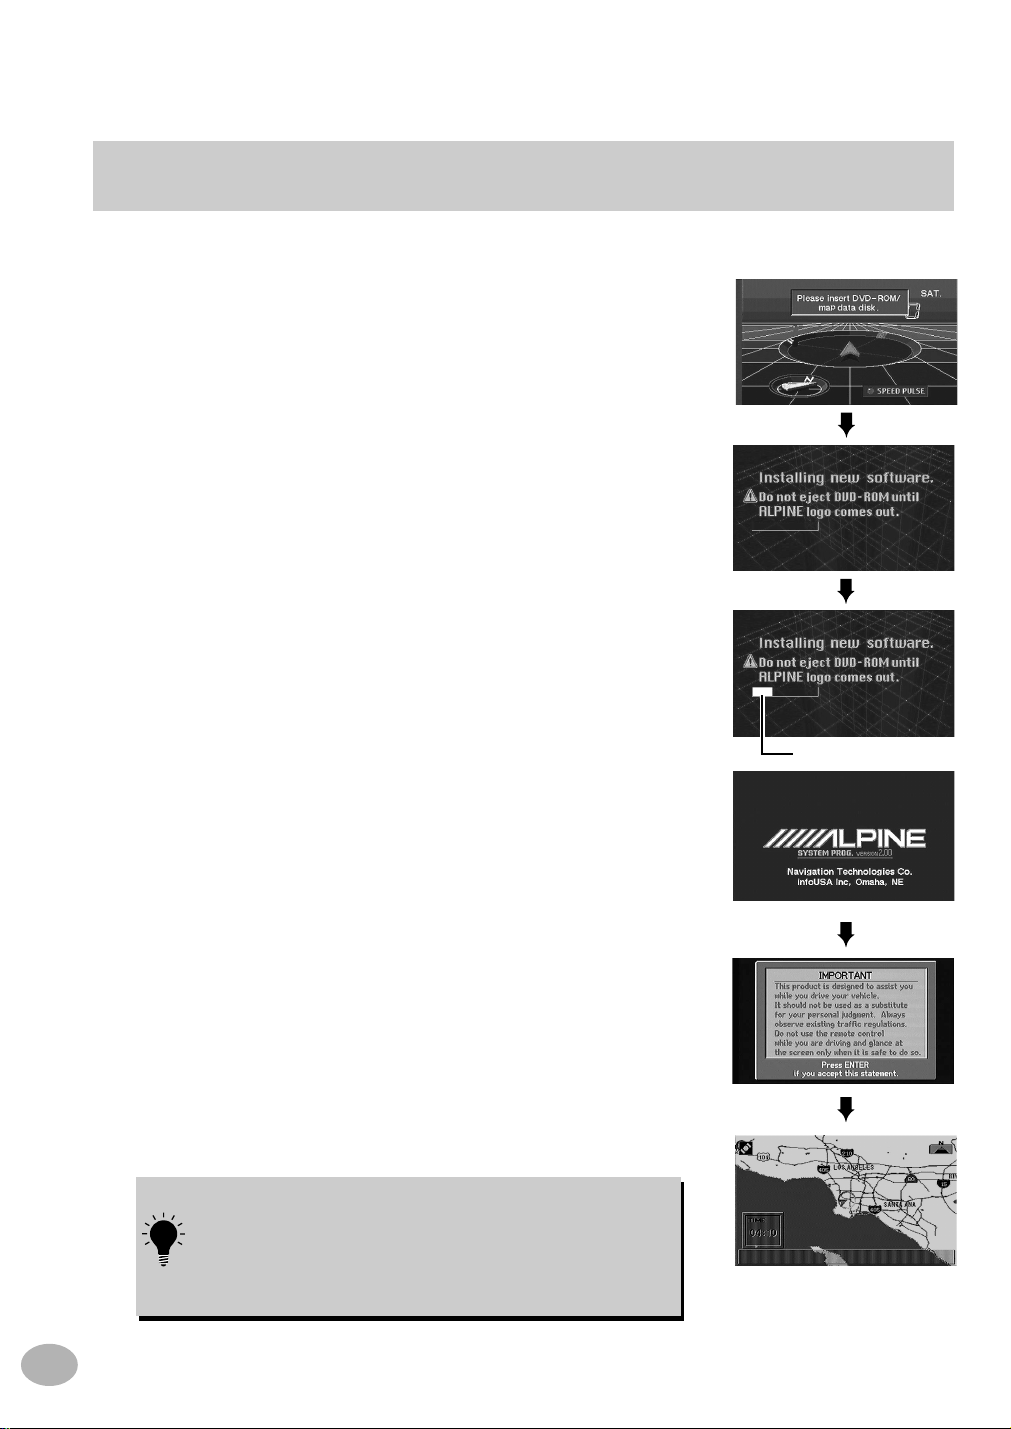
Installing New Navigation System Software
If a different version of the map disc has been used with your navigation system, the operating system
program installed will be rewritten automatically to read this SMART MAP PRO disc.
Remove the different version of the map disc from your
1
navigation system. Insert this SMART MAP PRO disc.
The display shows "Please insert DVD-ROM/ map data
disk." Insert the DVD-ROM disc into the NVE-N851A/
NVE-N852A Series Navigation System. (For instructions
on inserting and removing the DVD-ROM disc, refer to
the NVE-N851A/NVE-N852A Series Hardware Manual.)
The opening screen appears on the monitor display.
2
If a CVA-1003/CVA-1004/CVA-1005/CVA-1006/IVAC800/IVA-C801/IVA-D900 type system control monitor
is used, you may not see this screen.
A disclaimer screen appears. Please read this important
3
information. Press the ENTER button on the remote
control if you accept this statement.
Once the ENTER button on the remote control is
4
pressed, the map screen will appear on the display. The
vehicle's present location is indicated. If the vehicle's
present location is incorrect, drive the vehicle several
miles in an area with an open view to sky. This will
correctly synchronize the navigation system.
When powering on the unit for the first time, it takes the
GPS receiver approximately 10 minutes to calculate the
vehicle's current position. During this period, the vehicle
position icon may not move even if the vehicle is being
driven.
Installation Progress
6
Page 15
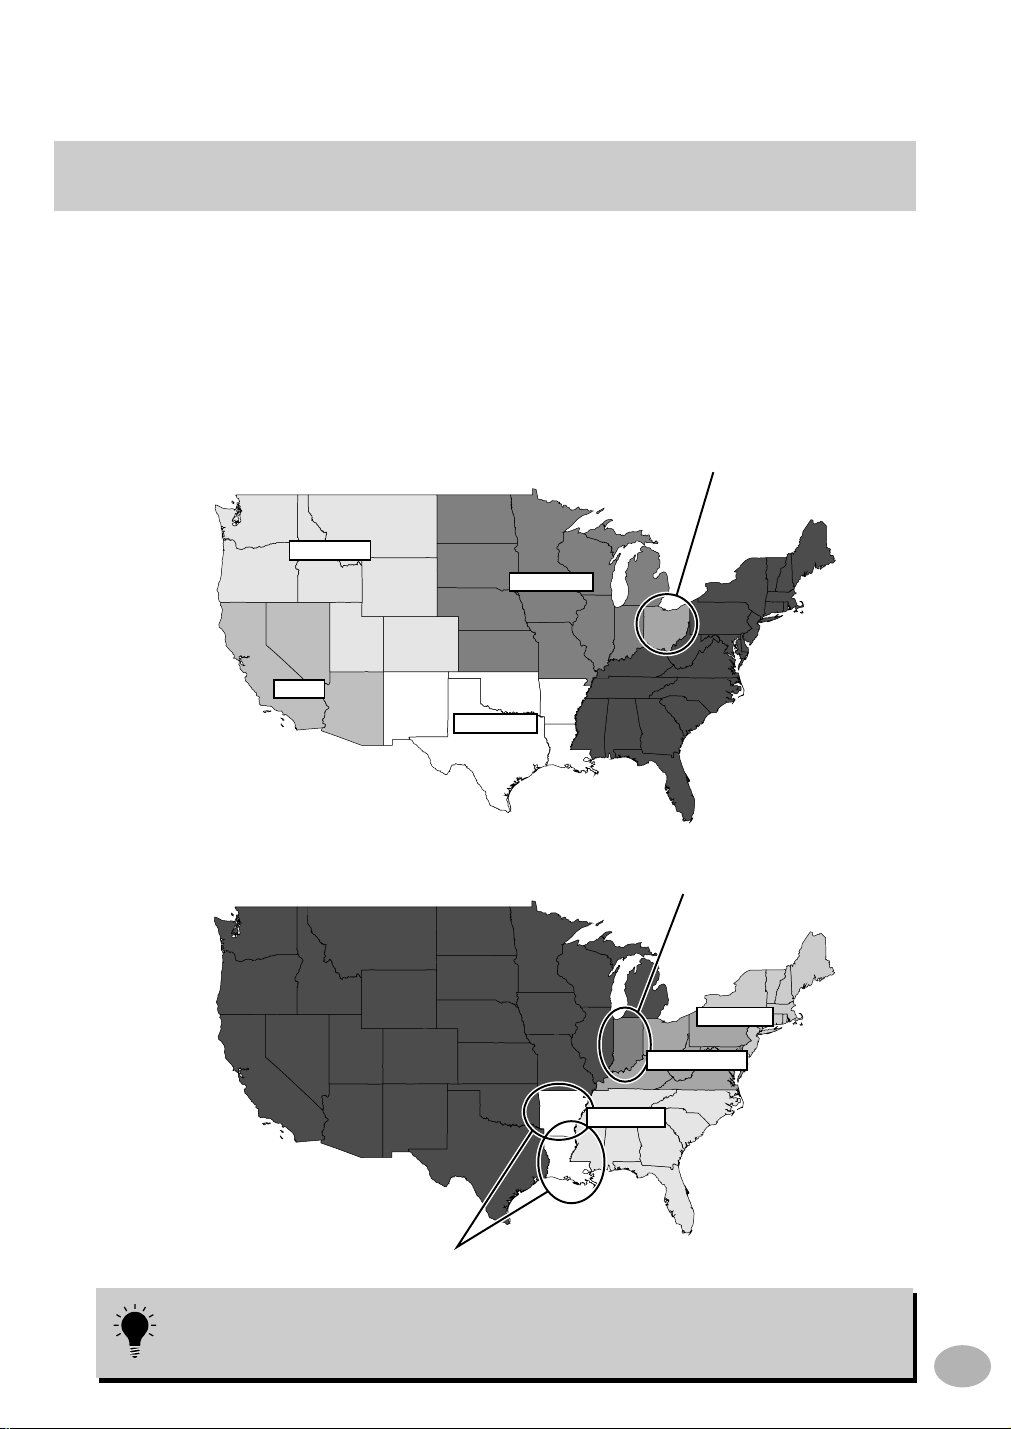
How to use the Disc
There are two discs available for NVD-A211: the EAST version, and the WEST version. Phone
number/POI (Point of Interest) information, etc., contained in the West area disc cannot be
searched by the East disc, and vice versa. Places in the West area, for example, can only be found
on the West disc.
If you happen to cross into the West area while using the East disc, the POI icons on the screen
map are not displayed. Route guidance is still possible, but it is recommended to change discs to
effectively use the navigation system.
The East and West version discs cover the areas as shown below. There are some overlap areas
which are stored in both discs.
West disc stored area
WA
OR
CA
West(W)
Northwest(NW)
NV
MT
ID
UT
AZ
East disc stored area
WA
OR
NV
CA
MT
ID
UT
AZ
WY
WY
CO
NM
CO
NM
ND
SD
Midwest(MidW)
NE
KS
OK
Southwest(SW)
TX
ND
SD
NE
KS
OK
TX
MN
MN
IA
MO
AR
LA
IA
MO
AR
LA
Overlap area
WI
MI
IN
IL
KY
TN
AL
MS
Overlap area
WI
MI
IN
IL
KY
TN
Southeast(SE)
GA
AL
MS
PA
OH
WV
VA
NC
SC
GA
FL
Northeast(NE)
PA
OH
Mid Atlantic(Mid A)
WV
VA
NC
SC
ME
VT
NH
NY
MA
CT
NJ
DE
MD
ME
VT
NH
NY
MA
CT
NJ
DE
MD
FL
Overlap area
You can search for “Named Place” and “Exit Information” from both discs by specifying the
area (see page 10). If you search for a destination from the address book or a recent
destination, a route can guide you without changing discs (pages 32 to 33).
7
Page 16
OPERATION
ENTER
/
ENTER
/
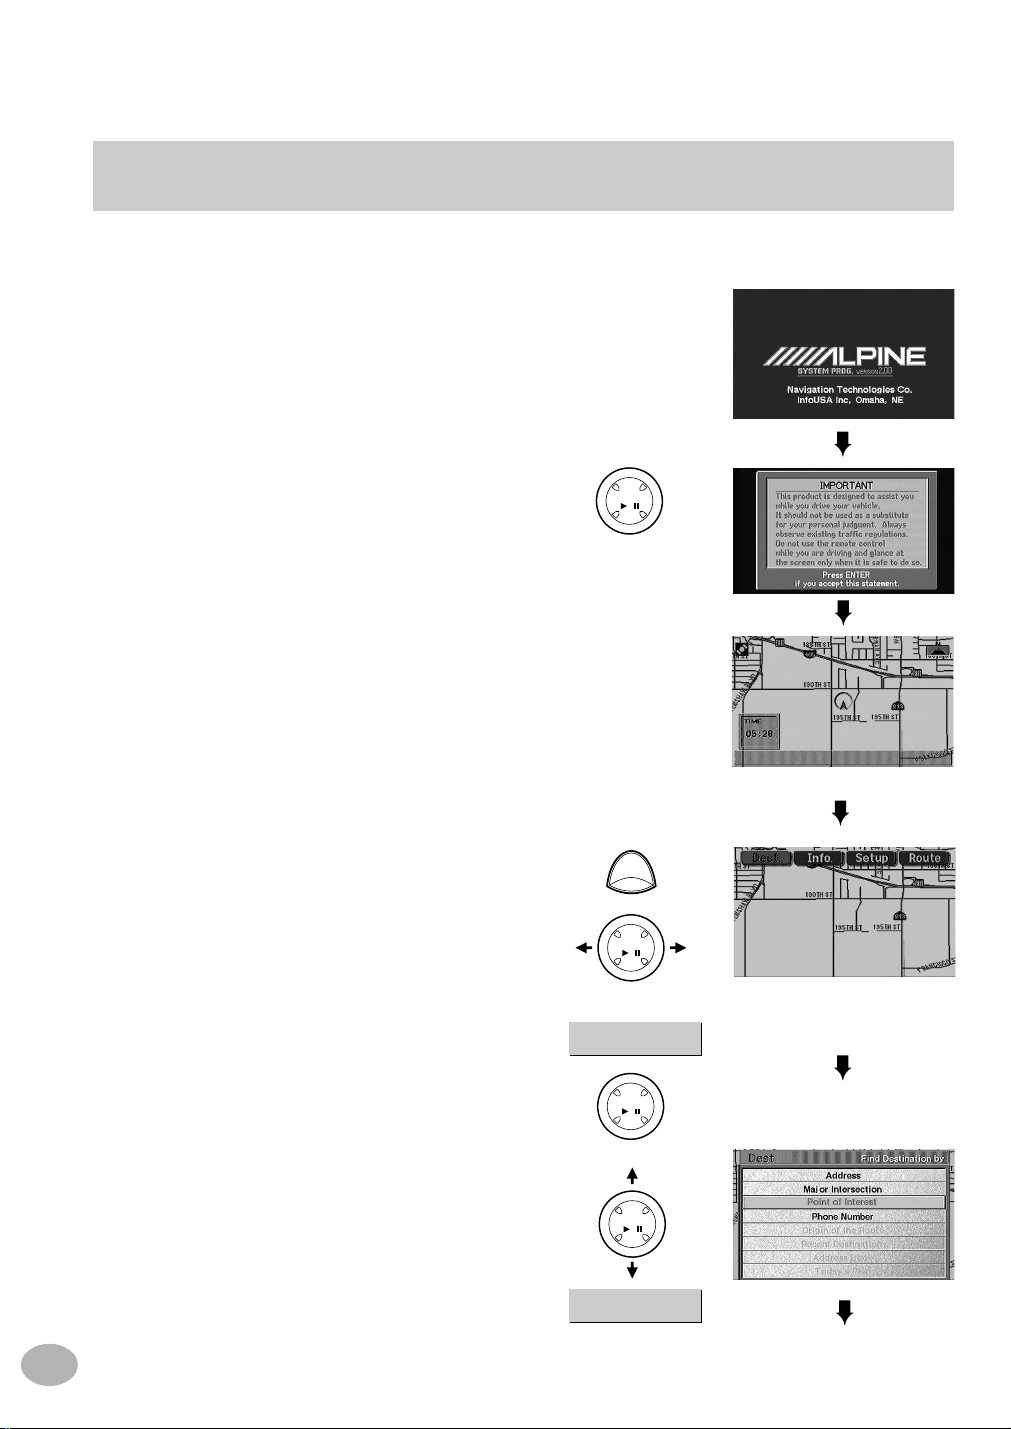
Basic Operation
The following example briefly describes how to use the Alpine Advanced Route Guidance Navigation
System.
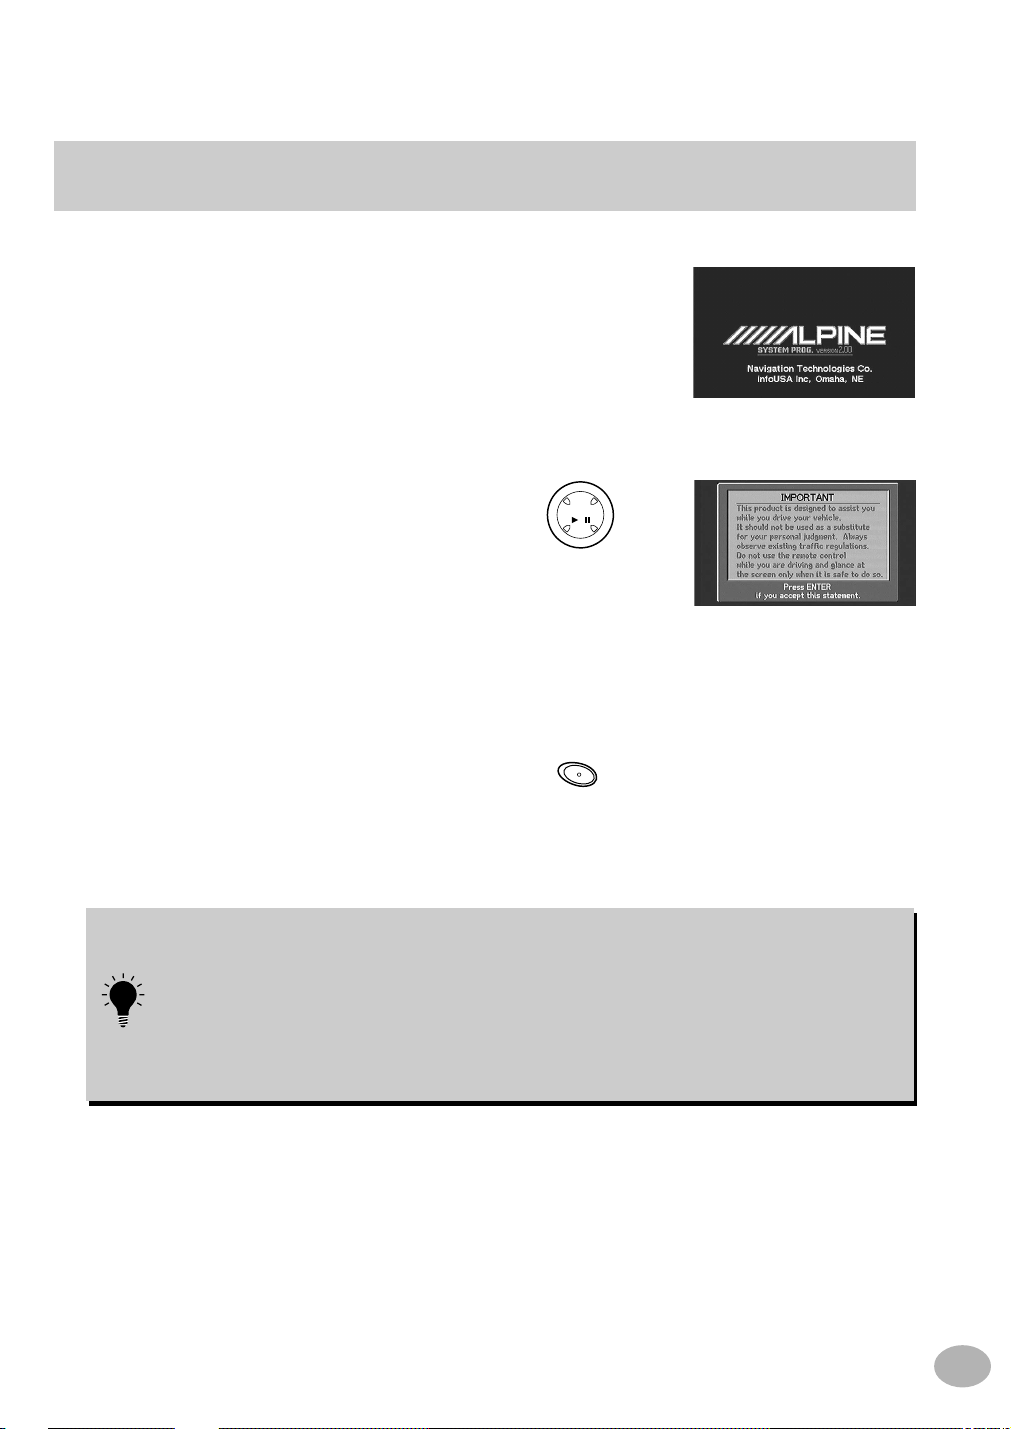
The opening screen will appear once the
1
navigation system is turned on.
(If a CVA-1003/CVA-1004/CVA-1005/CVA-
1006/IVA-C800/IVA-C801/IVA-D900 type
system control monitor is used, you may
not see this screen.)
A disclaimer screen appears. Please read
2
this important information. Press the
ENTER button on the remote control if you
accept this statement.
Once the ENTER button on the remote
3
control is pressed, the map screen will
appear on the display. The vehicle's current
location is indicated. If the vehicle's current
location is incorrect, drive the car several
miles in an area with an open view to the
sky. This will correctly synchronize the
navigation system.
Press the MENU button on the remote
4
control. The main menu bar will appear at
the top of the screen. Tilt the joystick to
highlight the desired menu item then press
the ENTER button.
(In this example, "Dest." is selected.)
The Find Destination by menu appears.
5
Tilt the joystick to select the desired
method, then press the ENTER button.
(This example shows when "Point of
Interest" is selected.)
MENU
ENTER
/
Dest.
ENTER
/
Point of Interest
8
Page 17

ENTER/ENTER
/
ENTER
/
ENTER
/
The Find Point of Interest by menu
6
appears. Use the joystick to select a
method to find the point of interest.
(In this example, "Place Type" is being
selected.
The place type list appears.
Move the joystick up or down to select the
desired place type, then press ENTER.
(This example shows when "Airport" is
selected.)
The Find Point of Interest by menu
7
appears. Use the joystick to select a
method to find the point of interest and
press ENTER.
(In this example, "City Name" is being
selected.
Place Type
Airport
Note: If you select "Sorted by distance," a list of
destinations will appear, sorted by the distance
from your current location.
The Find Point of Interest by menu
8
appears again. Use the joystick to select a
method to find the point of interest and
press ENTER.
(In this example, "City Name" is being
selected.)
The Input City Name screen appears. Use
9
the joystick to select the first letter of the
city name and press ENTER. The entered
character appears in the text window.
City Name
City Name
ENTER
/
Continued next page
9
Page 18
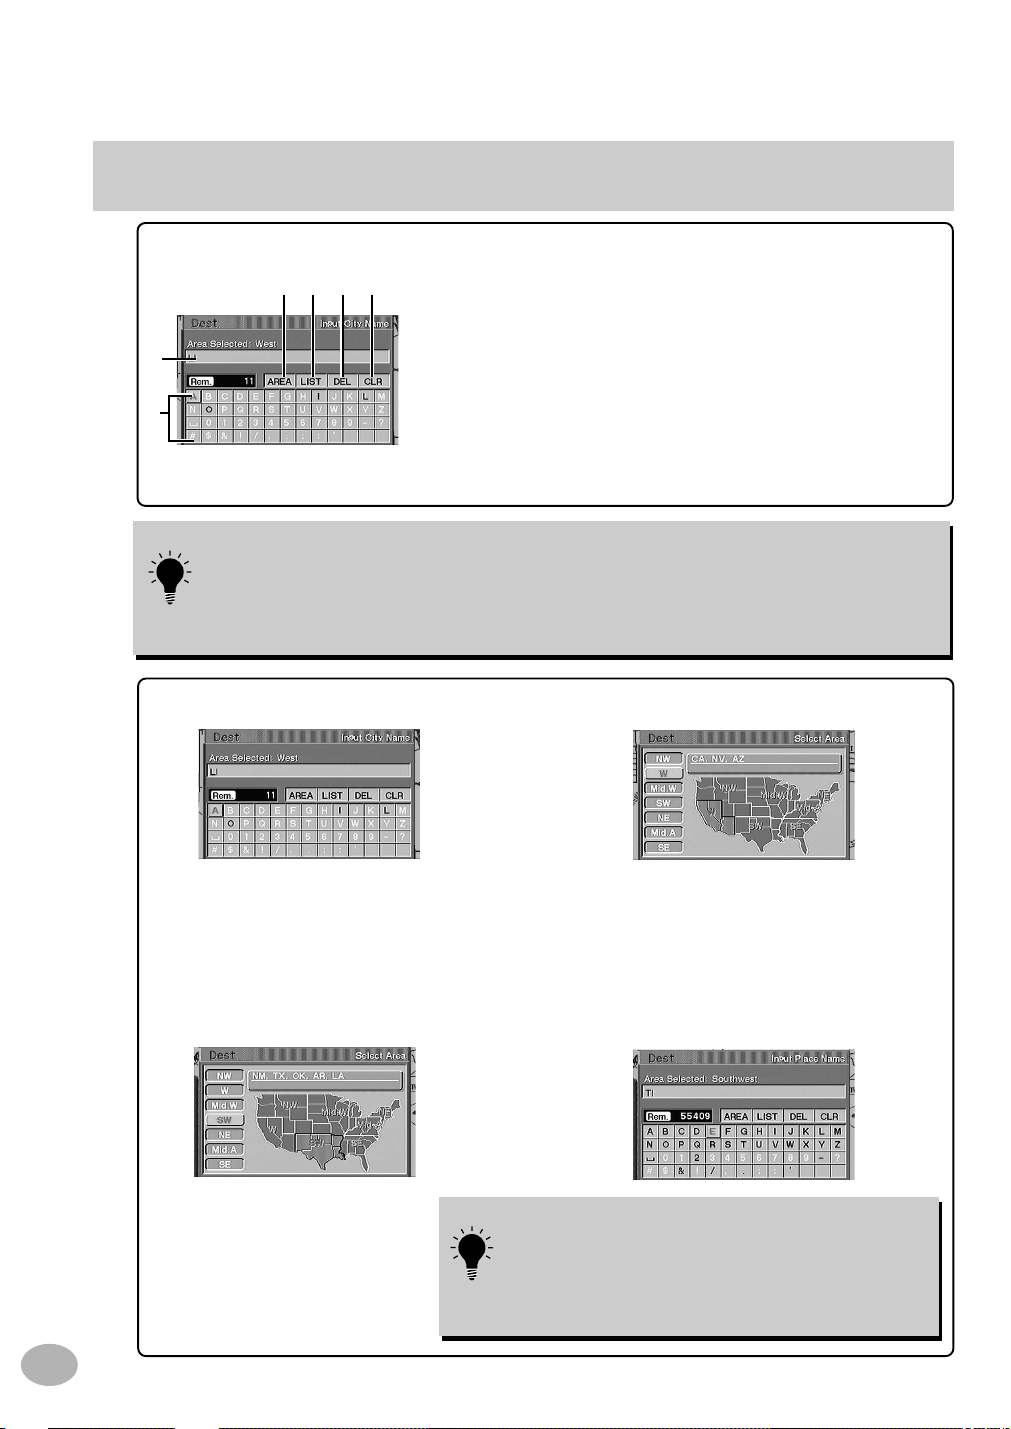
Basic Operation (continued)
The characters selected are displayed in the text window.
bcde
a
f
a When 1 character is input, the candidates for the next character are narrowed down (and the
others disappear from the character pallet).
a You can also search for a location by inputting just the start of its name and selecting "LIST."
a If you want to display the list of candidate city names, select "LIST" and press ENTER. If the
number of candidates narrows down to less than 7, the display automatically shows the
Select City screen. Skip to Step 10.
a. Text window
Displays the selected characters.
b. AREA
Selects areas other than the current-vehicle-position area.
c. LIST
Displays a list of the candidate names for the selected characters.
d. DEL
Returns to the previous character and erases it.
e. CLR (Clear)
Clears the text window.
f. Character pallet
Select the desired characters.
To search in other areas:
The current area being
searched is shown as "WEST."
Select the area to be searched by tilting
the joystick and pressing ENTER. For
example, if you wish to go to Texas, select
SW or the "South West" area.
You can search all US cities with either disc.
However, if you search a city in the West area with
the East version disc, the “Named Place” and “IA
items (facilities) around the highway exit with IA data”
(page 43) lists are displayed. To search for another
place, change the disc.
The selected area map is displayed.
Current area map (West area shown).
The Input City Name screen will appear
and will show "South West" as the area
selected.
Proceed to step 10.
10
Page 19
ENTER
/
ENTER
/
ENTER
/
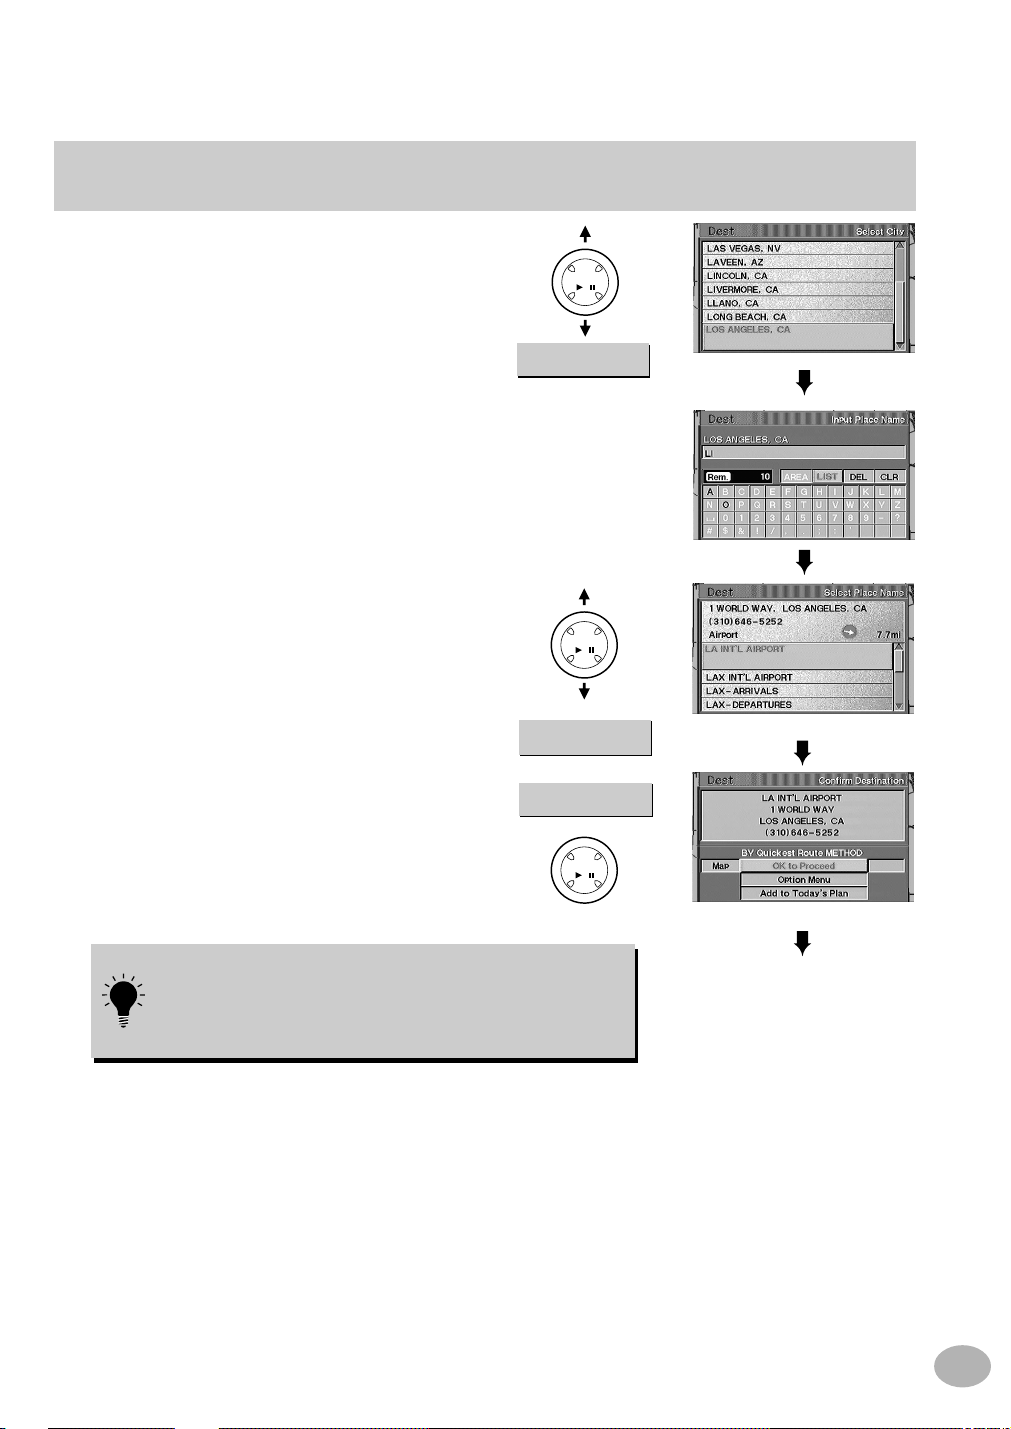
The Select City screen appears.
10
Use the joystick to enter a city name and
scroll down to select that city. Press ENTER
when finished.
The Input Place Name screen appears.
11
Once you have entered a few characters,
select LIST at the top of the character pallet
and press ENTER.
The Select Place Name screen appears.
12
Scroll through the names to select the
desired destination, then press ENTER.
(This example shows when "LA INT’L
AIRPORT" is selected.)
Once the destination is selected, the
13
Confirm Destination screen appears.
If the destination is correct, select OK to
Proceed then press ENTER.
LOS ANGELES, CA
LA INT’L AIRPORT
OK to Proceed
If you want to verify or modify the location of your
destination, directly on the map, highlight "Map" and press
ENTER. The Detailed Map Display will appear showing the
crosshair icon at the destination point. Press ENTER to
return to the Confirmation screen.
Continued next page
11
Page 20
Basic Operation (continued)
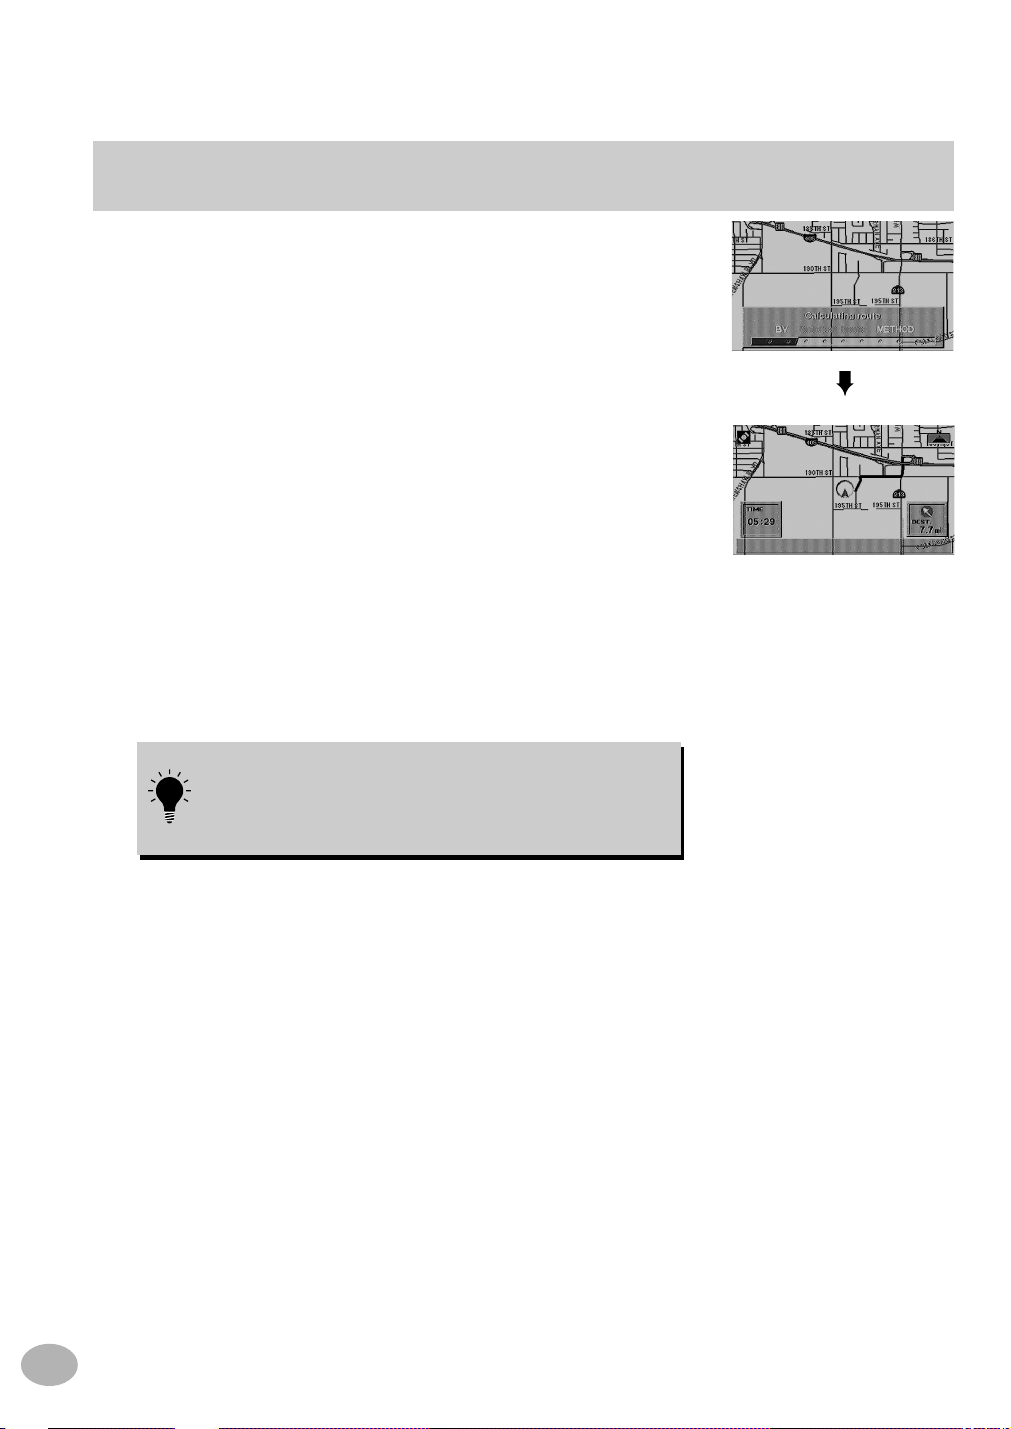
The navigation system quickly calculates
14
the route to the desired destination.
The map screen shows your current vehicle
15
position and a highlighted route. Once you
begin to drive on the highlighted route, the
system will guide you to the destination
using on-screen maneuver directions and
voice prompts.
(If the system determines that you are
currently on the route to the destination, it
will automatically announce the next
maneuver once you approach the next
turn.)
Once you arrive at your destination you should cancel the
route guidance by pressing the DEL DEST button on the
remote control (see page 49 for further information).
Otherwise, the navigation system will continue to guide you
to this destination as you drive away from this location.
12
Page 21
Switching the display on/off
ENTER
/
When the ignition key is turned to the A CC or ON positions, the opening screen will automatically appear .
After the opening screen is displayed,
1
important information will be displayed.
Make sure that it is read carefully.
(If you have the CVA-1003/CVA-1004/CVA1005/CVA-1006/IVA-C800/IVA-C801/IVAD900 system control monitor, the opening
screen may not be displayed.)
After you have read this important
2
information, press the ENTER button.
The map screen is displayed.
From any screen or menu, you may switch
3
the external monitor or CVA-1003/CVA1004/CVA-1005/CVA-1006/IVA-C800/IVAC801/IVA-D900 type unit's NAV source off
by pressing the DISP ON/OFF button on
the remote.
When you press the DISP ON/OFF button
again, the display turns back on.
ON/OFF
a If the DVD-ROM is not inserted in the navigation system, "Please insert DVD-ROM." is
displayed. For details on how to load the DVD-ROM, see "Inserting the DVD-ROM" and
"Removing the DVD-ROM" in the navigation system's Hardware Manual.
a If the DVD-ROM cannot be read or is inserted incorrectly, "Error reading DVD-ROM." will be
displayed on the screen. Try reloading the DVD-ROM correctly. If the message does not
disappear, contact your local Alpine navigation dealer.
a If the navigation system display is kept on with the engine off for an extended period of time,
the vehicle's battery may discharge. Make sure the system automatically turns off when
remove your key from the ignition switch.
13
Page 22
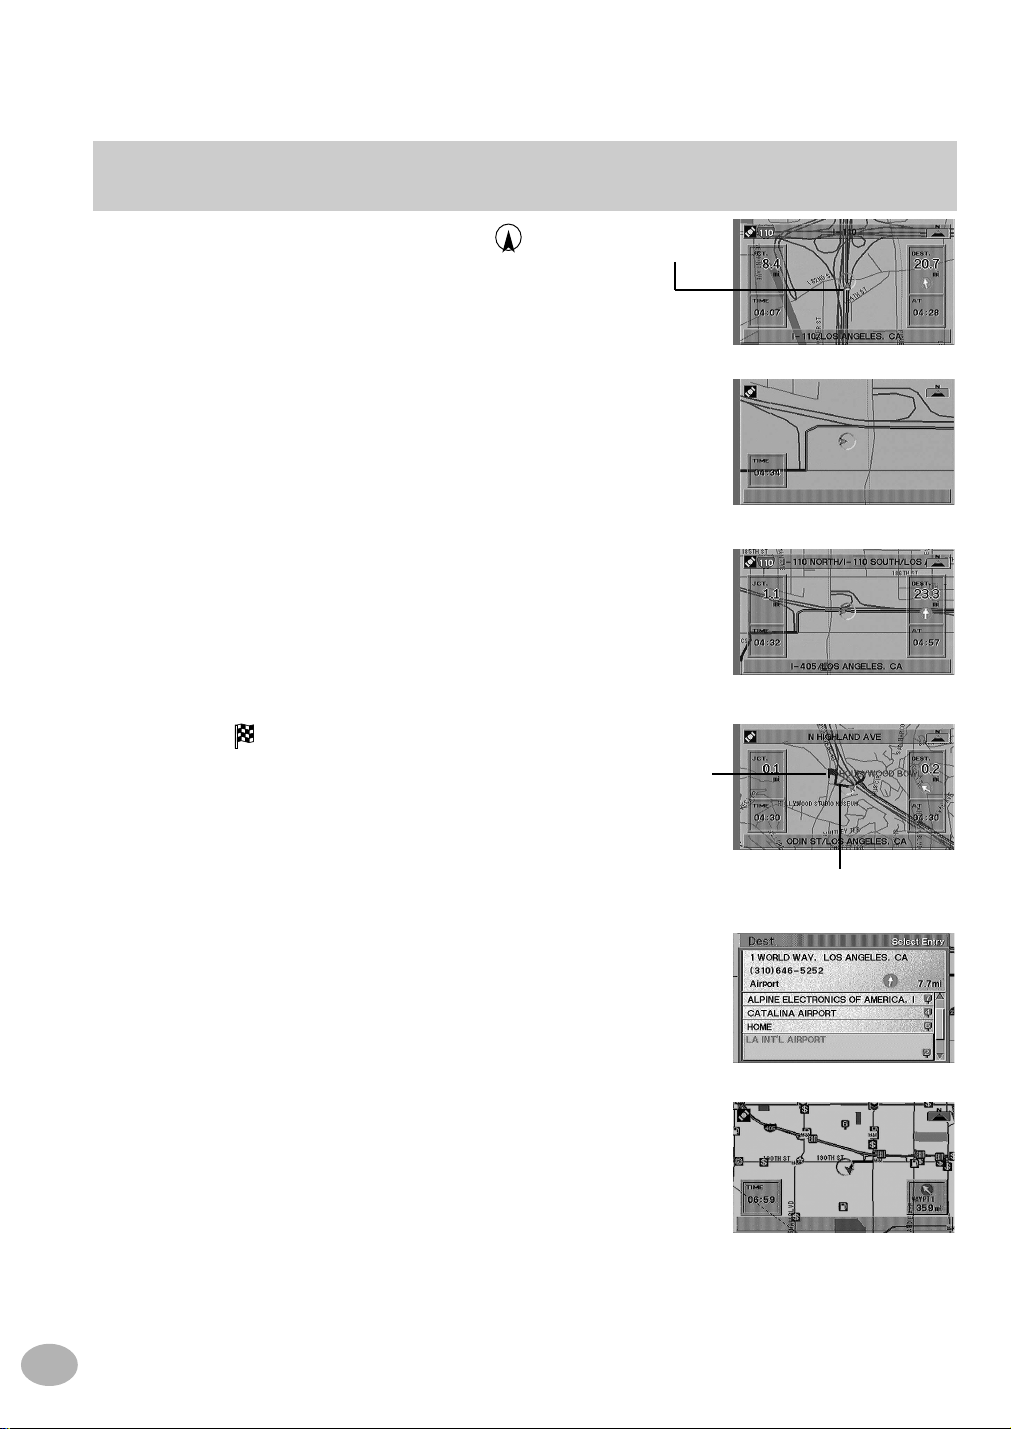
Switching between Split Screen Display and Detailed Map Display
Once the route has been calculated and driving begins, the navigation system will
guide the driver, turn-by-turn, to the destination. Real time voice directions and map
displays aid the driver throughout the entire route.
The type of display that appears during your trip can be selected according to your
preference.
The Basic Guidance Display automatically appears when the destination is selected
while the vehicle is in motion. When the Split Screen is set to ON in the Setup menu
(See page 65), pressing the MP/RG button on the remote control toggles the display
between the Split Screen Display and the Detailed Map Display.
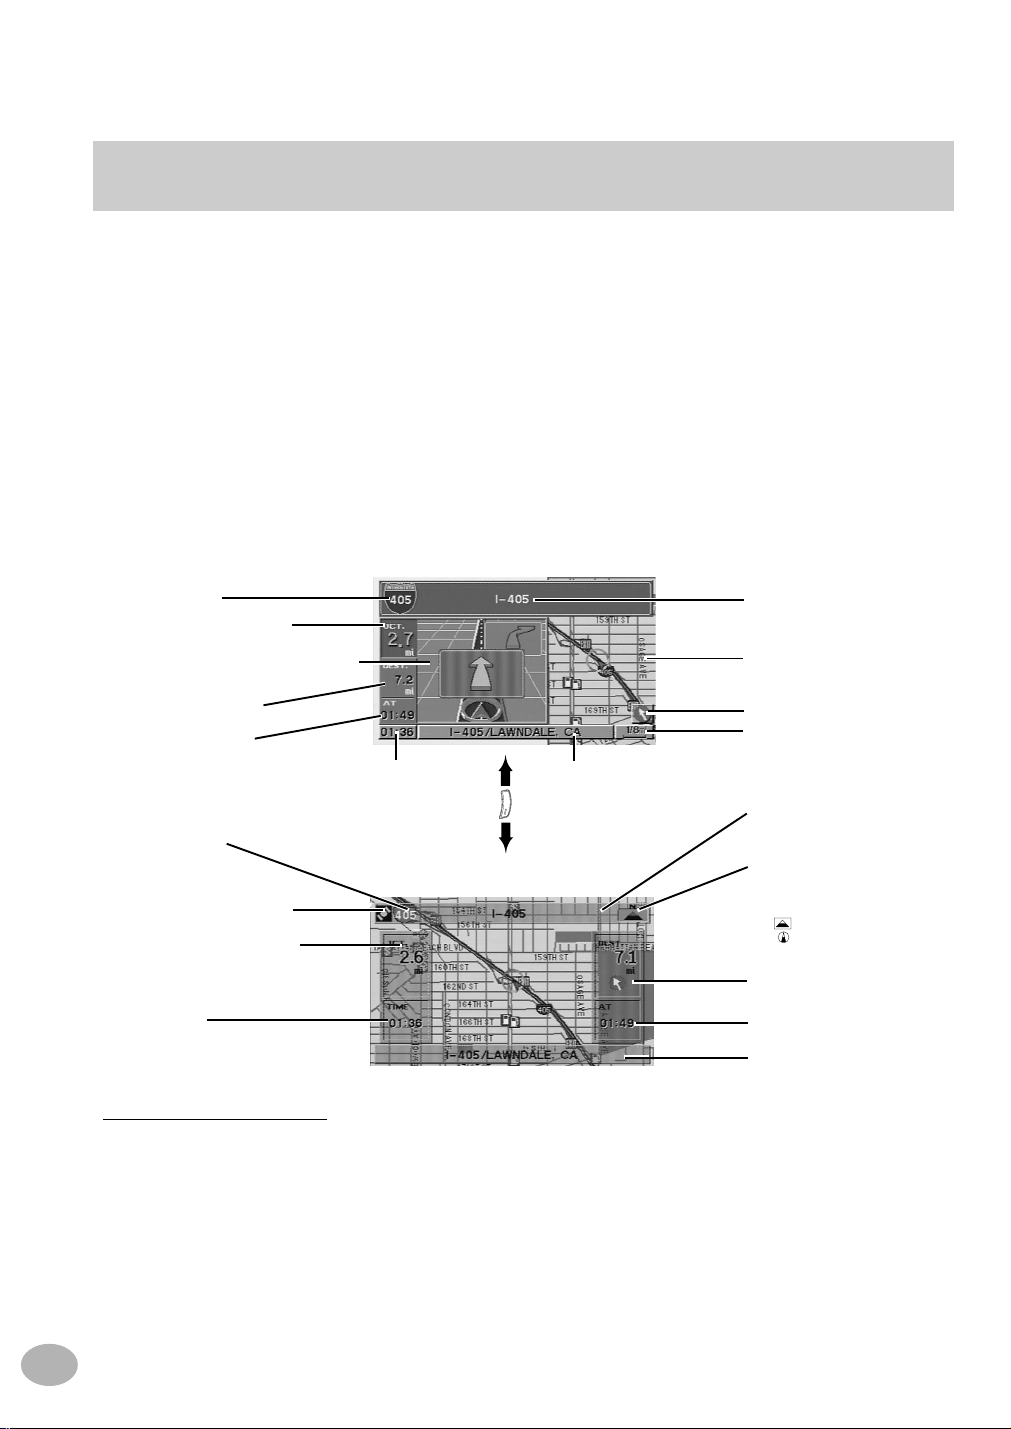
Split Screen Display
Freeway number
Distance to next maneuver
Basic Guidance Display or Zoomed
Intersection Map Display
Distance to destination
Estimated Remaining/
Arrival Time
Current Time
Freeway number
Current Road and City Name
MP
/RG
Detailed Map Display
GPS Signal Strength Icon*
Distance to next maneuver
Current Time
*GPS Signal Strength Color Key
Dark Gray: No satellite information being received.
Blue: Information from 1 to 3 satellites being received. Latitude and longitude information can be determined.
Yellow: Signals from 4 or more satellites being received. Indicates full signal strength. Latitude and longitude can be
accurately determined.
Street/highway name of
next maneuver
Detailed Map Display
Direction to Distance
Map Scale
Street/highway name of
next maneuver
Compass Icon
Indicates North and heading mode on
the current map.
N : North
: North Up icon
: Heading Up icon
(The arrowhead shows the
direction of north)
Distance and Direction to
Destination
Estimated Remaining/
Arrival Time
Current Road and City Name
14
Page 23
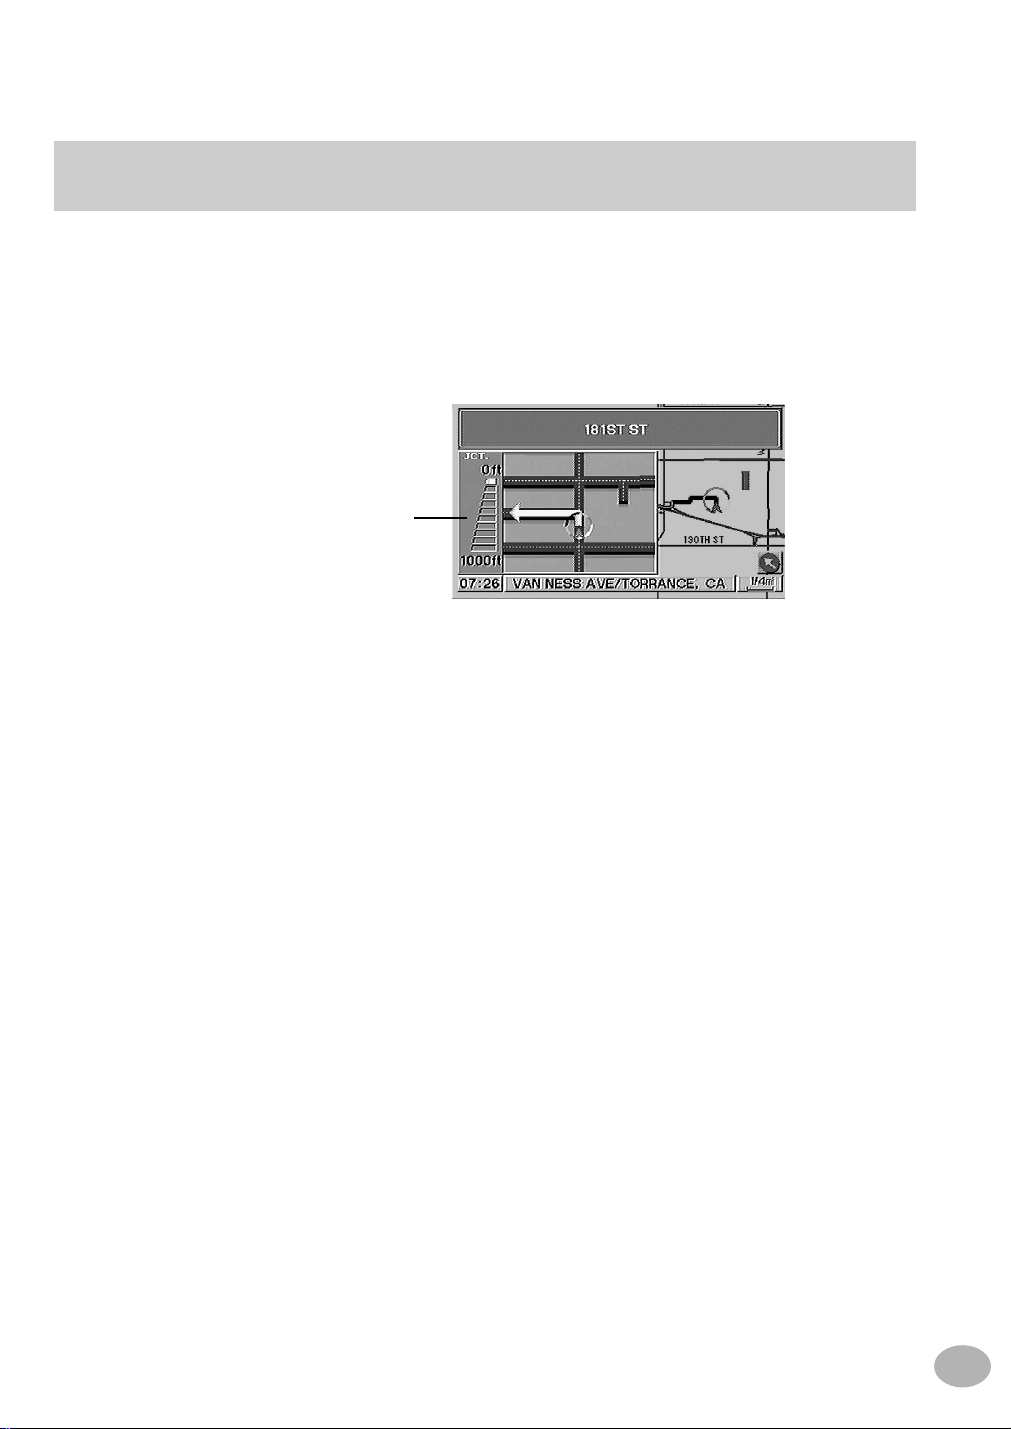
During navigation, when your vehicle approaches a major intersection, the Zoomed Major Intersection
Map of that intersection is displayed. This enlarged Major Intersection Map gi ves you additional information to complement the voice guidance. (This enlarged major intersection map may be displayed even
when no turns are necessary.)
Zoomed Major Intersection Map Display
This shows the remaining distance to
the next junction/intersection 3000
feet ahead on a freeway or 1000 feet
ahead on an ordinary road.
15
Page 24
Manual backup
MENU
ENTER
/
ENTER
/
The navigation system will automatically back up (save) your new settings (for example, address book
settings etc.) when the ignition switch is turned off and turned on again. If the battery leads should be
disconnected from the vehicle's battery , be sure to manually back up your ne w settings before disconnecting the battery leads as described below.
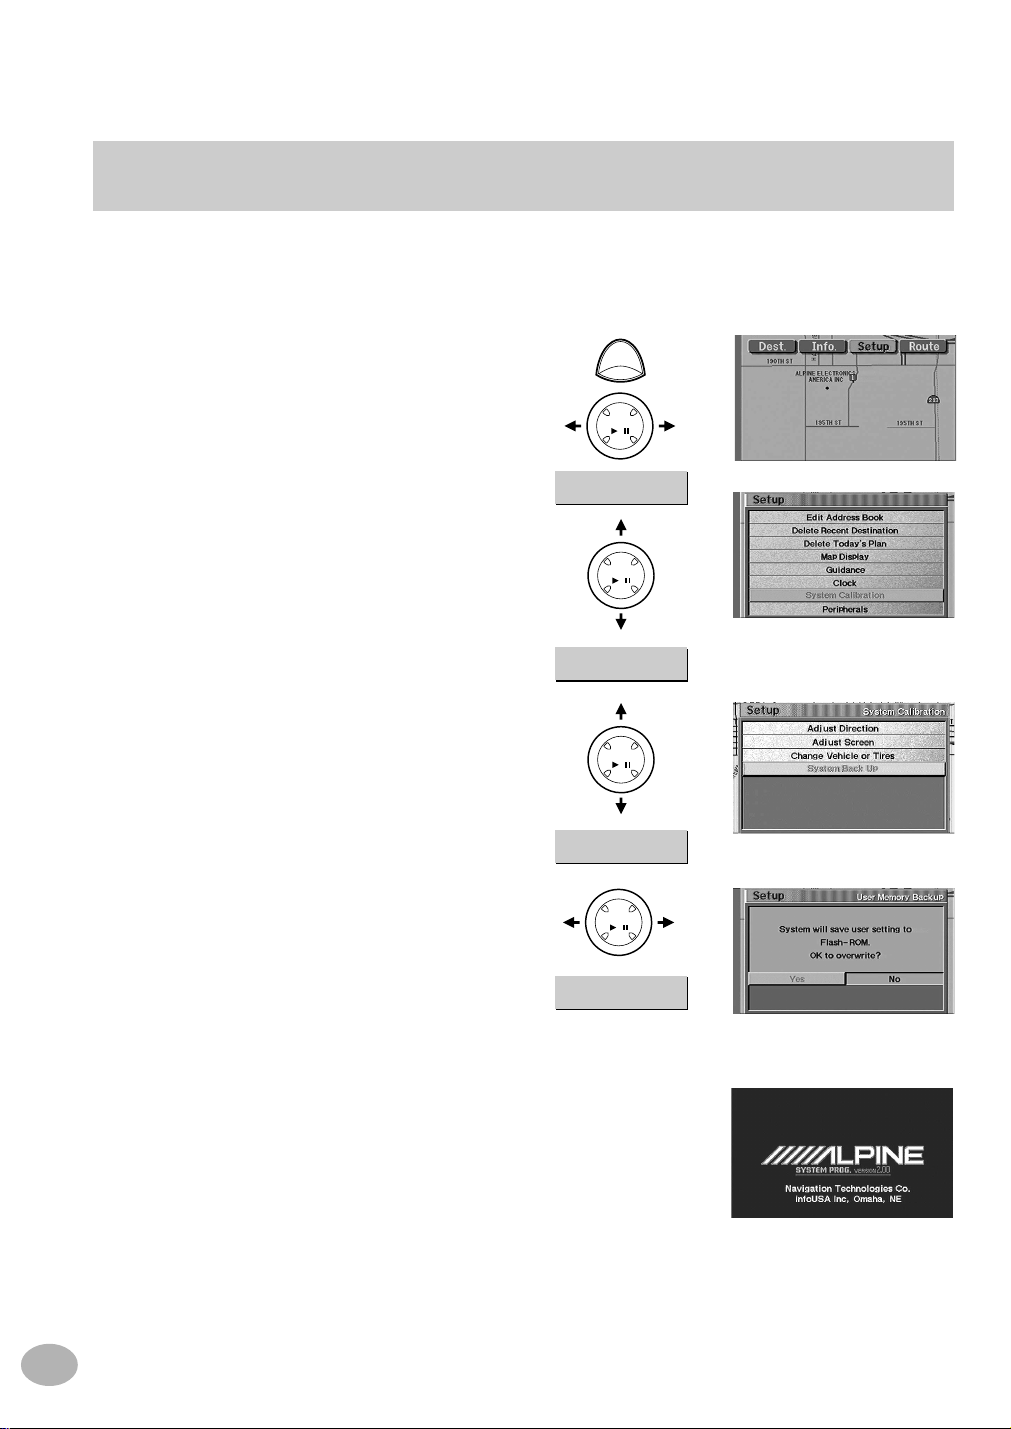
Press the MENU button to display the main
1
menu bar. Select Setup and press ENTER.
The Setup Menu appears. Select System
Calibration and press ENTER.
Highlight System Back Up and press
2
ENTER.
ENTER
/
Set up
System Calibration
16
The User Memory Backup screen
3
appears. If you would like to save your
settings to Flash ROM, select "Yes" and
press ENTER.
The navigation system begins the backup
4
process and the display darkens. Once the
backup process is complete, the opening
screen will appear.
System Backup
ENTER
/
Yes
Page 25
ENTER
/
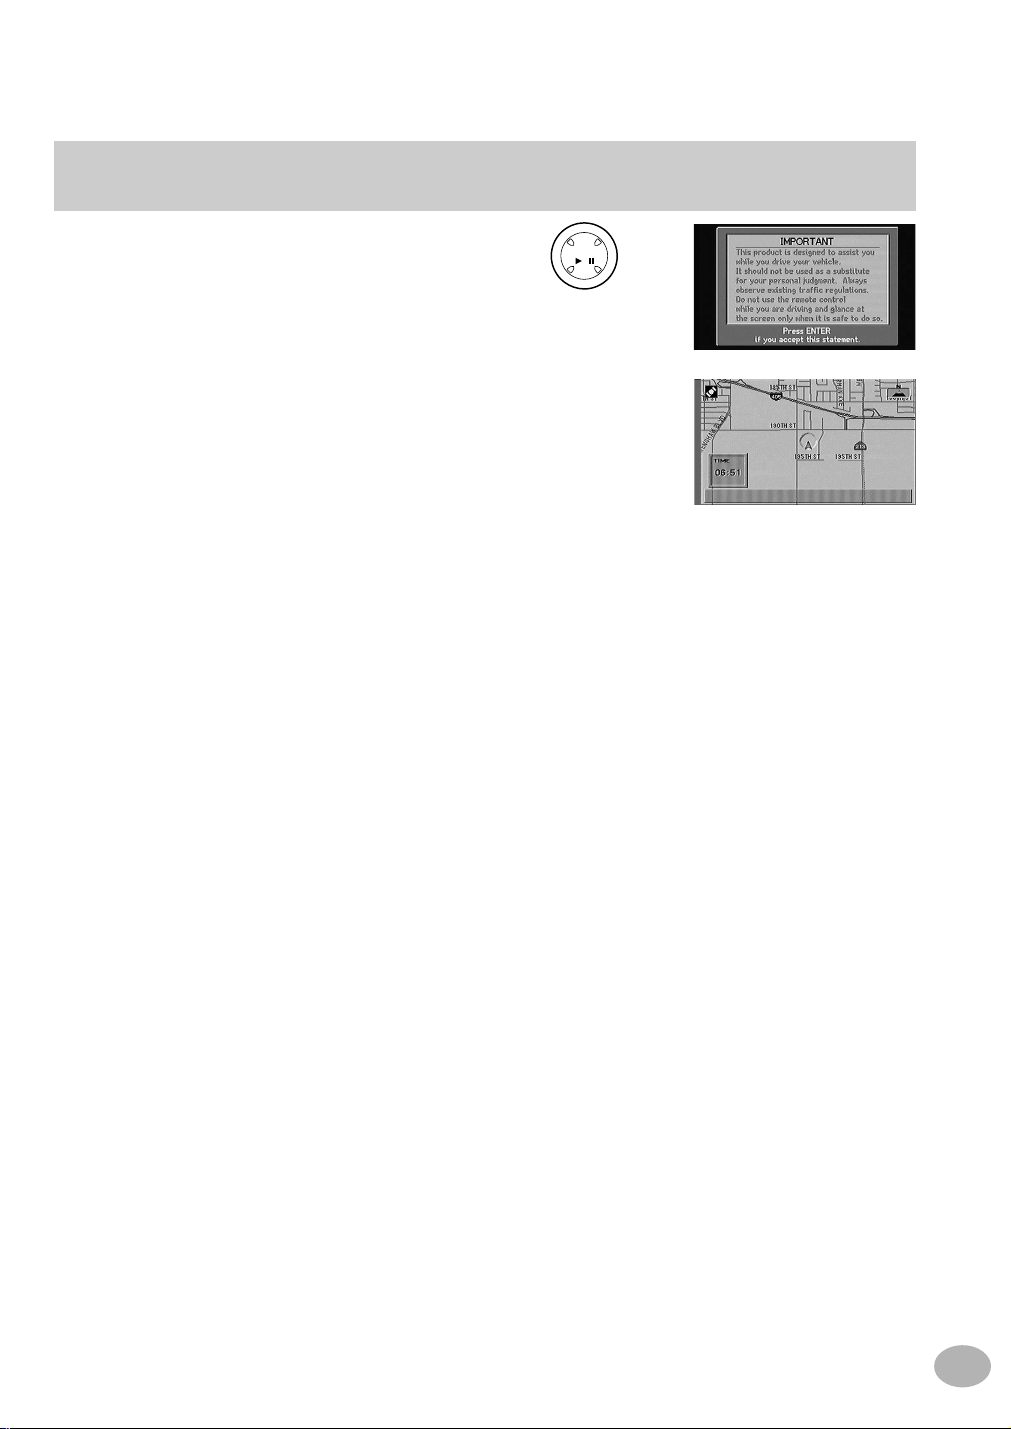
The disclaimer screen appears. After you
5
have read this important information, press
the ENTER button.
The map screen will appear and all of your
information will be successfully stored in
backup memory.
17
Page 26
DESTINATION MENU
ENTER
/
ENTER
/
ENTER
/
Entering a destination by Address
This section describes how to input your destination in the form of an address. The destination can be
input in one of eight different ways: by an address, an intersection, a point of interest, a location's phone
number, a recent destination, the personal address book, "Today's Plan" or by selecting directly from the
map. If you know the address of the destination, the system can calculate a route to that address.
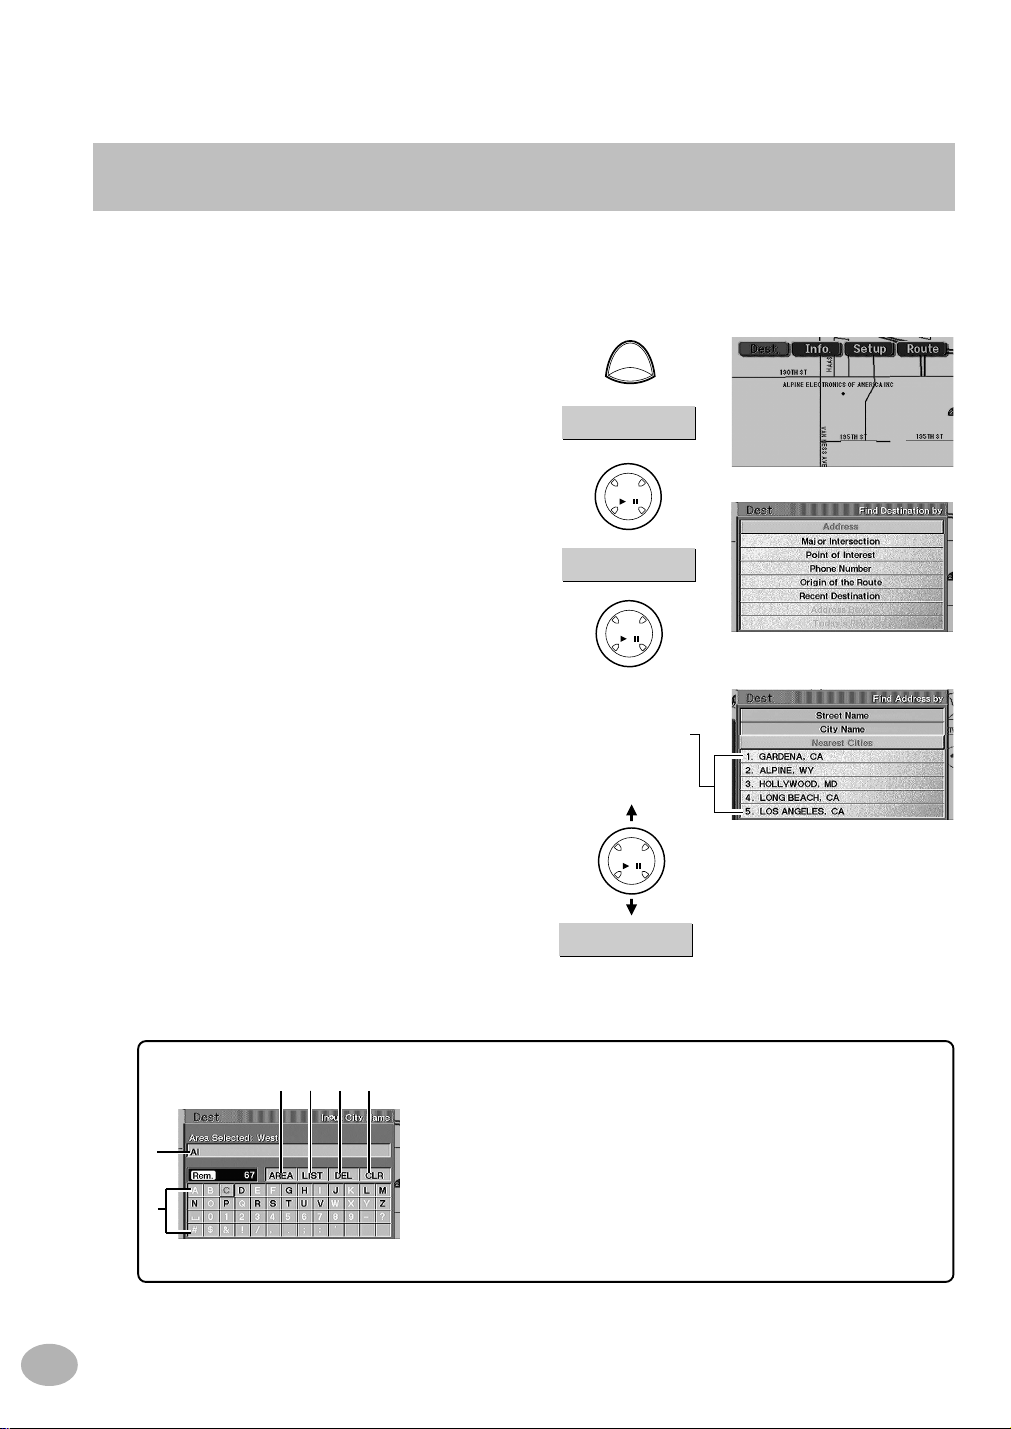
Press the MENU button to display the main
1
menu bar. Select (highlight) Dest. from the
main menu and press ENTER. A list of
input methods appears. Select Address
and press ENTER.
The Find Address by screen is displa yed.
2
Use the joystick to select one of the
following methods used to find an address
and press ENTER.
• Select Street Name if you want to search
for the street name and don't know the
city name.
• Select City Name if you want to search
for the city name first. For this example,
the City Name input method is selected.
• Select Nearest Cities if you want to
search for an address in the 7 nearest
bordering cities.
MENU
Dest.
Address
The city name of
the last-5 search
stored in memory.
City Name
18
The characters selected are displayed in the text window.
bcde
a
f
a. Text window displays the selected characters.
b. AREA
Select areas other than the current-vehicle -position area.
c. LIST
Displays a list of the candidate names for the selected characters.
d. DEL
Returns to the previous character and erases it.
e. CLR (Clear)
Clears the text window.
f. Character pallet
Select the desired characters.
Page 27
ENTER
/
ENTER
/
ENTER
/
ENTER
/
ENTER
/
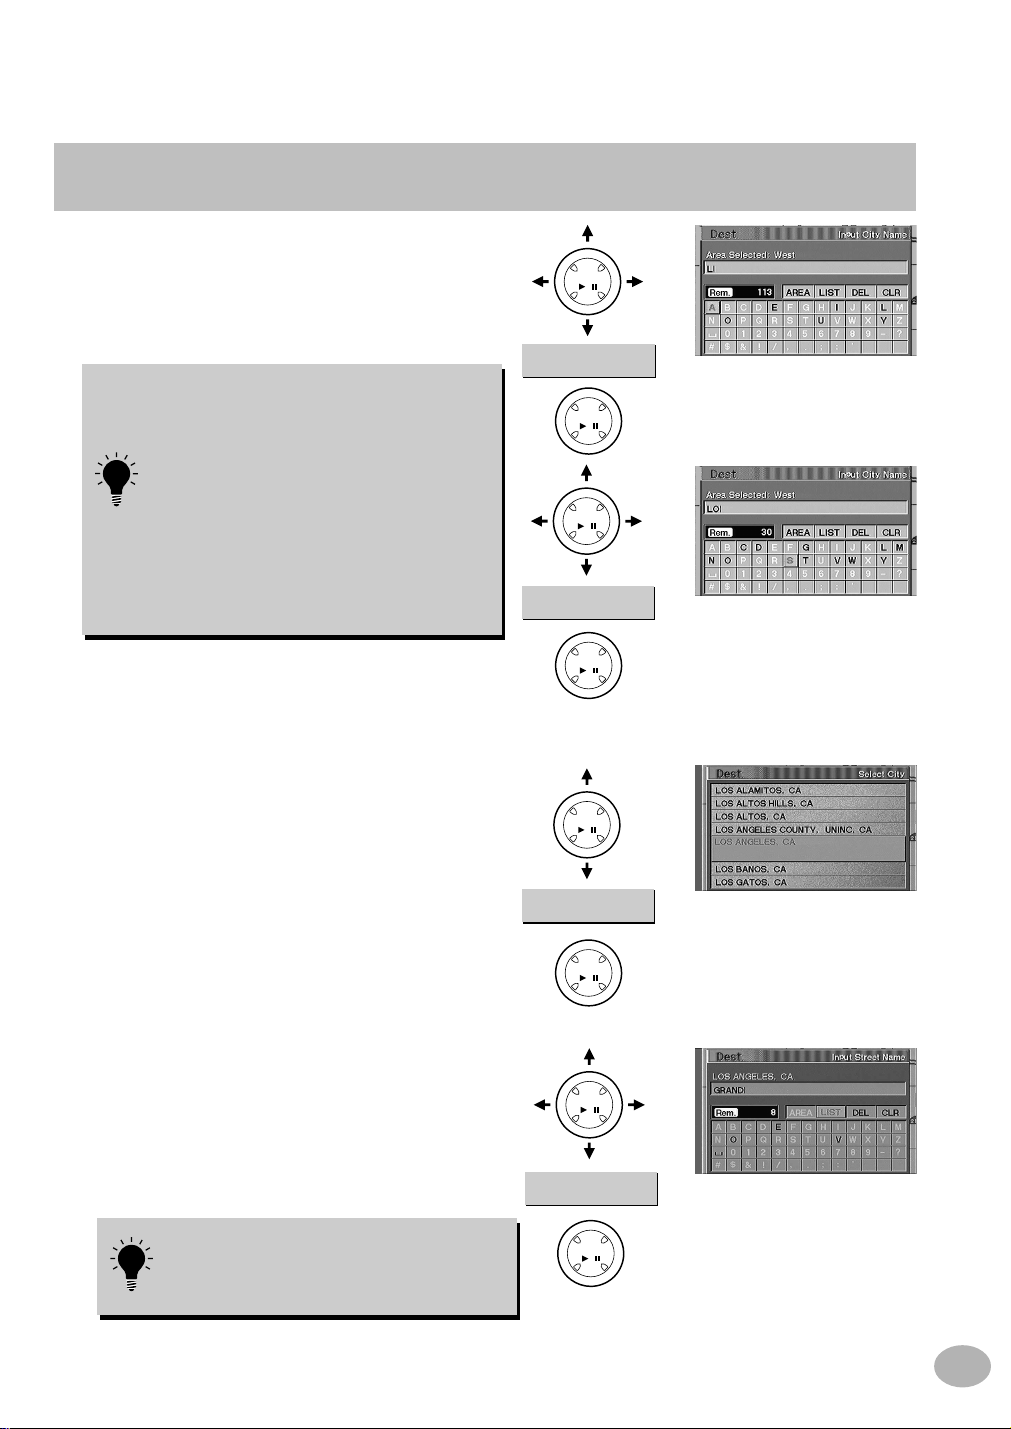
The Input City Name screen is displayed.
3
Use the joystick to select the first character
of the city name and press ENTER. The
selected character appears in the text
window.
a When 1 character is input, the candidates
for the next character are narrowed down
(and the others disappear from the
character pallet).
a You can also search for a location by
inputting just the start of its name and
selecting "LIST."
a If you want to display the list of candidate
city names, select "LIST" and press
ENTER. If the number of candidates
narrows down to less than 7, the display
automatically shows the Select City screen.
Skip to Step 4.
The Select City screen appears.
4
Use the joystick to enter a city name and
scroll down to select that city. Press ENTER
when finished.
ENTER
L
ENTER
/
LOS
/
The Input Street Name screen appears.
5
Enter the street name.
When finished inputting the street name,
select LIST at the top of the character pallet
and press ENTER.
If the number of candidates narrows down
to less than 7, the display automatically
shows the Select Street Name screen.
Skip to Step 6.
LOS ANGELES, CA
ENTER
/
GRAND
Continued next page
19
Page 28
ENTER
/
ENTER
/
ENTER
/
ENTER
/
ENTER
/
Entering a destination by Address (continued)
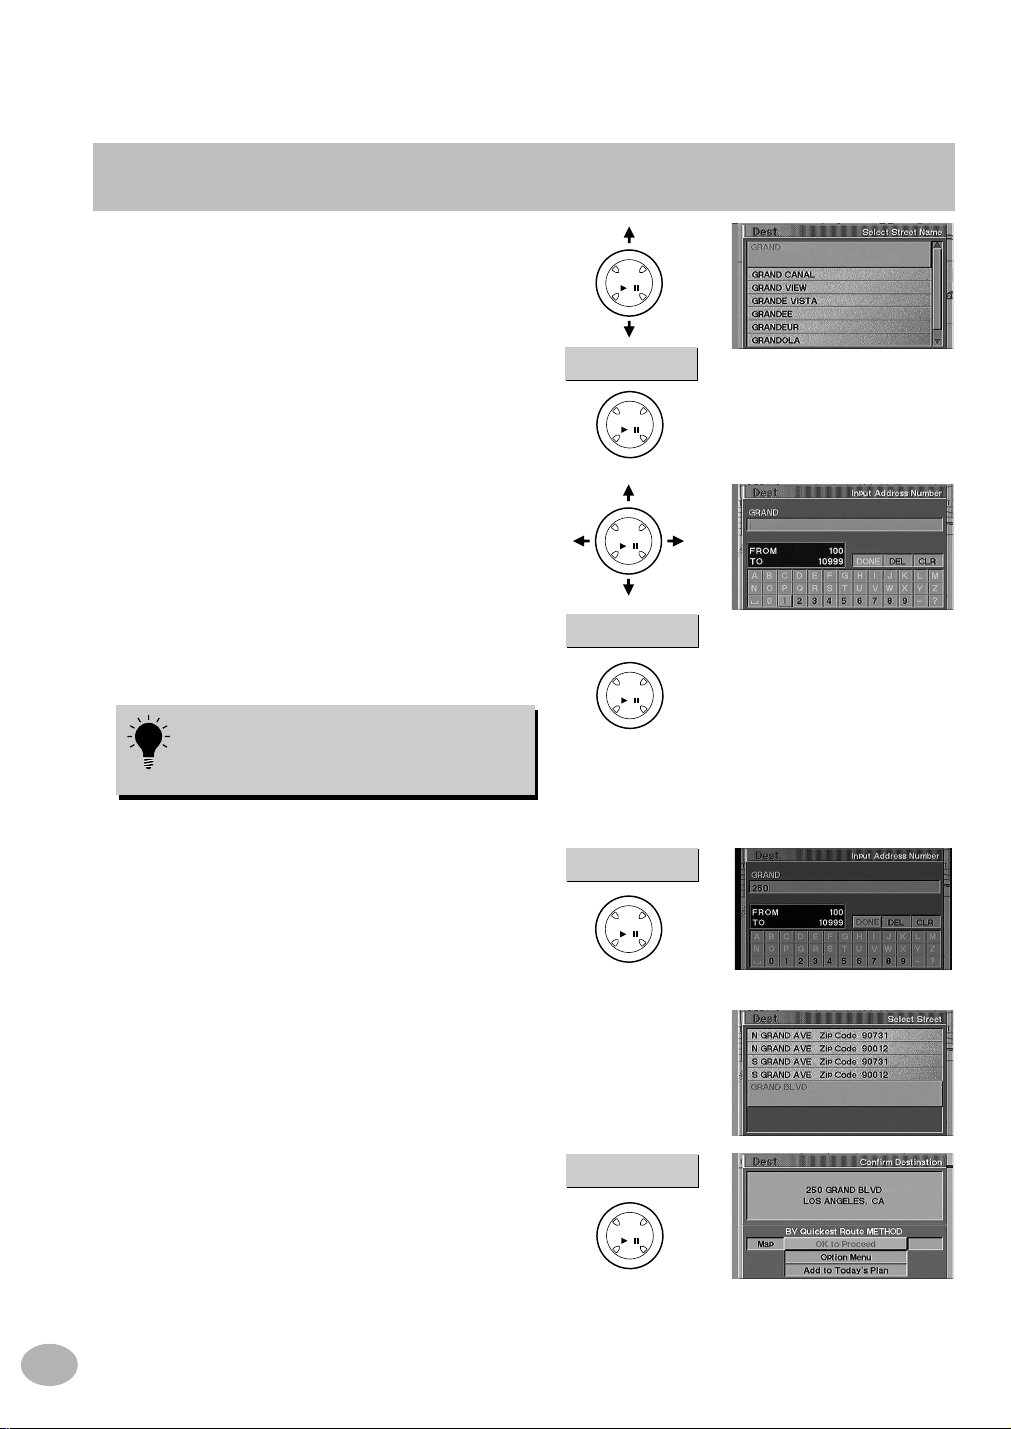
The Select Street Name screen appears.
6
Use the joystick to enter a street name and
scroll down to select that street. Press
ENTER when finished.
GRAND
The Input Address Number screen
7
appears. Enter the house or building
number for the destination by using the
joystick and pressing ENTER after each
entry.
A range of valid street numbers will be
shown just below the input window.
The address number can be input using the
numeric keypad on the remote control. For
operation, see page 5 "Remote Control
Reference Guide."
ENTER
/
2
20
When you have entered the entire street
8
address, use the joystick to select DONE
and press ENTER.
The Select Street screen appears.
9
Use the joystick to enter a street name and
scroll down to select that street.
Press ENTER when finished.
The Confirm Destination screen appears.
10
Select OK to Proceed and press ENTER.
The system will begin calculating the route.
Note: If you wish to add this entry to Today's Plan,
select Add to Today's Plan (see page 37). To
store this destination in your personal address
book, select Option Menu (see page 36).
DONE
OK to Proceed
Page 29
Entering a destination using a Major Intersection
ENTER
/
ENTER
/
ENTER/ENTER
/
ENTER
/
If you know an intersection near where you want to go, you can input two cross streets as your
destination. This section describes how to input a destination by entering two cross street names.
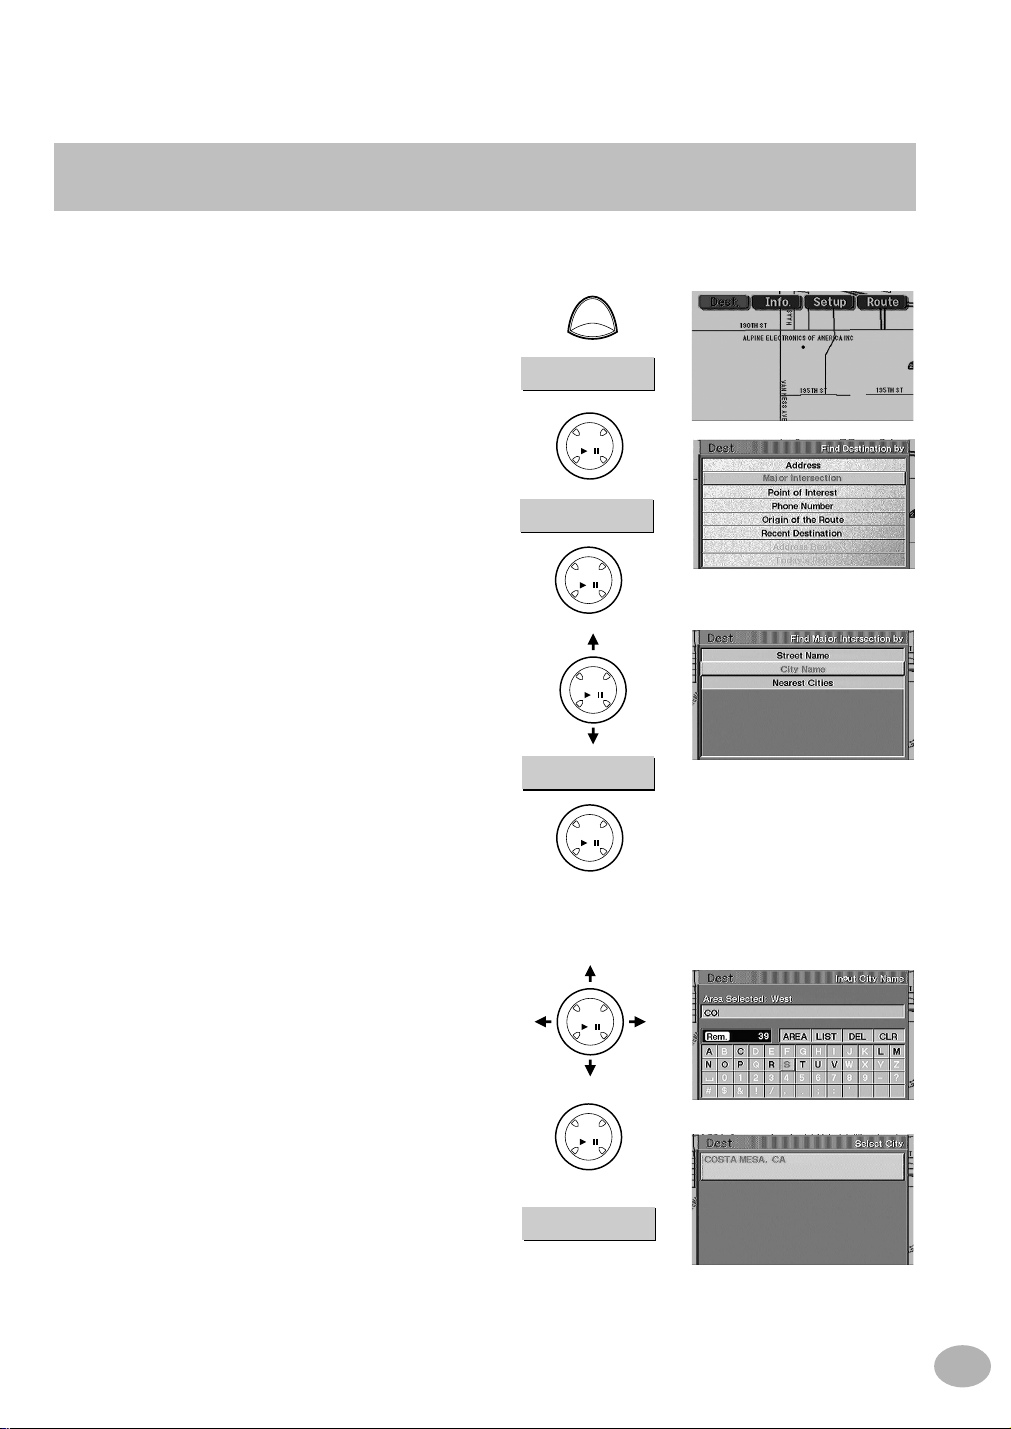
Press the MENU button to display the main
1
menu bar. Select Dest. from the main menu
and press ENTER. The Find Destination
by menu is displayed. Select Major
Intersection and press ENTER.
The Find Major Intersection by screen is
2
displayed. Use the joystick to select one of
the following methods used to find an
address and press ENTER.
• Select Street Name if you want to search
for the street name and don't know the
city name.
• Select City Name if you want to search
for the city name first. For this example,
the City Name input method is selected.
• Select Nearest Cities if you want to
search for an address in the 7 nearest
bordering cities.
MENU
Dest.
Major Intersection
City Name
The Input City Name screen is displayed.
3
Use the joystick to select the first character
of the city name and press ENTER. The
selected character appears in the text
window.
The Select City screen is displayed.
4
Use the joystick to enter a city name and
scroll down to select that city. Press
ENTER when finished.
ENTER
/
COSTA MESA, CA
Continued next page
21
Page 30

Entering a destination using a Major Intersection (continued)
ENTER
/
ENTER
/
ENTER
/
ENTER
/
ENTER
/
The Input Street Name screen is
5
displayed.
Enter the street name in the same manner
as Step 3.
Upon completing character input, select
LIST at the top of the character pallet and
press ENTER.
If the number of candidates narrows down
to less than 7, the display automatically
shows the Select Street Name screen.
Skip to Step 6.
The Select Street Name screen is
6
displayed.
Use the joystick to enter a street name and
scroll down to select that street. Press
ENTER when finished.
ENTER
/
LIST
ADAMS
22
The Input Cross Street Name screen is
7
displayed.
Enter the street name in the same manner
as Step 3.
When the character inputtings have been
completed, select LIST at the top of the
character pallet and press ENTER.
Note: If "Street Name Input" is selected first, and
the intersection exists in multiple cities, you will
need to select the city name in which the desired
intersection exists.
If the number of candidates narrows down
to less than 7, the display automatically
shows the Select Cross Street Name
screen. Skip to Step 8.
The Select Cross Street Name screen is
8
displayed.
Use the joystick to enter a cross street
name and scroll down to select that cross
street. Press ENTER when finished.
ENTER
/
LIST
PETERSON
Page 31

ENTER
/
The Confirm Destination screen is
9
displayed. If the specified cross streets are
correct, select OK to Proceed and press
ENTER. The system will start to calculate
the route.
Note: If you wish to add this entry to Today's Plan,
select Add to Today's Plan (see page 37). To
store this destination in your personal address
book, select Option Menu (see page 36).
OK to Proceed
23
Page 32

Entering a Point of Interest by Place Name
ENTER/ENTER/ENTER
/
ENTER
/
ENTER
/
ENTER
/
The navigation system allows you to enter a Point of Interest in one of three ways. This can either be by
place name, place type or phone number.
Press the MENU button to display the main
1
menu bar. Select Dest. from the main
menu, then press ENTER. The Find
Destination by menu appears. Select
Point of Interest and press ENTER.
Select Place Name from the Find Point of
2
Interest by menu and press ENTER.
The Input Place Name screen is displayed.
3
Use the joystick to select the first character
of the place name and press ENTER. The
selected character appears in the text
window.
MENU
Dest.
Point of Interest
Place Name
ENTER
/
24
You can search all US cities by specifying
the area.
For details, refer to page 10.
The Select Location screen is display ed.
4
To select a place, scroll through the list,
highlight the correct place name and press
ENTER.
If there are multiple locations to a certain place name, the
system will display the number of locations availab le. In this
example, MAY GARDEN shows 3 locations listed. To view
the available locations, select MAY GARDEN from the list
and press ENTER. The 3 locations will be listed from which
you may make a selection.
Page 33

ENTER
/
The Confirm Destination screen appears.
5
If the destination is correct, select OK to
Proceed and press ENTER. The system
starts calculating a route to the destination.
Note: If you wish to add this entry to Today's Plan,
select Add to Today's Plan (see page 37). To
store this destination in your personal address
book, select Option Menu (see page 36.)
OK to Proceed
25
Page 34

Entering a Point of Interest by Place Type
ENTER/ENTER/ENTER
/
ENTER
/
If you know the type of place you are headed to, you can search for a destination by place type by
selecting from a list of categories. The following example shows how to select the shopping center,
"Triangle Square" in Costa Mesa, California.
From any screen, press the MENU button
1
to show the main menu bar on the top of
the screen. Select Dest. from the menu
bar, then press ENTER to display the Find
Destination by menu.
Select Point of Interest and press
2
ENTER. This will display the Find Point of
Interest by menu. Select Place T ype from
the Find Point of Interest by menu and
press ENTER.
A list of place types is displayed. Select the
3
desired place type (in this example,
Shopping Center) and press ENTER.
MENU
Dest.
Point of Interest
Place Type
ENTER
/
26
Shopping Center
Page 35

ENTER
/
ENTER
/
ENTER
/
ENTER
/
ENTER
/
ENTER
/
ENTER
/
This will display the Find Point of Interest
4
by menu. Select "City Name" from the
"Find Point of Interest by" menu and press
ENTER.
(In this example, "City Name" is being
selected.)
When "Sorted by distance" is selected, the
list showing the place names for the
selected place type is shown in order of
distance from the current vehicle position.
Select the desired city name and press
ENTER, then proceed to Step 8.
The Find Point of Interest by menu
5
appears. Use the joystick to select a
method to find the point of interest.
(In this example, "City Name" is being
selected.)
• Select Nearest Cities if you want to
search for an address in the 7 nearest
bordering cities.
City Name
City Name
The Input City Name screen is displayed.
6
Use the joystick to select the first character
of the city name and press ENTER. The
selected character appears in the text
window.
The Select City screen appears.
7
Use the joystick to enter a city name and
scroll down to select that city. Press ENTER
when finished.
ENTER
/
COSTA MESA, CA
Continued next page
27
Page 36

ENTER
/
ENTER
/
ENTER/ENTER
/
Entering a Point of Interest by Place Type (continued)
The Input Place Name screen is displayed.
8
Use the joystick to select the first character
of the place name and press ENTER. The
selected character appears in the text
window.
The Select Place Name screen appears.
9
To select a place, scroll through the list,
highlight the correct place name (in this
example, Triangle Square is selected) and
press ENTER.
ENTER
/
Triangle Square
The name and address of the selected
10
destination appear in the Confirm
Destination screen.
If the destination is correct, select OK to
Proceed and press ENTER.
Note: If you wish to add this entry to Today's Plan,
select Add to Today's Plan (see page 37). To
store this destination in your personal address
book, select Save in Address Book (see page
36).
The navigation system starts calculating a
11
route to the destination.
OK to Proceed
28
Page 37

Entering a Point of Interest by Phone Number
MENU
ENTER/ENTER
/
ENTER
/
ENTER
/
If you know the phone number of the Point of Interest you are headed to, use this function to find the
address for the destination.
Press the MENU button to display the main
1
menu bar. Select Dest. and press ENTER.
The Find Destination by menu
appears. Select Phone Number and press
ENTER.
The Input Phone Number screen is
2
displayed.
Use the joystick to select the first digit of
the phone number and press ENTER.
Enter the phone number including the area
code.
Dest.
Phone Number
ENTER
/
The phone number can be input using the numeric keypad
on the remote control. After pressing the MODE button, the
numerals will be input while the status indicator is blinking.
For operation, see page 5 Remote Control Reference Guide.
After entering the entire phone number
3
including the area code, select OK and
ENTER
/
press ENTER.
OK
If the input phone number is
used at more than 2 places,
the display shows Select
Entry screen.
To select a desired place,
scroll through the list, highlight
the correct place name and
press ENTER.
Continued next page
29
Page 38

ENTER
/
Entering a Point of Interest by Phone Number (Continued)
The Confirm Destination screen appears
4
showing the address of the selected
destination. If it is correct, select OK to
Proceed and press ENTER. The system
starts calculating a route to the destination.
Note: If you wish to add this entry to Today's Plan,
select Add to Today's Plan (see page 37). To
store this destination in your personal address
book, select Save in Address Book (see page
36).
OK to Proceed
30
Page 39

Entering a Point of Interest by Latitude and Longitude
ENTER
/
ENTER
/
ENTER/ENTER/ENTER
/
If you know the latitude and longitude of the desired location, you can display that location by just
inputting those numbers.
Press the MENU button to display the main
1
menu bar. Select Dest. and press ENTER.
The Find Destination by menu appears.
Select Latitude & Longitude and press
ENTER.
The Latitude & Longitude screen is
2
displayed. Use the joystick to select the
digits for North Latitude and West
Longitude and press ENTER after each.
Enter the North Latitude and West
Longitude Including.
The latitude and longitude can be input using the numeric
keypad on the remote control.
After pressing the MODE button, the numerals will be
input while the status indicator is blinking.
MENU
Dest.
Latitude & Longitude
After entering the entire North Latitude and
3
West Longitude, select OK and press
ENTER.
The Confirm Destination screen appears
4
showing the address of the selected
destination. If it is correct, select OK to
Proceed and press ENTER. The system
starts calculating a route to the destination.
If you wish to add this entry to Today’s Plan, select Add
to Today’s Plan (see page 37). To store this destination in
your personal address book, select Save in Address
Book (see page 36).
OK
OK to Proceed
31
Page 40

Entering a destination by Recent Destination
ENTER/ENTER
/
ENTER
/
ENTER
/
ENTER
/
If your destination is one of the twenty most recent route calculations, you can recall that destination
using the procedure described in this section.
Press the MENU button to display the main
1
menu bar. Select Dest. and press ENTER.
The Find Destination by menu
appears. Select Recent Destination and
press ENTER.
A list of up to 20 most recent destinations is
2
displayed. Select the desired destination
and press ENTER.
The address of the selected destination
3
appears in the Confirm Destination
screen. If it is correct, select OK to
Proceed and press ENTER. The system
starts calculating a route to the destination.
Note: If you wish to add this entry to Today's Plan,
select Add to Today's Plan (see page 37). To
store this destination in your personal address
book, select Option Menu (see page 36).
MENU
Dest.
Recent Destination
OK to Proceed
32
If you search for a destination using “Recent Destination,” you do not need to change discs. You can search
for all destinations by using either disc.
Page 41

Entering a destination using the Address Book
MENU
ENTER/ENTER
/
ENTER
/
ENTER/ENTER
/
If a location has already been placed into your personal address book, you can recall this location for
use as a destination. The Address Book holds up to 99 different addresses and phone numbers. For
more information on how to store locations in the address book, see page 36.
Press the MENU button to display the main
1
menu bar. Select Dest. from the menu and
press ENTER. The Find Destination by
menu appears. Select Address Book and
press ENTER.
Your personal entries are listed in
2
alphabetical order. Scroll through the list to
select the destination and press ENTER.
Dest.
Address Book
The name and address of the selected
3
destination appear in the Confirm
Destination screen. If they are correct,
select OK to Proceed and press ENTER.
The system starts calculating a route to the
destination.
Note: If you wish to add this entry to Today's Plan,
select Add to Today's Plan (see page 37).
If you search for a destination from “Address Book,” you
do not need to change discs. You can search for all
destinations by using either disc.
OK to Proceed
33
Page 42

Entering a destination directly from the Map Display
ENTER/ENTER
/
This feature allows quick and easy selection of a new destination directly from a street segment or
Point of Interest icon on the Detailed Map Display. By selecting a street segment or icon, you can
quickly enter a destination without the need to input the city name, street, etc. It operates even while in
Guidance Mode.
During normal navigation with the Detailed
1
Map Display in view, move the cursor from
the Present Vehic le Position icon to the
new desired street or POI icon destination.
As you move the cursor it will change from
the Present Vehicle Position icon to the
Map Crosshair icon. You do not need know
the names of either the streets or POI.
Press ENTER.
To move greater distances on the Detailed Map Display quickly, use
the Zoom keys on the remote control to zoom out. Then use the
joystick to move in any of 8 different directions. When the approximate
location has been reached, zoom back in for more detail.
A call-out appears indicating the street and
2
city name. If you choose a POI icon, its
name will appear in a Place Name list. To
confirm this as your destination, press
ENTER.
ENTER
/
34
The Confirm Destination screen appears.
3
Select OK to Proceed and press ENTER.
The system starts calculating the route.
Note: If you wish to add this entry to Today's Plan,
select Add to Today's Plan (see page 37). To
store this destination in your personal address
book, select Save in Address Book (see page
36).
OK to Proceed
ENTER
/
Page 43

Entering a destination by Origin of the Route
MENU
ENTER/ENTER/ENTER
/
The navigation system can guide you to the starting point of your last calculated route. This is very
convenient when setting a return route.
Press the MENU button to display the main
1
menu bar. Select Dest. from the menu and
press ENTER. The Find Destination by
menu appears. Select Origin of the Route
and press ENTER.
Dest.
Origin of the Route
The Confirm Destination screen appears.
2
Select OK to Proceed and press ENTER.
The system starts calculating the route.
Note: If you wish to add this entry to Today's Plan,
select Add to Today's Plan (see page 37). To
store this destination in your personal address
book, select Option Menu (see page 36).
OK to Proceed
35
Page 44

Saving a destination into the Address Book
ENTER
/
ENTER
/
ENTER
/
Up to 99 addresses can be stored alphabetically in the Address Book.
Whenever a destination is selected and
1
entered, the system allows you to save the
address. Select Option Menu and press
ENTER.
The "Option Menu" screen is displayed.
2
Select Save in Address Book and press
ENTER.
The system automatically registers the
3
point into the Address Book.
During the registering procedure, the
display shows, for example, "No. 1
Registered" message when a point is
registered in the Address Book for the first
time.
Option Menu
Save in Address Book
36
The name, address and phone number are
4
now stored in the address book. The
confirmation screen will reappear showing
the saved inf ormation.
Press the MP/RG button on the remote
control to return to the current vehicle
position screen.
MP
/RG
Page 45

Adding a destination into Today's Plan
ENTER/ENTER
/
Today's Plan will calculate the most efficient travel order for multiple destinations. Up to 8 destinations
can be stored in "Today's Plan." This section describes how to add a destination into "Today's Plan."
Whenever a destination is selected and
1
entered by any method, the Confirm
Destination screen is displayed. Select
Add to Today's Plan and press ENTER.
The Today's Plan list is displa y ed with the
2
added destination highlighted. Press the
ENTER button.
The system returns to the Find
Destination by screen. To add more
entries to Today's Plan, repeat step 1.
Add to Today's Plan
37
Page 46

Using the Today's Plan Function
ENTER/ENTER/ENTER/ENTER
/
ENTER
/
ENTER
/
Today's Plan will calculate the most efficient travel order for multiple destinations. Up to 8 destinations
can be stored in "Today's Plan." This function has two settings, Auto and Manual. Manual will route
you to each destination in the order which they were entered. Auto will route you to each destination in
the most efficient travel order. The following example shows Today's Plan function used in the Auto
setting.
Press the MENU button to display the main
1
menu bar. Select Dest. from the menu and
press ENTER. The Find Destination by
menu appears.
Select Today's Plan and press ENTER.
The Confirm Destination screen appears.
2
If you would like to visit this destination first,
select OK to Proceed and press ENTER. If
you would like to select a different
destination to route to first, select Today's
Plan List and press ENTER.
MENU
Dest.
Today's Plan
OK to Proceed
Today's Plan List
38
T oday's Plan list will appear.
3
Use the joystick to select the destination
you would like to visit first and press
ENTER.
NATIONAL AIRPORT
Page 47

The system calculates the new destination
ENTER
/
4
order and displays the confirmation screen.
If the new destination is acceptable, select
OK to Proceed and press ENTER. If you
want to change the destination again,
repeat Steps 2 to 3 above.
If you would prefer to determine the order of the destinations
yourself, you may select Manual from the Today's Plan screen in
the Route Options for Today's Plan calculation. After selecting the
first destination, use the PLAN button on the remote to delete the
destination, then select your next destination (see page 81). See
the Setup section on page 58 for setting this option.
OK to Proceed
39
Page 48

Setting Waypoints
ENTER
/
ENTER
/
ENTER
/
You can set up to 5 waypoints from your current location to the current destination.
Set these points before selecting OK from the Confirm Destination screen.
Whenever a destination is selected and
1
entered, the system allows you to save the
address as a waypoint. Select Option
Menu and press ENTER.
The Option Menu screen is displayed.
2
Select Set as Waypoint and press ENTER.
Waypoint Number setting menu is dis-
3
played.
These points should be set as Waypoint 1,
Waypoint 2, Waypoint 3 and so on in order
in which they will be passed through.
Up to 5 points (max.) can be set.
When the route search is complete, the
4
current location is displayed. When you
start driving this route, the guidance begins
to the first waypoint.
Option Menu
Set as Waypoint
40
Page 49

Searching for local places
ENTER
/
ENTER
/
ENTER
/
ENTER
/
ENTER
/
ENTER/ENTER
/
ENTER
/
The navigation system can display up to eight types of Points of Interest in an area six miles around the
cursor position when you scroll the map. These include ATMs, Banks, Gas Stations, Grocery Stores,
Hotels, Parking Lots, Restaurants and Highway Exit with IA Data. You can search for such a desired
destination using the Find Local Places function.
Whenever a destination is selected and
1
entered by moving the cursor or searching
from its address, etc. the system displays
the Confirm Destination screen. Select
Option Menu and press ENTER.
Option Menu
The "Option Menu" screen is displayed.
2
Select Find Local Places and press
ENTER.
Find Local Places
The Select Place Type screen is displayed.
3
Select a desired place type and press
ENTER (in this example, Bank).
The Select Point of Interest Name menu
4
appears.
Select the desired point of interest name (in
this example, PREMIER AMERICA FEDERAL CU is selected) and press ENTER.
Bank
Continued next page
41
Page 50

Searching for local places (continued)
ENTER
/
The address of the selected destination
5
appears in the Confirm Destination
screen. If it is correct, select OK to Pro-
ceed and press ENTER. The system starts
calculating a route to the destination.
Note: If you wish to add this entry to Today's Plan,
select Add to Today's Plan (see page 37). To
store this destination in your personal address
book, select Save in Address Book (see page
36).
OK to Proceed
42
Page 51

Searching for Exit Information places
ENTER/ENTER
/
You can search IA items (facilities) around the highway exit with IA data only by selecting an EXIT
icon on the map.
To use this function, you have to set the Exit Information to make it effective. For details, refer to
“Setting Point of Interest icon options” (pages 61 to 63).
During normal navigation with the Detailed
1
Map Display in view, move the cursor to
the EXIT icon. As you move the cursor it will
change from the Present Vehicle Position
icon to the Map Crosshair icon. Press
ENTER.
The Select Point of Interest screen is
2
displayed. To select a place, scroll through
the list, highlight the correct place name
and press ENTER.
Facilities that are not IA items may be mixed in the IA items list of
the Select Point of Interest screen.
The Confirm Destination screen appears.
3
If the destination is correct, select OK to
Proceed and press ENTER.
The system starts calculating a route to the
destination.
ENTER
/
OK to Proceed
IA is displayed before the
place type of IA items
(facilities).
If you wish to add this entry to Today’s Plan, select Add
to Today’s Plan (see page 37). To store this destination
in your personal address book, select Save in Address
Book (see page 36).
If an IA item is set for the Destination or the Way Point,
the route guidance will be until the highway exit.
43
Page 52

SETUP/EDITING MENU
MENU
ENTER
/
ENTER
/
ENTER/ENTER
/
Address Book editing
Locations that are saved in the Address Book can be named for easy recall. Destinations saved in the
Address Book can be modified to include its phone number and perform special functions called "Beep
Points" and "Avoid Points." See the diagram below and the following pages for descriptions of these
functions.
Press the MENU button to display the main
1
menu bar.
Select Setup and press ENTER. The Setup
Menu appears. Select Edit Address Book
and press ENTER.
Setup
Edit Address Book
44
The entries in your Address Book are listed
2
in alphabetical order. Select an entry you
would like to modify or delete and press
ENTER.
(In this example, LA INT’L AIRPORT is
chosen.)
a
c
e
a Map Display
The selected point is displayed on the
map.
b Delete
The confirmation message for deletion is
displayed. (See below.)
Select "Yes" to execute the deletion.
b
d
c Name
You can give a name to a registered point.
AGo to Page 45 Name Editing.
d Telephone number
Telephone number information can be
added to an Address Book entry.
AGo to Page 46 Telephone Number
Editing.
e Special setting
Such information as avoid points and
beep points can be added to registered
points.
AGo to Page 47 Special Settings.
Page 53

Address Book editing (Name Editing)
ENTER
/
ENTER
/
ENTER
/
ENTER
/
ENTER
/
See page 44 for steps 1 and 2.
Select an entry you would like to modify or
3
delete and press ENTER.
(In this example, E MONLACO RD is
chosen.)
Select the name and press ENTER.
4
ENTER
/
The Input Name for Address Book screen
5
appears.
Select CLR (Clear) and press ENTER. The
current entry will be erased.
ENTER
/
Use joystick to change the address book
6
entry.
In this example, E MONLACO RD is
changed to HOME.
When finished entering the new name,
select DONE and press ENTER.
CLR
ENTER
/
DONE
45
Page 54

Address Book editing (Phone Number Editing)
ENTER
/
ENTER
/
ENTER
/
ENTER
/
See page 44 for steps 1 and 2.
Select an entry you would like to modify or
3
delete and press ENTER.
(In this example, ALPINE ELECTRONICS,
INC. is chosen.)
Select Tel. and press ENTER.
4
ENTER
/
Tel.
The Input Phone Number screen appears.
5
Use joystick to add or edit the phone number (valid for only 0 or 10 digits). Select OK
and press ENTER.
The address number can be input using the
numeric keypad on the remote control.
After pressing the MODE button, the
numerals will be input while the status
indicator is blinking. For operation, see
page 5 "Remote Control Reference Guide."
ENTER
/
OK
46
Page 55

Address Book editing (Special Settings)
ENTER
/
ENTER
/
ENTER
/
ENTER
/
ENTER
/
See page 44 for steps 1 and 2.
Select an entry you would like to
3
modify or delete and press ENTER.
(In this example, MAY GARDEN is chosen.)
Select Sp. and press ENTER.
4
ENTER
/
Sp.
The Special Setting screen appears.
5
Select the desired item and press ENTER.
L Setting the point to avoid (Point to Avoid)
• This setting allows the system to permanently avoid a specific point. Routes are set to avoid
roads between crossroads surrounding that point.
• Five locations can be set as Points to Avoid. These are assigned X0, X1, X2, X3, or X4 when
they are displayed in the Address Book.
L Setting the point to beep (Point to Beep)
• You can set the system to beep when you are driving and approaching a point requiring particular care (such as a point where accidents occur frequently).
• Up to ten locations can be set including the beep direction points (from B0 to B9).
L Setting the travel direction to beep (Point to Beep (Directional))
• For details on how to set the direction, see Page 73 Direction adjustment.
• You can set the system to beep, not only upon approach to a point but also from a specific
direction of travel. For example, you can set the system to beep as you near Las Vegas when
travelling from New York to Los Angeles.
• Up to ten locations can be set as directional beep points and beep points (from B0 to B9).
L Not used (No Special Setting)
• Use to cancel selected avoid points/beep points/directional beep points.
Continued next page
47
Page 56

ENTER
/
Address Book editing (Special Settings) (continued)
The special use setting list is displayed.
6
Press ENTER.
The memory editing list is displayed.
7
48
Page 57

Recent Route editing
MENU
ENTER/ENTER/ENTER/ENTER
/
ENTER
/
Whenever a route is calculated, the address of the destination is stored into the Recent Route list. The
list holds the twenty most recently calculated destinations. Any or all of the twenty previous destinations
can be deleted from this list.
From any mode, press the MENU button to
1
display the main menu bar. Select Setup
from the main menu, then press ENTER.
The Setup menu appears.
Select Delete Recent Destination from the
Setup menu and press ENTER. The Delete
Recent Destination screen appears with a
list of up to 20 most recent routes.
Setup
Delete Recent Destination
Select the address to be deleted and press
2
ENTER. In this example, GRAMERCY PL
is selected. The Confirm Deletion screen
appears. Select OK to Delete and press
ENTER. A confirmation window will appear.
Select Yes and press ENTER.
Press CANC. button on the remote control
or select Do Not Delete from the Menu if
you do not want to delete the address.
Select All Delete to delete all entries from
Recent Destinations.
GRAMERCY PL
OK to delete
ENTER
/
YES
49
Page 58

Today's Plan editing
MENU
ENTER
/
ENTER
/
ENTER/ENTER
/
ENTER
/
If you wish to delete a destination from Today's Plan, you may use this feature in the Option menu.
Press the MENU button to display the main
1
menu bar. Select Setup from the main
menu, then press ENTER. The Setup
menu appears. Select Delete Today's
Plan from the Setup menu and press
ENTER. The Today's Plan List appears.
Select the address to be deleted and press
2
ENTER. In this example, NATIONAL
AIRPORT is selected. The Confirm Dele-
tion screen appears. Select OK to Delete
and press ENTER. A confirmation window
will appear. Select Yes and press ENTER.
Press the CANC. button on the Remote or
select Do Not Delete from the Menu if you
do not want to delete the address.
Select All Delete to delete all entries from
Today's Plan.
Setup
Delete Today's Plan
NATIONAL AIRPORT
OK to Delete
ENTER
/
50
Yes
Page 59

Route editing
ENTER
/
ENTER
/
ENTER
/
ENTER
/
The Edit Route function allows the driver to remove or rearrange specific points along the way. This
allows the driver to customize a route to the destination.
Press the MENU button to display the main
1
menu bar. Select Route and press ENTER.
The Arrange Route menu appears. Select
Edit Route and press ENTER.
The Arrange Current Route screen is
2
displayed.
MENU
Route
Edit Route
ENTER
/
Delete
When you select Delete and press ENTER,
3
the entire current route will be deleted.
Confirmation screen asking you whether
you wish to execute the clearance procedure or not. Select "Yes" and press ENTER
if you wish to clear.
When the DEL.DEST button on the remote control is
pressed, the entire current route will be deleted.
ENTER
/
Yes
Continued next page
51
Page 60

Route editing (continued)
Select a point to be edited (the destina-
4a
tion, a waypoint, or the departure point)
and press ENTER.
The sub-menu appears as follows.
When destination is selected:
The map for the area
around the destination is
displayed.
When waypoint is selected:
The map for the area
around the waypoint is
displayed.
The specified waypoint is
deleted if you select
"Delete" here then "YES"
in the confirmation
Skip
When point of departure is specified:
screen.
Drop by
The map for the area
around the point of
departure is displayed.
Select the route between the points to
4b
be edited (XX.X mi) and press ENTER.
If the route is
changed,
rerouting is
carried out
automatically.
Shows the priority
mode between points.
The display returns to the Arrange
5b
Current Route screen.
52
Select the desired item from the sub-menu.
5a
The selected item is displayed.
Page 61

Changing order of waypoints
MENU
ENTER/ENTER
/
ENTER
/
ENTER
/
ENTER
/
Press the MENU button to display the main
1
menu bar. Select Route and press ENTER.
The Arrange Route Menu appears.
Select Edit Route and press ENTER.
The Arrange Current Route screen is
2
displayed.
Select Re-arrange and press ENTER.
Route
Edit Route
3
ENTER
/
Re-arrange
The waypoint arrangement screen is
4
displayed.
Select the waypoint you want to go first
5
among the waypoints currently set and
press ENTER. The selected waypoint
moves to the right side.
(In this example, Waypoint 2 is changed to
Waypoint 1.)
Change other waypoints in the same
manner.
The waypoint list with the new sequence is
6
displayed. If the sequence displayed is
acceptable, select "Done" and press
ENTER.
To reinstate the original sequence, select
Reset and press ENTER.
The System calculates the new route and
7
displays the confirmation screen.
ENTER
/
ENTER
/
Done
53
Page 62

Setting as Current Position
ENTER
/
ENTER
/
ENTER
/
ENTER
/
Use this function to correct the location of the present vehicle position icon on the map screen if it is
deviated from the real present location of your vehicle.
Move the cursor to the real present vehicle
1
location on the map and press ENTER
twice. The Confirm Destination screen is
displayed. Select Option Menu and press
ENTER.
Option Menu
The Option Menu screen is displayed.
2
Select Set as Current Position and press
ENTER.
Set as Current
Position
54
The selected point is set as the current
3
point and the current vehicle position is
displayed.
Page 63

Displaying the entire route
ENTER
/
ENTER
/
The navigation system allows you to view the entire route so that you can verify the navigation system's
route calculation. If you select a cross-country route, for example Los Angeles to New York, the navigation system will display the route at a special 256-mile magnification scale setting.
Press the MENU button to display the main
1
menu bar. Select Route and press ENTER.
The Arrange Route menu appears. Select
Display Entire Route and press ENTER.
The entire route is displayed on a map with
2
a large enough view that you can see the
entire route.
Your current position, waypoints, and the destination icon
are displayed.
When you press the MP/RG button, the
3
system returns to the map screen.
MENU
Route
Display Entire Route
MP
/RG
With the route displayed, press and hold the ^ button on
the remote control to zoom out until your desired wider
range route is obtained. When the button is kept pressed
and the widest range is reached, the system automatically
stops and displays the entire route.
Press the
increasing the magnification ratio one step.
button. Each pressing zooms in the map by
^
Caution
COMPL Y WITH THE CURRENT
TRAFFIC REGULATIONS WHILE
DRIVING
When using the navigation system,
always comply with the local traffic
regulations on the road while driving.
55
Page 64

Changing the off-route recalculation option
MENU
ENTER
/
ENTER
/
ENTER
/
ENTER
/
ENTER
/
If you deviate from the suggested route, the system can recalculate a route to get you back on the way to
your destination. You can choose to have the system automatically recalculate the route or await confirmation before recalculating the route.
Press the MENU button to display the main
1
menu bar. Select Route and press ENTER.
The Arrange Route menu appears. Select
Route Options and press ENTER.
Route
Route Options
Highlight Re-route and press ENTER.
2
You may select from either Manual or
3
Automatic. Use the joystick to toggle
between the two selections.
A) When set to Manual the system will
recalculate a new route when the DTR
(DETOUR) button is pressed.
(See page 80.)
B) When set to Automatic the system will
automatically recalculate a new route if you
deviate from the original route.
Press the MP/RG button. The system
4
returns to the Detailed Map display.
Re-route
MP
/RG
56
Page 65

Changing the route calculation method
ENTER/ENTER
/
ENTER
/
ENTER
/
ENTER
/
Depending upon the time of the day and road conditions, you may want to alter the way the system
calculates a route.
Press the MENU button to display the main
1
menu bar. Select Route from the menu and
press ENTER. The Arrange Route menu
appears. Select Route Options and press
ENTER.
Highlight Route Options and press ENTER.
2
Tilt the joystick up or down to select from
3
the four choices. Press ENTER to select
the setting. The method set here will remain in memory as a default setting until
you change the setting.
A) When set to Quickest, the system will
calculate the most efficient way to arrive at
your destination.
B) The Max Fwy (Maximize Freeways)
option calculates a route that makes most
efficient use of freeways.
C) When set to Min Fwy (Minimize Free-
ways), the system will calculate a route
that uses mostly surface streets.
D) The Min Toll (Minimize Toll Roads)
option calculates a route that uses the least
number of pay roads enroute to the destination.
MENU
Route
Route Options
Route Options
Press the MP/RG button. The system
4
returns to the Detailed Map display.
MP
/RG
57
Page 66

Setting the Today's Plan Calculation Method
ENTER/ENTER/ENTER/ENTER
/
When using Today's Plan, there are two methods by which the system will calculate a route. In the Auto
mode, the system will calculate the most efficient route for travelling to all the destinations in Today's
Plan. In the Manual mode, routing will be calculated in the order in which the destinations are listed in
Today's Plan List. The user will be prompted for the next destination and may select them in any order
from Today's Plan List.
Press the MENU button to display the main
1
menu bar. Select Route from the main
menu and press ENTER. The Arrange
Route menu appears.
Select Route Options and press ENTER.
Highlight Today's Plan and press ENTER.
2
Choose Automatic or Manual and press
ENTER to store your selection (in this case,
Automatic).
MENU
Route
Route Options
Today's Plan
Automatic
58
Press the MP/RG button. The system
3
returns to the Detailed Map display.
MP
/RG
Page 67

Recalling the Street List during guidance
MENU
ENTER
/
ENTER
/
ENTER
/
ENTER
/
During route guidance, you may display a list of street names to preview upcoming turns and street
names.
Press the MENU button to display the main
1
menu bar. Select Route and press ENTER.
The Route menu appears.
Select Street List and press ENTER.
Route
Street List
The Street List is displayed. To preview a
2
specific point, select a street name/maneuver and press ENTER.
When the LIST button on the remote control
is pressed, the street list can be directly
displayed.
The system previews the screen for that
3
particular point (preview screens are denoted by the map in which the specific point
is indicated by the crosshair icon). To
return to the Guidance mode, press the
MP/RG button.
You may scroll Up using the remote control to view the street
name following the one you are currently viewing. Scroll Down
to view the street name preceding the one you are viewing.
You may view the entire street list in this way. If you are
already on the first street, scrolling Down will do nothing.
MP
/RG
59
Page 68

Setting the map color
ENTER/ENTER/ENTER
/
ENTER
/
The system allows you to set the display's map color. For most drivers, a dark tone screen is preferred
when driving at night. The system can be set to automatically switch to dark tone screen when headlights are turned on.
Press the MENU button to display the main
1
menu bar. Select Setup and press ENTER.
The Setup menu screen appears. Select
Map Display and press ENTER.
Highlight Map Color and press ENTER.
2
You have 3 choices of display modes:
3
A) DA Y mode maintains a bright tone
screen even while your headlights are on.
B) NIGHT mode maintains a dark tone
screen even when your headlights are off.
C) AUTO mode switches automatically
between Day and Night screen color when
your parking lights are turned on and off.
MENU
Setup
Map Display
Map Color
AUTO
60
Highlight the mode of your choice (Auto is
shown here) and press ENTER.
Press the MP/RG button.
4
The system returns to the map screen.
MP
/RG
Page 69

Setting Point of Interest icon options
ENTER
/
ENTER/ENTER/ENTER
/
ENTER
/
ENTER
/
The system allows you to display some or all of the eight Point of Interest icons on the Detail Map
Display at one time. They will appear only in the 1/2, 1/4, 1/8, 1/16 and 1/32 mile magnification scale
settings.
Press the MENU button to display the main
1
menu bar. Select Setup and press ENTER.
The Setup menu appears. Select Map
Display and press ENTER.
Highlight P.O.I. Icons and press ENTER.
2
Three modes are displayed: ON, OFF, and
3
SET PLACE TYPE. Select SET PLACE
TYPE and press ENTER. A list of 8 icons
will appear. Highlight any of the following
icon types and press ENTER:
MENU
Setup
Map Display
P.O.I. Icons
SET PLACE TYPE
ATM
Bank
Gas Station*
Grocery Store
Hotel
Parking
Restaurant
Exit Information
Continued next page
61
Page 70

Setting Point of Interest icon options (continued)
Select Gas Station from the place type selection menu to display the list below showing the brand icons
(thirteen petrol companies) on the map.
<Gas station list>
Icon
Company's name
Shell
Tosco (Union76)
BP
Chevron
Texaco
Icon
Company's name
DIAMONDSHAMROCK
When the place type settings have been
4
completed, press CANC.
Select ON from the P.O.I. Icons menu and
5
press ENTER.
Exxon
Amoco
Mobil
ESSO
Icon
Company's name
PETRO-CANADA
Sinclair
SUNOCO
CANC.
ENTER
/
62
ON
ENTER
/
Page 71

ENTER
/
Press the MP/RG button.
6
The system returns to the Detailed Map
display.
Move the Map Cursor icon to any of the
7
visible P.O.I. icons, press ENTER, and the
name and address will appear on the
display for that icon.
To remove the point of interest icons from the map screen,
there are 2 choices:
a Deselect the highlighted icon that you wish to remove as
described in step 3.
a Select "OFF" in step 5.
MP
/RG
ENTER
/
63
Page 72

Setting the map screen orientation
ENTER/ENTER/ENTER/ENTER
/
ENTER
/
The map display can be positioned so that north is always at the top of the display (North Up). This
makes it easy to read your current heading from the map. In addition, the vehicle's icon can be positioned so that its current direction is always pointing to the top of the display (Heading Up). In this case,
the vehicle's icon will remain frozen in the center of the display while the map rotates with each turn.
This makes it easy to see the direction of the next turn on the map.
Press the MENU button to display the main
1
menu bar. Select Setup and press ENTER.
The Setup menu appears. Select Map
Display and press ENTER.
Highlight Map Display and press ENTER.
2
Either North Up or Heading Up can be
3
selected. Use the joystick to toggle between
the two and press ENTER.
A) When set to North Up, the map display
will always show the map with north facing
toward the top of the screen. The Present
Vehicle Position icon will rotate on the map.
MENU
Setup
Map Display
Map Display
64
B) When set to Heading Up, the map
display will rotate such that the Present
Vehicle Position icon is always pointing
toward the top of the screen.
Pressing the N/H button while in detailed map mode will allow
you to toggle between "Heading Up" and "North Up"
orientation.
Press the MP/RG button. The system
4
returns to the map screen.
MP
/RG
Page 73

Setting the Split Screen
ENTER/ENTER
/
ENTER
/
ENTER
/
The Split Screen Display of the Basic Guidance Display or Zoomed Intersection Map Display and
Detailed Map Display can be made.
Press the MENU button to display the main
1
menu bar. Select Setup and press ENTER.
The Setup menu appears.
Select Guidance and press ENTER.
Highlight the Split Screen selection and
2
press ENTER.
Two choices are displayed. Select one and
3
press ENTER.
A) When ON, the system displays a Split
Screen.
B) When OFF, the system does not display
a Split Screen.
MENU
Setup
Guidance
Split Screen
Press the MP/RG button.
4
The system returns to the Detailed Map
display.
MP
/RG
65
Page 74

Setting the voice guide type/frequency
ENTER/ENTER
/
ENTER/ENTER
/
The system allows you to choose the type or frequency of audible prompts you receive as you are
guided along your route.
Press the MENU button to display the main
1
menu bar. Select Setup and press ENTER.
The Setup menu appears. Select Guid-
ance and press ENTER.
Highlight the Voice Guide selection and
2
press ENTER.
Two choices are displayed. Highlight one
3
and press ENTER.
A) When set to the Minimum mode, the
system will emit tones only when approaching upcoming maneuvers.
MENU
Setup
Guidance
Voice Guide
Normal
66
B) When set to the Normal mode, the
system will emit tones and voice instructions when approaching upcoming maneuvers. Voice instructions are announced 1/2
mile before each maneuver on surface
streets and one mile before each maneuver
on freeways and expressways.
Press the MP/RG button. The system
4
returns to the Detailed Map display.
Pressing the "VOICE" button on the remote control will give
the distance to the next maneuver or repeat the maneuver
regardless of the "Voice Guide" setting.
MP
/RG
Page 75

Setting Est. (Estimated) Time display
ENTER
/
ENTER
/
ENTER
/
ENTER
/
When the system calculates a route, it also estimates the time it will take to arrive at the destination. It
will display this estimate as either "AT" or Arrival Time, or "TO GO," the time remaining to reach the
destination. These estimates are displayed under the Direction/Distance display at the right of the
Guidance or Map displays.
Press the MENU button to display the main
1
menu bar. Select Setup from the main
menu and press ENTER. The Setup menu
appears.
Select Guidance from the Setup menu and
press ENTER.
Highlight Est. Time to Dest. and press
2
ENTER.
Choose Arrival or Remaining and press
ENTER to store your selection (in this case,
Arrival).
Note: The time estimates are based on the
average speed of the vehicle. The Est.
Time will vary accordingly, as the vehicles
speed varies.
MENU
Setup
Guidance
Est. Time to Dest.
Arrival
Press the MP/RG button.
3
The system returns to the Detailed Map
display.
MP
/RG
67
Page 76

Setting assumed speed
ENTER/ENTER
/
ENTER
/
ENTER
/
ENTER
/
ENTER
/
ENTER
/
MENU
The navigation system allows you to fine-tune the parameters which influence the calculation of travel
time. If you are a slower or faster driver, the assumed speed settings can be adjusted accordingly.
Press the MENU button to display the main
1
menu bar. Select Setup and press ENTER.
The Setup menu appears.
Select Guidance and press ENTER.
Setup
Guidance
Highlight Assumed Speed and press
2
ENTER.
Two choices are displayed. Select one and
3
press ENTER.
A) When set to FWY (Freeway), the system
will display the Set assumed freewa y
speed screen.
Tilt the joystick to the right or left to increase or decrease the assumed speed
respectively. When setting has been finished, press ENTER to end the setting
procedure.
B) When set to SFC (Surface Road), the
system will display the Set assumed
surface road speed screen.
Tilt the joystick to the right or left to increase or decrease the assumed speed
respectively. When setting has been finished, press ENTER to end the setting
procedure.
Assumed Speed
ENTER
/
ENTER
/
68
Note: Do not select the speed exceeding the speed
limit.
Press the MP/RG button.
4
The system returns to the Detailed Map
display.
MP
/RG
Page 77

Setting audio interrupt
ENTER/ENTER/ENTER
/
ENTER
/
ENTER
/
MENU
The Audio Interrupt function allows the navigation system to mute your radio while voice prompts are
being played. This option may require additional parts or labor.
Please consult your Alpine dealer for details.
Press the MENU button to display the main
1
menu bar. Select Setup and press ENTER.
The Setup menu appears.
Select Guidance and press ENTER.
Setup
Guidance
Highlight Audio Interrupt and press EN-
2
TER.
Two choices are displayed. Select one and
3
press ENTER.
A) When turned ON, the system will mute
the radio (if connected) while announcing
voice instructions.
B) When turned OFF, the system doesn't
mute the radio at all.
This function may not work with some radios.
Consult your Alpine dealer for further
information.
Press the MP/RG button.
4
The system returns to the Detailed Map
display.
Audio Interrupt
MP
/RG
69
Page 78

Setting the GPS clock
ENTER
/
ENTER
/
ENTER
/
ENTER
/
ENTER
/
ENTER
/
The GPS receiver used in this system is synchronized to the time data being transmitted by the GPS
satellites. The satellite's clock is Greenwich Mean Time (GMT). This is the world-wide standard for
time. This makes the system's clock very accurate, once the appropriate time zone has been set.
Press the MENU button to display the main
1
menu bar. Select Setup from the main
menu and press ENTER. The Setup menu
appears.
Select Clock from the Setup menu and
press ENTER.
From the Clock Set Up screen, select Time
2
Zone and press ENTER. Choose the
appropriate Time Zone for your location and
press ENTER to store your selection (in this
case, Pacific).
Note: If crossing Time Zones while driving, the
clock must be reset manually for the new zone.
MENU
Setup
Clock
Time Zone
70
Pacific
Page 79

ENTER
/
ENTER
/
ENTER
/
To change whether Daylight Savings is
3
currently being observed or not, select
Daylight Savings Time and press ENTER.
Select ON or OFF depending upon which is
currently being observed. Press ENTER to
save.
Press the MP/RG button.
4
The system returns to the Detailed Map
display.
Daylight Savings Time
ON
MP
/RG
71
Page 80

Recalibration for new vehicle or tires
ENTER
/
ENTER/ENTER
/
ENTER
/
ENTER
/
The navigation system measures distance using the vehicle’s speed pulses. The vehicle’s speed pulses
vary depending on the manufacturer and tire size. Therefore, whenever you install this system into a
different vehicle or replace your tires, the distance coefficient is automatically recalibrated. This done by
comparing the speed pulse data to the GPS calculated distance. To make the recalibration speed faster,
clear the current coefficient. You can check on the screen whether or not vehicle’s speed pulses are being
counted.
Press the MENU button to display the main
1
menu bar. Select Setup and press ENTER.
The Setup menu appears. Select System
Calibration and press ENTER.
Highlight Change Vehic le or Tires and
2
press ENTER.
Confirmation screen asking you whether
3
you wish to execute the clearance procedure or not. Select "Yes" and press ENTER
if you wish to clear .
The system returns to the System Calibration display.
MENU
Setup
System Calibration
Change Vehicle or Tires
Yes
72
Press the MP/RG button.
4
The system returns to the Detailed Map
display.
MP
/RG
Page 81

Direction adjustment
MENU
ENTER/ENTER/ENTER
/
ENTER
/
ENTER
/
If the direction of the present vehicle position icon on the map is different from the actual direction of
your vehicle, you can correct the direction of the icon with the following method.
Press the MENU button to display the main
1
menu bar. Select Setup and press ENTER.
The Setup menu appears.
Select System Calibration and press
ENTER.
Highlight Adjust Direction and press
2
ENTER.
Setup
System Calibration
Adjust Direction
The direction correction screen is dis-
3
played. Tilt the joystick toward the left and
right to correct the direction.
When the direction is corrected, press
4
ENTER.
The present vehicle position icon is displayed in the corrected direction.
ENTER
/
73
Page 82

Screen position adjustment
ENTER
/
Some display will appear out of position when connected to the navigation system. The image position
can be optimized for a particular monitor being used with the system.
Press the MENU button to display the main
1
menu bar. Select Setup and press ENTER.
The Setup Menu appears.
Select System Calibration and press
ENTER.
Highlight Adjust Screen and press EN-
2
TER.
The screen position adjustment screen is
3
displayed.
MENU
Setup
ENTER
/
System Calibration
ENTER
/
ENTER
/
Adjust Screen
ENTER
/
74
Adjust the display position by tilting the
4
joystick.
The display screen moves the way you tilt
the joystick.
After adjusting, press ENTER.
5
The screen is displayed at the adjusted
position.
ENTER
/
Page 83

INFORMATION/GUIDANCE MENU
MENU
ENTER
/
ENTER/ENTER
/
Connection check for peripherals
Press the MENU button to display the main
1
menu bar. Select Setup and press ENTER.
The Setup menu appears. Select Peripher-
als and press ENTER.
The peripheral screen appears in the
2
display and it shows the connection state of
the Navigation Interface.
If connections for each item are correctly
and securely made, the display indicates
"Yes" and if not correct or unconnected it
indicates "No" at the right side of the item.
(This example shows when no item is
connected.)
Note: “Mobile Mayday” and “Cellular Phone” cannot
be used by this unit.
Setup
Peripherals
When you have checked the connections,
3
press ENTER. The system returns to the
Setup Menu.
Press the MP/RG button.
4
The system returns to the Detailed Map
display.
MP
/RG
75
Page 84

Navigation Simulation
MENU
ENTER
/
ENTER
/
You can watch a demonstration of the navigation system's voice and screen guidance by using this
function. The vehicle position icon will automatically move along the desired route showing a simulation of how the navigation system functions. If waypoints have been set, the simulation only shows a
route to the first waypoint.
Use this function only while the car is parked.
Press the MENU button to display the main
1
menu bar . Select Info. and press ENTER.
Info.
The Info. menu screen appears. Select
Navigation Simulation and press ENTER.
a The confirmation message only appears if a destination
has already been set.
a During the drive simulation, the system accepts operation
of the MP/RG, VOICE, ZOOM upward/downward and
N/H buttons in addition to the CANC button.
The drive simulation for the current route
2
begins.
To end the drive simulation, press the
3
CANC. button.
After the "Simulation ended." message, the
navigation system automatically returns to
the map screen.
Navigation Simulation
CANC.
76
Page 85

Viewing GPS Information
MENU
ENTER
/
ENTER
/
The navigation system allows you to view dynamic location information received from GPS satellites.
This feature is very useful for off-road users in establishing a starting point before trekking.
Press the Menu button to display the main
1
menu bar. Select Info. and press ENTER.
The Info. menu appears.
Highlight the GPS Status setting.
Info.
GPS Status
The GPS information screen is displa y ed.
2
a Satellites from which you are receiving are displayed
green and those from which you are not receiving are
displayed red. Yellow indicates that your position is being
calculated.
a The direction gives the heading of your vehicle.
a The speedometer display shows how fast your vehicle is
travelling.
a SPEED PULSE blinks when the speedometer signal is
coming in.
Press the MP/RG button.
3
The system returns to the map screen.
Altitude display accuracy can vary widely since the system
uses only GPS signals for determining altitude approximations.
Unlike altitude measurement, map matching accuracy is
much more precise due to calculation methods that
utilize, three inputs: 1) GPS signals, 2) vehicle speed
signals, and 3) the system's built-in electronic gyro signals.
MP
/RG
77
Page 86

Viewing Trip Information
ENTER/ENTER
/
ENTER
/
The odometer displays the route distance and time traveled since the power to the navigation system was
switched on.
Press the Menu button to display the main
1
menu bar. Select Info. and press ENTER.
The Info. menu appears.
Highlight the T rip Inf ormation and press
ENTER.
The Trip information is displayed. To reset
2
the Trip Meter (Distance Driven/Time
Elapsed), press ENTER.
A) Distance Drive refers to the total distance traveled after the trip meter is reset.
B) Time Elapsed refers to the total time
traveled after the trip meter is reset.
C) Odometer is the distance travelled since
this system was installed.
D) Total Time is the time elapsed since this
system was installed.
MENU
Info.
Trip Information
78
The Trip information will be cleared when the car battery
cable is disconnected.
Press the MP/RG button.
3
The system returns to the map screen.
MP
/RG
Page 87

Viewing Software Information
ENTER/ENTER/ENTER
/
You can view information about the DVD-ROM's version. Make note of this information and refer to it
whenever you communicate with Alpine Tech Support or your Alpine authorized dealer.
Press the MENU button to display the main
1
menu bar. Select Info. and press ENTER.
The Info. menu screen appears. Highlight
Version Information and press ENTER.
The D VD-R OM's information is displayed.
2
Press ENTER on the remote control to
return to the Info. menu.
Press the MP/RG button.
3
The system returns to the map screen.
MENU
Info.
Version Information
MP
/RG
79
Page 88

Using the Detour function
If during a route you require the system to detour around an obstacle, you may use the DETOUR button
to automatically recalculate a new route.
Press the DTR (DETOUR) button in the
1
Guidance mode. A window appears confirming the detour request.
The system recalculates the route around
2
the upcoming maneuver.
Note: The system will detour around the next
maneuver for about 3 miles ahead on freeways/
expressways and the next 1 mile ahead on surface
streets.
DTR
2
80
Page 89

Using the Plan function
ENTER
/
ENTER
/
While enroute to your first destination in Today's Plan, you may select to change the first destination.
Press the PLAN button while in the route
1
guidance mode. The confirmation screen
asking if you want to execute the clearance
procedure or not. If you want to change the
destination, select Yes and press ENTER.
The system will start recalculating the travel
2
order for Today's Plan. Once the system is
finished recalculating, the Confirm Desti-
nation screen appears. Select OK to
Proceed and press ENTER to proceed to
the new destination. If you would like to
route to a different 'first' destination, select
Today's Plan List again, and select a new
destination from the list.
PLAN
4
OK to Proceed
81
Page 90

REFERENCE
In case of difficulty
If you encounter a problem, please review the items in the following checklist. This guide will help
you isolate the problem if the unit is at fault. Otherwise, make sure the rest of your system is
properly connected or consult your authorized Alpine dealer.
Symptom
The vehicle's
position is
erroneous.
The
measurement
error is too
large.
Screen not
displayed
An error
message
regarding the
DVD-ROM is
displayed
Inconsistent
operation/
response of
remote control
Cause
The vehicle's position changed
after the ignition was switched
off.
• Movement on a ferry boat
• Rotation of a parking lot
turntable
• Movement by tow truck
Poor satellite reception
Not enough satellites to give
three dimensional positioning.
The navigation monitor is turned
off.
The DVD-ROM is not inserted
properly.
Disc dirty or damaged
The remote control batteries
are wearing out.
Solution
Drive the vehicle in an area of good GPS
reception to allow the unit to recalibrate
itself.
Move to a location where strong GPS
reception is possible.
Press the DISP ON/OFF button on the
remote control.
Set Power switch of monitor to Standby.
Eject the DVD-ROM and reinsert properly.
Clean or replace disc
Replace the remote control batteries.
82
No operation
Moisture condensation
Ambient temperature over
122°F (50°C)
Blown fuse
Allow enough time for the condensation to
evaporate (about 1 hour).
Lower the temperature in the vehicle
below 122°F (50°C), by driving with the
windows open or air conditioner on.
Replace with a fuse of the prescribed
rating.
Page 91

Error Messages
Various messages are displayed on the screen during operation. In addition to the messages telling
you the current status or providing guidance for the next maneuver, the following error messages
may appear. If one of these error messages is displayed, carefully follow the instructions in the
solution column.
Message
Please insert
DVD-ROM/map
data disk.
DVD ROM
unreadable.
Please check
DVD ROM.
DVD ROM being
checked.
Menu
inoperable while
driving.
Cautiously bring
vehicle to a stop
at a safe place
and set parking
brake before
using this
function.
Cause
• The disc has been removed.
• There was no disc in the system
when the power was switched on.
• A disc that the system cannot read
has been loaded.
• The disc is dirty or upside down.
• The disc cannot be read because of
condensation.
• A disc was just inserted.
• Vibration or the like made it
impossible to read the disc.
• The MENU button was pressed
while the vehicle was running.
• A menu selection operation was
carried out while the vehicle was
running.
Solution
Insert the disc.
Insert the map disc.
Take out the disc, check if it was
upside down, clean it if necessary,
then re-insert it.
Take out the disc, allow enough time
for condensation to evaporate (about
1 hour), then re-insert the disc.
When the disc check is complete, the
following screen is displayed
automatically.
Move the vehicle to a safe location,
stop, and engage the parking brake,
then carry out this operation.
If you are
driving, pull over
to use this
function. OK/NO
Roads can't be
found in area.
Please near the
main road.
• The MENU button was pressed
while the vehicle was running.
• A menu selection operation was
carried out while the vehicle was
running.
• When the destination or waypoint
was specified, there was no road in
the area, so no route could be
found.
• An attempt was made to erase a
waypoint even though no waypoint
is set.
Move the vehicle to a safe location,
stop, and engage the parking brake,
then carry out this operation.
Focus on a nearby major road, then
specify the destination or waypoint
again.
This message simply announces that
no waypoint is set. The message
goes out soon.
83
Page 92

Buttons and functions of remote controls
RUE-4119
(For NVE-N851A)
ENTER
MENU
CANC.
N/H
VOICE
ON/OFF
MP/RG
LIST
DETOUR
PLAN
DISP
DEL DEST.
RUE-4136
(For NVE-N852A)
S
O
/
A PROC.
23
5
F
U
N
C
.
O
P
/
C
L
V SEL.
U
/RG
CANC.VOICE
6
OK
2
)
3
5
8
9
!
%
"
.
L
O
V
ENTER
E
T
U
M
MENU
LIST N/H
DTR
1
PLAN
4
7809
DEL.
ON/OFF
DEL. DEST
R
S
E
MP
1
~
6
B
A
N
D
4
7
$
&
#
84
12
45
78
DEL
0
3
6
9
OK
Page 93

ENTER
/
MENU
MP
/RG
ON/OFF
DEL. DEST
Button No. RUE-4119 Description RUE-4136
Selects highlighted items within menus and moves
1
2
3
4
5
6
C
ENTER
M
A
VOICE
MP/RG
E
NU
.
C
N
map displays and vehicle position icon.
Press the ENTER button to select any highlighted
function, screen icon or street segment.
Changes map magnification ratio upward or
downward in 9 steps (1/32, 1/16, 1/8, 1/4, 1/2, 2, 8,
32 and 128 miles). Scroll through street, city or
place type listings a page at a time.
Displays the main menu bar.
Cancels current display screen and switches back to
previous screen with menus.
Initiates vocal instruction for next route maneuver or
repeats last instruction.
Toggles between Detailed Map Display and Basic
Guide Display during guidance. Switches directly to
Map when not in guidance.
CANC.
VOICE
7
N/H
8 To return to the guidance mode, press the MP/RG
LIST
Toggles between North Up and Heading Up
orientation.
Displays list of the streets currently set for the route.
button.
9
!
"
#
$
%
&
DETOUR
PLAN
DISP
ON/OFF
DEL DEST
12
45
78
DEL
0
OK
Automatically recalculates route if a road block or
traffic congestion is encountered.
Allows you to advance to the next destination in
Today's Plan list.
Turns the pictorial display on or off.
Deletes current destination.
Use these buttons to enter Phone numbers, address
3
numbers or street names containing numbers
6
9
(i.e., 42nd St.).
Deletes the character previously input.
Executes numeral inputtings and starts searching.
This has multiple functions. In map displays, zoom in
(
ENTER
or out; in list displays, scrolls list pages; in coordinate
inputting, moves cursor; in alphabet inputting, moves
alphabetical characters.
AUDIO/NAV.button
) —
Switches between Audio and Navigation operations.
Pressing this button illuminates the highlighted
portion of the display.
MODE button
~ —
Press this button to input numerals using the
numeric keypad. The numerals can be input while
the status indicator blinks.
2 3
LIST
DTR
PLAN
LIST N/H
1
PLAN
4
7809
—
N/H
DTR
DEL.
O
5
K
1
2
4
23
FUNC.
OR/CL.
6
85
Page 94

Remote Control Reference Guide for Head Unit
When you use the Alpine head unit, you can operate the head unit with the remote control (supplied
with NVE-N852A.)
Change AUDIO/NAV. Switch, on the side of the remote control, to AUDIO.
S
O
U
/
A PROC.
23
5
F
U
N
C
.
O
P
/
C
L
V SEL.
R
S
MP
/RG
E
1
&
4
B
A
N
D
CANC.VOICE
6
$
6
OK
7
!
#
2
%
3
5
8
9
"
.
L
O
V
ENTER
E
T
U
M
MENU
LIST N/H
DTR
1
PLAN
4
7809
DEL.
ON/OFF
DEL. DEST
No.
1
2
3
4
A PROC.
SOURCE
5
6
7
8
9
!
"
#
Numeric Keypad
$
%
AUDIO/NAV.
&
Button
:/J
VOL.
MUTE
BAND
FUNC.
OP./CL.
9
8
ON/OFF
V SEL.
MODE
Description
PUSH : PLAY/PAUSE
Radio mode: Preset Selection (C/B), SEEK UP/DOWN (@/A)
CD/MD Player/Changer mode:
Disc Selection (C/B), Music Sensor (@/A), BW/FF (@/A Hold)
Tape Mode: Program Sensor (C/B), REW/FF (@/A Hold)
Volume Control
Audio Processor
Source Selection
Audio Mute
Radio Band Selection
−
−
Display Angle DOWN (only pressing MODE button.)
Display Angle UP (only pressing MODE button.)
Power ON/OFF
−
−
Switching AUDIO/NAV. Switch to AUDIO side.
Operates 9 and ! (Flashes the Status Indicator for 5 seconds.)
86
Page 95

Remote Control Reference Guide for AV Head Unit
When you use the Alpine head unit with the monitor, you can operate the AV head unit with the
remote control (supplied with NVE-N852A.)
Change AUDIO/NAV. Switch, on the side of the remote control, to AUDIO.
S
O
U
/
A PROC.
23
5
F
U
N
C
.
O
P
/
C
L
V SEL.
R
S
MP
/RG
E
1
&
4
B
A
N
D
CANC.VOICE
6
$
6
OK
7
!
#
2
%
3
5
8
9
"
.
L
O
V
ENTER
E
T
U
M
MENU
LIST N/H
DTR
1
PLAN
4
7809
DEL.
ON/OFF
DEL. DEST
No.
1
2
3
4
SOURCE
5
6
7
8
9
!
"
#
Numeric Keypad
$
%
AUDIO/NAV.
&
Button
:/J
VOL.
A PROC.
MUTE
BAND
FUNC.
OP./CL.
9
8
ON/OFF
V SEL.
(1 to 6)
MODE
Description
PUSH: PLAY/PAUSE (CVA-1003/CVA-1004)
PUSH: Changes the modes as follows: Volume/Bass/Treble/Fader
(CVA-1005/CVA-1006/IVA-C800/IVA-C801)
PUSH hold: PLAY/PAUSE
(CVA-1005/CVA-1006/IVA-C800/IVA-C801)
Radio mode: Preset Selection (C/B), SEEK UP/DOWN (@/A)
CD/MD Player/Changer mode:
Disc Selection (C/B), Music Sensor (@/A), BW/FF (@/A Hold)
Tape Mode: Program Sensor (C/B), REW/FF (@/A Hold)
Volume Control
Audio Processor
Source Selection
Audio Mute
Radio Band Selection
This function button has the same function as the following
models: CVA-1003/CVA-1005/CVA-1006/IVA-C800/IVA-C801.
Indash Display OPEN/CLOSE (only pressing MODE button.)
Indash Display Angle DOWN (only pressing MODE button.)
Indash Display Angle UP (only pressing MODE button.)
Power ON/OFF
Switching V.SEL
This numeric keypad has the same function of the preset buttons
(1 to 6) as the following models: CVA-1003/CVA-1005/CVA-1006/
IVA-C800/IVA-C801.
Switching AUDIO/NAV. Switch to AUDIO side.
Operates 8 to ! (Flashes the Status Indicator for 5 seconds.)
87
 Loading...