

Page 1
QUICK REFERENCE GUIDE
IN-DASH GPS NAVIGATION RECEIVER
Map Update applies to following products:
NVD-W912 for INA-W910 and IVA-NAV-20
NVD-W902 for INA-W900, INA-W900BT and
IVA-NAV-10
INA-W900, INA-W900BT & IVA-NAV-10 do not have the Traffic Feature
Page 2

TABLE OF CONTENTS
SYSTEM CONTROLS ........................................................... 2
LANE GUIDANCE .................................................................. 3
JUNCTION VIEW ................................................................... 3
ENTERING AN ADDRESS .................................................. 4
SELECT AN INTERSECTION
AS THE DESTINATION
QUICK SEARCH FOR A PLACE OF INTEREST......... 10
EDITING THE LIST OF DESTINATIONS ..................... 12
CANCEL THE ACTIVE ROUTE ........................................ 13
SAVING A LOCATION AS AN
ADDRESS BOOK ENTRY
SPEED LIMIT WARNING ................................................. 15
ADJUSTING SPEED WARNING ..................................... 16
TRAFFIC SETTINGS /
UNDERSTANDING TRAFFIC
TRAFFIC INFORMATION IN ROUTE PLANNING .......................... 17
REAL-TIME TRAFFIC INFORMATION (TMC) ............................... 17
....................................................... 7
.................................................. 14
........................................... 17
TRAFFIC EVENTS ............................................................... 19
TO ENABLE/DISABLE TRAFFIC FEATURES.............. 20
QUICK MENU ....................................................................... 21
ROUTE SETTINGS .............................................................. 22
SELECTED MAP LOCATION (CURSOR) AND SELECTED
MAP OBJECT.............................................................................. 23
SCROLLING THE MAP ..................................................... 24
CHANGING THE LANGUAGE .......................................... 26
WHAT’S NEW? .................................................................... 28
FAQ .......................................................................................... 30
Page 3
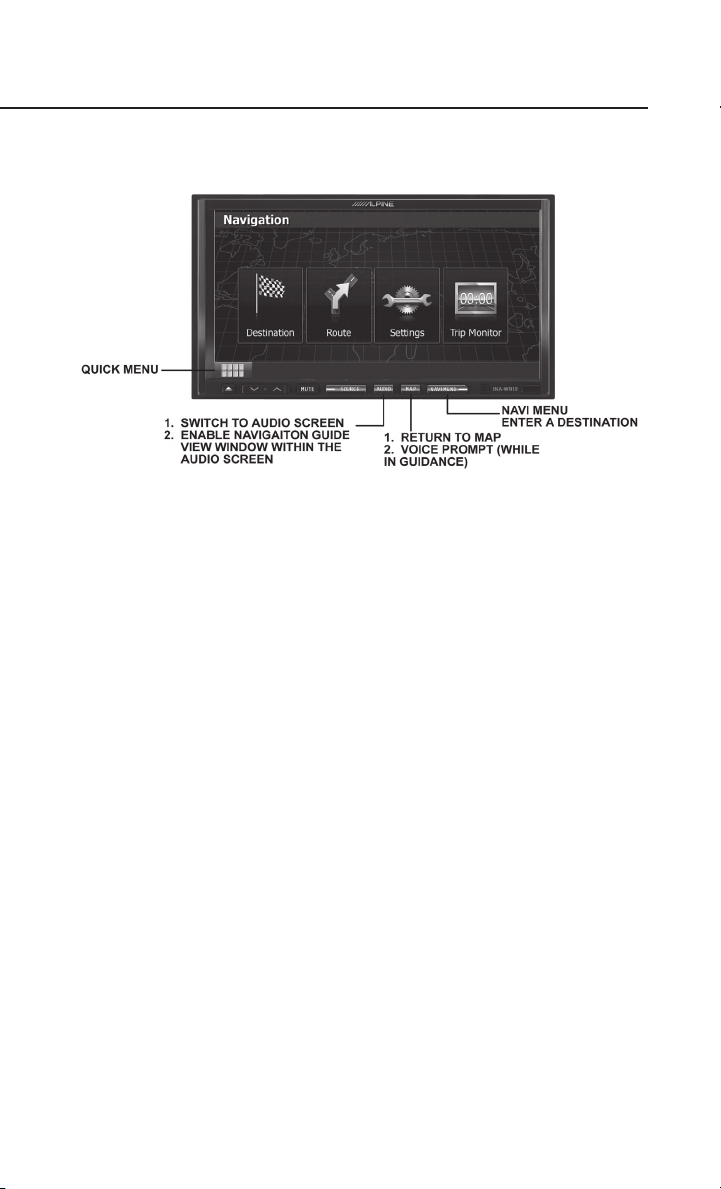
SYSTEM CONTROLS
2
Page 4
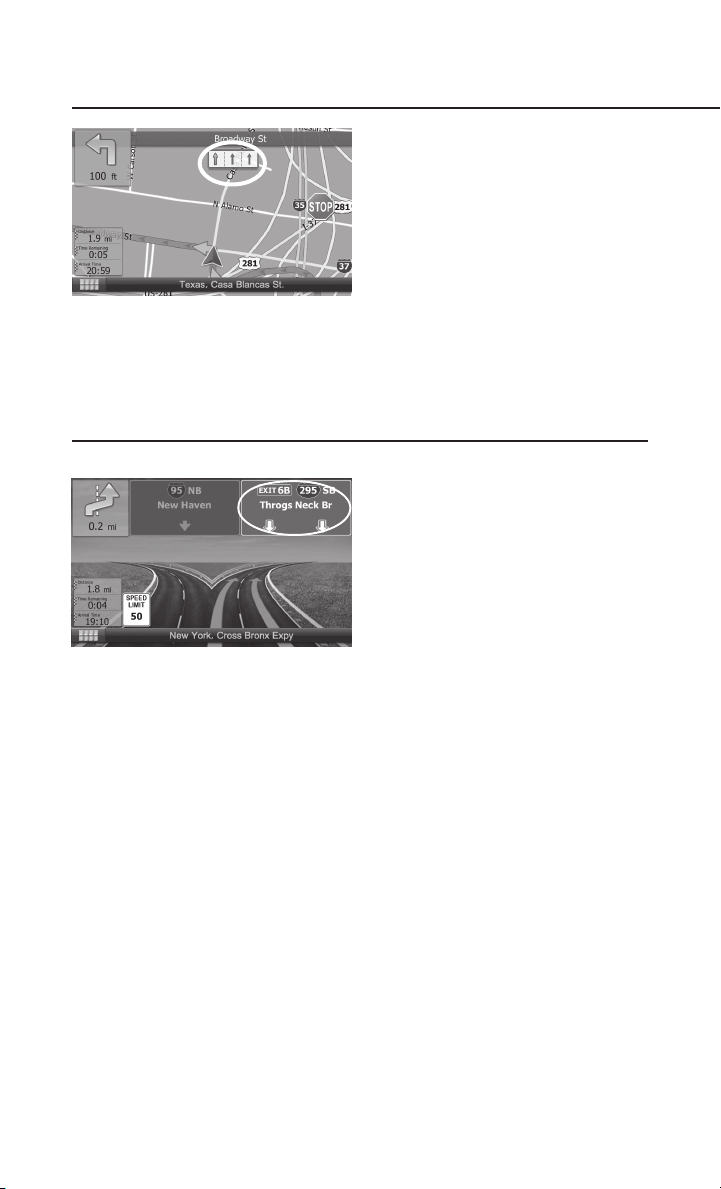
LANE GUIDANCE
JUNCTION VIEW
When navigating, these arrows
represent the lanes to take.
When navigating, highlighted
signs represent which lanes to
use; all others are dimmed.
3
Page 5
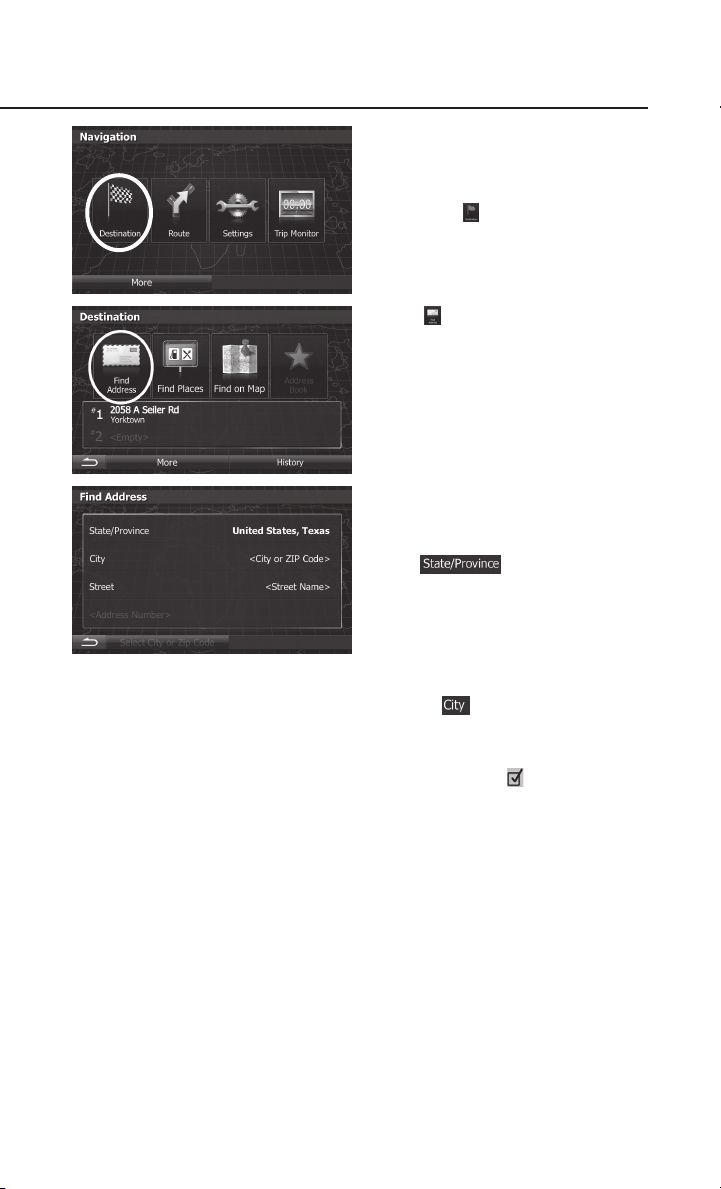
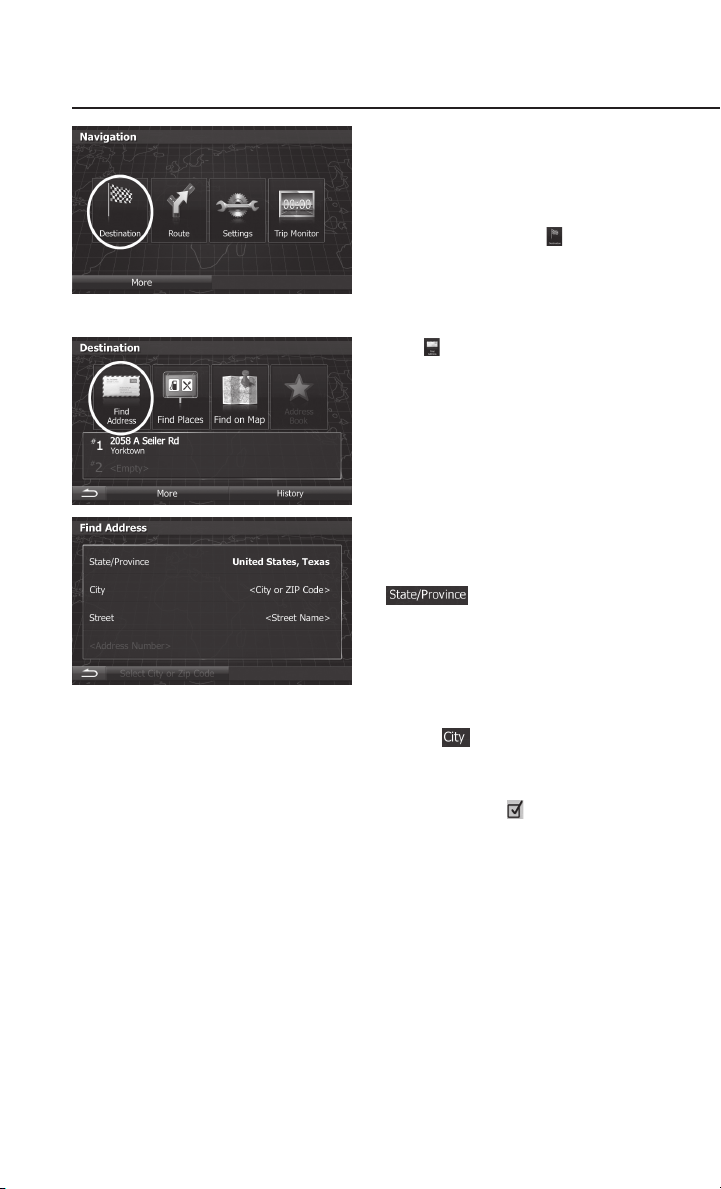
ENTERING AN ADDRESS
To enter an address as the
destination, do as follows:
1. Press the [NAVI MENU],
then tap
2. Tap
3. By default, the software
proposes the state where
you are driving. If needed,
tap , enter a few
letters of the destination
state on the keyboard, and
select one from the list.
4. Select a new city:
a. Tap . The city of your
current location is offered
by default. For a local
search, tap to accept it,
otherwise continue with
entering the destination
city name.
b. Start entering the
name of the city on the
keyboard.
4
Page 6
ENTERING AN ADDRESS
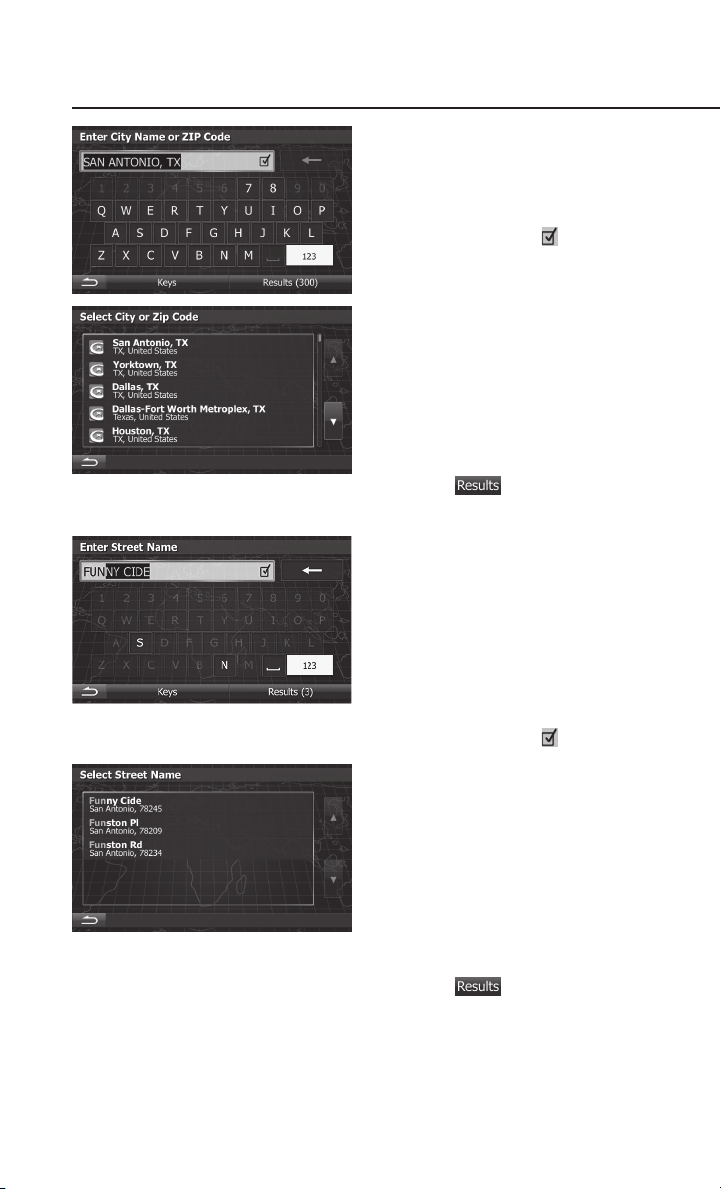
5. Enter the street name:
c. Find the city you need:
• The most likely city
name is always shown
in the input field. To
accept it, tap .
• If the desired name
does not appear, a
list a names will open
representing the names
that are the closest
match to the characters
you have entered. To
open this list before
completing your entry,
tap , then select
the city from the list.
a. Start entering the street
name on the keyboard.
b. Find the street you need:
• The most likely street
name is always shown
in the input field. To
accept it, tap .
• If the desired name
does not appear, a
list a names will open
representing the names
that are the closest
match to the characters
you have entered. To
open this list before
completing your entry,
tap , then select
the street from the list.
5
Page 7
ENTERING AN ADDRESS
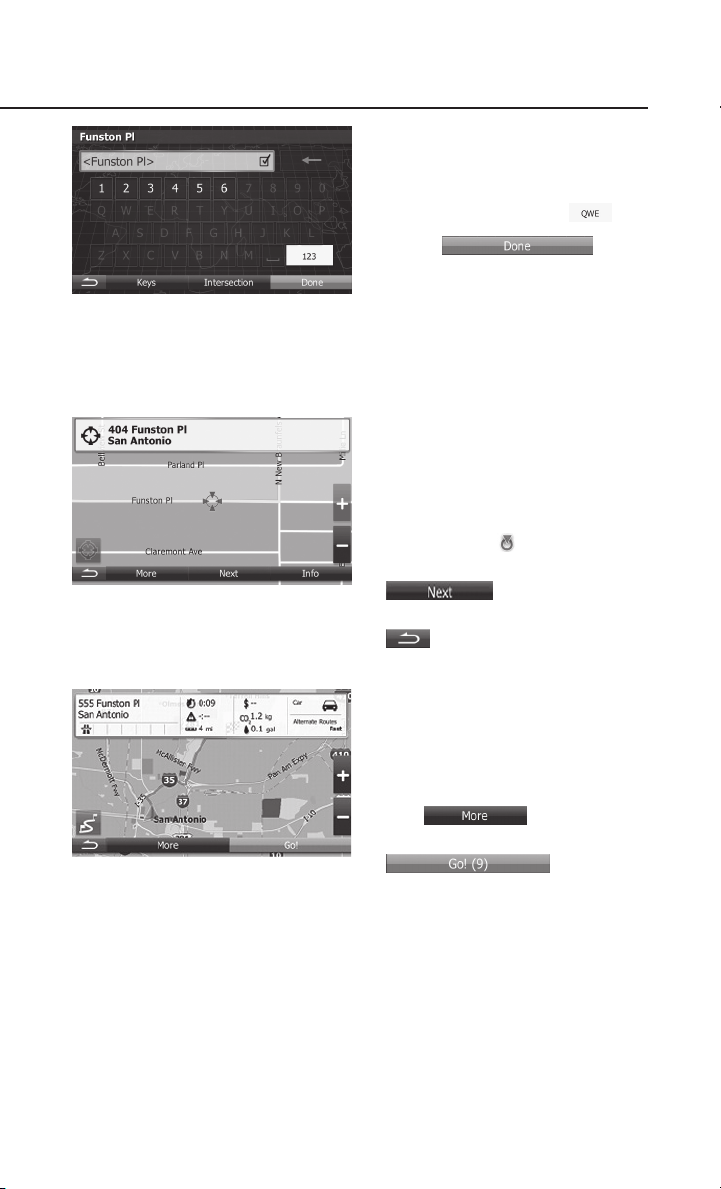
6. Enter the house number:
a. Enter the house number
on the keyboard. (To
enter symbols, tap ).
b. Tap
to finish entering the
address. (if the entered
house number cannot be
found, the midpoint of the
street is selected as the
destination.)
7. A full screen map appears
with the selected point in
the middle. If necessary, tap
the map somewhere else
to modify the destination.
The Cursor ( ) appears
at the new location. Tap
to confirm
the destination, or tap
to select a different
destination.
8. After a short summary of
the route parameters, the
map appears showing the
entire route. The route is
automatically calculated.
Tap to modify
route parameters, or tap
and
start your journey.
6
Page 8
SELECT AN INTERSECTION AS THE DESTINATION
To enter an intersection of two
streets as the destination, do
as follows:
1. Press the [NAVI MENU]
hard key, then tap
2. Tap .
3. By default, the software
proposes the state where
you are. If needed, tap
, enter a few
letters of the destination
state on the keyboard, and
select one from the list.
4. Select a new city:
a. Tap . The city of your
current location is offered
by default. For a local
search, tap to accept it,
otherwise continue with
entering the destination
city name.
b. Start entering the
name of the city on the
keyboard.
7
Page 9
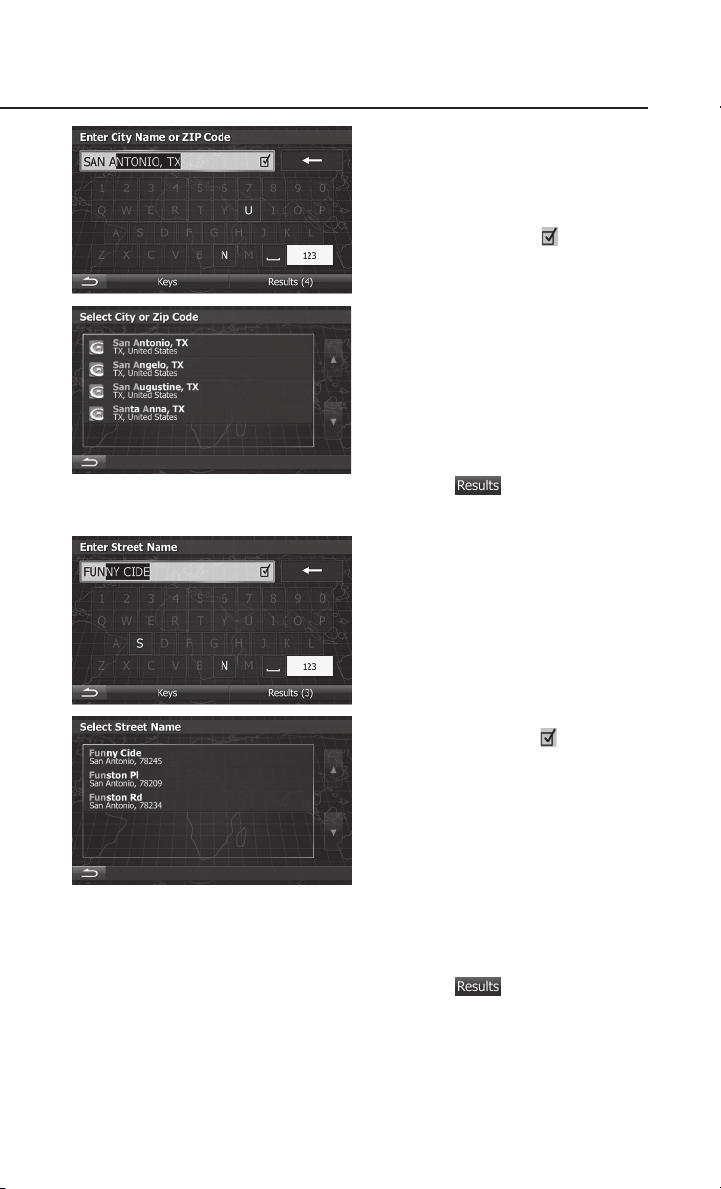
SELECT AN INTERSECTION AS THE DESTINATION
c. Find the city you need:
• The most likely city
name is always shown
in the input field. To
accept it, tap .
• If the desired name
does not appear, a
list a names will open
representing the names
that are the closest
match to the characters
you have entered. To
open this list before
completing your entry,
tap , then select
the city from the list.
5. Enter the street name:
a. Start entering the street
name on the keyboard.
b. Find the street you need:
• The most likely street
name is always shown
in the input field. To
accept it, tap .
• If the desired name
does not appear, a
list a names will open
representing the names
that are the closest
match to the characters
you have entered. To
open this list before
completing your entry,
tap . Then select
the street from the list.
8
Page 10
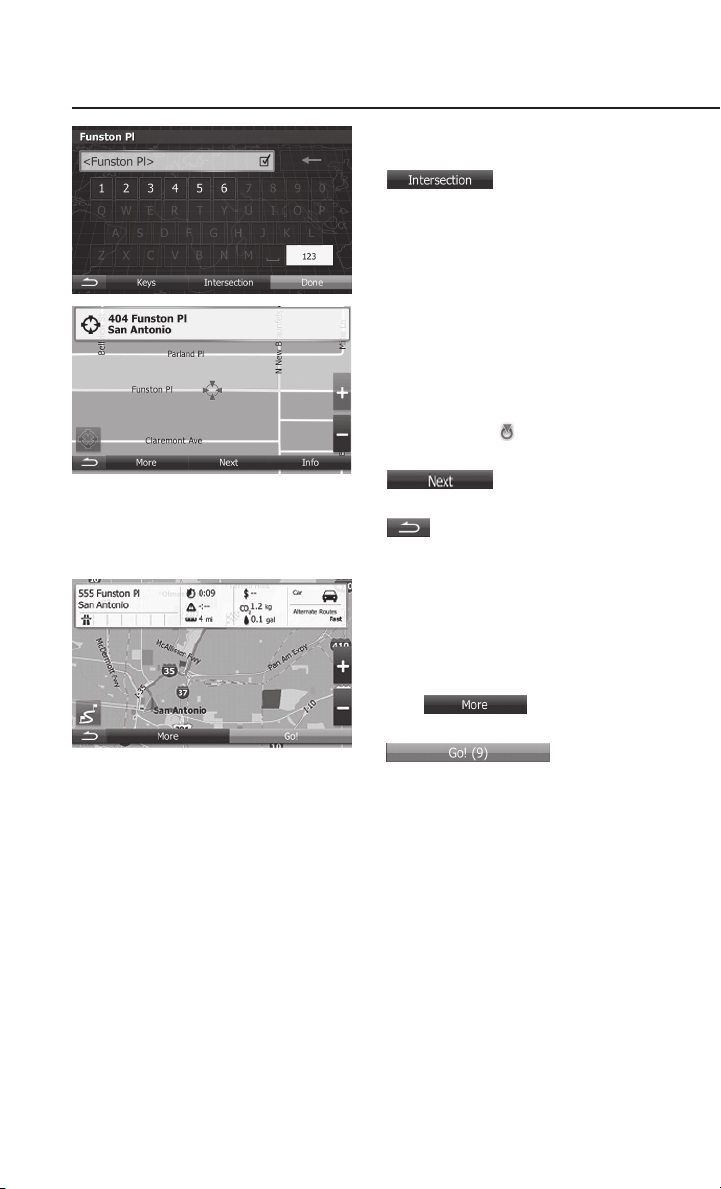
SELECT AN INTERSECTION AS THE DESTINATION
6. Instead of entering the
house number, tap
. The system
will prompt you to enter the
intersecting street name.
7. A full screen map appears
with the selected point in
the middle. If necessary, tap
the map somewhere else
to modify the destination.
The Cursor ( ) appears
at the new location. Tap
to confirm
the destination, or tap
to select a different
destination.
8. After a short summary of
the route parameters, the
map appears showing the
entire route. The route is
automatically calculated.
Tap to modify
route parameters, or tap
and
start your journey.
9
Page 11

QUICK SEARCH FOR A PLACE OF INTEREST
The Quick search feature lets
you quickly find a Place by its
name. The search is always
carried out
• along the recommended
route if it exists or
• around your current
location if there is no
destination given.
1. To start the Quick search
function, press the
[NAVIMENU] hard key,
then tap
Then Tap
2. Press
3. Using the keyboard, start
entering the name of the
Place.
10
Page 12

QUICK SEARCH FOR A PLACE OF INTEREST
4. After entering a few letters,
tap to open the list of
Places with names closely
matching what you have
already entered.
5. Browse the list if necessary
and tap one of the list
items. A full screen map
appears with the selected
point in the middle. The
name and address of the
Place is displayed at the
top of the screen.
6. If necessary, tap the map
somewhere else to modify
the destination. The Cursor
( ) appears at the new
location. Tap
to confirm the destination,
or tap to select a
different destination.
7. After a short summary of
the route parameters, the
map appears showing the
entire route. The route is
automatically calculated.
Tap to modify
route parameters, or tap
and
start your journey.
11
Page 13

EDITING THE LIST OF DESTINATIONS
You can edit the route
by modifying the list of
destinations. You can add or
remove destinations, modify
the start position or reorder the
list.
1. Press the [NAVIMENU]
hard key, then tap .
2. Tap .
3. You have the following
options:
• Tap to add a new
destination.
• Tap to delete a
destination.
• Tap to modify the start
point of the route.
• Tap to reorder
the list. You can do it
manually or you can let the
application optimize the
route for you.
12
Page 14

CANCEL THE ACTIVE ROUTE
To cancel the calculated route,
press the [NAVIMENU] hard
key, tap in the Navigation
menu,
and then tap .
The active route is deleted with
all its waypoints once you press
on the screen.
13
Page 15

SAVING A LOCATION AS AN ADDRESS BOOK ENTRY
1. Select a destination as
described previously. It can
be an address, a Place,
and any location on the
map, a previously used
destination from History,
a coordinate or a location
where a photo was taken.
2. When the full screen map
appears with the selected
location in the middle, tap
3. Tap [Add to Address Book]
4. (optional) Using the
keyboard, you can change
the name offered for the
Address Book entry.
5. Tap to
save the location as a new
frequent destination.
14
Page 16

SPEED LIMIT WARNING
Maps may contain information
about the speed limits of the
road segments. The software
can warn you if you exceed the
current limit while driving these
segments. This information
may not be available for your
region (ask your local dealer),
or may not be correct for all
roads on the map. Speed
warning can be fine-tuned in
Sound and Warning settings.
You can set the relative speed
above which the application
initiates the warning.
The following warning types
are available:
• Audio warning: you receive
a verbal warning when you
exceed the speed limit over
the given percentage.
• Visual warning: the current
speed limit is shown on the
map when you exceed it
(for example: ).
You can also choose to see the
speed limit sign on the map all
the time.
15
Page 17

ADJUSTING SPEED WARNING
1. Press [Navi Menu] Hard
Key
2. Select [Settings]
3. Select [Sounds and
Warnings]
4. Select [Speed Warning
Settings]
5. Use the slider to adjust
when the warning is
triggered (130% would
warn the least)
16
Page 18

TRAFFIC SETTINGS / UNDERSTANDING TRAFFIC*
Traffic informaTion
in rouTe planning
The recommended route is not
always the same between two
points. Offline statistical traffic
information (historical speed
information or traffic patterns)
can be taken into account in
the route calculation based on
the time of day and the day of
week whenever suitable data
exists. In addition, real-time
traffic information can help
you avoid current traffic events
like temporary road closures
or a traffic jam caused by an
accident. Both functions are
subject to data availability
real-Time Traffic
informaTion (Tmc)
TMC (Traffic Message
Channel) can provide you
with the real-time status of the
traffic. Route calculation
can avoid road blocks or
unexpected traffic jams caused
by an accident.
TMC is a specific application
of the FM Radio Data System
(RBDS) used for broadcasting
real-time traffic
and weather information.
Using traffic information is
enabled by default in the
software.
Your device contains the TMC
receiver that is needed to
receive Traffic events.
If public Traffic data is
broadcast at your location, the
software automatically takes
into account the traffic events
received. You do not need to
set anything in the program.
The receiver will automatically
search the FM radio stations
for TMC data, and the decoded
information will immediately be
used in route planning. When
your software receives traffic
information that may affect your
route, the program will warn
you that it is recalculating the
route. Navigation will continue
with a new route that is optimal
considering the most up-todate traffic conditions.
To fine-tune this recalculation,
you can set the minimum
delay that can trigger a
route recalculation. You can
also instruct the software to
have you confirm the new
recommended route before it
takes effect. You can do these
in Traffic settings.
*W900 does not have a traffic feature
17
Page 19

TRAFFIC SETTINGS / UNDERSTANDING TRAFFIC*
A special icon ( ) is
displayed on the Map screen to
show you whether traffic events
are received. The icon shows
the status of the traffic receiver
when there are no traffic events
on your route, otherwise it
shows the type of the next
traffic event on your route.
18
Page 20

TRAFFIC EVENTS
Road segments affected by
traffic events are displayed with
an alternate color on the map.
Small symbols above the road
show the nature of the event.
Tap to open the list of
traffic event categories:
In the first column you can see
the number of traffic events on
your route. The second column
contains the full count of traffic
events in the categories.
Tap any of the event types to
list the event in that category or
select the top row to open the
list of all traffic events.
Now tap any of the list items to
see its details, and to display
the affected road segment in its
full length on the map.
19
Page 21

TO ENABLE/DISABLE TRAFFIC FEATURES
1. Press [Navi Menu]
HardKey
2. Select [Settings]
3. Select [Traffic]
4. Selecting [Smart Routes]
will use traffic information
in routing. Selecting
[TrafficReceiver] will
turn the traffic feature
off completely (uncheck
this box to disable “traffic
ahead” verbal warning).
20
Page 22

QUICK MENU
Any screen that the
symbol is available, press it
and it will take you to a ‘quick
menu’ where you can search
for a POI, or DELETE a route.
21
Page 23

ROUTE SETTINGS
1. Press [Navi Menu] key
2. Select [Settings]
3. Select [Route Setting]
4. Then choose the options
you want (Use Highways,
Toll roads, Carpool Lanes,
or unpaved roads) in route
calculations
22
Page 24

ROUTE SETTINGS
SelecTed map
locaTion (curSor) and
SelecTed map objecT
You can mark a map location in
the following ways:
• Tap the map when
navigating,
• Tap the map when you
are asked to confirm the
destination at the end of a
search, or
• Tap the map in Find on
Map
When a map location is
selected, the Cursor appears at
the selected point on the map.
The Cursor is displayed with a
radiating red dot (
visible at all zoom levels.
) to make it
The location of the Cursor can
be used as the destination of
the route, a new alert point,
you can search for Places
around it, or you can save this
location as one of your Favorite
destinations.
You can also select some
of the objects on the map. If
you tap the map at the icon
of a Place of Interest or an
alert point, the object will be
selected (you see a red circling
border around the object), and
you can get information about
this object or use it as a route
point.
23
Page 25

SCROLLING THE MAP
Tap the map anywhere to browse it during navigation. The map
stops following the current position (the Vehimarker, a blue arrow
by default, is not locked in a fixed position on the screen any
more) and control buttons appear to help you modify the map
view.
Action Button Description
Moving the
map with
drag and
drop
Zooming in
and out
Tilting up
and down
No buttons You can move the map in any
direction: tap and hold the map,
and move your finger towards
the direction you want to move
the map.
,
,
Changes how much of the map
is displayed on the screen.
Your software uses highquality vector maps that let you
examine the map at various
zoom levels, always with
optimized content. It always
displays street names and other
text with the same font size,
never upside-down, and you
only see the streets and objects
that you need.
Map scaling has a limit in 3D
map view mode. If you zoom out
further, the map switches to 2D
view mode.
Tap the button once to modify
the view in large steps, or tap
and hold the button to modify it
continuously and smoothly.
Changes the vertical view angle
of the map in 3D mode.
Tap the button once to modify
the view angle.
24
Page 26

SCROLLING THE MAP
Action Button Description
Rotating
left and
right
Compass
Info
Return to
normal
navigation
Additional
options
Select
destination
, ,
Changes the horizontal view
angle of the map.
Tap the button once to modify
the view in large steps, or tap
and hold the button to modify it
continuously and smoothly.
Tap this button to cycle between
a 3D perspective and two 2D
top-down map view modes.
Tap this button to open a new
screen with information about
the selected map point, the
Cursor.
Tap this button to move the map
back to follow the current GPS
position. Automatic map rotation
is also re-enabled.
The map manipulation buttons
disappear and navigation
continues.
Tap this button to open a list of
additional features like saving
the Cursor as an Address Book
entry, or searching for Places
around the Cursor.
Tap this button to select the
Cursor as a new destination.
25
Page 27

CHANGING THE LANGUAGE
1. Press [Navi Menu]
HardKey
2. Select [Settings]
3. Select [Clock/Regional]
4. Select [Menu Language]
26
Page 28

CHANGING THE LANGUAGE
5. Select Desired Language
6. Then the system will
prompt you to restart, TAP
[RESTART]
27
Page 29

WHAT’S NEW?
NORTH UP/HEADING UP
This function has changed…
Auto Zoom control There is no setting to control this
Edit address book entry? There is no “Edit address book”
History Press [NAVI MENU]->Tap
Routing methods There are additional routing
Voice Key To trigger the VOICE to repeat,
Setting Home Follow Step 1,2, 3 under Saving
Curves/Corners ahead Press [NAVI MENU]-> Tap
The
now toggles between 3d and
HEADING UP. To view NORTH
UP… you must touch the
map anywhere to begin map
scrolling, then press the arrows
left or right until the north up
part of compass is red
feature. It is automatic.
function. If you need to make
a change, you must delete the
previous entry and re-enter it.
Destination->Tap History
methods available under
ROUTE SETTINGS, including :
Highways, Period Charge, Peruse Toll, Ferries, Carpool/HOV,
and Unpaved Roads
press the MAP hardkey
a location as an Address Book
entry in Quick Reference Guide.
Use the keyboard to change
the name for the Address Book
entry to ‘Home’. Tap Done to
save the Home location.
Settings-> Tap Sound and
Warnings->Tap Warning
Sign Alerts->Tap Curves and
Corners-> Move the slider to
change the warning distance of
curves/corners ahead
icon on the map
28
Page 30

WHAT’S NEW?
Make a phone call to place
of interest
1. Connect your phone to
W910 via Bluetooth
2. Follow Step 1,2,3,4,5 under
Quick search for a Place of
Interest in Quick Reference
Guide.
3. Tap
4. Tap to call
29
Page 31

FAQ
1. Q: Why does my system
show searching for
satellites every time I
turn the key OFF/ON?
A: In previous versions,
the navigation system
did not display when
it was searching. The
update displays the
searching icon so you
can determine when it
acquires satellites.
2. Q: Where are my zoom
in out buttons?
A: To see the , keys,
you must first initiate
map scroll, by touching
anywhere on the map.
Then the keys will
appear on the right side
of the map.
3. Q: Why does the quick
menu disappear?
A: To reduce Driver’s
Distraction, there is
a 10second timer, in
which the quick menu
disappears if no keys are
selected.
4. Q: How can I edit an
address book entry?
A: There is no feature for
this, you must delete that
entry, and re-enter the
information.
5. Q: How do I set my map
to North up instead
of heading up?
A: See 1st item in “what’s
new” section
6. Q: The system
zooms in and out
automatically, is there
a way to disable this?
A: There is no way to
disable this feature.
7. Q: How can I stop
the system from
announcing traffic
warnings verbally?
A: Please see page (18?) of
the Quick Users Guide.
8. Q: How can I stop
the system from
providing speed
warnings verbally?
A: Please see page (15?) of
the Quick Users Guide.
9. Q: A certain address
cannot be found in
the system, and the
area has been there
for over 6months.
A: Due to compilation and
production time, newer
addresses may not be
in the system yet. The
database is from 2013.
30
Page 32

FAQ
10. Q: How do I customize
my VP marker?
(bluetriangle)
A: Navi Menu -> Settings->
Scroll Down->Map
Settings -> Scroll
Down->Select 3D
Vehicle Gallery-> Use
the arrows to select your
icon.
31
Page 33

ALPINE IN-DASH NAVIGATION QUICK REFERENCE GUIDE
P/N: NVD-W912 & NVD-W902
 Loading...