

Page 1
EN
SF-5003 DESK FAN
DE
SF-5003 TISCHVENTILATOR
FR
SF-5003 VENTILATEUR DE TABLE
IT
SF-5003 VENTILATORE DA SCRIVANIA
NL
SF-5003 VENTILATOR
ES
SF-5003 VENTILADOR DE ESCRITORIO
Quality Home Appliances
Gebrauchsanweisung
Instrucciones de uso
Instruction for use
Mode d`emploi
Manuale d´ uso
Gebruiksaanwijzing
EN: For your own safety read these instructions carefully before using the appliances.
DE: Wegen eigener Sicherheit lesen Sie aufmerksam diese Gebrauchsanweisung vor dem Gebrauch der
Anlage.
FR: Avant que vous utiliser cet appareil, lisez bien ce mode d´emploi pour votre sécurité.
IT: Per garantire la sicurezza personale raccomandiamo leggere attentamente il presente Manuale,
ancora prima dell´uso dell´apparecchio elettrodomestico.
NL: Leest u voor het eerste gebruik zorgzaam de gebruiksaanwijzing door.
ES: Para su propia seguridad lea detenidamente estas instrucciones antes de comenzar a utilizar los
electrodomésticos.
Page 2
EN
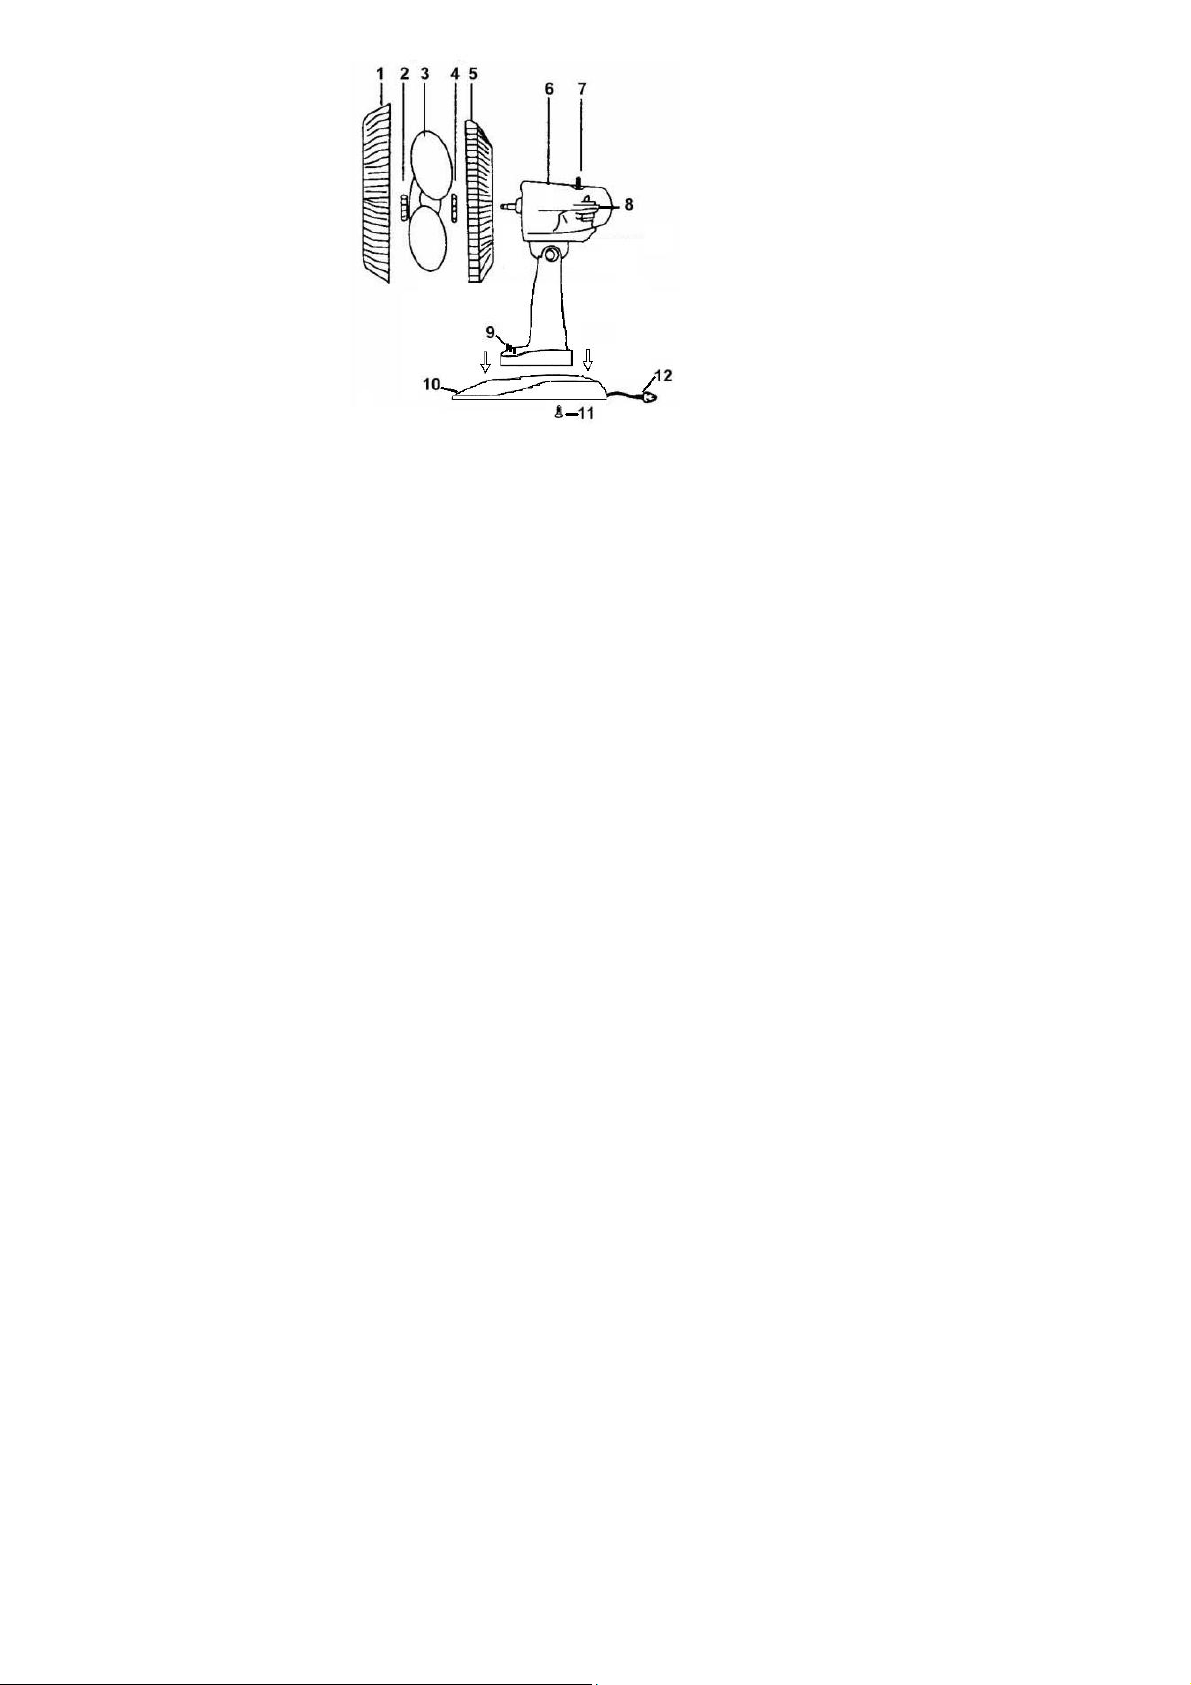
1. Front safety grille
2. Spinner
3. Fan blade
4. Locking nut
5. Rear safety grille
6. Motor housing
7. Clutch knob
8. Motor (built inside)
9. 3 speeds push button control
10. Base
11. Base screw
12. Power cord
FR
1. Grille avant de sécurité
2. Tourniquet
3. Lame de ventilateur
4. Écrou rétenteur de garde
5. Barre de retenue arrière
6. Boîtier du moteur
7. Bouton d’embrayage
8. Moteur (Construit a l’intérieur)
9. Bouton de commande à 3 vitesses
10. Base
11. Vis de base
12. Cable électrique
NL
DE
1. Vorderseite des SicherheitsLüftungsgitters
2. Schleuderrad
3. Ventilatorblatt
4. Schließmutter
5. Rückseite der Sicherheits-Lüftungsgitter
6. Motorgehäuse
7. Kupplungsknauf
8. Motor (innen eingebaut)
9. Einstellungsknopf für 3 Geschwindigkeiten
10. Sockel
11. Sockelschraube
12. Kabel
IT
1. Griglia di sicurezza frontale
2. Rotore
3. Lama Ventilatore
4. Dado bloccante
5. Griglia sicurezza posteriore
6. Carcassa Motore
7. Manopola Frizione
8. Motore (costruito dentro)
9. Pulsante per controllo delle 3 velocità
10. Base
11. Vite Base
12. Cavo elettrico
ES
1. Scherm
2. Spinner
3. Ventilatorblad
4. Sluitmoer
5. Achterscherm
6. Motorbehuizing
7. Verbindingsknoopje
8. Motor (ingebouwd)
9. Knoopje voo r 3 snelheden
10. Standaard
11. Standaardschroef
12. Snoer
1. Parrilla protectora frontal
2. Dispositivo de control de giro
3. Aspa del ventilador
4. Tuerca de bloqueo
5. Parrilla protectora posterior
6. Carcasa del motor
7. Botón o perilla de acoplamiento
8. Motor (armado e incorporado en el
interior)
9. Botón Pulsador para Control de 3
velocidades
10. Base
11. Tornillo de Fijación de la Base
12. Cable de alimentación
- 2 -
Page 3

ENGLISH
Dear Customer,
Thank you for choosing Alpina home appliance. You have chosen the best appliances that offer
2 years/24months warranty and years of service. We stand for quality, dependability and
friendship forever. We hope you will choose Alpina again and make ALPINA your first choice in
home appliances.
IMPORTANT SAFEGUARDS
When using electrical appliances, basic safety precautions should always be
followed, including the following:
1. Read all instructions carefully.
2. This appliance may only be connected to the same main voltage as shown on the rating
plate.
3. To protect against risk of electrical shock, do not immerse or rinse housing, cord or plug in
water or other liquid.
4. Close supervision is necessary when any appliance is used near children.
5. Unplug from outlet when not in use, before putting on or taking off parts and before
cleaning.
6. Do not contact any moving parts while the appliance is operating.
7. If the supply cord is damaged, it must be replaced by the manufacturer or its authorized
service agent or a similarly qualified person in order to avoid hazard & damage to the unit.
8. The use of attachment or accessories which are not supplied with the appliance are not
recommended. This could result in electrical shock or injury or permanent damage to the
appliance.
9. Do not let cord hang over edge of table or counter or touch hot surface.
10. Do not use the appliance for other than intended household use.
11. Switch off the appliance before changing accessories or approaching parts, which move in
use.
12. The appliance is not intended for use by young children or infirm persons without
supervision. Young children should be supervised to ensure that they do not play with the
appliance.
13. Do not obstruct the air flow.
14. Do not operate the fan without the guard.
This appliance is for household use and may be plugged into any AC electrical outlet (ordinary
household current). Do not use any other electrical outlet.
HOW TO ASSEMBLE:
1. To assemble safety grille and blade assembly, remove spinner by turning clockwise, then
the locking nut (anticlockwise) from the motor spindle.
2. Place rear of safety grille in position. Ensure grille fits onto locating lugs, the grille’s carry
handle will be at the top.
3. Fix grille into position by replacing locking nut tightly by hand. Do not force.
4. The hole in the centre of the fan blade has a flat surface on one side. This will align with a
flat surface on the motor spindle and ensure correct tightening spinner by hand
anticlockwise onto end of motor spindle. The spinner is self tightening, do not force at all.
5. Lift out all locking clips on front safety grille. Place grille into position and secure by
fastening clips over outer rim.
6. Assemble the base to the support pole using the fasteners provided.
HOW TO OPERATE
1. Remove the cable tie and unravel the cord set before operation.
2. Speed controls: 0. Off 1. Low 2. Medium 3. High
3. To blow air in one direction and stop oscillation, allow fan to move into desired position
and pull clutch knob up. Press down to return to normal oscillation function
4. Air flow can be adjusted upward and downward by tilting the fan to the desired position.
- 3 -
Page 4

ENGLISH
MAINTENANCE / CLEANING
1. Before cleaning always turn the fan off and unplug from the electricity socket.
2. To clean the blade and grille assembly, first remove outer grille, unscrew locknut and
remove blade from fan.
3. Wipe clean with a slightly damp sponge.
4. Clean motor housing and body assembly with a clean, damp cloth and wipe dry.
5. Never spray with liquids or submerge.
Note: If the cord set of this appliance becomes damaged, discontinue use. Repairs should be
undertaken only by a qualified technician.
Specification
Model No. : SF-5003
Power : 30W
Voltage : 220V, 50Hz
NOTE:
This product should not be disposed of with household waste.
Please recycle where facilities exist.
Check with your local authority for recycling advice.
GUARANTEE
This product is guaranteed for a period of 2 years from the date of purchase against defects in
materials and workmanship. Under this guarantee the manufacturer undertakes to repair or
replace any parts found to be defective, providing the product is brought back to the purchase
address. This guarantee is only valid if the appliance has been used in accordance with the
instructions, and provided that it has not been modified, repaired or interfered with by any
unauthorised person, or damaged through misuse.
This guarantee naturally does not cover wear and tear, nor breakables such as ceramic items,
bulbs etc. If the product fails to operate and needs to be returned, pack it carefully, enclosing
your name and address and the reason for return and bring it to the address of purchase. If
within the guarantee period, please also provide the guarantee card and proof of purchase.
- 4 -
Page 5

DEUTSCH
Lieber Kunde,
Wir danken Ihnen, dass Sie sich das Hausgerät ALPINA ausgewählt haben. Sie haben das
beste Gerät ausgewählt, das 2-jährige/24-monatige Garantie bietet und wird Ihnen jahrelang
dienen. Wir stehen zu der Qualität, Sicherheit und Freundlichkeit. Wir hoffen, dass Sie die
Marke ALPINA wieder auswählen und sie wird zu Ihren Lieblingsmarke unter Hausgeräten.
WICHTIGE SICHERHEITSMAβNAHMEN
Beim Gebrauch elektronischer Geräte müssen Sie Grundsicherheitsmaβnahmen einhalten,
zusammen mit folgenden:
1. Lesen Sie aufmerksam die Gebrauchsanweisung
2. Dieses Gerät können Sie nur zu den Quellen anschlieβen, dessen Quellenspannung der auf
dem Schild des Gerätes genannten Spannung entspricht.
3. Um das Risiko eines Unfalls durch Strom zu vermeiden, tauchen Sie den Körper, das Kabel
und auch den Stecker weder ins Wasser, noch in andere Flüssigkeit ein, und Spülen Sie
sie auch nicht ab.
4. Wenn das Gerät Kinder benutzen, ist es nötig, dass Sie es unter Aussicht haben.
5. Wenn Sie das Gerät nicht benutzen, schalten Sie es vom Stromnetz ab. Schalten Sie es
auch dann ab, wenn Sie die Einzelteile zugeben oder abknüpfen, oder wenn Sie das Gerät
reinigen wollen.
6. Berühren Sie nicht die beweglichen Hinterteile, während das Gerät im Betrieb ist.
7. Falls das Anschlusskabel beschädigt ist, muss es von dem Hersteller umgetauscht werden,
oder von dem autorisierten Serviceagent, oder von ähnlich qualifizierter Person, um die
Gefahr und die Beschädigung des Gerätes zu vermeiden.
8. Schlieβen Sie keine Teile an, die nicht zu den Originalteilen des Gerätes gehören. Es
könnte einen Unfall durch Strom oder dauerhafte Beschädigung des Gerätes verursachen.
9. Lassen Sie nicht zu, dass das Kabel über die Tischkanten oder über die Arbeitsfläche
hängt, oder dass es mit heisser Fläche in Kontakt kommt.
10. Benutzen Sie das Gerät nicht anders, als für das Haushalt.
11. Schalten Sie das Gerät vor dem Austausch der Einzelteile ab.
12. Das Gerät ist nicht dafür bestimmt, dass es kleine Kinder oder behinderte Personen ohne
Aussicht benutzen. Kleine Kinder sollten Sie unter Aussicht haben, um sicher zu gehen,
dass sie mit dem Gerät nicht spielen.
13. Behindern Sie nicht die Luftzirkulation.
14. Betreiben Sie den Ventilator nicht ohne die Abdeckung.
Dieses Gerät ist nur für Haushalt bestimmt und kann zu allerleier Stromausführung AC
(üblicher Strom im Haushalt) angeschlossen werden.
WIE ZUSAMMENBAUEN:
1. Entfernen Sie für den Zusammenbau des Sicherheits-Lüftungsgitters und Blattes das
Schleuderrad durch Drehen im Uhrzeigersinn, dann der Befestigungsmutter (gegen den
Uhrzeigersinn) von der Motorspindel.
2. Bringen Sie die Rückseite des Sicherheits-Lüftungsgitters in Position. Stellen Sie sicher,
dass das Lüftungsgitter auf das entsprechende Distanzstück passt, der Griff des
Lüftungsgitters ist oben.
3. Befestigen Sie das Lüftungsgitter durch manuelles Festziehen der Schließmutter an seiner
Position. Wenden Sie keine Gewalt an.
4. Das Loch in der Mitte des Ventilatorblattes hat auf einer Seite eine flache Oberfläche.
Dieses wird mit der flachen Oberfläche auf der Motorspindel verbunden. Ziehen Sie das
Schleuderrad mit der Hand richtig fest. Das Schleuderrad befestigt sich selbst, wenden Sie
keine Gewalt an.
5. Heben Sie alle Befestigungsklemmen auf die Vorderseite des Sicherheits-Lüftungsgitters
an. Bringen Sie das Lüftungsgitter in Position und befestigen Sie die Klemmen über dem
Außenriemen.
6. Bauen Sie Sockel und Stützstange unter Verwendung der vorgesehenen Befestigungen
zusammen.
- 5 -
Page 6

DEUTSCH
WIE BEDIENEN
1. Entfernen Sie vor Betrieb die Kabelbinde und rollen Sie die Kabelrolle auf.
2. Geschwindigkeitseinstellungen: 0. Aus 1. Niedrig 2. Mittel
3. Hoch
3. Zum Blasen von Luft in eine Richtung und zum Anhalten des Schwingens, lassen Sie den
Ventilator sich in die gewünschte Position bringen und ziehen Sie den Kupplungsknauf
nach oben. Drücken Sie ihn herunter, um wieder in die normale Schwing-Funktion
zurückzukehren.
4. Durch Kippen des Ventilators in die gewünschte Position kann die Luftzirkulation nach
oben und unten eingestellt werden.
WARTUNG/ REINIGUNG
1. Schalten Sie vor der Reinigung den Ventilator immer aus und ziehen Sie den Stecker aus
der Steckdose.
2. Entfernen Sie zur Reinigung des Blattes und des Lüftungsgitters zuerst das äußere
Lüftungsgittergehäuse, schrauben sie die Befestigungsmutter los und entfernen Sie das
Blatt vom Ventilator.
3. Wischen Sie es mit einem leicht feuchten Schwamm ab.
4. Reinigen Sie das Motorgehäuse und den Körper mit einem sauberen, feuchten Tuch und
wischen Sie es trocken.
5. Besprühen Sie es niemals mit Flüssigkeiten oder tauchen Sie es unter.
Anmerkung: Ist der Kabel dieses Gerätes beschädigt worden, brechen Sie den Gebrauch ab.
Reparaturen sollten nur von einem qualifizierten Techniker vorgenommen werden.
Beschreibung
Modell Nr. : SF-5003
Strom : 30W
Spannung : 220V, 50Hz
ANMERKUNG:
Dieses Produkt sollte nicht mit dem Hausmüll entsorgt werden.
Recyceln Sie es bitte in dafür bereitstehenden Einrichtungen.
Lassen Sie sich von Ihrer Behörde vor Ort wegen des Recycling
beraten.
GEWÄHRLEISTUNG
Dieses Produkt hat von dem Tag des Ankaufs 2-jährige Garantie auf beschätigtes Material
oder auf Herstellfehler. In dieser Gewährleistung verpflichtet sich der Hersteller, dass er jedes
beschädigte Teil reparieren oder austauschen wird und dass er das Produkt an die
Ankaufsadresse zurückgeben wird. Diese Garantie ist gültig nur in dem Fall, dass das Gerät
nach der Gebrauchsanweisung benutzt war und unter der Voraussetzung, dass es nicht
umgeändert, repariert wurde, dass darin keine unberechtigte Person eingegriffen hat oder
dass es nicht falsch behandelt wurde.
Diese Garantie bezieht sich nicht auf die Abnutzung und auf die Spalten, auch nicht auf
zerbrechliche Dinge wie zum Beispiel keramische Teile, Glühbirnen, usw. Falls das Produkt
aufhört zu funktionieren und man muss es zurückgeben, packen Sie es sorgfältig ein, legen
Sie Ihren Namen, Ihre Adresse, Grund der Rückgabe bei und schicken Sie es zurück an die
Einkaufsadresse . Wenn es noch unter Garantie steht, legen Sie Garantiekarte und Beleg vom
Ankauf bei.
- 6 -
Page 7

FRANÇAIS
Cher client,
Merci bien que vous avez choisi un appareil ménager ALPINA. Vous avez choisi le meilleue
dispositif qui vous offre une 2 ans/24 mois garantie et vous surement servira pour longtemps.
On vous garante une qualité, fiabilité et amabilité. On espére que vous choisissez la marque
ALPINA aussi en avenir et qu´elle devient votre marque la plus préférée parmi les appareils
ménagers domiciles.
LES MESURES DE SÉCURITÉ IMPORTANTES
En utilisant des appareils electriques vous devez maintenir des mesures de sécurité générales,
y compris des suivantes:
1. Lisez le Mode d´emploi avec attention
2. Vous ne pouvez qu´appliquer cet appareil aux sources dont la tension est conforme á une
tension qui est introduite á l´étiquette de l´appareil.
3. Pour empêcher un risque d´électrocusion, ne plongez pas le corps, cable, ni la gâchette
dans l´eau, ni dans l´autre fluide, ainsi que ne les rincez pas.
4. Si l´appareil est employé par des enfants, il est nécessaire les garder.
5. Si vous n´utilisez pas l´appareil, déconnectez le de la prise électrique. Faites la même
chose en ajoutant ou disjonctant les pièces ou si vous voulez nettoyer l´appareil.
6. Ne touchez pas des pièces arrières mobiles pendant ce que l´appareil est en service.
7. Si le cable d´alimentation est dégradé, il doit etre remplacé par le producteur ou par son
agent de service autorisé, ou bien par une personne qui est également qualifiée pour
éviter un risque et l´endommagement d´appareil.
8. N´ajoutez aucunes pièces dont l´appareil originale ne se compose pas. Cela pourrait
causer une électrocusion ou un endomagement de l´appareil permanent.
9. Ne permettez pas que le cable dépasse les angles de la table ou la surface de travail ou
qu´il se touche la surface chaude.
10. N´utilisez pas l´appareil pour les autres buts que pour l´utilisation domestique.
11. Avant de remplacer les pièces individuelles, mettez toujours l´appareil hors de service.
12. L´appareil n´est pas destiné aux petits enfants ou aux personnes affectées sans
surveillance. Vous devriez garder les enfants pour vous assurer qu´ils ne jouent pas avec
l´appareil.
13. N'obstruez pas la circulation d'air.
14. N'opérez pas le ventilateur sans garde.
Cet appareil est à l´usage domestique et peut être ajouté à quelconque sortie électrique AC
(courant commun pour ménage). N´utilisez aucune autre sortie électrique.
Installation:
1. Pour assembler la grille de sûreté et l'ensemble des lames, enlevez le tourniquet en le
tournant dans le sens de aiguille d'une montre, puis enlevez l'écrou de fermeture (dans le
sens inverse de aiguille d'une montre) de l'axe moteur.
2. Place rear of safety grille in position. Placez l'arrière de la grille de sûreté en position.
Assurez les ajustements de la grille, la poignée de la grille sera au dessus.
3. Placez la grille en position en serrant l'écrou de fermeture à la main. Ne forcez pas.
4. Celle-ci s’alignera avec une surface plate de l’axe moteur ; assurez vous que le tourniquet
est place correctement à la main dans le sens inverse de aiguille d'une montre à
l'extrémité de l'axe de moteur. Le tourniquet se bloque seul, ne forcez pas du tout.
5. Soulevez toutes les agrafes de fermeture de la grille. Placez la grille en position et le fixez
la à la grille arrière en utilisant les attaches.
6. Assemble the base to the support pole using the fasteners provided. Raccordez la base au
pole de soutien à l'aide des attaches fournies.
Fonctionnement
1. Enlevez le serre câble et démêlez la corde avant l’utilisation.
2. Control de vitesse: 0. Arrêt 1. Faible 2. Moyen 3.
- 7 -
Page 8

FRANÇAIS
Fort
3. Pour osciller le ventilateur, poussez vers le haut le bouton d'oscillation et pour empêcher
l'oscillation, abaissez le bouton d'oscillation.
4. La circulation d'air peut être ajustée vers le haut et en bas en inclinant le ventilateur dans
la position désirée.
MAINTENANCE ET NETTOYAGE
1. Avant de nettoyer éteignez toujours le ventilateur et débranchez le câble d'électricité.
2. Pour nettoyer la lame et la grille, enlevez la grille externe, dévissez le contre-écrou et
enlevez la lame du ventilateur.
3. Essuyez avec une éponge légèrement mouillée
4. Nettoyer le boîtier du moteur et la partie principale de l’appareil avec un tissu mouille.
Essuyez ensuite a sec.
5. Ne pulvérisez jamais de liquide ou ne submergez jamais.
Note: Si l'ensemble de la corde de cet appareil est endommagé, arrêtez l'utilisation. Des
réparations doivent être effectuées seulement par un technicien qualifié.
Specification
Nº du Modèle : SF-5003
Puissance : 30W
Voltage : 220V, 50Hz
NOTE :
Ce produit ne devrait pas être disposé avec les dechets de maison.
Recyclez s'il vous plaît dans des etablissements et locations appropries.
Renseignez-vous avec vos autorités locales pour des conseils recyclage.
GARANTIE
Ce produit a une 2 ans garantie depuis le jour d´achat contre l´endommagement du matériel
ou défaut de fabrication. Dans cette garantie le producteur s´oblige qu´il répare ou remplace
la partie dégradée et garante q´il renvoie le produit â une adresse d´achat. Cette garantie
n´est valide qu´en cas où l´appareil était utilisé d´après le mode d´emploi et supposé qu´il
n´était pas adapté, réparé, qu´aucune personne illégitime ne l´intervenait ou s´il n´était pas
mal manipulé.
Cette garantie ne refère pas á l´usure et crevasses, ni aux choses fragiles comme par
example des parties céramiques, ampoules, etc. Si le produit ne marche plus et il faut le
rentrer, emballez le soigneusement, ajoutez votre nom, adresse, raison pourquoi vous rentrez
le produit et le renvoyez á l´adresse d´achat. Si c´est pendant le temps de garantie, ajoutez
l´engagement signé par la caution et la confirmation d´achat.
- 8 -
Page 9

ITALIANO
Egregio cliente,
La ringraziamo di aver scelto l´apparecchio elettrodomestico ALPINA. Ha scelto il migliore
apparecchio che offre la garanzia di 2 anni/24mesi e Le servirá per lunghi anni. Confermiamo
la sua qualita, attendibilita ed amabilita. Speriamo che il marchio ALPINA sceglierá di nuovo e
questo diventerá il Suo marchio preferito tra gli elettrodomestici.
MISURE DI SICUREZZA IMPORTANTI
All´impiego degli impianti elettrici deve rispettare le misure di sicurezza principali, incluse le
seguenti prescrizioni:
1. Leggere attentamente il Manuale d´uso
2. Il presente apparecchio elettrodomestico si puó collegare soltanto agli alimentatori con la
tensione identica alla tensione scritta sulla targhetta dell´apparecchio.
3. Per prevenire un rischio di infortunio della corrente elettrica non immergere il corpo, cavo
o spina in acqua, neanche nell´altro liquido - non risciaquare.
4. Quando l´apparecchio elettrodomestico é usato dai bambini, é necessaria la sorveglianza.
5. Staccare dalla rete elettrica se l´apparecchio non é usato. Staccare anche nell´eventualitá
di aggiungere o scollegare singole parti, oppure durante la pulizia dell´apparecchio
elettrodomestico.
6. Se l´apparecchio é esercitato non toccare le parti posteriori mobili.
7. Il cavo di alimentazione danneggiato deve essere sostituito dal produttore, oppure dal suo
agente di servizio autorizzato, oppure dalla persona qualificata, per evitare il pericolo e
danneggiamento dell´apparecchio elettrodomestico.
8. Non collegare i particolari, che non sono la parte integrante originale dell´apparecchio.
Potrebbero causare l´infortunio dalla corrente elettrica, oppure il danneggiamento
permanente dell´apparecchio elettrodomestico.
9. Non permettere, che il cavo sporge attraverso gli angoli della tavola o superficie di lavoro,
oppure che viene in contatto con la superficie calda.
10. L´apparecchio elettrodomestico usare soltanto per l´impiego di casa.
11. Prima della sostituzione dei particolari singoli sempre disabilitare l´apparecchio.
12. L´apparecchio non é indicato per usare dai bambini o persone andicappate, senza la
sorveglianza. I bambini piccoli devono stare sotto la sorveglianza, per non giocare con l´
impianto elettrico.
13. Non ostruzionare la circolazione dell’aria.
14. Non operare il ventilatore senza la guardia.
Il presente apparecchio é indicato solamente all´uso di casa e puó essere collegato ad ogni
uscita elettrica AC (corrente standard nelle case). Non usare l´altra uscita elettrica.
COME MONTARE:
1. Per montare la griglia di sicurezza e la lama, togli il rotore movendo in senso orario, poi il
dado bloccante (anti-senso orario) dall’alberino motore.
2. Metti la griglia di sicurezza posteriore in posizione.Assicurati che la griglia entri nelle alette
localizzatrici, la maniglia portatile della griglia sarà in su.
3. Fissa la griglia nella posizione ricambiando il dado strettamente con la mano.Non forzare.
4. Il buco nel centro della lama del ventilatore ha una superficie piana da una parte. Questa si
allignerà con una superficie piana sull’alberino motore e assicurerà lo stringimento corretto
dell’alberino motore a mano in senso anti-orario fino alla fine dell’alberino
motore.L’alberino e auto-stringente, non forzare in nessun modo.
5. Lift out all locking clips on front safety grille. Place grille into position and secure by
fastening clips over outer rim.
6. Assemble the base to the support pole using the fasteners provided.
COME OPERARE
1. Rimuovi il blocca-cavo e slega il cavo prima di operare.
2. Controlli delle velocità: 0. Spento 1. Bassa 2. Media 3. Alta
3. Per soffiare aria in una direzione e fermare l’oscillazione, permetti che il ventilatore si
- 9 -
Page 10

ITALIANO
muova nella posizione desiderata e spingi la manovella del freno in su. Premi giù per
tornare alla funzione d’oscillazione normale.
4. La circolazione dell’aria può essere regolata in su o in giù movendo il ventilatore nella
posizione desiderata.
MANUTENZIONE / PULIZIA
1. Prima di pulire spegni sempre il ventilatore e sconnettilo dalla presa elettrica.
2. Per pulire la lama e la griglia, prima rimuovi la griglia esterna, svita il dado bloccante e
rimuovi la lama dal ventilatore.
3. Puliscilo con una spugna leggermente bagnata.
4. Pulisci la carcassa del motore e il corpo con un panno bagnato pulito e asciugala.
5. Non spruzzare mai con liquidi o immergere in liquidi.
Nota: se il cavo di quest’apparecchio si danneggia, interrompi l’uso.Le riparazioni dovrebbero
essere fatte solo da un tecnico qualificato.
Specificazioni
Modello Nr. : SF-5003
Elettricità : 30W
Voltaggio : 220V, 50Hz
NOTA:
Acest produs nu ar trebui aruncat impreuna cu gunoiul.
Rugam sa fie reciclat,acolo unde exista posibilitatea.
Informativa la autoritatile locale cu privire la reciclaj.
Cereti autoritatilor locale sfaturi cu privire la reciclare.
GARANZIA
Il Produttore concede per il presente prodotto la garanzia 2 anni dal giorno d´acquisto,
relativa al danneggiamento del materiale oppure il difetto di produzione. Con la presente
garanzia il Produttore si impegna a riparare oppure sostituire ogni parte danneggiata e
restituire il prodotto all´indirizzo d´acquisto. La presente garanzia é valida solamente alle
condizioni, che l´apparecchio elettrodomestico é stato usato conforme alle prescrizioni del
Manuale e alle condizioni, che l´apparecchio non é stato modificato e riparato, e che nessuna
persona senza autorizzazione non ha intervenuto in esso, oppure l´apparecchio non é stato
usato in modo scorretto.
La presente garanzia non riferisce alla usura e alle rotture, neanche alle parti fragili, per
esempio : parti di ceramica, lampadine, ecc. Quando il prodotto non funziona e é necessario
restituirlo, occorre imballarlo con cura, aggiungere il proprio nome e suo indirizzo, descrivere il
motivo di restituzione del prodotto e spedirlo all´indirizzo del centro d´acquisto. Se questo
avviene nel termine di garanzia, occore aggiungere il certificato di garanzia e la ricevuta di
pagamento eseguito.
- 10 -
Page 11

NEDERLANDS
Geachte klant,
Wij danken u voor de aankoop van dit ALPINA toestel. U heeft voor dit toestel gekozen en
daarmee krijgt u ook de garantie voor 2 jaar/24 maanden en vele jaren profijt. Ons bedrijf is
een synoniem van aanhoudende kwaliteit, betrouwbaarheid en vriendelijkheid. Wij hopen dat
ALPINA uw favoriete merk wordt onder huishoudstoestellen en dat u dit merk ook in de
toekomst gaat kiezen.
BELANGRIJKE VEILIGHEIDSWAARSCHUWINGEN
Bij het gebruik van electriciteitstoestellen moet u altijd bepaalde veiligheidsmaatregelen in
acht nemen, inclusief de onderstaande:
1. Dit toestel mag alleen aangesloten worden aan electriciteitsbronnen die op het plaatje
aangegeven staan.
2. Om het risico van een electrische schok te voorkomen, mag het toestel nooit in het water
of in andere vloeistoffen ondergedompeld worden.
3. Als het toestel door kinderen wordt gebruikt is er een toezicht van een volwassen persoon
noodzakelijk.
4. Als u het toestel niet gebruikt moet deze uitgeschakeld worden. Ook moet het toestel
uitgeschakeld worden als er onderdelen verwisseld of schoongemaakt worden.
5. Raak geen beweegbare onderdelen aan zolang het toestel aan staat.
6. Als het snoer beschadigd is mag het alleen maar door een medewerker van een
geautoriseerde reparatie dienst vervangen worden.
7. Sluit geen onderdelen aan die niet oorspronkelijk bij het toestel horen. Het kan een
elektrische schok of een beschadiging van het toestel veroorzaken.
8. Laat het snoer nooit over de kanten hangen en leg het nooit op een heet oppervlakte
neer.
9. Gebruik het toestel niet anders dan voor de hier beschreven huishoudelijke doelen.
10. Dit toestel is niet bestemd voor gebruik door kinderen of door niet bevoegde personen.
Let goed op bij de kleine kinderen dat ze het toestel niet als speelgoed gaan gebruiken.
11. Dit toestel is alleen voor huishoudelijk gebruik bestemd. Gebruik een gewoon
huishoudelijk stopcontact, geen andere aansluiting mag gebruikt worden.
12. De luchtstroming niet verhinderen.
13. Het toestel tijdens het gerbuik niet zonder toezicht achterlaten.
MONTAGE:
1. Om de scherm en de blad te monteren, verwijder de spinner door draaien naar rechts,
daarna de moer van de motor (naar links draaien).
2. Zet de achterscherm in de juiste positie. Controleer de goede richting, de handvat moet
naar boven gericht zijn.
3. Fixeer de scherm in de juiste positie door de moer met de hand dicht te draaien (niet te
hard).
4. De gat in het middel van de ventilatorblad heeft een platte oppervlakte op één kant. Deze
moet met de platte oppervlakte op de motor corresponderen. De spinner mag niet te hard
gedrukt te worden.
5. Trek alle klemmen uit de voorscherm. Zet de scherm in de juiste positie an maak de
klemmen goed vast.
6. Monteer de basis op de voetstuk van de stang met de koppelstukjes.
GEBRUIKSAANWIJZING:
1. Verwijder de draden en het snoer aan de kant voor het gebruik.
2. Snelheden: 0.Uit 1.Langzaam 2.Gemiddeld 3. Snel
3. Om de lucht in één richting te laten stromen en de oscilatie te stoppen, draai de
ventilator in de geeisde positie en druk op de verbindingsknoopje. Druk het weer naar
beneden indie u de oscilatie weer wilt aanzetten.
4. De luchtrichting kan veranderd worden door de ventilator naar de juiste positie te
trekken.
- 11 -
Page 12

NEDERLANDS
ZORG/ REINIGNG
1. Voor het reinigen moet het toestel altijd uitgeschakeld worden en de stekker uit het
stopcontact getrokken worden.
2. Om de blad en de scherm te reinigen, draai de moer los en verwijder de blad uit de
ventilator.
3. Met een licht vochtig sponsje afvegen.
4. Maak de behuizing en de motorgedeelte schoon met een schoon doekje een daarna
afdrogen.
5. Nooit met vloeistoffen besproeien.
Let op: Als het snoer van het toestel beschadigd is is het noodzakleijk met het gebruik van het
toestel te stoppen. De reparatie dient door een gekwalificeerde reparatiedienstmedewerker
gedaan te worden.
Technische gegevens:
Modelnummer : SF-5003
Vermogen : 30W
Spanning : 220V, 50Hz
AANTEKENING:
Dit product kan niet met huishoudelijk afval mee.
Recycle alstublieft wanneer de mogelijkheid bestaat.
Raadpleeg uw gemeente voor advies omtrent recyclen.
GARANTIE
ALPINA geeft dit product garantie tegen materiaal- en productiegebrekken voor een periode
van 2 jaar/ 24maanden vanaf de datum van aankoop door de klant. De producent is daardoor
verplicht, alle delen met gebreken te vervangen indien het product volgens de
gebruiksaanwijzing werd gebruikt, als er geen veranderingen door een niet-erkende persoon
werden gedaan en/of als het product niet door verkeerd gebruik beschadigd werd.
Deze garantie geldt natuurlijk niet voor een slijtage of barsten en/of voor licht breekbare
producten zo als ceramiek, gloeilampjes enz. Als het product niet functioneert en het moet
teruggegeven worden, verpakt u het voorzichtig, zet u uw naam met adres erbij en de reden
waarom u het product teruggeeft. Brengt u het daarna terug naar het adres waar u het
product heeft gekocht. Als dit in de garantietijd gebeurt, gaarne ook de garantiekaart
meenemen.
- 12 -
Page 13

ESPAÑOL
Estimado Cliente,
Le agradecemos por haber elegido los electrodomésticos para el hogar de Alpina. Usted ha
elegido los mejores electrodomésticos que le ofrecen 2 años/24 meses de garantía y varios
años de servicio. Nosotros trabajamos constantemente para brindar calidad, confiabilidad y
establecer una relación de amistad con nuestros clientes que perdure en el tiempo.
Esperamos que elija a Alpina nuevamente y que haga de ALPINA su empresa favorita cuando
busque electrodomésticos para su hogar.
MEDIDAS DE SEGURIDAD IMPORTANTES
Cuando utilice aparatos electrodomésticos, debería respetar siempre algunas
medidas básicas de seguridad, entre las que se incluyen las siguientes:
1. Lea todas las instrucciones detenidamente.
2. Este dispositivo solo podrá ser conectado a la tensión de suministro de red que se
especifica en la placa de valores nominales.
3. A fin de mantenerse protegido contra cualquier posible riesgo de descarga eléctrica, no
sumerja o limpie con agua la cubierta del dispositivo, o moje con agua o con cualquier
otro líquido el cable o el enchufe del mismo.
4. Es necesario mantener una estricta vigilancia cuando cualquier electrodoméstico sea
utilizado cerca de niños.
5. Desenchufe el aparato de la toma de corriente cuando no lo esté utilizando, antes de
encenderlo o de desarmar algunas de sus partes y también antes de llevar a cabo una
limpieza del mismo.
6. No toque ninguna pieza móvil mientras que el dispositivo esté funcionando.
7. Si el cable de suministro eléctrico estuviera dañado, deberá ser reemplazado por el
fabricante o por cualquier agente de servicios autorizado o por una persona debidamente
calificada para llevar a cabo esta tarea a fin de evitar poner en riesgo & dañar la unidad.
8. El uso de dispositivos auxiliares o de accesorios que no hayan sido suministrados con el
electrodoméstico no está recomendado. Los mismos podrían provocar descargas
eléctricas o deterioros o daños permanentes en el electrodoméstico.
9. No deje que el cable permanezca colgando por sobre el borde de la mesa o establezca
contacto con una superficie caliente.
10. No utilice el electrodoméstico más que en su hogar, siendo éste el uso para el que el
mismo fue fabricado.
11. Desconecte el electrodoméstico antes de cambiar alguno de sus accesorios o repuestos, si
los mismos estuvieran en uso.
12. El electrodoméstico no ha sido fabricado para ser utilizado por niños pequeños o por
personas débiles si las mismas no estuvieran bajo supervisión. Los niños pequeños
deberían ser supervisados para poder asegurarse de que ellos no jueguen con el aparato.
13. No obstruya el flujo de aire.
14. No haga funcionar el ventilador, si éste no contara con el protector.
Este electrodoméstico fue fabricado para ser utilizado en su hogar y por ello puede ser
conectado a cualquier tomacorriente CA (la corriente normal de su casa). No utilice cualquier
otro tipo de tomacorriente.
CÓMO ENSAMBLAR EL DISPOSITIVO:
1. Para realizar el montaje de la parrilla protectora frontal y del aspa, quite el dispositivo de
control de giro, girando el mismo en el sentido de las agujas del reloj, luego desenrosque
la tuerca de bloqueo (girándola en el sentido contrario al de las agujas del reloj) del
dispositivo de control de giro del motor.
2. Coloque la parrilla protectora posterior en la posición adecuada. Asegúrese de que la
parrilla encaje justamente dentro de las orejas de ubicación, la manija portátil de la parrilla
deberá estar ubicada en la parte superior.
3. Fije la parrilla en la posición adecuada, ajustando fuertemente la tuerca de bloqueo a
mano. No la fuerce.
4. El orificio que se encuentra en la parte central del aspa del ventilador posee una superficie
- 13 -
Page 14

ESPAÑOL
plana sobre uno de sus lados. Ésta se deberá alinear con la superficie plana que se
encuentra en el dispositivo de control de giro del motor y luego deberá asegurarse de que
dicho dispositivo esté correctamente asegurado, ajustándolo a mano y girándolo en el
sentido contrario al de las agujas del reloj, posicionándose en el extremo de dicho
dispositivo. El dispositivo se ajustará automáticamente, no lo fuerce en absoluto.
5. Levante y quite todas las horquillas de fijación de la parrilla protectora frontal. Ubique la
parrilla en la posición adecuada y asegúrela fijamente sujetando los bordes externos con
las horquillas de fijación.
6. Ensamble la base del poste de soporte utilizando los sujetadores proporcionados.
FUNCIONAMIENTO DEL VENTILADOR
1. Quite el sujetacables y desenmarañe el cordón eléctrico antes de poner en
funcionamiento el ventilador.
2. Control de velocidades: 0. Desactivado 1. Bajo 2. Medio 3.
Alto
3. Para que el aire sople en una dirección determinada y deje de oscilar, mueva el ventilador
hasta alcanzar la posición deseada y suba la perilla de oscilación. Presione nuevamente la
perilla si quisiera que el ventilador retomara la función normal de oscilación.
4. El flujo de aire puede ser ajustado para que ascienda o descienda, inclinando el ventilador
hasta encontrar la posición deseada.
MANTENIMIENTO / LIMPIEZA
1. Antes de limpiar el dispositivo, siempre apague el ventilador y desconéctelo del
tomacorriente.
2. Para poder limpiar el aspa y la montura de la parrilla, primero deberá remover la parilla
externa, desatornillando la tuerca de fijación, y luego deberá remover el aspa del
ventilador.
3. Quite la suciedad utilizando un trapo limpio o una esponja levemente humedecida.
4. Limpie la carcasa del motor y el ensamblaje del cuerpo del ventilador con un trapo limpio,
húmedo y luego séquelos.
5. Nunca lo rocíe con líquidos o lo sumerja en agua.
Nota: Si el cable de alimentación de este electrodoméstico estuviera dañado, deberá
suspender su uso. Las reparaciones del mismo deberán ser realizadas por un electricista o por
un técnico debidamente calificado.
Especificación
Modelo No. : SF-5003
Energía : 30W
Voltaje : 220V, 50Hz
NOTA:
Este producto no debería ser desechado junto a la basura de su hogar.
Por favor recicle el mismo donde haya instalaciones o recursos apropiados
para este fin.
Consulte con las autoridades locales para obtener consejos prácticos sobre el
proceso de reciclaje.
- 14 -
Page 15

ESPAÑOL
GARANTÍA
Este producto cuenta con una garantía de 2 años la cual comienza a contabilizarse a partir de
la fecha de compra, y la misma cubre cualquier defecto que pudieran presentar sus
materiales así como también defectos de fábrica. Según esta garantía el fabricante se
compromete a reparar o a reemplazar cualquier pieza defectuosa, ofreciendo al comprador
que lleve el producto al lugar donde lo adquirió. Esta garantía solo es válida si el
electrodoméstico ha sido utilizado respetando las intrucciones, y a condición de que el mismo
no haya sido modificado, reparado o que cualquier persona no autorizada lo haya manipulado,
o que se haya dañado por su uso incorrecto.
Esta garantía no cubre el desgaste natural por uso, ni las partes frágiles tales como los
elementos de cerámica, bombillos, etc. Si el producto no funcionara correctamente y debiera
ser devuelto, embálelo cuidadosamente, incluyendo en el paquete su nombre y dirección y la
razón por la cual es devuelto y envíelo a la dirección del negocio donde lo compró. Si se
encontrara dentro del período de cobertura de la garantía, por favor también adjunte su
tarjeta de garantía y un comprobante de compra.
- 15 -
 Loading...