

Page 1
Cordex 48-1.2kW 19" Front Access Shelf System
Installation & Operation Manual
Part #030-834-J0
Effective: 06/2011
member of The Group
™
Your Power Solutions Partner
Page 2

Page 3

Cordex 48-1.2kW
19” Front Access Shelf System
030-834-J0
In addition to these installation and operation instructions, the following documents and drawings are
included in this manual to provide the necessary information required for installation, operation and fault
diagnosis of the unit:
• Specifications, Shelf: 030-834-B1
• Specifications, Shelf w/CXCM1: 030-835-B1
• Specifications, Shelf, Bulk Power: 030-845-B1
• Specifications, Shelf w/CXCM1 & GMT Distribution Modules: 030-851-B1
• Specifications, Rectifier: 010-619-B1
• Specifications, CXCM1: 018-598-B1
• CSA/ NRTL Equivalence: 048-554-10
• Schematic: 030-834-05
• Outline Drawing, Shelf: 030-834-06
• Customer Connections: 030-834-08
• Schematic: 030-835-05
• Outline Drawing, Shelf: 030-835-06
• Customer Connections: 030-835-08
• Schematic: 030-845-05
• Outline Drawing, Shelf: 030-845-06
• Customer Connections: 030-845-08
• Outline Drawing, Shelf: 030-851-06
• Customer Connections: 030-851-08
Page 4
IMPORTANT SAFETY INSTRUCTIONS
Save These Instructions
This section contains important instructions that must be followed during the installation and maintenance of the
equipment and batteries. Read all of the instructions before operating the equipment, and save this manual for future
reference.
The following safety symbol is found throughout this manual:
Carefully read all information and abide by the instructions.
The following warning levels are used in conjunction with the symbol:
DANGER: You WILL be KILLED or SERIOUSLY INJURED if instructions are not followed closely.
WARNING: You CAN be KILLED or SERIOUSLY INJURED if instructions are not followed closely.
CAUTION: You CAN be INJURED or equipment can be DAMAGED if instructions are not followed closely.
Before using the product, read all instructions and cautionary markings on the product and any equipment
connected to the product.
Do not expose the product to rain or snow; install only in a clean, dry environment.
CAUTION: Unless otherwise noted, use of an attachment not recommended or sold by the product
manufacturer may result in a risk of fire, electric shock, or injury to persons.
CAUTION: Do not operate the product if it has received a sharp blow, it has been dropped, or otherwise
damaged in any way – return it to a qualified service center for repair.
CAUTION: Do not disassemble the product – call our qualified service centers for servicing. Incorrect
reassembling may result in a risk of electrical shock or fire.
CAUTION: Double pole / Neutral fusing.
WARNING: High leakage current – Earth connection essential before connecting supply.
Page 5

TABLE OF CONTENTS
1 INTRODUCTION .................................................................................................................................................. 1
1.1 Scope of the Manual ..................................................................................................................................... 1
1.2 Product Overview ......................................................................................................................................... 1
1.3 Part Numbers and List Options ..................................................................................................................... 3
EATURES ......................................................................................................................................................... 7
2 F
2.1 Rectifier modules .......................................................................................................................................... 7
2.2 Distribution Module ...................................................................................................................................... 9
2.3 Controller module ....................................................................................................................................... 10
NSPECTION .................................................................................................................................................... 14
3 I
3.1 Packing Materials ........................................................................................................................................ 14
3.2 Check for Damage ....................................................................................................................................... 14
NSTALLATION ................................................................................................................................................. 15
4 I
4.1 Safety Precautions ...................................................................................................................................... 15
4.2 Shelf Preparation/Mounting ....................................................................................................................... 15
4.3 Module Insertion/Removal ......................................................................................................................... 16
IRING AND CONNECTIONS ............................................................................................................................... 17
5 W
5.1 Safety Precautions ...................................................................................................................................... 17
5.2 Tools Required ............................................................................................................................................ 17
5.3 AC Feeder Protection/Sizing ....................................................................................................................... 17
5.4 AC Input ...................................................................................................................................................... 18
5.5 Calculating Output Wire Size Requirements............................................................................................... 18
5.6 DC Output for Model 030-851-20 (maximum 3600kW) ............................................................................. 19
5.7 DC Output for Model 030-834-20 (maximum 4800kw) .............................................................................. 21
5.8 DC Output for Model 030-835-20/ 030-845-20 (bulk distribution) ............................................................ 23
5.9 CAN Ports .................................................................................................................................................... 23
5.10 Network Connection and Remote Communications via CXCM1 ................................................................ 23
5.11 Signal Wiring Connections .......................................................................................................................... 24
PERATION .................................................................................................................................................... 27
6 O
6.1 Main Rectifier States ................................................................................................................................... 27
6.2 Main Rectifier Modes.................................................................................................................................. 28
6.3 Can Bus Communications ........................................................................................................................... 28
6.4 Factory Ranges and Defaults ...................................................................................................................... 29
YSTEM STARTUP ............................................................................................................................................. 30
7 S
7.1 Check System Connections ......................................................................................................................... 30
i
Page 6

7.2 Verify AC and Power the Shelf .................................................................................................................... 30
7.3 Check Battery Polarity and Connect ........................................................................................................... 30
7.4 CXC Reset .................................................................................................................................................... 30
AINTENANCE ................................................................................................................................................ 32
8 M
8.1 Fan Replacement ........................................................................................................................................ 32
ARRANTY AND SERVICE INFORMATION ............................................................................................................... 33
9 W
9.1 Technical Support ....................................................................................................................................... 33
9.2 Warranty ..................................................................................................................................................... 33
9.3 Battery Warranty ........................................................................................................................................ 33
9.4 Return of Material ...................................................................................................................................... 33
9.5 Service Centers ........................................................................................................................................... 33
CRONYMS AND DEFINITIONS ............................................................................................................................. 34
10 A
TABLE OF FIGURES
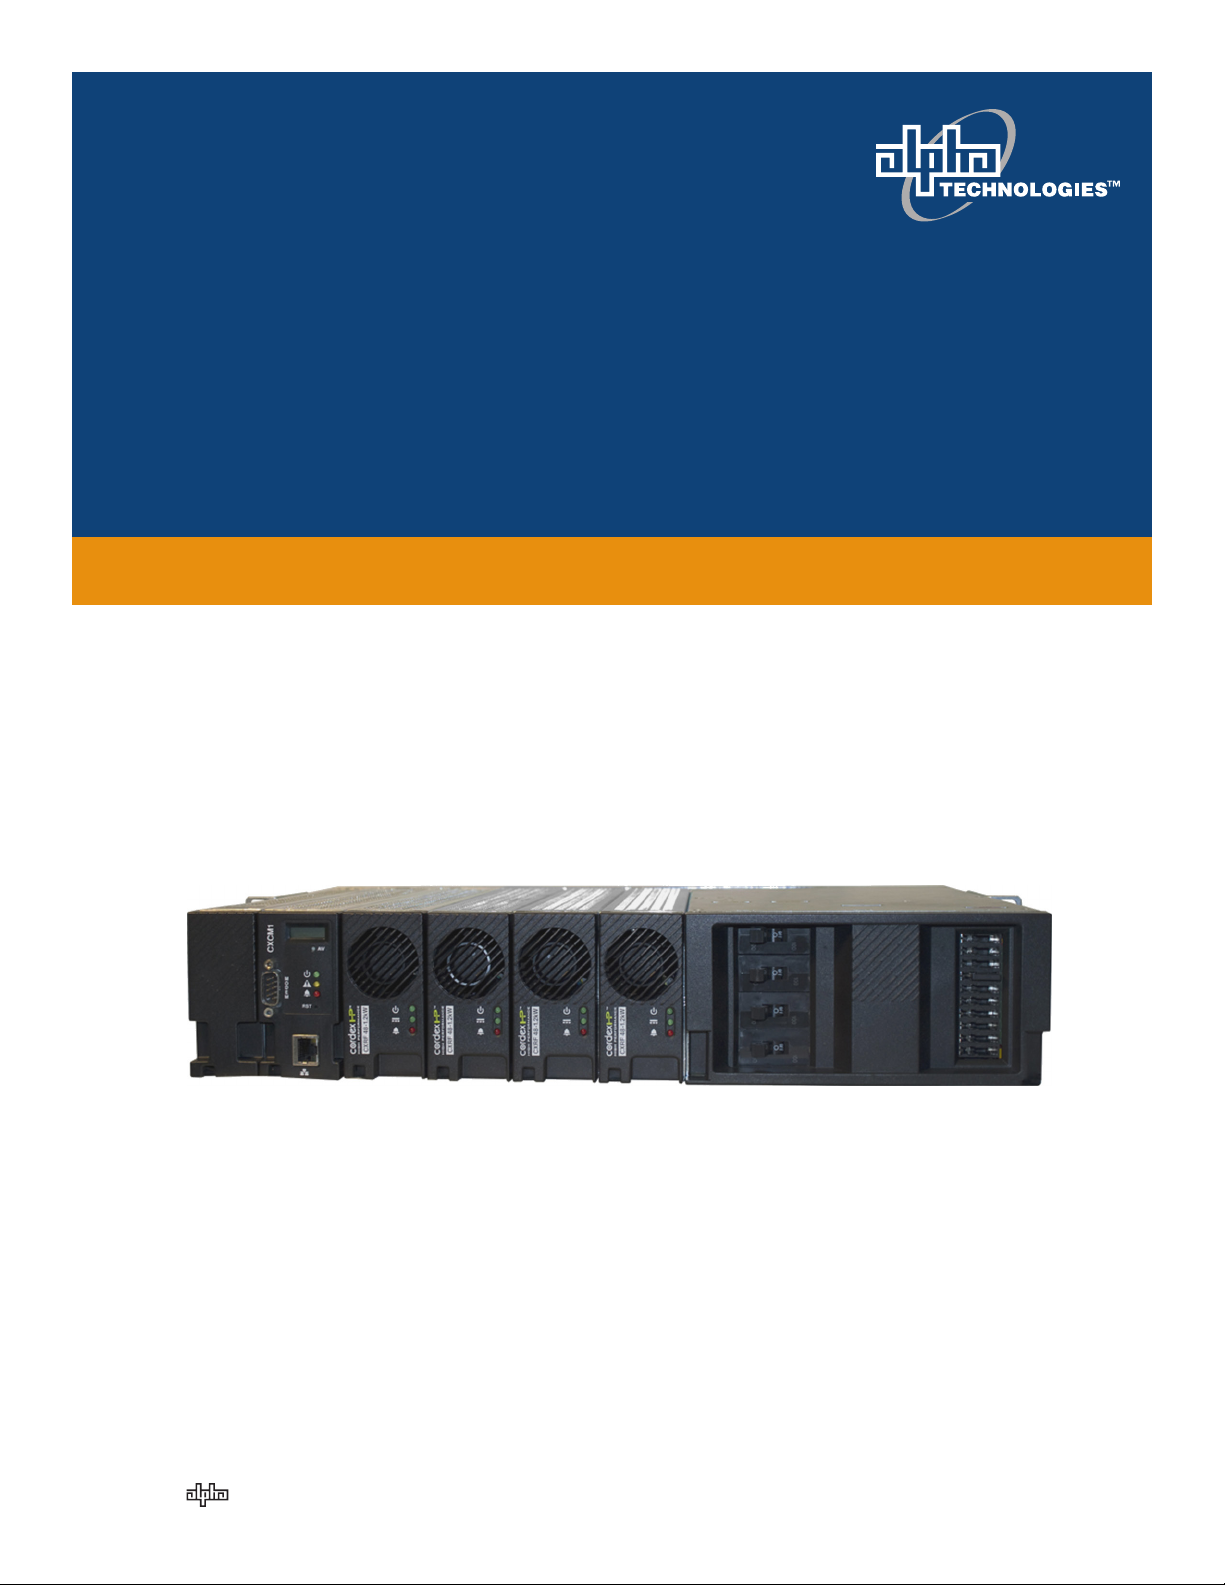
Figure 1–Cordex CXRF-HP 48-1.2 kW 1RU 19" shelf system, shown with 3 rectifier modules up to 3600W output
power, CXCM1 Controller and GMT fuse distribution ............................................................................................. 2
Figure 2–Cordex CXRF-HP 48-1.2 kW 1RU 19" shelf system, shown with (a) 4 rectifier modules up to 4800W output
power and CXCM1 controller (top shelf) and (b) 5 rectifier modules up to 6000W output power (lower shelf) .. 2
Figure 3–Cordex CXRF-HP 48-1.2kW 2 RU 19" shelf system, shown with 4 rectifier modules up to 4800W output
power, CXCM1 controller and GMT fuse distribution .............................................................................................. 2
Figure 4–Cordex CXRF-HP 48-1.2kW rectifier front panel ............................................................................................... 7
Figure 5–Cordex 48-1.2kW (4800W system) showing breakers and fuses .................................................................... 10
Figure 6–Cordex 48-1.2kW (4800W system) showing breakers and fuses .................................................................... 10
Figure 6–Cordex CXCM1 model system controller front panel ...................................................................................... 11
Figure 7–Cordex 48-1.2kW (4800W system) AC input, CAN, and signal connections ................................................... 18
Figure 8–DC output connections .................................................................................................................................... 21
Figure 9–Breaker ground connections ........................................................................................................................... 22
Figure 10–Front view of distribution module (cover removed) ..................................................................................... 23
Figure 11–Signal Wiring Terminal Blocks ....................................................................................................................... 24
Figure 12–Showing digital input connection method .................................................................................................... 25
Figure 13–Showing relay connections ............................................................................................................................ 26
ii
Page 7

1 Introduction
1.1 Scope of the Manual
This instruction manual explains the installation, interconnection, and operation of the Alpha Cordex CXRFHP 48-1.2 kW 48 Vdc power and distribution systems. Listed below are the four available configurations:
• 1RU shelf system, 3 rectifier modules, with CXCM1 controller and GMT fuse distribution (Figure 1)
• 1RU shelf system, 4 rectifier modules, up to 4800W output power with CXCM1 controller (Figure 2a)
• 1RU shelf system, 5 rectifier modules, up to 6000W bulk power output (Figure 2b)
• 2RU shelf system, 4 rectifier modules, up to 4800W output power, with CXCM1 controller, breakers
and GMT fuses distribution (Figure 3)
NOTE: To aid the user with installation, reference is made to drawings located at the rear of the manual.
1.2 Product Overview
• Designed specifically for restricted space installations, these 48Vdc power distribution systems
incorporate the HP (High Performance) series of 48V 1.2kW Cordex rectifier modules.
• Complete front access design, allowing for all customer connections in front of the rack channel.
• Cordex rectifier modules use a high frequency, switched mode conversion technique to provide a fully
regulated and isolated DC output from the AC mains. The Cordex CXRF-HP 48-1.2kW rectifier model
input is universal to allow use on 120/208/220/240Vac 50/60Hz electrical service.
• Rectifier power modules are “hot swappable”—they can be inserted or removed from the shelf without
cutting power to or from the system or the load.
• Additional power modules can be included with the system at the time of ordering or added after the
shelf has been installed.
• The shelves are designed for horizontal mounting in a 19" or 23" center mount installation via universal
mounting brackets (EIA rack spacing) and utilize dual IEC-type connectors for multiple AC line cord
solutions.
• The Alpha Cordex CXCM1 was designed as a modular CXC controller for the Cordex CXRF-HP 48-
1.2kW rectifier series. Details for installation and wiring are provided in the respective chapters of this
documentation package.
• All models of the CXC allow the user to set up, control and monitor the entire power system and
ancillary components from one central, easy-to-use source: your web browser. The CXCM1 model
does not have a touch screen display; therefore, system setup and management is performed
exclusively with the web interface. Details of controller operation are provided in the current version
software manual.
• The equipment is suitable for installation in Network Telecommunication Facilities.
• The distribution component uses up to four bullet-type breakers and up to ten GMT fuse positions. The
distribution module also allows for termination of two battery strings and includes a 125A battery shunt.
030-834-J0 Rev A Page 1 of 34
Page 8

Figure 1–Cordex CXRF-HP 48-1.2 kW 1RU 19" shelf system, shown with 3 rectifier modules up to 3600W
output power, CXCM1 Controller and GMT fuse distribution
Figure 2–Cordex CXRF-HP 48-1.2 kW 1RU 19" shelf system, shown with
(a) 4 rectifier modules up to 4800W output power and CXCM1 controller (top shelf) and
(b) 5 rectifier modules up to 6000W output power (lower shelf)
Figure 3–Cordex CXRF-HP 48-1.2kW 2 RU 19" shelf system, shown with 4 rectifier modules up to 4800W
output power, CXCM1 controller and GMT fuse distribution
030-834-J0 Rev A Page 2 of 34
Page 9

1.3 Part Numbers and List Options
1.3.1 Cordex CXRF-HP 48-1.2 kW 1RU 19" shelf system, up to 3600W output power, CXCM1 Controller and GMT fuse distribution (Figure 1)
This product can be ordered under the following part numbers and list options:
Description Part Number/List Option
Cordex CXRF-HP 48-1.2kW, 19" 1RU shelf, 3 modules, w/ GMT fuses ................................................. 030-851-20
[Equipped for one CXCM1 controller and up to three CXRF-HP 48-1.2kW rectifiers] ..................................... *List 0
19" rack, center mount ................................................................................................................................... *List 19
19" rack, flush mount..........................................................................................................................................List 21
23" rack, center mount ......................................................................................................................................List 23
23" rack, flush mount..........................................................................................................................................List 25
Black plastic cover ......................................................................................................................................... *List 58
Distribution w/ 8 GMT fuses ........................................................................................................................... *List 80
40-A load LVD ...................................................................................................................................................List 86
70-A battery LVD ...............................................................................................................................................List 87
CXCM1 controller ........................................................................................................................................... *List 99
Two universal AC line cords, C19R – flying leads, 3.5m each ................................................................ 877-790-19
Two 120Vac line cords, 5-15P plugs, 2.5m each .................................................................................... 877-690-19
Kydex cover for bus bar ........................................................................................................................... 567-837-19
Blank panel for power module slot ................................................................................................... 747-622-20-000
Temperature sensor assembly, 6 ft, 1/4" lug ................................................................................... 747-095-20-071
Temperature sensor assembly, 12 ft, 1/4" lug ................................................................................. 747-095-20-072
Temperature sensor assembly, 24 ft, 1/4" lug ................................................................................. 747-095-20-073
Temperature sensor assembly, 6 ft, 3/8" lug ................................................................................... 747-095-20-074
Temperature sensor assembly, 12 ft, 3/8" lug ................................................................................. 747-095-20-075
Temperature sensor assembly, 24 ft, 3/8" lug ................................................................................. 747-095-20-076
Temperature sensor assembly, 50 ft, 3/8" lug ................................................................................. 747-095-20-077
Temperature sensor assembly, 100 ft, 3/8" lug ............................................................................... 747-095-20-078
Temperature sensor assembly, 50 ft, 1/4" lug ................................................................................. 747-095-20-080
Temperature sensor assembly, 100 ft, 1/4" lug ............................................................................... 747-095-20-081
Temperature sensor assembly, 12 ft, 5/16" lug ............................................................................... 747-095-20-082
GMT fuse, 0.5 A ....................................................................................................................................... 460-004-10
GMT fuse, 1 A .......................................................................................................................................... 460-006-10
GMT fuse, 1.3 A ....................................................................................................................................... 460-081-10
GMT fuse, 1.5 A ................................................................................................................................
GMT fuse, 2 A .......................................................................................................................................... 460-083-10
GMT fuse, 3 A .......................................................................................................................................... 460-013-10
GMT fuse, 4 A .......................................................................................................................................... 460-085-10
GMT fuse, 5 A .......................................................................................................................................... 460-084-10
GMT fuse, 7.5 A ....................................................................................................................................... 460-105-10
GMT fuse, 10 A ........................................................................................................................................ 460-069-10
GMT fuse, 15 A ........................................................................................................................................ 460-150-10
....... 460-082-10
* Default option
The above information is valid at the time of publication. Consult factory for up-to-date ordering information.
030-834-J0 Rev A Page 3 of 34
Page 10

1.3.2 Cordex CXRF-HP 48-1.2 kW 1RU 19" shelf system, up to (a) 4800W output power and (b) 6000W output power (Figure 2)
This product can be ordered under the following part numbers and list options:
Description ............................................................................................................................ Part Number/List Option
Cordex CXRF-HP 48-1.2kW center mounting 1RU shelf for systems up to 4800W ................................ 030-835-20
[equipped to receive one CXCM1 controller and up to four CXRF-HP 48-1.2kW rectifiers] ........................... *List 0
48Vdc output .................................................................................................................................................... *List 2
19” center (6” offset) mount............................................................................................................................. *List 19
23” center (6” offset) mount................................................................................................................................List 24
Universal AC line cords, C19R – flying leads, 3.5m long .................................................................................List 88
120Vac line cords, L5-15P plugs, 2.5m long ....................................................................................................List 89
Blank panel (for power module slot) .................................................................................................................List 90
CXCM1 controller ...............................................................................................................................................List 99
Cordex CXRF-HP 48-1.2kW center mounting 1RU shelf for systems up to 6000W ................................ 030-845-20
[equipped to receive up to five CXRF-HP 48-1.2kW rectifiers .......................................................................... *List 0
48Vdc output .................................................................................................................................................... *List 2
19” center (6” offset) mount............................................................................................................................. *List 19
19” flush mount .................................................................................................................................................List 21
23” center (6” offset) mount................................................................................................................................List 23
23” flush mount .................................................................................................................................................List 25
Universal AC line cords, C19R – flying leads, 3.5m long .................................................................................List 88
120Vac line cords, L5-15P plugs, 2.5m long ....................................................................................................List 89
Blank panel (for power module slot) .................................................................................................................List 90
CXCM1 controller ....................................................................................................................................... 018-598-20
Basic module ..................................................................................................................................................... *List 0
Horizontal mount (1RU high ............................................................................................................................ *List 90
Cordex CXRF-HP 48-1.2kW rectifier power module, 120Vac-208-240Vac universal input ..................... 010-619-20
Basic module ..................................................................................................................................................... *List 0
Front cover, black plastic [material complies with GR-63 flame spread test] ................................................ *List 58
One universal AC line cord, C19R – flying leads, 3.5m (as used in List 88) ............................................ 877-671-19
One 120Vac line cord, L5-15P plugs, 2.5m (as used in List 89 ................................................................. 877-690-19
Blank panel (for power module slot)(same as List 90 ....................................................................... 747-622-20-000
Kydex cover, single shelf .......................................................................................................................... 567-837-19
Dual shelf bus bar connection (qty 2 required) consult factory for application .......................................... 615-368-43
I/O terminal block wire harness kit for CXCI/CXCM1 ................................
* Default option
....................................... 036-201-20-000
The above information is valid at the time of publication. Consult factory for up-to-date ordering information.
030-834-J0 Rev A Page 4 of 34
Page 11

1.3.3 Cordex CXRF-HP 48-1.2kW center mounting 2RU shelf for systems up to 4800W (Figure 3)
This product can be ordered under the following part numbers and list options:
Description ............................................................................................................................ Part Number/List Option
Cordex CXRF-HP 48-1.2kW center mounting 2RU shelf for systems up to 4800W ................................. 030-834-20
[equipped to receive one CXCM1 controller and up to four CXRF-HP 48-1.2kW rectifiers] ........................ *List 0
48Vdc output ...................................................................................................................................................... *List 2
19” center (mid) mount ..................................................................................................................................... *List 19
23” center (mid) mount .......................................................................................................................................List 23
23” center (6” offset) mount................................................................................................................................List 24
23” flush mount ................................................................................................................................................ *List 25
Circuit breaker distribution, bullet-type,
four load circuit breakers, two battery connections, ten GMT fuse positions, 125A battery shunt ............. *List 80
Circuit breaker distribution, bullet-type,
four load circuit breakers, two battery circuit breakers .............................................................................. **List 81
Battery LVD (LVBD), 100A.................................................................................................................................List 87
Two universal AC line cords, C19R – flying leads, 3.5m each ..........................................................................List 88
Two 120Vac line cords, L5-15P plugs, 2.5m each ............................................................................................List 89
Blank panel (for power module slot) ..................................................................................................................List 90
CXCM1 controller ...............................................................................................................................................List 99
CXCM1 controller ....................................................................................................................................... 018-598-20
Basic module ...................................................................................................................................................... *List 0
Horizontal mount (1RU high, not available with this shelf 030-834-20) .............................................................List 90
Vertical mount (2RU high) ................................................................................................................................ *List 91
Cordex CXRF-HP 48-1.2kW rectifier power module, 120Vac-208-240Vac universal input ...................... 010-619-20
Basic module [front panel material complies with GR-63 flame spread test] .................................................... *List 0
Two universal AC line cords, C19R – flying leads, 3.5m each (same as List 88) ..................................... 877-671-19
Two 120Vac line cords, L5-15P plugs, 2.5m each (same as List 89) ........................................................ 877-690-19
Blank panel (for power module slot)(same as List 90) ....................................................................... 747-622-20-000
Breaker, AM-type mid-trip plug-in, 1A ........................................................................................................ 470-300-10
Breaker, AM-type mid-trip plug-in, 3A ........................................................................................................ 470-301-10
Breaker, AM-type mid-trip plug-in, 5A ........................................................................................................ 470-302-10
Breaker, AM-type mid-trip plug-in, 10A ...................................................................................................... 470-303-10
Breaker, AM-type mid-trip plug-in, 15A ................................
Breaker, AM-type mid-trip plug-in, 20A ...................................................................................................... 470-305-10
Breaker, AM-type mid-trip plug-in, 25A ...................................................................................................... 470-306-10
Breaker, AM-type mid-trip plug-in, 30A ...................................................................................................... 470-307-10
Breaker, AM-type mid-trip plug-in, 35A ...................................................................................................... 470-308-10
Breaker, AM-type mid-trip plug-in, 40A ...................................................................................................... 470-309-10
Breaker, AM-type mid-trip plug-in, 45A ...................................................................................................... 470-310-10
Breaker, AM-type mid-trip plug-in, 50A ...................................................................................................... 470-311-10
Breaker, AM-type mid-trip plug-in, 60A ...................................................................................................... 470-312-10
Breaker, AM-type mid-trip plug-in, 70A ...................................................................................................... 470-313-10
Breaker, AM-type mid-trip plug-in, 80A ...................................................................................................... 470-314-10
Breaker, AM-type mid-trip plug-in, 90A ...................................................................................................... 470-315-10
Breaker, AM-type mid-trip plug-in, 100A .................................................................................................... 470-316-10
Breaker, 5/16" Bull Term,Aux Sw C-Sh, 60A 80VDC ................................................................................ 470-346-10
Breaker, 5/16" Bull Term,Aux Sw C-Sh, 100A 80VDC .............................................................................. 470-347-10
GMT fuse, 0.5A .......................................................................................................................................... 460-004-10
GMT fuse, 1A ............................................................................................................................................. 460-006-10
GMT fuse, 1.3A .......................................................................................................................................... 460-081-10
GMT fuse, 1.5A .......................................................................................................................................... 460-082-10
...................................................................... 470-304-10
030-834-J0 Rev A Page 5 of 34
Page 12

GMT fuse, 2A ............................................................................................................................................. 460-083-10
GMT fuse, 3A ............................................................................................................................................. 460-013-10
GMT fuse, 4A ............................................................................................................................................. 460-085-10
GMT fuse, 5A ............................................................................................................................................. 460-084-10
GMT fuse, 7.5A .......................................................................................................................................... 460-105-10
GMT fuse, 10A ........................................................................................................................................... 460-069-10
GMT fuse, 15A ........................................................................................................................................... 460-150-10
* Default option
** Distribution option requires one of List 19, 81, 87, or 99.
The above information is valid at the time of publication. Consult factory for up-to-date ordering information.
030-834-J0 Rev A Page 6 of 34
Page 13

2 Features
2.1 Rectifier modules
The Cordex CXRF-HP series of 48V 1.2kW rectifier modules employ an advanced resonant power
conversion technology featuring high power conversion efficiency. All internal semiconductor devices
operate under “soft-switching” conditions and exhibit very low power loss. The reduced power loss leads to
lower thermal stress on the semiconductors and thus improves reliability.
Sustaining low component temperatures is again the primary factor with meeting the three worst-case field
scenarios: (1) 65°C ambient temperatures, (2) full output power, and (3) low AC input (176Vac). While
meeting these specifications, Cordex rectifiers also offer roughly twice the reliability at 55°C and up to four
times more at 45°C ambient temperature.
2.1.1 Rectifier Front Panel
2.1.2 LEDs
The front panel LEDs provide rectifier status summary and help to locate a specific module under CXC
control.
AC
The top LED (green) is on when AC is within valid range and the rectifier is delivering power to the load.
The LED will flash (~2Hz) when AC is outside the nominal range – AC voltage is invalid if the AC Mains
Low or AC Mains High alarm is active. The LED turns off when AC has failed (or no AC power is
present).
DC
The middle LED (green) is on when the rectifier is delivering power to the load. The LED will flash when
communication is lost. The LED turns off when the rectifier is off; e.g., when commanded via the CXC.
Alarm
The bottom LED (red) is on continuously in the event of an active Module Fail alarm. The LED flashes
(~2Hz) when a minor alarm is detected. The LED remains off in the absence of an alarm. If the unit output
is not connected to a battery or parallel rectifier, the LED extinguishes if no AC power is present.
LED Activity During “Locate Module” Command from CXC
Figure 4–Cordex CXRF-HP 48-1.2kW rectifier front panel
When the “locate module” command has been received from the CXC, the LEDs behave in a distinctly
different way so that the rectifier is easier to visually identify among adjacent rectifiers.
This state is entered when commanded via the CXC. The LEDs flash in a distinct pattern repeating every
two seconds.
030-834-J0 Rev A Page 7 of 34
Page 14

LED Activity During Firmware Upload
When a rectifier firmware upload is in progress, the LEDs behave in the same way as the locate module
command described above.
2.1.3 Mechanical
A locking clip is provided to secure the rectifier into the shelf. During normal operation the rectifier must be
locked into position. A handle (or grip) is incorporated into the front panel to facilitate the removal of the
rectifier from the shelf. A ⅛" x 4 flat head screwdriver is used to lift and release the clip from the locked
position.
2.1.4 True Module Fail Alarm
The power modules have a “true” fail alarm. This provides a true indication of the power module’s ability to
source current. When the module’s output current drops below 2.5% of the rated output a low output
current condition is detected and the Module Fail detection circuit is activated. This circuit momentarily
ramps up the output voltage to determine if the module will source current. If no increase in current is
detected, the Module Fail alarm is activated. The module will test once every 60 seconds for the condition
until current is detected. Output voltage ramping will cease upon detection of current
load is required to avoid the Ramp Test Fail alarm; this can typically be provided with the parallel system
battery. Activation of this alarm could indicate a failed module or a failed load.
NOTE: For Cordex rectifier systems without batteries (or with a very light load; below 2.5% of rated output) it is
recommended that the ramp test be disabled to avoid nuisance alarms. The Ramp Test feature is
enabled/disabled via the CXC menu item: Rectifiers, Configure Settings.
1
. A minimum 2.5%
2.1.5 Heat Dissipation
Cooling of the module is front-to-rear with the exhaust air exiting at the back. The fan is variable speed;
which is determined by heatsink temperature and load.
2.1.6 Over Temperature Protection
Each rectifier module is protected in the event of an excessive increase in temperature due to component
failure or cooling airflow blockage. During over temperature conditions, the rectifier limits the output power
as well as the output current. If temperature continues to increase, a shutdown of the rectifier is initiated.
The rectifier shall restart automatically if the temperature has returned to a safe level.
2.1.7 Wide AC Range
A minor alarm is generated when the AC input voltage drops below specification.
• Output power is reduced linearly between 176Vac and 132Vac to 60% of the rated output power.
• Input current is limited to less than 6A for operation from 132Vac to 90Vac. Power is derated linearly
between 132Vac (~700W) to 90Vac (~475W).
• At a lower voltage the module will shut down and will not restart until the AC is greater than 90Vac.
• For voltages above 277Vac, power factor and total harmonic distortion may be derated. Up to 320Vac,
the rectifier may not be operational but shall not suffer any damage.
2.1.8 AC Inrush/Transient Suppression
The inrush current of the rectifier module is limited to the full load steady state line current to prevent surge
on the AC line. Modules are also protected from input lightning and transient surges in accordance with
IEEE/ANSI C62.41 Category B3.
1
Under normal conditions, a battery connected to the output of the rectifier will draw current when the voltage ramp occurs. Therefore the rectifier fail alarm will
not be generated with a battery connected.
030-834-J0 Rev A Page 8 of 34
Page 15

2.1.9 Soft Start
To eliminate an instantaneous demand on the AC source, a soft start feature is employed. Soft Start,
sometimes referred to as “current walk-in”, works by gradually (up to five seconds) ramping the current limit
up from zero to the actual or defined customer setting. The rectifier output voltage is ramped up from the
minimum voltage to the float voltage.
2.1.10 Start Delay
The rectifier modules are equipped with a delay timer in order to stagger start a series of modules to
prevent excessive loading of generators upon start up. The built-in timer delays the turn on of the module
depending on the value selected (up to 120 seconds) via the CXC. A minimum one-second delay is preset
to allow charging of the input capacitors.
2.1.11 Current Limit/Short Circuit Protection
The current limit function determines the maximum output current limit of the rectifier module, regardless of
output voltage or power. Maximum output current is limited to a constant value down to short circuit
condition. Current limiting can be used to mate the rectifier output current ampacity to the needs of the load
and parallel battery to minimize excessive battery recharge current.
The rectifier will sustain a short circuit at the output terminals indefinitely. The maximum short circuit current
shall not exceed 105% of the rated full load current.
2.1.12 Power Limiting
Each rectifier module is designed to limit power output to the module specification. This enables more
current to be supplied at lower output voltages, and allows matching of output to the demand of constant
power loads, normally seen with telecom equipment.
This feature may also be used for a faster recharge of flooded batteries paralleled with the load.
NOTE: Current limiting overrides the power-limiting feature.
2.1.13 High Voltage Shutdown (HVSD)
This feature provides protection to the load from over voltage conditions originating from the rectifiers. It
operates by shutting down the offending rectifier module when a high output voltage condition occurs.
Indication is through the red Alarm (Module Fail) LED. Modules will restart automatically; however, if more
than three over voltage conditions occur in one minute, the module will latch off and remain shut down until
it is reset.
2.1.14 Battery Eliminator Operation
Rectifier modules maintain all specifications (except where indicated) with or without a battery attached in
parallel to the output; however, if a battery or another module supplying DC voltage in parallel is not
present, there will be no monitoring or control activity if there is an AC power failure or input fuse failure.
2.2 Distribution Module
030-834-20 (Cordex CXRF-HP 48-1.2kW center mounting 2RU shelf for systems up to 4800W)
The shelf incorporates a distribution module for DC breaker/fuse output as well as battery connections. The
module includes support for up to four AM plug-in breakers and ten GMT fuse positions. Two batterylanding positions, a 125A battery shunt, and a site ground are also provided. It may also incorporate an
LVBD.
This module contains a unique sliding connection point system to allow for the several dual-hole lug
terminations in a compact space. See Wiring and Connections chapter of this manual for more details.
030-834-J0 Rev A Page 9 of 34
Page 16

Figure 5–Cordex 48-1.2kW (4800W system) distribution module
030-851-20 (Cordex CXRF-HP 48-1.2kW, 19" 1RU shelf, 3 modules, w/ GMT fuses up to 3600W)
The shelf incorporates a distribution module for DC fuse output as well as battery connections. The module
accommodates up to eight GMT fuse positions. Two batterylanding positions and an 80 A battery shunt are
also provided.
The module has low voltage disconnect (LVD) options, which are in series with either the battery or the
load.
The GMT fuse output connection points are accessible from the front of the module via plug-in connectors.
The battery connections are accessible from the rear of the module via 2-hole lug inputs.
Figure 6–Cordex 48-1.2kW (3600W system) distribution module
2.3 Controller module
The Cordex CXCM1 modular system controller is mounted in the rectifier system shelf and brings
advanced monitoring technology to the Cordex CXRF-HP 48-1.2kW series of rectifiers. This compact
system controller is designed for seamless operation and set up of Alpha power systems and is equipped
with the complete range of Cordex software features, including the following:
• Designed to communicate directly with Cordex rectifiers
• Includes battery temperature compensation charging
• Battery performance diagnostics
• Provides local and remote communications
• User definable alarms
• Daily logging of power system events and system statistics.
The main controller motherboard, located behind the CXCM1 front panel, contains a microprocessor,
memory, and other electronic components.
030-834-J0 Rev A Page 10 of 34
Page 17

Minor alarm is present (no major alarms)
Yellow
Major alarm is present.
Red
File transfer
Red LED illuminates when recovering from invalid firmware application
Lamp Test
All three LEDs flash in sync for two seconds
System status LEDs
Ethernet port
Push once for soft reset
LCD screen (V/A)
Display pushbutton
The CXCM1 includes a web server that provides easy set up and monitoring using an Internet connection
with the standard Windows Internet Explorer browser.
The data-logging feature allows the user to capture data from multiple inputs, for AC/DC voltages,
load/battery current, cell voltages and temperatures (automatically for up to 16 user defined logs). Typical
applications of the CXCM1 logging include power system details, thermal performance of outdoor
enclosures, battery cell specifics, or mains variations captured by an AC voltage watchdog.
A built-in audio speaker sounds an intermittent tone during active alarms.
The input/output (I/O) board houses a series of terminal connections.
NOTE: Customer settings for the CXCM1 are provided separately in the system documentation package.
2.3.1 Controller front panel
The CXCM1 has a 4-digit display for monitoring system voltage (V) and current (A). A pushbutton toggle
switch allows the user to alternate the display reading.
Modem port. Do not connect
to anything other than an
Alpha modem and cable.
Hold for 3 seconds to
reset IP address
Details of controller operation are provided in the current version software manual.
2.3.2 LCD screen
The controller front panel uses a 4-digit LCD screen to monitor the system voltage (V) and current (A). A
push-button toggle switch allows the user to alternate the display reading.
2.3.3 LEDs
The CXC has three LEDs located on the front panel. These are used to display the alarm status of the
power system, CXC progress and status during startup, file transfers and lamp tests.
Alarm Conditions
The CXC illuminates the LED that corresponds to the alarm status. Only one LED is illuminated at a time
during alarm conditions:
OK, no alarms present Green
Progress and Status Indication
toggle switch (V/A)
Figure 7–Cordex CXCM1 model system controller front panel
The LEDs are also used in the following situations:
Base unit validation All three LEDs on simultaneously.
030-834-J0 Rev A Page 11 of 34
Page 18

2.3.4 Reset
A reset button is located on the front panel for restarting the controller’s microprocessor.
NOTE: Refer also to the software manual – always select the Reset menu item before pressing the reset button.
2.3.5 Modem Port
The Modem port is designed for CXCM1 connection to Alpha Technologies Cordex DC Modem #018-585-
20.
CAUTION: Do not connect anything other than the Alpha modem and Alpha-supplied DB-9 cable to
the D-sub port on the front of the CXCM1.
2.3.6 Ethernet Port
The Ethernet port is designed for CXC connection to a user supplied network (TCP/IP secured by user) via
a front panel RJ-45 jack and a standard network cable.
Local access (e.g. laptop computer) is also possible from the Ethernet port connection using a standard
network crossover cable.
2.3.7 Analog Input Channels
The controller is provided with analog input channels for voltage, current, and temperature.
Voltage Inputs
Two voltage input channels, V1 and V2, provide monitoring of discharge and charge voltage. The CXC
software is pre-configured to monitor V1 for load voltage and V2 for battery voltage. V2 (wired internally) is
used as the system reference for rectifier float voltage, low voltage disconnect (LVD), system high voltage
alarm, and system low voltage alarm.
Current Inputs
The CXC software is pre-configured to monitor I1 for load current wired internally to the system current
shunt.
Temperature Inputs
Two temperature input channels, T1 and T2, provide monitoring of battery temperature and temperature
compensation (temp comp) or room/ambient temperature. A voltage is supplied to these terminals to power
the temperature sensors.
2.3.8 Digital Input Channels
The CXCM1 can accommodate up to two (2) channels and can monitor digital alarm/control signals from
rectifiers, converters and many other types of equipment. See Section 5.9.2.
2.3.9 Alarm and Control Output Relays
The CXCM1 contains four (4) Form C digital alarm output relays to extend alarms and control external
apparatus. Each internally generated alarm or control signal may be mapped to any one of the relays, or,
several signals may be mapped to just one relay or none at all. See Section 5.9.3.
2.3.10 Network Connection and Remote Communications
The Cordex system can be set up, monitored and tested via ETHERNET 10/100 Base-T serial data
connection. The communication protocol supports a web interface. All alarming and control of Cordex
rectifiers is accomplished with a CXC via a CAN bus.
A step-by-step connection wizard – provided to establish remote communications with your CXC – is
available via the Alpha website (http://www.alpha.ca/downloads
030-834-J0 Rev A Page 12 of 34
).
 Loading...