

Page 1

MODE D’EMPLOI
MODE D’EMPLOI
USER MANUAL
USER MANUAL
Fontaine à eau
Fontaine à eau
WWater dispenser
ater dispenser
• F 500 FC - Froid et chaud - Hot and cool
• F 500 CT - Chaud et ambiant - Hot and normal
• F 500 FT - Froid et ambiant - Cool and normal
Notice Fontaines 3/07/06 15:53 Page 1
Page 2

2
FRANÇAIS
FRANÇAIS
ALPATEC vous félicite d’avoir choisi ce produit et vous remercie de votre confiance.
Pour votre confort et votre sécurité, votre article a été vérifié à toutes les étapes
de sa fabrication et a passé avec succès tous nos tests de qualité.
Nos produits sont conçus pour vous plaire tant par leur design
que par leur facilité d’utilisation et dans l’objectif constant
de vous apporter complète satisfaction.
CONSIGNES DE SÉCURITÉ
CONSIGNES DE SÉCURITÉ
• LIRE ATTENTIVEMENT CETTE NOTICE AVANT LA PREMIÈRE UTILISATION DE L’APPAREIL.
• Vérifier que le voltage indiqué sur la plaque signalétique de l’appareil correspond bien à celui de votre
installation électrique. Si ce n’est pas le cas, adressez-vous à votre revendeur et ne branchez pas
l’appareil.
• Ne jamais laisser l’appareil sans surveillance lorsqu’il est en fonctionnement.
• Si vous devez vous absenter même un court instant, arrêtez l’appareil.
• Ne jamais laisser à la portée d’enfants et ne pas les laisser utiliser l’appareil en dehors de la stricte
surveillance des parents.
• Cet appareil est destiné à un usage domestique et selon les instructions du manuel.
• Vérifier régulièrement l’état du cordon d’alimentation. Ne jamais utiliser l’appareil si le cordon
d’alimentation, la prise ou l’appareil sont endommagés.
• Le cordon d’alimentation ne doit en aucun cas être en contact avec les parties chaudes de l’appareil.
• Ne pas entreposer ou utiliser de produits inflammables à proximité de l’appareil.
• Ne jamais plonger l’appareil dans l’eau ou tout autre liquide. Ne pas utiliser près d’une baignoire, d’une
douche ou d’une piscine.
• Ne jamais utiliser l’appareil à l’extérieur.
• Ne pas utiliser l’appareil avec les mains mouillées ou humides.
• Ne jamais utiliser l’appareil sur ou près de surfaces chaudes.
• Ne jamais déplacer ou débrancher l’appareil en tirant sur le cordon d’alimentation.
• Débrancher l’appareil avant de le nettoyer.
• Ne pas nettoyer l’appareil avec des produits chimiques abrasifs.
• Ne pas introduire d’objets métalliques pointus, ni vos doigts dans l’appareil pour ne pas l’endommager et
éviter tout risque de choc électrique.
• Ne jamais utiliser d’autres accessoires que ceux livrés et recommandés par le fabricant. Ceci peut être
dangereux et risque d’endommager l’appareil.
• Ne jamais réparer l’appareil vous-même. Vous perdriez le bénéfice de la garantie. Comme tout appareil
électrique, il doit être réparé par une personne qualifiée. De même, le changement du cordon
d’alimentation représente un réel danger et il est nécessaire de contacter un réparateur agréé.
Notice Fontaines 3/07/06 15:53 Page 2
Page 3

Précautions spécifiques :
• Ne jamais utiliser cet appareil avec un autre liquide que de l’eau.
• Essuyer les éventuelles fuites d’eau immédiatement après avoir chargé ou retiré une bouteille.
• N’utiliser cet appareil qu’avec de l’eau potable et propre à la consommation.
• Attention : cet appareil porte l’eau à une température approximative de 88°C. Veiller à prévenir les risques
de brûlures, tout particulièrement auprès des enfants et des personnes âgées ou irresponsables.
IMPORTANT
Ne jamais brancher l’appareil ou le mettre en marche à vide.
Vérifier que la bouteille soit correctement chargée et que l’eau puisse s’écouler des
deux robinets avant de brancher l’appareil.
LE FABRICANT NE SAURAIT ÊTRE TENU POUR RESPONSABLE DE LA MAUVAISE UTILISATION
DE L’APPAREIL.
CONSERVER SOIGNEUSEMENT CE MODE D’EMPLOI.
Lors de l’utilisation de bouteilles de 5L, vérifier que le plastique soit
suffisamment rigide pour ne pas s’écraser.
INST
INST
ALLA
ALLA
TION DE LA FONT
TION DE LA FONT
AINE
AINE
La fontaine doit être déplacée en la tenant à deux mains. Ne pas l’attraper par le haut avec une seule main.
Réserver 2,5 cm d’espace libre derrière la fontaine pour la circulation de l’air.
Ne pas exposer la fontaine à des températures inférieures à 10°C ou supérieures à 38°C.
La placer sur une surface plane et stable, suffisamment solide pour supporter son poids et celui de la
bouteille en pleine charge. Ne pas l’exposer à la lumière directe du soleil, la chaleur ou l’humidité.
3
Notice Fontaines 3/07/06 15:53 Page 3
Page 4
DESCRIPTION DE L
DESCRIPTION DE L
’APP
’APP
AREIL
AREIL
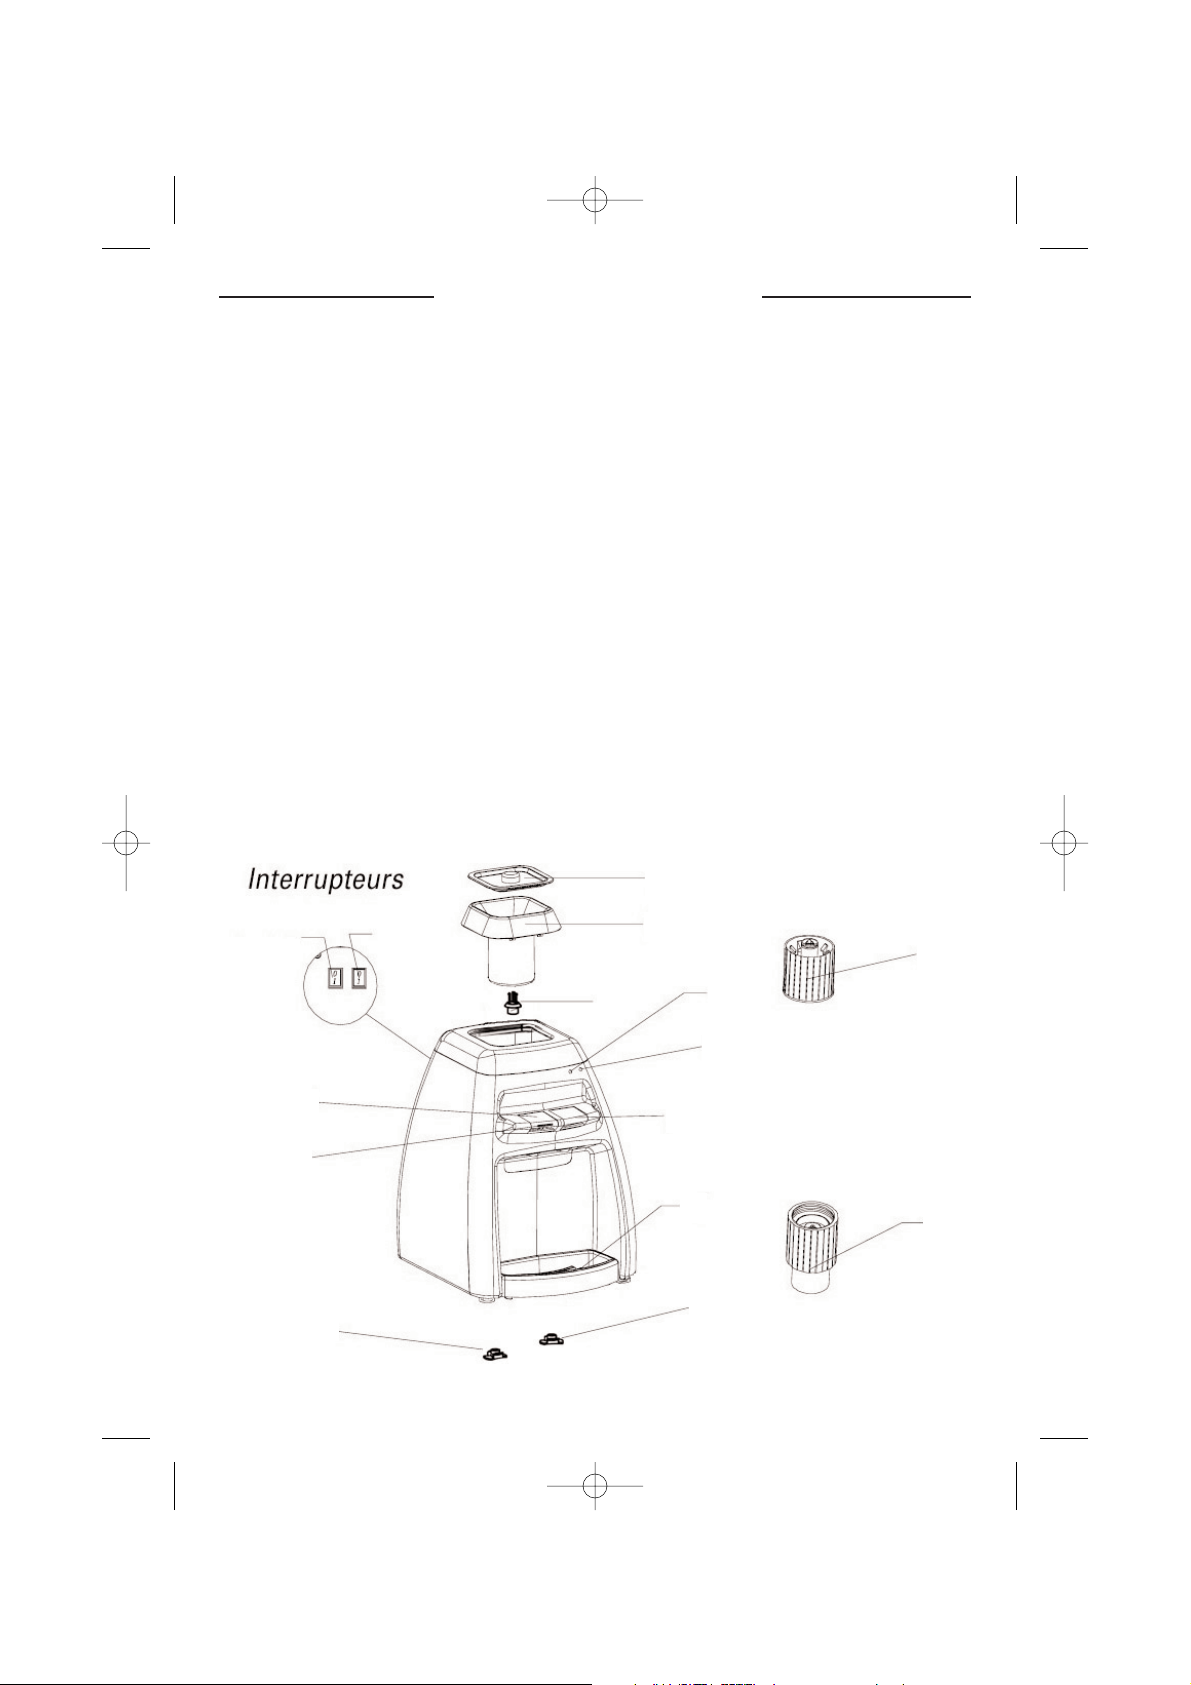
1. Couvercle anti-poussière
2. Coupelle supérieure
3. Clapet
4. Bouton poussoir température d’eau fraîche (modèles F 500 FC et F 500 FT)
ou ambiante (modèle F 500 CT)
5. Bac récolte-gouttes
6. Bouton poussoir température d’eau chaude (modèles F500FC et F500CT) ou
ambiante (modèle F 500 FT)
7a/b. Bouchon de vidange (1 exemplaire sur les modèles F 500 FT et F 500 CT,
2 exemplaires sur le modèle F 500 FC)
8. Bouton de sécurité d’eau chaude (modèles CT et FC)
9. Adaptateur pour bouteilles de 0,33 litres à 2 litres
10. Adaptateur pour bouteilles de 5 litres
11/12/13/14. Voir parties spécifiques
4
14 13
( Noir )
( Blanc )
1
2
3
4
5
6
7.a
8
9
10
11
12
7.b
Notice Fontaines 3/07/06 15:53 Page 4
Page 5
Parties spécifiques :
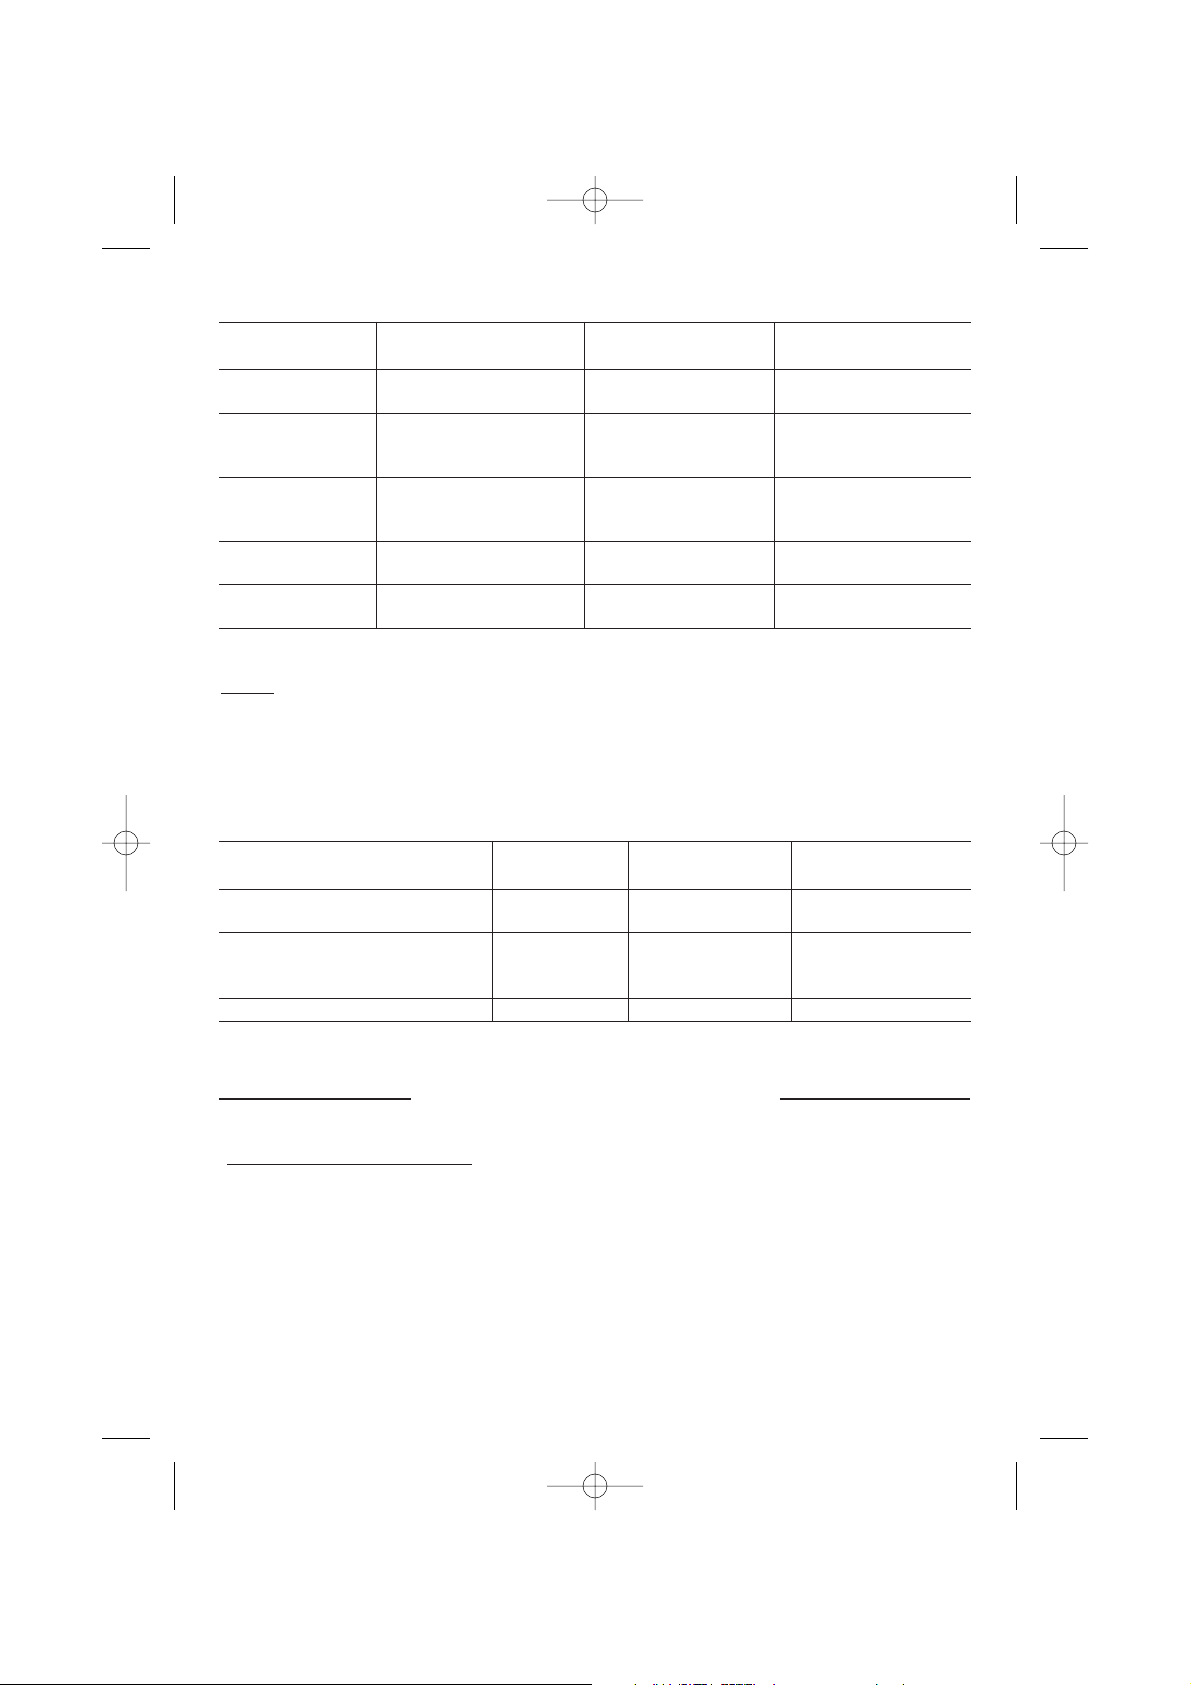
Partie/Modèle F 500FC F 500 FT F 500 CT
Chaud et froid Froid et ambiant Chaud et ambiant
11. Voyant lumineux Signale que le processus Indique que l’appareil Signale que le processus
ROUGE de chauffe est en cours. est sous tension. de chauffe est en cours.
12. Voyant lumineux Signale que le processus Signale que le processus
bicolore AU ROUGE refroidissement est en refroidissement est en ---
cours. cours.
12. Voyant lumineux S’allume lorsque la S’allume lorsque la S’allume lorsque la
bicolore AU VERT température voulue est température voulue est température voulue est
atteinte. atteinte. atteinte.
13. Interrupteur blanc Bouton M/A de la fonction --- Bouton M/A de la
eau chaude. fonction eau chaude.
14. Interrupteur noir Bouton M/A de la fonction Bouton M/A de la ---
eau froide. fonction eau froide
NOTE :
Pour mettre en marche les fonctions “eau chaude et/ou eau froide” de votre fontaine, appuyer sur
le bouton 0/I situé à l’arrière de l’appareil (13 et/ou 14). Lorsque le bouton est en position “I” ou “marche”,
l’appareil est prêt à fonctionner. Lorsque le bouton est en position “0”, l’appareil est éteint.
Les indications ‘froid” et “chaud” vous permettent simplement de visualiser rapidement le bouton
correspondant à vos besoins.
Caractéristiques/modèle F 500 FC F 500 FT F 500 CT
Chaud et froid Froid et ambiant Chaud et ambiant
Contenance réservoir d’eau chaude
et temps de chauffe initial (88°C) 420 ml . 10 min --- 800 ml . 10 min
Contenance réservoir d’eau
fraîche et temps 350 ml . 40 min 700 ml . 40 min --de refroidissement initial (<12°C)
Eau à température ambiante --- Ecoulement direct. Ecoulement direct.
CHARGEMENT DE LA BOUTEILLE
CHARGEMENT DE LA BOUTEILLE
•
Débrancher et éteindre l’appareil.
• Se laver les mains et essuyer le col de la bouteille ainsi que l’adaptateur avec un chiffon propre.
• Eviter de toucher les parties de l’adaptateur et de la bouteille qui seront en contact avec l’appareil.
• S’assurer que le niveau d’eau dans l’appareil soit suffisamment bas pour pouvoir installer la nouvelle
bouteille. Dans le cas contraire, l’appareil pourrait déborder.
• Voir le paragraphe « Entretien et nettoyage de la fontaine » pour la première utilisation de l’appareil ou
pour la procédure à suivre après une opération d’entretien.
5
Notice Fontaines 3/07/06 15:53 Page 5
Page 6

1. Retirer le bouchon de la bouteille et ajuster l’adaptateur sur le col de la bouteille.
a. Pour les bouteilles de 0,33 l à 2 litres, utiliser l’adaptateur 9. Pour l’ajuster, aligner le centre de
l’adaptateur avec le col de la bouteille et forcer par un geste rapide jusqu’à
entendre un déclic.
b. Pour les bouteilles de 5 litres, utiliser l’adaptateur 10. Pour l’ajuster, aligner le centre de l’adaptateur
avec le col de la bouteille et visser.
2. Charger la bouteille avec son adaptateur sur la coupelle supérieure de la fontaine.
3. Pr
esser les deux boutons d’eau
(voir explications ci-après) jusqu’à ce que l’eau s’écoule nor
malement des robinets.
4. Brancher l’appareil (à une prise munie d’un raccordement à la terre).
5. Allumer l’appareil à l’aide du (ou des)
interrupteurs placé(s) à l’arrière (13-14).
UTILISA
UTILISA
TION DE L
TION DE L
’EAU CHAUDE
’EAU CHAUDE
Bouton de sécurité
Afin d’éviter tout risque d’accident, cet appareil est doté d’une sécurité spéciale enfant pour l’eau chaude
(voir précautions d’emploi page 2).
Pour obtenir de l’eau chaude, presser d’abord sur le bouton rouge de sécurité (8), puis enfoncer le bouton
d’eau chaude (6) jusqu’à écoulement de l’eau.
Conseil d’utilisation
La mise en chauffe de l’eau étant extrêmement rapide, nous vous conseillons d’éteindre l’interrupteur
d’eau chaude (13), lorsque vous avez fini de vous servir.
De plus, ceci vous permettra de réaliser des économies d’énergies.
6
Bouteille 5L
Bouteille 0,33L-2L
Adaptateur
La bouteille
munie de
l’adaptateur est
chargé sur la
fontaine.
Notice Fontaines 3/07/06 15:53 Page 6
Page 7

ENTRETIEN ET NETTOY
ENTRETIEN ET NETTOY
AGE DE LA FONT
AGE DE LA FONT
AINE
AINE
Vidange de l’appareil
L’ eau restant au fond du réservoir doit être intégralement vidée avant le nettoyage de l’appareil ou si
celui-ci ne doit pas être utilisé pendant un long moment.
1. Eteindre l’appareil et le débrancher.
2. Retirer la bouteille de l’appareil.
3. UNIQUEMENT POUR LES MODÈLES F 500 FC ET F 500 CT.
Cette étape est nécessaire afin de refroidir l’eau contenue dans l’appareil et d’éviter tout risque
de brûlure pendant l’opération de vidange :
Placer un récipient capable de contenir de l’eau très chaude sous le robinet de la fontaine. Ouvrir le
robinet à la main pour permettre à l’eau de s’écouler dans le récipient. Simultanément, remplir d’eau la
coupelle en continu autant que nécessaire (sans verser trop vite pour éviter les débordements) jusqu’à
ce que l’eau s’écoule à une température proche de la température ambiante.
4. Vider toute l’eau dans un récipient jusqu’à ce que le robinet ne coule plus.
5. Placer l’appareil au dessus d’une bassine et l’incliner légèrement. Dévisser les bouchons de vidange
(7)et les retirer (7) à la main, puis vider complètement l’eau restée dans les réservoirs.
6. Une fois la fontaine totalement vidée, replacer les bouchons de vidange et revisser le couvercle.
Attention :
• Ne jamais retourner l’appareil pour essayer de le vider. De l’eau pourrait couler sur les composants
et provoquer un court-circuit.
IMPORTANT :
• Ne pas retirer les bouchons de vidange s’il reste de l’eau chaude dans l’appareil.
7
Bouchons de
vidange
• Avant de rebrancher et d’allumer l’appareil, vérifier qu’il est correctement chargé
avec une bouteille d’eau et que l’eau peut s’écouler des deux robinets
(voir paragraphe «Chargement de la bouteille ») .
Notice Fontaines 3/07/06 15:53 Page 7
Page 8

STÉRILISA
STÉRILISA
TION ET NETTOY
TION ET NETTOY
AGE DU(DES) RÉSER
AGE DU(DES) RÉSER
VOIR(S) D’EAU
VOIR(S) D’EAU
Le réservoir de la fontaine doit être stérilisé régulièrement pour éviter l’apparition d’un goût déplaisant, et
nettoyé afin d’éviter les dépôts de minéraux qui pourraient gêner l’écoulement.
1. Avant le nettoyage, éteindre et débrancher l’appareil. Dans le cas d’une première utilisation, passer
directement à l’étape 5.
2. Vider entièrement l’eau de la bouteille dans la fontaine et retirer la bouteille.
3. Vider complètement le réservoir d’eau (voir paragraphe « Vidange de l’appareil »).
4. Une fois la fontaine totalement vidée, replacer les bouchons de vidange et revisser le couvercle.
5. Ne jamais placer directement de solution javellisée dans le réservoir pour ne pas abîmer le plastique.
Remplir une bouteille de 2 litres d’eau additionnée de 2,5 ml d’une solution javellisée à 6%. Remuer pour
rendre le mélange homogène. Placer l’adaptateur sur la bouteille et la placer sur la fontaine
(voir paragraphe « chargement de la bouteille »).
6. Appuyer simultanément sur les 2 boutons de service d’eau, de façon à ce que l’eau coule des deux
robinets.
7. Laisser agir 10 à 15 mn.
8. Vider complètement l’eau de la bouteille et retirer la bouteille. Vider le réservoir.
9. Ajouter de l’eau propre dans la bouteille, recharger la bouteille, vider par les robinets, puis vider le
réservoir.
10. Répéter la dernière opération, 2 ou 3 fois.
11. Vider encore l’eau du réservoir, replacer les bouchons de vidange et revisser le couvercle.
12. Replacer une bouteille d’eau. La fontaine est à nouveau prête à l’emploi.
Problèmes éventuels
P
ROBLÈME
C
AUSE POSSIBLE
S
OLUTION
L’ eau a un mauvais goût La fontaine doit être Voir paragraphe « Stérilisation et nettoyage ».
ou une mauvaise odeur. stérilisée.
La fontaine est débranchée. Vérifiez le branchement et enfoncer la
prise à fond.
L’ alimentation électrique Vérifier les fusibles ou remettre le courant.
L’ eau n’est pas assez est coupée. Vérifier le nombre d’appareils en
chaude ou froide. fonctionnement.
Toute l’eau du réservoir a Attendre 30 mn que l’appareil réchauffe ou
déjà été utilisée. refroidisse le contenu du réservoir.
A la première mise en Les circuits d’eau en Le caractère potable de l’eau n’est en rien
fonction, l’eau a un goût plastique anti-bactérien altéré. Toutefois, vous pouvez rincer les
désagréable sont neufs. circuits en faisant circuler de l’eau jusqu’à
ce que le goût disparaisse.
8
Attention
Vérifier que la bouteille soit correctement chargée et que l’eau puisse s’écouler
des deux robinets avant de brancher l’appareil.
Notice Fontaines 3/07/06 15:53 Page 8
Page 9

CAUTION
CAUTION
Read all these instructions carefully before using this product.
• Make sure that the voltage rating on the type plate corresponds to your main voltage. If not, see your
retailer and do not connect the appliance.
• Never leave the appliance unsupervised when in use.
• If you have to leave, even a short moment, stop the appliance.
• Keep out of children or incompetent persons and do not allow them to operate this appliance.
• Only use the appliance for domestic purposes and in the way indicated in these instructions.
• From time to time, check the cord for damages. Never use the appliance if cord or appliance show any
sign of damage.
• Make sure that the connection cord does not touch any hot surface.
• Do not store or use gasoline or other flammables vapors and liquids in the vicinity of the appliance.
• Never immerse the product in water or any liquid for any reasons. Do not use it near a shower, a bath-
tub or a swimming-pool.
• Do not use the appliance outdoor.
• Do not use if you have wet hands.
• Never use the appliance on or near hot surfaces.
• Never move or tidy the appliance by pulling the cord.
• Unplug the appliance before cleaning.
• Do not clean the appliance with abrasive chemicals.
• Do introduce neither metallic objects, nor fingers inside the appliance in order to protect you from elec-
trical shock.
• Never use accessories that are not recommended or supplied by the manufacturer. It could constitute a
danger to the user and risk to damage the appliance.
• All interventions made by a non-qualified person can be dangerous; in this case guarantee conditions
would cancel. As all electrical products, a competent electrician must repair it.
Specific r
ecommendation :
• Do not use this dispenser to dispense anything other than water.
• Wipe up any water spills immediately after loading or unloading water bottles.
• Do not use with water that is microbiologically unsafe or of unknown quality.
• The dispenser heats water to a temperature approximately 190°F (88°C). Children, the disabled and the
elderly are at highest risk of being scalded.
CAUTION : Do not plug in the power cord or turn on the power switches
when the waterdispenser is empty.
THE MANUFACTURER WILL NOT ASSUME ANY RESPONSIBILITY IN CASE OF NON ADHERENCE TO
THIS RECOMMENDATION
SAVE THESE INSTRUCTIONS CAREFULLY
9
ENGLISH
ENGLISH
For your comfort and safety,
ALPATEC has checked all the steps of manufacturing. The products have been
made for you to enjoy their design and easiness to use.
ALPATEC, a complete range of air conditioners, coolers, fans and
heaters for you to be completely satisfied.
Notice Fontaines 3/07/06 15:53 Page 9
Page 10

PROPER INST
PROPER INST
ALLA
ALLA
TION AND LOCA
TION AND LOCA
TION
TION
The water dispenser should be moved by holding it on both sides with both hands, instead of lifting it at
the top with one hand.
Allow at least 1” (2.5cm) of space between the back of the water dispenser and the wall to allow proper
air circulation.
Do not install the water dispenser where the temperature will go below 50°F (10°C) or above 100°F (38°C).
Install the water dispenser on a level floor or counter strong enough to support it when fully loaded. Do
not install where it will be subject to direct sunlight, heat or moisture.
DESCRIPTION
DESCRIPTION
1. Dust cover
2. Top cup
3. Alcula
4. Icy water pushbutton (F500FC and F500FT models) or normal water pushbutton (F500CT model)
5. Drip pan
6. Hot water pushbutton (F500FC and F500CT models) or normal water pushbutton (F500FT model)
7. Drain plug (one on F500CT and F500FT models, two on F500FC)
8. Hot water key safety tab
9. Adaptor for 0,33L to 2L bottles
10. Adaptor for 5L bottles
11/12/13/14. See specific components
10
14 13
1
2
3
4
5
6
7.a
8
9
10
11
12
7.b
( Black )
( White )
Switches
Notice Fontaines 3/07/06 15:53 Page 10
Page 11

Specific components
Model F 500 FC F 500 FT F 500 CT
Part No. Hot and Cool Cool & Normal Hot & Normal
11. Red Indicator Heating is in progress Indicates power ON Heating is in progress
when it is ON. when it is ON.
12. Double colour Cooling is in progress Cooling is in progress ---
Indicator - RED when it is ON. When it is ON
12. Double colour the set temperature is the set temperature is the set temperature is
Indicator - GREEN reached when it is ON reached when it is ON reached when it is ON
13. White switch Heating power switch --- Heating power switch
14. Black switch Cooling power switch Cooling power switch ---
NOTE : To use hot water function and cool water function, press 0/I button on the back side of appliance (13
and/or 14) when the button is on “I” or “marche” position, the appliance is switch on. When the button is on
“0”, the appliance is switch off.
The words ‘froid” and “chaud” are only indication.
Features/model F 500 FC F 500 FT F 500 CT
Hot and cool Cool and normal Hot and normal
Hot water tank capacity and first 420 ml . 10 min --- 800 ml . 10 min
time to warm up (88°C)
Icy water tank capacity and first 350 ml . 40 min 700 ml . 40 min --time to cool (<12°C)
Normal water --- Direct flowing Direct flowing
LOADING THE DISPENSER
LOADING THE DISPENSER
• Make sur
e the dispenser is unplugged with both the hot and cold power switched of
f.
• Wash hands and wipe the adaptor and the top of the bottle with a clean cloth.
• Avoid touching the part of the bottle and adaptor that will be in contact with the water dispenser.
• Make sure the water level in the top of the dispenser is low enough to allow for proper bottle installation.
Failure to do so may cause the dispenser to overflow.
• Please refer to “care and cleaning of the dispenser” for using the water dispenser for the first time or after
its maintenance.
11
Notice Fontaines 3/07/06 15:53 Page 11
Page 12

1. Remove the cover on the bottle, and fit the adaptor into the bottle mouth.
a) Please use 9. adaptor for 0.33 to 2 L
bottles. For fitting, align the adaptor center to the bottle mouth, and force it into the mouth, until an
even “click” is heard.
b) Please use 10. adaptor for 5L bottles. For fitting, align the adaptor center to the bottle mouth, and tight-
ly turn the adaptor onto the bottle mouth.
2. Load the bottle fit with adaptor onto the top cup of the water dispenser as shown.
3. Pr
ess the hot water key (please
refer to the instruction below for this operation) and cold water key until water is flowing out homogeneously from respective taps.
4. Plug the water dispenser into power outlet.
5. Switch on the water dispenser (13-14).
USE OF HOT W
USE OF HOT WAA
TER
TER
Safe tab
There is a safe tab on the hot water key of the water dispenser, to prevent possible scalding accident with
children resulted from improper operation (please refer to “Caution”).
For getting water from the hot water tap, first press the red safe tab on the key towards the water dispenser
horizontally, and at the same time press the hot water key until water flows out from the tap.
Use instructions
As the firing of the water is extremely fast, we advice you to switch off the hot water switch (13) as soon as
you finish to help yourself.
Moreover, this will allow you to economize on energy.
12
Bottle fit with adaptor
is mounted on the
water dispenser.
Drain plug
Notice Fontaines 3/07/06 15:53 Page 12
Page 13

CARE AND CLEANING OF THE DISPENSER
CARE AND CLEANING OF THE DISPENSER
Drain from water dispenser
The remaining water should be drained from the water tank when the tank is to be cleaned or the water
dispenser will not be used for a long time.
1. Set the switch on the back of water dispenser to off position, and unplug the power cord of the water
dispenser.
2. Remove the bottle from the water dispenser.
3. FOR MODELS F 500 FC AND F 500 CT ONLY : this step is to cool the water inside the appliance,
in order to avoid any burn risk during the draining :
Place a container that can withstand the hot water temperature under the hot water tap of the water
dispenser, open the hot water tap with hand to allow water flow into the container, until the water flowing out is close to room temperature. Continuously pour water into the top cup of water dispenser as
needed (water should be poured in proper amount, to avoid overflow of water from the top cup).
4. Drain the water in the water dispenser into a container until no water flows out from the tap.
5. Put the water dispenser on a basin, and lift it by about 3 inches. Remove the drain plug as shown and
complete drain the water from the water dispenser.
6. After complete draining, fit on the plug, cover and screw again.
Warning:
• Do not hold the dispenser up side down to drain the water. It may cause the water flow about the inside
unit and short circuit may occurs.
• It is strictly forbidden to remove the silica gel plug when there is hot water in the water dispenser.
• Before turning on the power supply and connect
the power switch on the water dispenser, make sure there is a bottle with sufficient water on the
water
dispenser, and water can flow out from both taps. (Please refer to “Loading the dispenser”).
13
5L Bottle
0,33L-5L Bottle
Adaptator
Notice Fontaines 3/07/06 15:53 Page 13
Page 14

SANITIZING AND CLEANING THE W
SANITIZING AND CLEANING THE WAA
TER T
TER T
ANKS
ANKS
• Periodically the water dispenser tanks must be sanitized to prevent unpleasant tastes in the water and
cleaned to remove mineral deposits that can impair flow.
1. Before cleaning, set the power switch to off, and unplug the power cord. For a water dispenser used for
the first time, go to Step 5.
2. Completely drain the water from the bottle on the water dispenser, and remove the bottle.
3. Drain water from the water tank of the water dispenser. (See Drain from water dispenser)
4. Replace the silica gel plug and bottom cover.
5. Do not directly inject bleaching powder into the water dispenser, as concentrated bleaching powder
solution may damage plastics. Fill a 2L bottle with water, and add about 2.5ml bleaching agent of 6.0%,
and gently swing it to get it homogeneous. Fit an adaptor onto the bottle and place it on the water dispenser (See Loading the dispenser).
6. Press the hot water key, cold water key and cool water key (depending on respective types), so that
water flows out homogeneously from both taps of the water dispenser.
7. Wait for about 10-15 min.
8. Completely drain the water from the bottle, and remove the bottle. Drain water from the water tank of the
water dispenser (see Drain from water dispenser), and put on the water dispenser plug.
9. Add clean water into the water dispenser bottle and drain water from the taps until no more water flows
out, and drain water from the water tank of the water dispenser (see Drain from water dispenser).
10. Repeat previous Step (9) for 2 ~ 3 times.
11. Drain water from the water tank of the water dispenser (see Drain from water dispenser), put on the
plug, fit the bottom cover and screws with a screwdriver.
12. Operate as per “Loading the dispenser”, and the water dispenser can be used normally.
CAUTION
The power supply to the water dispenser can be turned ON only
when water can flow
out from both taps of the water dispenser homogeneously.
14
Notice Fontaines 3/07/06 15:53 Page 14
Page 15

Troubleshooting tips
Problem Possible Causes What To Do
Water has poor Unit needs to be sanitized. See Cleaning and Sanitizing the Water
taste or odor. Tanks.
Water is not hot enough Dispenser is unplugged. Push the plug completely into the outlet.
or cold enough.
The fuse is Blown/ circuit Replace house fuse or reset the house
breaker is tripped. circuit breaker. If too many items are
plugged into a single circuit, move
some items to a different circuit.
All the water in the water
tank has been used. Wait 30 minutes for heating or cooling.
When you use the appliance Antibacterial plastic water The water is all the same drinkable
for the first time, the water circuits are new. and the quality is not changed.
has an unpleasant taste. Never the less you can rinse the
circuits with water until the bad taste
disappears.
When using 5L water bottle, ensure that plastic is rigid enough in order
that the bottle does not break.
15
Notice Fontaines 3/07/06 15:53 Page 15
Page 16

16
07/2006
Indications relatives à la protection de l’environnement
Au terme de sa durée de vie, ce produit ne doit pas être éliminé avec les ordures ménagères mais doit être remis à un
point de collecte destiné au recyclage des appareils électriques et électroniques. Le symbole figurant sur le produit, la
notice d’utilisation ou l’emballage vous indique cela. Les matériaux sont reyclables conformément à leur marquage.
Vous apporterez une large contribution à la protection de l’environnement par le biais du recyclage, de la réutilisation
matérielle ou par les autres formes de réutilisation des appareils usagés. Veuillez vous adresser à votre municipalité pour
connaître la déchetterie compétente.
Instructions on environment protection
Do not dispose of this product in the usual household garbage at the end of its life cycle ; hand it over a collection point
for the recycling of electrical and electronic appliances. The symbol on the product, the instructions for use or the
packing will inform about the methods of disposal. The materials are recyclable as mentioned in its marking.
By recycling or others forms of re-utilization of old appliances, you are making an important contribution to protect our
environment. Please inquire at the community administration for the authorized disposal location.
Notice Fontaines 3/07/06 15:53 Page 16
 Loading...