

Allstar 9921MT, 9921T, 9921TK, 9931MT, 9931T User Manual
...
Manufacturer’s Limited Warranty
Allstar warrants its radio controls to be free from defect in material and workmanship for a period of one (1)
year from the date of purchase. To obtain service, contact your dealer.
To obtain service under this warranty the buyer must obtain authorization instructions for the return of any
goods from Allstar before returning the goods. The goods must be returned with complete identification,
with copy of proof-of-purchase, freight prepaid and in accordance with Allstar’s instructions or they will not
be accepted. In no event will Allstar be responsible for goods returned without proper authorization or
identification.
Goods returned to Allstar for warranty repair within the warranty period, which upon receipt by Allstar are
confirmed to be defective and covered by this limited warranty, will be repaired or replaced at Allstar’s sole
option, at no cost and returned pre-paid. Defective parts will be repaired or replaced with new or factory
rebuilt parts at Allstar’s sole option.
This limited warranty does not cover non-defect damage, damage caused b y unreasonable use, damage
caused by improper installation or care, vandalism or lightning, fire or excessive heat, flood or other acts of
God (including, but not limited to misuse, abuse or alterations, failure to provide reasonable and necessary
maintenance), labor charges for dismantling or reinstalling a repaired or replaced unit, or replacement
batteries.
These warranties are in lieu of all other warranties, either expressed or implied. All implied warranties of
merchantability and/or fitness for a particular purpose are hereby disclaimed and excluded. Under no
circumstances shall Allstar be liab le for consequential, incidental or special dama ges arising in connection
with the use or inability to use this product. In no event shall Allstar’s liability for breach of warranty, breach
of contract, negligence or strict liability exceed the cost of the product covered hereby. No person is
authorized to assume for Allstar any other liability in connection with the sale of this product.
This warranty gives you specific legal rights. Warranty effective after July 24, 2002.
Copyright © 2002 c.p.Allstar Corporation PART NUMBER 111243 REV F
After installing your receiver and transmitter, check the
operation of your radio controls b y moving
approximately 45 feet back from the garage d oor, then
press the transmitter button. Operation at this distance
should be reliable. However, environmental condi tions
and the location of the transmitter and receiver will
affect distance.
•
If the transmitter doesn ’t activate the operator check the
coding on both the transmitter and r eceiver. The code
setting must match exactly .
•
If the distance is inadequate ch eck the battery and
replace if necessary.
•
To maximize the operating distance move the
transmitter to different locati ons in the car until a
satisfactory distance is achieved. Vanity mirrors on sun
visors will affect performance.
•
If the receiver is in the proximit y of a metal beam or
other obstruction it may be necessary to relocate the
receiver to increase the op erating range.
•
If multiple receivers are mounted c loser than 15 feet,
blockin g and interferenc e may occur. Move the
receiver s further apart.
•
If system does not work at any dis tance, check that the
receiver terminals are connected to the proper operator
terminals.
•
If the HomeLink® transmitt er does not activate the
operator or distance is inadequate,veri fy proper
operation using the hand-held tran smitter. Contact your
HomeLink® system provider for help with
configuring the HomeLink® transmitter and to resolve
distance problems when using the HomeLink® system.
Operational Check
This device complies with Part 15 of the FCC Rules and with RSS-210 of Industry
Canada. Operation is subject to the following two conditions: (1) This device may not
cause harmful interference, and (2) this device must accept any interference received,
including interference that may cause undesired operation.
WARNING
Unexpected door operations can cause personal injury or property damage.
Classic Quik-Code Transmitter
Installation Instructions
Replacement for Models:
•9921T •9931T •8822T •8832T
•8833T •9921MT •9931MT •9921TK
•9931TK •8832TK •9931TK6
The Classic Quik Code Transmitter makes it
possible to operate a single or group of remotely
controlled devices such as a garage door opener,
with a single transmitter.
Programming the Classic is done by simply:
1. Put the transmitter in program mode.
2. Select the button you wish to use.
3. Enter your 9 digit code.
Product Features
Disconnect power to operator before any installation or repair. Follow all
instructions provided by the manufacturer of your operator.
WARNING
INSTRUCTIONS FOR REPLACEMENT TRANSMITTERS
Select the block of switches below that best matches the one in the
transmitter or receiver that you are replacing.
*The grids display an EXAMPLE
using the code shown on the switches to the left.
Allstar Radio C ontrols are comp atible with Ho meLink®.
Homelink® is a registered trade mark of Johnson Controls, Inc.
1 2 3 4 5 6 7 8 9
- - 0 0 + + - 0 +
1 2 3 4 5 6 7 8 9
- - + + - - + + -
1 2 3 4 5 6 7 8 9
- - + + - - + + -
OR
1 2 3 4 5 6 7 8 9
- - 0 0 + + - 0
+
turn page
Go to
Step 1a
turn page
Go to Step 1...
turn page
Go to Step 1...
9 switches w/ + 0 -
8 switches w/ + 0 -
9 switches w/ On & Off
Follow these simple instructions.
Please read the instructions completely before starting.
Further instructions are available at www.allstarcorp.com
1 2 3 4 5 6 7 8 9
+ / On
BUTTON
Zero
BUTTON
- / Off
BUTTON
1.
First, press and hold the +
button. The Red LED will turn on. Next,
while continuing to hold the + button,
press and hold the
-
button. Continue
to hold both buttons until the LED starts to
blink (approximately 5 seconds). Release
both buttons while
the LED is blinking.
The LED will blink two times and then
remain on to confirm you are in
programming mode.
Go to Step 2
1a.
First, press and hold the
-
button. The Red LED will turn on. Next,
while continuing to hold the
-
button,
press and hold the + button. Continue
to hold both buttons until the LED starts to
blink (approximately 5 seconds). Release
both buttons while
the LED is blinking
.
The LED will blink two times and then
remain on to confirm you are in
programming mode.
Go to Step 2
2.
While the LED is on, press the
button you wish to use.
(If your block has 8
switches press the
+
button, if not, press any button
you’d like to use).
The LED will blink off once and
then remain on.
- SELECT THE BUTTON YOU WISH TO USE
- PUT THE TRANSMITTER IN PROGRAM MODE -
- ENTER YOUR 9 DIGIT CODE
3.
Enter the 9-digit code from the
table pressing the buttons that correspond
with the grid above.
(If your block has 8 s witches
use the
+
button in the 9th positi on)
4.
After the 9-digit code is entered, the
LED will blink twice to confirm a valid code
and remain off.
5.
Repeat the procedure for the remaining buttons.
Go to Step 3...
Go to Step 4...
NOTE:
The table has a row for each one of the three buttons since it is possible to set a unique code for each
button. Write the code that you matched from your transmitter or rec eiver in the grids below.
*If the LED goes out,
start over.
*If the LED goes out,
start over.
When using the Allstar Classic with a Smart Receiver there is no need to
match a switch setting.
Simply make up your own unique code, enter it in the grid on page 2
and follow the instructions starting with Step 1.
When the transmitter is programmed, follow the instructions for teaching
the receiver the transmitter code.
Note:
If you want to program all the buttons you can Express Code them by
selecting the + button in Step 2 and ending the 9 position code in
Step 3 with a +. This will code all three buttons in one
programming step.
Keep transmitters and remote controls
out of the reach of children.
Do not let children play with or use the
transmitter or remote controls.
Unexpected door operations can cause
personal injury or property damage.
Do not place transmitter where the buttons
can be accidentally or unintentionally
activated.
WARNING
Battery Replacement
The MVP Quik-Code transmitter is provided with two
factory installed 3-volt batteries which should be
replaced after two years of normal use. The transmitter
code is retained in permanent memory and will not be
lost during battery replacement. To replace the
batteries, remove the back of the case with a small
screwdriver. Carefully slip the batteries out of the
holders and replace with fresh CR2032 3-volt batteries.
The “+” on the batteries must point away from the
circuit board. Replace the back of the cover and resume
normal use.
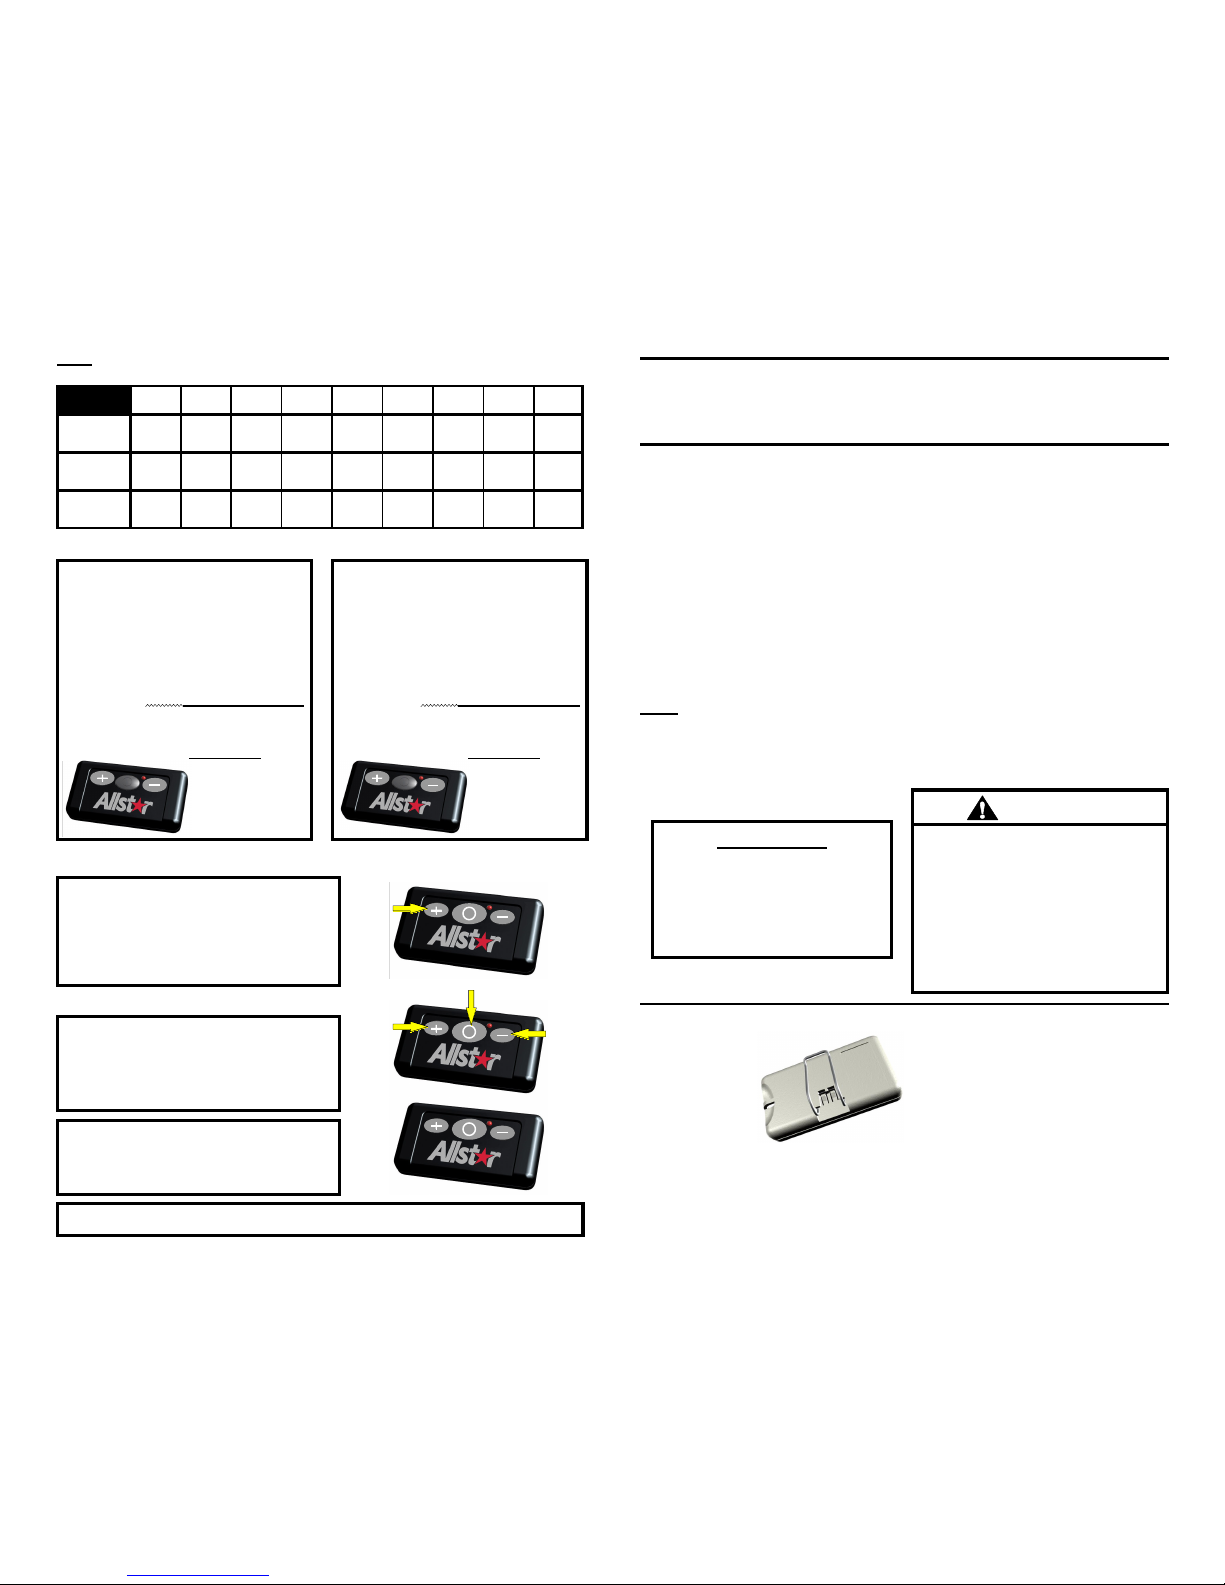
Installing the Transmitter
The transmitter is
supplied with a met al
clip which may be used
to attach the unit to a
sun visor. If the clip is
used, slide it int o the
recess provided on the
back of the transmitter
case until the snaps on the case fit around the clip.
If the transmitter is installed in a pocket in your car,
follow all the manu facturer’s inst ructions.
Improper transmitter installation or use may cause intermittent operation which can
result in unexpected door operations.
IMPORTANT
The SAME CODE must be set
on both the transmitter and
receiver. The controls will not
function if the codes are
mismatched
.
INSTRUCTIONS FOR USE WITH AN ALLSTAR
SMART RECEIVER
 Loading...