

Page 1

Telesyn™
AlliedView™ NMS System 9.0
Installation Guide
Issue 3
Copyright © 2007 Allied Telesis, Inc. All rights reserved Information in this document is subject to change without notice. without
notice
Page 2

Introduction
Congratulations on your purchase of the AlliedView™ Network Management System product. This product
allows users to query all aspects of Allied Telesis products in their network.
Who Should Read This Guide?
This document is for users who need to deploy the AlliedView NMS product on Windows1 or Solaris2
platforms. For in-depth knowledge of the NMS and its applications, refer to the AlliedView NMS AlliedView
Administration Guide and the NMS User Guide.
About this Guide
This Guide covers all aspects of the AlliedView NMS 9.0 installation, including:
• The hardware and software requirements
• Any new features for installing, starting, and uninstalling the AlliedView NMS software
• The instructions for installing, restarting, and uninstalling the AlliedView NMS server / client software
This document describes the installation of the AlliedView NMS.
The content of this Guide is organized as follows:
Chapter 1 describes how to prepare for the installation
Chapters 2 and 3 describes how to install the AlliedView NMS on the Windows 2003 and Solaris platform
Chapter 4 describes how to install a AlliedView NMS Service Pack
Chapter 5 describes how to start up the AlliedView NMS Server and clients
Chapter 6 describes how to shut down the AlliedView NMS.
Chapter 7 describes how to uninstall the AlliedView NMS
1.Registered Trademark ® 2003 Microsoft Corporation. All Rights Reserved.
2.Registered Trademark ® 2003 Sun Microsystems, Incorporated. All Rights Reserved.
Copyright © 2007 Allied Telesis, Inc. All rights reserved Information in this document is subject to change without notice.
Page 3

Chapter 8 describes how to uninstall a Service Pack.
Chapter 9 gives installation scenarios and includes references when needed to other sections or documents.
The Appendix describes how to enable anonymous ftp.
Reason for Update
For AlliedView NMS release 9.0, this document is being updated for the following:
• SSL is being removed
• The HPOV sections are being moved into a standalone document
• The Appendix has been updated, emphasizing that anonymous FTP is used by the NMS to manage
certain devices, and therefore must be enabled on the Backend server.
This document is being re-issued (Issue 3) to clarify that Solaris version 8, 9, 10 can be used on the client
and server. Refer to Section 1.2.
Service and Support
For information about support services for Allied Telesis, contact your Allied Telesis sales representative or
visit the website at www.alliedtelesis.com.
All company names, logos, and product designs that are trademarks or registered trademarks are the property
of their prospective owners.
Copyright © 2007 Allied Telesis, Inc. All rights reserved Information in this document is subject to change without notice.
Page 4

Copyright © 2007 Allied Telesis, Inc. All rights reserved Information in this document is subject to change without notice.
Page 5

Table of Contents
1 Preparing for Installation - - - - - - - - - - - - - - - - - - - - - - - -1-1
1.1 Types of Installation- - - - - - - - - - - - - - - - - - - - - - - - - - - - - - - - - - - - - - - - - - - - - - - - 1-1
1.2 System Requirements- - - - - - - - - - - - - - - - - - - - - - - - - - - - - - - - - - - - - - - - - - - - - - - 1-2
1.3 Getting Started - - - - - - - - - - - - - - - - - - - - - - - - - - - - - - - - - - - - - - - - - - - - - - - - - - - 1-2
1.4 Preparing for a Full Installation - - - - - - - - - - - - - - - - - - - - - - - - - - - - - - - - - - - - - - - 1-3
1.5 Preparing for an Upgrade Installation - - - - - - - - - - - - - - - - - - - - - - - - - - - - - - - - - - - 1-3
1.6 Preparing for Allied Telesis Management Extensions for HP OpenView- - - - - - - - - - - 1-3
2 Installation - Single Server - - - - - - - - - - - - - - - - - - - - - - -2-1
2.1 Overview- - - - - - - - - - - - - - - - - - - - - - - - - - - - - - - - - - - - - - - - - - - - - - - - - - - - - - - - 2-1
2.2 Installing on a Windows Platform - - - - - - - - - - - - - - - - - - - - - - - - - - - - - - - - - - - - - - 2-2
2.3 Installing on a Solaris Platform- - - - - - - - - - - - - - - - - - - - - - - - - - - - - - - - - - - - - - - - 2-6
3 Installing the AlliedView NMS - Distributed Front End Server3-1
3.1 Overview- - - - - - - - - - - - - - - - - - - - - - - - - - - - - - - - - - - - - - - - - - - - - - - - - - - - - - - - 3-1
3.2 Installing on a Windows Platform - - - - - - - - - - - - - - - - - - - - - - - - - - - - - - - - - - - - - - 3-2
3.2.1 Initial Installation on a Front End Server - - - - - - - - - - - - - - - - - - - - - - - - - - - - - - 3-2
3.2.2 Accessing the Front End Server from a Remote Client - - - - - - - - - - - - - - - - - - - - - 3-5
3.3 Installing on a Solaris Platform- - - - - - - - - - - - - - - - - - - - - - - - - - - - - - - - - - - - - - - - 3-5
3.4 Installation Scenarios - - - - - - - - - - - - - - - - - - - - - - - - - - - - - - - - - - - - - - - - - - - - - - - 3-6
3.4.1 Installing the FE Configuration on an Existing AlliedView NMS- - - - - - - - - - - - - - 3-6
3.4.2 Upgrading the AlliedView NMS and Installing the FE Configuration- - - - - - - - - - - 3-6
4 Installing an Upgrade Pack - - - - - - - - - - - - - - - - - - - - - - -4-1
4.1 Overview- - - - - - - - - - - - - - - - - - - - - - - - - - - - - - - - - - - - - - - - - - - - - - - - - - - - - - - - 4-1
4.2 Upgrading the Single Server NMS Back-End - - - - - - - - - - - - - - - - - - - - - - - - - - - - - - 4-1
4.3 Upgrading the Distributed NMS FE Servers- - - - - - - - - - - - - - - - - - - - - - - - - - - - - - - 4-5
AlliedView NMS Installation Guide (Table of Contents)
Page 6

5 Starting Up AlliedView NMS 9.0- - - - - - - - - - - - - - - - - - - - 5-1
5.1 Starting the AlliedView NMS Server on Windows - - - - - - - - - - - - - - - - - - - - - - - - - - -5-1
5.1.1 Starting the NMS Server from the Start Menu - - - - - - - - - - - - - - - - - - - - - - - - - - -5-1
5.1.2 Starting the NMS Server from the Services Window - - - - - - - - - - - - - - - - - - - - - - -5-1
5.2 Starting the AlliedView NMS Server on Solaris - - - - - - - - - - - - - - - - - - - - - - - - - - - - -5-2
5.3 Starting the Client- - - - - - - - - - - - - - - - - - - - - - - - - - - - - - - - - - - - - - - - - - - - - - - - - -5-3
5.3.1 Overview - - - - - - - - - - - - - - - - - - - - - - - - - - - - - - - - - - - - - - - - - - - - - - - - - - - -5-3
5.3.2 Local Application Client- - - - - - - - - - - - - - - - - - - - - - - - - - - - - - - - - - - - - - - - - -5-3
5.3.3 Remote Client - Java Web Start - - - - - - - - - - - - - - - - - - - - - - - - - - - - - - - - - - - - -5-4
5.3.4 HTML Client - - - - - - - - - - - - - - - - - - - - - - - - - - - - - - - - - - - - - - - - - - - - - - - - -5-6
5.3.5 Client Limitations - - - - - - - - - - - - - - - - - - - - - - - - - - - - - - - - - - - - - - - - - - - - - -5-7
6 Shutting Down the AlliedView NMS - - - - - - - - - - - - - - - - -6-1
6.1 Shutting Down a AlliedView NMS Client - - - - - - - - - - - - - - - - - - - - - - - - - - - - - - - - -6-1
6.1.1 Application Client - - - - - - - - - - - - - - - - - - - - - - - - - - - - - - - - - - - - - - - - - - - - - -6-1
6.1.2 HTML Client - - - - - - - - - - - - - - - - - - - - - - - - - - - - - - - - - - - - - - - - - - - - - - - - -6-1
6.2 Shutting Down the AlliedView NMS Server- - - - - - - - - - - - - - - - - - - - - - - - - - - - - - - -6-1
6.2.1 Windows - - - - - - - - - - - - - - - - - - - - - - - - - - - - - - - - - - - - - - - - - - - - - - - - - - - -6-1
6.2.2 Solaris - - - - - - - - - - - - - - - - - - - - - - - - - - - - - - - - - - - - - - - - - - - - - - - - - - - - - -6-2
7 Uninstalling the AlliedView NMS - - - - - - - - - - - - - - - - - - - 7-1
7.1 Overview - - - - - - - - - - - - - - - - - - - - - - - - - - - - - - - - - - - - - - - - - - - - - - - - - - - - - - - -7-1
7.2 Windows - - - - - - - - - - - - - - - - - - - - - - - - - - - - - - - - - - - - - - - - - - - - - - - - - - - - - - - -7-1
7.3 Solaris - - - - - - - - - - - - - - - - - - - - - - - - - - - - - - - - - - - - - - - - - - - - - - - - - - - - - - - - - -7-1
8 Uninstalling an AlliedView NMS Service Pack - - - - - - - - - -8-1
9 Installation Steps - Overview - - - - - - - - - - - - - - - - - - - - - - 9-1
9.1 NMS and iMAP/AT Device Software Version Compatibility - - - - - - - - - - - - - - - - - - - -9-1
9.2 Configuring a New NMS with New Devices - - - - - - - - - - - - - - - - - - - - - - - - - - - - - - - -9-2
10 Appendix - Enabling Anonymous FTP - - - - - - - - - - - - - - 10-1
10.1 Overview - - - - - - - - - - - - - - - - - - - - - - - - - - - - - - - - - - - - - - - - - - - - - - - - - - - - - -10-1
TOC-2
AlliedView NMS Installation Guide (Table of Contents)
Page 7

10.2 Windows - - - - - - - - - - - - - - - - - - - - - - - - - - - - - - - - - - - - - - - - - - - - - - - - - - - - - - 10-1
10.3 Solaris - - - - - - - - - - - - - - - - - - - - - - - - - - - - - - - - - - - - - - - - - - - - - - - - - - - - - - - - 10-2
10.3.1 Creating the Anonymous FTP Account - - - - - - - - - - - - - - - - - - - - - - - - - - - - - 10-2
10.3.2 Create the FTP Directory Tree - - - - - - - - - - - - - - - - - - - - - - - - - - - - - - - - - - - 10-2
10.3.3 Configure Upload Permission on Solaris 9-10- - - - - - - - - - - - - - - - - - - - - - - - - 10-4
10.3.4 Test Anonymous FTP Service- - - - - - - - - - - - - - - - - - - - - - - - - - - - - - - - - - - - 10-4
10.3.5 Configure AlliedView NMS (if necessary) - - - - - - - - - - - - - - - - - - - - - - - - - - - 10-4
10.3.6 Shell Commands - - - - - - - - - - - - - - - - - - - - - - - - - - - - - - - - - - - - - - - - - - - - 10-5
AlliedView NMS Installation Guide (Table of Contents)
TOC-3
Page 8

TOC-4
AlliedView NMS Installation Guide (Table of Contents)
Page 9

1. Preparing for Installation
1.1 Types of Installation
There are two basic types of AlliedView NMS installations: a full installation and an Upgrade Pack. A full installation is used when installing the NMS for the first time on a host machine. A full installation copi es all of the
files required to run the NMS to your hard drive. The software is delivered on a CD-ROM., which contains the
necessary files, documentation, and an installer program that steps you through the installation process.
AlliedView NMS Upgrade Packs are designed to upgrade your NMS to the next major software release.
Upgrade packs are mandatory and may not be skipped.
Service Packs are designed to service your AlliedView NMS with software bug fixes and are optional.
Service packs are inclusive of the previous SP so it is only necessary to apply the latest version. For example, if
SP 3 is latest version applying it will also apply the contents of SP 1 and SP 2.
Available for use with your AlliedView NMS and HP OpenView is the AlliedView NMS Management Exten-
sions for HP OpenView, which is a set of extensions to HP OpenView that allow the AlliedView NMS to be
accessed from the HP OpenView menu. It is a separate product that may be installed on the HP OpenView host
machine once your AlliedView NMS is installed.
AlliedView NMS Installation Guide (Preparing for Installation)
1-1
Page 10

System Requirements
1.2 System Requirements
The system requirements for the AlliedView NMS are listed in the following table.
TABLE 1-1 AlliedView NMS System Requirements
Requirement Windows Solaris
AlliedView NMS 9.0 server OS: Windows 2003
Machine: Dell, IBM, etc.
Processor: 1@3.4 GHz (2@3.6 GHz)
RAM: 1 GB (4 GB)
Disk: 40GB (RAID 5)
Monitor: 1280x1024 resolution
Client to communicate with
AlliedView NMS 9.0 server
Browser (Platform Independent)
OS: Windows 2000/2003/XP
Processor: 1GHz minimum
RAM: 512 Mb Minimum
Monitor: 1280x1024 resolution
Java JRE: 1.5.0_05
Explorer 6.0 and above
Mozilla 1.7 and above
OS: Solaris 8, 9, or 10
Machine: Sun Fire V210 (V440)
Processor: UltraSparc llli 1.34 GHz
(2@1.59 GHz)
RAM: 1 Gb (4 GB)
Disk: 40 GB 15,000 RPM SCSI (RAID 5)
Monitor: 1280x1024 resolution
OS: Solaris 8, 9, or 10
Machine: Sun Blade V125
RAM: 512 MB
Monitor: 1280x1024 resolution
Java JRE: 1.5.0_05
Mozilla 1.7 and above
1.3 Getting Started
If you are not familiar with the AlliedView NMS, you may want to review the product documentation prior to
installation to familiarize yourself with the AlliedView NMS. There are two user documents provided in addi tion to this Guide: the AlliedView NMS Administration Guide, and the NMS User Guide. The NMS Administra-
tion Guide describes the tasks associated with the administration of the AlliedView NMS. The NMS User Guide
describes the NMS user interface and how it is used. You may need to refer to the NMS Administration Guide
during the installation process. Locate this document before you start.
Release Notes are provided with each installation CD. These notes contain important information regarding the
release or Upgrade Pack you are installing. Before installing your AlliedView NMS software or Upgrade Pack,
carefully review the Release Notes and follow any special instructions that may be provided.
Note: You may want to print the Release Notes for future reference.
The preparation required depends on the type of installation you are performing. If you are performing a full
installation, refer to 1.4. If you are performing an Upgrade Pack installation, refer to 1.5.
1-2
AlliedView NMS Installation Guide (Preparing for Installation)
Page 11

Preparing for a Full Installation
1.4 Preparing for a Full Installation
Before starting the installation, you must verify that the host machine or machines on which you plan to install
the AlliedView NMS meet the requirements described in Table 1-1. If any host machine upgrades are necessary,
you must perform these upgrades prior to installing the AlliedView NMS. Upgrading host machines is not covered in this document. You will need to refer to the documentation provided with your host machines for these
procedures. Do not install or upgrade the AlliedView NMS on a machine until the machine meets the stated
requirements.
Caution: The AlliedView NMS server must have a static (rather than dynamic) IP address.
Otherwise, traps will not be routed correctly.
If the host machines meet the requirements, you are now ready to begin the installation process. An installation
CD-ROM is provided with your AlliedView NMS. If you have not already done so, locate and unpack this CDROM.
Note: If you cannot find your CD-ROM, contact your Allied Telesis representative.
You are now ready to begin. If you are installing the NMS on a Windows platform, refer to 2.2. If you are installing the NMS on a Solaris platform, refer to 2.3.
Note: Only one version of the NMS may exist on the systems. Uninstall previous versions of the
NMS or use the Upgrade Pack process to upgrade.
1.5 Preparing for an Upgrade Installation
An Upgrade Pack is used to upgrade an existing NMS installation to the latest release. Upgrade packs are available at the Allied Telesis website. Contact your representative for an account.
To prepare for an Upgrade Pack installation, perform the following steps:
1. Retrieve the upgrade pack from the following website:
http://www.alliedtelesyn.com/support/software/restricted/login.aspx
2. Perform an NMS backup. Refer to the NMS Administration Guide for instructions.
3. Shut down the NMS clients as well as the server. Refer to Chapter 6.
You are now ready to install the NMS Upgrade Pack. Refer to Chapter 4.
1.6 Preparing for Allied Telesis Management Extensions for HP OpenView
The Allied Telesis Management Extensions for HP Openview is a set of extensions to HP OpenView (HPOV) to
allow the HPOV to identify, monitor and manage Allied Telesis devices. Advanced device-specific and network
management functions are provided by the AlliedView NMS.
AlliedView NMS Installation Guide (Preparing for Installation)
1-3
Page 12

Preparing for Allied Telesis Management Extensions for HP OpenView
The Extension feature is not installed on the same machine as the AlliedView NMS. It should be installed on the
machine having HPOV. Refer to the Installation Guide for AlliedView NMS Extensions for HP OpenView.
1-4
AlliedView NMS Installation Guide (Preparing for Installation)
Page 13
2. Installation - Single Server
BE / FE Server (1)
Clients (5)
Managed
Elements
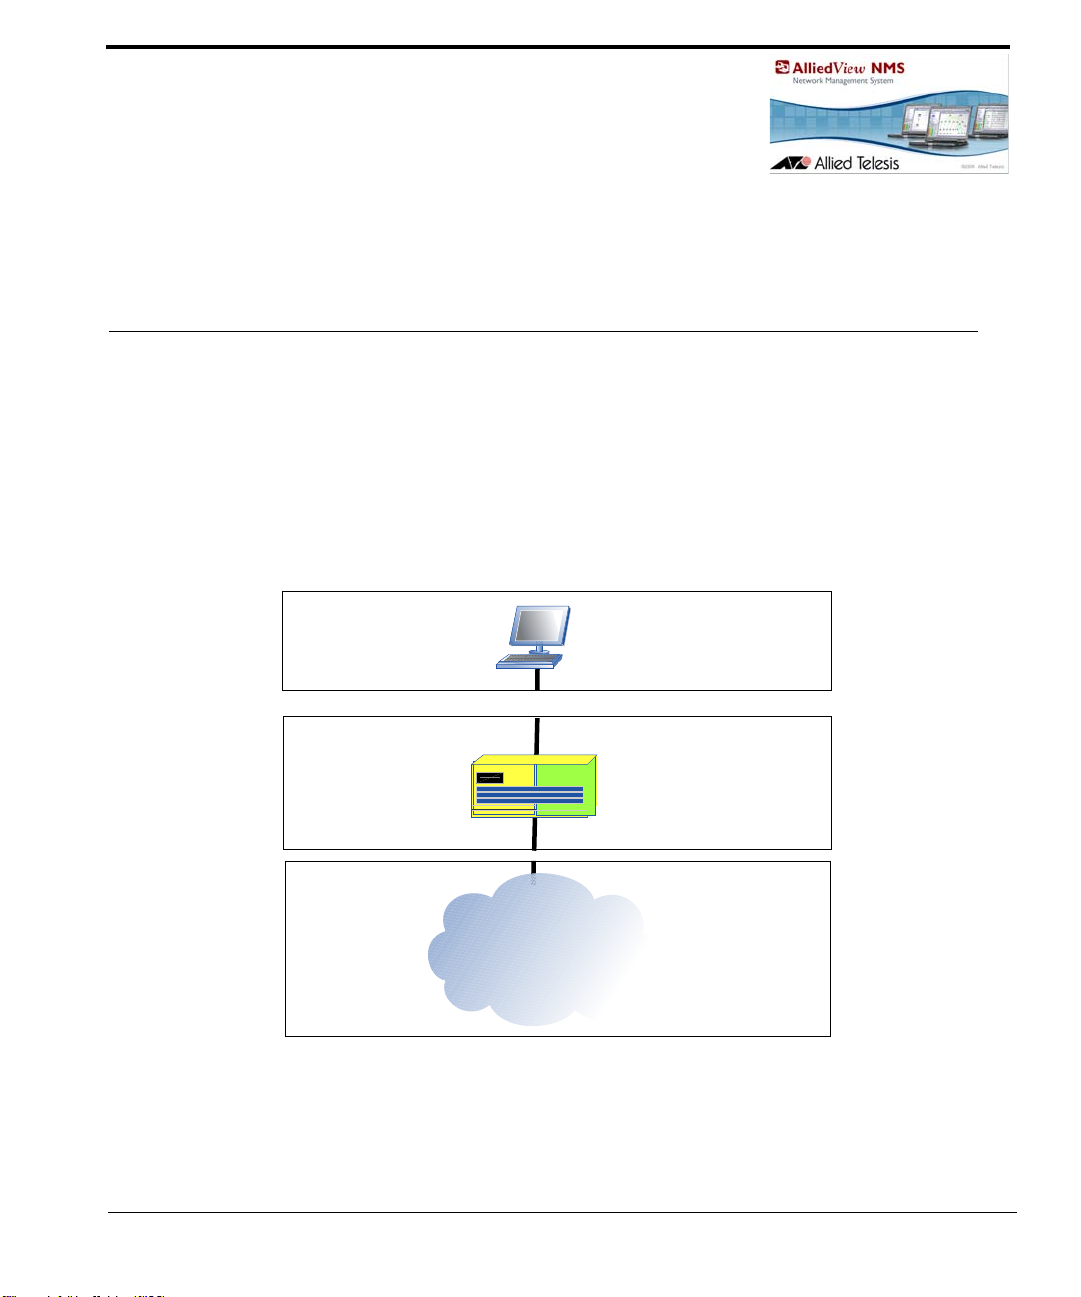
2.1 Overview
In the single server (default) configuration, the AlliedView NMS software is loaded on one server, which provides both Back End (BE) and Front End (FE) functionality.
Note: Anonymous FTP is used by the NMS to manage certain devices, and therefore must be
enabled on the server. Refer to Appendix A for instructions.
FIGURE 2-1 Single Server Configuration
AlliedView NMS Installation Guide (Installation - Single Server)
2-1
Page 14
Installing on a Windows Platform
2.2 Installing on a Windows Platform
To install the AlliedView NMS on a Windows platform, follow these steps.
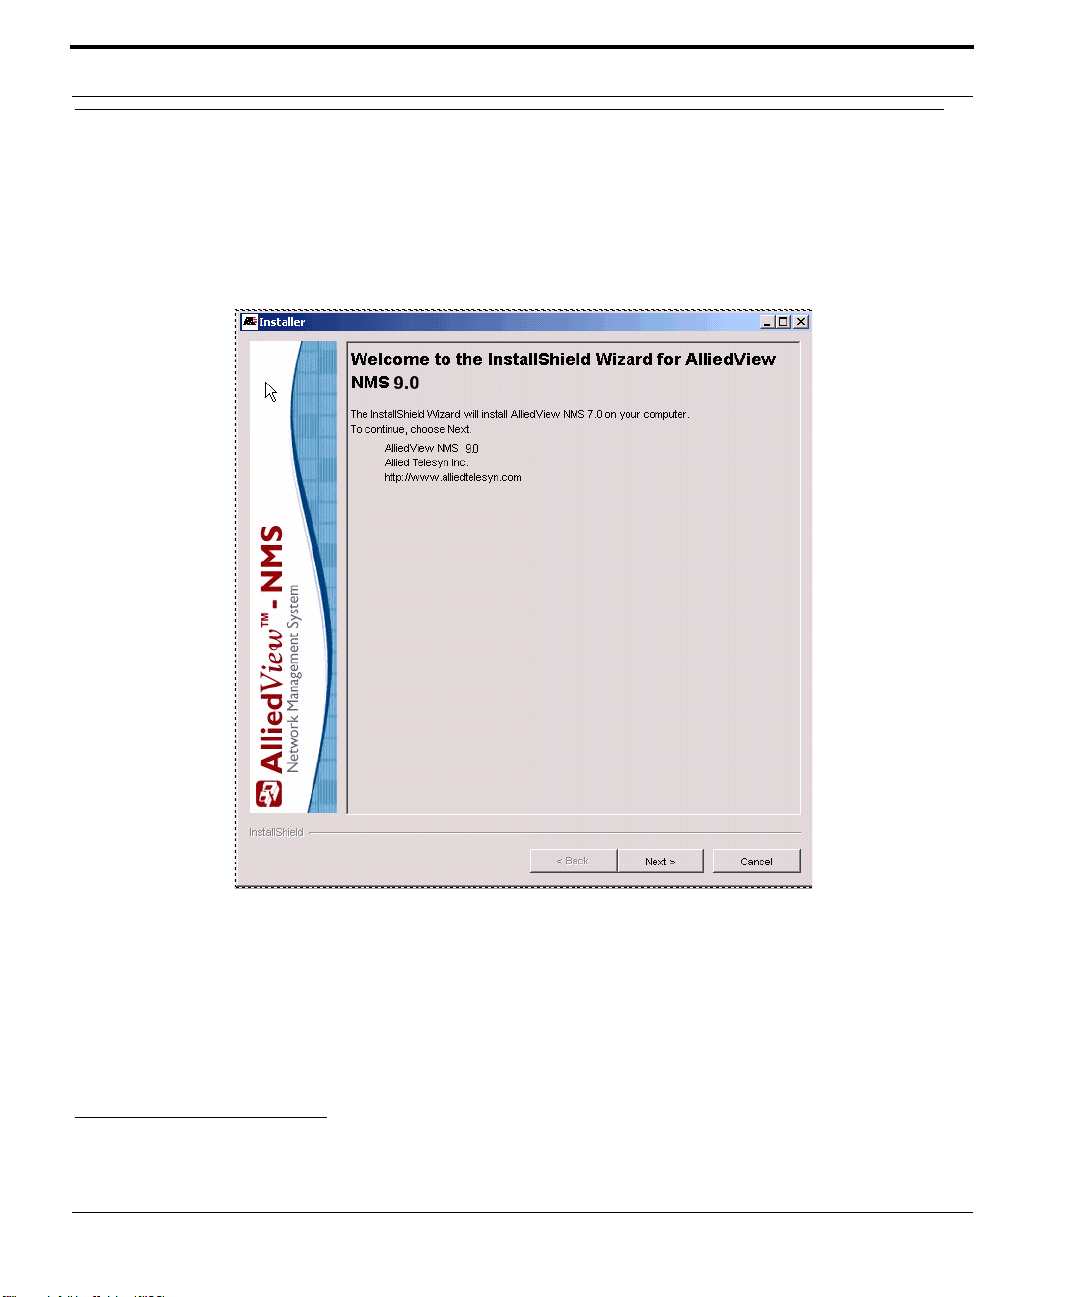
1. Insert the Windows installation CD-ROM in the CD-ROM drive. After approximately 60 seconds, the
1
InstallShield
Wizard Installer screen will appear, as shown in the following figure.
FIGURE 2-2 AlliedView NMS Installation Wizard Screen
2. On the Installer screen, click Next. This will display the license agreement page shown in the following fig-
ure.
1. Registered Trademark ® 2003 InstallShield Software Corporation. All rights reserved.
2-2
AlliedView NMS Installation Guide (Installation - Single Server)
Page 15
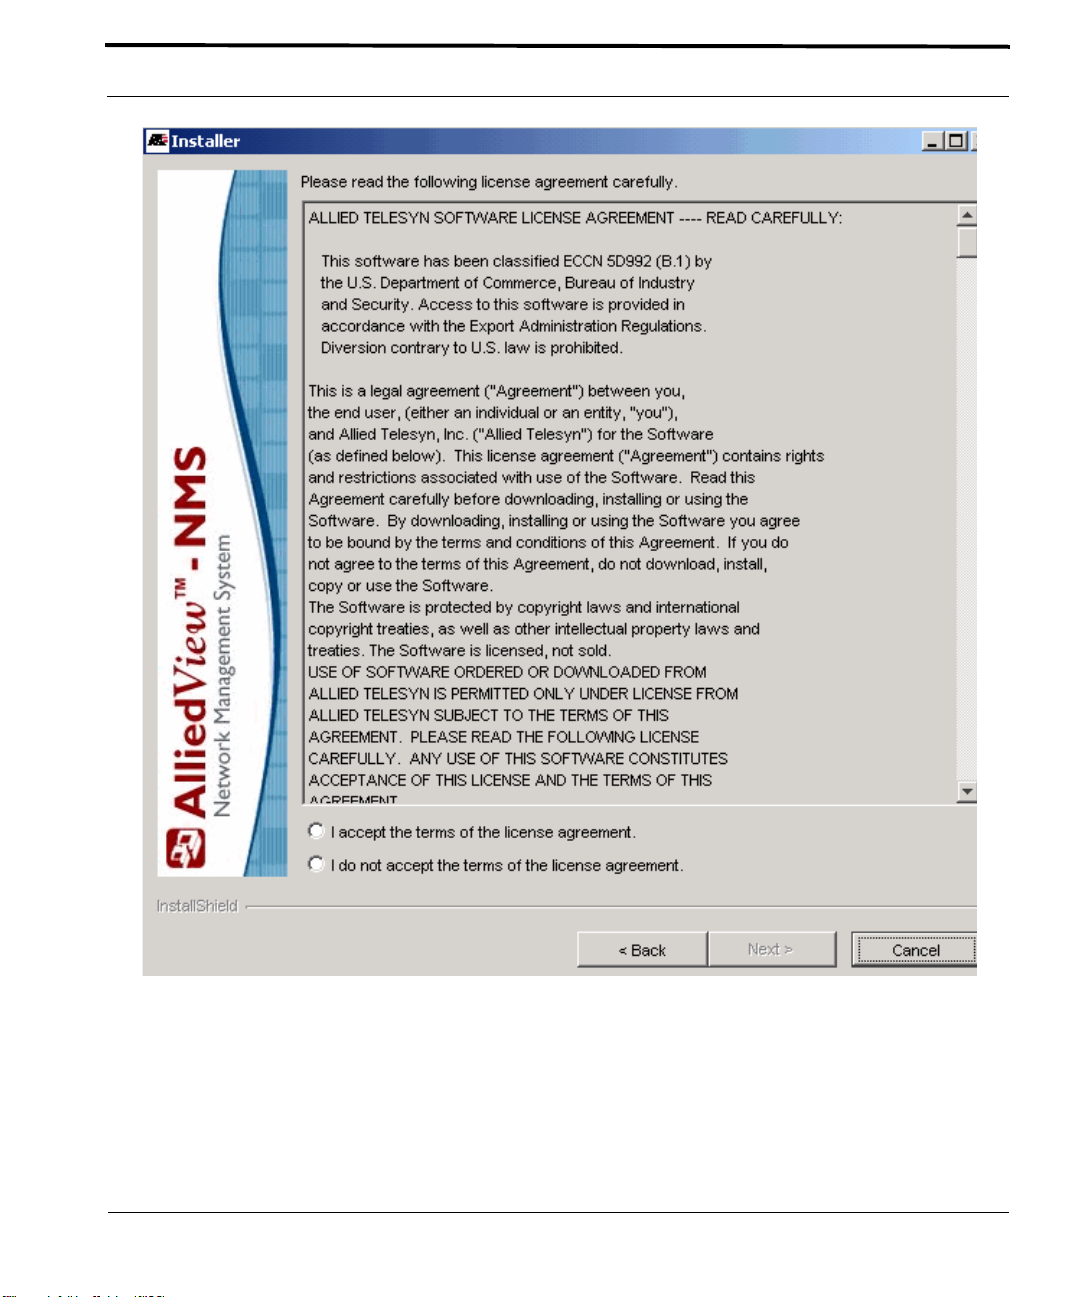
Installing on a Windows Platform
FIGURE 2-3 AlliedView NMS Installation Wizard License Agreement
3. Carefully read the license agreement, click the I accept the terms of the license agreement radio button, and
then click Next.
Note: If you do not wish to proceed with the installation, click Cancel to exit.
The next screen will specify the installation directory.
AlliedView NMS Installation Guide (Installation - Single Server)
2-3
Page 16
Installing on a Windows Platform
4. Although you can change this directory, it is highly recommended that you use the default directory pro-
vided. Click Next.
5. The next screen displays the selected installation directory and indicates the total size of the installation (in
Mb). If you need to make a change, click Back and make the change. If you wish to exit, click Cancel. Otherwise, click Next.
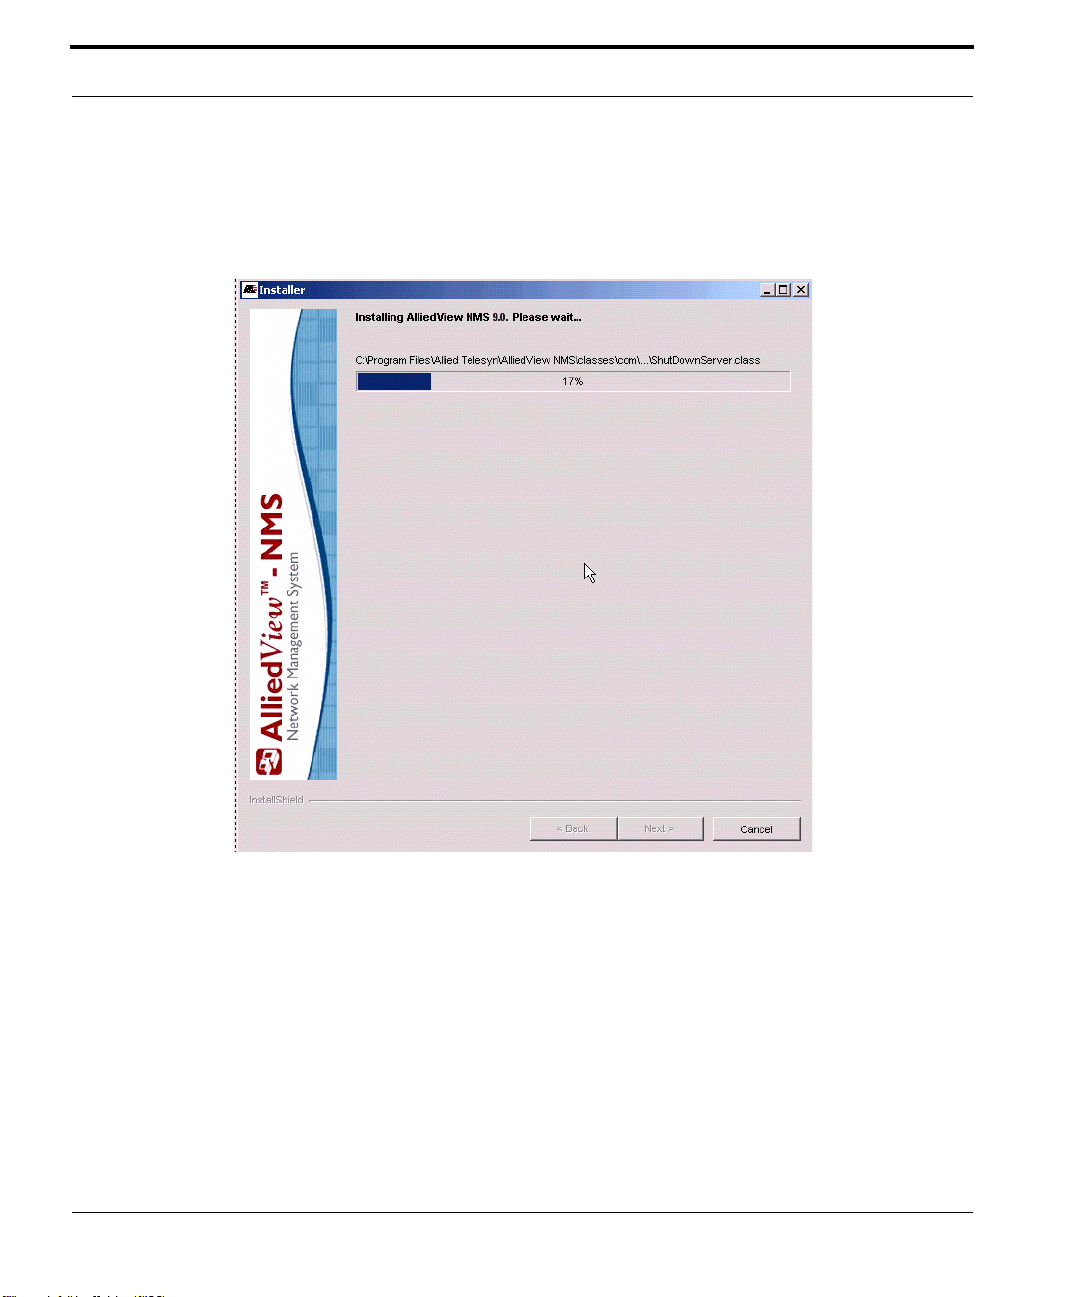
6. This will display the installation progress window shown in the following figure.
FIGURE 2-4 AlliedView NMS Installation Wizard Installation Progress
The progress bar tracks the progress of the installation. It will take a few minutes for the installation to complete. When the installation completes, the next window, shown in the following figure, will appear.
2-4
AlliedView NMS Installation Guide (Installation - Single Server)
Page 17
Installing on a Windows Platform
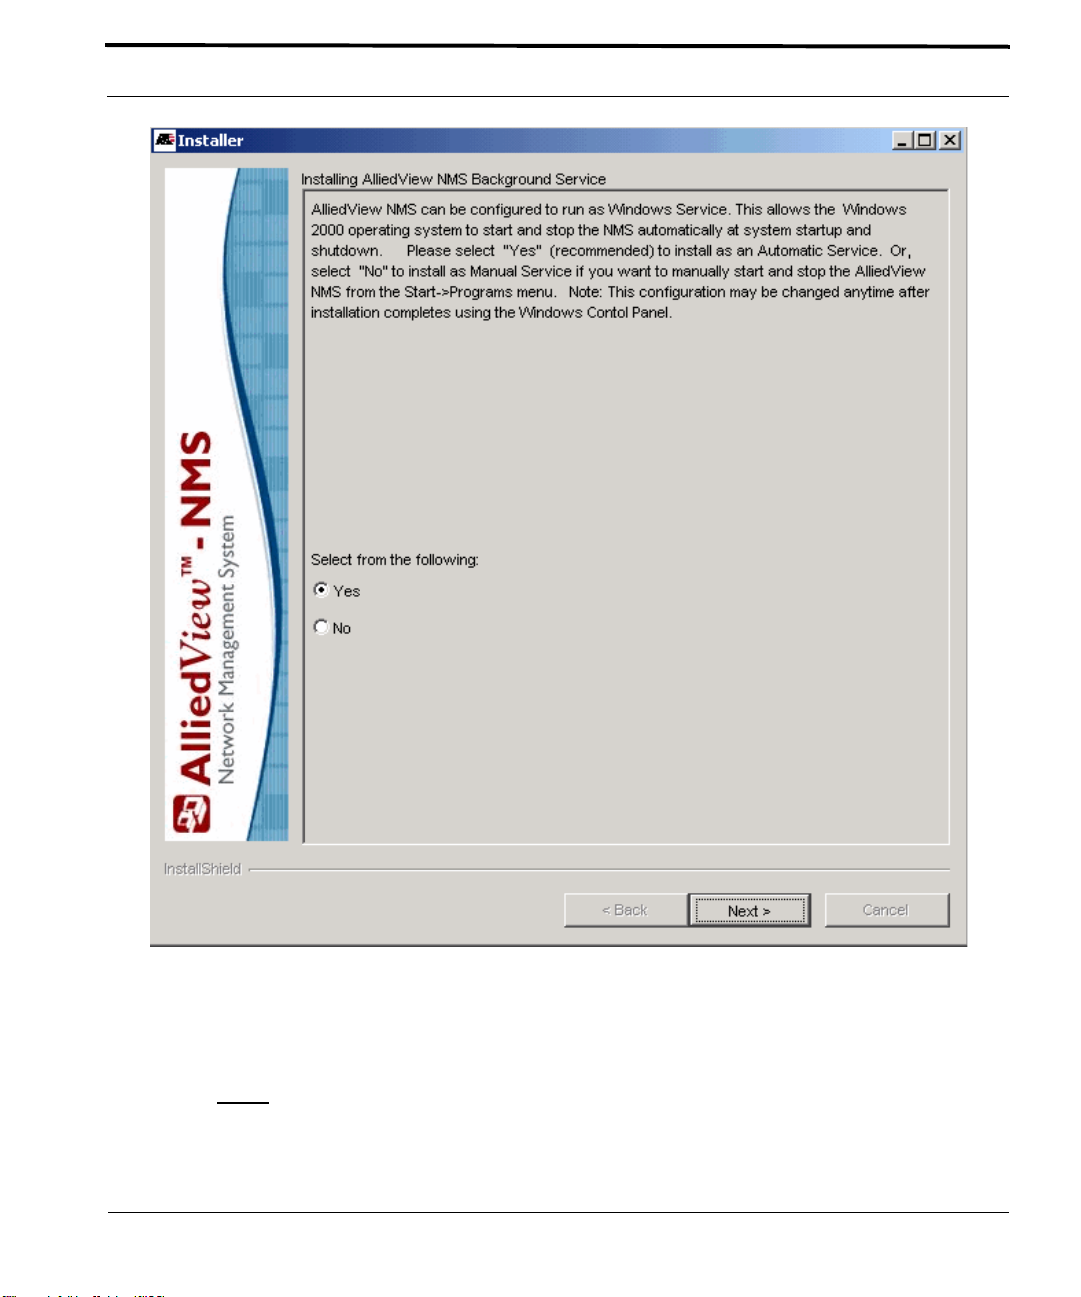
FIGURE 2-5 AlliedView NMS Installation Wizard File Installation
7. This window prompts you to choose whether to install the AlliedView NMS as a Windows service, which
allows the AlliedView NMS to automatically start up on Windows startup and shut down on Windows shutdown.
Note: It is highly
AlliedView NMS Installation Guide (Installation - Single Server)
recommended that you install the AlliedView NMS as a Windows Service.
2-5
Page 18

Installing on a Solaris Platform
Select Yes if you want the AlliedView NMS as a service. Otherwise select No. Click Next. The next window
will appear.
8. The next screen will confirm the successful installation of the AlliedV iew NMS. Complete the process as fol-
lows:
1. Click Next. The next window will appear.
2. The next window will ask you whether you want to restart your computer now or at a later time. If you
want to restart now, select Yes. Otherwise, select No.
Note: If you selected Yes, your computer will restart when you click Finish. Before restarting your
computer, if you have any Windows applications open other than the AlliedView NMS
Installation Wizard, close them now. If you selected No, this is not necessary as a restart will
not occur.
3. Click Finish to complete the process.
4. If you selected Yes to restart in the previous window, when your computer restarts, you will get the
AlliedView NMS Client logon window. If you want to log in, enter root as the username and public as
the password, and then click Connect. Otherwise, click Cancel to terminate the login process.
Note: The InstallShield adds the NMS Client startup program to your Windows Startup menu, which
means the client will start automatically when a user logs into Windows.
5. If you do not want the client to start automatically, remove AlliedView NMS Client from your Windows
Startup menu by right-clicking on it, and then selecting Delete from the pop-up menu.
You have completed the installation process. To start the AlliedView NMS, refer to Chapter 5.
2.3 Installing on a Solaris Platform
To install the AlliedView NMS on a Solaris platform, follow these steps:
1. On the machine on which the AlliedView NMS is to be installed, log in as root or as a user with root privi-
leges.
2. Insert the installation Solaris CD-ROM into the CD-ROM drive.
3. Start the Wizard manually by executing the AlliedViewNMS_x_x_Sol.bin file.
Note: The Solaris Installer requires 1.5 GB of temporary disk space to properly complete the
installation process. It is recommended the
best performance first copy the Installer (
location. For example:
% AlliedViewNMS_9_0_Sol.bin -is:tempdir /tmp -is:log /tmp/nmslog
4. Once the Installation Wizard starts, follow the instructions provided by the Installation Wizard. The instruc-
tions are identical to those provided during the installation on the Windows platform. For specific information on following the Wizard instructions, refer to Chapter 2.
2-6
AlliedView NMS Installation Guide (Installation - Single Server)
/tmp directory is used for this purpose. Also, for
AlliedViewNMS_x_x_Sol.bin) to a hard drive
Page 19

Installing on a Solaris Platform
Note: The default installation directory for the AlliedView NMS on the Solaris platform is /opt/
AlliedViewNMS. Although you can change this directory, it is highly recommended that you
use the default directory provided.
Note: Prior to release 7.0 the path was /opt/TelesynNMS.
5. Once installation is complete, start the AlliedView NMS. Refer to Chapter 5.
AlliedView NMS Installation Guide (Installation - Single Server)
2-7
Page 20

Installing on a Solaris Platform
2-8
AlliedView NMS Installation Guide (Installation - Single Server)
Page 21

3. Installing the AlliedView NMS - Distributed Front End Server
3.1 Overview
The AlliedView NMS is deployed by default in a single server, or non-distributed environment. There are therefore certain scalability limits, such as the number of devices or users. Starting in release 4.0, the AlliedView NMS
can be deployed in a multiple Front End server, or distributed, environment.
FIGURE 3-1 Distributed Front End Server Configuration
This section will focus on installing the Front End Server(s), and assumes the administrator understands how this
feature works and has deployed the network (both servers and devices) to support this configuration. The network administrator should therefore read the AlliedView NMS Administration Guide for a description of the distributed configuration (capabilities of the FrontEnd servers and Backend server) and the benefits it provides.
Installing the AlliedView NMS software on a Front End server is similar to installation on a single server, but
there are a few differences that must be considered during the installation. These are highlighted in the procedures below.
AlliedView NMS Installation Guide (Installi ng the AlliedView NMS - Distributed Front End
3-1
Page 22

Installing on a Windows Platform Initial Installation on a Front End Server
Note: The Front-End configuration is available only upon request. Please contact your Allied Telesis
representative for details.
Note: Anonymous FTP is used by the NMS to manage certain devices, and therefore must be
enabled on the Backend server. Refer to Appendix A for instructions.
3.2 Installing on a Windows Platform
Note: Prior to beginning the installation, obtain the IP address for the e xisting AlliedView NMS Back
End Server.
3.2.1 Initial Installation on a Front End Server
The software for a Front End server installation comes in a separate CD, and so can only be used to install a
Front End server. To install the AlliedView NMS Front End on a Windows platform, follow these steps:
1. Insert the Distributed Server Extensions installation CD-ROM in the CD-ROM drive. Afte r approxi mately
60 seconds, the NMS InstallShield
2. On the Installer screen, click Next. This will display the license agreement page.
3. Carefully read the license agreement, click the I accept the terms of the license agreement radio button,
and then click Next.
Note: If you do not wish to proceed with the installation, click Cancel to exit.
1
Wizard Installer screen will appear.
The next screen, shown in the following figure, will specify the installation directory.
1. Registered Trademark ® 2003 InstallShield Software Corporation. All rights reserved.
3-2
AlliedView NMS Installation Guide (Installing the AlliedView NMS - Distributed Front End
Server)
Page 23

Initial Installation on a Front End Server Installing on a Windows Platform
FIGURE 3-2 AlliedView NMS Installation Front End Wizard Install Directory
4. Although you can change this directory, it is highly recommended that you use the default directory provided.
Click Next.
5. After clicking Next, a confirmation window shows the directory and indicates the total size of the installation
(in Mb). If you need to make a change, click Back and make the change. If you wish to exit, click Cancel.
Otherwise, click Next.
6. This will display the installation progress window.
The progress bar tracks the progress of the installation. It will take a few minutes for the installation to complete. When the installation completes, the next window, shown in the following figure, will appear.
AlliedView NMS Installation Guide (Installing the AlliedView NMS - D istributed Front End
3-3
Server)
Page 24

Installing on a Windows Platform Initial Installation on a Front End Server
FIGURE 3-3 AlliedView NMS Installation Back End Host Form
7. The window prompts you to enter the IP address for the Back End server. This address must be correct to
ensure the Front End can download the appropriate files back End configuration files.
Note: If you input an incorrect address, the Front End server, at st art up, will not download the
appropriate Back End configuration files, and an error will occur. This can be corrected during
start up, as explained later in this procedure.
8. Click Next.
3-4
AlliedView NMS Installation Guide (Installing the AlliedView NMS - Distributed Front End
Server)
Page 25

Accessing the Front End Server from a Remote Client Installing on a Solaris Platform
9. The last form confirms you have successfully installed the Front End software. Click Finish.
10. There is no need to restart the server. Therefore, select Start -> Pr ograms -> <front end load> Start Server.
A progress window appears and lists the back end configuration files as they are loaded.
If the error “Unable to connect to Back End Host” appears, you have probably entered the wrong IP address
for the Back End server. To correct this, access the
nmsFE.bat
. Search on the string BE_HOST and it will have the Back End host address. Change this to the
<FE NMS load>/bin path and the file start-
correct IP address and save, then repeat this step.
11. Once the Back End configuration files are loaded, the NMS user interface will appear and will have the same
Network Object tree as the Back End server.
12. Refer to Section 5. for more information on starting up the AlliedView NMS.
13. Refer to the AlliedView NMS Administration Guide for further information on the FE server features.
3.2.2 Accessing the Front End Server from a Remote Client
If desired, a remote client can use the webstart application to access the Front End server. Note that this still
counts as one of the 5 GUI clients that are allowed per server.
The process is the same as starting up a single server configuration, except that the web server application will
use http://<FE Server IP address>:9090. Refer to the AlliedView NMS Administration Guide
for further information on the FE server features.
3.3 Installing on a Solaris Platform
The steps to install the Front End AlliedView NMS on a Solaris platform are similar to those for a Windows platform.
Follow steps 1 through 10 in 3.2.1 to install the Front End software, noting the following:
• In Step 4, the screen showing the default directory is /opt/AlliedViewNMS.
• In Step 7, the user must still input the correct IP address for the Back End server.
11. To start the AlliedView NMS, go to /opt/AlliedViewNMS/bin and execute:
./startnmsFE
If the error “Unable to connect to Back End Host” appears, you have probably entered the wrong IP address
for the Back End server. To correct this, access the
nmsFE.sh
. Search on the string BE_HOST and it will have the Back End host address. Change this to the
correct IP address and save, then repeat this step.
12. Once the Back End configuration files are loaded, the NMS user interface will appear and will have the same
Network Object tree as the Back End server.
13. Refer to Section 5. for more information on starting up the AlliedView NMS.
14. Refer to the AlliedView NMS Administration Guide for further information on the FE server features.
AlliedView NMS Installation Guide (Installing the AlliedView NMS - D istributed Front End
Server)
<FE NMS load>/bin path and the file start-
3-5
Page 26

Installation Scenarios Installing the FE Configuration on an Existing
3.4 Installation Scenarios
Since both the one BE and FE server(s) are loaded separately, it is important to ensure that the software loads are
compatible both when the system is set up as well as when upgrades are performed. This is particularly important when the administrator has an existing single server NMS and wants to change to the distributed server configuration. Moreover, the administrator may be upgrading the AlliedView NMS software version as well.
3.4.1 Installing the FE Configuration on an Existing AlliedView NMS
If the single BE AlliedView NMS server is keeping its current software load and Front End servers are being
added to the configuration, the steps are as follows, assuming the current NMS configuration is 8.0:
1. Keep the current software (8.0) on the one (now Back-End) server. No action is to be performed.
2. Install the FE version that matches the Back-End server (such as 8.0) on the FE servers, following the steps
in 3.2 or 3.3.
Note: All Front-End and Back-End servers should use either Solaris or Windows 2000/2003.
3.4.2 Upgrading the AlliedView NMS and Installing the FE Configuration
If the BE/FE AlliedView NMS is being updated and the FE configuration is being applied to the updated software load, the steps are:
1. Complete the upgrade of the single BE server to the latest AlliedView NMS version
2. Uninstall the current FE software. Refer to Section 7.
3. Install the latest AlliedView NMS version on the FE servers, following the steps in 3.2 or 3.3.
3-6
AlliedView NMS Installation Guide (Installing the AlliedView NMS - Distributed Front End
Server)
Page 27

4. Installing an Upgrade Pack
4.1 Overview
The upgrade pack is used to bring your AlliedView NMS to the next major software release. The process is identical for both Windows and Solaris. In 9.0 the same upgrade pack is used for Solaris and Windows.
Note: Prior to this procedure, perform a server backup as documented in 3.4.
4.2 Upgrading the Single Server NMS Back-End
1. Shut down the NMS Server. Refer to Chapter 8.
Caution: You must shut down the AlliedV iew NMS serv er; otherwise, the Allie dV iew NMS server
cannot successfully install the upgrade pack.
2. In your <NMS_HOME>/bin directory and locate file UpdateManager. Execute this file. This will bring up
the AlliedView NMS Update Manager window shown in the following figure.
Note: Use the UpdateManager.bat file for Windows, or the UpdateManager.sh file for Solaris.
AlliedView NMS Installation Guide (Installing an Upgrade Pack)
4-1
Page 28

Upgrading the Single Server NMS Back-End
FIGURE 4-1 AlliedView NMS Update Manager
FIGURE 4-2 AlliedView NMS Update Manager Installation Wizard
3. In the Installation Wizard window, click Browse. This will bring up the Sel e ct a File window. Refer to the
following figure.
4-2
AlliedView NMS Installation Guide (Installing an Upgrade Pack)
Page 29

Upgrading the Single Server NMS Back-End
FIGURE 4-3 AlliedView NMS Select a File Window
4. In the Select a File window, navigate to the Service Pack file located on the installation CD-ROM. This file
will have a .ppm file extension. Double-click this file, or select the file and then click Open. This will close
the Select a File window.
5. In the Installation Wizard window, if you wish to view the Readme file for this update, click Readme.
6. Click Install to apply the update. The update process will begin. The Installation Wizard window will track
the progress as shown in the following figure.
Note: If you do not wish to view the Readme file and the installation log file upon completion,
uncheck the View Readme and Log checkbox. This can be done during the installation
process.
AlliedView NMS Installation Guide (Installing an Upgrade Pack)
4-3
Page 30

Upgrading the Single Server NMS Back-End
FIGURE 4-4 AlliedView NMS Update Manager Installation Wizard Update In Progress
7. Allow the installation to complete, and then click Close.
8. The AlliedView NMS Update Manager window will now show the installed Service Pack as shown in the
following figure.
9. The Service Pack is now installed. Click Exit to exit the AlliedView NMS Update Manager.
4-4
AlliedView NMS Installation Guide (Installing an Upgrade Pack)
Page 31

Upgrading the Distributed NMS FE Servers
FIGURE 4-5 Update Manager Showing the Installed Service Pack
10. Start the NMS Server. Refer to Chapter 6.
11. The installation is now complete.
4.3 Upgrading the Distributed NMS FE Servers
To upgrade a distributed NMS FE server follow these procedures:
1. Follow the FE uninstallation procedure in Section 7.
2. Follow the FE installation procedure in Section 3.
AlliedView NMS Installation Guide (Installing an Upgrade Pack)
4-5
Page 32

Upgrading the Distributed NMS FE Servers
4-6
AlliedView NMS Installation Guide (Installing an Upgrade Pack)
Page 33

5. S tarting Up AlliedV iew NMS 9.0
5.1 Starting the AlliedView NMS Server on Windows
If you chose to install the AlliedView NMS as a Windows automatic Service, the AlliedView NMS Server will
start automatically when your computer is restarted. If you left the AlliedView NMS Client menu item in your
Windows Startup menu, the AlliedView NMS Client will also start automatically when your computer is
restarted. In this case, no further action is required, as both the server and client will be started automatically
when a user logs in.
If you chose not to install the AlliedView NMS as an automatic Service, you will have to start it manually. Likewise, if you removed the AlliedView NMS Client item from your Startup menu, you will have to start the client
manually. There are two ways in which you can manually start the AlliedView NMS Server: from the Start menu
or from the Administrative Tools window. The following sections describe how this is done.
5.1.1 Starting the NMS Server from the Start Menu
T o start the AlliedView NMS Server from the Start menu, select Start -> Programs -> AlliedView NMS -> Start
Server. The AlliedView NMS window will appear. In the window title bar, you will see DO NOT CLOSE. Do
not close this window as it will cause the server process to fail. Later, an Apache window will appear (on the FE
only). Do not close this window either.
Several messages will scroll by in the AlliedView NMS window as the server software initializes. You will see
the following message in the AlliedView NMS window when the server is ready:
Please connect your client to the web server on port: 9090
At this point, the server is ready to accept client connections. You can iconify the two server windows to get them
out of your way, but do not close either window
. If you need to shut down the server, refer to Chapter 6.
5.1.2 Starting the NMS Server from the Services Window
When you installed the AlliedV iew NMS software, item AlliedView NMS was added to your W indows Services.
To see this item, follow these steps:
1. Select Start -> Settings -> Control Panel to access the Control Panel on your computer.
Note: You can also double-click My Computer, and then double-click Control Panel in the My
Computer window.
AlliedView NMS Installation Guide (Starting Up AlliedView NMS 9.0)
5-1
Page 34

Starting the AlliedView NMS Server on Solaris Starting the NMS Server from the Services Win-
2. In the Control Panel, double-click the Administrative Tools folder.
3. In the Administrative T ools folder, double-click Services. The Services window will appear.
4. In the Services window, scroll down until you find item Telesyn NMS. This item is the AlliedView NMS
Service. Refer to the following figure for an example.
FIGURE 5-1 AlliedView NMS Automatic Service
If you chose not to install the NMS as an automatic Service, the AlliedView NMS service Startup Type will be
shown as Manual and the Status field will be blank in the Services window as shown in the previous figure.
Note: If AlliedView NMS is an automatic Service, the Startup Type will be Automatic.
To manually start the AlliedView NMS Service, right-click Te lesyn NMS in the Services window, and then
select Start from the pop-up menu. The Service Control pop-up window may appear briefly, and then the
AlliedView NMS Status field will change to Started in the Services window. Allow approximately 60 seconds
for the server to initialize. After the 60-second initialization period, the AlliedView NMS Server will be ready to
accept client connections.
Note: The Telesyn Apache will always appear as Automatic regardless of the the state of
TelesynNMS.
5.2 Starting the AlliedView NMS Server on Solaris
To start the AlliedView NMS Server on a Solaris platform, perform the following steps:
1. Log on as root or as a user with root privileges.
2. Change your current directory (cd) to /opt/AlliedViewNMS/bin.
3. Execute file startnms.sh.
5-2
AlliedView NMS Installation Guide (Starting Up AlliedView NMS 9.0)
Page 35

Overview Starting the Client
4. Allow the server to initialize.
5.3 Starting the Client
5.3.1 Overview
The AlliedView application client may be run locally on the AlliedView NMS server, or remotely on any javaenabled Windows, Solaris, or Linux system, The local installation is installed during the normal AlliedView
NMS server installation process (Section 2) and the Remote Client is installed using the Java Web Start technology via the remote client’s java-enabled web browser. The local and remote functionality is identical.
5.3.2 Local Application Client
The application client is installed on the server during the CD installation.
5.3.2.1 Windows
In windows it can be accessed by choosing Start -> Programs -> AlliedView NMS -> Start Client.
FIGURE 5-2 Application Client Logon Window
Clicking on Advanced brings up other options, including the option of using port 8443 for SSL.
5.3.2.2 Solaris
In Solaris if can accessed in
---------------------------------------------
AlliedView NMS Installation Guide (Starting Up AlliedView NMS 9.0)
./startApplicationClient.sh
5-3
Page 36

Starting the Client Remote Client - Java Web Start
5.3.3 Remote Client - Java Web Start
5.3.3.1 Overview
Java Web Start is a helper application that allows the AlliedView NMS client to run the AlliedView NMS
remotely via the Internet as a user application rather than as an HTML client. Java Web S tart is installed from the
AlliedView NMS Server via HTTP and must be installed on the client machine before the user can use it. A firsttime installation is typically performed on a new client machine or when the AlliedView NMS is first deployed.
The AlliedView NMS Server must be running in order to install the Java Web Start Client.
5.3.3.2 Installing Java Web Start
From your Web browser, enter the following address
http://<server ip address>:9090
where server ip address is the IP address of the AlliedView NMS Server.
The AlliedView NMS logon screen will appear as shown in the following figure.
1
Client
1. Registered Trademark ® Sun Microsystems. All rights reserved.
5-4
AlliedView NMS Installation Guide (Starting Up AlliedView NMS 9.0)
Page 37

Remote Client - Java Web Start Starting the Client
FIGURE 5-3 AlliedView NMS HTML Client Logon Screen
1. Click Web Start Client from the Java Web Start Interface panel and allow the application to load. This will
download Java Web Start from the AlliedView NMS as shown in the following figure.
AlliedView NMS Installation Guide (Starting Up AlliedView NMS 9.0)
5-5
Page 38

Starting the Client HTML Client
FIGURE 5-4 Java Web Start Download
2. If Java W eb S tart is not installed, you will be given the option of installing it from the Sun Web site. You can
also install it from the AlliedView NMS Login screen (refer to Figure 5-3) by clicking on Download Java.
Note: Installing from the AlliedView NMS Login screen (refer to Figure 5-3) is preferred since it will
always contain the correct version of the jre software.
For Solaris, click the Sun Microsystem’s Binary Code Agreement link and read the license agreement.
3. When the AlliedView NMS Authentication window appears, enter root as the username and public as the
password, and then click Connect. The AlliedView NMS Application screen will appear, with the IP Topology screen. Refer to the NMS Administration Guide and the NMS User Guide for more information.
Note: It is highly recommended that you change your password immediately upon first logging in.
The root username and public password are defaults for the AlliedView NMS. Leaving the
default password may make your NMS vulnerable to unauthorized access. Refer to th e
AlliedView NMS Administration Guide for information on changing the password.
4. Verify that the client can log in and that the AlliedView NMS starts up and displays properly on the client
machine.
5. If you wish to exit the AlliedView NMS, from the panel-specific menu, select File -> Exit.
5.3.4 HTML Client
For starting the AlliedView NMS Client for simple network monitoring over a slow dialup link, it is recommended that you use the HTML client. To start the AlliedView NMS HTML Client, follow these steps:
1. In your Web browser, enter the following address:
http://<server ip address>:9090
where server ip address is the IP address of the AlliedView NMS Server. The AlliedView NMS logon screen
shown in Figure 5-3 will appear.
5-6
AlliedView NMS Installation Guide (Starting Up AlliedView NMS 9.0)
Page 39

Client Limitations Starting the Client
2. Enter root as the username and public as the password, and then click HTML Client. The HTML Client
view will appear.
Note: It is highly recommended that you change your password immediately upon first logging in.
The root username and public password are known defaults for the AlliedView NMS. Leaving
the default password may make your NMS vulnerable to unauthorized access. Refer to the
NMS Administration Guide for information on changing the password.
3. Refer to the AlliedView NMS User Guide and the AlliedView NMS Administration Guide for information on
using the HTML interface.
5.3.5 Client Limitations
• The Java Web Start Client may throw exception InvalidClassException.
Java Web Start is a client-side technology that downloads software from the AlliedView NMS Server via
HTTP and executes it on the local (client) host. The AlliedView NMS Java W eb S tart client makes use of this
technology to keep client software synchronized with the NMS Server software when the NMS is upgraded.
However, the AlliedView NMS Java Web Start Client does not handle the case where the server is downgraded from a new version to an older version.
For example, if a user has the AlliedView NMS 6.0 server running on a host, and then replaces it with the
AlliedView NMS 5.0, the Java Web Start clients that had downloaded the 6.0 softwa re must remove their current Java Web Start Client and download it again from the AlliedView NMS 5.0 Server.
If the AlliedView NMS Web Start client is not re-installed as described above, the UnmarshallException and
InvalidClassException messages will be seen in the Java Web Start console. Re-installing the Java Web Start
Client is described in Section 6.3.2.2.
• A maximum of five users may be logged in on the AlliedView NMS at any given time.
The AlliedView NMS supports a maximum of five simultaneous client sessions. If a user attempts to log in
when five users are already connected, the user’s login attempt will fail with an error message indicating that
the maximum number of client sessions has been reached. The user will be able to log in when one or more of
the current users logs out.
AlliedView NMS Installation Guide (Starting Up AlliedView NMS 9.0)
5-7
Page 40

Starting the Client Client Limitations
5-8
AlliedView NMS Installation Guide (Starting Up AlliedView NMS 9.0)
Page 41

6. Shutting Down the AlliedView NMS
6.1 Shutting Down a AlliedView NMS Client
6.1.1 Application Client
For an NMS client running as a user application, to shut down the client, simply select File -> Exit from the
Panel-Specific Menu, or click the X in the upper-right-hand corner of the screen. The Confirmation Message
dialog box will appear. Click Yes in the dialog box to shut down the client.
6.1.2 HTML Client
For a AlliedView NMS HTML client, select File -> Logout from the AlliedView NMS Panel-Specific Menu.
6.2 Shutting Down the AlliedView NMS Server
6.2.1 Windows
To shut down the AlliedView NMS Server on a Windows platform, follow these steps:
1. Select Start -> Programs -> <AlliedView NMS load -> Shutdown Server. The Shutdown Server window will
appear. Do not close this window
will appear.
. Shortly afterwards, the Shutdown AlliedView NMS Server dialog box
Note: Click Cancel if you decide not to shut down the server .
2. In the Shutdown AlliedView NMS Server dialog box, enter the root user password in the Password field.
3. If you want to change the shutdown mode:
1. Click Settings. This will display the Mode of Shutdown window.
2. In the Mode of Shutdown window, select the desired mode.
3. Click OK.
4. Click OK. Allow a few seconds for the server to shut down. The Server Shutdown dialog box will appear
when the shutdown is complete.
5. Click OK in the Server Shutdown dialog box.
AlliedView NMS Installation Guide (Shutting Down the AlliedView NMS)
6-1
Page 42

Shutting Down the AlliedView NMS Server Solaris
6.2.2 Solaris
To shut down the AlliedView NMS Server on a Solaris platform, follow these steps:
1. Log in as root or as a user with root privil eges.
2. Change your current directory (cd) to <NMS_HOME>/bin.
3. Execute file ShutDown.sh.
6-2
AlliedView NMS Installation Guide (Shutting Down the AlliedView NMS)
Page 43

7. Uninstalling the AlliedV iew NMS
7.1 Overview
The process for uninstalling the AlliedView NMS is identical for both the single server and distributed server
FE(s).
7.2 Windows
To uninstall the AlliedView NMS from a computer running W indows, follow these steps:
1. Shut down any client connections and the server. Refer to Section 6.
2. Select Start -> Programs -> AlliedView NMS_load->Tools -> Uninstall. The AlliedView NMS InstallShield
will appear.
3. Click Next. This will display the next window.
4. Click Next. The uninstaller process will begin. When the uninstaller process is complete, the next window
will display, which contains a message indicating a successful uninstallation.
5. Click Finish to exit the InstallShield Wizard.
An alternate method is to remove the AlliedView NMS using Add/Remove Programs in your Control Panel as
follows:
1. Shut down any client connections and the server. Refer to Chapter 7.
2. Select Start -> Settings -> Control Panel to access your Control Panel.
Note: You can also double -click My Comp uter, and then select Control Panel in the My Computer
window.
3. Double-click Add/Remove Programs.
4. In the Add/Remove Programs window, click AlliedV iew NMS, and then click the Change/Remove pop-up
button. This will bring up the AlliedView NMS InstallShield Wizard.
5. Follow the Wizard prompts to remove the AlliedView NMS.
6. When the uninstallation is completed, close the Add/Remove Programs window and the Control Panel.
7.3 Solaris
To uninstall the AlliedView NMS from a computer running Solaris, follow these steps:
AlliedView NMS Installation Guide (Uninstalling the AlliedView NMS)
7-1
Page 44

Solaris
1. Log in as root or as a user with root privileges.
2. Change your current directory (cd) to <NMS_HOME>/_uninst.
3. Execute file uninstaller.bin.
7-2
AlliedView NMS Installation Guide (Uninstalling the AlliedView NMS)
Page 45

8. Uninstalling an AlliedView NMS Service Pack
Note: Uninstalling an NMS Service Pack is only necessary if the Service Pack is determined to be
faulty and must be removed.
Note: The uninstallation procedure is identical for Windows and Solaris.
To uninstall a AlliedView NMS Service Pack, perform the following steps:
1. Shut down the NMS Server. Refer to Chapter 6.
2. Navigate to your <NMS_HOME>/bin directory and locate file reinitialize_nms. Execute this file.
Note: Use file reinitialize_nms.bat for Windows, or file reinitialize_nms.sh for Solaris.
The Reinitialize AlliedView NMS Database window will appear.
3. Click Yes to in itialize the database. A pop-up dialog box will appear indicating success. Click OK in the dia-
log box.
4. In your <NMS_HOME>/bin directory, locate file UpdateManager. Execute this file. The AlliedView NMS
Update Manager window will appear as shown in the following figure.
Note: Use the UpdateManager.bat file for Windows,or the UpdateManager.sh file for Solaris.
AlliedView NMS Installation Guide (Uninstalling an AlliedView NMS Service Pack)
8-1
Page 46

FIGURE 8-1 NMS Update Manager Window Showing Installed Service Packs
5. Click on the Service Pack you want to remove, and then click Uninstall. The Uninstall window will appear
as shown in the following figure.
8-2
AlliedView NMS Installation Guide (Uninstalling an AlliedView NMS Service Pack)
Page 47

FIGURE 8-2 NMS Update Manager Uninstall Window
6. Click Finish. The uninstallation process will begin. The Uninstall window will track the progress as shown
in the following figure.
FIGURE 8-3 NMS Update Manager Uninstall Progress
AlliedView NMS Installation Guide (Uninstalling an AlliedView NMS Service Pack)
8-3
Page 48

Note: If you want the Uninstall window to close after the uninstallation is complete, check the
Automatically close after uninstallation checkbox. Y ou ca n do this during the uninstallation
process.
7. Allow the uninstallation process to complete. If the Uninstall window did not close automatically, click
Close to close it. The AlliedView NMS Update Manager window will no longer show the uninstalled Ser-
vice Pack.
8. In the AlliedView NMS Update Manager window, click Exit to exit the NMS Update Manager. The Ser-
vice Pack is now removed.
9. Restore the database files. Refer to the Allied View NMS Administration Guide.
10. Start the NMS Server. Refer to Chapter 5.
11. The uninstall procedure is complete.
8-4
AlliedView NMS Installation Guide (Uninstalling an AlliedView NMS Service Pack)
Page 49

9. Installation S tep s - Overview
The previous sections of this Guide have shown how the various components of the AlliedView NMS are
installed on the server and clients, as well as provisioning extensions for HP OpenView. The NMS Administration Guide explains how the NMS programs and configuration discover the network devices so that they are displayed and managed by the AlliedVi ew NMS interface.
The following lists the steps to go through the installation of the NMS and the network devices to ensure that all
devices are able to be discovered, the AlliedView NMS and the devices are physically connected, and the NMS is
polling and receiving the appropriate data from the devices.
9.1 NMS and iMAP/AT Device Software Version
Compatibility
For every version of the AlliedView NMS, there is a list of devices that the version of AlliedView NMS will support, as well as the software version of these devices.
Caution: Refer to the AlliedView NMS Administration Guide for the list of devices and their
software versions supported by the latest version of the AlliedView NMS. If there is
any question about compatibility, consult with your authorized Allied Telesis
representative.
AlliedView NMS Installation Guide (Installation Steps - Overview)
9-1
Page 50

Configuring a New NMS with New Devices
9.2 Configuring a New NMS with New Devices
If the AlliedView NMS is being installed for the first time and a new network is being configured, the network,
the devices, and the network interface to other networks need to be configured, as well as the AlliedView NMS.
Caution: Ensure the AlliedView NMS and the devices have layer 3 conn e ct iv ity ; if this is no t
done, the devices will not be able to communicate with the AlliedView NMS server.
TABLE 9-1 Steps for a New AlliedView NMS with New Devices
Step Details / Reference Notes
1. Evaluate Network Config-
uration Requirements
2. Install the AlliedView
NMS on the Server
3. Confirm the telnet server is
working
4. Start up the SNMP agent
5. Physically connect the
AlliedView NMS to the
network
6. Start the AlliedView NMS On the NMS, select Start -> <Load_Name>
7. Use the CLI Login Man-
ager
Ensure all network configuration information is
recorded and what changes (such as Network
VLANs) will be required
Refer to Section 2. For the latest version of a
AlliedView NMS release, the
CD may contain a Service Pack
that must be installed as well.
Refer to Section 3.
This must be done for each device For Rapier devices, the default is
on. For iMAP devices, use
>enable telnet.
This must be done for each device
For any issues specific to Windows or Solaris,
refer to their connectivity Guides.
Be sure the default user id and
-> Start Client
server as Autostart, you will have to select
. (If you did not set the NMS
Start Server first.)
When the NMS GUI appears, the only network
that appears is the one the server is a member
of.
Set up the global CLI user names and passwords. Refer to the Administration Guide, Section 3.3
password for Rapier devices
(friend, friend), iMAP devices
(officer, off icer) and the NMS
(root, public) is changed.
9-2
AlliedView NMS Installation Guide (Installation Steps - Overview)
Page 51

Configuring a New NMS with New Devices
TABLE 9-1 Steps for a New AlliedView NMS with New Devices (Continued)
Step Details / Reference Notes
8. Use the Discovery Config-
urator to Prepare for the
Discovery Process
9. Use the Security Adminis-
trator
10. Import Link Profiles
11. Set Device Attributes
12. Configure Applications
13. Perform a AlliedView
NMS Backup
Select Tools -> Discover Configurator to
bring up the Discovery Configurator Window. Then follow the tabs:
- General Attributes
- Protocol (always SNMP only)
- Network Discovery (Networks and Masks)
- Node Discovery (optional)
Refer to the Administration Guide, Section 3
Set up NMS users with passwords and scope of
control.
Refer to the Administration Guide, Section 4.
Create an excel spreadsheet and place it in
<NMS Home>\state.
Refer to the Administration Guide, Section
6.7.3.
Refer to the Administration Guide, Section 5.
Refer to the Administration Guide, Sections 5
and 6.
Make a backup of both the AlliedView NMS
file, the database, and devices
Refer to the Administration Guide, Section 3.4,
and Section 5.
The Discovery Configurator
is used to configure the
attributes of the discovery
process, and so it is critical
that these be set up correctly.
Since the physical link configuration for an existing network
can be large and complex, the
Network VLAN Manager can
have an Excel spreadsheet of the
physical links imported. This
will populate the Physical Network map, and any existing Network VLANs that use those
links will be configured.
With all devices discovered and
being monitored, it is now possible to configure applications
such as VLANs, HVLANs, and
Network VLANs.
Do this on a schedule to ensure
whenever changes due to Steps
11 and 12 are captured and
archived.
AlliedView NMS Installation Guide (Installation Steps - Overview)
9-3
Page 52

Configuring a New NMS with New Devices
9-4
AlliedView NMS Installation Guide (Installation Steps - Overview)
Page 53

10. Appendix A - Enabling Anonymous FTP
10.1 Overview
Use the following steps to enable anonymous FTP on the Backend Server. Refer to the AlliedV i ew NMS Administration Guide for how this works.
10.2 Windows
1. Control Panel -> Add/Remove Programs -> Add/Remove Windows Components
2. Select (without checking) Internet Information Services (IIS)
Note: For Windows 2003, Internet Information Services is under Application Server -> Details.
3. Click on Details
4. Check File Transfer Protocol Server, which will check its dependencies
5. Click Okay
6. Load the CD if prompted and enter the path D:\ENGLISH\WIN2000\ADV_SERV\I386
The default configuration will consist of:
• Anonymous access only, with passwords under Windows control
• Read access only
• Root is C:\inetpub\ftproot
• Logging is enabled
W rite access has to be enabled. Other default s may be modified. If the ftp root directory is modified, then it has
to be added to the AlliedView NMS config file conf\AT_server.properties.
1. Control Panel -> Administrative Tools -> Internet Services Manager
2. Select the host
3. Select the “Default FTP Site”
4. Right click and select Properties
5. Select the “Home Directory” tab and enable Write access.
AlliedView NMS Installation Guide (Appendix A - Enabling Anonymous FTP)
10-1
Page 54

Solaris Creating the Anonymous FTP Account
10.3 Solaris
Configuring FTP on Solaris can be a complex and difficult task if your system has been altered from the original
installation. On the other hand, it's a relatively straight-forward task if your system does not deviate from the
default Solaris installation.
Due to variations among UNIX and Solaris systems, however, this procedure cannot be reliably automated.
What follows is a procedure that can be followed on an unaltered system that will configure anonymous FTP
service suitable for AlliedView NMS.
This procedure assumes the ftp root directory will be
provided at the end of this section. If your system has been altered from the original installation or
been mounted with enough memory to handle file transfers (100 MB), you will have to modify this procedure
accordingly. FTP configuration is extensively documented in the Solaris man pages and on the web. For more
information, options, details, and security considerations, see the man pages for in
cess
or contact your system administrator.
Note: This procedure may require 30 minutes or more-depending on your pa rticular Solaris
installation and how much it differs from the default installation.
The AlliedView NMS will need read/write file access to the FTP pub directory and FTP clients (iMG/RG and
GenBand) will need retrieve and upload server permissions.
Note: The following procedure assumes the ftp home directory and anonymous ftp root directory will
be /opt/ftp. If you decide to use a different directory because of system constraints, then
replace all occurrences of /opt/ftp with your directory name throughout the procedure.
/opt/ftp. Shell commands to execute this procedure are
/opt has not
.ftpd or ftpd and ftpac-
10.3.1 Creating the Anonymous FTP Account
1. Begin the configuration procedure by logging in as root and creating the ftp account with the useradd com-
mand. (Shell commands are listed at the end of this section)
2. Set the /etc/passwd and /etc/shadow entries for anonymous usage. The ftp entry in /etc/passwd
needs to look something like:
ftp:x:30000:30000:Anonymous FTP:/opt/ftp:/nosuchshell
Note: The 30000 will be some number created by the useradd command and already in the file.
Don't change it to 30000. Use the number already there, but change the text that follows the
30000.
3. The ftp entry in /etc/shadow should look like:
ftp:NP:6445::::::
10.3.2 Create the FTP Directory Tree
Now create the ftp directory tree, configure the ls command, copy shared libraries, and set file permissions.
10-2
AlliedView NMS Installation Guide (Appendix A - Enabling Anonymous FTP)
Page 55

Create the FTP Directory Tree Solaris
1. Create the following subdirectories under the ftp root:
/opt/ftp
/opt/ftp/bin
/opt/ftp/pub
/opt/ftp/usr
/opt/ftp/lbin
/opt/ftp/lib
/opt/ftp/usr/bin
/opt/ftp/usr/lib
2. Set up the “ls” command for the anonymous user:
ln s /usr/bin/ls /opt/ftp/bin/ls
cp /usr/bin/ls /opt/ftp/usr/bin
3. Copy the following shared libraries to usr/lib (it's possible some of these libraries don't exist on certain ver-
sions of Solaris, but their functionality is still available in the other libraries that do exist):
/usr/lib/ld.so.1*
/usr/lib/libc.so.1*
/usr/lib/libdl.so.1*
/usr/lib/libmp.so.1*
/usr/lib/libnsl.so.1*
/usr/lib/libsocket.so.1*
/usr/lib/nss_compat.so.1*
/usr/lib/nss_dns.so.1*
/usr/lib/nss_files.so.1*
/usr/lib/nss_nis.so.1*
/usr/lib/nss_nisplus.so.1*
/usr/lib/nss_xfn.so.1*
/usr/lib/straddr.so*
/usr/lib/straddr.so.2*
AlliedView NMS Installation Guide (Appendix A - Enabling Anonymous FTP)
10-3
Page 56

Solaris Configure Upload Permission on Solaris 9-10
4. Set file permissions to allow read-execute to all directories, read-only to the ls command, and read-write-exe-
cute to pub:
chmod 555 /opt/ftp/bin
chmod 777 /opt/ftp/pub
chmod 555 /opt/ftp/usr
chmod 555 /opt/ftp/usr/bin
chmod 111 /opt/ftp/usr/bin/ls
chmod 555 /opt/ftp/usr/lib
10.3.3 Configure Upload Permission on Solaris 9-10
1. For Solaris 10, give clients upload permission by adding the fol lowi ng 4 lines to the end of /etc/ftpd/ftpac-
cess:
uploadclass=anonusers * /pub yes ftp 30000 0660 dirs
deleteyesanonymous
overwriteyesanonymous
renameyesanonymous
10.3.4 Test Anonymous FTP Service
Test the configuration by attempting to connect to the ftp service from a remote client, making a directory,
uploading a file, list files, retrieving the file, deleting the file, and finally removing the created directory. Acceptable user names are ftp and anonymous. Almost anything will be an acceptable password.
10.3.5 Configure AlliedView NMS (if necessary)
AlliedView NMS will assume the ftp root d irectory is /opt/ftp. To specify a different ftp root, edit the
FTP_ROOT entry in the AlliedView NMS config file conf/AT_server.properties.
10-4
AlliedView NMS Installation Guide (Appendix A - Enabling Anonymous FTP)
Page 57

Shell Commands Solaris
10.3.6 Shell Commands
The following shell commands will configure anonymous FTP service suitable for AlliedView NMS on most
Solaris installations. Due to variations in system administration from one system to another, this procedure cannot be guaranteed to work on all Solaris systems.
You are advised to create and configure the ftp account interactively in case errors occur.
#
# You must be logged-in as root to configure anonymous FTP
#
useradd ftp
cd /etc
#The following is ONE line
sed -e 's/^\(ftp:x\):\([0-9]\{1,\}\).*$/\1:\2:\2:Anonymous FTP:\/opt\/
ftp:nosuchshell/' passwd > passwd~
#
sed -e 's/^ftp.*$/ftp:NP:6445::::::/' shadow > shadow~
#
# Verify the settings before making them permanent.
#
more passwd~
more shadow~
#
# Make the verified settings permanent
#
# CAUTION: ANY ERRORS HERE MAY BE IMPOSSIBLE TO FIX.
#
chmod 660 /etc/passwd /etc/shadow
mv passwd~ passwd
mv shadow~ shadow
mv passwd~ passwd
chmod 440 /etc/passwd /etc/shadow
The rest of the shell commands, which also must be executed while logged-in as root, are listed in the file
bin/AT_configure_ftp.sh
. Any system-specific errors from these commands are typically harmless. In fact,
on certain installations, some of the shared libraries are obsolete, so “file not found” errors will be expected. The
last four commands in the file are to be used with Solaris 9 and 10, so skip them to use on Solaris 8.
AlliedView NMS Installation Guide (Appendix A - Enabling Anonymous FTP)
10-5
Page 58

Solaris Shell Commands
10-6
AlliedView NMS Installation Guide (Appendix A - Enabling Anonymous FTP)
Page 59

1 1. Appendix B - Activating NMS Sof tware License
11.1 Obtaining the License Activator Key
In order to convert your Evaluation copy to a fully licensed NMS, provide your Allied Telesis Representative
with the License Key Request Form (Appendix C).
This form must include the server unique identifier, which is obtained as follows:
11.1.1 Obtain Server Identifier
The following command must be executed on the NMS server to obtain the Unique ID.
• Solaris:
% /opt/AlliedView NMS/bin/UniqueIDSolaris.sh
• Windows Server:
C:\> \Program Files\Allied Telesyn\AlliedView NMS\bin\UniqueId.exe
Note: The server ID is already included when creating the License Key Form, explained below.
1 1.1.2 Obtain License Key Request Form
The Windows License Key Request Form can be obtained as follows (Windows only)
• Windows Server:
FIGURE 11-1 Obtaining License Key Form - Windows
AlliedView NMS Installation Guide (Appendix B - Activating NMS Software License)
11-1
Page 60

Obtaining the License Activator Key Applying License Activator Key
1 1 .1.3 Applying License Activator Key
Once the license activator key is delivered to you it must be copied to the NMS server and the AT_Update program must be run. This procedure may be applied to a running NMS server and it will take effect immediately
without the need of a system restart.
Note: This procedure must be run on the NMS Server with Administrator (W2003) or root (Solaris)
privileges.
1. Copy the license activator key (<filename>.upd) on to the NMS server directory
2. Bring up the File Update Tool Form.
• For windows, select:
• For Solaris, select <NMS_HOME>/bin/AT_Update.bin
3. The GUI will appear, as shown in Figure 11-2.
11-2
AlliedView NMS Installation Guide (Appendix B - Activating NMS Software License)
Page 61

Applying License Activator Key Obtaining the License Activator Key
FIGURE 11-2 File Update Tool Form
4. Use the Select File to locate the License.upd file
5. Select Apply and the key will activate the NMS as a fully licensed system.
6. When success message is received, select Cancel to close the window.
AlliedView NMS Installation Guide (Appendix B - Activating NMS Software License)
11-3
Page 62

Obtaining the License Activator Key Applying License Activator Key
11-4
AlliedView NMS Installation Guide (Appendix B - Activating NMS Software License)
Page 63

11. Appendix C - License Key Form
11.1 License Activation Form - AlliedView NMS
The license key will allow converting your evaluation copy to a fully licensed AlliedView NMS. Please provide
your Telesyn Sales Representative with all information on this form by either printing and sending a hard copy,
fax or email.
AlliedView NMS Installation Guide (Appendix C - License Key Form)
11-1
Page 64

License Activation Form - AlliedView NMS
License Key Form - Please fill out and send to your Allied Telesis representative
Date: ______________________
Company Information
Yo ur Name: ________________________________________________________________________
Yo ur Title: _____________________________________________________________________ ____
Yo ur E-mail Address: ___________________________________________ ______________________
Company Name: _____________________________________________________________________
Company Address 1: _________________________________ _________________________________
Company Address 2: _________________________________ _________________________________
Company Address 3: _________________________________ _________________________________
Admin Contact: ______________________________________________________________________
Telephone Number: _________________________________________________________________ __
E-mail Address (License Key will be sent here): _____________________________________________
Server Information
Total Number of System Nodes Managed: _________________ ____ _____________________________
Types of Nodes Managed (e.g. Rapiers, Switchblades, 9800s, MAPs, etc.): ___________________ ______
___________________________________________________________________________________
___________________________________________________________________________________
___________________________________________________________________________________
Product Information
Date of Purchase: _____________________________________________ ________________________
Where Purchased: ____________________________________________________________________
Technical Contact: _________________ ___________________________________________________
NMS CD Model Num Purchased: ________________________________________________________
PO Number for License Key Purchased: _______________________ ____________________________
Purchase Price of this License Key: ___________________________________ ____________________
Unique ID Code: ___________________________
Product Version: ____ _______________________
Service Packs: ____________________
11-2
AlliedView NMS Installation Guide (Appendix C - License Key Form)
 Loading...