

Page 1

OmniConnect
MultiModem
Internet Access Device
Quick Install Guide
PN 613-10790-00 Rev. A
Page 2

Copyright ”1999 Allied T e lesyn International, Corp.
960 Stewart Drive Suite B, Sunnyvale CA 94086 USA
All rights reserved. No part of this publication may be reproduced without prior written permission
from Allied Telesyn In ternational, Corp.
Ethernet is a registered trademark of Xerox Corporation. All other product names, company names,
logos or other designations mentioned herein are trademarks or registered trademarks of their
respective owners.
Allied Telesyn International, Corp. reserves the right to make chang e s in specifications and other
information contained in this document without prior written notice. The information provided
herein is subject to change without notice. In no event shall Allied Telesyn International, Corp. be
liable for any incidental, specia l, indirect, or consequential damages whatsoever, including but not
limited to lost profits, arising out of or related to this manual or the information contained herein,
even if Allied Telesyn International, Corp. has been advised of, known, or should have known, the
possibility of such damages.
Page 3

Regulatory Compliance Information
Agency Approvals
The following agency approvals have been obtained for the LanEdge
OmniConnect MutliModem in the areas of Safety, and EMC. Note that the
LanEdge OmniConnect MultiM odem is not required to c omply with FCC Part 68
and other telecommunications requir ements since it is not directly connected to
the PTT (Public Telephone and Telegraph).
Safety UL 1950, CSA 22.2 No. 950, EN 60950, EN 41003
EMC FCC Part 68, FCC Class B, Canada ICES-003 Issue 2 Class B,
EN 55022 Class B (CISPR22 B), EN50082-1, VCCI Class 2
CE Marking Directive
The CE mark signifies that the product meets the Eur opean Dir ectiv e 73 /23/EEC,
and 89/336/EEC.
EMC Informa tion
LanEdge OmniConnect MultiModem product conforms to the requirements of
Electro-Magnetic Compatibility (EMC) Directive 89/336/EEC. The installation
and maintenance procedures in the installation and configuration guide must be
followed to ensure compliance with these regulations.
EN55022B Statement
This equipment has been tested and found to comply with the limits for a Class B
equipment pursuant of EN55022. Class B equipment is information technology
equipment which satisfies the Class B interfere nce lim its. S uch eq uipment s hould
not be subject to restrictions on it s sa le and i s genera lly not subj ect t o r estriction s
on its use.
iii
Page 4

Regulatory Compliance Information
FCC Class B Statement
This device complies with Part 15 of the FCC Rules. Operation is subject to the
following two conditions: (1) This device may not cause harmful interference,
and (2) this device must accept any interference received, including interference
that may cause undesired operation.
This device has been tested and found to comply with the limits for a Class B
digital device, pursuant to Part 15 of the FCC Rules. These limits are designed to
provide reasonable prot ection against harmful interference in a residential
installation. This equipment generates, uses and can radiate radio frequency
energy and if not installed and used in accordance with the instructions may
cause harmful interference t o radio communications. However, there is no
guarantee that interference will not occur in a particular installation. If this
equipment does cause harmful interference to radio or television reception,
which can be determined by turning the equipment off and on, the user is
encouraged to correct the interference by one or more of the following measures:
• Reorient or relocate the receiving antenna.
• Increase the separation between the equipment and the receiver.
• Connect the equipment into an outlet on a circuit different from that to
which the receiver is connected.
• Consult the dealer or an experienced radio/TV technician for help.
Canadian DOC Compliance Notice
This digital apparatus does not exceed the Class B limits for radio noise emissions
for digital apparatus as set in the Radio Interference Regulations of the Canadian
Department of Communications.
Canadiene DO C Avis de Conformation
Le present appareil n umerique n'e met pas de bruits radioelectriques depassant les
limits applicables aux appareils numeriques de class B prescrites dans le
Reglement sur le brouillage radioelectrique edicte par le ministere des
Communications du Canada.
iv
Page 5

OmniConnect MultiModem Quick Install Guide
Operating Conditions for the EC
The LanEdge OmniConnect MultiModem routers conforms to the Low Voltage
Directive 73/23/EEC, and the EMC Directive 89/336/EEC.
Operating Conditions for the United Kingdom
The following apply to the LanEdge OmniConnect MutliModem when used in
the UK:
1. This apparatus must be connected to a main socket outlet with a protective
earth contact.
2. Connection of power supply: LanEdge OmniConnect MutliModems are
intended for use when supplied with power from a supply providing 220-240
VAC, 50/60 Hz up to 1.25A.
v
Page 6

Page 7

Table of Contents
Regulatory Compliance Information пппппппппппппппппппппппппппппппппппппппппппппппппппппппппппппппппппппппLLL
Agency Approvals...................................................................................................iii
CE Marking Directive.............................................................................................iii
EMC Information...................................................................................................iii
EN55022B Statement......................................................................................iii
FCC Class B Statement....................................................................................iv
Canadian DOC Compliance Notice...............................................................iv
Canadiene DOC Avis de Conformation........................................................iv
Operating Conditions for the EC............................................................................ v
Operating Conditions for the United Kingdom ....................................................v
Chapter 1
Introduction
Overview...................................................................................................................1
Work sheet ...............................................................................................................2
Topology ..................................................................................................................3
Chapter 2
Installation
Verifying OmniConnect MultiModem Package Contents....................................5
Placing the OmniConnect.......................................................................................5
To wall mount a LanEdge product..................................................................6
To place a single LanEdge product on a desktop............................................6
To interlock a group of LanEdge products on a desktop...............................7
Connecting the OmniConnect................................................................................8
Verify your PC Configuration...............................................................................10
Load OmniStart on the Host PC...........................................................................10
Configuration screens............................................................................................10
Enter Password...............................................................................................11
External Modem Setup..................................................................................12
Dial-In Setup..................................................................................................13
DNS Configuration........................................................................................14
Modem Parameter Verification.....................................................................15
Advanced Setup Options (Finish).................................................................17
LanEdge Publications............................................................................................18
Where To Find Allied Telesyn and Technical Publications.........................18
ппппппппппппппппппппппппппппппппппппппппппппппппппппппппппппппппппппппппппппппппппппппппппппппппппппппппппппппппппп м
пппппппппппппппппппппппппппппппппппппппппппппппппппппппппппппппппппппппппппппппппппппппппппппппппппппппппппппппппппппп и
vii
Page 8

Appendix A
OmniConnect MultiModem Installation Guide Feedback
Appendix B
Technical Support Fax Order
пппппппппппппппппппппппппппппппппппппппппппппппппппппппппппппппппппппппппппппппппппплк
пппппппппппппппппппппппппппппппппплм
viii
Page 9
Chapter 1
Introduction
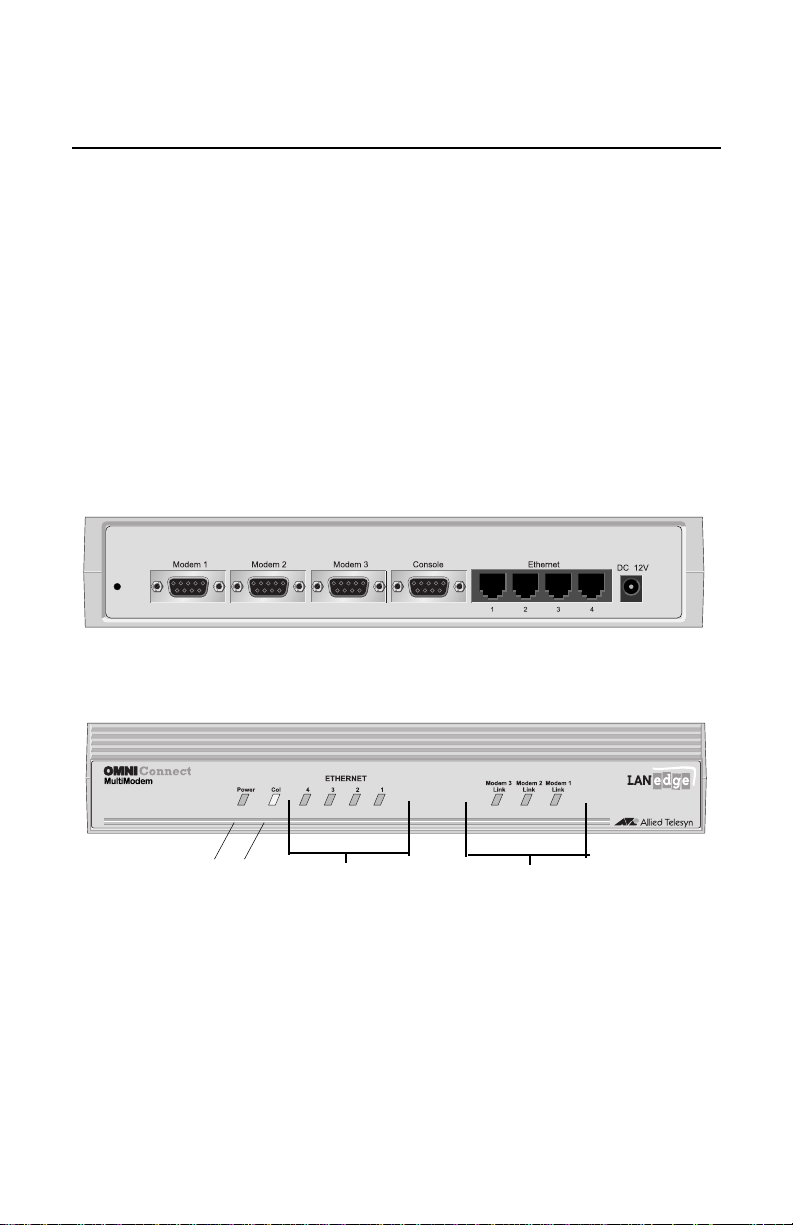
Overview
The OmniConnect M ultiM odem In ternet A c c ess Device con nects users o n a local
Ethernet LAN to the Internet over multiple (up to three) standard modem lines.
The illustrations below show the front and rear panels of the OmniConnect
MultiModem.
REAR
FRONT
Power Col
10Base-T LEDs
Ports 4, 3, 2, 1
ý
Activity LEDs
Modem 3, 2, 1
1
Page 10

Introduction
Work sheet
Before you begin installation, use the following OmniConnect work sheet and
note the listed information for use during configuration.
OmniConnect MultiModem Work Sheet
‰
Standard modem line(s) is installed and accessible.
‰
Obtain information about y our account from your Internet Service Provider
(ISP) :
— Login name _________________ __ ________________ __ ______
— Passwor d ____________ ___________ ______________ ________
— Phone number(s) ______________________________________
— Domain Name ________________________________________
— Domain Name Server IP Address
(default 192.168.1.1 )____________________________________
‰
Plan your network topology by identifying the OmniConne ct unit
connections.
‰
Verify that you have the hardware and cables necessary to complete the
installation. User supplied items include :
— 10Base-T Cables to connect each client workstation (1 provided)
— Modem(s) (up to three), serial cable (s ) (DB-9 Fe male to DB- 9 Fe male) to
connect to the OmniConnect, and telephone cable(s) (RJ-11) to conne ct to
the standard modem line(s).
2
Page 11

OmniConnect MultiModem Quick Install Guide
Topology
Plan your topology including the OmniConnect. The sample topology below
shows the OmniConnect MultiModem used for a group of PC users in a small
office network. In this example, four 10 Mbps PC NICs and three modems are
connected to the OmniConnect.
Legend
10Base-T Cable
Telephone Cable (RJ-11)
RS-232C
To Teleph on e
Line
Modem 1
(User supplied)
OmniConnect*
MultiModem
*Note: Por t 1 is either a Workstation or LAN
To Telephone
Line
Modem 2
(User supplied)
4321
To Telephone
Line
Modem 3
(User supplied)
10 Mbps Workstations
3
Page 12

Page 13

Chapter 2
Installation
Use this section to verify your package contents, position the device, and
configure it.
Verifying OmniConnect MultiModem Package Contents
‰
One OmniConnect MultiModem Internet Access Device
‰
Accessory bag containing rubber feet and bumpers for des ktop
placement, and screws for wall mounting the unit
‰
This Quick Install Guide
‰
One 10Base-T Ethernet Cable
‰
One analog telephone cable
‰
One two-piece AC power adapter
‰
A CD-ROM labeled OmniStart
‰
Warranty Card.
Placing the OmniConnect
You can wall mount a single LanEdge product, place it on a desktop, or interlock
two or more to form a single unit that occupies only one footprint on the
desktop.
Air vents are located on both sides of the LanEdge product casing.
Caution
Air vents must not be blocked and must have free access to the room
ambient air for cooling.
5
Page 14

Installation
To place your LanEdge product, see the steps that follow:
‰
“To wall mount a LanEdge product” on page 6
‰
“To place a single LanEdge product on a desktop” on page 6
‰
“To interlock a group of LanEdge products on a desktop” on page 7
To wall mount a LanEdge product
1. Do not install the rubber feet or bumpers if you are wall mounting the
product. If you previously installed the square rubber bumpers, remove them
using the following step. (The round rubber feet need not be removed. )
‰
To remove the square rubber bumper from the unit:
Place the unit upside down. For each bumper, insert the tip of a small
straight-slot screwdriver between the rubber bumper and the unit casing.
Press down on the screwdriver to pry the bumper off.
2. Prepare the wall by installing two screws (provided) at 9 1/4-inch (23.5 cm)
apart on center.
3. Position the unit ont o the screws. Skip to “Connecting the OmniConnect” on
page 8.
To place a single LanEdge product on a desktop
1. Place the unit upside down.
2. Locate the round rubber feet and square rubber bumpers from the accessory
bag. Remove the paper cover from the adhesive and press a rubber foot into
each round receptacle on the bottom of the unit. Remove the paper cover
from the adhesive and press a rubber bumper into each square receptacle on
the bottom of the unit.
3. Put the unit on the desktop. Skip to “Connecting the OmniConnect” on
page 8.
6
Page 15

OmniConnect MultiModem Quick Install Guide
To interlock a group of LanEdge products on a desktop
If you are in stalling a LanEdge F a stP rint Se rver, place it as the base (bottom) unit,
otherwise, place the OmniConnect as the base unit.
1. Select the base unit and place it upside down on a work surface. Locate the
rubber feet and bumpers from the accessory bag. Remove the paper cover
from the adhesive and press a rubber foot into each round receptacle on the
bottom of the unit. Remove the paper cover from the adhesive and press a
rubber bumper into each square receptacle on the bottom of the unit.
2. Place each of the other units upside down on a work surface. Locate the
rubber feet and bumpers from the accessory bag. Do not install the square
rubber bumpers. Remov e the paper cov er fr om the adhesive and pr ess a round
rubber foot into each round receptacle on the bottom of the unit.
1RWH
The LanEdge products will not interlock properly if the square rubber
bumpers are installed on the interlocking (upper) unit; install these
bumpers only on the base unit.
3. Place the first LanEdge unit on the desktop as the base. If you are installing a
FastPrint Server, place it as the base (bottom) unit, otherwise, place the
OmniConnect as the base unit.
7
Page 16

Installation
4. Pry off the interlock cap at each corner of the unit: From the side of the unit,
insert the tip of a small straight-slot screwdriver into the opening of the
interlock cap. Press down on the screwdriver to pry the cap off.
5. Place the next unit over the base (stack) and press down on each corner to
snap the units together.
6. Repeat steps 4 and 5 until all units are in the assemblage.
7. Continue with the installation instructions for each product, and then return
to “Connecting the OmniConnect” on page8.
Connecting the OmniConnect
1. Connect the modem serial cable(s) (DB-9 Female to DB-9 Female) to the
OmniConnect at the rear panel connector.
2. Connect the modem to the standard modem line(s) using RJ-11 telephone
cable(s) (one provided).
3. Connect the Ethernet LAN devices to the OmniConnect at the rear panel
connectors. Use a straight through RJ45 cable (one provided) to connect to
the PC through a 10 Mbps or 10/100 Mbps Ethernet Network Interface Card
(NIC). To connect a LAN to the OmniConnect, use a straight through cable to
Port 1 and move the MDI switch to the ON position (use a non-conductive
[plastic] object to move the switch through the case access on the bottom of
the OmniConnect). This eliminates the need for a crossover cable.
1RWH
For your c onvenience, a flexible cable tie at the right rear of the LanEdge
chassis can be used to secure the Ethernet cables.
4. Apply power to the OmniConnect as follows:
Plug the AC power adapter provided with the unit into the correct AC power
source for this adapter. Next connect the DC cable from the adapter into the
OmniConnect DC input.
Verify that the Power LED lights (see LED table).
5. Verify that the Ethernet LEDs light green (see LED table).
For troubleshooting techniques, refer to your Installation Guide.
8
Page 17

OmniConnect MultiModem Quick Install Guide
You are now ready to configure and setup the OmniConnect. To continue, see
“Verify your PC Configuration” on page10.
LED Color State Description
Power Green On The unit is receiving power , voltage is within the acceptable
Off No power.
Col Amber Flashing The unit is experiencing collisions on the LAN segment. It
Off Normal operation.
Ethernet Green On The port is c onnected to a active 10Base-T repeater or
Flashing The port is receiving dat a pa ck ets.
Off Port is not connected to an active 10Base-T repea te r or
Modem
Activity:
3, 2, 1
Green On The modem is connected to an activ e l ine.
Flashing The modem is receiving and transmitting.
Off The modem is no t active.
range, and the power supply is working.
is normal for this ind i cator to flash on occasi on
adapter and the link is active.
adapter.
9
Page 18

Installation
Verify your PC Configuration
1. Verify that your NIC and network driver are correctly installed; the Ethernet
LED on the OmniConnect and the Link LED on the NIC should be lit. If
necessary, refer to the installation manual for the NIC and the PC.
2. Verify that the TCP/IP protocol is installed and configured on each PC
connected to the OmniConnect. For details concerning this, refer to the
“TCP/IP Network I nstallation and Configuration” section of your Installation
Guide.
Load OmniStart on the Host PC
Use these steps to install OmniStart on the host PC.
1. Insert the CD-ROM and, if needed, execu te the
the Windows
£
95/NT
Start
button or by using Windows£Explorer.
setup.exe
file using
Run
withi n
2. Follow the instructions on the screen to install the applications on the PC and
run the configuration applications. The process starts by displaying the
OmniStart Welcome screen, then automatically copies files to the PC, and
begins the configuration. (You will need the work sheet information your
prepared in Chapter 1 during the configuration.) For descriptions of some of
the required configuration screens, refer to “Configuration screens.”
The simple installation described here is for a configuration that does not have an
established network and uses the OmniConnect as a DHCP server to dynamically
allocate IP address for each client PC. For specific configuration information
when using the OmniConnect with an established network, or to define filters,
DHCP parameters, or other Advanced Setup Options, refer to your Installation
Guide.
Configuration screens
The OmniStart configuration and setup utility has several screens. In most cases
the onscreen setup instructions allow you to quickly and simply install and
configure the OmniConnect. This section presen ts some of the mandatory
screens where the user must enter inform ation for a simple installation.
10
Page 19

OmniConnect MultiModem Quick Install Guide
Enter Password
Access to the OmniStart configuration utility is protected by a password. The
default password is
omni
. Enter
omni
in the dialog box titled Password and press
Enter or Next> to advance to the next screen.
To change the password from the default value, clic k the c heck bo x 'Select this bo x
to change the password' and then enter the new password in the New Password
and Confirm New Password dialog boxes and press Next>. This will change the
password to the new value. The maximum length of the password string is 15
characters and it may be any alphanumeric character. Pressing Cancel will
terminate the OmniStart installation.
11
Page 20

Installation
External Modem Setup
Each enabled modem has a Setup screen. The External Modem 1 Setup screen is
used to enter the Internet Service Provider (ISP) login, password and local
telephone access information for External Modem 1. The Internet Service
Provider (ISP) provides you a login name, password and a list of local telephone
numbers. Enter this information in the spaces provided. The OmniConnect will
use this information to establish a connection with the Internet Service Provider.
The Idle Time (seconds) may also be entered. The OmniConnect uses the Idle
Time parameter as the inactivity timer. It waits for Idle Time number of seconds
without any activity prior to disconnecting the connection with the Internet
Service Provider. Setting Idle Time to zero causes the connection to never time
out due to inactivity. The minimum value for Idle Time is 60 seconds and the
maximum value is 600 seconds.
Use this screen to configure the external modem manufacturer and model. Select
the Modem Manufacturer from the list and then select the Modem model
number. If the manufacturer of the external modem is not listed or not known,
then you can select Standard Modem Types as the manufacturer and then select
the Modem speed from the Modem 1 Model list. Additionally, to obtain some
special functionality from the external modem, a custom Modem Initialization
String can be entered by selecting Other as the Modem Manuf acturer and then
entering the exact Modem Initialization String in the edit box. The Modem
Initialization String must always contain the string
TIMEOUT 10
. Enter the
required modem initialization string after this portion.
12
Page 21

OmniConnect MultiModem Quick Install Guide
Pressing the Dial-In Setup box allows users to dial in on a specific modem. On
the OmniConnect, any one of the three external modems may be set for Dial-In.
Press the Dial-In Setup box to advance to the Dial-In Setup screen.
Scripting is enabled by clicking the Login Script box and advancing to the next
screen. Pressing the Login Script box allo ws users to send a script to the ISP; see
“Dial-In Setup.”
Dial-In Setup
The Dial-In Setup screen is used to setup a particular modem for Dial-In. Using
the OmniConnect Dial-In feature, users can call into the OmniConnect and
access resources on the local LAN or browse the Internet using one of the other
modems that are configured for normal (Dial Out) o peration.
To use Dial-In, select the check box entitled Enable Dial-In for modem number.
Only one modem (1, 2 or 3) may be enabled for Dial-In at any given time. The
authentication parameters used for the modem that is set for Dial-In use are the
login name, password and Idle Timeout specified in the Modem Setup (see the
previous screen). If the modem is not set for Dial-In, the login name, password
and Idle Timeout are used for outgoing connections to an ISP.
13
Page 22

Installation
For telecommuters and roamers who Dial-In, you have the option of allowing
PPP to assign the telecommuter (or PPP client) an IP address automatically or to
assign a particular IP address. The check boxes entitled “Use the default IP
address for Remote Co mput e r” and “Use the following IP address for the R e mot e
Computer” allow the user to select between these two option s. I f “Use the default
IP address for Remote Computer” is checked (default), the remote computer will
be assigned the IP address of 192.168.2.5. If “Use the follo wing IP address for the
Remote Compu ter” is checked, the IP address that is entered in the IP address
dialog box is assigned. Any IP address that is on a differ ent subnet from the LAN
(default 192.168.1.1/224 subnet) is allowed. Normally, this parameter need not
be changed from the default.
Press Next> to advance to the next screen.
DNS Configuration
Use this screen to enter the domain name and IP address of the DNS Server used
by the ISP. This information is provided by the ISP. This information is required
only if the DHCP server is being utilized. The DHCP server will provide the DNS
information collected from this s cree n to all the DHCP clie nts. The DHCP Server
may be disabled by selecting the Disable DHCP Server option. When the Disable
DHCP Server is selected, the DNS Configuration information is not required and
may be left blank.
14
Page 23

OmniConnect MultiModem Quick Install Guide
The default DHCP address is 192.168.1.1.
Once this information is entered, press the Next > button to proceed to the next
screen.
Modem Parameter Verification
15
Page 24

Installation
The Modem Parameter Verification screen verifies the configuration of the
modems, the ISP information and the DNS information. Each of these
parameters are checked in tern for each modem that is enabled. If there is a
failure, an 'x' is displayed next to the failing item, and if the configuration is
correct, a check mark is displayed. As shown in the example above, Modem 1’s
configuration failed, while Modem 2 and Modem 3 are correctly configured and
their ISP information and DNS information are also correct.
Modem Configuration verifies that the modem is correctly configured, is turned
on and connected to a proper analog phone line. If any of these are not true,
Modem Configuration returns a failure.
Lastly, DNS Configuration verifies the DNS server address that is entered in the
DNS screen. If this is incorrect, this test returns a failure.
ISP Configuration checks to see if the ISP information (login, password and
phone number) are correct and a login is possible. If any of t hes e are not correct,
this test returns a failure.
If there were any failures, press Next to go to the next screen, then press the Back
button to reenter the configuration and make corrections.
When the test returns satisfactory results, this concludes the setup process for a
simple installation. Press the Next button to go to the next screen.
16
Page 25

OmniConnect MultiModem Quick Install Guide
Advanced Setup Options (Finis h)
Once the user has reached this Advanced Setup Options screen, all the minimum
parameters for a simple installation of the OmniConnect have been configured.
Press the FINISH button on this screen to exit the setup program. The
OmniConnect is ready for use.
The various options located on this screen may be used to setup various advanced
options.
For specific configuration information when using the OmniConnect with an
established network, or to define filters, DHCP parameters, or other Advanced
Setup Options, refer to your Installation Guide. Refer to “LanEdge Publications”
for a list of documents.
When needed, to restart the OmniStart setup, select the
&RQILJXUDWLRQ
option icon installed in the
2PQL6WDUW#0XOWL0RGHP
2PQL6WDUW#
folder.
17
Page 26

Installation
LanEdge Publications
Visit our technical publications website at:
Related Guides
OmniConnect MultiModem Ins tallation Guid e,
613-10786-00
OmniConnect MultiModem Quic k Install Guide,
613-10790-00 (shipped wit h product)
www.alliedtelesyn.com
Web and CD-
—
Where To Find Allied Telesyn and Technical Publications
For Technical Support or Service
Location Phone Fax
Americas
United States, Canada, Mexico, Central
America, South America
Asia
Singapore, Taiwan, Thailand, Malaysia,
Indonesia, Korea, Philippines, China, India
Australia
Australia, New Zealand
France
France, Belgium, Luxe mbourg, The
Netherland s, Mi ddle East, Africa
Germany
Germany, Switzerland, Austria, Eastern
Europe
Hong Kong
Italy
Italy, Spain, Portugal, Greece, Turkey,
Israel
Japan
United Kingdom
United Kingdom, Denmark, Norway,
Sweden, Finland, Ice l and
Technical Bulletin Board Service
Technical Support Addr ess
CompuServe
FTP Server
1 (800) 428-4835 1 (918) 628-3222
(+65) 3815-613 (+65) 3833-830
(61) 2-943-5111 (61) 2-9438-4966
(+33) 1-60-92-15-32 (+33) 1-69-28-37-49
(+49) 30-435-900-126 (+49) 30-435-70-650
(+852) 2-529-4111 (+852) 2 529-7661
(+39) 02-416047 (+39) 02-419282
(+81) 3-3443-5640 (+81) 3-3443-2443
(+44) 1-235-442560 (+44) 1-235-442680
1 (425) 483-7979
TS1@alliedtelesyn.com
Go ALLIED
$GGUHVVã JDWHZD\ïFHQWUHïFRPý>ORZHUFDVHýOHWWHUV@
/RJLQã DQRQ\PRXVý>ORZHUFDVHýOHWWHUV@
3DVVZRUGã \RXUýHðPDLOýDGGUHVVý>UHTXHVWHGýE\ýWKHýVHUYHUýDWý
ORJLQ@
ROM
Print
—
18
Page 27

OmniConnect MultiModem Quick Install Guide
For Information Regarding Allied Telesyn International, Corp.
Allied Telesyn International, Corp.
19015 North Creek Parkway
Bothell, WA 98011
Tel: 1 (425) 487-8880
Fax: 1 (425) 489-9191
World Wide Web
Allied Telesyn International, Corp.
960 Stewart Drive, Suite B
Sunnyvale, CA 94086
Tel: 1 (800) 424-4284 (USA and Canada)
Fax: 1 (408) 736-0100
http://www.alliedtelesyn.com
19
Page 28

Page 29

Appendix A
OmniConnect MultiModem Installation Guide Feedback
Please tell us what additional information you would like to see discussed in this
guide. If there are topics you would like information on that were not covered in
this guide, please photocopy this page, answer the questions and fax or mail this
form back to Allied Telesyn. The mailing address and fax number are at the
bottom of the page. Your comments are valuable when we plan future revisions of
this guide.
I found the following the most valuable _______________________________
_______________________________________________________________
_______________________________________________________________
_______________________________________________________________
I would like the following more developed _____________________________
_______________________________________________________________
_______________________________________________________________
I would find this guide more useful if _________________________________
_______________________________________________________________
_______________________________________________________________
Please fax or mail your feedback. Fax to 1-408-736-0100. Or mail to:
Allied Telesyn International, Corp.
c/o Technical Communications
960 Stewart Drive, Suite B
Sunnyvale, CA 94086 USA
PN 613-10790-00 Rev A
21
Page 30

Page 31

Appendix B
Technical Support Fax Order
Name__________________________________________________________________
Company _______________________________________________________________
Address ________________________________________________________________
City ________________________State/Province_______________________________
Zip/Postal Code ___________________ Country_______________________________
Phone _______________________________Fax________________________________
Incident Summary
Model number of Allied Telesyn product I am using_____________________________
Firmware relea s e number of Allied Telesyn product_____________________________
Other network so ftware products I am using (e.g., netw ork managers)
___________________________ ___________________________________________
___________________________ ___________________________________________
Brief summary of problem __________________________ _______________________
___________________________ ___________________________________________
Conditions (List the steps that l ed up to the problem.) _________________ __________
___________________________ ___________________________________________
___________________________ ___________________________________________
___________________________ ___________________________________________
___________________________ ___________________________________________
___________________________ ___________________________________________
___________________________ ___________________________________________
___________________________ ___________________________________________
Detailed description (Please use separate sheet)
Please also fax printouts of relevant files such as batch files and configuration files.
When completed, f ax this sheet to the appr opriate Allied Telesyn off ice. Fax num bers can
be found on page 18.
23
Page 32

 Loading...