

Page 1

AlliedWareTM OS
How To |
Create a VPN between an Allied Telesis and a
NetScreen Router
Today’s network managers often need to incorporate other vendors’ equipment into their
networks, as companies change and grow. To support this challenge, Allied Telesis routers are
designed to inter-operate with a wide range of equipment.
This How To Note details one of the inter-operation solutions from Allied Telesis: creating
virtual private networks between Allied Telesis and NetScreen routers. It shows you how to
configure a VPN between a local Allied Telesis router and a remote NetScreen router, stepby-step. On the Allied Telesis router, it uses the Site-To-Site VPN wizard for the VPN
configuration.
The wizard runs on selected AR400 Allied Telesis routers from the router’s web-based GUI
(graphical user interface). It asks you to enter a few details and from those it configures the
following settings:
z encryption to protect traffic over the VPN
z ISAKMP with a preshared key to manage the VPN
z the firewall, to protect the LANs and to allow traffic to use the VPN
z Network Address Translation (NAT), so that you can access the Internet from the private
LAN through a single public IP address. This Internet access does not interfere with the
VPN solution.
You can use the command line to set up an equivalent configuration on AR700 and other
AR400 Series routers. See "The router commands" on page 28 for a complete list of the
commands the configuration uses.
C613-16099-00 REV D
www.alliedtelesis.com
Page 2

What information will you find in this document?
This How To Note begins with the following information:
z "Related How To Notes" on page 2
z "Which products and software version does it apply to?" on page 2
Then it describes the configuration, in the following sections:
z "The network" on page 3
z "How to configure the Allied Telesis router" on page 4
z "How to configure the NetScreen router" on page 13
z "How to test the tunnel" on page 26
z "The router commands" on page 28
Related How To Notes
Allied Telesis offers How To Notes with a wide range of VPN solutions, from quick and
simple solutions for connecting home and remote offices, to advanced multi-feature setups.
Notes also describe how to create a VPN between an Allied Telesis router and equipment
from a number of other vendors.
For a complete list of VPN How To Notes, see the Overview of VPN Solutions in How To Notes
in the How To Library at www.alliedtelesis.com/resources/literature/howto.aspx.
Which products and software version does it apply to?
The VPN wizard is available on the following Allied Telesis routers, running Software Version
1
or later:
2.9.
z AR4
z AR440S, AR44
You can use the command line to set up an equivalent configuration on AR700 and other
AR400 Series routers. See "The router commands" on page 28 for a complete list of the
commands that the configuration uses.
We created this example with a NetScreen 25, running ScreenOS 4.0.3r4.0.
The screenshots in this Note are from an Internet Explorer 6.0 browser running on
Windows XP and Windows 2000.
1
5S
1
S, AR442S
Page 2 | AlliedWare™ OS How To Note: VPNs with NetScreen routers
Page 3

The network
at-netscreen.eps
The following diagram shows the LANs and their interfaces and addresses.
Allied Telesis
router
NetScreen
router
eth0:
100.100.100.1/30
100.100.100.2/30
Internet
200.200.200.2/30
ethernet 3:
200.200.200.1/30
vlan1:
192.168.1.1
workstation:
192.168.1.100 by
automatic address
assignment
VPN
tunnel
ethernet 1:
192.168.2.1
workstation:
192.168.2.100 by
automatic address
assignment
Page 3 | AlliedWare™ OS How To Note: VPNs with NetScreen routers
Page 4

How to configure the Allied Telesis router
Before you
start
1. Access the router via its GUI.
2. Customise the router and set up vlan
always uses vlan
interface is configured on vlan
1
as the local LAN for the VPN connection, so you must make sure an IP
1
1
as the LAN interface. The site-to-site VPN wizard
before running the wizard.
3. Create a security officer. If you use the Basic Setup wizard to customise the router, this
creates one security officer, with a username of “secoff”.
4. Set up the WAN interface appropriately for your connection type. This example shows
the steps for both a fixed IP address on the WAN interface (as in the figure above) and a
PPPoE interface with a dynamically-assigned address.
The router setup of steps
1
-4 is described in How To Use the Allied Telesis GUI to Customise the
Router and Set Up An Internet Connection, which is available from www.alliedtelesis.com/
resources/literature/howto.aspx.
In this example, the Allied Telesis router has the following settings:
Interface Address Mask
Allied Telesis router LAN vlan
Allied Telesis router WAN:
if fixed IP address eth0
if dynamic IP address ppp0 0.0.0.0 0.0.0.0
Remote site’s WAN settings 200.200.200.
Remote site’s LAN settings
11
92.168.1.
1
00.100.100.
1
92.168.2.1 255.255.255.0
1
1
1
255.255.255.0
255.255.255.252
Page 4 | AlliedWare™ OS How To Note: VPNs with NetScreen routers
Page 5
Create the
VPN tunnel
1. Open the Configuration Wizards page
Log in as either the manager or the security officer. If you log in as the manager, the router
changes to secure mode when you finish the VPN wizard and at that stage prompts you to
log in again as the security officer.
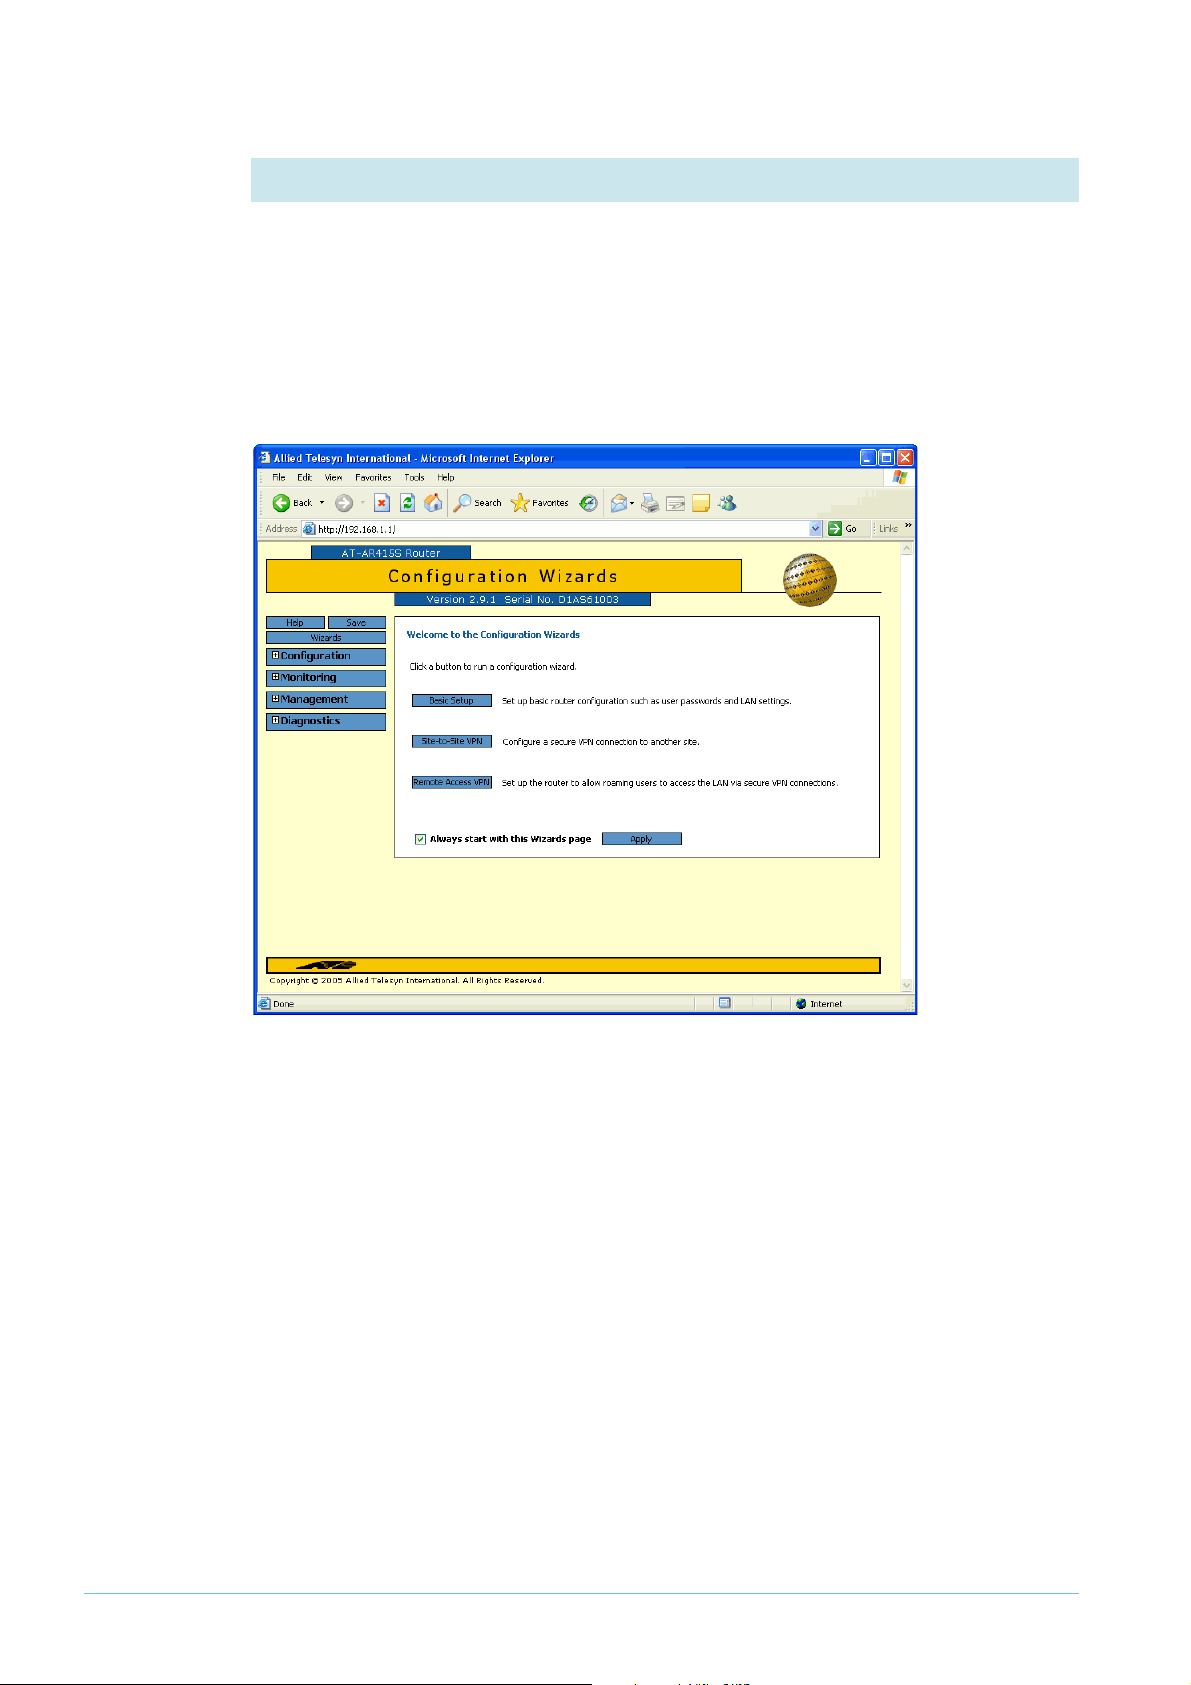
The Site-To-Site VPN wizard is one of the options on the GUI’s Configuration Wizards page.
Make sure your browser’s pop-up blocker is disabled—the wizard needs to open pop-ups. If
you access the Internet through a proxy server, make sure your browser bypasses the proxy
for this address.
The GUI opens at this page the first time you configure your router. After initial configuration
it may open at the System Status page instead. If so, click on the Wizards button in the lefthand menu to open the Configuration Wizards page.
Page 5 | AlliedWare™ OS How To Note: VPNs with NetScreen routers
Page 6

2. Start the Site-to-Site VPN wizard
Click on the Site-to-Site VPN button.
The wizard starts by displaying a
welcome message.
Click the Next button.
3. Name the VPN connection
Enter an appropriate VPN connection
name.
Click the Next button. If you have
multiple possible WAN interfaces
configured on the router, the wizard
next lets you select the appropriate
interface. In this example there is only
one WAN interface, so the wizard
selects it automatically and moves
directly to the remote site settings.
Page 6 | AlliedWare™ OS How To Note: VPNs with NetScreen routers
Page 7
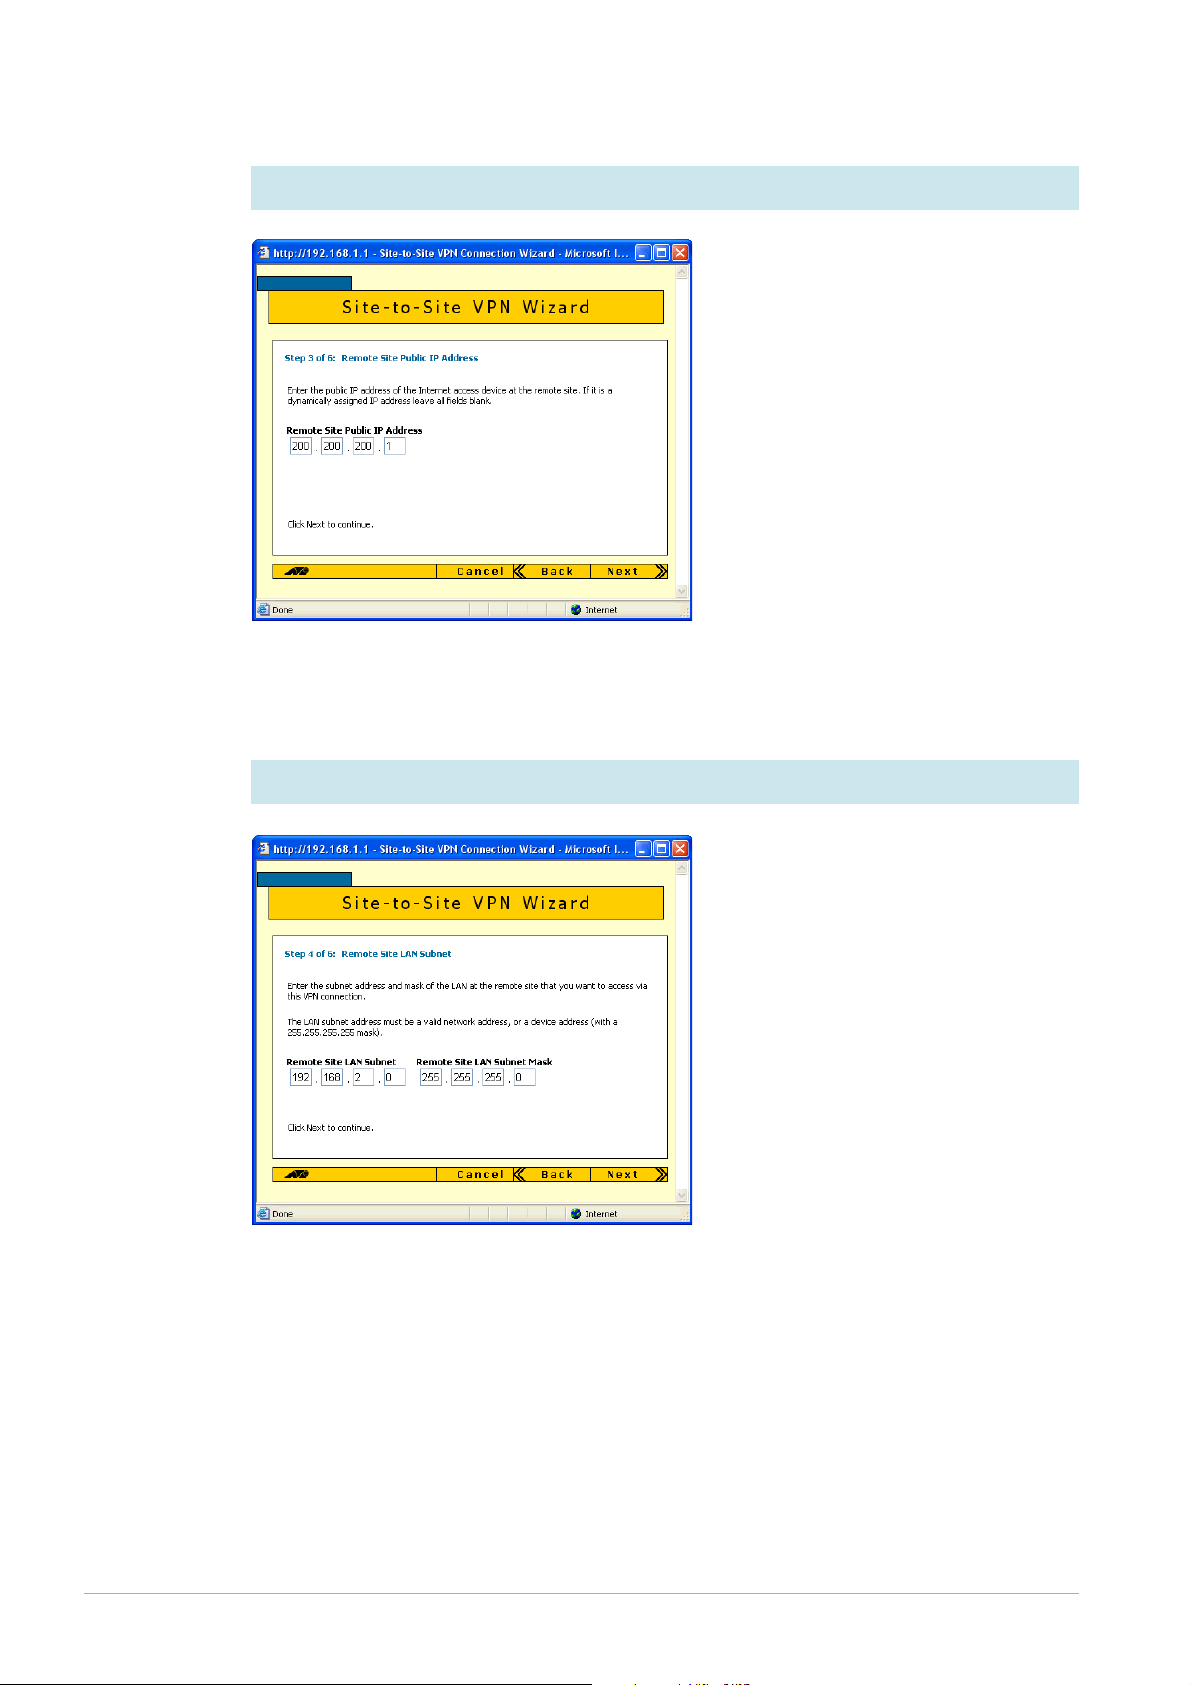
4. Enter the remote site’s WAN IP address
Enter the public IP address of the other
end of the tunnel. In this example, this
is 200.200.200.
Note that you can use the Tab key to
move between fields when entering the
address, but should not use the . key
(the period).
Click the Next button.
1
.
5. Enter the remote site’s LAN IP address
Enter the NetScreen router’s LAN
subnet address and mask. In this
example, this is
of 255.255.255.0.
Click the Next button.
1
92.168.2.0 and a mask
Page 7 | AlliedWare™ OS How To Note: VPNs with NetScreen routers
Page 8

6. Enter the shared secret key
Enter the secret key, which is an
alphanumeric string between 2 and 64
characters long. Both routers must use
the same secret key. On the NetScreen
router, this is the Preshared Secret.
Click the Next button.
7. Check the settings
Check the summary. If necessary, use
the wizard’s Back button to return and
correct any settings you want to
change.
Once you are happy with the settings,
click the Advanced Settings button to
configure additional settings that allow
interoperation with the NetScreen
router.
Page 8 | AlliedWare™ OS How To Note: VPNs with NetScreen routers
Page 9

8. Configure additional settings
This step has two alternatives:
z if your WAN connection has a static IP address, you need to configure Perfect Forward
Secrecy. This is the first alternative
z if your WAN connection has a dynamic IP address, you need to use Aggressive Mode,
configure Perfect Forward Secrecy, and give the peer a local ID. This is the second
alternative, shown on the next page
Static
address
If you have a static address, then in the
middle of the Advanced Settings page,
select the Use Perfect Forward Secrecy
checkbox and set the DH Group for
PFS to Group 2.
Then click the OK button.
Page 9 | AlliedWare™ OS How To Note: VPNs with NetScreen routers
Page 10
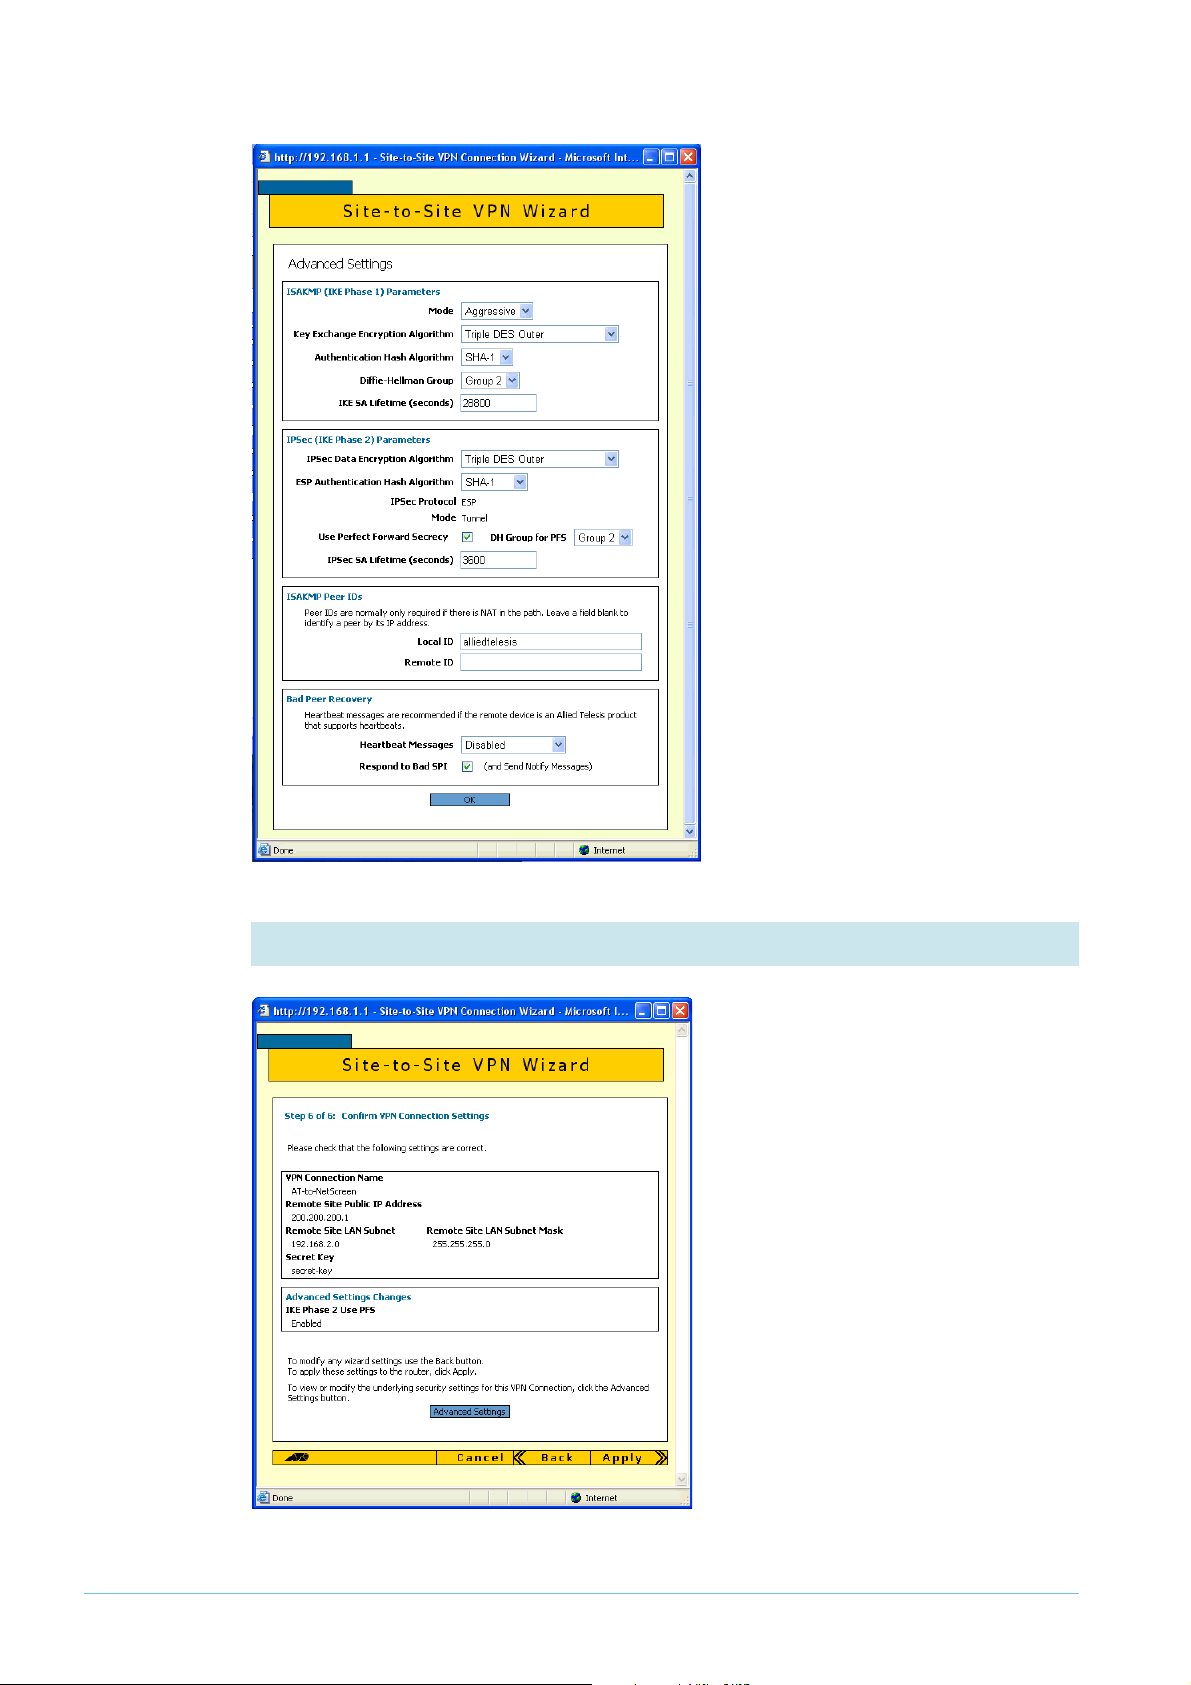
Dynamic
address
If you have a dynamic address, then on
the Advanced Settings page:
z at the top, select Aggressive Mode
z in the middle, select the Use Perfect
Forward Secrecy checkbox and set
the DH Group for PFS to Group 2
z towards the bottom, enter a Local
ID. This ID lets the NetScreen
router validate the Allied Telesis
router. Therefore, it must match
the Remote User ID value that you
enter on the NetScreen router
Then click the OK button.
Static
address
9. Check the settings again
Check the summary.
If you have a static address, the
summary now includes the Perfect
Forward Secrecy setting.
Page 10 | AlliedWare™ OS How To Note: VPNs with NetScreen routers
Page 11

Dynamic
address
If you have a dynamic address, the
summary now includes Aggressive
Mode, the Perfect Forward Secrecy
settings, and the Local ID.
Security
officer
If necessary, correct any settings you want to change. When all the settings are correct, click
the Apply button.
10. Finish the wizard
If you are logged in as the security
officer, the GUI displays a completion
message. Click the Finish button to
finish the Wizard and save the VPN
settings.
Page 11 | AlliedWare™ OS How To Note: VPNs with NetScreen routers
Page 12

Manager If you are logged in as manager, the
GUI displays a message to warn you
that you will need to close your
browser and re-login as a security
officer (see below) once you have
finished the wizard.
Click the Finish button to finish the
Wizard and save the VPN settings. The
browser now indicates that you no
longer have permission to view the
GUI.
The router configuration is now complete. If required, you
can log in to the router again for further configuration or
monitoring. To do this, close your browser, open it again,
and browse to the router’s IP address.
If you used the Basic Setup wizard to configure the LAN
settings, the router will have one security officer, with a
username of “secoff”.
Login as the security officer.
Page 12 | AlliedWare™ OS How To Note: VPNs with NetScreen routers
Page 13

How to configure the NetScreen router
To configure the NetScreen router, perform the steps in the following sections:
1. "Access the Router" on page 13
2. "Configure the interfaces" on page 15
3. "Configure routing" on page 18
4. "Configure the VPN" on page 21
Access the Router
By default, the NetScreen router starts up with a management IP address of 192.168.1.1 and
1
mask of 255.255.255.0 on the ethernet
port.
Resetting to
factory
defaults
If you have difficulty accessing your NetScreen router, you may need to reset it to its factory
defaults. To do this:
1. Power up the NetScreen.
2. Press the Asset Recovery Pinhole button—beside the console port—with a paper clip or
1
something similar. The Status
until the LED flashes green.
3. Release the button, then press it again. The LED flashes red (if it does not flash red, keep
trying until it does). Keep pressing the button for another 6 seconds until the LED turns
off.
LED flashes orange. Keep pressing the button for 6 seconds
1. Connect a PC to the router
Select a standalone PC to configure the router from—a PC that is not connected into any
existing LAN.
1
Connect a NIC card on the PC to the ethernet
port.
2. Set the PC’s IP address
Give your PC an address in the 192.168.1.0 subnet.
3. Browse to the router’s management GUI
Browse to
access the Internet through a proxy server, set your browser to bypass the proxy for this
address.
The login dialog box opens.
Page 13 | AlliedWare™ OS How To Note: VPNs with NetScreen routers
1
92.168.1.1. If you are using a pop-up blocker, disable it for this address. If you
Page 14

4. Log on
The router opens at its Home page.
The defaults are
username: netscreen
password: netscreen
Page 14 | AlliedWare™ OS How To Note: VPNs with NetScreen routers
Page 15
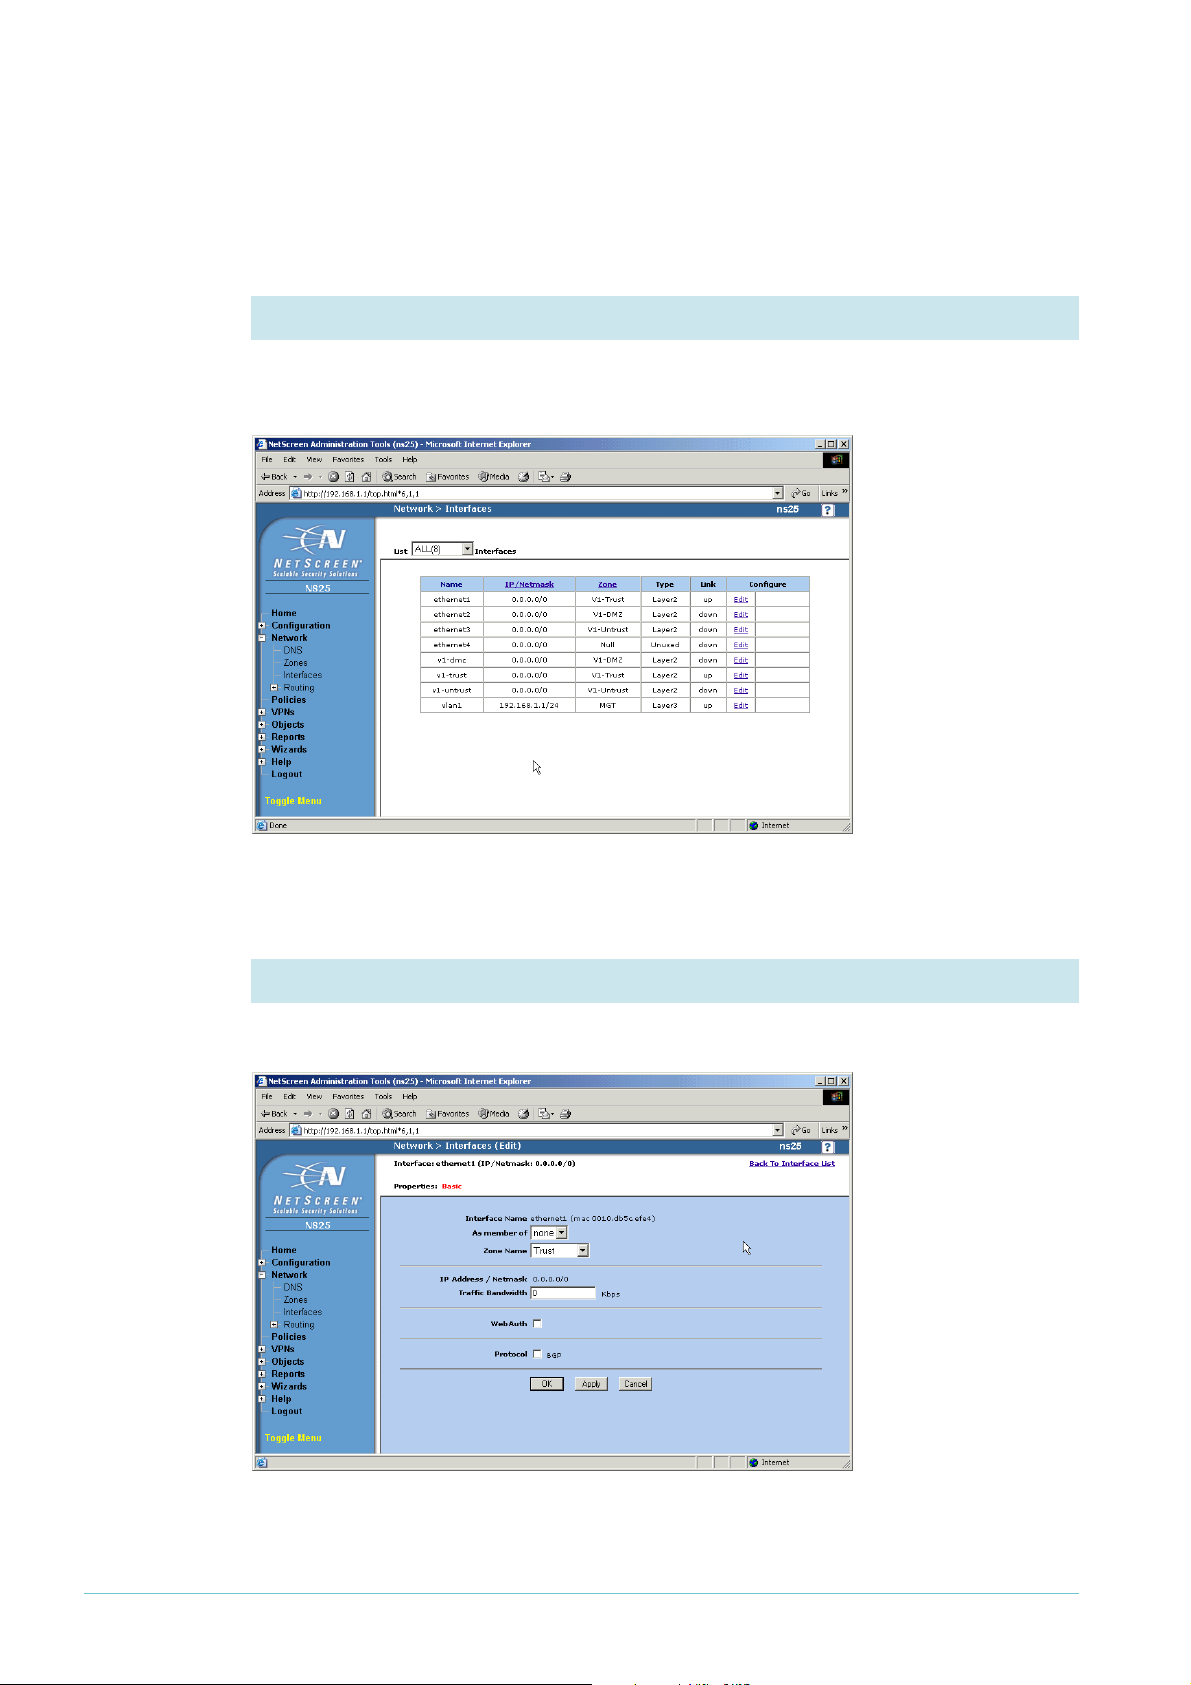
Configure the interfaces
The following steps configure ethernet1 as the interface to the LAN and ethernet3 as the
interface to the WAN.
1. Display the interfaces
From the left-hand menu on the Home page, select Network, then Interfaces. The GUI
displays the Interfaces Table page.
1
On the ethernet
row, click Edit.
2. Set the Zone Name for ethernet
Select a Zone Name of Trust.
1
Click the Apply button. The page refreshes with more settings available.
Page 15 | AlliedWare™ OS How To Note: VPNs with NetScreen routers
Page 16
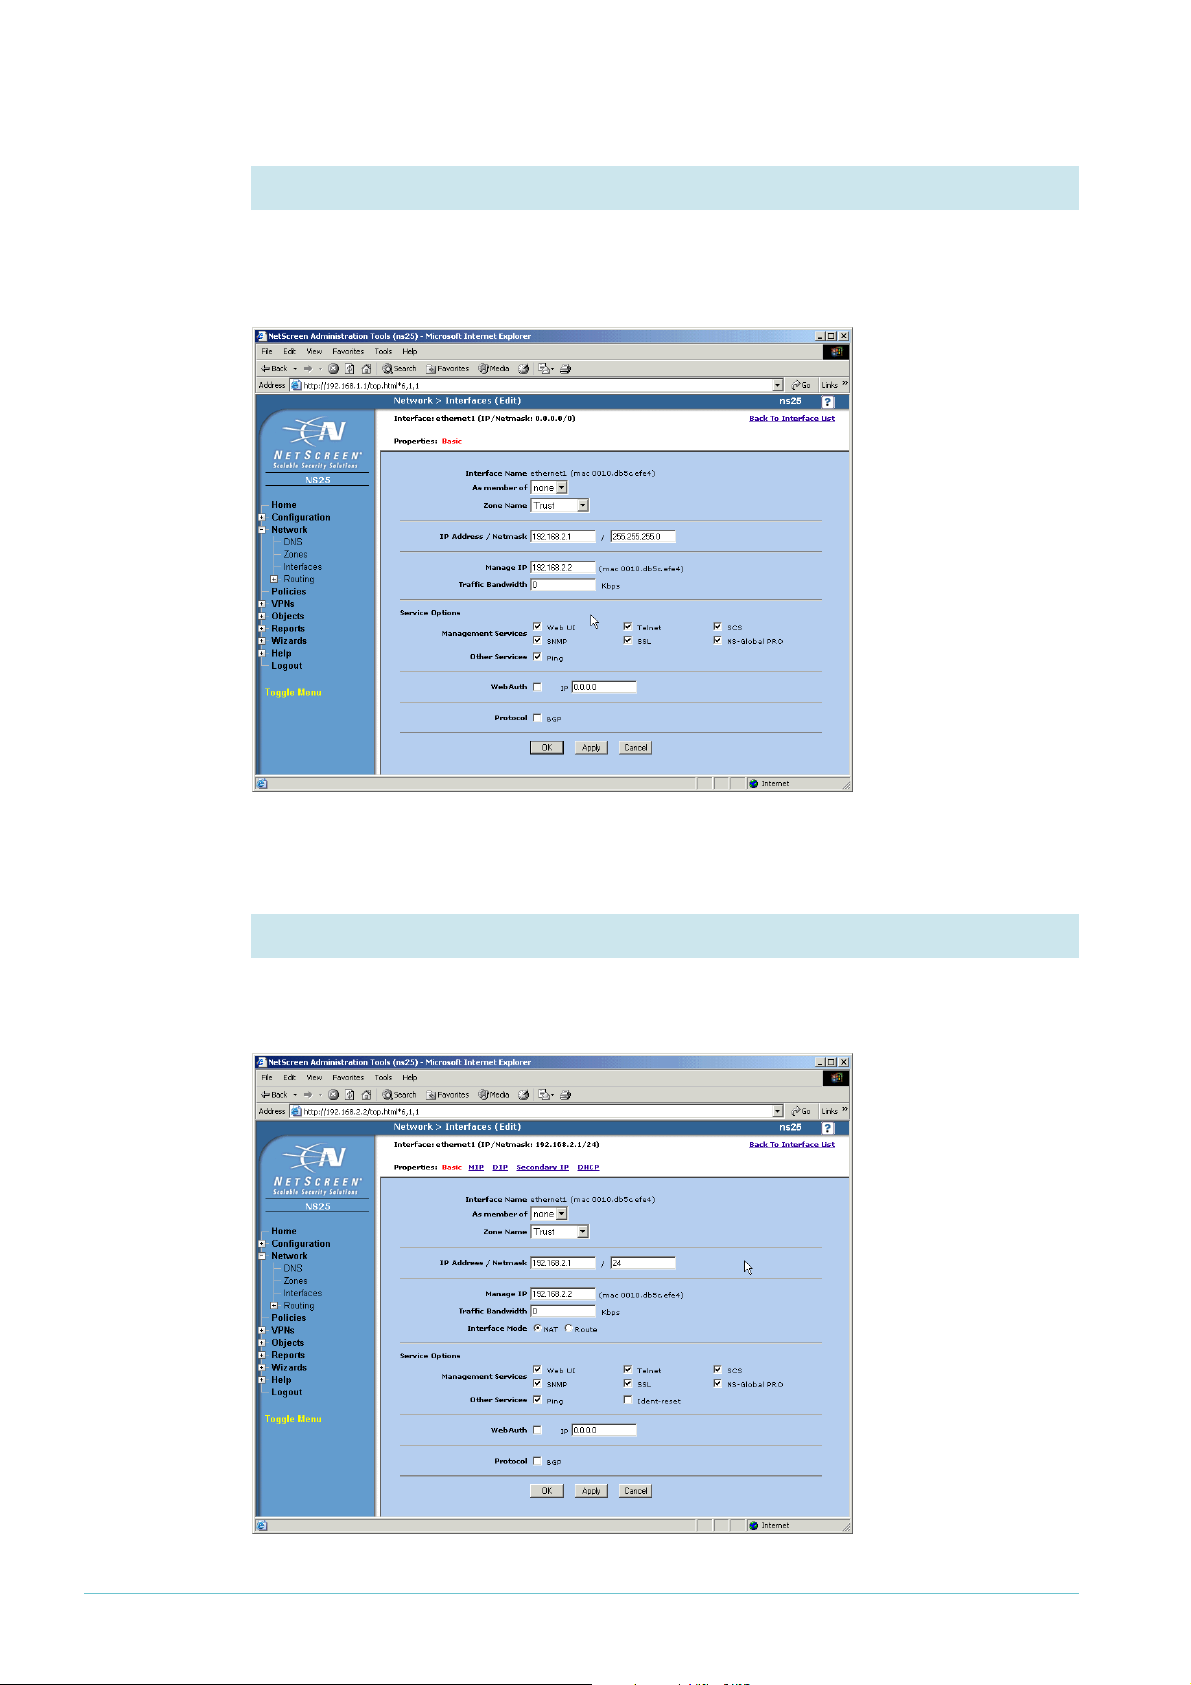
3. Change the IP address for ethernet1, if necessary
Change the IP address if you need to. In this example, the address is 192.168.2.1. If you
change the subnet (as we did) you must also change the management IP address for the
interface.
Click the Apply button. The page refreshes with even more settings available.
4. Check the interface mode for ethernet
Check that the Interface Mode is set to NAT, so that the router translates addresses of
packets from your private LAN to your public address.
1
Page 16 | AlliedWare™ OS How To Note: VPNs with NetScreen routers
Page 17

Click the OK button. If you changed the management IP address in step 3, this stops your
browser from accessing the GUI. Change the IP address on your PC if necessary, and browse
to the new management address.
1
You have now finished configuring ethernet
the public WAN interface.
If necessary, browse to Network, then Interfaces again. On the ethernet
. The next steps configure ethernet3, which is
3
row, click Edit.
5. Set the IP address for ethernet3
Check that the Zone Name is set to Untrust, and specify the appropriate IP address. In this
1
example, the address is a Static IP of 200.200.200.
and a mask of 30.
Click the Apply button. The page refreshes with more settings available.
Page 17 | AlliedWare™ OS How To Note: VPNs with NetScreen routers
Page 18
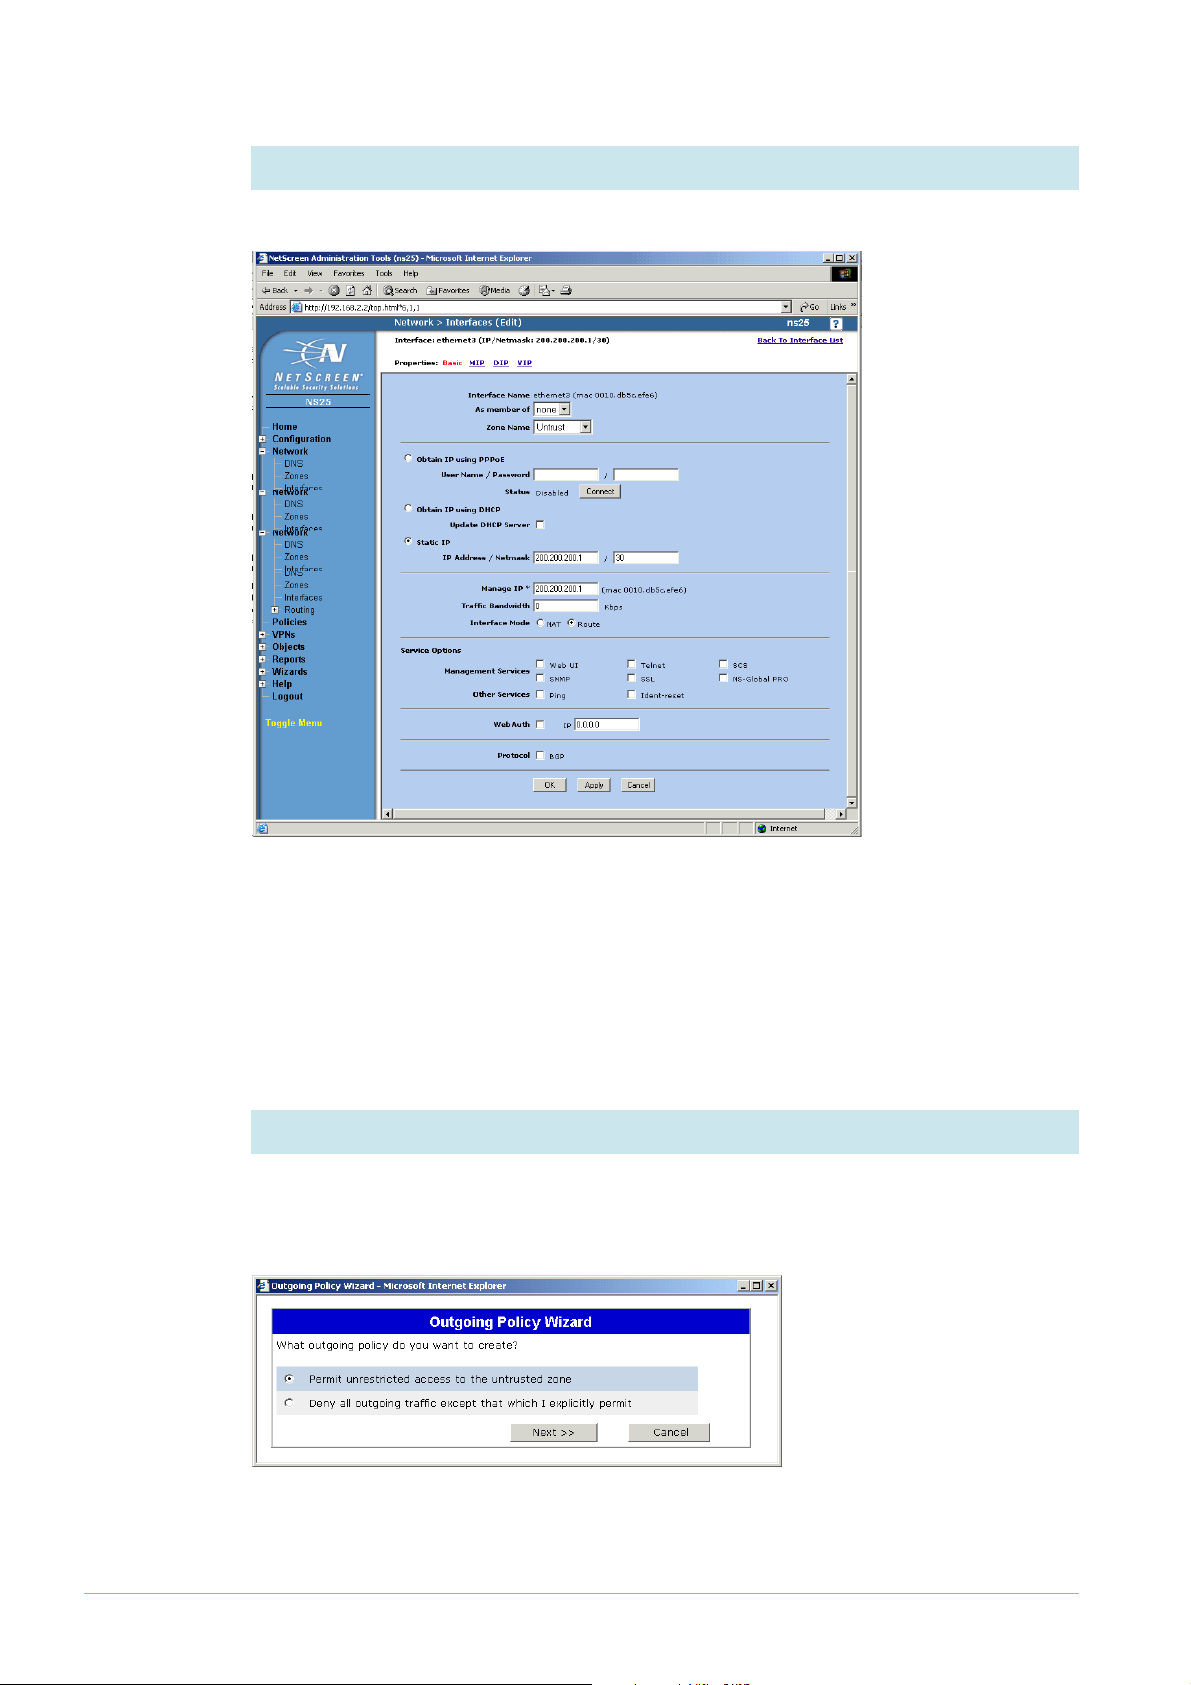
6. Set the interface mode for ethernet3
Check that the Interface Mode is set to Route.
Click the OK button. You have now finished configuring ethernet3.
Configure routing
By default, the NetScreen router blocks all LAN traffic from accessing the WAN. The
following steps change this, and also configure a default route.
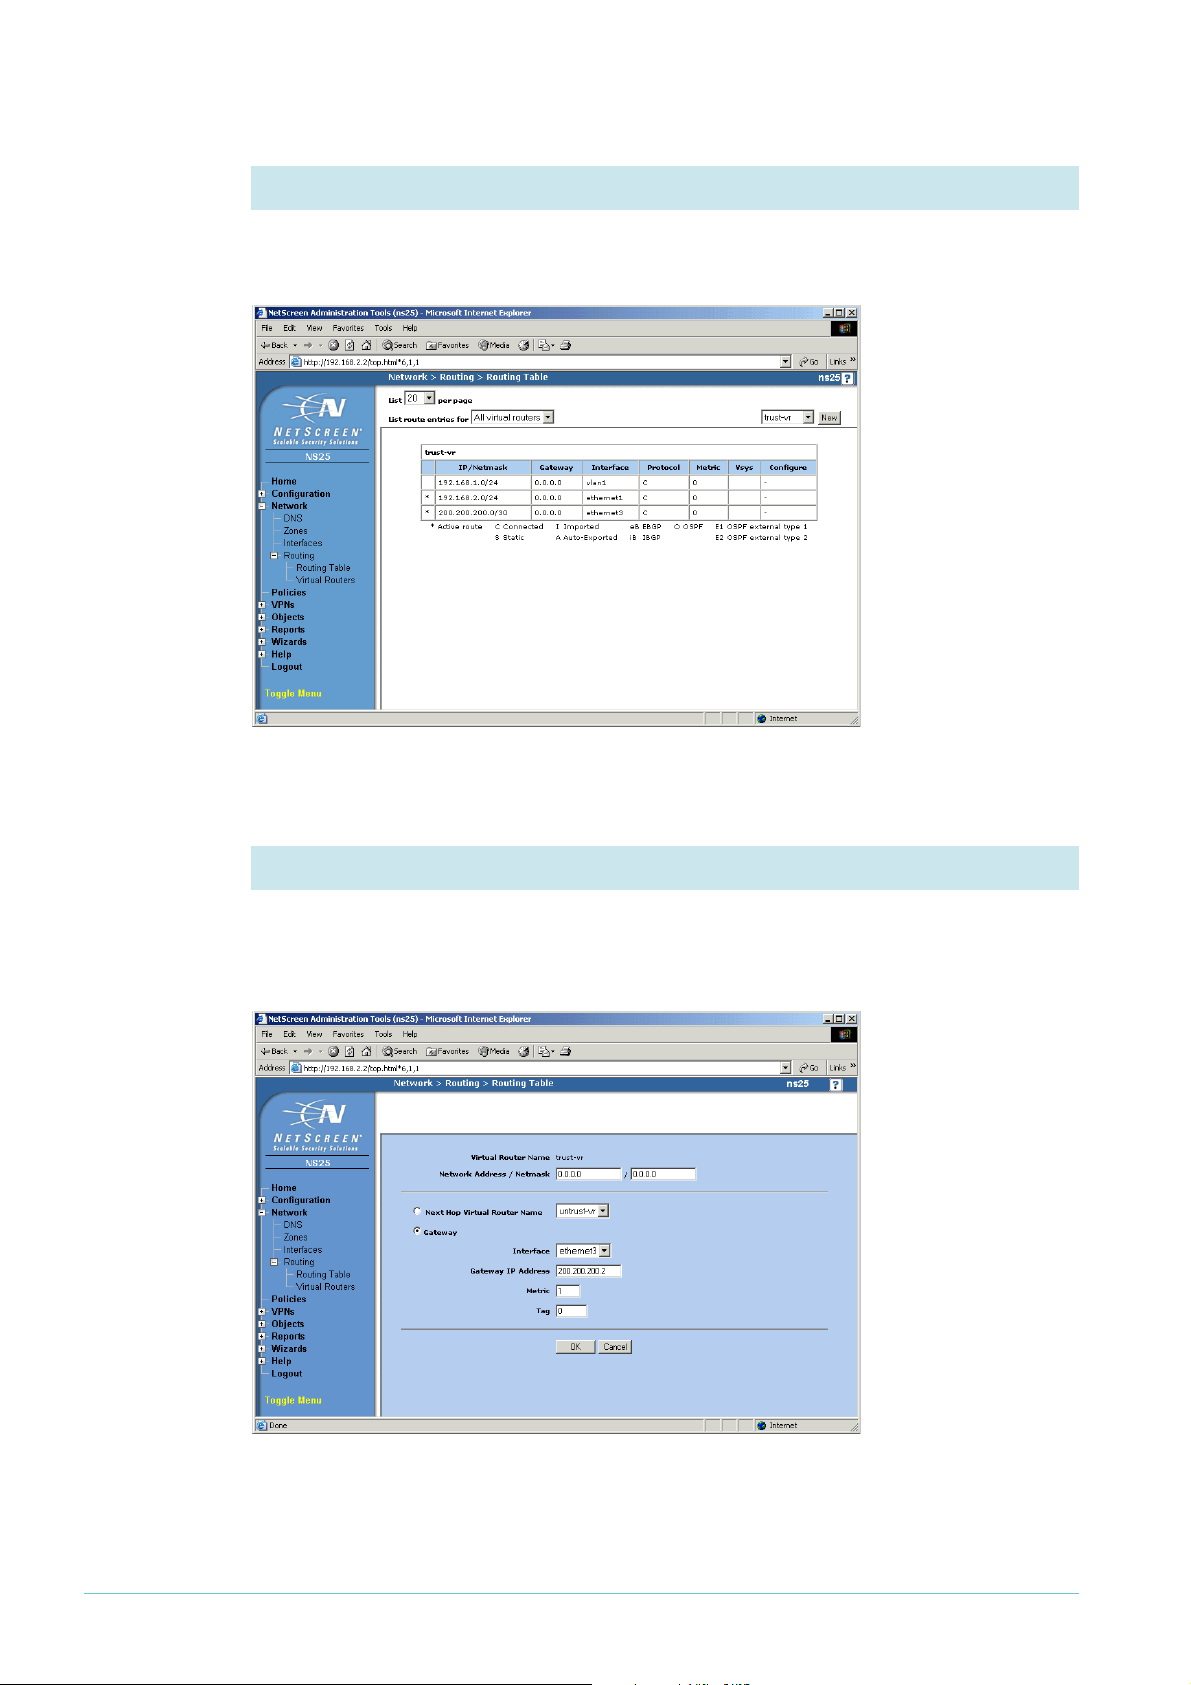
1. Start the Outgoing Policy Wizard
From the left-hand menu on the Home page, select Wizards, then Outgoing Policy. The GUI
displays the first page of the wizard. Select “Permit unrestricted access to the untrusted
zone”.
Click the Next button.
Page 18 | AlliedWare™ OS How To Note: VPNs with NetScreen routers
Page 19

2. Check the policy settings
The wizard displays a summary of the settings for you to confirm.
Click the Next button.
3. End the wizard
The wizard displays a summary of the settings.
Click the Finish button. The GUI displays the Interface Table page again.
Page 19 | AlliedWare™ OS How To Note: VPNs with NetScreen routers
Page 20
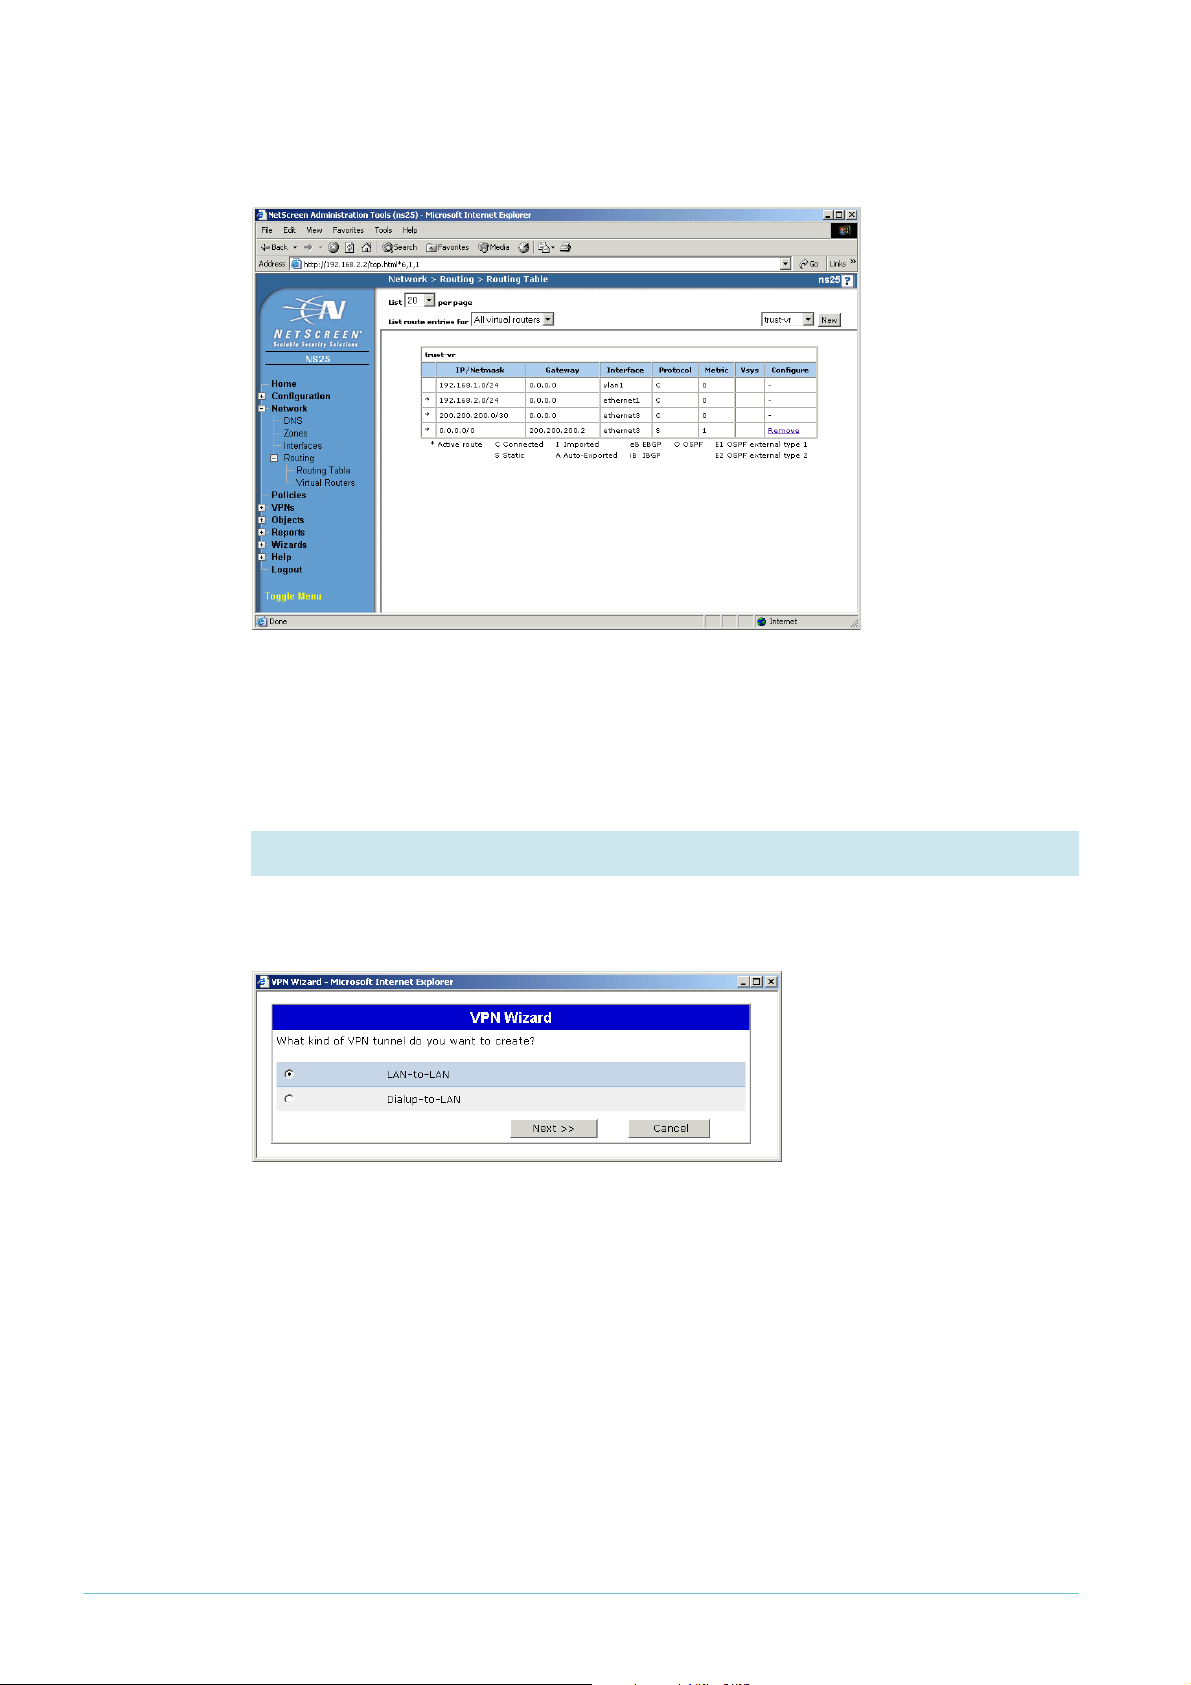
4. Display the routes
From the left-hand menu on the Home page, select Network, then Routing, then Routing
Table. The GUI displays the Routing Table page.
Click the New button.
5. Configure the default route
Enter a Network Address and Netmask of 0.0.0.0. Select the Gateway option, with an
Interface of ethernet3 and your ISP’s address as the Gateway IP Address. In this example, the
gateway address is 200.200.200.2.
Page 20 | AlliedWare™ OS How To Note: VPNs with NetScreen routers
Page 21
Click the OK button. The GUI displays the Routing Table page again. Check that your route
is correct.
Configure the VPN
The following steps create the VPN.
1. Start the VPN Wizard
From the left-hand menu on the Home page, select Wizards, then VPN. The GUI displays the
first page of the wizard. Select LAN-to-LAN.
Click the Next button.
Page 21 | AlliedWare™ OS How To Note: VPNs with NetScreen routers
Page 22
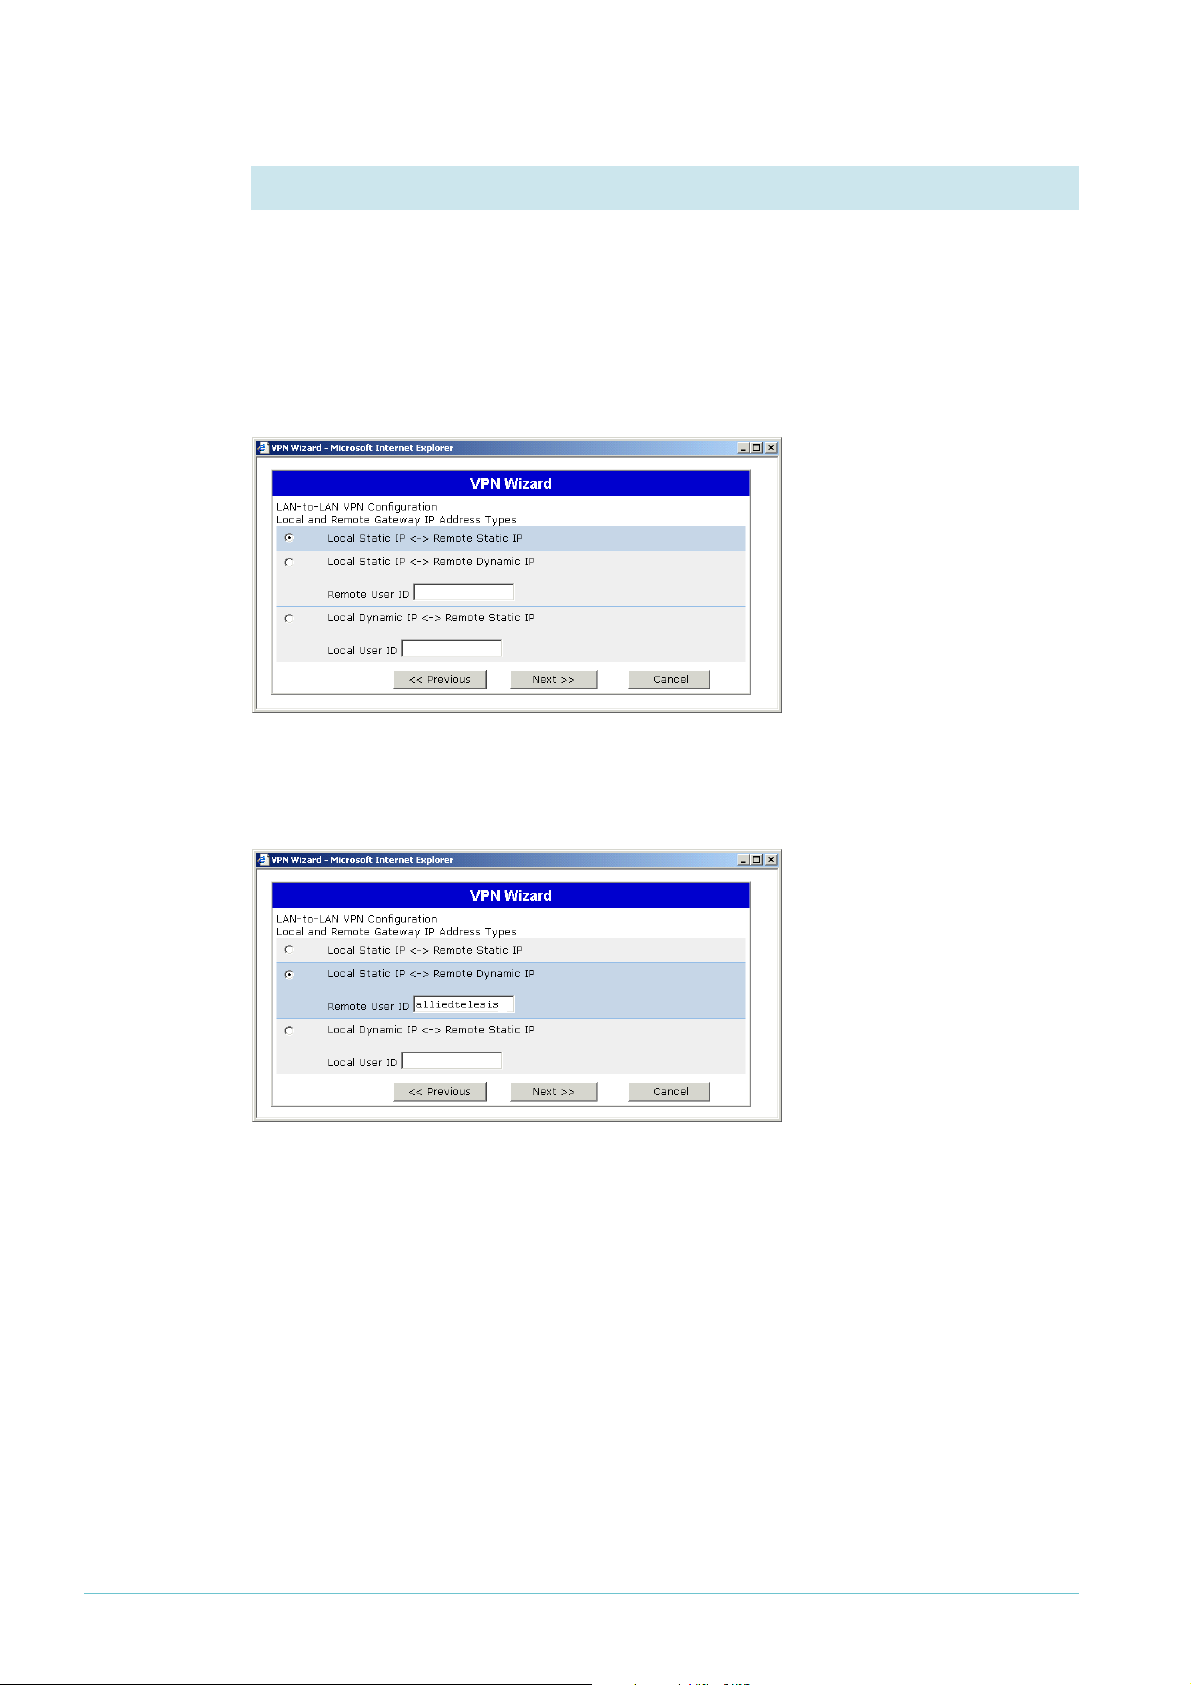
2. Select the type of address
Select the appropriate option. This example shows the options for when:
z both the Allied Telesis and the NetScreen routers have static IP addresses
z the Allied Telesis router has a dynamic address
Static
remote
address
Dynamic
remote
address
If both ends of the VPN have fixed IP addresses, select Local Static to Remote Static and click
the Next button.
If the Allied Telesis router has a dynamic IP address, select Local Static IP to Remote Dynamic
IP. In the Remote User ID field, enter the Local ID that you specified on the Allied Telesis
router Advanced page. Then click the Next button.
Page 22 | AlliedWare™ OS How To Note: VPNs with NetScreen routers
Page 23

3. Specify the remote address, if it is static
If you chose the Local Static to Remote Static option at the step before, enter the Allied
Telesis router’s public IP address,
Dynamic IP option, you do not see this step.
Click the Next button.
1
00.100.100.1 in this example. If you chose the Remote
4. Specify the encryption strength and key
Select Standard encryption and enter the preshared key. The key must be the same as the
Allied Telesis router’s secret key.
Click the Next button.
5. Specify the remote LAN
Enter the IP subnet of the LAN at the Allied Telesis router’s end of the tunnel. In this
example, the address is
Click the Next button.
Page 23 | AlliedWare™ OS How To Note: VPNs with NetScreen routers
1
92.168.1.0 and the netmask is 255.255.255.0.
Page 24
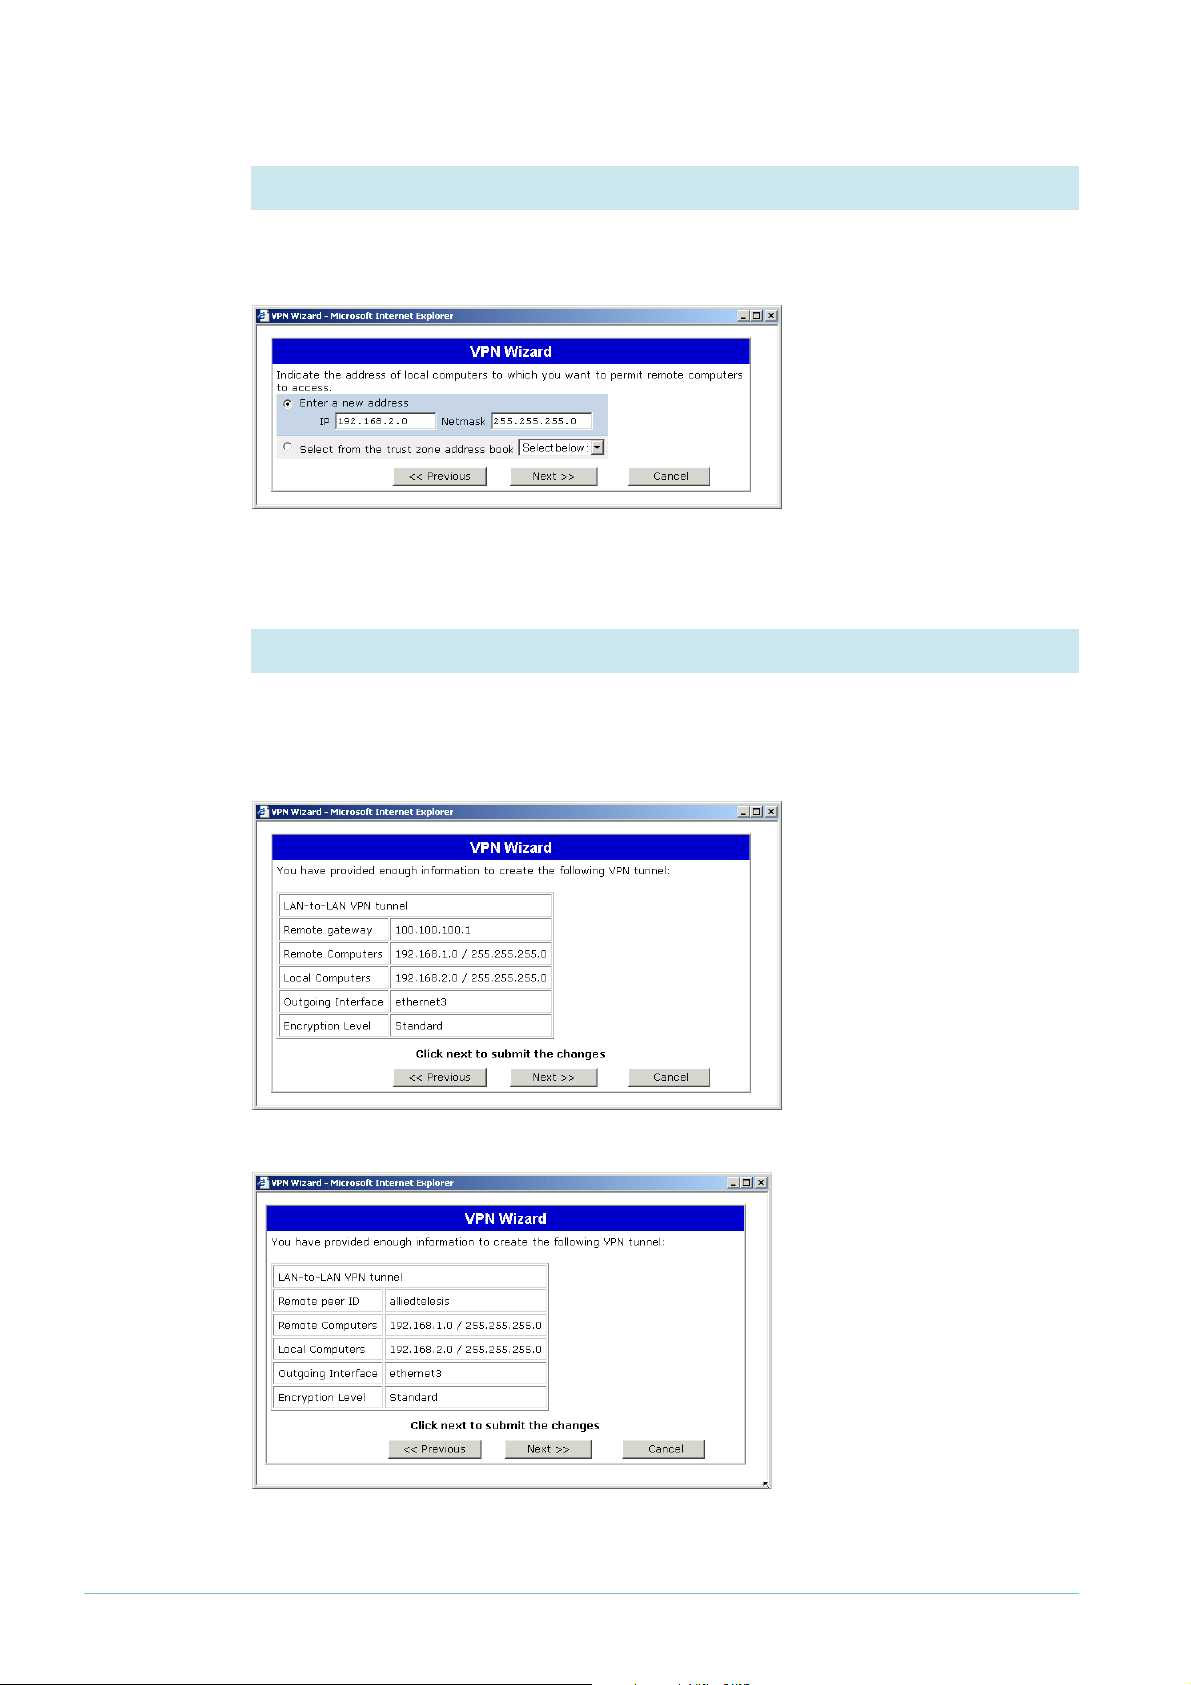
6. Specify the local LAN
Enter the IP subnet of the LAN at the NetScreen router’s end of the tunnel. In this example,
the address is
Click the Next button.
1
92.168.2.0 and the netmask is 255.255.255.0.
7. Check the policy settings
The wizard displays a summary of the settings for you to confirm. Check that the settings are
correct, and if necessary use the Previous button to return and correct them.
Static
remote
address
Dynamic
remote
address
Once the settings are correct, click the Next button.
Page 24 | AlliedWare™ OS How To Note: VPNs with NetScreen routers
Page 25
Static
remote
address
Dynamic
remote
address
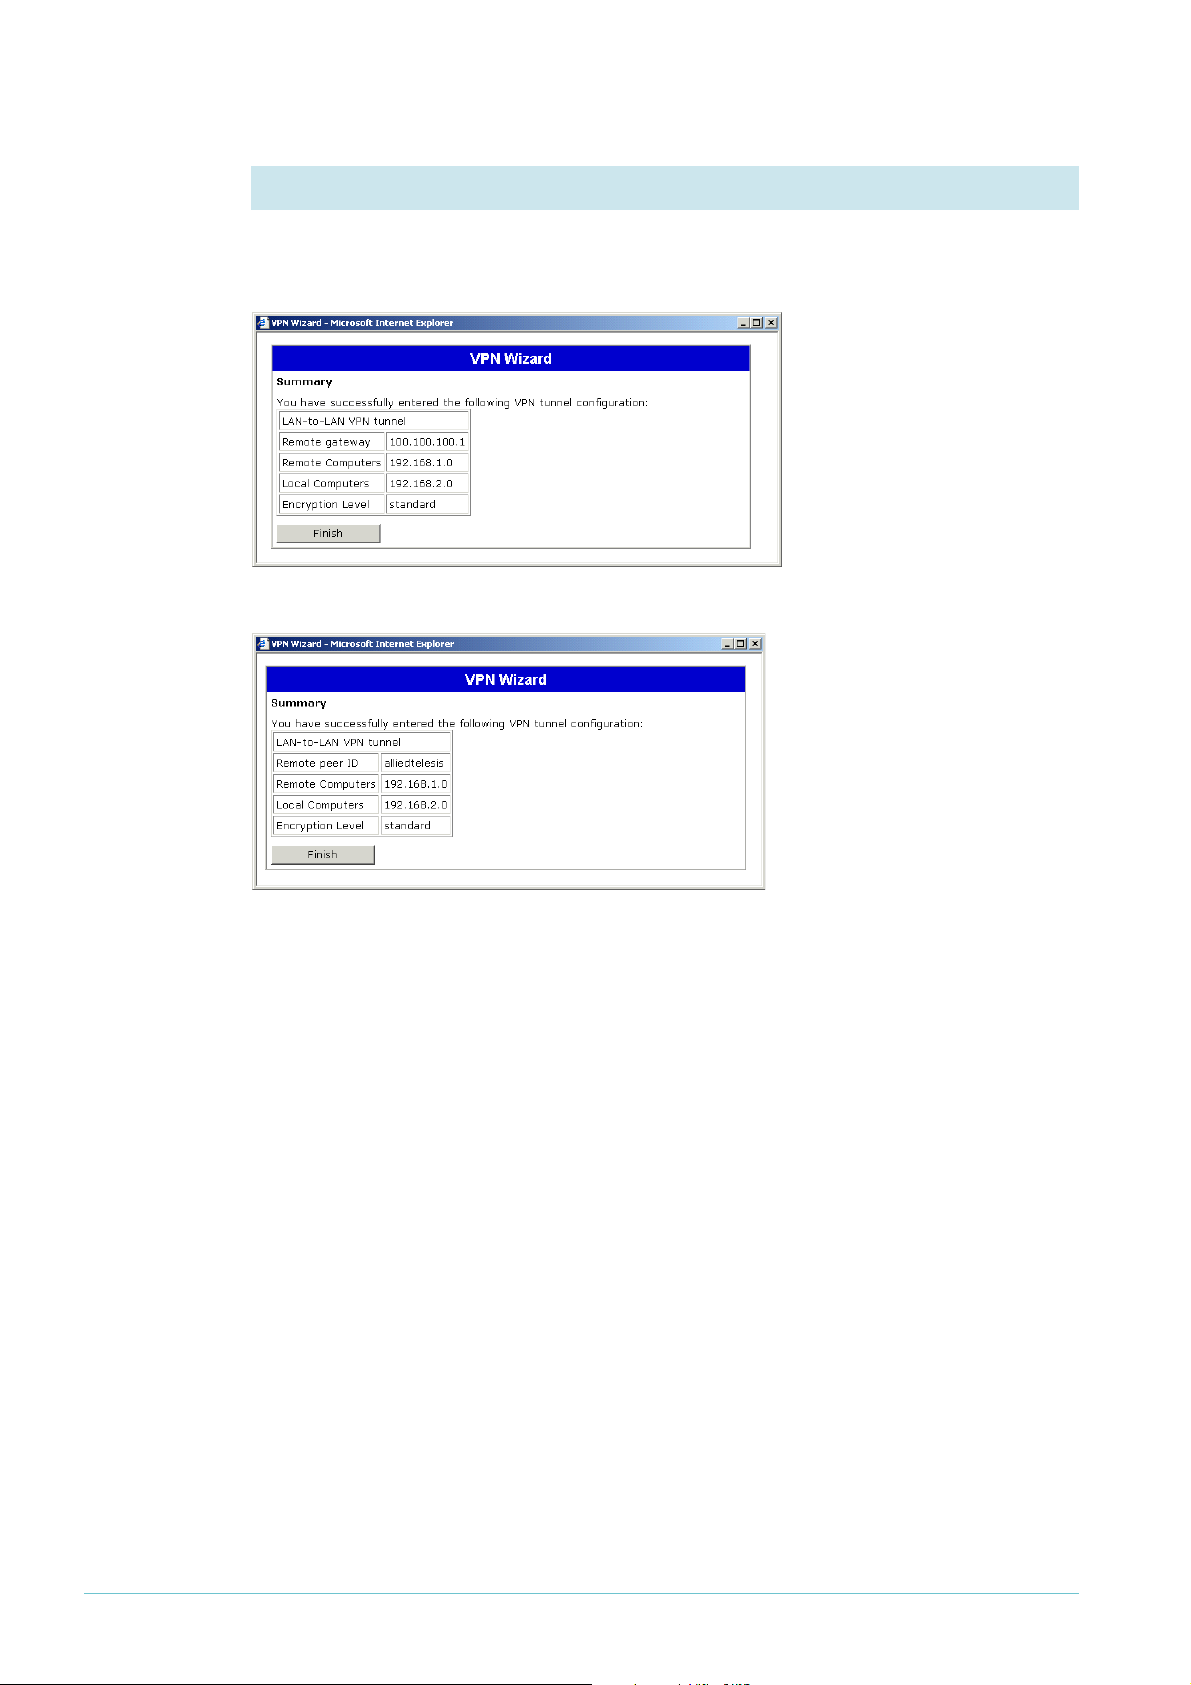
8. End the wizard
The wizard displays a summary of the settings.
Click the Finish button. This completes the configuration.
Page 25 | AlliedWare™ OS How To Note: VPNs with NetScreen routers
Page 26

How to test the tunnel
There are several options for testing the tunnel. If these checks show that your tunnel is not
working, see the How To Note How To Troubleshoot A Virtual Private Network (VPN).
1. Ping the LAN
The simplest way to test the tunnel is to ping from one LAN to the other. For example, from
the PC attached to the Allied Telesis router, ping the PC attached to the NetScreen router.
If the Allied Telesis router has a dynamic IP address, note that you must initiate the tunnel
from the Allied Telesis end. This means pinging from a PC attached to the Allied Telesis
router, not from a PC attached to the NetScreen router.
2. Check the events
On the Home page of the NetScreen router, you can look at the list of events while (or after)
attempting to ping from one LAN to the other. You should see entries for successful Phase
and Phase 2 negotiations. Click on the More link to display the events in full.
1
Page 26 | AlliedWare™ OS How To Note: VPNs with NetScreen routers
Page 27

3. Check the tunnel settings
On the NetScreen router, two pages are particularly useful for checking the VPN: Autokey
IKE and Autokey Advanced. To access these pages, select VPNs from the left-hand menu on
the Home page, then the desired option.
Autokey IKE shows some of the tunnel settings and lets you edit it by clicking on Edit.
Autokey Advanced shows information about the tunnel gateway and lets you edit it by
clicking on Edit.
Page 27 | AlliedWare™ OS How To Note: VPNs with NetScreen routers
Page 28

The router commands
This section lists the configuration commands that result from the GUI on each router. You
can compare your router configuration against these commands to help with
troubleshooting.
Allied Telesis router
To display the router configuration, log into its CLI and enter the following command:
show config dynamic
Static
address on
Allied Telesis
router
The configuration is:
# System configuration
set system name="AlliedTelesis"
# User configuration
set user=manager pass=your-password priv=manager lo=yes
set user=manager telnet=yes desc="Manager Account"
add user=secoff pass=your-password priv=securityOfficer lo=yes
set user=secoff telnet=no netmask=255.255.255.255
# IP configuration
enable ip
ena ip dnsrelay
add ip int=vlan1 ip=192.168.1.1
add ip int=eth0 ip=100.100.100.1 mask=255.255.255.252
add ip rou=0.0.0.0 mask=0.0.0.0 int=eth0 next=100.100.100.2
add ip dns prim=150.150.150.1 seco=150.150.150.2
# Firewall configuration
enable firewall
create firewall policy="guilan"
enable firewall policy="guilan" icmp_f=ping
add firewall policy="guilan" int=vlan1 type=private
add firewall policy="guilan" int=eth0 type=public
add firewall poli="guilan" nat=enhanced int=vlan1 gblin=eth0
add firewall poli="guilan" ru=1 ac=allo int=eth0 prot=udp po=500
ip=100.100.100.1 gblip=100.100.100.1 gblp=500
add firewall poli="guilan" ru=2 ac=allo int=eth0 prot=udp po=4500
ip=100.100.100.1 gblip=100.100.100.1 gblp=4500
add firewall poli="guilan" ru=3 ac=non int=eth0 prot=ALL enc=ips
add firewall poli="guilan" ru=4 ac=non int=vlan1 prot=ALL
ip=192.168.1.1-192.168.1.254
set firewall poli="guilan" ru=4 rem=192.168.2.1-192.168.2.254
# DHCP (Post IP) configuration
enable dhcp
create dhcp poli="lan-dhcp" lease=259200
add dhcp poli="lan-dhcp" subn=255.255.255.0
add dhcp poli="lan-dhcp" rou=192.168.1.1
add dhcp poli="lan-dhcp" dnss=192.168.1.1
create dhcp ran="standard" poli="lan-dhcp" ip=192.168.1.100 num=50
Page 28 | AlliedWare™ OS How To Note: VPNs with NetScreen routers
Page 29

# IPSEC configuration
create ipsec sas=0 key=isakmp prot=esp enc=3desouter hasha=sha
set ipsec sas=0 antir=true
create ipsec bund=0 key=isakmp string="0" expirys=3600
create ipsec pol="eth0allowISAKMP" int=eth0 ac=permit
set ipsec pol="eth0allowISAKMP" lp=500 tra=UDP
create ipsec pol="eth0allowISAKMPF" int=eth0 ac=permit
set ipsec pol="eth0allowISAKMPF" lp=4500
create ipsec pol="wiz_AT-to-NetScreen" int=eth0 ac=ipsec key=isakmp bund=0
peer=200.200.200.1 isa="wiz_AT-to-NetScreen"
set ipsec pol="wiz_AT-to-NetScreen" lad=192.168.1.0 lma=255.255.255.0
rad=192.168.2.0 rma=255.255.255.0
set ipsec pol="wiz_AT-to-NetScreen" usepfsk=TRUE gro=2
create ipsec pol="eth0allow" int=eth0 ac=permit
enable ipsec
# ISAKMP configuration
create isakmp pol="wiz_AT-to-NetScreen" pe=200.200.200.1 enc=3desouter key=0
natt=true
set isakmp pol="wiz_AT-to-NetScreen" expirys=28800 gro=2
set isakmp pol="wiz_AT-to-NetScreen" sendd=true sendn=true
enable isakmp
Dynamic
address on
Allied Telesis
router
The configuration is:
# System configuration
set system name="AlliedTelesis"
# User configuration
set user securedelay=600
set user=manager pass=your-password priv=manager lo=yes
set user=manager telnet=yes desc="Manager Account"
add user=secoff pass=your-password priv=securityOfficer lo=yes
set user=secoff telnet=no netmask=255.255.255.255
# PPP configuration
create ppp=0 description="Link to ISP" idle=3600 over=eth0-any
set ppp=0 iprequest=on username="pppoe_user" password="alliedtelesis"
# IP configuration
enable ip
enable ip remote
ena ip dnsrelay
add ip int=vlan1 ip=192.168.1.1
add ip int=ppp0 ip=0.0.0.0 mask=0.0.0.0
add ip rou=0.0.0.0 mask=0.0.0.0 int=ppp0 next=0.0.0.0
# Firewall configuration
enable firewall
create firewall policy="guilan"
enable firewall policy="guilan" icmp_f=ping
add firewall policy="guilan" int=vlan1 type=private
add firewall policy="guilan" int=ppp0 type=public
add firewall poli="guilan" nat=enhanced int=vlan1 gblin=ppp0
add firewall poli="guilan" ru=1 ac=allo int=ppp0 prot=udp po=500
ip=100.100.100.1 gblip=100.100.100.1 gblp=500
add firewall poli="guilan" ru=2 ac=allo int=ppp0 prot=udp po=4500
ip=100.100.100.1 gblip=100.100.100.1 gblp=4500
add firewall poli="guilan" ru=3 ac=non int=ppp0 prot=ALL enc=ips
add firewall poli="guilan" ru=4 ac=non int=vlan1 prot=ALL
ip=192.168.1.1-192.168.1.254
set firewall poli="guilan" ru=4 rem=192.168.2.1-192.168.2.254
Page 29 | AlliedWare™ OS How To Note: VPNs with NetScreen routers
Page 30

# DHCP (Post IP) configuration
enable dhcp
create dhcp poli="lan-dhcp" lease=259200
add dhcp poli="lan-dhcp" subn=255.255.255.0
add dhcp poli="lan-dhcp" rou=192.168.1.1
add dhcp poli="lan-dhcp" dnss=192.168.1.1
create dhcp ran="standard" poli="lan-dhcp" ip=192.168.1.100 num=50
# IPSEC configuration
create ipsec sas=0 key=isakmp prot=esp enc=3desouter hasha=sha
set ipsec sas=0 antir=true
create ipsec bund=0 key=isakmp string="0" expirys=3600
create ipsec pol="ppp0allowISAKMP" int=ppp0 ac=permit
set ipsec pol="ppp0allowISAKMP" lp=500 tra=UDP
create ipsec pol="ppp0allowISAKMPF" int=ppp0 ac=permit
set ipsec pol="ppp0allowISAKMPF" lp=4500
create ipsec pol="wiz_AT-to-NetScreen" int=ppp0 ac=ipsec key=isakmp bund=0
peer=200.200.200.1 isa="wiz_AT-to-NetScreen"
set ipsec pol="wiz_AT-to-NetScreen" lad=192.168.1.0 lma=255.255.255.0
rad=192.168.2.0 rma=255.255.255.0
set ipsec pol="wiz_AT-to-NetScreen" usepfsk=TRUE gro=2
create ipsec pol="ppp0allow" int=ppp0 ac=permit
enable ipsec
# ISAKMP configuration
create isakmp pol="wiz_AT-to-NetScreen" pe=200.200.200.1 mod=aggressive
enc=3des
outer key=1 natt=true
set isakmp pol="wiz_AT-to-NetScreen" expirys=28800 gro=2
set isakmp pol="wiz_AT-to-NetScreen" sendd=true sendn=true
set isakmp pol="wiz_AT-to-NetScreen" localid="alliedtelesis"
enable isakmp
Page 30 | AlliedWare™ OS How To Note: VPNs with NetScreen routers
Page 31

NetScreen router
To display the router configuration, in the left-hand menu select Configuration, then Update,
then Config File. Use the Save to File option to save the configuration.
Static
address on
NetScreen
router
The configuration is:
set auth-server "Local" id 0
set auth-server "Local" server-name "Local"
set auth default auth server "Local"
set clock "timezone" 0
set admin format dos
set admin name "netscreen"
set admin password nKVUM2rwMUzPcrkG5sWIHdCtqkAibn
set admin auth timeout 10
set admin auth server "Local"
set vrouter trust-vr sharable
unset vrouter "trust-vr" auto-route-export
set zone "Trust" vrouter "trust-vr"
set zone "Untrust" vrouter "trust-vr"
set zone "DMZ" vrouter "trust-vr"
set zone "Trust" tcp-rst
set zone "Untrust" block
unset zone "Untrust" tcp-rst
set zone "DMZ" tcp-rst
set zone "MGT" block
set zone "MGT" tcp-rst
set zone Untrust screen tear-drop
set zone Untrust screen syn-flood
set zone Untrust screen ping-death
set zone Untrust screen ip-filter-src
set zone Untrust screen land
set zone V1-Untrust screen tear-drop
set zone V1-Untrust screen syn-flood
set zone V1-Untrust screen ping-death
set zone V1-Untrust screen ip-filter-src
Page 31 | AlliedWare™ OS How To Note: VPNs with NetScreen routers
Page 32

set zone V1-Untrust screen land
set interface "ethernet1" zone "Trust"
set interface "ethernet2" zone "DMZ"
set interface "ethernet3" zone "Untrust"
set interface vlan1 ip 192.168.1.1/24
set interface ethernet1 ip 192.168.2.1/24
set interface ethernet1 nat
set interface ethernet3 ip 200.200.200.1/30
set interface ethernet3 route
unset interface vlan1 bypass-others-ipsec
unset interface vlan1 bypass-non-ip
set interface ethernet1 manage-ip 192.168.2.2
set interface vlan1 ip manageable
unset interface ethernet1 ip manageable
set interface ethernet2 ip manageable
set interface ethernet3 ip manageable
set hostname ns25
set address "Trust" "192.168.2.0" 192.168.2.0 255.255.255.0
"Created by vpn wizard"
set address "Untrust" "192.168.1.0" 192.168.1.0 255.255.255.0
"Created by vpn wizard"
set snmp name "ns25"
set ike gateway "Gateway for 192.168.1.0" address 100.100.100.1 Main
outgoing-interface "ethernet3" preshare "secret-key" sec-level standard
set ike gateway "Gateway for 192.168.1.0" nat-traversal
set ike gateway "Gateway for 192.168.1.0" nat-traversal udp-checksum
set ike gateway "Gateway for 192.168.1.0" nat-traversal keepalive-frequency 5
set ike policy-checking
set ike respond-bad-spi 1
set vpn "Tunnel for 192.168.1.0" id 1 gateway "Gateway for 192.168.1.0"
no-replay tunnel idletime 0 sec-level standard
set ike id-mode subnet
set xauth lifetime 480
set xauth default auth server Local
set policy id 2 from "Trust" to "Untrust" "192.168.2.0" "192.168.1.0" "ANY"
Tunnel vpn "Tunnel for 192.168.1.0" id 2 pair-policy 1
set policy id 1 from "Untrust" to "Trust" "192.168.1.0" "192.168.2.0" "ANY"
Tunnel vpn "Tunnel for 192.168.1.0" id 2 pair-policy 2
set policy id 0 name "Created by policy wizard" from "Trust" to "Untrust" "Any"
"Any" "ANY" Permit
unset global-pro policy-manager primary outgoing-interface
unset global-pro policy-manager secondary outgoing-interface
set pki authority default scep mode "auto"
set pki x509 default cert-path partial
set vrouter "untrust-vr"
exit
set vrouter "trust-vr"
unset add-default-route
set route 0.0.0.0/0 interface ethernet3 gateway 200.200.200.2
exit
Page 32 | AlliedWare™ OS How To Note: VPNs with NetScreen routers
Page 33

Dynamic
address on
NetScreen
router
The configuration is:
set auth-server "Local" id 0
set auth-server "Local" server-name "Local"
set auth default auth server "Local"
set clock "timezone" 0
set admin format dos
set admin name "netscreen"
set admin password nKVUM2rwMUzPcrkG5sWIHdCtqkAibn
set admin auth timeout 10
set admin auth server "Local"
set vrouter trust-vr sharable
unset vrouter "trust-vr" auto-route-export
set zone "Trust" vrouter "trust-vr"
set zone "Untrust" vrouter "trust-vr"
set zone "DMZ" vrouter "trust-vr"
set zone "Trust" tcp-rst
set zone "Untrust" block
unset zone "Untrust" tcp-rst
set zone "DMZ" tcp-rst
set zone "MGT" block
set zone "MGT" tcp-rst
set zone Untrust screen tear-drop
set zone Untrust screen syn-flood
set zone Untrust screen ping-death
set zone Untrust screen ip-filter-src
set zone Untrust screen land
set zone V1-Untrust screen tear-drop
set zone V1-Untrust screen syn-flood
set zone V1-Untrust screen ping-death
set zone V1-Untrust screen ip-filter-src
set zone V1-Untrust screen land
set interface "ethernet1" zone "Trust"
set interface "ethernet2" zone "DMZ"
set interface "ethernet3" zone "Untrust"
set interface vlan1 ip 192.168.1.1/24
set interface ethernet1 ip 192.168.2.1/24
set interface ethernet1 nat
set interface ethernet3 ip 200.200.200.1/30
set interface ethernet3 route
unset interface vlan1 bypass-others-ipsec
unset interface vlan1 bypass-non-ip
set interface ethernet1 manage-ip 192.168.2.2
set interface vlan1 ip manageable
unset interface ethernet1 ip manageable
set interface ethernet2 ip manageable
set interface ethernet3 ip manageable
set hostname ns25
set address "Trust" "192.168.2.0" 192.168.2.0 255.255.255.0
"Created by vpn wizard"
set address "Untrust" "192.168.1.0" 192.168.1.0 255.255.255.0
"Created by vpn wizard"
set snmp name "ns25"
set ike gateway "Gateway for 192.168.1.0" address 0.0.0.0 id "alliedtelesis"
Aggr outgoing-interface "ethernet3" preshare "secret-key" sec-level standard
set ike gateway "Gateway for 192.168.1.0" nat-traversal udp-checksum
set ike gateway "Gateway for 192.168.1.0" nat-traversal keepalive-frequency 5
set ike policy-checking
set ike respond-bad-spi 1
set vpn "Tunnel for 192.168.1.0" id 1 gateway "Gateway for 192.168.1.0" no-
replay tunnel idletime 0 sec-level standard
set ike id-mode subnet
set xauth lifetime 480
set xauth default auth server Local
Page 33 | AlliedWare™ OS How To Note: VPNs with NetScreen routers
Page 34

USA Headquar ters | 19800 Nor th Cr eek Parkwa y | Suite 200 | Bothell | WA 98011 | USA | T: +1 800 424 4284 | F: +1 425 481 3895
Eur opean Headquar ters | Via Motta 24 | 6830 Chiasso | Switzerland | T: +41 91 69769.00 | F: +41 91 69769.11
Asia-Pacific Headquar ters | 11 T ai Seng Link | Singapor e | 534182 | T: +65 6383 3832 | F: +65 6383 3830
www .alliedtelesis.com
© 2007 Allied Te l esis,
Inc. All rights reser ved. Information in this document is subject to change without notice.
All company names, logos,and product designs that are tr ademarks or registered trademarks are the proper ty of their respective owners.
Allied Telesis is a trademark or registered trademark of Allied Telesis, Inc. in the United States and other countries.
set policy id 2 from "Trust" to "Untrust" "192.168.2.0" "192.168.1.0" "ANY"
Tunnel vpn "Tunnel for 192.168.1.0" id 2 pair-policy 1
set policy id 1 from "Untrust" to "Trust" "192.168.1.0" "192.168.2.0" "ANY"
Tunnel vpn "Tunnel for 192.168.1.0" id 2 pair-policy 2
set policy id 0 name "Created by policy wizard" from "Trust" to "Untrust" "Any"
"Any" "ANY" Permit
unset global-pro policy-manager primary outgoing-interface
unset global-pro policy-manager secondary outgoing-interface
set pki authority default scep mode "auto"
set pki x509 default cert-path partial
set vrouter "untrust-vr"
exit
set vrouter "trust-vr"
unset add-default-route
set route 0.0.0.0/0 interface ethernet3 gateway 200.200.200.2
exit
C613-16099-00 REV D
 Loading...